
ryviri-cosplay
Everything Cosplay
Welcome to my cosplay blog! I'm not very active here and have been focusing more on my digital art journey. Personal blog: @ryviri
88 posts
Don't wanna be here? Send us removal request.
Last Seen Blogs

mohulu
Glitterbug
alphamastertonysblog
(Dominant Alpha
Daddies)

intamphuc
Sans titre

shynys
Restaurant at the End of the Universe

may84duelund
The Love of Lowe 514
Photo
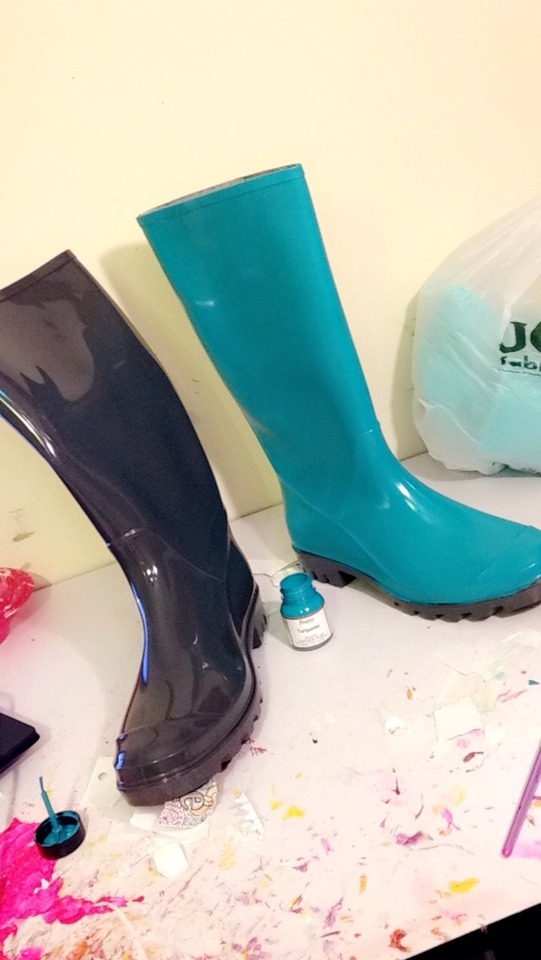

ATTENTION COSPLAYERS:
I would like to make the paint brand “Angelus” known. It is a special paint that is for leather, faux leather, rubber, and similar surfaces.
This is literally the best paint you can buy if you love a pair of shoes, but they aren’t in the right color for your character.
This stuff coats VERY well AND the coats of paint bend with your shoes. This means no cracking!!
In the photos above I took black rain boots and painted them with Angelus Turquoise. As you can see, they don’t look black any more! It’s so good!
I managed to paint two boots with a little one ounce bottle of the paint, and I still have a third of the bottle left over!
The paint dries very fast, so you can put layer on top of layer on top of layer without it streaking.
You can get the paint on Amazon and it comes in every color!
I just really wanted to make this known!! :D This stuff is amazing!
159K notes
·
View notes
Photo

Let’s say you wanted to glue fabric to wood, but what do you use? What about glass to paper? This to That lets you choose two things you want to glue and lists what types of glue is best. (Because people have a need to glue things to other things!)
220K notes
·
View notes
Text
Why I Gave Up Cosplay
Since gaining 70 pounds 2 years ago due to my health problems, I have pretty much lost my love of cosplay. And it makes me really sad because I enjoyed it so much. But the part I loved most about cosplaying was bringing the characters I love to life. And I no longer feel like I’m doing that because all of the characters are super skinny and I’m fat.
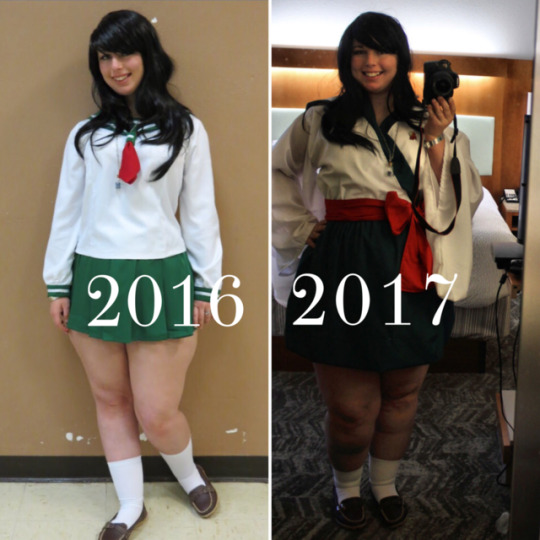
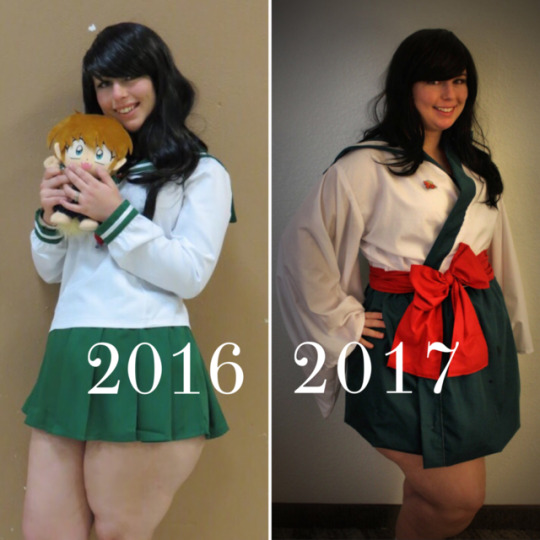
I was always curvy, but now that I’m so overweight, cosplaying feels completely different. Even the amount of response I got about my cosplay changed. Not that I cosplayed for the attention, but it was disheartening to see the positive feedback go down after I gained weight.
Maybe it would help if I saw more plus sized cosplayers out there. I’ve seen a few and they are awesome. But I’m talking about only a handful of them compared to the millions of skinny ones out there. There’s so many characters I still want to cosplay, but I just don’t have the confidence to try anymore.
I hate to ask this… but would you mind liking/reblogging this if you’re a plus sized cosplayer or if you think plus sized cosplayers are great and enjoy seeing them bring your favorite characters to life, even if they are not the same size as the characters? Like I said, I hate to ask this. But I really need the positivity and confidence boost right now.
#amazing cosplay!!!#no matter what shape or size or color or anything anyone can cosplay and look fantastic#you included!#society is shitty when it comes to body positivity and it isn't fair for people#please please keep it up! you look wonderful and have super rad costumes!!#i believe in you!
15K notes
·
View notes
Photo
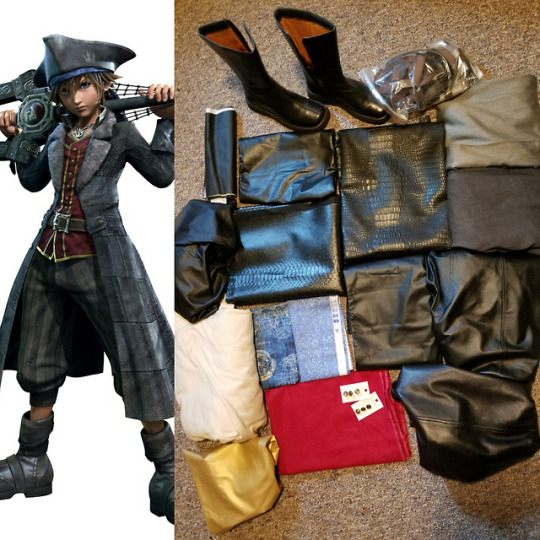
“Yo ho, yo ho, a pirates life for me!”
A surprise to no one I am making Pirate Sora! I have eight different kinds of pleather for this for his coat, super excited to work on this! <3 I will update this thread with my progress just like I did with KH3 Riku!
I will have a full tutorial on this cosplay on my Patreon!
7K notes
·
View notes
Photo
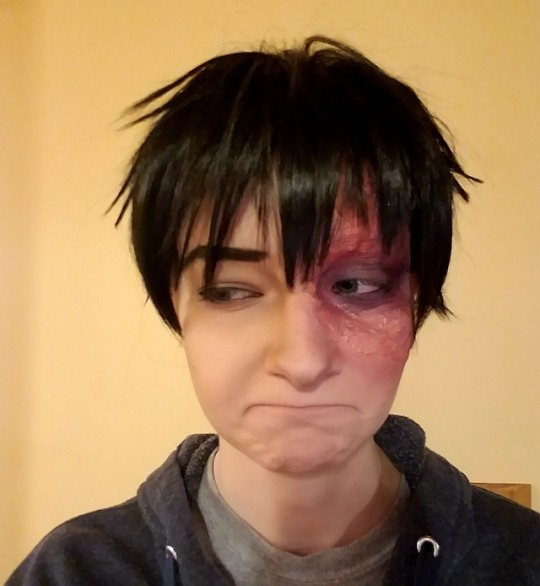
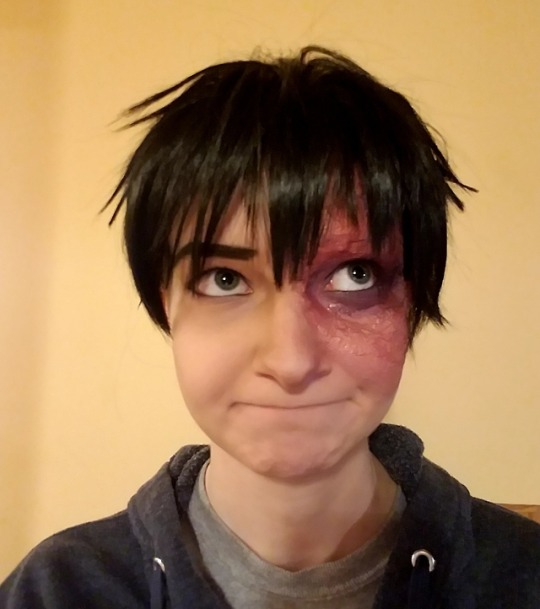
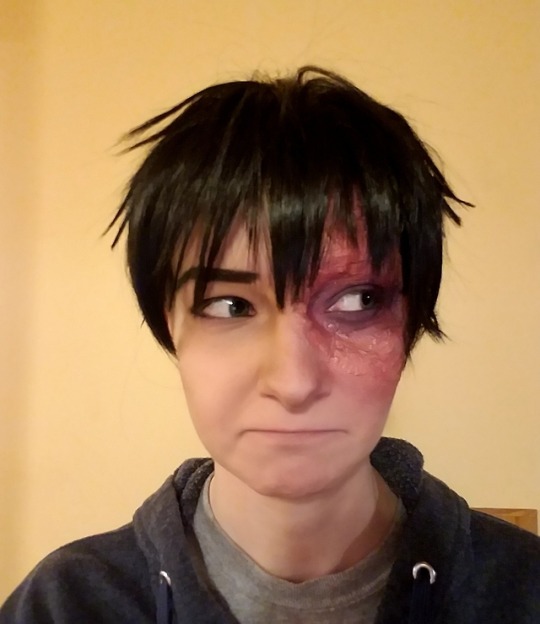
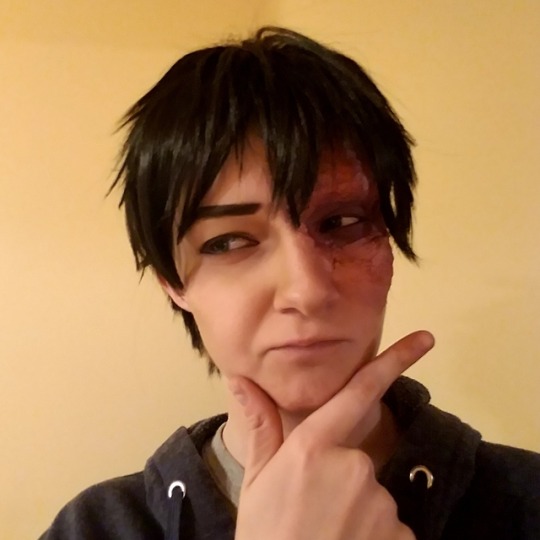
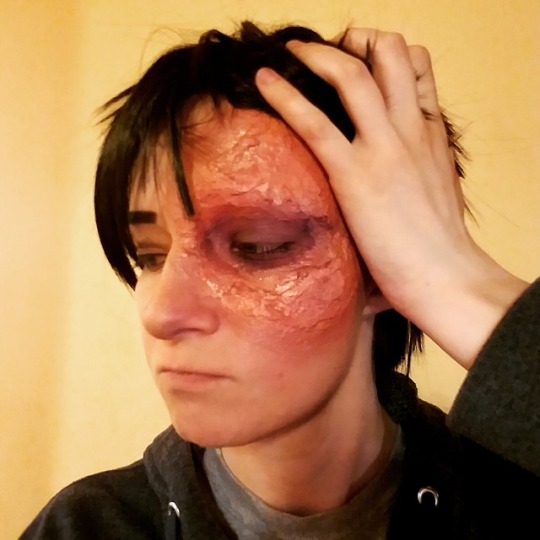
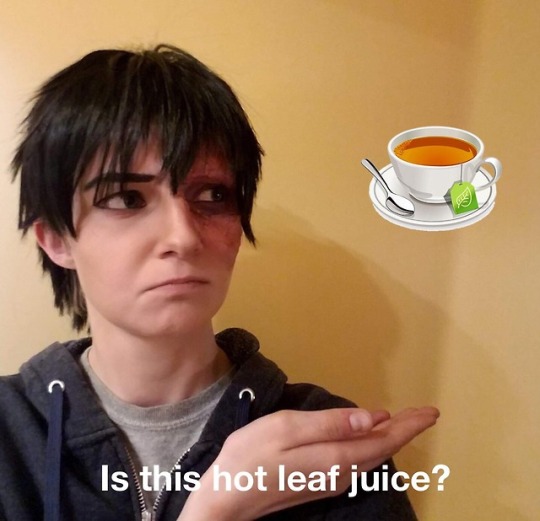
So my next cosplay is going to be Prince Zuko and I got to try making a liquid latex scar for the first time! It turned out pretty well, I'd say! (Excuse the crappy wig, I used this old beater one until I could get my hands on a new one lmao)
#cosplay#zuko#prince zuko#cosplay makeup#sfxmakeup#avatar#avatar the last airbender#honor#i marathoned the whole series in college and it was the best decision of my life#this might be my first cosplay contest piece!#stay tuned
30 notes
·
View notes
Video
Someone figured out how to make a mask that responds to eye movement! Another amazing start to a cosplay!
Props to Lenses Factory HK
135K notes
·
View notes
Text
Coscards creation tutorial!
Cosplay business cards or ‘coscards’ are extremely handy for those who hate the awkward hassle of ‘take my cellphone and add me on FB’ thing. Also, easier to network and to get your name out there for both cosplayers and photographers!
These are some suggestions/templates for your coscards.
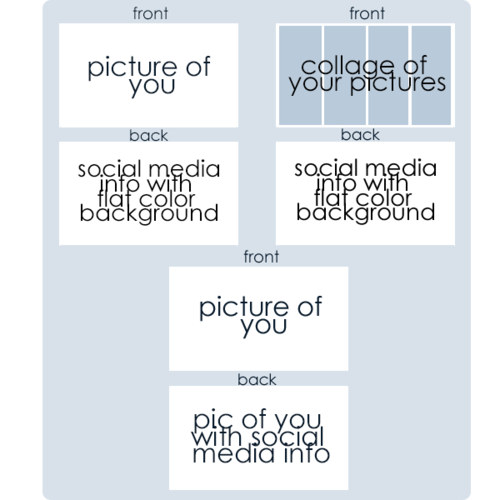
Just like any other business cards.
DOs:
- simple, clean
- readable text; basic and simple ones are best like Century Gothic
- state name/alias clearly
- keep your info compact and straight to the point
- use social media icons if you desire
- (Photoshop specific): use stroke for letters
- borders for flat bgs if desired
- pastel/light colors are usually better
- put your info in a corner if overlaying on an image
DON’Ts:
- clutter; don’t have too many words or pictures
- overly bright colors
- curly/calligraphy text
- overly large text
- cover your image especially faces with text
- put entire URLs/links (username on specified site is sufficient)
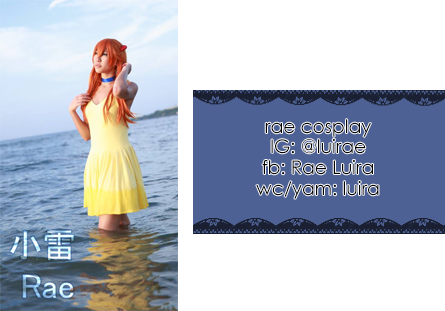
For the first example, here’s my sample:
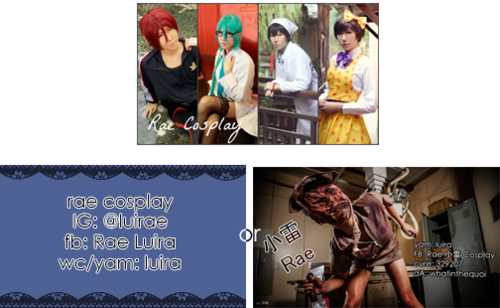
For second example, I personally suggest photographers to use this format instead of the other two.
Here is my sample. I did write in the template above to use flat bg, but if you have one cosplay/photo you want more emphasis on, you can include your info on the side and overlap it slightly. This one is most susceptible to clutter, but also shows a range of your skills better too.
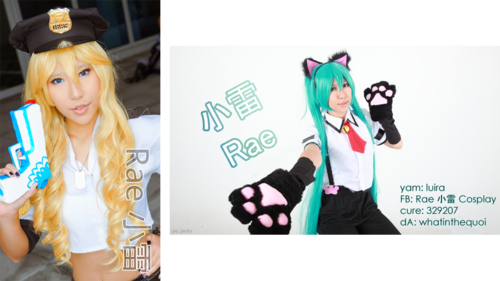
For the last example, here’s my sample.
These were all rendered on photoshop, but you can use online editing images if you wish. I personally prefer picmonkey or pixlr for anything.
But please understand that these are all at your own expense, and you will be handing these out for free. To get them printed at a company isn’t expensive and isn’t difficult (but Idk many besides visaprint so I can’t help you with that)
Hope that helped and good luck!
609 notes
·
View notes
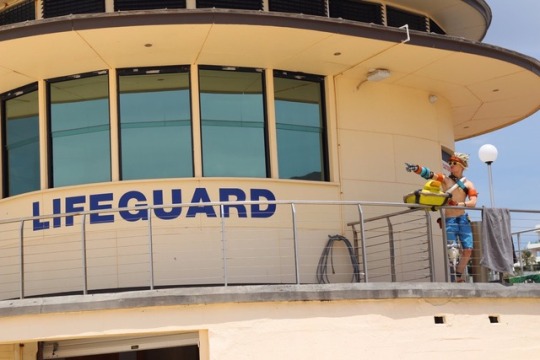
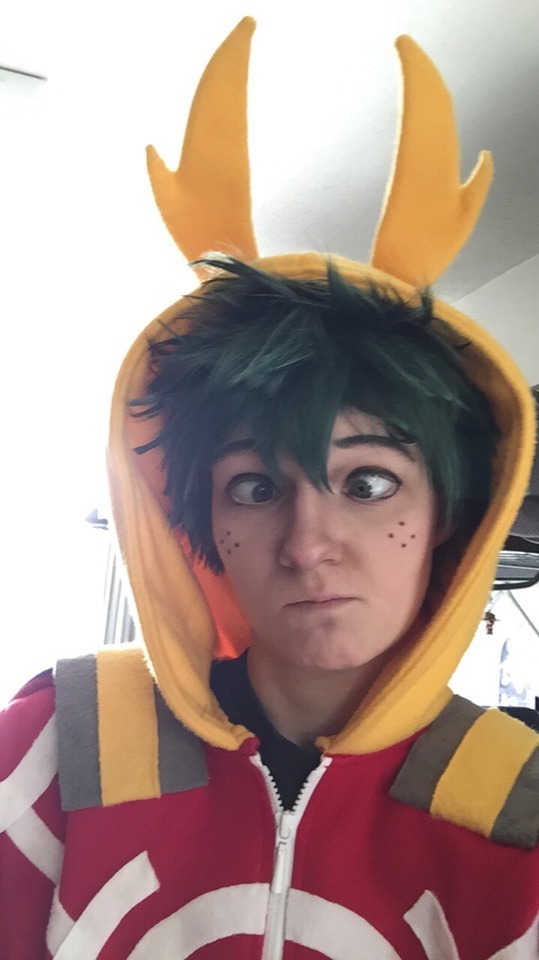
Photo
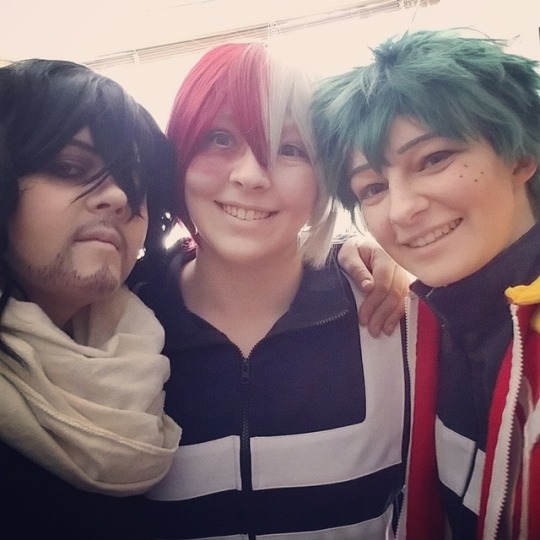

I know I haven't posted a lot here since being in college, but at least me and a few friends got to go to Anime Detour this year! It was a blast and I hope we get to go next year as well! 😁
#anime detour#anime detour 2018#cosplay#bnha#voltron#deku#midoriya izuku#todoroki shouto#aizawa shouta#lance#keith#shiro#mha#vld#squad#i was the deku and lance lol
32 notes
·
View notes
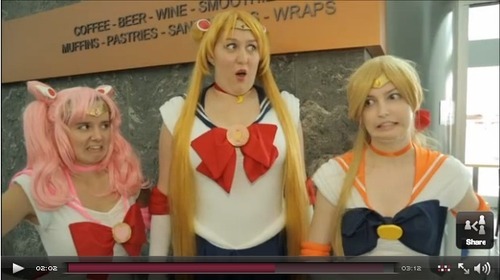
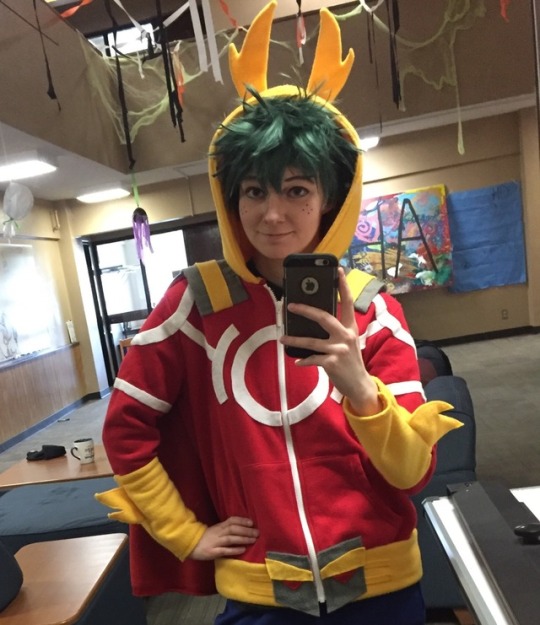
Photo
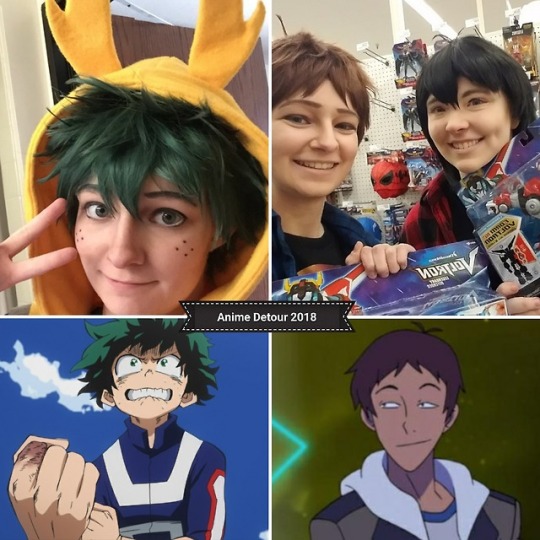
Who’s ready for Anime Detour 2018?
Can’t wait to be Deku on Friday, Lance on Saturday, and probably Deku again on Sunday!
A few friends and I are hosting the panels “My Hero Aca-game-ia!” on Friday at 3:30 and “What the Quiznak? A VLD Panel” at 3:00 on Saturday so be sure to check it out and message any of us if you’re interested in joining!
@akitamaki will be Todoroki and Keith
@everyones-cuppa will be Aizawa and Shiro
See ya there!
32 notes
·
View notes
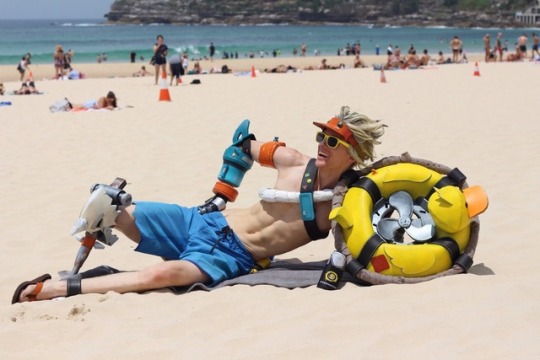
Photo
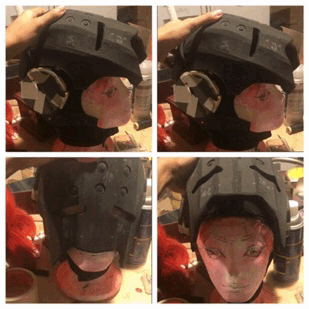
The most exciting part of my interpretation of Zenyatta!
•
I want to face reveal into Sanzang (which will be fun Makeup-wise) so I had to figure out a way to get the mask part to move.
I remembered how in Kindergarten we made paper plate clocks and used that technique to rig the mask to swing up!
Hopefully it works for his jaw area too, if not, I’ll go to my original plan of using screws 👍🏾
582 notes
·
View notes
Text
Tutorials and Costume Notes
“THE BIG ONES”
The following are our most popular tutorials, so they get a place of honour up top so that they are easier found :)
Custom thigh highs
Spandex boots
Basic capes
Cupcake “Madoka” skirts
GENERAL SEWING:
What is broadcloth for, anyway?
How do I avoid burning polyester with my iron?
Where do I go to learn to line things?
What is bias tape?
Where do I go to learn to sew?
Why should I use shoulder pads?
Notes on sewing vinyl/pleather
What do you do with retired costumes?
Learning at an advanced level
Why line a petticoat?
Why should I do mock-ups?
What is a knit?
What is horsehair braid?
Painting denim/heavyweights
How do I make my costumes look clean and professional?
Tips for sewing gloves
Washing your costumes
Finishing seams
WHAT FABRIC FOR…
What fabric should I line with?
What fabric for mock-ups?
What fabric for a character who lives in the desert?
What fabric for sailor shirts?
What fabric do I use for a flowy tunic?
What fabric for a schoolgirl jacket?
What fabric for an Assassin novice/period character?
PATTERNING:
How important are pattern blocks?
How do measurements on your tutorials work?
How do different patterns effect the shape of a hood?
What do we draft patterns on?
Keeping patterns clean and organized
Tools for marking patterns/fabric
SEWING MACHINES:
What To Look For
What To Look For 2
What machines do we have?
Stop-And-Start Buttons
Sergers
Vintage Machines
Embroidery Machines
Recommendations
FOOTWEAR:
Painting Boots
Custom Printed Tights
Making Custom Thigh Highs
Stenciled Designs on Tights
High Heel Tips
First Time in High Heels?
Painting Rubber Boots
Making Shoes From Scratch
Paint Colours for Vanellope Tights
NOTES ON PARTICULAR COSTUMES:
Poison Ivy
Captain America
Fire Emblem: Awakening: Lissa’s hoopskirts, Henry/Say’ri’s loincloths, Chrom’s trim, Panne overview
Satsuki and Nonon’s pleated dresses without waist seams
Serah Farron’s belt (Final Fantasy 13)
Ledo’s catsuit (Suisui no Gargantia)
Josephine’s shirt (Dragon Age)
Ruby’s petticoat (RWBY)
STRETCH FABRICS:
Attaching Applique to Spandex
Embroidery and Satin-Stitching on Spandex
Ironing Spandex
Recommendations for Attaching Logos
Fabrics For Catsuits
Crisp Necklines With Knit
Can I alter a one-piece catsuit to be two pieces?
Shortcuts to make bodysuits
CAPES:
Basic Single-Layer Capes
Tips for Safe Capes
Collared Capes
Channeling for Articulated Capes
Cape Closures
Fabric Options
Preventing lined capes from “drifting”
BATGIRLS:
StephBatgirl Cowl
Batgirl Bracers
Easy Belt Pouches
More Notes on Pouches
“Black Bat” Cape
Steph’s “Robin” Leggings
Zentai Suit Sellers
Non-Wholesale Bodysuit Sellers
SUPERGIRLS:
General Tag
Spandex Boots
General Tips
Making the Emblem
Turner Skirt
Turner Cape Pattern
PUELLA MAGI MADOKA MAGICA:
Tomoe Mami | Boots | Shirt Pattern | Mami’s Rifle Tag | Rifle Pattern | Installing Horsehair | Links
Akemi Homura | Tights
Kyoko Sakura | Hoodie Source | Prep List | Order of Assembly
Miki Sayaka | Sword Pattern
Madoka Kaname | Petticoat Tutorial | Two-Part Skirts | Cupcake Skirt
Other: Simple Bows | Soul Gem Commission Interest | Attaching Soul Gems
FIRE EMBLEM: AWAKENING:
This section would honestly be massive on its own, so it can be found over on its own masterlist. Even if you’re not cosplaying from FEA, it has some interesting stuff.
SAILOR SCOUTS:
Lining
Material choices
AESTHETICS:
Make-Up Products
Body Wizardry
Faking Large Breasts + Binding Resources
Tips for Defined Waistlines
Hiding Leg Cellulite
Slimming Pants
Tall Cosplayers
Face/Body Paint Brands
Two-Coloured Lips
Breast support for costumes with open fronts
Keeping cool in costume
ARMOR:
What They Don’t Tell You About Worbla
PROPS AND ACCESSORIES:
Wearing Helmets
Wing-Making Resources
How do I prime a plastic?
What are our moulds made of?
WIGS:
Anchoring Ponytail Wigs
Maintaining Long Wigs
Wig Sources with Fast Shipping
Where to Get Inexpensive but Good Wigs
Tips for Curly Wigs
PHOTOGRAPHY:
Flight Illusions
SHOPPING:
Where did you get your pale dance tights?
On Milanoo and wholesale
More on Milanoo and wholesale
COMMUNITY:
Talking To Your Parents
Cosplay Group Etiquette
Financial Tips
Being Body Positive
On Criticizing Concept Artists
Staying Motivated
How to Get Started
Why Don’t We Do Commissions?
Our Approach to Group Cosplay
Do We Work Out?
RECIPES:
Banana Bread
12K notes
·
View notes
Video
Cosplay (and general sewing) life hack- easy pleats with a fork! For all those school girl uniform cosplays and more :)
68K notes
·
View notes
Photo
I fuckin live for this oml. Idk who this is but the boi deserves a medal. Edit: here he is! http://instagram.com/fifty_face_jayce
3K notes
·
View notes
Text
SO I FIND OUT MY FRIENDS AND I ARE ON OUR LOCAL NEWS WEBSITE
We were asked all these questions about how long the costumes took us, how we did it, etc.
I paused the video right when we were asked how much money we spent on our cosplays and
does that give you your answer
382K notes
·
View notes
Note
Hello! Can you please explain the difference between things and worbla?
Sure! By things I assume you mean Thibra and other similar materials, so I’ll happily explain with a list!Worbla: a thermoplastic that, when heated up, becomes flexible and easy to bend and warp. When it cools down, it hardens again and retains the shape you molded it into.*It has a rough side and a smooth side. The smooth side is the more sticky side and the rough side would go on the outside. The rough side, unless you want to keep the look, needs to be coated in multiple layers of either gesso or mod podge or other alternatives in order to look smooth before painting.*It can be squished together and reused, so keep all of the scraps! Worbla is known for sticking to itself and also goes hand in hand with craft foam.Thibra: Also a thermoplastic that starts off hard, bends when heated up, then hardens again when it cools off. However, Thibra is much more stretchy than Worbla when warm. It can stretch much like putty or clay, unlike Worbla. *It also has a smooth surface regardless of the side, so priming it isn’t necessary for it to look smooth.*The scraps mold together much easier than Worbla scraps; however, since it’s so stretchy, whatever surface it covers will show any details underneath much more clearly than worbla will, which can have both good and bad results.I recommend you watch some youtube videos comparing the differences and similarities, that’s how I researched it. They’re definitely out there! Also, both are similar price but they’re both expensive. Depending on the project, you could even save some money by just sticking to craft foam for armor pieces or details. Even poster board, cardboard, air dry clay, or oven bake clay can still come in handy a lot!Hope this helps!
0 notes
Photo
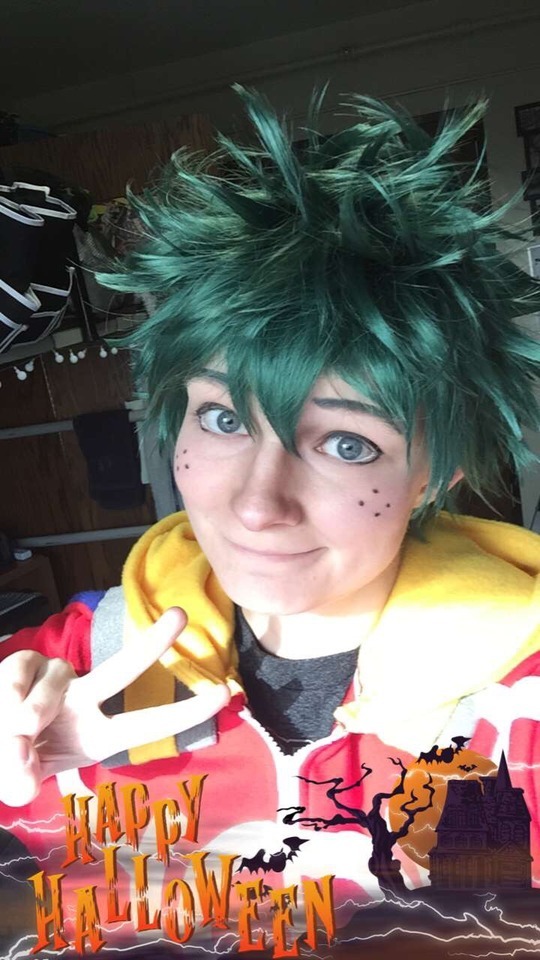
It was fun dressing as Deku on my favorite holiday! Happy Halloween everyone! 🎃👻
#bnha#deku#midoriya izuku#cosplay#bnha cosplay#midoriya cosplay#all might#my hero academia#halloween#cosplay fun
10 notes
·
View notes
Text
Hey! So I know some of you were asking for some advice on a Chrom cosplay so at last I am here to help. Sorry it's a bit late, but let's get started!
Here's the front of the shirt! The shirt and pants are made up of some dark blue spandex-ish type fabric, and I got about 4.5 yards of it. The shirt is actually two layers, the under layer being the part with the sleeve and folded collar. I used just a basic long sleeve shirt pattern for that but instead of sewing on both sleeves, I only did the one and just hemmed off the one missing the sleeve. The collar was simple too, I just used YouTube for collar tutorials since I never made one like this but it's very basic and is easier to make than you might think. Now, the top layer is a sort of poncho that I made out of the same fabric that I lined with bias tape as seen above and connected the buttons and other collar to.
Chrom is weird and has two collars, one being the folded one (that I sewed on the bottom shirt) and the other being a sort of Sailor Moon or Anime School Girl collar which I connected to the top layer, the poncho. The flatter, school girl collar was simple to make as well and just used more tutorials on YouTube, you can make these however you want or in what way you want, but that's how I did it! So the funky-shaped poncho went over the shirt and that's the base of the shirt!
The bias tape is actually made by me, I bought the fabric I wanted for it which was some silvery-gold satin and used a bias tape maker to get the even strips of fabric that are free of frays on the outside. Then I literally just hot glued them onto the shirt lol.
The buttons are made of craft foam and worbla and I just hot glued those on as well. Sometimes the simplest/laziest methods work the best!
This is the back of the shirt where you can see that school girl collar much better. To get the designs, I used some thinner cardboard/cardstock and cut out the shapes, then I took the same fabric as the bias tape I made and covered the cardboard pieces with it. (The cardboard could be like the backs of notebooks or cereal box cardboard, that's what I used) I tucked the edges of the fabric around the back of the cardboard and glued it down so the fabric didn't fray, then I just hot glued the pieces on, nothing fancy at all!
Here are the pants, I already talked a bit about them in a previous post but here they are again! The base of it is just leggings I sewed, then the part on the thighs are strips of that blue fabric that I put bias tape on and glued together and wrapped around my legs. So they're like an extra layer that I just hot glued on top of the leggings. I also stuffed them with a bit of stuffing to give them that pantaloons shape that Chrom has. (So yes, these are pillow pants basically) The little buttons are buttons that I covered in that same fabric and glued on as well.
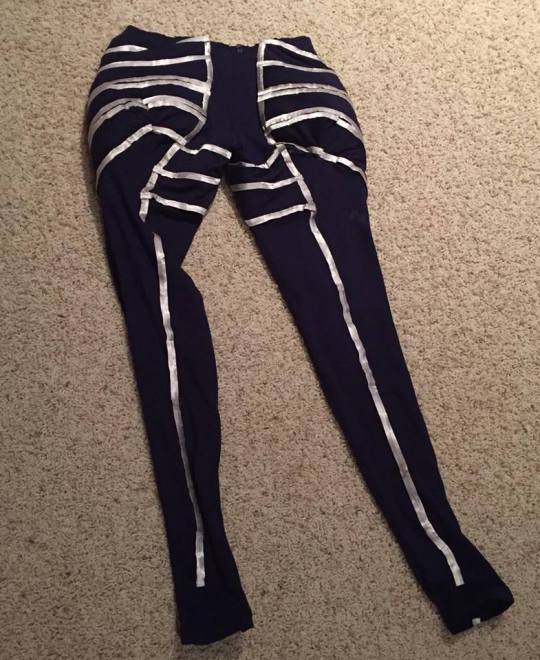
Here's the back of the pants where you can see how the fabric is wrapped around from the butt and all the way around the front and to the inseams. It was very awkward to make, but they're comfy!
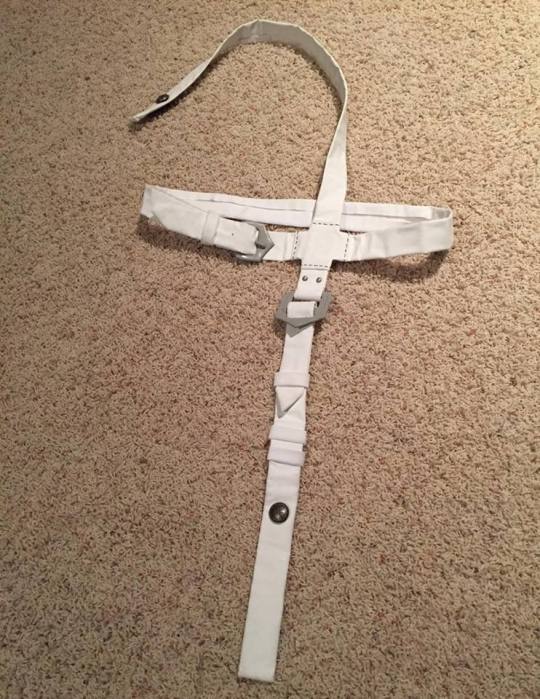
These are the belts that go around the chest area! I got about 2-2.5 yards of this I think... The base is just some white vinyl I picked up and folded over (and glued) so it had nicer edges. The buckles are made of craft foam and worbla and the buttons are googly eyes that I painted. There's also a decorative button that I sewed onto it as well.
It looks like a jumbled mess now, but if you take a look at a reference of Chrom, this all makes much more sense where everything should be placed! You can also see Velcro on there where I attach it to the bottom part of the belt that goes around the waist, which you'll see in a second.
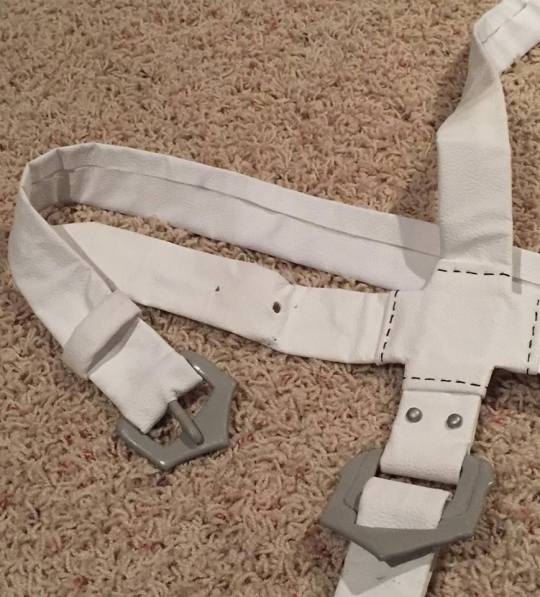
Only one of the buckles I made actually functions like a buckle in case I need to use it getting on the costume or taking it off, but usually I don't need to unbuckle it at all.
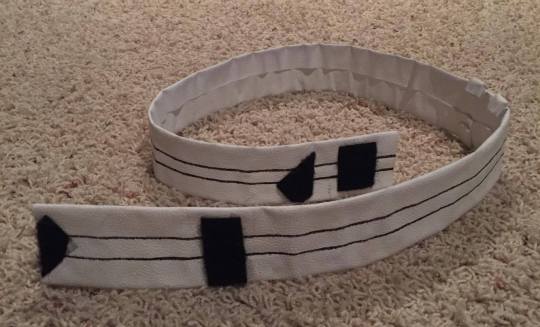
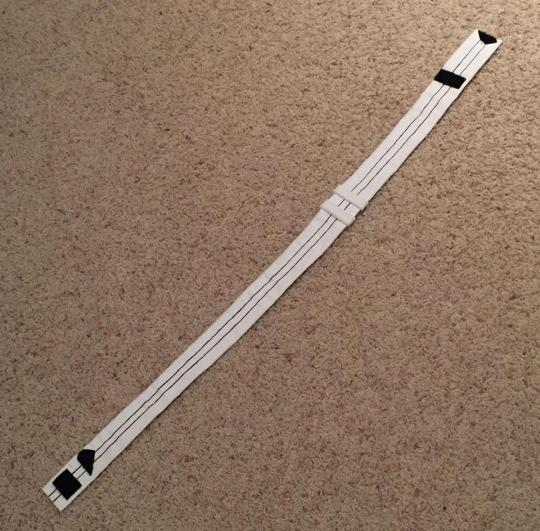
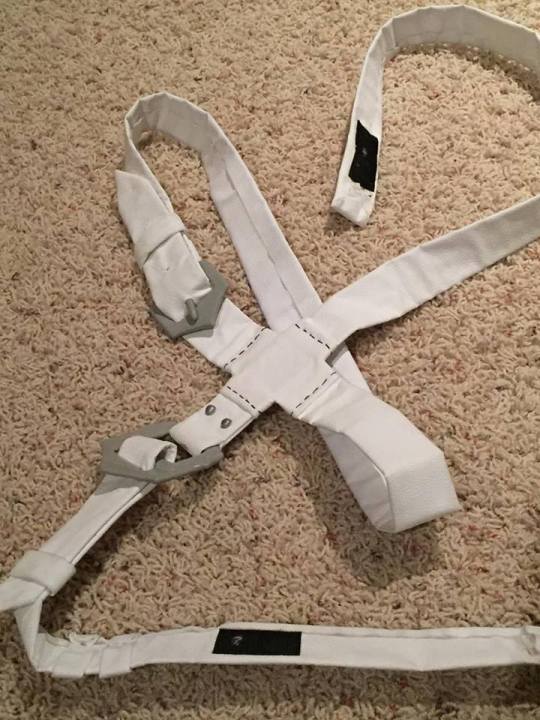
Here is the other belt I mentioned earlier that hangs lower on Chrom's waist and sort of loops around his thighs. You can also see the Velcro here where I keep it attached to the chest belts. Nothing fancy here either, just a strip of fabric with lines on it. The lines are black fabric paint that I very carefully painted on because for some reason, I didn't want to sew on the black lines since it was leather-y fabric. It took a lot of patience lol.
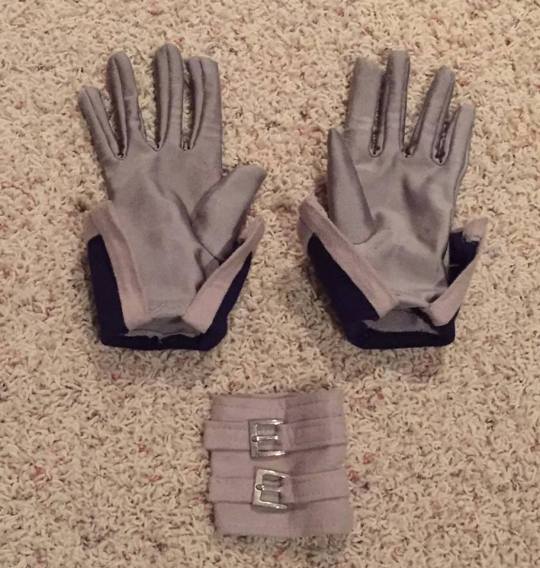
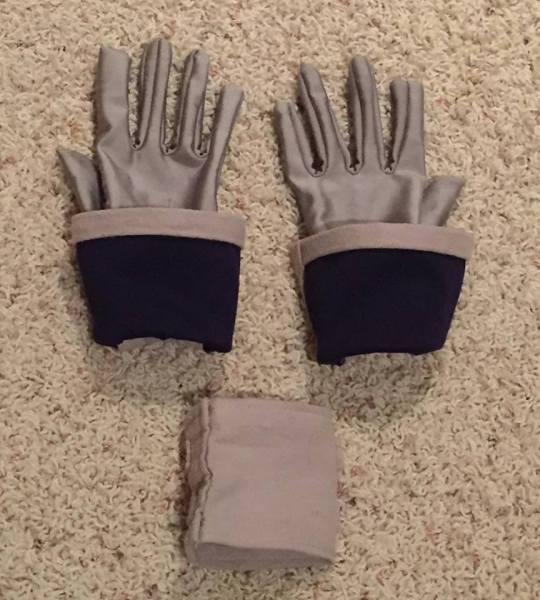
Moving along, these are the gloves and the little wrist band thing that goes on his sleeve arm! I literally bought some gray gloves off amazon, cut them down to size, then made little cuffs and sewed them on (that are lined with the same gray fabric as the wrist band). Then the wrist band is just a strip of fabric I hemmed and sewed in a loop that I just slide onto my wrist. It also has some tiny buckles on it that I believe I bought from Etsy, I just got a little package of like 12 of them since I used them more later on.
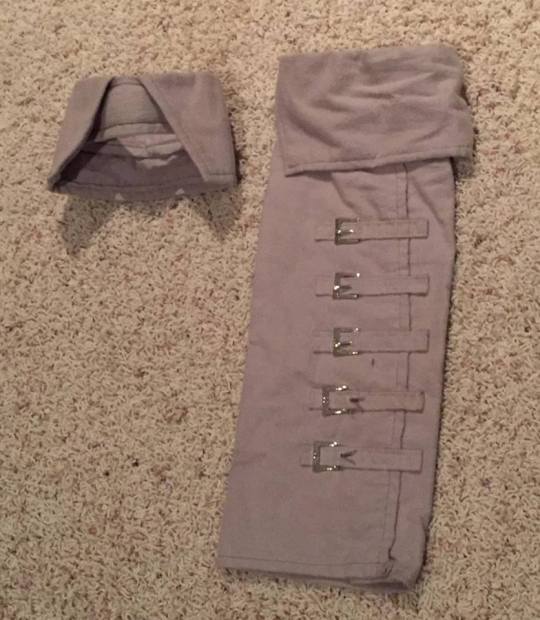
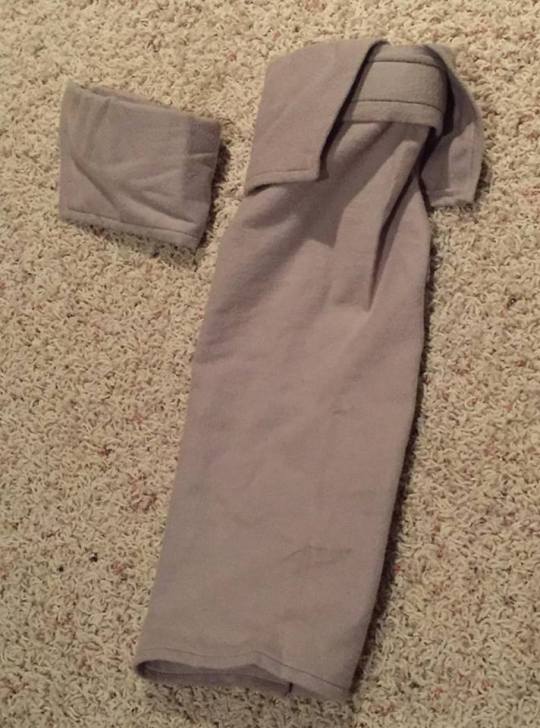
Here are the leg things! Leg sleeves? Leg bands? Leg warmers? I have no idea. Either way, you can see that the little buckles come into action again here and I just stuck them through little hemmed strips of fabric, then (you guessed it) hot glued the strips down to the base of the leg thing. The longer leg thing is just sewed in a tube and hemmed, once again nothing fancy there, then the top is a band that I sewed in a tube shape as well and sewed black lines on for details. As you can see, I also added on the cuffs just like the gloves made of that same gray fabric (that I got about 2 yards of). So I made two identical bands with cuffs, but one has that weird leg sleeve thing, otherwise they're exactly the same and just slide onto the legs just below the knees!
Now getting to the cape, you can see the little brooch he has that I made out of clay and then painted with acrylics and sealed with mod podge. The brooch is hot glued to some weird rope stuff I found at a craft store, however, I braided the rope so it was thicker, sturdier, and got a similar effect to Chrom's. The other end f the rope is hot glued to the inside of the cape on the edge there, where there is also another decorative button I just sewed on.
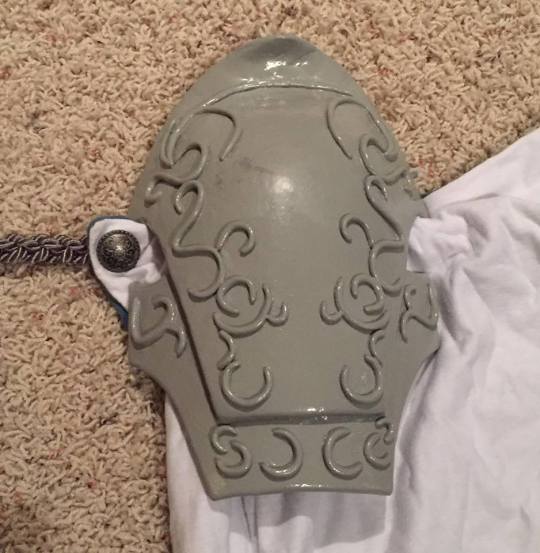
Here's the pauldron/shoulder armor! I could have done better on this but whatever. It's made out of craft foam and worbla and I just shaped it to the way I wanted and added on the details. The details are little strips of worbla that I heated up and rolled into noodles, then I just attached them and shaped them to the surface of the pauldron. No glue there since worbla sticks to itself! If it looks uneven, you can always heat it back up and move the pieces around!
I also just glued the pauldron to the cape because I was lazy and when I was looking at references, I didn't notice any straps or anything that Chrom has so that's what I did!
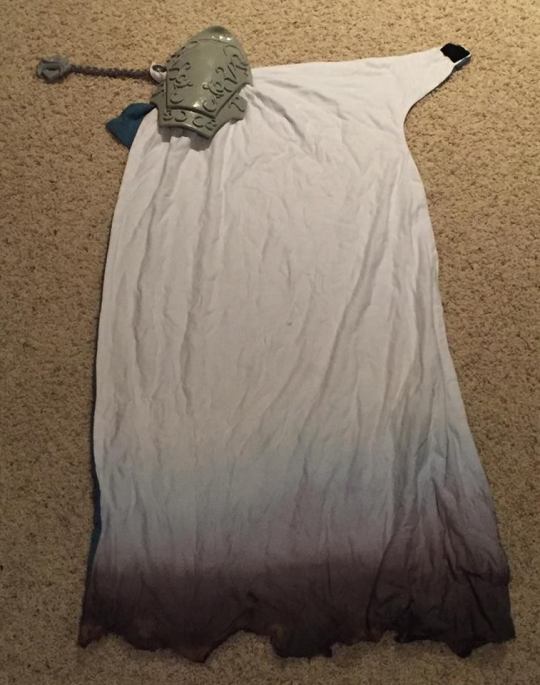
And this is the cape! You can see the black patch in the top right corner there, that's just more Velcro that connects to the back of the brooch, which of course also has Velcro on it. You'll see that in another picture as well. The cape is made up of some nice cotton fabric and it's two layers of the same stuff that are just sewed together. I made sure it was cotton because that's the easiest to dye since the bottom gray-ish part is gray Rit Dye that I dipped it in to gat the worn/burnt/dirty effect. The edges are all trimmed in random directions to give it the cool effect.
After that. I decided to take it up a notch! I actually rubbed that bottom part of the cape in some dirt and grass as well to get some real dirt effects. (which you can't see as well in the picture, but it's the thought that counts) Then I had some help with a blow torch and singed the edges of the cape to get an even more battle-worn and burnt look to it! This was the most fun part of making the cosplay tbh.
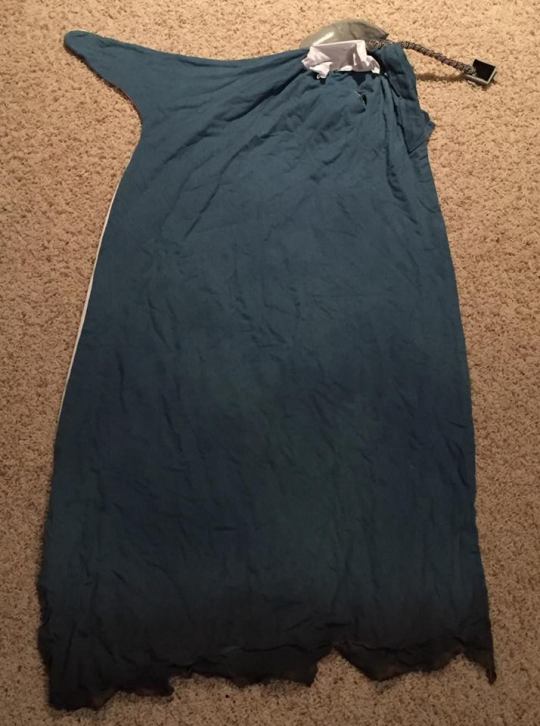
Here's the backside/inside of the cape! It's made of that same cotton fabric, but I dyed it blue! (Fun fact I had this fabric and it was dyed blue already before I even thought about making this costume because I was going to use it for something else but never did lol) You can also see the sloppiness of the cape bunched up where the pauldron is because that's where I glued it, but it looks fine from the outside which is where it counts! And you can also see the patch of Velcro on the back of the brooch that I mentioned before so I can keep the cape on and take it off with ease.
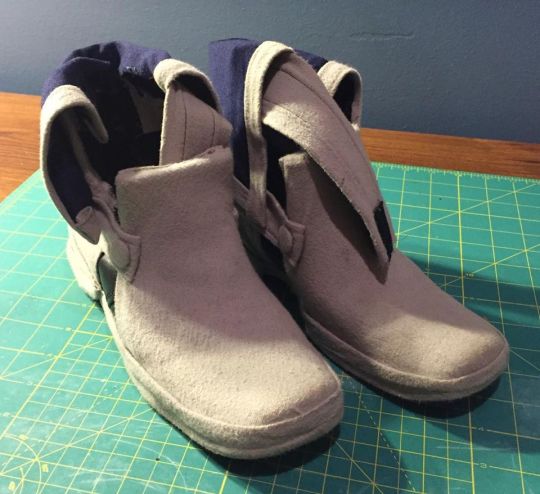
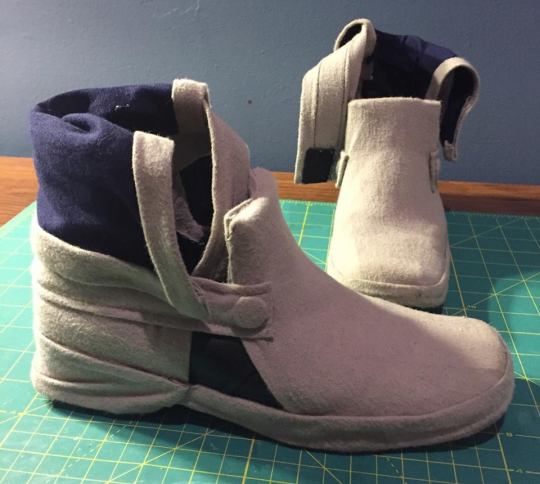
Next is the shoes! These were fun to make too! I just used a cheap pair of boots I bought from Saver's for the base and decorated them with the same dark blue and gray fabric from before. I added on some cuffs just like the leg bands and gloves, and of course I covered the front and back with some gray fabric which took a long time to get that smooth effect. With the leather-y boots, I used super glue to glue down the fabric and I only used the super glue along the edges so it didn't bleed through in random spots in the middle.
As you can see, they also have a band that I attached to the cuff part and I used Velcro so I can put them on and take them off easily. The Velcro especially helps keep them on my feet since I had to manipulate the original boots and cut them down to get them to the shape I wanted!

Almost done! These are the fake tattoos I made that I use for his Brand of the Exalt on his shoulder. I'm going to be honest, I went into Microsoft Paint (before I got a tablet and Paint Tool Sai) and took a picture of the brand and just colored it to that light red-ish color that I wanted. Like I said, sometimes the simplest methods work the best! Afterwards, I put the picture onto a Word document and got it to the size I wanted. Before I printed it on the special tattoo paper, I monkeyed around with the shade of red I wanted and the size and printed it on normal paper first to double check everything. Once It was settled, I fit as may little pictures as I could onto the Word document and printed it with the tattoo paper. There are instructions with the package, I just looked up "temporary tattoo paper" on amazon and it was the first one I'm pretty sure. This was an easy part of the cosplay too!
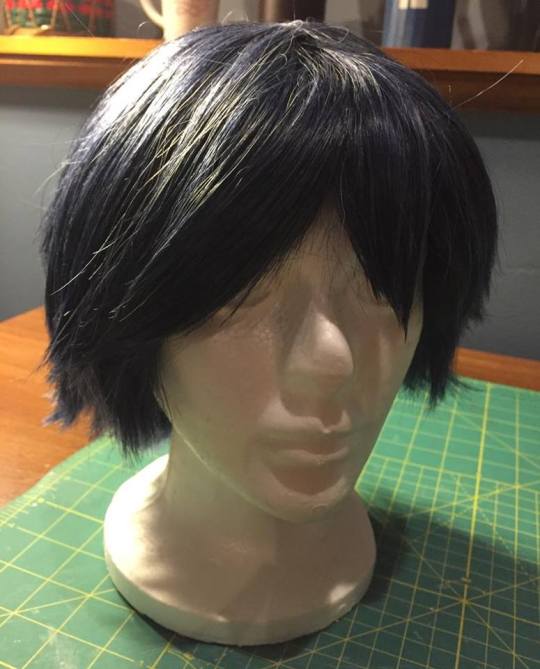
Last but not least, the wig! This is a Magnum wig from Arda wigs in the color dark blue, from what I can remember. It was very easy to style and I know I can always trust Arda to have some amazing cosplay wigs!
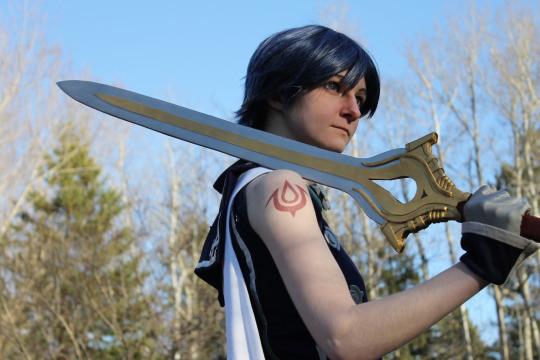
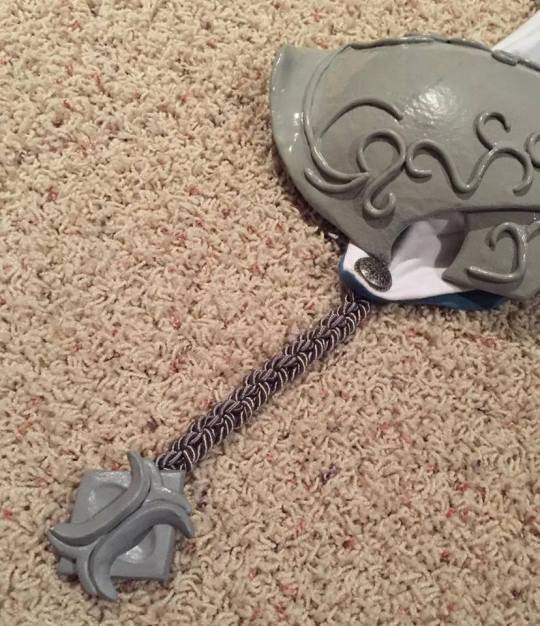
Besides the Falchion, that's basically it! The Falchion is made of poster board with foam and worbla details, but since there are 100 million ways to make swords, I won't go into depth unless you guys are interested.
Just let me know if you have any further questions and I'll try my best to answer them! Thank you so much for all of your support and great questions, I'm always happy to help!
#chrom#fire emblem#fire emblem cosplay#fire emblem awakening#fire emblem chrom#cosplay#cosplay help#cosplay tips#cosplay tutorial#This was such a fun cosplay to make and wear tbh#typing all this out made me want to wear this to another convention lol#long post
852 notes
·
View notes