#85g (Pack of 2)
Text
#Search Tumblr#Avatar#Following 💖#For you 🔮#Your tags 🔖#Manage…#Image#luckystorestore#Buy Lindt Lindor Milk Chocolate Salted Caramel Chocolate#200g | Luckystore.in#Buy This item: Lindt Lindor Milk Chocolate Salted Caramel Chocolate#200gm#Luckystore.in: Grocery & Gourmet Foods. It is made keeping your#LUCKYSTORE.IN#Luckystore.in: Grocery & Gourmet Foods.#lucky store#buy now#imported#Nabisco Ritz Bits Cheese Cracker Cup#85g (Pack of 2)#Perfect pack for a car cup holder Reach in to snack Recloseable Ingredients: Enriched flour (wheat flour#niacin#reduced iron#thiamine mon#Mathieu Teisseire Peach Ice-Tea Syrup 700ml#Allergen Information : Gluten Free Brand : Flavour : Peach Ice-Tea Volume : 700 ml Number of Items : 1 Speciality : No Genetic Engineering#Perrier Sparkling Mineral Water 750 Ml#(Imported) 12 Pcs | Carton#Brand Perrier Package Information Bottle Volume 750 Millilitres Package Weight 1.27 Kilograms Net Content Volume 750 Millilitres Package Ty#Check out these blogs
0 notes
Text
From my notes, if anyone wants to attempt The Cake
DRIES
- 1.5 cups cake flour (spoon & leveled)
- 1 tsp baking powder
- .25 tsp baking soda
- .4 tsp salt
CREAM
- 6 tbsp (85g) salted butter, softened to room temperature
- .75 cup (150g) granulated sugar
HIGH WETS
- 2 large egg whites, at room temperature
- 3.6 oz coconut milk, at room temperature
- .5 oz pandan extract
- .25 oz lime juice
LOW WETS
- 2oz pineapple juice, at room temperature
OVEN AT 350
WHISK THE DRIES
CREAM THE CREAM
BEAT THE WETS INTO CREAM (HIGH THEN LOW)
DRIES TO WETS
BAKE FOR 20 + 20
TENT AT 20
COMPOTE RECIPE
WETS
- .5 cup (100g) sugar lightly packed
- 5 oz pineapple juice
- 1 oz lime juice
DRIES
- 1 can crushed pineapple
SLURRY
- .5oz pandan extract
- 1 oz gin
- 1 tbsp corn starch
BOIL THE WETS
SIMMER WITH THE DRIES
COMBINE WITH SLURRY
MERINGUE RECIPE
BASE
- 4 large egg whites
- .5 cup sugar
- .5 tsp kosher salt
FLAVOR
- 1 tsp vanilla extract
- 1 tsp Brooklyn gin (or other high citrus gin)
- .25 tsp lime zest
MARRY THE BASE
BAIN MARIE THE BASE
BEAT THE BASE, LIGHTLY
FLAVOR THE BASE
3 notes
·
View notes
Text
balam kheera churan, Best Benefits, Side Effects, Health
balam kheera churan
Balam Cucumber Churna is a health preservation product known to have Ayurvedic preserving properties of Cucumber. This powder can provide various vitamins, minerals, and antioxidants that can be beneficial for the body.
#loki#lokiedit#mcuedit#marveledit#gay cats#lesbians#tiktok#rick astley#cats#chewieblog#cinemapix#cinematv#dailyflicks#dixonscarol#mediagifs#noalook#tusercora#tuserlyn#userbarrow#userbbelcher#userdiana#userksena#usermaguire#usersugar#*edits#loki spoilers#lokius#i'm in awe of everyone else who can color this series#hospital#patient
0 notes
Link
Pumpkin Coffee Cake Pumpkin Coffee Cake – moist and tender pumpkin cake brimming with spices and finished with a buttery crisp yet melt-in-your-mouth crumb topping. #BrownSugar #Butter #Cinnamon #Cloves #Eggs #Flour #Ginger #GranulatedSugar #HalfAndHa…
0 notes
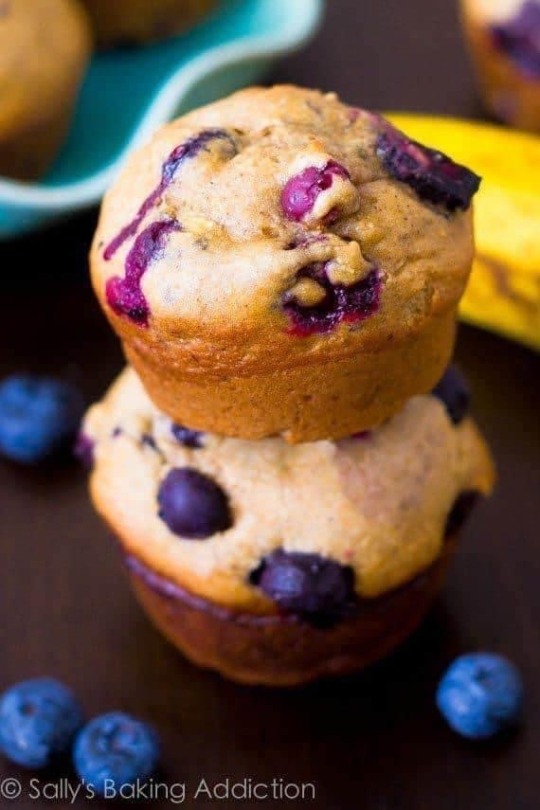
Text
Banana Muffins

Makes 9 muffins
Ingredients
1 and 1/2 cups (188g) all-purpose flour
1 teaspoon baking powder
1 teaspoon baking soda
1/2 teaspoon salt
1 teaspoon ground cinnamon
1/4 teaspoon ground nutmeg
1 and 1/2 cups (345g) mashed bananas (about 4 medium or 3 large ripe bananas)
6 Tablespoons (85g) unsalted butter, melted (or melted coconut oil)
2/3 cup (135g) packed light or dark brown sugar (or coconut sugar)
1 large egg
1 teaspoon pure vanilla extract
2 Tablespoons (30ml) milk
optional - 1 cup chocolate chips or pecans
Directions
Preheat oven to 425°F
Whisk the flour, baking powder, baking soda, salt, cinnamon, and nutmeg together in a medium bowl. Set aside. In a large bowl or in the bowl of your stand mixer, mash the bananas. On medium speed, beat or whisk in the melted butter, brown sugar, egg, vanilla extract, and milk. Pour the dry ingredients into the wet ingredients, then beat or whisk until combined. If adding nuts or chocolate chips, fold them in now. Batter will be thick.
Spoon the batter into liners, filling them all the way to the top. Bake for 5 minutes at 425°F, then, keeping the muffins in the oven, reduce the oven temperature to 350°F. Bake for an additional 16–18 minutes or until a toothpick inserted in the center comes out clean. The total time these muffins take in the oven is about 21–23 minutes, give or take. (For mini muffins, bake 12–14 total minutes at 350°F. Allow the muffins to cool for 5 minutes in the muffin pan, then transfer to a wire rack to continue cooling.
Muffins stay fresh covered at room temperature for a few days or in the refrigerator for up to 1 week.
Original recipe: https://sallysbakingaddiction.com/banana-muffins/
0 notes
Text
Matt Preston's irresistible salted chocolate sour cream cheesecake

INGREDIENTS
1 x 85g pack raspberry jelly
250g packet chocolate biscuits (we used Choc Ripple biscuits)
280g caster sugar
75g unsalted butter, melted
750g cream cheese, at room temperature
4 eggs
250g sour cream
200g dark chocolate, melted and cooled
¼ cup cocoa
1 1/2 tsp salt flakes
125g raspberries
>>>>>>>Get Access To 30mins Dessert Recipes>>>>
METHOD:
For the jelly cubes, follow the packet directions but use only half of the water they suggest. This will make the jelly firmer. Pour it into a small dish with straight sides and refrigerate for at least 3 hours.
2. Set the oven to 175C. Apply some grease and baking paper to a 23cm spring-form cake tin. Make sure the outside of the tin is wrapped three times. Use three long pieces of aluminum foil and overlap them slightly. Lift and fold the edges around the tin to create a “cup” that prevents water from getting in.
3. Make the biscuits into fine crumbs by crushing them or using a food processor. Add 60g sugar and mix well with the melted butter. Transfer the biscuit mixture to the cake tin and press it down firmly and evenly with a spoon.
4. Put the cream cheese in a stand-up mixer bowl with a paddle attachment and beat it until it is smooth and creamy. Add the rest of the caster sugar and beat it until it dissolves completely. Add one egg at a time and beat well after each one to mix them in. Turn down the mixer speed and add sour cream, chocolate, cocoa powder, and 1 ½ tsp salt and mix them together.
5. Spread the filling over the biscuit base and put the cake tin wrapped in foil in the center of a large, deep baking dish. Fill the baking dish with water until it reaches about 3cm high and put it in the oven. Bake it until it is golden and done about 1 hour.
6. To make this baked cheesecake very creamy, cool it slowly by turning off the oven and keeping the door shut. Let the cheesecake cool in the oven for at least 1 hour. Take it out of the oven. Let it cool completely before removing it from the tin.
7. Slice the raspberry jelly into squares then use it to top the cheesecake with fresh raspberries.
>>>>>>Get More Recipes Here>>>>>>
0 notes
Text
Price: [price_with_discount]
(as of [price_update_date] - Details)
[ad_1]
Product Description
DELICIOUS ROASTED SNACKS, PERFECT FOR GIFTING A Gift Box to add flavor, taste and lots of fun to your celebrations. This Omay Foods' Gift Box comes with roasted healthy snacks, dry-fruits all cooked in salt with no oil, seasoned perfectly for a delicious munch for your joyous times. This premium packed box comes with a special greeting card to make a wholesome, awesome gift for your clients, colleagues, friends, and family. Choose Omay, Choose Health!
CHOOSE OMAY FOODS GIFT BOXES FOR YOUR CELEBRATIONS
Healthy Roasted Snacks This Gift Box comes with the healthiest, tastiest snacks made using Rajasthan's Roasting process; food cooked in salt with no oil. Get the best Trail Mixes, Dry-Fruits, and Indian Snacks for your loved ones.
Special Greeting Card Included in this Gift Box is a custom greeting card to wish your loved ones in a special way! This box makes for a perfect gift; be it personal or corporate spaces.
Premium Packaging Our Gift Boxes are custom-designed & premium packaged to impress your dear ones; packed & shipped with utmost love & care to deliver safely anywhere in India.
What you get (1): Pack of HEALTHY SNACKS; prepared using Rajasthan's Roasting process - cooked in salt, absolutely oil-free. From Trail Mixes to Indian Snacks and even Dry-fruits, there's a complete variety to choose from.
What you get (2): A festive-themed gift box with a special Greeting Card on the top. Just the perfect way to impress your colleagues, clients, friends & family.
Package Contents: 1 x Strawberry Blast (85g), 1 x Berries Mix (85g), 1 x Oats & Moong (75g), 1 x Nutty Mix (50g)
[ad_2]
0 notes
Text
Ingredients
Cinnamon Roll Dough
4 1/2 – 5 cups all purpose flour
1/3 cup (75g) granulated sugar
2 packets Fleischmann’s® RapidRise® Yeast (about 4 1/2 tsp)
1 tsp salt
1 1/2 cups (355g) water
6 tbsp (85g) unsalted butter
1 large egg
Filling
1/4 cup (55g) unsalted butter, room temp
1/2 cup (100g) light brown sugar, packed
1 tbsp cinnamon
Cream Cheese Icing
4 oz cream cheese, room temp
1/4 cup (55g) unsalted butter, room temp
1 cup (120g) powdered sugar
2 tsp vanilla extract
Cook Mode Prevent your screen from going dark
Instructions
Cinnamon Roll Dough
In a large mixing bowl, whisk together 2 cups flour, sugar, yeast, and salt.
In a heat-safe bowl, combine the water and butter (cut into tablespoons). Heat in the microwave for 30 sec – 45 sec, until warm to the touch but not hot. The butter will not melt completely.
Pour into the dry ingredients with the egg and mix with a wooden spoon.
Add in 2 more cups of flour and mix. It should turn pretty thick and sticky at this point.
Add in 1/2 cup of flour and mix again. It should now turn shaggy and become difficult to stir. Once it reaches that point, set the spoon to the side and use your hands to mix and knead the dough.
It will be sticky, so add another 1/4 cup of flour and continue to mix and knead by hand. It should turn into a smooth mass that’s soft and tacky.
With a clean finger, press it into the dough. If your finger is sticking, add another 1/4 cup of flour and knead. If it’s not, then shape it into a ball and let it rest uncovered for 10 minutes.
When the 10 minutes is up, the dough should have puffed up quite a bit but not quite doubled in size.
Place the dough on a lightly floured surface and pat it into a rough rectangle shape. Roll it into a 10×15 inch rectangle using a rolling pin.
Spread the room temperature butter into a thin and even layer, leaving about 1/2 inch border all around the outside of the dough.
Sprinkle with the brown sugar and spread it even with your hand. Then top it with the cinnamon.
Working from the 15 inch end of the dough, roll it up into a log. Place your hands at each end of the log and give it a gentle squeeze in to compact the log of dough. It may have stretched out a bit during the rolling process so this brings it back together.
For best results, use unflavored dental floss to cut the rolls. If you don’t have floss, you could also use really thin sewing thread. If using a sharp knife, gently saw back and forth and try not to press straight down into the rolls. This will squish them into an odd shape.
Using the floss, slide it under the roll and toss both ends of the floss over top. Pull them through to create a cut. Cut off the two ends of the log and then cut the remainder into 12 pieces.
Cut the entire log in half, then cut those two halves in half to create 4 segments. Cut each of those 4 segments into 3 rolls to get a total of 12.
Place the rolls in a buttered or greased 9×13 dish (you could also use two 9″ round pans, placing 6 rolls in each). It’s OK if all of the rolls are touching. *See notes for overnight instructions
Place in a warm spot and cover with a towel to rise for 1 hour. If you live in a colder climate, preheat the oven to the lowest temperature. Once it’s ready, turn the oven off and place the rolls inside. This creates a warm environment for the rolls to proof.
Preheat the oven to 350F (first remove the rolls if you proofed them inside) and check on the rolls. They should have doubled in size and now take up the entire dish.
Bake for 25-30 minutes or until the tops are a light golden brown. While they cool, make the icing.
Cream Cheese Icing
Place the cream cheese and butter in a bowl and use a fork to mash the two together. Make sure they’re both softened to room temperature, otherwise the icing will be lumpy.
Add the powdered sugar and vanilla and mash again with the fork. Once the mixture starts to loosen, switch to a whisk and mix until smooth.
Spread onto the warm rolls and dig in!
1 note
·
View note
Text
0 notes
Photo

Serious Eats Italian-American Meatball and Tomato Sauce
https://www.seriouseats.com/italian-american-beef-pork-meatballs-red-tomato-sauce-recipe
https://www.seriouseats.com/the-best-slow-cooked-italian-american-tomato-sauce-red-sauce-recipe
Sauce
Ingredients
4 (28-ounce) cans whole peeled tomatoes, preferably imported D.O.P. San Marzano tomatoes (see notes)
1/4 cup extra-virgin olive oil, plus more for finishing
4 tablespoons butter
8 cloves garlic, minced (about 3 tablespoons)
1 teaspoon red pepper flakes
1 tablespoon dried oregano
1 medium carrot, cut into large chunks
1 medium onion, split in half
1 large stem fresh basil
Kosher salt and freshly ground black pepper
1 tablespoon fish sauce, such as Red Boat (optional)
1/2 cup minced fresh parsley or basil leaves (or a mix of the two)
Instructions
Adjust oven rack to lower position and preheat oven to 300°F (165°C). Place tomatoes in a large bowl. Using your hands, crush the tomatoes by squeezing them in your fingers until pieces no larger than 1/2-inch remain. Transfer 3 cups of crushed tomatoes to a sealed container and reserve in the refrigerator until step 4.
Heat olive oil and butter over medium heat in a large Dutch oven until butter is melted. Add garlic and cook, stirring, until softened and fragrant but not browned, about 2 minutes. Add pepper flakes and oregano and cook, stirring, until fragrant, about 1 minute. Add tomatoes, carrot, onion, and basil, and stir to combine. Season lightly with salt and pepper. Bring to a simmer over high heat.
Cover Dutch oven with lid slightly ajar and transfer to oven. Cook, stirring once every 1 to 2 hours, until reduced by about half and darkened to a deep red, 5 to 6 hours (reduce oven temperature if the sauce is bubbling too rapidly or the browned bits begin to turn too dark).
Remove from oven. Using tongs, discard onion halves, carrots, and basil stems. Add reserved tomatoes to sauce and stir to combine. Add fish sauce, if using. Season generously with salt and pepper and stir in minced herbs along with additional olive oil as desired. Serve immediately, or allow to cool at room temperature, transfer to airtight containers, and refrigerate for up to 1 week. Sauce can also be frozen in sealed containers for up to 6 months. To reheat, warm very gently in a saucepan with 1/2 cup water, stirring until it all melts and heats through.
Special Equipment
Dutch oven, Wooden spoon
Notes
This tomato sauce is only as good as the tomatoes you start out with. Look for whole peeled plum tomatoes packed in juice or puree. you'll never go wrong with D.O.P. San Marzano tomatoes imported from Italy, or go with a trusted brand of tomatoes if you have a favorite.
Meatballs
Takes about 3 hours if working in batches. Chopping ingredients takes a while.
Ingredients
1 packet unflavored gelatin (optional, see notes)
1/2 cup (120ml) homemade chicken stock or low-sodium broth (optional, see notes)
3 ounces (85g) crustless fresh white bread, cut into 1/2-inch cubes (about 2 unpacked cups)
1/3 cup (80ml) buttermilk, plus more as needed
1 medium (8-ounce; 225g) yellow onion, minced
3 ounces (85g) fatty pancetta, finely minced (see notes)
2 ounces (55g) Parmigiano-Reggiano, grated, plus more for serving
8 medium cloves garlic (about 1 3/4 ounces; 50g), finely minced
1/2 cup loosely packed fresh parsley leaves (1 ounce; 30g), minced
4 large egg yolks
1 teaspoon dried oregano
1 teaspoon ground fennel seed
1 tablespoon Diamond crystal kosher salt (12g); for table salt use half as much by volume or the same weight
Freshly ground black pepper
1 pound (455g) ground beef (at least 25% fat; see notes)
1 pound (455g) ground pork (at least 25% fat; see notes)
Instructions
In a heatproof measuring cup, sprinkle gelatin all over surface of stock and let stand for 5 minutes. (If not using stock and gelatin, proceed to Step 2.) Microwave stock, stirring once or twice, until gelatin completely dissolves, about 2 minutes. Pour stock into a wide heatproof bowl and refrigerate until fully set, about 30 minutes.
In the bowl of a stand mixer, combine bread with buttermilk, tossing to coat. Let stand, tossing occasionally, until bread is completely moist, about 10 minutes. Squeeze bread between your fingers or mash with a spoon to make sure there are no dry spots; if there are dry spots that refuse to moisten, add more buttermilk, 1 tablespoon at a time, until bread is moist throughout.
Add onion, pancetta, Parmigiano-Reggiano, garlic, parsley, egg yolks, oregano, fennel, salt, and pepper to bread/buttermilk mixture. Finely mince gelled stock, if using, and add.
Set mixer bowl in stand mixer and attach paddle. Starting at low speed and gradually increasing to medium-high speed, beat bread mixture until thoroughly blended, stopping to scrape down sides as necessary. Add 1/3 each of the beef and pork and beat at medium-high speed until thoroughly blended with bread mixture.
Remove bowl from stand mixer and add remaining beef and pork. Using a clean hand, gently mix meatball mixture, teasing apart ground meat with your fingers, just until ground beef and pork are thoroughly mixed in and no pockets of unincorporated meat remain; avoid mixing any more than is necessary for even distribution.
Preheat broiler and set oven rack in upper position. Line a rimmed baking sheet with aluminum foil. Form meatball mixture into handball-sized balls and arrange on prepared baking sheet; you should be able to make about 10. Broil meatballs until browned on top, about 7 minutes. (Browning times can vary dramatically, depending on oven broiler strength.)
Heat tomato sauce in a medium pot until simmering and add meatballs. Simmer until meatballs are just cooked through and register about 145°F (63°C) on an instant-read thermometer, about 10 minutes.
Serve meatballs, spooning sauce all over and grating more cheese on top.
Special Equipment
Stand mixer, rimmed baking sheet, instant-read thermometer
Notes
This recipe makes about 10 handball-sized meatballs; you can make them smaller or larger, as you prefer, but cooking times will change.
The chicken stock and gelatin help make meatballs that are insanely juicy and tender, but these meatballs will still be incredibly moist even without them.
The pancetta in this recipe adds juiciness and moisture, so the fattier the better; if you use pancetta that is too lean (more than 50% muscle), you won't get the same benefit. Pancetta is easiest to mince when nearly frozen.
It can be difficult to guarantee the fat percentage of pre-ground meat, but a higher-fat mix of about 25% is one of the keys to juicy and tender meatballs, so do your best to track down ground beef and pork from a meat counter or butcher that can get you the meat ground to your specifications. Similarly, the meat should be a fine or medium grind, not coarse, so make sure to confirm a proper grind when buying. Of course you can control all of this by grinding the meat yourself using cuts like beef chuck and pork shoulder, which both will get you in the ballpark of the fat percentage you need; if you do grind the meat yourself, you can save time by running the pancetta through the grinder too (just make sure it's nice and cold before grinding).
1 note
·
View note
Text
Low Cal Banana Blueberry Muffins
Nearly fat free, 131 calorie banana blueberry muffins. You won’t miss all the calories and fat, trust me!
Ingredients
2 and 1/2 cup (315g) white whole wheat flour (spoon & leveled), or mix of whole wheat and all-purpose flours
1 teaspoon baking soda
1/4 teaspoon salt
1/2 teaspoon ground cinnamon
1/4 cup (85g) honey
1/2 cup (100g) loosely packed light or dark brown sugar
1 cup mashed very ripe banana (about 2 large very ripe bananas)
1/4 cup (60g) nonfat vanilla Greek yogurt (or any yogurt)
1 large egg, beaten
3/4 cup (180ml) milk (I use almond milk, but you can use any kind)
1 and 1/4 cup (215g) fresh or frozen blueberries (do not thaw)
Instructions
1. Preheat oven to 350°F (177°C). Spray 15 muffin tins with nonstick spray.* Set aside.
2. Gently whisk the flour, baking soda, salt, and cinnamon together in a large bowl. Set aside.
3. In a separate bowl, whisk the honey and brown sugar together – it will be thick and lumpy. Try to get out as many lumps as you can. Whisk in the mashed banana, yogurt, and beaten egg. Slowly pour the wet ingredients into the dry ingredients. Gently begin to fold it all together. It will be very thick. Add the milk slowly and continue to gently mix the ingredients together. The milk will thin everything out, but the batter will still be quite thick. Gently fold in the blueberries. Do not overmix the batter.
4. Divide the batter between 15 muffin cups. Fill all the way to the top. Bake the first 12, then the last three in another batch. (Fill the empty muffin cups halfway with water in the 2nd batch to ensure even baking.) Bake muffins for 17-18 minutes OR until very lightly browned on the edges. A toothpick inserted in the center should come out clean. Remove from the oven and place pan on a wire rack. Allow muffins to cool and enjoy!
5. Muffins taste wonderful the next day, like most banana bread recipes because their flavor is enhanced. Muffins remain fresh and moist stored in an airtight container at room temperature for 2 days or in the refrigerator for 1 week.
Notes
Freezing Instructions: Muffins can be frozen up to 3 months. Thaw overnight in the refrigerator and warm to your liking before serving.
Liners: Do not use cupcake liners, muffins will stick to liners.
Nutrition: Each muffin is 131 calories each based on using nonfat vanilla greek yogurt and unsweetened almond milk.
1 note
·
View note
Text
15+ Vegan Dinner Recipes in 5 Minutes

What if I told you that it is possible to make a fresh, tasty Vegan Dinner Recipes in five minutes? Well, think again because the idea of making your own food at home seems foreign and unimaginable for most people these days.
But guess what - there are ten different recipes here just waiting on our attention! So go ahead; give them all a try (you'll thank me later!).
Vegan Aioli Recipe (2-minute + Oil-free)
Today, I am sharing a simple recipe for vegan cashew-based AIOLI to pair with fresh and roasted vegetables or use as a burger spread. It’s fantastic! You know you're going to love it!"
Ingredient
- Raw cashews in a cup (if using soaked cashews, see notes)
- water, 3/4 cup
- 2 to 4 cloves of garlic
- Dijon mustard, 2 tablespoons
- 1/2 lemon's juice
- mineral salt pinch, or to taste
Get the recipe here.
Related Reading: 10+ Vegan Breakfast Recipes
Quinoa & Veggie Collard Wraps Recipe
When I was in high school, my love for sandwiches led to a longing for lighter carbs and skipping the bread.
But now that I am gluten-free but still want those same delicious lunch tastes-I've realized how easy it is to pack them with more veggies! Eating this way means no longer having boring old salads or slathering peanut butter on vegetables as sides because they're already inside your "wrap."
Ingredient
- Four collard greens
- 50 ml of hummus (any variety)
- cooked quinoa, 1 cup
- 1 small cucumber
- 1 little tomato
- two shredded carrots and one sliced avocado
- 50 ml of sprouts
Get the recipe here.
Related Reading: 12+ Gluten-free Dairy-free Recipes
Vegan Protein Overnight Oats Recipe
You can have a high-protein, filling breakfast with these easy overnight oats! You’ll mix together some simple ingredients and pop them in the fridge for an afternoon snack or on busy workdays when you don't want to spend time cooking.
Ingredients
- Powdered vegan protein (I like using vanilla protein powder)
- Chia Seeds and Rolled Oats
- Cinnamon
- Dark sugar (or coconut sugar)
- Non-dairy milk without sugar (I use soy milk for the high protein)
- Vanilla flavoring
Get the recipe here.
Vegan Blender Queso Recipe
Well, I'll tell you what. If this quick blender queso is nut-free and oil-free then why don't we take a bite out of it? It's as simple as throwing some oats in the bottom with milk or cream before adding your favorite vegetables- tomatoes are my personal fave!
Ingredients
- Rolled oats, 3/4 cup (80 g)
- 2 tablespoons and 1 1/2 cups (355 ml) of water (10 g) yeast nutrition
- 36 g of roasted red pepper in 2 teaspoons
- two tablespoons (30 ml) brine for pickled jalapenos
- 1 salt shaker, or as desired
- One-half teaspoon of onion powder
- 50 ml of chili powder
- 1/4 teaspoon cumin powder
Get the recipe here.
Related Reading: 15+ Chicken and Pasta Recipes
Couscous Fried “Rice” Recipe
This Mediterranean fried rice is sure to be a hit with your family and can use up whatever vegetables you have in the fridge. If it doesn’t call for any eggs, try adding them next time or swap out some of these ingredients for others like spinach, cauliflower & peas!
Ingredients
- Dry couscous, 1/2 cup
- a half-cup of frozen vegetables
- Boiling water in a half-cup and salt in a teaspoon
- 14 package (85g) additional firm tofu
- 1 teaspoon soy sauce, or an equivalent,
- 1 teaspoon sesame oil
- 1 chopped stalk of green onion
- Sriracha sauce on top (optional)
Get the recipe here.
Chickpea Waldorf Salad Recipe
Waldorf salads are a perfect light meal. The addition of chickpeas, tart cranberries, and seasoned mayonnaise make this appetizer or lunch even more delicious!
If you don't like using store-bought vegan sauces for your meals then try making some tarragon vinegar-based ones at home with ingredients that are easily accessible in any grocery store nearby - there are tons out on Youtube too if needed assistance finding recipes.
Ingredients
- 1 cup rinsed and drained can of chickpeas
- 2 cups chopped Red Delicious apples
- 2 cups chopped Bartlett pears
- 1/2 cup chopped celery
- Chopped walnuts, half a cup
- a half-cup of red grapes
- 1/3 cup dried cranberries without sugar
Get the recipe here.
Mediterranean Bowl Recipe
The 5-minute Mediterranean bowl is an easy, healthy food option for when you're in a hurry. This quick and simple meal can be prepped with ingredients that are typically found at your home or on hand!
The recipe calls for veganism but is also gluten-free so everyone has access to these delicious bowls no matter their dietary needs.
Ingredients
- One small cucumber, diced
- half a cup of cherry tomatoes
- and a tiny bunch of minced parsley.
- 1-2 finely chopped spring onions
- olive juice
Get the recipe here.
Oatmeal Cutlets Recipe
Oatmeal is a vegan staple and not just for breakfast. You might be surprised to know that there are many different ways you can prepare oatmeal, from porridge to soup! It's also high in fiber with antioxidants which will keep your body healthy all day long.
Ingredients
- Cumin and fennel seeds, olive oil, and oats
- Divvied Chickpeas
- Black Split Gram
- shredded onion
- Chili Greens
- Ginger
- Capsicums
- Carrot
- Cauliflower
- Salt
Get the recipe here.
Cashew Queso Recipe
Cashews are the main ingredient in this queso, which gets its creamy base from raw cashew nuts that have been blended together with nutritional yeast and spices. The best part?
It literally comes together in 5 minutes! Enjoy this vegan/dairy-free dip as a sauce on top of your favorite burritos or tacos (or use it like we do: straight outta' Bowl).
Ingredients
- 1 cup uncooked cashews
- Nutritional yeast, 1/4 cup
- 1/2 teaspoon salt
- 1/tsp of the chili powder
- Smoked paprika
- 1/2 teaspoon
- 1/2 teaspoon turmeric
- 1-tablespoon lemon juice
- 1 clove of garlic
- water, 3/4 cup
Get the recipe here.
Related Reading: 14+ Kid-friendly Crockpot Meals
Vegan Basil Pesto Recipe
The best way to get your friends on board with this vegan basil pesto is by giving them some credit. Make sure you mention that it's made from cashews, garlic and fresh herbs - they'll never guess how much creativity can come out of something so simple!
Ingredients
- 1.50 for 1 1/2 cups of packed fresh basil
- 13 cup vegan parmesan costs $0.64.
- 2 garlic cloves cost $0.08
- Lemon juice, 1-2 tablespoons ($0.09)
- Olive oil, 1/3 cup ($0.64)
- Water, 2-4 tablespoons ($0.00)
- To taste, sea salt ($0.01)
Get the recipe here.
Coleslaw Recipe
This vegan coleslaw recipe is so easy and only takes 5 minutes to make! The longer it chills, the better.
This would be perfect for your summer picnic or potluck any time of year too - I know that everybody loves a good side dish combo packed full o' veggies with their favorite protein on top (chicken).
Ingredients
- Coleslaw mix, 5 cups
- 1/2 cup vegan mayonnaise
- Milk substitute, 1/2 cup
- 1 tablespoon lemon juice
- 1/4 cup oil
- 1/4 teaspoon salt
- pepper
- 1 tablespoon sugar
Get the recipe here.
Walnut Meat Recipe(4 Ways)
Walnut meat is a healthy and delicious alternative to conventional vegan meats like textured vegetable protein (TVP). You can make it in just minutes with only walnuts, mushrooms plus spices!
Ingredients
- walnuts, 1 cup
- 1 cup sliced mushrooms
- 1 tamari tablespoon (nama shoyu or soy sauce)
- to taste, salt, and pepper
Get the recipe here.
Hummus & Veggies Recipe
Hummus is a classic plant-based dip that's packed with flavor. There are many people who would turn down humus and veggies for anything else in this world!
If you have time, try my homemade version-it only takes 5 minutes but the end result will leave your guests speechless (and they're always telling me what their favorite part of dinner was).
Ingredients
- 1 large clove of garlic
- Chickpeas in a single 15-ounce can
- 1 big lemon (equals 1/4 cup of lemon juice)
- 4 ml of tahini
- 1/4 kosher salt teaspoon
Get the recipe here.
Vegan Kimchi Fried Rice Recipe
This easy vegan fried rice is a one-pan recipe that takes 5 minutes to make and will leave you with an unexpectedly tasty dish.
The spicy heat from the serrano pepper balances out the sweetness of ricotta cheese, while peas provide some soothing coldness in each bite-making for quite possibly one satisfying bowlful!
Ingredients
- veg kimchi
- prepared rice
- Onion Extra-firm tofu
- sauce soy
- mixed frozen vegetables
- powdered garlic
- burnt sesame oil
Get the recipe here.
Korean Soft Tofu Recipe
This simple, 7-ingredient recipe takes 2-5 minutes with no cooking required! It's delicious either cold or at room temperature and goes great paired up with rice.
Koreans call these dishes "rice thieves" because they are so tasty you'll end up eating way more than your fair share - meaning it really does steal the show from other meals (and diets).
Ingredients
- Silken tofu or soft tofu
- Tamari or soy sauce
- soybean oil
- maple sugar
- Gochugaru is a type of Korean chili powder.
- Onion greens
- semolina seeds
Get the recipe here.
Instant Vegan Tteokguk Recipe
Tteokguk is a Korean dish that’s traditionally made for the Lunar New Year. Depending on what broth you use, this soup might not be vegan but we have an easy recipe to make your own!
In Korea and Japan, it's tradition during their annual holidays called chunk or shintoametto to eat something called "tteokguksu." The word 'T Tee' means rice cake while ‘GUK SUE' means Soup/ Stock.' So there you have them - Trucks & Cars!!
Ingredients
- Cubes of vegetable bouillon
- supple tofu
- sour cream
- burnt sesame oil (chamgireum)
- coin-shaped rice cakes from Korea (tteok)
- selection of mushrooms
- Garlic
- Vegan-friendly Korean dumplings
- toasted dry seaweed
- Garlic, green
Get the recipe here.
Related Reading: 12+ Easy Lunch Ideas for Work
Conclusion
With this roundup of vegan dinner recipes that all take 5 minutes or less to make, you can easily add some variety to your weeknight meals. Whether you’re looking for a quick and easy meal or something a little more elaborate, we’ve got you covered. So get cooking!
Read the full article
0 notes
Text
10-minute pad Thai - by YuThaiPa

Yes you can do it in 10 minuets if you act smart.
Ingredients [serving for 2]
200g raw prawns
small pack coriander , stalks finely chopped, leaves roughly chopped
2 x 200g packs straight-to-wok pad Thai noodles
85g beansprouts
1 egg , beaten with a fork
juice 1 lime , plus wedges to serve
1 tbsp fish sauce
2 tsp sugar
1 tbsp roasted peanuts , roughly chopped, to serve
PAD THAI RECIPE IN TWO STEPS
IF it is too much to cook!! then takeaway @ (909) 679-5545,
[@35134 Yucaipa Blvd, Yucaipa, CA 92399 ]
STEP 1
1. Dry-fry the prawns with coriander stalks in frying pan until they are light pink
2. Add the following beansprouts, noodles, egg, fish sauce and sugar. Quickly Toss or mix together for 2 min until the egg is cooked.
TIPS- 1. Add lime juice, sugar, sauce, chilly as per taste.
2. Mix the ingredients well.
3. You can add garlic too for taste.
STEP 2. Garnishing [optional]
1. Remove it from flames, mix in few peanuts and coriander leaves, then divide between 2 bowls.
2. Use more peanuts and coriander if you wish or can serve with lime.
Tips -
1. You can do without peanuts and coriander leaves they are just for taste.
2. Squeezy the lime over the dish or serve with lime wedges or you can do both.
PH - (909) 679-5545
Address: 35134 Yucaipa Blvd, Yucaipa, CA 92399
0 notes
Text
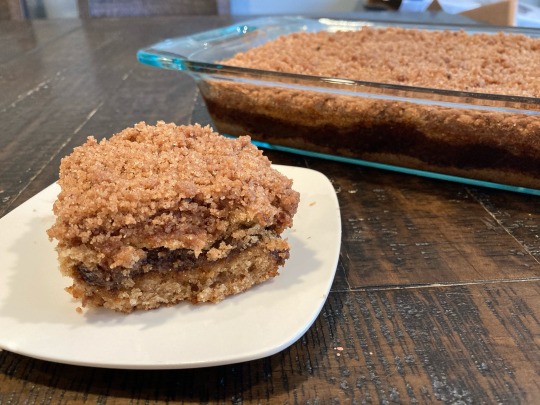
vegan cinnamon-streusel coffee cake
recipe under the cut!
Makes one 9 x 13" cake.
INGREDIENTS:
For the topping:
1 cup (200g) vegan granulated or turbinado sugar
1 cup (120g) all-purpose flour
1 Tbsp ground cinnamon, or 1 cinnamon stick toasted and ground
1/4 tsp salt
1/4 tsp ground mace (optional)
1 tsp instant coffee powder (optional)
6 tablespoons (85g) vegan margarine, melted
For the filling:
1 cup (215g) light brown sugar
1 Tbsp ground cinnamon, or 1 cinnamon stick toasted and ground
1/2 tsp instant coffee powder (optional)
1 tsp unsweetened Dutch-processed cocoa powder (optional, for colour)
For the cake:
3 3/4 cups (450g) all-purpose flour
12 tablespoons (170g) vegan margarine, softened
1 teaspoon salt
1 1/2 cups (300g) vegan granulated or turbinado sugar
1/3 cup (70g) brown sugar
1 Tbsp baking powder
1 Tbsp vanilla extract
1 cup (170g) vegan yogurt, room temperature
1 1/2 cups (360g) non-dairy milk, room temperature
INSTRUCTIONS:
1. Preheat your oven to 350 °F (176 °C) and lightly grease a 9 x 13" cake pan with nonstick cooking spray or with a neutral oil, such as canola.
2. In a medium bowl, whisk together the dry ingredients for the topping. If measuring by volume, measure flour by scooping gently into a dry measuring cup with a large spoon and levelling off with a knife; measure brown sugar by packing into a dry measuring cup until it holds its shape when tipped out. Add melted margarine and stir to combine.
3. In a small bowl, whisk together the dry ingredients for the filling and set aside.
4. In a large bowl, beat margarine and sugar together until creamy, 3-4 minutes. Add in the vanilla, salt, and baking powder and mix until combined.
5. In a separate bowl, whisk together yogurt and milk until combined.
6. Add in flour and milk mixture in alternating portions, beginning and ending with the flour, and mix until just combined.
7. Spread about half of the cake batter in your lightly greased 9 x 13" pan. Sprinkle the filling evenly on top of the batter.
8. Spread the rest of the batter over the filling. Using a butter knife held perpendicular to your work surface, gently swirl the filling into the batter to create a marbled effect.
9. Sprinkle the crumb topping evenly over the top of the cake.
10. Bake for 55-60 minutes, until a toothpick inserted into the centre of the cake comes out clean.
88 notes
·
View notes
Text
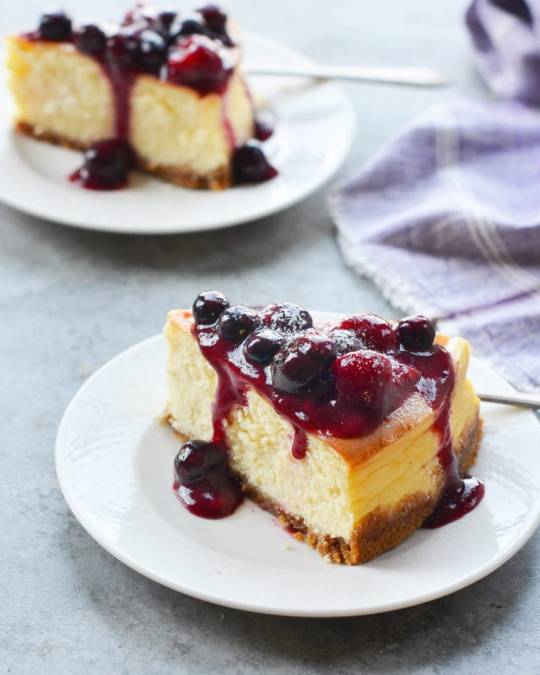
New York cheesecake

Ingredients
For the crust
85g butter, plus extra for tin
140g digestive biscuits, made into fine crumbs (add 2 extra biscuits if you like a thicker base)
1 tbsp sugar, granulated or golden caster
For the cheesecake filling
900g Philadelphia cheese, or other full-fat soft cheese
250g golden caster sugar
3 tbsp plain flour
1 ½ tsp vanilla extract
finely grated zest of 1 lemon (about 2 tsp)
1 ½ tsp lemon juice
3 large eggs, plus 1 yolk
284ml carton soured cream
For the soured cream topping
142ml carton soured cream
1 tbsp golden caster sugar
2 tsp lemon juice

Method
STEP 1
Position an oven shelf in the middle of the oven. Heat the oven to 180C/ 160C fan/ gas 4.
STEP 2
Line the base of a 23cm springform cake tin by putting a square piece of parchment paper or foil on top of the tin base and then clipping the side on so the paper or foil is trapped and any excess sticks out of the bottom.
STEP 3
For the crust, melt 85g butter in a medium pan. Stir in 140g digestive biscuit crumbs and 1 tbsp golden caster or granulated sugar so the mixture is evenly moistened.
STEP 4
Press the mixture into the bottom of the pan and bake for 10 minutes. Cool on a wire rack while preparing the filling.
STEP 5
For the filling, increase the oven temperature to fan 220C/ 200C fan/ gas 7. In a table top mixer fitted with the paddle attachment, beat 900g full-fat soft cheese at medium-low speed until creamy, about 2 minutes.
STEP 6
With the mixer on low, gradually add 250g golden caster sugar, then 3 tbsp plain flour and a pinch of salt, scraping down the sides of the bowl and the paddle twice.
STEP 7
Swap the paddle attachment for the whisk. Continue by adding 1½ tsp vanilla extract, 2 tsp lemon zest and 1½ tsp lemon juice. Whisk in 3 large eggs and 1 yolk, one at a time, scraping the bowl and whisk at least twice.
STEP 8
Stir a 284ml carton of soured cream until smooth, then measure 200ml (just over ¾ of the carton). Continue on low speed as you add the measured soured cream (reserve the rest). Whisk to blend, but don't over-beat. The batter should be smooth, light and somewhat airy.
STEP 9
Brush the sides of the springform tin with melted butter and put on a baking sheet. Pour in the filling - if there are any lumps, sink them using a knife - the top should be as smooth as possible. Bake for 10 minutes.
STEP 10
Reduce oven temperature to 110C/ 90C fan/ gas ¼ and bake for 45 minutes more. If you gently shake the tin, the filling should have a slight wobble.
STEP 11
Turn off the oven and open the oven door for a cheesecake that's creamy in the centre, or leave it closed if you prefer a drier texture. Let cool in the oven for 2 hours. The cheesecake may get a slight crack on top as it cools.
STEP 12
Combine the reserved soured cream with a 142ml carton soured cream, 1 tbsp golden caster sugar and 2 tsp lemon juice for the topping. Spread over the cheesecake right to the edges. Cover loosely with foil and refrigerate for at least 8 hours or overnight.
STEP 13
Run a round-bladed knife around the sides of the tin to loosen any stuck edges. Unlock the side, slide the cheesecake off the bottom of the tin onto a plate, then slide the parchment paper out from underneath.

RECIPE TIPS
MIXING THE INGREDIENTS The way you blend the ingredients is crucial: under-beating can lead to a lumpy mixture, over-beating can whip in too much air. This can result in uneven cooking, bubbles, and cracking.
KEEP EVERYTHING AT ROOM TEMPERATURE Keep everything at room temperature. To avoid lumps and ensure even mixing without over-beating, it is essential to have the soft cheese at room temperature before starting. Ideally, let it come to room temperature in its pack for 2 hours. If you're short of time, cut the soft cheese into chunks and leave to soften for 1 hour. It also helps to have a table top mixer with a powerful motor. But if you don't have one, a hand-held mixer works fine.
New York-Style Cheesecake
New York-style cheesecake is my husband Michael’s favourited dessert. In fact, the first time I met my future mother-in-law almost 20 years ago, she told me that the way to Michael’s heart was through his stomach, and that whenever she wanted him to do anything as a child, she bribed him with a slice of cheesecake. A traditional lady she may be, but I got the message loud and clear: learn to make a good cheesecake!
I’ve shared several cheesecake recipes with you — an Italian-style ricotta cheesecake, a pumpkin cheesecake, cheesecake bars, and even Baileys cheesecake marbled brownies – but never an authentic New York-style cheesecake.
My Recipe Videos
Breakfast Burritos
Breakfast Burritos
Volume 0%
Truth be told, New York’s take on cheesecake can be a little intimidating to make. Though the ingredients are simple, you have to worry about the water bath leaking into the cake, the surface cracking, and over or under-cooking. But after baking umpteen cheesecakes over the years (for birthdays and such, not bribery!), I’ve found that with the right recipe and a few pointers, a creamy, crack-free New York-style cheesecake is totally doable, even for beginners
WHAT YOU’LL NEED TO MAKE NEW YORK-STYLE CHEESECAKE
Before we get to the recipe, you’ll need a nine or ten-inch springform pan and 18-inch heavy-duty aluminium foil. The springform pan features sides that can be removed from the base, so you can release the cheesecake easily without having to flip the whole pan over (this would be a disaster with a cheesecake!).
2 notes
·
View notes
Text
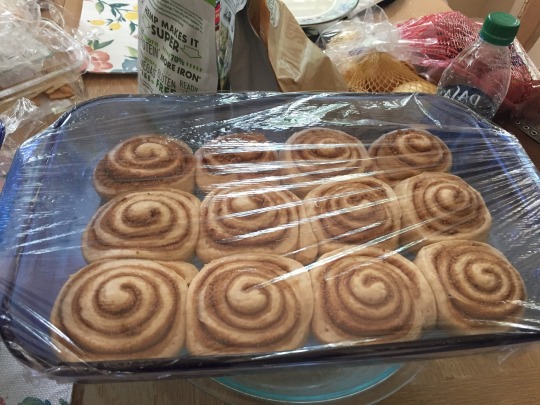
Sourdough Cinnamon Buns
This recipe does use commercial yeast because I’m always terrified that my starter won’t be active enough, so I usually add the ½ teaspoon yeast. Sometimes I just want to feed my starter right out of the fridge, wait 9 hours, and use it; This recipe works perfectly for that. If your starter doubles or triples 6-8 hours after fed, you shouldn’t need to add any yeast; you’ll just prove for a little longer.
Ingredients
Dough
1 cup (227g) ripe (fed) sourdough starter
3/4 cup (170g) lukewarm milk (I’ve used even 1% and it’s still fine)
1 large egg
4 tablespoons (57g) butter, softened
2 3/4 cups (326g) All-Purpose Flour
1/2 cup (57g) whole wheat flour (if you don’t have, you can just add another 1/2 cup of all-purpose)
1/4 cup (50g) granulated sugar
1 1/2 teaspoons salt
1/2 teaspoon instant yeast, optional
Filling
3/4 cup (159g) brown sugar, packed
1/4 cup (28g) all-purpose flour
1 tablespoon cinnamon
1/8 teaspoon salt
1 tablespoon (14g) butter, melted
Icing
3/4 cup (85g) confectioners' sugar
1/3 cup whipped creamed cheese
pinch of salt
1 1/2 tablespoons (21g) butter, melted
1/2 teaspoon vanilla extract
1 to 2 tablespoons (14g to 28g) milk or cream
Instructions
Mix together all the dough ingredients except the salt and (optional) yeast until the dough has formed a cohesive, sticky mass, 2 to 3 minutes on low speed of a stand mixer.
Add the salt (and yeast) on top of the dough (without mixing it in), then cover and let the dough rest for 20 minutes (autolyse).
After the autolyse, mix in the salt (and yeast) until fully incorporated, about 1 minute on low speed. Turn the mixer up one speed and knead the dough until it’s smooth and supple though still somewhat soft and tacky, about 2 to 3 minutes.
Cover the dough and let it rest in a warm (75°F) place for 3 hours if the yeast was added, 4 hours if not. To develop strength in the dough, stretch and fold it in the bowl three to four times during the rest. I stretch and fold the dough four times per “stretch-and-fold,” once on each side of the dough. You can be fairly flexible in your timing of these. With yeast would be every 45 minutes, without yeast would be one per hour. The goal is to end up with a strong dough with good elasticity.
Mix the filling: At some point before the end of the first prove, combine all the filling ingredients in a medium bowl. It’s not going to seem very wet and that’s okay.
Turn the dough out onto a lightly butter-and-floured work surface and gently pat it out to deflate it, going for a vaguely rectangular shape. Pat it or roll it out into a rectangular that is roughly 18-20 inches long and 10-12 inches wide.
Spread the filling evenly over the surface of the dough, leaving half an inch exposed along one short edge. You can pat in the filling a bit so it doesn’t move as much when you roll.
Starting with the filling-coated short edge, roll the dough into a log. It will become wider as you do so. If parts of the log are thicker than others, you can squeeze it slightly in those places and even it out.
Cut the log into twelve 1-1.5 inch slices and place the slides in a lightly greased 9 x 13 pan. I do this by placing my kitchen scissors above the log and snipping it. Even if I had knives sharp enough, or a string, I would probably still do this with kitchen scissors.
Cover the pan and let the buns rise for another 2.5 hours before baking. If no yeast was added, prove them 3-4 hours. They will be puffy and the middle of the buns will puff up at least a bit. You can refer to the photos on my post.
Bake in a preheated 400 F oven for 18-22, until golden. The middle rack for me cooks the tops too fast, so I go one below. Don’t worry if the tops get a little dark; they soften right up after icing and cooling a bit.
Make the icing while the buns bake by stirring all the ingredients together until smooth. Add the milk or cream by bits to get your preferred consistency, and know that the heat of the buns is going to make it more runny so it’s okay if it’s stiff.
Ice the buns after 5 to 10 minutes of cooling.
To refrigerate overnight then bake: Put covered buns in the fridge after 1.5 hours of the second prove if yeasted, 2-3 hours if unyeasted. Up to 24 hours later, take the buns out and leave them covered at room temperature while you preheat the oven to 400. Bake for 20-25 minutes, until golden. Remove, wait 5 to 10 minutes, ice.
Since there’s cream cheese in the icing, they’ll need to be refrigerated at the end of whatever day you make them on. 20-25 seconds in the microwave and they’re even better than when they were first baked.

1 note
·
View note
Last Seen Blogs

bowlingotter
The Bowlingotter Show

inbloom65
amore

nautical3383
*Symbiosis*

clipper777
Sans titre

miraculousdoodlesandsuch
Welcome To My Miraculous Blog