#asacoco
Video
youtube
Bijou's reaction when she saw the Tail, Plug Type Asacoco 【Hololive EN /...
4 notes
·
View notes
Photo
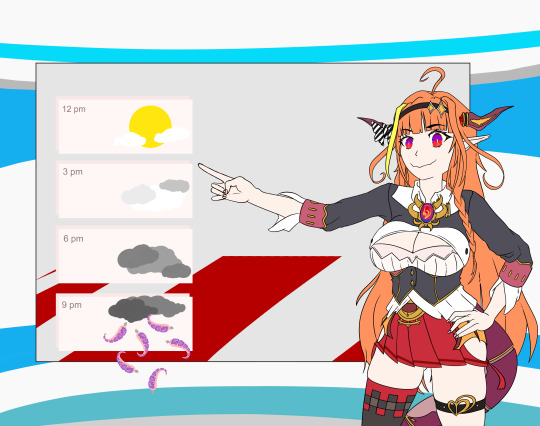
Good morning weather hackers, tonight is cloudy with a chance of asacoco.
10 notes
·
View notes
Text
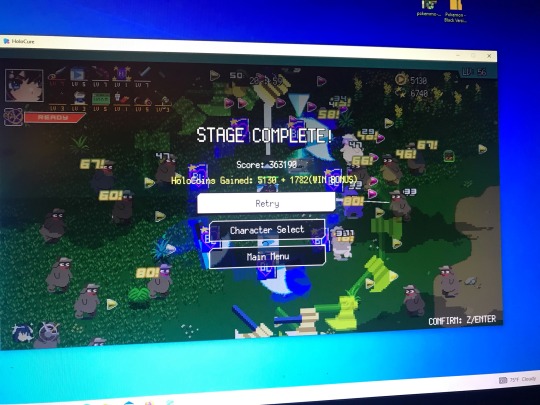
Peep the absolutely meaty clear on kroni
#for context for the critically unaware oomfies a normal run in like maybe 3k#a meaty 4k with a good supachat#I went fuckign OFF#also sorry for shitty quality#for reasons I can’t screenshot#asacoco addicts anonymous
0 notes
Text
Made a Fauna run in Holocure and I made her too powerful... like goddamn she healed too much. after the 20min boss I went AFK for 5 minutes and she was still full life. It took two minutes for the YAGOO to kill me, and I had to go out of my way and run toward them so my healing would lower and they could damage me fast enough.

I didn't even get all the collabs I wanted, just the holosheep supercollab. But Asacoco + Gorilla grip + bellpepper gave me a hefty amount of damage, and I had so much HP + healing to be killed in a reasonable manner. And since fauna deal damage on heal, yeah I guess that worked.
18 notes
·
View notes
Text
asamoco will never be as good as asacoco she didnt even say motherfuckers
4 notes
·
View notes
Text
HoloCure tips~
Since it's not like I'm doing much else, here's my tips and tricks for playing HoloCure! Now, a lot of this is basically just how I play, but it works well enough for me, so it should work well enough for at least some of you!
First off, this is the first thing I always do when I get into a game...
Focus on upgrading your character's attack, first off. The only exceptions I have to this are if you see the Study Glasses or the Limiter, grab those. They are a HUGE help, and the earlier you get them, especially concerning the glasses, the better. It's very useful for maximizing the amount of EXP you get, and how much you can collect, which will help you level up, which will help you get abilities and weapons that'll help you survive.
As for the weapons, here's my hint on that...
Go with your character's strengths.
If you pick someone like, for instance, Sana, who has a close range attack, you will probably want to choose weapons that will go well with it, to maximize the damage it does, rather than splitting the damage across ranged and close range attacks. Ranged attacks can come later, but first you wanna make sure that any enemy who comes close will die. Spider Cooking is a good choice, for example.
If you pick someone like Mumei, you're going to want a weapon that can hit from a distance to help compliment her feathers. So stuff like the Plug-In Asacoco.
There is one exception I will say to this, and that is the BL Book. This is a very handy weapon no matter what. Especially if you also get the Psycho Axe and upgrade it to the BL Fujoshi. I will say that the Frozen Sea is not quite as powerful, but it is still definitely a powerful weapon, and the slowing effect can be handy, but from my experience, it doesn't do as much damage as the Fujoshi.
When it comes to abilities, I'd say to go with what sounds good to you. I have already talked about the Study Glasses and the Limiter, but there's also stuff like the Credit Card, which combos well with Blacksmith's Gear.
There's also Super Chatto Time, which can combo well with Membership or the Greed Stamp.
Basically, look for good combinations of items. I would say to try to leave at least one item slot free for most of the round, just in case the game decides to drop you one of the super powerful and rare items.
That's pretty much my tips and tricks. Maybe some of it is just common sense, who knows?
4 notes
·
View notes
Text
HoloCure Item Guide
NOTE: This guide was written for 0.3.1656470021. Most items had ther effects tweaked or replaced in the 0.4 update, so this item guide is currently incomplete and inaccurate.
I still have HoloCure on the brain, so I wanted to write more advice for anyone looking for HoloCure advice on Tumblr. Having covered all eleven characters currently in the game, I figured I could either make an item guide or a weapon guide. I covered weapons more extensively than items in my character guides, for reasons I’ll get to momentarily, and I’ve talked about weapon choice a bit in my post bitching about weapon collabs, so…items it is.
The thing about items is, for the most part you’ll be fine whatever you grab. Most characters have a couple items they should try to grab (the big examples being Sana/Knightly Milk and Kronii/Body Pillow), but aside from that you shouldn’t worry too much. Like, yeah, some sets of items are gonna do better than others, but don’t sweat it if you wanted Injection Asacoco but could only get the mask or something.
Anyways, I’ve divided the items into half a dozen simple categories. They’re kinda arbitrary (like, does separating healing items from defense items make sense when they’re both meant to keep you from dying?), but the divisions make sense to me and should help me discuss the points I think they share in common. I’ll start with…
Healing
The Healing items are Full Meal, Nurse’s Horn (formerly Succubus’s Horn), and Uber Sheep. Now, Fauna excepted, there’s a limit to how much healing a character can use (generally 100% HP), so you usually don’t need more than one of these. And the more upgrades you’ve unlocked, the more experienced you are with the game, the less you need that one. But early on—before you have HP and regeneration upgrades, when you’re still getting used to strafing—you could really use a horn.
And ideally, your one healing item would be the Nurse’s Horn. It heals a bit of HP every time you defeat an enemy, and if everything comes together, you’re going to be killing a lot of enemies, especially when there are lots of enemies around (which if when you probably need healing the most). The Nurse’s Horn is a contender for strongest HoloCure item, period, and it’s certainly the best healing item.
That said, Uber Sheep is also fine. It makes food drop more often, both from enemies and from the sky. While it still drops less often than the Nurse Horn procs, each burger heals more than the Nurse Horn. Also, if you’re good at saving burgers when you’re healthy and finding them when you’re desperate, you can “store” food drops in a way you can’t with Nurse Horn procs. It’s not optimal, but it works.
The Full Meal, on the other hand, is no substitute for sheep or horns. It doubles all healing (except upgrade-shop regeneration), which…is not as helpful as it sounds. If you don’t have a Nurse’s Horn or a healing skill, it makes food heal 40% of your HP instead of 20%, which only matters if you’re below 80% and only really matters around 60-70%. If you’re getting that low on health regularly enough for that to be worth an item slot, something is probably going wrong.
Meanwhile, if you do have healing skills or a Nurse’s Horn, you’re not going to be very low on HP for very long, and the Full Meal will do even less (since all healing is 0 if you’re at 100%). I usually even don’t bother to upgrade Nurse’s Horns once I get them—5%/proc is enough for most situations—so I definitely don’t think doubling its healing is worth a slot. Sure, you’ll bounce back from Big Problems faster, which might help you if you encounter Big Problems often enough, but…
The only real use I’ve found for the Full Meal is alongside Injection-Type Asacoco and (of course) the Nurse’s Horn. ITA keeps your HP low enough that boosting the horn heals from 10% to 20% of your maximum HP is significant—it made the difference between struggling to reach a quarter health and hovering around 80-90%. There might also be some use with mildly cheesy strats that don’t need items—the Full Meal is the only item that doesn’t upgrade, which means it won’t clog up level-up options with unwanted upgrades. But aside from that? It’s useless.
All healing items are unlocked by default.
Defense:
The Defense items are Body Pillow, Headphones, and Plushie. Each protects you in a different way, with different strengths, weaknesses, and synergies.
The Body Pillow is, I think, the most broadly-useful. It provides a regenerating shield, like a second HP pool that is restored every fifteen seconds. In general, this is most useful for helping you endure attrition, taking small damage every so often (due to, say, mistakes) without access to healing, but isn’t as useful when you’re being overwhelmed.
Where the Pillow really shines, though, is protecting buffs. Many positive effects, from Sake’s crit boost to Perfection’s everything boost, can be lost from one enemy slipping past your cloud of particle effects and bumping into you. Losing Body Pillow shield does not count as damage for those purposes.
There’s one specific interaction I’d like to bring up here. It seems like the Pillow should synergize with Injection-Type Asacoco, giving you a buffer to protect your low HP. Instead, the Asacoco depletes your shield first. This isn’t nothing—the shield regenerates automatically, each time giving your HP a chance to recover—but to me, it seems less than the sum of its parts. Yet somehow I keep ending up with both of them at the same time (because they’re darn good parts).
Regardless, keep in mind what the Body Pillow protects you from. It will make your margins for error much more forgiving, especially when you have limited access to healing, but it will protect you only a little from big individual errors. Don’t rely on the Body Pillow for that.
By contrast, the Plushie is something you absolutely shouldn’t rely on, but it can serve as a get-out-of-sh*t-free card for an error of any size. It gives you a fraction of a second of invulnerability whenever you’re hit, at the cost of several seconds of reduces Attack and Speed.
If it was a smaller fraction of a second but no penalty, or if it penalized different stats, I could recommend this as a straightforward alternative or complement to the Body Pillow. But it penalizes the two stats you’ll need most to get out of a hairy situation. I’m not sure what situation this is for, or what character would run into it often enough for this to be worth a slot.
(Note that if you have both the Plushie and the Body Pillow, the Plushie won’t activate until your shield is depleted. I don’t know how this works with damage-negating effects like Headphones or Gura’s Short Height, but going only after those failed would make sense, right?)
Finally, Headphones. I’d say they’re about equally useful for preventing attrition and surviving big mistakes. When hit, they give you a chance of negating the damage and knocking all nearby enemies back. On one hand, this means you take less incidental damage; on the other hand, it also makes it easier to escape a crowd of enemies you stumbled into. It’s a well-rounded defensive option that I recommend for any character that doesn’t already have enough defense/healing items.
And that’s something you need to keep in mind! Not dying is an important part of victory, but it’s only one part. You need to defeat enemies—partly to reduce the pressure they’re putting on your defenses, but mostly to gather XP and other resources so you can keep getting stronger as the challenges grow. If you put too many resources (in terms of both item slots and level-ups) into defense, you won’t have the offense to keep up. The only perfect defense in HoloCure is an overwhelming offense (plus Nurse Horns).
Headphones and the Body Pillow are unlocked by default. The Plushie can be unlocked by surviving ten minutes as Hakos Baelz.
“Power for a Price”
The Face Mask, Gorilla’s Paw, and Injection-Type Asacoco work in more or less the same way: They give you a 30% damage bonus (which you can increase by leveling the item up), but also come with some kind of drawback.
The Face Mask is unlocked by default, the Gorilla’s Paw requires you to beat Smol Ame (the second and last “real” boss), and Injection-Type Asacoco requires you to beat Smol Ame in Stage Mode while equipped with Plug-Type or Breathe-In Asacoco.
The Face Mask is the simplest by far. You deal more damage, but also take more damage. The extra damage usually doesn’t matter much, especially if you don’t take the Mask until after grabbing your defense/healing item(s) and a few weapons, but it slims your margins for error by about a third.
Injection-Type Asacoco is another matter. It deals constant damage (without disabling “X time without taking damage” buffs, such as Sake or Phoenix Shield), but in exchange you get a big damage boost. In fact, ITA’s damage boost rises above that offered by other “Power for a Price” items—it goes up to 40/50% instead of the other items’ 35/40%. But obviously, being reduced to 1 HP is a big price!
It’s extremely powerful in the right build—unsurprisingly, one with a lot of healing. It’s great on Fauna or IryS, but not until after they pick up healing skills and ideally the Nurse’s Horn. But anyone can use it, if they have the Nurse’s Horn and are willing to (again) whittle away their margins for error.
I’ve been bringing up these “margins for error” (and “errors” in general) a lot, because I think this “error” lens is a good way of explaining what various items do for you. Defensive items let you make bigger errors without dying, while the Face Mask and ITA kill you for smaller errors. The Body Pillow lets you ignore minor errors, but doesn’t help when you’ve made a big mistake. Et cetera. And now that I’ve mostly finished the items that directly change how easy it is to die, I won’t be referencing that concept much again.
Anyways, the last “Power for a Price” item is the Gorilla’s Paw. (I don’t know who cut off Kanata’s hand, but they’d better watch out for Friend C.) It boosts base damage, at the cost of making your crit rate effectively zero (unless you invest way too many resources into bringing it back up to, like, 2%). Obviously, if you’re not interested in crits, this is basically free damage; equally obviously, if you need crits, you should stay the f&$* away.
Which brings us to the question of which characters care about crits. For this purpose, I divide characters into three categories: Crit-Hungry, Crit-Friendly, and Crit-Agnostic.
Crit-Hungry characters have skills which require a good crit rate to be effective. In order of ascending crit-hunger (by my estimates), we have IryS (who heals a bit on crits and maintains a buff by healing), Kronii (who needs to crit with her clock hands once every five seconds to maintain max Kroniicopter), and Hakos Baelz (whose CRATical Hits can deal ridiculous damage, but won’t deal much at all if they only happen 2-3% of the time). Giving any of these characters the Gorilla’s Paw would be an obvious error.
Crit-Friendly characters don’t need crits, but their innate skills boost critical hits. In ascending order of crit-friendliness, we have Calli (small bonus from the Rapper, plus a scythe-crit damage bonus during The Reaper), Kiara (Dancer bonus), and of course Ame (Detective Eye). The Gorilla’s Paw won’t cripple them, but losing critical hits will weaken them.
Finally, we have the Crit-Agnostic characters—Ina, Sana, Fauna, Gura, and Mumei. They have low base crit rates (except Mumei, who’s average), nothing that boosts them, and no special reason to care about the occasional 25% damage boost. For them, the Gorilla’s Paw is practically a straight damage boost.
Now, if only one item affected critical hit rates, it wouldn’t be worth breaking down characters by crit-friendliness. But the next category is…
Crit Rate Items
The Sake and Piki Piki Piman both increase your critical hit rate by 10-20% under certain circumstances. Unsurprisingly, these similar items should be considered under similar circumstances.
Crit-Agnostic characters shouldn’t reject crit rate items, unless they already picked up a Gorilla’s Paw, but it’s probably best not to seek them out. Keep your options for a cheap damage boost open, neh? A conditional 10-20% chance to deal +25% damage isn’t worth that much.
Crit-Hungry characters should consider whether their hunger has been sated. Baelz’s is a bottomless well of crit-hunger, but if Kronii gets one clock crit every ~4 seconds and IRyS is getting consistent heals, they don’t really need more crits. At that point, they’re more like Crit-Friendly characters.
Crit-Friendly characters don’t need to worry about saving themselves for a gorilla, but it’s worth asking how much they’d actually get from a crit boost. (This is, of course, going to depend on their current crit rate.) Remember, critical hits deal a lot less damage than you’d expect from the name, and neither of these items give constant crit bonuses.
That leaves the question of which beverage is best.
The condition for Sake is simple—don’t take damage for ten seconds. That’s something you probably want to do anyways. You’ll want to pick up a Body Pillow so you can make small mistakes without losing the buff, but other than that…play normally. It’s a good pick. (Note that damage from ITA doesn’t count as being hit.)
I’m not sure what’s up with the Piki Piki Piman, though. It provides its buff if you’ve been hit in the past ten seconds. It counts if you’re using a Body Pillow and you don’t take damage, so that’s good. I don’t know how it interacts with Headphones or other effects which “negate hits”.
I’ve never picked up the PPP—I try to avoid enemies. (I know I screw up, but I don’t think I do that every ten seconds). Maybe it’s worthwhile as a second crit booster if you have both Sake and the Body Pillow? Or just grab both items to make sure you always have one crit booster? I dunno, I’ve never tried it.
Both are unlocked by default.
Resource Boosters
These items don’t make you better at fighting enemies (directly), but instead give you more when you do. They range from helping you get stronger faster to being an in-run resource drain that basically only helps between runs.
Study Glasses are the first. They provide a bonus to XP earned—10%-30%, depending on level. Note that the Study Glasses have five levels, more than most items—you need to invest a significant chunk of XP to get the most out of these. But if you can snag glasses early in the run, you’ll more than make up the difference by the time things get tricky.
Obviously, you shouldn’t grab these glasses if you get them near the end of the game. But how late is too late? If you know the level you expect to be at the end of the game, you can roughly estimate. Figure out how many levels you expect to gain by then, and ask yourself how many extra levels you’d expect to get from an XP boost. Keep in mind that each level costs more XP than the one before it, so you shouldn’t expect more than a…I dunno, let’s say 15-20% bonus to levels earned? (I can’t find any information about how much the level-up cost increases per level, so I’m guessing.) If you expect to gain at least 25-30 levels, you’ll probably gain more bonus levels than you spent on your glasses.
If you do pick up the glasses, you’ll obviously want to upgrade them ASAP. Unless another build-critical item pops up (priorities), or you’re struggling and need to upgrade something else (in which case the glasses were probably a mistake).
The Credit Card is still mostly an in-run item, but its upgrades focus on the meta-currency angle. It increases anvil frequency by 20%, which can be thought of as a level where you can choose to upgrade any item or weapon you already have. This is obviously a handy thing to get more often! I’m not sure how handy, since nobody outside the dev team seems to know how often anvils drop.
The main benefit—and the only thing that improves by leveling up your card—is reducing the HoloCoin cost of enhancing max-level weapons. I have never touched that mechanic, but it’s probably useful for people who enhance everything to max level before dying or are less perceived-waste-averse than me. (It’s not hard.) But it seems like you’d need to work to spend more HoloCoins on anvils than you’d gain from drops, so this is mostly helpful for increasing your final HoloCoin profit.
Super Chatto Time is all about HoloCoin profit. It increases the drop rate of HoloCoins from defeated enemies. If you’re confident that you can win with one hand tied behind your back, or want to go really wild with enhancing max-level weapons, feel free. I feel like just saying it boosts meta-currency earned should tell you whether you want to grab this item or not.
All three of these need to be unlocked! You need to find an anvil (and end the run) to unlock the Credit Card, reach level 50 in a single run to unlock the Study Glasses, and end a run with 5,000 HoloCoins (including ones you held before the run) to unlock Super Chatto Time.
The easiest way to unlock akasupa time is to refund 5,000 HoloCoins of upgrades and run into shrimps until they somehow kill you. To unlock Study Glasses, invest in XP upgrades, survive, and maybe try Endless Mode. To unlock the Credit Card…I dunno, anvils are luck-based. Try praying to RNGsus.
Miscellaneous
The inevitable breakdown of any categorization system.
Knightly Milk is the very definition of a build-defining item. It increases the attack area of area-type attacks, and boosts Pickup Range a little. If you’re using lots of area-type weapons, it’s obviously a great pick! If you’re not, it’s almost useless.
It’s hard not to have some area weapons—most weapons are! (80% of Basic Weapons, 45% of Character Weapons, 60% of Collab Weapons, and a handful of skills and specials—assuming the wiki hasn’t missed anything.) But boosting the area of just a few weapons isn’t that impressive. If you grab Knightly Milk, you’ll want as many area weapons as possible. It’s just possible to have only area collab weapons (BL Fujoshi, Elite Cooking, Flattening Board, Idol Concert), which is probably ideal for a Knightly Milk build.
Knightly Milk is godly for Sana (who also gets a damage boost from it, and wants to use lots of area weapons anyways), and pretty good for Calli and Gura (who have some key area-type weapons and skills—and in Calli’s case, can’t outgrow her own skills with the Milk). I like the area-type weapons, so I like Knightly Milk. But if you prefer Breathe-In Asacoco and Light Beams and characters with no area abilities, it won’t be a good choice.
Idol Costume is a bit less variable, but it’s still character-dependent. It simply decreases the cooldown time for your Super Attack. On characters with great super attacks, like Ina or Baelz, it’s really good! On characters with redundant (Calli*), actively harmful (Mumei), or otherwise disappointing specials, it’s not worth the item slot.
*For like the middle half of the game, the only weapons Calli can’t kill with one swing of her scythe are bosses, and even after that it rarely takes more than two.
Finally, the Energy Drink. It increases your Speed—that is, your movement speed—while decreasing your maximum HP. Running faster can make it easier to avoid danger, even if you don’t notice the danger until the last second, but lowered HP obviously makes danger more dangerous. I’d say it’s a net positive, but not everyone wants to spend a slot on this specific positive.
Knightly Milk is unlocked by default. Idol Costume is unlocked by using a special attack (and then ending the run). Energy Drink is unlocked by surviving ten minutes as Calliope.
…that’s all, folks! Hopefully this is a helpful guide and not a time-wasting one!
4 notes
·
View notes
Note
Catch
*launches a plug type Asacoco at Alma using a portal with the same speed as it is in the Holocure game*

4 notes
·
View notes
Photo

@Und40889121
220 notes
·
View notes
Text

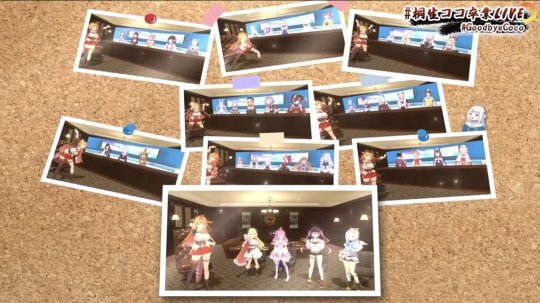
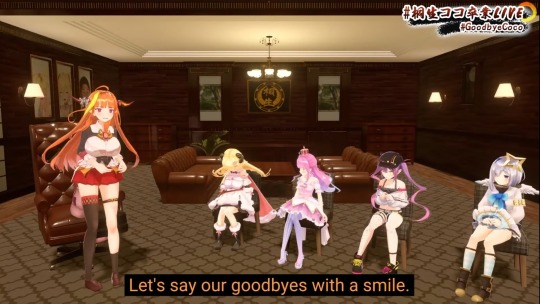


"Let's say our goodbyes with a smile."
She made her final bow. The music stopped. The stage went dark. I managed to see Kaichou off with a smile on my face.
My friends and I went out for breakfast. I drove them home, then went home to clean up. I rewatched parts of the stream to post.
"Are you really not gonna be around from tomorrow?" (Towa)
Kaichou...I know you said to stay positive and not to cry, but I had to disobey that order, just for a bit.
I may not have tuned into every one of your streams, but I knew you were special. Time and time again, you pushed boundaries, smashed through borders, and rewrote the rules. You changed the vtuber game forever, and you will never be forgotten for it.
"Live strong, you guys."
Kaichou told the other Holomems and all of her Tatsunoko to live strong, to never change, and to continue to shine. She would want to see her friends continue to flourish, and her fans to continue to support them.
Kaichou, it's lonely without you and your streams. We miss you so much. It hurts, like there's a gaping hole in our hearts that you left unplugged.
Even so...
In time, we're gonna plug that hole up with many, many new fun and happy memories, so that you will never have to feel regret about your decision, and so that you can continue to shine bright wherever you go next!
Kaichou, we're going to be okay.
Thank you for everything, and congratulations on your graduation!
KIRYU-KAI FOREVER
o7
#桐生ココ卒業live#桐生会forever#goodbyecoco#kiryu coco#tatsunoko#kondragon#weather hackers#kiseki knot#hololive#vtuber#kiryu coco graduation live#kiryukai forever#asacoco
110 notes
·
View notes
Photo

Coco Kaichou~
#kiryu coco#hololive#vtuber#digital art#Illustration#dragon girl#hololive fanart#kiryu coco fanart#asacoco
141 notes
·
View notes
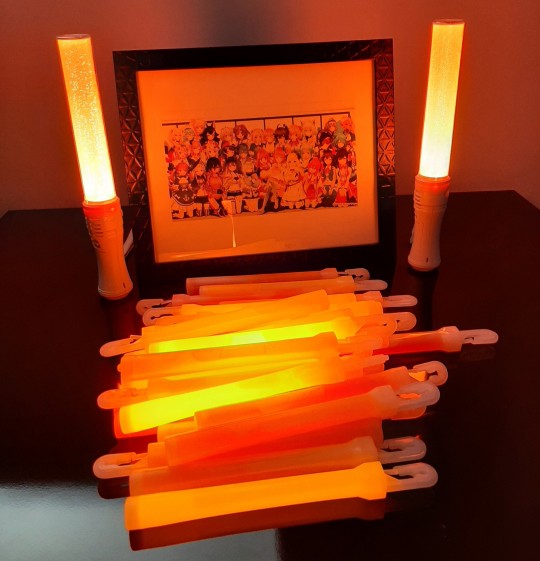
Photo
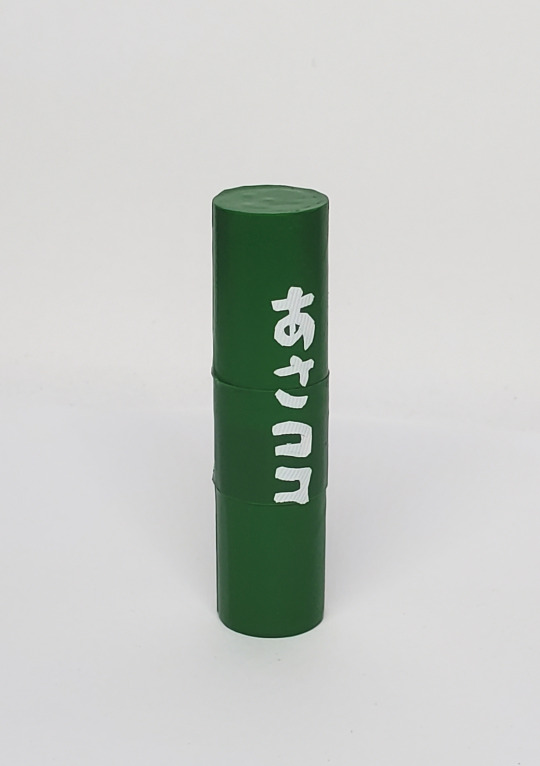
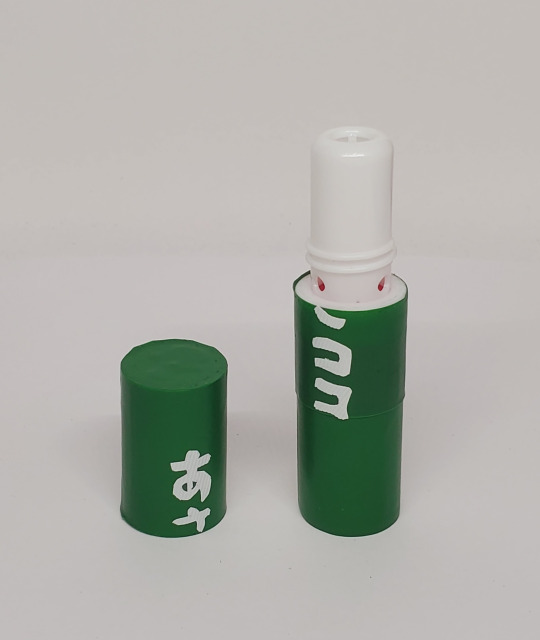
「Inhalation AsaCoco」
One day I made the appearance of aroma stick into AsaCoco Gas Tank.
It looks very cute and it can also suck!
#my post#my art#桐生ココ#KiryuCoco#みかじ絵#Kiryu Coco fanart#ホロライブ#hololive#virtual youtuber#kiryu coco#AsaCoco#あさココ#桐生会FOREVER
43 notes
·
View notes
Text
In light of the announcement of Coco Kiryu's graduation
What we as fans of Hololive should do is ensure her last few weeks go out with a bang. So I am gonna ask all the fans of Hololive to go to Coco's channel and subscribe to it if you haven't yet. Let's ensure she can reach a massive milestone before the day she goes. Spread this around to everyone you can so we can send Coco off with the giagantic bang she deserves to go out with.
#coco kiryu#kiryu coco#hololive#hololive gen 4#hololive en#hololive id#hololive en gen 0#yagoo#cover corp.#gawr gura#mori calliope#takanashi kiara#amelia watson#asacoco#akai haato#haachama
39 notes
·
View notes
Photo


A week ago, Kiryu Coco would stream for the very last time... (; - ;)
Digitally finished version of this sketch from a few months ago. Background inspired by her intro BGM.
#myart#GoodbyeCoco#kiryu coco#hololive#みかじ絵#桐生ココ卒業LIVE#artists on tumblr#vtuber#fanart#firealpaca#asacoco#coco kiryu#art#digital art#drawing#transparent#anime#waifu#yakuza#桐生ココ#たつのこ#illust#イラスト#manga#weather hackers#yagoo#REDALiCE#holoforce#hololive fanart#withmorebutter
45 notes
·
View notes
Text
Trying asacoco was a mistake.. now im addicted....
#4th gen girls are so chaotic and meme and cute!!#hololive#kiryu coco#asacoco#amane kanata#pptenshi#tsunomaki watame#himemori luna#tokoyami towa#meromero#ホロライブ#vtuber#virtual youtuber#pastel pink
289 notes
·
View notes
Last Seen Blogs

dontusedietpills
Untitled

good-morning-image-blog
Untitled

robdtsmith
tumblrob

instanttacowonderland
Без названия
dontusedietpills
Untitled