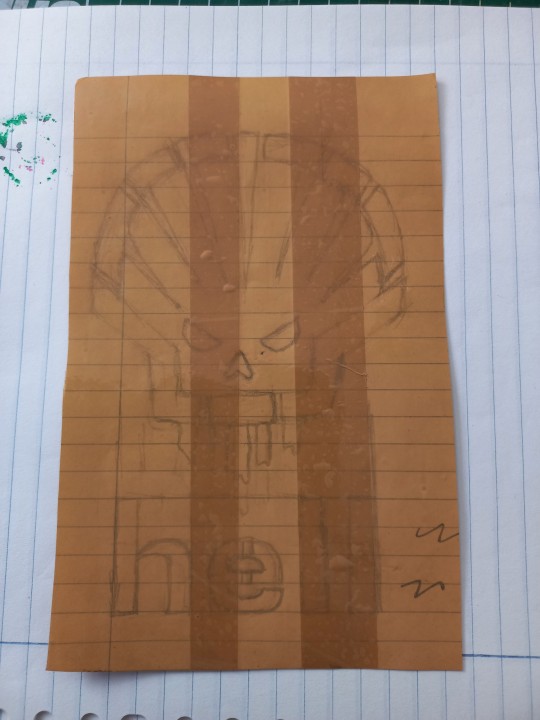
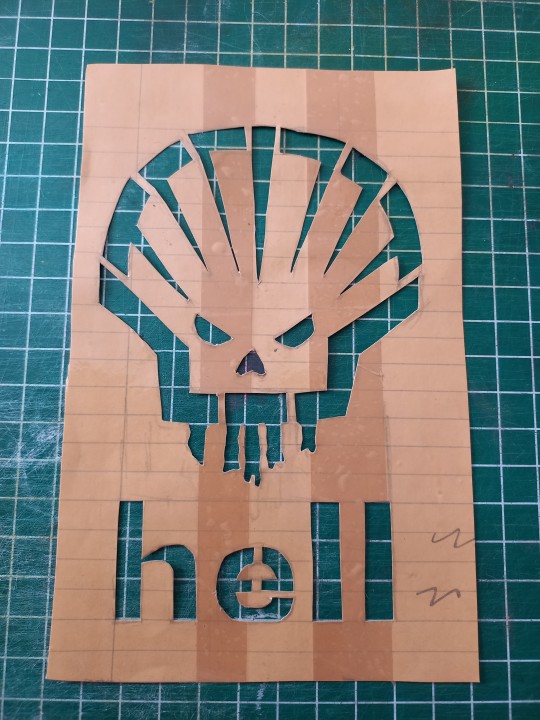
#punk patches
Text
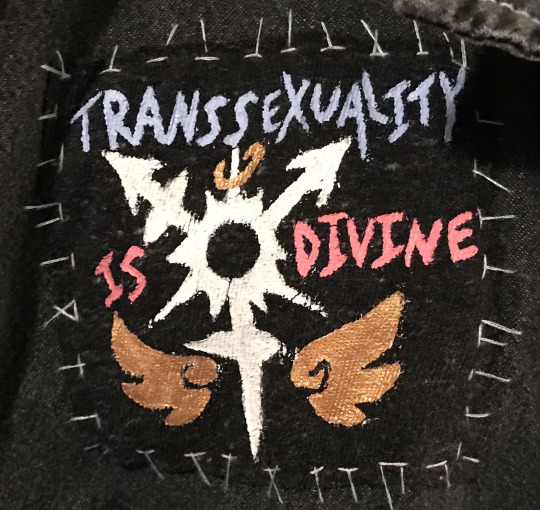
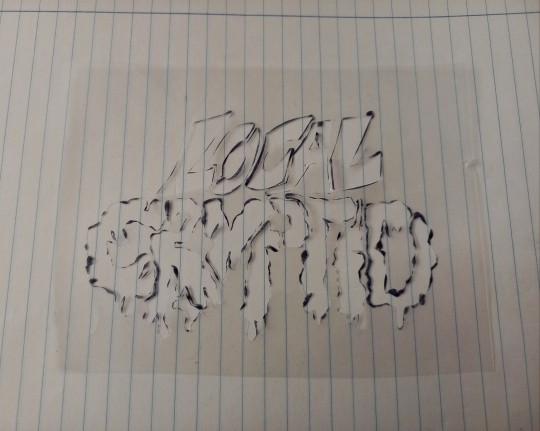
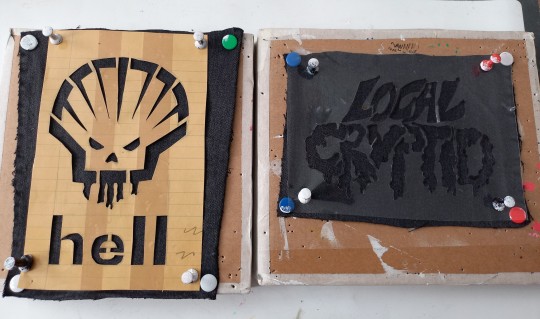
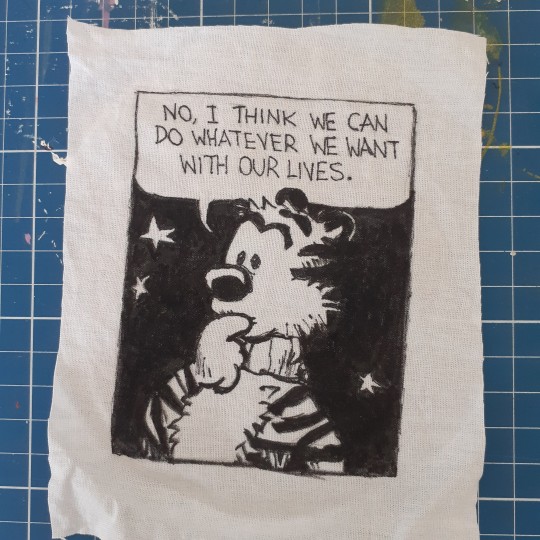
made some transsexuality patches for my jacket >:3
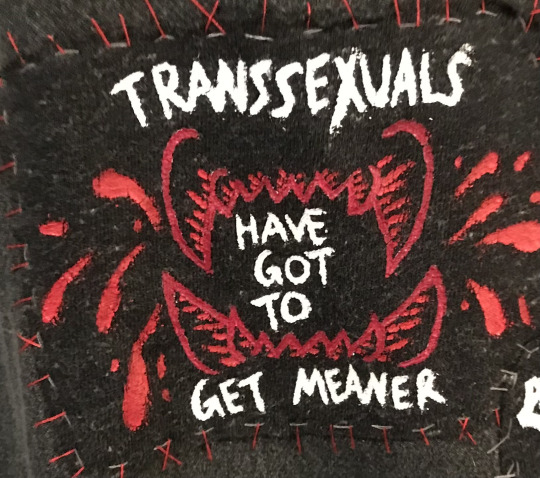
"transsexuals have got to get meaner" is a phrase I like from @sweatermuppet 's designs but I had an idea and wanted to make my own patch design based on it!!
and "transsexuality is divine" is a design/phrase I made myself inspired by sweatermuppet's transsexual designs as well!
#I might post my full jacket eventually but there's not many patches on it atm so I thought I'd just share my couple favourites :)#also lmk if the alt text is sufficient this is my first time trying to describe some images#my art#uh. I don't usually ever post irl art#what do I tag this as#sew on patch#transsexual#transgender#queer#queer art#punk#battle jacket#punk patches#diy punk
12K notes
·
View notes
Text
I'm seeing a lot of people say that punk fashion is expensive and inaccessible, which is very wrong. here is a list of some ways you can make punk fashion easier, cheaper and more accessible for you, since that's... kinda the whole point.
others are encouraged to add onto this!! (just don't recommend corporations like amazon. not cool.)
1. patches!! you don't need to buy them. DIY patches are not ugly or boring. in fact, they are encouraged here!! DIY, in my opinion, is always the best thing to do when it is an option and is safe to do so.
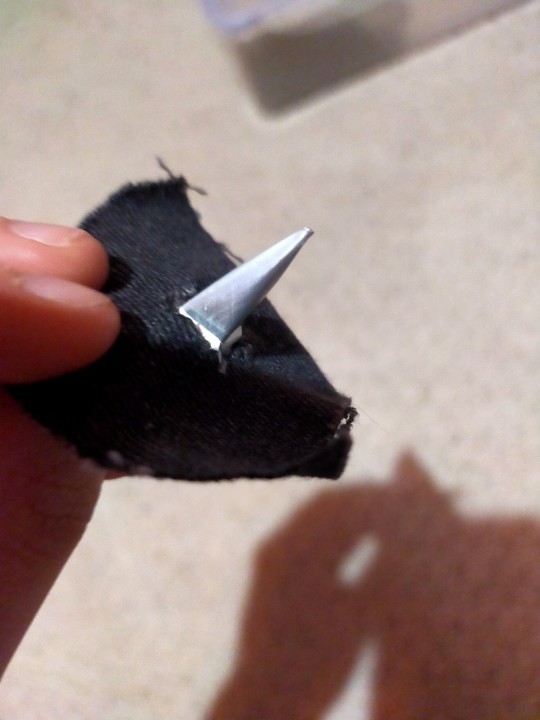
2. speaking of DIY, spikes!! you can make them!!
cut the top and bottom off of an empty can. cut down the middle of the cylinder and flatten it, so it's just a flat rectangle of metal.
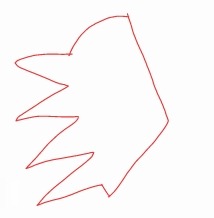
cut out a shape that is kind of a third of a circle, but around 3/4 of the curved edge is taken up by triangle shapes. (I'm not very good at describing, so here's a badly drawn picture)
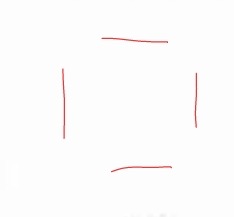
roll it into a cone, leaving the 4 triangles sticking out at the bottom. this bit is optional, but you can fill it with hot glue to make it more sturdy, just be careful touching the hot metal. I tend to hold the cone by one of the triangles with a bit of fabric wrapped around my fingers for this bit. cut 4 small holes in your fabric in this kind of shape:
and put the spiky bits of triangle through the holes. fold the triangles in on themselves to secure the spike in place. boom. spike obtained. this is one I made and attached to a little piece of fabric to test this method out:
3. battle vests!! (like the base jackets). the best places to buy these are charity shops and second hand websites in my opinion, but if anyone else knows any better options, please reblog with those!!
a good trick I find works well on eBay is to filter search results to your country (or state? can you do that in the US? idk) so that a: fast delivery because local, and b: all the sellers of everything that shows up are in YOUR TIME ZONE.
why is this important? when people sell something for really cheap, it goes FAST. check eBay at like, 2am or something. all the scalpers in your area are asleep. grab the cheap stuff while they can't.
4. sewing!! want patches, but can't sew for whatever reason? I've heard of a lot of people with joint conditions like arthritis complain about the inaccessibility of patch stuff, and that does sound extremely annoying, however:
safety pins!! while they are still a little fiddly, they're much less work so you don't have to fiddle about for long. if you can, you could even ask a friend to help, since it doesn't take long at all I'm sure someone will be willing to help out!! (I know I would, but that's just me, and I love this kind of thing). safety pins on clothes are also widely considered to be a symbol of solidarity, so if anything, you're adding some extra love and meaning to your patch pants/battle jacket.
if that's still too fiddly, fabric glue is always an option. unfortunately this means you won't be able to remove/reposition patches, at least without leaving a massive patch of residue, but if you're ok with that then fabric glue is probably your best bet.
for people who prefer sewing: as for where to get the thread, I've heard a lot of people recommending dental floss, as it's apparently much cheaper and works just as well. I haven't tried this myself so can't confirm that, but I thought I'd share it regardless.
5. where to get fabric!! old clothes. rip em up. you don't need any kind of fancy fabric from the craft store. my patches are made of old jeans that I grew out of.
don't have any old clothes and you don't want to waste any good ones? I'm not sure about other countries, but in the UK, as long as you're not on private property (trespassing), dumpster diving is perfectly legal.
I definitely ;) do NOT encourage ;) trespassing rich people's land ;) to steal from their dumpsters ;)
or tbh it doesn't matter too much how rich the person is, since it's all going to landfill anyway. if it's in the bin, it's free game, but you didn't hear that from me. ;)
please add onto this where you can!! and if I missed something or got anything wrong, add that on too!!
#diy punk#patch jacket#battle vest#patch vest#punk vest#diy patches#punk battle jacket#battle jacket#punk patches#patch pants
7K notes
·
View notes
Text
#punk#punk rock#punx#punk aesthetic#punk fashion#punk jacket#punk patches#punks#studded#patch jacket#diy patches#diy punk
1K notes
·
View notes
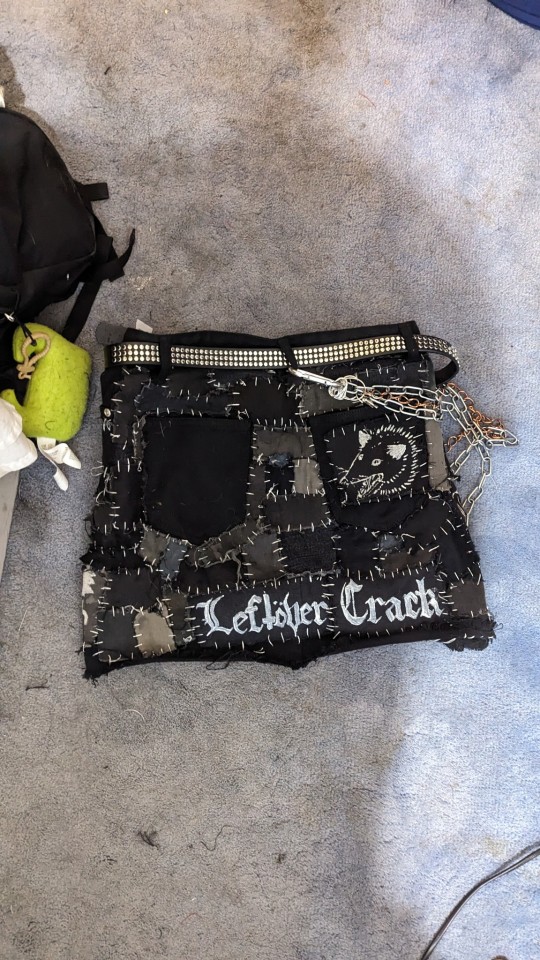
Text

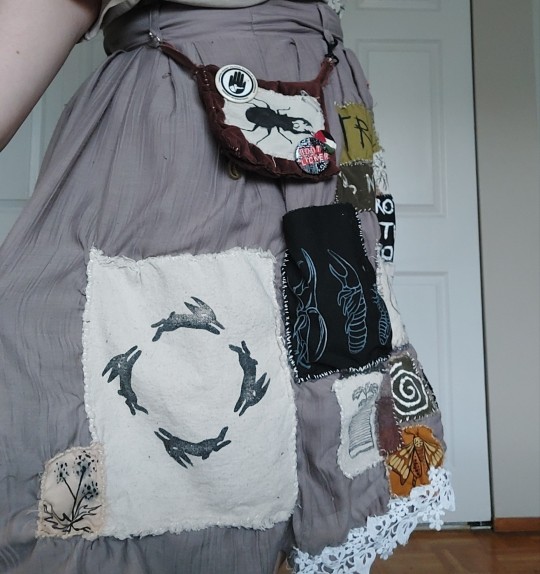
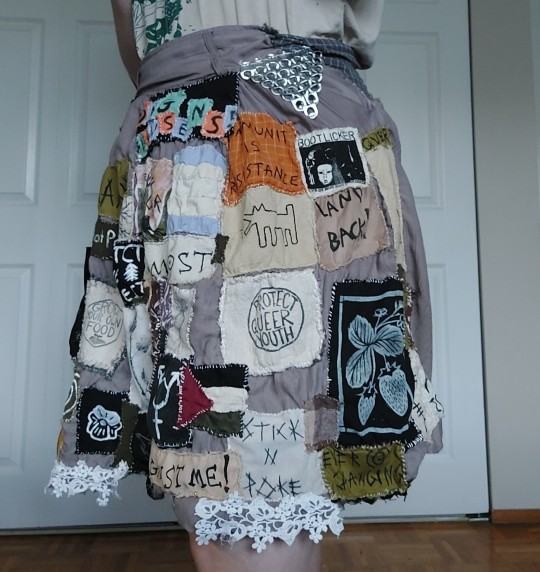
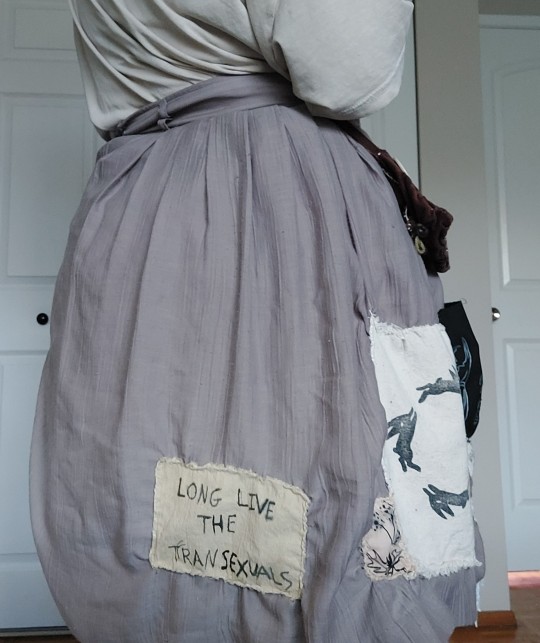
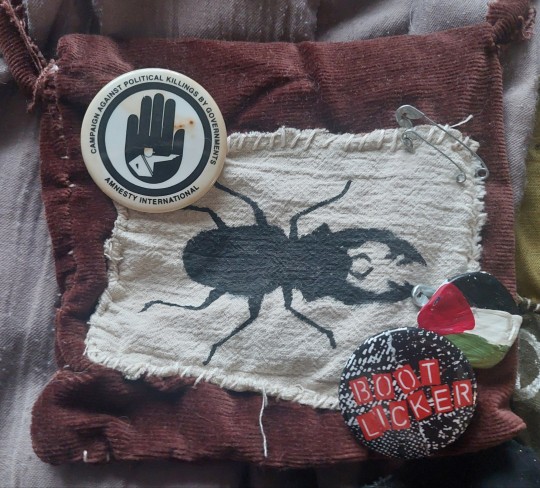
my patch skirt! a hefty boy. ive been working on this for over two years now!! most of the patches are handmade, and the little brown pouch with the beetle is handsewn as well.
1K notes
·
View notes
Text
I think a lot of people, esp younger people and those newer to the scene, kinda don't understand what "punks dress punk" actually means
It's not some kinda elitist thing, and it's not 100% mandatory if doing so isn't accessible to you for whatever reason
What "punks dress punk" means is that we dress for ourselves and in a way that deviates from societal norms/what is typically "employable" and "acceptable" because that's what punk is about, it's about deviating from what is expected and what is palatable
#i hope this makes sense/comes accross right lmao#punk#alternative#queer punk#diy or die#diy punk#cripple punk#punk diy#punk patches
1K notes
·
View notes
Text

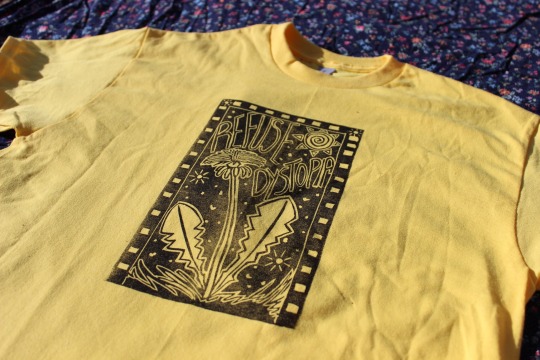
Refuse Dystopia
I made this print for myself as a back patch - it’s a battle cry. I won’t sit still and wait for the world, for my world, to get better. I’m taking it back myself like a dandelion growing through concrete. We won’t settle for a broken world anymore!!
If you want a sick back patch for your battle jacket, consider picking one up at my store below! I also put it on a tee shirt if that’s more your speed. Hope you enjoy!
more of my art | shop | tip
[description in alt ID]
#solarpunk#dandelion#ecopunk#hopepunk#plantblr#punk patches#back patch#queer art#queer artist#trans art#trans artist#artists on tumblr#block printing#block print#linocut#linoprint#linocut patch#linocut print#cottagecore#suprart
721 notes
·
View notes
Text


outfit pics i guess
740 notes
·
View notes
Note
Patch making tutorials?
and here i am once again, with a patch making tutorial
how to make stenciled patches:
i'll post a part two in the future which will cover freehanding and stamping ur patches
-
first some general info that might be useful:
i get my patch design inspo from pinterest, etsy, and tumblr. if sell your patches make sure you arent ripping off another artists patch design when using etsy for inspo. anarchostencilism also has tons of stencils both on deviantart and reddit which are free to use.
i use acrylic paint for my patches, but if you can afford it id advise fabric paint. to seal paint into the fabric iron the patches, it helps em last longer. some acrylic paint survives very well in the washing machine, but wash your stuff by hand the first time to see how well it holds up.
if you make your patches multiple colors, dont first make the whole patch one color and then paint over it with the other colors. if the paint starts cracking the base color will show through. (if you like that however then dont mind this)
i paint my patches on jean fabric, cause it makes the patches sturdy yet flexible. but shirt fabric or canvas both work very well too. anything except really plasticy/slippery or textured fabric can be used
i pin my patches down with pins onto multiple layers of taped together cartboard, to prevent the fabric from moving around and distorting the print
-
there's two ways in which i make my stencils
1. with paper covered in tape
2. with the plastic folder you put in your binders
-
option 1:
draw out your design onto some paper, make sure there arent any "loose" parts in the design that will get lost when cutting out the stencil

cover the paper in tape front and back, make sure you can still see your design through the tape
cut out your design, i use scissors and an exacto knife
-
option 2:
draw out your design (you can also draw the design directly onto the plastic folder)
cut a piece of plastic out of the folder big enough to cover your drawing and tape it down.
trace the design onto the plastic with pen or marker (any mistakes can be wiped out)
cut out your stencil
-
continuation from both option 1 and 2
after finishing your stencil you can pin them down on some fabric
dap on your paint with the point of a big brush or a sponge, depending on the paint it'll take 2-3 layers.
make sure your previous layer dried completely before adding the next one

after the paint has fully dried you can carefully take off your stencil.
!!dont unpin the patch before it fully dried, or the drying paint may cause the fabric to warp!!

thats it, questions are always welcome, now go and make stuff!!
#punk diy#diy fashion#punk#queer punk#diy punk#punk clothes#punk style#punk patches#patches#tutorial#my stuff
2K notes
·
View notes
Text
I added a water bottle pocket to my pants!
This came up due to the fact I use Lyft bikes to get around and they don't have bottle holders, so I placed this pocket here because this part of my leg remains relatively upright while pedaling.
Heres the initial proof of concept

But it looked rather silly especially when not in use. It also flopped around a lot when a full drink is being held and I was walking around so I started to look into ways to collapse it and secure it when in use.
First attempt came up with this:

Which looks nice, but wouldn't help restrain the movement of the pocket with a bottle in it.
So I moved to this belt design, using straps I had designed for the pants in an earlier iteration.


And it works like a charm.
Holds the bottle in place, is easy to fold away, and looks nice in use.
Though not sure I like the red and might switch to black straps but I'd love to hear all your thoughts and possible improvements!
774 notes
·
View notes
Text

“We Can Grow A Better World” backpatch, linocut on canvas, 13” x 9.5”, December 2022.
#I sold some to friends and made a few in white on black fabric (they don’t look as good tho)#this idea has been brewing for a while and im glad I could finally make it a patch!#my portfolio#punk#mother nature#linocut#punk diy#punks not dead#solarpunk#gardening#anarchy#skeleton#my art#back patch#punk patches#hopepunk
6K notes
·
View notes
Text

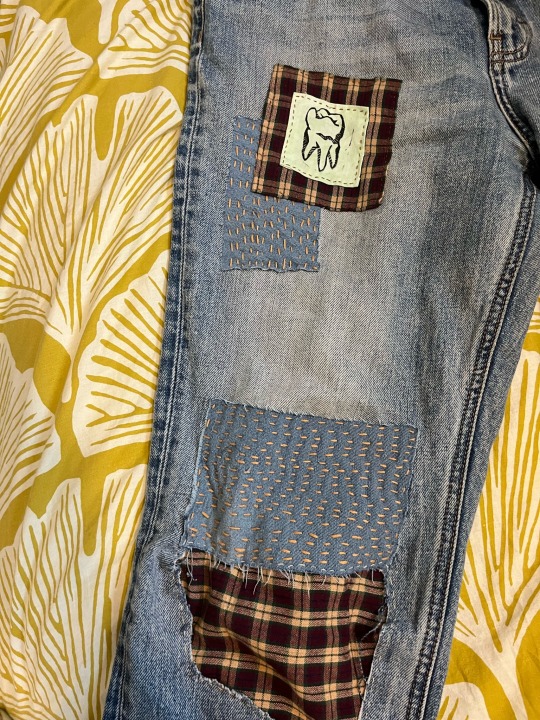

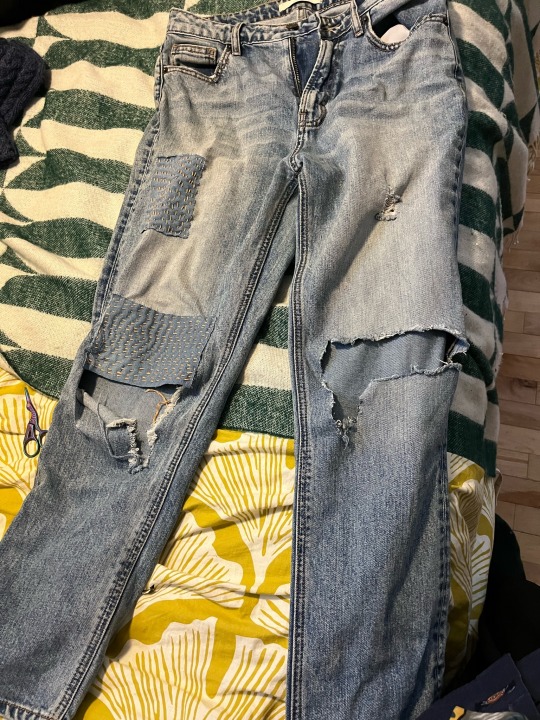
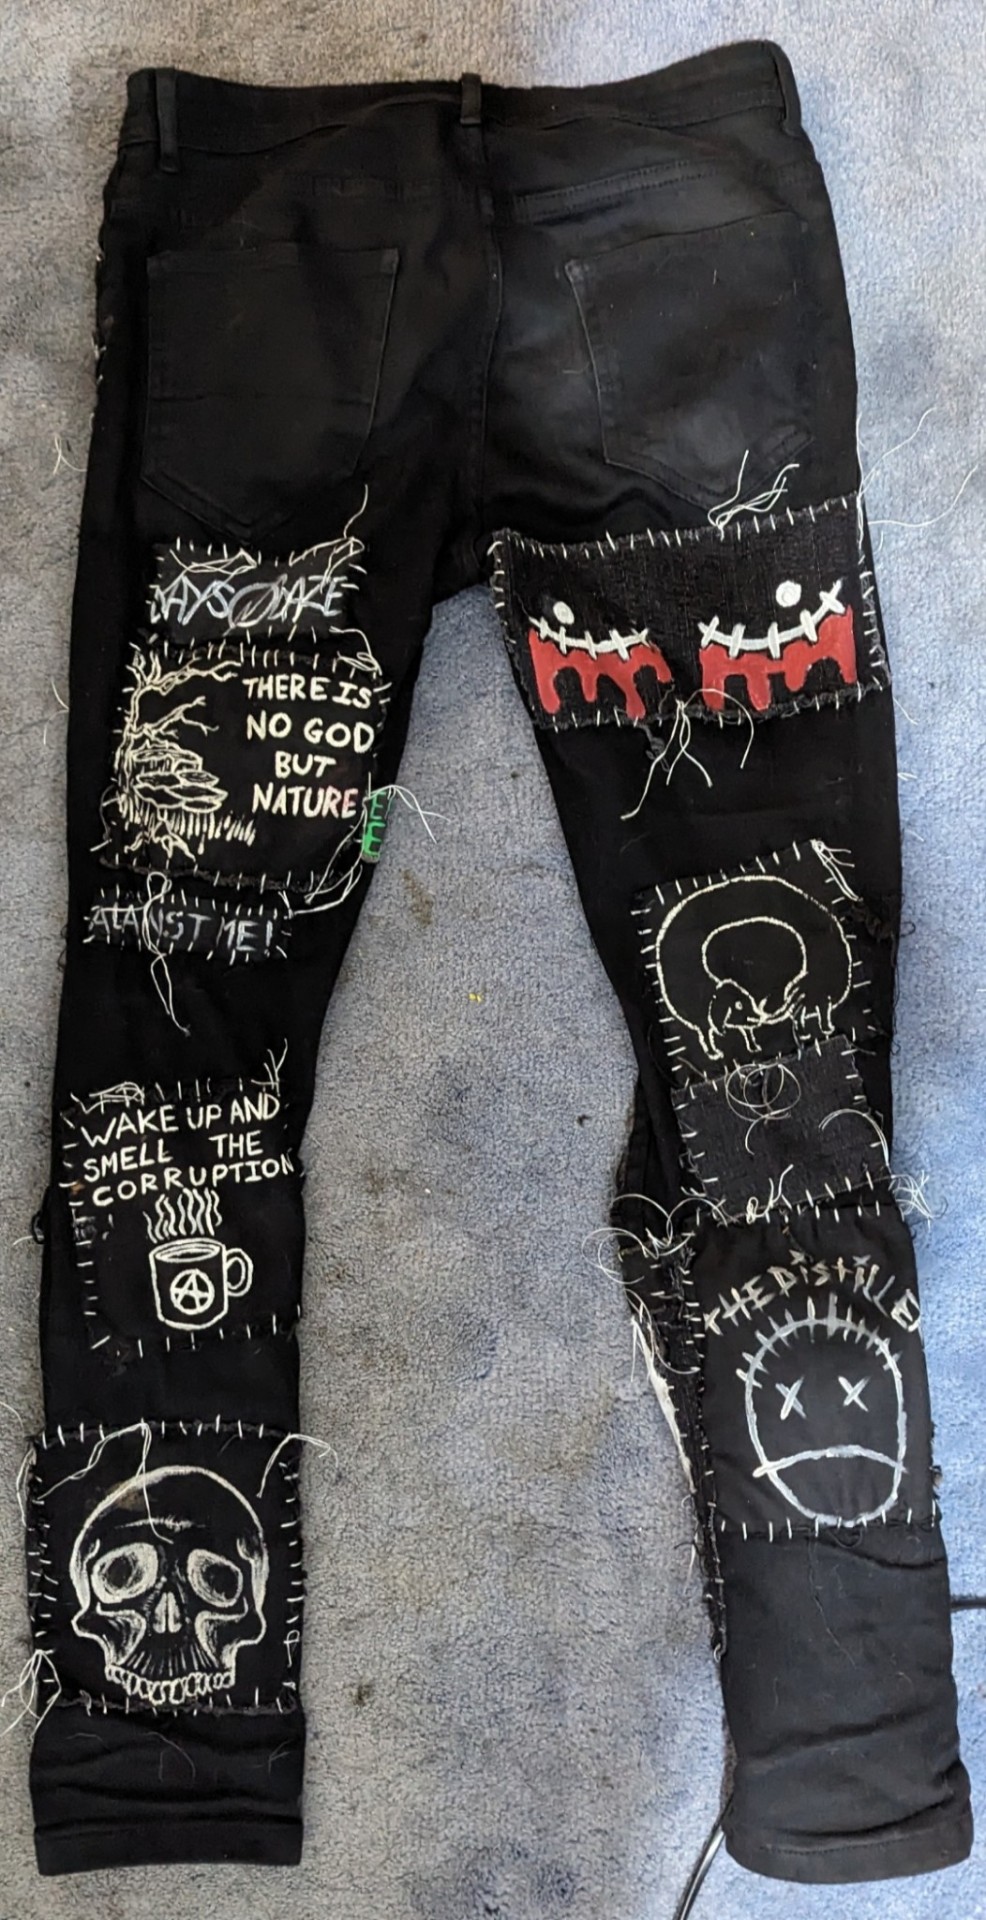
Finally got around to finishing this visible mending project from this fall.
#solarpunk#printmaking#punk patch#punk#diy fashion#blockprinting#punk patches#diy punk#patches#solarpunk fashion#eco fashion#visible mending#mending#clothing repair#sewing
575 notes
·
View notes
Text
well that's the fastest I've ever gotten from patch idea to execution. it exists now. I love it. all my nankin pens are dead. I don't know where I'm going to put it
715 notes
·
View notes
Text
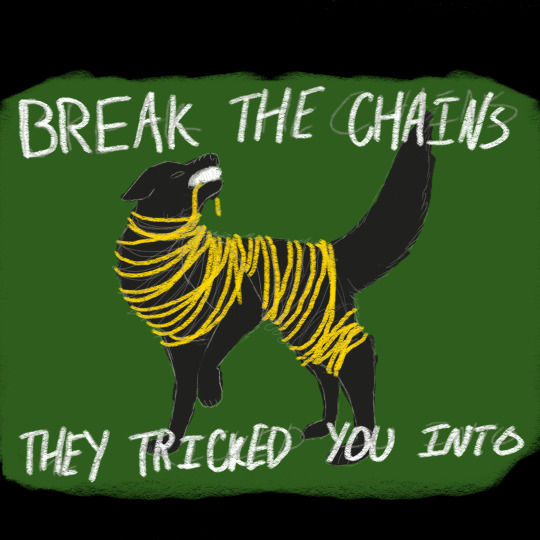
Just a quick mock up/lose sketch for a patch idea for my battle jacket I'm hoping to start soon inspired by Fenrir. Just got the basic idea and composition down so I have a reference for the real patch.
#punk#digital art#digital drawing#punk patches#diy#diy patches#diy punk#battle jacket#norse witch#neuropunk#queer punk#patches#patch ideas#fenrir#wolf art#norse mythology#folk punk
878 notes
·
View notes
Text

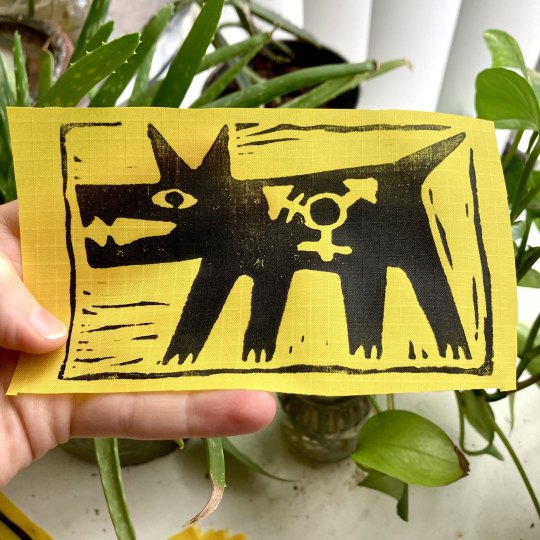
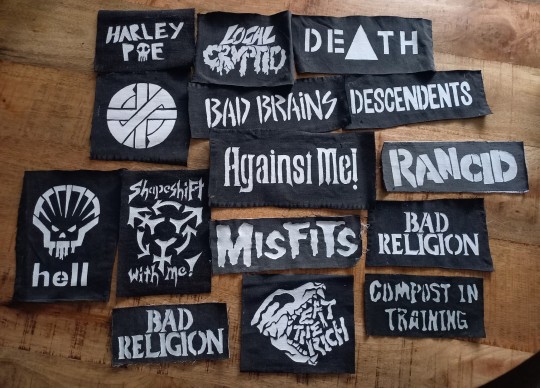
More patches (YELOW NYLON!!!!) in my etsy @ atomicgothicshop !
#patches#punk patches#punk jacket#transart#etsy#storenvy#transartist#lgbt artist#lgbt art#jacket patch#diy jacket#furry patch#furry badges#madlyfluffyart#trans patch#diy patches#diy punk#diy vest#diy projects#diy gifts
868 notes
·
View notes
Text
How to start a pair of punk patch pants
(a potentially really shitty tutorial)
I've seen a couple videos on this but a lot of them seem to skip out on some really key information and tricks so I thought I'd just write a probably really long and really rambly post about it!!!
Step one: gathering supplies
In terms of supplies the main things you'll need are:
The pants
Approximately 4 rolls of dental floss (this can change depending on number of patches and your pant size)
A needle with a big enough eye to fit the floss through
Acrylic paints
Brushes
Scrap denim or other scraps of fabric for the patches
Pins
Some kind of marker or pencil that will work on the fabric you've chosen
I will be going into some detail below about why you need each of these items!!
The pants themselves
personally I prefer either using a pair of jeans I already own or thrifting a pair to be as sustainable as possible, however if you really need to go out and buy a new pair for whatever reason get a high quality pair, this will help in the long run with preventing them from falling apart as easily.
The second main point I want to make is that the pants should not be skinny jeans. This is because when you sew on patches it slightly cinches in the fabric, and with skinny jeans generally being stretchy, this is going to result in the thread of the patches stretching out and snapping. Your patches will all just start falling off and it'll ruin your hard work.
This is why I'd recommend using a pair of jeans or pants that are a bit looser of a fit, such as straight legged pants or a pair of pants a size up from your actual size if possible!
Dental floss
The reason it's generally suggested to use dental floss rather than actual thread is because dental floss tends to overall be a lot stronger than your average thread, as well as often being more easily accessible to buy.
Needle
This ones pretty self-explanatory, just make sure you get a needle with a long/wide enough eye (the hole the thread goes through) for your floss to be able to fit through without trouble.
Acrylic paints
You may be wondering why I'm suggesting acrylics over fabric paints and there are a few reasons!
The first is simply that they're both cheaper and far easier to purchase for the average person than fabric paints, and I want this tutorial to be as accessible as possible for as many people as possible.
The second reason is that fabric paints require a lot of fucking around with setting the paint, whereas acrylics can just be left to dry and be finished, and so long as your pants are hand washed, the paints won't come out (unless you layer it on super thick or are really rough when you clean them).
Brushes
Another pretty obvious one, these are needed so you can actually paint your patches!!!
Fabric/spare denim
You need fabric or scraps to be able to actually create patches for your pants, so this is essential.
Any kind of scrap fabric can do, a lot of fabric stores tend to have bins of scrap fabric that are either pre-priced or priced by weight and that can be a really good opportunity to acquire the fabric you need!
Another way (the method I tend to use) is thrifting a few pairs of jeans alongside the pair I want to patch and then ripping them up into patch-sized pieces!
Either way, I really advise against buying straight up new fabrics by the metre for this as it kinda goes against the entire idea of sustainability and reuse.
A really big tip I have for when you're cutting the fabric of your choice up for patches is to actually only cut a little slit, and then rip. This produces a really nice distressed edge and will help add some texture and more of a fucked up look to your pants a lot quicker than if you waited for the fabric to fray by itself!
Marker/pencil
This is literally just so you can draw your designs onto your patches! I've personally found that either a black or white (depending on how dark the fabric you're using is) pastel pencil is generally good enough to get the general gist of what you want down well enough for you to paint it on.
Pins
These are literally just to hold your patches in place and literally any kind from proper sewing pins to safety pins will work! (just don't forget they're in the jeans before you put them on I promise you it isn't fun to put on a pair of jeans full of pins).
Optional: a sketchbook
You may want a sketchbook or alternatively scraps of paper if you have any kind of original concept for a patch so you can draw it out a few times first to really nail it, and it's also helpful to have if you aren't as confident in your painting and drawing abilities!
Step two: patch making
I personally pre-rip/cut all of my patches before I paint anything on them generally speaking and then fit whatever design I want onto whatever piece I think it would fit on, however if you want to paint your patches and then rip/cut the design out that's also an option (and probably a much smarter one I'm just incredibly stubborn).
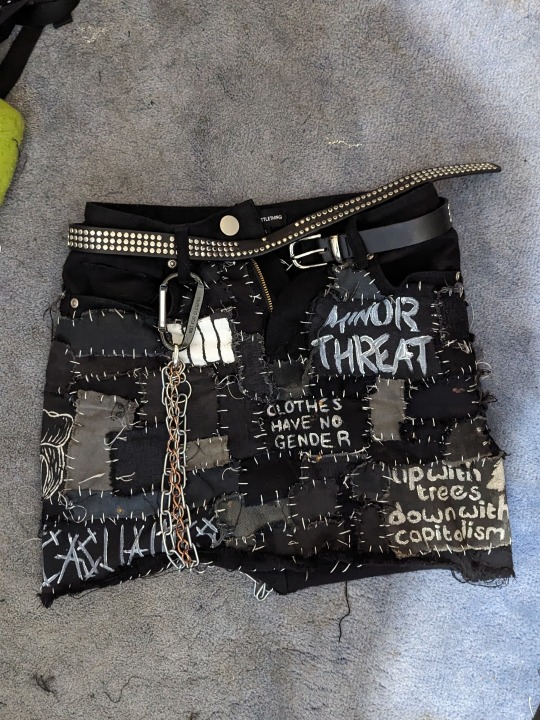
For punk pants you want a good mix of both punk bands, politics, and also maybe something a bit daft (I have the "he scream at he own ass" possum on the back pocket of a patched skirt for example). If you don't have bands and such, it kinda defeats the point of them being punk patched pants.
I personally generally pick a theme (eg. colourful patches, all black and white) when making anything patched because I think it makes everything look a bit more cohesive, but that is by no means a rule you actually have to follow I'm just autistic a fuck tbh.
Step three: the assembly
I personally put my main/bigger patches on first and put them on in a few different places until I get the placement I like, and then sew them on with the floss like this:

The main thing you want to do to make sure your pants don't wind up looking a bit weird or bare is to fill in any gaps between your painted patches with small, blank patches. Like this:
and that's pretty much it!!! I can't really explain via written text how to sew and how I personally tie off etc but if anyone would like a video tutorial lmk!!!
#punk#alternative#cripple punk#queer punk#diy or die#punk patches#diy punk#punk diy#patched pants#crust pants#patched skirt#punk skirt#crust skirt#punk pants#crust punk#punk style#punk fashion#punk culture
2K notes
·
View notes
Text
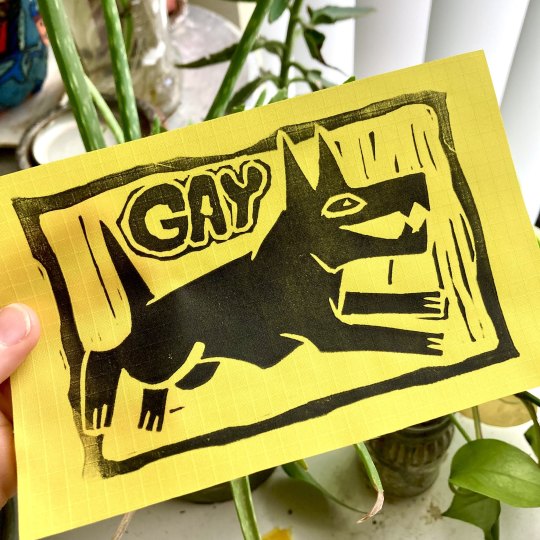
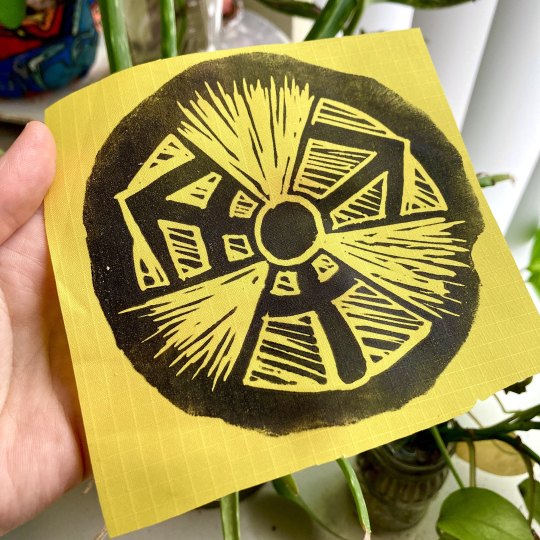
NEW PATCHES RAAGH


And my pockets!
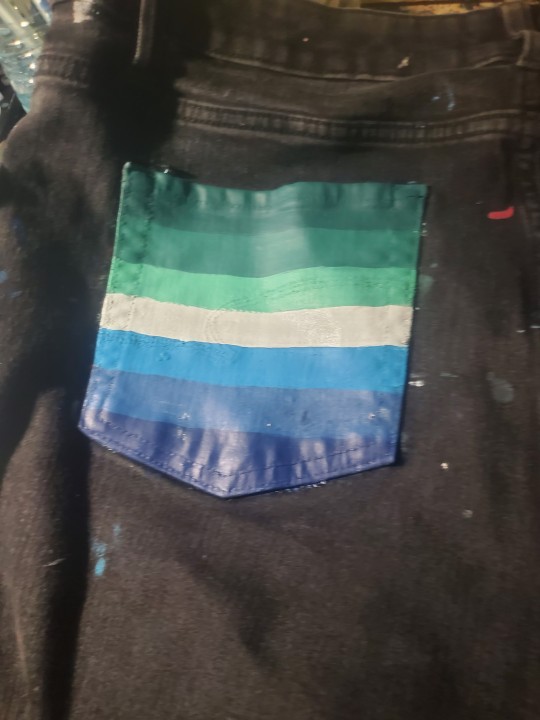


#canine kin#dogkin#wolfkin#canine therian#werewolfkin#therianthropy#nonhuman#crust punk#punk patches#punk style#diy punk#punk diy#queer punk#punk fashion
476 notes
·
View notes
Last Seen Blogs


aeriesblockchaincorp-blog
Blockchain
Development, ICO Development, Smart Contract Develop
nanaminty
the wanderer's shadow

death-stranded
[homo ludens]