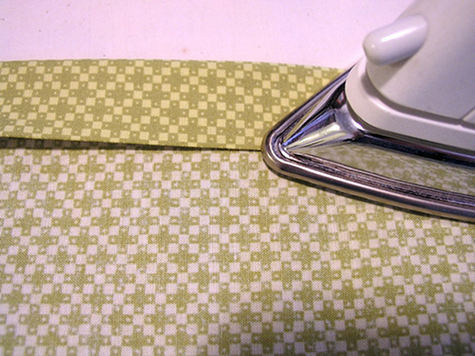
#with all the ironing and finishing off edges and sewing a lining
Text

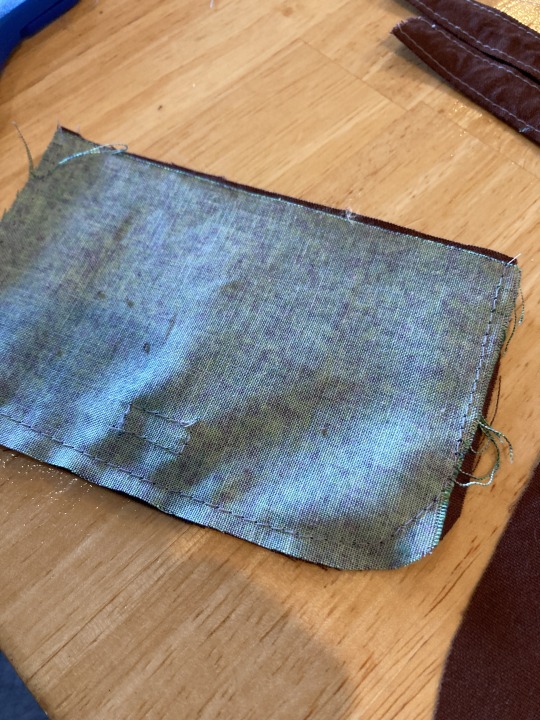
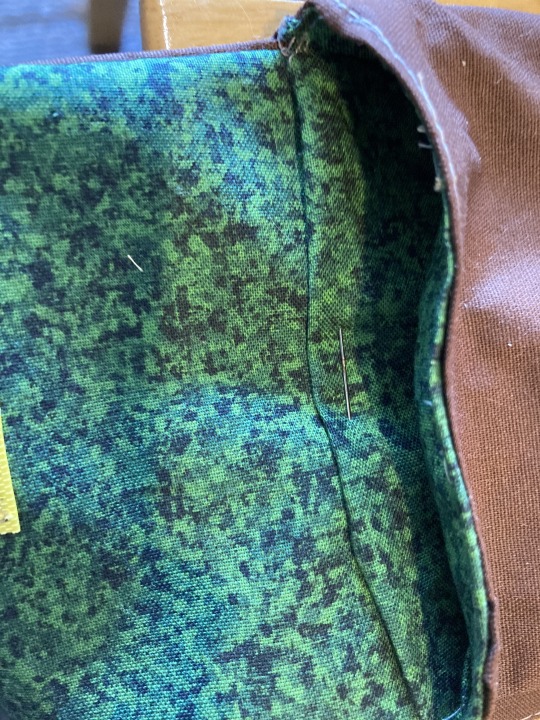
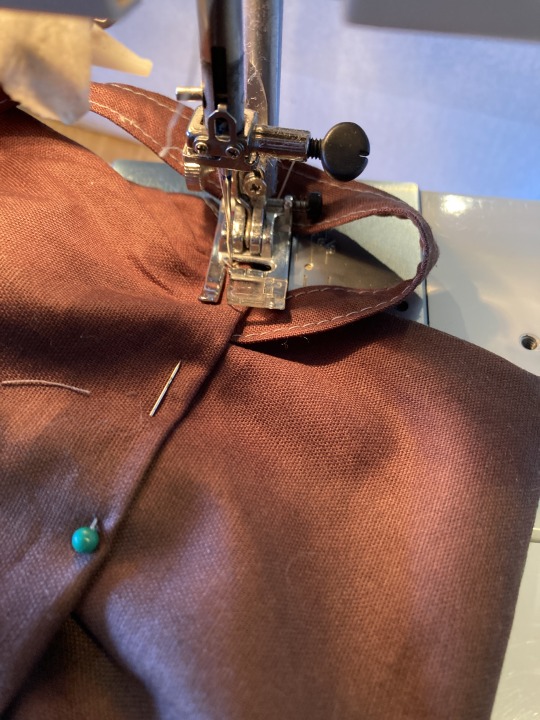
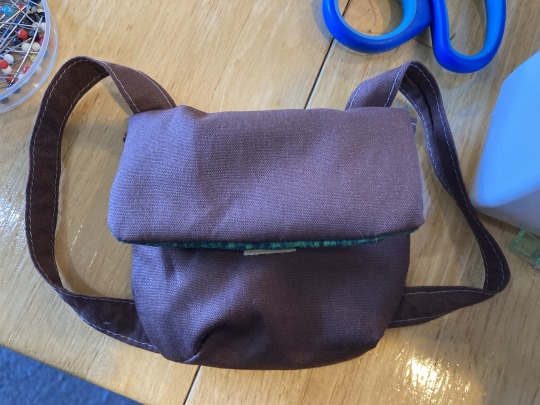
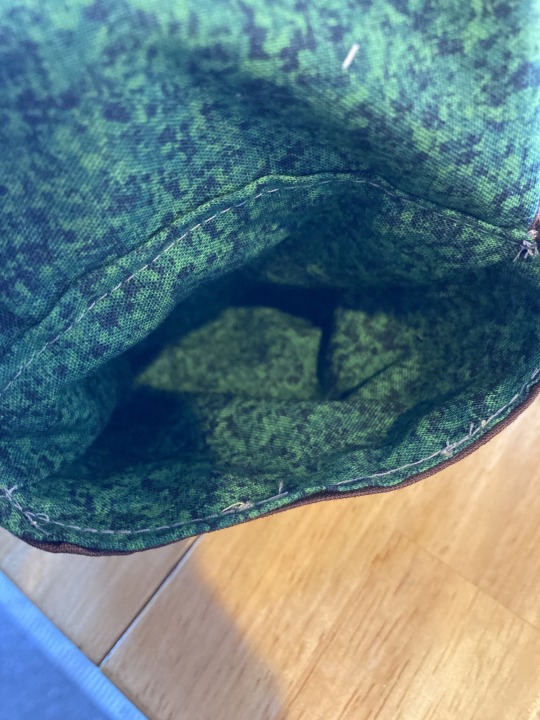
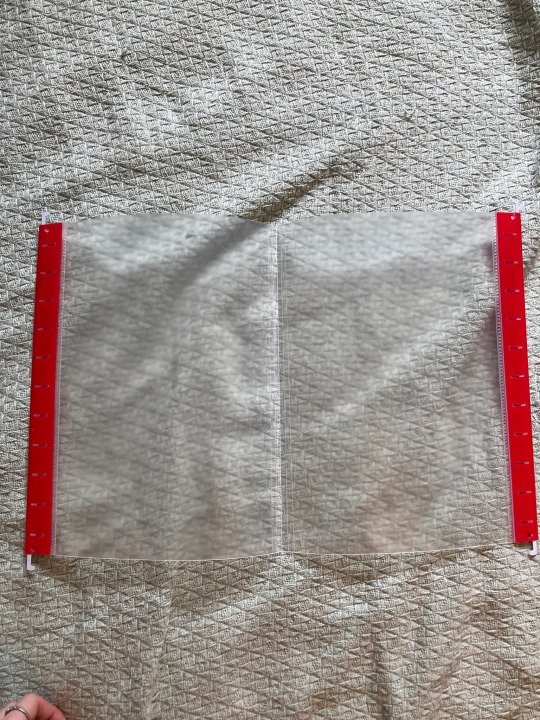
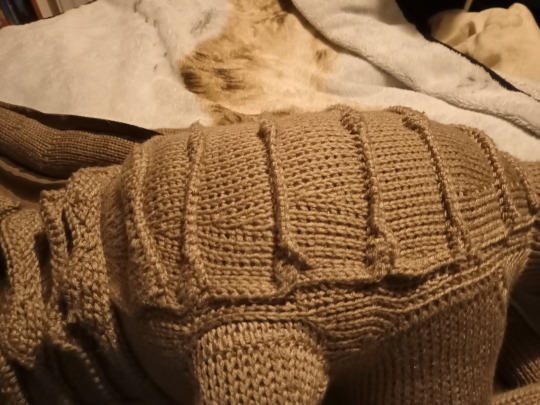
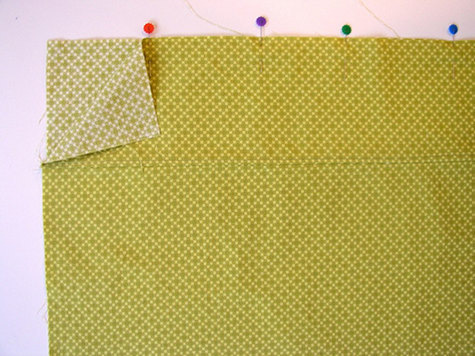
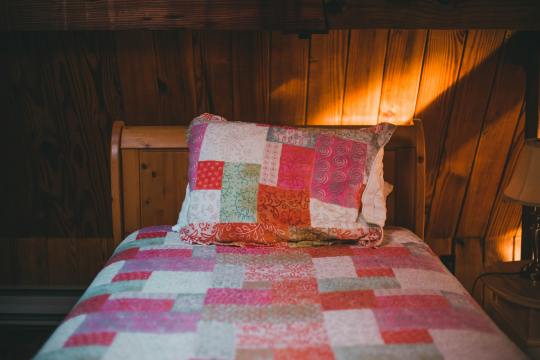
The first doll dress for my 18” doll! It still needs snaps but I’m going to wait to sew them on until the doll arrives, so that I can tweak the fit a little if needed
#sewing#handmade#doll clothes#1840s doll dress#tj makes doll clothes#(that’s my new tag for all the 18 inch tall doll stuff)#(1/12 scale doll stuff remains in the hypothetical dollhouse tag)#the pattern says it’s 1840s I’m not saying that#I absolutely cheated and used minky to make it way easier to make#I did not expect it to work up so quickly?#I mean it’ll take a lot longer when I make another one out of woven fabric#with all the ironing and finishing off edges and sewing a lining#(all things I did not do for this one)#but still! I was worried it’d be like a multi day project#not an afternoon project#this one only took and hour and a half to sew. that’s not counting the time for cutting out the fabric or sewing in the snaps#so it’ll probably be closer to two or two and a half hours total#but still! pretty quick!
14 notes
·
View notes
Text
my half finished clown :] happy halloween

#i really like how the hat n neckpiece came out :) wanted the sleeves a lil poofier but incan always give them a lil fill or something#im gonna finish the full cosplay on my own time maybe formmarch maybe nit.#i got up at 6 this morning to sew the sleeves on USBDUFBFGFJEBHYNSH#i did start the vest i have it all sewn and lined + the collar pinned to it but i just. uhg. the gold edge. fuck that#shoutout to my awesome classmate who gave me gold fabric to do it. sorry i didnt do it yesterday. too sleepy. ONE DAAAAY#i was like NO gold on the sleeves NO red on the puffs ONE button ebcause i dont feel like sewing more#AMEN.#that red fabric. OKAY THAT RED FABRIC FUCKING HTES ME ITS SOME SYNTHETIC WOVEN SHIT THAT WANTS ME DEAD. NOT WORTH IT#sits nicely for the hat. frays like a bitch. skips stitches like a bastard. does NOT want to press or iron.#i only just learned abt the burning synthetic fabric edge to stop it from fraying umm Yesterday thanks to aforementioned awesome classmate#so umm teehee.nits fine zigzag stitch works well enough. Okay im so tired i hust wanted to show off my gay little hat goodnigit#EDIT AAAAH THE PICTURE IS FLIPPED its ok i made sure to get the colors on the proper sides. red is on the left. believe me i made sure.
24 notes
·
View notes
Text

it is finally time to post my backpack pattern! i've been meaning to do this for a while! so if you'd like to try sew your own plush backpack i've drawn up a basic pattern i've been using that should be easy to edit to suit whatever shape you'd like. Please note i'm a newby at making patterns that are readable to others so apologies if it's a little messy. This pattern is intended for personal use only, i would love to see what people make if you do give it a go!
Pattern and basic walkthrough images will be under the cut!
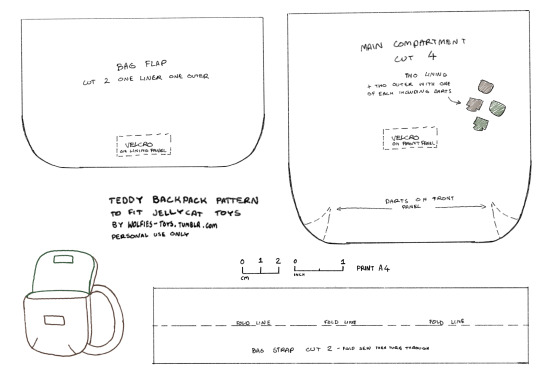
here is the basic pattern! it's very simple and i've written some rough instructions onto the pieces themselves as well. note that the side darts on the front of the bag can be completely ignored if you like. it just adds some extra shaping but isnt strictly necessary.
if you want to resize it should be relatively straightforward to, just adjust overall shape and size to your liking, i would recommend printing out the pattern and seeing how it sizes to your plush of choice, this pattern makes a backpack the size of what twig the bright orange fox is wearing in the photo, it is quite wideset, and will fit most bears but will be a little wide for something like a medium bashful jellycat. for something like a medium bashful i would suggest reducing the size overall of the main bag and keeping the bag strap length mostly the same. please note you will loose some length in the overall bag chamber once the flap is added. the most important things to keep in mind when resizing is width and bag strap length.

first you will want to cut out all your pattern pieces, first starting with the straps, fold in half and sew along the long edge, then turn the resulting tube through.


once your bag strap is turned through position the strap flat down on the sewing machine and sew along both edges to help it sit flat, you can iron the strap beforehand too if it's giving you a bit of trouble staying in position. that should leave you with two flat backpack straps! if you dont want to go to this trouble to make the straps, you can also just use some ribbon or elastic and skip this step
next you will want to sew on the little bit of velcro to the lining of the bag flap. and then to the corresponding front of the bag both while they are not sewn to anything else so it will hide the stitches.

then if you have cut the darts sew closed the darts on both the outer front and lining front. if you havent added the darts you can just skip this step.

you then want to sew together the bag flap lining and outside piece, making sure you sew inside out and then turn through.

pin or clip your main bag chamber lining together, i've found if using cotton you will loose a little length on the back piece if you sewed the darts, once sewn you can just cut the excess off.
next sew the outer back and front together, leaving little gaps at the lower corners for the bag straps to be sewn in place, then poke them evenly through the holes and sew them in place.

Turn through the main outer bag chamber, place the lining inside, and fold the edges of the front together, sew the front edge closed, leaving the back open for now
next you place the open end of the flap in between the lining and outer back of the bag and fold the edges of the lining and outer back together with the flap in the center, pin in place but dont sew it up just yet.

once that is positioned you can bring the bag straps up to the fold and place them inbetween the flap and the outer back, and make sure they arent twisted. then you can sew it together.
you should then have a finished plushie backpack that you can decorate with mini pins, bead keychains or just keep plain, and fill with lots of treasures from your plushies travels!
313 notes
·
View notes
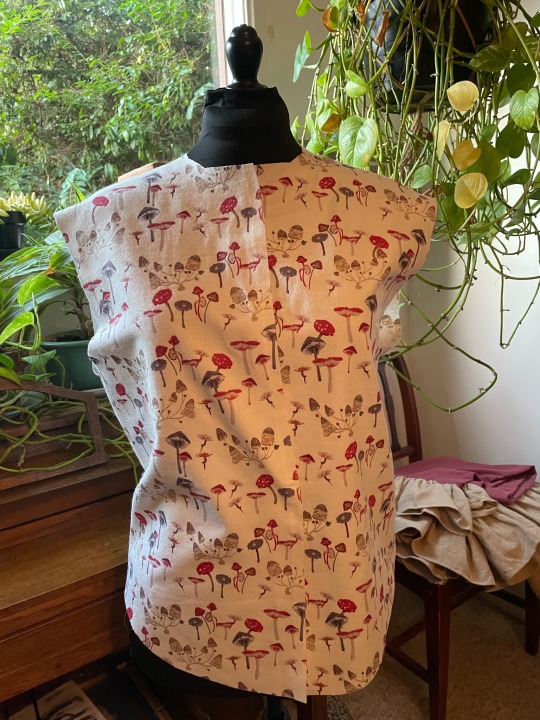
Text
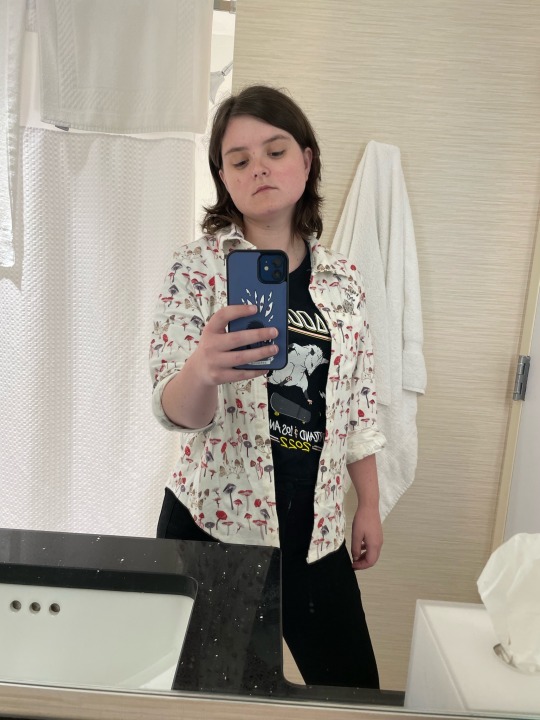
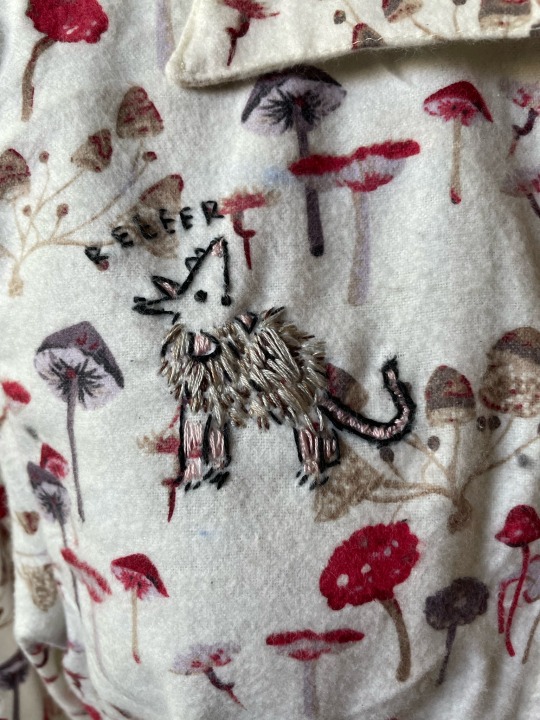
I made a Moonshine Cybin Flannel to see NADDPOD Live at Carnegie Hall (featuring an embroidered PawPaw)
Read more for details on how I made this
Making the Shirt:
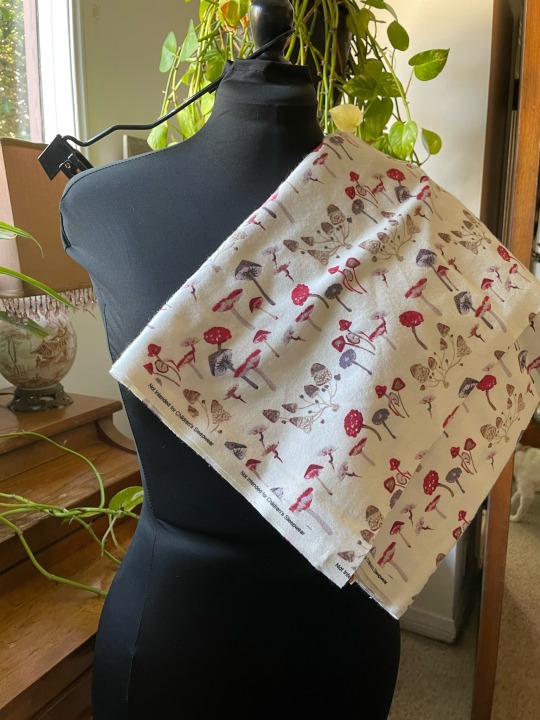
Like a week before I left for New York, I decided that I wanted to make my own NADDPOD clothes to wear since I don’t have a lot of merch. I remembered that JoAnn Fabrics had this mushroom flannel and so I ran out and bought two yards.
I used this button up shirt/lined jacket pattern from MCall’s:
The problem is that I’m right in between the largest boy’s size and the smallest men’s size. So I had to make some adjustments. I cut out the pattern, then shortened it at the waist because there wasn’t room for my hips in the original pattern. Then I cut out all the pieces: shirt front, shirt back, sleeves, pocket, collar, and cuffs.
I knew from using the pattern before that the sleeves were too big for the armhole, and I don’t like the look of gathered sleeves. So I trimmed 5/8” from both arm holes.
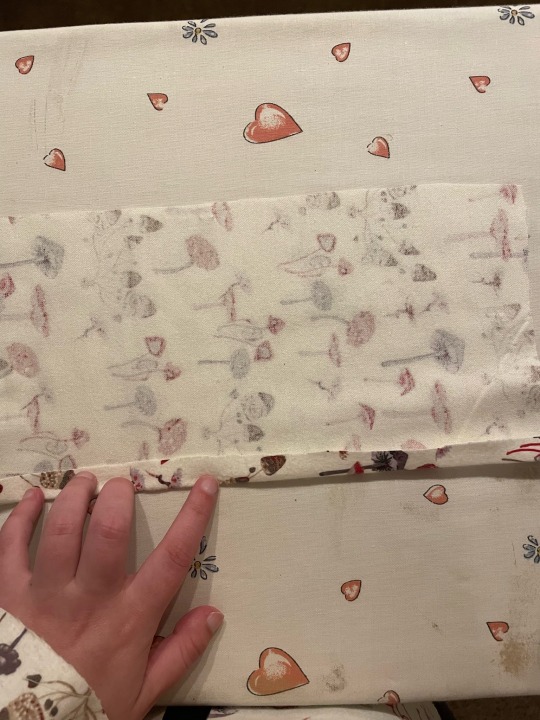
Once those adjustments to the pattern were made, I stitched the sides together.
Next up was the collar. I cut two collar pieces, stitched them with the pattern-side of the fabric facing each other, trimmed the excess at the edges and flipped it right side out and ironed it.


I pinned the collar in place around the neck and stitched it in place.

Next up was the sleeves. I stitched each sleeve together, leaving a gap open at the bottom so that the sleeves could be unbuttoned. I hemmed the opening of each sleeve so no raw edges were visible, the gathered the top of the sleeves so they fit into the arm hole.
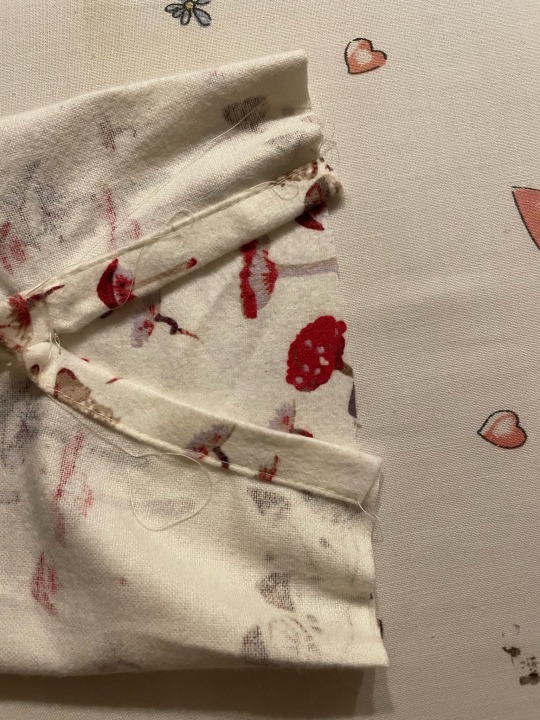
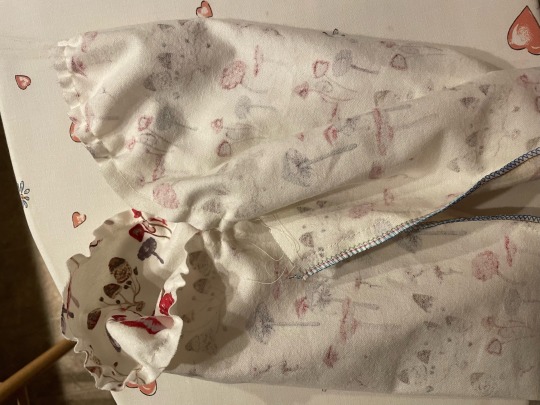
I pinned the sleeves into the arm hole and stitched them in place.

I cut two cuff pieces, and turned down one edge so that once it was stitched in place, there wouldn't be any raw edges. Then I pinned it in place so the right sides were together and the excess fabric of the cuff was pointed towards the shoulder. I stitched it in place, then folded the cuff in half, right sides together and stitched the ends. That way when the cuff was folded out the right way, all the raw edges would be held inside.
With that, the main construction of the shirt was complete.

Next were my first attempts at embroidery. I found a reference image online that reminded me of PawPaw and printed it out in various sizes. I stitched together a breast pocket, and pinned it to the shirt. Then I was able to use that and my printed images to decide how big I wanted the embroidery.
Once I decided on the size, I unpinned the pocket and transferred the drawing to the fabric using transfer paper. I pinned the drawing and transfer paper in place, and traced over the image. It left a carbon copy on the fabric, and I traced over that with heat erase pen so it wouldn't rub off while I worked.

After that, it was lot of stitching with embroidery thread. Have some in progress pictures.


With the embroidery done, it was time for the finishing touches. Using the guides on my pattern, I marked off the places where buttons and buttonholes were meant to go.

I used the buttonhole foot attachment and setting for my sewing machine to install the button holes, then I sewed the buttons in place by hand.
To secure the embroidery I cut out a patch of white flannel and ironed heat and bond to the back. Then I placed the patch over the thread on the backside of the embroidery, and ironed it in place. The patch prevents the loose threads from getting snagged on anything.

After that, I hemmed the shirt and it was finished!
I literally finished this project the night before I flew to New York. It ended up being a huge hit at the fan meet up in Central Park.
78 notes
·
View notes
Text
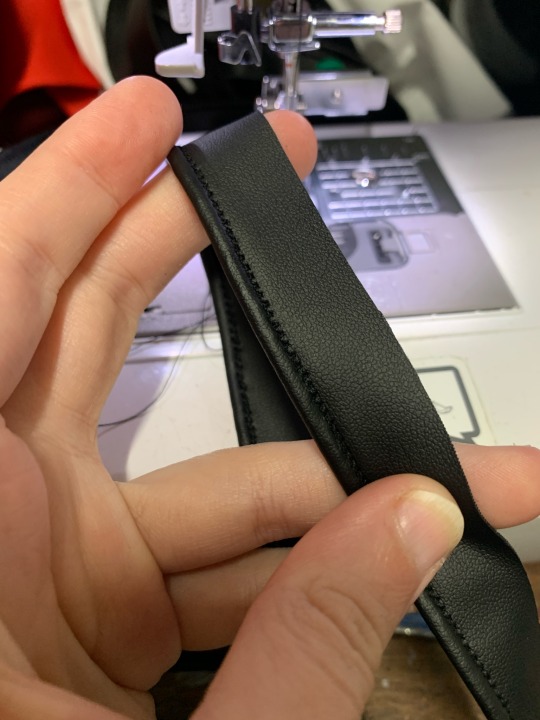
Vere cosplay description/tutorial continued part two (belt edition).
If you made it this far, GREAT!!! You're doing fantastic.
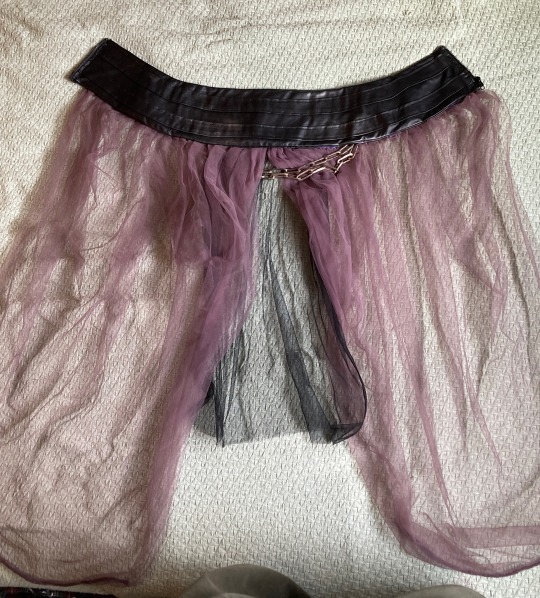
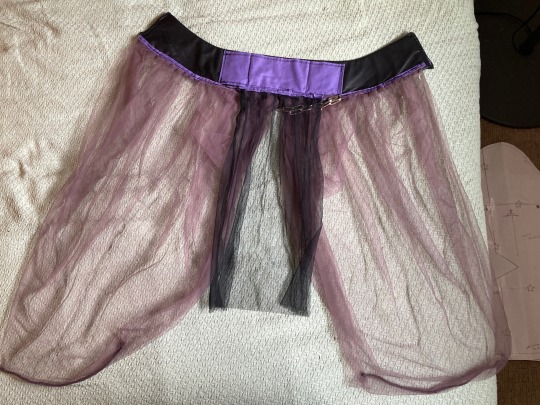
My interpretation of his waist/below
I chose to make the belt into a skirt, rather than the whole thing as a dress. This seemed a lot easier to me than trying to combine things further, and honestly I'd definitely recommend this. I made the belt pattern by covering my torso in Saran wrap, tape (masking or duct tape) drawing the belt shape on my torso, and then cutting it out. Note that your front and back of your torso may differ in shape, so I'd reccomend drawing where your belly button is.
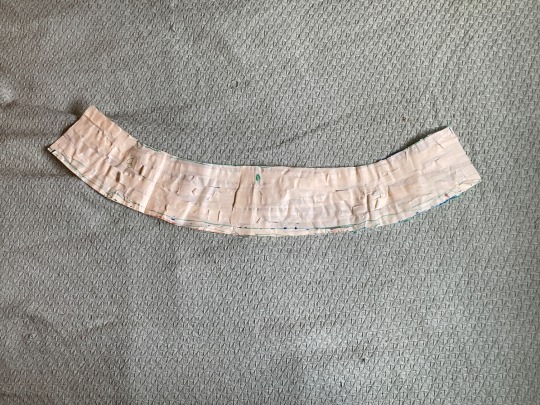
I then cleaned up the lines and made it into a pattern piece. Make sure it's symmetrical.. and ADD SEAM ALLOWANCE! If you're not impatient AF then I'd reccomend tracing your tape pattern onto paper so it's actually flat.
It's important for this belt to be SO STRONG because it's going to be under a LOT of strain during the day due to how it's tight and where it is on the body. Maybe it's overkill but I cut out a front and back piece(so my pattern x2), interlining, and added cotton underlining for strength to both the front and the back pieces.
Steps
1. make ur pattern with Saran wrap and tape
2. Clean up your pattern
3. Iron all your fabric and cut out your pattern (2 x of pattern, 2x of underlining cotton, 1x of interlining)
4. Staystitch and zigag fabric (except not the pleather bc we don't care Abt it as it doesn't fray)
5. Attach your interfacing to the cotton (front side cotton) and then baste the cotton to the pleather (front and back). So now you have 2 pieces of the belt, inside and outside piece.
6. Make the pattern for the strips of leather on the front. You should trace your belt pattern and then draw on the strips onto this tracing. They can't be straight lines bc this belt is a C shape tbh, and so they are almost like mini belt patterns. Don't forget seam allowance for their hems!
7. Sew these straps to the outside piece. If you have an idea for the metalic front belt details it would be great to attach them here in this step but I didn't bc I didn't have a good idea (might get them 3d printed though).
8. Freestyle some pockets bc ur gonna rly want some on the inside. I made one the size of my phone as well as credit cards.
9. Sew the pockets to the inside of the belt piece.
10. Put right sides together and sew the top seam of the belt together (seam by your belly button). Belt is like )( now. clip this inner seam.
11. One option you have is to now hem the bottom of the outside and the inside. In this case, you would put the pleated hanging fabric between these two layers and then topstitch it down. This isn't what I did but it'd look better imo than having it hand stitched to the inside. If you don't want to finish it this way, keep the right sides facing each other , sew the bottom hem, and then turn inside out. This will not be possible if you've added stiff belt details btw.
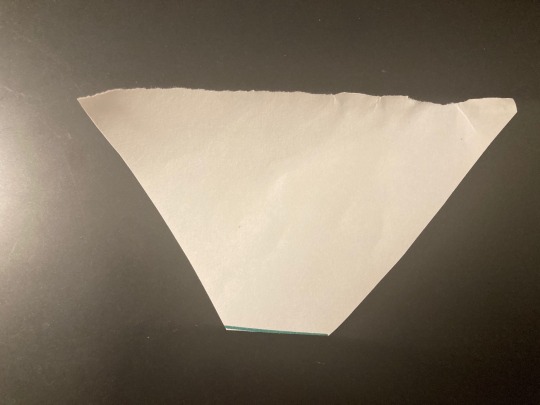
12. Figure out your pleating. I did this by pinning my fabric to my waist while was wearing shorts and seeing what density of pleats looked like and how it compared to what I wanted. It'll depend on how translucent your mesh/tulle is. You can do a small section, and then extrapolate. For me, I did a test of 17.5 cm of freehand pleating which I discovered was 98 cm of fabric (unpleated). As I needed the top pleated edge to be 44.5 cm long, that was-250 cm of fabric for EACH SIDE. These side skirt things are REALLY awkward bc you need all this pleating at the top to get the look but at the bottom, it's supposed to be little wider than a foot or so. Below I demonstrated my end shape with paper. You start with the wide top for the pleating, and the bottom the ending width you want it to be. Then, place weights at the corners and bring up the edges. Cut off the excess. Pleat the top edge as you would normally ignoring the odd shape and it should work out. The proportions in the bottom image is NOT ACCURATE Bc the top edge should be 250 cm and the bottom edge like.. 40 cm.
13. personally I just sewed the pleats to some small strips to keep everything together and then handsewed them to the inside of the belt (with my arm insidethe belt, like a pillowcase). But like I said, you could easily add them into the seam of the belt for a neater look.
14. Add your black gauze in here. Tbh it doesn't need a weird shape it can just be a rectangle that you pleat
15. I placed an unpleated mesh pannel behind the pleating and sewed small tacks throughout so the fabric stayed pulled back to the side. It felt too skirt like (?) Without this and more puffy, too. You don't have to do this but it was my solution and was pretty unobtrusive.
16. Hand fix your chains in. The cotton is also important for supporting these bc they're heavy af. I used chandelier chains, and I'd reccomend getting some where the links are NOT welded shut or it will be difficult to adjust the length of the chains without heavier duty metal working equipment.
17. Add in some structure! If the belt is an open pillowcase, this goes where the pillow would. I used a stiff plastic folders (below) cut into shape (smaller than the pattern by a bit so it doesn't mess with seam allowances). This gives your belt SO MUCH HEFT and is great!! You could also use foam too! Highly reccomend!
18. Add a closure. Personally I used a zipper, but a corset back would work great too especially if you fluctuate size. We don't see his back yet so you can do what you want lol.
19. Personally I added some wire to the bottom hem of the tulle to help it be straight and hang better with the weight but I didn't really like how this turned out.
Just for posterity, here's the pattern I made for the legbands. They're prettttty close but not SUPER close. I'd recommend covering your leg in ductape and having yourself or someone else try to draw the shapes in a mirror. It's wack AF though so I thought seeing what mine looks like laid flat might help you.
24 notes
·
View notes
Text
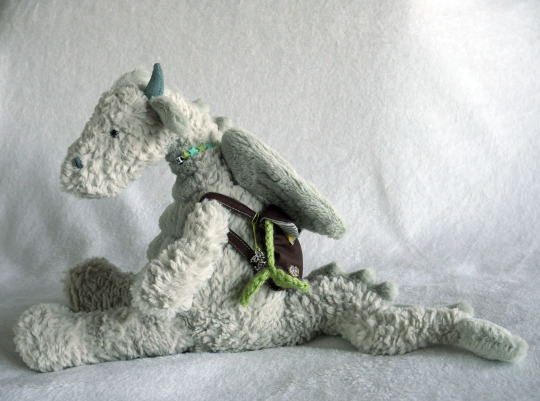
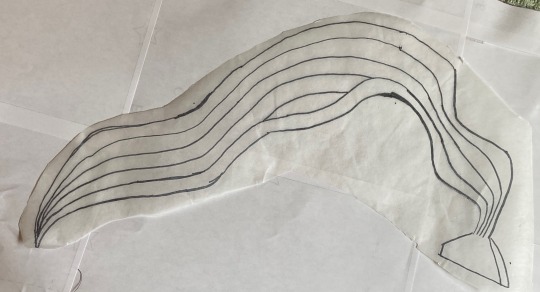
Fire Emblem Three Houses Crochet Wyvern - attempt 1
I finally finished it! It's taken me since the end of March 2022 (on and off, I got sidetracked making Alligator Loki for a while) but my prototype wyvern is done
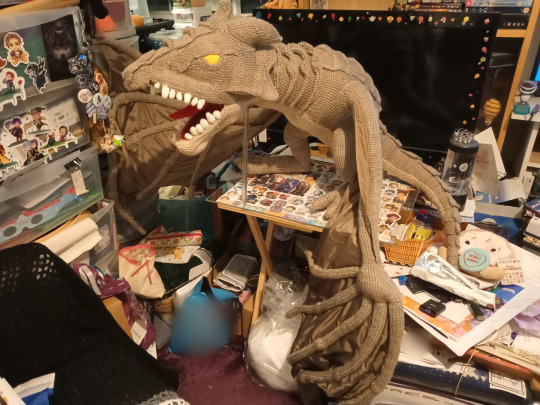
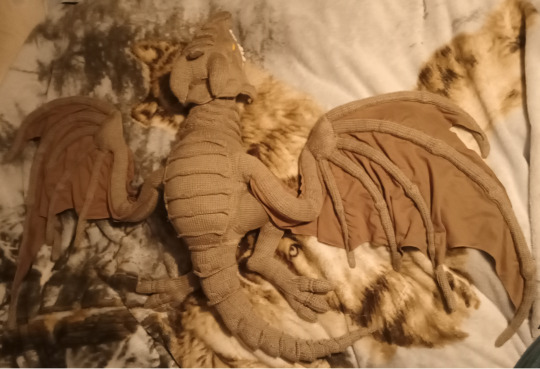
Wyvern is 123.5 inches / 10foot 3.5 inches / 313.69cm wingtip to wingtip, and 56 inches / 4 foot 6 inches / 142.24cm nose to tail tip, and roughly 6 lbs / 2.72 kg ish. So a chunky baby
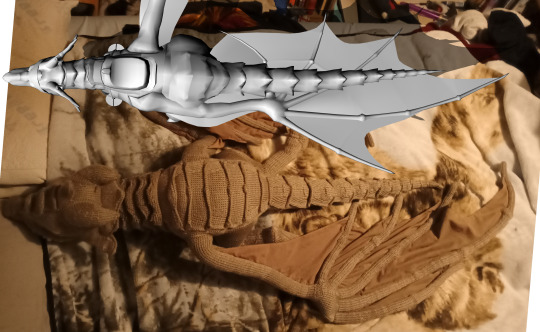
He was made out of aran weight yarn using a 5mm hook and for the most part is Tunisian knit stitch. His toes were done in Tunisian simple stitch, and I think I did his teeth in normal rounds?
And now I do a cut to save everyone's feeds from all the pictures I'm going to share ^_^
(For reference, here are two photos of the wyvern from in game)

First, a few more angles on wyvern, and then I'll point out things I want to change for the next one


He's a handsome lad, and very recognisable for what he's meant to be!
But he also could be improved. A lot
Example 1, I lined up wyverns nose and tail tip against the in game 3d model to see how close he was to being accurate. And, er. yeah.
To give myself credit, when I first started this back in March 2022, I was working out lengths and widths and general sizing from screenshots taken from examining units in Three Houses, where I traced the outline onto a sheet of paper to measure things and perspective makes things AWKWARD, ok? (As is having brain farts and not remembering that the ruler had metric on the other side of it, but shush, let's not mention that bit)
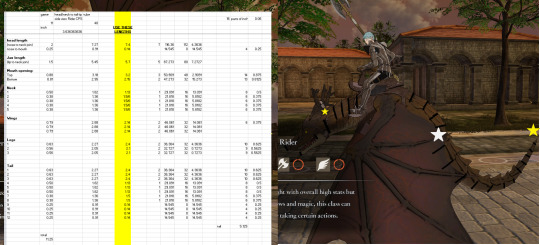
So the biggest thing to fix will be the scaling, if I can. I can definitely make the tail longer, the head shorter and thinner, the chest between the wings thinner, the wing sockets bulkier, and thanking all the stars, the wings get to be smaller too. By a LOT
The other major thing I want to do different/better is how the ridges along his back from nose to tail tip work.

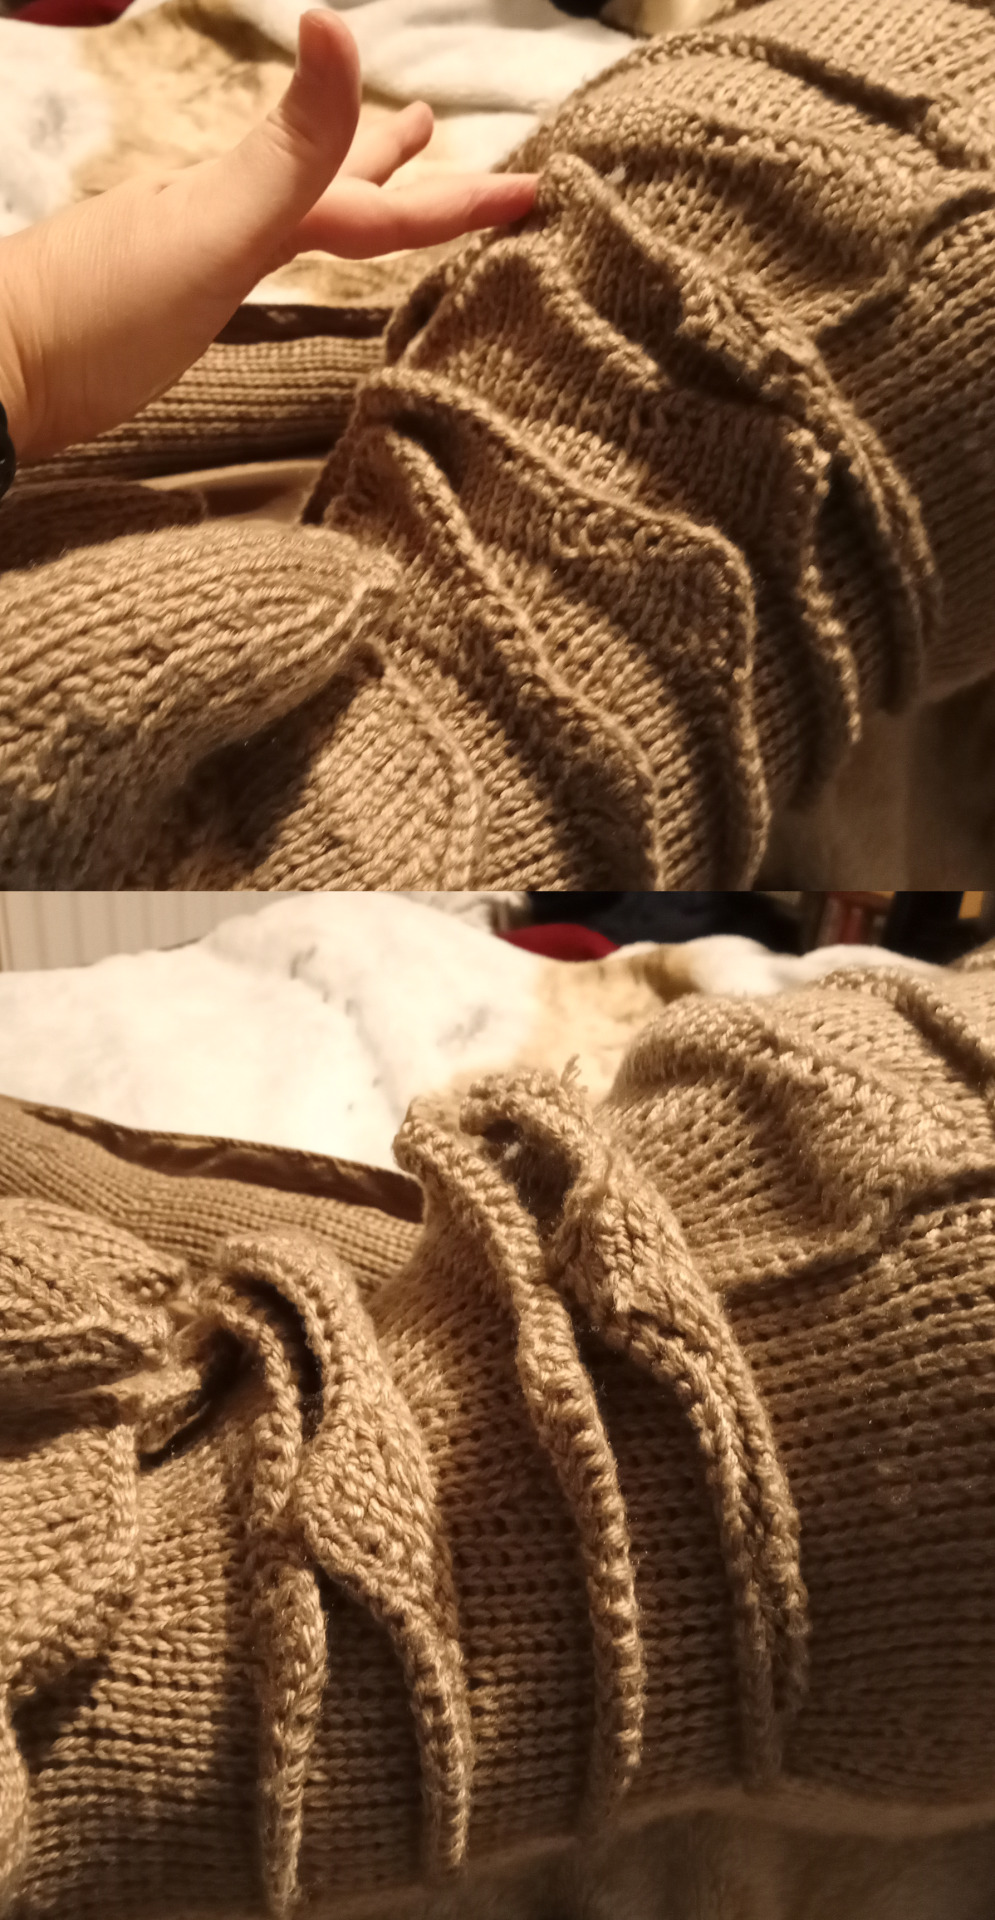

While they do work on wyvern, they don't look as great as I think they potentially can? So I'm going to be doing double layers of crochet, sort of, to help give the sticky up bit of the overlapping ridges more definition, and hopefully make them look like the slightly thicker scaling they're meant to be. It'll also help to smooth them out, so they won't have the weird dips where I've joined one to the next
I'm going to do the wings differently too, because what I did with these ones was quite frankly awful? I cut each wing segment into individual pieces to then hem and flip inside out to over sew the visible edges, and then hemmed up the sides that went inside the struts to then sew the crocheted parts to the fabric. So the fabric was the cheese to the crochet bread in this awful, awful sandwich situation.
I am also never, ever buying anything that is even vaguely silky or satiny or slippery ever again for anything
For the next one I'll keep the two pieces of wing fabric as one big piece, since the top and bottom of the wing membranes are actually slightly different colours if you look closely, but I'm going to cheat and use some of that iron on hemming tape stuff to fill the inside of the fabric after I've done all the outer hemming and over sewing so it'll kind of look like all the veins and stuff that the membranes have? So the fabric hopefully won't slip around so much, so will be easier to sew, and keeping it as one big piece means there's less change of me messing up the positioning of the struts on the panels because the wings on this one aren't equal despite my best efforts
Next is Claude's white wyvern, but it'll be made with DK yarn and either a 3.5 or 4mm hook, so it will (hopefully) come out significantly smaller than this one. And that one is going to get plastic boning/skeleton in it, so it'll be poseable!!!
52 notes
·
View notes
Text
DIY Duvet Cover

Project by Brett Bara:
I don’t know about you, but I never cease to be shocked at the price of bedding. And nothing sets off my “I could make that myself so much cheaper and better” instincts like duvet covers. It’s just a big flat case of fabric, yet even the simplest options easily soar into the three digits—but all it takes to make your own is a bunch of fabric, a few straight seams, and a spare afternoon.
Not only will going DIY with your duvet cover save you some cash, it’ll also allow you to custom-make exactly what you are looking for. What’s better than that? Let’s go! –Brett Bara
What You’ll Need
Approximately 10 yards fabric (see below to calculate exact amount; I suggest buying extra just in case)
Yard stick, long quilter’s ruler or tape measure
Sharp scissors
Straight pins
Sewing machine
Iron and ironing board
Selecting and Preparing Fabric
I recommend machine-washable cottons or cotton-linen blends for duvet covers. Quilting shops are a great place to look for fabrics, as there are tons of choices there for cottons in tiny prints, large prints, solids and everything in between.
Here I’m working with Denise Schmidt Hope Valley Piney Woods from Free Spirit Fabrics.
Be sure to wash, dry and iron your fabric before beginning to pre-shrink it.
Fabric Tips
*If you find yourself head over heels for designer bedding, check to see if you can buy two flat sheets from the line, and use these to sew your own duvet cover. This can be much less expensive than buying the duvet cover itself, and sometimes the manufacturer uses the very same fabric for the sheets as for the duvets, so you’re really working with the exact same material.
*Consider using a different fabric for the front and back of the duvet so that the piece is reversible—two looks for the price of one, and a special bonus for the décor commitment-phobes among us.
Planning and Cutting
There aren’t strict standards for bedding sizes in the US (comforter sizes tend to vary among manufacturers), so I recommend measuring the comforter you plan to cover and using those numbers to plan your duvet cover.
Since fabric generally isn’t sold in widths wide enough for a full duvet, you’ll need to seam a few panels of fabric together to make the front and back. I suggest placing one full panel down the center of the duvet with two smaller panels to each side of it; this is generally nicer-looking than making one seam down the middle of the duvet.
NOTE: Remember that you should trim off the selvedge edges of your fabric (these are the finished edges on both sides of the fabric which are a little different in texture and/or color from the rest of the fabric) before sewing. Remember to subtract the selvedge edge from any measurements as you plan your piece.
Measure the width of your fabric without selvedge; plan to place one full panel of fabric down the center of the duvet and two smaller panels to each side of it. Simply make the side panels as large as they need to be to reach the desired width of your duvet cover, adding 1” to the width of each panel to allow for seam allowance.
So, if your center panel needs to be 40” wide and each side panel needs to be 20” wide, cut the panels 41” wide and 21” wide. Those extra inches will be consumed by the seams.
The length of your duvet is simply the desired finished length plus 2 ½” for hem and seam allowance.
*Remember that you need a front and a back, so plan all your measurements and double them to calculate the total amount of fabric you’ll need.

Here’s what your panels will look like when they’re ready to go. (Note: I’m making a mini duvet here to make it easier to see the big picture of shape and construction.)
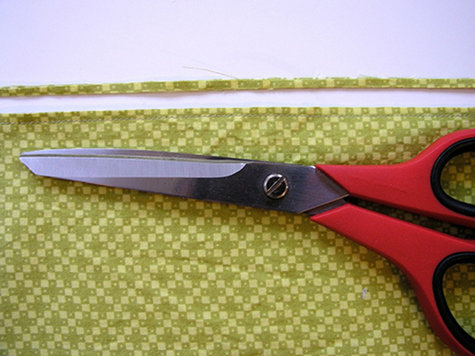
Sewing: French Seams
To begin, you’ll sew each side panel to its corresponding center panel, to make the front and back of the cover.
For a really nice professional-looking finished result, I recommend using French seams in this project. These seams are finished on both the inside and outside, so that no raw edges of fabric will be visible anywhere.
French seams may sound fancy, but they’re really easy! Here’s how:

Place two pieces of fabric WRONG SIDES TOGETHER. (This is the opposite of normal; usually you sew most seams right sides together.)
Sew the seam with a ¼” seam allowance.
Trim away about ½ of the seam allowance, being careful not to get too close to the stitches.
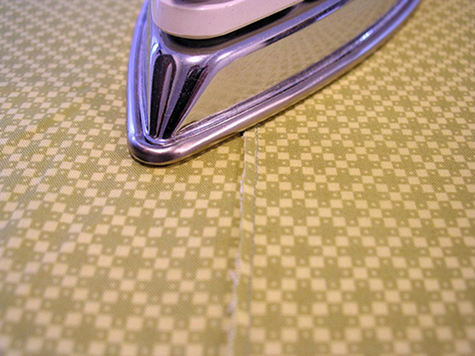

Iron the seam to one side, then fold at the seam so that right sides of the fabric are facing together, and iron the seam closed.

Pin the seam closed to avoid shifting, and sew it again with a ¼” seam allowance. Iron this seam to one side, and your French seam is done.

From the outside it looks like a regular seam, but on the inside all you see is this nice finished flap. Nice, right?!

For a nice finishing touch, you can top stitch to tack down the flap. All you do is top stitch on the right side of the duvet alongside the French seam, stitching over the folded-over flap in the back.
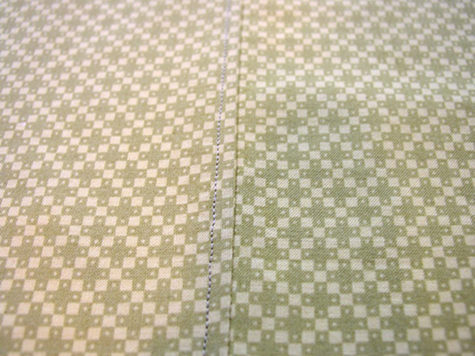
Iron the seam once again after top stitching to smooth and relax it.
Repeat for all center/side panels so that you have a complete front and back.
Attaching the Front and Back Together
Place the front and back together with wrong sides facing, pinning each side seam in place. Sew each side with French seams as described above (but skip the top-stitching for the sides). After sewing the sides, sew the top closed with a french seam as well.

The inside of the duvet is now fully finished, with no raw edges visible at all. Isn’t that nice? Here is what the corners will look like on the inside.
To hem the bottom of the duvet, fold 1” of fabric to the inside and press. Fold up another 1” and press again; pin folds in place.

Stitch hem close to the exterior fold line and again close to the interior fold line.
Getting Closure
You have many options for closing up the bottom of the duvet (in each of these cases, I suggest placing a button/snap/ribbon about every 8” along the bottom):
*Buttons and buttonholes: easy to do with the buttonhole attachment that comes with most sewing machines.
*Sew-on snaps: very easy to sew on by hand, and quick to snap/unsnap when you change the duvet.
*Snap fastener kit: All you need is a hammer and the special tool that comes in this set to attach snaps without sewing for a very professional-looking result. (Check the instructions on the package.)
*Ribbon or twill tape: even easier to install. I suggest tucking 10” lengths of ribbon or tape under the folds of the hem before sewing it.
*Zippers: long zippers can be purchased online; you might consider a zipper closure along the bottom, using the same zipper-installation method as the zippered pillow cover.

That’s all there is to it! Don’t you feel so wonderfully nice and cozy with your new handmade duvet cover?!
14 notes
·
View notes
Text
My last post about the progress on my Batuu vest left off with me contemplating exterior pockets, looking to Bix Caleen as an example of a fitted vest in the Star Wars universe. I ended up talking myself out of any visible exterior pockets, with or without flaps, after looking at all those pictures of Bix. I've got enough other bits of visual interest going on with my outfit that I felt like exterior pockets just cluttered up the look.
Once I had decided against adding additional pockets, I was able to move on to the next step: finishing all the edges and attaching the lining to the exterior in preparation for getting the zipper in place. I turned under the armscyes of the lining and the exterior separately, both using a blue lace hem tape that I originally bought to go with this fabric back in 2016. Eventually I'll top-stitch them together with the hem tape sandwiched invisibly between the exterior and the lining, but for now they're finished enough to allow me to try the vest on without fraying the armscyes.
It took me awhile to think through all the steps for attaching the zipper, with all the asymmetry and overlapping and exterior and lining, while also not wanting the zipper to show from the outside at all. Eventually I figured out that I would need the underlap (left front) to be completely sewn together with the edges finished before I could attach the zipper to that side -- but I would need the overlap (right front) to not be sewn together yet, so that I could attach the zipper just to the lining.
With that finally figured out, I put the lining and the exterior together with right/finished sides together, lined up all the seams and notches carefully, then pinned the edges together from the left (underlap side) shoulder, down the center front of the underlap, and around the lower edge of the vest all the way around to the bottom corner of the center front on the overlapping right side of the vest.
After a lot of ironing to get all of that to lay flat when right side out, I was able to trim the center front edge of the overlap to be nice and clean and straight again. When I drafted the center front panels, I modified that right side to have an additional ~2" of width past where I wanted the zipper to be, specifically so there would be a built-in flap to cover over the zipper. Remember: no visible zippers in Star Wars!
Once I had the overlap panels of both the lining and the exterior all trued up, I marked the center front line on the lining side (in the below pic, the angled line going from lower left to upper right), laid half of the separating zipper onto the fabric so that the teeth were lined up with where the center front line met the lower edge of the vest, then measured from the outside edge of the zipper ribbon to the cut edge of the overlap panel. It was just about 7cm away from that edge, so I measured that distance all the way up (past the dashed line that marked the underbust elevation) and drew a nice crisp line with my chalk pen.

That gave me an easy line to follow when sewing the zipper to the inside/lining of the overlapping flap. Since I hadn't sewn the edge of that panel together yet, I was able to move the exterior layer out of the way and sew the zipper only to the lining, for now. I sewed one line of stitching just slightly in from the outside edge of the zipper ribbon, then did a second pass about halfway between the edge and the zipper teeth. It's on there nice and secure, but has a bit of room to separate from the fabric while it's being zipped, so it doesn't get fiddly.
After that, it was just a matter of pinning the other side of the zipper to the lower front corner of the underlap (this time on the exterior side of the fabric, where it faces the lining of the overlap), then try it on with the rest of my Batuu Bounding outfit and pin the underlap side of the zipper until I had the fit I wanted.
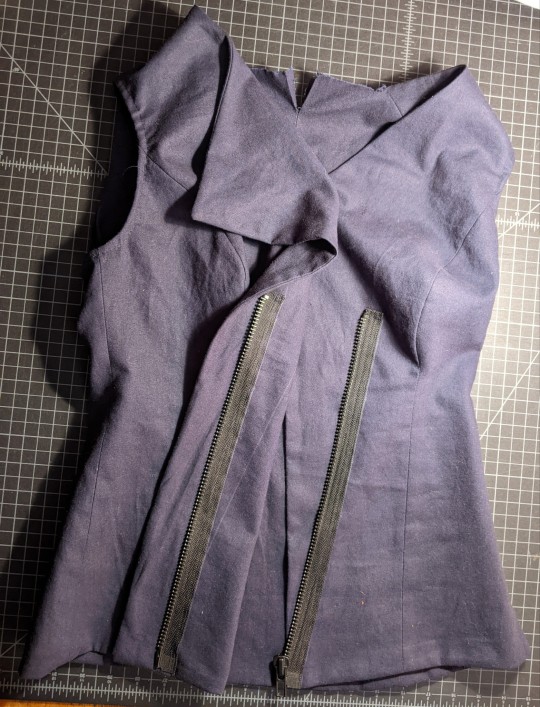
I sewed down that side to match the overlap panel side of the zipper, then tried everything on again to double-check the fit. It was a bit weird with the exterior of the overlap flap still unattached, but it fit well enough that I decided to sew the edges of that overlap flap from the lower corner up to the shoulder seam. The back of the neckline is still open, and the armscyes have been turned under but not attached to each other yet, so I can turn the whole thing right side out by pulling it through the back of the neck. With all that ironed and the zipper zipped up, the vest looks like this currently:
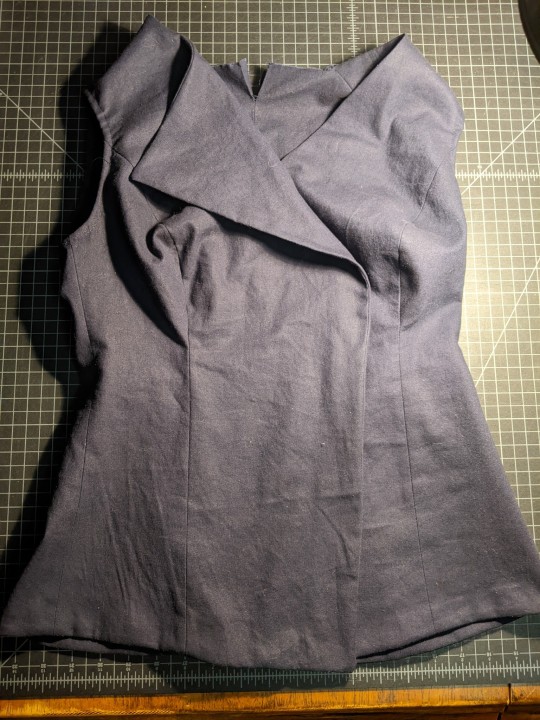
Folding back the outer edge of the overlap reveals the zipper. Because of all the overlapping and underlapping, the zipper is just top-stitched in place. It was way more mind-bending to figure out where everything needed to be placed to get this look, but way easier to actually sew on than, say, an invisible zipper set into a seam.

At this point I was able to try on the vest (with my Jyn Erso sweatshirt) and get a pretty good idea of the overall look. I still want to do a bunch of top-stitching both for accent and to help everything lay flat, but even with that I think I'm going to need something to keep the flap over the zipper from coming open.
I looked at a bunch of options for Star Wars-y looking buckles, settled on one I liked the best, then cut the basic size of them out of paper and taped five of them to the outside of the overlap just to get a basic idea of how it would look. I got Jack to weigh in on it too, and we both felt that the buckles were reducing the sleekness of the vest, and weirdly pushing it more towards an Imperial/First Order sort of look. My character isn't an out-and-out rebel, but she doesn't side with the First Order either. I pulled the taped on paper off again, and both Jack and I felt that that was the significantly better look.
But since I knew I still wanted some sort of closures to keep the flap down -- including one at the top left shoulder, that will hang open most of the time, along the lines of Han Solo's and Cassian Andor's shirts (and a bunch of others, this sort of overlap detail shows up frequently all throughout the franchise) and thus be visible where it hangs open.
I ended up finding these slightly unusual looking hooks-and-eyes that I think will provide a nice, nearly invisible look through the torso of the vest, but not look totally out of place on the flap edge that's hanging open. Bix's fitted coat has a similar closure of just barely visible, just slightly odd hooks and eyes, so I feel like I'm in good company there. They should arrive tomorrow, giving me enough time to hopefully get some of the top-stitching done before then.
That top-stitching is the next step, and one of the last things I need to do for this vest project. I want to top-stitch just inside all the finished edges, including the armscyes, and on each side of each of the seams, probably 2-3mm away from the edge and the seamline. That's going to involve getting everything lined up correctly and all the seam allowances lying flat inside the space between the exterior and the lining, but I think the effect will be totally worth it, both for the smoother fit and the subtle visual interest.
After that, I'll have some handsewing to do to invisibly anchor the zipper to the exterior of the overlap panel and to attach the hooks and eyes, once they arrive. The very last thing I'll do on this project is decide if I want a little stand-up half collar that ends somewhere on top of the shoulder, a bit like the one on Jyn Erso's vest.
I'm pretty sure I want a collar like that, the question is just if I need to lower the neckline in the back first, and then how far forward on the shoulder I should bring the collar. Once I've decided on that, I'll cut it out in two layers, lining and exterior, and sew the outside edges together. Then I'll be able to sew the lower edge of the exterior to the back of the neckline, and hand-sew the lining lower edge to fully encase all the raw edges. I did something similar with the Moment vest, and it comes together pretty quickly. I think I should be able to have the vest completely done by this time next week without much trouble. Hopefully.
Alongside working on my vest, I've been continuing to hand-sew the pleated panels onto Jack's jacket. In the tags on my last sewing update, I mentioned that I had about 5" still to go on the first panel. I was in the really annoying section in the middle of the sleeve where I really had to put my whole arm into the sleeve just to pass the needle through, and it was slow-going. I had to make myself push through that annoying section, rather than continue to put it off.
Eventually I worked my way all the way down to the cuff, cut off the excess from the pleated panel, turn under the edges of the lowest pleat, and hand-sew that into place. I am so pleased with how it turned out, but to keep Jack from making jokes about only having one sleeve done (and so that I wouldn't find myself with time to hand-sew and nothing ready to sew), I quickly pushed on to getting the second pleated strip started. I took a bunch of measurements from the finished sleeve and transferred them to the second sleeve, pinned the pleated panel into place, and had Jack try it on just to double-check the placement.
I was able to tear through the upper section of that second panel, between my increased speed and confidence in my method of hand-sewing this, the easy access through the neck side of the jacket, and a couple of long-ass work meetings where I was basically just there to listen in and take notes every now and then. As of posting this, I'm about halfway through with the second panel, and starting to get into that annoying section of the sleeve again.

The effect of the pleated panels on both sleeves is just so cool that I will definitely be getting photos of the jacket on Jack at some point, either on our Disneyland day or during a try-on before that. He's somewhat allergic to photos, but damn it I'm proud of how this looks, and I want to show it off. I've been calling it a 'sewist flex' from the very beginning -- look at what I can do, look at how cool and Star Wars-y it is -- and I'm really looking forward to sending this beauty out into the world in all its epicness.
And I think Jack feels similarly, based on how he's been talking about wearing this jacket all the time once it's done. His whole outfit together (this jacket, cream colored henley shirt with the buttons and bottonholes removed, mustard-y tan moto jeans, hiking boots) looks wonderfully casual Batuu Bound. The effect of the whole thing is Star Wars, but none of the individual pieces feel weird or costume-y. He might not wear those pieces together for anything other than going to Batuu, but each piece paired with something else looks pretty normal. So if Jack is able to get a lot of wear out of this modified jacket, all the better. I know I'll get that burst of sewist pride every time I see him wear it, lol.
#my sewing#Batuu Bounding#Batuu vest#Jack's jacket project#2024 mood#long post#10 days to go and I'm using all my excitement to keep making progress on sewing#also I've started rewatching The Mandalorian if only as a way to take a break from all the Star Wars YouTube videos I've been watching lol#there are still a couple of other tiny details I would like to do if I get time for them. in particular:#finding a way to cover the laces of my Doc Martens and the buckle on my belt#adding a place or two for 'code cylinders' on both my outfit and Jack's (especially since we don't have any other greebles)#breaking out the needle-nose pliers to adjust the length of some earrings that look cool with my outfit but hang just a bit too low#and finally gluing down the wraps on my kyber crystal necklace so I can be confident that the crystal won't fall out at some point at DL#the necklace is really the only one that MUST be done. the rest are entirely nice-to-have but I'm hoping I'll have time#and on that note I should get back to sewing lol
5 notes
·
View notes
Text


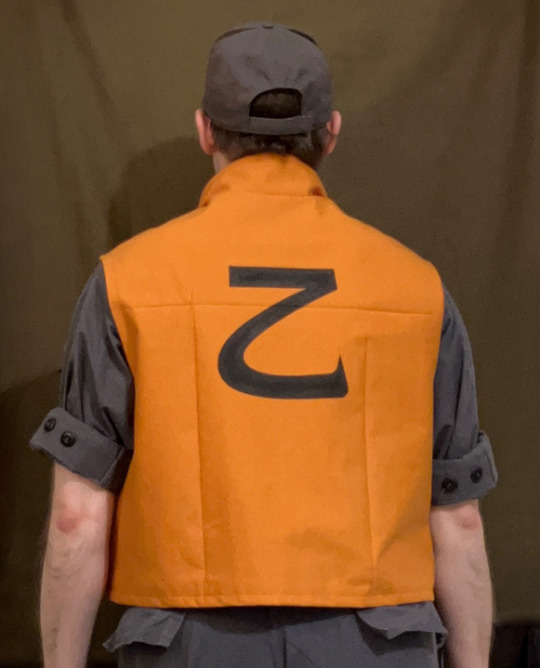
Army guy from AKIRA costume completed.
Details below:
I think I was up just past eleven last night hanging the flak jacket to dry. Got up at 6:30 AM to finish work this morning.
Took a little time to try to iron in some creases to accentuate the top stitched details on the front and back.
Decided on the back symbol and redrew it in Illustrator. Cut an adhesive black vinyl version, which would not stick to the vest fabric (?!), so I cut a stencil out of some other adhesive vinyl. Mixed up a 'primer' coat of orange by eye to seal the edges of the stencil, quick dried it with a heat gun, then applied the black paint and heat gunned that.
Clumsily hand-sewed the shoulder patch on. And, of course, forgot the gloves in the car.
Moderately proud of this. Pretty accurate, all things considered. All cotton, so about as cool as it could be. Flak jacket made entirely from scratch, based loosely off a store-bought pattern. Fully lined and interfaced! Wire in the collar, fully functional box-pleated pocket, and fully functional zipper! A big, dumb, sweaty, sore, pain in the ass to make, but mission accomplished.
15 notes
·
View notes
Note
I have a quilting question! That being, I’ve never quilted before but I have a gazillion squares of fabric (thrift store whoops, didn’t realize it was cut) and I need a new quilt. If I’m trying to do a basic “I want a warm blanket” quilt, would I just… sew a checkerboard of the squares together, then get batting and idk, a piece of matching size fabric for the back? I have a sewing machine but nothing specifically quilting I don’t think.
Hi! You've got the basics down, that pretty much is the bare bones of quilting and if you want to start with just that you absolutely can.
There are some steps that can make the finished product a little less lumpy and/or a little more durable (ironing, basting, stuff like that) but off the top of my head I don't have specific resources to point you toward? Let me see if any of the quilt youtubers I watch have some videos on it
okay this quilter doesn't seem to have a "never made any sort of quilt before" tutorial but once you've made one quilt I recommend Just Get It Done Quilts (or if you want to be particularly ambitious about your skills, before your first quilt? I found a lot of technique advice only made sense to me after I'd made my first quilt, but you might learn differently than I do). She has a lot of pattern videos and a lot of technique videos.
This seems like a decent very detailed step-by-step guide to making a quilt from start to finish (I just glanced at it), but I will tell you one thing that most of the guides you will read will disagree with:
If you are making a simple patchwork for your first quilt (aka a checkerboard of squares) and you aren't super picky about the exact finished size, you do not need to worry about the 1/4" seam allowance. You can ignore all of that and come back to figuring out how to do it later. For simple patchworks, it's just important that your seam allowance is consistent.
So, if you're not super familiar with sewing but are using a machine, just line up the edges of the fabric with the edge of the foot on your sewing machine, and whatever that is will be fine (as long as the seam allowance is large enough to not unravel. It'd work for all the sewing machine feet I have, but I have not seen all the options)
also tagging in @creations-by-chaosfay, who has been quilting a lot longer than I have. Do you have a good step-by-step starting guide to making your first quilt?
#ask away!#writerproblem193#once you make your first quilt it makes a lot more sense#but it's difficult (for me at least) to find online resources for people who have never made quilts#all the resources I've found assume a base level of knowledge most people don't have before making their first quilt#(about like the names of parts of the quilt and the names of steps of quilt making. things like that)
37 notes
·
View notes
Text
Salem version 2.0 updates
I posted about my orb prop for Salem but now I’m going to a big info dump on the updates for the dress remake. (Reference pic below)

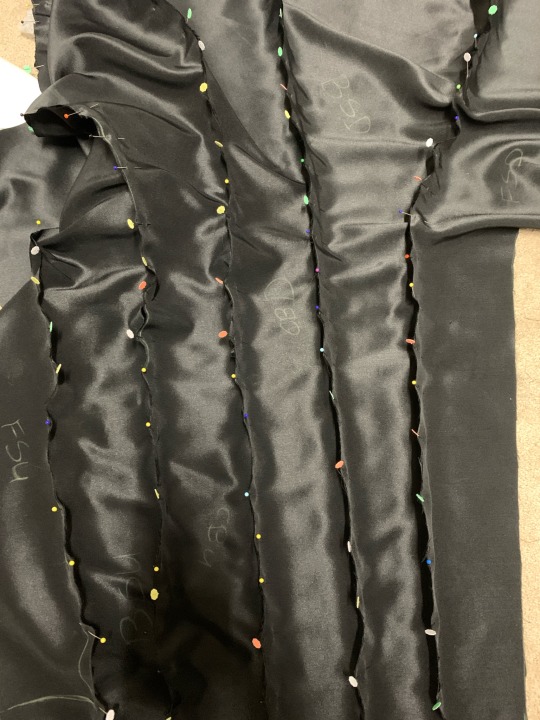
The dress is about 10 yards of fabric for each layer (matte satin outer layer, red taffeta lining). I combined two different commercial patterns and then did about 3 different mock-ups and some draping to get the shapes. I had to bulk order fabric for this project and it was absurd to see how much fabric there was when I went to cut my pieces. Cutting took me 4.5 hours and then ironing out all the wrinkles took me another 2 hours.

I made a questionable decision and decided to make piping out of some stretch vinyl in my stash and some random rope cord I had. I made over 200 inches worth of this so that I could add it to the edges of the collar, boob window/cut-out, and sleeve openings. This was such a struggle. I honestly don’t know if I would recommend doing this.
I spent a day or two just sewing everything together, pressing the seams flat, and adding a zipper to the main dress. Then, it was shenanigans time (aka: detailing).
For the red designs on the cape sleeve and bodice, I wanted to use those to add technical difficulty since I will be competing in Salem 2.0. I decided to do a mix of satin stitching and beading appliqué techniques.
I cut out the designs from taffeta and also heat n bond (two-sided adhesive for fabrics). I used my iron the get the taffeta in place and then fiddled with the zig-zag stitch on my machine until it was very dense. I went around the edges of all the shapes with the makeshift satin-stitch and had tear-away stabilizer underneath the fabric. After I finished that purgatory, I broke out silver-lined glass beads and started hand-beading. I did that part over Thanksgiving when I had time off work so I was able to finish the beading in a week. I used over 2,200 beads (seed beads and bugle beads) for both the bodice and the cape.


Now, I’m having to actually attach all the pieces and get the lining installed since all the detailing is done. It’s just a matter of getting the dress together, pressing my seams, and making fit adjustments. I’m also adding pockets to the sleeves so I can have somewhere to put my phone and emergency snacks.
2 notes
·
View notes
Note
coming in with the unwanted sewing advice because I cannot help myself (i'm so sorry) you could probably use a lining for that cloak. even if it isn't strictly necessary (which, without further details I cannot determine but it seems Unlikely) it will 1. add insulation 2. finish off all the edges and pretty the inside of the cloak and 3. make the skin feel Good Texture rather than Bad Texture.
also this is a reminder for me as much as it is for you to press your damn seams. it does make a difference, it's always worth it, just do it (if you have an iron available, of course)
Yeah, I probably will do the lining. I'm just really worried about fucking it up and wasting cloth when it's turning out alright without the lining, because the pattern I'm using only gave lining instruction for the hood, so I don't actually know HOW to add lining to the main body, and I'm just applying the logic used on the hood to the rest of it. And in my usual experience, "It's fine, I can just figure this out" tends to have a 50/50 chance of being fine or going horribly wrong.
The original pattern was supposed to be done in fleece, which is already insulated and comfy and doesn't need too much finishing, and the cloak goes all the way around you, so it was fine. But I'm using velvet instead of fleece because 1) looks prettier and 2) it's really really hot where I am, and I wanted to use something a liiiiiittle lighter than fleece. The tradeoff is that I definitely need to finish it, and I probably need a liner as well (Plus, I can add inside pockets if I do a liner!!!). So, yeah, the main hangup is that Sporks Will Screw It Up And There Goes That Money And Time Down The Drain, but I probably doooo need to add that lining.
I can't use an iron on velvet, do you happen to know any ways to press the seams that I could use instead?
2 notes
·
View notes
Text
I am sewing a late victorian walking skirt to use in my Halloween costume (and then on as part of my regular wardrobe) on my lovely treadle sewing machine made in 1900.
The disadvantage of my treadle machine is that she sews in a straight line, forwards, and nothing else. No backstitching, no zig-zagging. So to finish off all my raw edges I will enclose them in bias-binding.
I do not have an ironing board. I have one of those sleeve boards and a pressing ham. So anything other than pressing open seams will not be happening.
So because I am currently sewing in my teeny tiny college dorm room where the largest horizontal plane is my 1,6m x 2m bed (if I remove all the extra cushions, blankets and pillows) I actually took the time yesterday evening to actually baste my lining to the outer fabric so that the whole flatlining thing gets easier and I don't have to deal with as many pins.
Also, sewing pin inflicted wounds that drew blood count: 4
#but hey! My machine can automatically wind the bobbin for the lower thread!#sewing adventures#she speaks
9 notes
·
View notes
Text
Garbage Farm (#42)
2023-03-17, Garbage Farm session #42 (I think), spanning from Summer 4 Year 4 to Summer 15 Year 4
Cast:
me (@mothmute )
E.B. (@salamand3rin)
Kimi (@2kimi2furious)
Highlights include, but are not limited to:
Alex is gonna start reading books and be a nerd now, to everybody’s horror
we’re out of wood!
Pierre called, says he has “the finest” seeds and produce
what produce is that, pierre??
Robin finished Pam and Penny’s new house!!
she spends some time rambling about the woodworking
we choose not to take credit, causing Pam to refer to their anonymous donors as “pure angels”
Robin evidently tells everybody anyway, ‘cause everybody seems to know.
“snitches get stitches, robin!”
Frucko isn’t visible in E.B.’s version of the cutscene, so she just sees me running around and doing a little hop
Should I buy shortcuts for $300,000? yolo
Harvey is nowhere to be found, it’s E.B.’s turn for garbage marital strife :(
We forgot to remind Kimi to make the fancy purple shorts
Haley sleeps through rock time when Kimi goes to use Emily’s sewing machine
Lewis is now afraid of and mad at Kimi
The ducks keep taunting us by going up to the edge of the pond ... and stopping.
Shane wants garbage money too, now, goddammit Robin
Speaking of Robin, she’s now hitting a cliffside with her hammer in the middle of the night
BIG WINE MONEY
Kimi likes jumpscaring Lewis
Marnie just giggles about it
I get caught with iron crumbs all over my face.........
(There was a train but I missed it)
Robin mailed me some wood, I guess she realized we direly needed more (we always need more wood)
New cows, Jumbus and Zartino
Kimi says Stardew’s random animal names are “so cursed”
I begin breaking down the keg-shed, but hitting each keg is taking forever
hey, what if I just set off a bomb to break them? I’m so smart :)
OH NO IT DELETED THEM I AM NOT SMART THIS IS A DISASTER
lmao RIP me, laughing about it is the only way to keep from crying
Emily mailed me a sea urchin!!
We were talking before the session about somebody marrying Emily just to get her very special hat, only to give it to a sea urchin — this is approval!!
Worst part of making new kegs is gonna be getting enough oak resin, so I plant a buttload of oak up by the train station
ugh I’m gonna have to make extra tappers...
(it’s my fuckup, I can take responsibility for it)
A rare crow is spotted on garbage farm, eating the fiber field.
I start buying my way out of my mistakes (specifically: iron, copper, some wood, some stone, some extra coal)
Kimi borrows Frucko
Alex and Harvey both want to know what their spouses are gonna put in the soup. I guess they haven’t been initiated into that level of the Garbage Mysteries
Starting another pond, I get a special line about how Robin’ll start the day after tomorrow, since she always takes festivals off. I don’t think I’ve seen that before, it’s a nice touch!
okay, I made a bunch of extra tappers
Luau day!!
The melons are ready, but we can leave those for the day after
Everybody is at the luau except for Pizza :(
Every year, the Governor says this is the best soup he’s ever had—
is our soup getting better every year? is the governor a liar??
“maybe he’s forgetful” shhhh my theories are more fun
“maybe he goes around complimenting towns’ soups”
“maybe it’s a new governor every year, they replace the old one with a clone”
The Bloobening!
(ask not for whom the berry bloobs; it bloobs for thee)
Witchcraft?? In Garbage Farm???
(it’s just a void egg, we’ve got void eggs at home)
more cows, Bollello and Matchu
This is not good weather for sports!
Kimi visits the desert for fashion!
(dweeb fashion, she gets suspenders)
“we got oak resin?”
... actually, no!
Kimi stays up crafting in the shed and dies.
Marlon says he found her face-down in the mud ... in our shed.
???
E.B. tries to pick up some batteries near the desert obelisk and gets sent to the desert, good thing there’s a bus
“who’s watering the fiber? you don’t need to”
I think it’s Elliott, actually!
starting to tap the new oak
I suggest a garbage derby someday
KEG TUNNEL is starting to come online......!
TO-DO:
fix my mistake ;_;
more kegs, also more preserves jars
Finish Kimi’s Hoe
if it isn’t finished already
Even more ponds??
We’re gonna need so many sea urchins
still need a big melon......
I mean I guess worst case scenario we leave the cauliflower up and try again next summer, right?
still need to venture deeper into skulls............
still need a prismatic shard for the museum???
3 notes
·
View notes
Text
The Basic Forms of Quilts
Quilts are a broad category of decorative hanging or blanket, spanning a diverse range of techniques, designs, applications, and fabric types. The most basic is the patchwork (or pieced) quilt, which involves the maker cutting and sewing together a variety of contrasting and complementary fabric pieces. Blocks are sewn together, pressed, and sewn into larger columns or rows, This sewing together is often done in a repetitive geometric pattern and can include hexagons, pinwheels, stripes, triangles, or eight-pointed stars.
Some traditional pieced quilts, such as crazy quilts and log cabins, employ “foundation piecing” techniques of stitching small pieces of fabric, not just into each other, but into a larger ground fabric. When creating mosaic-style patchworks, traditional British quiltmakers use a similar foundation paper-piecing (FPP) technique. This involves using paper as the foundation, which stabilizes the quilt block and allows for the placement of unusual, small, and detailed pieces. The paper is printed with a template, which lays out the shape of pieces and where they will be sewed to each other, or directly to the paper. Once the fabric is sewn and arranged, the paper is removed, yielding a finished quilt.
The applique quilt involves adding decorative fabric to the already made quilt, employing shapes that extend well beyond squares, triangles, and rectangles. The shapes can be cut from fabric in any design, including curves and abstract elements (as they are not sewn together, but to the underlying quilt, they do not need to match through straight lines).
There are a number of applique techniques, including the traditional needle turn hand sewing method of cutting shapes with a seam allowance, which is the area between stitch and fabric edge. The pieces are next pinned to the background in a preferred position. A sharp needle end is used to turn-under that seam allowance on each patch. The pieces can now be sewn in place using a blind stitch, with the pins then taken out. The sew and turn technique eliminates the requirement of turning under the seam allowance, prior to shapes being sewn into the background.
The raw edge or iron-on technique involves tracing the piece’s outline onto fusible web, or a thin sheet of sticky webbing. This is cut out, peeled off its backing paper and pressed onto the fabric’s reverse side, such that the shapes exactly match. When all the shapes are prepared, with the fusible web attached, they are simply ironed onto the background quilt, adhesive side down.
One essential when starting any applique project is to cut background fabrics that are larger than the target quilt size. This is because the background will often become distorted and shrink a bit as various shapes are added. Once all the pieces have been ironed on, the background can be squared.
Another technique involves making the embroidered quilt. This involves first creating a quilt with blocks that are relatively blank, which provides space for personalized stitching. The embroidery performed on this can be simple or complex, and may be used in simply outlining blocks and other shapes. It may also be used to add decorative elements such as small scattered stars, or X’s. It is also employed when adding commemorative elements to the quilt, as with a set of initials, a first name, a year, or a wedding date. Some quilt embroiderers stitch favorite phrases, while others add creative shapes, such as a set of family handprints.
0 notes
Text
-ties -done, got to try out loop turner. that was fun. finished these yesterday
-neckline facing- this was actually rather easy and nice. it's a little lopsided but it gives it character. considering i didn't use an iron and this fabric doesn't hold a crease it's excellent.
-yoke - we are 40% complete with this step. need to sew back gathers to inner yoke, iron up bottom hem of outer yoke, sew on+topstich outer yoke. probably should try to get to 50% tonight if possible, start with darts first thing tomorrow, then finish the yoke.
-darts - (i should have probably done this before the yoke but it's okay. shhhh. i can do it at 50% yoke completion.)
-sleeves - i am NOT gathering the sleeveheads. this is in line with the garment i'm basing this off of, however, i did add sleevehead gathers on my mockup because my sleeveheads were larger than my armseyes. this is fine- i will ease the sleeveheads center-> out and trim any excess. i DON'T give a fuck. i will turn and fell these like on the original.
-side seams. these are frenched on the original. will french and do the stupid turning thing you have to do when a frenched seam splits. you know what i'm talking about. this will be finicky because i haven't done it in a long time, if ever. this should be done AFTER sleeve cuffs; see below.
-collar - honestly this is going to be hellish. i think my process will be inner collar to neckline, outer collar to inner collar, turn, outer collar to neckline/topstitch. however, this leaves major room for wonky top collar edges. this is what i did on the mockup and it does look fine, but the mockup is plain weave cotton, MUCH easier to work with. alternative process is collar pieces together, turn, fit neckline inside somehow, topstitch. this alternative sounds worse, given the slippery nature of the fabric. we'll see how it goes
-sleeve cuffs - i need to add the gathering thread to these. the process here should be sleeve->gather, sleeve to inner cuff, ?????, side seam, outer cuff topstitch. this is because it is fucking annoying to gather the sleeve in once it's a circle. however, i anticipate it will also be fucking annoying to figure out how to make the thing not look bad with the side seam if i sew it first-- possibly i should sew the majority of the gathered sleeve to inner cuff, leaving a couple inches give on either side of the seam, and then french the side seam and then finish inner cuff-cuff loop-outer cuff topstitch. yes, the side seams on this one carry all the way up the sleeves. on the original the frenched seam is caught inside the cuff, which indicates a sleeve gathered into a finished cuff, which is a curse i might just have to bear.
-bottom hem. easy peasy lol. only concern not yet noted above is that i MIGHT run out of thread and have to run and get more.
-> done
due: as early in the day thursday as possible.
#i also have to finish blind hemming one of the legs of the pants i'm going to wear. don't look at me.#i may complain but i LOVE this that's why i'm doing it to myself.
0 notes
Last Seen Blogs