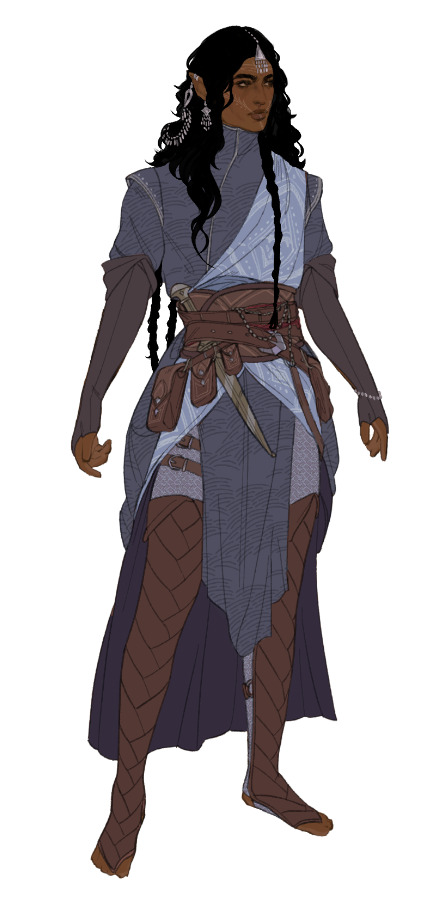
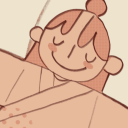
#I'll clean these up in CSP later
Text
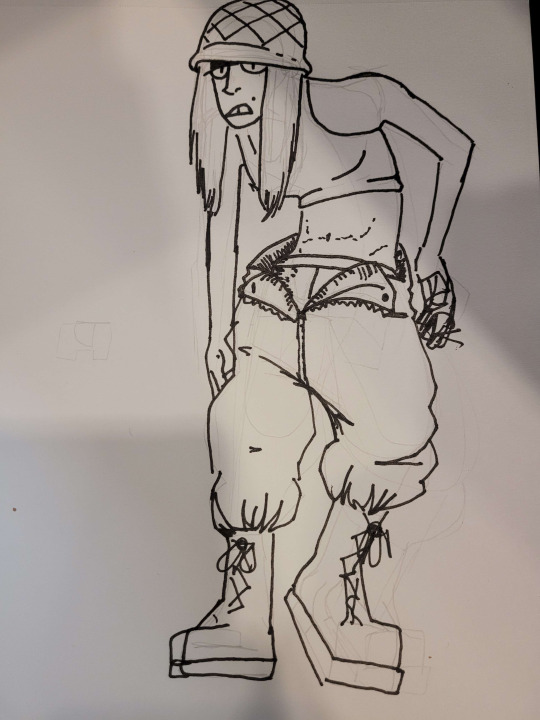

Her name is Johnny she's the worst ever.
#failwoman oc#my art#sketches#traditional art#I'll clean these up in CSP later#just wanted to post something#she's terrible and is in every war ever all at once (mentally and physically)#yes her pants are always down but her boots are always tight#and yes i cannot draw hands right now sue me
35 notes
·
View notes
Note
Hey! I love your art a lot, and you've helped me learn a lot about other things aswell. I just wanted to thank you for all that! ❤️
(This part is optional: I was wondering if you have any process videos of the full body character designs, you do? Like with the different outfits? I love the texture of that particular style of yours so much and would love to learn to integrate some aspects into my own art, If you would allow for that?)
Hi and thank you! It's much appreciated and I'm glad you stuck around :)
That's totally fine! Unfortunately, I don't think I have any process videos of the character designs (they take me a while and I go back and forth a lot with outfits so I never have space for them on my computer) but I can give a run-through of what I do!
- this is only applicable for CSP -
Step One:
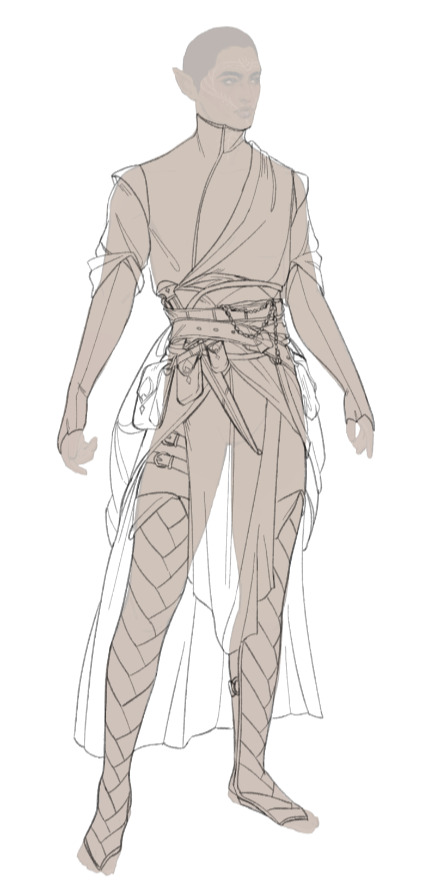
First Image: So I start with the base, I go about these like those paper dolls. I sketch these out, line them, and color them in as I would any other lineart - however I merge the layers after I'm done. They are always bald because if I'm going for an outfit lineup I can change up the hairstyle depending on the clothes. Second Image: After I merge all the layers and lower the opacity, I can sketch the outfits on a different layer - If there are smaller details I want to include I usually sketch them in a different color so I can see it clearly.


Step Two:
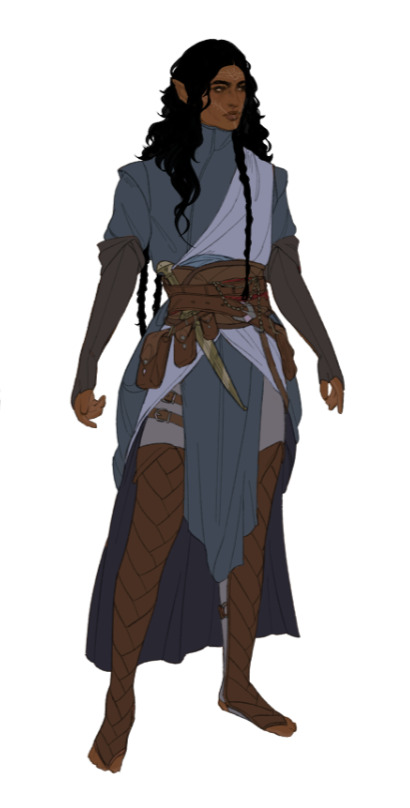
First Image: after sketching out what I want, I turn down the opacity for the sketch layer and line over that. I use a really high stabilization because I have shakey hands and it always looks clean with a high stabilization. For things like jewelry, I don't always do line art (mostly depends on how small it is) but I save it for later. Second Image: I don't always do hair as a solid color but In this case, I painted the hair on a layer above both the lineart, base, and coloring layer. Coloring the lineart is pretty standard, nothing fancy (I use the fill tool to speed up time often). Just make sure the colors are differentiated enough so you can use the color gamut tool in the next step.
Step Three:
Images One & Two: With the lineart fully colored, you can select individual colors and add or draw patterns. Most of the patterns I use are from the Csp gallery (bunabi has good ones up I use often). If you have the selection on a different layer, you can change up the layer filter or even do another select color gamut on the pattern and shade/color it yourself (this is how I do metallic fabrics). Once you're done adding patterns, merge everything except the base layer and lineart.

Step Four:
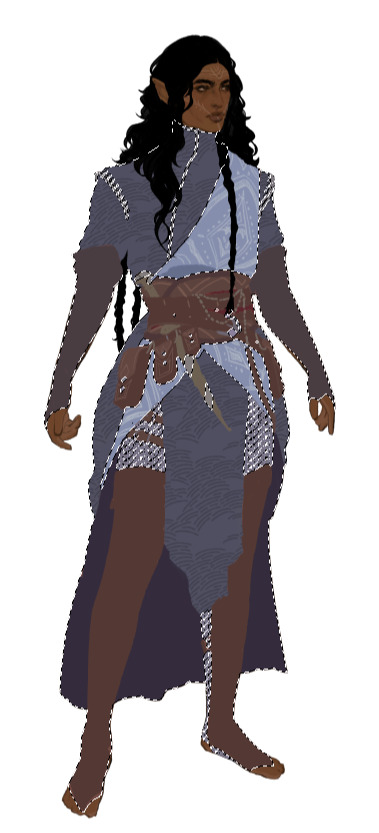
Images One & Two: For things like jewelry that would be too small to line, I freehand a silhouette of the jewelry with a bright neon color, then select the color gamut on the neon color, and then select the color outline so it has the appearance of me doing itty bitty lineart for it. I go back in on the color layer, shade it, and color it as metal, and then bam. You are all done!

Smaller things: After everything is done sometimes I'll go back in with a dark pen and go over some of the lineart where fabric creases just to give it more depth or I'll put a color filter over the final drawing just to make it all a bit more cohesive.
This is the brush I use for softer lineart:
And this is the brush I use for more thin, detailed, lineart:
Hope this helped a little, happy drawing!
167 notes
·
View notes
Text
I'm a menace and don't know how to operate Clip Studio Paint, so here's black and white Grandpa V lol. I've tried to color this twice now. The first attempt I hated. The second I tried CSP for the first time and didn't export the image correctly and it looked like hot garbage. And then I didn't save the actual CSP file, so I lost all the work I did anyway...
I'll try coloring again later, maybe. (I must be cursed. Third times the charm, but hey, practice.) That being said, the brushes in CSP are actually quite cool. Really enjoyed the watercolor ones, they kinda sorta behave like irl.
I did the sketch on paper, scanned it in, and cleaned it up a bit. Still can't draw lines I'm happy with digitally.
#cyberpunk 2077#art#fan art#oc: valerie hye jin li#my grandpa v#stinky not fresh#i hate coloring#but i'm trying#even though i insist on doing it the dumbest way possible#need to look into getting a drawing tablet with an actual screen to hook up to my laptop too#le sigh
37 notes
·
View notes
Text
My Comics Process
I've seen other people post an overview of their comic making process, so I figured I'd put up my own for Valley Echoes. Fair warning, a lot of this is probably good examples of what you really shouldn't do. There's bits to it I need to tweak. But overall this is just what works for me.
Step 1: Borderline Maladaptive Daydreaming
I have a general outline of upcoming comics and plot points, mostly in my head, partially written down in a Notepad file named "ejfiejfeij." Sometimes I'll see something like an incorrect quote or headcanon that inspires a part of a comic, and when that happens I'll try to take note of the original creator of said inspiration to credit later.
Several of my comics have been literally inspired by weird things that have happened while playing modded Stardew - one good example being this bit.
Step 2: Sketch Concept
I don't always do this stage in full for every comic - sometimes I just know exactly how things are going to go. But a lot of the time I like doing it because it's a quick way to note down specific visual ideas I have for upcoming comics so I can save time once I get to them.
Funny enough I don't really write scripts for my comics. Again, probably something I should do, but I find writing out scripts actually makes it harder for me to get ideas out fluidly. A script feels like I have to lock down a lot of details right away - that isn't necessarily the truth, it's just how it feels for me, and can result in me not being able to just get the ideas out of my head.
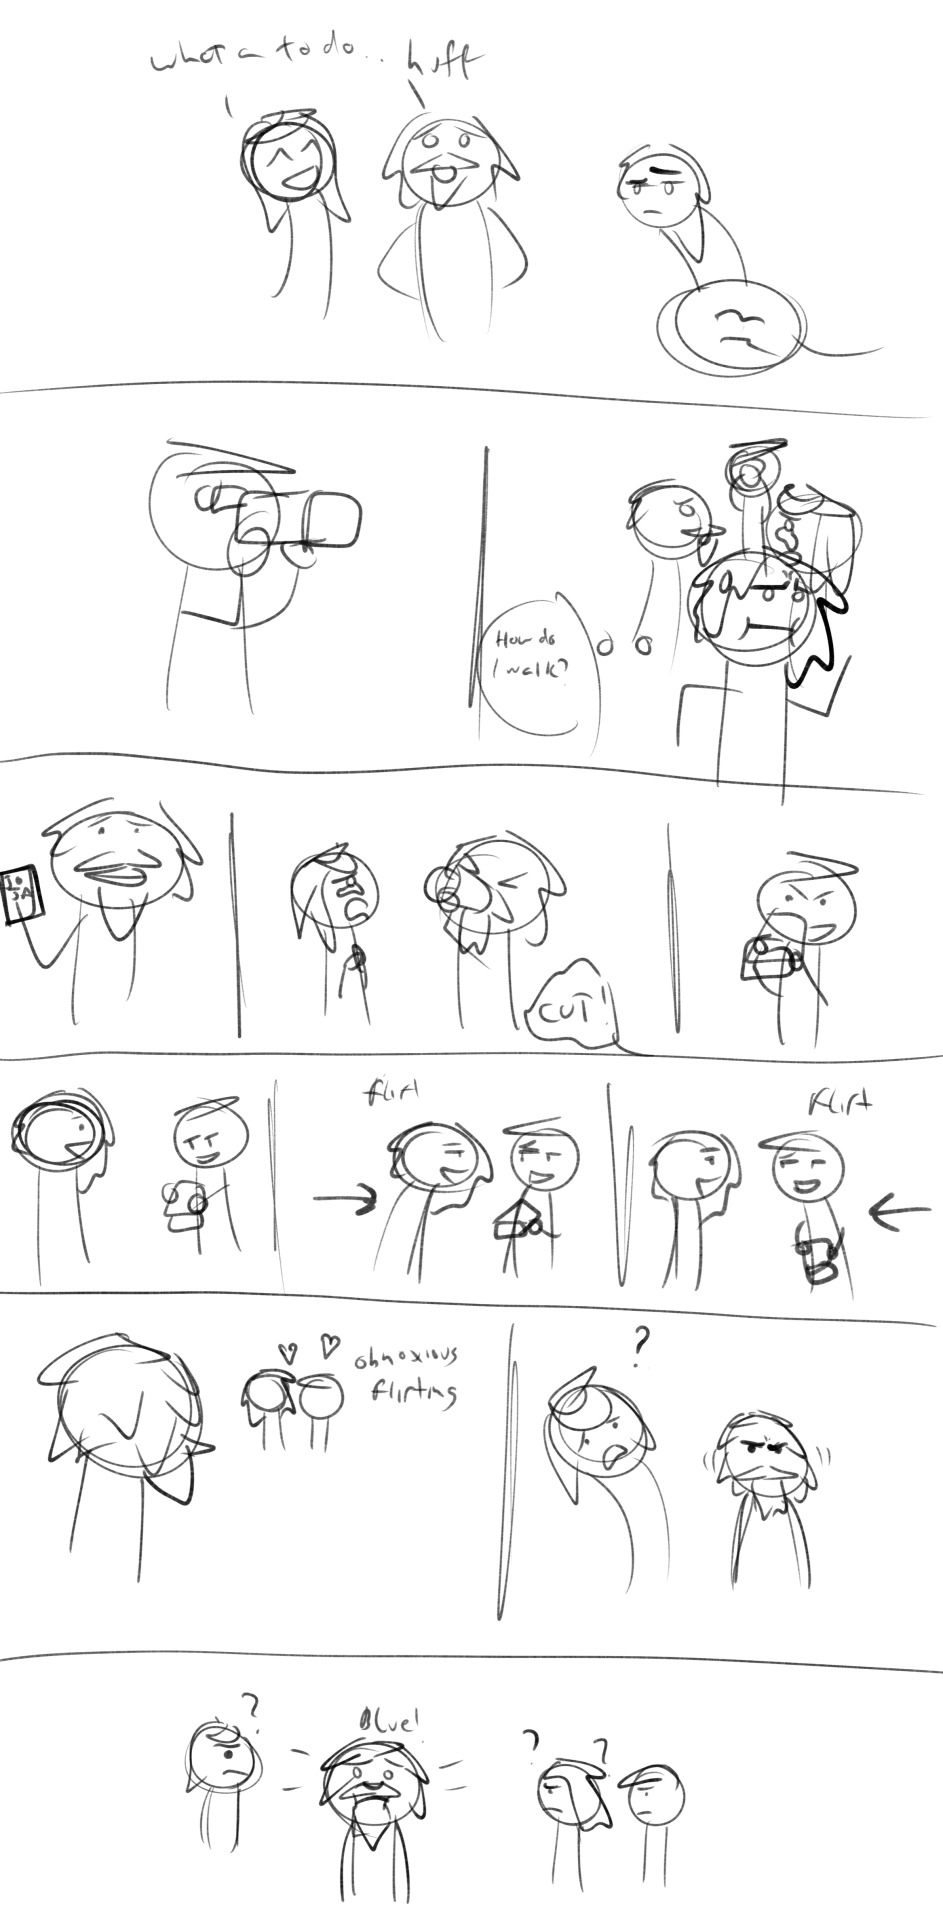
I purposefully keep this stage very, very simplified and loose, mostly for the above reasons. The idea is to keep as much detail-oriented thought away from this stage of the process as possible. You'll see I use certain quick markers to differentiate characters - Shane's sideways hair triangle, Emily's curl, Clint's beard, and Zeke's zig-zaggy hair.
I may write down specific dialogue lines that I know for sure I want in the final comic, but mostly it's just general dialogue ideas or reminders to myself what the "bit" is supposed to be if it's not immediately obvious. I'll add small direction lines if they're important, and quick speech bubbles as a reminder that a character is talking offscreen.
Apologies for my abysmal handwriting. It's readable to me, and in this stage that's really all that matters.
Step 3: Detailed Sketch
This is the part where I finally sit down and take a couple of hours to do the initial comic sketch. Sometimes the final version of this won't entirely match up with the concept. Rarely, I've added or removed panels up until the final image. In most cases, though, this is where the overall comic gets locked in.
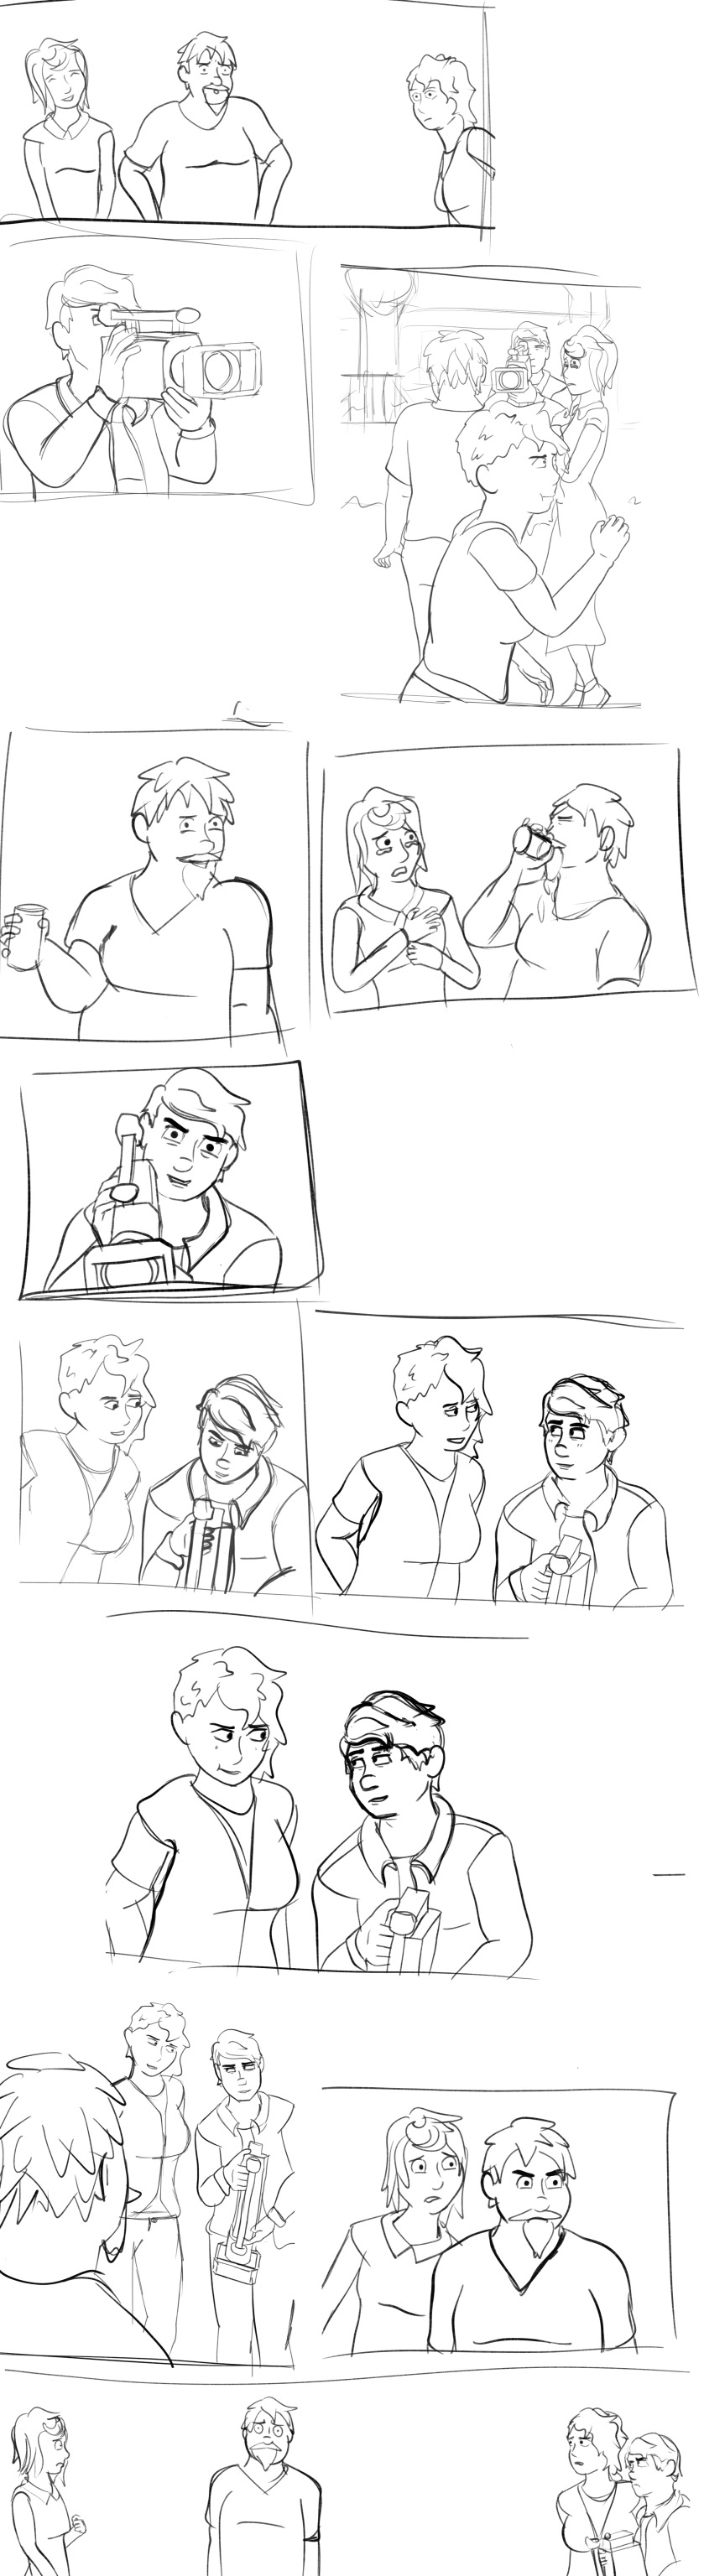
I use CSP's 3d models and assets for most of my scenes. I have saved models for each of the characters' proportions, which I find is super great for keeping relative heights consistent. Most of the time when I need props or other set pieces in a scene I'll just use various primatives, however there was absolutely no way in hell I was going to be able to pull that off for the camera, so that's its own asset.
I don't carry my notes over from concept to this stage, I mostly just refer back to the concept layer when I need to add those bits. I've been trying to get more in the habit of sketching out word bubble blocks at this stage to get an idea of how much space I need to leave in each panel. I didn't do this for this comic, which did lead to issues with the one panel where Zeke is trying to walk naturally, but oh well.
Step 4: "Inking"
I like to call this stage "inking" but it's really doing the final clean up layer. This is where I start messing with vectors.

There's actually a lot of steps to this that I can't quite show in this final layer version. Here, I start with just drawing over the lines in the detailed sketch layer with my "inking" pen. I try to keep my lines clear and tend to draw over crossing lines so I can erase the overflow later for a cleaner look. Throughout this stage I'm doing a lot of line adjustments, simplifying where I can, just to make the next part easier.
After I've done all that, I'll go back and adjust line thicknesses. I could probably do a whole post on that alone, but in general I lean toward thicker lines, thickening the lines of clothing, hair, eyebrows, and eyes in particular, as well as thinning wrinkle and other small detail lines.
Step 4: Base Color
I have a pallet of base black-grey-white colors for Valley Echoes, each of which I use consistently for different details. For example, nearly all characters get the same "skin" color (exceptions being Maru, Jas, and Demetrius, who each have their own). Zeke and Shane's hair and common outfit colors are also saved, as well as a few for other recurring characters.
Other than that, I try to "color" according to what needs to stick out in a scene and just trying to make sure grayscale tones aren't too similar next to each other and muddied. If two characters are going to be standing next to each other frequently I try to give them noticeably different shades in their clothing.
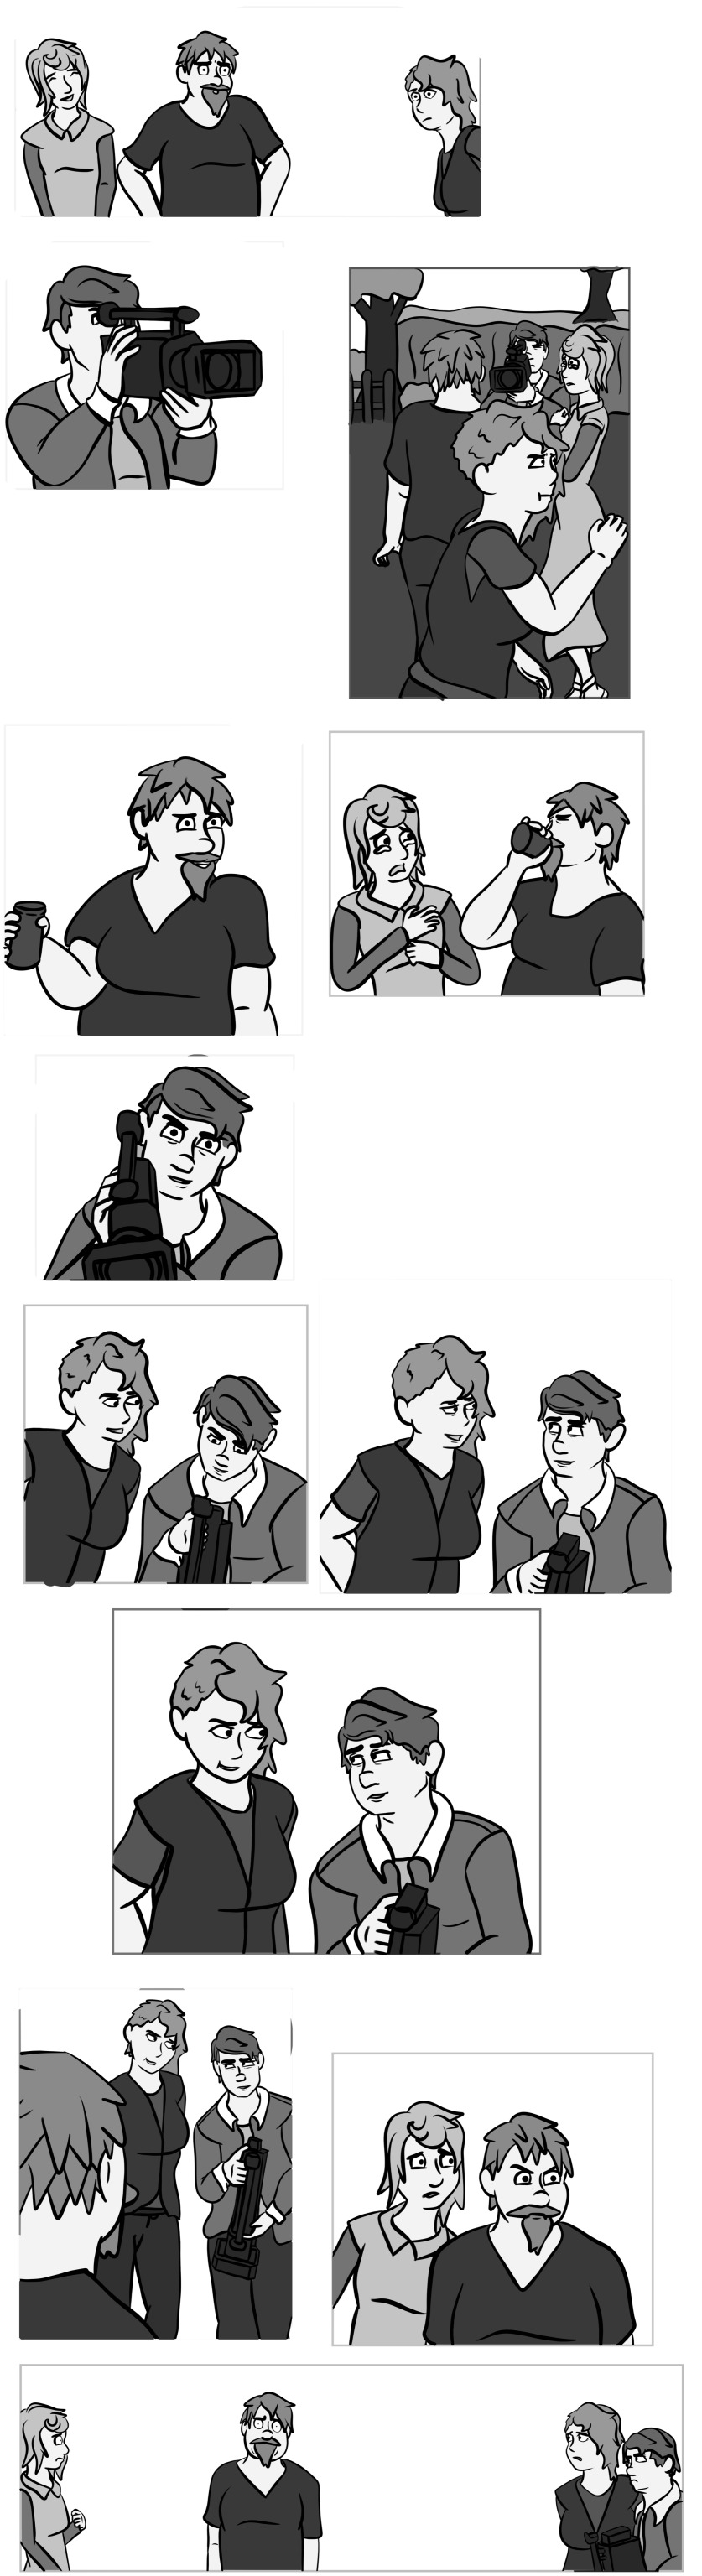
The process for this is slightly different for in-color comics. I also have pallets saved for those comics.
Step 5: Details
This is where I'll go back in and add other details that can't simply be added with fill and other tools. In this case, I added Shane's stubble, the blushing in several panels, and Clint turning blue with effect lines.
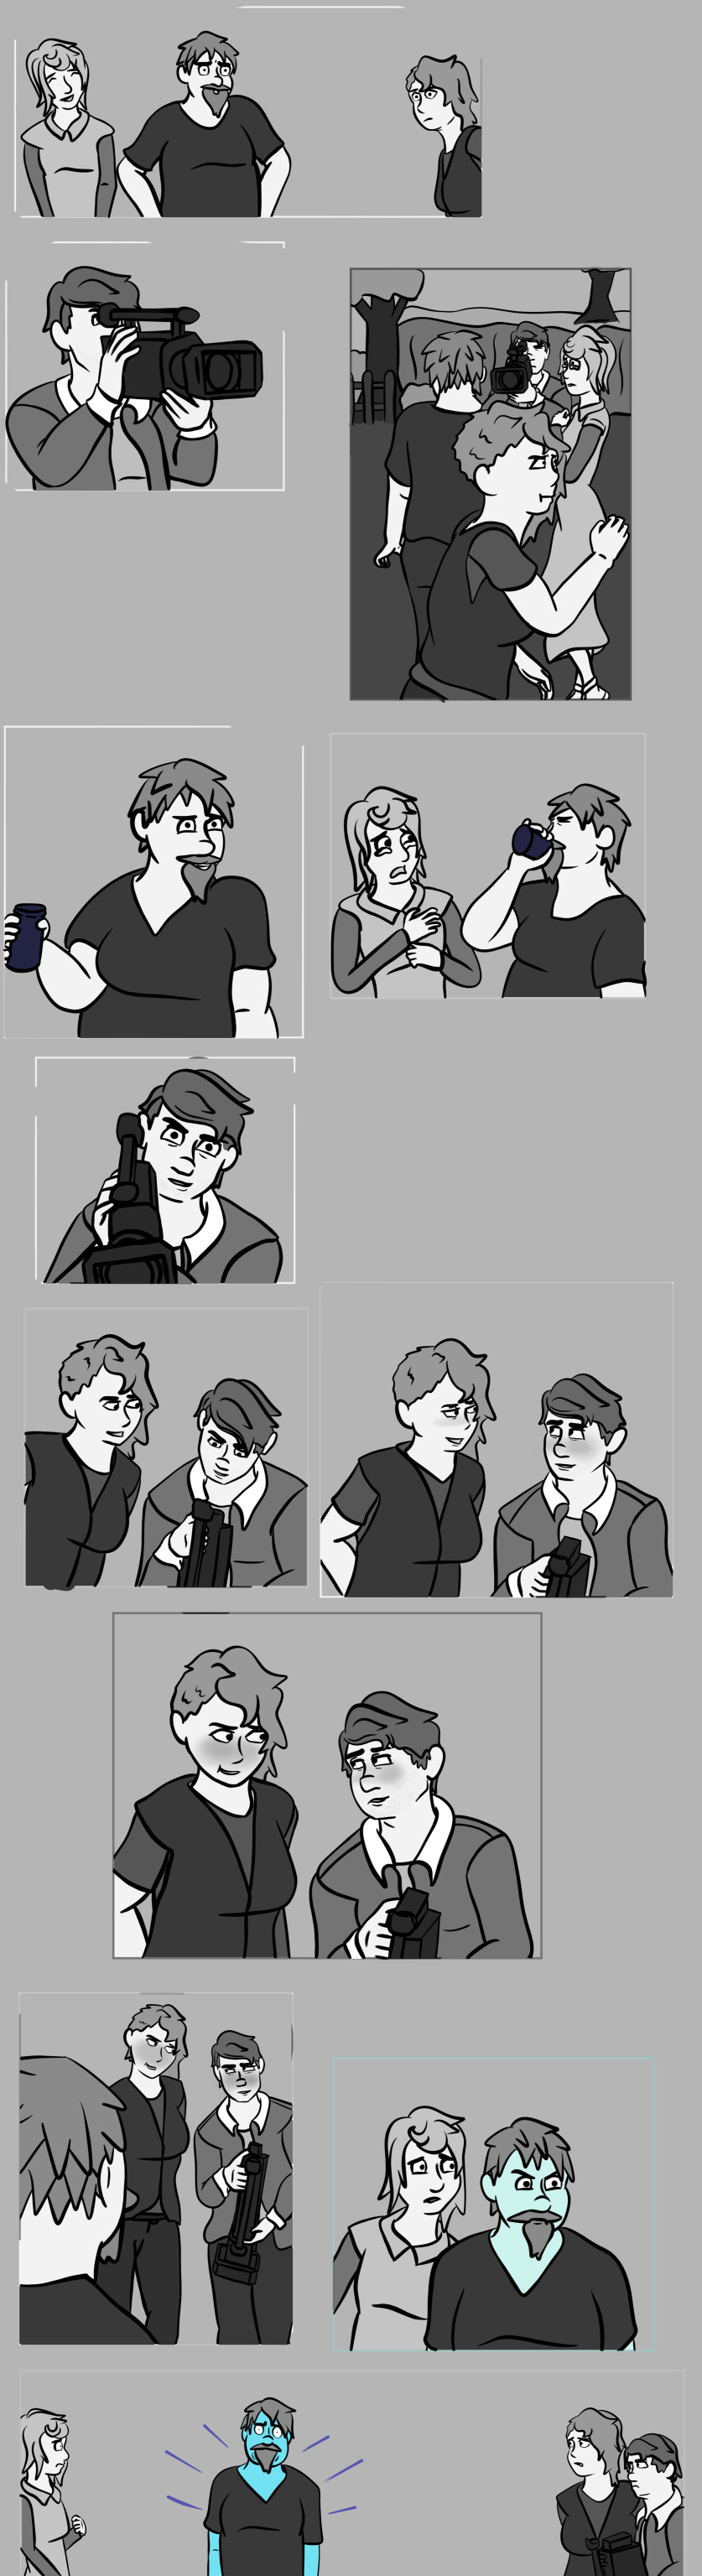
This is also where I'll add a background. Again, I try to keep the backgrounds so that they don't muddy the foreground elements.
Step 5: Dialogue
This is the bit where I'm likely going to do some revamping in the future. CSP's base dialogue tools are...not great. I'm considering finding another program for doing this bit.
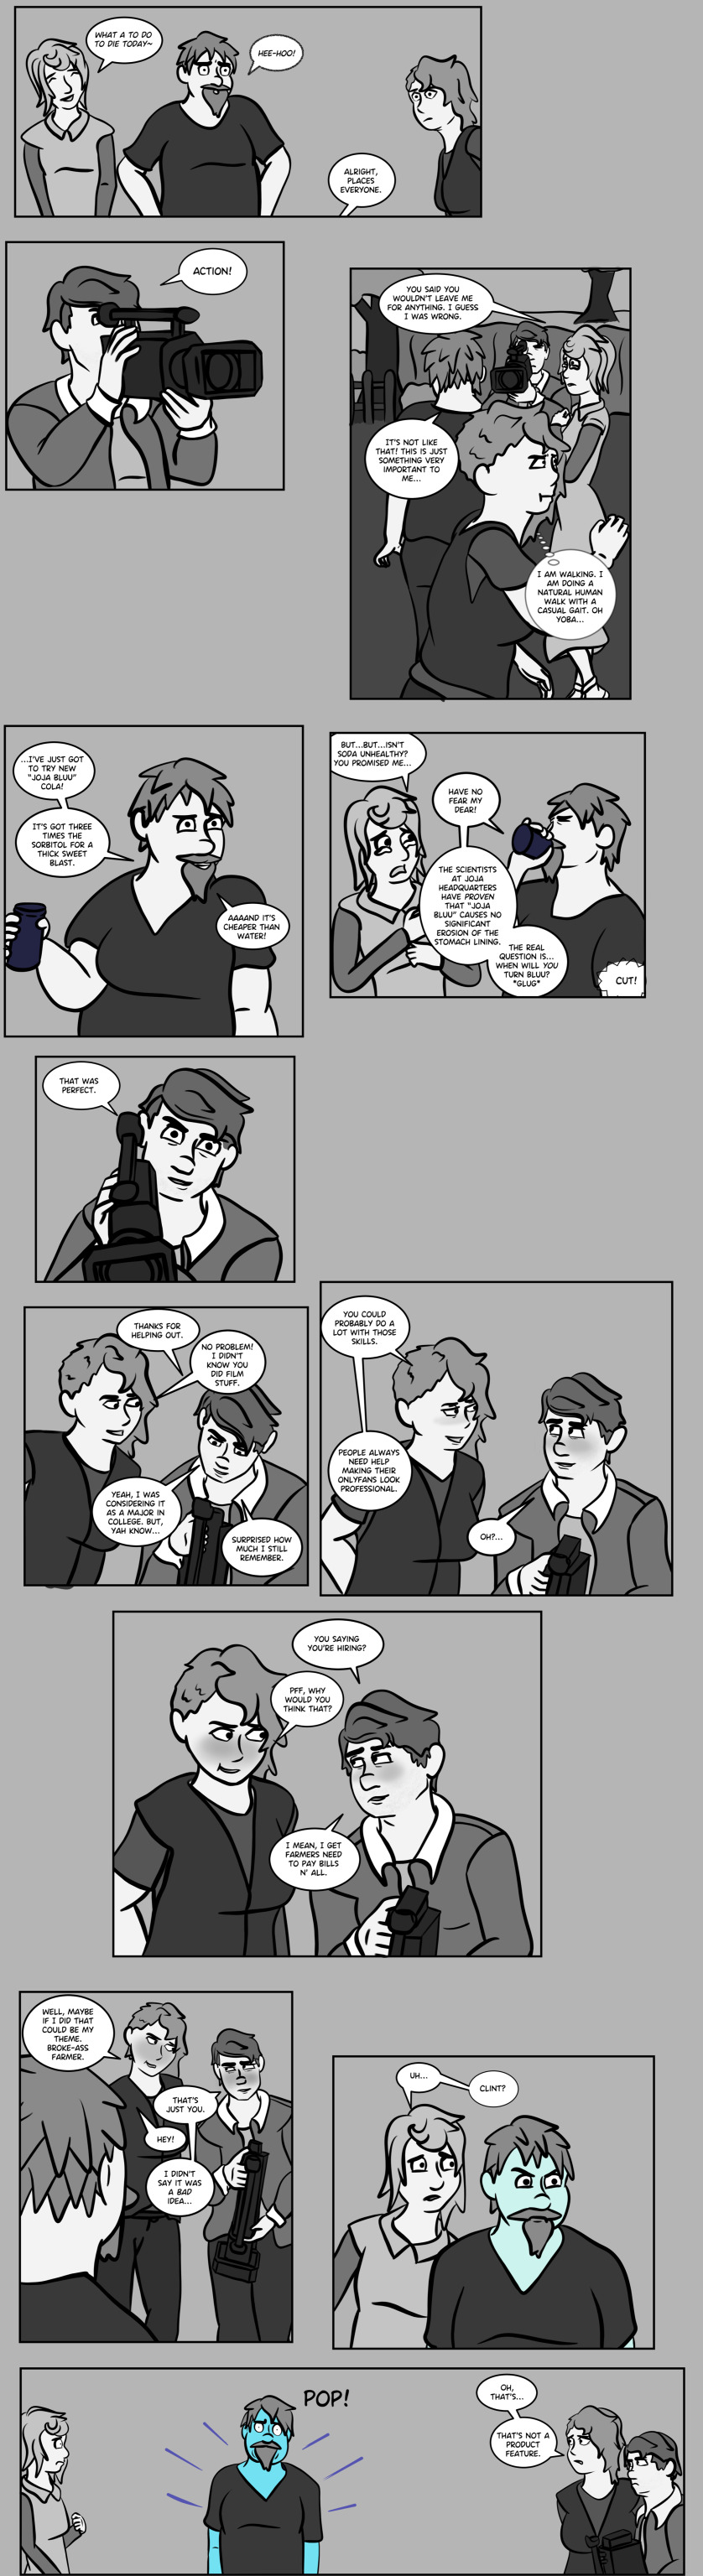
I've also been trying to learn more about methods for dialogue bubble placement in general. This is the bit that can be the most frustrating for me, but overall it works.
How to write the dialogue itself would probably take up multiple posts in of itself. It's a bit instinctual to me because I have much more experience with writing in general. There's also a lot you can say about how splitting dialogue into different bubbles changes how those lines are interpreted, etc.
In this case, a chunk of this comic is taken directly from the original SDV scene, slightly altered for timing purposes. When it comes to canon scenes, it variates on how strictly I follow the dialogue.
After this step, it's just splitting each of these into separate images for each panel and uploading to Tumblr. And I guess that's my very messy, still in development process.
20 notes
·
View notes
Text
Fo4 Companions Modern AU Part 1

(For context: none of the Characters are evil, and some things are intentionally left blank because I plan on writing a larger story line. I've loosely based their backstories on their irl backstories, and am intentionally writing out certain characters. Their personalities will largely stay the same, along with the likes and dislikes. The sole survivor does not exist in this universe, and while I'll write intertwining stories, none of them are actually paired together.)
This is pretty long, but I intend to write more later, so deal with it.
Gage ran away from his family farm as child, and got put into the foster system where he met Cait and Macready. Cait had been displaced from her home due to intervention from CSP, and Macready's mother never knew his father, and passed away due to a drug overdose.
In the small town they lived in, Gage, being 12 going on 13, was tasked with walking 8 year old Cait and 10 year old RJ to and from the busstop from school. Often stopping by the pier to catch salamanders to chase the kids with, or getting free candy for finding worms for old longfellow.
Eventually, after aging out of the system, Gage found himself living in a shitty apartment, working as a mechanic. Cait, now a teenager and dealing with the trauma she experienced as a child would run away from the shelter, finding herself hungover or still wasted on Gage's beaten and ripped up couch, him already left for work, a cup of coffee and some pain killers on the kitchen tabel, with a sticky note about her puking on his boots before passing out in his living room.
RJ, watching this, decided to find busy work at Old longfellow's fishery. The old man was more than happy to have help, his age slowly creeping up on him.
Cait continued to spiral, leaving Gage to clean up her mess and RJ to drive her back to the shelter, RJ met a cute girl named Lucy, a transfer student. Her parents didn't approve of him, despite being nearly 17, driving and holding a steady job.
Eventually, after RJ himself aged out of the system, he moved into a decent small house with Lucy, the two eloping soon after she found out she was pregnant.
Without RJ in the picture and Cait getting worse and worse, Gage was left to deal with Cait on his own. One night, after coming home from a long day at work, he found Cait on the floor, Blue in the face, and not breathing.
Rushing her to the hospital, a head-on collision caused them to crash, an ambulance arriving quickly, saving his and Cait's lives, but Gage now found himself missing an eye. He contacted the shelter and asked for her to be permanently placed in his care.
At first she thought it was an act of mercy, something like love, but it quickly became clear when he signed her up for involuntary rehab, not even saying goodbye to her, that this was his very silent revenge.
Months of grueling rehab later, Cait was released from rehab, to find that her room at Gage's apartment had been filled by McCready. Lucy had died in labor, baby Duncan being handed over to his grandparents, who had deemed RJ unsuitable as a single parent, and his inability to keep up with the mortgage was proof enough to them and the judge.
Gage gave her two options, pay up, or get out. The only place where she was able to get a job was Madden's boxing gym. The place usually empty, apart from some soldiers from the nearby army recruitment offices in town, was a good place for her to clear her head.
Overtime, McCready and Gage noticed a significant improvement in Cait's demeanor. She'd been spending extra time boxing when she wasn't working as a mat maid. Gage even joined her frequently, and despite being built from years of working with heavy machinery and having about a foot on her, she managed to win most matches. RJ doesn't join the fights but will often join to watch Cait dominate in the ring.
After a few years of saving, a broken arm, many failed custody battles, and a hefty move into a better apartment, Cait and RJ saved to buy Gage a very feisty iguana, who he named Zilla.
In return, Gage helped RJ hire a lawyer, and RJ now has partial custody over Duncan, and he and RJ help Cait at her events at the local shelters, promoting drug free lifestyles, and providing supplies for homeless folks.
#fallout#fallout 4#art#artists on tumblr#fallout raider#fo4#nuka world#digital art#cait fo4#robert macready#fo4 gage
11 notes
·
View notes
Text


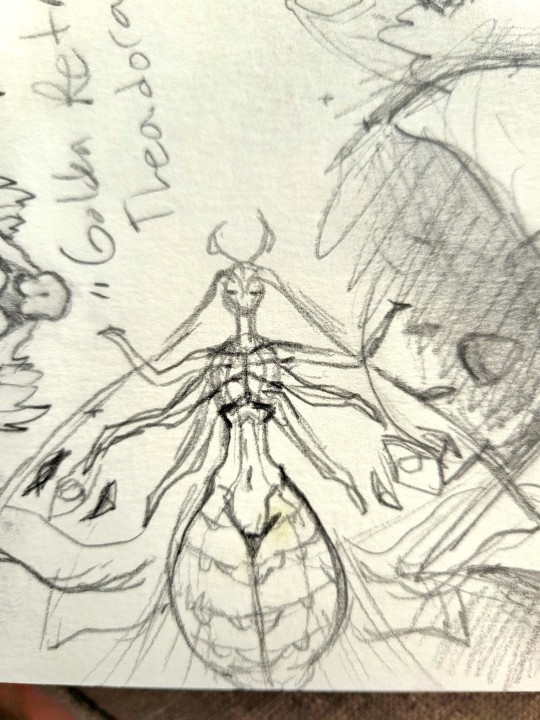

The sketches are piling up for my webcomic.
I'm going to work on thumbnailing a few scenes traditionally today and then pop them into CSP to organize and make clean line art later.
This story has been a work in progress for over 5 years. It has been revised and rewritten many times. I have to face that it will never be perfect, but it will be fun.
It was a slog trying to write it as a novel since I'm a visual artist. So here I am experimenting with comics so that my beloved story doesn't fade away~
I really hope you all like the story and characters.
*crosses fingers*
I'll post the first written chapters here as a teaser for the comic. I'll likely make a side-blog to post the finished comic pages on. Though I'll probably post them even earlier on my ko-fi and patreon.
Girl gotta hustle these days 🙃
3 notes
·
View notes
Text

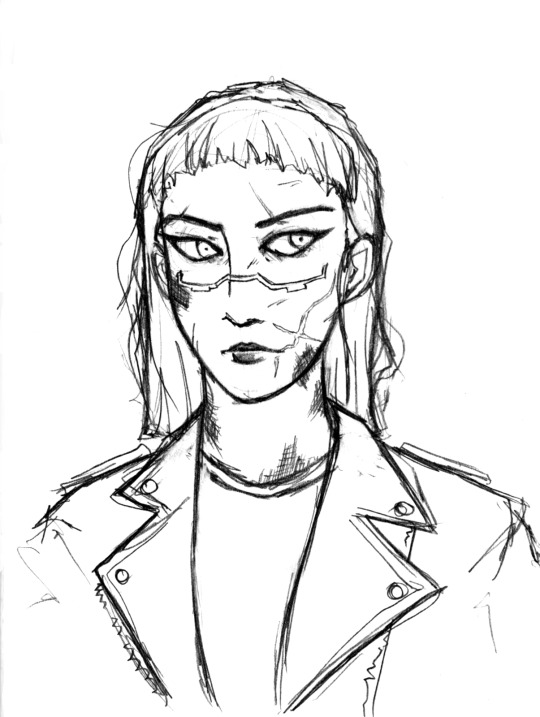
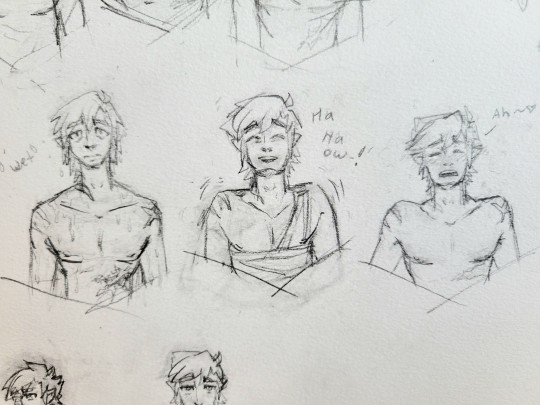
Got an idea from a manga panel and it evolved into this. I'll probably clean it up in CSP later but she looks pretty good (I'd say).
1 note
·
View note
Photo

I wanted to try Clip Studio Paint again since I never really used it since I got it and I was actually able to draw a face I liked again for once. Because I found one (1) brush I liked..
but in general I have to say this program feels kinda unintuitive for me I’m missing a lot of simple features that I think are definitely there but way too hard to find and therefore use, I’ll try a bit more but if someone has a tutorial or smth that isn’t hours long that they recommend that would be nice.. especially on customizing brushes...
#obey me#obey me oc#oc:gabriel#angel oc#fancharacter#oc#angels#original character#Gabe threatened me that I would regret drawing him ugly one more time#maybe I'll clean this up a bit more later#I'm also scared the next time I'm drawing again it won't work out again and shove me into crippling depression#but also pls where the fuc is hue and saturation adjustion in csp#i don't need anything else
14 notes
·
View notes
Note
what brush do you use for your lineart? it looks so good ;;
AAHDSHD;;;; TYSM FOR ASKING IK THIS IS A SIMPLE QUESTION BUT I WILL USE ANY CHANCE I GET 2 RAMBLE ABT ART TECHNIQUE & WHATEVER BC ITS MY FAVE FUCKING THING IN THIS WHOLE WIDE WORLD
My brushes r actually quite simple !!!!!!! I built them to compliment my very freehand/sketch style. If someone is interested, feel free to ask, I can check how to make them downloadable/whatever, but really I have just a couple things that I focus on when it comes to them!!!
Square tip. I use one in CSP called quadrado, I think its in the original set, I'll have to check that out later? But yeah I feel a square tip allows for some fun angular spots to really come through !!! This is also super popular in painting I think, angles & sharp edges r super important there
Shape dynamics. The super basic stuff. I have two main brushes; my basic square, which is for draw flow stuff, and a rough square, which i mostly use to fill in bigger areas / do some extra shading with. My basic square has more flexibility (a bigger range, a lower minimun value) and the rougher one is less flexable and most of the time chunky.
Density. I find density options more appealing to me compared to opacity, but I cant tell why? exactly???? yk???? But yeah. Again, basic square has more flexibility, and rougher less. I find the flexibility & range in my basic brush SUPER important, since i like sketching within my linework and erasing it away/cleaning it up. (difficult to explain- if someone wants a video feel free to ask)
Basically:
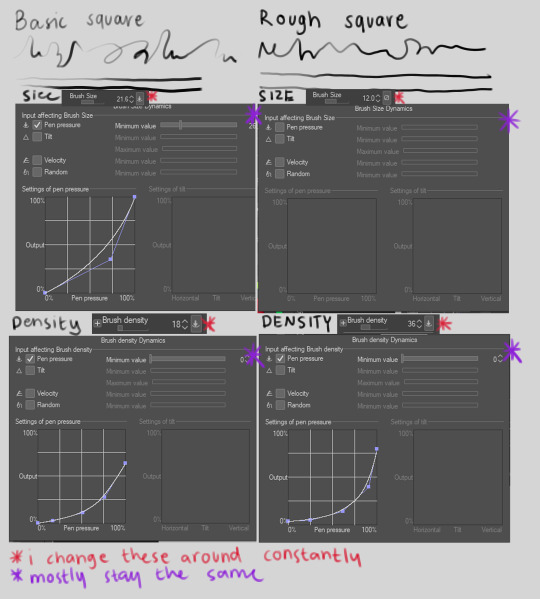
oSoOther settings go a bit more into semantics. I also use a blender tool to sometimes soften areas, and often my eraser is set to erasing on all layers so I can kinda build my linework ON my sketch layer and use it in the back as some extra flow.
My current style of drawing is inspired by som rly specific artists that I can talk abt if someone wants 2 hear. I do intend to experiment w stronger lines, im just a wuss and like all... squishy stuff ; v ;
U DIDNT ASK, but again bc i just loooove rambling abt this shit, some additional things that have personally helped me w linework!!!
Those super basic linework practices !!! Just drawing straight lines endlessly, drawing a squicle and trying to replicate it now w a slower stroke
Forcing urself to sketch fast; croquis !!!! I recommend croquis cafe for anyone looking to do this kinda stuff online, its GREAT. Just focus on the time, not how good the sketch is. Croquis is FANTASTIC. it helps u develop muscle memory for unique strokes, develop understanding of what u need to pay attention to (are you paying attention to shadow, light, where the weight of the body is, the squished parts, the stretched out parts, the skin, the muscle, the hair, etc) (ive personally done sessions just focusing on darkest shadow, midtone shadow etc, or light, or the stretched out parts, or just like, a few lines to give the idea of the pose ((eg 5 sec croquis)) ((tho i havent seen those in any web stuff, i had a class where we had those and they were fantastic))) anyways DO CROQUIS AND ALLOW URSELF 2 SUCK AT IT DO IT UNTIL UR HAND HURTS AND UR HEAD HURTS (dont actually do that please) (drink water, take breaks, stretch ur hand)
Warmups !!! before i take on a serious linework, I ALWAYS DO WARMUPS. Some lighter line stuff, flowier line stuff. I often do croquis for this. If i dont do this i get more severe hand cramps, because.... yeah
Traditional sketches w different pens. Preferably ones that u cant erase. Kinda similiarly to croquis, this is super good to just develop more confidence w ur lines. U cant go back and erase them so... U just have to learn to get them right. Im bolding this bcs this is probably the one tip i heard that has helped me the most. All my traditional sketches w pens r ugly as hell but they seriously have helped me so much to get some more freedom and have more fun when drawing & not worry all the time, and its made the process way more enjoyable !!!!
Also please take breaks and stretch ur hand !!! THeres a lot of good guides for artists to stretch their hands :> Seriously. Take care of urself.
#ask#anonymous#u thot u could just ask me for my brushes u wrong !!!#*infodumps*#i fucking#love art process#I k u didnt ask but this stuff is so exiting to me
89 notes
·
View notes
Last Seen Blogs

runerain
Black Lives Matter
seatokki
Twink Whisperer

hermioneblackdelacour
Haremione
leksii
Still figuring it out
blazinravinsworld
Untitled