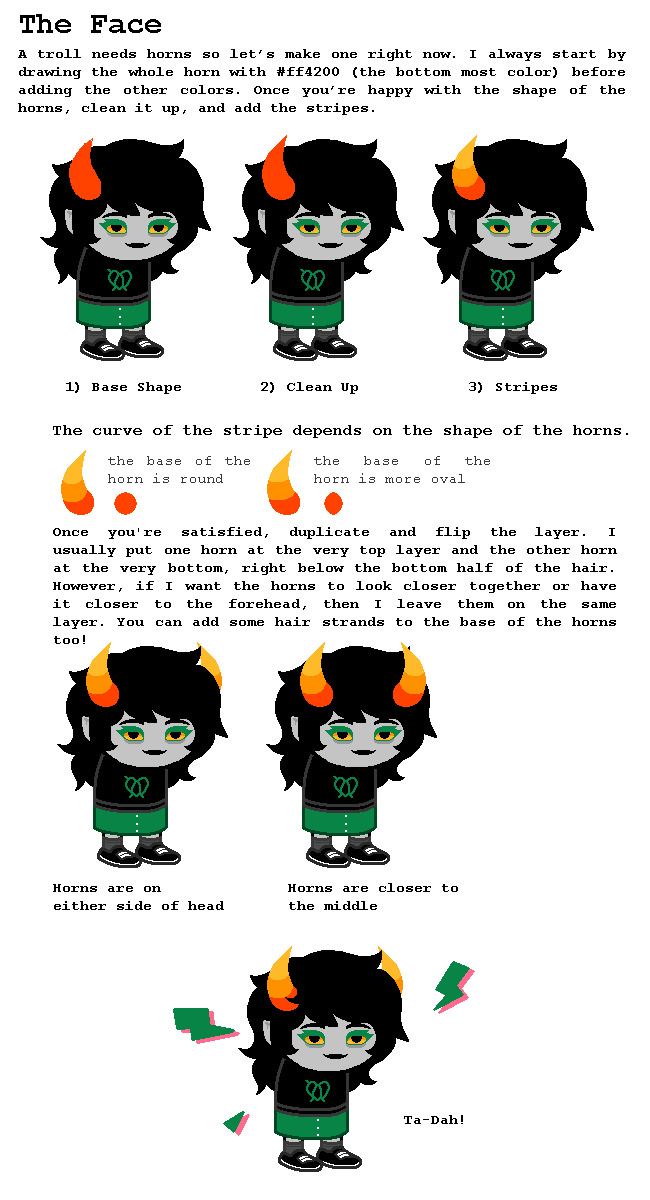
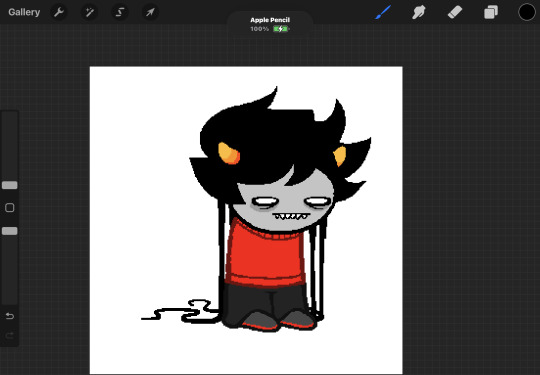
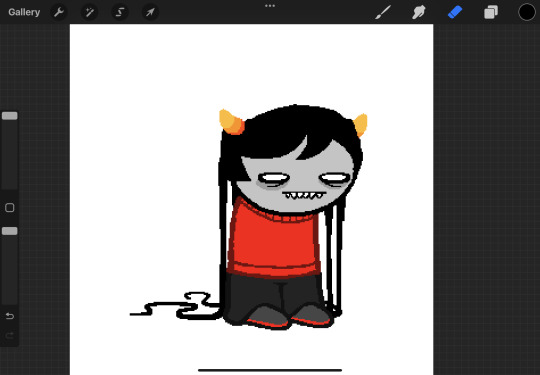
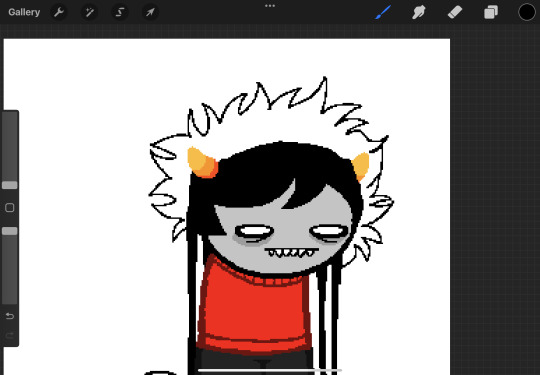
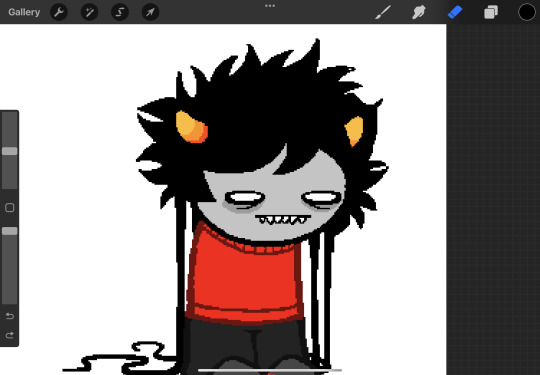
#Sprite edit tutorial
Note
Hi I was just wondering if you can make a tutorial How do you make your Sprites Edits I'm really interested in making my Looks really cool Sorry if my grammar is bad English isn't my 1st language I hope you have a good day/night <333
ALRIGHT SO!!!!
im not very good at explaining shit but i’ll try my best
ALRIGHT
here’s the brush i use!! i have no idea who’s brush it is. i just found it on pinterest.
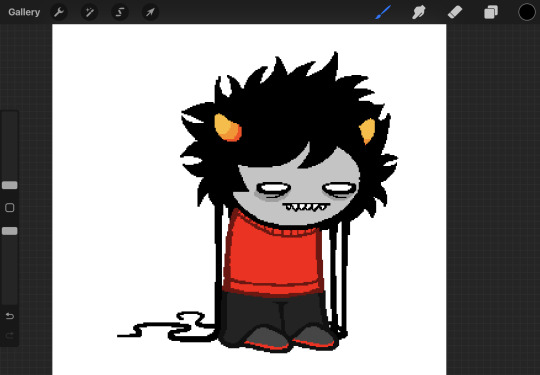
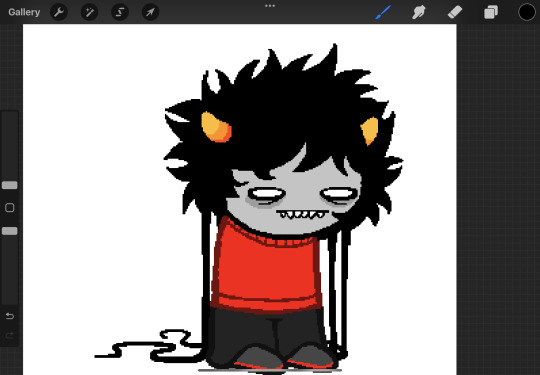
SHRINKING EYES!!!!

for me, i mainly start with the little black dot in the middle of the sprites eye. i make a white circle around it to mark how big or how small the eye is gonna be.
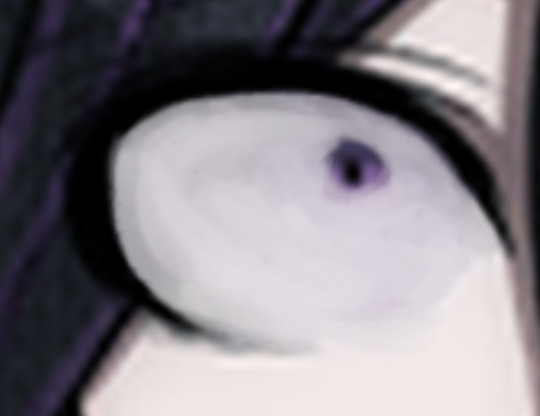
then, i color it in!! you can also shade the eye with some black as well. (mainly use low opacity for shading. you can use different colors too!)
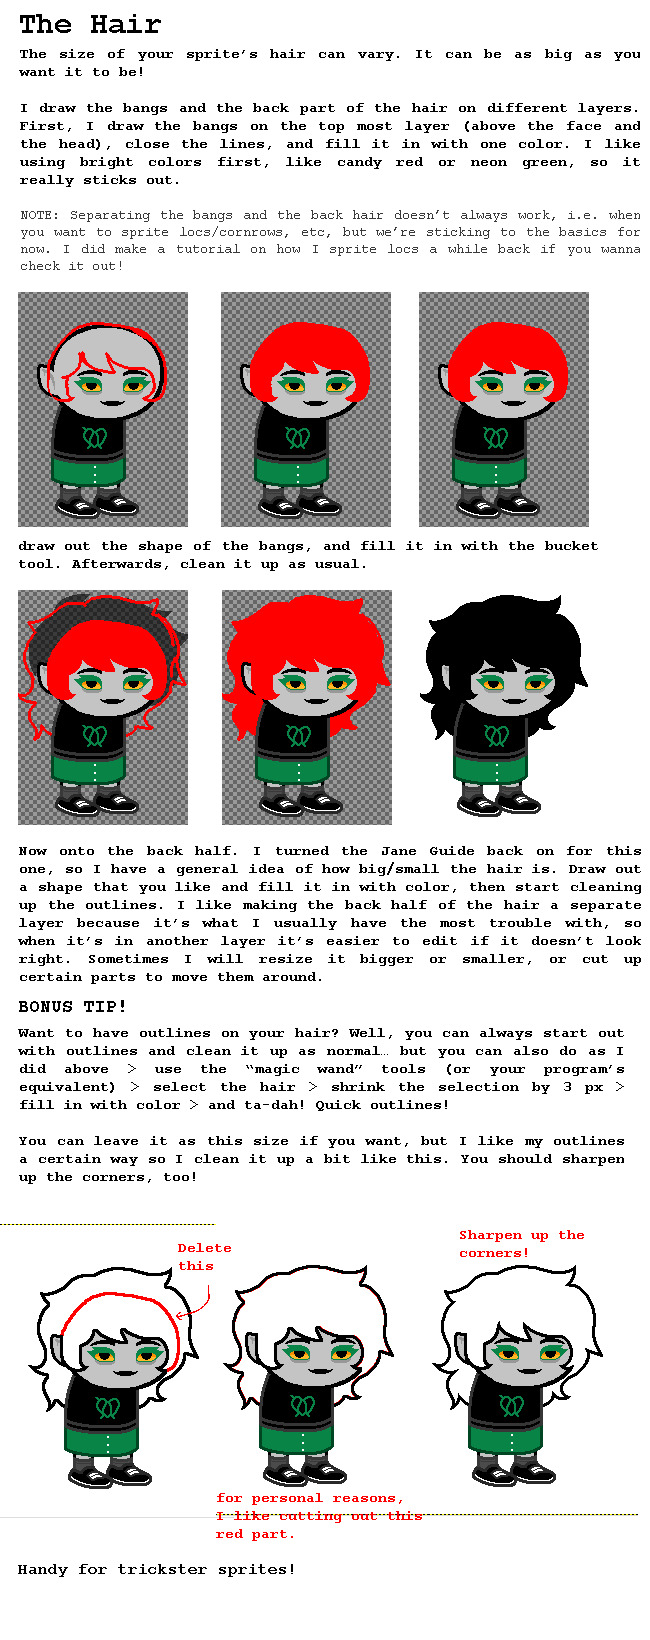
SHADING HAIR!!!!!

i always follow the original shading in the hair (as you can see in red.) you don’t have to follow the original shading! you can always do it your way!

then, i grab the same color as the original shade color, darken it a bit, and color with low opacity! for a bit more extreme, use the blur brush at a VERY low opacity to kinda blend it in a bit.
last one for now bc im running outta space
SHADING CLOTHES!!!!
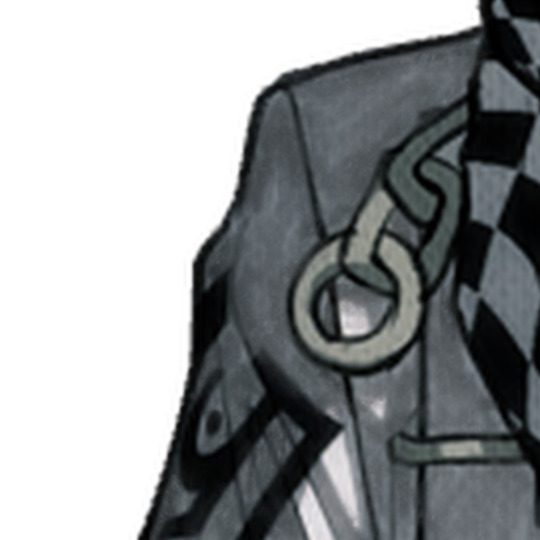
shade with black on a low opacity. mess around with the original shading on the clothes but make sure the wrinkles are still visible.

then get a lighter color and try to overlap it. go crazy with it! but not too crazy. we wanna make sure to see the wrinkles!!! (and make sure the color is not too light or not too dark!)
anyway this is mainly a starter kit on how i do basic things for my sprite edits. please please PLLLEEASSEEE ask me questions about my sprite edits! i love getting asks about them! also you don’t have to stick with my methods! go out and try other ways to do these things! again, not really good with explaining shit so if yall have any questions, please send me an ask! happy to answer any confusion! :3
@speeeeeb @radiostarr-art @typicalglassofsalt
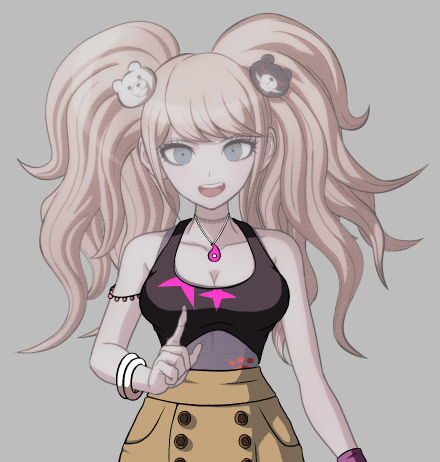
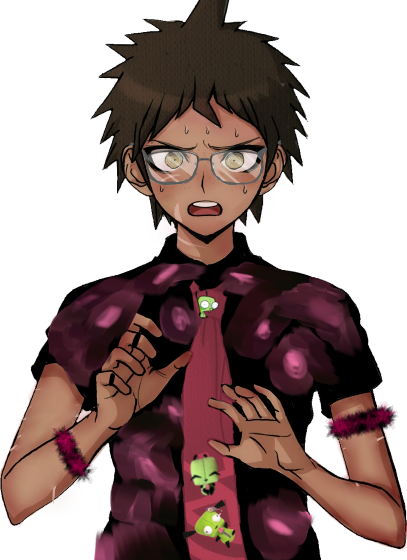
#incineroar teaches how to do shit#danganronpa#kokichi ouma#danganronpa drv3#danganronpa kokichi#drv3#sprite edit tutorial#sprite edit#I HEART SPRITE EDITS!!!!!!!
6 notes
·
View notes
Note
How do you make your sprite edits?
Hey! I'm flattered that you're interested, that's very sweet of you <3 I'm sorry if this reply came later than you expected but I thought for this I'd made a small tutorial, so I had to get screenshots for the whole process and stuff ehfuerhgr
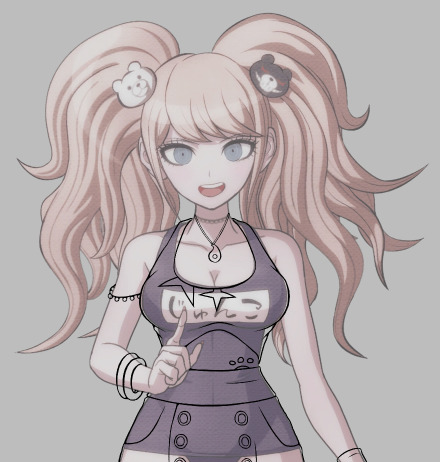
So first, I start with grabbing the DRS bathing suit sprite of the character I want to edit because those sprites have the least amount of detail for me to erase (for this example let's use Junko)

Then I turn the opacity down on her model and start a basic sketch of the outfit design on top of it on another layer. Because the base has a lot of dark lines and details, I change the colour of the sketch to bright red so it's easier to see the difference.

After that, I make a new layer and start the lineart. Because the artstyle uses inconsistent line length, I try to do the same with my lines (a good tip is to see how the line width looks on the original base and try to mimic it on your own lines, it may not be 100% accurate but it'll at least be closer to the original style than if you used the same width throughout)
Then, I add the colours and the shading. This part gets a little complicated, because instead of doing the base colours and the shading on the same layer, I make one layer for the shading and then create another layer for the colours, which I put underneath the shading layer so I can keep the shading consistent (another tip: follow the shadows on the original base where appropriate and then add any extra shadow for stuff like fabric folds. This is especially important if you're editing a female character because of the shading around their breasts)
Next, I go back to the base and edit out any details from the original bathing suit that wouldn't be there with the new outfit (Junko's actually a good example for this, as her bathing suit covers her midsection but my outfit design doesn't, so I would have to edit it to look like it's exposed)
(Another tip is to add shading in accordance to the new outfit, such as the beaded armband in the picture above)
Buckle up for this part because it's a Lot-
This part might be a little confusing because I realised after taking the screenshots that I might have done the process...out of order? Compared to how I usually do them at least lmao. So what I ended up doing was blurring the lineart and shading layers slightly to match the blurriness of the original sprite, merging those layers + the colour layer together, making yet another layer, choosing a dark colour that fits the palette of the original character and making a circular gradient over the outfit, as the original sprite also has a gradient.

Then I searched for the polka-dot texture you see in Junko's hair and overlaid it with the outfit, resized it, blurred it and set it's opacity to where it matches with Junko's hair as much as possible (thanks @sir-sunny for this tip!)
(The texture that I use is the first result that shows up on Google Images when you search 'danganronpa texture overlay', which was made by JLE42 on Deviantart, who says it's free to use)
Generally I don't name my layers, and I usually delete the obselete ones as I go on, but for the sake of this tutorial I decided to keep them so y'all know what they look like. These are the result of this one edit:
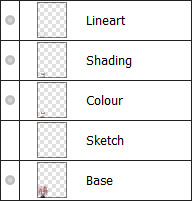
(Before the gradient)

(After the gradient)
After that, I add every layer except the sketch layer together so it's one image (depending on the layering, I have to add certain layers in different orders so the last image is as neat as possible)
And there you have it! I'm sorry if this got hard to follow, this is my first real tutorial and I'm extremely bad at articulating myself efhiuerg. I hope it's at least enough for you to get an idea of how I work!
(Any messy bits I intentionally left in because the THH sprites are messier than the other games and I wanted to replicate the style as much as possible)
(Program is Firealpaca btw lol)
#Danganronpa#Danganronpa sprite edit#Sprite edit tutorial#Tutorials are harder than I thought :')#Still kinda fun tho!!
49 notes
·
View notes
Note
hello! I adore your art and I'm thinking of getting into spriting myself! would you mind describing your process and the tools you use?
Hi there! Sorry it took so long, it took me a while to find the time to really sit down and commit. I pretty much just wrote down my process step by step, but I hope it will be useful to somebody! I like seeing homestuck sprites, and I am always happy to encourage newcomers.
Warning: It's pretty long, so I put the rest under read more. I also uploaded it to sta.sh in case it's hard to read on tumblr. Also I'm worried tumblr is going to crunch up the image quality so stash is safer
sta.sh link: https://sta.sh/21dbajknxluz?edit=1


If there's anything specific you want to know, feel free to ask! This guide is by no means the only way to sprite, so feel free to experiment with your own style/method!
Also, don't be afraid to use bases. That's how I started out, using bases of the talented spriters who came before me.
171 notes
·
View notes
Note
if you don't mind sharing with the class, how do you do your sprite edits? they look so cool ive always wanted to do them myself but i didn't know where to start!!!
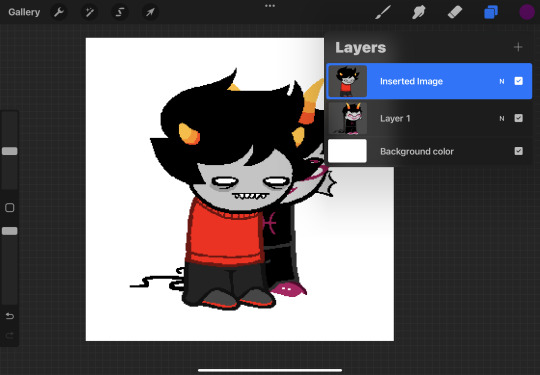
Okay so I kinda cheat I follow the tried and true method of tracing over the sprite and changing things as I go (usually on a different layer)

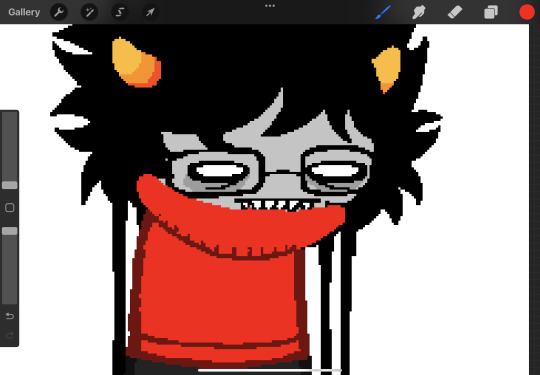
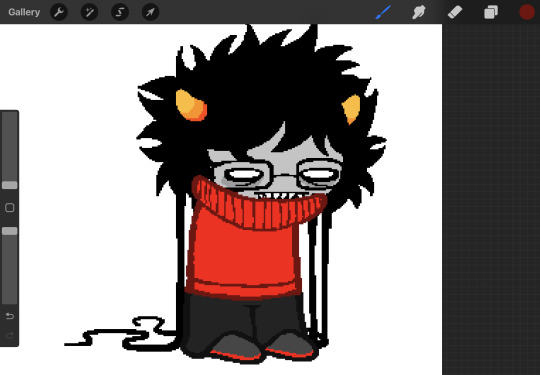
wip pic of my chili pepper edit
my process is also needlessly complicated because i’m scared i’ll mess up so i keep everything on a separate layer but it works so
I also sketch beforehand and play with the sprite itself to see how it would look before I really go in with lineart (checking if my proportions look right and i’m not crazy) and then I clean up. Big thing to also remember and that I have to force myself to remember is that these sprites are small and don’t need too many details, so if your redesign is very complicated i’d recommend trying to boil it down to its most important aspects and design points so that the sprite is still readable and easy on the eye. Of course these are just edits so you can have fun but i’ve found that at least in my case my over designing doesn’t translate well to sprite so I try to tone down the details but find a way to incorporate it in a way that’s flattering and good on the eyes.

my Mocha Ray as an example because I removed some bits to keep it simple but opted to add the patterns to add a subtle touch if that makes sense
I also really recommend using a hard brush, of course this isn’t needed but if you want that more “canon” look that is definitely your best bet. I personally use these brushes because they have that effect but have that grainy look i love a lot in my art. Not sure if this helped my process is kinda all over the place but if it works for me it might work for you (^▽^)👍
54 notes
·
View notes
Note
can you teach us howw you do your sprite edits your sprites are so cool i lovve them so much
sure!
ill go step by step.
ill use the ask im currently working on as an example
the person asked for a kankri edit with meenahs braids and a few other assets. so step one is to go to the MSPA wiki and take the sprites for editing

then download the sprites off of the wiki page
open your program of choice (i use procreate on ipad)
import both of the sprites
take the assets of each sprite that you need, i only need meenahs braids from her sprite, so ill just take that and erase the rest of her sprite
the ask speficied for 4-2 braids on each side, i chose to do 2 on each. but meenah dosnt have braids on the other side so i just hand drew them instead of copy pasting them to the other side
they also asked for scruffy hair, so i will have to redraw his hair
so to do that i erase his hair
rough out the new shape
fill it in
touch it up a bit
add more hair to his bangs
next they asked for rectangular glasses, thats fairly easy, i just draw them like this
last is an "obnoxiously big turtle neck" and ill make it like this
sketch out the shape
fill in
continue the pattern from the orignial sprite
crop
remove background
and youre done!

these are the brushes i use/used
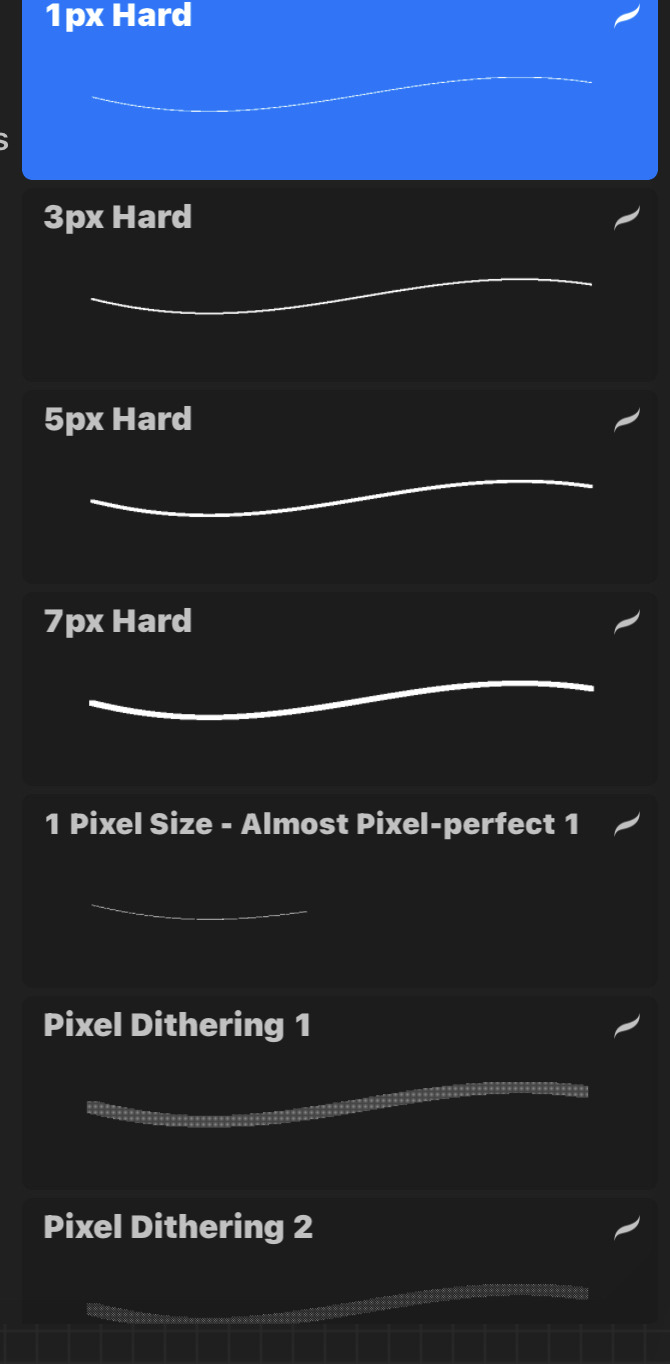
i mainly only use 1 pixel and 3 pixel brushes sometimes 5 or 7 if its a panel edit. RARELY do i use the dithering brushes, thats for shading if i need it but its very hard to shade that way
hope this helps you!!!!!
24 notes
·
View notes
Text

been chipping away at this Roxy for a while....... my art skills just aren't good enough yet to do what i want, so i'm gonna call it 'done' for now ;; it was fun practice though!!!

#remi pixel art#homestuck#roxy lalonde#trying to break away from just sprite art and edits so this was freehand!#eventually i need to actually start like. watching tutorials and shit#(added her shirt symbol to the bottom because the damn gun completely covers it lmao)
100 notes
·
View notes
Note
Every time I see your sprite work, it just makes me want to make a sprite edit of Akane with the design I made for her in my "She Was Saved" AU (An AU based on the idea of Akane surviving the events of DRA), but I've never done any sprite work so, do you have any tips?
Ok ok so, first things first, i wanna make it clear that none of my sprites are made from scratch, they're sprite edits, hence why i always tag them as such. Every single one of them used some canon character as a base for the base sprite (that one fitst sprite where the character is just standing there with a simple expression) and a handful even have canon sprites uses as bases for poses. Just figured i should make that clear so there's no confusion here.
While I'm not sure if I'm the best at giving tips n stuff, here's what i could think off;
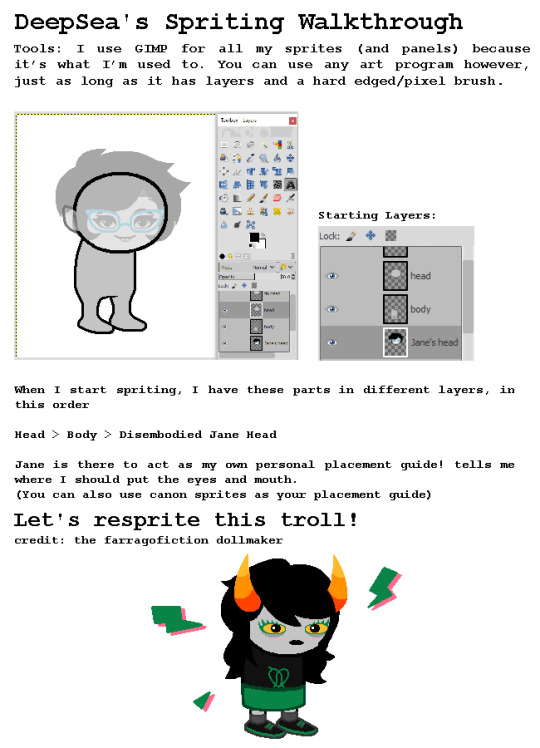
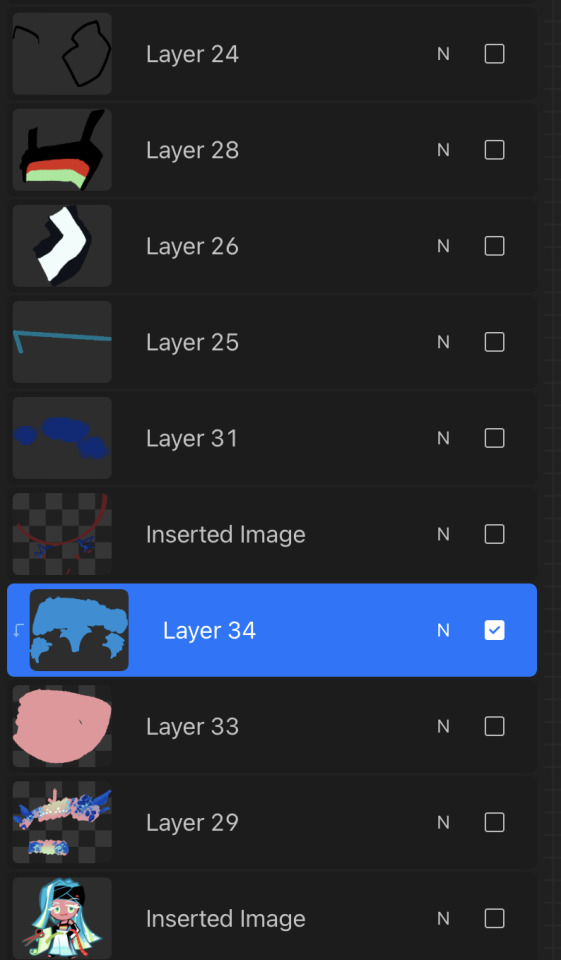
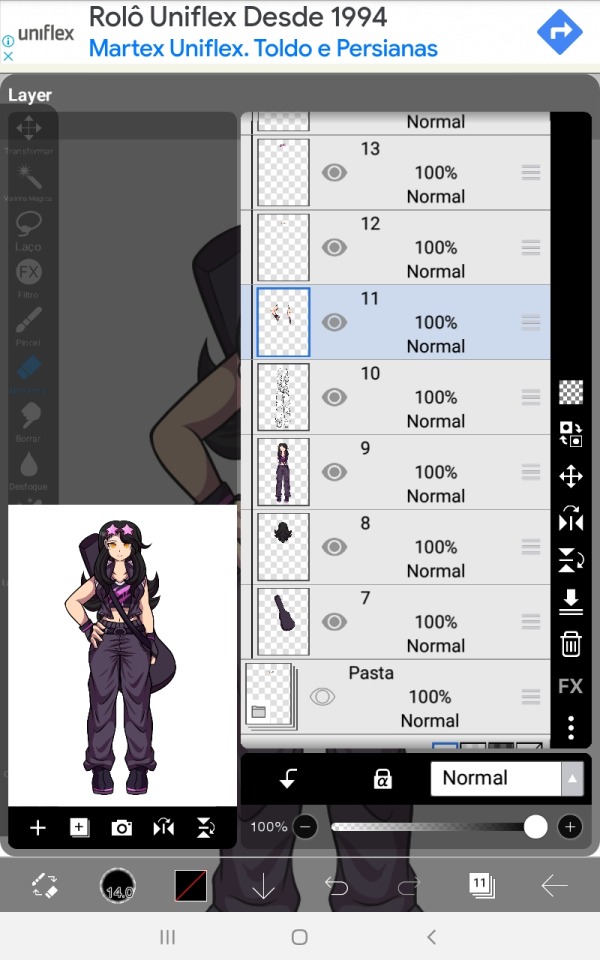
I think the most important tip i can give anyone who wants to get into sprite editing is MAKE A BUNCH OF LAYERS‼️Save things separately just to be sure rather than merging them because that almost always leads to more time spent later down the line. While the amount of separate things certainly varies from artists to artists here's the one i use for my edits.

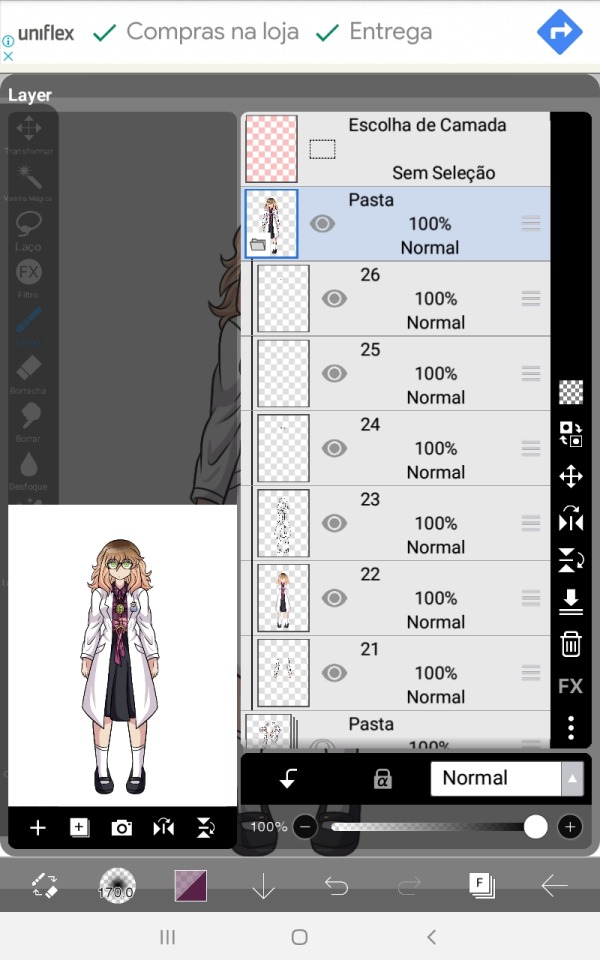
The app i use (Ibis paintX) allows me to make folders with a bunch of layers to them so i use them to keep stuff more organized.
On the first pic well have a folder with the base sprite, one for the different poses and in Beni's case two for the different eyes she has (one for the normal eyes and one for the ones that are part of the glasses, normally i only have one layer with all the eye variants)
On the second image I've opened the folder that holds the base sprite, or should i say just sprite since it's in this folder that i organize everything that belongs to one specific sprite when I'm making them as to not get myself confused. Anyways, you can't see in the screenshots but the first layer has her glasses, second has her eyebrows and mouth and the third has the eyes.
Fourth has the main body lineart and fifth has the main body colors, please keep those separated as by doing so you make it easier to add those lil effects onto the character's faces on certain expressions + having the lineart of the main body always helps when sketching and connecting the different arms to the main body.
Lastly you got the arms, but ideally you should make the arms/poses in a way they can be placed over the body layers since that just makes things easier to put together, i just have this habit of placing the no pose arms under everything else.
When editing i make the different arms and eyes in advance so that when i start making the different sprites i can just duplicate the canva with the first one a thousand times and everything will carry along with those. Saves time in the long-run + you don't need to separate all layers on them (lineart, colors, shading) since they're just parts there's no problem in just merging them together.
A very important thing to note tho i that if the character has glasses or any accessories that you plan on removing or moving around in some pose/sprite this accessory should be made in a different layer from the main body, this makes editing easier than if you had to just erase and refill the part where the accessory was in the sprite you don't want it to be in.
A similar rule should be applied to the character's hair, if they have short or mid length hair you can just add the whole thing to the main body sprite, but if the character's hair is long you should make this bluk/back part of the hair in a separate layer placed under the main body layers. This also apllies to any back accessories.
Here's Akira as an example; she has one layer for her glasses, one for the back/bulk of her hair and one for the guitar case she carries.
These are essentially the basics of if, so let's go over to some actual tips.
Make the sprites on a small canvas.
Since the Danganronpa another games are made on game maker the size of the character sprites is surprisingly small, while I don't think you should just do it on the same canvas size as the actual sprite, it's good to have a smaller canvas so that the lower amount of pixels gives it a look similar to the in-game sprites + as you can see by mine, they don't actually look low quality at all.
(if curious, the go-to canvas size i use for most of my edits is 773x1020)
Use other sprites as references/bases
Especially if you're just starting on making sprites, use the canon ones for bases, references or even just straight up trace them. This will make the sprite look closer to canon and will start making you undertand the elements that make up the style of the sprite, do it enough times and soon enough you'll be able to make poses on your own without needing a sprite from the game as a base.
Remember! What's wrong about tracing is not the act of tracing itself, as the act of doing so is a great exercise to help you learn, the problem is when you do it and claim you made it 100% on your own. Since these are sprite edits, there's not a problem in doing so.
Observe and learn what makes up the style you're trying to replicate
This is hard to talk about since it really is something that comes with practice, I've been making sprite edits for like 5 years now so this stuff is like written on the walls of my brain by now. Just try to look and analyse the sprites and slowly you'll start seeing patterns and small onto them that you didn't noitce before, like how Linuj's sprites have a bit if line weight to them but are still on the thinner side, how he tends to make the hands a bit on the smaller side, how when he color the character's skins he makes the area near the top of the head a lighter shade than the rest of the skintone, the way he usually makes the character's mouths, and even some more complex things like how the male characters will have very little to no eyelashes while the female characters tend to have a whole lot of them, etc.
At the same time, there's no shame in deliberately ignoring some of these things. Personality the small hands REALLY bother me in a few cases and i tend to just make mouth shapes on a whim instead of trying to stay 100% close to the style. It's just a question of messing around and figuring stuff out, it won't look perfect on the first go, but overtime you'll start to get the hang of it.
#i hope this small sprite editing tutorial helps! if you have more questions feel free to send them#these are sorta all i could think of for now#you did mention that these are for an Au Akane so you could also try editing these out of her sprites themselves#instead of making a whole base and multiple parts just pick the sprites and edit the new design over#it could possibly be easier for a beginner? i do feel like making them in this form leads to better results tho#anyways. fun fact! i used the eyelash thing as a subtle form or trans coding on Akira's sprites :]#i love you small details that people won't notice unless pointed out ❤️#hyena ramblings#sprite edit#edit#sprite editing tutorial
17 notes
·
View notes
Note
these boys ..
EEEEEEE
LOVE THEM!!!!!
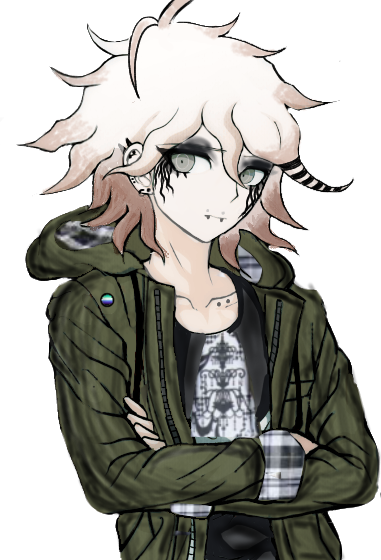
#I love your sprite edits so much hehehehehe#asks#danganronpa#hajime hinata#nagito komaeda#nagito drop that makeup tutorial!!
11 notes
·
View notes
Note
Hi, I'm just wondering when you get criminal case sprites idk how to explain it like a… when a face without eyes and the eyes are separate do you like drag and drop them on the face or you use the official code to put the exactly on the right place. Thank you
If you only have the original PNG sprite sheet, then yes, it will unfortunately be a case of drag and drop.
This is why I highly recommend downloading the GAF file alongside the sprite sheets and using GAF converter.
The converter displays the sprite as they would appear in the actual game, and also gives you access to hide and reveal whatever layers you want, similar to to Photoshop, Paint Tool SAI etc.
So if you only wanted the eyes from a sprite, you can just remove all the layers until you have only the eyes.
I hope I understood this right, but if you haven't already, I would recommend watching my sprite tutorial since I cover most of the steps in detail there 😊
9 notes
·
View notes
Note
It is okay to take inspiration, heavily referance, heavily inspired, colorpicked, copy, draw, use as (icon, sprite video, personal) your crk edit design with credits? :] it okay if you don't want it to get mass overboard inspired or copied or used it, etc. I respect your choice on it.
•Take Inspiration- Yep!
•Heavily Reference- Yep!
•Heavily Inspired- Yep!
•Colorpick- Yes! I do not own colors! (no one should be owning colors whatta ough)
•Copy- idk what this means? im assuming its something like me giving a character sprinkles that doesnt have sprinkles in og so.. Sure! i don't mind that either!
•Draw- omg bats eyelashes ouf course
•Use- Of course! I post my arts and edits for people to enjoy in any way they see fit! ^^
just as long as you do take my art or edits and explicitly state that you created it OR make profit off of my art, Then i think thats okau wit me!
#speaking of sprite edits- i got an ask saying if i could make a tutorial on how i do it#i should rreallly get to asnwering that ask oopsie#cand posts#cand answers
6 notes
·
View notes
Text
if anyone has experience with editing npc dialogue in sdv or map editing... LOL
#but not right now. bc i havent worked on it in like. almost a YEAR? maybe?#actually i just learned about dropdowns in goog docs so . better organizing for changing text#theres tutorials but havent had much luck with map editing using tiled..#his sprites are so good though im a spriting genius
2 notes
·
View notes
Text
Me: I have a Grand Idea for a cool new mod for the video game I am currently fixated upon, I bet This Time it won't be so hard to try and make it. :)
Me, inevitably, every single time:
#aesa rambles#it's going great guys#gave my first try at editing maps and stuff for stardew#the tutorial i found is great at One Specific Type of Change so i had to... figure out part of it myself#legit just needed to figure out how to make a character go from Map A to Map B by walking onto a tile#the tutorial i was looking at tho assumed i was making a door you have to click on which like... Fair i guess#but not helpful#i do think i may have gotten it and if I'm correct then the code is much simpler#tbh even the program i used wasn't as unintuitive as i feared#i mean i would love to find a user manual anyway (i did not look for one tbf) but at least it's not like. the fucking Creation Kit x.x#i figured before i did any more sprite work i should actually make sure#i know how to you know... make things work in the game#something i should NOT have started doing at 10pm#it is now going on 1am
1 note
·
View note
Note
How do you get your edits so professional looking? Like the pattern/filter thing on top of everything and the clean transition from the actual sprite to the made up outfit and stuff? Teach us your ways 👀
I have a tutorial here!
1 note
·
View note
Photo
WIP! HollowRoom talksprites, take 2
I’m in the process of finalizing some stuff (again) and Yuki’s getting some more changes. I’ll probably change his surname again, and as you can see, his design’s gotten a bit of change as well- his hair is floofier and his headband is gone, but you can now see his original hair color roots. He hasn’t re-dyed it in a while.
Ezza’s next on my list! I was gonna do Mika first but apparently I can’t draw folded arms anymore so I’m moving on to Ezza for now.
#homestuck#homestuck sprite edit#wip#talksprite#hollowroom#I wish xamag's talksprite tutorial they posted on DA is still online#I could really use it right about now
40 notes
·
View notes
Text
It's been a lot of work over a lot of time but I think I can finally share this...
PMD:EoS, but with all of the starters!
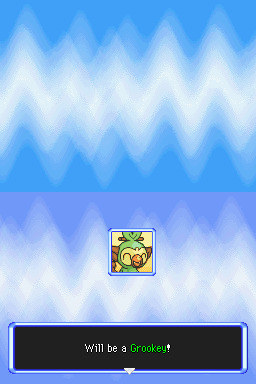
...Including Grookey, finally!!!!! 🥳

Introducing PMD: Expanded Sky!
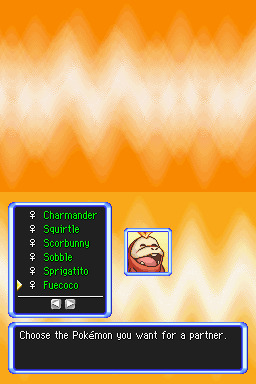
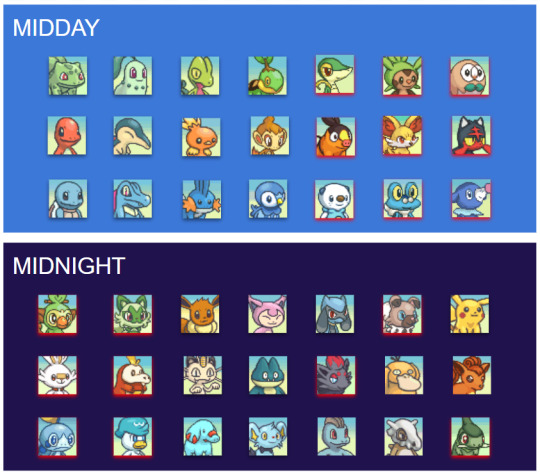
This is a public mod available to download now! It adds in all starters from unova all the way to paldea, as well as zorua, axew and rockruff, and allows evolving eevee into sylveon.
Speaking of which, fairy type has been patched into the game! Disarming voice replaces milk drink and moonblast replaces judgement, which was unused.
Some non-traditional starters are no longer available as hero options in this due to lack of space, but are still available as partners. (Skitty can be chosen as a hero in version 1.0.0 only, so download that version instead of the latest if you wanna use her! Riolu and Shinx are available in version 1.2.1 and below)
If one of your faves was taken off the hero roster (eg vulpix, skitty, riolu, munchlax, etc), I have a tutorial here on how to quickly edit the patched file to put them back in :)
Several regional variants have been added! Alolan Raichu, Alolan Marowak and Hisuian Typhlosion are now available as potential evolutions for their respective base stages.
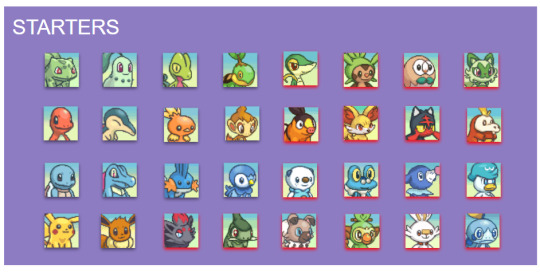
Partners across both rescue team and all three versions of explorers are available too, including Cubone, Munchlax, Machop, Vulpix, Riolu, etc
Sprites and portraits are courtesy of the brilliant PMD Sprite Repository and the many incredible artists who contribute to it!
Credits for all improvement patches, sprites and portraits are included in the download, as well as an explanation on how to patch the game and the full starter list.
The mod is split in two versions to accommodate all the partners - MIDDAY version and MIDNIGHT version. The download includes both, as well as the tool required to patch your game! You'll need a clean US copy of pmd eos at hand.
A full list of moves learned by newly added Pokémon can be found here, as well as info on how to evolve them and their IQ groups.


If you run into any issues, feel free to drop me an ask or DM and I'll see how I can help/what I need to fix!

You can find the download for this rom hack here!
Edits/updates noted under the cut:
(27/04/23)
The overall mod now has a name - expanded sky! Reflected earlier on in the post.
I've been informed that the included patching tool (XDelta) doesn't work on mac, and after some digging around and discussions in dms we found this tool works for Mac instead.
Added graphics to the post displaying which heroes and partners are part of the hack.
(11/05/23)
Added link to learnset compilation for all new pokémon.
(17/05/23) Version 1.1.0 has been released!
Sobble is now a starter, replacing Skitty (Skitty is still accessible by downloading v1.0.0 on the download page). Sobble is also now a partner in MIDNIGHT.
Zorua/Zoroark's moveset has been tweaked slightly
Base forms of all new starters can now be found in Oran Forest, and can be recruitable in the post-game. The new fire starters can also be found in Giant Volcano.
Extra portraits and sprites were added for Cubone, Psyduck and Machop. Like the rest of the new assets in this mod, these were imported from the PMD Sprite Repository, and credits are on the title screen and in the readme.txt.
Extra credits + more in-depth instructions for patching the game included in the readme.txt.
(18/05/23)
Added a link to a tutorial on swapping out heroes for others already existing in the game.
(22/05/23) - Version 1.1.1 has been released!
Fixed genders for female starter options on the quiz.
Updated Fuecoco to use new portraits and sprites. (Credits to Garbage)
(23/05/23) - Version 1.1.2 has been released!
Female starters from gens 5-9 can now evolve correctly (save for starters who don't have evolutions in the game yet - these are listed in the text file in the download)
Rockruff can now evolve, and Midnight Lycanroc's evolution method has been fixed to use the Lunar Ribbon as intended.
(15/06/23) - Version 1.2.1 has been released!
In 1.2.0, a second version of the mod was included in the zip compatible with melon emulator, and potentially others that were having issues with saving.
Fairy gummis were also made available as mission rewards and shop items.
There's a couple more things that can be seen in the changelog including bugfixes, but the main other thing promised was that Froakie and Litten can now evolve directly into Greninja and Incineroar. Due to an evolution flag not being set this ended up untrue, but has been fixed in 1.2.1.
This post claimed dazzling gleam is in the game, but it should've said disarming voice.
🆕 (10/03/24) - Version 1.3.0 has been released!
Dusk Lycanroc, Drizzile, Inteleon, Grookey, Axew and Fraxure have been added, as well as Alolan Raichu, Alolan Marowak an Hisuian Typhlosion.
Axew replaces Shinx in the hero roster, and Grookey replaces Riolu.
Additional portraits and sprites added for starter evolutions, including vanilla starters. Sleep animations have been copied over to EventSleep/Laying/Wake animations if missing.
Greninja erroneously had the same moveset as Froakie. This has now been fixed.
Credits are no longer displayed on the title screen.
Sprite, portrait and patch credits can now be viewed by talking to a Cyndaquil NPC on the crossroads.
Evolution help can also be accessed by talking to this same NPC.
🆕 (23/05/24) - Version 1.3.1 has been released!
The uhh. Grovyle problem. Yeah. That should be fixed.
(Grovyle was missing several sprites as a side effect of trying to add new ones, due to his unique setup in the vanilla game as such an important npc. His sprites should now be reverted to a functional state, rather than leaving him to walk fowards on the spot all the time).
An issue present from the start that caused the game to freeze while advancing floors in dungeons occasionally should now be resolved.
#pokemon#pmd#eos#pmd eos#rom hacks#I'VE BEEN WORKING ON THIS FOR SO LONG... REALLY HOPE U GUYS LIKE IT#pmd expanded sky
4K notes
·
View notes
Text
THINGS TO DO WITH YOUR OCS
If you’re like me and you like to play around with your OCs a lot, here’s some things you can do with them!
ART & CRAFTS
Put your OCs in character scenario memes! Here’s some I found on Deviantart.
Do an art trade where you draw someone’s OC and they draw yours!
Use those "Draw The Squad" templates and draw your OCs.
Crochet/knit/sew/etc. a plushie of your OC.
You can also make a paper doll! You can find tons of tutorials on youtube.
You can also make a figure of them out of something like clay, cardboard, or another material.
You can build them out of Legos!
You can also create a hand or finger puppet of them.
Draw a comic featuring your characters!
Create an animation of your character.
Draw your characters as animals!
Create pixel art of your OC! Maybe even make it look like video game sprites.
Draw your characters as playing card designs.
Draw your characters as tarot card designs (Suggested by @ultragirl-parsley)
Create a coloring book full of your OCs!
Create a large cardboard cutout of your character. There are tons of tutorials online!
Put your OCs as designs on cookies, cakes, etc. (I kinda want to do this one but I know it won't turn out well for me 'cuz I suck at handling food T_T)
Design your OC's home.
Make a board game about your OCs and their story
Make Minecraft skins of your characters
INTERNET
Make your OCs in picrew or other dress-up things!
Create a character playlist on Spotify or other music site!
Create a Pinterest board with inspo for your OCs! Maybe outfits they’d wear, a moodboard, etc.
Reblog those “tag your OC as” blogs! They usually have a prompt and you can reblog it and tag which OC it describes. Here’s a few blogs which do this: Tag Your OC on Tumblr develop your oc on Tumblr Daily Asks for your OC (tumblr.com)
Take quizzes as your OC! You can find some on Quotev or IDRLabs.
Make a roleplay account as your OC.
Create a quiz on Quotev about your OC. Maybe something like, "Would my OC like you," "How similar are you to my OC," etc.
Put your OCs in the incorrect quote generator.
Find OC questionnaires and templates online.
Create a page on your Tumblr just for your OC! You can include things like a character sheet, general facts, your posts about them, etc.
WRITING
Do character exercises for them! You can find a lot of these on the internet, but here’s an example.
Write from your OC's perspective. It'll help you understand them better!
Create a list of media they enjoy. Maybe movies, video games, songs, etc.
Write a song (or just lyrics) about your OC or parts of their story.
Write a random story about their childhood!
Create an in-universe news report from your OC's world.
Write a poem about your OC.
OTHER
Put your OCs in character alignment memes! Here’s some from a search on Pinterest.
Create voice headcanons for your OCs. Here’s an example of Vivziepop’s for Hazbin Hotel..
Play as your character in video games! Like, maybe design your character in Miitopia or Sims.
Do some theatre improv games as if you were your OC.
Edit your OC on to pride flags.
Also, you could maybe make those like, Tiktok edits of your OC? (Y'know the ones I'm talking about?)
Create an AU version of your characters! (I’ll create a list of AU ideas soon! :D)
Have your characters solve the trolley problem and other moral conudruums.
Cosplay as your OC!
Create ship names for your characters!
You can also find baby names that your OC might like or something.
Create a visual novel/dating sim in Google Slides (or if you can code, you can do it like that!)
Create a crossword/word search relating to your characters and story.
Answer "Would you rather?"questions as your character.
Find poems that remind you of your OC.
Make family trees.
If anyone has anymore ideas, please tell me and I’ll add them to the list!!
#oc#original character#list#oc creator#oc artist#original character artist#original character creator#oc challenge#ocs#masterlist#things to do#artists on tumblr#writers on tumblr
579 notes
·
View notes
Last Seen Blogs
detalle-constructivo
Detalle Constructivo
pudding-sama
プリン様のブログ

saplingchewer
⛏🌲🦊✨
bad-grammer
Can You Guess My Name
