#embroidery tips
Text
This tip is a real life saver especially when you are working on a large scale project.
PLEASE NOTE: THIS ADVICE ONLY APPLIES TO DMC THREADS OTHER BRANDS MAY BE DIFFERENT
17 notes
·
View notes
Text
All about sewing tools

Sewing Tools for Professional Results
As with any profession or hobby, using the right tools can make all the difference in the
world and can make the difference between amateur or professional results. Even if you’ve
only sewn a few projects and collected some basic sewing tools, it may be time to learn
about some of the advanced sewing tools designed to give your project that professional
edge.
Most sewing projects can be completed without the following tools, but as you improve
and fine-tune your skills and develop an affinity for quilting, home decorating or clothing
construction, you’ll find these tools indispensable for saving time, increasing accuracy and
simplifying tasks
Cutting Tools
Needlework Scissors and Snips Small, 3"- to 5"-long needlework scissors or snips are indispensable for clipping close to the stitching line or trimming intricate areas of a project. They can be used wherever your large bent-handled shears can’t reach.
Snips have spring-loaded handles. Keep a pair alongside the sewing machine, at-theready
to cut stray threads.
Rotary Cutter
Used with a self-healing mat and a clear plastic ruler, rotary cutters are ideal for straight cuts in one or more fabric layers.
Look for blades that can be easily removed and replaced and a handle that is comfortable. Rotary mats and rulers are made specifically for rotary-blade cutting, and the materials don’t dull rotary blades as other products might. Both the mat and the ruler feature gridlines and angles for cutting accuracy. See more about: rotary cutters
Measuring & Altering Tools Grid Board
Use a large grid board under the fabric and pattern to align the fabric grain while pinning and cutting. A padded grid board allows you to pin into it when stretching or blocking fabric. Some have ironing surfaces that are also helpful for fusing large fabric sections. Consider a rotating grid board if your space is limited. Mats and wide rulers used for rotary cutting are actually
modified grid boards used both underneath and on top of the fabric. See “Rotary Cutter” above.
French Curve or Fashion Ruler
These rulers have a variety of curves to mimic the body’s curves and are used when
altering patterns. It’s helpful for the simplest length adjustment and indispensable when actually changing the style of a garment. Depending on how you turn the ruler and what segment you use, one ruler gives you all the curves necessary to complete pattern lines when altering or drafting patterns.
Marking Tools
FabricMarking Pens
The space-age chemicals used to make these clever pens become more high-tech
every day. The disappearing ink allows you to mark most projects at the exact location
needed—even on the fabric right side— without fear of staining or discoloration.
Look for an ink color that is in high contrast to your fabric, and for accuracy select a fine
tip. Choose a water-soluble pen for long-term projects, when you want the markings to remain until you remove them with water. Air-soluble pen inks disappear within a few hours and are ideal for fabrics that can’t be washed or dampened. Some air- and water-soluble pen manufacturers caution against exposing marked fabrics to sunlight or the heat of the iron because heat may set the ink permanently. Always test the pen on a scrap of the fabric before using it on your project.
Pressing Tools
Tailor’s Ham
Resembling a ham, this pressing tool is used as a base or a mold when pressing curved or shaped seams. It’s available in several sizes and should be covered on one side in cotton and the other in wool. The ham’s curves are designed to mimic garment curves and are used to
set the shape of collars, lapels, sleeve caps and more.
Point Presser & Pounding Block
The raised points of this wooden tool allow you to press deep into a corner without creasing the surrounding fabric. The base is used as a pounding block, or clapper, to flatten seams.
Needle Board
A flat, flexible board with a bed of short needles placed very close together, a velvet board or needle board is used for pressing napped fabrics, such as velvet and corduroy, without crushing the fabric’s pile. A lessexpensive, and less-effective, version of a needle board
features a canvas backed fabric with a raised pile front that takes the place of the needles.
Sewing Tools
SewingMachine Needles
Sewing needles are designed for the type of fabric, thread and stitches you’re using. Using the right size and type of needle will greatly improve your sewing success. For more information on choosing the best needle for your project .
Tip: A stitching problem, such as skipped stitches or looping or shredding threads, at firstmay appear to be a problemwith themachine when actually it’s a call for a new or better-suited needle.
Bodkin
Used for drawing elastic, cord or ribbon through a fabric casing, bodkins are available in several different styles. The pincer is usually the shortest with teeth at one end designed to clamp down firmly on ribbon or elastic and pull it through a tubular casing. Longer versions have a safety pin style closure at one end, and the slimmest version, designed like a large sewing needle, has a large eye for feeding narrow cord in narrow casings. A bodkin’s ball-point end comes in handy for turning fabric tubes right side out.
Point Turner
A point turner is a hand-held, pointed plastic tool designed to poke into tight corners. For crisp, sharp corners and points, use this tool to push out the corners of collars and cuffs before pressing. The opposite end is flat or rounded; use it to hold open seam allowances while pressing, so you don’t burn your fingers.Basting Tape Much faster than hand basting with needle and thread, use narrow, paper backed basting tape to hold zippers, bias tapes and trims in place while stitching.
Fray Preventer
A drop of this liquid on the cut edge of a woven fabric will bond the edges and prevent the fabric from raveling. Before using, test the product on a scrap of the actual fabric, or in an inconspicuous area of the project.
Allow the test piece to dry thoroughly. Then wash, dry and press it as you would the finished project, to be sure the product doesn’t discolor the fabric.
Read the full article
4 notes
·
View notes
Text
Embroidery/cross stitch/similar needle arts Tip:
If you're embroidering and need to draw outlines on the fabric, but regular pencil does not show up very well on the fabric - use a glass-marking pencil or even a color pencil! ((Images of glass marking pencil vs. 3H drawing pencil - bc 2HB is even lighter vs. White and blue color pencil - on a medium wash light denim fabric)

This is the glass marking pencil(white, these are also in some other colors but I had only found white ones in stores)
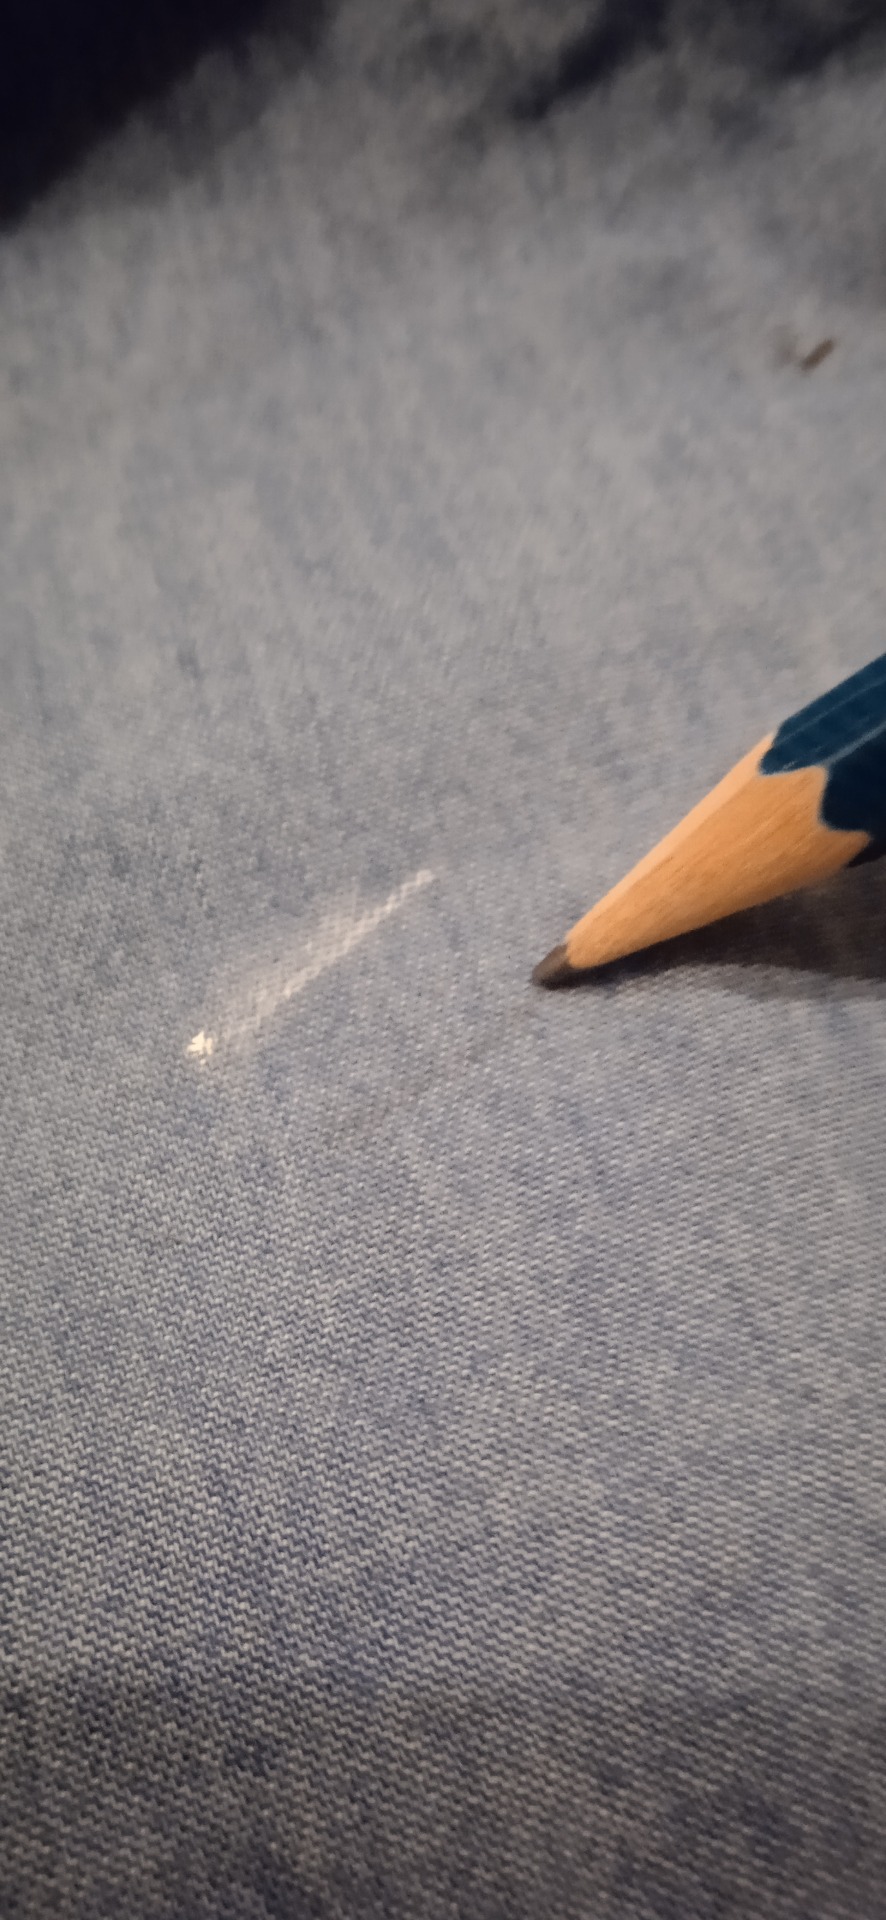
And we have a comparison with the 3H pencil - the 3H pencil line is hardly visible on this fabric.
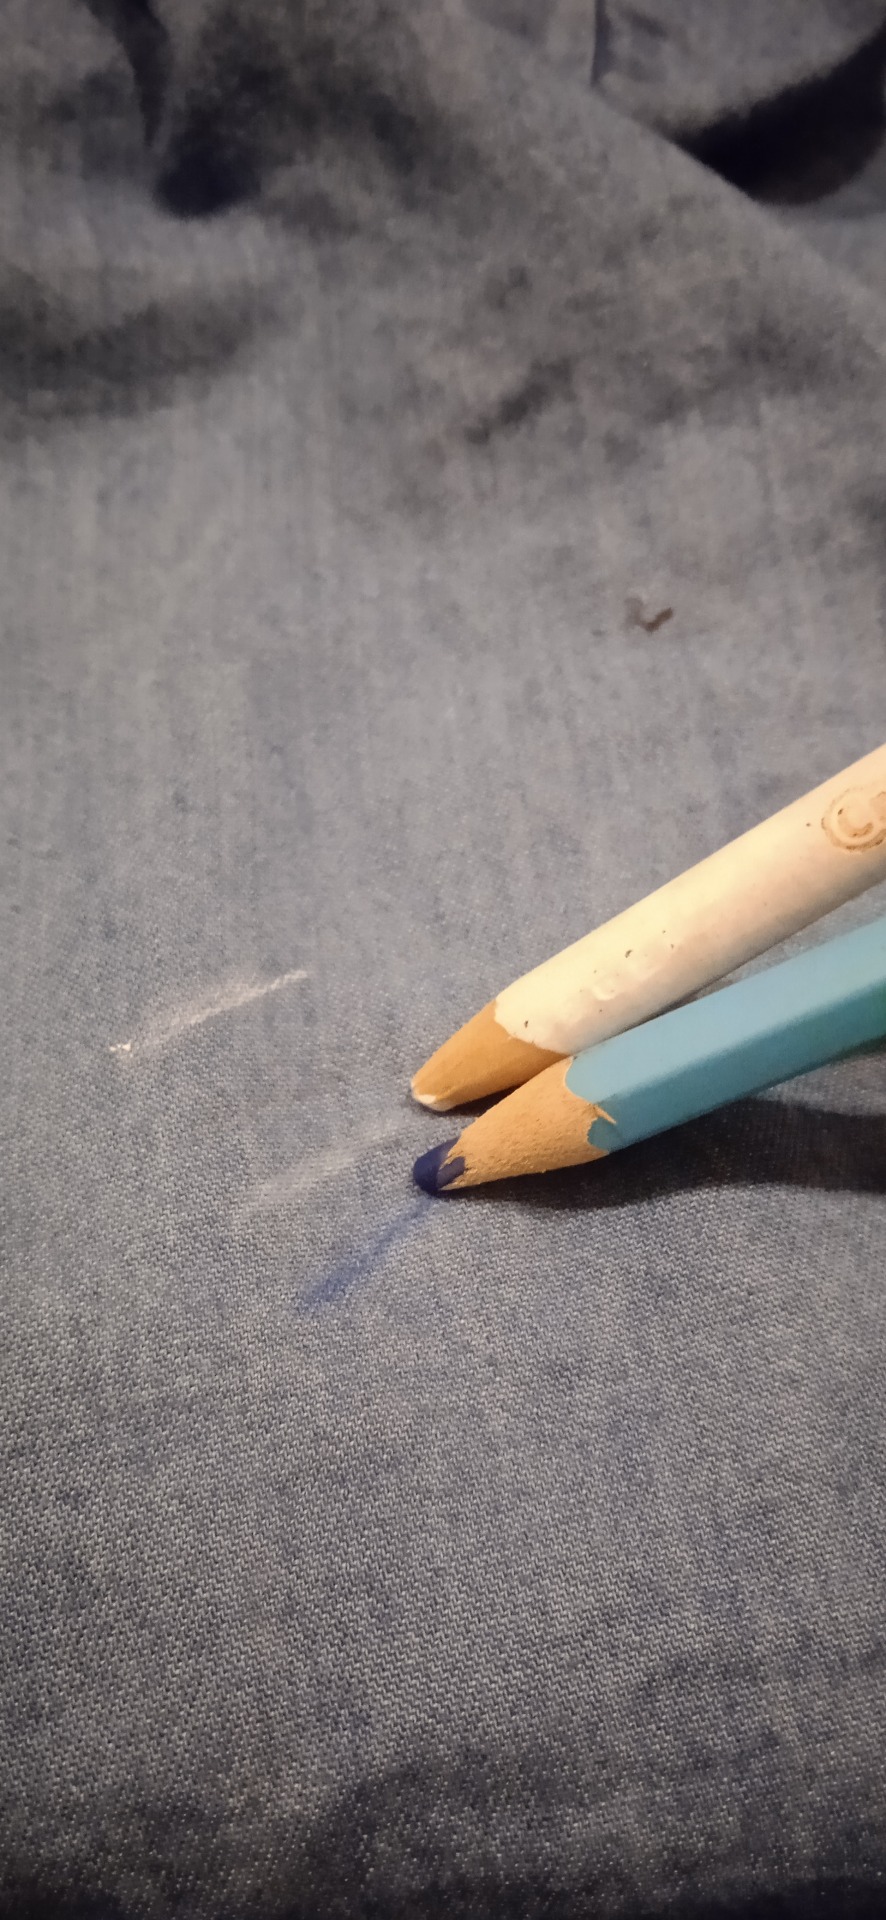
Finally, since I was curious about whether regular color pencils work, I tried a white color pencil and blue one, both of which worked pretty well(and yes they do also erase)
12 notes
·
View notes
Text
youtube
These are some tips I’ve found out through the years that are really helpful when you’re first learning to embroider!
PRODUCTS MENTIONED:
Darice Embroidery Hoops: https://amzn.to/3jkcdNY
Kona Cotton: https://amzn.to/32zw063
Water Soluble Markers: https://amzn.to/2MGtbpM
Stitch Step By Step Embroidery Book: https://amzn.to/32Du3Wb
☺ Embroidery kits: https://crewelghoul.com/product-categ...
☺ Read the full blog post:
https://crewelghoul.com/blog/secrets-...
#Crewel Ghoul Embroidery#solarpunk#embroidery#embroidery tips#embroidery for beginners#how to#how to embroider#diy#do it yourself#Youtube
10 notes
·
View notes
Text
New Post has been published on Free embroidery designs
New Post has been published on https://embroidery-designs.org/what-is-embroidery-stabilizer-and-how-to-choose-it/
What is embroidery stabilizer and How to choose it?
What is embroidery stabilizer and How to choose it?
What is embroidery stabilizer and How to choose it?
A stabilizer (alluded to in modern circles as support) is a fundamental for machine weaving. It is utilized to help the texture during the sewing system to continue to pucker or then again extending from happening.
The decision of stabilizer can represent the deciding moment a weaving project. Utilizing a stabilizer that is deficient for the texture or on the other hand the join count of the plan can make even awesome
digitized plan look awful.
Stabilizers are characterized by the strategy used to eliminate the overabundance from the rear of the venture after the plan has been sewed. The three most normal sorts are:
1) Cut-Away
2) Tear-Away
3) Wash-Away
Inside each gathering are a few loads of stabilizer.
• Pick the weight that most intently relates to the heaviness of the texture to be weaved.
• Pick the load as indicated by the fasten count of the plan – the more noteworthy the line count, the
heavier the stabilizer ought to be.
Sticking any of these stabilizers to the texture with a brief cement shower prior to hooping is
prescribed to hold the layers back from moving during the weaving process and to make the thing simpler to circle.
The most important factors to consider when choosing an appropriate stabilizer are:
1) Fabric
2) Embroidery Design
3) Back Appearance
4) The “Hand” or Feel
5) Test Results
Texture
• The main rule – – Use a remove stabilizer while weaving on sews or stretchy textures.
The remove will uphold the fastens not just during the weaving system itself, however during the
lifetime of the article of clothing too.
• Texture weight and stabilizer weight ought to be viable. As a general rule, the heavier the texture, the
heavier the stabilizer ought to be. On the other hand, the lighter, milder, or more drapey the texture, the lighter
the heaviness of the stabilizer ought to be.
• A sheer texture will require a water-dissolvable stabilizer so that no excess pieces of stabilizer will be seen
from the right side.
• The texture and picked plan ought to be viable. A lightweight texture can become overpowered by
a line concentrated plan. On the other hand, an open vaporous configuration can get outwardly derailed in a rested or weighty texture.
Weaving Design
• The more join in a plan, the heavier the It would be ideal for stabilizer to be.
• Utilize a very much digitized plan that has adequate underlay to offer base help for the join.
• Assuming it is important that you utilize a specific sort of stabilizer, pick the plan likewise.
Back Appearance
• In the event that you believe positively no stabilizer should show from some unacceptable side, you should utilize a water-solvent stabilizer.
• In the event that you are OK with the vast majority of the stabilizer being taken out, you can utilize a tear away.
• While utilizing a remove stabilizer, the overabundance must be removed leaving a circle of stabilizer on the back side of the venture.
The “Hand” or Feel
• The weight and kind of the stabilizer will impact the wrap of the texture.
− A significant burden stabilizer will add weight to the article of clothing. Indeed, even a weighty tear away stabilizer will add weight since some stabilizer will remain behind the join.
− The lighter the heaviness of the stabilizer, the more noteworthy the wrap of the texture will be.
− A wash away stabilizer will add no weight by any means to the texture after it is washed.
• The cut edges of a remove stabilizer stay on the posterior of the venture. The heavier the remove,
the seriously disturbing this edge could be on a piece of clothing that will be worn straightforwardly against the skin.
Test Results
Testing is in every case enthusiastically suggested. Despite the fact that you keep all the stabilizer rules, they are
simply that – rules. There are numerous factors in texture quality inside every texture gathering, as well as
contrasts in the nature of the plan. The most effective way to decide the legitimate stabilizer is to test.
Tear-Away Stabilizers
Remove stabilizers are viewed as the most steady of the three stabilizer types. They can be utilized on any texture type, yet all the same MUST be utilized while sewing on weaves or stretchy textures. The abundance
stabilizer will be removed, yet the stabilizer behind the fastens will show up for the lifetime of the piece of clothing and will keep the plan’s fastens from popping as the article of clothing is extended or controlled.
Evacuation:
• Trim with scissors no nearer than ј” to Ѕ” away from the edge of the plan and round any corners.
• Try not to endeavor to remove open regions inside the plan itself.
• Place the task with the stabilizer side down.
Accumulate the texture in your grasp and cut the stabilizer. This will keep you from unintentionally
cutting the texture!
Heavy Weight Tear-Away
• Tears away very cleanly and easily – stiff edges are easy to grasp
• Supports large number of stitches
• Great for items that need more support for heavier
stitch count designs
Medium Weight Tear-Away
• Available only in black
• Firm tear away, but very easy to remove
Ultra Clean and Tear
• A soft medium weight tear away stabilizer
• Removes very easily – does not stress the stitches as it is removed
• Remaining bers will easily wash away as the project is laundered
Light Weight Tear-Away
• The lightest weight of the tear away stabilizers – adds very little weight to the project
• Easy to tear away leaving a very clean edge
• Can be printed on and used for paper piecing
• Great for use when stitching decorative stitches on the sewing side
• Available in a fusible version (See Specialty Stabilizer section)
Wash-Away Stabilizers
Wash away stabilizers ought to be utilized when all follows of the stabilizer should be eliminated from the back
of the venture, for example, while utilizing a sheer texture or weaving a task that will be seen from the back
side as well as the front. Since this kind of stabilizer does not help however many fastens as tear away or remove stabilizers, cautious thought ought to be given to the plan decision. Try not to utilize this stabilizer if your texture can’t be washed.
Removal:
• Remove as much stabilizer as possible by tearing or cutting away the excess.
• Rinse the project under warm running water until all traces of the stabilizer are removed.
• When creating lace, the more it is washed, the softer the lace will be.
AquaFilm Backing
• A clear lightweight backing – quick to rinse away
• Use for quilting in the hoop if the quilt itself cannot be hooped
• Too lightweight for stand-alone lace
BadgeMaster
• A heavy clear backing
• Can be used for stand-alone lace
• Majority of stabilizer can be torn away before rinsing
AquaMesh
• An opaque backing that supports the greatest number of stitches
• Can be used in the creation of stand-alone lace
• Very stable water soluble stabilizer that is not prone to premature perforation during stitching
• Excess cannot be torn away – cut the excess away from the outer edges and then rinse
What is embroidery stabilizer and How to choose it?
Specialty Stabilizers
Fusible Stabilizers
Fusible stabilizers are utilized by cutting a loop measured piece of stabilizer and sticking it to the rear of the
texture. This will forestall extending of the texture during the hooping system, and will assist with keeping frames accurately enrolled. The texture/stabilizer is then hooped in the customary way.
FUSIBLE POLYMESH CUT AWAY
FUSIBLE TEAR AWAY
To use:
• Lightly adhere the adhesive side of the stabilizer to the back of the project in the area to be embroidered.
• After the embroidery has 뀠nished, carefully separate the stabilizer from the fabric (heating with an iron
very briefly may aid in this).
• Remove the excess by either cutting away the Fusible PolyMesh, or tearing away the Fusible Tear
Away.
Paper-Backed Pressure Sensitive Adhesive Stabilizers (aka sticky-backed stabilizers)
These stabilizers are used in the same manner. They are all coated with the same type of pressure-sensitive
adhesive with a protective paper backing. The difference will be in the number of stitches that
the stabilizer will support as well as the manner in which the excess stabilizer is removed. Select the
stabilizer type (cut away, tear away, or water-soluble) by applying the same principles as if using a regular
stabilizer. (Refer to earlier page on stabilizers.) Most generally these stabilizers are used for “hoopless” embroidery.
STABIL-STICK CUT AWAY
STABIL-STICK TEAR AWAY
AQUAMESH PLUS (WATER-SOLUBLE)
To use:
• Hoop with the paper side up.
• Score and remove the paper to reveal the sticky surface.
• Position the fabric over the sticky surface and smooth into place.
To remove:
• Separate the stabilizer from the fabric by gently pulling the layers apart.
• Remove the excess by either cutting, tearing, or washing it away depending on the type of stabilizer
used.
Water Activated Stabilizer
HYDRO-STICK TEAR AWAY
Hydro-Stick is a heavy weight tear away stabilizer with an adhesive coating that is activated by water. It is
most often used for “hoopless” embroidery. HydroStick holds the fabric VERY 뀠rmly. The project
cannot be accidentally bumped or moved out of place during the embroidery process.
It will not gum the needles since it is not a sticky adhesive.
To use:
• Hoop the stabilizer with the coated side up.
• Moisten the top slightly with water and adhere the fabric to the top of the hooped stabilizer.
• Allow the stabilizer to dry for a few minutes before embroidering.
To remove:
• Lift a loose corner of the stabilizer and apply moisture to the area between the stabilizer and the back
of the fabric.
• Continue to lift and moisten until the stabilizer has been separated. Then tear the excess away.
Toppings
As the name implies, toppings are used only on the top of the fabric to control the nap of the fabric. They are too lightweight to be used as the backing stabilizer.
AquaFilm Topping
• A clear water soluble product – excess easily removed with water
• Must be used on napped fabrics such as towels, knits, velvets, or velveteens to prevent the nap of
the fabric from poking through the stitches
• Improves the appearance of the embroidery design on any fabric with any kind of an irregular weave
To use:
• Place the AquaFilm over the top of the hooped fabric. AquaFilm does not need to be hooped with
the fabric, but it does need to be secured. − Moisten the corners and attach to the fabric, use
Painter’s Tape, or pins (carefully placed outside the stitching area) to hold the AquaFilm in place.
− Use a design basting box, or a hoop basting box to further secure the AquaFilm. Slow the machine
down to its slowest speed as the basting box is stitched. Using the foot control on your machine
will also give you greater control.
To remove:
• Carefully tear away as much of the AquaFilm as possible.
• The remainder can be rinsed away with water.
TopCover
TopCover is a vinyl type product that prevents the color of the fabric from showing through the stitches
as well as controlling the nap.
It is Ideal for use when stitching light designs on dark fabric, or vice versa. The TopCover behind the stitches
will remain there throughout the lifetime of the project.
To use:
• Place TopCover over the top of the hooped fabric. It does not need to be hooped with the fabric, but it
does need to be secured.
− Use Painter’s Tape or pins (carefully placed outside the stitching area) to hold it securely.
− Use a design basting box, or a hoop basting box to further secure the TopCover. Slow the machine
down to its slowest speed as the basting box is stitched. Using the foot control on your machine
will also give you greater control.
To remove:
• The needle perforations will make it easy to remove the excess. Tear away as much as possible.
• Tiny bits that cannot be torn away can be melted away with the tip of the iron. Be SURE to clean the
iron after this use.
2 notes
·
View notes

Text
Have y'all tried embroidery?
It's very therapeutic, and you get...
A Butterfly!
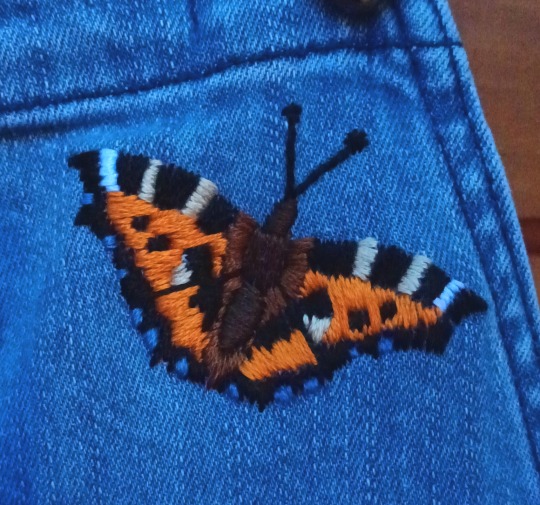
A Small Tortoiseshell to brighten the day.
#butterfly#embroidery#tortoiseshell#sewing#yah i know the white wing tips look blue it's the lighting i tell ya
209 notes
·
View notes
Text
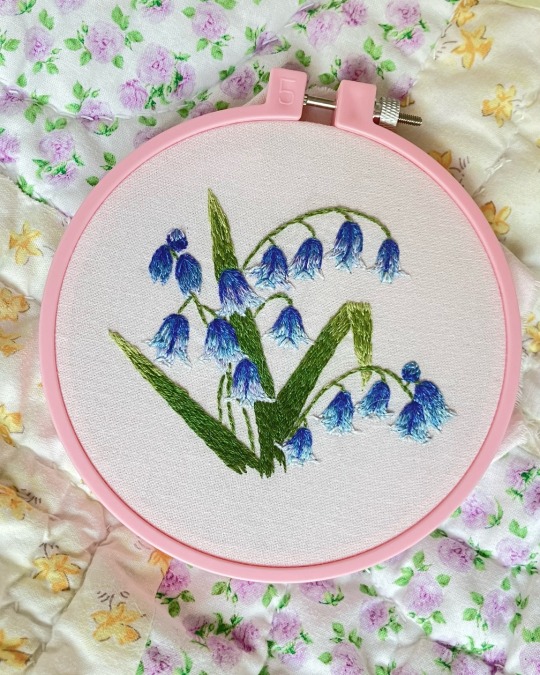
finished bluebell embroidery 💙
#embroidery#thread painting#fiber arts#flower embroidery#bluebells#spring flowers#cottagecore#I finished these a while ago but forgot to post oops#already working on the next one: rowan berries!#this one was really hard I struggled with the flowers#not 100% happy with it but I think it’s good enough?#on real flowers the petal tips turn up but that’s really hard to show with thread…#bluebells are sometimes also called harebells! what a cool name#mine
42 notes
·
View notes
Text
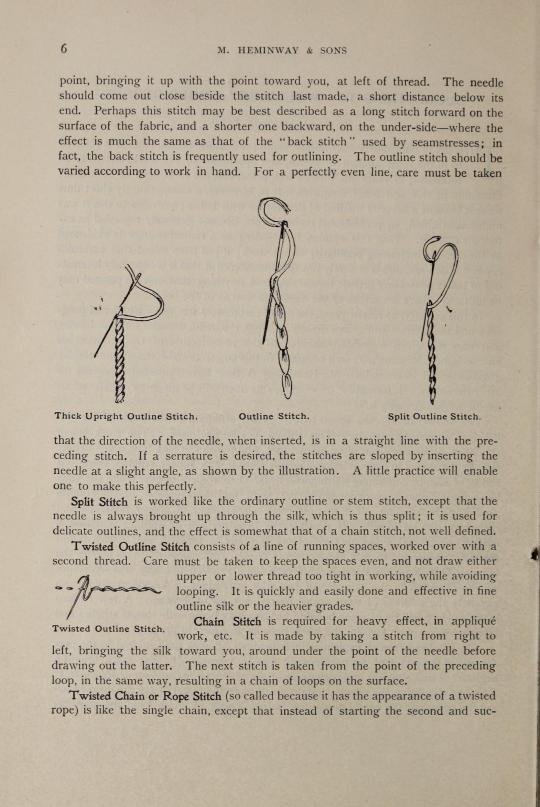
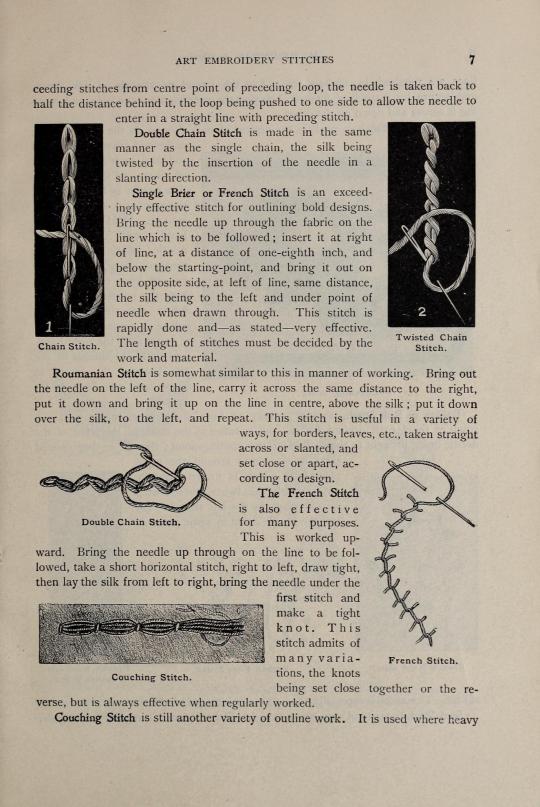
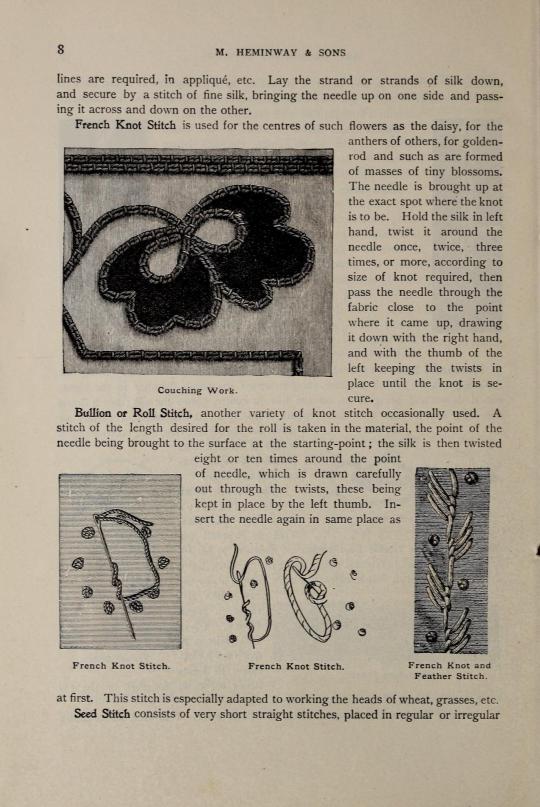
A Treatise of Embroidery, crochet, and knitting with illustrations
By George C. Perkins, Anna Grayson Ford, and M. Heminway & Sons Silk co circa 1899.
Part 1 of this series!
Enjoy,
~Tweedle
.👒
.🦇💜
#historical sewing#sewing#sewing tips#embroidery#embroidery stitches#embroidery tutorials#1890s#1899
92 notes
·
View notes
Text
Tuto de emparchado de ropa. HAY SEGUNDA PARTE
Caso 1: agujero más grande que (redacted)
Necesitarás
Hilo de coser
Agujas y alfileres
Tela
Tu prenda hecha bolsa
Paso uno: medir el agujero
Hagamos de cuenta que la zona delimitada *suavemente* en rosa es el agujero. Medí una figura cuadrada o rectangular a su alrededor. El de la imagen medía 6cm de alto y ancho
Paso dos: cortar tela
Cortá tela de almenos un cm más de alto y ancho. Acá sería de siete por siete.
Paso tres: doblar las orillas
Doblá las orillas de la tela para adentro dos veces, con dobleces muy finos. Empezá con dos lados paralelos.
Así. Luego cosé ambos dobladillos.
Repetilo del otro lado.
Luego coselo a la prenda
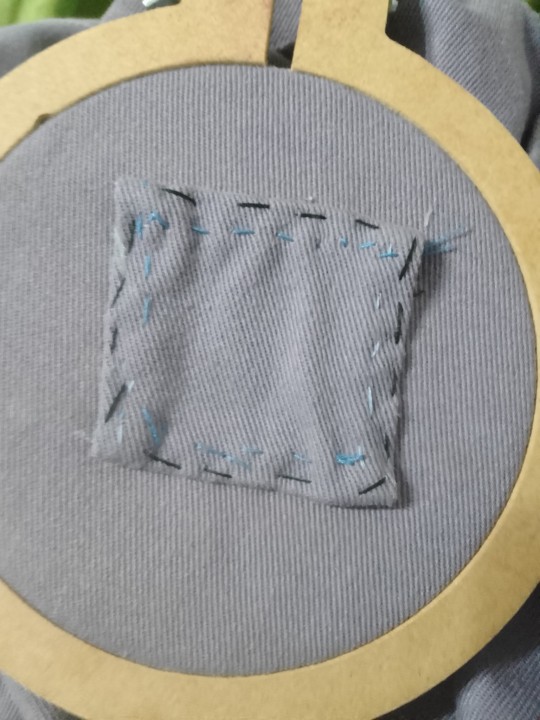
Usé hilo negro para que se vea mejor. Pero les debería quedar algo así.
#argentina#argieblr#argie tag#argieposting#argie posting#argie tumblr#sewing#costura#diy#diy punk#punk#embroidery#tips arg#argentips
34 notes
·
View notes
Text
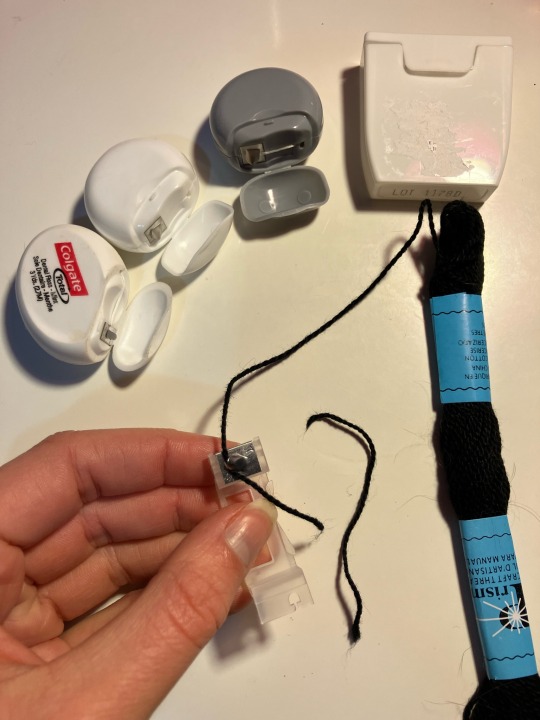
Ingenious hack I just came up with
Use the cutter on floss dispensers to cut string/thread quickly without bulky scissors
39 notes
·
View notes
Text
Homesteading Resources Master Post
So, I have been really into homesteading lately, you call it a hyperfixation, I call it free dopamine. This is my masterlist of sources for different aspects of homesteading life. I plan on making a life in the city homesteading masterlist too. Please be careful when canning a preserving food, I am not an expert, but these sources seemed credible so be sure to can with caution.
Happy Homesteading!
General
Homesteading 101
Skills to Develop
Farmers Market Directory
Ways to make a Profit
Farmer's Almanac
Livestock
Livestock Pros and Cons
Meat Rabbit Guide
Pigs Guide
Chicken Guide
Ducks Guide
Goat Guide
Sheep Guide
Meat Cow Guide
Milk Cow Guide
Gardening
Composting
USA Planting Zones
Europe Planting Zones
Homemade Pest Control
High Yield Garden
High Yield Vegetables
Pollinator Garden
Canning
Canning 101
Fruit
Vegetables
Kitchen
Veggie Recipes
Bone Broth
Wheat to Bread
Sustainability
Self Sufficiency
Reduce, Reuse, Recycling
Clothes Mending
Crafts
Cross Stitch
Embroidery
Whittling
Crochet
Quilting
Knitting
#homesteading#nontrad homemaker#farmlife#farming#farm#plants#crafts#embroidery#gardening#livestock#masterlist#tips#canning#food preservation
20 notes
·
View notes
Text
learn to digitizing your embroidey designs

From Sketch to Stitch: A Comprehensive Guide to Digitizing Your Embroidery Designs
The world of embroidery has embraced the digital age, allowing you to transform your own unique designs into stunning stitched masterpieces. But how do you bridge the gap between a simple vector graphic and a complex stitching pattern? This comprehensive guide, crafted with 2500 words, will teach you the art of digitizing your embroidery designs, from software choices to stitch considerations and finishing touches.
Before We Embark: Understanding SVGs and Embroidery Files
Scalable Vector Graphics (SVGs): These text-based descriptions of images offer infinite scalability, making them perfect for digital design.
Embroidery files: These contain specific instructions for your machine, including stitch types, colors, and placement (DST, EXP, JEF, PES formats are common).
Step 1: Choosing the Right Software
Consider these factors when selecting your digitizing software:
Skill Level: Are you a beginner or an experienced digitizer? Some programs cater to novice users, while others offer advanced features.
Budget: Free and paid options exist, each with varying capabilities and functionalities.
Compatibility: Ensure the software outputs files compatible with your embroidery machine.
Here are some popular choices:
Free:
Inkscape: A free vector graphics editor with the Ink/Stitch plugin for basic digitizing.
Sewing & Embroidery Software (SERF): Free software with limited but beginner-friendly digitizing features.
Paid:
Wilcom Embroidery Studio: Offers powerful tools for advanced digitizing and editing.
Embrilliance Enthusiast: User-friendly software with various features at a good price point.
Brother PE Design: Ideal for beginners with Brother embroidery machines.
Step 2: Preparing Your SVG
Simplify the design: Remove unnecessary details or intricate lines that might not translate well to embroidery.
Optimize colors: Limit your color palette to what your machine can handle (usually 6-12 colors).
Convert to paths: Ensure all elements in your SVG are outlines (paths) for proper stitching.
Step 3: Importing and Converting
Import your cleaned-up SVG into your chosen software.
Follow the software's specific instructions for converting to an embroidery file. This typically involves:
Choosing stitch types: Select appropriate stitches for different parts of your design (satin stitch for filling, backstitch for outlines, etc.).
Setting stitch parameters: Adjust stitch density, length, and direction for desired effects.
Color mapping: Assign thread colors to different parts of your design.
Step 4: Digitizing Tweaks and Adjustments
Preview and test: Most software allows you to preview your design on a virtual embroidery machine. Check for stitching issues and adjust paths or settings if needed.
Refine stitch types and parameters: Experiment with different stitch combinations to achieve the desired look and texture.
Consider thread types and colors: Choose thread that complements your fabric and design aesthetic.
Step 5: Export and Embroider!
Once you're happy with your design, export it in a file format compatible with your embroidery machine.
Transfer the file to your machine and prepare your fabric and thread.
It's finally time to see your creation come to life! Embroider your design, following your machine's instructions.
Bonus Tips for Success:
Start simple: Begin with basic shapes and designs to get comfortable with the conversion process.
Practice digitizing: The more you experiment, the better you'll understand how different stitches and settings affect your final outcome.
Join online communities: Connect with other embroidery enthusiasts for tips, advice, and inspiration.
Don't be afraid to ask for help: If you get stuck, consult software manuals, online tutorials, or seek assistance from experienced digitizers.
Remember, with a little practice and this guide as your compass, you'll be well on your way to transforming your SVG dreams into beautiful embroidered realities!
Further Resources:
Websites: Needlework Tips and Techniques: https://www.needlework-tips-and-techniques.com/
Books: "The Complete Book of Digitizing" by Jeannette Douglas, "Digitizing Designs" by Laura Ashley
YouTube Tutorials: CreativeBug Cutwork Embroidery Masterclass, Bluestone Creations Cutwork Basics
Online Forums: Embroidery Forum
With these additional resources and the knowledge you've gained, you
Read the full article
2 notes
·
View notes
Text
she now watches me in my sleep
#I’m so hsppy abt her still yayyyyy:3#okay talking abt the plushie her head is HUGE. Like you could have her on a flat surface and poke her face and she will tip over#The embroidery/stitching is very well done. There are some flaws like you can see the visor part SLIGHTLY on her right eye but the design#Is lovely:3#I love heerereerrrrrrr#Sketches#wrenbles#joyous day to be alive
119 notes
·
View notes
Text
Tried my hand at embroidery for the first time by making this little llama! I'm relatively new at hand sewing and the fabric was kinda old and loosely woven so it looks a little messy but it was fun to make. :)
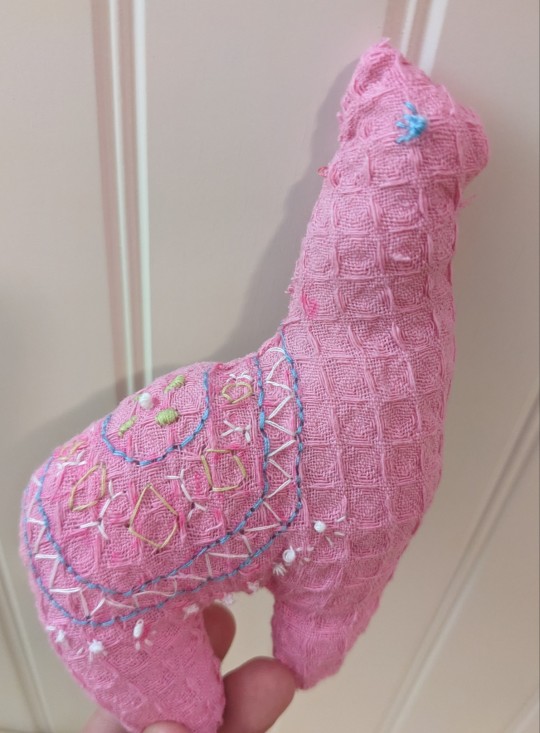
#I spent the time listening to a really bad detective radio show#I have no idea why I kept listening#it was not good#I listened to like 10 episodes in a row#pro tip don't make things out of old towels#it's not fun#if you look at the embroidered parts you'll see what I mean because all the holes kept expanding#and the edges were fraying badly#if you've gotten this far you should give me name suggestions#I'll link the free pattern I used in the comments#sewing#hand sewing#embroidery#llama#sewblr
13 notes
·
View notes
Text
does anyone have any favourite hand-sewing/embroidery/mending/darning youtube channels like stuff that would be good guides for beginners
#my mom gave me some equipment and basic instructions and good book about embroidery textures but i need to just like#watch omeone do more and give beginner guides and tips for what to practice and stuff
14 notes
·
View notes
Last Seen Blogs

bradicalguy
Bradicalguy

mariahelena19522-blog
Sem título

abbycadoodle
✨wowzers bowzers✨

fruitytrollroll
erotica is my passion

healthmasterlove-blog
Untitled