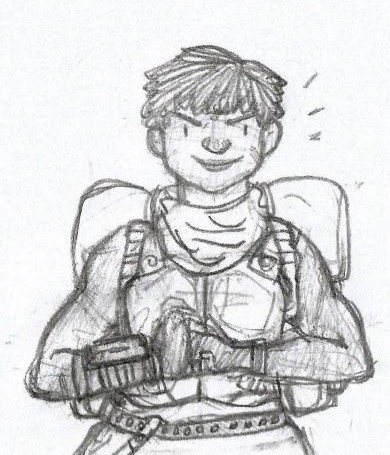
#file under: photoshop experiments
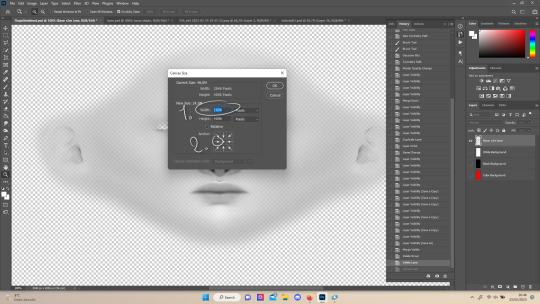
Text


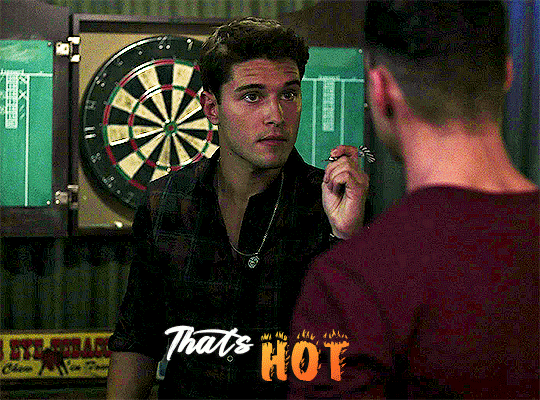
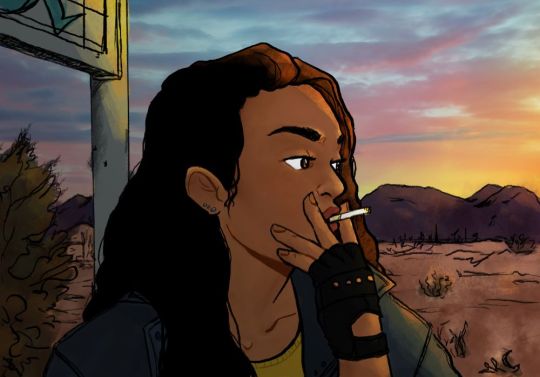
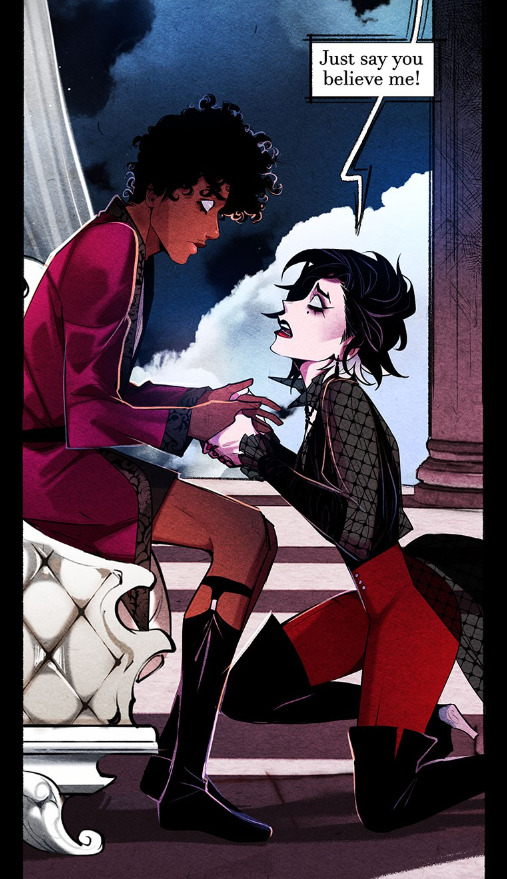
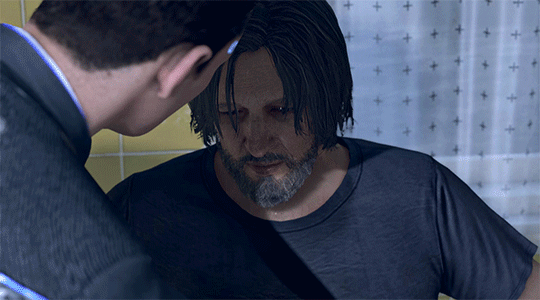
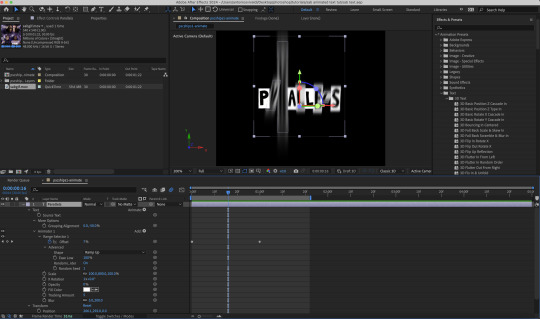
Tarlos Wedding Celebration Event [Week 4] -> favourite quote(s) -> season 1
#911 lone star#tarlosweddingcelebration#911lsedit#tarlosweddingevent#tk strand#carlos reyes#tarlos#I so clearly used this prompt as an excuse to just fuck around in photoshop and try some different effects lmao#will i ever use these effects again? probably not#but it was fun!!#my gifs#file under: photoshop experiments#episode: s01e02 yee-haw#episode: s01e03 texas proud
327 notes
·
View notes
Text


Neural Filters Tutorial for Gifmakers by @antoniosvivaldi
Hi everyone! In light of my blog’s 10th birthday, I’m delighted to reveal my highly anticipated gifmaking tutorial using Neural Filters - a very powerful collection of filters that really broadened my scope in gifmaking over the past 12 months.
Before I get into this tutorial, I want to thank @laurabenanti, @maines , @cobbbvanth, and @cal-kestis for their unconditional support over the course of my journey of investigating the Neural Filters & their valuable inputs on the rendering performance!
In this tutorial, I will outline what the Photoshop Neural Filters do and how I use them in my workflow - multiple examples will be provided for better clarity. Finally, I will talk about some known performance issues with the filters & some feasible workarounds.
Tutorial Structure:
Meet the Neural Filters: What they are and what they do
Why I use Neural Filters? How I use Neural Filters in my giffing workflow
Getting started: The giffing workflow in a nutshell and installing the Neural Filters
Applying Neural Filters onto your gif: Making use of the Neural Filters settings; with multiple examples
Testing your system: recommended if you’re using Neural Filters for the first time
Rendering performance: Common Neural Filters performance issues & workarounds
For quick reference, here are the examples that I will show in this tutorial:
Example 1: Image Enhancement | improving the image quality of gifs prepared from highly compressed video files
Example 2: Facial Enhancement | enhancing an individual's facial features
Example 3: Colour Manipulation | colourising B&W gifs for a colourful gifset
Example 4: Artistic effects | transforming landscapes & adding artistic effects onto your gifs
Example 5: Putting it all together | my usual giffing workflow using Neural Filters
What you need & need to know:
Software: Photoshop 2021 or later (recommended: 2023 or later)*
Hardware: 8GB of RAM; having a supported GPU is highly recommended*
Difficulty: Advanced (requires a lot of patience); knowledge in gifmaking and using video timeline assumed
Key concepts: Smart Layer / Smart Filters
Benchmarking your system: Neural Filters test files**
Supplementary materials: Tutorial Resources / Detailed findings on rendering gifs with Neural Filters + known issues***
*I primarily gif on an M2 Max MacBook Pro that's running Photoshop 2024, but I also have experiences gifmaking on few other Mac models from 2012 ~ 2023.
**Using Neural Filters can be resource intensive, so it’s helpful to run the test files yourself. I’ll outline some known performance issues with Neural Filters and workarounds later in the tutorial.
***This supplementary page contains additional Neural Filters benchmark tests and instructions, as well as more information on the rendering performance (for Apple Silicon-based devices) when subject to heavy Neural Filters gifmaking workflows
Tutorial under the cut. Like / Reblog this post if you find this tutorial helpful. Linking this post as an inspo link will also be greatly appreciated!
1. Meet the Neural Filters!
Neural Filters are powered by Adobe's machine learning engine known as Adobe Sensei. It is a non-destructive method to help streamline workflows that would've been difficult and/or tedious to do manually.
Here are the Neural Filters available in Photoshop 2024:


Skin Smoothing: Removes blemishes on the skin
Smart Portrait: This a cloud-based filter that allows you to change the mood, facial age, hair, etc using the sliders+
Makeup Transfer: Applies the makeup (from a reference image) to the eyes & mouth area of your image
Landscape Mixer: Transforms the landscape of your image (e.g. seasons & time of the day, etc), based on the landscape features of a reference image
Style Transfer: Applies artistic styles e.g. texturings (from a reference image) onto your image
Harmonisation: Applies the colour balance of your image based on the lighting of the background image+
Colour Transfer: Applies the colour scheme (of a reference image) onto your image
Colourise: Adds colours onto a B&W image
Super Zoom: Zoom / crop an image without losing resolution+
Depth Blur: Blurs the background of the image
JPEG Artefacts Removal: Removes artefacts caused by JPEG compression
Photo Restoration: Enhances image quality & facial details
+These three filters aren't used in my giffing workflow. The cloud-based nature of Smart Portrait leads to disjointed looking frames. For Harmonisation, applying this on a gif causes Neural Filter timeout error. Finally, Super Zoom does not currently support output as a Smart Filter
If you're running Photoshop 2021 or earlier version of Photoshop 2022, you will see a smaller selection of Neural Filters:


Things to be aware of:
You can apply up to six Neural Filters at the same time
Filters where you can use your own reference images: Makeup Transfer (portraits only), Landscape Mixer, Style Transfer (not available in Photoshop 2021), and Colour Transfer
Later iterations of Photoshop 2023 & newer: The first three default presets for Landscape Mixer and Colour Transfer are currently broken.
2. Why I use Neural Filters?
Here are my four main Neural Filters use cases in my gifmaking process. In each use case I'll list out the filters that I use:

Enhancing Image Quality:
Common wisdom is to find the highest quality video to gif from for a media release & avoid YouTube whenever possible. However for smaller / niche media (e.g. new & upcoming musical artists), prepping gifs from highly compressed YouTube videos is inevitable.
So how do I get around with this? I have found Neural Filters pretty handy when it comes to both correcting issues from video compression & enhancing details in gifs prepared from these highly compressed video files.
Filters used: JPEG Artefacts Removal / Photo Restoration
Facial Enhancement:
When I prepare gifs from highly compressed videos, something I like to do is to enhance the facial features. This is again useful when I make gifsets from compressed videos & want to fill up my final panel with a close-up shot.
Filters used: Skin Smoothing / Makeup Transfer / Photo Restoration (Facial Enhancement slider)
Colour Manipulation:
Neural Filters is a powerful way to do advanced colour manipulation - whether I want to quickly transform the colour scheme of a gif or transform a B&W clip into something colourful.
Filters used: Colourise / Colour Transfer
Artistic Effects:
This is one of my favourite things to do with Neural Filters! I enjoy using the filters to create artistic effects by feeding textures that I've downloaded as reference images. I also enjoy using these filters to transform the overall the atmosphere of my composite gifs. The gifsets where I've leveraged Neural Filters for artistic effects could be found under this tag on usergif.
Filters used: Landscape Mixer / Style Transfer / Depth Blur
How I use Neural Filters over different stages of my gifmaking workflow:
I want to outline how I use different Neural Filters throughout my gifmaking process. This can be roughly divided into two stages:
Stage I: Enhancement and/or Colourising | Takes place early in my gifmaking process. I process a large amount of component gifs by applying Neural Filters for enhancement purposes and adding some base colourings.++
Stage II: Artistic Effects & more Colour Manipulation | Takes place when I'm assembling my component gifs in the big PSD / PSB composition file that will be my final gif panel.
I will walk through this in more detail later in the tutorial.
++I personally like to keep the size of the component gifs in their original resolution (a mixture of 1080p & 4K), to get best possible results from the Neural Filters and have more flexibility later on in my workflow. I resize & sharpen these gifs after they're placed into my final PSD composition files in Tumblr dimensions.
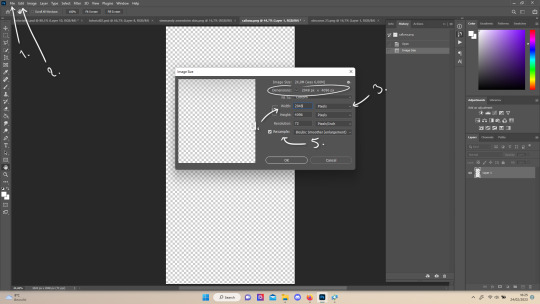
3. Getting started
The essence is to output Neural Filters as a Smart Filter on the smart object when working with the Video Timeline interface. Your workflow will contain the following steps:
Prepare your gif
In the frame animation interface, set the frame delay to 0.03s and convert your gif to the Video Timeline
In the Video Timeline interface, go to Filter > Neural Filters and output to a Smart Filter
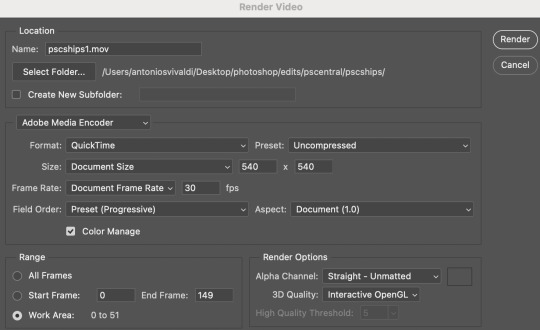
Flatten or render your gif (either approach is fine). To flatten your gif, play the "flatten" action from the gif prep action pack. To render your gif as a .mov file, go to File > Export > Render Video & use the following settings.

Setting up:
o.) To get started, prepare your gifs the usual way - whether you screencap or clip videos. You should see your prepared gif in the frame animation interface as follows:

Note: As mentioned earlier, I keep the gifs in their original resolution right now because working with a larger dimension document allows more flexibility later on in my workflow. I have also found that I get higher quality results working with more pixels. I eventually do my final sharpening & resizing when I fit all of my component gifs to a main PSD composition file (that's of Tumblr dimension).
i.) To use Smart Filters, convert your gif to a Smart Video Layer.
As an aside, I like to work with everything in 0.03s until I finish everything (then correct the frame delay to 0.05s when I upload my panels onto Tumblr).
For convenience, I use my own action pack to first set the frame delay to 0.03s (highlighted in yellow) and then convert to timeline (highlighted in red) to access the Video Timeline interface. To play an action, press the play button highlighted in green.

Once you've converted this gif to a Smart Video Layer, you'll see the Video Timeline interface as follows:

ii.) Select your gif (now as a Smart Layer) and go to Filter > Neural Filters

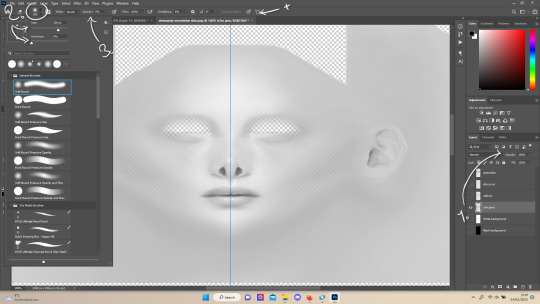
Installing Neural Filters:
Install the individual Neural Filters that you want to use. If the filter isn't installed, it will show a cloud symbol (highlighted in yellow). If the filter is already installed, it will show a toggle button (highlighted in green)

When you toggle this button, the Neural Filters preview window will look like this (where the toggle button next to the filter that you use turns blue)

4. Using Neural Filters
Once you have installed the Neural Filters that you want to use in your gif, you can toggle on a filter and play around with the sliders until you're satisfied. Here I'll walkthrough multiple concrete examples of how I use Neural Filters in my giffing process.
Example 1: Image enhancement | sample gifset
This is my typical Stage I Neural Filters gifmaking workflow. When giffing older or more niche media releases, my main concern is the video compression that leads to a lot of artefacts in the screencapped / video clipped gifs.
To fix the artefacts from compression, I go to Filter > Neural Filters, and toggle JPEG Artefacts Removal filter. Then I choose the strength of the filter (boxed in green), output this as a Smart Filter (boxed in yellow), and press OK (boxed in red).
Note: The filter has to be fully processed before you could press the OK button!

After applying the Neural Filters, you'll see "Neural Filters" under the Smart Filters property of the smart layer

Flatten / render your gif
Example 2: Facial enhancement | sample gifset
This is my routine use case during my Stage I Neural Filters gifmaking workflow. For musical artists (e.g. Maisie Peters), YouTube is often the only place where I'm able to find some videos to prepare gifs from. However even the highest resolution video available on YouTube is highly compressed.
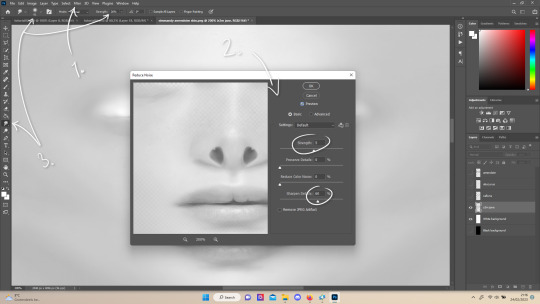
Go to Filter > Neural Filters and toggle on Photo Restoration. If Photoshop recognises faces in the image, there will be a "Facial Enhancement" slider under the filter settings.

Play around with the Photo Enhancement & Facial Enhancement sliders. You can also expand the "Adjustment" menu make additional adjustments e.g. remove noises and reducing different types of artefacts.

Once you're happy with the results, press OK and then flatten / render your gif.
Example 3: Colour Manipulation | sample gifset
Want to make a colourful gifset but the source video is in B&W? This is where Colourise from Neural Filters comes in handy! This same colourising approach is also very helpful for colouring poor-lit scenes as detailed in this tutorial.
Here's a B&W gif that we want to colourise:

Highly recommended: add some adjustment layers onto the B&W gif to improve the contrast & depth. This will give you higher quality results when you colourise your gif.
Go to Filter > Neural Filters and toggle on Colourise.

Make sure "Auto colour image" is enabled.
Play around with further adjustments e.g. colour balance, until you're satisfied then press OK.
Important: When you colourise a gif, you need to double check that the resulting skin tone is accurate to real life. I personally go to Google Images and search up photoshoots of the individual / character that I'm giffing for quick reference.
Add additional adjustment layers until you're happy with the colouring of the skin tone.

Once you're happy with the additional adjustments, flatten / render your gif. And voila!

Note: For Colour Manipulation, I use Colourise in my Stage I workflow and Colour Transfer in my Stage II workflow to do other types of colour manipulations (e.g. transforming the colour scheme of the component gifs)
Example 4: Artistic Effects | sample gifset
This is where I use Neural Filters for the bulk of my Stage II workflow: the most enjoyable stage in my editing process!
Normally I would be working with my big composition files with multiple component gifs inside it. To begin the fun, drag a component gif (in PSD file) to the main PSD composition file.
Resize this gif in the composition file until you're happy with the placement

Duplicate this gif. Sharpen the bottom layer (highlighted in yellow), and then select the top layer (highlighted in green) & go to Filter > Neural Filters

I like to use Style Transfer and Landscape Mixer to create artistic effects from Neural Filters. In this particular example, I've chosen Landscape Mixer
Select a preset or feed a custom image to the filter (here I chose a texture that I've on my computer)

Play around with the different sliders e.g. time of the day / seasons
Important: uncheck "Harmonise Subject" & "Preserve Subject" - these two settings are known to cause performance issues when you render a multiframe smart object (e.g. for a gif)

Once you're happy with the artistic effect, press OK
To ensure you preserve the actual subject you want to gif (bc Preserve Subject is unchecked), add a layer mask onto the top layer (with Neural Filters) and mask out the facial region. You might need to play around with the Layer Mask Position keyframes or Rotoscope your subject in the process.
After you're happy with the masking, flatten / render this composition file and voila!

Example 5: Putting it all together | sample gifset
Let's recap on the Neural Filters gifmaking workflow and where Stage I and Stage II fit in my gifmaking process:
i. Preparing & enhancing the component gifs
Prepare all component gifs and convert them to smart layers
Stage I: Add base colourings & apply Photo Restoration / JPEG Artefacts Removal to enhance the gif's image quality
Flatten all of these component gifs and convert them back to Smart Video Layers (this process can take a lot of time)
Some of these enhanced gifs will be Rotoscoped so this is done before adding the gifs to the big PSD composition file
ii. Setting up the big PSD composition file
Make a separate PSD composition file (Ctrl / Cmmd + N) that's of Tumblr dimension (e.g. 540px in width)
Drag all of the component gifs used into this PSD composition file
Enable Video Timeline and trim the work area
In the composition file, resize / move the component gifs until you're happy with the placement & sharpen these gifs if you haven't already done so
Duplicate the layers that you want to use Neural Filters on
iii. Working with Neural Filters in the PSD composition file
Stage II: Neural Filters to create artistic effects / more colour manipulations!
Mask the smart layers with Neural Filters to both preserve the subject and avoid colouring issues from the filters
Flatten / render the PSD composition file: the more component gifs in your composition file, the longer the exporting will take. (I prefer to render the composition file into a .mov clip to prevent overriding a file that I've spent effort putting together.)
Note: In some of my layout gifsets (where I've heavily used Neural Filters in Stage II), the rendering time for the panel took more than 20 minutes. This is one of the rare instances where I was maxing out my computer's memory.
Useful things to take note of:
Important: If you're using Neural Filters for Colour Manipulation or Artistic Effects, you need to take a lot of care ensuring that the skin tone of nonwhite characters / individuals is accurately coloured
Use the Facial Enhancement slider from Photo Restoration in moderation, if you max out the slider value you risk oversharpening your gif later on in your gifmaking workflow
You will get higher quality results from Neural Filters by working with larger image dimensions: This gives Neural Filters more pixels to work with. You also get better quality results by feeding higher resolution reference images to the Neural Filters.
Makeup Transfer is more stable when the person / character has minimal motion in your gif
You might get unexpected results from Landscape Mixer if you feed a reference image that don't feature a distinctive landscape. This is not always a bad thing: for instance, I have used this texture as a reference image for Landscape Mixer, to create the shimmery effects as seen in this gifset
5. Testing your system
If this is the first time you're applying Neural Filters directly onto a gif, it will be helpful to test out your system yourself. This will help:
Gauge the expected rendering time that you'll need to wait for your gif to export, given specific Neural Filters that you've used
Identify potential performance issues when you render the gif: this is important and will determine whether you will need to fully playback your gif before flattening / rendering the file.
Understand how your system's resources are being utilised: Inputs from Windows PC users & Mac users alike are welcome!
About the Neural Filters test files:
Contains six distinct files, each using different Neural Filters
Two sizes of test files: one copy in full HD (1080p) and another copy downsized to 540px
One folder containing the flattened / rendered test files
How to use the Neural Filters test files:
What you need:
Photoshop 2022 or newer (recommended: 2023 or later)
Install the following Neural Filters: Landscape Mixer / Style Transfer / Colour Transfer / Colourise / Photo Restoration / Depth Blur
Recommended for some Apple Silicon-based MacBook Pro models: Enable High Power Mode
How to use the test files:
For optimal performance, close all background apps
Open a test file
Flatten the test file into frames (load this action pack & play the “flatten” action)
Take note of the time it takes until you’re directed to the frame animation interface
Compare the rendered frames to the expected results in this folder: check that all of the frames look the same. If they don't, you will need to fully playback the test file in full before flattening the file.†
Re-run the test file without the Neural Filters and take note of how long it takes before you're directed to the frame animation interface
Recommended: Take note of how your system is utilised during the rendering process (more info here for MacOS users)
†This is a performance issue known as flickering that I will discuss in the next section. If you come across this, you'll have to playback a gif where you've used Neural Filters (on the video timeline) in full, prior to flattening / rendering it.
Factors that could affect the rendering performance / time (more info):
The number of frames, dimension, and colour bit depth of your gif
If you use Neural Filters with facial recognition features, the rendering time will be affected by the number of characters / individuals in your gif
Most resource intensive filters (powered by largest machine learning models): Landscape Mixer / Photo Restoration (with Facial Enhancement) / and JPEG Artefacts Removal
Least resource intensive filters (smallest machine learning models): Colour Transfer / Colourise
The number of Neural Filters that you apply at once / The number of component gifs with Neural Filters in your PSD file
Your system: system memory, the GPU, and the architecture of the system's CPU+++
+++ Rendering a gif with Neural Filters demands a lot of system memory & GPU horsepower. Rendering will be faster & more reliable on newer computers, as these systems have CPU & GPU with more modern instruction sets that are geared towards machine learning-based tasks.
Additionally, the unified memory architecture of Apple Silicon M-series chips are found to be quite efficient at processing Neural Filters.
6. Performance issues & workarounds
Common Performance issues:
I will discuss several common issues related to rendering or exporting a multi-frame smart object (e.g. your composite gif) that uses Neural Filters below. This is commonly caused by insufficient system memory and/or the GPU.
Flickering frames: in the flattened / rendered file, Neural Filters aren't applied to some of the frames+-+
Scrambled frames: the frames in the flattened / rendered file isn't in order
Neural Filters exceeded the timeout limit error: this is normally a software related issue
Long export / rendering time: long rendering time is expected in heavy workflows
Laggy Photoshop / system interface: having to wait quite a long time to preview the next frame on the timeline
Issues with Landscape Mixer: Using the filter gives ill-defined defined results (Common in older systems)--
Workarounds:
Workarounds that could reduce unreliable rendering performance & long rendering time:
Close other apps running in the background
Work with smaller colour bit depth (i.e. 8-bit rather than 16-bit)
Downsize your gif before converting to the video timeline-+-
Try to keep the number of frames as low as possible
Avoid stacking multiple Neural Filters at once. Try applying & rendering the filters that you want one by one
Specific workarounds for specific issues:
How to resolve flickering frames: If you come across flickering, you will need to playback your gif on the video timeline in full to find the frames where the filter isn't applied. You will need to select all of the frames to allow Photoshop to reprocess these, before you render your gif.+-+
What to do if you come across Neural Filters timeout error? This is caused by several incompatible Neural Filters e.g. Harmonisation (both the filter itself and as a setting in Landscape Mixer), Scratch Reduction in Photo Restoration, and trying to stack multiple Neural Filters with facial recognition features.
If the timeout error is caused by stacking multiple filters, a feasible workaround is to apply the Neural Filters that you want to use one by one over multiple rendering sessions, rather all of them in one go.
+-+This is a very common issue for Apple Silicon-based Macs. Flickering happens when a gif with Neural Filters is rendered without being previously played back in the timeline.
This issue is likely related to the memory bandwidth & the GPU cores of the chips, because not all Apple Silicon-based Macs exhibit this behaviour (i.e. devices equipped with Max / Ultra M-series chips are mostly unaffected).
-- As mentioned in the supplementary page, Landscape Mixer requires a lot of GPU horsepower to be fully rendered. For older systems (pre-2017 builds), there are no workarounds other than to avoid using this filter.
-+- For smaller dimensions, the size of the machine learning models powering the filters play an outsized role in the rendering time (i.e. marginal reduction in rendering time when downsizing 1080p file to Tumblr dimensions). If you use filters powered by larger models e.g. Landscape Mixer and Photo Restoration, you will need to be very patient when exporting your gif.
7. More useful resources on using Neural Filters
Creating animations with Neural Filters effects | Max Novak
Using Neural Filters to colour correct by @edteachs
I hope this is helpful! If you have any questions or need any help related to the tutorial, feel free to send me an ask 💖
#photoshop tutorial#gif tutorial#dearindies#usernik#useryoshi#usershreyu#userisaiah#userroza#userrobin#userraffa#usercats#userriel#useralien#userjoeys#usertj#alielook#swearphil#*#my resources#my tutorials
394 notes
·
View notes
Note
hi i'm sorry to bother you but do you have any tips on giffing dark indoor scenes? yours always look so good!
hi there! not a bother at all :) i can definitely try to explain the steps i usually take under the cut!
this tutorial will assume that you already know the basic steps of gif-making — if you don't, there are lots of great tutorials floating around on this site that can help you out! :)
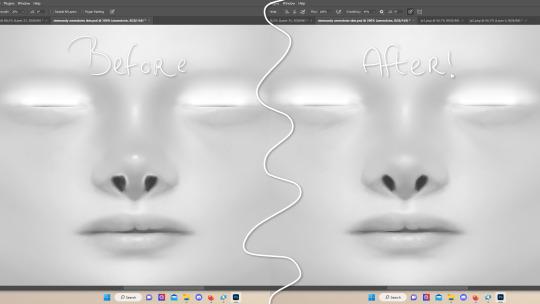
here's the gif i'll work with to explain my steps, the bottom being the original and the top being the coloured/brightened version.

before we start, a general tip i recommend keeping in mind: if you want to brighten a dark scene, you'll want to get your hands on the highest quality download you can find. 1080p is decent, but if your laptop can handle 2160p 4k hdr files* without sounding like it's about to explode, that'll get you even better results!
(*colouring hdr 4k files requires a different set of steps — the scene will appear washed-out on photoshop, so you need to make sure that you don't end up whitewashing anyone if you do choose to work with this type of file.)
since most of my downloads are 1080p, i'll use this type of file in this tutorial.
the first step of my gifmaking process with 1080p files is almost always the same no matter what scene i'm giffing. i make a brightness/contrast layer and set the blending mode to screen:

now my gif looks like this:

depending on the scene and how washed out it looks after this layer, i'll play around with the opacity. for this gif, i didn't touch the opacity at all. use your best judgement for this, because every scene is different!
i find that dark indoor scenes are usually tinted in yellow or green. one of my first goals is to try to fix the undertone of this scene before focusing on brightening it any further. i go to colour balance for this, and play around with the midtones, shadows, and highlights.
again, every scene is different, so the amount to which you use colour balance will differ, but for this specific scene, my goal was to neutralize the yellow. i focused particularly on the midtones and shadows of the colour balance layer, moving the scales to the opposite of the reds.


doing so will help with neutralizing the yellow. the only reason i moved the scales towards magenta and blue (therefore making it a bit more red than less) rather than green and yellow in shadows was because i wanted a darker contrast in the blacks. moving them to green and yellow made the overall scene more yellow since there were so many dark spots that shadows affected. (you'll see what i mean when you start experimenting with your own gif — this part of the process really just depends on your preferences!)
our gif might not look that much better yet, but it will soon! our best friend channel mixer is gonna help us out. for an in-depth post about how to use this adjustment layer, i recommend checking out this tutorial.
i'm someone who prefers to make more than one layer for the same adjustment layer for a reason i can't even explain (i just find that it helps me stay more organized). so don't think of this process like i can only use this layer once so i MUST fix it NOW. you can create multiple layers of the same adjustment layer, because every layer on top will affect the ones underneath it.
since my priority is getting rid of the yellow tint, i went to the Blue section of the channel mixer and increased it in all of the scales:

this step alone has helped us out so much, because look at our gif now!

not only does the background look less yellow, but so does izzy's skintone.
now i'm going to focus on trying to brighten the scene even more without destroying the quality. the levels layer can actually help out a lot with this.

the amount to which i move each toggle differs per scene, and i think experimenting depending on your gif works best for this layer.
side note: i prefer not to use the ink droppers on the side because the contrast in the result usually ends up feeling too strong for my preferences, but if you find that this works better for you, then go for it! basically, the first dropper with the black ink should be clicked before you select the darkest part of the scene that you can find, and vice versa for the third dropper with the white ink — click it, and then select the brightest part of your scene.
curves is the next layer that does fantastic work! unlike the levels layer, i do actually use the ink droppers for this. it's the same concept, with the first dropper being used on the darkest part of the scene, and the third dropper on the brightest.
try to think of curves as something that not only further brightens your scene, but also helps with the colour neutralizing process.
i grab the first dropper, then click the darkest parts of the gif that i can see. depending on the undertone of the blacks that you're clicking on, the tint of your gif might actually change significantly. this is why i prefer to click once, then undo the action if i don't like what it gives me. izzy's leather jacket was the sweet spot for this gif.
when i'm satisfied, i make another curves layer and use the third dropper to click the bright/white parts of the scene. for this gif in particular, the lights in the background were a good fit because they carried a yellow undertone — this meant that my curves layer actually helped to further neutralize the yellows in the scene as a whole!


(i manually dragged the curves graph upwards for the third dropper to make it brighter. i don't need to do this if the dropper does this for me automatically, but since the lights were pretty bright, it only changed the tone of the scene and didn't increase the brightness — hence the manual step.)
pat yourself on the back, because this is what our gif looks like now!

this is good, but it's not great — there's still just a bit too much yellow in the scene for my liking (sorry, i'm picky! :P)
i created another channel mixer layer and played with the toggles until i was satisfied:


ta-da! the gif as a whole is much less red/yellow now:

this is when i start fixing the colouring now — namely, his skin tone. selective colour will be your best friend here. i wanted to make his face just a tad brighter and less of a yellow-ish magenta shade, so i focused on the reds and yellows.


then, out of habit, i created another selective colour layer and took out more of the "yellow" in the whites to make them whiter, and increased the black (just by +1, since the contrast is pretty good enough already).


note: i switched to "absolute" for these two colours. basically, relative = less vibrant colour manipulation, and absolute = more vibrant/stronger colour manipulation. i prefer to stick to "relative" for fixing skin-tone since "absolute" can be a bit too strong for that.
our gif looks like this now!

his face looks brighter and much less yellow, so i'm satisfied!
this next step is not mandatory at all — again, i'm just picky and despise yellow-tinted scenes. i personally believe that indoor scenes that are yellow/green tinted make them look more dark than they actually are, so i do my best to get rid of these colours.
i also don't always do this, but for this gif, i just simply went to hue/saturation, selected the yellows from the drop-down menu and decreased its saturation.

be careful not to do this too much. depending on the quality of your download, this can significantly decrease your gif quality. i tend to worry less about this when i'm working with 2160p files, but again, those files require an entirely different set of steps when it comes to brightening/colouring.
since this was a 1080p file download (and one that was actually less than 1GB, oops, don't do that), i played it safe and decreased it by -39 only.
note: you also want to be cautious of colour-washing skintone when it comes to this step. i find that another selective colour layer can help perfect the skintone in case the yellow drains out of it too much, but skip the hue/saturation step if it's too difficult to work with — better to be safe than sorry.
anyway, this is the final gif!

that's usually what i do when it comes to colouring dark indoor scenes! i hope this tutorial makes sense, and if you have any further questions, don't hesitate to reach out! :)
#tutorial#gif tutorial#resources#completeresources#coloring tutorial#allresources#dailyresources#userraffa#userdean#uservivaldi#alielook#usercats#usermoonchild#usernaureen#userbarrow#userabs#useraish#useralison#userisaiah#*mytutorials#i am so sorry if this is incoherent#it’s so hard to explain things coherently 😫
629 notes
·
View notes
Text
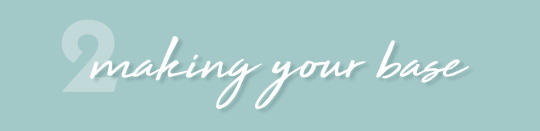
TS3: CAS Lighting Edit
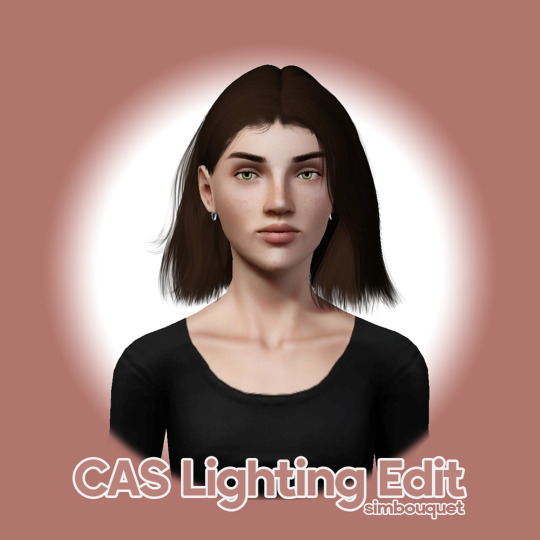
Last year, I was experimenting a little bit with the CAS lighting and managed to come up with this neat little mod that I’ve had sitting around up until now. I figured it was about time I shared, so here it is!💡
More info and download under the cut!
Previews: White Background / Default CAS Background
This CAS lighting is much less flat than EA’s default, with defined shadows that draw attention to the Sim’s face and add depth to their features, overall making them more faithful to what they’ll look like during gameplay. It also happens to make the mirror reflection just a little more bearable to look at! :P
I’ve included comparison images in the links above, one with the Sim on a flat white background where you can see the differences in lighting without distractions, and another in the good ol’ CAS screen to give you an idea of how it looks inside that environment.
Compatibility
This mod is compatible with all your usual world lighting mods, since they edit completely different resources.
This mod is incompatible with any mods that edit the CustomLightRigging _INI resource. AFAIK, the only other mod like this that’s out there at the moment is @criisolatex's lovely Pure CAS Lighting Mod, which I recommend if you prefer a more stylized, silky-smooth look.
Download: SFS / MTS
Place the .package file in your Packages or Overrides folder.
Credits & Thanks
s3pe: Exporting/Importing resources, creating the .package file.
Notepad++: Editing the .ini file.
Adobe Photoshop 2024: Creating the preview images.
Thanks to @misspats3, @antoninko, @simplyslow and @probablyzora for testing and giving feedback!
Thanks to the lovely community at TS3 Creators Cave!
317 notes
·
View notes
Text
holy shit this year marks 10 years of this blog and moz!! i can't remember the exact date i started posting here - my archive says i have one post from november 2013 but let's disregard that - but i do remember it was around late 2014/early 2015 :)
^ one of the very first moz art pieces i ever drew, for fallout week 2015!!
memories and art through the years under a read more bc it got long
2014 → baby's first rpg!! i started playing fnv on my cousin's jailbroken xbox late 2013 and finished mid 2014 and i loved every minute of it. i remember waking up at 8am and playing almost nonstop until 2am the next day haha!
i didn't play moz on my first playthrough - but i did start creating a character that would eventually become her: a shorthaired ex-boxer who punched her way through obstacles when diplomacy failed. i remember she spent a lot of time with boone. i liked him then, because he saved my ass more times than i can count. but i digress. this is draft 1 moz essentially
2015 → this is the year that i was doing my thesis so i could graduate but i was so depressed and stressed about it that i distracted myself by replaying fnv on pc, where i played through the dlcs for the first time. i fell in love with the dlcs' oversarching story; particularly ulysses, who i became obssessed with, especially since i couldn't find any content of him at the time. in the game, i played as moz; i had most of her personality and choices down, but her backstory was still up in the air.
fun fact: this was an existing sideblog that i remade to be a fallout blog so i could look for ulysses content, and when i couldn't find any, i made some myself, featuring moz as my main courier six. originally, i didn't ship them, but eventually i ended the year as a courier/ulysses otp shipper.
this was the year i started drawing digitally - my uncle let me borrow a drawing tablet and i used an old copy of photoshop i pirated hehe
2016 → i graduated this year!! and promptly fell deeper into my depression. this was the year that it got so bad that i had to be medicated. through it all, this blog and moz and ulysses and my fandom friends were with me. and for that i am truly grateful :) this was the year i figured out how to lock transparent pixels so that i could color my lineart lol
2017 → i started hammering out moz's backstory this year i think. there's a lot of sketches of her and her family in my files. i experimented with shading and backgrounds here but that experimentation was pretty short-lived
2018 → i started using references seriously!!!! i did a lot of oc on oc kissing this year, featuring mostly moz and many friend ocs haha

2019 → didn't draw much this year. actually this year was a blur and i can't remember much from it except from it being the year of my terrible no good bad copywriting jobs... anyway i did manage to continue my courier/ulysses brainrot and make this piece, which i'm still proud of
2020 → pandemic time. i spent a lot of time asleep at home and i think this was also the year i started doing commissions?? shoutout to anyone who has ever commissioned me - thank you so much, i truly appreciate it!!

2021 → i switched from my old-ass pirated photoshop to clip studio paint and never looked back. also i did a bunch of commissions for my grandmother's surgery, which failed, and i distracted myself from the sadness by drawing my ocs over and over and playing disco elysium

2022 → by this year, i've got moz down pat and have started vaguely developing other ocs instead. but she's still always at the back of my mind

2023 → i bought new brushes from true grit texture supply and immediately found new favorites that i started using for everything. i tentatively started incorporating background elements in some pieces!
2024 → while it's still too early to say where this year will lead me art-wise, i will say that i started experimenting in realistic paint studio (which i bought in 2021, the same time as clip studio paint) a few days ago and i'm liking the results so far. we'll see!

all in all, these last 10 years have been quite a ride, but i'm glad i stuck around and i'm glad you guys stuck around too!! much much love 💖💖💖
#shh peri shhh#god. look at that old art... i took the ones that i still kinda liked but the rest...#well i don't hate them. but they're old and of their time and i wish i could redo them lmao#my art#moz
84 notes
·
View notes
Note
howd u do that lil graph paper effect in ur recent knuckles and sonic art
i just drew it on paper first! excuse the grammar xrffgfsf
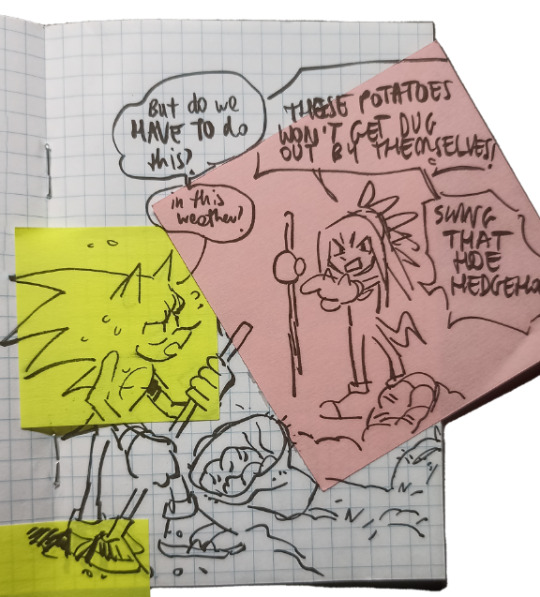
these stick notes weren't there intentionally i just messed up a lot of times xddd i just took a photo of this and everything else was a one big experiment, i just knew i wanted to mix the look of a traditional sketch with digital art so i fought to achieve that. I played with lots of settings, used color range in photoshop to extract the lineart so i could draw under it, many many things. It was al very spontaneous, the file is a mess frgfdbf i had to redraw knuckles entirely his leg is broken :'(((
376 notes
·
View notes
Text

i didn't have a tutorial yet... so i made one lol. its longer than i wanted it to be, but i wanted to make sure it's easy to follow for people who've never made cc or have no experience with photo editing software, and fully explain my process. it's by no means hard at all though lol, i guarantee you making skin details is the easiest thing aside from recolors and if you want to learn this is a good place to start :-)
for people who are more experienced than that, and want to know specific things-- i've sectioned everything so it should be easy to skim through until you find what you need!
requirements.
this tutorial will only require sims 4 studio (free) and photoshop (not free) or gimp (free). i pirated photoshop 2022 myself. any version will do but i think 2022 just has nice new features for making content! if you don't want to buy or pirate, gimp is a similar alternative.

1.1 how to find skins to use as a base.
in case you don't have (a) skin(s) in mind to use for your skinblend, my tip is to download as much random ones as you can find. this way you have a lot to choose from and it's easier to get an idea of what you want.
go-to creators for maxis match skins: heihu, madmono, pyxiidis, faaeish, miikocc, emmibouquet and stretchskeleton.
creators for maxis mix/alpha skins: sims3melancholic, obscurus, ddarkstonee and pralinesims.
creators for maxis mix/alpha skins that only allow editing for private use: northernsiberiawinds, remussirrion and thisisthem.
go into cas and try them all out. if you like a part of a skin, write down which skin it is and what part(s) you want to use of it from which swatch if it has multiple.
for example, i almost always use one or two skins for just the nose shape, one for the eyebags, one to three for the lips and one for the basic shading of the face. don't be afraid to use the opposite style skins of what you're going for, you can always add or erase details.
1.2 exporting the skins.
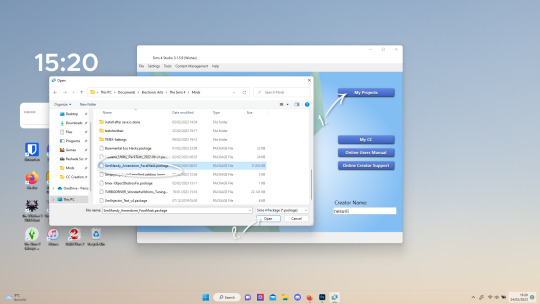
now we're gonna export the skins with sims 4 studio. click on "my projects" (1) and navigate to whereever you have the skins you want to use, and select one and click "open" (2).
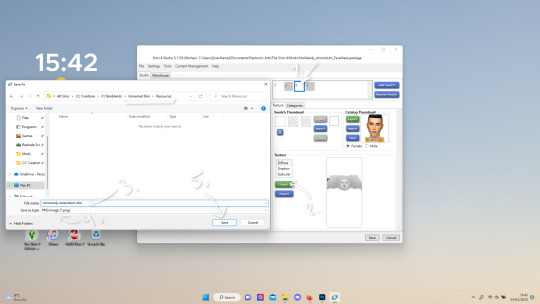
the colored little boxes in the top right are the swatches. click whichever swatch you wanted to use something from (1), then click the "export" button (2). you'll get a window to save the exported skin now.
tip: i highly recommend making an organized folder for your skinblend, to have all your files together and easy to find. if you haven't made it already you can easily do so within this window.
i put mine in a folder called "resources" in a folder named "unnamed skin" for example.
name the exported skin file (3) and make sure the "save as type" is set to .png (4).
after saving the file, you can just click "cancel" on the bottom right to go back to sims4studio's starting screen. if you have multiple skins you want to use, repeat the above process for all the other skins to export them too.
2.1 opening the exported files in photoshop/gimp.
open your program of choice and click on "file" from the top bar (1) and then "open..." and navigate to the skin files. you can left click and hold down your CTRL key to select multiple at once to open.
we have to layer them all in one file, but before we do that we have to check if they're all the same size.
note: some skindetails might be 2048x4096, others may be 1024x2048. unless you want your skin to be compatible with the HQ mod, you should just opt for 1024x2048, as without the mod both resolutions look identical. the bigger one will just make your fize unnecessarily large.
click "image" at the top bar (2), then "image size". it'll say the size at dimensions. if it's at the size you want it to be at, just exit the window.
if you need to edit it, select "pixels" from the dropdown menu (3), and put in 1024 for width and 2048 for height OR 2048 for width and 4096 for height. if you're sizing up select "bicubic smoother (enlargement)" under resample (5).
repeat this for every skin you opened.
2.2 layering the skins together.

copy and paste all the skins individually onto one by selecting them with CTRL + A and CTRL + C on your keyboard, and pasting them into one of the other opened skins with CTRL + SHIFT + V. you can then close all the other tabs.
the file now has multiple layers. you can rename them by double clicking the layer name. this makes it easier to keep track of whats what. you can reorder them as well by dragging them with your mouse. put the skin you want to use as base (for the general facial shading, highlighting) at the bottom.
tip: i recommend making all white and all black background layers to see the skins better. you can do so by pressing D, then CTRL + SHIFT + N. for the white layer then press CTRL + BACKSPACE and for the black layer repeat the first two steps and then press ALT + BACKSPACE. now there should be two new layers in black and white. drag them to the bottom of the list. i prefer using white so i put black last.
2.3 changing the opacity in parts of the base skin layer.
to make ea's preset details (cheek/nose bridge sharpness, dimples) come through your skinblend, you need to change the opacity of the base skin sometimes. alpha skins tend to be fully opaque but maxis match skins are usually already transparant enough.
hide all the layers aside from this base layer by clicking the eye icon next to the layer names. you can see the transparancy with the visibility of the grey-white blocks or if you find it easier you can also unhide the black background to see it instead.
to change the opacity, you can either edit the entire layer's opacity (1) or use the eraser tool (E key) to add transparancy at specific parts.
if you have photoshop 2022, turn on vertical symmetry (+). if you don't have it, you can choose to edit only one side of the skin and mirror it later or do both sides and embrace some asymmetry.
i selected the eraser (2) and set the brush size to about 200px and 0% hardness. the opacity of the brush i set to about 10% (3). i used the eraser on the lower cheeks, the nose bridge and tip and the bottom of the chin. i also erase the upper eyelid 100%, cause i prefer to have eyelid freedom :p. it then looks like the above! this will very subtly let through details, if you want more you should make it more transparant.
2.4 optionally: editing out freckles, pores and/or eyelashes.
your base may have pores, freckles or moles you want to get rid of. to smoothen everything at once, click "filter" at the top bar (1), "noise" and then "reduce noise". i only edit the strength and sharpen details setting (2), this setting erased the pores and most of the freckles for me while keeping the details looking sharp, but you likely have to adjust it a little cause it depends on how large/fine the details are.
the remaining freckles, pores and eyelashes i remove by using the smudge tool, with 0% brush hardness and at 25% strength. (3) brush size depends on the size of the details. i just go over it in circular motions until the freckle or whatever it is has been blended away without pixelation.

for this part i'm going to only show how i do the nose as an example, however it works the same for editing in eyebags, lips, jaw lines or whatever you want to add in too.

unhide the layer of the skin you want to use a part of, and hide the base layer.
if you are going to use multiple parts of that skin (for example, you want both the nose and the lips of that skin), duplicate the layer by right clicking the layer name and choosing "duplicate layer...". then hide the duplicated layer. it's easier to edit one part at a time.
use the selection tool (M) to select the part. press CTRL + SHIFT + I and then DELETE. press CTRL + D to unselect. should look something like the above.
use the eraser tool (E) at a moderately small size like 30px~ with about 30% hardness and 100% opacity to erase around "hard lines", like the nostrils in this case and the bottom of the nose. the nose bridge has "soft lines", so if you were to use a hard brush for that, the shading of the nose bridge would look far too harsh and unblended.
for the soft lines, set the eraser tool at a bigger size like 100px~ with 0% hardness and a lowered opacity between 15-45%. erase soft lines "gradually", so the shadows blend in with the layers underneath it. should look something like the picture above.
always look at the newly added part with both a black and white background to see if there's anything you need to erase more. then look if it blends in properly with the layers underneath. if it's too dark or light, you can click on "image" on the top bar, then "adjustments" and "brightness/contrast", and lower or raise the brightness until it blends in better.
i'm using two separate skins to make the nose, so i've repeated the process above for the second nose skin, then used the method of step 2.3 to erase certain parts and make other parts more transparant / blended in. as you can see above, it's now the perfect offspring between the two noses i used.
note: for a maxis match nose, you'll want to avoid a completely opaque nose, mainly at the nose bridge it should be more transparant. i always make sure the lips and eyebags are fully opaque though, unless you're going for a vanilla type of skin it doesn't look good transparant.

at this point, i like to save the file with the white background layer on and see what it looks like in sims 4 studio. this gives you a better idea of what it looks like on sims and what you may want to change or add. press CTRL + SHIFT + S and name your file, and set the file type to .png.
open any skin or skin detail cc file just like in step 1.2, and instead of exporting anything, click "import". now navigate to the file you just saved, and open it. the sim model now displays what your skin looks like. should look something like the above! you can click cancel after you've looked enough, so you don't have to worry about ruining the original cc file.

maybe you're happy with the skins current state... but in case you want to add or change some things, here's a step by step how i do it.
5.1 drawing shadows & highlights.
as you probably have noticed, everything needs to be done in greyscale, so select black (for shadows) or white (for highlights) in the top right colored box. make a new layer (CTRL + SHIFT + N). select the brush tool (B) and set the brush at about 0px with 100% opacity. draw the shape of the shadow or highlight where you want it. make sure to make a new layer for every shadow and highlight!
now you can either use the smudge tool to blend it out, but i prefer using "filter" from the top bar, "blur" > "gaussian blur". i just play around with the radius until it's blended out but still has some shape to it. it depends on how small or wide and blended you want it to be.
then i use the eraser to shape the shadow/highlight further. for example, i want the shadow in this case more blended out towards the eye, but harder towards the forehead and nose, so i use the eraser on that side. lastly i change the layer opacity to make the shadow/highlight less dark/light. my preference lays with subtle details, but of course you can make it as contrasted as you like!
5.2 drawing small details.
to draw your own details, use the brush in 1-3px brush size, 100% opacity in black. i can't help you here cause it's just drawing where you want and then blending it out with the smudging or blurring tool where needed, and using the eraser at lower opacity to blend it in.
to give you some ideas, i usually draw some details on the nose like sharper nostrils or a nose wall, some texture on the lips and the eyebags. i like using reference pictures of real peoples skins to see where and how to draw things. before and after pictured above! (i'm so proud of these eyebags yall T-T)
5.3 adding other creators cc skin details.
if you don't like drawing things yourself or know just the right cc skin detail your skin needs, you can also use other creators' skin details on yours.
maxis match + mix details: pyxidis about face, miikocc face kits, okruee face details, sammi-xox face details, lamingtonsims face details.
maxis mix + alpha details: detail overlays by obscurus-sims, ddarkstonee & sims3melancholic
like in step 1.2, just open the file in s4s and export whatever swatches you want to use. remember to make sure the resolution of the file is the same as your skin's before copy and pasting it on your skinblend! and remember you can lower the opacity layer for these too.
5.4 mirroring your skin.
if your skin isn't mirrored/symmetrical yet, save your file as a .psd and then right click the layers, click "merge visible", press CTRL + ALT + C, and set the canvas width to half what it is now (either 1024 or 512). (1) click the arrow in the left middle if you want to mirror the left side, or the arrow on the right middle for the right side. (2) press "ok".
press CTRL + A, then CTRL + X, then CTRL + SHIFT + V. delete the layer beneath the active one (it's empty). then press CTRL + ALT + C again, and put the canvas width back to the original (2048 or 1024). select the same arrow you selected before, and click "ok".
press CTRL + A again, then CTRL + C. now click "image" from the top bar, "image rotation" and then "flip canvas horizontal". now press CTRL + SHIFT + V .... and voila, your skin should now be mirrored.
note: ik there's a ridiculous amount of steps for such a simple thing so i feel like there's probably a much faster way to do this, but i hate following tutorials and guides (the irony) so this is just the way i taught myself lmao
5.5 last test & optional last touches.
at this point, i'm done with the skin. i erase everything aside from the face if the skin still has a full body texture cause i prefer face-only skinoverlays. i always save as .psd and .png, .psd is to edit it later on if need be. once again import your skin into s4s like in step 4, and see if you're happy with the skin. if not, just keep editing whatever you need!
i also like to add alternate versions of the skin lastly here. some examples: a soft nose or hard nose bridge (justice for flat soft noses, simblr loves to erase them lol), different eyebags, lighter or darker lip option, version with eyelid overlay or without.

6.1 creating the package file.

to make the package file for your skinblend, open s4s and select "create cas standalone" and then click "cas". (2) now select "skin detail forehead" from part type (3), click the most left forehead wrinkle and click "next" (4). name the skin file whatever you want, you can always change it later!
click "import" and open your skin file. and voila! you're pretty much done!
6.2 editing the age, gender & occult flags and category.
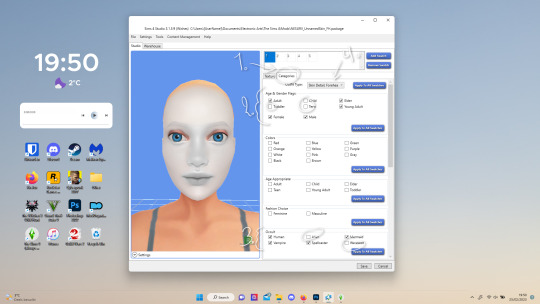
right now your skinblend is only available for young adult to elder sims, and not for aliens and werewolves, so you probably want to change this. go to "categories" (1) and check the boxes you want under "age & gender flags" and "occult" (2). you don't need to change any of the other things.
if you wish to change the skin detail slot it's in, you can change it at "outfit type". most people use either forehead or mouth crease, but you can use any of the ones that start with 'skindetail'.
6.3 adding swatch colors, thumbnails or additional swatches.
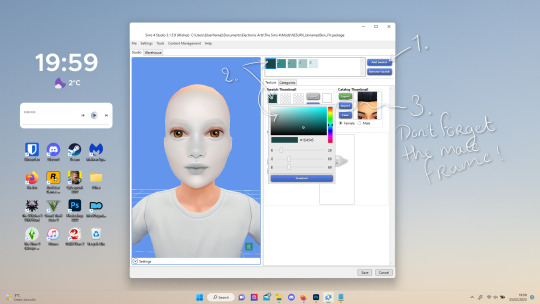
if you want, you can add multiple swatches (1). you can also edit the color of the swatches (2) and upload a custom thumbail with 104x148px resolution (3), make sure to upload for both male and female frames.
6.4 editing the sorting layer.
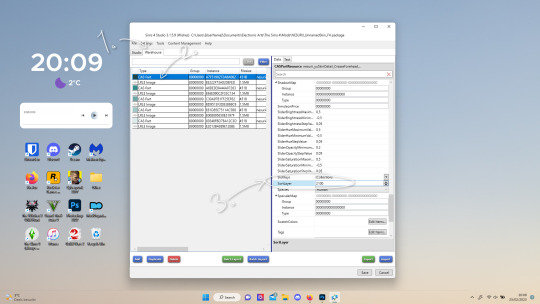
it's not the end of the world if you don't do this, but you may run into some skin details or freckles/moles that won't display on top of your skinblend if you don't edit it :).
click on the "warehouse" tab (1), select the first "cas part" (2). scroll down on the right to find "sort layer" (3) and put in 2100. you're gonna want to change this for each cas part individually.
now just save your file... and try it out in game!
if you need any help or have any questions please comment below <3 feel free to tag me in the end result if you want too.
(my end result)
246 notes
·
View notes
Note
Let me preface this: I'm an architecture major
I used to be a big LO fan but obviously fell out of love of it like a lot of us did, and I know LO uses SketchUp for backgrounds. That is not an issue I have with the comic or any comic, I want artists to have an easier time in any way they can. I was always under the impression Rachel imported the models into Photoshop and drew over them like you can see in the early episodes with the sketchy lines. Well, school just started recently for me and I now have access to SketchUp for my coursework, and I made a few discoveries:
1. Photoshop cannot read SketchUp files, and while you can import them into Clip Studio through some configuring, they can be finicky and will lose parts in the importing process, so they are best used into the original SketchUp program to export as PNGs.
2. Many of the models Rachel uses are incredibly easy to find, especially if you put "modern", "luxury", or "classy" before the main part of the search. Many of the houses and rooms for example are first page results.
3. The biggest discovery: You know how we all assumed Rachel was hand-drawing all the lines over the SketchUp models and how she gave up the longer LO went on? Well, it's actually worse. It turns out SketchUp has a thing called "Styles" in it, which means you can mess with the lines and look of the model, such as making it look more like a blueprint or playing with the colors. Well, they have a lot of styles on SketchUp known as "sketchy lines", which are the exact ones Rachel used early in the comic to fit with her style, and it takes a literal click of a button to do. All she would do is pose the model, click the sketchy line style, and export the PNG. That's it.
So, yeah, Rachel is so checked out of the comic that she can't even bother to click a single button to make the models fit into the comic's style anymore. Use that information however you like.
Ouhhh sorry OP, I'm about to like, undo all the work you just put into that ask. We've already known about the 3D background problem for a long while now.
First off, it's more likely LO doesn't use SketchUp but actually Acon3D, which is a website that offers 3D models both for free and at cost, which are actually compatible with software like Clip Studio. As soon as you open it up you'll likely see a lot of very familiar backgrounds that are often used in romances, isekais, and period pieces. It's literally the go-to spot for Webtoon Originals creators. Like, to the point that I wouldn't be surprised if Naver was partnered with them because of how many of their creators use it.
Second, there's plenty of up-to-date evidence to support the fact that Rachel doesn't exclusively stick to one software, sometimes she's drawing in Photoshop, sometimes she's drawing in Clip Studio Paint, sometimes she's drawing in Procreate. She's undoubtedly using Clip Studio for her paneling, speech bubbles, and backgrounds, as there are built in tools to utilize and convert 3D materials into lineart, among other features that are recognizable as coming from CSP because they're not available in PS or Procreate.
Third, yes, she just uses filters to turn her backgrounds into lineart, this has been apparent since S1. The only backgrounds she's ever 'hand drawn' were the ones involving lots of nature and even those are mostly just Photoshop brushes stamped on.
Like I realize I'm probably bursting your bubble here and I apologize for that lmao but these buildings were never hand-drawn, this is not new information ( ̄﹏ ̄;) I appreciate you mentioning your own experiences with it as you're learning it though, I find once you start to learn the process yourself you really start to notice what others are doing. Even I've gone through that over the past couple years as I started to use 3D models and more advanced tools specifically for drawing webtoons.
I will mention btw, there's nothing wrong with using 3D models for your character drawing and backgrounds. The only time it tends to get frustrating is when you're reading a comic that isn't making any attempts to blend the background in with the art style.
Like, The Kiss Bet probably uses 3D models to help with perspective and laying out scenes quickly without second-guessing, but you can tell they still hand-draw over the models because they look natural and like they belong to the comic's stylization. The characters don't look out of place sitting in a living room and the living room doesn't look distracting.
But then you get stuff like Lore Olympus, Let's Play, and Midnight Poppy Land, and it becomes a bit more obvious they're not giving a shit about backgrounds lmao


I get it, WT's deadlines are cutthroat as fuck, but if it's getting to the point that you have an entire team behind you and you're literally just copy pasting video game models from Phantom Hourglass, then it's probably time to re-focus your priorities a bit. There are comics with as few as 1-2 assistants (and even in some cases no assistants at all!!) pulling off backgrounds better than this, even when they're taking shortcuts.
(Nevermore and City of Blank)
But a lot of that does come down to how WT manages its expectations as well as support for their creators. The deadlines and requirements WT puts their creators under are insane and awful in the long-term, and they're not acting with the amount of professionalism they ought to be for a platform that's trying to breakout as a major publisher here in the West. I feel like it comes down to WT loosening the choke chain around their creators, but also creating a standardized level of quality to ensure it's not suffering for the sake of quantity. The traditional literature industry has real editors and stages of quality control for a reason, whereas WT is more interested in just throwing as many series at the wall and dumping all their stock into the ones that stick.
#lore olympus critical#lo critical#webtoons critical#antiloreolympus#anti lore olympus#ama#ask me anything#anon ama#anon ask me anything
86 notes
·
View notes
Note
Hello! I love your gifs! How do you make yours so clear and high quality/What's your process? <3
Hi!! Thank you so much!! I've never really had to explain out my process to anyone and I don't know how much detail you need, but I'll try my best and try to be as thorough as possible just in case!!
For my D:BH gifs, the process starts out with recording my own game play. I have a gaming computer that already had the GeForce Experience app downloaded, so I use that to record my game play. It records at 1920 × 1080p, 60 frames per second, so the files can get... rather large 😅 The video of my playthrough of the Russian Roulette chapter (~11 minutes long) was just under 4 GB. So its not light...
From there, I figure out what in particular I want to gif (for the timestamp roulette series, I let a random number generator figure out whereabouts I'm looking). Once I know that, I open up VLC and use it to isolate that particular shot + a little more on either end.
After I have the shot(s) I want to gif isolated, I open up Photoshop. I use "File" > "Import" > "Video Frames to Layers" and choose the video I want. You can do this straight from the video of your playthough, but I find that the shorter the video is, the easier it is to work with in this step. I trim my video more, to about a click or two outside of the specific shot I want. Like so:

From there I delete any extraneous frames from the "timeline" section that comes up.
Then is cropping: my go-to crop uses the "W x H x Resolution" option - I put 540 px in the first box, 300 px in the second and leave the third blank.

After that, I have an action in Photoshop that does the next steps for me (to make things quicker), but what it does is sets the frame rate (which will have to be done again after saving the gif because Photoshop hates everyone apparently), converts all the layers into a single object, and sharpens the gif. I've only been gif-ing for about a year and a half, and before that I had exactly zero experience with Photoshop at all, so all the numbers from these steps are still the same as the numbers I pulled from the tutorial I used when trying to figure everything out. For those, you can look at this absolutely AMAZING tutorial, by hayaosmiyazaki, specifically steps 7. gif speed and 8. sharpening.
From there, I start adjusting the colors. From what I've noticed, I seem to do a good bit less color adjustment than some, or maybe even most, other gif makers. It's honestly all about personal preference, so play around with it and find what you like! I personally like to stick as close as possible to the original colors, while still brightening the image up enough to make it clearer and more legible. So, for a majority of my gifs, I only apply an "Exposure" layer, a "Brightness/Contrast" layer, and a "Hue/Saturation" layer (from the "Layer" > "New Adjustment Layer" menu.) The numbers here change dependent upon the lighting in the shot.
For example, here's a before and after of this shot I just did so I could type this out and make sure I got every step 😅 For this one, I did Exposure +1.0 (no change to Offset or Gamma Correction), Brightness +20, Contrast +10, and Saturation +5 (no change to Hue or Lightness).
Once I'm satisfied with my coloring, I go to "File" > "Export" > "Save for Web (Legacy)". I watch the gif there to make sure it looks how I want, maybe go back and do a few tweaks to the coloring if I'm not quite happy, check the file size and then save it!
Tumblr's maximum file size is 10MB so if your gif is over that, you won't be able to use it on tumblr - in order to fix that, you may have to delete a few more frames. Or you can crop it to so there's less pixels in the "Save for Web" pop-up by changing the numbers in the "Image Size" section
And now, once I have my gif named and saved. I go back to "File" > "Open" and open up that gif. From there, I go to the little three lines icon in the top right corner of my "Timeline" section, click "Select All Frames" and then click the three dots on one of the frames and change the frame delay. For my DBH gifs, I do 0.02 seconds cause it looks best to me. Depending on how many frames per second your recording software does/what you personally like speed wise, this may be different for you. This is also different for gifs from live action or other media (for those, I prefer 0.05 seconds - it looks the most realistic to me.)
Then, I just save again, overriding the file from before I changed the speed, and voila! That's my process!
I hope this helps; if you have any more questions, my ask box is always open!! And again, thank you so so much 🥰 I'm so glad you like my gifs!!
21 notes
·
View notes
Note
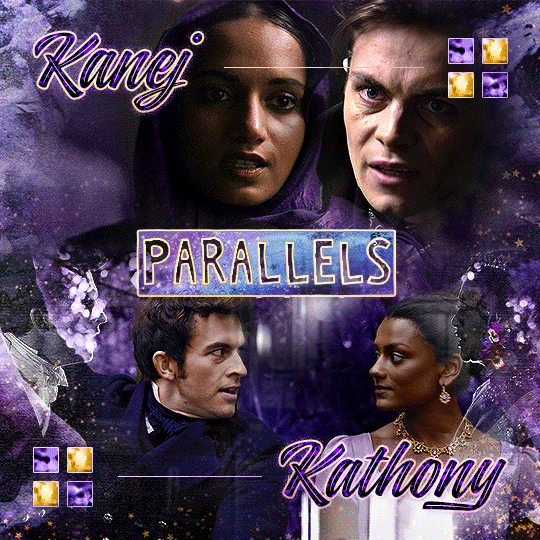
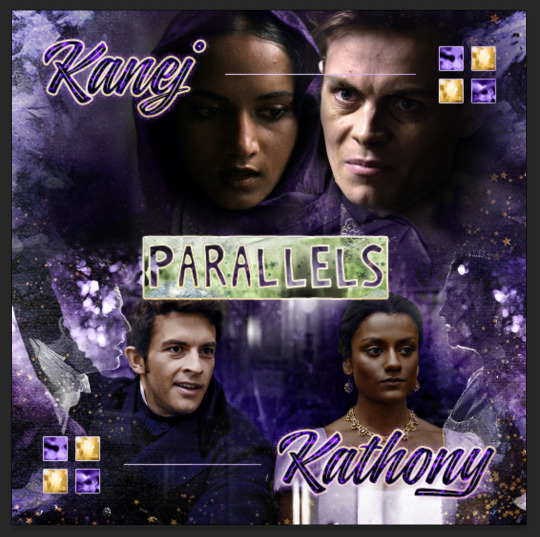
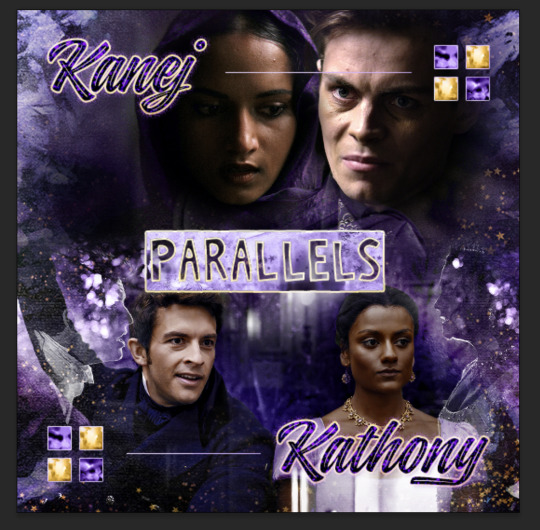
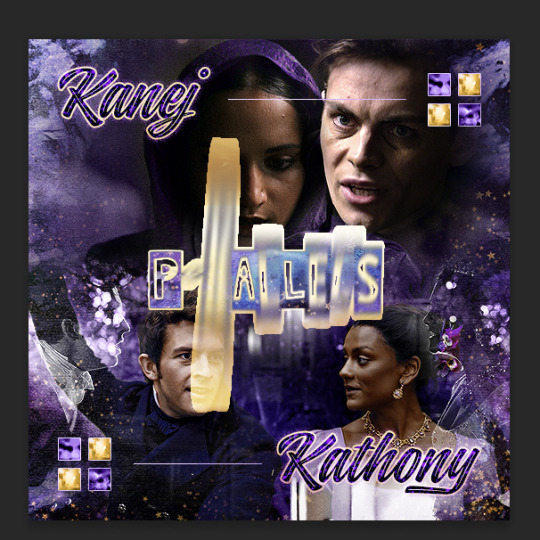
Oh I’m sorry I have GOT to ask! How did you do the text animation in the first gif of 718688291365502976/pscentral-event-15-favourite-ships-kanej?? It’s just. It’s so beautiful
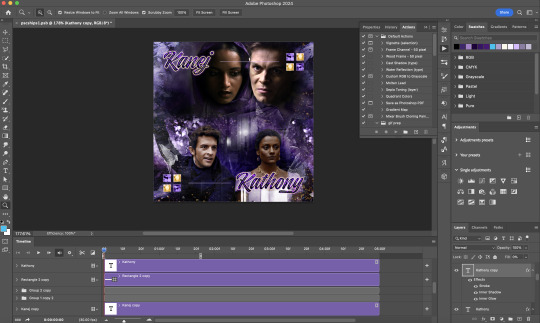
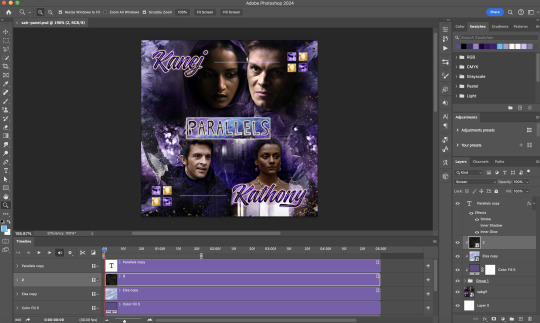
Hi anon! I've used After Effects to create the text animation in the first panel of this post. I'll show you the basic idea of how I've created the animated text effect here :D
What you need:
A cutout font (the font that I've used is Trouble Child Outblack by @justlikethistrain)
Adobe Photoshop with Video Timeline feature
Adobe After Effects
Supplementary files: gif prep action pack / golden outline layer style / assorted textures
Difficulty: advanced; knowledge in gifmaking with the video timeline interface assumed
Note: This tutorial assumes that you're working with all of the composite gifs in a Photoshop composition file and using the video timeline interface
Other useful tutorials to refer to: Text overlay effect / After Effects text animation / clipping mask vs layer mask
Tutorial under the cut. Like / reblog if you find this useful!
1) Photoshop: Preparing your gif panel
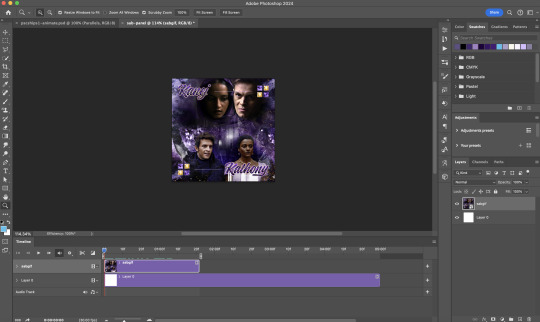
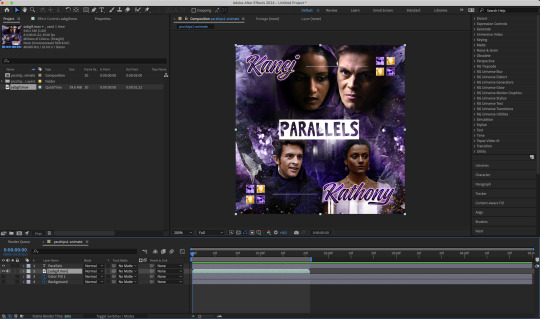
Setting up your PSD composition panel: Create a blank PSD file and set it to Tumblr dimensions (540px x 540px in this particular gifset)
Enable Video Timeline and drag all of the component gifs from your folder to the PSD composition file. Resize / move these gifs around until you're happy with the placements.
Trim the timeline work area so it's the same length as the shortest component gif you've added to the PSD composition file. You can also add some textures & additional adjustment onto this panel.
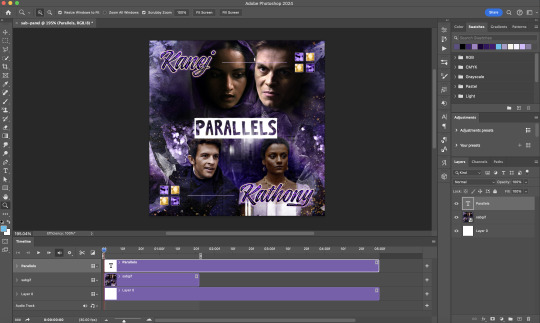
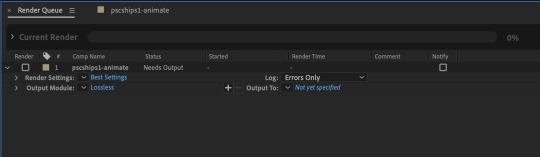
2) Photoshop: Exporting your base gif
I highly recommend exporting the base gif right now, to ensure a smoother experience scrubbing through the video timeline when adding finishing touches later on in the workflow.
My preferred method is to render the composition as a video clip from File > Export > Render video.
To get the optimal export quality, I use the following settings:
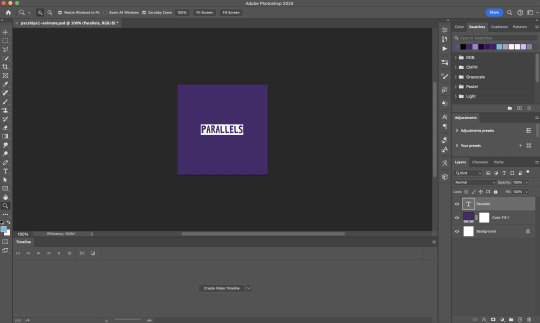
3) Photoshop: Preparing your text layer
Make a new Photoshop composition file of Tumblr dimensions

Drag in the video clip that you've just rendered (the base gif) to this composition file
Add a new text layer in your PSD composition file and set the colour to white then tweak this layer until you're happy with the text placement.
For performance optimisations on After Effects, I duplicate the PSD composition file and delete all other layers. This PSD file contains only the text layer that will be animated.
4) Photoshop: Adding overlays & decorations on the text layer
This step allows you to preview the text effect without the animations (i.e. allows you to tweak the texturings & colourings)
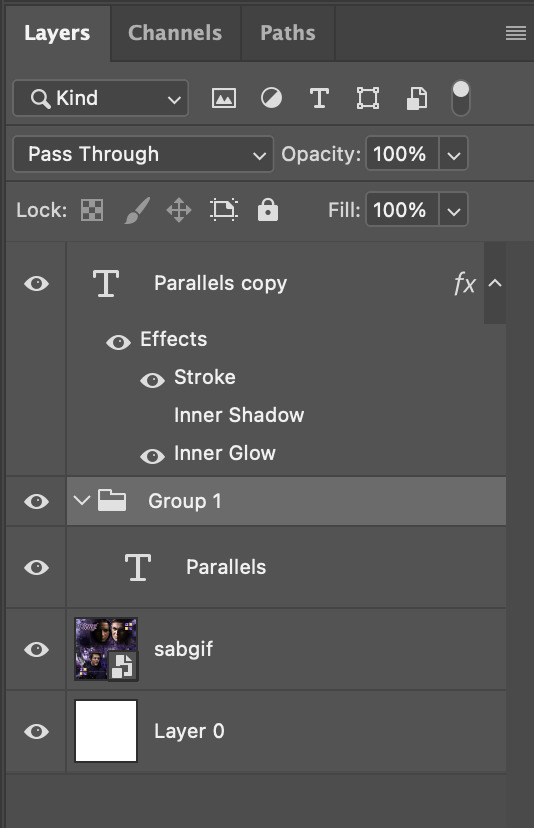
Duplicate the text layer. Set the bottom layer's (highlighted in red) blend mode to Exclusion and apply the gold outline layer style to the top layer (highlighted in green). Make sure the Inner Shadow is disabled!
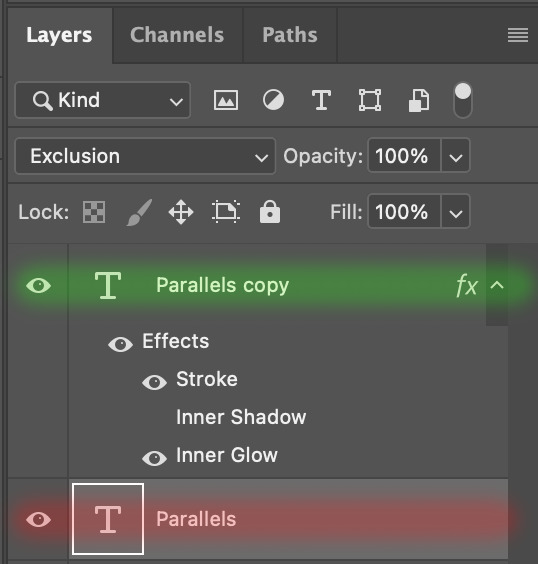
The panel now looks like this
I want to have the liberty to use different colours & textures on the bottom text layer with animation, so the next thing I do is to right click on the bottom text layer and select "Group from Layers"
To change the colour of the filled text layer to purple:
Collapse the Group that you've just created
On top of the collapsed Group a purple Colour Fill layer,
Set the Fill layer's blend mode to "Colour"
Right click on the Fill layer and select "Create Clipping Mask"
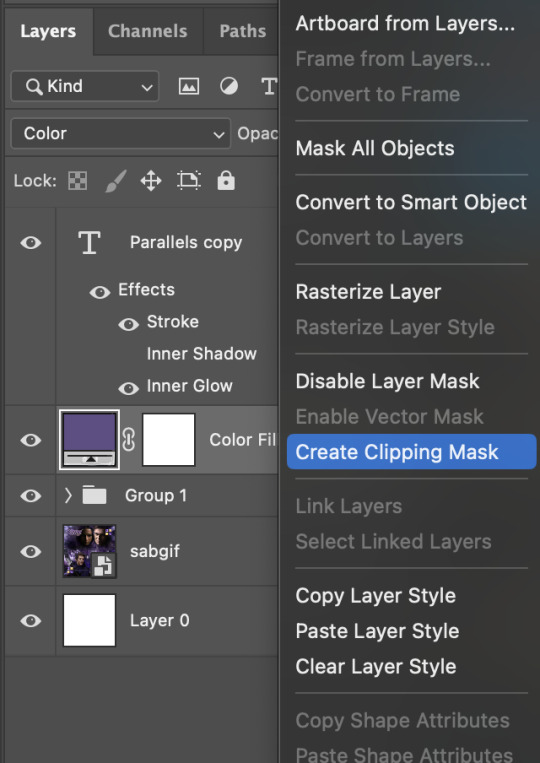
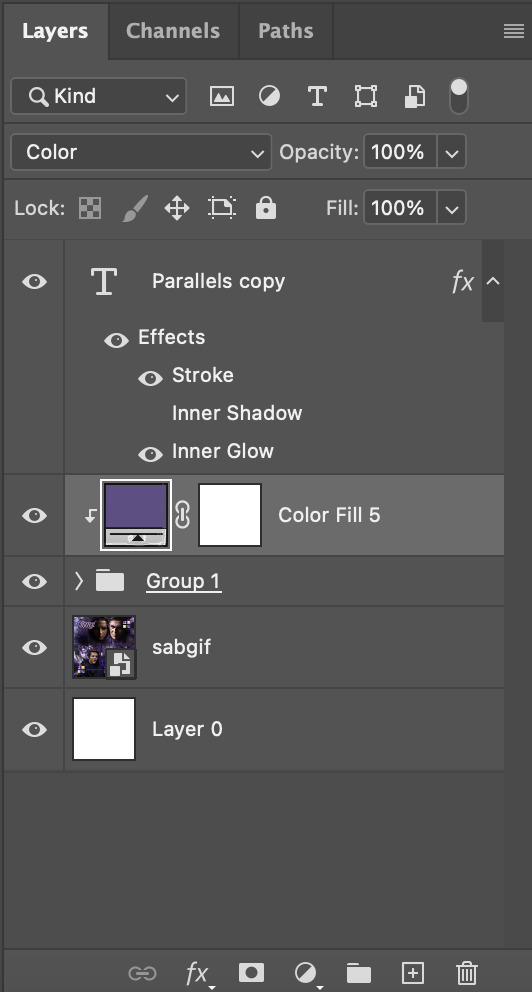
Now the colour of the filled text layer is purple
After adding more textures & decorations on the text layer (with photo negative effects) I get the following:
5) Photoshop: Adding overlays & decorations on the text layer
To avoid performance issues on After Effects, I make a new PSD file of the same dimension. With both the PSD files open, I select the text layer (highlighted in red) while holding Shift, I drag this to the blank PSD file (see the green arrow)
Holding Shift ensures that the layer's placement is preserved when it's copied to a separate PSD file.

In the new PSD file, I set the text layer's blend mode to "Normal"
6) After Effects: Animating your text layer
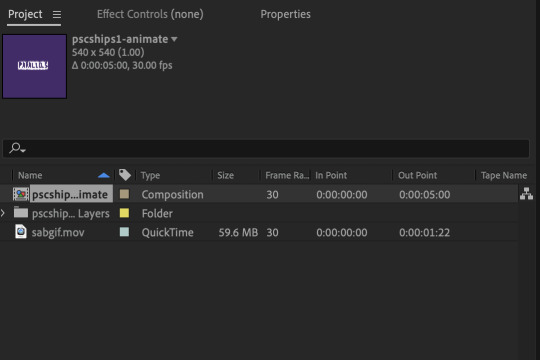
Make a new project on After Effects and drag in the text layer PSD file. Import this file as a Composition

Also drag in the base gif video clip to the AE project.
While we won't be exporting anything with the base gif visible, having this file in the project file is useful if you want to have a better picture of how the animation will look in tandem with the gif.
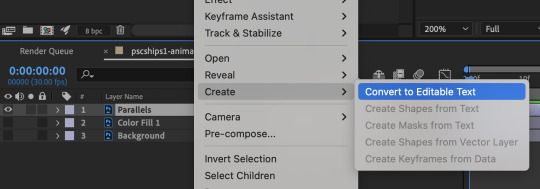
Double click on the composition. Hide the colour fill and background layers. Then right click on the text layer, go to Create > Convert to Editable Text
To be able to preview the animation with the base gif, drag the video clip to the composition file and below the text layer. The visibility of the layer can be toggled on / off anytime in the After Effects workflow
Now we prepare the text layer to be animated. Because the final animated effects is 3D & has motion blur, right click on the text layer and select "3D layer" (highlighted in green) and Switches > Motion Blur (highlighted in red)

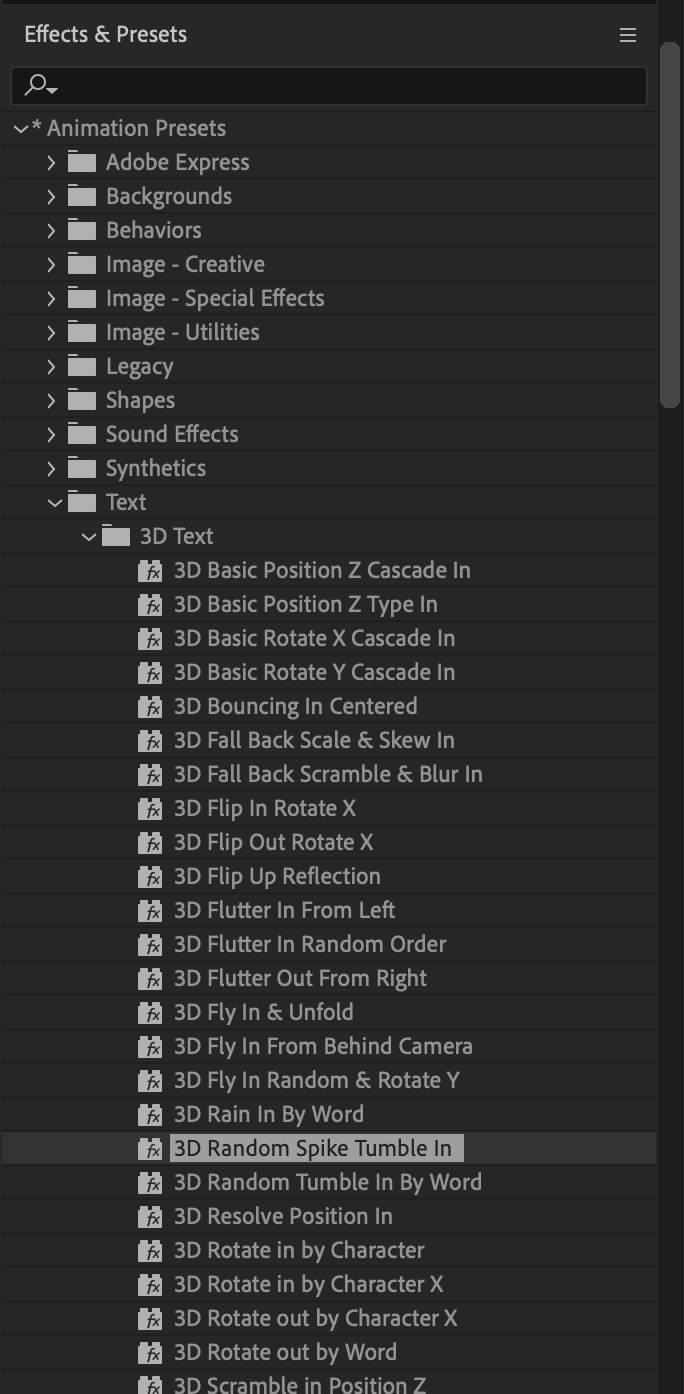
Go to Animation Presets > Text to browse through some presets that you could use to animate the text layer. For this gifset, I've used a preset within the 3D Text folder called "3D Random Spike Tumble in".
While selecting your text layer, press U to view the keyframes and you can adjust the position of these keyframes until you're happy.
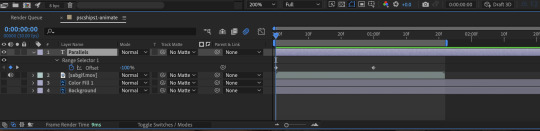
For more finishing touches, press U again to tweak more options in this preset. In this case, I do to Animato 1 > Range Selector and changed the Colour Fill to #fff (the default colour is light yellow)
Then do you File > Export > Add to Render Queue
Click on the Output Module and use the following settings to render the text layer as a video file with transparency
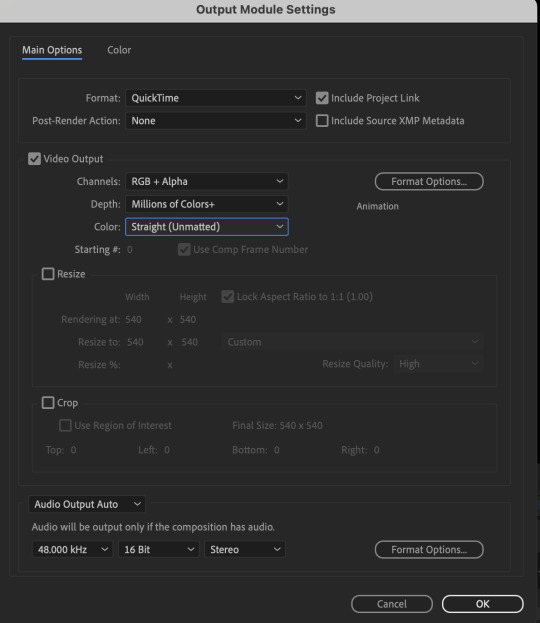
Then after specifying the folder in which you'll export the video to, click "Render" to render the video file containing your animated text layer.

7) Photoshop: Adding the animated text & finishing touches
On Photoshop, drag the rendered clip containing animated text, to the PSD composition file with the static text layers.
Duplicate the animated text video layer
Drag one of the layers inside Group 1 and set the blend mode to "Exclusion" (Highlighted in green)
Move the other layer to the top and apply the gold outline layer style with Inner Shadow disabled (highlighted in red)
Hide both text layers (highlighted in yellow)

By scrubbing through the timeline, I've noticed that the animation didn't look clean enough, so I'll add some finishing touches
By selecting the upper text layer containing layer styles, go to the timeline and add opacity keyframes going from opacity 0% to 100% a few frames apart

Once you're happy with the finishing touches, flatten / render your PSD composition file, change the frame delay to 0.05s and export your gif and voila!

I hope this helps 💖
#tutorial#gif tutorial#photoshop tutorial#after effects#chaoticresources#dearindies#userriel#useralien#userraffa#usershreyu#user.tee#useryoshi#usernik#userjoeys#usersole#arthurpendragonns#userhallie#*#my tutorials#my resources
111 notes
·
View notes
Note
hi sorry if this has been asked before, but i've been looking on your faq page for aska regarding your gifs? especially how yo make them - I'd like to create some too but it's so complicated😅
i use photoshop (not paid for lmao i downloaded a version off here years ago from like. 2016) + kmplayer + if it's game gifs, i use nvidia shadowplay to record
i'll put this under a cut because of images/length
i open my footage in kmplayer, and use the frame extraction function over the timespan of the clip i want to gif. these are the settings for that:
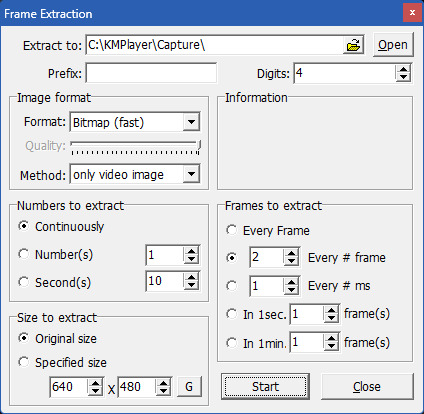
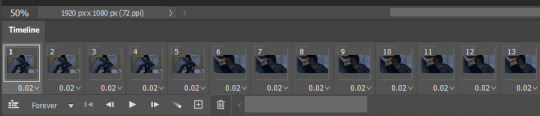
normally for games, i record in 60fps and extract every 2nd frame, but sometimes i extract every frame and scroll through to delete duplicates made from stuttering etc. for everything else like movies/tv, i extract every frame. normally, i try to go for around 100 frames, but you can have more or less depending on your final gif size, and also you can always trim your gif down when you're in photoshop, but more frames = longer import time
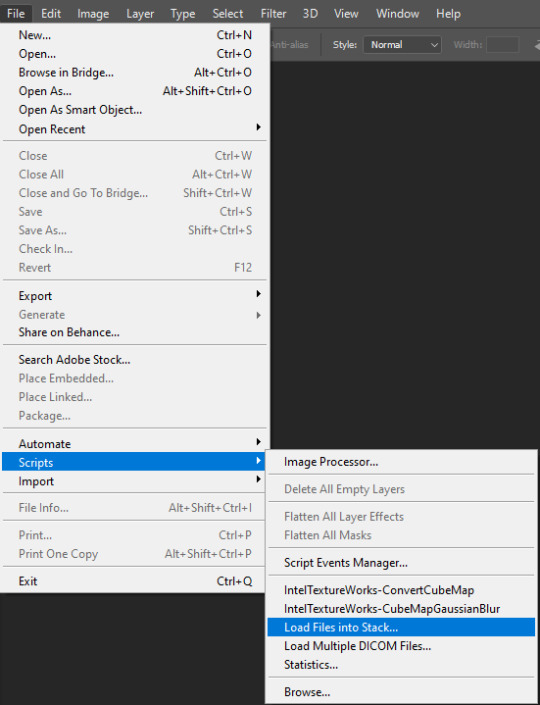
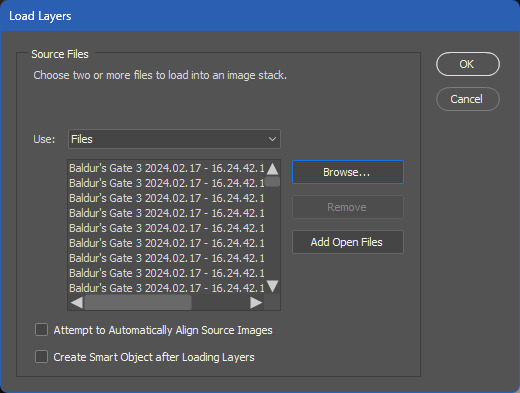
then in photoshop i go to file > scripts > load files into stack and select all the frames i want to go into the gif i'm making
for the method i use, you need a version of photoshop with timeline animation, and make sure the timeline i displayed (window > animation)
now the next part has a lot of little steps, but they're fairly easy to get the hang of once you've done it enough. it's basically muscle memory for me now but i still do sometimes do things in the wrong order lmfao
anyway. the steps are as follows:
click 'create video timeline'
click the 3 little boxes in the bottom left
in the right menu, choose 'make frames from layers'
when thats loaded, open the menu again and choose 'reverse frames'
click the last frame and change from 5 seconds to no delay
make sure you choose 'forever' instead of 'once' in the bottom left
select all frames (you can select the last one, then scroll back to the first and shift click to select them all, or just click 'select all' in the menu, i'm just used to doing it the first way for some reason lmao)
in the right menu, choose 'convert to timeline'
then select all the layers (can use shift click again)
and finally go to filter > convert for smart filters
here's a very small shitty gif of the process for a visual aid (a gif of a gifmaking guide... wow)
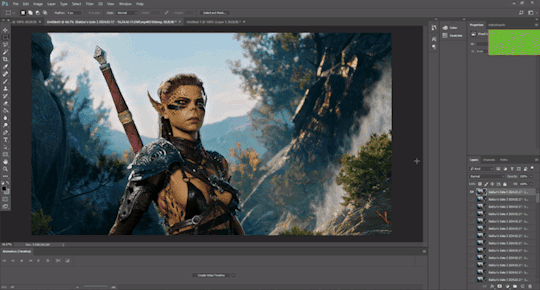
now you have a gif, basically! but you still need to resize and sharpen and edit, etc. i've posted about some of the things i do before but not really in detail because i mess around every time and don't always do the same things. and you don't have to do much! just do whatever looks good to you :')
tumblr's gif dimensions are 540px width for wide gifs, 268px width for two small gifs, and three small gifs are 177px for the two outer gifs, 176px for the middle one (don't ask me why they did that)
once you're done with that, you can export the gif by going to file > export > save for web (legacy). these are usually my settings:
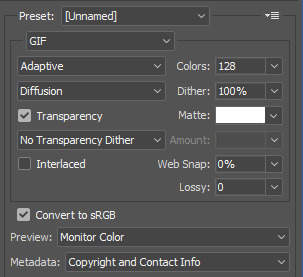
but i might change the colors to 264 if it's a smaller gif, or even to 64 if there are less colours and i can get away with it. for example in these gifs, i only used 64 colours since they were pretty brown/monochrome anyway, but something a lot more colourful would look terrible with 64 colours
the gif needs to be max 9.99MB, but if it goes over, you can always adjust it in the next step. once it's exported, i open it again
select all the frames and click the little arrow on one of the frames, then change the timing. i almost always use 0.05, but you can experiment with what you like the look of
then if the gif's over 9.99mb i just delete frames from the beginning and/or end until it's under the limit. then export it the same way as before (overwrite the old one or save it as a new file if you like) and you're done!
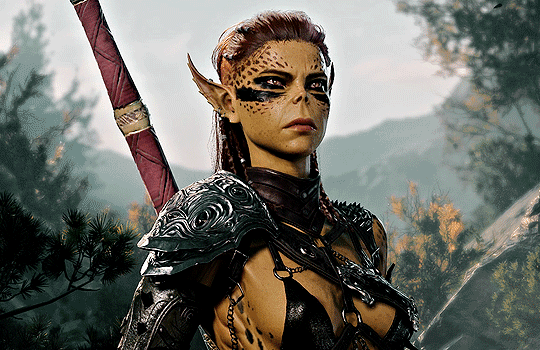
#ask#gif tutorial#kinda. i suck at explanations so maybe this isnt the best LOL#if you need me to clarify anything pls lmk! i always wanna help people learn new stuff if i can
16 notes
·
View notes
Text
i've received a couple asks for a tutorial of how i create gifs. i know there are really great tutorials out there already. personally, i find photoshop too tedious, time-consuming, unstable, and with varying end results due to file size constraints for tumblr.
so, what's my secret for saving time and not jumping through hoops for clean gifs? i cheat. honestly, ezgif does most of the work for me.
for my step-by-step process, see below!
record your gameplay using geforce experience. another free option is obs studio. if you use reshade/gshade, then you'll need one of these programs to capture the game as you see it.
next, upload your video to ezgif and trim the it down to roughly 10 seconds (or less). this is the start time and end time you see just below the video preview. you can use the video controls to see where you want to start and stop in real-time.
then, change the image size to original (up to 800px) and frame rate to 10 (max 30 seconds). you can push the frame rate higher for shorter gifs, but i've found it's unnecessary and this frame rate keeps the file size down.
method should automatically load up as ffmpeg and doesn't need to be touched. directly below that, check the option to optimize for static background.
your settings should look like this once you've uploaded the video and made the adjustments listed above:
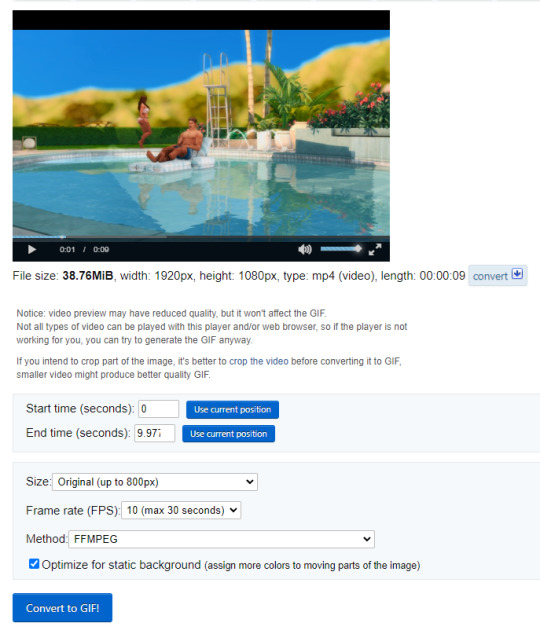
now convert to gif! it may take a few seconds, but your gif will appear below this button. notice the file size, width, height, and frame total? we need to keep the file size under 10mb for tumblr. i generally try to keep it under 9.5mb because tumblr can be finnicky about it and sometimes rejects anything close to 10mb.
if you're already under 10mb (9.5) and like the current aspect ratio, then you can right-click and save your gif as-is. if you're still over the maximum file size or want to change the image ratio, let's continue!
optimization
under your new gif, you'll see the crop feature. click through so we can change the aspect ratio. this is up to your preferences, honestly. you can select from the automatic ratios (a lot of folks like 1:1) and then center the box freely. personally, i prefer a 5:4 ratio that isn't listed on the site. since i know the ratio in pixels to fit tumblr's dashboard width, i type my custom dimensions into the fields. (width: 540, height: 430) but you can input whatever you like.
convert your gif again for the cropped dimensions. this should hopefully have you around the 9.5mb file size.
if not, click the optimize link below your gif. from the drop down list under optimization method, select remove every 4th frame, then convert one last time for the smallest file size without losing quality.
if you're still over because you have a lot of shifting colors or you're using a gif longer than 10 seconds, then you can either keep dropping frames off or resize the gif to smaller dimensions.
when you're done, right-click and save your gif so you can then upload it to tumblr. never, ever direct-link from ezgif. these previews you see on their site self-destruct after a few minutes and i can't guarantee that tumblr will publish them. always save and upload.
note: a lot of shifting colors in your original video may create unwanted pixelation. the image is having to move colors around in an attempt to stay smooth. even with that pixelation, i've found this method maintains an overall smoother texture than photoshop.
that's it! i hope this helps making gifs easier and faster for everyone since you don't really need any fancy or paid programs. if you have any questions or find errors in this tutorial, send me an ask!
happy simming!
499 notes
·
View notes
Text
The Curse of Artistic Vision
I think being an artist comes down to developing an image in your head and then feeling compelled to manifest it. Sometimes you are able to improve upon that image in your head. Or you end up with something different that you like better.
But sometimes, for various reasons, you can't quite make that image a reality. And I don't know if other artists feel this way, but it feels like heartbreak every time. Not quite on the level of an incident of human decoupling, but it definitely sticks with you for a long time.
Sometimes I am limited by the current state of my skillset. I just haven't learned enough and gained enough experience to take a photo like the one in my brain.
And sometimes I am limited by my body, which puts huge restrictions on the amount of energy I can dedicate to crafting a photo.
I feel my knowledge and experience has never been at the level I am currently at. I think I have the *potential* to shoot just about anything I can imagine. Which is a cool feeling. I also feel like my image editing and manipulation skills are at the highest they have ever been. Which means anything I can't do in-camera, I can achieve in Lightroom and Photoshop.
But I just don't have a lot of energy to capture photos right now. And I am very limited by how much physical effort I can dedicate to the photographic process. Which is very frustrating. I'm hoping if I build a new studio in the house that will help a lot.
In the meantime, I have this library of images I took before 2017. Many of them I was not able to achieve my artistic vision.
But... I came close.
Which means on many of these old images I can use my editing skills of today to achieve what I could not back then.
And so I have started a huge re-edit project where I go back and realize my images as I wanted them to be.
I had this idea for an image of someone in the middle of a dark forest in an open field reading a book and the only illumination was a lamp that seemed to be plugged into nothing. It popped into my head and it just seemed like a cool photo to create.
In July of 2016, my friend Ryan was visiting and we decided to try it. We even rented a big fancy 50 megapixel camera for a few days. I had never used a professional level camera and it was my birthday and I wanted that experience.
I even had this cool idea to hide a flash in the lamp so it would look like it was illuminated.
The resulting image was not anything like I had in my head. And for some reason, I edited it super bright, and you can barely even notice the cool lampshade flash trick. If you lower the exposure of the RAW file there is a well-defined circle of light in the grass, but it is hard to see in the 2016 edit.
Where is the dark background? Why didn't I underexpose the background to make it look like night or sunset? I knew how to do that back then. I totally could have crafted the photo in my head at that time.
But then I noticed I only took like 8 photos of this scene. And I *always* overshoot. I took 300 photos of a bridge recently.
Then I remembered what happened. We moved a giant rocking chair, a lamp, and lighting equipment to the middle of my neighbor's yard and by the time I was ready to take the photo, I was about to pass out. I believe it was very hot as well.
And so the above was the best I could do under that circumstance. My body limited my artistic vision. And this has been bothering me for years. Sometimes I will think back on this photo and how cool it looked in my head and I will feel that heartbreak again.
When I look at the RAW file... it is actually much better than my edited image.
Which makes me curious why I made it so damn bright. My best theory is I had a monitor that was slowly dying and I didn't realize how dim it got because our eyes are so good at adjusting, and it's possible all of my images from that era were overly bright because I was overcompensating for a dying display.
That fancy camera (Canon 5DS R) was a dream to work with. And having so many extra megapixels to play with is such a joy. People say you don't need more megapixels these days, but when you are doing high level image manipulation, having as much information as possible makes it a lot easier. Especially when making complex selections.
So, I've got a good start. I have a lot of pixels to play with. I was almost certain I could manifest my vision with modern knowledge and tools.
I'll start with the baseline edit in Lightroom. I'm not going to worry about the sky, as that will need to be swapped for my nighttime aesthetic.

The circle of light was there! It was just hiding in my bright exposure. So that's neat. And when you lower the exposure of the background, the lampshade trick presents itself as well.
At this point I was getting excited because I could see the potential. I just had to find the right sky. This one looks perfect.
Okay, it is time for the big reveal.
Did I finally get this image out of my brain and into reality?

I DID!
I don't know if people will like this or find it artistically interesting, but Ryan and I were both very happy with the new version.
Also, I think Ryan's purple shoes really steal the show.
Though I had one idea that was never in my head originally.
Should I try it?
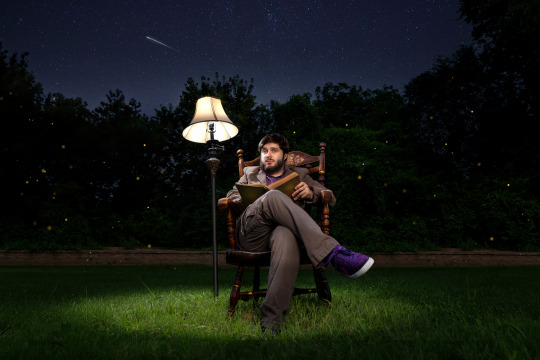
I still haven't decided on the fireflies yet, but Ryan and Katrina like them.
I can't state how nice it was to work on a 50 megapixel photo from a full frame sensor coming from a 10 year old camera with 4 stops less dynamic range and 24 megapixels.
This is zoomed in to 100%!
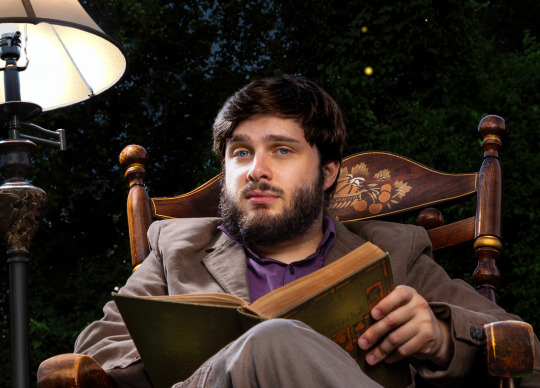
And the image doesn't even get soft at 300%.
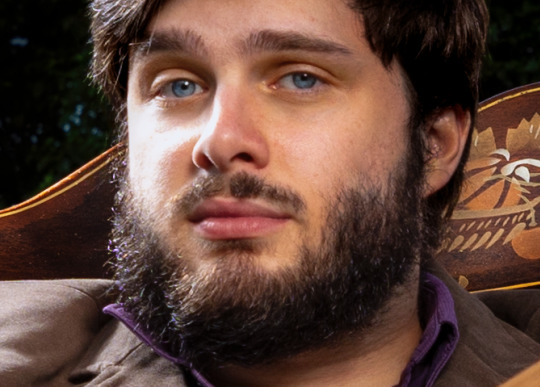
Sorry, I got caught up in the megapixels.
And there is one detail you'll probably never notice unless I point it out, but I completely rebuilt the lampshade because I overexposed it.
I always say small details add up to big results. Plus I had to use some creative problem solving to figure out how to recreate a lampshade and I always enjoy that part of the process—where you don't know how to do something and then you figure it out. Very satisfying.
In any case, my brain feels better now. I feel like I was able to settle something that has been bothering me for ages. And I am grateful I was able to realize my artistic vision—even if it took 8 years.
Here is the before and after. It's fun to switch back and forth.

On to the next photo. And it may involve a furry little orange friend.
56 notes
·
View notes
Text
How to Make High Quality Gifs
A few people have asked me for a gif tutorial, so here we go! As a disclaimer, there are many parts of gif-making that are subjective, and this is just my personal process/preferences. If anyone is confused about a particular step, or wants more in-depth info about something, just message me!
Tools:
✧Laptop/computer
✧Adobe Photoshop 2024
✧External Hard Drive (mine is 250GB)
✧Video Downloader (I use the Video Downloadhelper extension on Firefox)
PHASE ONE: Make Animated Gif
1. Download high quality video
This is very important! You should download the highest quality of the video you can find. I use the free Video DownloadHelper extension on Firefox, but it doesn't download audio sometimes (it could be me not using it properly, or they want you to pay to get audio). No audio is fine for gifs, but if I'm doing a video edit, I either need to record the audio separately with Quicktime or use a free online downloader for youtube, twitter, or instagram videos.
For this gif, I downloaded an HD interview from the F1 website with the Video DownloadHelper extension on Firefox.
Tip: Make sure your video file is an .mp4 -> photoshop can struggle with .mov files bc they're larger
2. Import: Video Frames to Layers...
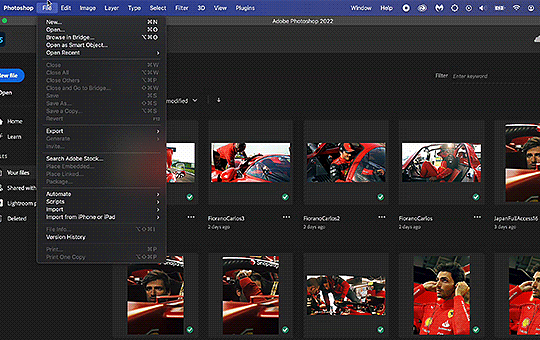
File -> Import -> Video Frames to Layers... -> Open your video -> Selected Video Range -> Make Frame Animation
If photoshop has to load a while to make the frames, it means you should select a smaller portion of the video to animate.
Tip: If you discover that there are duplicates of every frame or that there are way too many frames for the portion of video you want to gif, you may need to re-import and check the "Limit to Every _ Frames" box, and write in "2". This will import every other frame of the video and get rid of duplicates or too many frames.
Once your frames are imported, make sure you're working in the "Motion" workspace by going to the top to Window -> Workspace -> Motion.
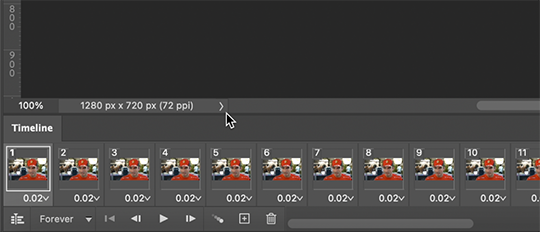
Now, all your frames should appear at the bottom in the Timeline. Make sure that the box in the left corner is set to "Forever", and now it should play the frames and loop back to the beginning each time.
3. Choosing your frames
I usually aim for around 60 frames total for a gif, but sometimes I'll go under or over that number. This particular gif is 55 frames in total. In general, I want my gif to be around 3 seconds in length bc under that feels too short and over that starts to be a large file size. Totally subjective, though! (edit: I have started to experiment with up to 80 frames for some gifs, which comes out to about 4 sec.)
Play through your frames and if you want to delete some, select them and click on the trashcan icon, which you can see in the screenshot above. (If you don't delete them this way, you'll have issues later.)
4. Set Frame Delay

Once you're happy with your frames, select all of them and click on the part that says "0.02", then go to "Other..." I usually choose 0.05 or 0.06, to land my gif around 3 seconds, but it depends on the video and how many frames you have. This particular gif is set to 0.06 because it looked good and brought me to around 3 seconds.
You can always choose a delay and if you don't like it, go back and change it! Just do what looks good to you.
5. Convert to Video Timeline
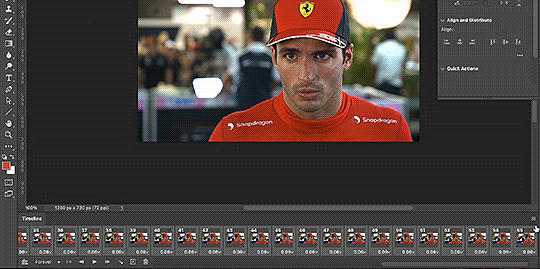
Click on the symbol that looks like 4 lines stacked, and choose "Convert to Video Timeline". Now is usually when I play through the gif to see what the speed is looking like/if I like the frame delay and it's landing somewhere around 3 seconds. If not, you can just Undo and adjust anything when it's still in the frame animation stage.
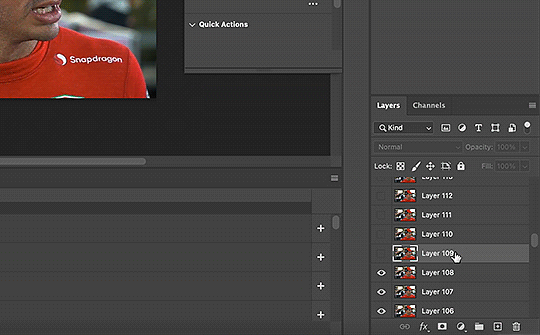
Next, scroll through the Layers on the right side and delete any layers that don't have the "eye" symbol next to them -> these are frames you deleted in the frame animation stage, but they need to be deleted in the timeline stage as well. Lastly, select all your remaining layers (which should all have the "eye" symbol) so they're all highlighted.
6. Convert to Smart Object
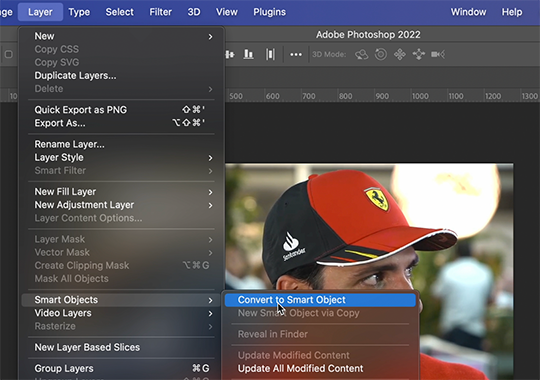
With all layers selected, go to the top to Layer -> Smart Object -> Convert to Smart Object. Ta da! You have a gif.
I always make sure to save my file at this point (you can do it before, but it just depends on how fast you work). Remember to frequently save your progress while gif-making: sometimes, photoshop gets overwhelmed and quits while you're mid-color correction 🥲. You never want to start over from scratch...
Now, some people like to crop & resize their gifs first. Or do sharpening before color. Or color, resize, then sharpen. It's really up to you. The order I like to do is Color, Sharpen, Crop, Resize, Export.
PHASE TWO: Color & Sharpening
(the fun part!)
1. Brightness/Contrast
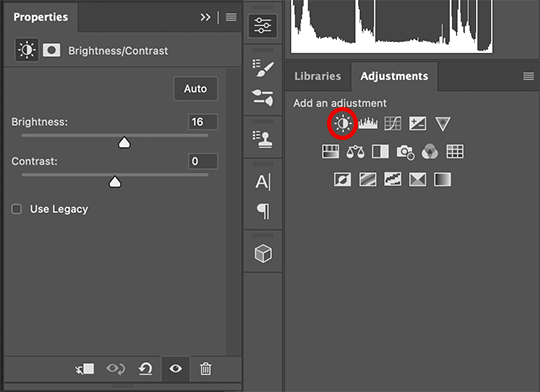
So here's where we start getting into the really subjective stuff. I always use the Brightness/Contrast and the Selective Color adjustment layers to do my coloring. I rarely touch the contrast bc that can be adjusted in selective color, but almost always, the gif needs overall brightening.
Tip: Even when I think a video looks bright to my eyes, sometimes I post the gif and they look dark once they're in the app. My advice is to always brighten a little bit, even when you don't think it's needed...
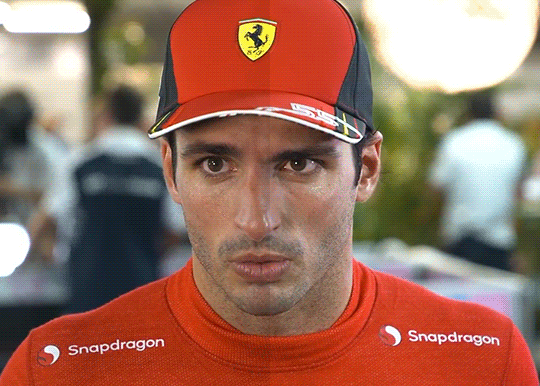
Here shows the very subtle shift in brightness I did for this gif. It can be a lot more intense depending on the video quality/lighting. The difference will also look a lot more stark after the color layer is applied.
2. Selective ColorNext is color. This is totally up to you and what looks good to your eyes. Make sure you have any software turned off that might change the color of your screen (like a nighttime filter or something that removes blue light).
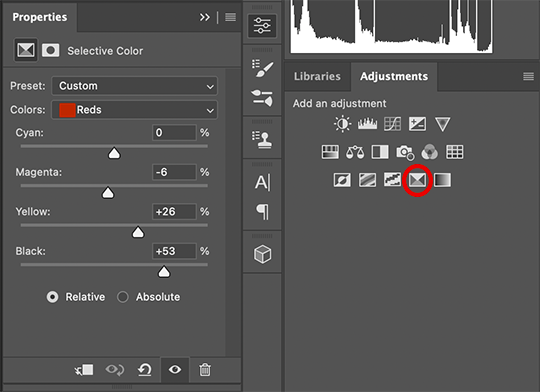
I use selective color bc you can adjust the levels of cyan, magenta, yellow, and black in each color channel independently. This is how I adjust the specific color of red that Charles and Carlos wear, or the amount of cyan in the blacks, etc. The "Neutral" layer effects the whole image, so I'll sometimes add some yellow there if I'm wanting a warmer image, or I'll add or remove black to brighten or darken the mid-tones.
Just play around! Sometimes, I'll take the slider from +100 to -100 back and forth just to see what it's doing to the gif. And I frequently turn on and off the color layer to see what the gif looked like before and after color. (I've found that most F1 content is really magenta-skewed, which you may not even notice until you've corrected it out).
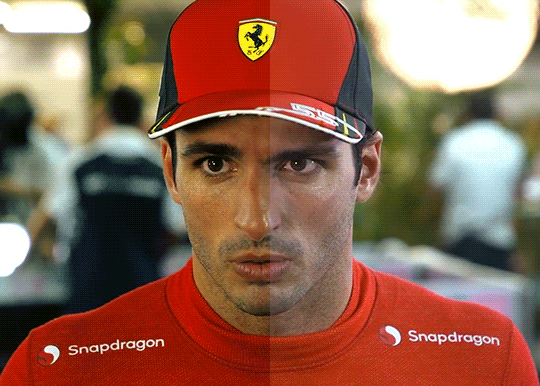
Above is Color vs. No Color.
It might look extreme to you presented this way, but when the whole gif is colored, no one questions it! As long as there's consistency across gifs, that's all that matters. I frequently copy and paste my adjustment layers onto another gif from the same interview/video so the look stays consistent.
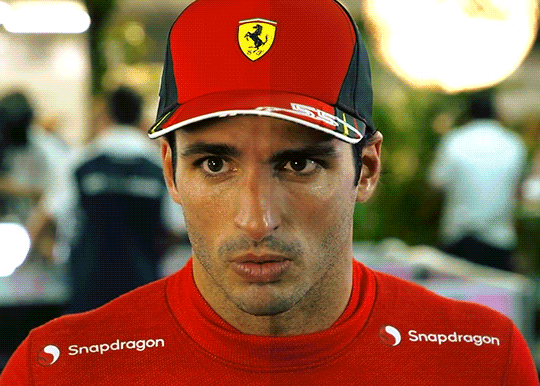
Above is Color w/ Brightening vs. Without.
This gives you a better idea of how much of a difference that Brightness/Contrast layer makes.
3. Sharpening
I got my Sharpening routine of choice from this tutorial on gif-making. To be honest, I don't know if it's the best sharpening procedure bc I haven't taken the time to in-depth compare to other ways of doing it, but it looks good to me! So I've stuck with it. (edit: I've also added a Reduce Noise filter to my sharpening routine. But as always, just do what looks nice to you!)
I copy and past the sharpening from my other gifs onto new ones so I don't have to do all the steps again. There are quicker ways of doing this, like using quick actions and stuff, but how I do it is fast enough for me.
If you want to figure out your own Sharpening routine:
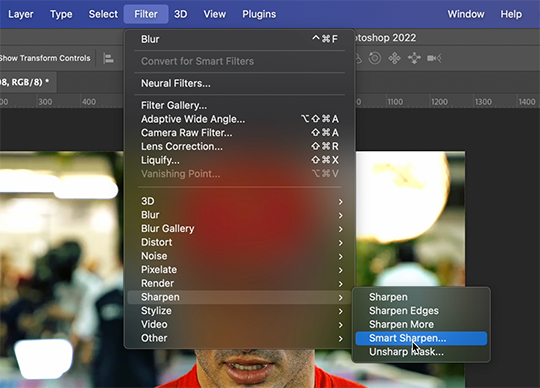
With the gif layer selected, go to the top to Filter -> Sharpen -> Smart Sharpen. It will bring up this window:
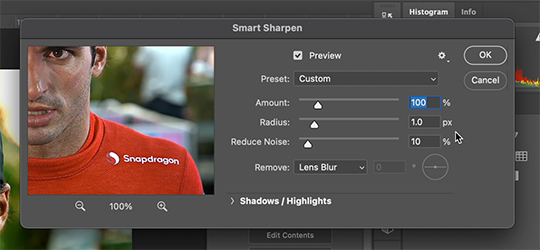
Here you can play around with the amount, radius, noise reduction, etc. and see what you like.
I also add a Gaussian Blur effect, which you'll find under Filter -> Blur -> Gaussian Blur.
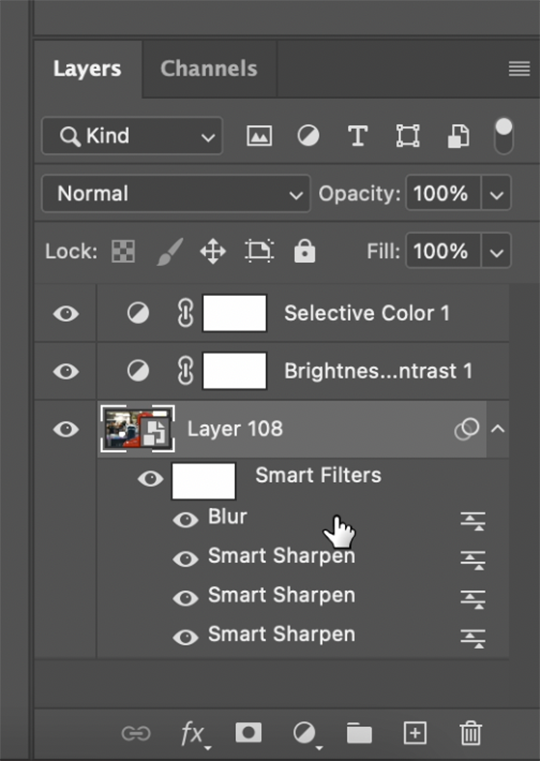
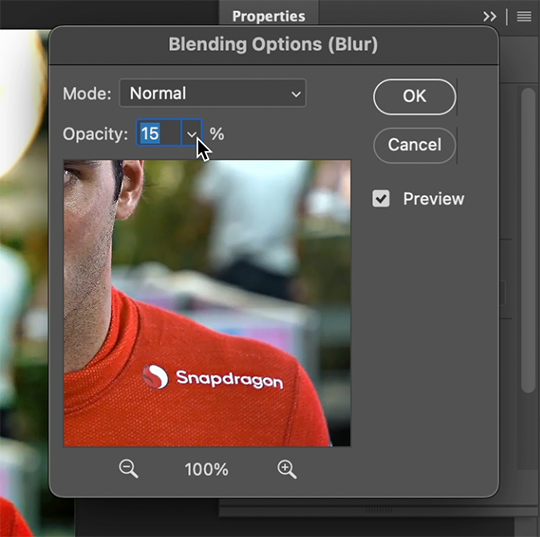
^All of your Sharpen and Blur effects will stack up underneath your gif layer like this. To adjust the opacity of one of these effects, double click on its adjustment/slider symbol to the right, and it'll bring up the Blending Options window.
If there's any sharpening or blurring layer you don't like, you can easily drag it into the trashcan symbol to get rid of it.
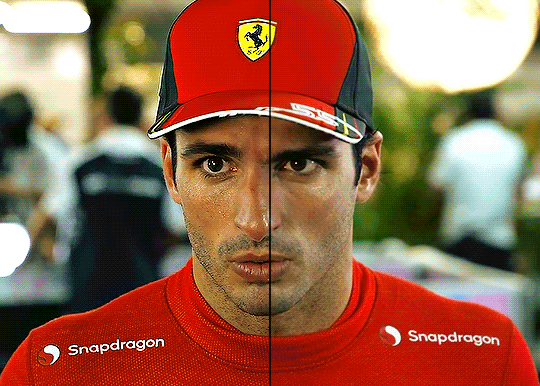
Above is a visual of Sharpened vs. None.
You can really tell with the difference in the Snapdragon logo on either shoulder. But I also personally love how much more Carlos' eyes pop to me on the Sharpened side.
As you can see, it's up to your preference. Sometimes, I really love gifs I see that aren't sharp, but rather really smooth and almost painterly. It's up to the gif-maker!
PHASE THREE: Crop & Resize
1. Cropping
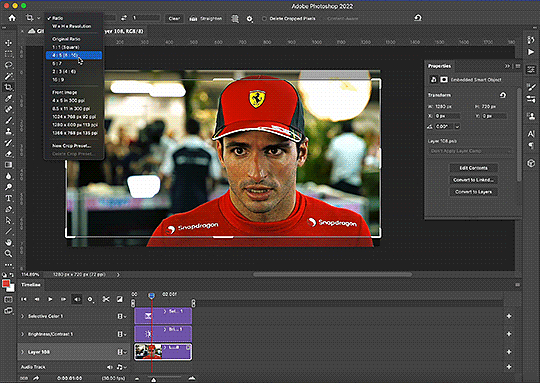
Go to the toolbar on the left and choose the Crop Tool. Above where it says "Ratio", you can choose from preset ratios that photoshop has, or you can make your own. I like to use the presets, or at the very least, clear numbers that you can apply to a whole gifset. Free transforming without a ratio makes it nearly impossible to maintain consistency across a gifset.

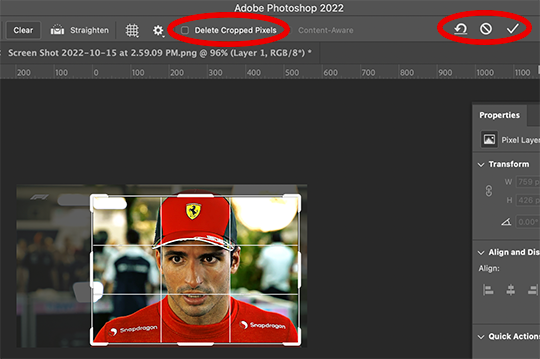
If it isn't already, uncheck "Delete Cropped Pixels". This will allow you to move the gif around inside the cropped area later if you want to adjust what's in frame. It also gives you the option to increase the frame later, if you want. You can also click the gear icon next to "Delete Cropped Pixels" and change how you view the gif during cropping.
When you're done, click the check mark or hit Enter. Now, you've got a cropped gif!
2. Resizing
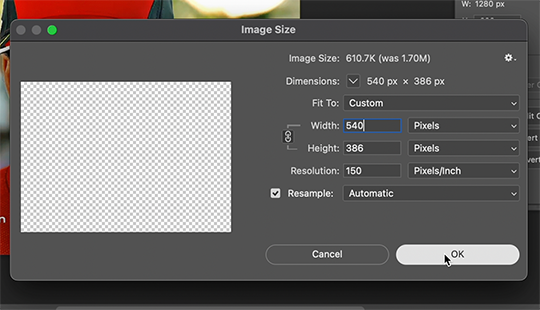
Go to the top to Image -> Image Size...
Make sure you have Pixels selected. For the Resample tab, I have it set to Automatic here, but sometimes I'll use Bicubic smooth or sharpen, depending on what I'm doing. Here's a cool post that compares the different settings. Just experiment with it.
(edit: I no longer change the resolution to 150. I've found that increasing the resolution, and therefore the size, before ultimately resizing down to 540 px means you are compressing even more (the larger something is, the more it has to be compressed within 540 px). I now leave the resolution at 72, which is what it's set at originally, and if the image composition allows it, try to crop in as close to 540 px as I can get so that when I resize, there's the least amount of compression happening.)
If I know a gif is going to be the full width of a tumblr post, I'll resize the width to 540 pixels (the height doesn't matter). But if I make a portrait-style gif which will be sharing a row with another gif, I'll resize anywhere from 270 px -> 350 px. If it's smaller than 270 px, tumblr will enlarge the gif and it'll look bad. If it's wider than 270 px, tumblr might reduce its quality a bit and it won't look as good. But personally, I prefer that if someone clicks on the gif to enlarge it, it looks better enlarged, so I usually will leave it around 345 px as long as the file isn't too big.
PHASE FOUR: Export (last one!)
Once you're happy with everything about your gif, it's time to export. (Remember to save your progress frequently!)
Go to the top to File -> Export -> Save for Web (Legacy)...
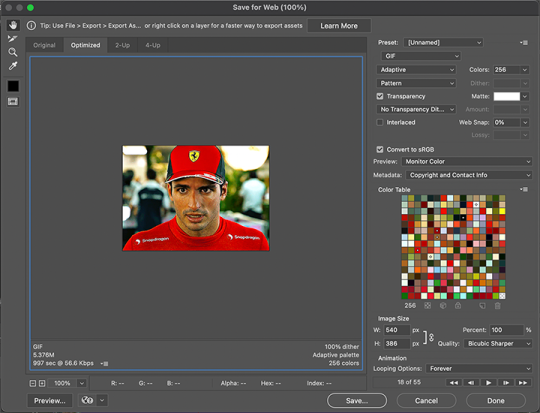
^It'll bring up this Save window.
These are the settings I like to use for gifs. You'll find a lot of differing opinions out there about Adaptive vs. Perceptual/Pattern vs. Diffusion, but you should always have "GIF" selected, "Transparency" checked with "No Transparency Dither" selected, Looping set to "Forever", and Colors set to "256". I like "Bicubic Sharper" for my Quality tab, but there are whole tutorials just about comparing those settings. The best thing to do though is to try them out and compare for yourself.
(edit: I've discovered that if a gif is slightly too large and I don't want to shorten it or resize it down, I can try to reduce the colors from 256 to 128 to get it under the limit. I'll never go below 128, and sometimes I will go to 200 or 170 to try to eliminate as little color variety as possible, but often there is not a noticeable difference in your finished gif. But always compare, of course, to make sure.)
On the bottom left is where the size of the gif is shown -> tumblr requires gifs 10MB and under, but in my experience, gifs load/play best on tumblr when they're around 6MB. I always leave a little growing room as well, bc it might say 5.8MB in this window, but after it saves, the file will have grown a little bit and will likely be over 6MB at that point. (edit: I now regularly post gifs that are around 9.5MB and tumblr seems to be able to handle it better.)
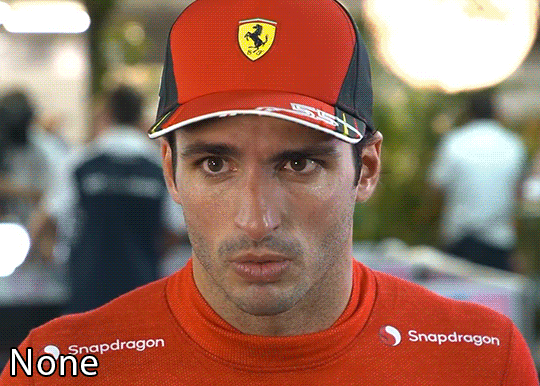
AND THAT'S ALL!
If you've made it this far...congratulations! haha
I know this is a whole lot of information and you might be feeling overwhelmed! But I hope, if anything, this shows you just how complex gif-making can be, and how it is absolutely an art! No one should be stealing anyone's gifs, as a lot of hard work and love goes into the process.
This doesn't include things like adding text to a gif, or more complex adjustments and corrections like masking or key frames. But I'm happy to do more of these if there are specific questions people have.

Let me know what you're curious about or if something is unclear! And happy gif-making! ❤️
#wooow this was a process to make lol#people can let me know if they're curious about adding text or more complex adjustments - i am at your service!#gif tutorial#ask
204 notes
·
View notes
Note
Hello!
I am in awe of your edits and gifs !!! :0
I wanted to try making my own, but I have no idea where to start tbh - do you have any pointers or advice for a good tutorial? Or what programs you use?
I am especially interested in making gifs for bg3, aha.

Hi there, first of all thank you so much! I'd be happy to help, so I made a little tutorial that basically depicts my process. Full disclosure, this is the way I make gifs, so it may differ from how other creators make them. :3 I use Photoshop CC 2018, but the process should be similar in different versions as well.

Things to keep in mind:
gif sizes: when making gifs you should make sure their size is no larger than 10 MB (as of currently), since otherwise tumblr will not be able to post them. the best way to lower gif size is to lower the amount of included frames. you can simply delete them in the Timeline window.
gif dimensions: to avoid tumblr resizing your gifs and turning them into a blurry mess, keep their width 540px when posted one above other, or 268px if you want to post two gifs side by side. the height doesn't matter as long as you keep the width as mentioned above
psds and recolors: I use extensive recoloring on my gifs which includes filters like color balance, selective color, gradient fill, hue/saturation, curves and more. many creators offer their own psds as a free download so you can use them for your gifs but these will usually require some manual adjustments as your giffed scenes could have a different lighting situation going on. this tutorial is focused more on the actual "making" of a gif, but I would be happy to make another one that would be more about the actual coloring I make :3
With that being said, let's go! Read on for the full tutorial.
First, you need to know how to actually make a gif. For recording purposes, I use the GeForce experience app since I have an Nvidia GPU, but there are many other programs online that you can use to record footage of your games. Basically, we want to make a short video that we will then turn into a gif in PS.
Once you have a suitable footage, open up PS and go to File → Import → Video Frames to Layers...

You will see a window like this. It's possible your recorded footage would be longer than the accepted file size of a gif, so you should choose which parts of the video you want to include (you can see them as two little arrows under my video here). Once everything is in order, hit OK.

Now it's time to resize the gif, I usually use 540x250 for my scenery gifsets, but as I said, it's the width that matters. Since I am planning to post this gif on its own, I chose 540.

Now it's editing time for me, but you can choose to do this after you sharpen the gif, which will be depicted later. I love pastel pink colors so I used selective color / color balance here to make it more pink, and several levels / curves layers to up the brightness more and make it look more pastel and "washed out", but this all comes down to personal preference naturally!
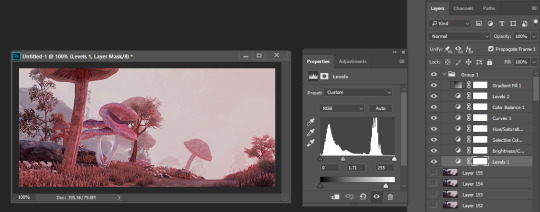
Sharpening a gif is optional, but it makes it look much more crisp, so I highly recommend it! First, you want to go to your Timeline (if missing, you can re-enable it through Window → Timeline), click the menu icon, and Select all Frames. Now we need to do the same for our layers (you can do this by selecting the first layer, holding shift down and clicking the very last layer).

After you have both your Layers and Frames selected, go back to Timeline, click the menu button again and choose Conver to Video Timeline.
Now go to Filters → Convert to Smart Filters. You can ignore the pop-up message or choose to click the prompt to never display it again. After that go back to Filter → Sharpen → Smart Sharpen.

You can see the settings I use here. Hit OK and ur done!
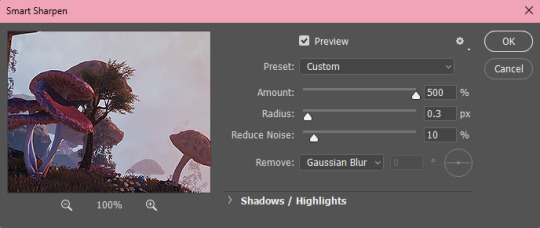
Now we want to save the gif. Go to Export → Save for Web (Legacy). In earlier versions of PS it might be simply listed as Save for Web. It may take the gif a few seconds to load, depending on the size. In the pop-up window, make sure your looping options are set to Forever.
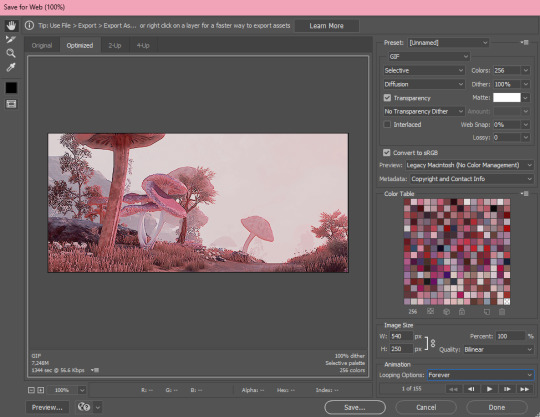
And with that you are done! If you have any questions please don't hesitate to ask me. :3
Unsharpened version:
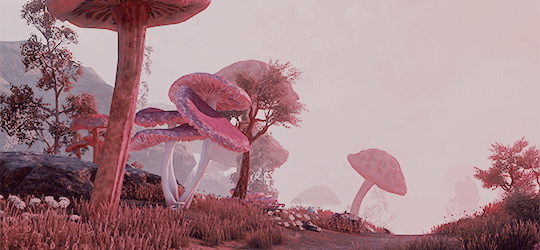
And sharpened:

#ask#saturnawa#gif tutorial#ps tutorial#ambie's tips#hope this helped! feel free to ask me any more questions uwu and good luck!
50 notes
·
View notes
Note
Hi! I've been a follower for awhile of you and Sara as I play TS3!
I started becoming a creator and learning to Convert 4to3 items in my game which has been so fun for me.
I tend to love a certain style that I can't find in most cc creators so I want to make my own eyes, skins, skin details/ tattoos etc. to make my sims.
To keep it short is there any tutorials you learned from on how to make skin and eyes and tattoos? Any tips you could give to help out someone who is trying to learn themselves and start a simblr?
Hello!! That is definitely why Sara and I started making stuff, it makes your sims feel more like your own characters when you can add the personalized touches yourself. Sara and I have been skin blending for a long time (around since 2016 I wanna say) and we're mostly self taught, I don't remember a lot of people wanting to share their skin blending techniques back in the day. The most I can do is to link you to here and browse through their tutorials they have shared. The other basic tips I can share is that Sara and I use the 3D mode in photoshop for all of our skins, you'll need to get .dae files to open in photoshop which you can find here, find a base skin, doesn't have to be terribly detailed just so you know where the eyelids, nose, and mouth should go as well as the ears. Make sure you make a new layer before pasting whatever details you want to add otherwise when you merge it down on the 3D side it'll go onto whichever layer you were on (then you gotta completely redo it and it's a pain in the ass). ALSO! You can use liquify to move stuff around better in the 3d mode, I use multiply when placing stuff first so I can line it up where it needs to go. I've also seen some skins where people haven't matched the scalp correctly or there's a line where the body and the head meet, my trade secret is to use the eyedrop tool and grab the color on the face dds then just paste it completely in the scalp and on the body I use a soft brush and drag it over the very top of the neck on the body dds. As for eyes and tattoos, eyes are definitely like making makeup in the regard that you can make them recolorable and they go in the makeup category so if you have any experience with that it's not too hard, just make sure if they're not recolorable to set the color in TSRW to white so they show up properly in game. Tattoos I always add directly to my sims skins, accessory tattoos look awful in game, they glare under the light and they're blurry, easier to just add them to the skin, for the body you can just paste them on in 2D but for face tats I recommend using the 3D mode instead because of warping, black tattoo with a white background I tend most of the time to set the layer to multiply and it looks fine.
For examples of tattoos warping:
You want the tattoo to be here so if we place it like so in the 2D mode it looks fine right?
Wrong because it is going to look like this in game

So instead paste it in 3D mode like so and then merge it down
It'll look like this in the 2D mode but it's fine! It'll look correct in game!

I was kinda spit balling but I hope this helps even a tiny tiny bit!
22 notes
·
View notes
Last Seen Blogs
tuneinitstaylor
lifeasweknewit.
nomoresea
No More Sea

ultrasmileexpress-blog
Ultra Smile Express

polybabypanda3
New Poly journey (Triad)

disneydreamsandprincesses
Disney Dreams and Princesses