#run of show software
Text
S4E11: What is Run of Show - Live Stream Planning
If you fail to plan... Yeah, you know. This episode we talk about creating a "Run of Show" for your YouTube Live Streams with @DrElo #Podcast
So are your livestreams or recorded videos a disorganized mess? This episode we talk about how to organize your “run of show”, your show flow, your script for your show with my guest, Dr. Elo, yes, that Dr. Elo.
We will also talk about scripts, worksheets, and teleprompters. I don’t use a teleprompter but you might or you might want to. You can use these for your show. Even if you are doing a…

View On WordPress
#copyright free music#copyright free music for youtube videos#live streaming planning run of show#planning live videos#royalty free#royalty free background music#royalty free music#Run of Show#run of show agenda#run of show doc#run of show document#run of show script#run of show software#run of show template excel#run of show timeline#run the show#scripts#show flow#teleprompter#teleprompter how it works#What is Run of Show#worksheets
0 notes
Text
Complete DVD rips of Always Sunny seasons 1-10 are up on the Internet Archive, as well as Blu-ray rips of Season 6's bonus features. Everything is included; episode commentaries, bonus features, bloopers, deleted scenes, etc etc. all episodes soft-subbed in English, French and Spanish. Go nuts.
I'll continue adding to this archive when I can, I plan on archiving various commercials and internet exclusive content from FX's YouTube channel as well, since they've been taking various videos down lately.
#iasip#it's always sunny in philadelphia#always sunny#ada speaks#iasip extras#iasip deleted scenes#the only thing i didnt upload from the dvds were commercials for various other FX shows that were being advertised#and the first episode of archer that was included on the s5 dvd#also pspspspsps sunny video editors. use these rips. i promise theyll make your edits look uber sexy#(can confirm. ive already used them in my own and they are MILES better than anything currently existing online. that's lowkey why i did it#(use handbrake and run them through a lossless reencode with a dash of deinterlacing if your video editing software doesn't like mkv format
566 notes
·
View notes
Text
why's it so hard to set up a custom minecraft server...
#like cmon I have a public facing server already#I know it works since the logs dont show any errors#and like ive tried running the exact same hardware+software setup on my local network#but like unfortunately the public facing server only has IPv6#and I cant connect cause my ISP only issues IPv4#and the other people I want to play with probably only have v4 as well#I guess the hosting provider I have technically has a v4->v6 proxy to allow ppl with v4 only to connect to their servers#but it only passes through http imap and smtp traffic#so its pretty much useless for what I want to do#and like so far finding a proxy service that actually does what i want it to do seems impossible#like PLEASE I WANNA PLAY MINECRAFT WITH SOMEONE ELSE#I DONT WANNA SPEND TIME TRYING TO FIGURE OUT HOW TO GET THE SERVER RUNNING
3 notes
·
View notes
Video
welcome to the bell parade
7 6 2 5 4 7 3 2 5 1 4
4 7 4 7 6 4 (when i was a young boy)
6 74 6 7 67 4 53 (my father took me into the city)
6 7 6 54 3 (to see a marching band)
4 5 7 4 764 (he said son when you grow up)
674 6 7 67 4 53 (would you be the savior of the broken)
6 7 6 54 3 (the beaten and the damned)
(notation is only somewhat reflective of timing lolz). the limited palette necessitates a bit of wrongness.. for instance the first B (third note) is supposed to be higher than the other notes but adapting to the lower B sounded better than using the only other higher note - the A7. alas, tis the nature of shits and giggles 🖤
#MCR#I stayed up until 4 AM on christmas eve (christmas day i suppose) to do this.#MUSIC IS HARD.. I AM NOT A MUSICIAN (YET?)#i bought a kalimba recently and one of the melodies i've learned is..... the opening to black parade !!!#since i realized it's a fairly simple piano melody and went O_O I Could Play That so i did.#and now here tumblr is giving me another instrument.. waow...#mods please i would pay to keep this blessed thing#or i suppose i could just. install a software which lets me program my number keys to notes. and have a more flexible range of notes..#but that lacks the whimsy of Playing Music on Tumplr Dot Com 🌈#So anyway i saw my chemical romance live on tour this summer owo#I GOTTA BRAG ABOUT IT HEH#THEY WERE SO !!!!!!!!!!!!!!!!#legendary show.#unforgettable. i think i almost passed out trying my god damn best to dance in the aisle#me and my buds rolled up in our best emo attire#we did make a hot topic run at a mall on the way before the show.#i also made a tractor supply run. what the hell can you wear from tsc to a concert? i will leave it to mystery.#my setlist had mama B) i would have been so sad if not.#okay now i am just reminiscing good night or not i'm gonna fiddle with a couple more tunes and try to not get absorbed.#I WANT THE BELLS UNTIL NEW YEARS AT LEAST. PLEASE#on the kalimba i like to transition from zelda's lullaby into WttBP... lullaby (or at least the part i've been playing??) ends on#the same note parade starts on. it's funny
24 notes
·
View notes
Text
EPISODE ONE OF PTSDIVA IS FULLY PRESERVED WOO!!!!!!
#screen recorded the podcast > imported into editing software to get rid of audio gaps and isolate the audio track from the video#> downloaded the just-audio version and everything transferred perfectly!!!#i'm gonna wait until i have the full show preserved to start reuploading them#plus maybe it'd be good to run it by scott and get his permission to make these publicly available i'm assuming he'll say yes#bc like he wouldn't get money from them being paywalled on stitcher anymore since the app is being taken down completely#so the alternative is just not having ptsdiva be available at all#i'm also going to put the episodes on 2 hard drives when i'm done just in case anything ever happens to the google drive#one hard drive will be for me and one will be for scott if he doesn't already have his own copy of the episodes#(bc he said in an email he wants to look into getting a physical copy of the show so i assume he doesnt have the episodes)#and episode one has a buddy cole monologue at the end so once i'm ready to release the google drive#i'm gonna put just the buddy monologue as an audio post on here and include the link to the google drive in the description#i'm so proud of myself for figuring this out lmao archiving media to the rescue!!!!!
4 notes
·
View notes
Text
every time i do research on the thyroid i find out another basic bodily function it’s involved in
#my body is like running brand new software that should technically be updated but never was#i love getting worse i love my mum seriously discussing seeing a cardiologist with me because im at increased risk of heart problems and#irregularities are starting to show up and im noticing issues it’s great and fine and fun#gonna talk to my professor about seeing if there are job openings in his lab#jobs that would be so so feasible for me i think#disability#im like a vampire but not and also worse#my joints and nerves are also fucking up but that’s just par for the course at this point#the monstrosities attached to my legs
3 notes
·
View notes
Text
It’s honestly really exhausting to be taught in speech pathology that you should use specific, clear, and concise language when talking to others, but Neurotypicals never seem to understand specific contextual language and act as if you’re using vague terminology 😭😩😭
💖Neurotypicals Learn How To Communicate Better Challenge💖
#and it always goes back to neurotypicals refusing to admit when they misunderstand something or someone#also if you are a passive aggressive person I hope you choke#dealing with people face to face is normally fine for me but sometimes it just shows the double standards given to ND’s versus NT’s#I have a finite amount of energy and ability regarding verbal skills so don’t waste it on YOUR mistakes#if it’s my mistake then I gladly do take note#regardless I hate when it results in me having difficulting maintaining my verbal skills because I get so exhausted#but at least I now know why I’m so easily drained#I always thought I was like choosing to be this way tbh because speech pathology only did so much for me#but to find out the speech pathology was treating my autism…#it’s still very overwhelming to have to realize my entire life has been my software not matching my hardware#my brain has always felt like I was an old iPhone running Linux#but the fact my autism diagnosis was hidden from me for over 20 years still messes with me emotionally in ways I can’t recognize
12 notes
·
View notes
Text
well that's a new one
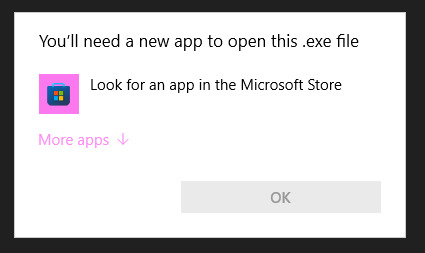
#for context. a .exe file is a program. it's already an 'app'. it doesn't need one to open it. Windows is what opens .exe files.#i think this is caused by a broken registry key for a file context menu item that points to a program that i deleted.#so it tries to run that path and fails. and is like “whelp. i guess i don't know how to open that type of file” and shows this error prompt#software gore
1 note
·
View note
Text
ooh baby, ooh baby, i’m in love | eren jaeger.


the note 𐦍 i’ve recently been thinking about a successful, older (early to mid thirties), soft spoken eren who lives to spoil the woman of his dreams—so i’m gonna share this with y’all too. i’m actually just projecting our relationship. not proud of the ending but wtv. part two here. inspired by west coast, lana del rey.
contains 𐦍 nsfw, fem!reader, stupidly rich!eren, established relationship, vaginal sex, mating press, cervix kisses, use of pet names (princess, baby, my wife, the usual yk), unprotected sex, breeding, squirting, softie eren, mild body worship, size kink, hand on stomach while fucking mhm, i love you’s exchanged, praise kink, eren talks to your pussy while he’s in it, i’m thinking black reader but it’s all subjective babes: if you like it, read it!!
truth be told, eren jaeger doesn’t believe he has much to live for.
he’s kept his circle small for all of these ongoing years; with the occasional extension of acquaintances from work dinners, or christmas parties—though, he preferred to slip away from such events when eyes weren’t so…watchful. he likes to think his social battery has drained over the course of his life. looking back at his angstful teenage years, fourteen year old most likely wouldn’t recognize the person he is today.
his once intense nature that resembled an overbearing presence of loud determination turned calm—steadfast and slow to visible anger (with the exception of a passive aggressive comment here and there from simple annoyance). the short hair that once barely covered his nape now fell to his broad shoulders, however, he preferred to keep it up—maintaining appearances while keeping it convenient. the smaller five foot six body grew to an intimidating lean six foot four instead.
however, those things were quite trivial; he knew such changes happened with growth and eventual maturity.
but for a significant chunk of his life, eren was never the greatest with women. he was oblivious—blind to the wandering eyes full of admiration from girls in his classes and workplace—and nose deep in his books. he wouldn’t rest until he was on top of his grades; which he had no problem with. His emphasis on success failed him when it came to the dating scene; to say the least he was shy—and married to his work as well.
but on top of all this, eren was a patient man, and good things always comes to those who wait.
and when a dangerously beautiful woman comes wandering into his life on the street outside of an office dinner he gracefully slipped away from, asking him for an extra five dollars to help pay for her cab home from a no-show date—a woman that has him battling the slew of warning alarms sounding away in his usually zen mind and redefining what he thought was himself—he knows that he’s waited long enough.
simply put, he’s a man of his craft; dedicated to two things. his work, and his wife.
His wife—the phrase has his brain melting into pure grey matter that spills out his body in the form of love. To even think he has the opportunity to refer to you as such is priceless in itself. eren didn’t believe he could love—let alone love this hard. you ask him to run, he’ll say how far; jump—how high?
you’ve changed him—ever since he offered to drop you off in his sleek black mercedes benz parked somewhere by the valet and you giggled in response, saying ‘i’m not usually so trusting of strangers’ will the slightest glint of curiosity in your bright eyes.
and somewhere in between the months, his ten hour workdays turned to six, important software development meetings got pushed back for convenience, the accumulating days of paid time off started being used, for once, his assistant could do their job, and his new focus was you.
diamonds and pearls, nails and hair, dinners on boats and vacations on beaches, shopping sprees on his black card and all of his devotion towards you—only you.
eren…he’s a worshipper—it doesn’t take much for him to get on his knees for you. he’s not ashamed, if anything, he’s proud. he likes to say that anything that’s his, is yours; so who are you to deny what he gives you?
that’s another thing he oh so loves about you—you readily take everything he can offer. you let him take care of you, and he wouldn’t want it any other way; you’re his wife after all.
his wife, his wife.
“my wife…” eren mumbles to himself as he buries his face into the crook of your perfumed neck. the pronounced scent makes his head spin, you can’t fathom how in love with you this man is. as his large hands engulf your own, he’s met with the texture of your wedding ring that cost him over twenty grand, the one you cried over when you saw it in his hands offering it to you—but eren doesn’t think it does his adoration for you enough justice.
he prefers to show you.
while there’s no doubt that material items and dream homes are things you like to receive—there’s nothing better than the way he has you now, one leg resting atop his shoulder and the other barely slung around his waist as he steadily ruts his hips into your own.
oh, how could you be so beautiful? splayed out on the bed like a wicked man’s deepest desires and dreams; the one he secretly lusts for from across the room with no hopes to introduce himself because you’re just so out of his league. your hair is messily draped over the silk pillows, all remnants of your lipgloss/lipstick gone from your parted lips and instead smudged on his own, the gold necklace with his diamond initial was falling into the dip in your neck, and you were gazing at him with need. pure, heartfelt need.
your body arches towards him, manicured hands trailing towards your own chest to play with your nipples that hardened from the low temperature of the room. “i need you eren, make me feel you—i want it.” your voice is smooth, accompanied with a small whine that reminds him just how spoiled you are, and how it’s all his fault.
but he couldn’t care less—you deserve it for wandering into his life to make you his own.
“i know princess, i know.” he knows damn well you need him, he knows, he knows—he’s repeating it as he peppers a kiss to your jewelled ankle before pressing down on the back of your thigh to steady himself.
eren fucks like he loves—endlessly and hard.
maybe that’s why the way he bullies your pussy while bottoming out has you grasping at the threads of the sheets and chanting his name like a hymn followed by prayer. he lets your cunt feel every bit of him, the ridges—veins, down to the last inch. he’s terrifyingly big, another thing you love about him.
his dick feels like it’s mushing your insides, curving up against your spongy walls that oh so desperately tighten around him. every thrust is harder than his last, and the way the trimmed hair resting above his base brushes against your clit provides all the extra stimulation that has your head rolling to the side. your uncontrolled moans turn to sobs when you feel his tip tickle your cervix—and boy does it make him a rejuvenated man.
“look at me.” his words barely register as syllables in your clouded mind—you keep your head turned, eyes focused shut as your body shakes upwards from the fervour of his unrelenting tempo. there’s a lot of things eren can have, and you not watching the way his slick covered dick slips in and out of your weeping pussy isn’t one of them. “you have to look at me pretty girl.” his tone is soft but firm, thick fingers taking your chin in his hands and turning you towards him once again.
“see how well you’re taking me? all of it.” he gives you a million dollar smile, hinting for you to watch where the two of you connect. “your pretty cunt just wants it so bad, right?”
“oh, eren…” it’s always a sudden surprise how soiled his mouth can get at times like this. heeding his request, you watch his cock disappear in your folds—and you sight of it has you fluttering around him like a whore.
“you were made for me, weren’t you? prettiest sight i’ve ever seen.” you’ve heard his praises a multitude of times, having him ramble on about fucking you so much your walls moulded to fit him like a tight glove, only that now, he’s saying it to your pussy instead.
“only you ‘ren, was made just for you.” you babble out, feverishly bucking your hips up to meet his ruts.
when your eyes finally rip away from below and back up to his face, the look he wears has your cunt melting like putty. with furrowed brows, a dip in his forehead and a bitten lip, he watches your body move with each fuck. even in such a sinful position, you were just so divine.
almost subconsciously, his ringed hand moves from your hip and over to your torso, gliding over your pierced belly and stopped at your lower stomach, “I’m right here baby.” gently, he applies pressure to the spot, making your eyes blow open as you moan in response. the feeling gives you butterflies—ones that go straight to your clit and stimulate the nerves in your shaky legs.
“cummin—eren i’m cumming!” you’re rambling, scrambling to push his hand away from your belly, but it’s all too late, and eren knows that well. how could he not? your body is a temple, he’s explored every inch of it, and the sudden vice grip your walls have you him and periodic throb of your cunt is all too telling. your orgasm is drawn out, legs spazzing around your entranced husband, “mm, oh-fuck! yesyesyes eren, don’t stop!”
oh, aren’t you just perfect. his eyes soften when he watches how your mouth hangs open in a silent scream, only to capture it in a languid and sloppy kiss, teeth grazing your plump lips and sucking on them like a sweet. you whine he pulls himself away from your body completely, instead he takes the time to tack his thumb to your puffy clit, rubbing feint circles and the occasional attempted heart on the bud. he always does this, coaxing out the last of your orgasm with nimble fingers that you dream about
“you gonna let me take good care of you?” he asks softly between hushed breaths while grabbing hold of both your legs and hoisting them over his shoulders. helplessly, all you can do is nod; you’re in a trance at the very sight of him. his defined torso is illuminated by the back light of one of the many lamps in your bedroom, his hair is slipping from its captive elastic band, the grip of his hands on your ankles sends searing hot pulses straight to your sensitive clit.
he gives himself a few good pumps, sliding his length between your folds. your wetness aids him in bottoming out once again, but your sensitivity has you squirming in his hold. “gotta stay put baby.” he marvels, talking you into submission, “that’s my girl.”
his praises are followed by the shift of his hands down to the back of your thighs, they gently rub the plush skin before pushing them down to meet your chest. while there are some circumstances where looking down at you sparks something within him, eren likes to be eye to eye with you when he’s balls deep—turns him on even more being in such close proximity with such a captivating woman.
you squeal from the uncomfortable burn in your hamstring from being folded in half with the additional feeling of eren’s body weight on your own. you swear that you can feel your heart palpitating in your ears as you feverishly clench around him. “it’s too much! can’t take it, can’t take it!”
“of course you can, you know you can, your pussy takes everything i give it.” eren speaks between juts, pressing your knees to your shoulder blades as he pistons into you without any regard for decency. his thrust feel like a hammer, knocking your body into the memory foam mattress you begged him to buy.
stars cloud your eyes as he wraps himself tighter around you, head in the side of your neck as he peppers kisses across your skin. your pants and gasps are loud, amplifying the sounds of slapping skin and balls hitting the fat of your ass. his favourite part is when you dig your nails into his back, leaving cresent shaped imprints and jagged lines across it like a painter with a canvas; scars of your love.
deep groans fill your ear, soft and sweet; all eren can ramble about is you—how good you feel, how quick you can make him unravel like a ball of string, how lucky he is to have you in his life—the list goes on.
“i love you—fuck, i love you so much baby, you treat me so well.” with his declaration of love, his pace seems to increase, fucking you dumb and leaving you to heave for whatever air is left to breathe.
“i love you too, so much.” your eyes scramble around in your haywire brain, overloaded by the repeated feeling of the jackhammering going on in your walls and the non-stop cervix kisses he gives you. “it’s all yours, eren; you deserve it, you deserve this pussy. you married this, have it.”
eren jaeger doesn’t believe he’s deserving of much; has he earned things? yes. but you…laying beneath him, telling him he deserves you? it makes him never want to leave—not that he would dream of doing so in the first place.
he does deserve it—your words make his brain malfunction. he deserves it. fuck, you might just be the death of him.
you’re crying for him, grasping at any part of his body possible to get him closer to you than physically possible. your tighten around his base once more, and your hand flies down to messily prod at your clit in an attempt to play with it.
meanwhile, eren’s unrelenting pace falters; that man knows he’s going to cum soon, and he’ll be damned if he doesn’t do it with you. so he pleads with you to give him one more—telling you that you’ve got another one bundled up in there for him. to say it’s true is unknown, but your body listens to eren, and miraculously whatever he believes will happen comes to fruition.
but your body is delicate—everyone knows delicate things break under pressure. with the unrelenting strain and stretch his dick gives your walls, the tight feeling in your core, and aching numbness in your legs, your buildup feels much more violent—ready to release all built up tension given to you by your husband.
“eren—keep on going like this and i’m gonna make a mess!” you fuss around, hand reaching to gently push his torso away in fear you may soil the freshly made sheets.
“that’s the goal.” he states as a matter of factly, brows furrowing as a suppressed groan bubbles up from his chest at the thought: pretty little face going stupid and clawing at anything within reach as you writhe and cum all over his torso and lower body. you can’t make him budge now that he’s a determined man.
his strokes grow sloppy but powerful, curved cock repeatedly ramming into your spongy spot that force your plush walls to grip around him, “you’re eating me up here, love.” he mumbles, moaning into your mouth in the disguise of a messy kiss.
the last roll that tips you over the rocky edge is a shaky one, the last one he could give before emptying himself into you. it’s thick and hot and you feel it fill you as you twitch underneath him and cover his abdomen with your juices. wordlessly, his hands reach for yours as he stills; soft lips peppering the lining of skin on your cheek.
eren jaeger knows that change is inevitable—it comes with time. but eren jaeger also knows one thing will stay the same; his love and adoration for the pretty girl laying below him.
#eren jaeger x reader#eren x reader#eren smut#eren jaeger smut#aot smut#aot x reader#snk x reader#snk smut#eren yeager x reader
5K notes
·
View notes
Text
Hey, do you think Windows 11 sucks goat sweat through a bendy straw?
You can go back to Windows 10 with a little planning and two USB keys.
Step 1: Get your swearing, searing hatred of Win11 on (optional, but feels nice)
Step 2: Download the Win10 Media creation tool somewhere eazy to get to (your desktop, download folder, whatever). It can be gotten here, freezey peezey: https://www.microsoft.com/en-us/software-download/windows10
Step 3: Run that sucker, and choose "USB drive" where prompted, and choose the smaller-capacity USB key (8gb or more). NOTE: That drive will be reformatted. Back up anything you have on there if it's not already.
Step 4: Use your large-capacity USB drive (or other external storage media, or whatever cloud-based solution you like - I have two USB thumb drives and three separate offsite/cloud storage options, all of which are free) to back up all your important shit.
I AM NOT FUCKING AROUND. THIS PROCESS WILL WIPE YOUR C:/ DRIVE LIKE A DISH PIG CLOSING A DINER. YOU WILL LOSE ANYTHING NOT STORED ELSEWHERE.
Step 5: Unplug your backup drive(s), slap that naughty little USB key with the install media, open windows explorer
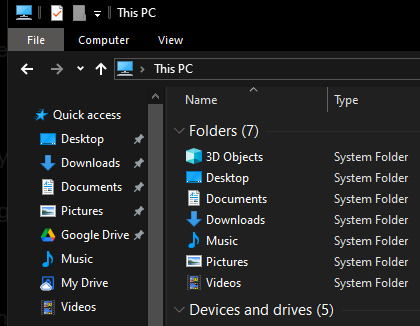
(this bad boy)
... and locate the setup.exe file.
Step 6: Cackling like the mad genius you are (wenis dance optional, but I don't know it, and would trip over one of my cats), run that bastard and choose the only option available (the other two will be greyed out and unselectable):
Windows Fucking Seppuku
Step 7: Get yourself a celebratory snack and/or beverage, as your computer rejects the farce of AI, constant marketing, and pushy bullshit.
Step 8: Be subjected to Win10's first-use bullshit. Hey, it can't all be kittens and middle fingers.
Step 9: Reinstall all your shit, and copy the stuff you backed up back. And, hey! You now have both a recovery USB key and all of your shit backed up so if you or your computer are hit by lightning for this show of hubris, at least all your weird porn will be safe.
955 notes
·
View notes
Text
DP x DC idea/prompt
Okay Wayne Industries has hired a new employee that's Phenomenal at their job. They have every program and software up to date- everything working smoothly without any interruptions or delay.
Only strange thing is no one has ever seen them. They work strictly remotely due to disability. However, they are not on record to exist except for the last few years.
Sam, Tucker, and Danny are runaways, running from GIW. They had to leave everything behind to keep themselves, the ghost zone, and their love ones safe. They're too young and have no way of actually being hired without finding out.
Thankfully one of them is great at hacking, and he's been dreaming of working there for a while and now he has the perfect opportunity to show his skills AND work for company.
However despite all his skills- They don't go unnoticed.
A certain Tim Drake and the rest of the Batfamily had already figured out this "new hire" wasn't who he said he was. In fact, they may have found out it was a group of runaway teens before the second week.
Now the only question they have, is why? Also Tim thinks its fun to test Tucker's skills and purposely throws viruses his way.
Sam and Danny are probably focusing on doing the main shopping/looking out for giw and doing odd things for extra money while Tucker is living his dream.. remotely.. and anonymously.. but hey its the dream and the pay keeps them well afloat.
Luckily they found a place that won't ask questions as long as they get the money.
Basically the Bats are keeping this group of teens employed while figuring out why they're on their own. Also while helping anonymously make their mystery employee (s) get better at their documentation by asking for information here and there without penalty.
Its become a game, especially to Tim. XD
#long post#danny phantom#danny fenton#dpxdc#dp x dc#tucker foley#sam manson#team phantom in gotham#tim drake#dpxdc prompt
3K notes
·
View notes
Note
ANDROID GHOST AJDBAHGEJADHJWHAH SKEHEBJWBDJA WKRBBWJF IM NEVER GOING TO THINK ABOUT ANYHITNG ELSE EVER AGAIN
also question: is there like a cum storage in his body that would have to be manually refilled?? if so imaging fucking him until it’s literally empty
It does have to be manually refilled. Trying to find a way to put a come making system in Ghost's body was a bit more challenging than you thought it would be, so you opted for the refillable route. Much easier. Plus you figure he won't run out too quickly. It's not a huge amount that gets stored, but you figure it's enough.
You did not anticipate that going his entire android life without a dick or orgasm software would probably lead to some... overconsumption once he did have it. Ghost shows up like two days later and needs to be refilled. He'll tell you straight up it's because he was masturbating too. He's got a "lot of time to make up" and boy is he making up for lost time.
Also "fucking him" is a bit of a stretch, "being used to get him off" is more accurate. Because that's what he does. He moves you with mechanical strength and precision like a living doll made to take his cock. In a way you are. You designed his dick exactly to your own desires, meeting his specifications while you drooled over the mechanics and tested the synth skin under your tongue. Now you sit on your knees with your head bumping against the wall as Ghost thrusts your perfect cock into your mouth, holding your head between his hands and pulling you down until you gag.
"Giving you what you deserve lovie," He tells you, something achingly tender in the swipe of his thumb against the tears staining your cheek, "lemme shut that brain o' yours off for a while."
He pins you to the workbench, keeps you on your back and presses your knees up to your shoulders. The weight of him is enough to keep you from moving as he pushes his thick cock into your dripping cunt, the angle perfect for him to beat against your cervix with each short thrust. It's too much too fast. The ache of it punching pleasure deep in your stomach, your cunt clenching as it tries to keep him inside. Your head spins, your breath catches, Ghost hooks your legs over his shoulders and laces his fingers behind your head. He forces you to bend under his weight, makes you watch the way his cock disappears into your puffy pussy and comes out glistening with slick.
And he'll keep you there, keep hitting that mind numbing spot deep inside you until your legs are shaking and you're screaming his name. He'll fuck you through orgasm, tap his metallic forehead against yours and let your breath fog his faceplate. He'll fuck you through his own orgasm, make you realize that despite adding a routine to increase sensitivity with each consecutive orgasm, you didn't actually program in a refractory period. Ghost will fuck you until he's empty, and then he'll fuck you past that.
"Making up for lost time," He'll tell you when he finally lets you up. Making up for lost time, you think as you stretch your aching legs towards the floor and try to find your balance. You're losing time on your back and on your knees, and now you've got synthetic come sloshing around and dripping out of you.
Price can't fire you for this, can he?
#cod x reader#x reader#simon ghost riley x reader#ghost mw2#simon ghost riley#ghost x reader#simon riley#simon riley x reader#simon riley x you#simon ghost x reader#mw2 ghost#ghost cod#android!ghost#cyberpunk au#just dump like a half gallon of come in my girl Ghost#would anyone be interested in.... no I shant say
1K notes
·
View notes
Text
How I ditched streaming services and learned to love Linux: A step-by-step guide to building your very own personal media streaming server (V2.0: REVISED AND EXPANDED EDITION)
This is a revised, corrected and expanded version of my tutorial on setting up a personal media server that previously appeared on my old blog (donjuan-auxenfers). I expect that that post is still making the rounds (hopefully with my addendum on modifying group share permissions in Ubuntu to circumvent 0x8007003B "Unexpected Network Error" messages in Windows when transferring files) but I have no way of checking. Anyway this new revised version of the tutorial corrects one or two small errors I discovered when rereading what I wrote, adds links to all products mentioned and is just more polished generally. I also expanded it a bit, pointing more adventurous users toward programs such as Sonarr/Radarr/Lidarr and Overseerr which can be used for automating user requests and media collection.
So then, what is this tutorial? This is a tutorial on how to build and set up your own personal media server using Ubuntu as an operating system and Plex (or Jellyfin) to not only manage your media,, but to stream that media to your devices both locally at home, and remotely to anywhere in the world where you have an internet connection. This is a tutorial about how building a personal media server and stuffing it full of films, television shows and music that you acquired through indiscriminate and voracious media piracy various legal methods like ripping your own physical media to disk, you’ll be free to completely ditch paid streaming services. No more will you have to pay for Disney+, Netflix, HBOMAX, Hulu, Amazon Prime, Peacock, CBS All Access, Paramount+, Crave or any other streaming service that is not named Criterion Channel (which is actually good). If you want to watch your favourite films and television shows, you’ll have your own custom service that only features things that you want to see, and where you have control over your own files and how they’re delivered to you. And for music fans out there, both Jellyfin and Plex support music streaming, meaning you can even ditch music streaming services. Goodbye Spotify, Youtube Music, Tidal and Apple Music, welcome back unreasonably large MP3 (or FLAC) collections.
On the hardware front, I’m going to offer a few options catered towards differing budgets and media library sizes. The cost of getting a media server up and running using this guide will cost you anywhere from $450 CDN/$325 USD at the entry level to $1500 CDN/$1100 USD at the high end. My own server was priced closer to the higher figure, with much of that cost being hard drives. If that seems excessive, consider for a moment, maybe you have a roommate, a close friend, or a family member who would be willing to chip in a few bucks towards your little project provided they get a share of the bounty. This is how my server was funded. It might also be worth thinking about cost over time, how much you spend yearly on subscriptions vs. a one time cost of setting up a server. Additionally there's just the joy of being able to scream "fuck you" at all those show cancelling, movie deleting, hedge fund vampire CEOs who run the studios through denying them your money. Drive a stake through David Zaslav's heart.
On the software side I will walk you step-by-step through installing Ubuntu as your server's operating system, configuring your storage as a RAIDz array with ZFS, sharing your zpool to Windows with Samba, running a remote connection between your server and your Windows PC, and then a little about started with Plex/Jellyfin. Every terminal command you will need to input will be provided, and I even share a custom #bash script that will make used vs. available drive space on your server display correctly in Windows.
If you have a different preferred flavour of Linux (Arch, Manjaro, Redhat, Fedora, Mint, OpenSUSE, CentOS, Slackware etc. et. al.) and are aching to tell me off for being basic and using Ubuntu, this tutorial is not for you. The sort of person with a preferred Linux distro is the sort of person who can do this sort of thing in their sleep. Also I don't care. This tutorial is intended for the average home computer user. This is also why we’re not using a more exotic home server solution like running everything through Docker Containers and managing it through a dashboard like Homarr or Heimdall. While such solutions are fantastic and can be very easy to maintain once you have it all set up, wrapping your brain around Docker is a whole thing in and of itself. If you do follow this tutorial and had fun putting everything together, then I would encourage you to return in a year’s time, do your research and set up everything with Docker Containers.
Lastly, this is a tutorial aimed at Windows users. Although I was a daily user of OS X for many years (roughly 2008-2023) and I've dabbled quite a bit with various Linux distributions (mostly Ubuntu and Manjaro), my primary OS these days is Windows 11. Many things in this tutorial will still be applicable to Mac users, but others (e.g. setting up shares) you will have to look up for yourself. I doubt it would be difficult to do so.
Nothing in this tutorial will require feats of computing expertise. All you will need is a basic computer literacy (i.e. an understanding of what a filesystem and directory are, and a degree of comfort in the settings menu) and a willingness to learn a thing or two. While this guide may look overwhelming at first glance, it is only because I want to be as thorough as possible. I want you to understand exactly what it is you're doing, I don't want you to just blindly follow steps. If you half-way know what you’re doing, you will be much better prepared if you ever need to troubleshoot.
Honestly, once you have all the hardware ready it shouldn't take more than a weekend to get everything up and running.
(This tutorial is just shy of seven thousand words long so the rest is under the cut.)
Step One: Choosing Your Hardware
Linux is a light weight operating system, depending on the distribution there's close to no bloat. There are recent distributions available at this very moment that will run perfectly fine on a fourteen year old i3 with 4GB of RAM. Moreover, running Plex or Jellyfin isn’t resource intensive in 90% of use cases. All this is to say, we don’t require an expensive or powerful computer. This means that there are several options available: 1) use an old computer you already have sitting around but aren't using 2) buy a used workstation from eBay, or what I believe to be the best option, 3) order an N100 Mini-PC from AliExpress or Amazon.
Note: If you already have an old PC sitting around that you’ve decided to use, fantastic, move on to the next step.
When weighing your options, keep a few things in mind: the number of people you expect to be streaming simultaneously at any one time, the resolution and bitrate of your media library (4k video takes a lot more processing power than 1080p) and most importantly, how many of those clients are going to be transcoding at any one time. Transcoding is what happens when the playback device does not natively support direct playback of the source file. This can happen for a number of reasons, such as the playback device's native resolution being lower than the file's internal resolution, or because the source file was encoded in a video codec unsupported by the playback device.
Ideally we want any transcoding to be performed by hardware. This means we should be looking for a computer with an Intel processor with Quick Sync. Quick Sync is a dedicated core on the CPU die designed specifically for video encoding and decoding. This specialized hardware makes for highly efficient transcoding both in terms of processing overhead and power draw. Without these Quick Sync cores, transcoding must be brute forced through software. This takes up much more of a CPU’s processing power and requires much more energy. But not all Quick Sync cores are created equal and you need to keep this in mind if you've decided either to use an old computer or to shop for a used workstation on eBay
Any Intel processor from second generation Core (Sandy Bridge circa 2011) onwards has Quick Sync cores. It's not until 6th gen (Skylake), however, that the cores support the H.265 HEVC codec. Intel’s 10th gen (Comet Lake) processors introduce support for 10bit HEVC and HDR tone mapping. And the recent 12th gen (Alder Lake) processors brought with them hardware AV1 decoding. As an example, while an 8th gen (Kaby Lake) i5-8500 will be able to hardware transcode a H.265 encoded file, it will fall back to software transcoding if given a 10bit H.265 file. If you’ve decided to use that old PC or to look on eBay for an old Dell Optiplex keep this in mind.
Note 1: The price of old workstations varies wildly and fluctuates frequently. If you get lucky and go shopping shortly after a workplace has liquidated a large number of their workstations you can find deals for as low as $100 on a barebones system, but generally an i5-8500 workstation with 16gb RAM will cost you somewhere in the area of $260 CDN/$200 USD.
Note 2: The AMD equivalent to Quick Sync is called Video Core Next, and while it's fine, it's not as efficient and not as mature a technology. It was only introduced with the first generation Ryzen CPUs and it only got decent with their newest CPUs, we want something cheap.
Alternatively you could forgo having to keep track of what generation of CPU is equipped with Quick Sync cores that feature support for which codecs, and just buy an N100 mini-PC. For around the same price or less of a used workstation you can pick up a Mini-PC with an Intel N100 processor. The N100 is a four-core processor based on the 12th gen Alder Lake architecture and comes equipped with the latest revision of the Quick Sync cores. These little processors offer astounding hardware transcoding capabilities for their size and power draw. Otherwise they perform equivalent to an i5-6500, which isn't a terrible CPU. A friend of mine uses an N100 machine as a dedicated retro emulation gaming system and it does everything up to 6th generation consoles just fine. The N100 is also a remarkably efficient chip, it sips power. In fact, the difference between running one of these and an old workstation could work out to hundreds of dollars a year in energy bills depending on where you live.
You can find these Mini-PCs all over Amazon or for a little cheaper on AliExpress. They range in price from $170 CDN/$125 USD for a no name N100 with 8GB RAM to $280 CDN/$200 USD for a Beelink S12 Pro with 16GB RAM. The brand doesn't really matter, they're all coming from the same three factories in Shenzen, go for whichever one fits your budget or has features you want. 8GB RAM should be enough, Linux is lightweight and Plex only calls for 2GB RAM. 16GB RAM might result in a slightly snappier experience, especially with ZFS. A 256GB SSD is more than enough for what we need as a boot drive, but going for a bigger drive might allow you to get away with things like creating preview thumbnails for Plex, but it’s up to you and your budget.
The Mini-PC I wound up buying was a Firebat AK2 Plus with 8GB RAM and a 256GB SSD. It looks like this:

Note: Be forewarned that if you decide to order a Mini-PC from AliExpress, note the type of power adapter it ships with. The mini-PC I bought came with an EU power adapter and I had to supply my own North American power supply. Thankfully this is a minor issue as a barrel plug 30W/12V/2.5A power adapters are plentiful and can be had for $10.
Step Two: Choosing Your Storage
Storage is the most important part of our build. It is also the most expensive. Thankfully it’s also the most easily upgrade-able down the line.
For people with a smaller media collection (4TB to 8TB), a more limited budget, or who will only ever have two simultaneous streams running, I would say that the most economical course of action would be to buy a USB 3.0 8TB external HDD. Something like this one from Western Digital or this one from Seagate. One of these external drives will cost you in the area of $200 CDN/$140 USD. Down the line you could add a second external drive or replace it with a multi-drive RAIDz set up such as detailed below.
If a single external drive the path for you, move on to step three.
For people with larger media libraries (12TB+), who prefer media in 4k, or care who about data redundancy, the answer is a RAID array featuring multiple HDDs in an enclosure.
Note: If you are using an old PC or used workstatiom as your server and have the room for at least three 3.5" drives, and as many open SATA ports on your mother board you won't need an enclosure, just install the drives into the case. If your old computer is a laptop or doesn’t have room for more internal drives, then I would suggest an enclosure.
The minimum number of drives needed to run a RAIDz array is three, and seeing as RAIDz is what we will be using, you should be looking for an enclosure with three to five bays. I think that four disks makes for a good compromise for a home server. Regardless of whether you go for a three, four, or five bay enclosure, do be aware that in a RAIDz array the space equivalent of one of the drives will be dedicated to parity at a ratio expressed by the equation 1 − 1/n i.e. in a four bay enclosure equipped with four 12TB drives, if we configured our drives in a RAIDz1 array we would be left with a total of 36TB of usable space (48TB raw size). The reason for why we might sacrifice storage space in such a manner will be explained in the next section.
A four bay enclosure will cost somewhere in the area of $200 CDN/$140 USD. You don't need anything fancy, we don't need anything with hardware RAID controls (RAIDz is done entirely in software) or even USB-C. An enclosure with USB 3.0 will perform perfectly fine. Don’t worry too much about USB speed bottlenecks. A mechanical HDD will be limited by the speed of its mechanism long before before it will be limited by the speed of a USB connection. I've seen decent looking enclosures from TerraMaster, Yottamaster, Mediasonic and Sabrent.
When it comes to selecting the drives, as of this writing, the best value (dollar per gigabyte) are those in the range of 12TB to 20TB. I settled on 12TB drives myself. If 12TB to 20TB drives are out of your budget, go with what you can afford, or look into refurbished drives. I'm not sold on the idea of refurbished drives but many people swear by them.
When shopping for harddrives, search for drives designed specifically for NAS use. Drives designed for NAS use typically have better vibration dampening and are designed to be active 24/7. They will also often make use of CMR (conventional magnetic recording) as opposed to SMR (shingled magnetic recording). This nets them a sizable read/write performance bump over typical desktop drives. Seagate Ironwolf and Toshiba NAS are both well regarded brands when it comes to NAS drives. I would avoid Western Digital Red drives at this time. WD Reds were a go to recommendation up until earlier this year when it was revealed that they feature firmware that will throw up false SMART warnings telling you to replace the drive at the three year mark quite often when there is nothing at all wrong with that drive. It will likely even be good for another six, seven, or more years.

Step Three: Installing Linux
For this step you will need a USB thumbdrive of at least 6GB in capacity, an .ISO of Ubuntu, and a way to make that thumbdrive bootable media.
First download a copy of Ubuntu desktop (for best performance we could download the Server release, but for new Linux users I would recommend against the server release. The server release is strictly command line interface only, and having a GUI is very helpful for most people. Not many people are wholly comfortable doing everything through the command line, I'm certainly not one of them, and I grew up with DOS 6.0. 22.04.3 Jammy Jellyfish is the current Long Term Service release, this is the one to get.
Download the .ISO and then download and install balenaEtcher on your Windows PC. BalenaEtcher is an easy to use program for creating bootable media, you simply insert your thumbdrive, select the .ISO you just downloaded, and it will create a bootable installation media for you.
Once you've made a bootable media and you've got your Mini-PC (or you old PC/used workstation) in front of you, hook it directly into your router with an ethernet cable, and then plug in the HDD enclosure, a monitor, a mouse and a keyboard. Now turn that sucker on and hit whatever key gets you into the BIOS (typically ESC, DEL or F2). If you’re using a Mini-PC check to make sure that the P1 and P2 power limits are set correctly, my N100's P1 limit was set at 10W, a full 20W under the chip's power limit. Also make sure that the RAM is running at the advertised speed. My Mini-PC’s RAM was set at 2333Mhz out of the box when it should have been 3200Mhz. Once you’ve done that, key over to the boot order and place the USB drive first in the boot order. Then save the BIOS settings and restart.
After you restart you’ll be greeted by Ubuntu's installation screen. Installing Ubuntu is really straight forward, select the "minimal" installation option, as we won't need anything on this computer except for a browser (Ubuntu comes preinstalled with Firefox) and Plex Media Server/Jellyfin Media Server. Also remember to delete and reformat that Windows partition! We don't need it.
Step Four: Installing ZFS and Setting Up the RAIDz Array
Note: If you opted for just a single external HDD skip this step and move onto setting up a Samba share.
Once Ubuntu is installed it's time to configure our storage by installing ZFS to build our RAIDz array. ZFS is a "next-gen" file system that is both massively flexible and massively complex. It's capable of snapshot backup, self healing error correction, ZFS pools can be configured with drives operating in a supplemental manner alongside the storage vdev (e.g. fast cache, dedicated secondary intent log, hot swap spares etc.). It's also a file system very amenable to fine tuning. Block and sector size are adjustable to use case and you're afforded the option of different methods of inline compression. If you'd like a very detailed overview and explanation of its various features and tips on tuning a ZFS array check out these articles from Ars Technica. For now we're going to ignore all these features and keep it simple, we're going to pull our drives together into a single vdev running in RAIDz which will be the entirety of our zpool, no fancy cache drive or SLOG.
Open up the terminal and type the following commands:
sudo apt update
then
sudo apt install zfsutils-linux
This will install the ZFS utility. Verify that it's installed with the following command:
zfs --version
Now, it's time to check that the HDDs we have in the enclosure are healthy, running, and recognized. We also want to find out their device IDs and take note of them:
sudo fdisk -1
Note: You might be wondering why some of these commands require "sudo" in front of them while others don't. "Sudo" is short for "super user do”. When and where "sudo" is used has to do with the way permissions are set up in Linux. Only the "root" user has the access level to perform certain tasks in Linux. As a matter of security and safety regular user accounts are kept separate from the "root" user. It's not advised (or even possible) to boot into Linux as "root" with most modern distributions. Instead by using "sudo" our regular user account is temporarily given the power to do otherwise forbidden things. Don't worry about it too much at this stage, but if you want to know more check out this introduction.
If everything is working you should get a list of the various drives detected along with their device IDs which will look like this: /dev/sdc. You can also check the device IDs of the drives by opening the disk utility app. Jot these IDs down as we'll need them for our next step, creating our RAIDz array.
RAIDz is similar to RAID-5 in that instead of striping your data over multiple disks, exchanging redundancy for speed and available space (RAID-0), or mirroring your data writing by two copies of every piece (RAID-1), it instead writes parity blocks across the disks in addition to striping, this provides a balance of speed, redundancy and available space. If a single drive fails, the parity blocks on the working drives can be used to reconstruct the entire array as soon as a replacement drive is added.
Additionally, RAIDz improves over some of the common RAID-5 flaws. It's more resilient and capable of self healing, as it is capable of automatically checking for errors against a checksum. It's more forgiving in this way, and it's likely that you'll be able to detect when a drive is dying well before it fails. A RAIDz array can survive the loss of any one drive.
Note: While RAIDz is indeed resilient, if a second drive fails during the rebuild, you're fucked. Always keep backups of things you can't afford to lose. This tutorial, however, is not about proper data safety.
To create the pool, use the following command:
sudo zpool create "zpoolnamehere" raidz "device IDs of drives we're putting in the pool"
For example, let's creatively name our zpool "mypool". This poil will consist of four drives which have the device IDs: sdb, sdc, sdd, and sde. The resulting command will look like this:
sudo zpool create mypool raidz /dev/sdb /dev/sdc /dev/sdd /dev/sde
If as an example you bought five HDDs and decided you wanted more redundancy dedicating two drive to this purpose, we would modify the command to "raidz2" and the command would look something like the following:
sudo zpool create mypool raidz2 /dev/sdb /dev/sdc /dev/sdd /dev/sde /dev/sdf
An array configured like this is known as RAIDz2 and is able to survive two disk failures.
Once the zpool has been created, we can check its status with the command:
zpool status
Or more concisely with:
zpool list
The nice thing about ZFS as a file system is that a pool is ready to go immediately after creation. If we were to set up a traditional RAID-5 array using mbam, we'd have to sit through a potentially hours long process of reformatting and partitioning the drives. Instead we're ready to go right out the gates.
The zpool should be automatically mounted to the filesystem after creation, check on that with the following:
df -hT | grep zfs
Note: If your computer ever loses power suddenly, say in event of a power outage, you may have to re-import your pool. In most cases, ZFS will automatically import and mount your pool, but if it doesn’t and you can't see your array, simply open the terminal and type sudo zpool import -a.
By default a zpool is mounted at /"zpoolname". The pool should be under our ownership but let's make sure with the following command:
sudo chown -R "yourlinuxusername" /"zpoolname"
Note: Changing file and folder ownership with "chown" and file and folder permissions with "chmod" are essential commands for much of the admin work in Linux, but we won't be dealing with them extensively in this guide. If you'd like a deeper tutorial and explanation you can check out these two guides: chown and chmod.

You can access the zpool file system through the GUI by opening the file manager (the Ubuntu default file manager is called Nautilus) and clicking on "Other Locations" on the sidebar, then entering the Ubuntu file system and looking for a folder with your pool's name. Bookmark the folder on the sidebar for easy access.

Your storage pool is now ready to go. Assuming that we already have some files on our Windows PC we want to copy to over, we're going to need to install and configure Samba to make the pool accessible in Windows.
Step Five: Setting Up Samba/Sharing
Samba is what's going to let us share the zpool with Windows and allow us to write to it from our Windows machine. First let's install Samba with the following commands:
sudo apt-get update
then
sudo apt-get install samba
Next create a password for Samba.
sudo smbpswd -a "yourlinuxusername"
It will then prompt you to create a password. Just reuse your Ubuntu user password for simplicity's sake.
Note: if you're using just a single external drive replace the zpool location in the following commands with wherever it is your external drive is mounted, for more information see this guide on mounting an external drive in Ubuntu.
After you've created a password we're going to create a shareable folder in our pool with this command
mkdir /"zpoolname"/"foldername"
Now we're going to open the smb.conf file and make that folder shareable. Enter the following command.
sudo nano /etc/samba/smb.conf
This will open the .conf file in nano, the terminal text editor program. Now at the end of smb.conf add the following entry:
["foldername"]
path = /"zpoolname"/"foldername"
available = yes
valid users = "yourlinuxusername"
read only = no
writable = yes
browseable = yes
guest ok = no
Ensure that there are no line breaks between the lines and that there's a space on both sides of the equals sign. Our next step is to allow Samba traffic through the firewall:
sudo ufw allow samba
Finally restart the Samba service:
sudo systemctl restart smbd
At this point we'll be able to access to the pool, browse its contents, and read and write to it from Windows. But there's one more thing left to do, Windows doesn't natively support the ZFS file systems and will read the used/available/total space in the pool incorrectly. Windows will read available space as total drive space, and all used space as null. This leads to Windows only displaying a dwindling amount of "available" space as the drives are filled. We can fix this! Functionally this doesn't actually matter, we can still write and read to and from the disk, it just makes it difficult to tell at a glance the proportion of used/available space, so this is an optional step but one I recommend (this step is also unnecessary if you're just using a single external drive). What we're going to do is write a little shell script in #bash. Open nano with the terminal with the command:
nano
Now insert the following code:
#!/bin/bash
CUR_PATH=`pwd`
ZFS_CHECK_OUTPUT=$(zfs get type $CUR_PATH 2>&1 > /dev/null) > /dev/null
if [[ $ZFS_CHECK_OUTPUT == *not\ a\ ZFS* ]]
then
IS_ZFS=false
else
IS_ZFS=true
fi
if [[ $IS_ZFS = false ]]
then
df $CUR_PATH | tail -1 | awk '{print $2" "$4}'
else USED=$((`zfs get -o value -Hp used $CUR_PATH` / 1024)) > /dev/null AVAIL=$((`zfs get -o value -Hp available $CUR_PATH` / 1024)) >
/dev/null
TOTAL=$(($USED+$AVAIL)) > /dev/null
echo $TOTAL $AVAIL
fi
Save the script as "dfree.sh" to /home/"yourlinuxusername" then change the ownership of the file to make it executable with this command:
sudo chmod 774 dfree.sh
Now open smb.conf with sudo again:
sudo nano /etc/samba/smb.conf
Now add this entry to the top of the configuration file to direct Samba to use the results of our script when Windows asks for a reading on the pool's used/available/total drive space:
[global]
dfree command = home/"yourlinuxusername"/defree.sh
Save the changes to smb.conf and then restart Samba again with the terminal:
sudo systemctl restart smbd
Now there’s one more thing we need to do to fully set up the Samba share, and that’s to modify a hidden group permission. In the terminal window type the following command:
usermod -a -G sambashare “yourlinuxusername”
Then restart samba again:
sudo systemctl restart smbd
If we don’t do this last step, everything will appear to work fine, and you will even be able to see and map the drive from Windows and even begin transferring files, but you'd soon run into a lot of frustration. As every ten minutes or so a file would fail to transfer and you would get a window announcing “0x8007003B Unexpected Network Error”. This window would require your manual input to continue the transfer with the file next in the queue. And at the end it would reattempt to transfer whichever files failed the first time around. 99% of the time they’ll go through that second try, but this is still all a major pain in the ass. Especially if you’ve got a lot of data to transfer or you want to step away from the computer for a while.
It turns out samba can act a little weirdly with the higher read/write speeds of RAIDz arrays and transfers from Windows, and will intermittently crash and restart itself if this group option isn’t changed. Inputting the above command will prevent you from ever seeing that window.
The last thing we're going to do before switching over to our Windows PC is grab the IP address of our Linux machine. Enter the following command:
hostname -I
This will spit out this computer's IP address on the local network (it will look something like 192.168.0.x), write it down. It might be a good idea once you're done here to go into your router settings and reserving that IP for your Linux system in the DHCP settings. Check the manual for your specific model router on how to access its settings, typically it can be accessed by opening a browser and typing http:\\192.168.0.1 in the address bar, but your router may be different.
Okay we’re done with our Linux computer for now. Get on over to your Windows PC, open File Explorer, right click on Network and click "Map network drive". Select Z: as the drive letter (you don't want to map the network drive to a letter you could conceivably be using for other purposes) and enter the IP of your Linux machine and location of the share like so: \\"LINUXCOMPUTERLOCALIPADDRESSGOESHERE"\"zpoolnamegoeshere"\. Windows will then ask you for your username and password, enter the ones you set earlier in Samba and you're good. If you've done everything right it should look something like this:

You can now start moving media over from Windows to the share folder. It's a good idea to have a hard line running to all machines. Moving files over Wi-Fi is going to be tortuously slow, the only thing that’s going to make the transfer time tolerable (hours instead of days) is a solid wired connection between both machines and your router.
Step Six: Setting Up Remote Desktop Access to Your Server
After the server is up and going, you’ll want to be able to access it remotely from Windows. Barring serious maintenance/updates, this is how you'll access it most of the time. On your Linux system open the terminal and enter:
sudo apt install xrdp
Then:
sudo systemctl enable xrdp
Once it's finished installing, open “Settings” on the sidebar and turn off "automatic login" in the User category. Then log out of your account. Attempting to remotely connect to your Linux computer while you’re logged in will result in a black screen!
Now get back on your Windows PC, open search and look for "RDP". A program called "Remote Desktop Connection" should pop up, open this program as an administrator by right-clicking and selecting “run as an administrator”. You’ll be greeted with a window. In the field marked “Computer” type in the IP address of your Linux computer. Press connect and you'll be greeted with a new window and prompt asking for your username and password. Enter your Ubuntu username and password here.

If everything went right, you’ll be logged into your Linux computer. If the performance is sluggish, adjust the display options. Lowering the resolution and colour depth do a lot to make the interface feel snappier.

Remote access is how we're going to be using our Linux system from now, barring edge cases like needing to get into the BIOS or upgrading to a new version of Ubuntu. Everything else from performing maintenance like a monthly zpool scrub (this is important!!!) to checking zpool status and updating software can all be done remotely.

This is how my server lives its life now, happily humming and chirping away on the floor next to the couch in a corner of the living room.
Step Seven: Plex Media Server/Jellyfin
Okay we’ve got all the ground work finished and our server is almost up and running. We’ve got Ubuntu up and running, our storage array is primed, we’ve set up remote connections and sharing, and maybe we’ve moved over some of favourite movies and TV shows.
Now we need to decide on the media server software to use which will stream our media to us and organize our library. For most people I’d recommend Plex. It just works 99% of the time. That said, Jellyfin has a lot to recommend it by too, even if it is rougher around the edges. Some people run both simultaneously, it’s not that big of an extra strain. I do recommend doing a little bit of your own research into the features each platform offers, but as a quick run down, consider some of the following points:
Plex is closed source and is funded through PlexPass purchases while Jellyfin is open source and entirely user driven. This means a number of things: for one, Plex requires you to purchase a “PlexPass” (purchased as a one time lifetime fee $159.99 CDN/$120 USD or paid for on a monthly or yearly subscription basis) in order to access to certain features, like hardware transcoding (and we want hardware transcoding) or automated intro/credits detection and skipping. jellyfish features for free. On the other hand, Plex supports a lot more devices than Jellyfin and updates more frequently. That said Jellyfin's Android/iOS apps are completely free, while the Plex Android/iOS apps must be activated for a one time cost of $6 CDN/$5 USD. But that $6 fee gets you a mobile app that is much more functional and features a unified UI across Android and iOS platforms, the Plex mobile apps are simply a more polished experience. The Jellyfin apps are a bit of a mess and the iOS and Android versions are very different from each other.
Jellyfin’s actual media player itself is more fully featured than Plex's, but on the other hand Jellyfin's UI, library customization and automatic media tagging really pale in comparison to Plex. Streaming your music library is free through both Jellyfin and Plex, but Plex offers the PlexAmp app for dedicated music streaming which boasts a number of fantastic features, unfortunately some of those fantastic features require a PlexPass. If your internet is down, Jellyfin can still do local streaming, while Plex can fail to play files. Jellyfin has a slew of neat niche features like support for Comic Book libraries with the .cbz/.cbt file types, but then Plex offers some free ad-supported TV and films, they even have a free channel that plays nothing but Classic Doctor Who.
Ultimately it's up to you, I settled on Plex because although some features are pay-walled, it just works. It's more reliable and easier to use, and a one-time fee is much easier to swallow than a subscription. I do also need to mention that Jellyfin does take a little extra bit of tinkering to get going in Ubuntu, you’ll have to set up process permissions, so if you're more tolerant to tinkering, Jellyfin might be up your alley and I’ll trust that you can follow their installation and configuration guide. For everyone else, I recommend Plex.
So pick your poison: Plex or Jellyfin.
Note: The easiest way to download and install either of these packages in Ubuntu is through Snap Store.
After you've installed one (or both), opening either app will launch a browser window into the browser version of the app allowing you to set all the options server side.
The process of adding creating media libraries is essentially the same in both Plex and Jellyfin. You create a separate libraries for Television, Movies, and Music and add the folders which contain the respective types of media to their respective libraries. The only difficult or time consuming aspect is ensuring that your files and folders follow the appropriate naming conventions:
Plex naming guide for Movies
Plex naming guide for Television
Jellyfin follows the same naming rules but I find their media scanner to be a lot less accurate and forgiving than Plex. Once you've selected the folders to be scanned the service will scan your files, tagging everything and adding metadata. Although I find do find Plex more accurate, it can still erroneously tag some things and you might have to manually clean up some tags in a large library. (When I initially created my library it tagged the 1963-1989 Doctor Who as some Korean soap opera and I needed to manually select the correct match after which everything was tagged normally.) It can also be a bit testy with anime (especially OVAs) be sure to check TVDB to ensure that you have your files and folders structured and named correctly. If something is not showing up at all, double check the name.
Once that's done, organizing and customizing your library is easy. You can set up collections, grouping items together to fit a theme or collect together all the entries in a franchise. You can make playlists, and add custom artwork to entries. It's fun setting up collections with posters to match, there are even several websites dedicated to help you do this like PosterDB. As an example, below are two collections in my library, one collecting all the entries in a franchise, the other follows a theme.

My Star Trek collection, featuring all eleven television series, and thirteen films.

My Best of the Worst collection, featuring sixty-nine films previously showcased on RedLetterMedia’s Best of the Worst. They’re all absolutely terrible and I love them.
As for settings, ensure you've got Remote Access going, it should work automatically and be sure to set your upload speed after running a speed test. In the library settings set the database cache to 2000MB to ensure a snappier and more responsive browsing experience, and then check that playback quality is set to original/maximum. If you’re severely bandwidth limited on your upload and have remote users, you might want to limit the remote stream bitrate to something more reasonable, just as a note of comparison Netflix’s 1080p bitrate is approximately 5Mbps, although almost anyone watching through a chromium based browser is streaming at 720p and 3mbps. Other than that you should be good to go. For actually playing your files, there's a Plex app for just about every platform imaginable. I mostly watch television and films on my laptop using the Windows Plex app, but I also use the Android app which can broadcast to the chromecast connected to the TV. Both are fully functional and easy to navigate, and I can also attest to the OS X version being equally functional.
Part Eight: Finding Media
Now, this is not really a piracy tutorial, there are plenty of those out there. But if you’re unaware, BitTorrent is free and pretty easy to use, just pick a client (qBittorrent is the best) and go find some public trackers to peruse. Just know now that all the best trackers are private and invite only, and that they can be exceptionally difficult to get into. I’m already on a few, and even then, some of the best ones are wholly out of my reach.
If you decide to take the left hand path and turn to Usenet you’ll have to pay. First you’ll need to sign up with a provider like Newshosting or EasyNews for access to Usenet itself, and then to actually find anything you’re going to need to sign up with an indexer like NZBGeek or NZBFinder. There are dozens of indexers, and many people cross post between them, but for more obscure media it’s worth checking multiple. You’ll also need a binary downloader like SABnzbd. That caveat aside, Usenet is faster, bigger, older, less traceable than BitTorrent, and altogether slicker. I honestly prefer it, and I'm kicking myself for taking this long to start using it because I was scared off by the price. I’ve found so many things on Usenet that I had sought in vain elsewhere for years, like a 2010 Italian film about a massacre perpetrated by the SS that played the festival circuit but never received a home media release; some absolute hero uploaded a rip of a festival screener DVD to Usenet, that sort of thing. Anyway, figure out the rest of this shit on your own and remember to use protection, get yourself behind a VPN, use a SOCKS5 proxy with your BitTorrent client, etc.
On the legal side of things, if you’re around my age, you (or your family) probably have a big pile of DVDs and Blu-Rays sitting around unwatched and half forgotten. Why not do a bit of amateur media preservation, rip them and upload them to your server for easier access? (Your tools for this are going to be Handbrake to do the ripping and AnyDVD to break any encryption.) I went to the trouble of ripping all my SCTV DVDs (five box sets worth) because none of it is on streaming nor could it be found on any pirate source I tried. I’m glad I did, forty years on it’s still one of the funniest shows to ever be on TV.
Part Nine/Epilogue: Sonarr/Radarr/Lidarr and Overseerr
There are a lot of ways to automate your server for better functionality or to add features you and other users might find useful. Sonarr, Radarr, and Lidarr are a part of a suite of “Servarr” services (there’s also Readarr for books and Whisparr for adult content) that allow you to automate the collection of new episodes of TV shows (Sonarr), new movie releases (Radarr) and music releases (Lidarr). They hook in to your BitTorrent client or Usenet binary newsgroup downloader and crawl your preferred Torrent trackers and Usenet indexers, alerting you to new releases and automatically grabbing them. You can also use these services to manually search for new media, and even replace/upgrade your existing media with better quality uploads. They’re really a little tricky to set up on a bare metal Ubuntu install (ideally you should be running them in Docker Containers), and I won’t be providing a step by step on installing and running them, I’m simply making you aware of their existence.
The other bit of kit I want to make you aware of is Overseerr which is a program that scans your Plex media library and will serve recommendations based on what you like. It also allows you and your users to request specific media. It can even be integrated with Sonarr/Radarr/Lidarr so that fulfilling those requests is fully automated.
And you're done. It really wasn't all that hard. Enjoy your media. Enjoy the control you have over that media. And be safe in the knowledge that no hedgefund CEO motherfucker who hates the movies but who is somehow in control of a major studio will be able to disappear anything in your library as a tax write-off.
805 notes
·
View notes
Note
Can you do Boothill with a male reader who has the abilities of Absolute Solver from murder drones
Male reader went missing after the ICP destroyed Boothill's homeland. Many years later, Boothill and the other met male reader but male reader already got possessed by the Solver
I want an angst with a happy ending story please
Absolute
Boothill | M. Reader as the Absolute Solver [Murder Drones]

----------
"The flesh demands invitation."
----------
"What are you doing all smiling like that?"
"Huh? Oh nothing."
[Name] narrowed his eyes at Boothill's words, not believing it. He says it was nothing, but his scans say otherwise. The other can't help but laugh at [Name] expression, those neon [Color] eyes that narrowed on his visor. "I was just thinking about what to get my daughter."
"I see, got any ideas yet?"
"I'm thinking..."
Without saying anything else, [Name]'s visor changes to that of a shopping list. "Well there are countless gifts you could get from across the galaxy so—"
"Wait wait wait!"
His visor glitches and goes back to normal. [Name] looked at Boothill for a second seemingly confused. What was that about?
"I want to make it special."
"Oohh.." [Name] blurred out as he finally understands. "If you're going to handmade it. I could help if you like."
"Heh, thanks [Name]."
For as long as he knows [Name], the robot is a kind person who's happy to help those in need. He was a joy. Everyone was. Everyone on his home planet was a joy, like a small neighborhood. Everyone gets along with one another, there's rarely any conflict it's just a nice and welcoming place. Home.
Therefore [Name] didn't deserve this, none of them deserved this. It's outrageous. What did they do? What kind of sin did they commit to have on this planet. Their home. Destroyed in such a way.
As Boothill look at the surrounding fire and destruction of his home, he began to search around the area. Any place he thinks people will be at. Anywhere.
There are at least survivors right? Surely there are some people who survived this.. who saw the attack an immediately run towards a safe place.. surely..
Right..?
But nothing..
Boothill find nothing but ashes and ruins of once someone's home.
Everything..
..is destroyed.
Why.. why does this have to happen? He was happy. They were happy! What did they do to deserve this?
SCREW THE IPC!!
----------
"Upgrading models? cutting maintenance costs? There are many reasons the client may wish to disassemble a drone individual or a series after a period of use. Following these two simple steps is key to avoid—"
"Incompletely disassemble drones may occasionally reboot from software death alone. More than undead federal fine hazards. Its corrupted AI carries an increased risk of future errors."
.
.
.
He stood there completely motionless. How is he supposed to react to that? After so many years...
Staying at the Express may be the best call for him. It's a free ride after all. Not to mention everyone is quite nice. Dan Heng was even willing to show him the Data Bank but...
This is one of them..? One of the information they've obtained during their travels? Don't get him wrong, it's useful, incredibly useful. But... if Boothill were to obtain such knowledge long ago..
He would have properly disassembled him.
To prevent such a fate from happening to someone he holds in high regards. If he were to do that... none of this would have happened!!
He—it screeches as it tries to get out of its restraints. That's not him. That's not [Name]!!
This was just another planet. One where the Nameless has set their sights on. They thought it was just another Stellaron Crisis. But... this is not the work of a Stellaron.. but the work of a drone that's not been properly disassembled.
It continues to screech as the researchers expose the drone to the artificial sunlight. It screeches in pain and agony as the researchers run around, trying to put a stop to this... thing..
He can't watch this.. he can't watch this any longer.
Without saying another word Boothill leave the Cathedral to get some fresh air. He can't. He just can't watch that.. whatever they were doing to someone he cared for.
----------
"MacGuffin." The robotic voice echoes throughout an empty.. bloody.. ruined.. Cathedral.
Is this the type of thing the Nameless has to handle? Not the Absolute Solver no no... Fighting for your muddle fudgling life! Dodging an attack Boothill ready his revolver and shoot the claw-like thing.
It laughs at their attempts. It's six against one and yet they're losing how pathetic! "Thank you for the new host." It stated casually before narrowing avoiding an attach by Himeko's laser with a smirk on it's face the Solver summons it's claws once more and began it's onslaught of attacks. In a blink of an eye, all of them experience multiple near death situations left, right, and center. Fighting someone who can regenerate is cheating! They could be here for all of eternity!
Where's the cure!?
Its perpetual grin seems to widen every time any of them try to harm it which of course never worked as the Solver's regeneration rate is incredibly high. It laughs, summoning a miniature blackhole that was quickly disabled by Welt as he attack the Solver. "Have any of you find it get?"
"No, we're still looking!" March replied, firing an arrow at one of it's claws while looking around for the crucifix that holds the data. The cure for the Solver. "Well I'm sorry, but fighting while searching is not easy!" Caelus cuts in, looking around the place as he ducks under the benches to avoid a stray attack. "Just focus on searching, we'll try to cover you!" Dan Heng stated firmly, using his powers as a Vidyadhara to at least land a critical attack on the Solver.
With each attack the Solver just keep regenerating! But each time they themselves is inching closer to their own demise! Boothill took cover as he reload his bullets while looking at his surroundings for any potential threats. But something else caught his eye..
It's the crucifix!
Quickly taking it from the bloody floor, Boothill examine it for a moment, making sure it's the real deal. After a quick and swift examination, the usb connector pops out at the bottom of it. It's real alright. The cure for the Solver and the key to ending this nightmare.
"Cover for me!" He signaled before making a run for it. The Nameless did their best to keep the Solver at bay until Boothill does the finishing blow and slammed the crucifix usb model straight into the drone's visor and just like clockwork it let out a glitched robotic groan as it tries to take out the crucifix and in its efforts the cure done it's job. Motionlessly throws crucifix away the drone immediately slump to the floor.
Looking amongst themselves, the Nameless stood their ground not knowing whether the fight is over or is the Solver playing tricks on them. With caution Boothill slowly approached his old friend. Surely he's still there right? The Solver is dead. The patch worked! It has to work! Or else it....
Kneeling in front of him Boothill extended his hand. Waiting for a respond from the other. Anything! Much to their surprise the drone took the other's hand, slowly looking up, revealing it's---no, his neon [Color] eyes on his visor while the crack where they inserted the patch is slowly being healed. Yes! It worked! Letting out a dry, pained laugh Boothill gave [Name] a tight embrace. He's back. His old friend's back.
#seme male reader#top male reader#x male reader#x reader#honkai star rail#honkai star rail x reader#honkai star rail x male reader#hsr#hsr x reader#hsr x male reader#hsr boothill#boothill#boothill x reader#boothill x male reader#murder drones#absolute solver#murder drones absolute solver
344 notes
·
View notes
Text
Boomerang (part 3)
Vox x Female!Ex!Overlord!Reader
Summary: Your infuriating ex is planning something, and it's putting everyone on edge. But if he wants at the hotel, he'll have to go through you (and Alastor) first.
<— Part 2 Chapter Index Part 4 —>
—6 HOURS AGO—
"What," Valentino growled, claws creating cracks in the table from how hard he was gripping it. "The fuck did you just say?"
Velvette was no better. Her lip was pulled into a furious snarl, and for once her phone was nowhere to be seen. "Vox, are you out of your fucking mind?"
"Relax," Vox reclined in his chair, raising a brow at his murderous business partners. Velvette's eye twitched and the table creaked in protest under Valentino's fury. "I'm not actually going for redemption, damn, calm your tits people."
"What happened to keeping up an image for the brand?" Velvette banged a fist against her armrest, gritting her teeth. "The Morningstar bitch was literally humiliated on live television, and now you're going to personally advertise for her?!"
"The next extermination is coming sooner than ever, and people are getting desperate. This little publicity stunt can work in our favor," Vox crossed his claws under his chin, megawatt smile growing. "What's a little pity pitch going to hurt? Think about it, I can gather intel, fuck up Alastor's little project, and show Y/n where her allegiances should lie. Win-win-win," he chuckled ominously.
"Cut the shit, Vox," Valentino scoffed, leaning forward to sneer in his face. "It's obvious you're only going this far for that bitch. Can't keep a leash on your toys, hm?"
Vox grit his teeth, digging his claws into his thighs under the table. He knew this wasn't going to go over well, but to be talked down to by someone who was benefiting from him? "So what if I am?" He hid his rage with a large, mocking grin. "And by the way, where's Angel Dust? Haven't seen him around in a while."
Val's face twisted with rage. "You fucking—"
"Enough!" Velvette snapped, glaring at both of them. "I don't have time for this stupid shit. Get on with it or this meeting is over."
Vox's unhinged smile slowly relaxed into his charming PR one. "Of course, my apologies Velvette, Val. I can see why you're not...convinced yet. Let me fix that."
The projector on the wall suddenly sparked to life, displaying three pie charts and a legend with many colorful categories. He gestured to them from left to right. "This is a distribution of our profits from ten years ago, five years ago, and last year."
"We have eyes," Velvette droned boredly.
Vox's antennae sparked in irritation, but he continued regardless. "Y/n's helped develop countless programs and softwares, and with her expertise our earnings jumped thirty seven percent, especially during the collaboration between Voxtek and DeepSpace VR. Now, what happens now that she's taken her business elsewhere? Hell knows she has the computing power to run it without our servers—"
"So, we're supposed to just bend over backwards for a few bucks?" Valentino snarled, crossing his arms.
Vox's screen glitched as he struggled to keep his composure. Thirty seven percent was not just a few bucks. But he knew antagonizing Val right now was more trouble than it was worth. "Val," he chuckled, sauntering forward to rest a hand on the backrest of Valentino's chair, leaning into his space. "Since when have you said no to money?" His eye widened, rings spinning.
"Since it walked out on two legs and ignored us," Valentino snorted.
"Val, I need you to see the bigger picture!" He grasped both of Valentino's shoulders, moving behind him so he could speak enticingly into his ear. "This is an opportunity to keep our brand at the top, and get dirt on that radio bitch. The future is what matters, and we are going to be the ones pioneering it."
The projector flickered to one of the surveillance cameras pointed at an exterior angle of the hotel. Then, the image suddenly rippled to show an artificial video of the same property, but instead of the tacky hotel, there stood a modern building adorned with a bright, neon V logo.
Valentino's smile grew at his last sentence, and he turned in his seat, leaning his forehead to rest against Vox's screen. "I like your vision, Cariño," he purred, grinning wickedly to show off his golden tooth. "But, if your little money-making cocksleeve doesn't come back, well, don't say I didn't tell you so~" he said in a sing-song voice, long tongue coming up to lick languidly along the side of Vox's monitor.
Vox's grin froze on his face, screen glitching.
Valentino chuckled, pushing out of his seat before strutting away. "Oh, and Vox baby," he threw a saucy wink over his shoulder. "Come find me when you get lonely, yeah?"
The double doors slammed shut behind him, bathing the room in silence. Which Velvette quickly broke, of course.
"What the fuck, Vox?" She scrubbed a hand down her face. "All this for a profit we can afford to lose? Really?"
"Velvette," his smile twitched up to full, blinding attention again. "Have I ever let you down before? Everything is under control, trust me!"
"Uh huh," Velvette scowled, unconvinced. "You know, Alastor and Y/n are the only people you've ever really lost it for, and you're going to a place where there's both of them."
"What, you don't think I can handle myself?" His smile strained.
Velvette shook her head, standing up from her chair and approaching him. "You know, that PR shit might work on everyone else, but I can see through your bullshit, Vox," she gave him a hard stare. "Just don't fuck everything up, got it? Or I'll make you wish you didn't."
His fists clenched as she walked past him, smile dropping into a scowl as soon as she was out of view.
****
—PRESENT—
"Whatever you do, make sure he's at least ten floors away from me," you muttered to Vaggie, watching as Charlie gave the bane of your existence an awkward tour of the hotel.
The atmosphere was so tense and suffocating, it was starting to make you incredibly antsy. The others were no better. Angel was drumming his fingers anxiously on the bar counter, Niffty was curiously regarding the new "resident" and Husk was already chugging his second bottle of hard liquor. Holy hell, and you couldn't even forget about Alastor if you tried, the radio demon releasing a constant stream of static and looking about ready to sacrifice someone—preferably Vox—in an incredibly painful and sadistic ritual.
"I can't believe she's letting him stay," Angel hissed under his breath, rubbing his temples in exasperation. "Actually no, what am I saying? This is Charlie, of course she'd let him stay. God damnit."
A tap on your shoulder made you turn around, only to find your favorite stiff drink on the counter behind you. You nodded gratefully at Husk, taking the glass and throwing it back like water.
"At least the hotel's in one piece!" Niffty chirped, her one eye back to tracking any stray insects. "Less mess to clean up." Her knife gleamed as she stabbed a cockroach clean in half with a deranged giggle.
"This isn't going to end well," Vaggie scowled darkly. "He's going to try something, I fucking know it."
"Yeah, no shit," Angel groaned, Husk grunting in agreement.
"Or," Pentious chimed in, hair flaring thoughtfully. "He truly does want to redeem himself?"
There was a silence as everyone turned to look at him incredulously, before a unanimous, resounding "no," rang out.
****
"Anddd here's your room key," Charlie presented it to him with a flourish, beaming brightly. "We hope you enjoy your stay! Breakfast, lunch and dinner are served downstairs in the dinning room, or you can go out and get your own food! We'll get your survey ready for you tomorrow so that you can start building your schedule."
"Schedule?" He quirked a brow, taking the room key from her outstretched hand. "For what, exactly?"
"Oh! Um," Charlie laughed, rubbing the back of her neck. "We actually host group therapy activities and trust exercises with the other staff and residents! You'll fill out a short survey so that we can personalize—"
"O-kay, let me stop you there, sweetheart," he chuckled, grin widening condescendingly. "I think it's great what you're doing, really, I do. But I've already got a schedule, and a billion dollar company to run. I'm quite the busy man, you know?"
Charlie furrowed her brow. "But—"
"Seriously, my sales would fall and what would my clients say? Hm?" A crowd booing track played in the background as Vox shook his head like she was just some uneducated child. "So thanks, but no thanks." He shot her a wink, before the door slammed in her face.
Charlie blinked in shock, taking a few seconds to process that she'd been dismissed in her own hotel. Her shoulders slumped as she trudged away.
But that only lasted for a few steps, before she perked right back up. What was she thinking? Giving up so quickly on one of her clients?
Charlie grinned, smacking a fist into her palm. She'd just have to try harder.
Unbeknownst to her, a figure had been watching the entire exchange from the shadows. Your jaw clenched, claws digging into the drywall.
"Unbelievable," you shook your head in disdain.
****
As soon as the door shut, Vox deflated like a balloon.
"Fuckkk," he hissed under his breath, sliding down the door tiredly. "The hell am I doing?"
He allowed himself only a few minutes to wallow in self-pity, before he sighed, pushing off the floor and getting to work. In less than twenty minutes, he had the whole room wired to his needs, electronic Voxtek devices littering the previously empty spaces. Now he had a way to travel without leaving his room.
He was just about to dematerialize into one of his laptops when a familiar, chilling presence made him freeze.
"Why, you only just got here! Don't tell me you're leaving already," Alastor chuckled, tilting his head in mock concern.
The radio demon was leaning an elbow against his dresser, just casually invading his privacy. God, just his smug face made Vox want to kill him already.
"What's it to you, old timer?" Vox sneered, electricity sparking from his claws in agitation. "Unlike you, some of us actually have responsibilities. So if you don't mind—"
"Oh my, breaking your word to Y/n already!" Alastor shook his head with a grin, sound effects of a heckling crowd emanating from his microphone cane. "How very...disappointing. Truly, I'd expect better from you!"
Vox's eye widened, the swirling rings on full display as his teeth grinded in rage. "Y-y-y-you keep her fucking name out of your filthy, cannibalistic mouth! You hear me?" He glitched furiously, electricity sparking in glowing webs from his monitor.
"Aha! Someone's a little on edge," Alastor laughed in tandem with an artificial, mocking laugh track. "Really, that was too easy! You're losing your touch."
"Get the fuck out of my room!" Vox snapped.
"Gladly," the radio demon grinned menacingly, the corners of his mouth stretching to unnatural proportions. "But first, I came to deliver a little message."
Vox gritted his teeth, curling his fists by his sides. His electricity buzzed under his skin, ready to electrocute the fuck out of this crazy fucker if he needed to.
"If you and your merry band of idiots pull even the smallest stunt to sabotage the hotel," Alastor approached him, antlers growing as his eyes turned to radio dials. "I think you'll find out that absence did not make my heart grow fonder."
"What, don't tell me you actually care about this place," Vox grinned, baring his teeth. "The whole redemption thing doesn't really seem to be up your alley, no offense."
"Oh, of course not! Haha! Don't be ridiculous," Alastor chuckled like he'd said something hilarious, but it was overlayed with bursts of radio static. "But I'm afraid I've invested too much in this source of entertainment for you to ruin it with your cheap, unoriginal touch."
The message was clear: don't touch my things.
Vox curled his lip, unwilling to back down no matter how utterly disturbing Alastor's demon form was up close. It gave him chilling flashbacks of their last explosive disagreement. "Then stay away from Y/n," he spat.
Alastor's grin widened, eyes glowing an eerie green as he held out his hand. "Is that a deal?"
Vox grimaced, looking at Alastor's creepy, voodoo doll appearance. "Hell no, you creepy fucker."
Then, like whiplash, Alastor's demon form receded and the air became breathable again. "Well, glad we cleared that up, then!" He laughed exuberantly, twirling his cane. "Nice catching up, chum!"
The demon grinned as he disappeared into shadowy wisps of smoke, melding with the darkness against the walls.
Vox's jaw clenched, electric anger vibrating through him and rattling his teeth. "Fuck!" He kicked over the first thing he saw, which happened to be a wooden workbench. It took a few deep breaths for him to finally calm down and collect his thoughts.
When he was no longer at risk of causing a city-wide outage again (that had been fucking embarrassing), he made his way back to his laptop like he was originally planning to do, only to pause in shock when he saw the brand new device short circuiting, screen full of pixelated static.
An explosive rage convulsed in his chest, the lights in the hotel flickering ominously.
"You red bambi ass fucker!"
****
<—Part 2 Chapter Index Part 4 —>
Taglist: @pooplyface1423 @spookysisters @that-one-weeb-buts-its-the-main @neito327 @hxzbinwrites @coleisyn @bababahannah @yellowsubiesdance @dirk-strides @justaspectatorforfandomarts @harmoira @sunnyslug @gum-iie @lady-valtieri @mit-suri @whatelsecouldgowrong @sillysimplysilky @eternalera @aoiyx @hazellight11 @hopefully-not @tsuvvy @imcryinginemo @dinorawrss @rekoloid @ayesha-eroticax3 @sle3pyh3ad2 @l0verboyxoxo1111
#hazbin hotel#hazbin hotel vox#vox#vox hazbin hotel#hazbin vox#vox hazbin#vox x ofc#vox x you#vox x oc#vox x reader#vox x y/n#vaggie hazbin hotel#vaggie#charlie hazbin hotel#alastor#hazbin alastor#alastor hazbin hotel#alastor the radio demon#angel dust hazbin hotel#husk hazbin hotel#niffty hazbin hotel#sir pentious#hazbin hotel husk#hazbin husk#hazbin vaggie#hazbin hotel alastor#sir pentious hazbin hotel#angel dust#niffty#charlie morningstar
898 notes
·
View notes
Text


Neural Filters Tutorial for Gifmakers by @antoniosvivaldi
Hi everyone! In light of my blog’s 10th birthday, I’m delighted to reveal my highly anticipated gifmaking tutorial using Neural Filters - a very powerful collection of filters that really broadened my scope in gifmaking over the past 12 months.
Before I get into this tutorial, I want to thank @laurabenanti, @maines , @cobbbvanth, and @cal-kestis for their unconditional support over the course of my journey of investigating the Neural Filters & their valuable inputs on the rendering performance!
In this tutorial, I will outline what the Photoshop Neural Filters do and how I use them in my workflow - multiple examples will be provided for better clarity. Finally, I will talk about some known performance issues with the filters & some feasible workarounds.
Tutorial Structure:
Meet the Neural Filters: What they are and what they do
Why I use Neural Filters? How I use Neural Filters in my giffing workflow
Getting started: The giffing workflow in a nutshell and installing the Neural Filters
Applying Neural Filters onto your gif: Making use of the Neural Filters settings; with multiple examples
Testing your system: recommended if you’re using Neural Filters for the first time
Rendering performance: Common Neural Filters performance issues & workarounds
For quick reference, here are the examples that I will show in this tutorial:
Example 1: Image Enhancement | improving the image quality of gifs prepared from highly compressed video files
Example 2: Facial Enhancement | enhancing an individual's facial features
Example 3: Colour Manipulation | colourising B&W gifs for a colourful gifset
Example 4: Artistic effects | transforming landscapes & adding artistic effects onto your gifs
Example 5: Putting it all together | my usual giffing workflow using Neural Filters
What you need & need to know:
Software: Photoshop 2021 or later (recommended: 2023 or later)*
Hardware: 8GB of RAM; having a supported GPU is highly recommended*
Difficulty: Advanced (requires a lot of patience); knowledge in gifmaking and using video timeline assumed
Key concepts: Smart Layer / Smart Filters
Benchmarking your system: Neural Filters test files**
Supplementary materials: Tutorial Resources / Detailed findings on rendering gifs with Neural Filters + known issues***
*I primarily gif on an M2 Max MacBook Pro that's running Photoshop 2024, but I also have experiences gifmaking on few other Mac models from 2012 ~ 2023.
**Using Neural Filters can be resource intensive, so it’s helpful to run the test files yourself. I’ll outline some known performance issues with Neural Filters and workarounds later in the tutorial.
***This supplementary page contains additional Neural Filters benchmark tests and instructions, as well as more information on the rendering performance (for Apple Silicon-based devices) when subject to heavy Neural Filters gifmaking workflows
Tutorial under the cut. Like / Reblog this post if you find this tutorial helpful. Linking this post as an inspo link will also be greatly appreciated!
1. Meet the Neural Filters!
Neural Filters are powered by Adobe's machine learning engine known as Adobe Sensei. It is a non-destructive method to help streamline workflows that would've been difficult and/or tedious to do manually.
Here are the Neural Filters available in Photoshop 2024:


Skin Smoothing: Removes blemishes on the skin
Smart Portrait: This a cloud-based filter that allows you to change the mood, facial age, hair, etc using the sliders+
Makeup Transfer: Applies the makeup (from a reference image) to the eyes & mouth area of your image
Landscape Mixer: Transforms the landscape of your image (e.g. seasons & time of the day, etc), based on the landscape features of a reference image
Style Transfer: Applies artistic styles e.g. texturings (from a reference image) onto your image
Harmonisation: Applies the colour balance of your image based on the lighting of the background image+
Colour Transfer: Applies the colour scheme (of a reference image) onto your image
Colourise: Adds colours onto a B&W image
Super Zoom: Zoom / crop an image without losing resolution+
Depth Blur: Blurs the background of the image
JPEG Artefacts Removal: Removes artefacts caused by JPEG compression
Photo Restoration: Enhances image quality & facial details
+These three filters aren't used in my giffing workflow. The cloud-based nature of Smart Portrait leads to disjointed looking frames. For Harmonisation, applying this on a gif causes Neural Filter timeout error. Finally, Super Zoom does not currently support output as a Smart Filter
If you're running Photoshop 2021 or earlier version of Photoshop 2022, you will see a smaller selection of Neural Filters:


Things to be aware of:
You can apply up to six Neural Filters at the same time
Filters where you can use your own reference images: Makeup Transfer (portraits only), Landscape Mixer, Style Transfer (not available in Photoshop 2021), and Colour Transfer
Later iterations of Photoshop 2023 & newer: The first three default presets for Landscape Mixer and Colour Transfer are currently broken.
2. Why I use Neural Filters?
Here are my four main Neural Filters use cases in my gifmaking process. In each use case I'll list out the filters that I use:

Enhancing Image Quality:
Common wisdom is to find the highest quality video to gif from for a media release & avoid YouTube whenever possible. However for smaller / niche media (e.g. new & upcoming musical artists), prepping gifs from highly compressed YouTube videos is inevitable.
So how do I get around with this? I have found Neural Filters pretty handy when it comes to both correcting issues from video compression & enhancing details in gifs prepared from these highly compressed video files.
Filters used: JPEG Artefacts Removal / Photo Restoration
Facial Enhancement:
When I prepare gifs from highly compressed videos, something I like to do is to enhance the facial features. This is again useful when I make gifsets from compressed videos & want to fill up my final panel with a close-up shot.
Filters used: Skin Smoothing / Makeup Transfer / Photo Restoration (Facial Enhancement slider)
Colour Manipulation:
Neural Filters is a powerful way to do advanced colour manipulation - whether I want to quickly transform the colour scheme of a gif or transform a B&W clip into something colourful.
Filters used: Colourise / Colour Transfer
Artistic Effects:
This is one of my favourite things to do with Neural Filters! I enjoy using the filters to create artistic effects by feeding textures that I've downloaded as reference images. I also enjoy using these filters to transform the overall the atmosphere of my composite gifs. The gifsets where I've leveraged Neural Filters for artistic effects could be found under this tag on usergif.
Filters used: Landscape Mixer / Style Transfer / Depth Blur
How I use Neural Filters over different stages of my gifmaking workflow:
I want to outline how I use different Neural Filters throughout my gifmaking process. This can be roughly divided into two stages:
Stage I: Enhancement and/or Colourising | Takes place early in my gifmaking process. I process a large amount of component gifs by applying Neural Filters for enhancement purposes and adding some base colourings.++
Stage II: Artistic Effects & more Colour Manipulation | Takes place when I'm assembling my component gifs in the big PSD / PSB composition file that will be my final gif panel.
I will walk through this in more detail later in the tutorial.
++I personally like to keep the size of the component gifs in their original resolution (a mixture of 1080p & 4K), to get best possible results from the Neural Filters and have more flexibility later on in my workflow. I resize & sharpen these gifs after they're placed into my final PSD composition files in Tumblr dimensions.
3. Getting started
The essence is to output Neural Filters as a Smart Filter on the smart object when working with the Video Timeline interface. Your workflow will contain the following steps:
Prepare your gif
In the frame animation interface, set the frame delay to 0.03s and convert your gif to the Video Timeline
In the Video Timeline interface, go to Filter > Neural Filters and output to a Smart Filter
Flatten or render your gif (either approach is fine). To flatten your gif, play the "flatten" action from the gif prep action pack. To render your gif as a .mov file, go to File > Export > Render Video & use the following settings.

Setting up:
o.) To get started, prepare your gifs the usual way - whether you screencap or clip videos. You should see your prepared gif in the frame animation interface as follows:

Note: As mentioned earlier, I keep the gifs in their original resolution right now because working with a larger dimension document allows more flexibility later on in my workflow. I have also found that I get higher quality results working with more pixels. I eventually do my final sharpening & resizing when I fit all of my component gifs to a main PSD composition file (that's of Tumblr dimension).
i.) To use Smart Filters, convert your gif to a Smart Video Layer.
As an aside, I like to work with everything in 0.03s until I finish everything (then correct the frame delay to 0.05s when I upload my panels onto Tumblr).
For convenience, I use my own action pack to first set the frame delay to 0.03s (highlighted in yellow) and then convert to timeline (highlighted in red) to access the Video Timeline interface. To play an action, press the play button highlighted in green.

Once you've converted this gif to a Smart Video Layer, you'll see the Video Timeline interface as follows:

ii.) Select your gif (now as a Smart Layer) and go to Filter > Neural Filters

Installing Neural Filters:
Install the individual Neural Filters that you want to use. If the filter isn't installed, it will show a cloud symbol (highlighted in yellow). If the filter is already installed, it will show a toggle button (highlighted in green)

When you toggle this button, the Neural Filters preview window will look like this (where the toggle button next to the filter that you use turns blue)

4. Using Neural Filters
Once you have installed the Neural Filters that you want to use in your gif, you can toggle on a filter and play around with the sliders until you're satisfied. Here I'll walkthrough multiple concrete examples of how I use Neural Filters in my giffing process.
Example 1: Image enhancement | sample gifset
This is my typical Stage I Neural Filters gifmaking workflow. When giffing older or more niche media releases, my main concern is the video compression that leads to a lot of artefacts in the screencapped / video clipped gifs.
To fix the artefacts from compression, I go to Filter > Neural Filters, and toggle JPEG Artefacts Removal filter. Then I choose the strength of the filter (boxed in green), output this as a Smart Filter (boxed in yellow), and press OK (boxed in red).
Note: The filter has to be fully processed before you could press the OK button!

After applying the Neural Filters, you'll see "Neural Filters" under the Smart Filters property of the smart layer

Flatten / render your gif
Example 2: Facial enhancement | sample gifset
This is my routine use case during my Stage I Neural Filters gifmaking workflow. For musical artists (e.g. Maisie Peters), YouTube is often the only place where I'm able to find some videos to prepare gifs from. However even the highest resolution video available on YouTube is highly compressed.
Go to Filter > Neural Filters and toggle on Photo Restoration. If Photoshop recognises faces in the image, there will be a "Facial Enhancement" slider under the filter settings.

Play around with the Photo Enhancement & Facial Enhancement sliders. You can also expand the "Adjustment" menu make additional adjustments e.g. remove noises and reducing different types of artefacts.

Once you're happy with the results, press OK and then flatten / render your gif.
Example 3: Colour Manipulation | sample gifset
Want to make a colourful gifset but the source video is in B&W? This is where Colourise from Neural Filters comes in handy! This same colourising approach is also very helpful for colouring poor-lit scenes as detailed in this tutorial.
Here's a B&W gif that we want to colourise:

Highly recommended: add some adjustment layers onto the B&W gif to improve the contrast & depth. This will give you higher quality results when you colourise your gif.
Go to Filter > Neural Filters and toggle on Colourise.

Make sure "Auto colour image" is enabled.
Play around with further adjustments e.g. colour balance, until you're satisfied then press OK.
Important: When you colourise a gif, you need to double check that the resulting skin tone is accurate to real life. I personally go to Google Images and search up photoshoots of the individual / character that I'm giffing for quick reference.
Add additional adjustment layers until you're happy with the colouring of the skin tone.

Once you're happy with the additional adjustments, flatten / render your gif. And voila!

Note: For Colour Manipulation, I use Colourise in my Stage I workflow and Colour Transfer in my Stage II workflow to do other types of colour manipulations (e.g. transforming the colour scheme of the component gifs)
Example 4: Artistic Effects | sample gifset
This is where I use Neural Filters for the bulk of my Stage II workflow: the most enjoyable stage in my editing process!
Normally I would be working with my big composition files with multiple component gifs inside it. To begin the fun, drag a component gif (in PSD file) to the main PSD composition file.
Resize this gif in the composition file until you're happy with the placement

Duplicate this gif. Sharpen the bottom layer (highlighted in yellow), and then select the top layer (highlighted in green) & go to Filter > Neural Filters

I like to use Style Transfer and Landscape Mixer to create artistic effects from Neural Filters. In this particular example, I've chosen Landscape Mixer
Select a preset or feed a custom image to the filter (here I chose a texture that I've on my computer)

Play around with the different sliders e.g. time of the day / seasons
Important: uncheck "Harmonise Subject" & "Preserve Subject" - these two settings are known to cause performance issues when you render a multiframe smart object (e.g. for a gif)

Once you're happy with the artistic effect, press OK
To ensure you preserve the actual subject you want to gif (bc Preserve Subject is unchecked), add a layer mask onto the top layer (with Neural Filters) and mask out the facial region. You might need to play around with the Layer Mask Position keyframes or Rotoscope your subject in the process.
After you're happy with the masking, flatten / render this composition file and voila!

Example 5: Putting it all together | sample gifset
Let's recap on the Neural Filters gifmaking workflow and where Stage I and Stage II fit in my gifmaking process:
i. Preparing & enhancing the component gifs
Prepare all component gifs and convert them to smart layers
Stage I: Add base colourings & apply Photo Restoration / JPEG Artefacts Removal to enhance the gif's image quality
Flatten all of these component gifs and convert them back to Smart Video Layers (this process can take a lot of time)
Some of these enhanced gifs will be Rotoscoped so this is done before adding the gifs to the big PSD composition file
ii. Setting up the big PSD composition file
Make a separate PSD composition file (Ctrl / Cmmd + N) that's of Tumblr dimension (e.g. 540px in width)
Drag all of the component gifs used into this PSD composition file
Enable Video Timeline and trim the work area
In the composition file, resize / move the component gifs until you're happy with the placement & sharpen these gifs if you haven't already done so
Duplicate the layers that you want to use Neural Filters on
iii. Working with Neural Filters in the PSD composition file
Stage II: Neural Filters to create artistic effects / more colour manipulations!
Mask the smart layers with Neural Filters to both preserve the subject and avoid colouring issues from the filters
Flatten / render the PSD composition file: the more component gifs in your composition file, the longer the exporting will take. (I prefer to render the composition file into a .mov clip to prevent overriding a file that I've spent effort putting together.)
Note: In some of my layout gifsets (where I've heavily used Neural Filters in Stage II), the rendering time for the panel took more than 20 minutes. This is one of the rare instances where I was maxing out my computer's memory.
Useful things to take note of:
Important: If you're using Neural Filters for Colour Manipulation or Artistic Effects, you need to take a lot of care ensuring that the skin tone of nonwhite characters / individuals is accurately coloured
Use the Facial Enhancement slider from Photo Restoration in moderation, if you max out the slider value you risk oversharpening your gif later on in your gifmaking workflow
You will get higher quality results from Neural Filters by working with larger image dimensions: This gives Neural Filters more pixels to work with. You also get better quality results by feeding higher resolution reference images to the Neural Filters.
Makeup Transfer is more stable when the person / character has minimal motion in your gif
You might get unexpected results from Landscape Mixer if you feed a reference image that don't feature a distinctive landscape. This is not always a bad thing: for instance, I have used this texture as a reference image for Landscape Mixer, to create the shimmery effects as seen in this gifset
5. Testing your system
If this is the first time you're applying Neural Filters directly onto a gif, it will be helpful to test out your system yourself. This will help:
Gauge the expected rendering time that you'll need to wait for your gif to export, given specific Neural Filters that you've used
Identify potential performance issues when you render the gif: this is important and will determine whether you will need to fully playback your gif before flattening / rendering the file.
Understand how your system's resources are being utilised: Inputs from Windows PC users & Mac users alike are welcome!
About the Neural Filters test files:
Contains six distinct files, each using different Neural Filters
Two sizes of test files: one copy in full HD (1080p) and another copy downsized to 540px
One folder containing the flattened / rendered test files
How to use the Neural Filters test files:
What you need:
Photoshop 2022 or newer (recommended: 2023 or later)
Install the following Neural Filters: Landscape Mixer / Style Transfer / Colour Transfer / Colourise / Photo Restoration / Depth Blur
Recommended for some Apple Silicon-based MacBook Pro models: Enable High Power Mode
How to use the test files:
For optimal performance, close all background apps
Open a test file
Flatten the test file into frames (load this action pack & play the “flatten” action)
Take note of the time it takes until you’re directed to the frame animation interface
Compare the rendered frames to the expected results in this folder: check that all of the frames look the same. If they don't, you will need to fully playback the test file in full before flattening the file.†
Re-run the test file without the Neural Filters and take note of how long it takes before you're directed to the frame animation interface
Recommended: Take note of how your system is utilised during the rendering process (more info here for MacOS users)
†This is a performance issue known as flickering that I will discuss in the next section. If you come across this, you'll have to playback a gif where you've used Neural Filters (on the video timeline) in full, prior to flattening / rendering it.
Factors that could affect the rendering performance / time (more info):
The number of frames, dimension, and colour bit depth of your gif
If you use Neural Filters with facial recognition features, the rendering time will be affected by the number of characters / individuals in your gif
Most resource intensive filters (powered by largest machine learning models): Landscape Mixer / Photo Restoration (with Facial Enhancement) / and JPEG Artefacts Removal
Least resource intensive filters (smallest machine learning models): Colour Transfer / Colourise
The number of Neural Filters that you apply at once / The number of component gifs with Neural Filters in your PSD file
Your system: system memory, the GPU, and the architecture of the system's CPU+++
+++ Rendering a gif with Neural Filters demands a lot of system memory & GPU horsepower. Rendering will be faster & more reliable on newer computers, as these systems have CPU & GPU with more modern instruction sets that are geared towards machine learning-based tasks.
Additionally, the unified memory architecture of Apple Silicon M-series chips are found to be quite efficient at processing Neural Filters.
6. Performance issues & workarounds
Common Performance issues:
I will discuss several common issues related to rendering or exporting a multi-frame smart object (e.g. your composite gif) that uses Neural Filters below. This is commonly caused by insufficient system memory and/or the GPU.
Flickering frames: in the flattened / rendered file, Neural Filters aren't applied to some of the frames+-+
Scrambled frames: the frames in the flattened / rendered file isn't in order
Neural Filters exceeded the timeout limit error: this is normally a software related issue
Long export / rendering time: long rendering time is expected in heavy workflows
Laggy Photoshop / system interface: having to wait quite a long time to preview the next frame on the timeline
Issues with Landscape Mixer: Using the filter gives ill-defined defined results (Common in older systems)--
Workarounds:
Workarounds that could reduce unreliable rendering performance & long rendering time:
Close other apps running in the background
Work with smaller colour bit depth (i.e. 8-bit rather than 16-bit)
Downsize your gif before converting to the video timeline-+-
Try to keep the number of frames as low as possible
Avoid stacking multiple Neural Filters at once. Try applying & rendering the filters that you want one by one
Specific workarounds for specific issues:
How to resolve flickering frames: If you come across flickering, you will need to playback your gif on the video timeline in full to find the frames where the filter isn't applied. You will need to select all of the frames to allow Photoshop to reprocess these, before you render your gif.+-+
What to do if you come across Neural Filters timeout error? This is caused by several incompatible Neural Filters e.g. Harmonisation (both the filter itself and as a setting in Landscape Mixer), Scratch Reduction in Photo Restoration, and trying to stack multiple Neural Filters with facial recognition features.
If the timeout error is caused by stacking multiple filters, a feasible workaround is to apply the Neural Filters that you want to use one by one over multiple rendering sessions, rather all of them in one go.
+-+This is a very common issue for Apple Silicon-based Macs. Flickering happens when a gif with Neural Filters is rendered without being previously played back in the timeline.
This issue is likely related to the memory bandwidth & the GPU cores of the chips, because not all Apple Silicon-based Macs exhibit this behaviour (i.e. devices equipped with Max / Ultra M-series chips are mostly unaffected).
-- As mentioned in the supplementary page, Landscape Mixer requires a lot of GPU horsepower to be fully rendered. For older systems (pre-2017 builds), there are no workarounds other than to avoid using this filter.
-+- For smaller dimensions, the size of the machine learning models powering the filters play an outsized role in the rendering time (i.e. marginal reduction in rendering time when downsizing 1080p file to Tumblr dimensions). If you use filters powered by larger models e.g. Landscape Mixer and Photo Restoration, you will need to be very patient when exporting your gif.
7. More useful resources on using Neural Filters
Creating animations with Neural Filters effects | Max Novak
Using Neural Filters to colour correct by @edteachs
I hope this is helpful! If you have any questions or need any help related to the tutorial, feel free to send me an ask 💖
#photoshop tutorial#gif tutorial#dearindies#usernik#useryoshi#usershreyu#userisaiah#userroza#userrobin#userraffa#usercats#userriel#useralien#userjoeys#usertj#alielook#swearphil#*#my resources#my tutorials
395 notes
·
View notes
Last Seen Blogs


sodatea2024
Soda’s Corner Of Shame

sunshinelemonade
oc blog

advancedmensdevelopment
Advanced Men's Development

abdullahyafa
Yua Faa