#watermarking is also an option but i have never liked the way it looks
Note
Which gif/s or gifset/s of yours are people reposting? I'm sorry it's happening :( BC I want to reblog the og's from you
it was a while ago but i remember seeing people repost this firefly set on twitter. and im sure the gerard joan of arc costume is on there at this point... i don't think people have reposted any of my stuff on tumblr without credit (that i know of lol) so its really not that big of a deal i think. once a gifset like... gets past a certain amount of notes its bound to be reposted somewhere. its annoying but like... nothing i can really do about it except complain. thank uu for being sweet though, anon
#answered#much luv#watermarking is also an option but i have never liked the way it looks#and if im going for anything with gifs its to please myself with the way it looks
2 notes
·
View notes
Text
Being Masc & Goth
This blog usually isn't fashion-focused, but I was thinking about alt fashion and how it's sometimes a struggle to figure out how to style things in a masc way if you're interested in darkalt fashion, but you don't want to go too casual or basic with it. So I thought I'd throw together some tips, link some DIYs, and maybe throw in a few moodboards.
I want to preface this with one thing: You do NOT have to adhere to traditional gender roles. Fuck anyone who tells you that you do. If you're a guy and you want to get into alt fashion don't let anyone tell you that you can't pull off a skirt or a dress or a strappy top. Literally the whole point of being alt is Doing Whatever The Hell You Want Forever.
However, not everyone feels comfortable in that (I made this post because I'm transmasc and sometimes the long gothic dresses make me dysphoric), and not everyone is safe to do that ( as much as it sucks ass, if you live in a conservative area sometimes it can be genuinely dangerous for guys to wear makeup and dresses in public, and your safety should always come first), so I thought I'd lay out some tips on how to dress alt and masc from my own experience. I'm still learning so feel free to leave your own advice in the replies or reblogs!
General Styling Tips:
- Jackets. Jackets, jackets, jackets. Something about a big jacket always seems to give an outfit a more masc energy, and adding a cool jacket to an outfit can be a great way to elevate it and add some extra visual interest. I like black blazers, leather jackets, and black denim jackets in particular, but vests (formal menswear ones or more casual denim or leather ones) can work well too, especially in hot weather.
- Any basic black pair of jeans will look 100x more alt if you loosely attach some chains to the pockets or belt loops. Also, pants with wider legs tend to look more masc than tighter fits. not sure why. Slacks can also be a really good and underrated option.
- If you want to find good headwear, cool sunglasses have never failed me. You may be able to take some inspiration from Ouji fashion as well, but that's just my personal taste.
- If you have a basic piece around, you can add pins, patches, safety pins, etc for a more casual look, or if you're going for something more formal, trims and lace details and embroidery can really add interest and elegance to it. (if you can't sew, you can order iron-on embroidered patches online or find them in craft stores that'll do the trick just fine.) This can take your pair of slacks or plain black blazer and turn it into a piece of formal gothic menswear you can make a staple of your wardrobe.
- Find inspiration in your favorite goth artists. There's a lot of really cool goth music out there and a lot of those bands get really innovative with their looks! Figure out what you like about their style and try incorporating a few things in, it's fun!
- If you have an alt wardrobe already but it just seems like something's missing or it could use some interest, try switching up the silhouettes or adding an extra layer! Seriously, don't be scared of playing with textures and sleeve shapes! I see a lot of dudes who just wear a band tee and a pair of jeans all the time, and there's absolutely nothing wrong with that, that can be a great look! But I think a lot of dudes just genuinely think that that's their only option and that everything else just "wasn't made for them" and that makes me a little sad. shred up some shirts and layer them, wear some bell sleeves, throw some extra safety pins or studs on, have fun! No one said masc fashion couldn't be fun.
Unisex/Masc DIY Videos I Found:
youtube
youtube
youtube
youtube
youtube
youtube
... And Some Inspiration!

[These are all goth music artists, I wrote the band/artist names in small text on the images that were not already watermarked for those who are curious]
#goth#goth music#gothic#gothgoth#goth subculture#gothblr#goth aesthetic#gothcore#gothic rock#goth rock#darkwave#deathrock#postpunk#post-punk#post punk#90s goth#trad goth#gothic style#romantic goth#goth fashion#goth style#goth makeup#goth outfit#goth goth#goth masc#goth guy#goth guys#goth men#goth bands#goth band
1K notes
·
View notes
Text
tumblr in reddit terms
blogs: personal subreddits where the theme/topic is 99% of the time just “me and whatever the hell i feel like at the moment”. for reference, the most common other theme rn is “wizard roleplay that never breaks character”
reblogs: crossposts. these are crucial to maintaining tumblr’s ecosystem. due to blogs generally having fewer followers than subreddits have subscribers, this is the way that posts get seen and passed around. the vast majority of posts on a person’s blog tend to be reblogs, so if the people you follow dont reblog a whole lot, your dashboard is gonna be a ghost town. post limit (combined total of reblogs and original posts per day) is 250, so feel free to go hog wild
tags: this one is complicated. theyre a combination of flairs and Comments But Low-key. you can use them for organization and to avoid seeing content you dont want to (go to your blog, settings, account settings, content you see, and then add tags you want tumblr to warn you about before seeing it). if op tags the post #reddit (in the tags, not the body of the post), itll show up in the #reddit tag when anyone searches that tag. tags are also used for comments that dont really add anything to the post. you know how a jpeg gets kinda gross when its been through a million screenshots and has ifunny watermarks and shit? thats what adding “lmao same” as a comment does to a post. comments stay on reblogs, while tags show up in 4 places: op’s notifications, the notifs of whoever you reblogged it from, when someone clicks on the “notes” button of a post and actively looks for the tags left on it, and when people view your specific reblog of the post (like a follower would on their dashboard)
likes: upvotes but weaker. almost everyone turns off all the algorithms (settings, account settings, dashboard preferences, toggle off the first 3 options. also, make sure your dashboard is on "following" and not "for you". this is highly recommended), so leaving a like doesnt boost the post in any way. they still matter to some people. you can also use them to bookmark a post and go back to your likes later
enthusiastic and/or hyperbolic tags: reddit gold. you wanna let op know you like their art? leave something like ”#printing this out and stapling it to my forehead #op you wanna get married?” in the tags
pornbots: both reddit and tumblr have an issue with them. we block and report them on sight. they usually have hot women as their icons, no posts or reblogs, and a description like “22, brazil, nurse <3″. try to not look like that if you dont wanna get blocked by everyone you follow
blocking: you have this as well, but it seems like a bigger deal on reddit. the reason we are not twitter is because we block bitches who annoy us and move on with our day. do not feed the trolls
things we dont have:
karma: clout-chasing is The Most embarrassing thing you can possibly do on this site. we are all in this circus together and the clown who gets the most laughs is still a clown. popular users will literally deactivate sometimes because clout is a burden. no one here makes money
1K notes
·
View notes
Note
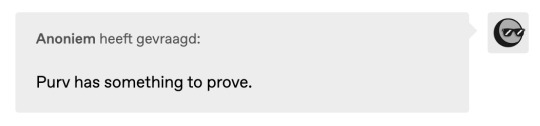
Are you giving any credence to the info Purv has regarding CM?
No
You don't say so 😳

Good observation Anon! How come there's always something new when I just showed how fabricated her 'proof' is....

Eeeeewwwww
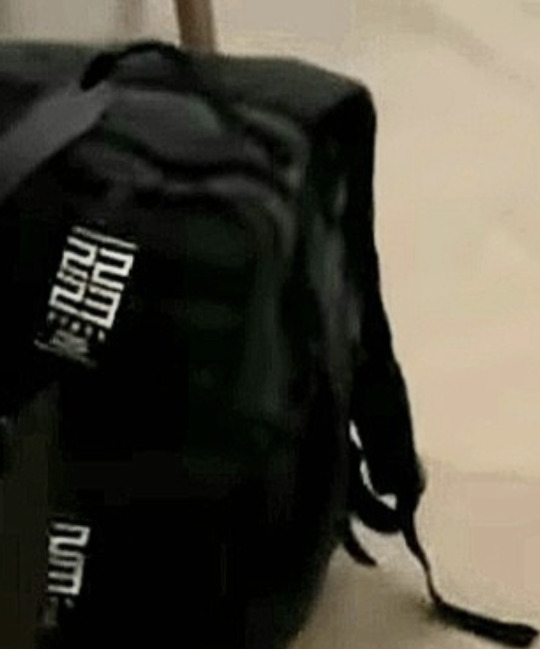
Yes I've seen it 🙄... The Hyrox patch is the same for one whole season, only the city name changes
The one for Glasgow this year

Berlin

Birmingham

Los Angeles
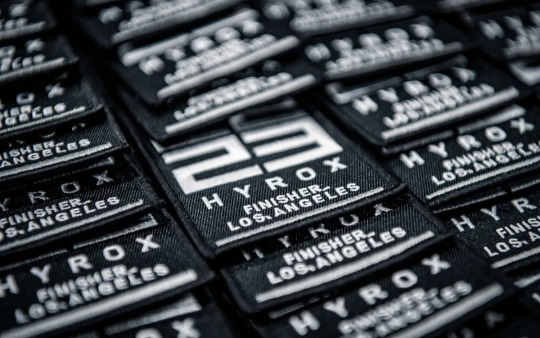
Do you need more?
Oh and this season (22/23) so far there have been these many events

I didn't take the time to count all the participants of all those events, if someone wants to be my guest. But I think you can imagine there are thousands and thousands of people all over the world owning these patches of the Hyrox event.
Oh and I don't know how to clearly identify what exact city or cities the patches (note patches as in plural) on the backpack are from. Can you?

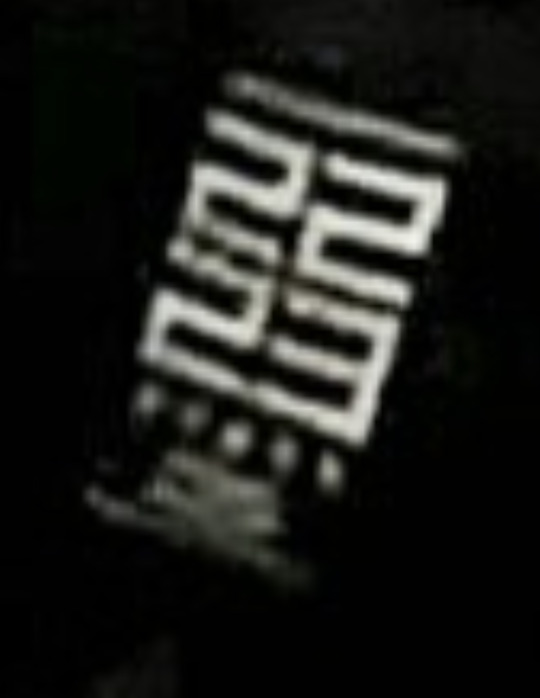
Yeah, sorry this is very blurry, and it is going to look very shippery this way. I just can't help... but really... help me out here?
And... yes, as I noted above, and there's still not something wrong with my eyes and I swear I didn't have a drop of alcohol all day. (and it's 3.30am right now) but I'm not seeing double... do I? I see two, as in 2 patches of this season! Do you see it too???
I don't know, but it seems to me that every participant only get one (1) patch from the event he/she participates in. And by my knowledge, and as we can see on the website, Sam only participated in the one at Glasgow. No other ones!!!
Go, f.i look at Nic Rasenti's entries. he has a lot more, London and Glasgow. Oh, perhaps Nic was with her in Paris? Is that how she knows Sam? he has been in Paris before with Nicole. And perhaps he was hoping he would be one of the friends invited for his Miami birthday party and told Cinderella to go there too.... 🤪
See what I did here? I just did what shippers do, and what Purv does. She tries to paste a couple of random things together that slightly can in some very far fetched way be connected, but there are a ton of other options, which conveniently aren't taken into account. Needless to say I don't think it was Nic in Paris cheating on Nicole 😉 But I take it that my dearest gentle readers do understand that.
Right... next.
Btw. she wrote 6 weeks ago in a hotel with Cinderella... 😉
Now see, here's an Anon that can calculate for herself and use a calendar as well. Exactly, 6 weeks ago was Easter weekend, he was not only with his family but also spotted on the airport in Edi by a fan. (on 8 April)
But okay okay, I hear you she 'posted' a bunch of pics, she could have easily posted that a week later on. Okay... cause, it was Friday 30 March right, her Anon spotted them in a restaurant in Paris. Friday after he had just been one day on set (per the birthday post for Dries), that particular post you should expect Cinderella to like, especially if he would have given her the privilege to leave the set already after one day to spent the weekend with her in Paris. But exactly that one was not liked by her according to the fantasy lalalanders (how rude!)
Oh and for the record, if you would like to be in Paris in no time and not go through all the trouble an airport has, (going there Antwerp - Brussels and all the checks and security) we in Europe rather take the Thalys to Paris. Brings you right in the city at Gare du Nord, Very comfortable travel, and you'll be in the heart of Paris within the hour. Check it out people! (but yeah, I figure you in the US wouldn't dream of it)
right next...
I haven't seen any video, I did never requested to follow Cinderella (I never follow any of those or OL related accounts). I really do not need to see it but thanks for your observation Anon
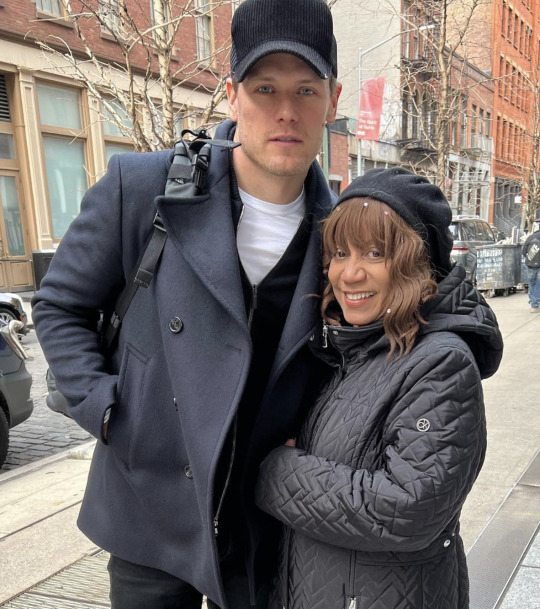
There is no way anybody can identify the woman in NYC in the video, I even have the original one without the watermark... But for what it is worth, it doesn't strike any similarity to the pics I've seen from Cinderella.
Yes we're calling her Cinderella. Thanks for you message, maybe I can make some more sense out of it. Read on!

Oh... now that's rude, he didn't even bring a whole case of his whisky like he did for his birthday in Miami??? Not even a bottle??? Now... I'm totally disappointed now... or could it be that... oh right wait the backpack...

or just maybe not! ^^

Ah right the backpack! Uhm, I posted the image above. Let's do some comparing of backpacks we know Sam owns and travels with. (as that is what shippers do as well).
December 2022 leaving NYC


See the grey straps? No match
11 January fanpic by QueenNurys IG
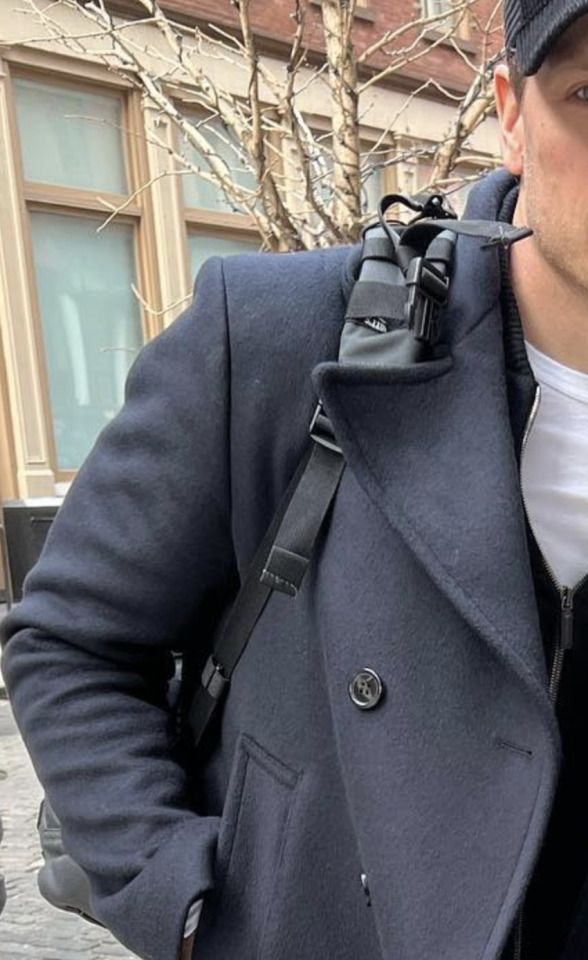
These straps look even more broad with some cushion thing on the shoulder, I don't see a match. Do you?
and doesn't this backpack look sort of green? 🤔
Nope nope nope....

I think you're suffering from confirmation bias Anon. Don't worry though many do in this fandom

How am I doing so far Anon?
And how well did that work out 🤐
Conclusion: As said above, a lot of pasting things together. I really think P should be a bit nicer to shippers at this point as her posts are even worse in putting all kind of 'proof' together that is purely random and wouldn't hold in any court. She's making a fool of herself by doing the same things she condemns shippers for. Making the most fantastic connections that can be debunked easily in many ways. More over how these things come up right after something is posted here, like the Hyrox events. Why did she not notice that before... ooh right yes, her eyes after yesterday her eyes are hurting... but she had weeks in advance to figure this all out, no? Really, I almost have more respect for shippers for putting their posts together with proof (that also doesn't hold, don't get me wrong) but at the very least had more proper investigation and thoughts than what is fabricated here in 2 nights....
Now my dearest gentle readers, I hope you will grant me some sleep (3.50am right now) and hopefully I can spend my time from here on to real news and not fabricated nonsense.

39 notes
·
View notes
Text
the average process for sourcing images on this website is a waking nightmare, and it goes something like this:
see a photo of copia that looks like it was taken by a professional photographer. there is no watermark, but the bottom edge of the photo is blurred in a way that looks like someone might have edited out a watermark. the post has 250+ notes. there is no source in the notes. op did not take the photo.
reverse image search. across five engines, one comes up with zero hits, and the others come up with the tumblr post and a pinterest post that predates the tumblr post.
okay, so now we know op of the tumblr post took it from pinterest.
now dig through this pinterest just to make sure op of the pinterest post did not take the photograph. op of the pinterest post did not, in fact, take the photograph. this version of the photograph is also blurred on the bottom edge.
but now there is nowhere else to go from here, and this image will be floating around and getting ever-greater amounts of exposure and attention with zero credit to the original photographer.
it's very, very hard to prove that this is what's happening, but here's the most likely scenario, to me:
the original photo exists somewhere on the original photographer's website, probably with the watermark intact. however, reverse image search engines don't index every single image that's been on the internet for all time. especially if it's on a smaller website, it simply will not show up when people search for it.
when originally uploading that photo, it's possible the photographer never shared it on social media and just tweeted something like "hey, went to see ghost! new photos on my website!" with a link to a gallery.
then, for reasons i cannot understand, someone followed that link, downloaded the photo, removed the watermark, and put it on pinterest. now, until the end of time, that pinterest op is the earliest known source.
then, for reasons i understand even LESS, someone on tumblr took that photo from pinterest, weird blurry edge and all, slapped it onto a post with a one-line caption, and proceeded to get 250+ notes for it.
this happens every day on this website. it's frustrating and it's just an asshole thing to do. if you see uncredited photos, the next logical step is NOT to keep reposting them so you can get notes. it's to do your best to find the source for that photo, and if you can't, don't repost it. easy!
and this next option is still an asshole move, let's be clear, but if you absolutely cannot BEAR to not repost this image, if not reposting this image will make you shit yourself into an early grave, if you absolutely NEED those 250+ notes from random internet strangers, then at a bare minimum, write in the tags or the caption that you're not the photographer. write in the tags that you like this photo, but you couldn't find the original source even though you did your due diligence. write that you would really appreciate it if anyone who knows the source lets you know. and then, if and when someone tells you, update the post.
or just, you know, don't repost uncredited photos.
what you CAN do is look at the social media accounts of photographers who go to shows. look at their websites. look at their galleries. ask them what their policy on reposting and sharing their images is. read their posts or their website's guidelines on this. take that policy seriously. do not tamper with their watermarks. do not share without their permission. if they let you share their work, appreciate it and do not make them regret letting you do this.
and then, maybe, you can feel like you've earned a fraction of your internet clout when you post someone else's work with the same dang caption of "thinking about that old man's ass again."
14 notes
·
View notes
Text
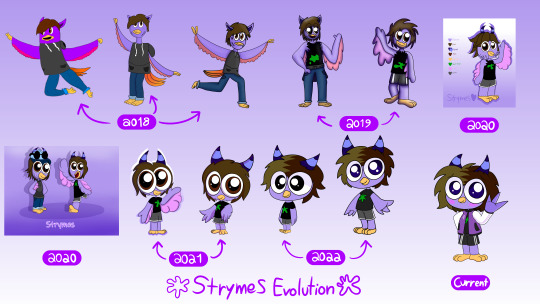
Free Fall Direct - May 2023
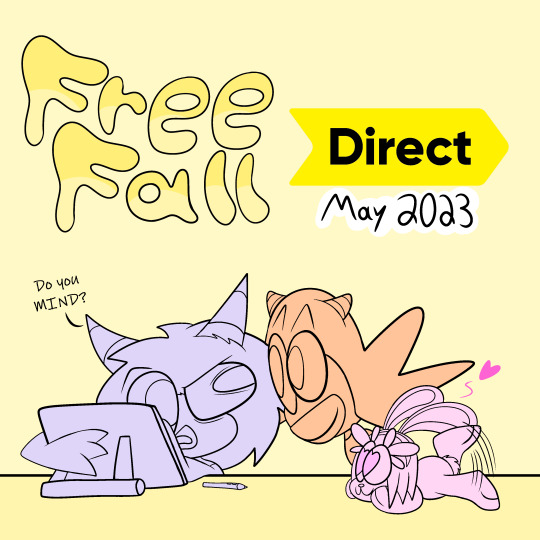
Hello, it’s me! The bird drawer guy.
Now that Free Fall is in full swing after finishing up Chapter 1 - Terrifying Awakening, I have a few things I want to share regarding the future of the comic! So I thought I would make it all “””professional””” and make it a monthly thing where I talk about some BTS stuff going on with this project! Y’know, for those who give a flying bird.
So let’s get into it!
💜NEW WEBSITE💜

This is what the home page of the new Free Fall website looks like so far! There will be many changes made of course (i sure do love the times new roman at the top).
This time it’s made in Neocities, which means no filthy dirty Wix watermark at the top anymore (sorry wix ily but you were trash)!
This also means the comic will now be presented in the “normal” way, with each having its own page with arrows to click at the bottom to go to the next or previous page. Before, you just had to scroll down, but Wix wouldn’t load the entirety of Chapter 1 that way, so now it’s unreadable in that state (especially on mobile where the pages kept getting out of order), and I don’t have the energy to try and fight with a mediocre website host >:P
💜ARTWORK?💜
This website will contain a couple of new bonus features aside from the comic. One of them is the Artwork tab (a reworking of the “Art Gallery” tab from the last one). This time it will contain artwork I’ve made in the past (THAT DOESN’T CONTAIN SPOILERS), as well as concept art of the characters, locations, and other fun aspects of the story! I hope that will be a fun gander to look through, especially as more gets added to it with time! There might even be some cut content as well... oooOOhhh!
💜OST?? Like, MUSIC??💜
Oh yeah, like music.
One of my biggest visions for Free Fall was the addition of an original soundtrack that would play while you read (as an optional thing of course, and the ost would be available on youtube as well). And the OST tab would be the place to listen to any track at any time!
It should be fairly easy to implement now on the new website! I’ll even put the old Free Fall tracks on my youtube under the “Free Fall Beta” playlist in there as a little bonus for that!
💜But where’s the characters tab, Strymes?? You can’t have a webcomic website without the characters tab!💜
And you’d be right! But it’s still gone, only because you can now access the characters’ “bio cards” right on the home page to learn about the cast! Under “Click HERE to learn about the Cast!”
I have posted it before, but here’s a link to it if you’ve never seen it. It’s a little interactive archive of every character introduced in the story (or is confirmed to be in the story) so far: https://docs.google.com/presentation/d/1EL9yR7b2e2eOQdZzQreuYrbqPrKfnJPKUGI-Pxh4WUA/edit?usp=sharing
So that’s all I have to say about the website so far! It’s coming along and it’s been good learning how to code with HTML. A little daunting and overwhelming and gut-wrenching to get everything working... but good.
💜CHAPTER 2 NEWS💜

Now for the stuff you’re really here for.
This is a quartet of characters who are going to appear in Chapter 2. Who are they... and more importantly WHAT are they? You’ll just have to wait and see, nyeheheheheee >:3
There will of course be more of your favourites from Chapter 1 as well. I think you’re really gonna like Bella in this one XD
Learning what I’ve learned from making Chapter 1, this should be a MUCH better paced romp with better writing that gets more to the point, while still having good clean dialogue, as well as better visuals (which you might have seen improved THROUGHOUT chapter 1, as that chapter took MONTHS to make lol).
With that being said, it might not reach as MANY pages as chapter 1, but hopefully it will be a much more enjoyable experience overall with fun new characters!
💜IN CONCLUSION...💜
I think that’s it for now. Thank you for reading this far if you are somehow here lmao. It means a lot to me and I couldn’t be more thankful for even having an audience for this in the first place. So thank you thank you thank you. 💜😊With that being said, I’m sorry for not being as active on my socials as I used to be. I think I have less of an attachment to constantly scrolling through Insta and Tumblr these days (and I don’t have twitter to rope me back in anymore so maybe that’s a plus all around). I can assure you I am working on more art slowly but surely. I still have so many WIPS it’s not even funny, but I want to shift focus to artwork that I can truly call... well... art.And that means not just posting an oc drawing like “here you go” just to make sure I’m relevant. I couldn’t care less anymore. I am perfectly satisfied with not trying to please the algorithm at every turn, thank you VERY much.Tangent aside, thank you for reading. I’ll see you guys in June with another one of these! Weehee!
#free fall#freefallwebcomic#strymes#autumn#webcomic#comic#ocs#original character#fantasy#adventure#webcomicupdate#freefalldirect
9 notes
·
View notes
Text
On AI Art: a perspective from computer engineer/artist
With all the discourse about AI art going on right now, I thought I’d add my perspective to the mix. But the TL:DR is that some AI art hurts artists who provided - albeit unknowingly and/or unwillingly - the datasets that allow the AI to generate “art”.
I’ll try to keep this untechnical so that I get the point across well enough.
In my senior year of college, I took a class called Sensor Processing for Autonomous Vehicles in which we discussed some of the AI learning that allows autonomous vehicles (also called self-driving cars) to identify and respond to what they “see” via a number of sensors - including radar, video cameras, and infrared. They could be seeing the lines in the road, road signs, people, or any number of things. AI or machine learning allows the brains behind the car to determine what the object is and respond accordingly. The brains being a computer hosted either in the car or remotely on a super computer.
Now you might be wondering, “How does the car know what a person looks like?” The answer is that some of these AI learn the same way that babies do. When you’re a baby, someone points to a cat and says “This is a cat. This is what a cat looks like.” Then they point to other slightly different looking cats and repeat, “Those are also cats.” Certain machine learning algorithms learn similarly using what is called a dataset. This dataset can consist of millions of images that are then initially labeled by humans. This allows the machine to start off with the correct data to then learn from these images what a cat or human or stop sign looks like. After this initial processing of the dataset, the AI can recognize, with some level of accuracy, a cat.
Without this dataset, the algorithm is basically useless because a computer is not going to inherently know what a cat looks like. Similarly, how can an AI art program know what its art should look like without taking “inspiration” from artists on the internet?
In relation to AI art, this dataset is any artist’s Instagram or Tumblr or TikTok or whatever is readily available online. And here is where the first ethical dilemma arises. Typically, using an artist’s work without permission is something that can get you banned from social media. In this way, unless the programmers behind the AI art applications have asked for permission to use artists’ art as their dataset, this can be viewed as art theft. Based on the discourse online, permission was neither requested nor given.
To be cynical for a moment, putting any art on the internet opens the possibility for that art to be stolen. The void claims as it sees fit. Big corporations like Disney can monitor and rectify such thefts since they have the time, money, and manpower. Most, if not all, artists online do not. Putting anything out there without a watermark absolutely marring the piece is some acceptance of risk. For the artists who depend on likes, views, commissions, and the ilk for their income, that’s not an option. They spend hours upon hours creating art to post so they can generate income. (Or if you’re small time like me, you just generate some likes but that’s still quite nice too.)
As an artist (or at least someone who likes and does art), I never want to see someone claiming my work as their own. It’s a terrible feeling. In relation to one’s pride as an artist, it is also infuriating to see AI “artists” not saying that their art is computer generated. Here I’m talking about the people who use apps made by programmers to generate their images. I think the person who coded and trained an AI to generate images should be credited. That’s no small feat. However, I’m entirely unimpressed by the people who added an image to an app or website and clicked a generate button. Anyone can do that. In my personal opinion, art is made, not generated. And that is the second ethnical issue - misrepresentation on the internet. *sarcasm* How shocking. How unprecedented. *sarcasm* Same story, different narrator.
Even with all this said, I don’t consider AI art inherently evil. In some ways its intriguing from a technical and artistic perspective. However, its the ethics around how these programs acquired their datasets and how people are using it that causes it to be controversial. Surprise, surprise. People are the problem more so than the machines. Machines don’t know right or wrong. They know only what we tell them. And what have we learned here?
For some more info on AI:
https://www.ted.com/talks/yann_lecun_deep_learning_neural_networks_and_the_future_of_ai
https://www.ted.com/talks/briana_brownell_how_does_artificial_intelligence_learn?language=en
AI Art specific video:
https://www.ted.com/talks/blaise_aguera_y_arcas_how_computers_are_learning_to_be_creative?language=en
#ai art discourse#ted talks#opinion#just my 2 cents#ai art is not art#say no to ai art#neural networks#machine learning#ai art#ai art generation#computer engineering#artists on tumblr#artist struggles
6 notes
·
View notes
Text
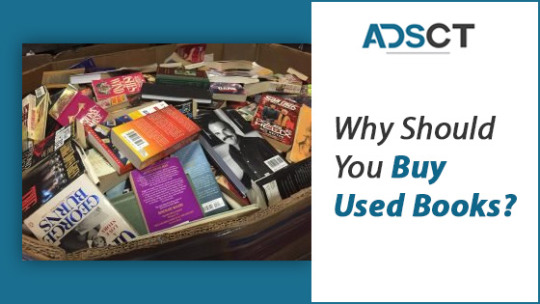
Why Should You Buy Used Books?
No matter how many options there are for reading online, there is still something about reading offline. This article will investigate the upsides of picking a handed down book for your next read. To find the best books, simply use the Top classified sites in USA .The fact that you will save a lot of money comes first. Isn't that pretty obvious? Although newly printed books are beautiful and aesthetic, purchasing secondhand will almost certainly save you at least half the money. Also, you will wind up more connected with books than before.
Completing your current book and purchasing additional compelling titles for your shelf is inspiring. The fact that you will end up keeping that book stack stacked high is the icing on the cake of purchasing inexpensive used books. On the off chance that you are climate amicable, this one for you. Purchasing a used book is environmentally friendly.
Since the United States alone produces nearly 2 billion new paper books annually, purchasing a new book is not really a good option. This implies the removal of millions of trees, which will result in tons of CO2 and a considerable trail. Even though the most recent book by your favorite author is quite trendy, why not consider the environment and pick up one of the millions of used copies that are already in circulation?
This is my personal favorite because old books share a common history. Like a box of chocolates, because you never know what emotions will be written in the margins. And that is just beautiful. You are a part of a shared history, and you can participate in this activity and add some more ideas to it. War and Peace brings you to an end. Your favorite passages are highlighted and marked. Feel free to give up your affection for the dated publication at this point. Lending a used book to colleagues and connections has a stunning beauty to it. It's like adding a soul to the life of the book!
You could share the memory with others. Books don't require spoiling, so get a pre-owned duplicate as opposed to making a fuss over keeping it fresh, tea without stain as that of newly printed books. Don't be afraid to toss the book in your bag and head out on the road with your favorite music plugged in, even if the binding has probably been tampered with and there are a few wrinkled pages. They are familiar with the past because these used books have been around there for some time. I believe they are prepared to be a piece of your handbag. The first-deal legitimate principle is the explanation that assists us with selling utilized books, collections, or a few other utilized protected merchandise. Buying used is a great way to use your first-sale benefits to save money! Additionally, there are some truly exceptional vintage book covers to choose from.
There are many books on the market, from sci-fi classics from the 1970s to hot adventure novels; Instead, think about purchasing these used book covers. However, starting a conversation on the train ride to work is a fantastic idea. The scent of newly printed pages can't compete with that smell of an old book or those yellow pages. Think about those secondhand, used books that have developed their unique scent over many years, decades, or rarely centuries. Consider having a This-Burned through 200-Years-In-A-English Library smell or The-One-Cherished By-A-Parisian-Blue-blood smell, and obviously a muddled yet remarkable smell, or a one that is tempered by watermarks! In conclusion, used books are remarkably similar to our personalities. These pages may have their own personality, are occasionally a little worn out, but they have a history. You now have sufficient reasons to choose a used book when considering your next read. If you're looking for genuine goods online, check out these Free classified ads in Chicago.
#free classified websites#classified ads free#classified free ads#freeclassifieds#free online classified ads usa#free classified ads in arizona
0 notes
Text
Lit to epub converter online

LIT TO EPUB CONVERTER ONLINE PDF
LIT TO EPUB CONVERTER ONLINE PORTABLE
LIT TO EPUB CONVERTER ONLINE TRIAL
LIT TO EPUB CONVERTER ONLINE DOWNLOAD
Upload a file or specify a URL for our converter and hit 'Convert file'. I highly recommend SumatraPDF or MuPDF if you're after something a bit more. With this free online LIT converter, you can convert an ebook or document to the Microsoft LIT ebook format.
LIT TO EPUB CONVERTER ONLINE PDF
You may or may not need an add-on or extension to do it, but it's pretty handy to have one open automatically when you click a PDF link online. Most web browsers, like both Chrome and Firefox, can open PDFs themselves. It's completely fine to use, but I find it to be a somewhat bloated program with lots of features that you may never need or want to use. We delete uploaded epub files instantly and converted lit files after 24 hours. Adobe created the PDF standard and its program is certainly the most popular free PDF reader out there. Just drop your epub files on the page to convert lit or you can convert it to more than 250 different file formats without registration, giving an email or watermark. 100 free, secure and easy to use Convertio advanced online tool that solving any problems with any files. Most people head right to Adobe Acrobat Reader when they need to open a PDF. Best way to convert your PDF to EPUB file in seconds. PDF files always look identical on any device or operating system. The reason PDF is so widely popular is that it can preserve original document formatting.
LIT TO EPUB CONVERTER ONLINE PORTABLE
The Portable Document Format (PDF) is a universal file format that comprises characteristics of both text documents and graphic images which makes it one of the most commonly used file types today. Any unused portion of the free initial period will be forfeited when you purchase a subscription.What is a PDF (Portable Document Format) file? Current subscription may not be cancelled during the active subscription period however, you can manage your subscription and/or turn off auto-renewal by visiting your Apple Account Settings after purchase. Account will be charged for renewal within 24-hours prior to the end of the current period. Payment will be charged to your Apple account at confirmation of purchase and will automatically renew (at the duration/price selected) unless auto-renew is turned off at least 24 hrs before the end of the current period. LIT (Microsoft eBook File) Released in 2000, LIT (Literature) files are used with Microsoft Reader and devices like Windows Mobile. Download your converted MOBI file immediately.
LIT TO EPUB CONVERTER ONLINE DOWNLOAD
Step 3 - Download your converted MOBI file.
LIT TO EPUB CONVERTER ONLINE TRIAL
This app includes an optional auto-renewable subscription (Premium Pass): Premium Pass beings with a free trial period, then an auto-renewable monthly subscription when trial ends. Select LIT file from your computer using the browse function. These conversions don't require a server, and are usually done almost instantly! We are continuing to add support for more local conversions with each update. We've also recently added support for local conversions for many popular conversion types. O conversor de LIT para EPUB funciona em qualquer plataforma e dispositivo - Windows, Mac, Iphone, Android. While the files are immediately deleted after conversion or cancellation, you should be aware that by using this app, you agree that your files will be sent over to internet from the app to the conversion server. O melhor aplicativo da web para converter arquivos LIT em EPUB online. Files are immediately deleted from the server after conversion. You must have an internet connection to use this app. You can even browse your previously converted files with our in-app file browser.Ĭonversions usually take less than 15 seconds!Ĭonversion is done on a secure cloud server, which makes conversion easier, faster and much more battery-friendly. Save, Share or Open your converted ebooks in your favorite reader apps immediately. You can convert from dozens of input formats, here are some of the most popular formats we support converting your ebooks from:ĮPUB, MOBI, PDF, TXT, FB2, DOCX, AZW3, ZIP, DOC, HTML and more! MOBI, EPUB, TCR, PDB, PDF, AZW3, LRF, FB2, LIT, TXT, RTF, OEB Save your file, or open it in your favorite app! Convert! It will only take a few seconds.Ĥ. Choose your output format ( MOBI, EPUB, PDF, TXT, AZW3 etc. Easily convert your ebooks between nearly any major formats!Ģ.
0 notes
Photo
The Official STE Love on Tour 2022 Masterpost!
I meant it when I said we never really know when he will drop another tour on us, and here we are!
This is the post where you’re going to find the rules and regulations of posting/sending asks/etc. You must like and reblog this post to show that you understand. This is to make sure that we make this as smooth and easy for everyone as possible.
Everything is going under a cut, because it’s going to get long:
THE RULES
1a. When sending me an ask, I need you to be as clear and informational as possible. If you’re selling, I need:
The place of the show (and if it’s a city that has multiple shows, i need to know if it’s night 1,2,3 etc)
The date of the show (you can check here)
The price at which you’re selling your ticket. If you bought it off someone and are reselling, please be transparent! The whole point of the STE is we want to make sure fans get to see Harry.
Whether you’re ok or not with being contacted by DM
IF you’re selling on behalf of someone else
NEW: You must provide proof of purchase. Screenshots w/watermark, and screen recording. Failure to do so will result in your ask being deleted. You can upload those items here.
If you are buying, I need:
What show(s) you’re looking for (be specific with dates, please)
What part of the arena you want to be in
Whether you’re ok or not with being contacted by DM
1b. NEW: I will only post tickets that are being sold at what people paid for them, or lower, and below what they are going for on resale sites. I don’t care what the resale sites are selling them for: if you want to resell them that way, there are multiple options available to you.
I know buying tickets with the platinum pricing has been tough, so I have opted to allow people to sell their tickets for what they paid for them *on ticketmaster*. This means no resales, purchases off stubhub etc.
2a. Multiple asks/spam posts will be deleted. I promise I see your ask, and I will post it when I get the chance. This isn’t my day job! I have a strict 3-strike rule: if you spam ask me three times with the same ask, I will block.
2b. Followers who spam posts will also be blocked/banned from the account. Give people time to respond instead of spam-responding, please.
3. Anonymous asks will be screened and will not always be given priority. Since I can’t go through a blog to double check if it’s legit or not, I will give priority to those who send through asks non-anonymously.
4. I do try and screen every ask to make sure that I’ve not been duped by a bot or a scammer before I post or reblog. I’m still trying to figure out a way to combat that, but until then please do your own digging and only give out information you are comfortable giving out. I know this is a good community and I know we all want the same thing, but it’s important to know that there are people out there who will….not be so nice. That’s the dark underbelly of it all. That being said: if you think someone might be scamming you, feel free to message me and we can flag them on the blog!
5. I do not work for TM/Live Nation/etc. Most of the information I have, I have through taking a little time to research. While I am happy to answer questions, please do take a look for yourself first before sending me an ask about Ticketmaster policies or why certain things don’t work, etc!
6. If you do sell a ticket from here, please shoot me a message so I can edit the post/reblog it to say it’s sold! That way I can keep tabs on the ones that have been sold/unsold!
BLANK/NEW BLOGS
Going forward, if your tumblr blog is blank (i.e. you’ve made an account specifically to look for Harry Styles tickets and have zero posts - or even only posts about buying/selling/trading tickets) - you must provide us with one of the following -
an active twitter account
an active instagram account
as there is no way to possibly to make sure a tumblr account is legitimate if it has nothing on it. This is to ensure that you are indeed a real person, and that you’re not a bot/scammer.
NEW: If either of those accounts are less than a month old, I will not post your queries.
At the end of the day we want to protect everyone who comes looking onto stylesticketexchange, but there’s only so much I can do.
Failure to do so will result in your ask being deleted. There will be no three strike rule. It will be at the discretion of the mods of STE.
TRADES
Because the pricing is so askew right now, I will not be posting trades.
“BEST OFFERS”/Negotiations
We do not do ‘best offer’ or negotiations here!
Please be transparent with your asking price, and what you paid for it. We do not allow bidding wars on tickets. The whole purpose of the site is to make sure that tickets go to deserving fans. If we find that your ask is teetering on the ‘best offer’ line, we will shoot you a message to re-send.
Failure to do so or consistent ignoring of this rule will result in your ask being deleted.
Payments
The safest, easiest way to buy and sell right now is through PayPal Goods and Services. I ask that anyone selling or buying tickets use this method, but if you mutually agree on another method of payment, make sure you’ve read through the terms and services of those sites. PayPal is currently the only site that protects buyers should something go wrong. If you use Venmo/Cashapp etc, you do so at your own discretion.
The not-so fun stuff.
Because it’s all fun and games until someone gets hurt, right?
A reminder that while we would hope people are being honest and open about their tickets, a word of caution: make sure you are getting all the information and doing everything you can to protect yourself before making a decision to buy. That means:
Being aware of the people who are trying to scam money from others because they think they can make a quick buck.
Reading the rules/regulations of ticket resale sites such as stubhub/ticketmaster/stubhub/etc.
Not giving over *any* personal information that you’re not comfortable giving.
Do not give money over before you are sure you have the tickets. (come to a mutual agreement on the exchange!)
Make sure your tickets are real - you never know what people are capable of!
If you’re going to pick up tickets, make sure you’re in a public space, or with a friend/family member.
I hate that any of it has to be said at all, but I have heard absolute horror stories of ticket fraud and people being taken advantage of. We all want to see Harry, and I want to help people do that - but you do have to be aware of the dangers and repercussions of doing ticket exchanges or buying tickets from resale sites.
I am always happy to help out in any way. If you believe that something suspicious is going on, please feel free to shoot me a message and we will go through it together!
I think that’s it! On a personal note: I’m not here all the time: I am dealing with a sick family member and the pandemic and my own life. I do this out of the kindness of my heart and in my spare time. If I don’t respond or post right away chances are I am not here. I do my best, and all I ask for is a little patience in return.
I will more than likely add things to this post as time goes on, and thank you for reading/liking/reblogging. Thank you for supporting stylesticketexchange and helping fellow fans see Harry in concert. Here’s to Tour 2022!
x STE
ps: if you’ve truly read this you will like and reblog it before you send an ask :)
137 notes
·
View notes
Text
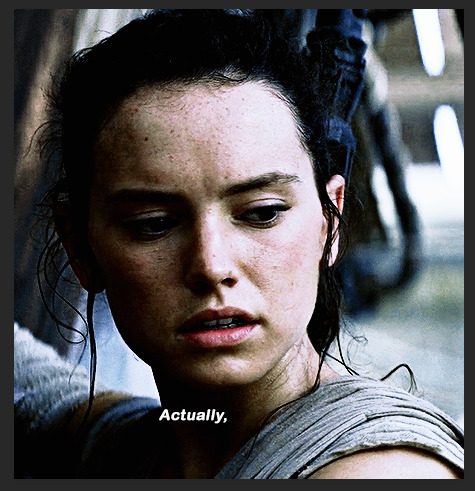
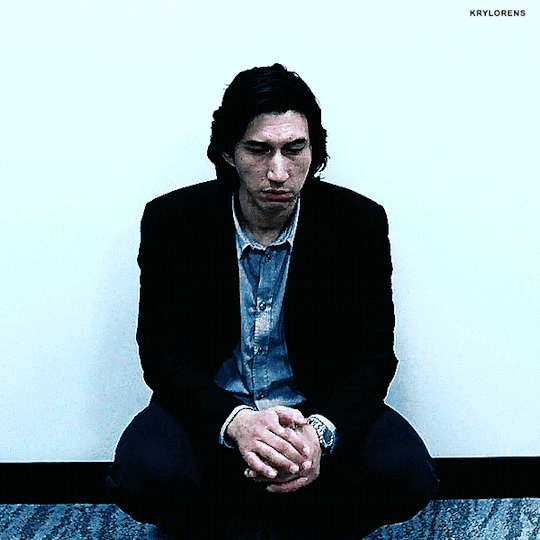
KYLOSOLO’S/KRYLORENS’ STEP BY STEP BASIC GIFFING TUTORIAL, inc. ALL RESOURCES:
this is part one out of two not don’t worry, part two is just me filming the process, i just had to put it onto a separate tumblr post since i can’t place it in this one.
PART TWO HERE: [x]
i’ve been giffing for about over six years and it’s only very recently that i feel i’ve got a grasp on a pretty good method, for me at least. if you’re reading this you probably have prior knowledge already but this tutorial is also going to go over the basics as if you know nothing. → this is just how i do everything and my ordering process, there are way better gif-makers out there but i know how finicky the process can be so i wanted to give out all my tricks! it might seem like a lot but it becomes second nature easily. (let me know of any broken links and or questions.) just to note i use windows not mac.
SORRY FOR SPELLING AND GRAMMAR ISSUES, i really pushed myself and i struggle with articulation.
things you will need/learn: (it’s all free!) →the ones in bold are essential.
—adobe photoshop; i use cc2020 which you can get here: [x]
—mpv; (a frame captures, i’ve used pretty much every type over the years, even ps’ inbuilt one but this is my favourite & this tutorial on how to use/dl it is the best) [x]
—***at least 1080p footage; if you don’t have any you can still use this frames folder to follow along with me :) [x]***
—4k video downloader [x]
—a megasync account [x]
actions:
—@kylos tumblr sharpening; (these are just my favourites you can use any you find/make really but this makes your gifs look even more hq) [x]
—@kylos twitter sharpening: [x]
—@rory-amy tumblr/twitter save; (i just use the save action out of this pack and it’s a LIFESAVER) [x]
—if you’re not sure how to put these into your ps i’ll show you how later on in this tutorial.
how to learn colouring + how to add subtitles correctly + how to make hq twitter gifs:
—all later on in this tutorial with links to my own resources and might have my twitter watermark by mistake.
*what this tutorial isn’t including:
—how to t*rrent.
—how to upscale footage.
—how to make multiple gifs/gifset are crop them the same way/move frames over to a new document; (i’m just focusing on how to make one simple gif)
—how to use gradient/html text for captions but here’s a great tutorial on it. [x]
i just want to give a big shout out to @kylos because all her tips are just amazing and top-tier!!!
‧͙⁺˚*・༓☾ ☽༓・*˚⁺‧͙ ok now onto the good stuff! ‧͙⁺˚*・༓☾ ☽༓・*˚⁺‧͙
★ how to load in and sort out your layers: [1/2] ★
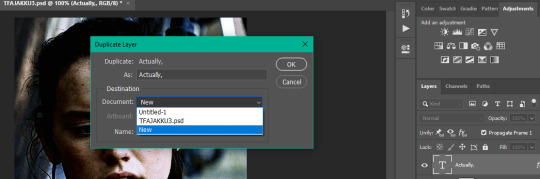
—once you’ve dl the frames or gotten your own you’ll need to load them into ps like this;
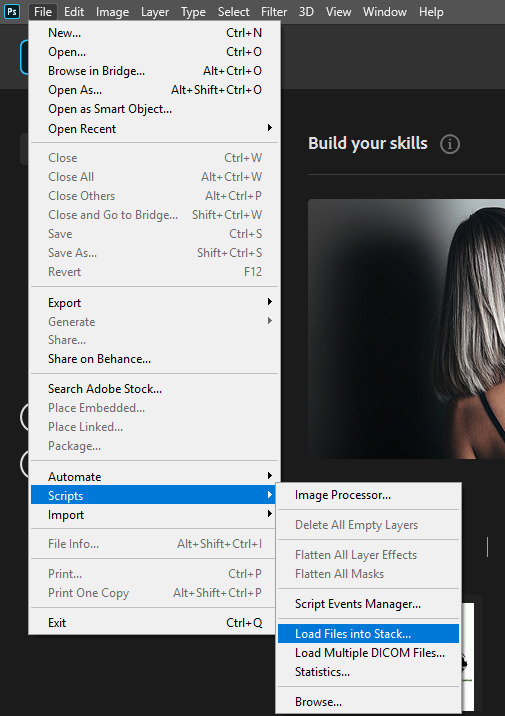
when load layers pops up, you can select individual files (for a more complicated set this is good) but i prefer to just use the folder option. now select your captures folder from wherever you saved it. depending on how many frames/how hq they are will effect how long the loading time is. it can really vary.
—ONE THING YOU SHOULD NEVER DO: is take EVERY OTHER FRAME when making your gifs this destroys the flow of them and is an older method to gifs that isn’t needed.

—if your ps is brand new you’re going to have to add some stuff, which i’ll show you how to do.
— first go to window and select TIMELINE and ACTIONS. then move your ADJUSTMENTS bar up and close the tab it came from since you won’t need those. (if you ever do, just click workspace and then RESET ESSENTIALS) and next you’re going to click on your timeline bar, then CREATE FRAME ANIMATION.
— *your screen should now look like this:*

—then on your timeline bar at the right top corner there’s three little lines, click that. then select MAKE FRAMES FROM LAYERS and after SELECT ALL FRAMES and next REVERSE ALL FRAMES. (depending on the ps you use your frames might be like mine and need to be reversed, just click the play icon on your timeline to make sure).
—i always play through the gif before doing anything and i noticed the gif frames are a bit long for my taste so i’m going to press my shift key and then select up to frame ten by right clicking (they should now be highlighted) and click the trashcan icon on the TIMELINE bar to delete them. you can trim your gifs at the end doing this if the mb is too high and your gif doesn’t load when uploading. currently tumblr is up to 10mb and twitter is around past 15mb.
—after deleting your frames you then need to SELECT ALL FRAMES again and then CONVERT TO TIMELINE.
★ how to crop your gifs: ★
***here is when i like to do it: (4th icon on the bar on your left)***
—however, you can do this before or after, just as long as it isn’t after making it a SMART OBJECT or sharpening.
—there should now be a new a bar on top of your gif and next to RATIO is where you should put your dimensions in (as in width:height)

—there are tumblr dimensions but i find you can be more lax with them, i like to change it up a lot but for now i make square gifs around 450px x 450px and rectangular ones around 500px x 340px but it’s up to you. if you’re really struggling and see a set with a size you want to use yourself you can study the size of it by inspecting its elements on desktop, and rounding up. but i would recommending doing it yourself. making your own style is the fun of it!!!
—for twitter the best size is 600px x 600px. this is a square, sometimes frames can’t just fit neatly into this shape/sizing so find what’s best or copy my tumblr dimensions if you’re struggling.
***note: when cropping your gif you can get weird transparent lines around it. → to get rid of those when cropping your gif, you have to: crop inwards a bit, (or as much as you want) and move the cropping square/shape a bit into the middle.
now, make sure you go to IMAGE on top bar select and put in your gif dimensions.***
‧͙⁺˚*・༓☾ ☽༓・*˚⁺‧͙
★ back to your layers: [2/2] ★
—now go to your LAYERS bar and select every frame with an eye icon next to it, right click and select on top of them and select CONVERT TO SMART OBJECT. this should leave all the frames you have deleted earlier and those have no eye icon, you can select those akin to how you did it on your TIMELINE bar, just use the trashcan icon on your LAYERS bar or just select DELETE LAYERS when right clicking.
★ how to insert and use actions: ★
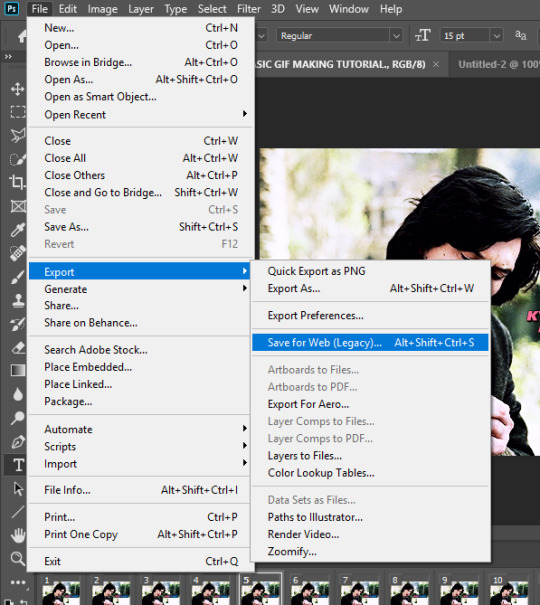
—to do this you need to locate your actions folder. so, go to your adobe photoshop file, right click on the ps icon and then click ‘FILE LOCATION’ then search in it for ACTIONS. next if your action(s) are downloaded go open another file explorer tab:
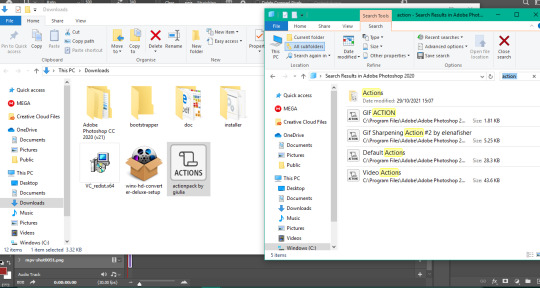
then drag and drop it like this:
—if it says administer permission is needed click yes.

—once you’ve done this head back into ps to use the ACTIONS, first to sharpen, then to save:
—you’re going to click the arrow icon on the sidebar on the left side to your LAYERS and then the three lines as shown here:
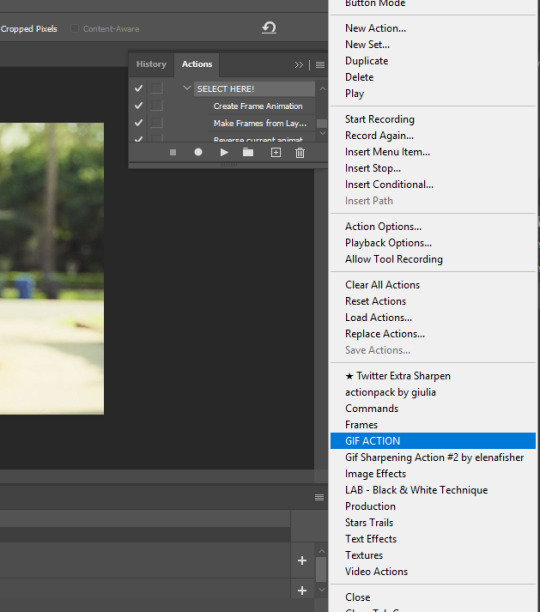
—you’ll see where it says SELECT HERE, do that and then click the arrow icon below it and just click continue if you get the make layers error, this won’t affect anything. (sometimes gifs can glitch at this stage but just undo or you may need to restart your gif.)
—ok now your gif is sharpened! if you think it’s too much you can add gaussian blur from the FILTERS bar at the top but i just prefer to lower the opacity by double clicking the bars next to the word SMART SHARPENED which has now appeared x2.
—for me gif colouring at this stage is hard because playing the gif in this mode blurs it and i like having the individual layers so this is where the action pack (save) comes in handy! *it also saves you from having to open your gif at the end and adjusting to 0.07 sec bug to 0.05 gif speed the action auto does it to 0.05 for you (which i’ll explain next.) just select the action the exact way you did sharpening. just scroll down to where it says save.
—now your ps should look like this (this is a good point to save, but i’m the worst and do it after i colour usually.)
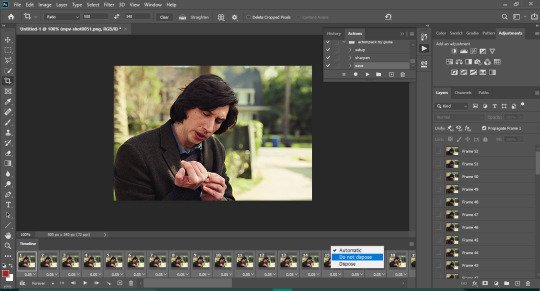
adjust the gif speed by double clicking the numbers if you want to change it from 0.05 speed but even if your gif is short making it anything more slower or even faster can mess up your flow. the best range imo is around 0.04-0.06, although i usually never stray from 0.05. i also like to put do not dispose on all the frames (which you again can do by shift clicking or the three lines on your timeline to get select them all and then any frame right clicking to do that should work for both things.)
★ how to colour (basic not colourful): ★
—now this is the best part for me, however it’s the most tricky and vague in a way. one psd (your saved photoshop document that contains your colouring and usually the gif too) might not work for the next gif even if it’s the same film or ‘footage’ and getting your own style can take a long, long time. you can use other peoples psds but i find making your own is the most rewarding. but! i have studied those psds given out and incorporated them into my own style over time.
—*so, what i have decided to do is just that. i have made a base psd for this gif for you to study. but i really recommend looking at other tutorials to teach you how to do that. i’m just gonna get you started, which i hope no one minds. i did try and make it less my very blue-toned grunge style and more ‘normal’. [x]
—note 1: select all of the adjustment layers on the side and then to put them into a multi-set just select DUPLICATE LAYERS and put them onto your document/next gif. be smarter than me and don’t name randomly or keyboard smash your psds, sorting out your psds makes life so much easier trust me and you can reuse them!!! (i keep ALL of mine in folders in my documents and then they are sub-dived).
—note 2: i like to go more extreme and lessen the vibrancy/saturation and then constantly edit and mess with the opacity rather than being subtle, there’s so many ways to do this. so again, it’s just messing around. however, even if you all your frames selected sometimes this can bug out and mess up one of the frames. so, keep watch on that and either undo or just duplicate the new version of your adjustment layer and delete the bugged one.
*if you do want me to make a how to on my colouring that goes more in-depth/colourful please let me know.
★ how to add perfectly in the middle subtitles: ★
—here i’m going to give you my subtitles with its settings preset, but edit it to your own liking! [x]
—if you’re loading it in, different sizes/factors effect your subtitle placement and your text can looks random like this:
so what you’re going to do this: drag it into the place you want and then make sure your text bar looks like this:
—since this is also an adjustment layer you can get the same bug of it being fixed on one frame only and then the rest are how it used to be. so, just duplicate it into a new file like this:
—and after duplicating it back onto your main gif and get rid of the old one.it should be good. (again, this is just my own learned solution)
—this is also applicable to twitter watermarking which i’ll mention later on.
now that you’ve done all of that and hopefully saved your gif it’s time to export it!
the save settings i use:
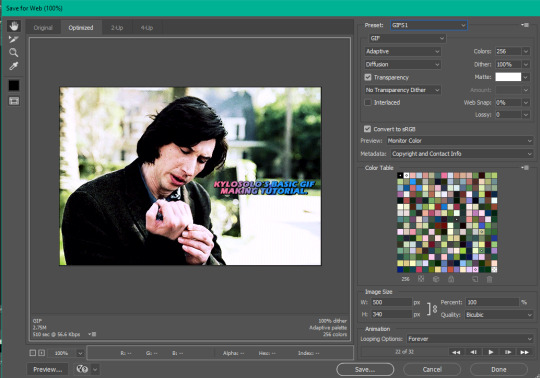
★ how to make hq twitter gifs: ★
—read this tutorial, already linked above but: [x]
—if you’ve read everything above then making a hq twitter gif won’t be a hard adjustment, you just need to change and add a few things.
—first: make sure it’s 600px x 600px (you can change this but to get the best result)
—second: use the twitter sharpening action!!! you can adjust this, but twitter can really repress the quality if you use just the tumblr one, or your preferred method. although some footage needs you to lower the sharpening or else it can look like a lot, but don’t be afraid it’s an easy fix!
—if you’re adding subtitles make them a bigger than you would for tumblr just make sure it doesn’t go through the bottom left side of your gif.
—before posting, make sure you have watermarked it! which you can only do on the top left/right corner and bottom right or else it’ll get covered up! you can also place in somewhere else if you’d like it’s up to you.
—the video of me making a gif will be one for twitter so if you’re unsure about anything from this or the entire tutorial hopefully it clears that up. :)
it should look something like this, just in your style!:
✨✨✨ now that should be everything!!! if you have made it this far, thank you for bareing with me and let me know if there’s anything confusing!!! this took a very long time of planning and making so if it helped, interact with this post? <3 ✨✨✨
#big shout out to everyones resources mentioned!!!#gif tutorial#mine#mine: tutorial#mine: gifs in txt#ft. charlie barber
122 notes
·
View notes
Text
Hi everyone!
One person a while ago send me a DM with some interesting questions about how to do commissions and then my friend asked me similar questions and I decided to make this! This is just "to sum up" all things I know:
Some tips for commissions
If you dont mind, could you tell me how you do commissions? I wanna see how it goes if I start them
How am I supposed to interact with the other and should the payment be made in portions depending on showing them the progress of the project
Well that depends.
For payment I use PayPal, it's easier for me, it has a good thing: paypalme link, but I heard that it's better to use invoices. Never tried tho but I can explain you the difference if needed.
There a lot of variants:
Some artist ask 100% of price upfront, like me - I don't want to be fooled, and that way I know that everything will be fine, if at some moment commissioner will just disappear or whatever. Also money is best motivation. But some customers don't like that option because "how do I know that you will finish it??" Soooo there are some other options.
Some artists ask 50% of price before they start working on project and 50% after sketch approval. That allows them to be sure that they will receive atleast anything if commissioner says "nah, I changed my mind" in the middle of process. And also customer is sure that you are working on it. Also as variant: 50% after sketch approval and 50% after finishing the project.
Some ask for payment only after they finish the project, because they aren't sure how fast they can do it and will they even finish that, and that way they can back up any moment without any problems because... well they haven't got any money right, no responsibility? They send super awful quality finished variant, or even a ugly photo of screen, then ask for payment and then send a file with good quality.
There are a lot of variants, you can make up one that suits for you the best, but there is one important rule:
Never Ever Send The Finished Art/Project To Customer Before The Payment.
Not everyone is honest so they might just grab the art and "drop" you without any money. You can send them super awful quality photo/screen, or add a huge ugly watermark or whatever.
Also. About refund.
Sometimes customers can ask for refund. They changed their mind, or they need money for something, or... they may be a lot of reasons. For that situations I have a rule: No refunds if I started the work. That rule can be any. Like "no refunds if i already did the lineart" or anything. That's up to you. And also if you don't have money to refund don't be afraid to say: "Sorry I can't refund right now, give me a few days"
ALSO! (too many "aslo" XD) Don't hesitate to make refunds yourself! The reasons can be any: you don't like the project/customer, you don't have time, or any. Just write them sorry and send money back.
If we send them a final photo (safely a poor quality or watermark) and they ask more edits, should we charge them?
About edits. That also depends. Lemme show the example.

That comic page was a commission.
I made a mistake - black characters eyes should be red with white lines, but they are black with white lines. Customer ask to correct that. Actually that was impossible - that work is traditional, but I knew how to easily correct that in Photoshop, and that was my mistake (I should pay more attention to refs XD) I did it.
BUT.
If they asked me to correct some poses or anything big I would say no, because for that I need to redraw whole page.
I would say something like "Sorry I can't correct poses now, when I sent you the sketch you said it's alright and approved it, so I can't do that"
Or! You can ask for more money. Like in that case - it would require me to make my job twice, so... yeah I can ask for more money.
But as I said earlier that's all up to you, how much time and energy you are ready to spend for what price.
And is it alright to ask them for references if they know what they want the drawing to look like?
First of all - YES. References is good! Ask them about character references, feel free to ask them for more drawings with characters if you aren't sure how to draw something or for example how character look from behind. Ask them about some references of stuff like surroundings, ask them to send some images/arts that look similar. That's completely okay, and helps you.
What do some artists mean by do not use art for commercial purposes?And what action can be taken if not obeyed?
Well some people think "I paid for that I can do whatever I want" but it's not that. Commissioner pays for time, energy and art materials not for a work itself.
So by "do not use my art in commercial purposes" i mean noone can sell it in any way.
Like... Someone commissioned small drawings that looks like a sticker. And even though they paid for it, even though it's their characters they cannot print it and sell. They can print it and gift to their friends, they can even print it 10000 times, but they can't earn money using it.
Although I do have an option to draw some merch. Like... If someone will come to me and say: "Hey I want to make a daki with my character and sell it and I want you to be my merch artist" I would say "Okay, but the price will be much higher". But that's a different situation. We would agree on that before I start working. And noone is making money on my work behind my back.
I hope I explained it good enough XD
And when we are done with a commission, do we just send it to their dms(the work)?
Yes. I usually just send it. And also I have the rule: customer receives a clear art (with my signature, because any of my work have it) but I post online only variant with watermark.
And also sometimes I offer to send a file via email, especially if customer is from Twitter (because Twitter really corrupts quality of the images, Tumblr is better in that way)
Also there are two pretty important things I wanted to talk with you:
prices and lack of customers.
Every one setting their own prices, that depends on how big is your fanbase and who is in your fan base. Obviously 12 years old girls won't have a lot of money, you know. But setting up too low prices is actually worse that not having any customers. That might seem like a good decision "I'm just starting and that's my deal" you might think, but that's wrong. Setting too low prices affects ALL artists. You better read more information about that from someone more educated in economics than me, but trust me - low prices for art are bad.
Don't be scared if noone will commission you at first. It always hard at first. And also don't stress out abot having no customers after a while. Like I had a super great month where I earned a tonn of money and then... Boom. Nothing. Whole month without any work. That happens uωu
If you struggling defining prices for your art look up for other artists with your level of skill or a bit higher and also look up for average price per hour for artists and you should kinda balance between how much you work and how much time and effort you put in your work and how much people are willing to pay for that!
Anyway...
That's all I can say for now. I hope that helps, feel free to ask me any questions I will answer then as good as I can and I will update that post
41 notes
·
View notes
Text
Quick guide to SAVING LIVEJOURNAL/OTHER FAN CONTENT with THE WAYBACK MACHINE:
(quick note: Tumblr content is honestly much more at risk, so if you have the stomach to try finding things on Tumblr, you can also use this method on that and do some good work)
Uhhh this got long, so look for the bolded parts if you’re not here for a long read lol.
Okay so, at some point, LJ is going under. Or at least all the gay stuff they can find on there. More to the point, PHOTOBUCKET, TINYPIC, IMAGESHACK.... all of those have left huge scars in the records of LJ fandom. So I’ve been using the fact that the Wayback Machine lets you save outlinks if you sign up with the Internet Archive! (Free!)
There’s a Save Page Now function! Good places to use it on include:
Rec lists
People’s masterlists of their own fics/art/meta
Somebody’s well-organized LJ Memories (the page you save needs to contain direct links to the posts you want to save, so if there are sublevels in the Memories you need to go as deep as possible)
community profiles
Every page of a community, if you really feel like it--I’ve been doing this with some small comms, but it’s.... less than feasible with big communities.
Check the “Save Outlinks” button, and the WB will also save links from the page you enter! You can get a lot of stuff at once. Unfortunately there’s a limit on the number of links it’ll grab, but it’s better than nothing. You’ll also see a lot of ERROR!s and it’s annoying. When it’s a Job Failed you can try the page again later.
I don’t know yet how it picks the outlinks to save, so maybe it’s random and you could eventually get all of them by Saving repeatedly??? I’m pretty sure it tries to start at the top, though, because communities with a huge list of tags in their layout are probably not worth your time: I’ve been trying to get stuff from the KKM Fanfic Challenge comm, but.... well, look at it. Trying to save any page with outlinks just picks up a whooooole bunch of those tags on the sidebar, and barely any actual posts. No matter what kind of URL you put in, that sidebar’s always there. You’d have to save each post individually to get every fic. Hope LJ’s not going anywhere fast!
Community profiles are among the most important, because that gives us a lot of info like how many members are left (after years of bleeding users) and how many comments and posts there were in the community! Unfortunately this method is REALLY BAD for art and icons--lots of them are just gone with tinypic and people’s personal LJ albums. Also the WB isn’t good with images in general and there’s no real alternative. But the profiles of icon communities, plus fanfics, meta, stuff like that: a lot of it left to be grabbed! Big main community profiles are best, because they often listed other smaller communities for the same fandom. Saving the big profile with Outlinks will pick up the profile links of all those smaller communities!
Sometimes the big community profiles will just make you sad. Try to soldier on. (If you’re really committing to this, don’t forget that smaller comms will also have even smaller comms listed as affiliates that never made it into the Big Fandom Community’s profile. You can come back later and Save their profiles directly. Sometimes they also have links to fanlistings and other rare things that are also useful to have saved!)
If you can think of a small community, you can also use the method of saving every page, which takes some work and time: you have to save the skip=10 URL, and after that skip=30, skip=50, etc. Then come back later and do skip=20, skip=40, skip=60, etc. The reason for this is that the Wayback Machine will only save one single URL every 30 minutes. So if you’re saving outlinks from skip=30, you’ll also get an incomplete snapshot of skip=20 and skip=40, minus all the important links on skip=20 and skip=40. Obviously, this isn’t much fun and works only with small comms. But it does save a lot of text.
Here’s the type of stuff you’ll get:

a saved PROFILE url: This is good! It saves info about how active a user or community was. In this case it was a user, but the profile is info they chose to put front and center, and the WB isn’t gonna crawl any deeper and grab personal posts from 2004 or anything. (You’ll get a lot of user profiles that aren’t really necessary when using this method.)

a modified POST url: Also good, but you’re gonna get a ton of duplicates on these due to how many different ways LJ would link to a single post. The style=mine doesn’t alter the content. You’ll also see lots of “#cutid1″, which of course is the link left by an LJ-cut. That’s fine, it gets the post. The content of posts 82379 is safe! (but NOT all the nested comments!)

a comment link (in this case dreamwidth which isn’t in danger, but the same format): This saved both the post itself (79392) and a comment thread (131360). You probably can’t get every comment thread just because the WB is bad at unfolding LJ threads, but this does contain the post itself. If you don’t see the plain post URL itself in the list of saved URLS once WB is done saving outlinks, but you do see a comment link: that comment link also has the original post! You don’t need to keep trying!

a journal’s tag link: This is less useful. It saves a snapshot of the tag page itself, but nothing deeper. Any content under an LJ cut or in the comments is not saved. There’s no way to keep these from saving, though. Just keep in mind, that tag in the picture doesn’t mean that the fics this person linked to have been saved. You’ll have to enter the tag link URL itself into the Wayback Machine’s SAVE page for that.

ERROR! JOB FAILED.: These are annoying! Most likely nothing was saved. Unless a comment link was successfully saved, you’ll have to copy-paste the URL that failed and put it into the SAVE page.

LIVE PAGE IS NOT AVAILABLE: There’s nothing you can do unless this URL was already saved somewhere.
BUT WHAT ABOUT IMAGES????
The passage of time means it’s probably too late. Imageshack and Tinypic took out a huge chunk of images on LJ, and PhotoBucket tried to make people pay them by putting big ol’ watermarks on all pictures except those hosted by premium users. It didn’t work and they said sorry, but the watermarks are still there. Lol. If you right-click +Open image in new tab, the watermark goes away, but who wants to do that with every single image? Also, the Wayback Machine sucks with big images and there’s no alternative at the moment.
If you’re lucky enough to find some holy grail like a big post of 1000 icons hosted on someone’s premium Photobucket, you could save a snapshot of the page. Wayback Machine lets you check that as an option, but IF YOU SAVE A SNAPSHOT WITH A TOOL LIKE “GoFullPage”: I find that GoFullPage, at least, will save you a big long image with no Photobucket watermarks! But you’ll have to save that image yourself, or store it somewhere, so keep that in mind.
Also, the snapshot means no animated gifs--although if you want to save those, they’ll be tiny little LJ icon gifs, so pretty easy to store on your own computer.
#fanlore#fandom preservation#is that a tag#livejournal#wayback machine#just gonna add as a tag that i'm trying to avoid doing this with comms where everyone was clearly about 13#let's let them have the privacy of vanishing into the ether someday
100 notes
·
View notes
Text
#showyourprocess
From planning to posting, share your process for making creative content!
To continue supporting content makers, this tag game is meant to show the entire process of making creative content: this can be for any creation.
RULES — When your work is tagged, show the process of its creation from planning to posting, then tag up to 5 people with a specific link to one of their creative works you’d like to see the process of. Use the tag #showyourprocess so we can find yours!
sabrina @lanwangiji, my love, tagged me to share my process of making this typography edit! check out her explanation of her the untamed edit and her edit tag.
1. PLANNING
i once opened lyrics edit requests so i can learn and practice typography. this edit was a request as well. i asked them which lyrics they wanted to have and the colors they’d like. since i got several requests and it was hard to keep tabs on them, i made a trello board so i could organize everything. i’m still using the trello board for every edit idea i have, the board makes my life easier.
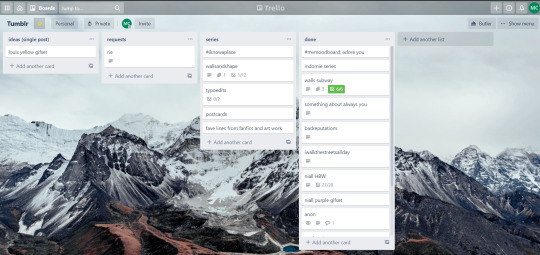

above is what i filled the card in the board with. basically just information of the requests.
1.1 INSPIRATION
once i got the request, my first thought was to find the vibe the song/lyrics exude. “it’s an old curse” screamed witchy vibes to me, so i went to pinterest to find some inspirations. at first i was looking for witchy poster designs and i came across this. i liked how it has smoke-ish graphic and i thought the smoke suited the “old curse” lyrics. and tbh pinterest is a rabbit hole, they gave me suggestions after suggestions, like this and this which became my inspiration for the color palette (i added the gold from those pics) and the sun moon design gave me the idea to incorporate space stuffs too. i somehow landed on this too, and because i wanted to include space theme, i made a simple phases of the moon. ultimately the hero of this edit was the lyrics, i didnt want the graphics took the center stage. i was inspired to make a crystal ball and do this kind of typography but after several trials i couldnt get the the typography right, so i scratched that idea and went with the space theme instead.
1.2 PICKING COLORS
after i was feeling inspired enough, i went looking for the right colors. i usually just type “color name” and “palette” on pinterest. example “dark grey color palette” and i chose the one i liked best. when the request only asked for 1 color, i always searched for either a complimentary or contrasting color to give it a jushz, to add sprinkles. that’s why i added gold on top of the dark grey.
1.3 FINDING FONTS
this is the hardest part. the fonts play important role to the design. they need to convey the vibes of the lyrics, in this case witchy/magic vibe. i needed to find fonts or font just as magical and a bit whimsical. tho i hoard fonts... i like to use new font for every typography edit lmao sue me.
i highly recommend going to creativemarket free goods site, pixelsurplus font freebies and behance to search for fonts. i always use 100% free fonts, that means i can use it personally as well as commercially. creativemarket gives me desktop license for the fonts, which means i can use it for commercial as well. the reason i do this because i want to open an etsy shop someday, and i want to have the right license when i sell my stuffs. i almost never buy fonts bc they are expensive lmao.
the fonts in used are “Vintage” for the main typograpy (i think i was a freebie from creativemarket) and “Morganite” for the title of the lyrics and the name of artist.
2. CREATING
once i have my materials and ideas, i open my illustrator and hope it doesnt crash every 5 min.
for this kind of typography edits, i use 600x700 px. tbh i dont like using 540px, the suggested tumblr size, as the width bc to me it doesn’t look as good in quality, so i up the px. but more on this sizing later. i utilize the artboards function in illustrator, and i use 2 artboards.
i use illustrator (ai) bc i’m working with vectors. when i work with vectors, the graphics/texts or whatever im making in ai wont become blurry or lose its quality when i enlarge or shrink it. in compare to photoshop, i need to make for example the moon graphic very big, so i wont lose the quality when i reduce and enlarge it again. with vector, i can start small and when i expand it, it’s still as good as when it’s tiny.
2.1 GRADIENTS
i started with the gradients first. i created a rectangle as big as 600x700px and with the “freeform gradient” tool in ai, i played with the colors. below is the color palettes i used
2.2 LYRICS AND GRAPHICS
once the gradients are done, i worked with the lyrics and graphics right away. when i first doing this edits, i made typos a lot lmaooooooo. so i copy and pasted the lyrics on top of my artboard, so i wouldnt have any typos.
i had 3 layers in my ai. one for the inspo pics and the OG lyrics. the rest for the edits themselves. i broke up “It's an old curse/dreamers diving headfirst” into to parts, hence the 2 more layers
i almost always started with the lyrics first then the graphics. but for this edit, i made the smoke first so i can layout where my text would be.
tbh the process of making the lyrics is a trial and error. i tried bunch of different stuffs and i chose whatever the best. but i worked like methodically, i made sure i finished the first part of the lyrics first then i could move on.
i was lucky with this font “vintage”. the font offers me several glyphs like these
and i chose the one at the bottom. you’re very lucky if you find a font and they have glyphs.
excursion: glyphs vs fonts
glyph is an individual character. It might be a letter, an accented letter, a ligature, a punctuation mark, a dingbat, etc.
A font is a digital file which is used to display a typeface, which contains the entire upper- and lowercase alphabet as well as punctuation, numbers, and other special characters.
after i was finished with all the lyrics i added some graphics to make the edit pretty like small stars or dots. i added the song title and the artist too, sometimes at the bottom sometimes at the top. and i added my watermark put it as small as i could and made it a bit invisible but still can be seen.
2.3 EXPORTING
exporting! this is where i’m going to go deeper with the dimension of my work. in ai, i always choose to save with “export as screens” function. it automatically divides the artboards i have and save them separately. i always save as png, bc the size is smaller than jpg but can maintain the quality.
now the export tab looks like this
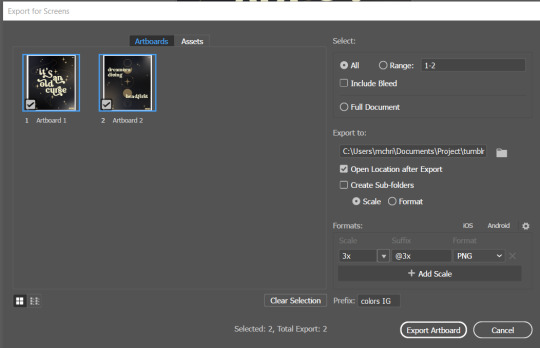
see the formats? i always scale up my edits, 2-3 times the original artboard size. reason is, to maintain the quality. i have tried to save it as original, 600x700 px, but it turned out a bit blurry. bc everything in ai is vector, when i scale up it doesnt lose the quality. BUT once i save it as png, it’s not a vector anymore, and when you zoom in until a certain degree it’ll be pixelated. that’s why i always scale up, to avoid it becoming pixelated when it’s just zoomed 1 or 2 times.
2.4 FINAL TOUCH
i opened my photoshop and also pray it won’t crash. import the png of my edits, add some grains/noise. the reason i use photoshop is, the noise filter is way better than in ai. it’s smoother somehow. and then i export my edits.
(i have a timelapse of how i made one of my edits, it’s not this one, but it’ll give you a better visualization. find it HERE
3. POSTING
now the hardest parts are done, we go to posting!
i uploaded the 2 posters on tumblr as photos then i wrote the captions. for this typography edit, i always chose another lyrics that i like from the same song for the caption. i bolded the lyrics, add link to all of my typography gradient edits.
i always use this link to color my caption. i usually choose 3-4 colors, and i took the colors from my edit. but this was not until recently lmao. before i just took a guess and looked for similar colors that match the edit, but then i thought “why didnt i just use the color in the posters lmao”
ok after i have my html code for the caption, i go to this site to replace the “;” with “ “ so tumblr can read the code.
i’m not one who puts their edits in draft, bc i just cant wait to post it. i have to option here, either i post it immediately when the time is right (i usually post between 4-8) or i schedule it, if im finished before 4.
i put all the necessary tags and click post! i am done finally!
i’m tagging:
@thetriangletattoo for this amazing series
@deludedandlostcause for this impressive gif
@half-lightl for this spectacular edit
@gayndrew for this stunning drawing
@thechampagnelovers for this cool collage
@cloudslou for this incredible edit
@heyangels for this incredible edit
35 notes
·
View notes
Text
Gift
Children were not an option with schlatt, but life likes laughing in the face of her plaything's plans.
A Dark figure stood outside Schlatts front door holding a sleeping baby boy. They gently placed a kiss on his head, setting him down in a basket of soft chubby flesh with curly blonde hair contrasting to the red blanket and white envelope setting in his lap. Soft sweet words and melodies kept the child's mind at ease as the figure rang the doorbell scurrying away from the scene of the crime leaving soft coos and cries on the doorstep of Schlatts house.
-----
Who the fuck could be up at 12 o’clock in the fucking night? Ughh if it Connor or ty I swear I’m going to skin their asses.
I can’t see shit in this fucking pitch-black house!
the hallway should be around here somewhere, oh great here it is.
fuck! the peephole is too tall, all I can see is the street which of course is empty.
Probably just the neighborhood kids playing a prank but I was supposed to get a package today with a schlattcoin in it.
The door squeaked slightly open summers lingering warmth invading the perfectly cool house.
the porch looked empty at least-
A small child sat in a basket slept soundly under the porch light golden fizz crowning him like a halo.
“What the fuck??”
Did someone just fucking leave a baby on my doorstep?
I glanced down the still vacant block, nothing had changed. No slow cars or anything, just a baby in a basket with a letter sitting on my fucking front door.
What do I do?
I-
I could just walk away from this definitely is not my problem in the slightest.
God damnit I can't just leave a baby on my doorstep-
fuck!
fuck Shit ass just FUCK! WHAT THE HELL DO I DO WITH THIS?
"Hey um did someone leave their baby on my porch?"
,,,
fuck. welp I just take him in and then drop him off at the orphanage in the morning
yeah they'll be able to take care of him, he'll be in good care.
yeah, then this whole weird dream can be over.
okay, kid let's get you inside whoever left you on my doorstep must be really upset.
ugh, fuck, it's too fucking dark in here to see anything.
Where was the floor lamp again?
Fucking! where is the stupid twisty thing
ah there!
the lamp flickered to life illuminating the dim living room, soft black second-hand couches with mismatched coffee tables, and a flat-screen TV. Half of the stains on the couch had been made by Connor at this point, and Ty always insisted on using a cozy on the coffee tables to not leave a watermark despite the countless others already there.
okay um, he'll just sleep in the basket tonight.
wait aren't babies supposed to sleep a certain way?
Maybe I should let him sleep in the bed with me?
fuck what if I accidentally move and sleep on him though-
yeah, let's just keep him in the basket what's the worst that can happen-
I'll just sit on the couch and yeah
I’ll just sit here and make sure he's' okay.
Then in the morning we can drop him off and find his mom and dad.
yeah,, just um sit here and make sure he's okay
,,,
Oh fuck- the letter
how the hell did I forget- and why the hell haven't I read it yet it literally had my name on it
,,,,
,,,
,,
fuck.
'I'm sorry to drop him off on your front door but I can no longer support him'. 'He is your son'. 'His name is Tommy after my grandfather Thomas'. 'please take good care of him'.
that bitch-
she just- after having the kid can't even go and support him!
I mean I would have-
I would have fucking helped out if I knew!
How haven't I heard anything about this?
fucking hell, I have a kid- I'm a dad now I guess? how the fuck-
I don't know the first fucking thing to being a dad
wait fuck am I ready to be a dad?
would I even make a good dad- I run a fucking scam business
how am i-
Small sounds came next to me, the small wiggling infant was stretching himself out kicking the blanket away. His bright blue eyes glanced at the world around him before falling shut again. I don't know why, but everything in me just swole with pride looking at his stupid ravioli sized fist and beautiful blue eyes
i-
I can't drop him off at the orphanage tomorrow
fuck
I can't just leave him.
I um
I guess I am a dad now? fuck I'm not prepared at all for this.
A small tight squeal erupted next to me as Tommy wiggled upset by something.
Fuck-
"fuck um- wait- shit no-no"
fuck I don't want to hurt him-
"shh shh it's okay little guy I got you it's okay"
his soft body fit in my arms as I gently cradled him, rocking him back and forth as he softly fell back into a deep sleep.
Okay yeah, yeah I um.
I can do this.
I'll be a good dad for you toms.
-----
A tale like any other filled the room: big happy balloons and birthday cake sitting on a table with a now 8-year-old Tommy sitting across from Jschlatt. The candles had long since lost their wish powers and gifts already opened and played with. Connor and Ty were sipping on their drinks listening to the story of how we got here with frosting-covered silverware and a now 9-year-old boy casually adding their comments on how Jschlatt didn't even know how to change a diaper before ty stepped in. Jschlatt had just finished his story of the now happiest day of his life.
"-and that Toms is the story of how I became your dad"
Tommy looked amazed and confused, his brows furrowed in thought.
god, he looks so much like me when he does that.
his horns should start sprouting soon too if I am correct.
"So I was your gift," he finally responded, "like from the Easter bunny?"
Conor snickered, remembering the panicked phone call he got that night at 1 am with Tommy crying in the background while I pleaded for him to come over and help. It was far from a gift at the time, more like being shoved into a car going 40 miles an hour with no clue what to do.
But I gotta bite. I would never trade it for anything in the world ever.
"Yeah, and to this day it's the best thing he ever got me way better than chocolate in my humble opinion"
yeah, the best gift I could have ever been given.
-----
This took a lot longer then the first fic ill admit but its also twice as long so i hope you guys injoy it just as much.
also again thank you gheysnakelady or @dadschlatt-tommyau for this amazing au i really like it.
#dadschlatt tommy au#original writing#fanfiction#tommyinnit#jschlatt#i honestly made the mistake of comparing my writting to others while writing this#so there was a point where i was like is this even god?#but i think i am happy with how it ended up#im not good with angst but maybe ill dabble in it#just for you gheysnakelady#anyway can i not post this to my main now#sorry for the two ping btw#i didnt mean to
108 notes
·
View notes
Note
hi! do you think you could explain how to make gifs where it's only one gif (like 540px) and you split that area and put two (268px for example) or more separate scenes in it pls? i found a way to do it myself but it's quite complicated so i was hoping there was an easier way that i didn't know about. i hope you understand what I mean, for example that one set you made with a compilation of scenes from each chan's room
hi!! of course i can 🥰💖 !! the way that i do it, is pretty simple (to me)!! so i hope this is helpful!!
A Quick Tutorial On How To Combine Gifs!

edit: this was super wordy so i ended up including a quick screen recording of how i did it as well at the very end!! i really hope this makes sense/helps- let me know if it doesn’t!! i’ll try to explain better 😅
okay, so the first thing is to just make all the gifs you know you’ll be combining! but when i’m making them, i make sure that i do NOT add a delay on the gifs! that step i do later!

every other step that you do in ps (colouring, watermarking, blur, etc) you should still do!! after you’ve made all the gifs, export them as you normally would.
then, i open all three gif files in photoshop! it should open and the timeline view of the gif is what you should be seeing! (make sure it’s not the video timeline as the transparency won’t be saved!!)
once you have all the gifs open, check how long each gif is. chances are, they won’t all be the same length. unless you plan for this properly when you’re using vapour synth (which i never do 😅) they’ll be different lengths.. if you’re lucky the discrepancy won’t be too vast where you can delete a few frames from the from and end of each clip so they’ll match up.

so for example, my first gif had 122 frames, my second one had 130 frames, and my last one had 110 frames. i’d just pick the one with the lowest count and then delete 12 frames from the first gif, and 20 frames from the second one.
another trick is to multiply and see if there is a common number between the two but this is really only useful if the gif has like below 60 frames... because these are 540px gifs and you’re combining 2 or more gifs it tends to be a lot bigger... so for example, if one gif had 30 frames and the other one had 60, i would just duplicate the first gifs frames so that it would play twice in the time the second one would play once... (idk if that makes sense but TT TT)
so moving on! once you have all the frames matched up, go to the gif you know will be the first of the set. here, go to the crop tool, and in the ratio/size of the crop, put in your dimensions. so since you want 540px gifs, you’d put 540 in the first box, and then whatever the height of your gifs are in the second.


at this point, i would also put all the layers in this gif into a folder in the layers panel, to make it easier to see!

now, going back to the LAST gif of the panel and select all the frames from the timeline bar, and the copy the frames.

going back to the first gif of the panel, go into the lined menu again, SELECT all the frames again, and this time choose “paste frame,” another dialogue box will open up that looks like this:

select the “paste over selection” option! just like before, i immediately put these into a folder (in the layers panel) and then i move the gif over to the very right side of the new big gif!
make sure you have ALL the frames selected and not just the very first one!
now, just rinse repeat with any of the remaining gifs. if you have more than 3, the next one i would put is the middle one, so that i can gage the middle and how far apart the gifs do have to be!!!
after the last gif is in, i select all the frames from the timeline and adjust the delay! i set it to whatever that specific set requires. the reason i do that step here is because sometimes ps messes up the gif if you include the delay ahead of time?? idk why but.. i find it easier to just do the delay after the fact!
now you can save your gif the way you’d save any; just export it like normal (pray its under the 10mb limit) and voila! you got a comp gif!
also, this was super wordy, so i’ll just include a quick little recording of how i do it!! i hope this made sense and wasn’t too confusing >///<!!!
youtube
#*tutorial#burnit#answered#i hope this helps!!!#please let me know if it doesn't;; noafieaoewinaw#i tried to be clear but -___- smtimes i ramble;;#thats why i included that super rough vid lmao;;#maybe ill do a nicer vid later :(#long post
14 notes
·
View notes
Last Seen Blogs