#clipping mask
Text


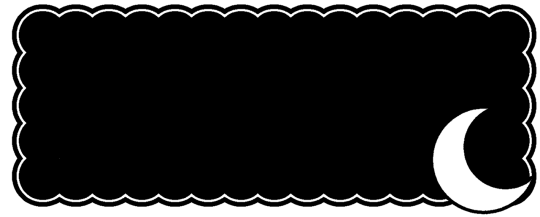
Minecraft themed banner masks!
If you like or use these, a reblog would be appreciated! ^_^ <3 This was not requested, I& just really needed some more banner masks! Feel free to request more though!
#rentry#rentry layout#rentry graphics#aesthetic#graphic resources#graphics#mask#clipping mask#overlay#layout#banner#banner mask#minecraft#mineblr#decor
498 notes
·
View notes
Text

moon + shooting star clipping masks • (F2U)
672 notes
·
View notes
Text

⏖ 🌀 SONIC TEAM ICON MASKS 𐙚


⌒⌒ f2u ┈ no reposts !!
✿ MADE BY ME ! ∿ ୧

++ versions with eyes


#sonic#sonic team#sonic the hedgehog#knuckles the echidna#amy rose#tails the fox#miles tails prower#rentry#icon mask#icon frames#masks#frames#clipping#clipping mask
169 notes
·
View notes
Note
Hi! Your edit for Day 8: Sono Bisque Doll wa Koi wo Suruis is really cute!! Would you please make a tutorial for it?
Hi, anon! Thank you!! So glad you like it. (o˘◡˘o)
And sorry for the late reply. Please check the layout tutorial under the cut for this POST.


So you can follow the steps easily, I uploaded the PSD file HERE.
These will be the layers of the file upon opening:
The SINGLE BOX folder is for the GIF with one image. I turned the visibility off since I wanted to focus on the triple image tutorial. Either way, you will do the same actions for the single box and triple box. If you will use the single box, just turn the visibility on and turn off the TRIPLE BOX and COLOR SWATCHES ELLIPSES folders.
In my original post, I used a pattern and clipped it on the RECTANGLE BG (which is a rectangle shape) but I did not include it on the PSD file because the pattern is not mine. You can use whatever pattern you would like or simply change the rectangle shape's color. To do so, double-click the RECTANGLE BG icon then change the color.
Expand the folder to use the TRIPLE BOX layout:
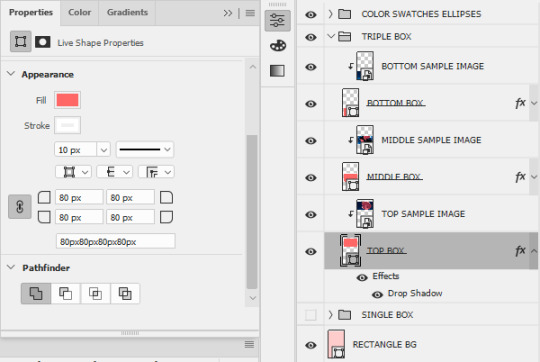
For the boxes (TOP, MIDDLE, and BOTTOM), I used the rectangle tool with the following properties on the left side. Then I added Drop Shadow effect for a 3D-ish visual effect using the settings below:
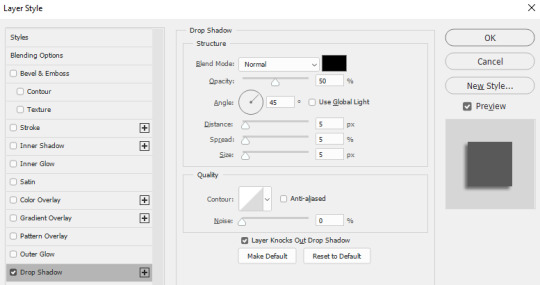
Feel free to change this setting according to your preference.
The SAMPLE IMAGES will be replaced by your GIFs [if you will use GIFs instead of images]. To add GIF, you need to make sure that your GIF file is using VIDEO timeline instead of FRAME timeline and that it is converted to a SMART OBJECT. [It must be a smart object so you can clip it on the boxes.]
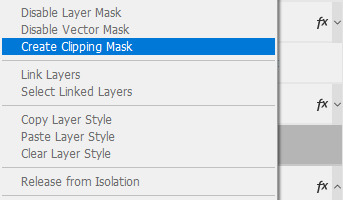
Once you added your GIF/image to the PSD file, make sure that it is one layer above the BOX where you want to place it. Once placed, right-click on the GIF/image, then select Create Clipping Mask.
If you want to move the image inside the box, make sure that you have selected the image file. If you want to move both the box and the image inside it, select both layers.
Do the same actions on the MIDDLE and BOTTOM BOXES. The same actions also apply to SINGLE BOX.
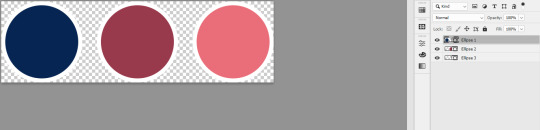
Next would be the COLOR SWATCHES ELLIPSES:

I already converted the ellipses to smart objects on the PSD file. To change the colors of the ellipses and other settings, you need to open the smart object by double-clicking the icon. Once opened, another file should open with a .PSB filename.
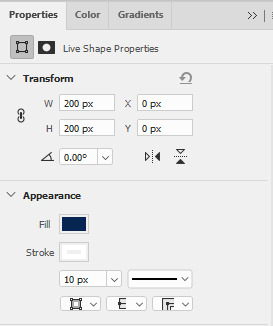
To change the colors of the ellipses, just double-click on the individual ellipses layers icons. You can also change the settings by going to properties:
Once done with the changes, just save it (CTRL+S), then close the PSB tab. The changes should successfully reflect on the PSD file.
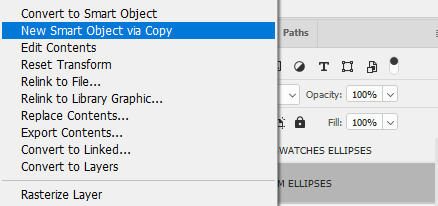
NOTE: The TOP ELLIPSES and BOTTOM ELLIPSES are the same smart object. The other one is simply the flipped version of the other. So any changes made to a single smart object will also reflect on the other smart object. If you want to have different colors for the TOP and BOTTOM ELLIPSES, you need to copy the smart object instead. To do this, right-click the smart object, then select New Smart Object via Copy.
This means that you are trying to create a totally new smart object that will retain its own settings and not be affected by your other existing copied smart objects.
That's it for this tutorial! I hope I explained it clearly but if there are issues with the file I shared or questions on how to use it, feel free to send me an ask or a message.
#art answers#reply#anon#gif tutorial#clipping mask#psd template#adobe photoshop#resources#artsresources
7 notes
·
View notes
Note
May I ask for a tutorial if it is not going to cause you too much trouble on the first gif of this amazing set of yours? <3 I just couldn’t find a tutorial on making multiple gifs in one 💕💌
Hey friend! Of course it's no trouble. So if I understand correctly you're asking about the layout and having all four scenes in one gif?
For reference, the gif in question:
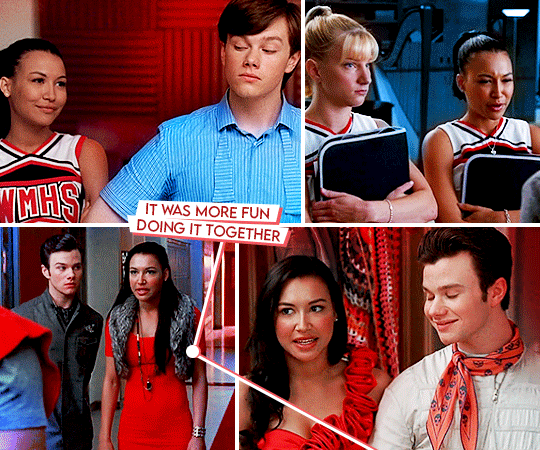
What I'm going to describe applies to the other three similar gifs in the set as well just a different layout.
The most important tool we'll be using is Clipping Mask - it will enable us to essentially size our scenes and all the adjustment layers. First, we need the layout itself. My inspiration/template for this gif was this wonderful set, so I basically just created rectangles the same sizes as the gifs on there. Once I do that, I have my base:

This is what hiding under that very gif above. Once you know what scenes you'd like to use, you place the layers(/in my case Smart Object) on top and right click -> Create Clipping Mask. What you'll notice is that your scene and any and all layers within the clipping only go as far as your base, the rectangle does. This saves you from having to cut around the edges manually of having to Layer Mask everything.
In the Layers tab, we now look like this:

This works when you're not working on timeline like I am, too, in which case if you don't have a Smart Objects all the frames are just clipped to the base.
You make sure that all your gifs are the same length/adjust your work area and that is it, really. Once you clipped all the scenes you get a gif:
I hope that answers your question, please let me know if there's anything else I should go in-depth with. After this, it's colouring and adding text as desired. This adjustment-less gif really shows how badly lit season 1 is compared to season 1 lol.
It looks kinda weird but I wanted to demonstrate what a huge difference even a huge adjustment layers do (and colouring was a big part of this set):

#gif asks#gif tutorial#user tina-cohen-chang#lmao my colour layers moving into frame#clipping mask#i did this real quickly so please feel free to ask further questions if anything isn't clear
36 notes
·
View notes
Text

I wanted to show someone how to use a clipping mask for colored lines but was told they are a visual learner. So instead, I drew a guide.
step 1: have 2 layers. This step is not necessary, you can simply do with 1 layer. However, I often will do colored lines when I have color underneath. I tend to use it as a guide so that my lines blend a bit better.
step 2: draw something. You can use an existing drawing you previously made for this. Either way, make sure it has lineart (or not. Just layers that can be messed with).
Step 3: make a new layer above another layer. This is going to likely be above your lineart layer. Now, set it to clipping mask.
Step 4: color in the lines/layer to however you see fit. There you go! You have colored lineart without any of the hassle of cleanup! You can also cleanly merge it.
6 notes
·
View notes
Text
Photoshop Clipping Mask
Photoshop Clipping Mask is done Only by Adobe Photoshop, In the World How Many Creative Photo Editor Use Photoshop as Photoshop Clipping Mask non can Say. Unbelievable!! Adobe Every Year Update Photoshop for User Friendly and Recent Photoshop CC 2023 is very Easy to use. Nowadays in Business or Communication like E-Commerce Product, Man Woman Fashion, Food and Furniture, Automotive Photo. Digital Marketing Agency, Creative Photographer, photography studio, footwear e-commerce company, Streetwear and Swimwear Clothing have lots of images which need to Separate Object from Background for Removal Background and use New Background for Looking Professional.
2 notes
·
View notes
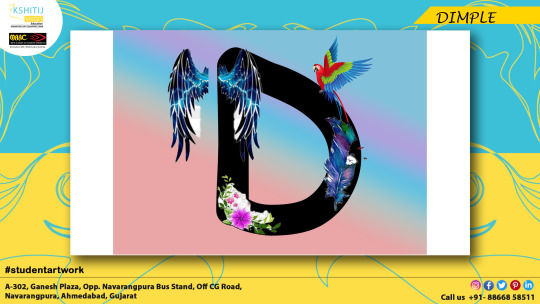
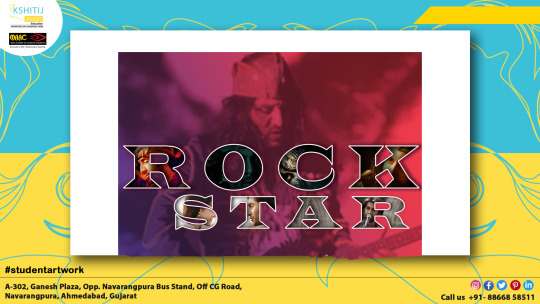
Text


Poster Design
#Adobe #Adobephotoshop #photoshop #kshitijvivan #sahdevvala #artwork #Photoshoptutorial #photoedit #photoediting #graphics #graphicdesigner #designer #creativegraphics #creativedesigner #creativedesign #educationvala #education_vala #parthsir #educationvala.com #educationvalanews #creativeagency #socialmediabanner #socialmediabannerdesign #socialmediapost #realestate #realestatesocialmediapost #socialmediapostrealestate #socialmediapostdesign #socialmediapostlayout #creativesocialmediapost #creativegraphicdesign #creativedesign #socialmediapostfor #socialmediapostforrealestate #movieposter #moviebanner #filmposter #filmbanner #clipmask #clipmasking #layermask #layermasking
#adobe#kshitijvivan#photoshop#sahdevvala#photoshoptutorial#educationvala#indian army#layer mask#clip masking#clipping mask#clip mask#indian army wallpaper#graphic designer#desinger#educationvala.com
6 notes
·
View notes
Text
WHAT RHYMES WITH CLIPPING MASK!?
idk you tell me.
(also saw ruin trailer, trailer good)
6 notes
·
View notes


Text
Loosen up
How do I do it
Well, at least one way of doing it is just chilling, turning on Netflix, and watching some horror. Yep. Some ghosts and scary jumps will do it for me. Makes me downright euphoric! Now of course I can’t just sit and not do something with my hands. So the iPad is right nearby and I would like to show you some freestyle work that I did. I’m loving t but would be interested in what you guys think.
The process
Actually, it’s just like mediation. I choose a color pallet and then choose some digital brushes that have shapes and textures. In these images, I used the oils pallet, ink, and then some shapes, dots, etc. Just whatever dazzles your eyes and tickles your mind. That tickling your mind is the important part. I also used the liquid options to make things a little special on a couple of these. You can see the shapes in the “Lakes and Mountains” background. I especially like the black addition to this. The small hash marks and the round circles just make my eye want to run over and over this image. Little flicks of gold in it. I knew I wanted to put some gold in it because I had been on Tik Tok and saw some furniture redos and they added pieces of gold leafing in their process although I have not been a fan of “gold” for a few years somehow I really started to be drawn to it. I am also going to add some bits of silver to them as well.
In the “Rain on the Ocean” background, you can really see the cracks in the lower part of the image giving it an old look and adding texture. I used more of an umber color instead of black so that it would not compete with the black dots. I am obsessed with dots. For highlights, I have used some complimentary colors but in neon to offset the neutral colors. You can see a bit of a brick wall as well towards the upper part of the background.
Shown here is Passion, another background image. I uploaded this in a jpg. just due to the large file size. I didn’t want to reduce this at 50% like I did the other just because If I package these up for download (and I am thinking of doing that) I like to give my customer the best printable file and that is a png. They are very heavy files but really pick up all the colors and detail. Not that you can get a great printout with a jpg I just love png formats. Most likely both files will be added to my downloadable. That is also something I like doing providing multiple file options in my packages. It is just nice. It’s easy to “save as” but some people may not have that capability.
What are some of the things you can do with these?
Well there are a lot of things. First off I think these are just beautiful as is. I would love to get a print of a couple. you could even take and add to the print once you got them. A bit of texture, some gold or silver. Photos places over them and then some fabric and string for a collage. Just anything. But I made these for some digital creations.
So here is a sketch. This is a city corner. I kind of like the sketchiness of it. I used the background “lakes and mountains” on this and applied it with a clipping mask then filled in the buildings. Now I did add some watercolor to it to create a bit of shadowing. It got a bit too muddy on the building second from the from on the righthand side but then that can all be changed because I was using layers so I can toss that one out and apply a different technique. On the whole it wasn’t bad. My object was to keep the messy look.
Now to just see what it would look like with a global gradient applied I went ahead and put it through that filter. The yellow and black looked the best. If I continue to play around with it I could get a bit more defined image and perhaps I will do that, but you will have to come back in a few days when I have had the time to be more playful in my work.
So drop a comment below and tell me what you think. Would you use the backgrounds in this way or perhaps another? What do you think of the background?
4 notes
·
View notes
Text

⏖ 🎀 AMY ROSE ICON MASKS 𐙚


⌒⌒ f2u ┈ no reposts !!
✿ MADE BY ME ! ∿ ୧

76 notes
·
View notes
Text
3 notes
·
View notes
Text
2 notes
·
View notes
Last Seen Blogs
stageturn
this font is not ziglets

hhh420
題名未設定
gins-right-tiddy
Chocolate parfait, my beloved

maker-studio-digital
Maker Studio
flojo-jojo
art n stuff