#green r4
Text
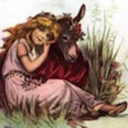
Period dramas dresses tournament: Green dresses Round 4- Group A: Mina Harker, Bram Stoker's Dracula (gifset) vs Princess Margaret, The crown
#period drama dresses tournament#tournament poll#tumblr tournament#polls#fashion poll#mina harker#bram stoker's dracula#dracula 1992#princess margaret#the crown#green r4
63 notes
·
View notes
Text

luigi time!
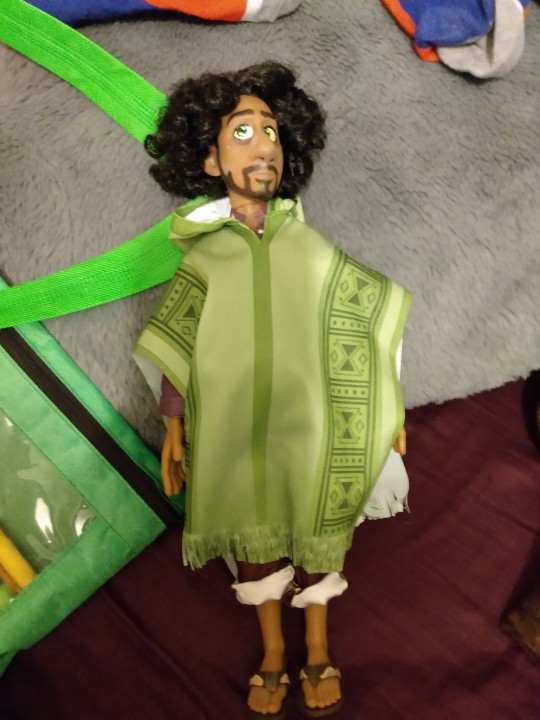
#super mario#luigi#clai's art#I'M SO MAD I POSTED THESE IN MY DISCORD CHAT FIRST WITH THE MESSAGE:#''guess who i've just drawn. hint: he's green and a nintendo character''#and i'm KNOWN for being a huge fan of N P/kemon so they were supposed to guess HIM and then i'd go ''HAHA WRONG ITS LUIGI''#BC I'VE LITERALLY NEVER TALKED ABOUT MARIO WITH THEM#BUT BY SOME CHANCE THE FIRST PERSON WHO REPLIED. ANSWERED LUIGI AS A JOKE#SO MY JOKE WAS RUINED#anyway. i'm playing superstar saga rn i'm enjoying it a lot#i love the mario and luigi series so much but i've only finished bowser's inside story and that was YEARS ago#i got stuck at one boss battle in partners in time and then my r4 broke so i never finished that#and i only got to play dream team for a little bit bc it was my friends copy not mine#now that i have a jailbroken 3ds i can FINALLY play and finish ALL OF THEM
77 notes
·
View notes
Note
hey if you write a pattern for the chilchuck amigurumi I will buy it instantly
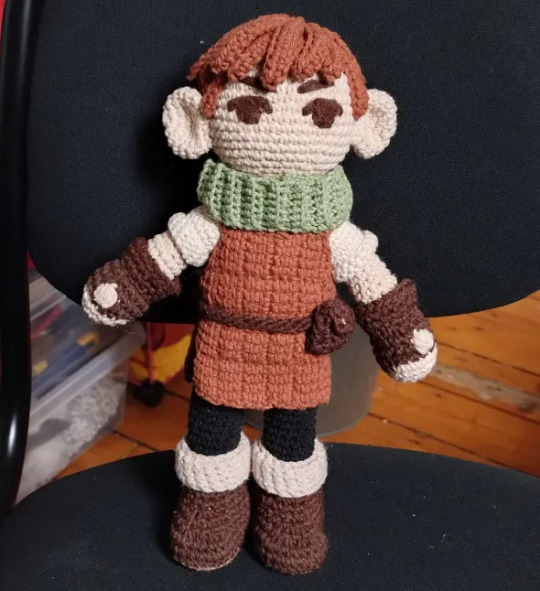
ive gotten multiple asks about this, so ill just answer them all here in one go.
i wrote down everything while i was working on it, but i theres some stuff that i would do diffrently and i also didnt take a lot of process pics so it wont be a full proper pattern for those reasons, but ill add all that i have under the cut!
i dont want any compensation, but if you wanna do me a favor you can donate to esims for gaza, unrwa, any of these gefundme's, or another trusted charity of your choice.
now to the pattern! i would love to see the results of anyone making a squeakychuck, feel free to tag or dm me :)
the dimensions of this depend on the size of ur squeaker and yarn, i had a 4ish cm squeaker and somewhat thick 4/8 cotton yarn (kinda 6/8ish thickness). depending on ur yarn and squeaker u might need to follow a different pattern for the body.
if youre using a different body base pattern, the tunic and blouse pattern are pretty easily adjustable. ill add some notes for that at those sections of the pattern. ill also link some videos i used at relevant sections.
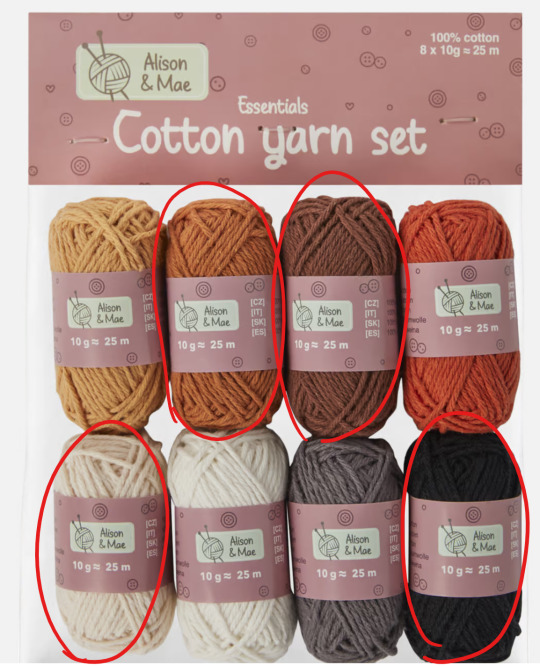
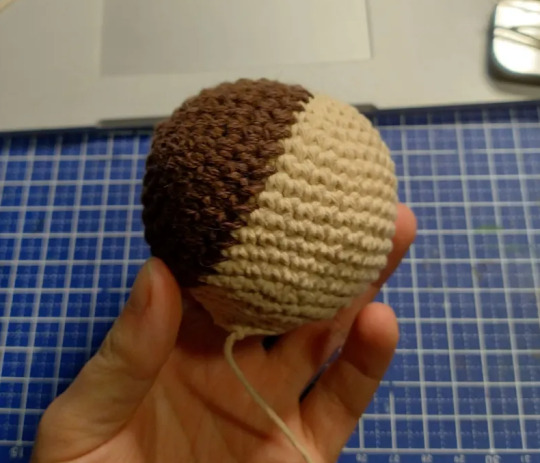
if theres an Action store near where u live, see pic below for the yarn i used for the skin, reddish brown, black and light brown. i got 3 of these but 2 packs was enough. the dark brown and creme were from my stash. i also got the squeaker from a donut dog toy from Action.
-
abreviations list (all in us terms):
mr = magic ring
sc = single crochet
hdc = half dubble crochet
slst = slipstitch
ch = chain
bobble = 5 double crochet in one stitch
BLO = back loop only
FLO = front loop only
what you need:
-skin color of choice yarn
-creme/white yarn (normal for body, thin for blouse)
-greyish creme (for boot flaps)
-black yarn
-dark brown yarn
-light brown yarn
-reddish brown yarn
-green yarn
-4 tiny buttons (for arm joints)
-cardboard (for shoe sole
-3.5mm hook
-squeaker
-needlefelt needle
-stuffing
-stitchmarker (optional, i always mark the first stitch of the round)
-
once again disclaimer, this is not a propper pattern, this is just what i wrote down while i was crochetting. it may not nessecarily be the best way to do it. i wanted most clothes to be removable, but you have to partially disassemble the doll if you want to remove them. if you dont like how something looks or works ur free to do whatever you want. big fan of fucking around and finding out personally.
if you have any questions feel free to dm me, might take me a while to reply though.
-
SQUEAKY CHUCK PATTERN 3.5mm hook
head (skin)
r1: sc 6 in mr
r2: (inc) x6
r3: (sc 1, inc) x6
r4: (sc 2, inc) x6
r5: (sc3, inc) x6
r6: (sc4, inc) x6
r7: (sc 5, inc) x6
r8-15 : sc 42
r16: (sc 5, dec) x6
r17: (sc 4, dec) x6
r18: (sc3, dec) x6
r19: (sc2, dec) x6
r20: (sc 1, dec) x6
r21: sc 12
slst, fasten off
ears x2 (skin)
r1: sc6 in mc
r2: (inc) x6
r3: (sc, inc) x6
r4-6: sc 18
r7: dec 9. slst fatsen off.
Body - leg up (skin, black, thick creme)
start with skin
r1: ch 6, inc in 2nd, sc 3, 4inc, sc 3, inc
r2: inc 2, sc 3, inc 4, sc 3, inc 2
r3: inc 3, sc 5, inc 6, sc 5, inc 3
r4: BLO sc in all
r5: sc 3, dec 2, sc 3, dec 2, sc 6, dec 2, sc 3, dec 2, sc 3
r6: sc 1, dec, sc 4, dec 6, sc 4, dec, sc 1.
r7: sc 6, dec 3, sc 6
stuff
-r8 dec, sc in all
change color to black [color change video]
r9-23: sc in all
1st leg: fasten off
2nd leg [joining legs video]:
r24: sc7, ch 1, sc join in 1st leg after last sc, sc13, sc1 in visible v loop of ch1, sc 7
r25: sc7, sc 1 in remaining v loop of ch1, sc21
r26-31: sc 28
r32: sc 7, change color to creme/white, slst 1, sc 20
r33-35: sc 29
r36: (sc 8, dec) x3
r37: (sc7, dec) x3
r38: (sc6, dec)x3
add squeaker
r39: sc21
r40: (sc 5, dec) x3
r41-42: sc18
r43: (sc 1, dec) x6
fasten off
Arms (skin, dark brown)
i made the arms movable with button joints, but after looking at some videos i discovered that what i did is not called a button joint and i dont have a video explaining it, so i hope this drawing helps.
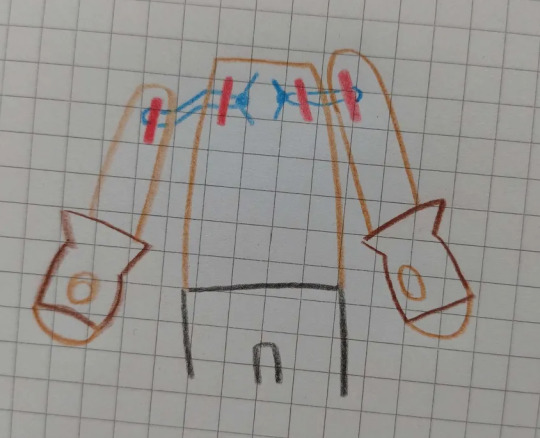
the red bits are the buttons inside of the arms and body, and the thread (blue for clarity, i matched it w the skin) should be pulled tight and finished off with a double or tripple knot inside the body.
or you could just sew on the arms that also works. but wait with doing that until youve finished the blouse as the hands dont fit through the sleeves. i have a seperate section on assembly at the end of the pattern.
start with skin
r1:sc6 in mc
r2: inc x6
r3(sc, inc)x6
r4 : sc 18
change color to brown
r5: sc 18
1st arm r6: sc 3, bobble, sc 14.
2nd arm r6.2: sc 14, boble, sc 3
[i matched the top loop to the bobble color but i think it would look better if u didnt]
r7: sc 18
r8: (sc 4, dec)x3
r9: (sc 3, dec)x3
r10 sc12
color switch to skin (you might want to do this a round earlier, i didnt initially plan on making the gloves flared, and this color change part can sometimes be seen and look kinda weird)
r11-14: sc 12
r15: (sc4, dec)x2
r16-19 : sc 10
r20: (sc3, dec)x2
r21: sc8
insert button joint
r28: (sc2, dec)x2
slst, sew shut
glove flare (dark brown)
r1: ch 15, slst join LONG TAIL
r2: (sc4, inc)x3
r3: sc4, inc, sc8, inc, sc 4
r4: sc 2, slst fasten off
sew 2 rows below thumb bobble
boots (light brown, dark brown, greyish creme) [video]
these are removable but they dont go on easily, so you gotta patiently massage the feet in there.
start with light brown
ch 7, start in 2nd from hook:
r1: sc 5, 3inc, sc 4, inc
r2: inc, sc 4, inc 3, sc 4, inc 2
r3: inc, sc 5, hdc inc 7, sc 5, inc 2
r4: slst fasten off. sew in holes/tails, fray ends for flat gluejob. trace onto cardboard for sole.
switch color to dark brown
r1: BLO join slst, BLO sc in all
r2-3: sc in all
glue in sole
r4: sc 8, dec 5, sc 12
r5: sc 7, dec 4, sc 10
r6: sc7, dec2, sc 10
r7-10: sc in all
switch color to greyish creme
r11-12: sc in all
r13: slst, FLO sc in all
r14-16: sc all
slst fasten off
flip the greyish creme flap over.
blouse (thinner creme)
this is a standard raglan pattern, if you need the whole thing bigger/smaller you need to have more/less chains at the beginning. this change also carries over to the collar. the increases are evenly spaced for me, and unless your doll has a very broad chest this shouldnt have to change.
if the arms need more space you need to either add more rows to the r3-7 part and/or add more chains in r8 (this part should fit pretty sugg around the body)
i was experimenting a bit w using BLO to minimize the gap where the sleeve and body seperate (r8). it worked p good but you can ignore it if you dont understand it and just sc in all.
r1: ch24, slst join.
r2: (sc 5, inc) x4
r3-7: inc in first of previous inc. last row should have 10 sc between increases.
r8: sc5, blo sc 1, ch 5, blo sc join in 1st of next inc, sc 11, blo sc1, ch5, blo sc join in 1st st of next inc, sc 5
r9: sc6, blo sc 1, sc 5, blo sc1, sc11, blo sc 1, sc 5, blo sc 1, sc 6
r10-13: sc in all (36)
r14: (sc8, inc)x4
r15: sc in all (40)
slst finish off
Sleeve
r1: join mid armpit, slst ,sc2, sc in the leftover bits from the BLO stitches, sc 1, sc in leftover BLO bits, sc2
r2-6: sc in all
collar
join left-middle front, sc 7, inc, sc8, inc, sc 7. turn
r2: sc7, inc, sc 10, inc, sc 7. turn
r3: sc8, inc, sc 10, inc, sc 8. turn
cuffs
r1: join mid body-facing side, FLO sc 20
r2-4: sc 20, slst fatsen off
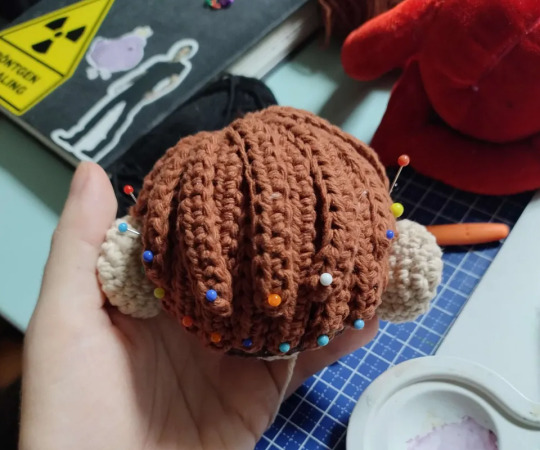
Tunic (red brown) [tunesian entrelac crochet]
if you want to make this bigger i recommend keeping the same square layout, but making the squares bigger. its a bit of measuring and math to figure it out.
the tunic is made in tunesian crochet and i dont really know what written patterns for that look like so i hope this makes sense.
for a single square:
r1: ch4, start in 2nd back bump from hook. pull up a loop from ever back bump. you should have 4 loops on your hook total. simplestitch in all
r2-4: simplestitch in all.
r5: slst in all. fasten off
for the slanted parts i did the decrease by pulling through the middle 2 loops in one go on the back pass
this is how the full thing should look, its worked from bottom left to top right.
sew together the shoulders together, then sew in all of the ends
:) good luck
tunesian crochet has a tendancy to curl, so if you used cotton i def recommend blocking it
i defined the grid a little bit with a dark brown pencil.
cowl (green)
BLO sc 7, repeat till desired lenght, then BLO slst join the last row to the first.
scalp undercut bit (dark brown)
r1: sc 6 in mr
r2: (inc) x6
r3: (sc 1, inc) x6
r4: (sc 2, inc) x6
r5: (sc3, inc) x6
r6: (sc 4, inc)x6
r7: sc36
sew on back of the head (recommend doing this before the ears and face, see end for more detailed assembly instructions)
hair (reddish brown) [hair video]
disclaimer, this is kind of a mess. the lenghts didnt line up the way i intended so i improvised by adding loose strands and spent a lot of time pinning every strand in place before glueing them down.
i used bison kit contact glue since its sturdy, transparant, flexible and waterproof. you can use hot glue as well, i just personally dont like it because its bulky.
r1: sc 21 in mc. join BLO slst
r2: ch 12, sc in 2nd from hook, gdc10, BLO slst join
r3: ch 12, sc in 2nd from hook, gdc10, BLO slst join
r4: ch13, sc in 2nd from hook, hdc 11, BLO slst join
r5: ch13, sc in 2nd from hook, hdc 11, BLO slst join
r6: ch 14, sc in 2nd from hook, hdc 12, BLO slst join
r7: ch16, sc in 2nd form hook, hdc 14, BLO slst join
r8: ch 18, sc in 2nd from hook, hdc 16, BLO slst join
r9: ch 18, sc in 2nd from hook, hdc 16, BLO slst join
r10: ch 14, sc in 2nd from hook, hdc 12, BLO slst join
r11: ch 12, sc in 2nd from hook, hdc 10, BLO slst join
r12: ch 10, sc in 2nd from hook, hdc 8, BLO slst join
from now on, join in the FLO's of previous round
r13: ch10, sc in 2nd from hook, hdc 8, FLO slst join
r14: ch10, sc in 2nd from hook, hdc 8 , FLO slst join
r15: ch12, sc in 2nd from hook, hdc 10 , FLO slst join
r16: ch12, sc in 2nd from hook, hdc 10 , FLO slst join
r17: ch14, sc in 2nd from hook, hdc 12 , FLO slst join
r18: ch16, sc in 2nd form hook, hdc 14, FLO slst join
r19: ch 18, sc in 2nd from hook, hdc 16, FLO slst join
r20: ch16, sc in 2nd form hook, hdc 14, FLO slst join
r21: ch14, sc in 2nd from hook, hdc 12 , FLO slst join
1x ch 6, sc in 2nd from hook, hdc 4
2x ch8, sc in 2nd from hook, hdc 6
2x ch 10, sc in 2nd from chain, hdc 8, slst in same, fasten off.
2x ch 12, sc in 2nd from chain, hdc 10, slst in same, fasten off.
3x ch14
pin all in place until it looks good, tie +glue loose strands first. then glue back pieces, crown, and lastly bangs/ top back layer. some of the lose strands go behind the ears, one is the left sideburn, and the rest is to cover up the crown. these pics are the best i can do as a guide, this was my first time doing this so i was struggling lol.
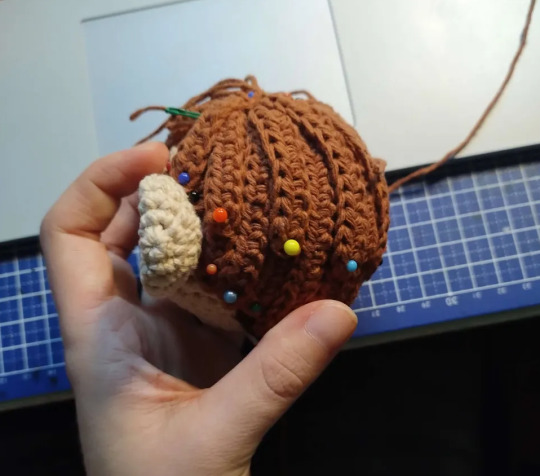
i didnt fully glue down the bangs and the top back layer bc i thought it would be fun if u could ruffle his hair, but my friend who i gave the plush to has significantly abused him (its been 2 days) and his hair is a mess so im gonna have to glue it down again lol. might as well do it all the first time if u plan on throwing him down the stairs or something.
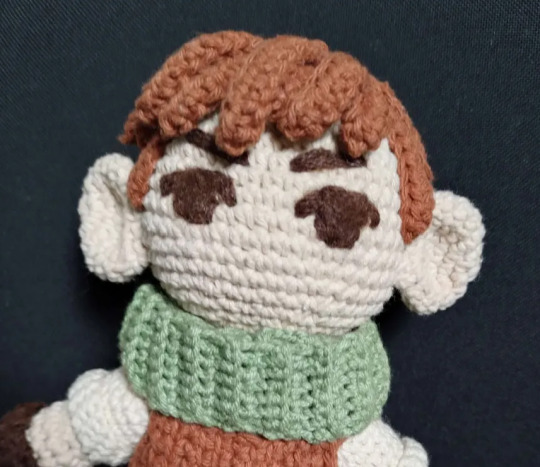
Face
for eyes + eyebrows, embroider outline with dark brown, then needle felt [video] the inner parts w unraveled dark brown fluff. the dark brown i used was probably acrylic. cotton doesnt really work well for this.
Belt and pouch (dark brown)
the belt is a 3 strand basic friendship bracelet! [video]
sew together the ends and hide it with by sewing the pouch on top.
i didnt write down the pattern for the pouch, but from the top of my head its the same start as the squares for the tunic
r1-9: simple stitch in all
r10: simple stitch 1, decrease by putting your hook through 2 vertical bars when pulling up a loop, simple stitch edge 1.
r11: slst in all, finish with a long tail
use tail to sew together the sides, and sew the pouch onto the belt. use some yellow thread to make a button.
ASSEMBLY.
put on the blouse, put the arms in their place and finish the button joints.
put on the tunic, lace the sides with dark brown yarn, finish with a knot and hide the tails underneath the chest part of the tunic.
slide on the belt and boots.
sew the scalp undercut bit to the head
sew the ears to the head
tie + glue the loose hair strands behind the ears
glue the back of the hair
glue the back of the hair
glue the middle circle part of the hair
glue the top back layer and bangs
sew the head to the body
put on the cowl
i hope this is somewhat clear, feel free to dm me is you have questions.
enjoy your squeakychuck :D
105 notes
·
View notes
Text

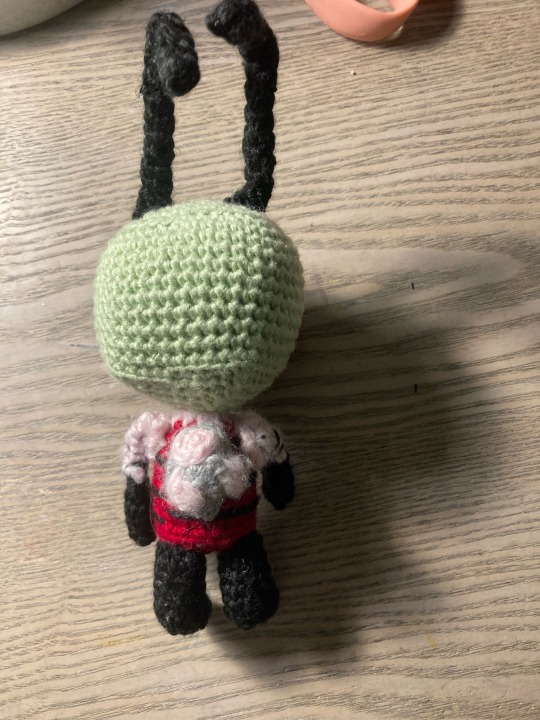
Invader zim crochet pattern
IMPORTANT INFO (PLEASE READ BEFORE YOU GO ON TO THE PATTERN):
THIS PATTERN IS WRITTEN IN U.S. TERMINOLOGY
PLEASE DO NOT SELL MY PATTERN ON ETSY, RAVELRY, OR ANY STORE OF THE LIKE, BUT YOU CAN REPOST IT AS LONG AS YOU LINK IT TO MY BLOG (millys-craft-corner) OR TIKTOK/YOUTUBE (fiestywyvern) FEEL FREE TO SELL ANY FINISHED PRODUCTS. Be sure to link me if you post your Zims as I’d love to see them.
Zim stands at about 5 inches tall or 12.7 cm, not including antennae
Techniques used
Sc
Inc
Dec
Triple dec
Triple inc
Magic ring
Chain
Basic embroidery and sew techniques
Not so well known techniques used
Triple inc- an increase with 3 stitches in one stitch instead of 2
Triple dec- a decrease going across 3 stitches instead of 2
Materials
3.5 mm crochet hook
size 3 or light worsted or light yarn weight in these colors light green, black, deep ruby red, light grey, and light pink
aluminum wire in size 14 or pipe cleaners
black embroidery thread
a medium sized sewing needle
tapestry needle
pliers if you’re using wire
hot glue
light pink felt
stuffing
Head and torso (make 1)- start with green
R1: 4sc in mr (4)
R2: triple inc around (12)
R3: 1 sc, (triple inc, 2sc)x3, triple inc, 1sc (20)
R4: 2sc, (triple inc, 4sc)x3, triple inc, 2sc (24)
R5: 3sc, (triple inc, 6sc)x3, triple inc, 3sc (36)
R6: 4sc, (triple inc, 8sc)x3, triple inc, 4sc (44)
R7: blo
R7-16: sc around (10 rounds) (44)
R17: blo- 4sc, (triple dec, 8 sc)x3, triple dec, 4sc (36)
R18: 3sc, (triple dec, 6sc)x3, triple dec, 3sc (28)
R19: 2sc, (triple dec, 4sc)x3, triple dec, 2sc (20)
R20: sc, (triple dec, 2sc)x3, triple dec, sc (12)
R21: dec around (charge to light pink at the end) (6)
R22: inc around (charge to red at the end) (12)
R23: sc around (12)
R24: inc, sc around (18)
R25-30: sc around (6 rounds) (18)
R31: blo- dec, sc around (12)
R32: dec around (6)
F/o, leave a long tail and 3 embroider stripes, using black yarn, so they cut the torso into thirds
Use the tail to close up piece
Shoulder pads (make 2)- light pink
R1: ch 5 and sc down from the 2nd chain from the hook, ch 1 and turn (4)
R2: 2 dec, ch 1 and turn (2)
R3: dec
F/o and leave a long tail for sewing
Arms (make 2)- start with black
R1: 3sc in mr (3)
R2: sc around (3)
R3: inc around (6)
R4: sc around (6)
R5: dec around (3)
R6: sc around (change to pink at the end) (3)
R7-10: sc around (4 rounds) (3)
F/o leave a long tail for sewing and embroider stripes using sewing needle and black thread
Legs (make 2)- black
R1: 4sc in mr (4)
R2: inc around (8)
R3-7: sc around (5 rounds) (8)
F/o and leave a long tail for sewing
Feet (make 2)- black
R1: 3sc in mr (3)
R2: sc, inc, sc (4)
R3: sc, inc, 2sc inc (6)
R4: 2sc, inc, 2sc, inc (8)
F/o leave a long tail for sewing
Pak (make 1)- light grey
R1: 4sc in mr (4)
R2: inc, sc (6)
R3: 2inc, sc, inc, 2sc (9)
R4: 2sc, 4inc, 2sc, slst (13)
R5-6: sc around (2 rounds) (13)
F/o leave a long tail for sewing
Big pak spot (make 1)- light pink
R1: 4sc in mr (4) Sl st into 1st stitch
f/o and leave a long tail for sewing
Small pak spot (make 2)- light pink
R1: 3sc in mr (3) sl st into 1st stitch
F/o and leave a long tail for sewing
Eyes (make 2)- red
R1: 6sc in mr (6)
R2: inc around (12)
R3: 4sc, 2inc, 4sc, 2inc (16)
R4-5: sc around (2 rounds) (16)
Antennae (make 2)- black
R1: 3 sc in mr (3)
R2-19: sc around (18 rounds) (3)
Assembly
Sew arms to shoulder pads
Sew bottom of feet to the sides of the legs so they create an “L” shape
Sew pak spots to the pak
Sew pak to body
Sew arms to body
Sew legs to body
Sew eyes to the lower left and lower right sides of the head
Cut out eyeshine out of light pink felt and hot glue it or sew it to the eyes
Cut 2 pieces of 5 inches of pipe cleaner/wire and fold in an inch on both sides so it’s 3 inches long. Insert them into each the antennae and sew antennae towards the back of the head. Fold back 1/4 of the antenna so it creates a right angle.
Congrats you just finished your irken invader, now go take over the earth!


232 notes
·
View notes
Text
Happy 4th Anniversary to Glitch Techs!
As a little gift to the fandom, here's a free crochet pattern so you can make your own Chomp Kitty plushie!!
Materials used:
-----------------
•4mm crochet hook (any will do, 4mm was the only size I had. KEEP IN MIND that hook size plays a role in determining the size of your plushie)
•Vibrant green wool/yarn (I got a 100g ball from Woolcraft, but I don't know the exact colour name.)
•Purple wool/yarn (Same as above) *
•Baby blue wool/yarn (Brand unknown)
•White wool/yarn (Brand unknown) *
•Black wool/yarn (Brand unknown) *
•Darning needle
*If you want to do less crocheting, you can use felt instead!! Just skip the parts where you crochet the stripes (purple), the teeth (white), the eyes (white and black) and the whiskers (black)
Note: Try your best to keep the thickness of your wool/yarn consistent. Having chunky wool in one part and then thin wool in a later part can look a bit weird sometimes. ALSO!! MAKE SURE YOU GET ENOUGH WOOL. That being said, a ball of each colour should be plenty! :D
If you want to make Horn, just swap out the colours! :D
Pattern Key:
--------------
•MC = Magic Circle (A technique used for starting pieces)
•Sc = Single Crochet (A single stitch)
•Inc = Increase (Two stitches into one)
•Dec = Decrease (Crochet two together. Use invisible decrease for better, more uniform result)
•2(sc, inc) (This is an example of format. This means that you single and then increase twice)
If you don't know how to do these, I suggest looking up a tutorial on YouTube!
Alright, with all of that out of the way, here's the pattern:
Legs (Make 4)
----------------
The legs are done in green.
R1: Magic Circle - 6 (6)
R2: Inc 6 (12)
R3: 4(2sc, inc) (16)
R4-6: 16sc (48)
R7: 2(6sc, dec) (14)
R8: 14sc (14)
R9: 2(5sc, dec) (12)
R10-12: (12) (36)
R13: dec, 10sc (11)
R14-16: 11sc (33)
Stuff the legs firmly, especially at the paws, so they keep their shape properly. If you have beans, you can put them in the paws to weight them!
Body (Sorry but the rounds are really messy here in terms of formatting, apologies for any pattern mistakes)
------
Start with baby blue
R1: Chain 5 (5)
R2: sc into current stitch, 4sc, inc (7)
Rotate piece. Into the other side of the chain: 4sc, 3inc, 3sc, 3inc (19)
R3: sc, 2inc, 3(sc, inc), sc, 2inc, 2(sc, inc) (25)
R4: 3sc, 3(inc, 2sc), 6sc, 3(inc, 2sc), inc (35)
R5: 11(2sc, inc) (44)
R6: 14sc, 3(dec, 2sc), 5sc, 3(dec, 2sc) (37)
R7: 2[inc, 2sc, inc, 3(sc, inc), 2sc, inc, 6sc] (50)
R8: 52sc (52)
We will now crochet rounds around the outside of the leg, skipping the stitches on the inside (the ones that are attached to the body). Still crochet into the "corners"
Switch to green
We're going to attach the legs this round, without sewing. Push the hook through the next stitch, and then into one of the stitches of one of the legs. Pull the green through and sc.
R9: another 3 sc, same as before, go through the body and the leg. 8sc, Attach another leg by crocheting 4sc into the body and the next next leg, 10sc, another leg with 4sc, 8sc, another leg with 4sc, 10sc
R10: 3sc, 2dec, 14sc, 2dec, 16sc, 2dec, 14sc, 2dec, 16sc
R11: Full round of sc (When I said messy, this is what I meant lmao, I didn't count the stitches in each round for the body so I'm doing it in post and it might be wrong, my bad y'all)
Unfortunately, the next round might be hard to follow because I got lazy with my notes.
Sorry </3
R12: Another round of sc BUT in each leg "corner" (the first and last stitch that joins the leg to the body), dc. There should be 8dc total
R13: sc around the leg, sc, dec, 2sc, dec, sc, sc around the leg, sc until next leg, sc around leg, sc, dec, 2sc, dec, sc, sc to finish round
R14: 2[dec, 4(2sc, dec)]
R14: 2(3sc, dec), 3sc, dec, 4sc, dec, 14sc, dec, 4sc, dec, 10sc
R15-16: all sc
R17: sc, dec, 2(4sc, dec), 5sc, dec, 4sc, dec, 4sc, dec, 5sc
R18: 3(dec, sc), 9sc, 3(dec, sc), 5sc
R19: all sc
Start stuffing if you haven't already. Stuff after each round after this if needed. Firmly stuffing keeps the pose better but less firm means more cuddly. Your choice!
R20: 2dec, sc, 2dec, 5sc, 2dec, sc, 2dec, 3sc
R21: 4dec, 2sc, 4dec, 2sc, 6dec
Leave a generous tail to sew up the body. Use the darning needle to sew, then snip the excess and hide the rest by either pushing it into the body with the hook or using the needle to pull it through the side.
Head
------
Start with baby blue. The Dark Ages are over and I started writing down the pattern properly again lol. (Sorry once again for the nightmare of the body)
R1: MC - 6 (6)
R2: Inc 6 (12)
R3: 6(sc, inc) (18)
R4: sc, inc, 5(2sc, inc), sc (24)
R5: 6(3sc, inc) (30)
R6: 2sc, inc, 5(4sc, inc), 2sc (36)
R7: 6(5sc, inc) (42)
R8: 3sc, inc, 5(6sc, inc), 3sc (48)
R9: 6(7sc, inc) (54)
R10: 4sc, inc, 5(8sc, inc), 4sc (60)
R11: 6(9sc, inc) (66)
R12: 5sc, inc, 5(10sc, inc), 5sc (72)
R13-25 (13 rows): 72sc (936) Good luck, soldier. Switch to green at row 14.
R26: 5sc, dec, 5(10sc, dec), 5sc (66)
R27: 6(9sc, dec) (60)
R28: 4sc, dec, 5(8sc, dec) 4sc (54)
R29: 6(7sc, dec) (48)
R30: 3sc, dec, 5(6sc, dec), 3sc (42)
R31: 6(5sc, dec) (36)
R32: 2sc, dec, 5(4sc, dec), 2sc (30)
Start stuffing if you haven't already. Stuff well to ensure your Chomp Kitty's head keeps the spherical shape. Continue to stuff after each round if needed.
R33: 6(3sc, dec) (24)
R34: sc, dec, 5(2sc, dec), sc (18)
R35: 6(sc, dec) (12)
R36: 6(dec) (6)
Leave generous tail, sew, snip, hide tail.
Tail
----
The tail is done in green.
R1: MC - 6 (6)
R2: Inc 6 (12)
R3-5: 12sc (36)
R6: 3(3sc, inc) (15)
R7: 15sc
R8: 3(3sc, dec) (12)
R9-11: 12sc (36)
R12: 3(2sc, dec) (9)
R13-16: 9sc (36)
R17: 4sc, dec, 3sc (8)
R18-20: 8sc (32)
Stuff firmly so it sticks up! Leave tail for sewing. Sew onto body, snip, hide. You know the drill by now :)
Ears (Make 2)
----------------
The ears are done in green.
R1: MC - 6 (6)
R2: Inc 6 (12)
R3: 6(sc, inc) (18)
R4: sc, inc, 5(2sc, inc), sc (24)
6(3sc, inc) (30)
Fold the ears over in half, then in half again. Unfold the second fold (this should crease it a little to make it pointy). Leave tail for sewing. When sewing, sew the side with the crochet stitches down so the clean edge is up top.
Eye whites (Make 2)
-----------------------
The eye whites are done in white.
R1: MC - 6 (6)
R2: Inc 6 (12)
R3: 6(sc, inc) (18)
R4: sc, inc, 5(2sc, inc), sc (24)
R5: 6(3sc, inc) (30)
R6: 15(sc, inc) (45)
Leave tail. Sew on.
Pupils (Make 2)
-------
The pupils are done in black.
R1: MC - 6 (6)
R2: Inc 6 (12)
R3: 6(sc, inc) (18)
R4: sc, inc, 5(2sc, inc), sc (24)
Leave tail. Sew on.
Mouth
--------
The mouth is done in white.
R1: MC - 3 (3)
R2: Chain 1 to turn, inc until end of round (6)
R3: Turning chain, (sc, inc) until end of round (9)
R4: Chain, (2sc, inc) until end (12)
R5: Chain, (3sc, inc) until end (15)
R6: Chain, (4sc, inc) until end (18)
R7: Chain, (5sc, inc) until end (21)
R8: Chain, (6sc, inc) until end (24)
R9: Chain, (7sc, inc) until end (27)
R10: Chain, (8sc, inc) until end (30)
Leave tail for sewing. Sew on. Use black wool to embroider the teeth.
Nose
------
The nose is done in purple.
R1: MC - 6 (6)
R2: sc, triple inc (three stitches into one), 5sc, tripinc, 4sc
Leave tail. Sew.
Head Stripe
--------------
The head stripe is done in purple.
R1: Chain 2
R2: sc into the first chain (2nd chain from the hook)
R3: Chain to turn, sc into current stitch, sc into each stitch (3)
R4: Chain to turn, sc into current, sc into each (4)
R5-10: Continue this process of building up until you have 10 stitches across
R11-13: 10sc (30) Chain before the start of each row, but don't sc into the chain
Now just sc until the end of each round, skipping the current stitch. This decreases the rows by one each time. Continue until you only have one stitch left. Leave tail for sewing, sew on.
Tail Stripes
-------------
The tail stripes are done in purple.
Small one:
R1: Chain 3
R2: 2sc, inc
R3: 3sc, inc (into other side of chain)
Leave tail, sew
Big one:
R1: Chain 5
R2: 4sc, inc
R3: 5sc, inc (into other side of chain)
Leave tail, sew
Body Stripes (Make 2)
--------------------------
The body stripes are done in purple.
R1: Chain 15
R2: 15sc
R3: inc, dec, 13sc, dec, inc, dec, 13sc, dec
Leave tail, sew.
Whiskers (Make 4)
---------------------
The whiskers are done in black.
R1: MC - 9 (9)
R2: 3(2sc, inc) (12)
R3: 3sc
R4-6: Chain 1 to turn, 3sc
R7: Chain, dec, sc
R8-9: Chain, 2sc
CONGRATULATIONS!! YOU ARE NOW THE PROUD OWNER OF A CHOMP KITTY CROCHET PLUSHIE!!!
Feel free to tweak the pattern for yourself if you want! However, please do not release my pattern elsewhere, repost it, or sell it. This pattern is free!! It should not be gatekept!! (Also, it's a little unfair if you get to make money off of my design rip) If you want to share, reblog or share a link :)
Apologies for any typos or confusion due to formatting!! This is my first pattern! I tried very hard to make him accurate, but simplified some areas to make it easier. I hope you enjoy!!!
#happy 4 years to my canon event#glitch techs#This took me days#I really hope you guys like it#I will post pics#I just want to take some nice ones first#chomp kitty
25 notes
·
View notes
Note
Hey p! Can we maybe, have part 2 of 👀 your last obi wan fic👀 pretty please 🥺

AN | This man deserves everything and I want to give it to him! 🥰 Enjoy!
Pairing | Obi-Wan x Fem!Reader
Warnings | None
Word Count | 1.6k
Masterlist | Main, Star Wars
Part 1, Part 3
── ・ 。゚☆: *.☽ .* :☆゚. ──
“Have you ever thought about starting a family?” the question left his lips before he was even fully aware of it. Once trained and hardwired to refrain from speaking without first contemplating what he was saying, he had loosened up in the years since. At first you hadn’t heard him fully, too busy tending to the small garden the two of you had planted.
It was a far cry from the home you’d known on Tatooine; this was lush and green and flowing with wildlife. Takodana might not have been the safest place in the galaxy - then again no place was - but it was close to it. When Obi-Wan had first suggested a move, you hadn’t believed him; now that it was a reality, you knew it had the best decision.
“What was that?” you studied the fresh vegetables before tossing them into your basket. When you were met with silence, you wiped your hands on your pants and turned to him, “my love?”
“I…it is nothing,” he insisted with a soft little half smile. You didn’t quite believe him, but weren’t about to pressure him to admit anything either. He would tell you, he always did, on his own terms. Perhaps you weren’t even meant to hear just yet, “do you need a hand with anything?”
“I’ve got it,” you promised as you slowly stood up, stretching to relieve some of the tension that had settled in your bones while you gardened, “you could do me one favor though - can you check on the washing? I just want to finish up here and then I’ll be in.”
“Of course,” he paused for a moment, biting the inside of his cheek as his feet seemed to be rooted in the wrong. You couldn’t help but laugh lightly at him.
“Obi? Everything alright? You’re acting…off.”
“Yes,” he insisted, snapping back into a reality, a flush of crimson creeping up in his cheeks, “I’ll see you inside then.”
You offered him a small wave as he slowly padded back inside, his head already in the clouds. There was a moment where you wondered if he knew what was on your mind, what had been going on lately. While it was a very real possibility, you didn’t think he was any wiser. He’d know soon enough anyway, might as well let it be a surprise.
The small droid you’d decided to welcome into your home chirped happily as he held out an arm to take the basket of vegetables from you. It was an old R4 unit you had more or less rescued and given a second life; he was sweet and you couldn’t deny that it was nice to have a little helper around.
“I know,” you told him, patting the top of his head gently, “he’ll find out soon. I’m surprised he doesn’t know already. I’m even more surprised you haven’t gone and spilled the beans! And don’t argue with me - you are the most gossipy droid I’ve met!”
He beeped a sarcastic response before moving towards the house with you following close behind. This was a far cry from the life you’d onced lived, isolated and alone in the desert. This was nice, this was where you were meant to be. As one with him - your love.
── ・ 。゚☆: *.☽ .* :☆゚. ─
Obi-Wan had been moving around restlessly in bed for what seemed like hours now. You hadn’t said anything at first, positive that he would eventually sleep but it never came. Then again, you’d been up the entire time as well, partly because his tossing and turning had kept you awake and partly because your own thoughts wouldn’t leave you either. At some point, you couldn’t take it any longer and you reached across the bed for him.
“Hey,” you whispered softly, wrapping your fingers around his wrist. He stopped moving almost instantly, letting out a small sound that seemed like relief. Tugging on his arm gently, you motioned for him to face you. He did so, and you laid so you could face him, brushing a few stray locks of hair out of his face, “maybe if you told me what was on your mind, it might help you sleep.”
“You’re very sly, aren’t you?” he couldn’t help the smile that tugged up the corners of his mouth as you offered him an innocent little grin.
“That all depends on whether or not you’re actually going to divulge anything to me,” you leaned in so the tip of your nose was brushing against his, “or perhaps you could kiss me instead. Both would be great, but if I have to settle for one, I’ll take what I can get.���
“I’m assuming, as always, you have a preference?” there was an amused lilt to his voice, and you see the twinkle in his eyes despite the only pale moonlight filtering into the room. You smiled sweetly, and he laughed - a genuine, soft laugh that you’d been craving to hear all day, “both?”
“Both,” you agreed before he finally kissed you, softly and sweetly letting his lips linger against yours, “always both, my love. Now tell me - what were you going to ask me earlier?"
"It was not…important," for someone who could be so convincing, he was not a good liar.
"If it was not important, then why has it been bothering you all day?" your hand found his face as you gently touched brushed your thumb over his cheek, "i am more attuned to your idiosyncrasies than you might think."
"Indeed you are," he agreed with the smallest huff, "I asked you earlier if you had ever given thought to starting a family?"
Ah. So you had heard him correctly.
“Starting a family?” you mused softly as you heard him inhale sharply. He was…nervous for your answer. Interesting - he wasn't normally one to succumb to nerves, “I already have a family. You and Four…perhaps it’s not the most conventional family, but that’s what we are.”
“I suppose…you’re right.”
“Family isn’t necessarily blood or normal, as you well know,” you grinned as he wrapped an arm around your waist and pulled you closer, “family is what you make it.”
“Ever the philosopher,” he kissed you softly and you easily gave in to him, “I suppose I should have rather asked if you’d ever thought about expanding our family?”
“Oh,” you pretended to be surprised as you pulled back to gauge his reaction. You wondered if he did know and was trying to get it out of you. But as you looked at him intently, trying to get a good read on him, you realized that somehow he didn’t know, “you mean…a child?”
“Yes,” his answer was soft, barely spoken so only you could hear it. Obi-Wan tried to read your face, which you were struggling to keep pointedly neutral, “it’s…only a thought of course.”
“Of course,” you agreed seriously, offering him a nod of agreement as you tried to hold back your giggles, “can I admit something to you, Obi-Wan?”
“You can tell me anything,” you reached for his hand, gently bringing it to your lips before pressing a kiss to his knuckles. You felt him relax next to you and you decided that now was as good a time as any to let him in on the little secret you’d been carrying around for several weeks.
“I…might be a few steps ahead of you in the desire to expand our little family,” you whispered, noticing that his face immediately went through several different expressions as he tried to piece together what you were saying. He didn’t respond for a few moments, but you were sure he had reached the only logical conclusion, “Obi-Wan?”
“You’re…pregnant?” he sounded so incredulous, so in awe that any hesitation you might have had that quickly dissipated.
“Yes,” you said softly, “I am. I found out…a few weeks ago. I wasn’t sure what to think at first - it took a while for me to process. And then I didn’t quite know how to tell you either. I was going to tell you, obviously, and it’s not like I could have hid it forever, but…yeah. I was kind of wondering if you were going to put the pieces together.”
“I…I thought something had felt different,” he admitted quietly, “but I didn’t think…well. This is a surprise.”
“A good surprise or…?”
“A most wonderful surprise,” he promised as he laced his fingers through yours, giving them a light squeeze, “the best surprise.”
“I thought so too,” you made a small sound of surprise as he pulled you as close as possible into his body, “so to answer your question - yes, I have given it some thought. I love you, Obi-Wan.”
“I love you, my most darling, beautiful girl,” he kissed you, deeply and hungrily, needing all of you over all of him, “thank you.”
“Whatever for, silly man?”
“This, you - all of it,” he whispered against your lips, “our family.”
#obi-wan kenobi#obi-wan kenobi x reader#obi-wan kenobi x you#obi-wan kenobi x fem!reader#ewan mcgregor#ewan mcgregor x reader#ewan mcgregor x you#star wars
410 notes
·
View notes
Text
Title: The Sugar Effect (1/?)
Rating: Teen+
Pairing: Bucky Barnes/Tony Stark
Tags/Warnings: AU - Modern, AU - Bakery, AU - Coffee Shop, AU - No Powers, Slow Burn, Awkward Flirting, Flirting, Pre-Serum Steve Rogers, Additional Tags To Be Added
Summary: While out in Brooklyn, Tony Stark stumbles upon a bakery, and a bakery owner, that he just can't seem to stay away from.
Notes: for @buckybarnesbingo square K4 'au: bakery' and @tonystarkbingo square R4 'au: coffee shop'.
AO3 Link
Tony grumbled to himself as he trudged down the block. What sort of company held their meetings in Brooklyn, of all places? The manufacturing plant wasn’t here, and their head office certainly wasn’t here. Tony sent sent Friday a note to remind him to deny the company's offers for a merger and then shoved his phone in his inner jacket pocket just as the clouds overhead opened up. He cursed and tried to stay under storefront awnings, but it was no use, the rain coming down traveled with the slight wind whipping through the buildings, and Tony found that his Tom Ford suit was not made for the rain.
Reaching for the handle on the first place he saw that served coffee, Tony pulled the door open and nearly sighed at the cinnamon scented warmth at seeped through his suit. A small bell had jingled over the door, and a man in long sleeves stepped out from the back. He was taller than Tony and his silky looking brown hair was pulled back into a bun. Pfft, hipsters.
“Welcome to Wake and Bake, what can I getcha?”
“Wake and Bake?” Tony raised an eyebrow and then glanced back at the door. Definitely hipsters.
“It’s funny,” The man shrugged. “So, can I get ya anything?”
“Coffee, hot.” Tony stepped towards the counter.
The man nodded and turned his back to Tony as he prepared his drink. Taking the opportunity, Tony glanced around the shop; the walls were covered in shelves full of knickknacks, several mismatched overstuffed arm chairs were placed around low bookshelves and coffee tables. The walls, what little of them he could see through all the artwork hung up, were black. The floor looked like that industrial made light colored hard wood. Several pastry cases sat to his left, shelves half filled with delicious looking treats. There was no one else in the small store besides him and the employee.
“Here ya go,” The man said as he placed the full cardboard cup on the counter. “Lids, sugar and what-not are over there.” He jerked his head, chin indicating which way as he his fingers tapped over an iPad. “Anything else?”
“How about a chocolate muffin? My CEO will kill me if I come back empty handed after ducking out of a meeting.”
The man chuckled and stepped over to the case. He selected one and placed it into a paper bag. “Wouldn’t want that,” He placed the bag next to Tony’s coffee.
With nothing else to keep him, Tony tapped his card on the reader and gathered up his coffee and muffin. He dreaded going back out into the rain, so he tapped out an SOS to Happy while he doctored up his coffee.
—-
He wasn’t specifically out to go to the bakery in Brooklyn, but once again Tony found himself in the borough and thought “why the hell not?” so he instructed Happy to stop on the way back to Manhattan. Tony hadn’t been able to stop thinking about the guy behind the counter. It had been awhile since a man caught his attention like that, it mostly being women - and then exclusively Pepper for awhile - for quite some years. But that stupid hipster man-bun had Made Tony wonder that deep brown hair would look like when let down, freshly washed and soft– damnit. Tony definitely had a thing for long hair, and he needed to stop thinking about it before the car came to a stop outside the shop.
This time, there were a few people scattered around - a girl on a laptop with green hair and more metal in her face than was probably healthy, a guy reading a book, and a tiny man with a drawing pad and a pencil. The same guy was behind the counter, wiping part of it down, and he smiled as Tony walked up.
“Duck out of another meeting?”
Tony smirked. “Nah, but I figured I’d give this place another shot. CEO loved the muffin, by the way.”
“Well, I appreciate it.”
“You’re the owner?” Tony was a bit surprised, this guy definitely did not give off bakery owner vibes.
“Owner, head baker, cleaning staff, and occasional accountant,” The man smiled. “I’m Bucky.”
“Tony,” He glanced up at the menu board. “Let me have a latte this time.”
—-
Bucky got to work, he didn’t know much about coffee - baking was his true specialty - but damn near everyone he talked to when he was trying to get Wake and Bake from an idea to an actual business told him it would be a good idea to serve coffee with the baked goods. So a couple brews of simple drip coffee, a latte, and a plain mocha made it’s way to the menu. Stuff Bucky could handle.
He turned back to the man at the counter and placed the latte down. “Anything else?”
The man studied the pastry case for a moment before his eyes lit up. “You have baklava?”
Bucky smiled. “Ma’s family recipe.”
“I’ll take two - no wait make it three - pieces.”
Bucky laughed as he bagged up the baklava, it was always nice when people appreciated his family recipes. Once Bucky placed the bag down, the man grabbed it and pulled out a piece to immediately try.
The noise he mad as he bit into the crispy and gooey layers was almost pornographic, but Bucky ignored the way it made heat pool in his stomach and just chuckled. “Good?”
“So good,” Tony quickly nodded. “In fact gimme a couple more pieces.” He said as he pulled out his wallet.
—-
As soon as the door had finished shutting, Steve was out of his seat, headed for the counter. He had to pause as his vision swam and he swayed slightly, but then resumed his mission.
“Bucky!”
His best friend grinned over at him. “Another cookie?”
“You can not flirt with him!” Steve hissed.
Bucky’s eyebrows notched down, furrowing. “What the hell are you talkin’ about?”
“That is Tony Stark,” When there was no recognition in his friend’s expression, Steve huffed. “But ugly building in Manhattan? Takes up my view of an otherwise gorgeous skyline?”
He ignored Bucky’s muttered “Oh, right.” and barreled on.
“I know you like to flirt with the customers, get more tips, but you can not flirt with that one, Buck, he’s bad news!”
Bucky just raised an eyebrow. “Didn’t know being nice to the customers was considered flirtin’, but I’ll keep that in mind.”
Steve huffed, arms crossing over his chest. “Whatever, just give me another cookie.”

#buckybarnesbingo2023#tonystarkbingomarkvii#tsbmvii#winteriron#starkbucks#winteriron fanfic#marvel fanfic#starksvinyls fic#fic: the sugar effect
11 notes
·
View notes
Text
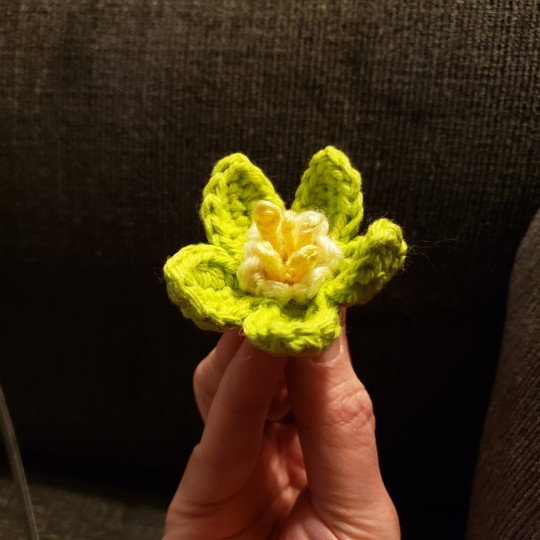
I see a lot more people are seeing these posts than I thought! So, here's my pattern for a hellebore or Christmas rose. I've never written patterns before, so please let me know if anything is confusing!

Pattern below the cut!
Petals
Using green worsted weight yarn and 2.5 mm hook
Start with magic ring
R1: 5 SC into ring. slst to 1st stitch and ch 1.
R2: SC2 into each stitch (10 stitches total.) slst to 1st stitch and ch 1.
R3: SC all around (10 stitches total)
R4: ch 6, then starting from 2nd ch from hook, 5sc down the chain. slst into next sc. Repeat 4 more times.
R4: for each petal, SC, DC, HDC, SC, sl st, ch 1, then down the other side sl st, SC, HDC, DC, SC. slst into the sl st from last round. Repeat for each petal. Finish with an invisible join and fasten off.
Middle stamens
Using worsted weight yarn and 2.5mm hook
In white yarn
Start with magic ring
CH 6, then slst onto ring. Repeat 5 more times. Fasten off.
Middle longer stamens
Using pale yellow embroidery floss and 2.0mm hook
Make magic ring
Ch 8, then in 2nd ch from hook 2 SC, sl st in remaining ch, sl st to ring. Repeat 4 more times. Fasten off.
Assemble by pulling loose tails of longer stamen through the center of the middle stamen. Then pull all loose tails through center of petals. You can conceal the loose ends by adding a sepal, but I just sewed it directly onto the blanket.
7 notes
·
View notes
Text
I set up my petre bag! I'm in the middle of moving in with my cg, and the packing thing is really hard. This is just a fun way to relax and destress so I have motivation to pack more tomorrow!

First, I got my coloring book and the crayons my cg got me!
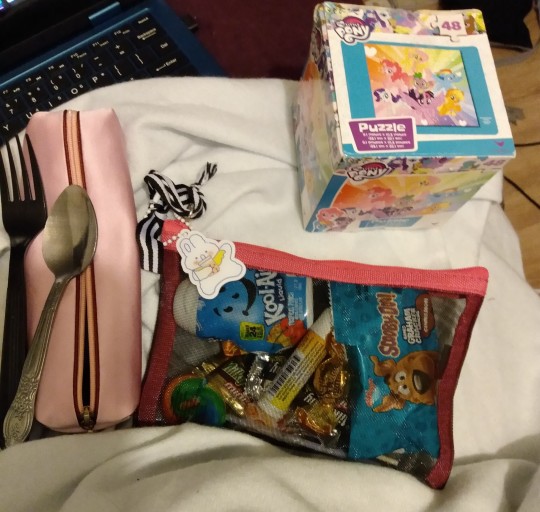
Next I got my mlp puzzle, snacks, and my favorite spoon and fork(everyone has a favorite, right?). Using the Kool aid mix makes it easier to drink more water, I recommend it!
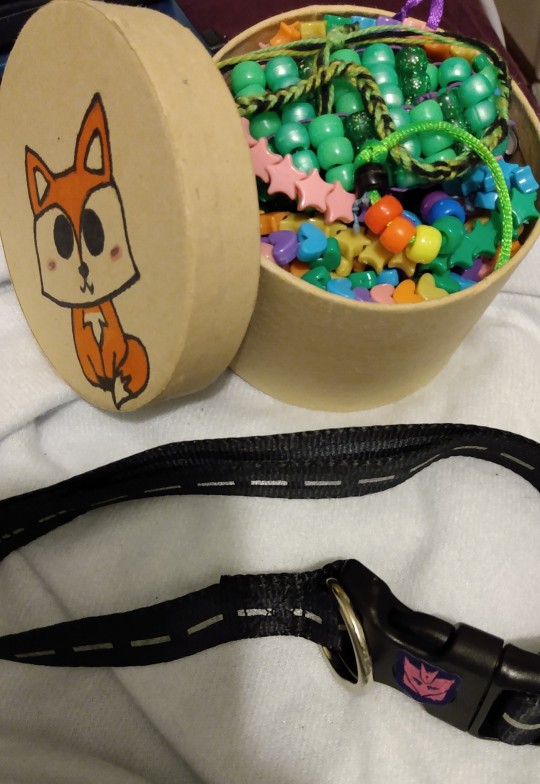
Than I have my collar and some bracelets I like to wear when in pupper mode! They're so shinyyyy!

My teether helps me not chew on my mouth so much, and I love chewing on my rope!

My ears and gloves are my favorite things! My ears are so soft, and the paws are so comfy.

Then I have my journal (left) and sketchbook(right)! Can you tell I love stickers?
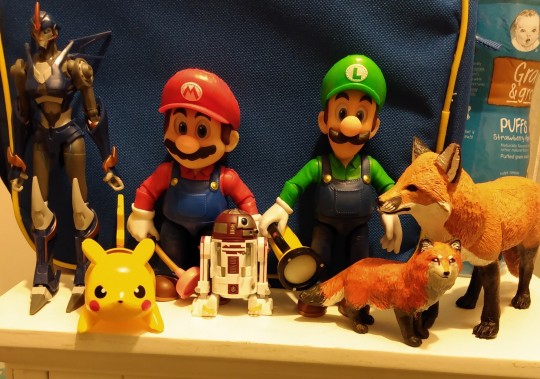
Then my toys! I have Arcee, Mario, Luigi, Pikachu, R4, Mama Foxy, and Angel cake! Hooman me repainted this Bruno doll, and Angel cake!
Lastly, I have my plates(they're green, white, and blue), my bottle, and my puppy bowl! It's got snackies in it now, XD.
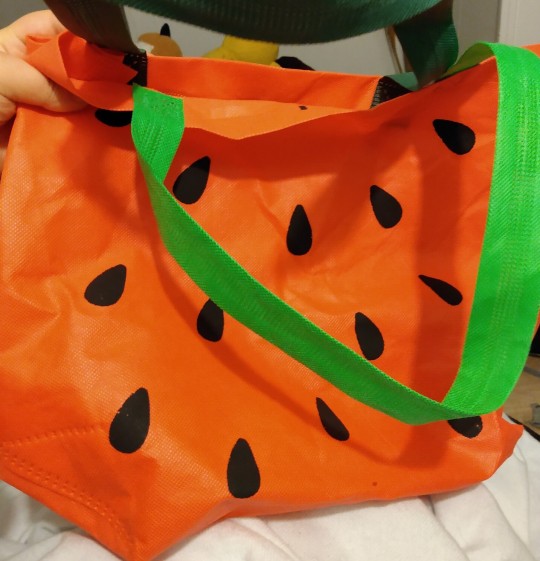
And this is the bag it's all going in! I love it bc it looks like a watermelon, which is my favorite fruit!
Gentle reminder to drink water and have a snack! Byeee!
#sfw interaction only#sfw petre#fox regression#fox petre#fox regressor#fox chaos#sfw caregiver#pet regression#pet regressor#sfw little community#petre bag
11 notes
·
View notes
Text
Valve Series Timeline
Somebody asked me why I don't do a post about all the connections between half-life and portal and all the back story there. The theory being that a lot of other theorists don't get it right.
And they weren't wrong. The problem with most theorists is that they stop at a surface level, where I go real deep into the lore and pick out all sorts of details and connections. Sometimes even to a degree that isn't fully supported by on game detail.
But here's the thing with the half-life series. And valve games in general;
The story and background lore is already plotted out to a near dizzying degree. There is rarely a loose end between games.
Me doing a segment on half-life and portal would just be connected end to end on a path already laid out by valve. It would be incredibly boring. I would have suspected that's why other theorists don't do it. But I'm beginning to think it's just that people don't think about things to the degree I do.
Note I said: "To the Degree I do" not better, not worse. Just not the same way. But probably because I'm more of a completionist.
Anyway to prove my point, I'll simply point out the first Half-Life multiplayer expansion (Developed by Gearbox Studios): Half-Life: Decay
The bonus mission follows a couple of vortigaunts: R-4913 and X-8973. In the game, both share the same character model. I heavily suspect that only R4 was actually modelled, it being a kind of throwaway bonus mission, and the fact that valve only has "R-4913" written in an air duct along with "Code Green". The game Half-Life: Uplink does the same, only referencing R-4913 and *not* X-8973
Now. Let's look at Portal 2's Multiplayer Heros: Atlas and Peabody. Compare ATLAS and R4913 visually. They have the same basic body type. You could boil this down to a simple throwback. But Valve doesn't do things half-baked. Except for a third game. This is intentional on the devs part. All the way down to how they're "just a couple of random a*, but vitally important grunts"
The vortigaunts are sent on a viral suicide mission by the Nihilanth. GlaDOS is a Nihilistic artificial intelligence who sends the same two on a suicide mission, which is vitally important for her plans.
These two are essentially Seal Team 6.
To take things a step further if your rearrange the letters in ATLAS, LAATS, matches up with a kind of l33t-speak interpretation, which was appropriate for the year that Half-Life came out. And Valve and Gearbox being full of a bunch of dumb Internet nerds, makes this incredibly far-fetched interpretation, not so far-fetched. (Considering Ls and Rs is still a thing we do to this day thanks to all the languages that roll them together.)
The same for PEA-BODY or X-8973. I don't know how X converts to P yet... But given enough time and effort I could learn..but it'll probably be easier to ask gearbox themselves.
The implications of this are important; it means that both Vortigaunts and Humans (specifically: dying people [or wounded warriors]) were placed into AI like Caroline into GlaDOS.
This is the exact reason why some test subjects didn't have to sign a waiver whenever you see those waivers lying around.
And, if I'm not mistaken: Why Chell was uploaded in the first place...
15 notes
·
View notes
Text


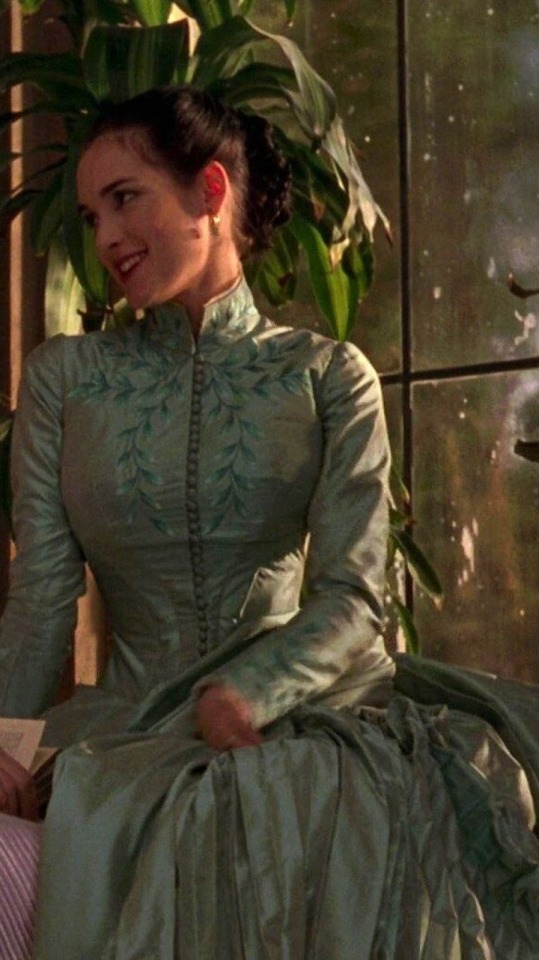
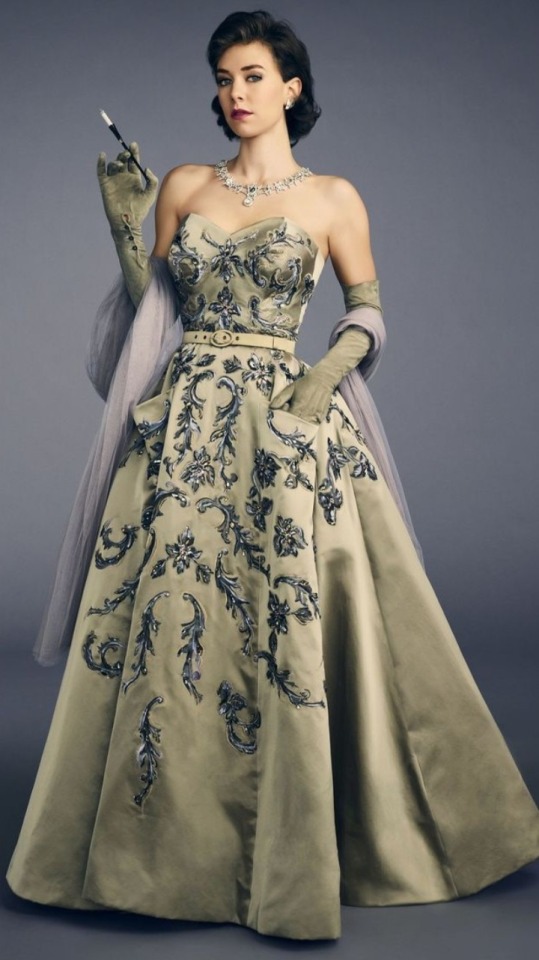
Period dramas dresses tournament: Green dresses Round 4- Group D: Catherine de Medici, Diane (pics set) vs Izumi Hideko, The handmaiden (gifset)
Propaganda for Izumi Hideko's dress (written by its submitter):
A formal kimono part of a triad of green costumes that hideko wears. THE CHARACTER WORK. THE THEMATIC COHERENCE. YOU UNDERSTAND.
#period drama dresses tournament#tournament poll#tumblr tournament#polls#fashion poll#catherine de medici#diane#diane 1956#izumi hideko#lady hideko#the handmaiden 2016#the handmaiden#green r4
38 notes
·
View notes
Text


by philshootsphilm, Philip 📷🎞️
Lago di Como, Italy
Italian summer greens 🌿
📷 Leica R4
🎞️ Kodak Portra 400
#film#filmphotography#35mm#analog#photography#nature#kodak#film photography#coast#italy#europe#leica#leicar4#porta 400#porta400
8 notes
·
View notes
Photo


@mad0nna asked: favorite 60s/70s/80s music?
Pictured above are some of my favorite albums from the 60s/70s/80s (in no particular order)...
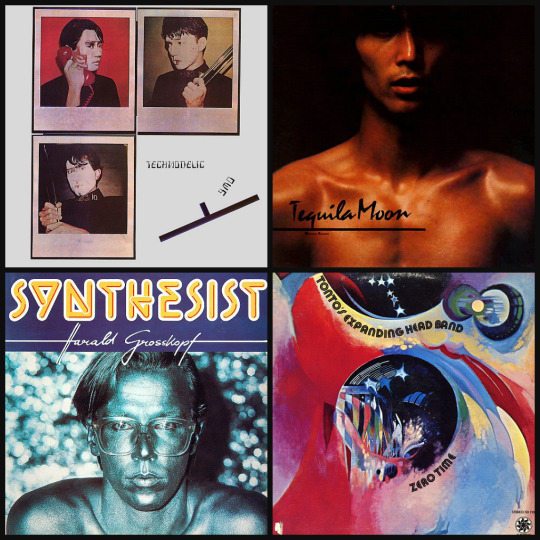
R1: Yellow Magic Orchestra - Technodelic (1981), Masahiro Kuwana - Tequila Moon (1979), Pink Floyd - Wish You Were Here (1975), Haruomi Hosono - S・F・X (1985)
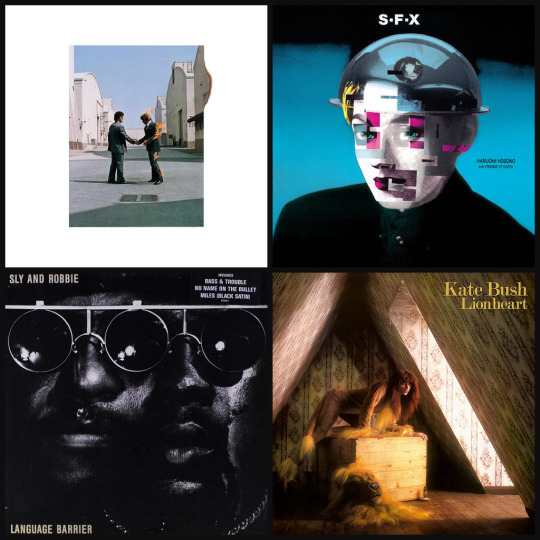
R2: Harald Grosskopf - Synthesist (1980), Tonto's Expanding Head Band - Zero Time (1971), Sly and Robbie - Language Barrier (1985), Kate Bush - Lionheart (1978)
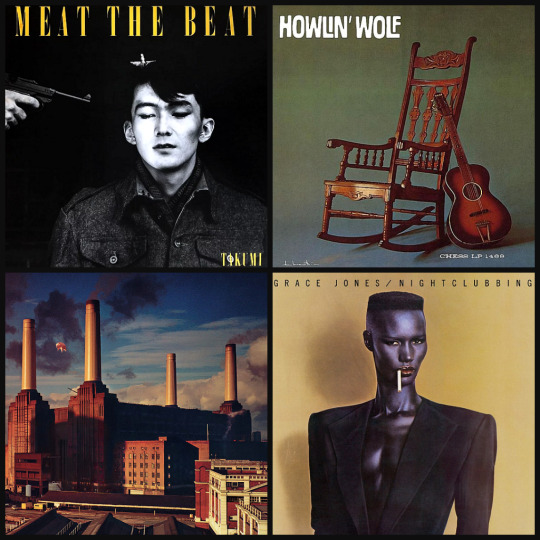
R3: Takumi - Meat the Beat (1983), Howlin’ Wolf - Howlin’ Wolf (1962), Thomas Leer - The Scale Of Ten (1985), Pictures - Pictures (1983)
R4: Pink Floyd - Animals (1977), Grace Jones - Nightclubbing (1981), Pink Floyd - The Dark Side of the Moon (1973), Ryuichi Sakamoto - Left Handed Dream (1981)
R5: Elvis Presley - Elvis is Back! (1960), Hideki Saijo - Twilight Made... (1985), Yukihiro Takahashi - Neuromantic (1981), Al Green - Call Me (1973)
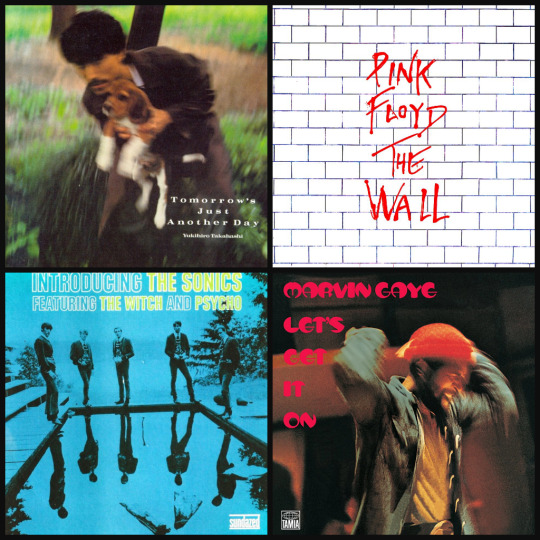
R6: Peter Richard - Frozen Red (1983), Grace Jones - Warm Leatherette (1980), Stump - Mud on a Colon (1986), Yellow Magic Orchestra - BGM (1981)
R7: Yukihiro Takahashi - Tomorrow's Just Another Day (1983), Pink Floyd - The Wall (1979), Yellow Magic Orchestra - Naughty Boys (1983), Pink Floyd - Meddle (1971)
R8: The Sonics - Introducing The Sonics (1967), Marvin Gaye - Let’s Get it On (1973), The Drifters - Under the Boardwalk (1964), Yukihiro Takahashi - What, Me Worry? (1982)
R9: Prince - Controversy (1981), The Spoils of War - The Spoils of War (1969), Sven Grünberg - Hingus (1981), Haruomi Hosono - Philharmony (1982)
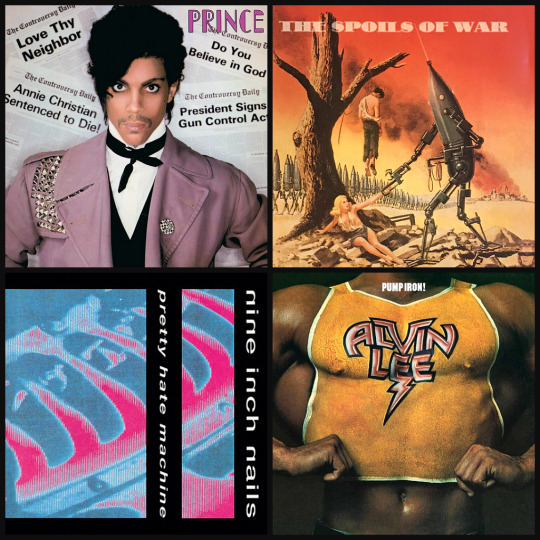
R10: Nine Inch Nails - Pretty Hate Machine (1989), Alvin Lee - Pump Iron! (1975), David Bowie - Hunky Dory (1971), Tangerine Dream - Zeit (1972)
There are so many more albums and artists from those decades that I am very much into, of course. But I already got too carried away as it is.
68 notes
·
View notes
Text
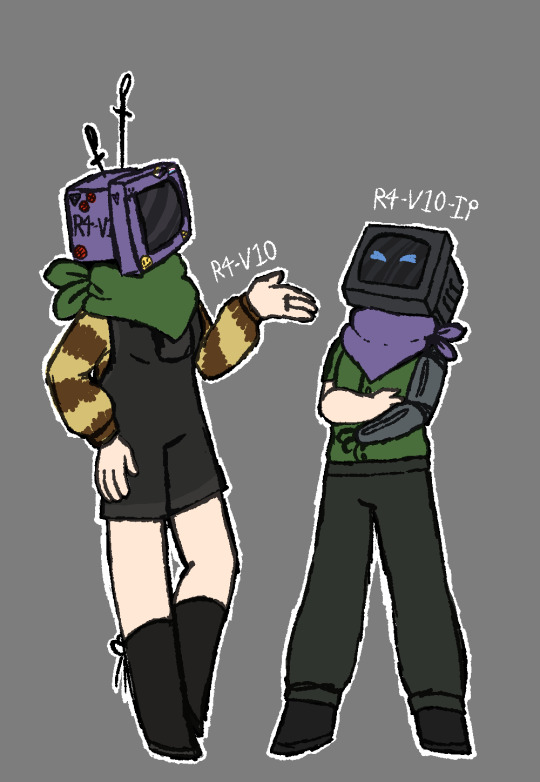
(ID: a digital drawing of two characters with computer heads.
on the left is a character with a purple pc for a head, covered in various stickers, with a blank screen. she is wearing a green bandana, a yellow and brown striped sweater, black overall shorts and shin high boots. she has two antenna on her head, and is gesturing with on hand. Written by her hand is the name R4-V10.
on the right is a short character with a grey pc head, with blue eyes. he is wearing a purple bandana, green shortsleeve button-up, and dull green pants with black boots. his head is thrown back with laughter. his left arm is a prosthetic. Written by his head is the name R4-V10-IP. End ID.)
these are my sons R4-V10 (aka R4 or Ravio) and R4-V10-IP (aka IP or Ravioip). are their names basically the same? yes. are they very different? also yes. they are like phones that way.
#cabinet man colors#described#oc#R4 is based on just. an outfit i like. IP is based on my current minecraft skin. he also has wings in the game but i didnt draw them.
2 notes
·
View notes
Text


9 notes
·
View notes
Text
MATCHUPS AND BRACKET!

Matchups were made at random with a wheel, and fandom names were only added on bracket so they’d fit onto lines.
First round of polls are planned to release Sunday 26th, 5pm EST
Below is a written list of fandoms AND characters participating:
LEFT SIDE
L1. Magai Record- Tsuruno, Felicia, Sana VS. Sonic the Hedgehog- Team Chaotix
L2. Among Us- Orange, Green, Purple Crewmates VS Homestuck- Davesprite, Jadesprite, Jasprosesprite
L3. Land Before Time- Cera, Spike, Chomper VS Red vs Blue- Locus, Siris, Felix
L4. Fire Emblem Three Houses- Lorenz Hellman Glocester, Leonie Pineli, Ignatz Victor VS Animation vs Minecraft- The Second Coming, Green, Purple
RIGHT SIDE
R1. Phineas and Ferb- Phineas, Ferb, Candice VS Gravity Falls- Dippy Fresh
R2. Scooby Doo- Velma, Shaggy, Daphne VS Rise of the TMNT (2018)- Donatello and Michelangelo Hamato
R3. Oggy and the Cockroaches- Dee Dee, Marky, Joey VS Sailor Moon- Sailor Venus, Sailor Jupiter, Sailor Saturn
R4. Teen Titans- Starfire VS Sanders Sides- Virgil, Remus, and Orange side Sanders
13 notes
·
View notes
Last Seen Blogs

margerymendelsonblog
Untitled

laputaskies
Scars come with livin'

future-chocominto-icecream
『From the bottom, to the Sky~!』

red-rose-corner
Writings From A Field of Roses
airy-nothing
The Form of Things Unknown