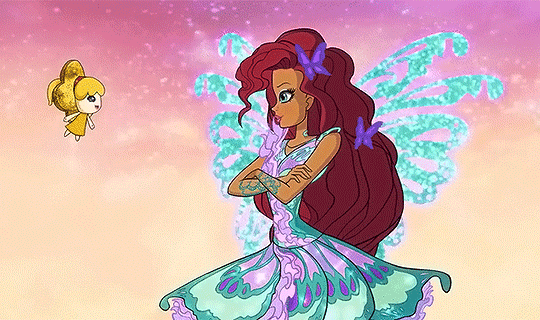
#i still need to make a psd for... real... people?? so have this for now
Text
#precure#pretty cure#dancing star precure#*#flashing lights#i accidentally set the poll for a week like an absolute idiot but the result was yassss so#i still need to make a psd for... real... people?? so have this for now
122 notes
·
View notes
Note
i might have already asked but are you planning to update five or a lot can change in a year anytime soon?
As always, very happy people are still interested in this story because I've poured a lot of myself into it <3 My answer is, still, I do plan on finishing it! But I've left it on the backburner because I am no longer in the correct headspace, and also, I no longer have the same time availability I did before.
blah blah the usual excuses under cut
I think I hit a crossroads when I lost my old laptop some years back, with it went the psd files for about 12 parts of the story and I was never able to recover them. That, plus the fact that I started Five before I went through clinical rotations, and the karaii before that and the karaii after that are very different people. Not to be too melodramatic about it, but public hospitals in third world countries with intense local gang warfare is pretty ptsd-inducing, and fictional stories about child soldiers quickly start feeling a bit sour when you see in front of you real live people shaped by those forces in a very not-fictional sort of way. You see one person dying and then you see several couple more and you fuck up giving CPR once and all these things kinda pile on, y'know? My comic about Kakashi started feeling like something I couldn't get into anymore. For a while there, all my art felt like it had been drawn by a very different person that I could no longer recognize. Infantile, childish, narrow-visioned-- deep sunk in a place of fiction when real life in front of me demanded my attention.
I've been a medical doctor for a couple years now though, so I've grown into my big boy boots and am doing quite well for myself, as it were. I'm currently a postgraduate resident for psychiatry so art and fandom have returned to being a place for me to destress and chill :) My Five comic is a legacy I am very proud of and really truly do want to finish, but I need to get back into that headspace to do it proper-like. There are so many unfinished stories percolating there that I'd be long-term sad if I fumbled them all in an effort to speedrun an ending. It would be a disservice to my younger self, who was so ambitious and had such a clear vision, y'know?
As it is, these things take time, and patience, and if you've run out of them then I hope you enjoyed the ride, and find greener pastures <3 Life's really truly too short to sweat the small stuff. Enjoy your health while it lasts, and don't forget to make your own meaningful human connections 'cause those can keep you going for a long time :D And thanks for being interested enough to send me a message! I am genuinely very happy people still enjoy my old works enough to come asking me about them. Stay awesome, and don't forget to smell the flowers!
22 notes
·
View notes
Text
HAPPY TURTLE TUESDAYYY TMNT FANDOMMM!!!! I have a treat for y'all artists who love to make TMNT OCs!!! If you love the 2012 era, you're gonna love this one too!!!
A FREE TO USE TMNT DARK HORIZONS FLASH GAME CHARACTER SELECT TEMPLATE, MADE FROM THE ACTUAL GAME SPRITES!!! (Scroll below for the Google Drive of the files, credits first to the artist though sorry! :D)
(ft also the fancy animation particles for when you get to this menu, for those who wanna add it too! (( the GIF is the raw version, without the effect settings/scripts added in Flash tho.)))
PLEASE KEEP IN MIND!! I DID NOT CREATE THESE ASSETS, NOR HAVE I DRAWN THEM
(I am an artist posting this, who has replicated the game's art as a fan, so I want to disclose clearly, that these are NOT MY WORKS HERE.)
PLEASE PLEASE PLEASE give all the credit to the SENIOR ART DIRECTOR working on this Flash game, Damian Aliberti and his team of artists from Quadramma (I could not find sources online that confirm who are said artists unfortunately, so I can only credit the art-director for now)!!!
He even made a page about this project, for his portfolio! Check it out, it's AWESOME!! (CLICK MEE / TAP MEEE)
^I didn't know they planned to bring this to mobile, so you can predict that I'm happy, that this game is still seemingly loved by the Italian studio that made it seemingly. x) (I can only assume they're Italian, due to the file-names, don't quote me on this though, barely any info exists on this Flash game as you can predict LOL)
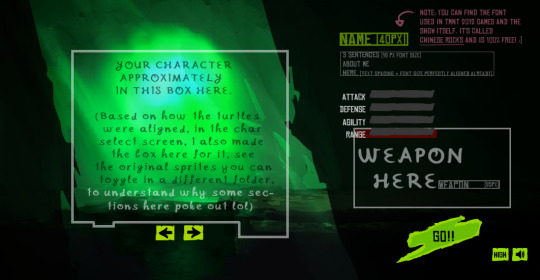
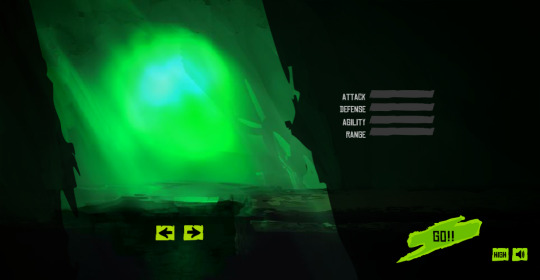
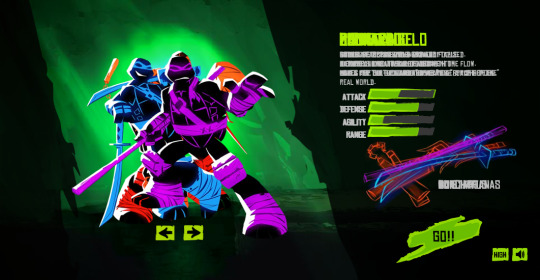
GOOD NOW THAT YOU HOPEFULLY READ WHO MADE THE PRETTY ART: CLICK ME OR TAP ME FOR THE GOOGLE DRIVEE (drive provides the GIF, a PSD, SAI2, PNG and MDP file!! [the joys of owning several art programs, making this much more accessible to people :v])
btw, also like..Maybe not use this for commercial/profit purposes though, that'd be profiting off resources you didn't make, and that are copyrighted. I don't think that's legal. :"v
NO CREDIT REQUIRED. COMPLETELY F2U. I did not after all make the assets, nor will claim so. :V as I mentioned, I extracted these from the actual game, which is why these are all so crisp and nice looking, instead of me using a snipping tool like 2 yrs ago for my fun challenge of recreating the game's artstyle LOL
I do NOT claim these assets or the art I've extracted as my own, this is all purely from the game, and very obviously, these are I guess, owned by Nickelodeon, so I ask you ofc do not...Do some legally questionable things w/ this stuff sdfklsd, pls behave fans, I'd rather not get reported for something I didn't do for providing this to the internet. xD
--
Whilst credit would be nice, and linking back to this would be even nicer for other fans who might just like me,, wanna replicate this cool game's aesthetic sdfskldglk, it's optional, completely LOL. It did only take like 2 hrs to piece this stuff together, to look like a real screenshot thank god. xD
FEEL FREE TO SHOW ME IF YOU ALSO DRAW IN THE GAME'S STYLE OR WANNA BANTER ABOUT TMNT OCS OROROR YKNOW USED THE THING AND WANT ME TO SEE ITTTT I GLADLY STARE AT TMNT POSTS NO MATTER WHAT ERAAAAA~
I JUST WANT PEOPLE TO APPRECIATE THIS GAME'S ARTSTYLE NGL. THAT'S ALL I WANT. And if more ppl also would wanna draw in it it'd make me so happy. I am like...The most acoustic TMNT fan out there man, I have the weirdest wishes in mind xD
Hope anyone wants this orrr like needs it orr dreamt of doing this too orrrr just never thought about doing it, but now that a free template is out there, someone might also wanna do it!! I love whenever like- fandom templates and stuff is made. I plan to maybe make this a Toyhou.se code too, since I do have the raw files of the games and could try to see if I can replicate the animations and stuff and make it non-premium and premium!
(Maybe I should make fandom codes more often in general tho at the topic of that, did it before for Terraria and helped out w/ a Monster High code, to give it a mobile compatible version LMAO)
If anyone or me figures out the artists behind the sprites, I'd gladly show them too, bc GORGEOUS GAME MAN!!!! THEY DESERVE ANY PRAISE THEY GET FOR THE ART AND THE GAME ITSELF ANSAHSHAJS, here I go again I swear, I'm done yapping now. I should participate in internet olympics when it comes to writing essays in every post I ever made. xD
#free to use#f2u#tmnt base#tmnt#tmnt 2012#teenage mutant ninja turtles#flash games#f2u base#base#template#free template#oc template#art template#character template#fake screenshot base#no credit needed#art base#fainthed#fainthed cherry#o0cherrypie0o#o0fainthedcherry0o#dew it#draw some stuff w/ this hellyea
3 notes
·
View notes
Note
hi! first of all, i want to say that i love your gifs so much, you always make such beautiful things. i recently started giffing, and i was wondering if you have any tips about settings or process you usually use in your coloring psds? i'm struggling on what steps i should follow :(
hello ! thank you for taking the time to say this !
i usually never know what to say off the top of my head because i am generally chaotic & do things by whim and instinct rather than any real process, but !!! luckily, i was just talking to a friend about it recently so here's what i got.
photoshop settings- i've mentioned this in my main blog before, if you're not already doing this, load all your giffing steps into an action. if you don’t know how to make an action this handy tutorial tells you how.
- change your most used commands into easily reachable keyboard shortcuts on the keyboard. for example, assuming you're right handed, your right hand will be cropping and colouring so you could switch command + (w) to open file>export>save for web to see your saving settings / command + ( ` ) to select the next tab. (i'm on a mac so imagine i used windows alternatives ) by using your left hand.
gif saving settings
you might have your favourite go-to settings i.e. selective/pattern & bicubic etc. but just like not all sharpenings are created equal, different gif save settings work better for different sharpening styles. try different combis, the results may surprise you. for example, i used to swear by selective pattern+bicubic sharper when saving gifs, but i switched my sharpening style, and started going for a smoother, cleaner, glowier look, and realised after a lot of trial and error that adaptive/diffusion + bicubic smoother works best for the high value sharpening+gaussian blur settings i'm using to create what i want. the big lesson here is don't be afraid to strip everything down and go back to basics sometimes, it's tedious, but it usually pays off. i tried to find the post that taught me this for you and i can't but this one is an alternative !
colouring
- the main things you'll be doing to colour a gif are (i don't always follow these in order but usually i do):
a) brighten ( i.e. curves, levels, brightness, i used to add a white balance filter but stopped doing that years ago )
b) deepen ( these would be your contrast/gamma correction & offset on exposure adjustment layer/left arrow thingy of the levels adjustment layer )
c) colour correct, the hardest part ! it's like doing makeup. you'll end up using probably everything, colour balance, curves in the rgb setting (i need to learn to get comfy with this bc i'm not yet, but! soon.), selective colour my bff, hue/saturation & vibrance. there are great tutorials out there, but my most recent game-changer is i've finally figured out how to use the channel mixer adjustment. it helps to focus on a neutral colour in the background of your gif when it has an awful orange/green/whatever filter when using channel mixer (like a white wall or blue sky that has turned gross looking bc of the film's base filter), then adjust and play around until it turns into the colour it's supposed to be. then it will be easier to pile on layers over to colour your fc. i am ofc still learning, i have no idea how colour lookup works (i've read tutorials and still don't understand jvhakjx).
d) final adjustments. this is when after the above, you decide whether you want to stylise your colouring, make it more vibrant, less vibrant, give it a tint, brighten again or enhance certain colours before saving!
- a great way i got the hang of colourings is to open up colouring psds other people have made and toggle each adjustment layer on and off to see what difference they make to the base, you'll start to understand what the purpose of each thing is and why the layers are in that specific order.
last but not least, it took me 10 years to make gifs the way i do now ! my early gifs were all experimental, i went through so many phases (some i'm quite ashamed of, like the low vibrance/high saturation + high brightness trick i used to abuse. why did i do that.), and i did in fact master each adjustment layer (by this i mean learn to use them to their best potential) one by one. don't get discouraged, be patient with yourself and don't be afraid to try things !
8 notes
·
View notes
Text
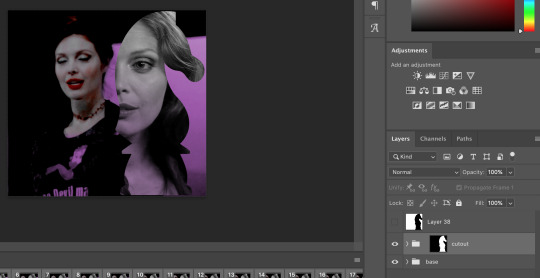
gif cut-out tutorial
ok ok so @subtledean requested a tutorial on how to do stuff like this post with the gif cutouts and the text effects. hopefully this helps aria ;w; i’m not the best at explaining things but i included some screencaps for clarity. i’ve tried to compress all the sample gifs and screenshots down to under 3mb to avoid tunglr compression on mobile so if they look a little different from the actual gifset, that’s probably why!
what you’ll need:
photoshop, i’m using PS 2021 but any version of photoshop will work out
a basic knowledge of gif-making (i’m assuming you already know how to make a gif and color it).
step 0: storyboard
this isn’t strictly necessary but i HIGHLY HIGHLY recommend it. you don’t have to do any photoshopping this first step, but it’s really important to check out your footage and the shots you have gathered to see what works, especially if you’re trying to combine three or more gifs onto the same canvas. like literally take a piece of paper and draw out where you want the character’s faces to be, where you want the cutouts to be in relation to their faces, and think about whether or not there’s enough empty space to the right or left of characters heads for a cutout to be placed. is there too much movement that would be distracting or messy in an already busy gif?
things like that really help, and it also makes you double check on your footage quality and feasibility. if you end up making a gif where you want one character’s face to be on the left side of the gif but it turns out there’s not enough empty space on the right side of their face to place a cutout and you then have to hunt for new footage or start all over, it’s kind of a trainwreck and you just waste another hour of your time as you deepen your procrastination hellhole. that’s not a real story—
step 1: make the base gif
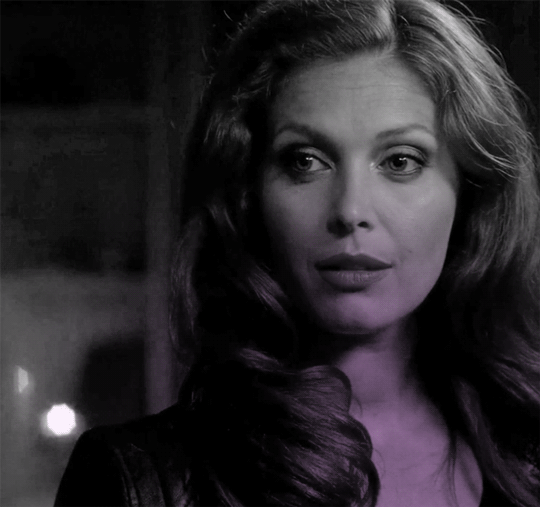
i’m assuming you know how to color it already. and aria i KNOW you know how to color already so :) size it accordingly to your desired dimensions.
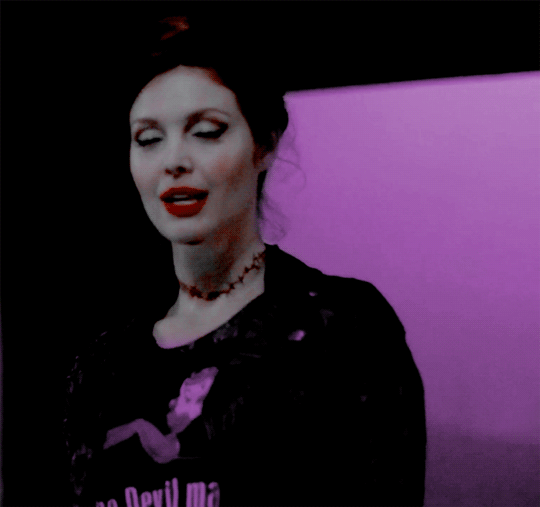
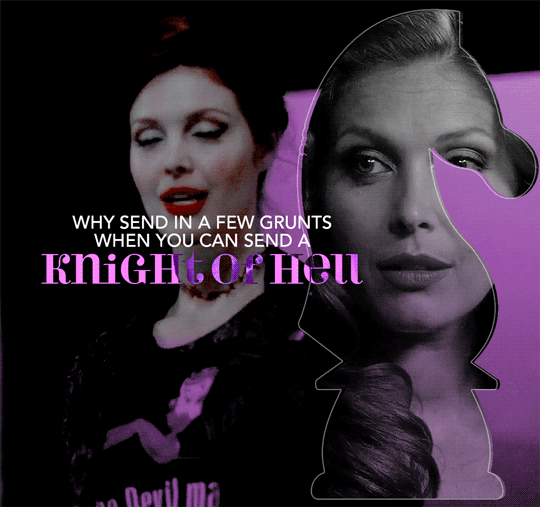
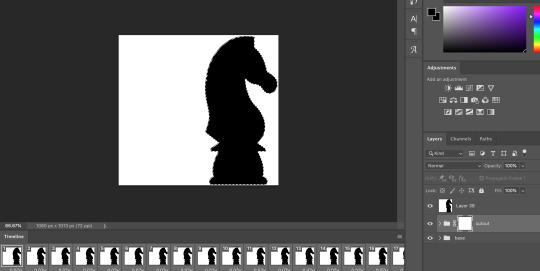
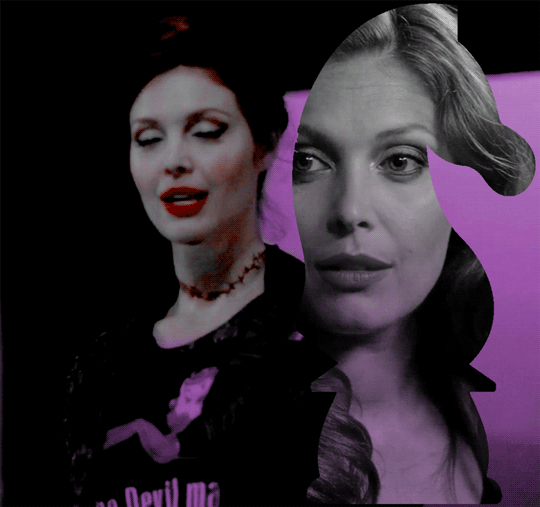
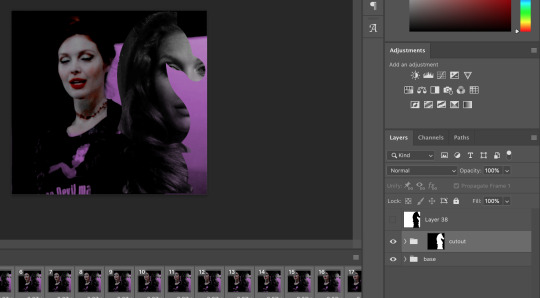
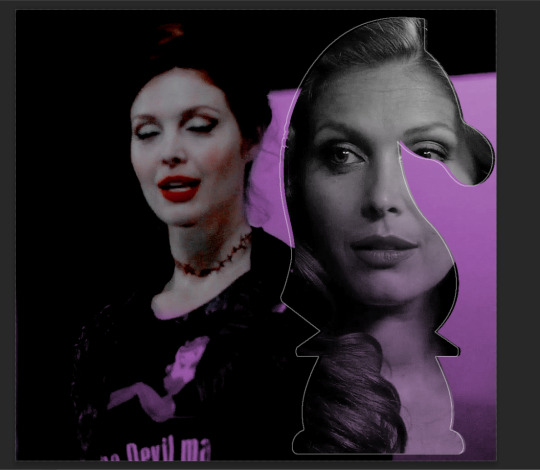
as you can see, i left enough space on the right side of abaddon for the knight cutout to be placed.
save this as a .psd file. you don’t actually have to sharpen and do everything that comes at the end of making a gif right away, but make sure your layers are clearly labeled. do NOT convert to video timeline/smart object just yet.
step 2: make the cutout gif
this is critical: make absolutely certain your cutout gif has the same number of frames as your base gif. otherwise it could get really messy! abaddon has 20 frames, so the cutout will also have 20 frames. again, do not convert the cutout gif to a video timeline/smart object. just keep it as a frame animation. here’s my cutout gif. it’s just a simple b&w gif but i added a touch of purple for color consistency sake whatnot.
now for this particular gif i’ve actually cropped abaddon to be roughly exactly where i would want her face to be in relation to the first gif, but that is unnecessary. helpful, but unnecessary. you do NOT need the cutout gif to be cropped exactly perfect in order to make this work.
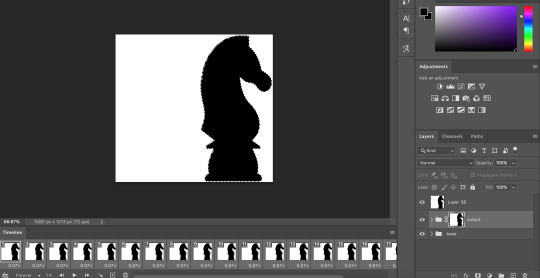
step 3: combining the two gifs
there are many different ways to combine two gifs onto the same canvas. some people like to do it via video timeline. i prefer to do it by frames and convert everything to a video timeline only at the end (it’s just a personal preference). here’s a tutorial if you prefer working with timelines, but i’m gonna go over how to do it by frames.
first group everything in your base gif into one folder. then group everything in your cutout gif into one folder as well. you can name them however you want to keep track of things.
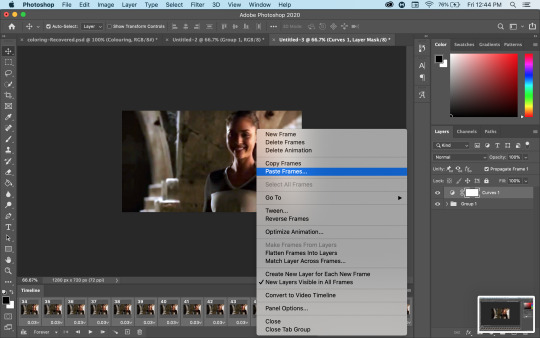
then, select all of the frames in your cutout gif. in this case, all 20 of b&w abaddon get selected. make sure its not just frames 4-20 or whatever, but all the frames you made. you can click frame one and then shift-click your last frame to double check.
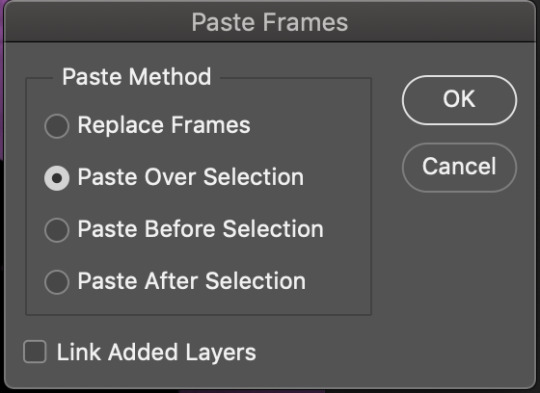
click the timeline tab group options bar and then go to options > copy frames
now go to your base gif canvas. select ALL the frames of your base gif as well (it’s critical that all of them are selected).
now do options > paste frames.
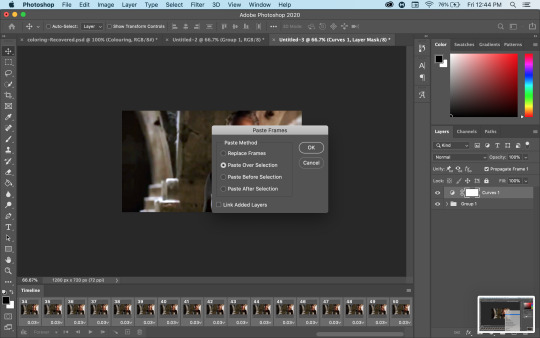
a popup should appear and you’re going to select the “paste over selection” option. do not link layers.
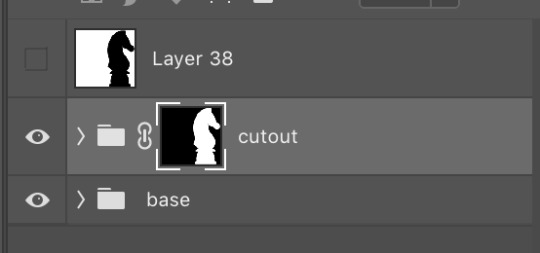
your cutout gif should now be completely or partially obscuring your base gif. however, now you should see two groups on your sidebar of layers. one for the base, one group for the cutout. if you labelled them with names you can tell which one is which.
step 4: creating the cutout
in order to create the cutout, we use my favorite thing in the whole world of photoshop. layer masks.
to make a layer mask, you simply select a layer or group you want to mask and then click this little icon on the row of icons at the bottom of your layers panel.
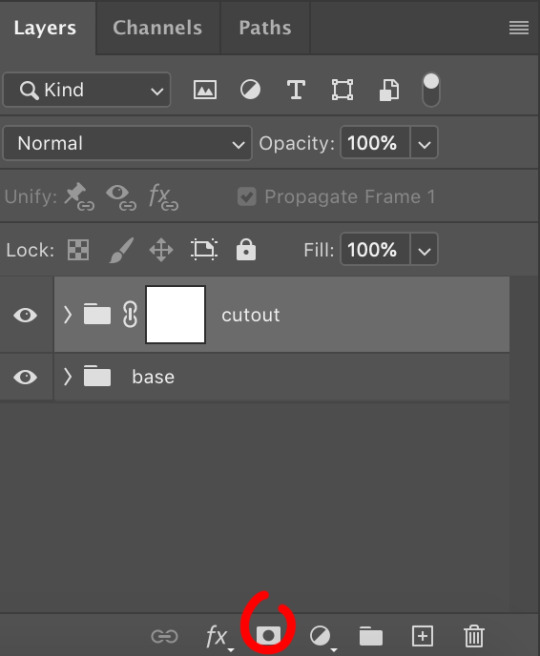
white on a layer mask means whatever group or layer is getting masked is completely visible. black on a layer mask means that the group or layer is invisible. if there is 50% gray on a layer mask, then its 50% visible. so on and so forth.
i love these so much i abuse them on the daily. i’ve made a few gifs where i’ve masked every frame one by one because i wanted to get some cool effects. admitting that kind of embarrasses me but oh well.
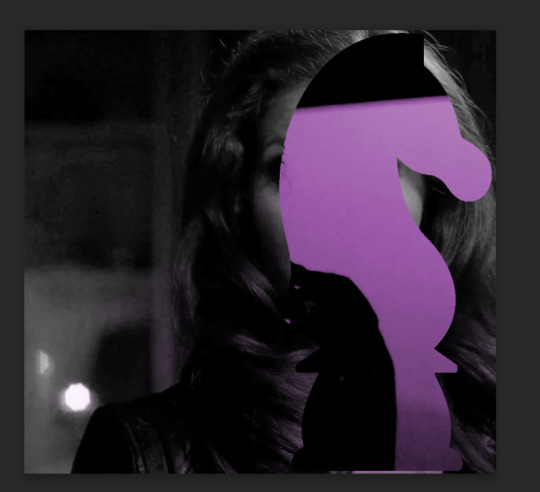
anyway this is simple though. just find a picture or an outline of a knight. i used these boyes:
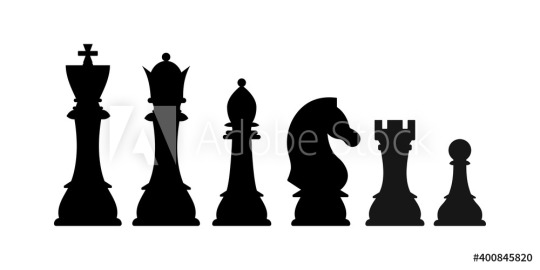
obviously i cropped out the knight of the bunch, got rid of the watermark, and then i placed it on the canvas where i wanted it to go.
select the interior of the knight with the magic wand tool. should be pretty simple since it’s all black.
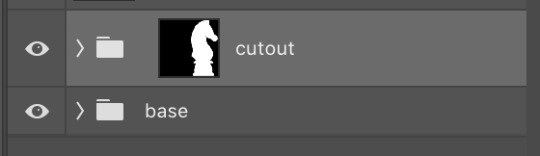
now click over to your layer mask. make sure you have selected the mask and not the group. you can tell you have selected the mask when a little white rectangle pops up on it.
when you know you have the mask selected, click command+i or control+i to invert. if for some reason you do not have this keyboard shortcut, just take a brush tool and color over the area in complete black. as long as the magic wand tool is still selecting just the interior of the knight, it should be fine.
now once again, black means a layer will NOT be showing, white means a layer will be showing. so right now after i disable the visibility of the top layer we used as a reference for the silhouette, it looks like:
do not fear the clownery. layer masks are great because they are always non-destructive. meaning that even if you somehow mess up and your canvas is showing something completely gross, you can always go back and edit your layer mask and your original gif would be unharmed as long as you did not touch any layers in the group, only the mask. simply invert the mask (again, make sure your mask is selected and then command+i or image > adjustments > invert) to get:
for a layer mask that looks like:
you could have also just made a black layer mask to begin with and then inverted the knight outline to be white. many different ways to do the same thing.
another tip: if you select your outline and then click layer mask upon a group or layer with no mask at the current moment, it will automatically make a layer mask with your selection as white and the unselected pixels as black. this is normally how i do my cutouts, because it’s a time-saver even if it like. saves a few seconds max. but i typed out the above for explanation and clarity, so hopefully i didn’t just make anyone more confused.
anyway.
now say you don’t like where the cutout abaddon is positioned. layer masks can also be linked or unlinked, depending on the little link icon you see between the group and the layer mask in the image above. if the icon is visible, the layer mask and the group are linked. if you cannot see the link icon, they are unlinked.
linked layer masks will move in conjunction with the group if any type of transform is done upon them. if the group moves, the layer mask also moves. but if a layer mask is unlinked, you can move the mask and the group independently of one another. for instance, i can change where the cutout is located on the overall canvas of the gif by simply moving ONLY the layer mask (and thereby changing where the blacks and whites of the layer mask occlude the cutout gif contents). but i can also transform the cutout gif layers without changing where the overall outline is located relative to the canvas itself. basically, i can transform the interior contents of the cutout independently. so here (make sure all of your frames are selected):
group unlinked. i’m also making sure that now i am selecting the GROUP (ie. the frames of the layers you are actually going to move) and not the layer mask. you can tell because the little white rectangle around the layer mask can no longer be seen.
now i can transform/adjust the contents of the cutout solely “within” the cutout, and i don’t have to worry about changing where the cutout is located in relation to the overall gif. when transforming, make sure all the frames of your gif are selected. like select the whole group and not just an individual layer, basically.
i’ve seen a lot of how to combine and cut out gifs tutorials on this website, and here is a really good one that i know sully also used <3 big shoutout to all the photoshop queens being inspired by each other!! however i haven’t seen anything that mentioned the linked vs. unlinked layer masks, which i really feel like deserves a shoutout. you don’t have to crop your gifs out perfectly every time, you can always adjust them later. for demonstration, i’ve positioned abaddon in a few different positions with an unlinked layer mask.
step 5: creating the outline
so in order to emphasize the shape of the cutout (the knight), i simply delete the white space surrounding the picture of the knight in the original silhouette that i used. magic wand tool + delete. you can also make a new layer, then paint bucket tool it. many ways to do the same thing.
now with only the knight on a transparent background, i double click the layer to pull up the effects. select outer glow. i used these settings:
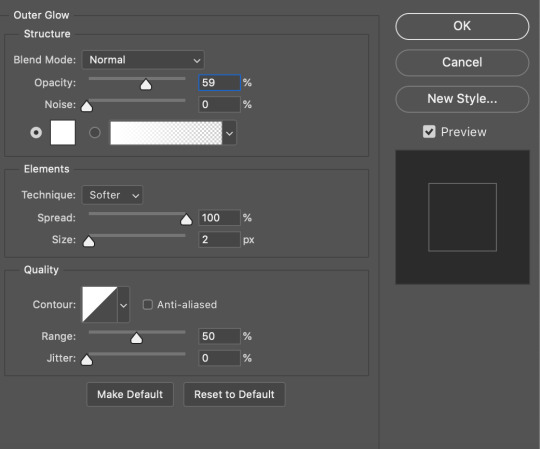
when you are doing this, make sure you are on frame one of the frame animation and the “propagate frame one setting” is selected, otherwise you might end up only applying the effect to one out of your many frames, which blows.
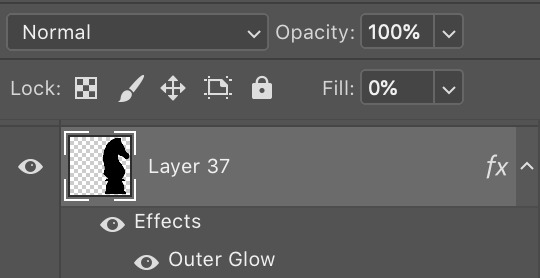
then i go change the fill setting to 0%, BUT i leave opacity at 100%. fill is basically like opacity, but it doesn’t affect layer effects (whereas opacity does). so you basically get only the outline but not the black. you can also set the blending mode of the layer to screen and get the same effect, etc, etc. feel free to adjust however you see fit, in addition to the outer glow settings.
i move this layer over a couple pixels to give it the little offset effect, but you don’t have to.
step 6: adding the text
okay the two fonts i used are avenir and perla. i think a LOT of gifmakers use them because they’re really pretty.
i make TWO different text layers, one with avenir in a smaller size and one with perla in a bigger size. this is because for the perla one, i’m going to be changing the blending mode whereas i don’t want to be changing the blending mode for the smaller text. i position the text where i want it to be and make sure the perla font is in the color i like:
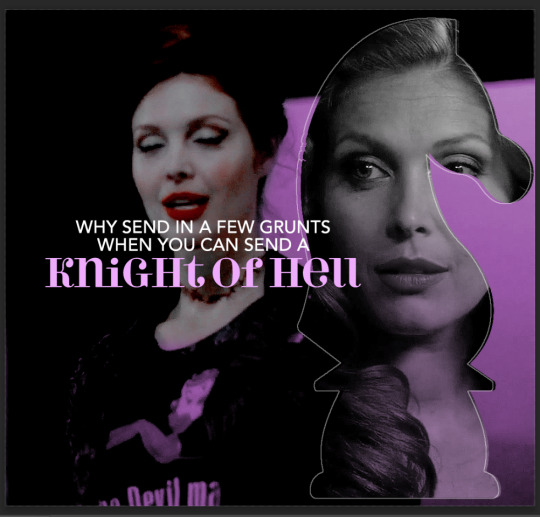
then i change the blending mode of the fancy text (perla) to difference. ONLY that layer, and again make sure to check “propagate frame 1″ and make changes on the first frame to apply the change to all of your frames.
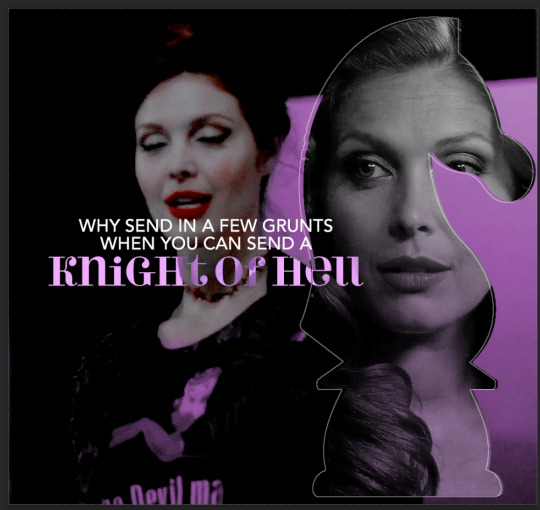
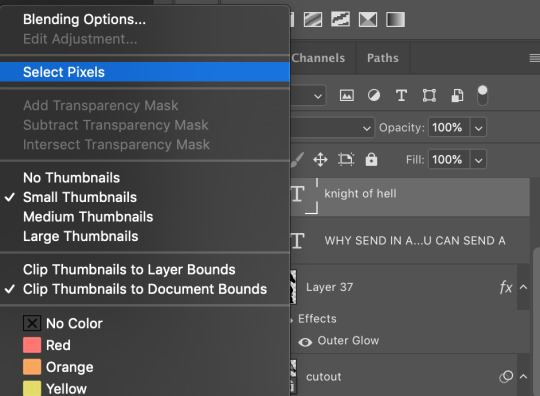
but i still don’t think it produces enough of a difference. so i right click on the text layer for knights of hell, and then go to: select pixels.
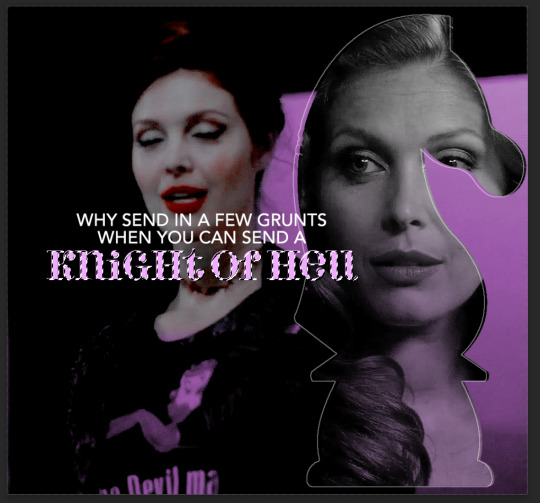
then i click the curves adjustment layer. this will automatically make a curves layer with a layer mask that occludes everything BUT the area you selected. beautiful. i drag the curves around until i get enough of a difference that i like. normally i make the lights lighter and the darks darker. yeehaw.

again there are sooooo many different ways to achieve the same effect on photoshop. this is just want comes easiest to me, and it’s totally okay if you find a different way that works better for you at producing the contrast you want or the colors you want.
step 7: export and cry
NOW you can convert everything to a video timeline, put your video frame layers to smart objects, and then apply your finishing sharpening filters. export, cry, and hope tumblr compression doesn’t screw you over.
hopefully this was helpful! pls like... idk support my edits if you found this helpful or reblog this post. feel free to dm me about how u do some of the text effects as well bc i’m always trying to learn new things and i am by no means an expert on like. any of this.
aria please go write your fucking thesis before i delete this entire tutorial challenge. :D
#subtledean#THIS IS FOR YOU#I FEEL LIKE THIS TUTORIAL HAS MORE WORDS THAN UR THESIS ATM SO!!!#tutorials#mine#idk what to tag this but PLS pls pls feel free to talk to me abt ph*toshop#or ask for help or point me towards other tutorials <3#shoutout to sully too its in there somewhere#resources#100n#ps
187 notes
·
View notes
Note
Hey there, hope you’re having an amazing day and week! First of all I absolutely love all of your photos and you’re sims are stunning! 😍
I don’t know if you’ve answered this before but how do you edit your photos to look so amazing?? I’m trying to step up my photoshop game and would love some pointers! 💛
this is so kind of you to say, i might just cry 🤗🥰 thank you so much for taking the time to say this! i really appreciate it! honestly you made my day and week so thank you!! ❤💕
i have not actually answered this before, and i'm 100% happy to give pointers! i am still learning myself, so i will also leave a bunch of resources at the end of this post that really helped me, just because im really bad at explaining things at times, so i apologise in advance for that! i am also happy to make a video explaining all this, if that's easier for anyone, so if you would like that, please let me know and i will! i know lots of people are very visual learners so i truly am happy to!
1. Reshade is not necessary. I use reshade, but you do not need to, I know a lot of computers can't handle that and ive seen so many photos come out just as amazing without it. But, if you can use reshade, i like to use this preset by @breadcrumbss3 and usually any by the lovely @intramoon !! I use them all with the latest version of reshade (4.9.1) and tweak it (very rarely) if i need it to look different.
2. Topaz Clean is super helpful, and i use it a lot just to smooth everything out. it's especially good if you do a lot of gameplay pics and just want a quick little thing to do without having to do it manually. I would go here (sims 3 tutorial hub) to get it without having to...well...spend money we could use to buy things on the sims :) if you need a direct link to anything, let me know. i personally use this action set by avonlea, as i just have to click a button and it does it all for me. however, if you dont want to use topaz, you can get the same sort-of effect by reducing the noise, i found a tutorial here as well for you.
3. Shadows!! If you're doing edits shadows are really good at bringing some depth! i often over-do them whoops, but usually it just makes it look more real. i normally do a soft shadow over all the main parts of the face or body that need it, using the overlay blend layer before going into a harsher shadow for areas like the nose and edges of the mouth to define it more. for this i use a smaller brush and a brown-ish colour, with the multiplier blend layer. i will sometimes then blur it out using gaussian blur, depending on how harsh it is. there's a really good tutorial i watched for this that i'll link down below!
4. colouring and psds! there are so many out there, but usually i just play with the colours myself until i get what i like. but otherwise i'll use this big set of psds that come with a bunch of options.
5. hair strands! i love doing this, it's my favourite part!!! i have a drawing tablet, which makes it a bit easier to do but again sometimes mine can still look crazy when i over do it haha. if you would like to do hair strands and stuff, i use this brush set :)
Those are the main things i can think of, i hope it's at least somewhat helpful, i know im really bad at tutorials. a video would probably be easier to showcase things, but i wasn't sure if you wanted that. again im totally happy to do one if you'd like that! now these are some really good sources and tutorials that i use a lot (most are for the sims 4, but it's basically the same for the sims 3 too):
- TS4 Basic Editing Tutorial in Procreate (although most of these effects you can use in photoshop, which is what i did)
- Sims 4 | Screenshot Editing Tutorial
- Intramoon's tutorials
- This one by Pea-Milk is really good too!
- Lamatisse's Tutorial
- PeonyPyxels Tutorial
sorry about this mess, hope you could understand somewhat! thank you again for the lovely words. if you wanted to know about anything in particular, dont be afraid to ask again or pm me! have a beautiful day!
37 notes
·
View notes
Text
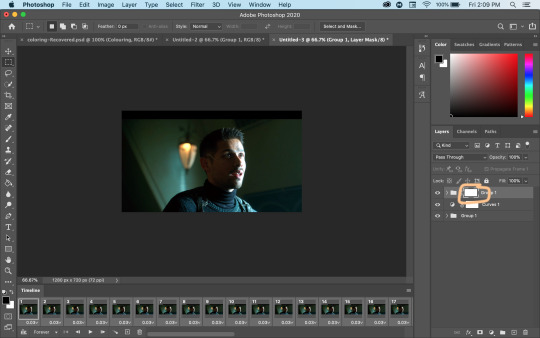
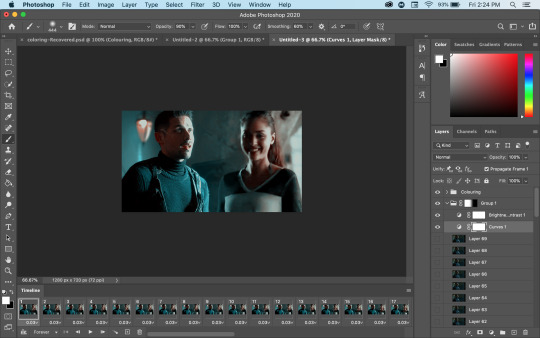
Basic Giffing Tutorial
How I make gifs for a simple scene + coloring + captions under the cut:

I’ll show you how to make this ^^^ gif (including the sharpening, coloring and captioning process).
Okay let’s start with what you need to do this: A version of photoshop with timeline (I use photoshop 2020 but probably any version will work, the program layout might just look a bit different), HD videos to gif from (preferably 1080p, especially for making big gifs, but 720p is also okay if you can’t get anything better, I just recommend making smaller gifs with it), some kind of video player that lets you trim clips in it (I use Quicktime Player because it’s the default for Macs)
1. Start with a video clip of the scene you want to gif. I usually download full episodes and clip scenes from the episode. My computer is a MacBook Pro and the default video player is Quicktime so I just trim my clips directly in that. In Quicktime you can just press CMD+T and it’ll give you trimming options. Most people use the screencapping method to make gifs, but it requires extra software and that’s not how I learned, so I’m going to tell you how to gif straight from video clips. I have no idea if there’s a difference in quality or ease between the two methods, but if you find that my way is too difficult then there are plenty of tutorials on how to do it via screencapping too like this one.
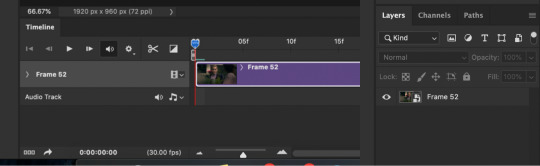
2. Open the clip in Photoshop. Just hit CMD+O and then select the video you want to gif from (or go to File > Open). Then, in the Timeline window at the bottom, scrub through the video and trim it (with the little scissor icon to the left) at the first frame of the scene/shot you want to gif and the last frame. Delete the excess clips. Before the next part, I usually crop off the black borders that some videos have if their original aspect ratio isn’t 16:9 (which most aren’t). For TV shows from Netflix, for example, the aspect ratio is usually 2:1 (or 540:270) so if you set the crop ratio to this you can get rid of exactly the black, no more and no less. I have several preset crop ratios (540:270 for TV shows, 540:225 for most movies, etc.). You can do further cropping after you have made and colored the gif, but getting rid of borders before converting the video to frames makes this easier. If your video does not have these black borders to begin with, ignore this part.
3. Convert video to frames. In the upper right hand corner of the Timeline window there is an icon that is four small lines stacked on each other (time line menu). When you click on it, a drop down menu will appear. In this menu select “Convert Frames > Flatten Frames into Clips.” Then click the button in the lower left hand corner (three small rectangles next to each other; frame animation button) that says “Convert to frame animation” when you hover over it.

After, it should look like either of these. Sometimes, if you crop the video before you start the process, it gives you two frames like in the image on the right above. If this happens, delete the frame with the shorter time stamp on it (as indicated by the number at the bottom). Next, click the dropdown menu in the timeline window again and select “Make Frames From Layers.” It will then turn into multiple frames, as shown below:

Delete the first frame (it will have a number under it, while the rest of the frames say “0 sec”), then use “select all frames” from the dropdown menu so that they are all highlighted and click “0 sec > other” and set the frame delay to “.06 seconds.” Scroll down to the bottom of the layers channel window and click and delete “Video Group 1″ then scroll back to the to top of the window and select all the layers by holding Shift and clicking on the top layer. Click the icon in the lower left hand corner that says “Convert to Video Timeline (video timeline button) and the frames should convert to long purple bars stacked vertically on top of each other. Then, under the “Filters” drop down menu at the top of the screen, select “Convert for Smart Filters.” This converts the layers to a smart object, turning the stack of bars a single purple bar and a single layer in the layers channel. When you press play in the timeline window, the image should move and play through like a video. If it doesn’t, you missed a step. It should now look like this (the left is the timeline window; the right is the layers window):
This seems like a lengthy process, but I have compiled most of these steps into a few Actions. With the actions (starting at step 3 of this tutorial) you use “Part1″, delete the frame with the shorter time stamp on it (if needed), “make frames from layers,” delete the first frame and Video Group 1, select all frames in Timeline and change frame delay to .06 seconds, select all layers in the Layers window, then use "Part2″. I assign my actions to function keys so all I have to do is use a few keyboard shortcuts ( i.e. Part1 is F1, Part2 is F2, etc.). This makes the whole process much quicker. Here is a link to download the actions I created for this process. Once you get the hang of using the actions, it all goes pretty fast. Also, when using the actions you might get messages like this:
Just click stop and keep going with the instructions.
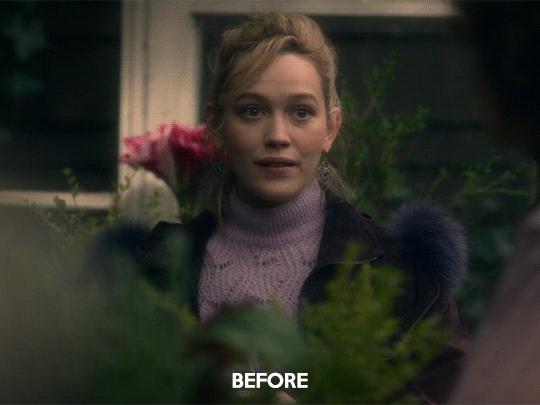
4. Duplicate the frame in the layers window and set the top layer to screen using the drop down menu in the window (it’s the second from the top and should say “Normal” to begin with. That changes the scene from this:

to this:

5. Make coloring adjustments. Everyone colors gifs in their own ways, so you absolutely don’t have to follow what I do. This is just the basics of how I color:
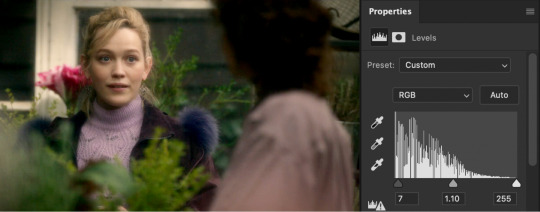
I always start with Levels (some people use curves, some people use both, I never learned how to use curves though). Under the levels adjustment menu, I start by using the black point dropper and select the darkest part of the image. Sometimes it takes a bit of clicking around with the dropper to find what works. Depending on the scene (colors, lighting, etc.) I also move the sliders if needed. There’s no real formula to it, I just do everything by sight, changing things until it looks good to me. For this gif, I selected a dark part of Jamie’s hair with the black point dropper. Then I did some minor adjustments with the sliders on the graph. If you’re coloring a darker scene, the sliders are very useful for brightening the scene, but this is a fairly well lit scene so not much is needed. This is the scene with Levels added:
Next, I usually use color balance to fix the color changes that Levels made. This looks too yellow to me now, so I use the yellow-blue slider to add in blue. You’ll have to play around with what looks best for whatever scene you’re giffing, but I’ve found that most scenes I add blue and sometime add red or cyan, but rarely use the magenta-green slider. With color balance added:

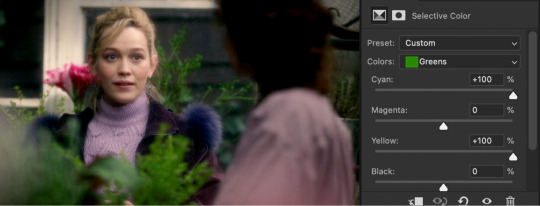
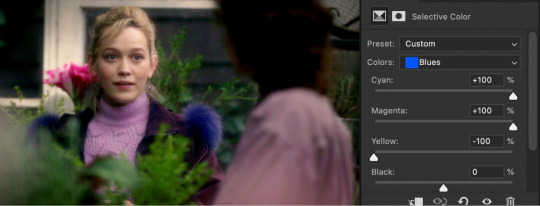
Next I use a series of selective color layer. Make a new layer for every different color adjustment you make, it makes it easier to edit if you make a mistake or want to make changes later. I always start with Black, usually just adding a little to Cyan, Magenta, and Yellow so that it increases the contrast of the whole scene.

From there, you have to pick out what colors you want to accent or correct. You get better at this the more you do it. In this scene, I want to accent the green of the plants and the purple of their clothes. Normally I would do Red next to adjust skin tone, but because I want to increase the green in the picture, I’m going to start with Yellow. This will make skin tones look too yellow-green, but you can correct this with a Red Selective Color layer. The Yellow layer made the plants greener, but the Red returned the proper color to Dani’s skin.


I keep adding more selective color layers to bring out more color in the scene.

To make it even more vibrant, I use several Hue/Saturation layers to increase the saturation of certain colors.


Sometimes I also add a Vibrance layer, but for this scene it wasn’t needed. Lastly, I usually add a Brightness/Contrast layer. I prefer to get contrast out of deepening the blacks in the scene rather than use the contrast setting in this adjustment layer, but sometimes I do use it. Most of the time I just increase the brightness a little, depending on the lighting in the scene.

Really, coloring is all about just messing with different settings until things look right to you. I’m still learning new things every time I make a new gif. There are tons of other adjustments available that I haven’t even tried out, so feel free to mess around with them. Note: The more adjustment layers you add, the more the quality might decrease. I do try to do minimal adjustments normally, but I wanted to make this coloring fairly vibrant so it has a lot more layers.
If you are making multiple gifs from the same scene, repeat the process of Steps 1-4 and then copy the adjustment layers from the first gif to each subsequent gif. I normally group all the adjustment layers together (select the layers and press CMD+G) which makes it easier to copy the layers to another PSD.
6. Crop and resize the gif. You can crop your gifs any way you want. I’m in the habit of making rather large gifs (which is thankfully now possible due to the 10mb size limit) and most of my gifs are cropped at ratios of 3:2, 4:3, or 1:1. For longer scenes I usually use 16:9. Crop your gif at whatever ratio you want and then resize it. For Tumblr, there are specific dimensions that gifs have to be for them to format properly in posts. For “large” gifs (one per row), they must be 540px wide. Height does not matter. For smaller gifs they have to be either 268px (two per row) or 177px (three per row). Resize the gif by either using CMD+OPTION+I or going to the “Image” dropdown menu at the top of the screen and clicking on “Image Size” If you already cropped at your desired ratio, just change the width to 540, 268, or 177, according to the size gifs you want.
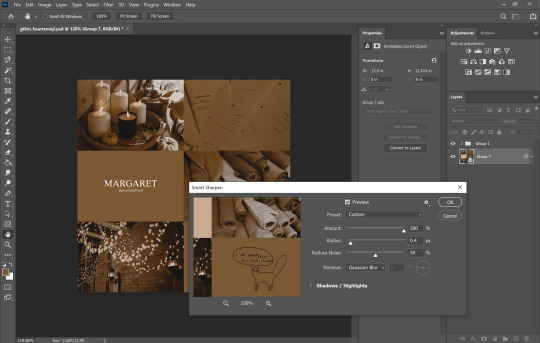
7. Sharpen the gif. After you have cropped and resized the gif as desired, you need to sharpen it. Because of the method I used in the beginning (duplicating the layers and setting the top to screen), you will have to add a Sharpening filter and a Gaussian Blur filter. Select the top layer of the gif (not the top coloring layer) and click on the “Filter” dropdown menu at the top then select “Sharpen > Smart Sharpen” These are my sharpening settings (if you’ve ever giffed before, or looked at other tutorials, you’ll notice this is sharper than most people would use. That’s because you also have to slightly blur the layer below it, which dilutes it to a proper sharpness):
Next, select the lower layer of the gif and go back the the “Filter” menu and select “Blur > Gaussian Blur” and set the radius to “1.0 pixels.”
These sharpening and blur settings are also actions I’ve created. If you download the action I listed before, assign them to function keys and you will just have to select the appropriate layer and use the function key to do the work. Additionally, learning the keyboard shortcuts speeds along the process.
8. Export/save the gif. Go to “File > Export > Save for Web (Legacy)” or CMD+OPTION+SHIFT+S. These are my save settings (I actually have no idea what any of these things mean... I’ve never changed any of them).
The important thing really is that you make sure that under looping options near the bottom (not shown in this screenshot) it says “Forever,” not “Once.” And also check how big the file is in the bottom left corner:
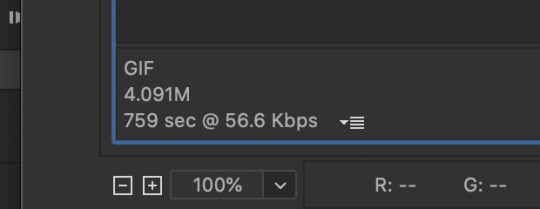
As long as the number under GIF is less than 10M, you’re good to go. Then save the file and name it.
9. Caption the gif (if needed). You can either do this in the PSD you already had open to create the gif or you can open the gif you just saved and caption it there. I find it easier to add captions directly in the current PSD. When it comes to captions, it’s really based on your own preferences. I’ve seen people use all different fonts, sizes, colors, and placements for captions. Some fonts I can recommend are: Myriad Pro, Calibri, Arial Rounded MT Bold, and Keep Calm.

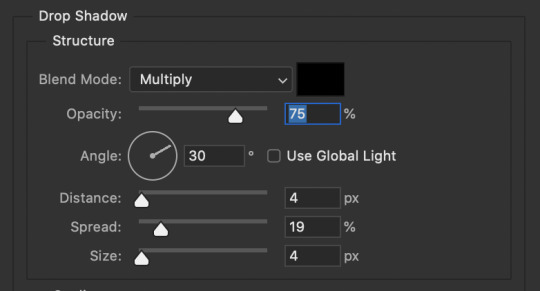
There are plenty of others too. The main thing is that they normally look best when they are bolded and italicized. I have been using Keep Calm for my captions lately. I also add Stroke and Drop Shadow to the text (my text settings are also included in my Actions):

Just make sure the text is centered and has a good margin from the bottom.

This is what it looks like with those effects ( font: Keep Calm; size: 13; tracking: -25).
Anyway, that’s my basic process for gifmaking and coloring. I hope this gives you some kind of foundation to work off of. Just keep experimenting with different techniques and you’ll keep getting better. Read other people’s tutorials and tips and try them out to see what you like and works for you.
#if you're seeing this now i dont make gifs like this anymore#if you ask i'll make an updated tutorial#riah.txt
223 notes
·
View notes
Photo

RULES: When your work is tagged, show the process of its creation from planning to posting, then tag 5 people with a specific link to one of their creative works you’d like to see the process of. Use the tag #showyourprocess so we can find yours!
i was tagged to show this , this and this one by @suibianjie @cherryysundae @fengqing @wangxianbunnydoodles and @still-snowing.
it was really nice seeing the similarities and differences in everyone’s processes and i’m truly in awe with all of yours creations (*˘︶˘*).。.:*♡ and ali i really enjoyed reading your art process! it’s was so interesting and your art is wonderful!
(special thanks to @lan-xichens @suibianjie, @highwarlockkareena, @nyx4, @aheartfullofjolllly for organizing this (´。• ᵕ •。`) ♡ you all are amazing!)
[I didn’t have the psds saved so I had to remake them but as far as i remember this is how I made the original ones too since my process hasn’t changed a lot since then.]
Planning
Surprisingly all three of the above gifsets were part of my the untamed x color series so not a lot of thought was put into the panning since the scene or characters were already chosen for me.
If a scene isn’t specified like the last two I go through the episodes or clips to pick out the scenes i want to gif or those which would look good based on the general theme of the set.
(this is a part of the cql folder where i’ve clipped out the major/ defining scenes. please excuse the ridiculous names asjjsd it helps me remember what they contain)
Creating
For this tutorial/process I’ll explain the wangxian in purple one in detail and then go over the other two briefly since it’s almost the same process.
So I selected the exchange between wangxian where wwx’s talking about helping out with the yin iron and imported it.
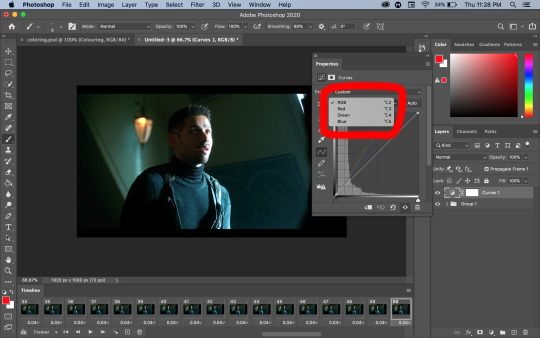
Then I converted to timeline before converting the layers to smart filter. After this I start my base coloring process which is just messing around with the curve and selective color layer until i get the skin tones accurate and the over all, the gif more brighter.
Now since the request called for purple/indigo I added another selective color layer and the adjusted the cyan and blue options under it to make it purple instead. **what i usually is that I adjust the colors slightly in one layer and then adjust a little more after adding another layer.
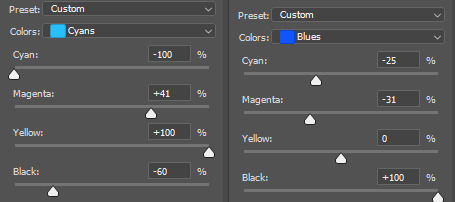
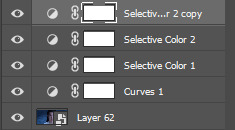
it resulted in three more layer (which sometimes get adjusted even in the end if it looks like it needs more tinkering.
Overlay:
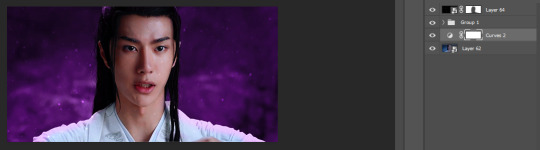
The hunt for overlay usually takes the longest unless I don’t already have it saved. I was just going through my folder when I realized it might look good with this. So I opened, cropped and resized the snow gif and then after converting it to smart filter duplicated it onto the lwj gif.
I play around with the blending options (for this one I used color dodge) and since this doesn’t obstruct the main gif I only used the layer mask for lwj’s face after decreasing the opacity like this.
Then after adding my watermark I finally convert everything to smart filter again, then smart sharpen my gifs (using the settings 0.5) and adding gaussian blur (setting it to 0.3) before exporting it and saving for the web.
Here’s the finished result as compared to the original.
Posting
Like Monica I can’t keep gifs in my draft more then a day (and that too is a stretch lmao, the itch to post is real sjdjdsj). So i either queue it for the next day day if its getting really late or just post it right away. I don’t save any psds unless I really like the coloring of it and even that gets deleted after a week. (the only gifs that get saved occasionally are gfxs for future reference).
2- Coloring for Wangxian x Rainbow
For the rainbow series, I had to make a list of all the scenes I wanted to add ( i wanted to include all the landscape/scenic ones with wangxian so that involved going through a lot of episodes). The whole process is nearly the same apart from the coloring which required more selective color layers and masking (i forgot to save the picture after applying the masking in this one, oops!)
@wangxianbunnydoodles Hao I’m sorry I couldn’t do a separate one for the xue yang post cause I was in a rush, but I’ll definitely try to do that in the future
Tagging:
@manhasetardis with this one (it’s definitely my favourite one! the way your coloring is always so consistent and just this concept! i love it
@wei-gege and this one (your glitter series and their coloring is so wonderful, i always look forward to them on the character birthday events)
@xiaodaozhang and this one! Eva I love each one of these so much! the masking the text style!
@petekaos and this set (rahul i don’t even go here but the coloring in this is so gorgeous I couldn’t stop looking)
@veronaprincess and this wangxian lotus lake date one! i adore the coloring.
@kaonoppakao and this one! it’s so pretty!
no pressure though (´。• ᵕ •。`) ♡
#pstutorial*#showyourprocess#thank you for the tag!#gifmaking#hopefully all of this made sense but if any bit is confusing or i dont make sense please feel free to send me an ask or message <3
45 notes
·
View notes
Note
I often don't make things for poc because I'm scared of whitewashing them. Can you link to the tutorials that show how to go about this or could you explain it yourself? I'm always too scared of making things with poc in them and I don't want to whitewash anyone so advice would be amazing!
hi! i guess i could share the things i know about it but i do want to clarify that i’m not an expert at editing! so, if you want really indepth help, it would probably be best to ask someone else!
as for tutorials, these are the ones that have personally helped me! this one by @fadenet (specifically pale/pastel gifs including characters with dark skin), this one by @blueshelp (specifically about east asian and southeast asian celebs), and this one by @kispesan (specifically about edits). this is a post with a ton of resources for gif making, including things about coloring and other anti-whitewashing tutorials (highly recommend!).
when it comes to what i do, it really depends on what i’m making! i’ve made a couple of edits specifically about unwhitewashing characters of color which you can find here for examples, but overall what i do really depends on the kind of edit i’m working with.
i’d also like to quickly say that i use photoshop! while the basic coloring will cross into other programs, some of the tools/names might be different.
lets use an edit of the character aisha from winx club as an example! in season 8 of winx club, the characters aisha and flora (both having dark skin) were whitewashed. the following pictures are a screenshot from the series, showing the whitewashing, and the same sc but edited to reflect her original skin tone and hair color.
in this edit, i actually went in and recolored her skin using the brush tool (yes, it takes a hot minute to do, but you get faster the more you do it). the reason i do this for picture edits, is purely a personal preference. i like having the control of only editing the parts i want to edit and keeping the rest of the picture the same as before. personally, i don’t love using the selection tools so when i don’t need to,, well, i don’t.
if you have the time, patience, and ability to physically recolor still pictures, i’d definitely recommend it! it allows you to use the eyedropper tool on the original skin tone which makes for a much more accurate edit. taking advantage of the selection tools and paint bucket tool can make the process a lot quicker too!
now, lets use a different method, one that i personally use for things like videos and gifs (basically, anything moving)!

these gifs come from the same season as the above example and as you can see, aisha is heavily whitewashed in the first one. now, this is where coloring becomes your best friend!
so, you have your gif ready for coloring, maybe you used a psd/filter or you did your own thing, regardless, the person in the gif is whitewashed and you want to fix it. so, what do you do? (now, obviously this is just one example. there are many others ways to do this!). what i do, is almost exclusively use the hue/saturation and the color selection layers (i will occasionally use the brightness and curves layers depending on the scene)!

^^this little “guide” or whatever shows what you need to find for this tutorial.
the first thing you should do, is figure out which colors primarily make up the person’s skin tone. a good way to figure this out is by using a hue/saturation layer. click the hue/saturation, which will show a menu similar to the one in the picture, and go through each color and turn the saturation all the way down, so it says -100. don’t mess with the hue or lightness levels yet, just the saturation. this will show which colors make up the person’s skin tone! as an extreme example, if someone’s skin was green and you turned the saturation of greens all the way down, that person’s skin wouldn’t look green anymore, it’d look like someone put on a black and white filter specifically for the color green. just keep a close eye on what changes! now, this saturation change is just temporary! after you know which colors are in that person’s skin tone, you can just delete the hue/saturation layer. (you really only need to do this if you aren't used to coloring darker skin. once you get used to it, you likely won't need to, but it can still be a good reference point if you're lost on what to do)
so, after figuring out what colors you need to focus on, go to the selective colors layers, so you can edit just those colors! for our example here, aisha’s skin tone is mostly made up of reds and yellows while her hair is mostly reds and magentas. when i’m editing her skin tone and hair color, i only focus on those colors. in the selective color layer menu, you have four other colors to control; cyan, magenta, yellow, and black. although it would help, you don’t need to know everything about colors or color theory for this! just mess around with the colors sliders until you get something close to their original skin tone. you may need multiple layers of selective colors to get this right! don’t panic if it doesn’t happen right away, just keep going.
something i think is incredibly important during this step, is having a picture of that person/character open! that way you can actually go back and forth to see if what you’re doing is close. another tip, having another file open with a completely white background with a colored circle of that person’s base skin tone on it really helps. this way you can use the eyedropper and brush tools to see how close what you have in the edit is to the original (basically, use the eyedropper tool to select the skin tone in the edit and then use the brush tool to color it next to the circle of the original skin tone. this helps you see up close how similar they are!). here's an example!

the first example is from the gif and the second is from the still picture edit! you'll notice that the gif example doesn't match up exactly because in that specific scene aisha was directly in sunlight, making her skin slightly brighter than usual, while the photo i used for reference has normal lighting. remember to pay attention to things like lighting and shadows!
now, at this point you might be thinking, “this tutorial only shows what to do for animated characters and i make edits with real people :(”. don’t worry! the second method still works! here’s an example using a real person, kim taehyung from the group bts.

obviously, this isn’t perfect because i spent like. two minutes on it. so the skin is blotchy, the lips are too red, and the background changed. but the way i edited it is mostly the same as the gif example i used! the only difference being that i also used a color balance level to darken up the whole picture. however, besides that i did the exact same things as i did with the gifs of aisha above. if you're making edits with real people, then just do whatever you usually do to make sure it looks more realistic.
i hope all of this made sense? i’ve never done a tutorial before and basically all of what i’ve said has already been said! but here are some more tips for the road:
-when editing black people/characters, don’t make their skin red
-when editing indigenous people/characters, don’t make their skin red
-when editing east asian and southeast asian people/characters, don’t make their skin yellow
-pay attention to lighting! if a scene has darker lighting, skin will look darker than it is!
-on the flip side, if a character is right in front of a very bright light, their skin will look lighter
-don’t avoid the colors red and yellow, especially for people with tan/darker skin. those colors are always essential. they won’t look bad in your pastel edit.
-don’t be afraid to ask for help! if you have mutuals who make edits you can try asking them. or even making a separate post asking for help from any followers that edit! basically, if you truly don’t know what to do, either look it up or ask for help.
-do not just post the whitewashed edit/gif/art with the excuse that it’s, “just the filter” or “just the psd”. take responsibility for what you’ve created.
-if you’re using a filter/psd and you really can’t figure out how to unwhitewash someone.. use a different filter! ik you might really like the one you picked, but that doesn’t excuse racism. there are lots of filters/psds out there that don’t whitewash. use one.
i’m gonna be honest, unwhitewashing is really easy as long as you know how to work whatever program you’re using. and even if you just started, it’s still pretty simple! if you’re scared of making edits with poc because of whitewashing, learn how to not whitewash.
anyway i hope this helps? let me know if something doesn't make sense or needs more explaining! but i'd really recommend looking at the tutorials i linked as they're more in-depth and offer a lot of insight!
#hnng let me know if something doesnt make sense im a little stupid#photoshop#photoshop tutorial#coloring tutorial#anti whitewashing#anonymous#answered#mine.edits#(kind of?)
41 notes
·
View notes
Note
I need some kind of a photoshop lesson for this aesthetic of yours
okay i’m gonna do a tutorial real time for a picspam type aesthetic that will look like this ⇣ a photo i will put here once i make it.
step one. open ps : )

welcome : )
okay so dimensions r a thing tumblr compresses photos like hella so i do all my still img aesthetics 900x900 is you’re trying to do this for say insta i would actually recommend jumping up to 1080x1080. pixels, obviously. idk if i have to clarify that.
so click ctrl+n or create new i’ll be doing 900x900

these r the rest of my settings i personally do not think they matter my resolution stays at 72 the only thing i’ve detected this affecting is font size. (side note notice how this pic looks all fuzzy? that’s bc it’s a ss with a boatload of pixels. and if there’s one thing tumblr hates. it’s pixels. and then it’s users. but who’s counting? tumblr is. i recommend keeping ur still images 900x900♥)
step two is collecting ur images i personally use pinterest for these bc quite frankly it’s really nice & easy to find these types of photos esp if you’re looking for a canon character bc if you type in [character name] aesthetic you’ll get stuff if you don’t quite frankly even just type in aesthetic you can scroll until you find an image you like click on that and go through like images underneath it and keep burning thru. like u probably know how to work pinterest. but i am being thorough and covering my bases. searching [color] aesthetic is also nice or even searching a character that isn’t the character you’re doing this for but who’s kind of similar that also works. i recommend esp for charmed bc their pinterest gets bogged down with screencaps and then like. charms like jewelry searching “charmed aesthetic” or “phoebe halliwell aesthetic” really just doesn’t cut it so what i’d recommend is instead of going through pins, go through boards.
bc like. big difference. other pro tips if you see a board you like, go to the person’s profile and check out their other boards bc odds are you’ll find more you like. another protip if you’re specifically doing ocs typing in oc aesthetic will get you a lot even going to the boards on that as well. yields.
so. you’ve gathered ur images. u need five. open em. i’m making an aesthetic 4 myself which you’ve probably already guessed from the fact i’m putting the finished piece at the top, but it’s not ready yet so it’s still a surprise for me.
cropping. if ur doing a 900x900, use these setting exactly. 1080x1080 use 1080/2 x 1080/3. i’m not doing the math 4 u ♥

most important part? Delete Cropped Pixels. otherwise ur not really doing anything. crop all five images.

but them in ur document. document? psd? ur thing ♥ place them places. u do not have to commit now. leave one middle one blank. it does not matter which one. i personally like to alternate my text pieces if i’m doing a long post like what i did on my ncwotng set. some people keep them all on the same side. this lowkey bugs me i feel like it throws off the Balance but i imagine some people like The Consistency. i don’t. but w/e. it’s up to u as this is gonna be ur set. also like. as you’ve cropped these to x/2,x/3 settings they should fit nice like puzzle pieces : )

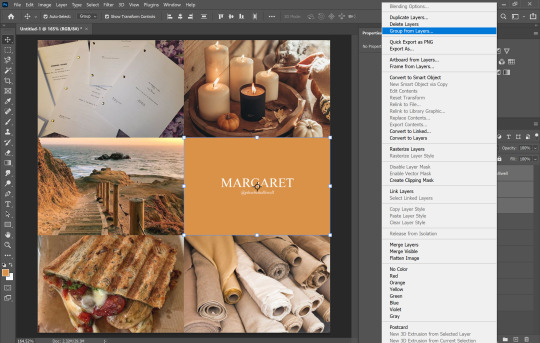
the next step i personally like doing is creating by text box with The Color™ do this bc simply duplicating one of ur images, shoving it in the empty slot, and converting into a sharp object. edit contents.


now. obvi i selected these images w a color scheme in mid. i recommend u do the same. even if it’s just vague. they don’t all have 2 fit. this is my example of my sheridan piece b4 or after. tweaking is possible. layers w masks r ur friend. i can talk about them more if need be.
But. back 2 the smart object. brush tool. paint it.
♥
the text i used was times new roman all caps 40pt font 0 spacing for the title and times new roman 14pt font 0 spacing italics for the subheading. here’s my dency b4 and after for comparison

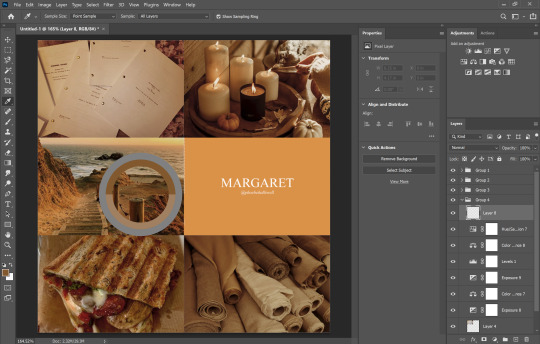
next step is after you have your text in alright, shove everything into groups. mode on “normal”


then you can start editing. the groups let you edit things like lighting and color without touching any of the layers below it 👍
i’m not gonna do a Major coloring tutorial, for lighting i’ll usually tinker with exposure, levels, sometimes brightness/contrast. for colors, color balance + hue/saturation. i rarely touch anything else.
i’ll bring u along 4 the coloring of this one bc i’m gonna add a layer mask.

so the first thing i’m going to do bc the paper itself is already close to the vibe is i’m going to color it normal and just ignore the background

something like that. then i’m going to add a layer mask (square button w the plus sign)
and then i’m going to eye dropper a color off from somewhere else
now i was talking about the “normal” blend mode stops ur color settings from bleeding over onto other images? does not apply to painting on layers but you’re already masking this bad boy, so it doesn’t matter. just don’t say i didn’t warn u
i’d recommend using a really ridiculous blend mode to clean up ur thing at first, i’m using darken which isn’t that wild but like whatevs.
add a layer mask using this button.

select and mask
use this thing to clean up ur mask
okay so i did a lot since we last spoke

but if i impart any lesson to u. it’s: fuck around. find out. that’s literally how i’ve basically done everything. nothing’s ever really gone horribly wrong. click things. see what happens.

okay so now that you’ve kinda gotten everything figured out. change ur text box color again. i’m introducing u to ye ol trick that is not the paint brush. but. hue/saturation on colorize more yeah babyyyyy

ahaha yes. love this bad boy.
Now. Trick To Make Everything Super Cohesive™. put things above All of your groups.

yeah boy.
reorganize ur thing bc u don’t like how it looks.
fuck around w a lot of stuff.
it’s still cluttered.
fuck it. grab a new image.
something like that. never let the fear of striking out keep u from playing the game : )
fuck around a bit more.

vibes♥
save ur image bc u literally Have Not Done That Yet

& then remember the other thing u forgot to do
eyedropper what ur text box looks like move the whole thing to the tippity top and recolor

this is just bc u’ve fuck around a lot w a lot f different settings. this ensures that the text stays the same color u set it as.
okay final step.
turn The Whole Thing into a smart object, smart sharpen
leave out the text box tho. the sharpened text can look weird. it’s ur choice, but with these settings,, cronch.
and wallah. ctrl+shift+s save as png and bada bing bada boom baby. aesthetic
#like i cannot stress how much of this simply is. fuck around. find out.#like just have fun click on things#go ape#like there's no right or wrong way to do this#anyways i used to make these for harry potter on canva ♥ remember ur roots#tutorials#ps tutorial#aesthetic tutorial#ogwork
37 notes
·
View notes
Photo

So, since I got a couple of asks about making a manip tutorial, I’m going to walk you guys through how I made the Sofia Martinez x Diego Hargreeves gif that you see above! I use photoshop on mac for all of my gifs, so it may look different on other computers, but the theory is the same (I don’t know what version of photoshop it is lmao, I got it free through school)
This is admittedly not my best gif ever but it was less complicated than a lot of what I make so it seemed like a good one to make a tutorial for! Details are below the cut since this is super long
1. So first I start by loading the first of the two gifs! If you’ve never used photoshop before, you can do that in “file”
NOTE: If you already know how to get a gif loaded then you can skip ahead to step 4, and if you know how to get the gif to only include the frames that you want then you can skip to 6!
(Ik most people will use premade gifs but I make all of mine from scratch so I included that in this)
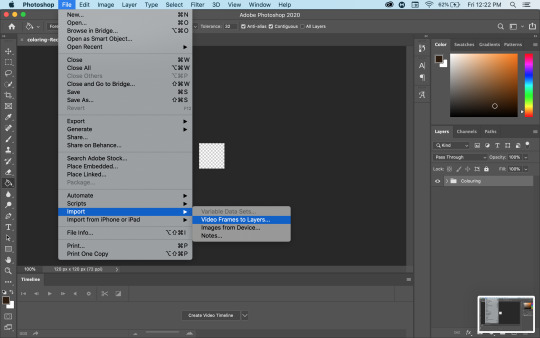
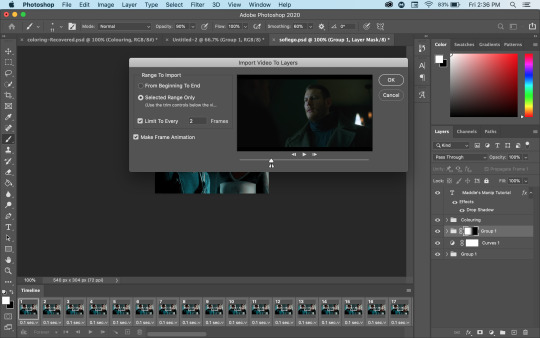
2. So I know that different people load gifs differently, but I always go with import video frame to layer! It opens my files and I find the mp4/mov file that I want to load from!
3. So I forgot to screenshot this originally which is why you can sort see the final result lmao but anyways then I go and select what part of the file I want! Now I’ve used this Diego scene in a lot of edits so I know exactly where I want it, but finding the exact moment sometimes takes a bit more time/attempts before you get exactly what you want!
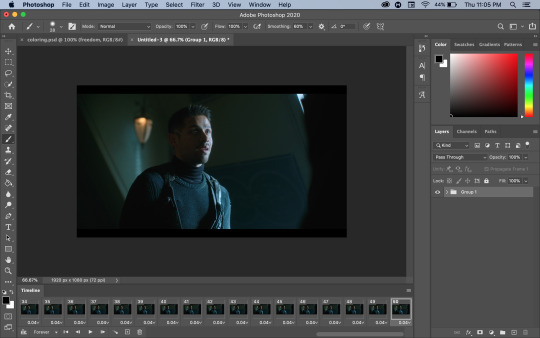
4. So now that I have a gif, you can see my timeline at the bottom! The first step to making an actual gif is to go through the timeline and delete all of the frames that you don’t want! In my case, that includes all of the Luther frames that came before this scene! And I decided to make this a 50 frame gif, so once I had 50 frames of Diego, I also deleted everything after that!

5. So once you get just the frames that you want, go to your layers on the side and delete all of the layers that are no longer in your gif! After that I make the remaining layers into a group because I find gif making a lot easier when everything is in groups lmao!
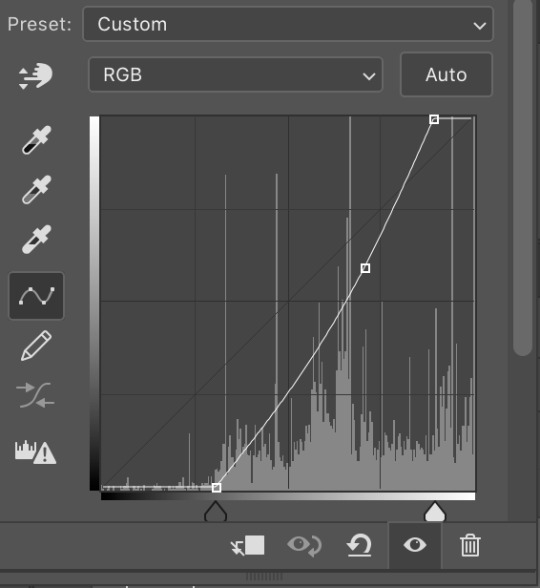
6. Then I like to create the curve layer! This may look different on pcs but on mac you go to the layers dropdown into new adjustment layer to curves!

7. For creating the curves that I want, use the highlight (circled pink) and lowlight (circled yellow) eyedrops! I start with the highlight and I click on what I want to have as the lightest point of the gif (in this case, Diego’s neck), then I use the lowlight and click on what I want to be the darkest point (in this case, his harness)

7b. Now, if you want to change any of the curves from there, you can click on where it says RGB and choose which colour to adjust! If I want the entire thing to be brighter then I’ll go through each colour and increase them all by the same amount; if I want to make one colour stronger or weaker then I only change that one!
7c. in this closeup you can see where the numbers are on the bottom! I only ever adjust the input number, I don’t touch the output at all! Once you’re on a specific colour, click on the square at the top (highlight) or bottom (lowlight) of the curve to determine what you’re adjusting!

NOTE: Don’t assume that these will be your final settings! Once you combine the gifs and we get to the real colouring, they will definitely be changing! But I personally prefer having the base curves already done and then adjusting things later rather than trying to start it later!
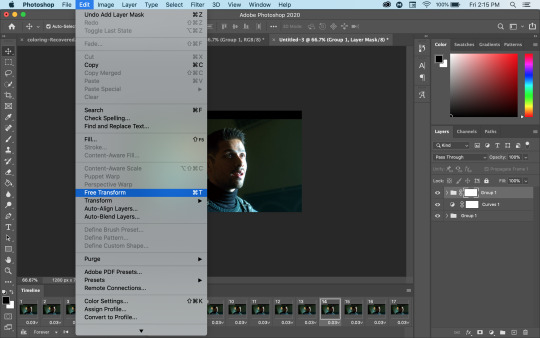
After that, I repeat the process to make the second gif, and now we get to making the manip!
So my Diego gif is bigger (1920x1080) than my Sofia gif (1280x720), so I’m going to be moving his gif onto hers!
8. So to copy the gif you’ve made, select all of your frames and then click the three little lines on the bottom right of your timeline! Make sure you’ve selected all of the frames
9. Then, you can choose the copy frames option!!
Note: I should have done it sooner but I forgot; at this point make sure that your curves layer has been moved into the group so that it copies with everything else!

10. So then we move to our other gif, and again we make sure that we’ve selected all the layers, and we click the three little lines again! Make sure that you’ve selected the top layer of the gif so that the layers from the other gif will go on top of it!

11. This time, we’re going to choose to paste frames, and when the pop up appears, make sure to select “Paste Over Selection”! That’s what will put the gif you copied on top of the gif you have selected!
12. so now we this! At this point I can’t see the gif underneath it, so we’re going to create a layer mask (circled in orange in the second screenshot) and get to really making the manip!
NOTE: this will actually say add layer mask, but when I press the command key to take a screenshot it switches to vector, sorry about that!


12b. Circled in orange here is the layer mask! This is the layer that we’re going to do all of the editing on now to make the other gif visible!
13. Now, because of the size difference between the two gifs, I decided to move the Diego gif to be fully centred to start! So I used the free transform tool and just dragged it over! This won’t be its final size or position, but it means that when I go back to editing the layer mask, I’ll be able to see more of the Sofia gif to know what I want to change!
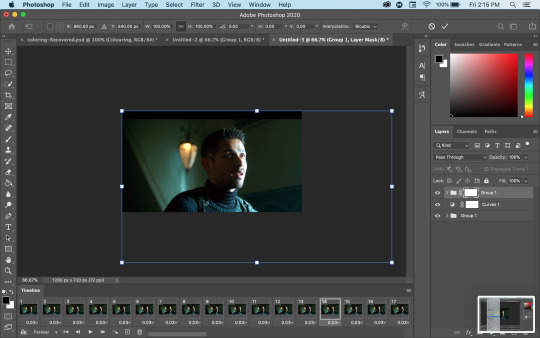

14. So now that it’s more or less where I want it for now, it’s time to get my brush! I always start off with a big brush (better for the fast, imprecise work that I do to start) with 0% hardness! I almost always use 0% hardness unless I need a really defined edge. Make sure that your foreground colour is black and then just paint on the layer mask until you can see the bottom group! If you accidentally hide more than you meant to, just switch your foreground colour to white and paint over it, which will re-reveal it


15. So now that I can actually see the entire Sofia (Lindsey) gif, I’m going to go back to the free transform tool and resize/move the Diego gif until they’re roughly the same size! Then I’ll go back to my layer mask (still with black as my foreground colour) and paint over the mask until it’s as visible as I want!
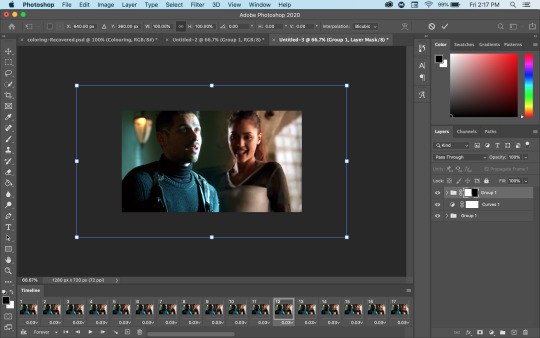

15b. Now I found the entire gif was too far to the left for my liking, so I selected both groups and went back to the free transform tool and just moved everything to the right until it was more centred!

16. So now I have a manip that I like, but the lines are still harsher than I want them to be!! So I go and right click on the layer mask and choose the Select And Mask function!

17. Now this brings us to a new menu, where we can work more on the mask! I like to use the feather function (you can see where the box is highlighted blue) to soften the edges of the manip! I usually start with 50px and either lower or increase the number until I like the way it looks! I can’t describe exactly what it does but it makes the edge softer and the manip looks more blended
18: Now it’s time to colour the gif! So I have my psd open here, so I right click on the group and choose duplicate group, and then for the destination, I choose my manip (untitled 3, in this case!)
NOTE: I use a colouring PSD that was shared with me, but you can find colourings all over tumblr and deviantart — you don’t even need a psd, you can make your own or just play around with different adjustment layers until you like it!


19. Now I go back to my manip file and oof, if looks way worse like this! So I go back to those curve layers from the beginning and adjust things until it looks better and matches better! For Sofia, I made the green and blue curves stronger, and for Diego I made the red stronger! For Diego I also added a brightness/contrast layer to lessen the harsh contrast!

20. Now it’s time to resize the gif! Tumblr limitations don’t allow gifs wider than 540px (no height limit that I know of), so that’s what I set mine to! Then it automatically changes the height to keep the ratio the same!
21. Now when I make my gifs smaller, I always end up with this awkward little empty space on the edge, so we go back to our layer mask, now with white as our foreground colour, and just using a small brush we will that in again so it looks normal!


22. then we save!!! Go to file > export > save for web, and then you’ll get the first save popup (the big one), click save, and then you get the smaller one and you can name it whatever you want!

23. and now we have a gif!!!!

I really hope this tutorial helps at all! If you ever have any questions about this tutorial, feel free to shoot me a DM or an ask and I’ll try to clarify; and if you’d ever like to know how I do another type of edit or a specific edit, shoot me an ask and I’ll try to put together a tutorial!
Happy creating y’all!!!
81 notes
·
View notes
Text
my experience with addy / hiqey
i’ve contemplated posting my history with addy/hiqey for awhile now. my friends have encouraged me to do so, but due to her stance in the rpc i was always far too scared to do so. with all that is coming to light with her recently, not only is a huge weight off my shoulders as far as comfortably roleplaying as my escape, but knowing i’m not alone. my story with addy dates back to about september 2018. i do warn you this will be long, and i’ll try to include enough details to make it make sense while not dragging things on and on. this includes both my personal relationship with addy, as well as my experience with her in groups one where she she was an admin, and groups where i was an admin. as well as i believe we coadmined one together. i’ve put screenshots where i could, but some of this dates back to 2018 and i just don’t have access to those texts/rp accounts anymore.
a huge huge shout out to @bumkeyz for starting this avalanche, and for also supporting me one on one along with all my friends to feel safe enough to come forward. i’ll put all of my story under a read more.
i’m going to start this by saying, my name is mel/melanie. you may have heard of me because back when addy was on rpslayed she wasn’t a big fan of me for awhile. predominantly my group the cape(?) the main isn’t up anymore so i can’t remember the exact @. i’m 21 years old, i will be 22 this month. i am married & i have a 3 year old daughter. this is information i don’t normally tell people i’m married / have a child, because well, i just feel a little judged. not because anything anyone has specifically done or said, but my own anxieties worried that people will think it’s weird to be married with a child and still in twitter rp. but it is important to my story with addy, which is why i’m letting everyone know right off the bat.
i met addy in a group called producers. this group is from september 2018, so i’m not able to access anything right now, but am digging. i played (feel free to clown me) a g-eazy character named pierce. addy played a carlson young who’s name i can’t quite recall, and a gracie abrams named lolly. lolly & pierce became friends first & at some point we exchanged phone numbers. lolly & pierce flirted a lot, pierce was a player yada yada. eventually she ended up getting a different ship on lolly & pushed her carlson young onto pierce. pierce had a different love interest & didn’t end up going for her. this should’ve been the first negative sign/red flag. when pierce didn’t get with her character, she got very short & snarky ic and ooc. i believe both of her characters blocked me ic. even though pierce had made no ic promises to either to not be with someone else. we still maintained some level of friendship, but she was extremely weird about when i mentioned my ship. our friendship ended for a few months because of an incident that started ic between me and another character. the mun who played this character and i had bonded ooc over having been pregnant, we talked somewhat often about her dealings with her pregnancy. so i felt close enough/friendly enough with this mun that when something happened with her character & another character ic i dm’ed her to see if she was ok .long story short it went bad. i texted addy and told her that. i explained that i felt as if this mun & i were close and it was like dm’ing a friend. she held onto the fact that i shouldn’t have messaged her. when i didn’t immediately conform to her thought she kicked me out of the group. i was literally devastated. i loved that group, that character, my ship; all of it. she blocked me. though this story is 2 paragraphs long, it’s minor in the grand scheme of things. after this she smeared me on rpslayed for months until our paths crossed again in a group called glitches/glitch? we decided to squash our beef. this was december 2019.
in december 2019 we became friends again. honestly, i wish we never crossed paths. we got very close right away. she started telling me about a bad friendship she had, with someone we mutually knew from producers who i will not name since it’s not my place to put their name in this, and gained my sympathy. so much so that i ended a friendship with that person based solely on accusations that addy had told me. this is something that i can now realize i did wrong. i literally cussed this person out on the phone, solely based off things addy told me. i didn’t listen to someone who had been my friend for months, who defended me and picked me up when addy was tearing me down on rpslayed. i turned my back because addy convinced me to. she made this person seem awful. and again, i’m not naming them, but they know exactly who they are. and when thy do read this, i’m sorry.
now this is where things get out of hand. addy & i begun an intimate relationship. this is very personal, and i know some may pass judgment. but my husband was cool with it. addy also began talking to my husband, they texted. we had a groupchat. not to get into details about the relationship, but it was romantic. i am going to try and organize my thoughts. into themes.
money
this relationship lasted from about january ish to april romantically. i became addy’s crutch. she began going through personal issues with her family. and i started sending her money. to be frank i don’t remember how it started. i helped her with a job search, supporting her through these tough things that were going on. the money started casually i suppose. it was $10 for lunch. $25 for nails. but then it got worse. i bought her a phone. and slowly she grew more entitled to my money. asking for it. demanding it. guilting me when i didn’t give it. i lied to her and told her i lost my credit card and turned it off, but the guilt i had i told her that i could turn it on when she needed it. in screenshots i will post below she guilted me because i was sick and fell asleep before turning my card on. whether what she’s saying occured is true or not, it was just one example of how she made me feel. at one point she had my credit card on her uber, and charged nearly $400 of ubers on my credit card that i didn’t know about. she claimed it was an accident, because i let her put my card on her account under the agreement that she would turn it off. we had an agreement of what she would pay me back, some things that i got her were gifts and i didn’t want/need back. other things it was always an agreement she would pay me back. however whenever i would mention sending me a payment she had an excuse. one time even guilting me by reminding me how much better i have it than she does. all in all i spent / sent upwards of $2500/$3000 on her. only about $1500/$1800 i wanted back. i never saw a dime back, she never made good on her promises. at some point i gave up on asking.
ETA: as far as the uber situation goes, she did apologize and state that it was never on purpose when i found out that there was nearly $500 in charges. she said she thought she was charging her moms card. this shows a photo of 1 page of a 5 page statement of all the transactions put on my card by her in one month. there are only 6 of these transactions that were me. all of the ubers and venmo were her. i didn’t make her take off my card, which in hindsight was obviously a very bad decision. i just didn’t want to leave her stranded without ways to get home/where she needed to be.
this is her demanding money. this was in the summer. at this point i was so manipulated by her/scared of her/scared of losing her that i didn’t know how to say no. in this instance i deflected with a picture of my child. screen shot.
in the screenshots here, this is where i fell asleep. i was on vacation and got extremely dehydrated in the sun. i literally felt so sick and she made me feel guilty for falling asleep. X X X
this screenshot shows one of the times i actually asked her when she would repay me. at this point my credit card was nearly maxed out from ubers and sending her money. i was anxious about it and she made me feel bad for asking because her situation was worse than mine. this was the same day she asked me for $250 for a down payment on her car. X asking for money. X making me feel bad for asking when she’s gonna pay.
literally to this day im still in credit card debt because of this. yes i make good money, yes my husband does too. but credit card debt is hard and everyone knows it. i do fine for myself, but i don’t have hundreds extra to pay this down.
also, i cannot locate the bank screenshot. but as recent as this february, six months since she spoke to me, she still had my card on her uber and usted it again. i can’t find the screenshot of the actual of the bank transaction because i’ve completely had to close that account for fraud and transfer my balance to a new card. but here is a screenshot from february 12 where i tell my friends i caught her doing it. X .
manipulation in groups/related to groups
orbis. i ran a group called orbis, it was a reality show group. addy was one of my friends who really wanted me to open it. all of my groups i’ve adminned i’m the lead. i just always take on that roll so i do get very busy with them on top of my real life. i work full time and i’m a mom so i spread myself thin.she made me feel really guilty for this, saying i wasn’t giving her enough time, she wasn’t anyones dog. so i posted my unfollow. then she told me i was stupid for doing that. so i deleted my unfollow. then she said that me deleting my unfollow showed that i didn’t really care how she felt. screens. X X
lumeer. very similar situation to above. only this time i left the group completely for about 3 weeks. i called my coadmin crying about what she was doing to me, sent her the psds and templates for grpahics and left fully, though i helped them out if issues arose/they needed anything.
impulse. this was recently and this got brought to the tags. im going to copy & paste what i sent to bumkeyz as far as the story goes for what happened.
“ what happened in impulse is only one of several examples of addy being awful in groups i've adminned. this goes back to our friendship but specifically here's what happened in impulse. addy played a character named briar, the other characters involved were as mentioned in other posts loki & khalil (fai fc). one of he first days of the group khalil hooked up with both loki & briar. when the "updates" account posted about loki & khalil's hook up (we posted any and all plot drops that were sent in, it was a reality show so we consistently updated what the cameras caught), briar got upset on main. addy then messaged khalil's mun ooc and asked for the plot to be erased. essentially because she didn't like that khalil had hooked up with both her and another girl in the same day/same manor. as odd of a request as i was the khalil mun agreed to wipe it & asked that if there was anything that ever came up again that made addy uncomfortable to please not hesitate to dm. addy then softblocked khalil. which is strange. why soft block with briar's reason to dislike khalil has been wiped? that night addy posted on her personal tumblr hiqey "i forgot all fai khadra fcs are weirdos" or soemthing along that line. the khalil mun reasonably got uncomfortable with that, but was softblocked & didn't tell the main. they just ignored it since their characters weren't interacting now. for the next few days addy continued to shade khalil and loki on main, despite any ic reason for disliking them being wiped. loki then approached briar IN CHARACTER asking what was wrong/why she was shading/why they didn't like her. i don't know all the details of that conversation, but i know it ended with loki saying she was going to block briar & briar saying that was fine. bear in mind the admins had no idea any of this was happening at this point. addy then dmed the main, playing victim. after more shading of khalil, khalil's mun decided to block briar as well. addy despite wiping this plot and having 0 ic communication with khalil continued to shade the characters ic. so addy dmed the main playing innocent. asking for us to have them unblock, saying she had no idea why they blocked or what she did. as admins we had no idea why either, figured it was something ic so we dmed both muns. khalil's mun agreed after some hestiation, and asked if they had to follow her and i said no. they didn't elaborate. loki's mun however refused, & i'm glad she did because she told us what was going on. of course once we were told everyting we didn't make her unblock. up until we told addy that we were not going to make those muns unblock her, she was extremely sweet to us. she praised us on her rpt. said she loved the group. fed the main compliments. but when she didn't get her way out of us, and was essentially told on, she started causing issues on the timeline with different characters. she sent us a dm on the main telling us to "learn how to handle your group melanie" and deactivated before i could get a chance to reply. “
what i didn’t tell bumkeyz is that deejay/rpslayed played khalil. another example of addy’s manipulation is that when she saw deejay getting anons she followed deejay and texted her after several months of no communication, starting to tell her side of the story and play innocent -- not knowing that deejay was the person who was behind khalil the entire time. she made khalil out to be the bad guy, not knowing that it was deejay. after finding out deejay and i were friends, when deejay posted on rpslayed for people to follow me shortly after trying to get deejay on her side, addy blocked us both (again).
manipulation between friends (?)
i don’t really know a great way to title this, but this is similar to the situation i mentioned with the unnamed person above -- how addy made me think that person was the worst so i would stop being friends with them. this is a few more examples of that.
the entire time i was friends with addy, she told me that deejay hated me. she told me that deejay was convinced that i was this person who tried to get her kicked out of a group. she told me that she did her very best to convince deejay that it wasn’t true, but no matter what she did deejay just hated me. nearly a year later deejay and i cross paths in a group. we started talking ooc and i mentioned this. i asked her why she thought that was me. we found out that basically, while addy was telling me she was trying to convince deejay it wasn’t me, she was telling deejay that it was me. she would also tell me personal information about deejay that i had no business knowing, whether it be real life information or just telling me the groups deejay adminned when she knew deejay didn’t want anyone knowing.
i have found out recently that addy has recently been telling people a lie about when she came to visit me. on one evening when she visited me in june of 2019, we went to my friend’s house. we both drank, and smoked. i am someone who neither drinks nor smokes, and i got a very bad mix from it. my anxiety sky rocketed. i was crying on my friends couch practically paralyzed. i didn’t want to move. i felt sick. i felt scared. my friends were going to drive us back to my house and shortly before we were about to walk out addy said she needed to go to the hospital. my friend’s boyfriend drove her there, and when he came back they took me home. this night is very blurry for me. i remember barely being able to see straight, my friend helped me walk to and from the car. addy has told her friends that i refused to pick her up from the hospital that night, and i’ve now heard this from two of her close friends. when in reality, i was so far gone that not only was i sick and scared, but i couldn’t see straight. i had absolutely no ability to be behind a wheel. i’m not surprised she twisted this against me.
i provided a few people screenshots where addy was telling me to block them/trying to convince me that they were awful and hurting me. at the same time that addy was telling me this, she was doing the opposite to them -- to keep us apart. i believe this is some sort of power. always wanting to be everyones number one.
i don’t have a lot of screenshots for this, so i won’t go into much detail, but i can say on more than one occasion, or more than five or ten she told me who to and not to be friends with. told me to block people who had been our friends who were no longer friends with her.
flat out manipulation.
i don’t want to go back through my texts too much honestly. it’s still a sore spot. it still sucks and it still hurts. but i think anyone and everyone involved with addy at some point or another has similar stories about the way she treats her friends. there were points where i begged. begged and begged her not to leave me. i can’t even count how many times she blocked and unblocked me. how many times she made me feel the worst and then came back. she came back because she knw i was there. and that my generosity was practically endless. i couldn’t say no to her, frankly i can’t say no to anyone. if anyone dmed me today and said hey i need $15 for a ride home. i’d probably send it. that’s just how i am. addy completely had me wrapped around her finger. to the point that i left friends who were good to me. i left my own groups i worked hard on. i nearly ended my engagement (which cannot be entirely blamed on her, but the relationship she and i had was built off lots of manipulation). i know that i could go find 100 screenshots and texts of her manipulating me but honest i just don’t want to do that to myself again. she has made me out to be the villain to anyone she can. i have had 2 different people tell me that she told them i say the n word, which is the furthest thing from the truth. i fear the things she’s said about me to people. if she can 100% make something up, what can she twist from actual arguments or issues we had?
i know this sounds like a lot of rambling for nothing. but for nearly two years i’ve lived in fear in the rpc of addy. less so when we were friends. i’ve feared telling my side because i felt invalid. frankly even as i type this im scared. scared she’s already convinced everyone i’m awful and no one will read this or care. i just am thankful that this finally came to light. i am glad that i won’t feel scared anymore. roleplay is my one place to be free. as a mother, a full time worker, i don’t have a lot of time for hobby’s and frankly i don’t have a lot of them. i don’t draw, or read. i like to write. and i’m just thankful this can finally be lifted off me.
115 notes
·
View notes
Text
FA222 ,principles of graphic design:
Instructor: mr.munwar mukhtar
@uob-funoon @mnwrzmn
Project 1 : interviews
What is your given name, and user name on ZBrush Central?
My name is Khalid Abdulla Al-Muharraqi, my ZBrush Central user name is "Khalid72".
Tell us about your company, how did you start?
I set up Muharraqi-Studios to continue my family's history in the creative world and I am trying to continue to build on what my father started. The company was set up about two years ago after I left the commercial world of advertising with my partner Rashad who decided to leave a career in banking. We wanted to get together to make a place that allows us to be more creative. Since then we have been fortunate enough to work on some of the biggest projects in the middle east, and also continue working on our ideas and concepts, like our movie project. The most important thing for me is the work I do and that's what we are all about.
What is the size of your company?
The company is me and my partner, oh and our secretary... Keesha, a German Shepard! I am a hand's on guy and I do all the creative work myself. At first, I thought it was normal to carry that load because of the speed I work in, but later found out that I am actually very fast compared with bigger teams of artists in other studios. Finally I understood what people were telling me when they said I was 'unusual'. That’s why some of the CG magazines in Europe were amazed that a lot of our work is done by a one man team that puts all the 3D components together into a visualization. I work about 13 to 18 hours a day, I love 3D work, so my hobby and my work has joined into one, so … yes, very little time for a normal life.
What type of projects do you work on?
Well, I have been working on Architectural Visualizations since we started a couple of years ago, but I try to satisfy my urge to do what I really like, art!
You're located in Bahrain, somewhere most of us don't know about. Can you tell us how you learned your trade?
I love this question, Yes Bahrain is a small Island in the Persian gulf, we speak Arabic as our main language and English for the second, I will answer the second part in two parts, If you mean The art... I would say that I come from an artistic family, my father is one of the most well known artists in this part of the world, you can say that he is a household name in these parts. If you are asking were did I learn the 3D or CG art, I would say that I learned it by practicing for 8 hours a day after my official day of work, so I guess you can say I have been my own teacher in the industry.
Tell us a bit about your client base, mostly local, or do you have clients in Europe, Asia, America?
We serve clients from the Middle East, Europe and the Americas, I would say that I have been fortunate enough to have worked with some of the top people in the architectural industry, most of our clients are attracted to the type of work that we produce.
ow long have you been an artist?
Since I was six...I think! Well, the first painting I have sold when I was eleven. I was always painting and trying to find new techniques that will help create the concept in my mind.
Tell us about your background, your education, your mentors...
I studied art in Houston Texas for over seven years between interior decoration, photography, Visual communication, and digital enhancement or photo retouching, from there I have continued my working career in the commercial world. My first mentor would have to be my father, learned everything I know from him. He gave me the push start into the art world and made me feel it. There are also the books and artwork he has exposed me too with some of the top art in the world. A lot of names come to mind but I would say Frank Farazeta, Boris, The Creepy magazine and of course all the original Mad magazines and books that were very hot in the early 80's.
When you became an artist, did you first use traditional media?
For sure, I started with Pencil then got into crosshatching with ink, then I started painting with water colors and gouaches. I finally got into air brush art before I tried CG art.
What was your first CG package? What is your first 3D Package?
Nice question... first CG software was PSD, version 2, it was like magic... It felt strange especially that I was a traditional artist at the time. My first 3D package would be Alias Sketch for the Mac since I was a Mac user for a long time and did not have much 3D developers for Mac at the time. It was a new world for me and I think I still have a dusty copy of it today even after the software was canceled back in the early 90's, it just reminds me of my past.
How long have you been using ZBrush?
It has only been about six months, but I was up and running almost a few hours after I purchased it.
What made you try ZBrush?
I was watching some of the tutorial videos on how to paint details on the Gnomon training DVD's, and that's when I was shocked to see that it is art on the computer! I did not believe it at first, but It was one of the happiest moments when I first installed my first copy of ZBrush and started painting geometry for the first time, it reminded me with the days when I was pushing and pulling real clay to make a small creature of my imagination when I was a kid.
What's your favorite ZBrush feature?
The ability to paint geometry like it is physically in my hands.
How has ZBrush enabled you to express yourself in ways other packages couldn't?
Well you cant really compare it with any other software, it's simply too different! It changes how a CG artist works, it changes how he looks at things, has changed the industry to the next future leap, and who would want to go back to the past....? I would simply say that the concept of the software is very smart and impressive, my only wish to add on it is to have a bigger view port :)
Now onto "Floating Islands"Tell us about your creative process, how did this concept emerge?
One evening when I was stuck in the studio waiting for clients approval on a project that I was preparing for the kingdom of Bahrain, I was trying to get free again and relax my mind from all boundaries, I started to sketch a concept that has bean in my mind since I was a kid, the island that was then discovered to be on the back of a whale, these were some of the old middle eastern stories about Sinbad's magical voyages.
Do ideas just come to you out of nowhere, or are there particular artists or work you are inspired by?
I am always inspired by everything that is beautiful, whether it is an artist or a design or just Gods creation, I would also say that I have always had my own style in my work and almost never try to follow a certain style that I have seen.
I love this piece, can you tell me about the process of creating it? Have you explored this style before? Or was this created for something specific?
The process was, a sketch or the map as I would call it, and that would be the basis of my creation, I almost never start without it, once I crack the direction then I would start thinking about the execution and the path to take. About the style, well I don't think of my work as style, I think it is more towards I do what I feel, it is only when I am finished with it that I say "Yes! That's what I was tying to do". I almost never tried to repeat a style that I have seen elsewhere on my work. I feel that It is like a code of respect between artists.
In your image "Floating Islands" where was ZBrush used?
ZBrush helped me sculpt the geometry and take it to the next level in a short time. Modeling, UVs, Painting and scenes setups was between Lightwave and Modo. With ZBrush I was able to put the final touches that would make it come to life. ZBrush helped me start painting the UV map textures and setting up the foundation of the look and feel. I also generated some of the whales textures by the amazing ZMapper ;)
Tell us about your pipeline.
I start with Modo, then go to ZBrush, then finally render with Lightwave. The thing with software today is that they work hand in hand to complete each other, for instance ZBrush is very specialized in what it does, it focuses on the need of the artist and helps the creator to complete his task sufficiently with a smooth flow, artists have never had it this good.
What projects are you working on now?
We have just completed the visualization for the Master Plan for the Kingdom of Bahrain with one of the leading Architectural firms in the world, we have helped restructure and rebuild old and new cities for the country. Now I will be working more onto the movie project that we have been trying to get the time to start, hopefully I will be able to focus more on creating more Characters and environments for the movie.
Any last comments for us?
I would like to say Thank you to Manuel at Pixologic and Pixologic for appreciating the work I do. I would also like to thank all the development team and staff at Pixologic for there dedication to work together to help create some of the best tools ever created for the CG industry, I always expect the ideas to be fresh and most importantly designed for the end user, the artist, allowing the artist to continue being an artist without the restrictions and boundaries of a computer.
4 notes
·
View notes
Note
a vent (feel free to ignore if it's too much!): so recently i've noticed psd makers getting anon asks on whether they're ok with people who write certain topics (mostly rpf, incest, rape, underage, the usual "problematic" topics) using their recourses. now, i don't roleplay any of these subjects on tumblr, so even if a content creator said not to use their stuff, it's not even something i need to worry about - but, and maybe this is me overthinking it, what if i, someday, write a noncon fanfic on ao3? i'm still not using their resources on the subject or writing it on tumblr, but i'd probably feel weird about it, like i'm crossing some boundary. what if a psd maker whose content i've already purchased suddenly goes "actually don't use my psds if you rp abusive relationships", which is probably the closest to what people consider "taboo themes" of the things that i roleplay. it just feels like a fine line between personal boundaries and a shitty situation for a customer - not wanting to cross boundaries but already having PAID for something previously, when no such rules existed. it's making me want to 1. block everyone i see saying this, because even though i don't personally roleplay the topics above, i don't feel SAFE around people who tell others what kind of fiction they are allowed to enjoy and 2. just quit using people's resources and spend years learning to make my own psds so i won't have to worry about this shit. it's just stressing me out, as someone who has been harrassed and bullied online for speaking against censorship. i've had literal sock accounts made just to spew targetted harrassment at me on twitter. i've been accused of being a pedo and supporting incest and this is??? literally for saying "i don't think real people should be harrassed for fictional shit", i've not even shipped underage or incest ships. both make me uncomfortable. but fuck, antis make me 1000000x more uncomfortable than people who ship these kinda ships. i digress, this got rambley, i just. do you have any advice on what to do with the potential psd situation, or am i really just overthinking it? (always worried i accidentally send stuff like this off anon. help)
I need you to know that I actually had to rush-scroll back up and just double check that you did submit on anon lol! I always get worried I'll miss the one person who accidentally didn't use anon, if it makes you feel any better! When someone does submit with their URL attached, I message them first to be sure they are okay with them having it posted that way/it wasn't an accident ;) That's what I would want someone to do!
Alright, so, anyhow...
I've also noticed that becoming a more common thing and it's been on my (maybe huge) list of things to look into for a bit because I really do try to make sure I'm not just noticing things in my areas of the RPC/failing to notice things that do not impact me. Since I do all my edits and graphics, it falls into the first category for me. So, thank you for moving that up the list and informing me that it really is more prevalent and not my imagination!
My take on seeing it was a combination of business logic and anxiety, not going to lie.
On the first: charging to do a psd that is just that, just a psd file being used as a template/to act as an easier version of a photoshop "action" in a way, that's 100% legal and fine. Absolutely no muddy waters there. However, charging to do things like icons, edits, etc. that include images of celebrities and stills from movies (or gifs) is quite muddy. Legally, it's not legal. It's a thing we're allowed to do and use (on most platforms) because we're not making money off of it, we're not claiming to hold rights to the images, and so on - it's ignored but illegal. Charging money for it, however, even when phrased as "for my time" (which, absolutely valid feeling), is a more serious form of illegal and potentially attention-getting. This all gets more iffy though when we add donation instead of direct commission/purchase when working with these copyrighted materials. You can ask people to donate and suggest a donation based on your time spent, and that is always what I advise people to do.
Okay, so, that preface is necessary because the thing about stipulating use-rights is that they're iffy, too, there are variables present.
Often, these same people are charging for things like icon packs as well, meaning that even if they're only charging you for a template-style psd file sans imagery they don't own, they've kind of shot themselves in the foot. Not to mention, it's exceedingly damn hypocritical to pitch a fit about someone violating your rights when you're literally using other people's copyrighted materials lmao And that does tend to occur to me, yeah, it's a consequence of attorney friends and running businesses.
The other issues with this are that usage rights have to be stated at the time of purchase and morality clause-style shit, as pertains to products, is not legally binding.
When you purchase something like a psd file, that purchase acts as a sort of contract.
Think of like...buying a photoshop brush set - the person selling it puts very simple rules as to its use, such as: non-commercial use only, brush pack cannot be resold or distributed for free, separate brushes from the pack cannot be resold or distributed for free individually. Meaning that you own the brushes you bought, but you are not legally allowed to make real-life money from anything you use them in, and you cannot send the whole pack or files individually to friends for free or charge other people for them. By buying these, you have agreed to these stipulations of use and ownership.
If the person sells psd's and you agree to what they've stated about the use (you can't use them to do commissions you make IRL money from, you can't give them away to friends, etc.), that's binding even somewhere as casual as RP Land. The exchange of real currency makes it that serious.
However, there are limits to stipulations of use! One of those things is when you agreed - this person cannot, even one literal second, later change their terms of use and retroactively hold you to them. If they were okay with you not crediting them anywhere or using them in works you will gift others or charge others something like game currency for at the time you purchased, then that's it. Tough shit for them, not you, when they decide a month later that they want credit given where the work appears, that they do not want finished products gifted, or don't want you to make even in-game currency from them.
And that absolutely would apply to the morality wank, yes.
Except that this very morality wank comes with its own issues. Reality is not tumblr. In reality, at least in most instances and countries, you can't throw in a fucking morality clause regarding the buyer, use of item, or finished product.
Think of this in this way: Chik-Fil-A starts denying chicken and waffle fries to anyone suspected of being queer. They're legally allowed to run their business (as a private business, everything does have variables) with some things that are morally objectionable that they feel morally aligns with their religious beliefs. They're not allowed to deny queer workers a job or queer customers service, however, in accordance with overarching laws.
While "being gross" online in fiction is not like, making anyone a protected status person lol this is just an extreme example to drive home the point. Legally, when it comes to items/products be they digital or physical, your rights and responsibilities as the seller don't include your moral policing.
What your right is, is to make people uncomfortable to a degree, yeah. You absolutely can do that. You can state some nasty shit about prospective buyers you don't want. For example, they should (I mean, they should just grow up and get some real concerns, but) be stating that they would not like to see their psd's used by people on this following DNI list of idiocy, and they will block those users if possible to prevent interaction and purchase. That's really it, that's what they can do and the least immature way to proceed.
On the second: none of this logic would make me feel comfortable about interacting with them and their psd's in the future once they had outed themselves as morally objectionable and dangerous to me with this nonsense. And I would still feel anxious about using things I had previously bought because once harassed...it doesn't really go away, does it? It would just give me some ease about the latter with things I'd already made. Like, I could keep using the icons I'd made with those psd's with a little bit more comfort knowing that they honestly have not a leg to stand on outside of their harassment.
I might have the tendency to respond to harassment without much upset, but that doesn't mean I want to be harassed. Especially when I am not doing anything that draws that kind of attention. Not that harassment is warranted over anything, but when I make a PSA or answer an ask that I know is likely to get their attention and piss them off? That's an acceptable risk I am knowingly taking. When I'm just going about my life as a RPer, it isn't.
So, I don't feel like you're overthinking it or being too concerned! In no way did you sign up for getting unwanted attention, and because it has happened before, of course, you're trying to insulate yourself from having it happen again. That's totally reasonable!
Now, what you could do about it...
It's another of those situations in which we're only truly capable of controlling ourselves. Everyone else is kind of a NPC.
You don't have to do anything I'm suggesting, but these are things I would do!
I would block the shit out of anyone saying these things/trying to make them stipulations, yes.
By that, I mean that I would also visit blogs they appear to interact with and they'd be blocked as well. We can all reblog something like resources or a shit post from a user we do not agree with without realizing it, but when it's frequent reblogs, direct support, and friendly vibes going on, it's safer to assume that they are aware their friend sucks. More importantly, that they do not think their friend sucks and support their views.
Even if that is not the case, do you want someone else's repeated inattention to expose you to bad actors? Nope! So, don't run the risk of paying and otherwise interacting with the one resource blog in the group that doesn't express these views/"requirements," but does involve themselves with those who do.
Try to find people selling these resources, that are not connected to the problem ones, who do not have those views. Once a trend starts, it is very hard to stop until it has run its course naturally, so, this might be difficult and take some extreme effort. You might want to consider asking like-minded friends who use psd's where they got them so you can check those users out for yourself.
If they're all the same, problem, people...
Look for users well outside of your corner of the RPC(s) who are not asking to be paid. I know it sounds wild, but there really are RPers out there who just enjoy making things for others! I can think of at least one right off on my dash. They might not be advertising for doing psd's or psd packs, but either they might be willing to do so (especially if they do not appear policing-positive) if you explain what is going on, or they could at least fill some requests for you for fully made icons and such. Hell, people who love doing this work usually know others who do as well, and anti-policing people quite reasonably stick together. They could have suggestions for someone not vile selling psd's.
Depending on what it is you want your psd's to do, I promise you that it wouldn't take you very long to learn it. I know...I know lol that's both really easy for me say when I've been doing it for over twenty years and am about to piss some people off. The latter because the most common settings on popular psd's are extremely simple shit, a lot of that is the kind of thing you're expressly told not to do in design work. Like ramping up extreme contrast, pixelating the fuck out of an image, and turning up the primary colors only. Once you get to playing with photoshop or an equivalent, you will totally see what I mean. You can accidentally make an icon look identical to something that is on trend in the RPC. If that was what you were going for? You've hit the mark, and it's just repetition and tweaking it here and there!
Once you start playing with it, too, it's actually pretty intuitive when it comes to the basic things like resizing, adjusting colors and contrast, and doing easy effects like blurs and sharpening. Frankly, playing with it is better than half the tutorials you'll find because they get unnecessarily complicated when all you want to do is crop your muse's face, overlay some color, and add a damn dotted border. Listen, like I said, I have a lot of experience...and I find many tutorials frustrating and overwhelming!
It is not just you, you're not dumb or anything. People get very comfortable with something and when they try to explain it to others, they use terms and methods that are more advanced or specific to them than they realize. That's all!
If you have friends who make their own things, ask them some very basic questions about what you want to do. They know you, so, they'll know better how to explain to you, specifically. Just keep it simple until you've had some time to experiment! Ask things like, "I want to take this image, resize it to be an icon, and add an orange tint to the image while sharpening only my muse's features...how would I do that? Easy mode?"
And! You don't even have to pay for photoshop or pirate it anymore! Photopea is as an exact copy as possible entirely located in your browser for free. It's all overwhelming at first, a real case of too many options and ways to do the same thing, but the only way it gets less overwhelming is just diving into it. Dive in, get a little frustrated, have some successes, make some awesome discoveries, it gets a bit addicting in short order. Then, the tutorials and tips are so much easier to figure out and expand on, too.
If you'd like, you can always send me a pm here and ask me. I'm happy to try to explain how to do things, zero judgment or impatience. Just an additional option if you both decide to try learning and would feel comfortable doing that. Zero judgment as well on not wanting to do either of those things!
Okay, this one is much harder than learning PS basics because it's honestly a bit terrifying...the way these people are, they're going to take issue with you no matter what you do, and in the end, if they notice you and feel like bothering you, they will. There's literally nothing you can do about it. All you can do is try to buffer yourself, stay away from them, and be aware that you are not the problem.
Like with the AO3 thing or writing what could be viewed as toxic relationships. You can never write or be interested in a single, solitary thing that they're on about (and accusing you of doing in real life when the burning Eye of Moron turns your direction), but to them, you supporting the right of other people to do so is just as bad as doing it yourself. To them, the toxic relationships not only would be problematic, they'd be problematic enough. Being uncomfortable with their policing and feeling unsafe because of it is, to them, a red flag of how problematic you are. Writing anything they've deemed objectionable (or reading or viewing it, for that matter) anywhere, doesn't have to be on this platform or RP-adjacent, doesn't have to actually utilize any of their materials, is enough.
They're absolutely including you in who shouldn't use their shit. That's part of the "logic" and methodology of policing. Everyone is problematic, so, everyone can be labeled a pedo and harassed without too many people getting up in arms about it. No one is safe, so, everyone better behave. You don't actually have to be engaging with or enjoying things like underage, non/dubcon, rape, abusive relationships, etc.
It's gross, it's bullying, it's actually a problem...and there isn't much you can do.
All that is truly up to you is making an effort to avoid them, though, this is very often unfair and likely to get more unfair as resource blogs of all sorts deal in it more. At least, in this case, you do have some small bit of actionable power - by not ever buying from them. They wouldn't be charging if they did not either need or want the money, not giving it to them is a bigger hit than things like simply unfollowing/blocking, reblogging PSA's, and so on is!
Nope, it isn't like you're denying them some extreme amount of money by yourself, but every three, five, ten dollars is felt pretty hard when you desperately need money and/or are saving for something.
I know, I mean, I personally do know, that it's impossible to "get over" bullying, Anon. I'm in no way telling you to just get over it and move on, find some great well of not caring somewhere! What I'm saying is that there is power in not giving them power. The power to make you anxious, uncomfortable, unsafe, when you have every right to be here doing your thing and are not hurting anyone. And it might seem to be a deeply contrary sort of logic, but realizing and accepting that there are people out there who irrationally dislike you for literally no reason, that you cannot infallibly escape or avoid, despite doing nothing wrong is a bit empowering. Because it puts into perspective the things you can control, and when we know what is in our control, it's easier to just enjoy our time here without constantly waiting for the other shoe to drop. If it drops, we can go put it back in the closet where it belongs.
It starts to put a positive spin on the whole, damned if I do, damned if I don't feeling, if that makes sense? I'm probably way too tired to try to be explaining this lol I'm sorry!
Anyway, again, I'm not implying you can or should do any, let alone all, of those suggestions! I just really hope that something will help you feel even a little bit more at ease. It's an unfair situation, it isn't right, and you have every reason to be uncomfortable and stressed. If I could make it happen, you better believe that every policing asshole out there would be writing heartfelt apology letters and sending donations to everyone they've upset lol but...since I can't make that happen, all I can do is say what I, personally, do, would do, or have done.
0 notes
Text
Kit’s OC Time {Part 2}
🌼So I got this wonderful ask from @chocolatetwix and I got super excited. There is a lot here so I just decided to make a huge post about it. That and I can save it and work on it too so that’s a bonus. You can’t really do that with asks. This will be in a couple different parts so that it’s not too overwhelming!
Let’s continue!
Costume/ CC: Back in my DA days I used to draw a lot of animals and I had a fursona as well. Now I am not sure if I am going to keep her or not but I do actually still like her design. I might just tweak it a tad.

I have an incredible piece of artwork from Nukerooster of her and I just need to share. Go check them out as well (>>>LINK HERE<<<)
Akuma: Another fluffy boy but I have this OC named Akuma, original... I know. He will most likely make an appearance in my Hell world once I re work him a bit. Basically he was a demon that caused a lot of Chaos and havoc but messed with the wrong village. Mid transformation he got a blessed sword rammed through his chest keeping him that way until the sword is released. It also perpetually bleeds, never heals, and drains his power. Poor demon baby boy. Also I realize that he is old... but like... I still love his design if that is even possible. He used to be red in color which I will post and then I redrew him a few years ago to see how he would look more current. Now he is teal ish.


Nuke also did this incredible one of Akuma.
Because of my major I sometimes randomly come up with cute RPG character designs and I really wanted to do one of little monster animals. I created this little guy during one of my classes.
Spip: He is a little vampire ghost bunny. The cross shaped vile around his neck is filled with his HP restore (Blood) If you have a lot the vial will be full but if you don’t have enough it will deplete over time. Poor little Spip just wants to be friends with people but because of what he is they run away. He is kind of my homage to Bunicula if anyone remembers that book. I have ideas for his little buddies too like a Frankenstein cat and so forth. Just a cute little idea.
Lastly we have the Infernum (name will probably change I am kind of thinking about calling it Twisted Otherworlds or just Otherworlds) cast which is even larger than the Hell side and I don’t even want to think about that right now X’D It is a little overwhelming. What I do have however are some of the designs I made for them, costume wise. This was back during my fashion degree projects. Think realms with twisted fairytale characters that happen to used to be real people from different periods in time. This is the point I really started to dig into the horror genre and it kind of shows though looking back I think I always kind of have been...
The story is basically a fairytale romp and during the day light hours it’s perfectly fine all zanny and fun but at night is a whole other story. You see the souls that live in these Realms used to be living breathing people. The only thing is that if you end up here though you lose all memory of that life. The Madness which is like a magical curse infects these souls and turns them into their own personal fears or horrors. It’s all back story based and intense so I won’t go into it. There are different monsters and characters and even though it’s an older idea I do think it still has a lot of potential. The realms of the Muses so to speak. Their day and night are switched as well so no matter where you are in the world you dream in the daylight and it’s night there soooo your usually going to get a pretty lucid horrifying nightmare but if you sleep during the night time you will have good dreams. Just don’t fall asleep during the day light hours X’D
Anywhoo! Here are some of my favorites and again these are really old so their designs will be tweaked for the long run. I also apologize for the quality the actual PSD files are not on my laptop so I have to settle with the project photos I took a long time ago. In order you have the Rae the Black Rabbit, Lucian the Hatter, Ace the Cheshire Cat, Crow (probably change the spelling) the Scarecrow, The Woodsman, and one of Pan’s Lost Boys. I also included the top hats I made for them because I still think they are pretty neat!
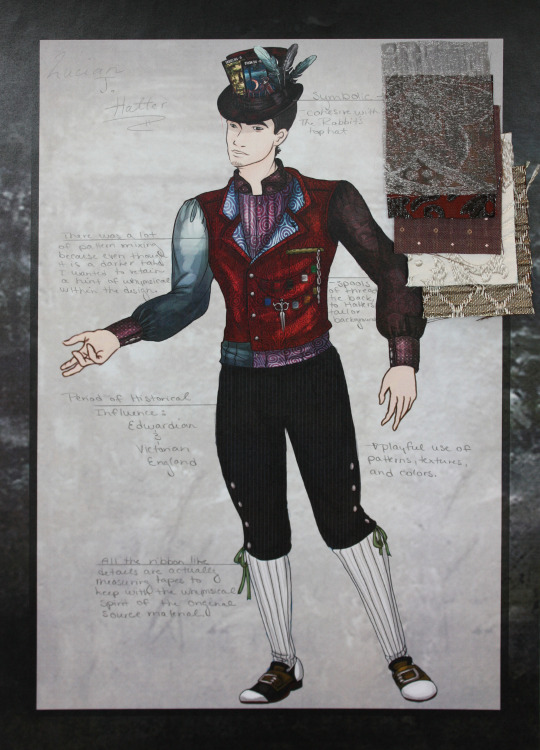
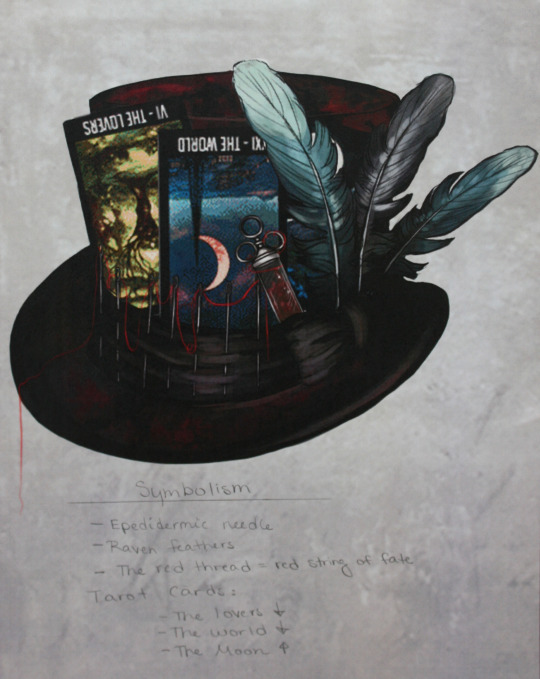
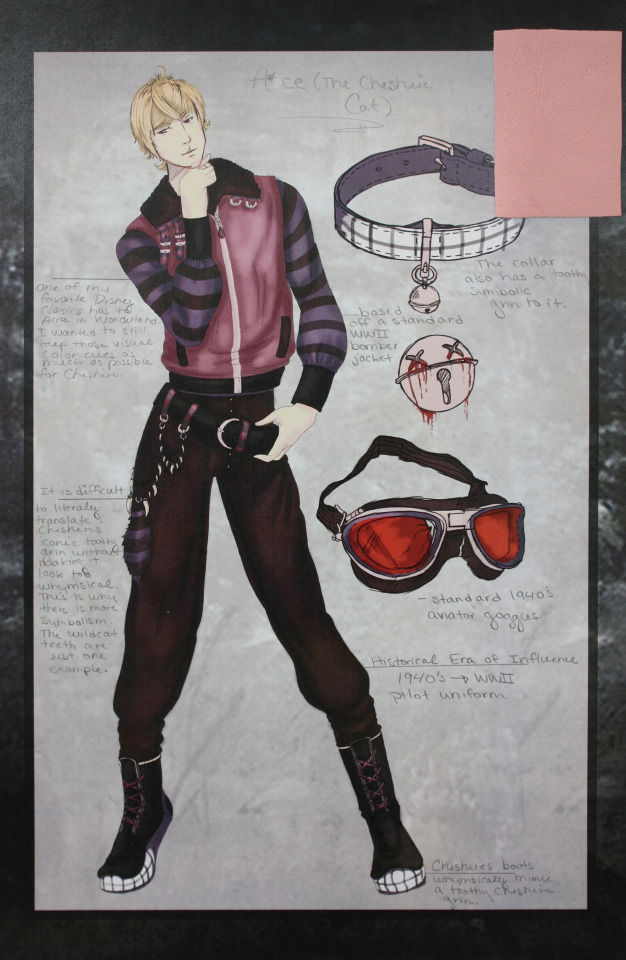
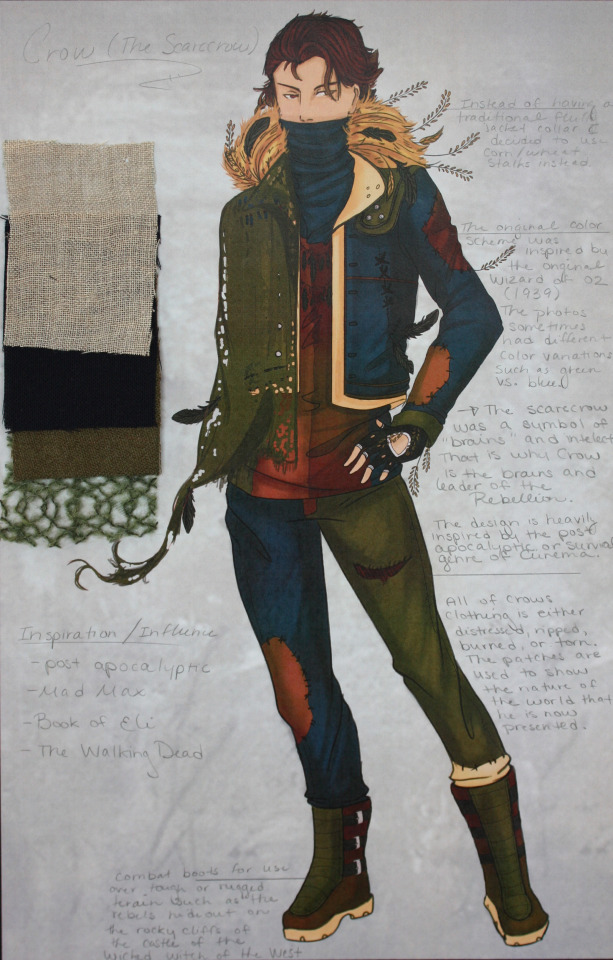
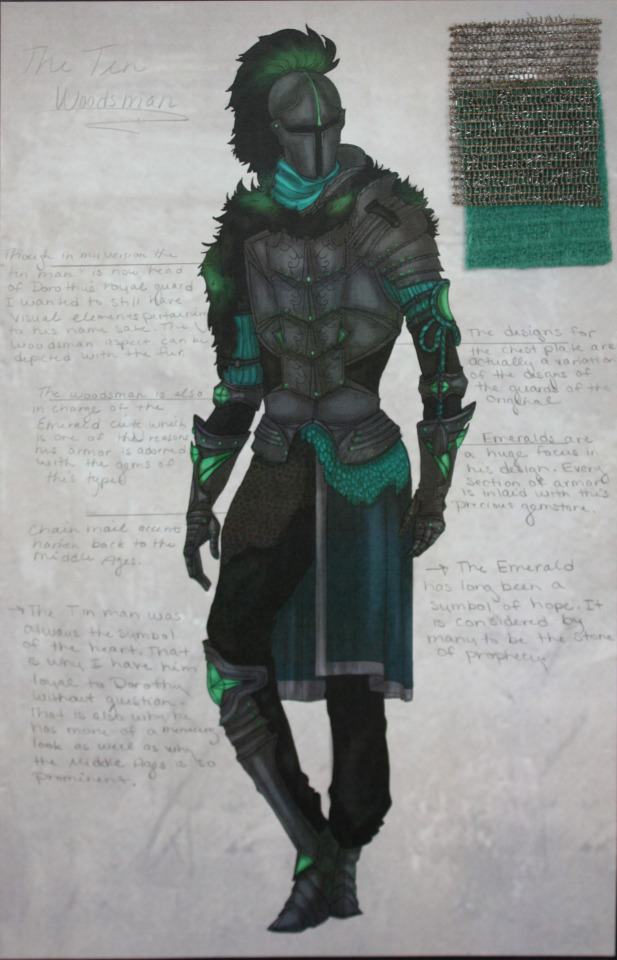
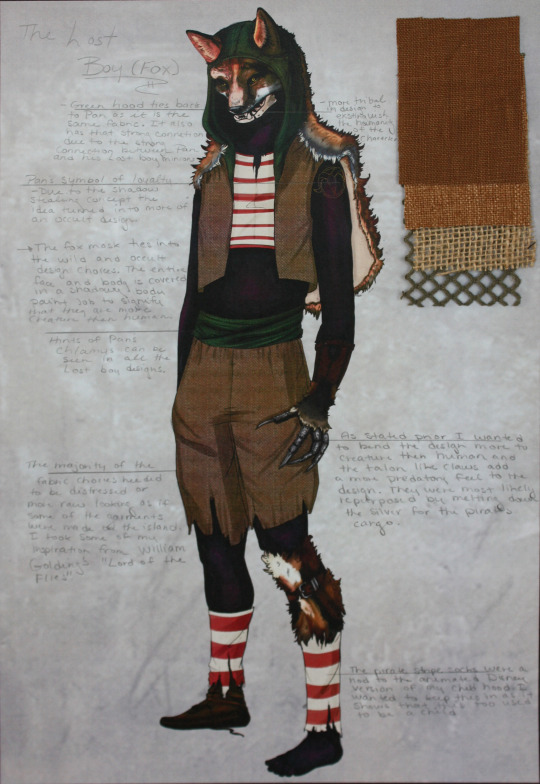
There are also some REALLY old designs for the Twisted Otherworld characters. They had more of an anime flair to them. That said there are a couple characters that I want to share since they are actually important despite the artwork being older than Methuselah.

Maximillian March/ Mad March: Crazy March Hare? I think so. He is a puppet master of sorts in the story and I have to redraw him but he has these deep swirly eyes and sharp teeth. (huh... looks like that design choice happened a long time ago... WELP)

Tweedles: One of my friends was able to pick this out immediately but yea... these are the Tweedles. Their nightmarish 1910′s gas mask Orwellian horror cyborg versions anyway. I have a full image of Dee somewhere that I need to find... (edit) AH there he is... btw I was like 15 when I did this design so I gotta question what the heck was going through my brain.. unless it was that Doctor Who episode with the children that just freaked me out... yeah.. that was probably it. Are those real organs and muscles you ask... yes... yes they are.

#oc#kits asks#nearly a decade of characters#original characters#persona world builds#Otherworlds#species#god I feel old#thank you for asking!#part 2#Rabbit#Hatter#Hare#Cheshire cat#lost boy#woodsman#Crow#Spip#Akuma#CC#OLD fursona#furry?
23 notes
·
View notes
Text
[REVIEW] Her Love in the Force: Ayumu Shinonome - Who I Once Was

I got some pretty good reception on my previous Episode 0 review, so I thought I would share my thoughts on Shinonome’s Who I Once Was as well. It’s not so much a review as much as just my personal thoughts on what this Episode 0 contributes to Ayumu’s past and future, some character analysis on Shinonome, Naru, AyumuxMC, Team Kaga, and why I think it tells us a lot about how I think Ayumu’s Love’s Trial route might play out.
Ayumu’s whole season so far has gone in a pretty different direction from everyone else’s. For example, one of the biggest differences is that his Love’s Battlefield route actually focusses more on his development rather than his MC’s (who frankly… gets little to no development). This is due to another big difference, which is how the role of Tsugaru is used to emphasise the changing dynamic between him and his MC due to their change in hierarchical divide. (I’m also currently working on a piece about how the MC’s dynamic with Team Tsugaru is used as a plot device for the key character and relationship developmental themes and how this differs from route to route, as well as what is consistent.) His Episode 0 does a similar thing.
When I read Soma’s Who I Once Was, it thrilled me because it helped contextualise and provide insight into his character by letting me retrospectively analyse his behaviours and traits in his earlier routes. This was important information since Soma is someone who doesn’t change much before and after joining Public Safety; his MC is the one who has the biggest effect on his changing attitude (and it’s something that he is conflicted about even into his second season). Therefore, his Episode 0 helped develop a more well-rounded picture of the version of him that we actually get to see. Ayumu’s Who I Once Was does the opposite thing for me. While Ayumu’s Ep 0 does provide a lot more information about his past that we have never heard of (almost everything that happens in Kaga, Goto and Soma’s routes are things that they have already mentioned), what this does is help set up the direction that Ayumu’s future route is heading towards. If Goto’s and Soma’s Episode 0s help us understand where they came from, Ayumu’s tells us where he is going.
Typically, the rest of the PSD instructors join Public Safety to fulfil their vendettas, except Ishigami whose reason for joining Public Safety (apart from maybe his sister’s case) is never explicitly stated afaik because his Episode 0 is literally just about academy life with Kaga lmao. However, Ayumu has no personal tragedy that leads him specifically to Public Safety. He ends up there because of his own mistakes, and the act of joining Public Safety alone helps him to develop a sense of purpose. Contrast this with Goto and Soma, who are still lost in the mist of grief and vengeance even after joining Public Safety, or Kaga, who literally only just got closure on one aspect of his motivation and is still working on the other. For the others, joining Public Safety is a stepping stone to helping them get to where they want to be. For Ayumu, Public Safety finally gives him a sense of purpose and choice, meaning that the Ayumu we see in his MS1 is already markedly different from the version of him we see here in his Episode 0. Later, I will expand on why this is still not entirely him going on his ‘own’ path, but it is still a significant decision nonetheless.
The path that brings Ayumu to Public Safety is influenced most strongly by two reasons, the former of which is influenced by the latter, and they are: (1) ennui; (2) his love for Sachi.
You may be thinking: how could you leave out Naru, who orchestrates the entire string of events that leads to Ayumu even first getting involved with the police? That’s because the reason that Naru even comes to learn of Ayumu is because of Ayumu’s ennui. So let’s begin with that.
Ayumu’s ennui stems from his privilege and his sense of obligation. We learn that he’s studying at T University (presumably Todai, a.k.a. Tokyo University, one of the country’s most elite institutions) to take over his family’s business (which is in electronics), but that he finds this unsatisfying. Because he thinks that he was adopted just to be the successor to the illustrious Shinonome house, he feels like he has to fulfil his role as heir. However, this is something that he finds personally unfulfilling. The reason for this is partially that he is just a genius who needs more intellectual stimulation. But more significantly, this is because he is struggling with his internal conflict over obligation to his parents (becoming the heir to Kochi Electronics) and his feelings for Sachi (becoming a police officer in the hopes that he will recognise him as her hero). Ayumu is someone who we know to be extremely concerned about his image – not just in the literal, physical sense, but also his whole persona. We know that Ayumu doesn’t even like to show his true self to his own parents; the only person that he’s ever been truly vulnerable around is Goldie. He protects his true feelings well and is quite prone to doing things to keep up an impression that other people have of him. At the same time, he is also someone who is not very communicative, and can often make assumptions about people’s intentions. This is one of the reasons why he is so inherently burdened by what he perceives to be the expectations of others.
Anyway, the different mindsets that he holds regarding these two options are illustrated particularly effectively through the two groups of his university ‘friends’. On the one hand, you have the guys, who are little more than schmoozy jerks who are only interested in one night stands and talking about their sexual conquests. They represent life as a future CEO, where Ayumu would be forced to network with people (and perhaps even become the type of person) who he finds shallow and frankly not worth his time.


On the other hand, there’s Suo, who represents both a more idealistic and meaningful type of future and a choice that goes along with Ayumu’s goal of being Sachi’s hero, but this path is also something that he clearly is unsure about. Both of these options are ones which are based on what Ayumu thinks that other people want him to do, not because of his personal interest. This is why, quite predictably for a genius but also because he is trapped in a place where he feels he has no real control, Ayumu ends up unfulfilled.
This lack of fulfilment leads him to partake in something that is genuinely a personal interest of his: hobby hacking. We can tell that this is actually fulfilling to him not just because he’s exceptionally talented, does it a lot and says he enjoys it, but also because hacking is the only thing that he is sure about. This is expressed through the directness of his hacking style, which Naru becomes attracted to and praises as “straight to the goal, like a comet”. And this is why I would argue that Naru is less responsible for Ayumu’s ultimate trajectory than Ayumu’s own tedium, because it is the tedium and indecisiveness that Naru takes advantage of the most.


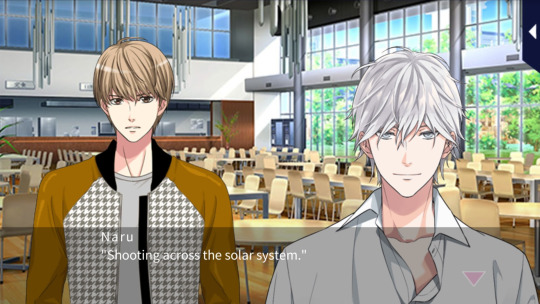
Kinda weird that they didn’t use a close up sprite of Shinonome to match Naru’s one tho.
If you’ve played Ayumu’s Battlefield route, it’ll come as no surprise to you to know that Naru is manipulative. Honestly, I would go as far as to say I find him to be one of the most terrifying villains throughout HLITF. I won’t go too far into his character, but I want to talk a bit about the relationship between him and Ayumu. For all of his smarts, Ayumu falls into Naru’s trap so easily. This is because Naru recognises and targets certain weaknesses that he picks up, such as Ayumu’s disdain for those around him, which is why he taunts him that he can do better than being friends with those “kids” whose conversation is “way below your level”.


He’s both stroking Ayumu’s ego and affirming his belief that the uni friends are immature. He does the same thing with the job situation, taunting him not just about Ayumu’s consideration of applying for a civil servant position but also about taking over the family business. Here, he recognises that Ayumu has reservations about both, and seduces him into taking a third option beyond those two: to focus on his hacking and join forces. Naru shows him that his current situation isn’t enough for someone as great as him, recognising Ayumu’s tedium and showing him a dangerous, challenging world.


Ayumu becomes tempted. I think the biggest clue that he has actually fallen into the trap deliberately set by Naru comes at this one point, where we see Ayumu’s internal monologue about how he is spending more and more time with Naru and on the hacking forum. He thinks that he should quit soon, since he was treating it just as a challenge and now knows where his level is. Naru interrupts this line of thought, saying “Too sweet”. He is commenting on the peach nectar, saying that it’s literally too sweet (too much sugar), but the same word 甘い in Japanese is also used to mean naïve, meaning that Naru could be calling Ayumu naïve (for being so easily manipulated). Obviously, Naru probably isn’t responding to Ayumu’s internal monologue since he can’t read minds, but from a reader’s perspective, I think that moment was quite deliberate. Maybe I’m just reading too much into things, but I found it to be both very clever and also quite haunting, especially since the next move that Naru makes is his first attempt to propose the hacking duel which ends up being a trap for Ayumu to allow Naru to steal confidential NPA data.

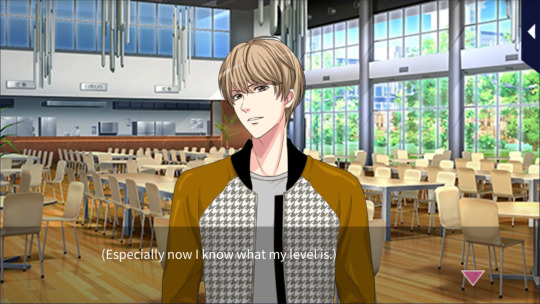

It’s also clever that Suo interrupts before he can go through with this proposal, since wholesome Suo represents an idealistic path towards justice.
Anyway, even after Naru, who has more or less lured Ayumu almost completely to the dark side, actually successfully proposes that battle, there is one thing stopping him from going through with it, and that leads us on to point number 2.
Let’s talk about Sachi.
She, and his love for her, are the only reason why he’s even considering a future in law enforcement at first. He says as much, that it’s not his dream.

Those typical Ayumu character traits that I previously discussed in relation to his relationship with his parents make their reappearance. Firstly, the fact that he feels like he needs to keep up a certain image, which is demonstrated when he drinks coffee in front of her and lies about no longer drinking sweet beverages. In this case, he is trying to perform maturity. Secondly, his feeling of obligation: he feels obliged to Sachi to fulfil his promise that he’ll become a police officer in her stead. Thirdly, the fact that this feeling is self-imposed. Sachi never explicitly said “I want you to become a police officer.” He made that promise of his own accord, assuming that’s what she wanted. Ayumu is doing everything that he thinks is expected of him.
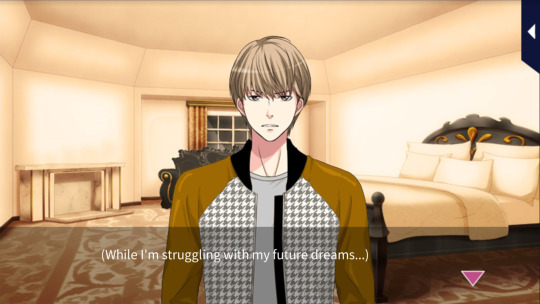


(We later find out that she never forgot and he was just assuming that she did)
Even his disillusionment at uni life and his friends to some extent stems from his feelings for Sachi. The main reason he sees those friends as immature is because they talk about nothing but girls and hooking up, even when they are getting top scores in tests. He even actively separates himself from them in this regard: when he thinks about their girl chat, his mind drifts to Sachi and he thinks about how he’s different.


Ayumu is a fool for love. We see the same thing happen over and over again even with his own MC: he’s surprisingly (not that surprising anymore haha) childish and emotional when it comes to his feelings. He is a one-woman man through and through, to the point where he is literally so head over heels that he often allows his feelings towards the subject of his love to dictate his actions. We like to think that Ayumu is so clever and calm and logical – and he can be, when it comes to work – but every mistake he makes in his Episode 0 is the result of an uncontrolled emotional response to being hurt by Sachi. He lost his virginity to a random one night stand when Sachi went on an overnight trip with her teacher. He’s resigned to throw away a future in law enforcement as a way to get back at Sachi because he thinks she’s forgotten her words.


Think about it: he has no personal negative feelings about the police, not in the way that Soma does, for example. He sees the police agency as a place that’s associated with a promise with Sachi, and how he wants to be seen by her. I previously mentioned that Ayumu is someone who cares a lot about how people see him and is weighed down by a feeling of obligation that he imposes on himself. Thus, when he thinks that she isn’t even thinking of him anymore, he decides to go through with hacking them as a way to get back at her as well as to throw away his heavy feeling of obligation towards that promise. To be honest, every time he threw everything down just to listen to Sachi talk about another man was devastating to read every time. My heart just ached.
However, despite being the reason why he ultimately chooses to give in to Naru’s manipulation, Sachi is the one element about Ayumu that Naru doesn’t know about. What Naru doesn’t know is that all of these emotions that he used to taunt Ayumu lead back to Ayumu’s feelings for Sachi. Those college friends’ talk of hooking up is cheap next to his feelings for Sachi. His indecision over career is due to his internal conflict over whether he will just have his heart broken again. We know that his parents are such great people and keep encouraging him to do what he wants to do, but Ayumu actively chooses to disregard their sentiments in order to keep himself trapped as an excuse.
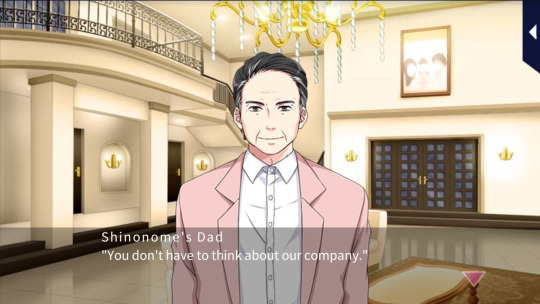
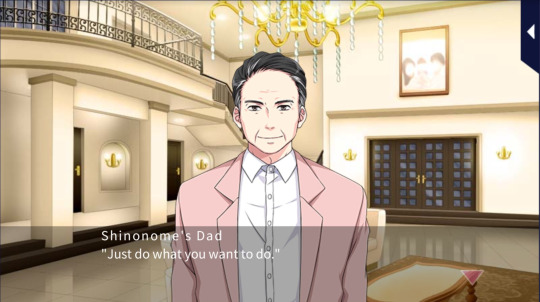


To be honest, I think he is choosing to be in denial since he knows that even if he does go through his promise to Sachi and becomes a police officer, it wouldn’t change the fact that she loves some other guy, but he just is too afraid to admit that to himself honestly. He wants the choice to be taken away from him so he doesn’t have to take responsibility for the outcome. Let’s be real, refusing to admit his honest feelings to himself is one of Ayumu’s defining traits lol.
This is why I truly believe that Ayumu is the one man in HLITF who loves the hardest. At the end of the day, all of Ayumu’s choices and mistakes in his Episode 0 come down to his feelings for Sachi. His indecisiveness over his career, his disdain for college talk about hooking up, his conflicting feelings about law enforcement, even his choice to ultimately join Public Safety, almost his entire identity is based around Sachi. Personally, I really appreciate that the writers didn’t underplay how important she was to him and almost his entire past just to appease readers who want to forget about her. Even when the choice to join law enforcement becomes his own choice (bc of the bombing incident), he still relies on Sachi for strength.


The reason I feel that way is because this is a demonstration of how strong Ayumu’s love is, but also because it just goes to show how much his MC changed him to make him able to forget about someone as important as Sachi and fall in love with her instead. And this is also why I believe, in Ayumu’s future Love’s Trial route, that Naru will be defeated because he will not be able to understand the level of depth and dedication that Ayumu’s love truly reaches, and how his words, actions, thoughts and entire world are shaped by his love for his girl.
Let’s revisit those three points of his character that I mentioned previously and see how they relate to his relationship with his MC – more specifically, how she has managed to overcome them.
1. Needing to project a certain image. This defence mechanism is something that HLITF MC gradually wore down over the years through her relentless pestering but is dealt with most explicitly in Our Graduation Epilogue chapter 3. She wants to be his home, i.e. the place where he can be himself entirely without any pretence of trying to be cool.
2. His feeling of obligation. This is something that isn’t as clear cut as a promise, but I would say that the closest thing to obligation here would be his role as her instructor. I think this is one of the reasons that he is so adamant about maintaining that teacher/student boundary and why he has always worked to bring out her innate strengths, because he feels obliged to her as an educator and mentor and that he has to fulfil this duty to her. That’s why he gets so worried about losing that dynamic, because he’s worried that he’ll lose his worth to her when that role no longer exists and that she won’t need him anymore. Luckily, she disproves that for him and shows that she’s actually more excited for that boundary to be dispersed.
3. Being assumptive/imposing burdens on himself. This is related to what I previously explained about his anxieties. But also, jumping to conclusions is something that we see Ayumu doing throughout the first two seasons and substories as well. These two are constantly getting into arguments because of miscommunication, particularly in substories (the ones that come to mind the most are Temptation Lingerie, 夏、ほてりが冷めるまで and Surprise Date Love Story). But luckily, we know that things always work out because he’s just so in love with her haha and because she’s so unwavering in her love for him~
Naru is formidable. I really think the second half of Ayumu’s S3 is going to be one of the most intense routes in the entire game because he is a direct nemesis who just seems like an anarchistic edgelord, not a whole terrorist group or organisation that has a goal wider than just chaos. He’s clever and crafty, and I believe his hacking skills will be at least on par with Ayumu’s (i.e. I think Ayumu will find it challenging to go against him technically). I think he will be furious that someone of Ayumu’s talent has been coopted by Public Safety, of all people, and he will do anything he can to get his ‘friend’ back with him, perhaps employing the same types of taunting and tempting techniques that he used in this Episode 0.
What will separate the two will be what Ayumu will do for, and with, his MC. The one key point that Naru was missing the first time was that Ayumu’s decisions were ultimately swayed by Sachi, because you know he would have exploited that weakness if he had known. And I believe he will miss that point again this time when he tries to take Ayumu back. He already knows that Ayumu cares for his MC but what he won’t realise that Ayumu’s love can strengthen him now; it’s not a weakness. Plus, Ayumu has already demonstrated, and is now even more explicit about, how far he is willing to go to help her. Also, if he has to battle Naru, he won’t be doing it alone. He has the love of his life, who he personally trained into a specialist, fighting alongside him.
Anyway, that’s enough speculating from me. I don’t have the energy at the moment to articulate in detail about the ways in which Ayumu and his MC love each other, but I’m sure it’s obvious to all of you who have read his routes and fallen in love with him. I just want to mention some things that I loved about this route.
The great thing about every Episode 0 route is that all of the characters are still extremely flawed even at the end, which allows us to get a good sense of how they got from point A (life before PS) to point B (joining PS), and then how that then brings them to point C (meeting and falling in love with you). I mentioned before that joining Public Safety is still not really Ayumu’s own choice. This is because he’s still madly in love with Sachi, and his choice is still at least partially because of her words, although also because of all his mistakes. Also, speaking of mistakes, man does Ayumu make a whole lot of them here.
I really enjoyed seeing him get thrown into a position where he suddenly becomes startingly aware of his relatively privileged life, which also contributes to his sense of ennui btw, and become forced to question huge questions about life, death and morality. Considering all this happens in about 5 years and he presumably spent a couple years at the Police Academy before entering Public Safety, it made me realise that Ayumu learned and matured really quickly. The Ayumu we know now is so much more experienced that it was really fun seeing him basically just be a dumb kid who think he’s so great getting caught up in something bigger than he could have ever imagined. The bombing issue is Ayumu learning what being truly powerless really means. Choosing between life in IT or life in the police becomes a non-issue when he suddenly gets given a day to figure out what to do with his stolen information.
Also, can we just talk about Kaga’s kindness? You guys know how much I love Team Kaga dynamics, and I kind of love that we get to see that their dynamics are basically like this from the start, with Ayumu basically being a brat to Hyogo-san and then Kaga kind of begrudgingly adopting him and going out of his way to recruit him. We love bratty Ayumu but thinking back now, I also love how obedient he is to Kaga and how much they trust each other despite their first ever interaction being Kaga beating Ayumu in a dark alley lmaooo. But the thing that is the most telling to me about Kaga is the fact that we now know that Shinonome was involved in the deaths of Hamaguchi and co., i.e. the very thing that made Kaga choose to transfer to Public Safety. So like Goto and Soma, Kaga and Shinonome play a role in bringing each other to Public Safety. You can tell the writers consulted either a show bible or Kaga’s Ep 0 because the dialogue at the press conference is almost exactly the same in both routes haha. Anyway, Ayumu got tricked into stealing files that Naru deleted from the NPA database regarding the bomb threat case that Kaga was working on. It was Ayumu’s tip to all the reporters and Kaga that led to Kaga sending Hamaguchi and the rest of his squad to the abandoned building where they lost their lives. I mean, obviously, as Namba says, the fault lies with the terrorists (and then with NARU!!!, and of course with the higher ups who just buried the case) but Kaga knows that the case information that Shinonome helped Naru steal was crucial to this case, and yet not only does he not blame Ayumu, he actually goes out of his way to recruit him. I love how Kaga-style it is as well to say “I’m gonna have you in the end anyway. You may as well come quietly. Say yes and then think about it after.”
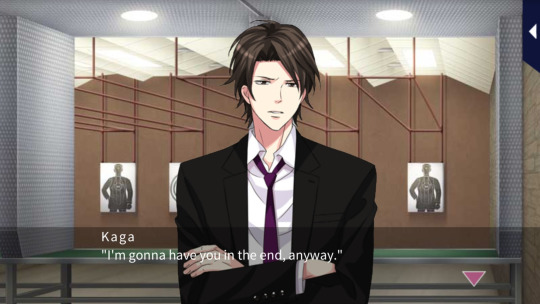


(This is almost a Prince Joshua level “yes or yes” proposal)
By the way, I also want to bring attention to this one moment in particular where Kaga’s expression SOFTENS when he sees Hamaguchi… Kaga cares about the people around him so much ;~~;


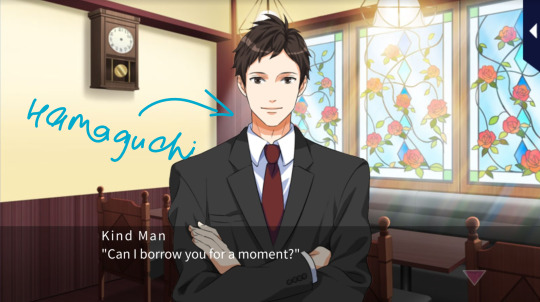
Anyway, I’m gonna wrap it up now because I will literally keep on going and never stop and I’m already about about 4000 words so I’m just gonna add a few more of my notes:
No wonder Namba still treats him as a kid cause he met bratty 20 year old Ayumu
By the way, how great was Namba’s advice? “Whatever you choose, I only hope that it’s to help others and not for your own amusement”
This is another defining difference between Ayumu’s (current) and Naru’s mentalities which I didn’t want to get into cause I had a slightly different focus.
I said this before but I’ll say it again: Ayumu’s parents encouraging him to follow his path and do what he wants to do even though it means that their business will no longer be a family business…. Gives me Emotions
“The shittingest”

Why did Ayumu get the nice giant dorm room that MC gets at police academy when Kaga and Ishigami had to share one room lol
And Goto and Subaru had to share a room too even when they were working detectives in Criminal Affairs
Ayumu calls Kaga yakuza no less thanTHREE TIMES lol

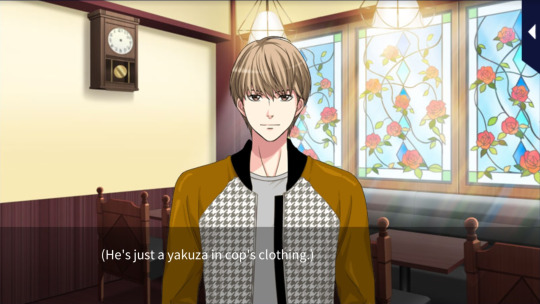
I know that this has been mentioned by Sachi before but this route really hit home for me that the bullying way he treats his MC is like... what he does when he’s happy?! He was so depressed and disillusioned this whole route that we got none of that behaviour and it made me really miss it
By the way, I’m like 90% certain that Suo is going to make an appearance somehow in Ayumu’s Love’s Trial route
TSUKUNO AYUMU!!!!!!!!!!
Also, I wish they gave us a little more introspection on Ayumu’s relationship with MC at the but also what a typical scene between the two of them we get to see! (Her being a dorky, clingy girl and him grousing but actually ENJOYING IT like the tsundere he is)
Do you agree/disagree with my thoughts? Let me know what you thought of, and enjoyed about, the route and my notes on it!
#ayumu shinonome#hyogo kaga#jin namba#her love in the force#hlitf#who i once was#review#voltage inc#voltage otome#otome game#otome romance#love 365#love 365 find your story#this ended up being more than 4000 words lmao
60 notes
·
View notes
Last Seen Blogs
venomoftheshank
Ask Venomshank

gyan-vigyan
Gyanvigyan.in

averyweakgay
A very weak gay
bonasita
Welcome to the Mom blog