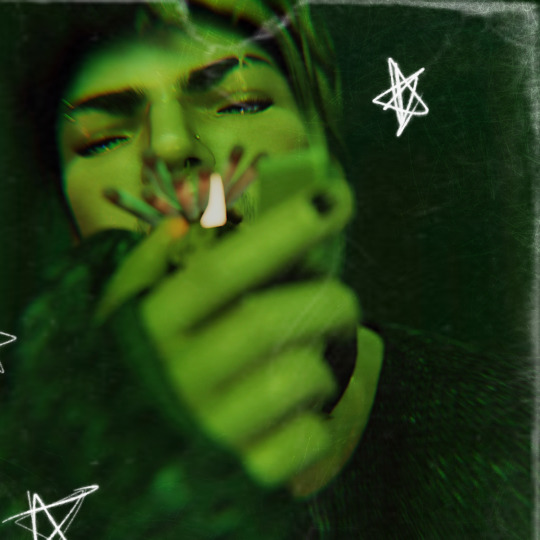
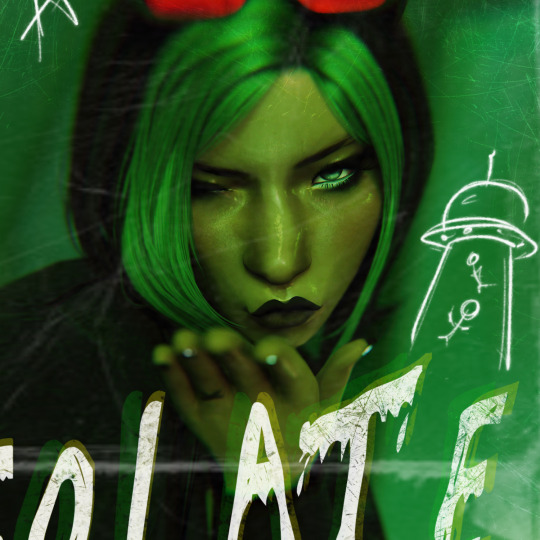
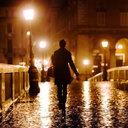
#i used the blender compositor for some of the effects :-)
Text


alien emoji
#ts4#simblr#ts4 edit#ts4 render#sims 4#myedits#AUverse#bow#dhestyn#kelly#sue#gaston#good news i didn't forget how to make things#this still isn't the band edit i had planned to do but idk it's kind of fun i guess#i used the blender compositor for some of the effects :-)#looking at it now it kind of ended up being an unintentional remake of that one bandAU edit i did forever ago#i never did like that one#the lighting was. not good.#but anyway! look at me posting my other OCs for once!#stella & marky are not in the band but#stella sells merch for them at their shows & marcus very lovingly tells them how much their music sucks#btw they actually are a band in canon. they perform in their high school talent show & everything#they don't get big at all though & they kind of just... give up on it after a while#kel is the only one out of the 5 of em who actually knows anything about making music#so they were doomed from the start really#this AU is literally the exact same as canon but they get mildly famous#probably played at warped tour or something when that was still a thing lol
213 notes
·
View notes
Text
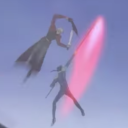
A fan animation I made of @spearxwinds character Talas! Really pleased with how it turned out in the end. Base Model was made by @the-mirror-sunflower-owo then I did rigging, animation and rendering for it.
Go check them both out!
If anyone wants to use the Rig for something I'm happy to share it (not the model though, thats not mine to share sorry) for you to put your own sea monsters / dragons / whatevers on, just send me a message!
I might do another render with some compositor effects later if I feel like it.
Its rendered in Eevee, and everything was made in blender.
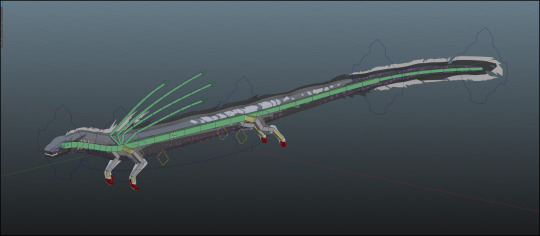
Its got Bendy bones with corrected rotation controls on all the five main spinal controls, IK targets for the spines, feet and hands are both IK blends with switchable Spaces, Pole Vectors and IK toggle Shoulders.
It probably still wants a little more work if it was going to be in production, but for a little 1 week project in uni holidays I'm pretty pleased with where he is.
123 notes
·
View notes
Note
is it ok to ask how u edit ur lookbooks? i love your style sm
hiii!!!! omg thank you 🥹
first thing you need to know is that where my lookbooks are concerned i'm not doing a whole lot of editing. that's my secret, i think. i do as much as i can in blender. which is why this is exceedingly flattering for you to say because i do not consider myself very good at editing (mostly compared to those ppl that do shadows and hair strands, that's not my bag yanno!!!) i also try not to get too repetitive, so this is all just kind of general. if you got specific lookbooks in mind, i can dig into it.
also to preface this, i'm not going to link to any specific tutorials, because i don't know your particular learning style and there are soooo many tutorials out there that i could take hours just finding one. so i'm sorry but i'm going to have to leave the research with you, and point you in the right direction.
i've been using the same PSD, more or less, for well over 10 years now. i tweak it a little every time. learning how to make your own PSD can be a game changer-- you can learn how to manipulate the colors the way you wanna manipulate them, and if you use it long enough (like i have!) you'll create a signature. i'm such a sucker for the selective color adjustment layer, it's how i get my pinks so uniform. 💗
almost as important as a PSD is the action you use. i also made that, just a little sharpening, very tiny topaz effect, and more smart sharpen. in doing this (either taking the time to learn to make your own, or finding one you like) you'll free up a lot of time by quickly filtering your images and moving onto the fun parts.
layers layers layers!!!!
blending options for your layer open up (little mermaid voice) a whole new world! whether it's text you're bringing style to, cool outlines, soft glows, you can have a lot of fun just playing around.
fonts. just collect cool fonts you like. lost-type co-op is one of my favorites. play around with making some typography. there's no right answers!! but if you're working in a bigger canvas, make sure to zoom out so you know it's gonna be readable when tumblr scales it down to fit its format.
if you're going the blender route:
get in the habit of doing transparent background versions of every shot. even if i don't plan on using them, i just have them, and it makes editing a lot easier, a lot less painful. don't even have to crop out the backgrounds, it's just done.
learning how to use the compositor is another game changer. it's how i bring a little bit of a glow to my renders and make them pop without even having to open photoshop.
turn on node wrangler. this isn't relevant to anything in specific just look into how to enable node wrangler and thank me later.
also turn on the ratio aspects in your blender camera settings. this will allow you to see if things are centered, or juuuust the right amount of off-center if, if you're into that.
#i hope literally any of this is helpful#my brain is scrambled egg today i'm tired it's been long my head hurts#and i was about to work on this months lookbook when my mouse died :3#asks#anon#blender tips#photoshop tips
10 notes
·
View notes
Text
PART 2 OF THAT ASK
this is going to be long sorry. some blender things i want to share for absolute beginners from my perspective of someone who is still a beginner. under cut!
NAVIGATING THE VIEWPORT is done by holding down middle mouse button (to rotate your view), and [shift] + middle mouse button (to move around). if you dont have a 3-button mouse, go to edit (in the top left-ish) -> preferences -> input -> tick the box that says ‘emulate 3-button mouse.’
THE TABS AT THE TOP (layout, modeling, sculpting, animation, etc) are not all 100% necessary! esp at first! one of them is for writing in python scripts! you dont need that probably! dont worry if some of them are scary at first, just dip your toe out when you feel comfortable. i use the ‘layout’ and ‘shading’ tabs the most, and usually dont do much else unless i want to add post-processing effects in the compositing/compositor tab.
YOUR HIERARCHY is the list of things in the top right, itll usually start out with a camera, a light, and a cube. they have little symbols by them. you can rename things in the hierarchy by double-clicking them, or pressing [f2]. the [f2] to rename thing is helpful in programs besides blender, btw. you can make ‘collections’ in the hierarchy by right-clicking and adding a new collection. you can rename that as well. things can be dragged into collections, and this all just helps keep it nice and organized. it wont kill you to not do hierarchy upkeep, but its a good habit for future more complicated things.
BELOW THE HIERARCHY is a thing with LOTS of tabs on the side, each tab having a little symbol on it. you can ignore most of them and branch out when you feel more comfortable. the most immediately useful one is the blue wrench, or modifiers. there are many types of modifiers! dont be scared. you can learn them as you go. i dont know what all of them do. i like array, though, and boolean, and mirror. there are many more that you can play around with to see what happens!
MODIFIERS are applied to objects, in object mode. switch between ‘object’ and ‘edit’ mode by pressing [tab]. if you add a modifier to an object and switch to edit mode, you wont be able to edit the modifers ‘results’ (ex: an ‘array’ modifiers adds a line of copies of the modified object, so you wouldnt be able to change any of the copies), but, if you edit the modified object, the results will reflect that. you can ‘lock in’ the modifier by [tab]’ing to object mode, clicking a little drop-down on the modifier, and hitting apply. this ‘solidifies’ the results, and they can now be edited like your initial object, which now has no links to the results.
OBJECT MODE is the mode you want to be in when repositioning your objects, and adding new objects to the hierarchy. operative word there is hierarchy. you can add new objects ( [shift] + [A] ) while in edit mode, but they wont show up in the hierarchy as a new, capital O Object. if you select a cube, go into edit mode, and make another cube, those two cubes are counted as the same ‘object’ by the hierarchy, and will be connected as such when youre in object mode. you can separate geometries like this by selecting the secondary cube (all of it!) (usually [A] works for selecting all of it but since you want only one of the cubes you should shift-click all the faces or go into x-ray mode and drag-select everything) -- and pressing [P]. this brings up a menu, where you can click ‘separate by selection’ - and whapow, that errant cube is now its own Object. this is important, for, say, instances where you make an entire room while in edit mode (accidentally), and so everything is mashed together as a single Object in object mode. unhelpful if you want to reposition the couch ‘object’ easily!
HOTKEYS are the best. press [G] to move, and while moving, you can press [X], [Y], or [Z] to lock that movement to a certain axis (x, y, or z). same with scaling with [S] and rotating with [R] -- using the x y and z keys is very helpful. also, while rotating with [R], before you lock-in your rotation by left clicking, you can type in a specific number to set the degrees to. like. click to select -> [R] -> “90″ -> click to set. now it is turned 90 degrees. easier than eyeballing. [crtrl] + [R] (in edit mode) will add EDGE LOOPS to your object. theyre helpful for adding extra segments and stuff. play around with it. use the scroll wheel while placing said edge loops to add more of them, and you can [S] or [G] while doing this as well. play with it! extrude with [E] is one of my favorites. it creates a new face and pulls it out of the existing geometry. be careful to not hit [E] and forget you did that. it can clutter the geometry by leaving unseen extrusions. hit [E], then either [G] or [S]. or [G] and then [S]. so on and so on. or [R]. the world is your oyster. press [alt] + [E] for a little extrude menu, which can be helpful if youre trying to extude, say, different faces on the same cube at the same time. regular [E] will kind of mangle it, so [alt] + [E] -> extrude along normals, or extrude individual faces. play with that to see the difference between them
SWITCH BETWEEN MODES -- as in, vertex, edge, and face mode -- by pressing [1], [2], or [3] at the TOP of your keyboard. not the numpad the numpad is for other things. i like face mode the most, but using all of them is most helpful. you can scale and rotate edges and faces, but can only move vertices. [shift] lets you select multiple at once, and so does [ctrl], but [ctrl] selection will select anything between point A and point B. sometimes you want this, sometimes you dont, and sometimes it does it wrong. while im thinking about it, you can also select edge loops (remember?) with [alt] + [shift].
ORTHOGRAPHIC VIEW is the last thing ill mention. if you have a numpad (unsure what you do if you dont. um. look it up), press [5] to change to orthographic view. this is helpful for aligning stuff without locking to x y or z. play with it.... and switch back with [5]
theres more but im getting tired so i hope this helps!
7 notes
·
View notes
Text
Intro To Motion Graphics Information
Intro to Motion Graphics is a course designed to provides an introduction to the field of motion graphics, which involves creating animated visuals for various mediums such as films, advertisements, websites, and more.
The course covers the fundamental concepts and techniques of motion graphics, allowing students to develop a solid understanding of the principles behind effective motion design.
What You’ll Learn In This Course?
Lesson 1
In lesson 1 I walk through my default startup settings as well as my technique and theory on how to make seamless loops
Lesson 2
In lesson 2 we will be learning how to tackle procedural modeling, a simple camera rig, and some fun node tricks to animate emissions
Lesson 3
In lesson 3 we will be learning a versatile way to make stunning loops and diving right into my favorite way to create procedural patterns
Lesson 4
In lesson 4 We will be learning how to shape volume to create smoke and nebulas along with learning how to loop particle systems
Lesson 5
Lesson 5 is packed with info. We will be learning many different ways to approach looping things and how to problem solve in those situations. Taking some rights we will be learning how to add variation to simple looping movements. At the end will be hopping in the compositor to add some extra effects.
Lesson 6
In lesson 6 we will be taking many of the techniques we have learned in past lessons to create an eye catching and versatile loop design, along with a few new node tricks
Lesson 7
In this last lesson we tackle how to use the text tool and a few ways to take 3D text and make cool graphics with it.
About Author
Nathan Duck creates immersive visual experiences through vibrant animations, beautiful 3D environments, and concert visuals.
He is based in Nashville,Tennessee, working with musicians from around the world creating tour packages and visual art of the music industry.
He also teaches Blender online and has garnered over 200,000 subscribers on YouTube, uploading weekly tutorials.
More courses from the same author: Nathan Duck (Ducky 3D)
0 notes
Text
speed racer and 'animetism'
watching this fascinating making-of documentary for speed racer...
youtube
what's kind of interesting is that well, a lot of the techniques they're using - compositing 2D greenscreen planes into 3D environments, shooting in full HD, spherical panoramas (nowadays known as HDRIs) actually have become standard in the VFX industry. you don't need prototype cameras either, but instead you can do them at home pretty easily nowadays - check out this tutorial by Ian Hubert:
youtube
yet for all that your modern marvel movies, which are infamously composed on a greenscreen in every shot to the point that they start to forget you can just point a camera at stuff, or other high tech filming techniques like The Mandalorian's Unreal Engine real time rendering TV walls box, have none of the editing panache that this film had; I think a major missing ingredient is the notion of "animetism" defined by Lamarre in The Anime Machine (see here for an excerpt of the book, which honestly takes it a lot further than I'm taking it here, or this lecture series for a more gradual presentation with video, and this review by Matteo Watzky for a fantastic critical look into the theory's limitations), i.e. partially breaking from illusionistic 3D perspective to focus on moving 2D layers.
this might be an odd thing for me to say because I've previously gone on about how for me the real magic is when the 2D animation takes on the notion of "cinematism" and starts to approach that 3D illusion. but I think what speed racer does that makes it so interesting is come at that suture from the other side, taking real life 3D film but moving the layers around in the compositor in a way that subtly or overtly breaks from strict 3D projection. and its resemblance to anime was quite openly deliberate - in the documentary above they talk quite a lot about how anime involves 2D layers sliding about, and the way they emulated that, in a way that anticipates Lamarre's emphases (if not all the commitments of his theory).
this possibility is always there in compositing programs like After Effects and indeed Blender, and there are certainly animators like Cyriak who are doing their best to push it to extremes. Cyriak's approach tends to be to take photos and chop them up into pieces which he then treats with puppet animation and 2D morphing effects, often cloning them hundreds of times to create fractals, resulting in some fascinating body horror type visuals. some of his more recent videos take more of a 2.5D approach, like this music video for The Existential Threat by Sparks; photos of cities are organised into rough perspective layers and the camera makes moves like zooms but it's all very approximate. much like the race sequences in Speed Racer there's no conventional cuts but the camera flies from place to place, in and out of windows and screens, through walls etc.
a similar approach is taken in Otomo's short film Cannon Fodder which I discussed in this article on animation backgrounds with 'baked in' camera moves. Cannon Fodder shoots some scenes in perfect perspective, others in more of a 2.5D layered arrangement, but just like Cyriak's video there the camera is always moving; you can recognise shot transitions but there are (almost) no actual cuts.
I've talked before about how I thought 2D-in-3D non-photorealistic animation, like J'ai Perdu mon Corps (animated in Blender Grease Pencil with most shots rotoscoping from 3D models) or Into The Spiderverse (a CGI film which uses extensive 2D drawings to modify its renders and a lot of comic book stylings like Kirby Dots) is one of the most fascinating directions animation is going at the moment. and I think this just helps underline that one of the things that most grabs me in animation is that convergence of 2D and 3D, where we use the language of perspective in one shot and the language of layers in another or mix them together in the same shot, making all the parts of a sequence flow into each other in an intoxicating way.
in the past i think i've given in to a temptation to think of this kind of 2D effect as a shortcut, a limitation of not having the time to meticulously draw every frame in perspective, and challenged myself to animate a complicated series of camera moves on 1s ostensibly to teach myself better anatomy (a project I still intend to finish). but actually I think I need to realise the opposite is true: it's when we intentionally take control over the cues of depth and the 2D patterns made by 3D projection, rather than strictly limiting ourselves to the mathematics of perspective projection, that we reach that fascinating inbetween point that a computer cannot reach on its own. so hopefully I can start to apply that notion when I'm animating more and more.
46 notes
·
View notes
Note
Could you tell more about how you recreated the PlayStation 2 start up animation? In particular I’m wondering about the motion blur, aliasing, and other PS2 specific rendering quirks. Thanks <3
gladly! actually most of that stuff is done in blender’s compositor! i can break it down for you.

early game console motion blur was not true motion blur -- that is, the physical simulation of a camera shutter being open for too long while something is moving. to do this today, the renderer takes note of the location of every vertex in the scene during the last frame, and compares those locations to the current frame. then it will take those positional differences (sometimes creating a few extra “steps” in between those two positions for extra data) and create a blur between them, achieving this:
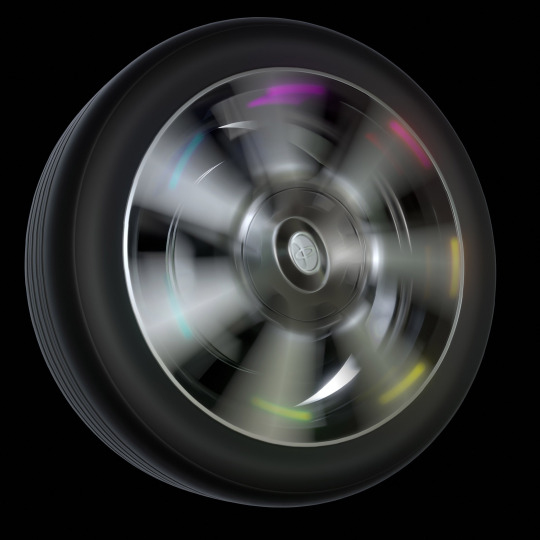
the PS2 (and the other consoles at the time) was a graphical powerhouse compared to its predecessor, and thanks to new rendering techniques, was able to sort of simulate motion blur without the full cost of actually simulating motion blur, like we do today.
to do this, there was a technique often referred to as “color accumulation blur”, where the last 2 or 3 frames were simply overlaid on top of the current frame at a lower opacity. it cost next to nothing, reduced aliasing (or jaggies) on some edges, and for the time was a pretty convincing full-screen motion blur effect—at the expense of it looking like “ghosting” or “afterimages”:
now, without doing some crazy render layer trickery, blender doesn’t necessarily have the compositing tools to do this exact effect (at least to my knowledge, i’m not a wizard or anything), but it’s very convenient that during the PS2 boot animation, the camera moves smoothly forwards in a single direction.
we can't use blender's default motion blur feature for this effect, because it'll actually be high quality motion blur instead of the kind we want. blender just so happens to have a very nice feature in its compositor called directional blur.

here is first bit of the compositor node setup. here, i take the currently rendered frame, and pump it through a directional blur node, which will blur the frame outwards from the center. those “zoom” and “spin” sliders modify the intensity of the blur and the spin of the blur, and i animate those upwards as the camera gains speed towards the end of the animation. the iterations slider is what determines how many copies of the original image will be overlaid against each other to create the blur, and considering what we learned above, i set that to 2 so it looks nice and choppy.
after that, i hook up the original image and the new blurred image into an add node, adding them together!

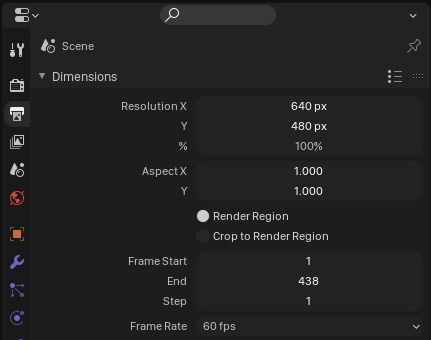
this one's pretty simple. the PS2 typically rendered graphics at a resolution of 640x480 (it could do 240p and 480i, but for simplicity's sake i stuck with 480p). so in blender's render settings, i set the resolution to 480p.
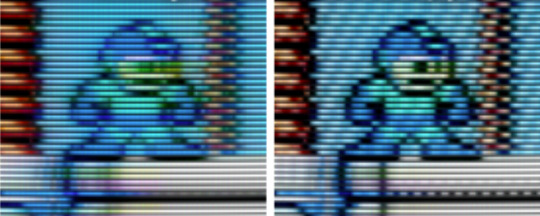
anti-aliasing is a technique where you take a rendered image and through one technique or another, reduce the appearance of jagged edges on pixels—allowing the image to look smoother and cleaner.
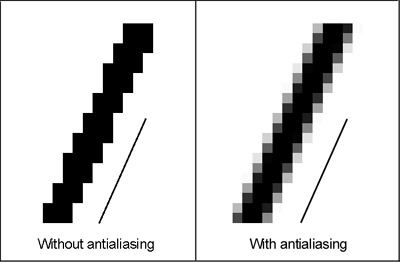
the common anti-aliasing techniques of the time were extremely expensive especially for a console, so most titles didn't use it at all. this is why a lot of older games (and a lot of new ones too) can have graphics with pixelated shimmery edges. however we mostly had CRT TVs at the time back then, and CRTs are notoriously good at covering up aliasing.
blender, however, has anti-aliasing enabled by default. to fix this, we need to head over to the scene tab, and go to film > pixel filter.
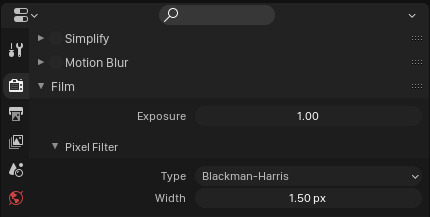
blender's anti-aliasing method is called pixel filtering, and by default the "width" (strength) is set to 1.5px, which will sort of let each pixel affect the next half-pixel in all directions. it ends up looking like this:
don't worry i barely understand it either, we just need to turn it off. so i set the width to 0.01px, and bam! crispy jaggy aliasing.

finishing touches
finally, i had to give the render an old-school analog feel. the PS2 rendered digital images and sent them through a low-quality analog cable. that’s right, i’m talking about these bad boys:
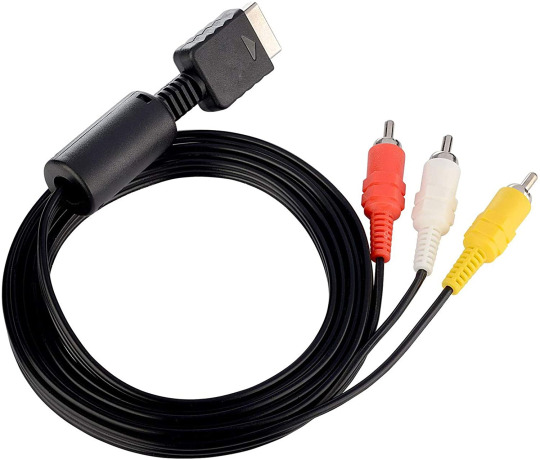
since only one of these cables were used for sending a video signal, they had to send chroma (color information) and luma (brightness information) data through the same pipe... so naturally you’d get some crosstalk between the two, resulting in some odd looking color smearing:
to achieve this in blender, we do some more compositing!
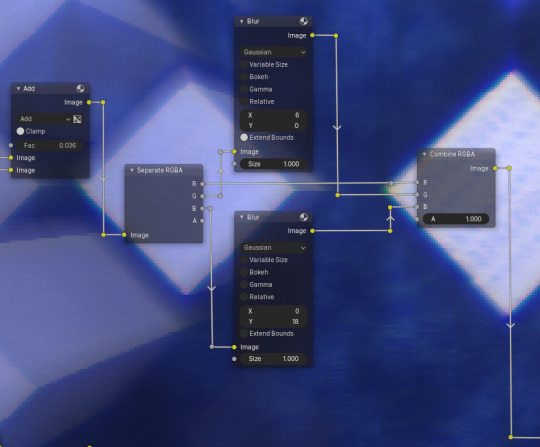
here, i am taking the frame with all effects applied up to this point, splitting it into its red, green, and blue color channels with a separate RGBA node, and then ever-so-slightly applying a blur to the blue and green channels before re-combining them back together with a combine RGBA node. it’s definitely not accurate to how chroma-luma crosstalk works in real life, but it’s good enough that the effect is convincing! (NOTE: for this screenshot i’ve dialed the blur way up to make it more apparent for this post—it’s much more subtle in my final render)
...aaaand that’s about it!
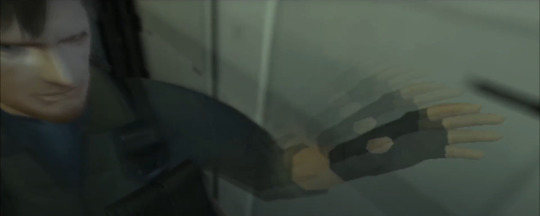
there’s definitely a lot more at work here to make it PS2-authentic but those are the big ones! i also rendered the little colored balls of light as a separate render layer and added them on top of the frame, lowered the contrast a bit to look more like a recording of a real PS2, and turned off raytraced shadow casting.
here’s what the frame looks like before it hits the compositor:
and here it is after:
thank you for asking and thank you for reading! i love talking about this stuff.
186 notes
·
View notes
Video
vimeo
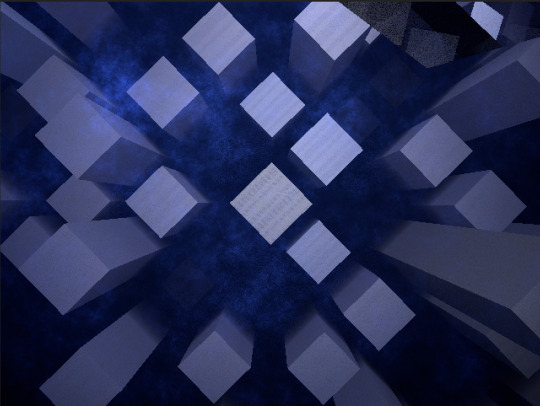
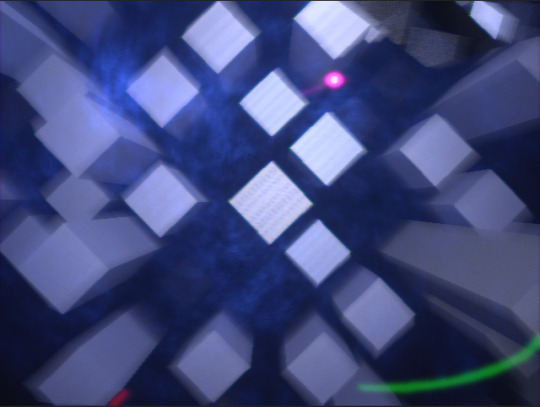
Here it is - the stream intro for my darling @mogsk‘s current season, the MogsK Underground Experience! The idea was inspired the kind of ‘underground broadcast’ vibe, old Playstation demo discs, and of course the Fallout intro.
I built the TV and all its attachments, and the surrounding 3D environment, in Blender and animated the camera move, which bridges the gap from the ‘prestream’ section that runs while people are filing in and the main stream itself. Mogs made the video that plays on the TV and the sound!
Making-of details below:
Mogs provided me a reference of the type of TV she wanted:
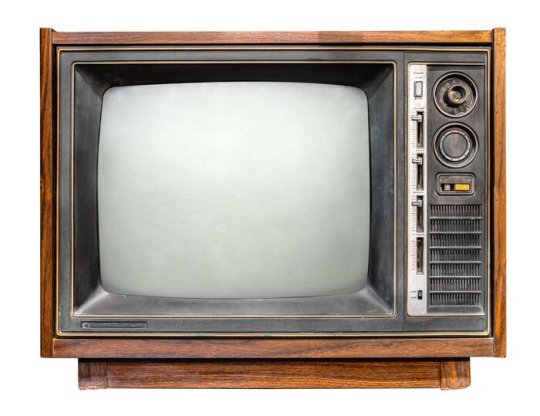
I made a preliminary sketch of the scene which proved very useful for quickly working out concepts:

Most of the TV parts were poly modelled. The wires are all curves, naturally, as are the metal strips connecting the decoder box to the colander. The colander doesn’t actually have holes in the mesh, that’s just an alpha channel I painted. Overall the construction phase of the project took maybe a couple of solid days, most of it all in one huge burst last week.
Here’s a different angle on the TV. You can see it’s really designed around this one camera angle...

Would it actually work to use a colander as an aerial? ...probably not very well, not least because it’s spherical rather than parabolic, but I love the concept. It was fun to try and get the rest of the pieces to look like sheet metal bent and screwed or welded together.
Rendering was done in Cycles. I drastically cut the sample count down to keep render time under control. We decided against denoising since the grainy noise felt appropriate to a desert environment. plus about six hours to render the camera move at 59.96fps.
The static camera part was achieved almost entirely in compositor nodes. I disabled the whole scene apart from the video, rendered the cropped and transformed video to an image sequence, and then rendered a transparent version of the TV with a holdout texture to EXR and composited it over. It worked great and saved days of rendering - if I ever come back to add more elements to the scene, I’ll render on top of shadow catching holdout materials and composite them over.
I generated the buildings in the background using the Building Tool addon to blender, assigned materials mostly by hand then created the shattered building using Booleans (which required some cleanup since Building Tool makes non-manifold meshes). I wanted to use voronoi shatter for debris but it didn’t work great, so instead I used that on the foreground bricks. To the shattered building I also used a procedural voronoi material to add displacement for cracks, though I don’t think this effect worked too great and I ended up turning it off almost completely. Here’s a closeup on the broken building - it’s not pretty up close!
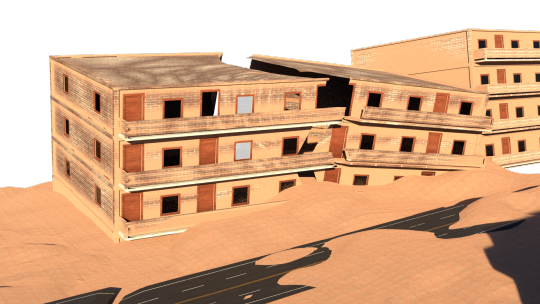
The materials are broadly based on free PBR textures from various websites, such as:
https://freepbr.com/
https://www.sharetextures.com/
https://polyhaven.com/ (which provided the HDRI lighting)
https://ambientcg.com/
https://www.texturecan.com/
https://www.cgbookcase.com/
The ground was given a displacement map following this procedural dunes tutorial which I modified to cause the dunes to scale with difference. I added to this a PBR sand texture with a normal map from one of those sites. I used adaptive subdivisions on the displacement maps, which is a very nice rendering feature, although I think it hit the render time a bit to precalculate those on each frame.

As a quick hack to have sand and dirt catch the recesses of the TV and make it feel like it’s been outside in a desert, I used an ambient occlusion node to mix the TV’s material with the sand material. This was far from perfect - there are many places on the TV where you can see the sand appearing where ambient shadows would, making it obvious it’s an ambient occlusion. Unfortunately Blender does not yet have a node to produce something like a cavity map, but in any case the right approach would have been to simply paint a sand map. Learning texture painting will have to be another project.
With GPU acceleration, Blender can get really impressively good renders very fast, but it sure hit my computer hard. It’s obviously nice when you can work in Eevee but in this case I wanted lots of specular surfaces like the TV screen reflecting the environment which could be part of Mogs’s screen overlay.
8 notes
·
View notes
Photo

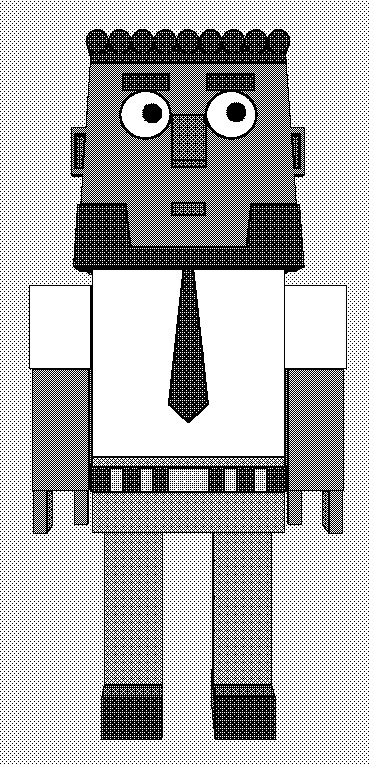


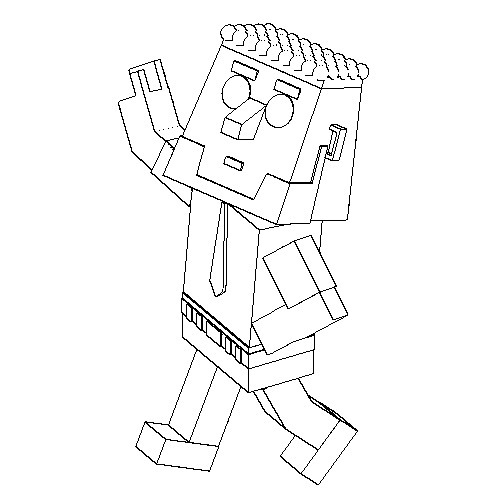
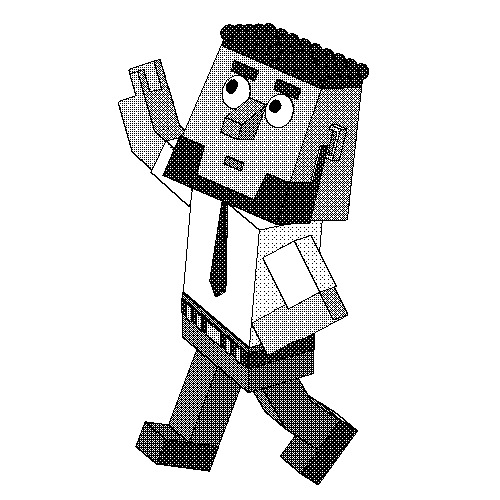

Some stylistic experiments of Globozone characters. The first three pairs were done by rendering a model of Abdu I made in Blender, then using the edge detect tool in GIMP, then colouring it with black and white mode in MS Paint. The creepy image of Al at the bottom was a render with a lot of compositor effects (Laplace filter and contrast mostly). The diagonal line is an error in the geometry, I think.
The tonal/dithering effect looks terrible in anything other than full view, please bear in mind.
5 notes
·
View notes
Video
Today was a little weird. I tried to create a fake tilt-shift effect in blender using some trickery. Two view layers, one with a material that renders distance-to-random-empty as a black/white image, and then that drives a blur node in the compositor.
Tilting the lens relative to the camera sensor plane tilts the focal plane. This with a shallow depth of field creates an optical illusion. The DOF doesn't change with distance how we expect, our brain makes sense of it by seeing everything as very tiny.
Also, on the internet, almost everybody explains the effect in varying degrees of wrong. I won't pretend I can get it right in a single tweet, but just .... don't go googling and expect anything useful. This is a big pet peeve of mine.
So trying to do tilt-shift in blender is pretty silly because blender is a fake camera that is hypothetically free of all of the distortions and limitations of a regular camera, and here I am like "no, wait, i want to simulate the bad parts too"
(well, it can do shift)
problem 1: I want distance to plane, not distance to point, but I couldnt be bothered to implement the vector math on that, due to being lazy. I mean time constraints.
problem 2: I duplicated objects and put different materials on them instead of doing material passes, going with what I knew how to do.
problem 3: gaussian blur is a primitive facsimile of real out-of-focus blur, even by 3d software standards
Problem 4 through 800: its a pain in the ass to set up, and not durable to work with
The kind of experiment I would normally let rot on my hard drive, content as a learning exercise, if it wern't for the daily-art challenge thing.
0 notes
Link
3D Model : BLENDER
I am making a 3D model with Blender. A few years ago I worked with this program. I "scanned" a head. - photographed it from all sides and modified it in Blender. In the end I milled it out of Polystyrene with a 3d cutter.
That was some time ago. I am trying to familiarise myself with the programme again.
Blender is a free, GPL licensed 3d graphics suite, which can be used to model, texture and animate bodies. These can be systematised into graphics, animations and software. Created image syntheses can be post-processed with the help of the integrated compositor and video editing programme.
Maybe I'll use it for my video animation- project...
The different modes in which objects can be modified:
Object Mode
Rough editing of objects (scaling and rotating) and arranging the scene.
Edit Mode
Modelling of points, edges and surfaces of an object
Sculpt Mode
With a multiresolution modifier or dynamic topology, you can edit an object with different brushes without moving individual points.
Vertex Paint
You can create vertex groups by painting individual points.
Weight Paint
Vertex groups can be created by colouring the points. If an object is blue, it has no effect, if an object or point is red, it has full effect. All colour gradations in between have an effect accordingly.
Texture Paint
Objects can be textured with a UV map.
First step: I try to built a 3D object, by watching this tutorial.
https://www.youtube.com/watch?v=TPrnSACiTJ4
0 notes
Note
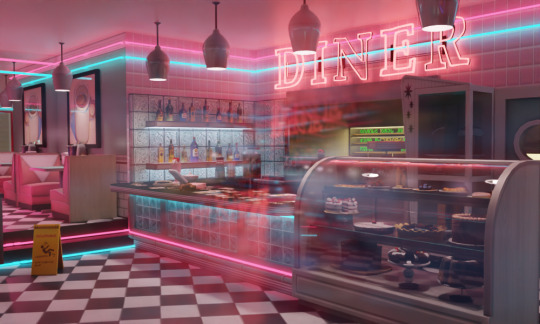
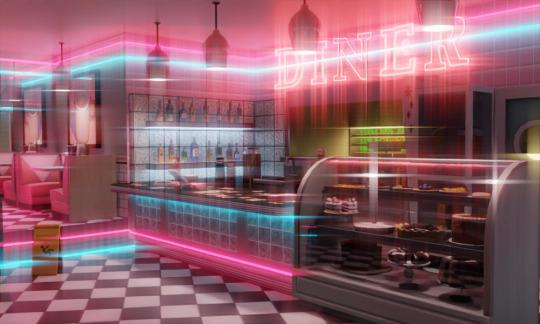
did u build the diner in the actual game or in blender? if so in blender how did u get the pink and blue light bars they look lush
ahhh this is such an exciting question!!
so for starters-- building in game is an essential first step. you need an idea of what you're doing, where stuff goes, and most importantly: a list of all the objects and cc you're going to be using. sims 4 studio and sims 4 tray importer are your friends!
but, back to the question at hand:
the mesh itself is from here, and i'm a little obsessed with this entire set if you haven't noticed. but there are a few components to creating neon like that, and making them glow, too!
1. emission shader. my bestie... she replaces your principled bfsd node. if you're trying to make a texture glow, replace the node with an emission node, and you can control the strength all you want! if you just want some lights with no texture attached, as was the case in that render, it's even simpler: an emission node, and your material output, like so,

2. denoising. so here's the thing... using emissions as a light source like this? it creates a lot of noise. that's bad. we don't want that. to fix that, most of the work is gonna be done in the compositor, but there are some things we have to do before we're ready to hop over there. let's go view some layer properties!

under data, you're going to want to turn on "denoising data," and under light, at the bottom of the list, you want to turn on "ambient occlusion." these are important for when we hop over to the compositor.
everything else happens in the compositor, so if you're not familiar i'd suggest getting acquainted! this tutorial helped me a lot, but admitted it's a little tricky. do not hesitate to send me an ask if you're struggling and i'll hop in your dms!
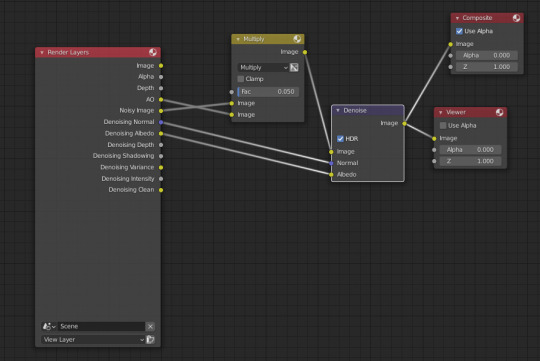
before we worry about rendering our image, let's set up the nodes for denoising your image. (shout out to @wirefiish for helping me with this part, btw, it's been a game changer, and i cannot recommend enough that you save this node set up to your start file!) (also also: that "multiply" node is a math node, you have to select multiply from the drop down!)
the real trick to making your shit glow though?
3. glare node. the glare node is fucking aaaawesome! you pop it on the end of your current node set up, like so:

i like her a lot. she's fun. fog glow is what i tend to use, for a little dreamy, glowy look, but depending on what you're going for, there are a lot of really cool things you can do with it. first is my usual, the fog effect. second is the ghost effect, third is "simple star", and the last one is streaks.


#asks#blender tutorials#i put an rgb curves node between the denoise and glare also#but thought that might overcomplicate things
39 notes
·
View notes
Text
Mech designs WIP

I had a chance to work some more on the mech design last night. it was decided we would use the first design and give it a color scheme reminiscent of O G Gundam. there are various other Mecha anime references in the design.
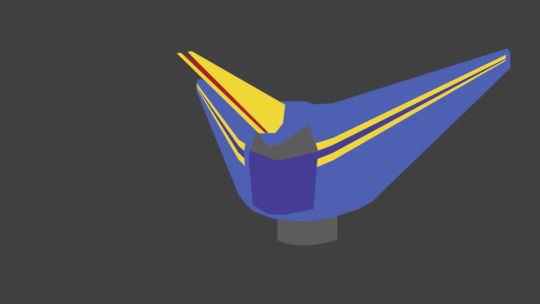
close up of the head. For the design we are still using flat minimalist colors

Head front view. note the horn is actually split. it also has a powered up form.

when it transforms the horn will slide down and...

Split open in a reference many of you will recognize.
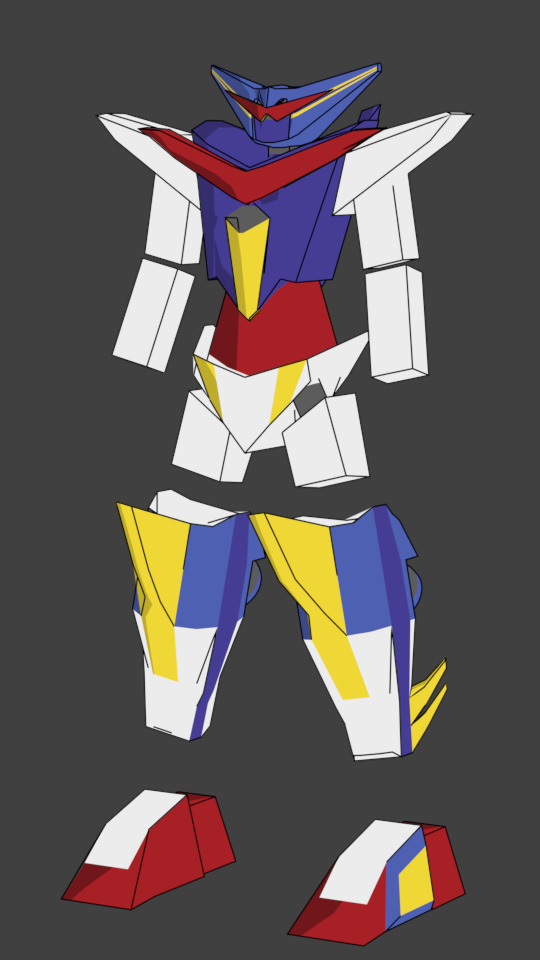
when powered up the shading changes to more anime like shading. LINE work will also be added in this form. I'm using freestyle for the line work. I only plan on using freestyle on the powered up form as to make it stand out more. I will also be applying some effects in the compositor when it's powered up.
There's still quite a bit to do the arms and feet are just stand in parts. the hips and legs need another pass. the wings and hands need to be belt along with all the joints. it will also need to be rigged, however the weight painting should be rather easy since it is a rigid model and will not need to deform.
Made by me in blender. questions and comments are always welcome
3 notes
·
View notes
Photo

10 Things You Should Do To Create Awesome 3D Environments (Part 2)
Have you ever attempted to create a 3D environment and found that your final render falls a little bit…flat?
Most likely, you may have missed an important step in your scene creation process. Here are 10 things you should focus on if you want to give your 3D environment the best chance of looking awesome and get one step closer to achieving photorealism.
We continue from Part 1 to show you ways to bring out the best of your 3D environments.
Use a physically-based renderer
A physically-based renderer is a renderer which simulates lighting exactly as how it is represented in the real world. It produces results far better than raytraced renderers. Unlike raytraced renderers, a physically-based renderer knows calculates how to bounce light rays from objects to other objects and this can help easily simulate photorealistic lighting.
It would probably be a bit complicated to understand exactly how it works. From an artist’s point of view, a physically-based renderer helps produce photorealistic lighting and textures with very little effort compared to the old raytraced renderer. Your 3D environments will look really awesome
The downside to physically-based renderers are that they are slow. Really slow! This is due to all the complex calculations that need to occur on your scene. When I created my short films, the average render time per frame for a film made using a raytraced renderer (Blender Internal renderer) was 5 minutes. The average render time per frame for another film made using a physically-based renderer (Cycles renderer) was about 1 hour. It’s not much of a big deal if you are only rendering still images, but rendering an animation using these renderers can be quite tedious.
What to do: If you use Blender, there is a physically-based renderer already inbuilt. On the top menu, just change the renderer from Blender Render to Cycles Render.
Use HDRI Lights
Lighting a 3D environment can be complicated. There are so much complexities involved with simulating realistic and convincing lighting and one would need to understand some lighting theory. In the past, 3D artists would create multiple light sources to simulate sunlight, sky lights, bounce lighting and things like that. The result would be a 3D enviroment scene with a big mess of lights everywhere.
Nowadays, the most popular trend is using HDRI lights in combination with a physically-based renderer. HDRI images are high-dynamic range images and contain more information such as brightness and intensity data within the one image. We can make complete use of this to simulate realistic lighting. Physically-based renderers can help remove the big mess of lights as it helps realistically simulate bounce lighting. Combine that with HDRI images and our 3D world can be realistically lit up without the help of really ANY extra lights at all. You could get away with using the HDRI to control the lighting for your entire environment.
Make use of HDRI images as a light source in your 3D scene to help push for more awesome realism and visual appeal!
What to do: Grab a HDRI sky image on any HDRI image download site. I prefer to use HDRI-Skies.com. Load up your HDRI image in your 3D software and set it up so that the intensity information contained within the HDRI could help light up your 3D world. In Blender, you could load the HDRI image directly in the Environment Texture node of the Sky. You would also need to capture the same HDRI image as an input for the strength/intensity. There is no point in having a HDRI image if you don’t make use of the extra information available within HDRIs. Do note that HDRI images are generally quite large and may crash your scene while rendering. That sacrifice may be worth it, however, depending on the result you are able to get from it.
Make use of photography techniques
If you have ever taken classes in photography, your skills have not gone to waste. You can fully utilize those skills in your 3D renderings as well. If you haven’t, then taking some time to learn some of the basics such as composition, f-stops, depth of field and so on will only do you a world of good.
What to do: In Blender, you can select your camera and go to the camera settings in the Properties window. From there, you can play around with some of the settings that you would tend to see on a DSLR camera. You can even simulate the look of a specific camera such as a Kodak camera or a cinematic camera like those powerful RED cameras, by going to the Scene tab and under Color Management, changing the “Look”.
Go subtle with post-processing
Once your render is complete, you should take advantage of post-processing. Post-processing can help to push your renders to the next level and give that sort of “pop” or that extra “wow” factor to your final render.
Some of the post-processing effects you could take advantage of includes adding glare, vignettes, glows, depth-of-field, motion blur, color grading, lens distortion, overlaying images over the original render and the list just goes on.
But remember to not go overboard with this. The bulk of the work should have been done in the modeling, texturing/shading, lighting, and rendering. The post-processing is just a touch up to give that final polish.
You will kill the appeal and realism of your render if you go overboard with the post-processing effects. In the art world, subtlety is always key!
What to do: Use a photo editing software like Photoshop or GIMP. If you use Blender, you can also use the compositor built into Blender. Just change the Screen Layout on the top menu from Default to Compositing and then select ‘Use Nodes’. Each node can be used to create the effect you desire.
Get feedback (and get them early)
The final tip that will really benefit you and help push your 3D environments to the next level is getting feedback! While you work on your 3D environments, show it to other people and see what they think of your work so far. Try to get their opinions early and try to get them often.
When you create your environments, you are so immersed into your world and you will likely focus on one specific area. This may cause you to overlook other areas of your environment and sometimes getting a fresh pair of eyes can be beneficial in this regard. They can help you catch issues with your render that you would have otherwise overlooked.
Getting feedback is really important as it can also help you improve as a 3D artist overall. However, you will need to learn to take criticism with a grain of salt. Sometimes you will get very encouraging feedback and other times the feedback could just be downright vicious. If you want to improve as an artist, you need to observe, understand and learn from the honest criticism. Getting honest criticism is almost always beneficial to you as an artist. Use the encouraging feedback as motivation and the pointless and vicious comments with no real substance as a waste of space (they only do this to get attention or perhaps a little envious of you).
What to do: Be active in communities related to 3D! Try being active on online forum sites like CGTalk, BlenderArtists, and relevant Facebook Groups to name a few. The people there encourage works in progress and are always more than happy to help!
That’s it! Incorporate these tips into your next epic 3D environment and you’re 3D renderer will gift you by giving you beautiful renders.
Go back to Part 1 if you haven’t seen the rest of the tips already.
Prefer to learn by doing? Enrol in the course below to learn how to create a backyard scene from scratch. This will be useful to you if you’re a beginner!
9 notes
·
View notes
Link
Windows software alternatives for Linux, nowadays, many tech enthusiasts shifting from Windows to Linux (the open-source world) just to have a different and unique experience. We have written a detailed article, on this topic covering Why I Switched From Windows 10 to Manjaro Linux?, you can read that too and know why we prefer Linux over Windows.
Well, if you are also planning to shift from Windows to Linux, to experience a new environment. But somewhere you are a little bit afraid and thinking whether you will get all those features and software of Windows in Linux or not. So yes you will get all those features and even more options for a single software, Linux offers various open-source application software and a more stable operating system. You can give a try though.
So here in this article, we are going to discuss Windows Software Alternatives for Linux, if you are also wondering to shift into a new environment, or you have already shifted to Linux and searching for good alternatives to the software you use in Windows. So you are at right place, you will get the best Windows software alternatives for Linux.
Windows Software Alternatives for Linux
After Effect Alternative for Linux
Natron
Natron is an open-source, powerful digital compositing software for creating VFX and motion graphics, this can fulfill all of your 2/2.5D needs. This is a flexible open-source compositor and its robust OIIO file format and OpenFX architecture make it more resilient for the visual effects community. It comprises a plethora of tools developed for OFX software developers by using some open-source plugins and tools including some powerful keying or sturdy matte generation keys.
This proves itself Natron is the best Windows software alternatives for Linux.
Download Form Here
Also Read: 5+ Free IDM Alternatives You Can Try in 2020
Photoshop Alternative for Linux
GIMP
GIMP, which represents the GNU Image Manipulation Program, is an open-source, free Photoshop elective. GIMP has cons like the lack of Professional interface in Photoshop, inadequate updates, and some missing advanced tools. You can read a detailed comparison between GIMP and Photoshop, follow the given link GIMP Vs Photoshop: An In-depth Comparison.
Premiere Pro Alternative for Linux
Lightworks
Lightworks is an awesome forefront of film editing and has an amazing history of been used in many of the finest movies in the cinema. It can fulfill all of your needs whether you want to shoot a video or YouTube, or for a 4K film project. It is loaded with a number of fascinating features like intuitive user interface for spectacular user experience, easy timeline editing, and trimming videos, it supports a wide variety of file formats including variable frame rate media, and many other precise editing tools.
This proves itself Lightworks is the best Windows software alternatives for Linux.
Download From Here
Also Read: 20+ Chinese Popular App Alternatives for Android
Lightroom Alternative for Linux
Raw Therapee
Raw Therapee is a great, cross-platform raw photo processing software, who covers a broad user range from beginners to the professional photographers, it is designed with a motive to generate raw files from a large array of digital cameras.
It provides high image quality with a non-destructive, and 32-bit (floating point) processing engine working upon modern demosaicing algorithms which will help you in making world-class images.
This proves itself Raw Therapee is the best Windows software alternatives for Linux.
Download From Here
Dreamweaver Alternative for Linux
Bluefish
Bluefish is an amazing editor dedicatedly designed for web developers and programmers, which provide a variety of options to write websites, scripts, and other programming codes. It is an open-source project, hence completely free to use. You can write CSS, HTML, and even python codes. This software comes with so many spectacular features.
This proves itself Bluefish is the best Windows software alternatives for Linux.
Download From Here
Also Read: Microsoft Editor: A Good Alternative to Grammarly?
CorelDraw Alternative for Linux
Inkscape
Inkscape is a professional vector graphics editing tool, it is a great tool for the designer, web designer, illustrator, or if you are someone who needs to design vector imagery.
It is a robust, and flexible drawing tool which supports a broad range of file formats. It helps you to create bezier and spiro curves.
This proves itself Inkscape is the best Windows software alternatives for Linux.
Download From Here
Also Read: Top 5 Best Zoom Alternatives for Video Calling
3Ds Max Alternative for Linux
Blender
Blender is an open-source 3D creation suite. It supports the complete 3D pipeline widely distributed between modeling, rigging, simulation, animation, rendering, video editing, 2D animation, and many other features.
It is a public project, so designed with the contribution of hundreds of people throughout the globe including scientists, artists, students, animators, modders, and many other kinds of individuals.
This proves itself Blender is the best Windows software alternatives for Linux.
Download From Here
MS Office Alternative for Linux
Libre Office
LibreOffice is a powerful office suite – its clean interface and feature-rich tools help you unleash your creativity and enhance your productivity.
LibreOffice includes several applications that make it the most powerful Free and Open Source office suite on the market.
This proves itself Libre office is the best Windows software alternatives for Linux.
Download From Here
Also Read: [Top]5 Best Free Alternatives to Paid Softwares
Windows Server Alternative for Linux
Samba
Samba is free software that provides stable, secure, and fast file services for all the clients using the SMB/CIFS protocol. Samba is an important component that integrates seamlessly with Linux/Unix servers and desktops into Active Directory environments. It functions as both a regular domain member as well as a regular domain controller.
Download From Here
So, these were some of the best Windows software alternatives for Linux, if you are new to Linux or wondering to give a try to Linux operating system so, these free and open-source software will captivate you with Linux forever by their enthralling features and functionalities. Moreover, we experienced that Linux is more stable than Windows and your system works more smoothly, also its performance gets enhanced with the Linux operating system.
via TechLatest
0 notes
Text
16/09/2019
Script for unit 11 film presentation:
Hello my name is Owen and I am a student on my way to achieve a level 3 diploma in Visual affects and animation.
I am very interested in the visual effects side of the course, i love superheroes and star wars.
i really enjoy creating the effect of the flash and thor using lightning.
Some of my strengths include:
compositing in premiere pro and after effects.
modeling and sculpting in maya and blender.
Creating elements in after effects.
And my weaknesses:
The illiterate side.
i do not yet have then requirements to achieve my future job.
no experience with nuke at the moment.
I would like to go to Escape Studios or Bournemouth university so i can achieve my eventual goal of becoming a compositor or a nuke artist in framestore or industrial light and magic.
But unfortunately there are obstacles i need to hurdle over these include:
Expenses for accommodation and the uni course.
Chance of getting in to the course i need to be very good.
But i can overcome these by applying for a loan and working as hard as i can to make sure i get a distinction in my course.
In conclusion my next steps will be to finish my course at college with a distinction move on to uni and study for my BA’s and my MA’s then get employed by either Framestore or industrial light and magic as a compositor or nuke artist and work my way up to vfx supervisor and beyond that.
0 notes
Last Seen Blogs
welovewinter
قصتنا الغريبة
yareyareyumi
im yariyumi till i dye

incorrectnarutoquotes
incorrect naruto quotes

gojaimas
Gojaimas

annzybwrites
Annzy B.'s Writing