#maybe i should make a tutorials tab?
Note
hi hi, could you maybe show us how to render skin in Blender or make it look a bit realistic? When i import my Sim into Blender it doesn't look like it should, it's texture isn't really good. Or do you know any good tutorial? Hope you can help me out<3
hey babes! :3 this got kinda long bc i ended up writing a tutorial so i put it under a readmore lol as usual anyone can dm me if they need more help
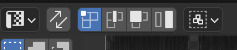
so first off if u dont have this setting enabled on simsripper, definitely turn it on

it makes a huuuuge difference.
i render in eevee nowadays so i also make sure to check ambient occulsion on so i have sexc shadows

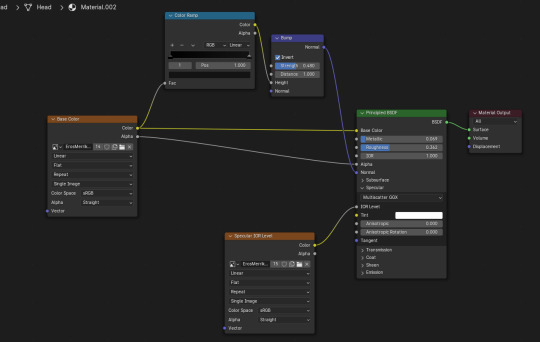
and these are my node usual settings for that look of pores/gloss my sims faces/bodies have it is MAGIC
to do this you have to separate the eyes from the head/the body parts from the top and bottom meshes, which can be done in the UV editing tab
this is what it looks like when u go into the uv editor after selecting the head mesh
click those little arrow guys so it looks like this and u can select the eyes part of the head
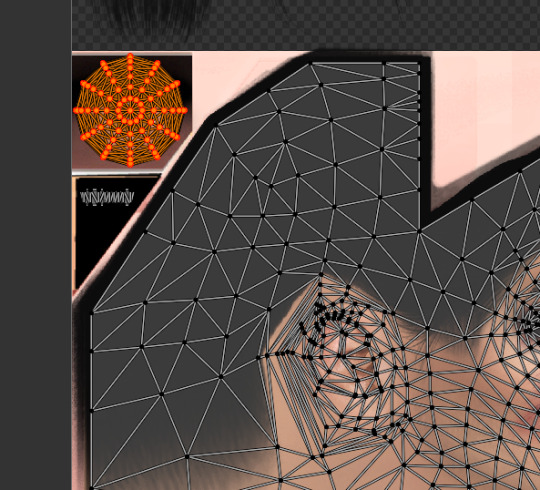
hover over the other window (the viewport thingy where u can see ur actual sim) and hit the P key, then hit selection and itll separate the two! this is suuuuper useful its how i add varying texture/shine to clothes n shit and u can even delete parts of meshes u dont like if the texture cooperates
i feel like there may be a better way to do this?? but back over in the layout tab ur gonna go to the materials section
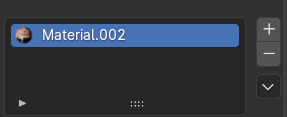
and hit that little minus so that the material thing goes away. it doesnt matter which part u do this on(the head mesh or ur new eye mesh) it just unlinks the textures so u can edit them separately
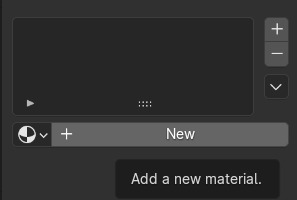
hit new
and then i usually go to another mesh that i havent messed w the nodes in and copy + paste them into this ~ new ~ material thingy u get it LAWL. so now it should turn from white to the normal texture and u can edit it at will! repeat one million times for everything u wanna change kjhkljhk
this is usually how my eyes nodes look
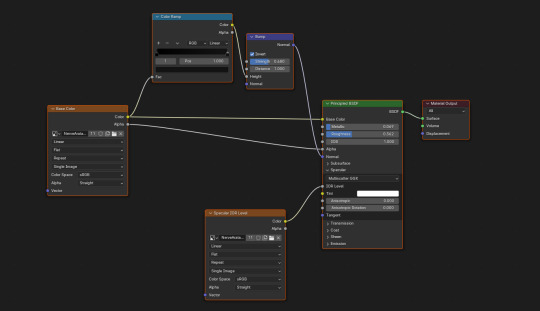
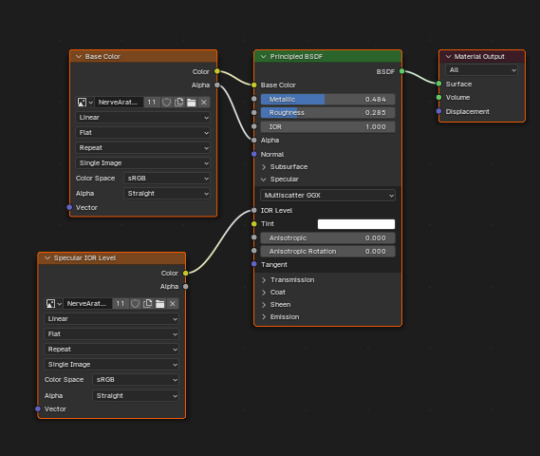
and again this is my head/body nodes like we saw before! the bump map is what gives it that look of pores its soooo sexy. u can get those by hitting shift + a and searching for color ramp + bump. obviously i mess w these settings depending on the vibe/lighting but yeah thats how i set up my skins for Realism!! :-)
ngl it was actually kurt tricoufamily that taught me this a whillleeee ago so thank him not me im just a thief
11 notes
·
View notes
Photo
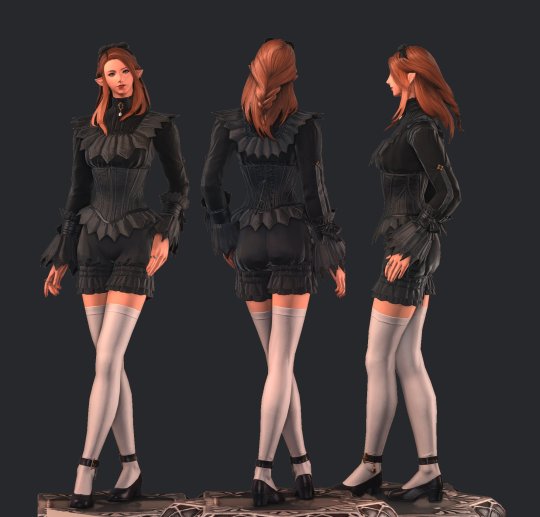
CDD ~ Fresh Start Styled Look
If you’re like me, the first thing you do in CAS is clear everything off the sim for a nice fresh canvas. This custom styled look (when coupled with Mizore’s hider mod) is intended to make that take as few steps as possible every time.
Download and info below the cut for future updates
Item Details:
Base Game Compatible
Toddler Infant - Elder; Masc & Fem frames (Added infant support on June 16, 2023; please redownload)
1 Variant (per frame)
Custom thumbnails
Needs @mizoreyukii’s Styled Looks Hider to truly be worth it. If you’re overly attached to EA’s styled looks, this cc probably isn’t for you.
Removes all accessories, clothing, shoes, makeup, skin details (excluding acne and scars), tattoos, facial hair and hair (changes color to dark brown for adultFem + children, blonde for AdultMasc, red for toddlers for all of them now I believe (I can’t remember tbh 😅 - if anyone knows how to remove the hair without changing the color, please hmu)
Does not change teeth, eyebrows, eye color, acne and scars (I couldn’t get it to remove these last 2 categories)
Tagged for all outfit categories
Added overrides (June 16, 2023) for shoes/bare feet and masc frame nude tops to resolve the look not applying to those categories after one of the recent patches. If you want to use an alternate override from someone else and it isn’t compatible automatically, (only do this if it’s not working otherwise) open your desired alternative in Sims4Studio, navigate to the warehouse tab, tick the setting box for “ShowInUI”, and save the file. (Edit June 6/20) I’ve been informed by @asixteenthrose that even with changing your desired override to have the showinui checked, you still need my overrides for the styled looks for some reason, and the desired override can’t be in a subfolder/must be in main mods folder.
Added “Stripped Start” (June 16, 2023) which affects the accessories, makeup, facial hair, clothing, and shoes, but does not affect hair, body hair, skin details, or tattoos. You can have both Fresh Start and Stripped Start in your folder at the same time or not; they should not conflict with nor do they depend on each other.
Downloads:
> SFS < (Current Version is a zip)
> Google Drive < (Current Version is a zip)
Needs: > Hider Mod for EA Looks < (by MizoreYukii)
Notes:
There is no way I would have been able to figure out this project without MizoreYukii’s How to Make Custom Styled Looks tutorial, so huge thank you to her.
This look is mainly for simmers who want nothing on their sim when they start in CAS. If there is enough demand for a version that keeps existing tattoos, skin details, and maybe hair; I might make that as a v2 down the road. After receiving nonny asks, I went ahead and added a version like this while updating the original.
I timed myself clearing every outfit category for a new sim using just this look as fast as I could, and it only took 15 seconds total.
I have added patch numbers to the files in case someone needs the outdated version.
Kijiko eyebrow texture defaults cause the fem frame teen-elder not to show Fresh Start.
1K notes
·
View notes
Text
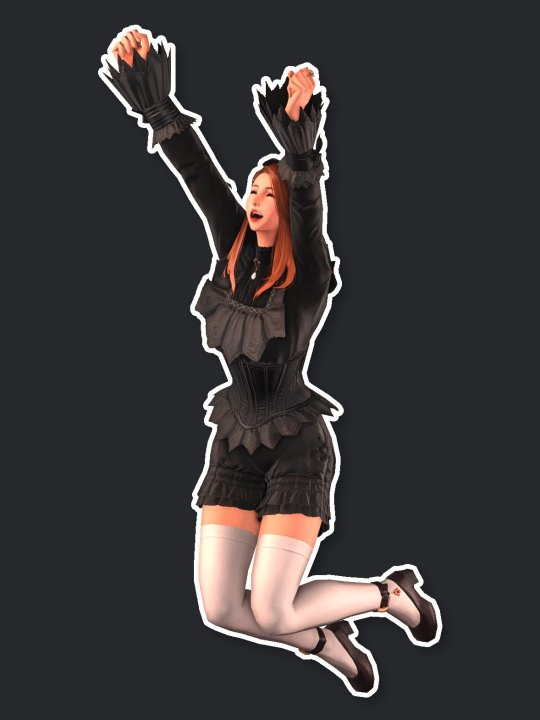
ReShade Guide: Transparent Screenshots
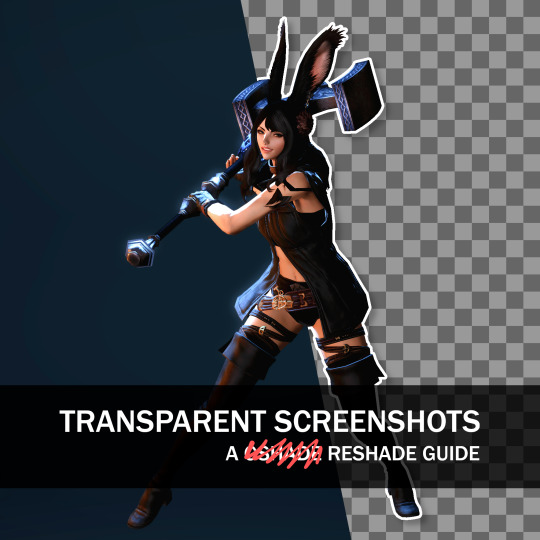
Want a nice cut-out picture? transparent chromakey shots are here to save the day!
You can achieve this with a combination of two features in ReShade: ChromaKey.fx, a technique that generates a greenscreen effect, and Clear Alpha Channel, a toggle located under the Settings tab.
1 - Setup

Make sure PNG is selected as the target format since JPG doesn't preserve transparency!
Also, don't forget to re-enable Clear Alpha Channel after taking your shots - otherwise, you may capture completely black shots!
2 - Enabling the Shader

Place Chromakey.fx right after FFRestoreUI.fx- otherwise, your UI may be hidden by the shader.
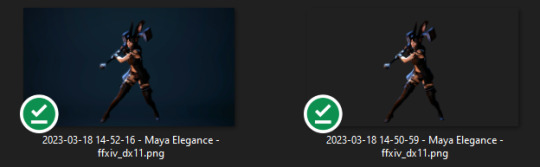
3 - Take your screenshot!
You should now be able to capture shots with transparency properly preserved!
Chromakeyed, transparent images can be used in several different situations! For example, I often use it to create tutorial slides.

What about reference cards for art commissions?
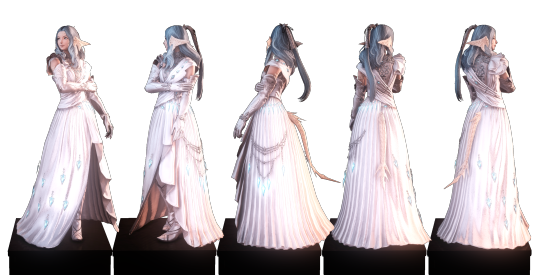
Or maybe stickers with your friends. Or Discord emotes. Or whatever strikes your fancy. The sky's the limit!
This is my first guide adapted to ReShade. If you have any questions about this feature or other aspects of ReShade or GPose, feel free to ask!
And if you need a handy guide to help you migrate from GShade to ReShade, here's a link!
#reshade#reshade tutorial#ffxiv#gposers#aquitaine studio#leon aquitaine#gpose guide#reshade guide#gpose
974 notes
·
View notes
Text

Full disclaimer to begin with. This is just how I do conversions. There are no doubt other ways, possibly even better ways to convert objects, but this is the way I know how. This post is going to be long and image heavy and I am going to walk through it slowly so nothing is missed. If any of it is still confusing once you've gotten through it, feel free to send me an ask and I will answer to the best of my ability. Part One of the tutorial under the cut!
Programs You Will Need (and links where you can find them):
SimPE
Sims 4 Studio
Blender
Milkshape
Not Strictly Necessary, But Certainly Nice To Have:
The Compressorizer by JFade or @lazyduchess edit which can be found here
A Photo Editing Program - I use Photoshop, but GIMP is a completely free, open-source program and it would work just as well for recolors or texture editing.
Now onto the tutorial!
Step One - Launch Sims 4 Studio. If it is your first time launching Sims 4 Studio or if you had launched it before without maybe knowing what to do, click on "Settings" and make sure everything is pointing where it needs to.
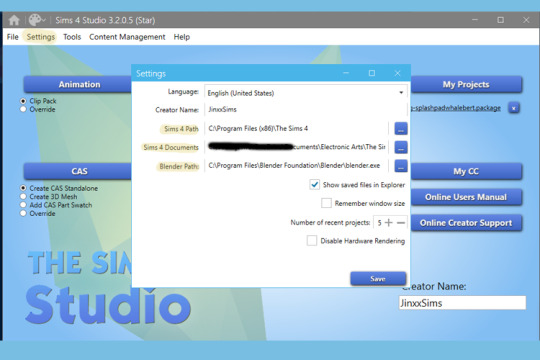
If it's not, the objects from the Sims 4 games, EPs, and kits you own won't show once you get into the studio. Once you've adjusted the paths, hit "Save."
Step Two - From the main screen of Sims 4 Studio, select the "Object" header.
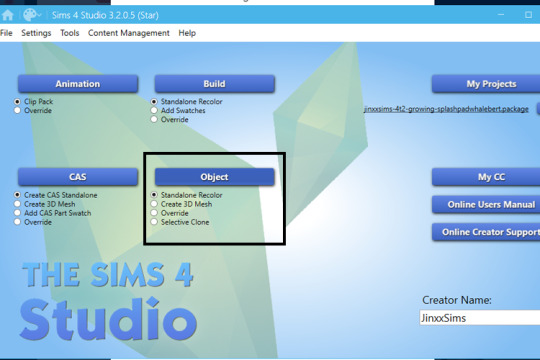
Leave it on "Standalone Recolor." Once you hit the "Object" header, the studio will begin loading all the Sims 4 meshes in your game. It will just take a few seconds for the objects to populate.
Step Three - Choose the object you want to convert.

You can use the "Game Pack" or the Search fields (which I highlighted above) to narrow down the items instead of being bombarded with all of them at once. For this tutorial, I'm going to be converting the "Caress Chair" from the Base Game.
@sims4t2bb is the most amazing database of 4t2 content. Here you can find the various packs and kits and see what has been converted already, so you don't end up converting something that's already out there available for download. Seriously, this is an amazing resource. @lafeeverte-sims and @twentyfourfirst-sims update this database in practically real time. I don't know how they do it. This is easily one of the single greatest resources for the 4t2 converters out there. Bookmark it and check it often.
Step Four - Select the item you're going to convert and hit "next" down in the bottom, right-hand corner.
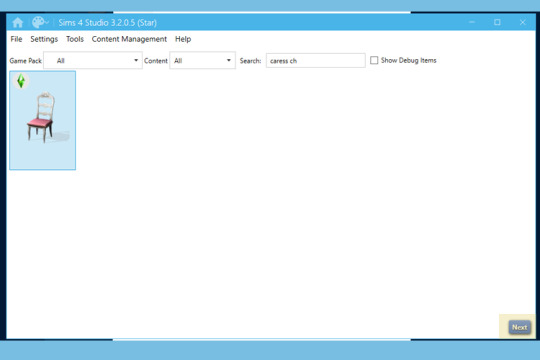
Once you've clicked "next," you'll be prompted to give your file a name and choose where to save it. THIS FILE IS USELESS. It will not be used at any point during the conversion process. In fact, you can delete it the moment Sims 4 Studio creates it. If having a lot of files around confuses you more, get rid of it right away.
For my own part, I keep it around because I have the short term memory of a goldfish. I use it to set up what I'm eventually going to name my mesh file. So in this particular instance, I named this pointless file jinxxsims-4t2-base-caresschair because it is the Caress Chair and it is from the Base Game. I know, super original, right? It works for me though.
You could name this thing xyz, it wouldn't matter. As I said, the file is never going to be used. Give it a name, hit "save," and Sims 4 Studio will spend a few moments getting the file up and ready.
Step Five - It's time to gather the components of the object. First, let's get the mesh.
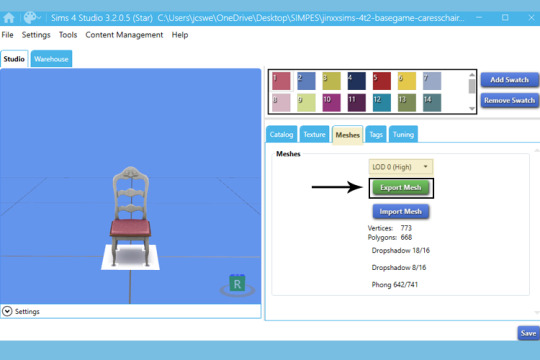
Choose the "Meshes" tab. The LOD 0 (High) field should already be selected. Don't change it. Finally, choose "Export Mesh." You'll be prompted to give your mesh a name. I always just name mine "mesh," because I want there to be no doubt about what files I have floating around in my WIP folder.
Once you click "save," the game will spend a few seconds extracting the mesh as a blender file. Once it's done, go to the "Texture" tab.
Step Six - Gather the textures.

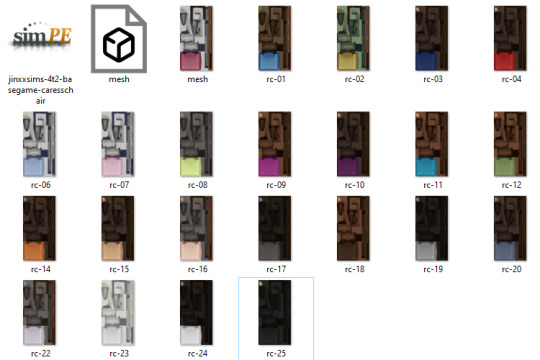
Highlight one of the color swatches at the top of the window. The first one will always be the "mesh" color. Click "export." You'll be prompted to give your texture a name. I always save the first one as "mesh."
Click on each swatch and extract the textures the same way. You will be prompted to save each swatch when exporting them. I name all of mine in the simplest way possible.... rc-1, rc-2, and so on.
KEEP IT SIMPLE. Especially when just getting started. Feel free to get fancy once you get the hang of things, but when starting out... simple is best.
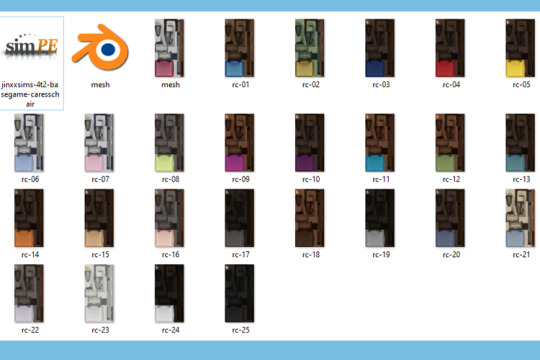
This is what my WIP folder looks like after I've exported all the textures. Regardless of what you're converting, yours should look similar.
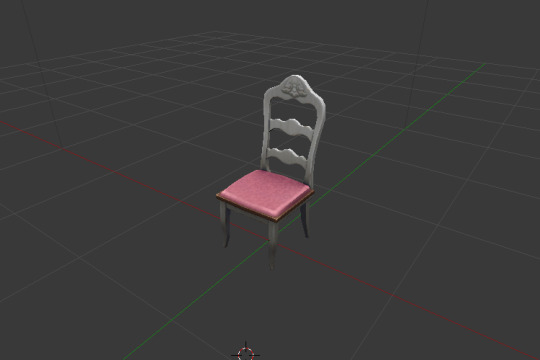
Step Seven - Double-click the "mesh" file to have it open in Blender.
Full disclosure. Blender absolutely baffles me. I know there are people who can create objects from scratch in it and do other, all kinds of impressive things, but... that is not me. I use it for roughly sixty seconds, just to get the mesh in a format that Milkshape will accept, and that's it.

The first thing we need to do is eliminate the white boxes beneath the chair until the only thing left is the mesh. On the right hand side of the window, there are listings of what the mesh is currently composed of. "s4studio_mesh_0," "s4studio_mesh_1," and "s4studio_mesh_2." Next to each, there is what looks like a little eyeball. Click the eyeball and what that part of the mesh is will disappear.
In this case, when you click the eyeball next to "s4studio_mesh_0," the big white box disappears.

So, we know that "s4studio_mesh_0" is really just that white box. Go ahead and delete it by right clicking "s4studio_mesh_0" and choosing "Delete" from the drop-down menu.
Next, click the eyeball next to "s4studio_mesh_1" and the tiny white squares under each leg disappear, so we know that that layer of the mesh is just more white boxes. Right click "s4studio_mesh_1" and choose "Delete" from the drop-down menu.
You're left with just the mesh on its own, and that's perfect! In my experience, the white boxes are almost always on layers 0 and 1 if there are 2 sets of white boxes.
Step Eight - Export the mesh as an OBJ.

Go to File > Export > Wavefront (.obj)

A panel with settings will appear on the left side of the screen. Leave the default settings, but uncheck "Write Materials" beneath "Include UVs." If you leave it checked, that's ultimately fine. All it does is create an unnecessary file in your WIP folder. I uncheck it because the less unnecessary files you have floating around, the better, because there's less of a chance of confusing yourself.

Set your file path to your WIP folder (that's the black line in the image above) and give your mesh a name if you want to rename it (I just leave mine as mesh) and then click "Export OBJ." Once you've done so, you can exit Blender and delete the Blender file that Sims 4 Studio created.
This is what my WIP folder looks like now:
Step Nine - Launch SimPE. Once the program has opened, launch the Object Workshop. I have mine in a side panel, but you can also launch it by going to Tools > Object Creation > Object Workshop. When the Workshop launches, it will ask you to choose between "Start" or "Open...".
"Start" is for cloning and recoloring Maxis objects. "Open..." is for cloning and recoloring custom objects. When doing conversions of things like chairs, tables, beds, etc., choose "Start" and clone from Maxis objects. Clone from "Open..." when creating objects Maxis doesn't really have in the catalog... like the sprinkler I just shared, the single-tile workout bags I shared, or like an end table with multiple slots when you don't want to add the slots in yourself.
Since this is just a basic dining chair, we're going to choose "Start." This will take a little while for SimPE to load the whole Sims 2 catalog. Just be patient. When it's finished loading, you'll be presented with a list that looks like this:
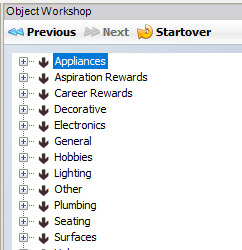
In this instance, I'm going to choose "Seating" and then "Dining Room" since I'm converting a dining chair. This will make sure that the chair I'm converting has all the functions of a dining chair... like it will be pushed in under a desk or a table rather than be stationary like a living chair.
How do you know which object to clone? Honestly, sometimes it's a bit of a crapshoot. IgnorantBliss on MTS has compiled a list of easy-to-clone objects here that you can download and reference when cloning. I used it A LOT when I first started converting.
When you select an item to clone, most of the time it will tell you which EP it is from. I think it's generally most accepted to clone from Base Game items if there is a Base Game item available to clone from, because the most people will be able to use it, but in my own personal opinion... at this stage in the game and time, clone whatever works for you. The Sims 2 is abandonware. Everyone who wants to play the Sims 2 has access to the full game, with all its EPs for free.
OldGamesDownload works in partnership with the Internet Archive to preserve games that have been abandoned by their creators and keep them available to the public. All Sims 2 (and Sims 1!) games can be found on their website, free of charge.
I say all of that just to say... if you clone a dining chair from Apartment Life rather than the base game... that's fine! You're not obligated to meet everyone's needs, and if someone doesn't have Apartment Life but really wants your dining chair, the means to get it are out there. Create for yourself and your own convenience first.
For this tutiorial, I'm going to clone the base game dining chair "Tea Party in Teak." Once I've highlighted it in the list, I'm going to choose "Next" at the top of the Object Workshop panel.
Step Ten - Clone the object. Under "Task," choose Clone in the drop down menu. My settings look like this:

Once yours match, choose "Start."
This will bring up a panel for you to choose the name, price, and catalog description for your item. Notice how I never told you to close Sims4Studio? That's because I go back to it now to copy the information from Sims 4.
In the Sims 4 Studio window, choose the "Catalog" subheading and copy the information over to SimPE.


I always add a line beneath the description with my screenname. If I'm converting CC from Sims 4 rather than EA content, I also always include the original creator's name. I would encourage others to do the same. This way, if there's a problem with something you shared, people know who to contact. Or, if someone gets a WCIF for an object you shared, it's easy for them to know who the maker is to help a fellow Simmer out. And if you convert someone else's object, it's just in good taste to give them the credit they are due.
Once you've given your object a title, price, and description, click "Finish" in the Object Workshop. You can also close Sims4Studio at this time.
Step Eleven - Finish preparing the clone and save your mesh.
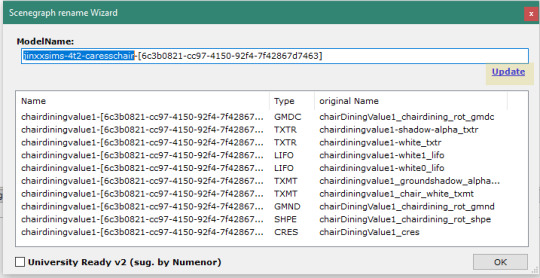
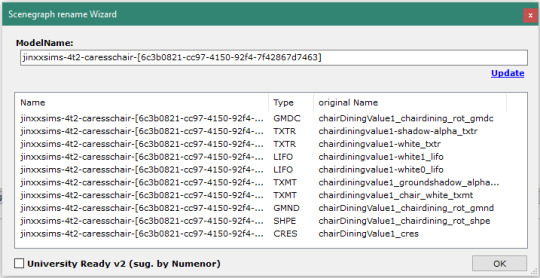
The Scenegraph rename Wizard comes up after you hit finish. In the ModelName field, give your object a name. Not everyone does this, but I do, for neatness and clarity's sake. Once you've given it a name, click "Update," and all the values in the field will be adjusted.
Ta-da! Click "OK" and you'll be prompted to save your mesh. This is when I use that dummy file that I said you could delete immediately from Sims 4 Studio. I click it so it automatically names my new save, then I add -MESH at the end.
In this case, my save file is now jinxxsims-4t2-basegame-caresschair-MESH. I always do all capitalized "MESH" because I think there's less of a chance of anyone deleting the mesh accidentally when it's there all big and bold.
Click "Save" and SimPE will create the file for you. If you hung on to the dummy file like I did, at this point, you can delete it.
And that's where I'm ending "Part One" of this tutorial. I will work on "Part Two" which will take you the rest of the way through conversions later today and hopefully have it up tonight or tomorrow!
149 notes
·
View notes
Text
So you want to make a recolor...
I made a quick recolor tutorial for a friend group so I thought I'd go ahead and share here too. This is just a super quick guide for how to recolor an object/cas item.
There are two types of recolors. Standalone and Overrides. Overrides will replace the item/swatches that exist in the game. Standalone recolors create an additional item with it's own swatches. This tutorial works for both kinds, you just pick which one in Step 1, and then the rest is basically the same.
This tutorial also works for pretty much all buy mode items and CAS items. Anything that is tileable...I think maybe that's what you could call it...anything that can be stretched across multiple tiles, for instance, wallpapers, flooring, roofing, fencing...these types of items require a few more steps that I will not be covering here.
Ok so you want to recolor something, you need Sims 4 Studio (S4S) and a photo editing program like photoshop (there are plenty of free alternatives out there too, like Gimp is one I know a lot of people use).
Step 1! Open up S4S and pick either "Standalone" or "Override" depending on what your end goal is. Generally, you'll probably do standalone. I usually reserve overrides for permanent world items I want to change, like changing the images on the billboards in San Myshuno, for instance.
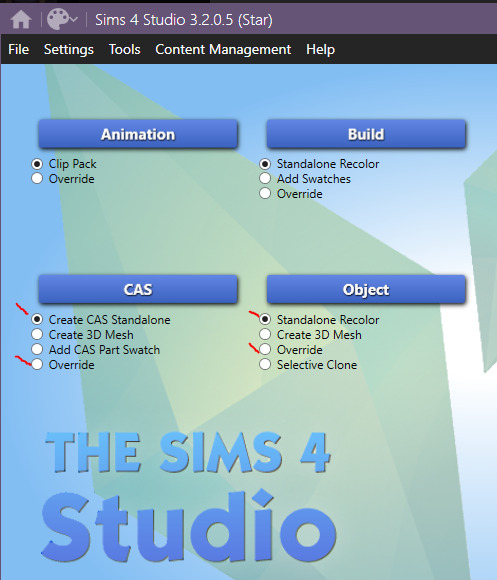
For this, I'm going to make a standalone recolor of an object so you would make sure Standalone Recolor is selected and then click "Object."
Step 2. Find the thing you want to recolor. Across the top there's filters so you can narrow it down by pack or search keywords to help find what you're looking for. Pick your item and click "next" at the bottom. A save window is going to pop up, save your file and make sure to name it something useful that's actually identifying so you can easily find it and remove it/update it/etc in the future. If you just hover your mouse over an item, it will give you the game's name for that item.


Congrats, you've created a Sims 4 package.
Step 3. (Optional) If you want to make changes to the in game display name, description, price, or style tags...you can do that on this first screen and then just hit "Apply To All Swatches." You do not have to make changes here if you don't want to though.
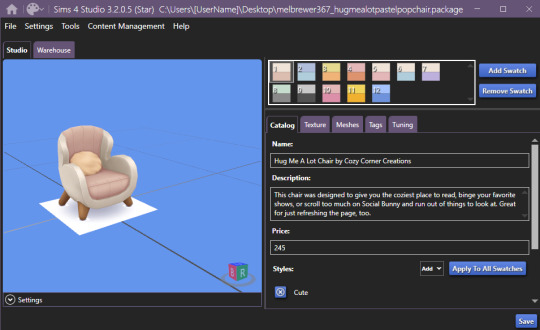
Step 4. This is where the fun begins. Click on the "Texture" tab. This is where you're going to get the file that you actually need to recolor. If there's a plain white swatch, I would pick that one, otherwise, I would go with whatever the lightest and most blank swatch is to make it easier on you to recolor. You just click one of the numbered swatch boxes at the top and then in the lower section make sure you have "Texture" highlighted, in this case it is my only option, and then click "Export." Another save window will pop up, just save that texture file somewhere easy to find, it'll only be there temporarily. (Or, if you want to be really smart and you plan on recoloring many things, you should make a project folder for each thing and save your texture files and things in there so you can always come back to them later.)

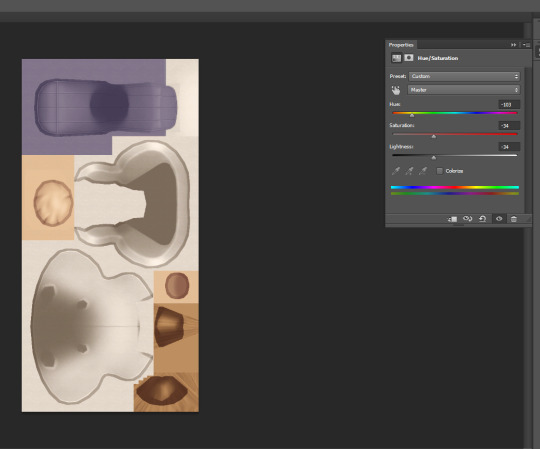
Step 5. So the exact tools and steps and such will kinda vary here based on what you want to accomplish and what program you use but, the broader overall process is the same. Open your texture file in an image editing software, change the colors/patterns/etc how you want, and then save that texture file. For instance, on this one I'm just going to change that pink section to a different color by just selecting the pink area with a marquee/quick selection tool and then using the Hue/Saturation tool to change the color.
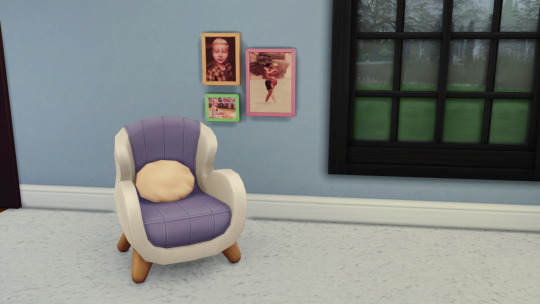
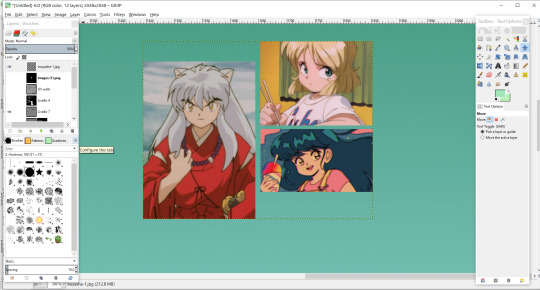
Another example, this is something James Turner did in a recent video that someone asked about, you could choose some in game frames with images, put your own screenshots onto that image, and then boom you have your screenshots in game as framed photos. You would simply add your screenshot on top of the framed image as a second layer, line it up nice and neat, and you're good to go. Here's an example of what that would look like:
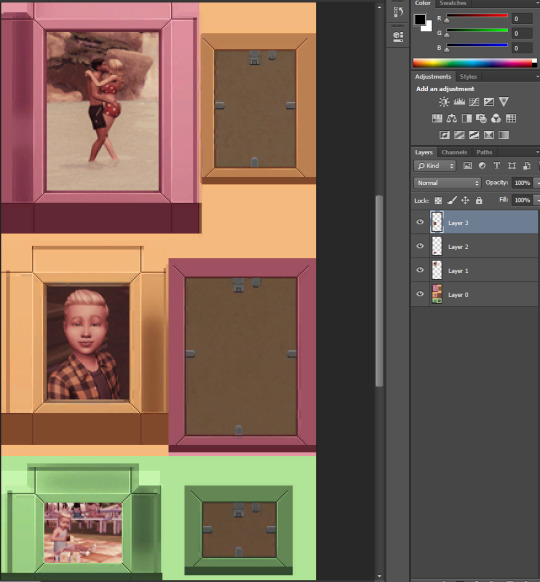
That's also basically how you could quickly add patterns to something. Lay your pattern image over top of the texture, change your layer style to something like "Multiply" or "overlay" depending on the look you're going for. Either way you do these, just remember to save your final product as a .png file.
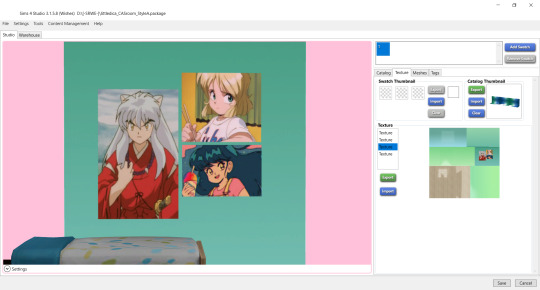
Step 6. Back to S4S! Same place you were before, except now you need to click "Import" down in that lower texture section, select your texture file you just made. While you're on this screen, you should also update the colors in the "Swatch Thumbnail" section to match your new recolor, and you can also "remove swatch" to get rid of any additional swatches you don't need. Once you're done with all of this, hit save, and then go throw that .package file into your Mods folder.

Step 7. Go in game and check out your items and then pat yourself on the back.
Now you too can be cursed with this knowledge so that every time a new item/clothing is added to the game and you think, "wow I'd really like this if it was in better swatches" you can just...make those swatches.
106 notes
·
View notes
Note
Duu, I apologize if I'm asking too much, but would you mind doing a tutorial on how you use Rig Plus? The creator's tutorial is too complicated for me to understand :(
omg, okay. this is how I do it, but I'm fairly new to using this, so it might not be perfect. Still, it might help you get started 👇🏽
I'm going to make it as beginner-friendly as possible and include a lot of pictures because maybe you're like me, anon and you're more of a visual learner 🙃
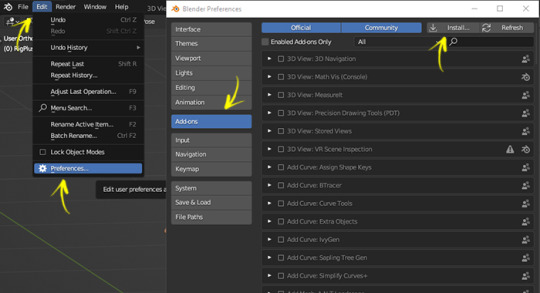
First, let's check that we have the correct version of TS4 Studio and Blender (this is important, trust me). Following the creator's instructions: "It's compatible with any recent Sims4Studio Star (beta) that supports Blender v3.3 & v3.6". so I have Sims4Studio v3.2.1.2 and Blender 3.6 (Is that the latest S4S? I don't know, but it works for me).
you need to download both files. Only extract the one that says 'vyxated - RigPlus v1' (if you extract the other one, Blender won't recognize it. Don't ask me why, I have no idea, but I extracted it and it didn't work, so I had to leave it as it is. we learn from mistakes, I guess). It should look like this:

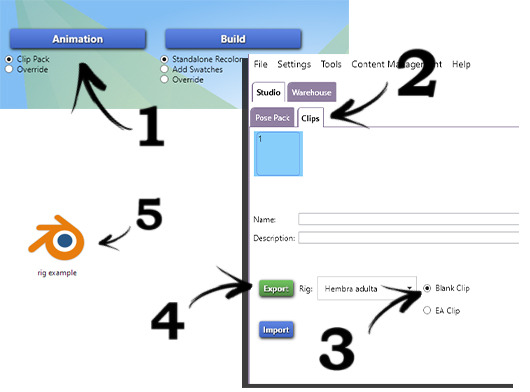
Ok, can we make the poses now, Du? No, I mean, you can if you want. But first, we need to make sure we have everything ready to export it when we're done. For that, we need this:
You can see this in the right column of the Blender window, under the 'Scene' section at the bottom
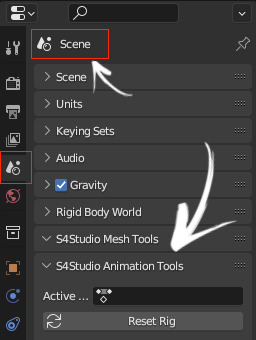
Do you have it in your Blender? If you do, yay, then you can make your pose. If you're like me and you don't have it, don't panic yet! I'll tell you how to get it. It's as easy as opening an exported rig from S4S in Blender, and magically, the little window appears. Now I'll show you how (assuming you previously synced your S4S with Blender from 'settings'. I'll assume you know how to do that; if not, send me another ask, and I'll tell you how).
now what? nothing. you SHOULD have that S4S tab (when I first opened the EA Rig+ it didn't show up for me until I did that. You can close that blank rig; you won't need it anymore). ok NOW can we make the poses? yes! wait, no. the Add-ons. that's pretty easy: "File > Blender Preferences > Add-ons > Install… > select vyxated_RigPlus_extras.zip /.py"
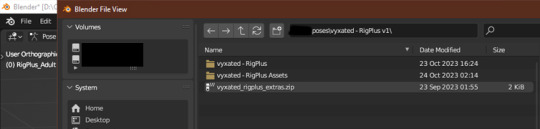
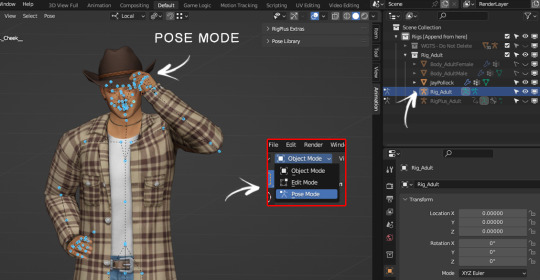
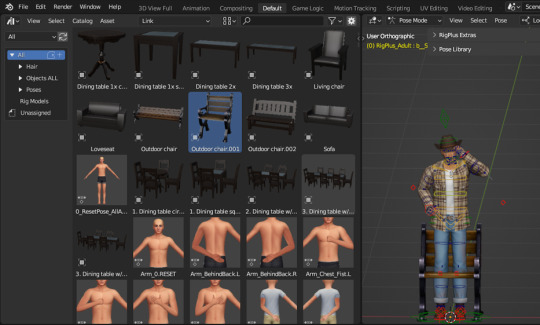
NOW you are ready to make a pose. here's mine 🤠
We're going to save the pose. For this, the process is a bit different from saving a pose normally. Just follow the steps and you should be fine. You can check if it's saved correctly at the end; I'll show you how, don't worry.
fist, HIDE 'the RigPlus_Adult' (that's the one with all the controls to move the sim).

It should appear orange, both the selected parts and the points on the sim body. According to the creator's instructions, you MUSTN´T insert keyframes while in Object Mode or you'll end up with the T-pose in the game. Orange = OBJECT MODE, blue = POSE MODE. You need to be in POSE MODE (all blue dots) to insert keyframes. let's see some pictures.
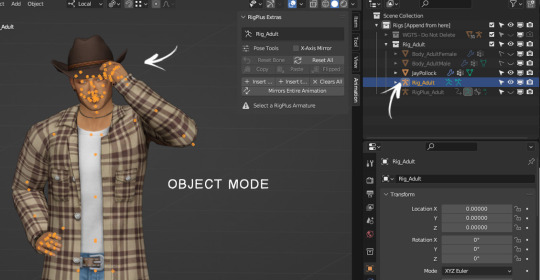
don't insert keyframes here ☝🏽
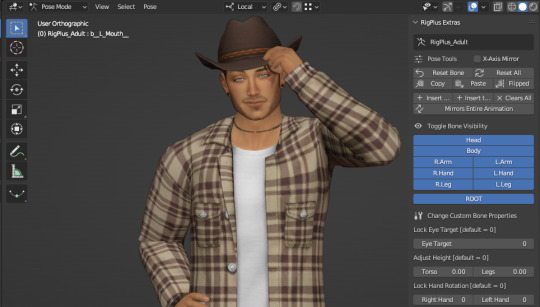
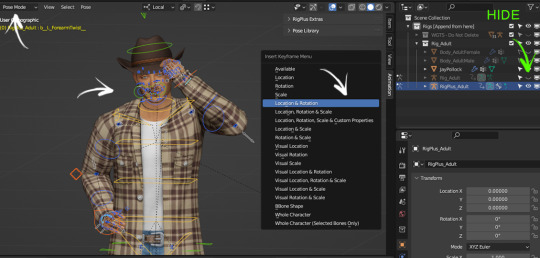
NOW you can inser keyframes (in other words: on your keyboard, you press A and then I > Location & Rotation). IMPORTANT: always remember to have Rig_Adult selected to insert keyframes.
Now hide Rig_Adult and leave only RigPlus_Adult visible because we're going to insert the keyframes there too. Same process: make sure you're in POSE MODE > A (to select all) > I > Location & Rotation.
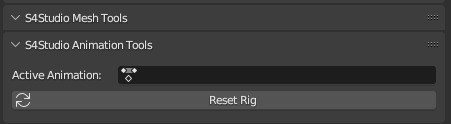
You're ready to export your pose. But wait! Remember I told you we needed that S4S window? Here's where that comes in. To export your pose, you need to have 'Rig_Adult' selected, otherwise, it won't save properly. The way to check if you're selecting the right one is by looking at that S4S window. Let me show you how:
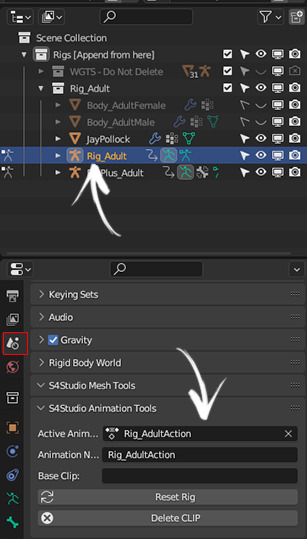
You go to Scene, and at the bottom where it says 'S4Studio Animation Tools,' it should say 'Rig_AdultAction.' If you have the right one selected, you can now save your pose as you would normally do.(you know, going to Files > Save As…)"
That would be basically everything!! ✨Now, Some tips:
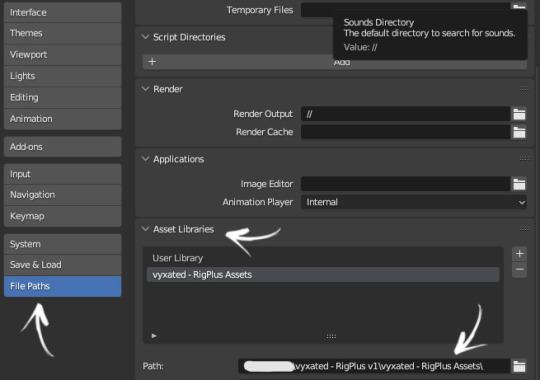
to view/use the Asset Browser (where you can find objects), you have to go here:
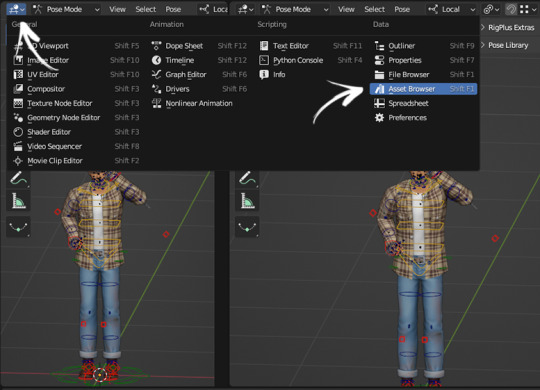
And to install it, in the creator's words: 'Edit > Blender Preferences > File Paths > Asset Libraries > add the vyxated - RigPlus Assets folder you've extracted'
I don't know how much you know about Blender, anon, so I'm going to be super basic here. To move the "bones" use R, RR, and G. Just press one of these keys and see if it moves where you want. Doesn't work with R? Then Ctrl+Z and try RR. Still no? Ctrl+Z and G. Just try until it looks the way you want 😁
Oh, right! I mentioned you could check if the pose was exported correctly and almost forgot to tell you how lol. Once you put the pose in your pose pack in S4S, all you have to do is export the pose you made from there (in the same way I explained to you above). I export it to the desktop, double click and open it. If the pose looks exactly like what you made, then congratulations! You've done it right. If all you see is the T-pose, then go back to the saving step because you've done something wrong (in my case, I was saving the pose in Object Mode, but I also had issues when I didn't have Rig_Adult selected when saving the pose 😆)
Alright, that's all! I hope it's not too confusing and that it helps you! Let me know if something isn't clear, nonny! 💖
45 notes
·
View notes
Text

Blender Tutorial: Building a Scene
Part 1: Importing Furniture from Sims 4
Building a scene from scratch is no mean feat, so this will likely be a multi-part tutorial.
In this tutorial I'll be going over the basics on building a scene. This will be the barebones necessities to get a room with a moose and some nice lighting to place your sims in for a render.
There are, of course, more in-depth and complicated ways of doing this, but these are the basics and the easiest (in my opinion!) way to get a nice little scene without too much work.
With that all said, let's get started!
Let's start by adding furniture into our scene.
Usually I'd build a room first but I know many of your were asking how to do this so I'll cover this first!
Step 1: Exporting Meshes and Textures from S4S
Appending furniture and decor to a scene works the same way as appending jewelry to a sim. First we have to prepare it for blender in Sims 4 Studio.
If you're using a piece of furniture from the game, select "Object" in Sims 4 Studio. It may load slowly so be patient!

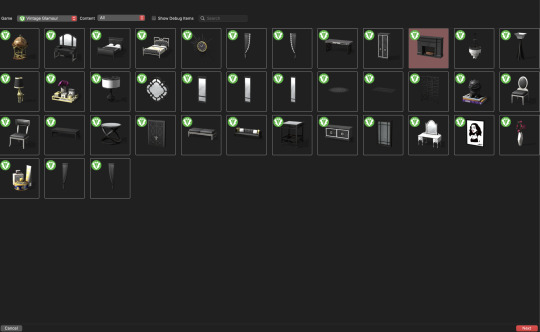
Then you'll see the game's full catalogue:

Filter and sort as needed to find what you're looking for.
For this tutorial I'm going to remake (and revamp) one of the first blender scenes I've ever made, which looked like this:

So I'll export the fireplace first. It's from Vintage Glamour, so I'll filter my S4S by Vintage Glamour, and here it is:
Highlight the fireplace then click "Next"
Name the package anything, but make it easy to remember. If you need another swatch in the future you can always open the fireplace directly in S4S instead of searching for it each time.
Save it somewhere easy to find!
Once opened, you'll see this:

To render furniture, we need to export the Mesh and Texture files.
I'm in the habit of exporting my mesh first, so we'll do it that way.
Click the "mesh" tab and you'll see this:

Click "Export Mesh" and save the .blend file somewhere easy to find!
I typically keep the .package, .mesh, and .png (texture) files all in the same place.
I find it easier while working in blender. Do whatever makes sense to you just make sure to stay organized!
After saving the mesh, navigate to the Texture tab and do the same thing:

Export the texture and save it somewhere easy to find.
Repeat this process for all the furniture you'll need for your scene.
Step Two: Appending Furniture Items into Blender & Applying Textures
Now let's go into blender.
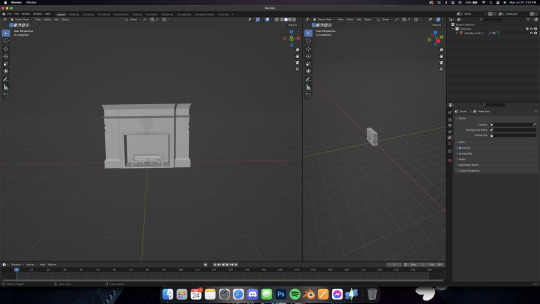
As always, delete the default cube, lamp, and camera, then set up your workspace in whatever way is comfortable for you.
I like to set mine up like this:

Now, just like with jewelry, let's append our fireplace in.
Go to File -> Append and locate your fireplace .blend file.
Open the file, then the Object folder, then select all "studio_mesh" files you see:


You should then have something like this:

Delete the bone_bone and rig as always, then also delete the footprint, which for me was the first studio_mesh in my Outliner list.

Then you'll have the fireplace by itself:
Navigate to the Shader Editor in your preferred workspace, then to the "Material Properties" tab.


Click the minus beside the diffuse texture to get rid of it.
Then click the "New" button that appears once the diffuse is gone.


Nodes will appear in your shader tab!

Like we did with jewelry, add in an Image Texture node, a Mix Shader, and a Transparent BSDF.
Connect and arrange them exactly like I have here:

Make sure you add in your texture file in the Image Texture node (click open, then navigate to your .png file we exported from S4S).
Change the blend mode to Alpha Hashed in your properties window, like this:

And make sure you're in Material Preview mode (I wasn't) by pressing Z on your keyboard and selecting "Material preview"

Now you should have something like this!

In Part Two, we'll add in the walls of the room and maybe a window!
Some notes before I leave you:
Using CC works the same way, you can add it into the custom content folder in S4S OR you can double-click the package file and open it in S4S that way.
Some objects, like trees, have more than one texture. I'll do a separate mini tutorial on that if yall need but basically you'll export both texture files and then apply them to the proper parts of the object (for a tree, for example, the leaves and trunk are often separate texture files)
Please let me know if yall have any questions! And stay tuned for Part Two!
#salemsims tutorial#render school tutorial#sims 4 render tutorial#sims 4 blender tutorial#render tutorial#blender tutorial#tutorial
45 notes
·
View notes
Text
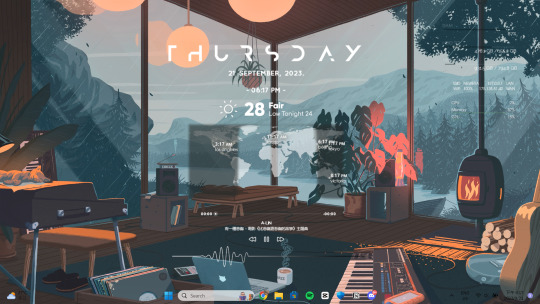
˖⁺‧₊˚✦ ways to make your laptop aesthetic feat. some extensions, websites & apps for students
i created this cause i found some time to finally upgrade and properly personalise my laptop, it took me almost an entire day watching youtube videos, researching for these and setting them up. so... i'm basically posting this for myself lol, but i also feel like sharing cause these are actually really good hehe
i'm using a windows laptop but i think most of these should work on mac too. most of these are free but there are maybe like less than five that require to be paid.
those that are marked with an asterisk (*) are the ones that i'm currently using while others are recommended or alternatives!
here is what my home screen looks like now:
i. screen saver
fliqlo (ios & win) *
flipit (win, an inspired & alt ver of ^)
flix clock (mac & web, paid ver comes with colours other than black)
aura gradient clock (mac & web)
retro anime desk clock (mac)
flocus (web) *
studywithme (web)
note: remember to right-click the file and select "install", then ensure that the wait time (e.g: 5 mins) is less than your "turn off your screen" and "put my device to sleep after" (e.g: both 15 mins) in power settings
ii. tab themes
kluk: a clock tab theme *
angry study helper: a tab theme that gets angy at u whenever u open a new tab
gratitutab: a minimalistic tab theme that works as a to-do list
prioritab: a tab theme that shows priorities that u had set for the day, week, and month
iii. extensions
tldr this: summarizes long docs, websites, articles, etc. with just a click *
paperpanda: download research papers by clicking on it, it searches on domains like google scholar, semanticscholar, aodoi, and more *
coffeelings: mainly a mood tracker that also saves mini journal entries
colorzilla: an eyedropper colour picker *
whatfont: click on it and hover on any text to show what font it is *
mybib: an apa, mla, harvard, and more styles citation generator *
read aloud: a tts reader that supports more than 40+ languages *
notion web clipper: creates a website into a bookmark into notion *
noisli: lets u listen to relaxing playlist while u study/work
iv. websites
lofi.cafe
i miss the office
i miss my cafe
i miss my bar
i miss my library
a soft murmur
patatap
tomato timers
animedoro
lifeat
coolors
blush designs
untools
fontjoy
zenpen
decision maker
museum of endangered sounds
future me
v. apps
virtual cottage
chill corner
notion *
vi. rainmeter skins
mond *
lano visualizer
amatical *
small clean weather animated *
ageo
sonder *
cloudy
harmattan
note: if you're new to rainmeter, it can be a bit overwhelming, u may check out this short and simple tutorial on it, make sure to read the instructions if you're using complicated skins like weather (may require u to edit in txt), i also highly rec watching techrifle's videos
vii. misc.
wallpaper engine * (highly rec getting from chillhop)
my live wallpaper (free alt of ^)
translucenttb *
roundedtb
note: u can disable your shortcut icons to be invisible by right-clicking on your home screen, go to "view", and untick "show desktop icons", this is optional and i would always enable it whenever i'm working and gaming for easier access, i also set the icons to small
29 notes
·
View notes
Text
Tumblr Cosmetic Customization Tutorial
You there! New Tumblr User with a default icon and header, no description, no custom URL, and not wanting to be mistaken for a bot--you just want to maybe figure out this weird hellsite and follow some people without being blocked, right?
Maybe you've been around for a little while, or are returning from that other hellsite, and don't know what the heck folks mean by enabling the custom URL and why are so many blogs opening on the dash instead of in a new tab?!
Let's sort this mess out below the cut with a screencap-laden tutorial, starting on mobile app (since Most new blogs start there these days, and many people use mobile more, or exclusively) and then moving to web browser for some other features that aren't available in the app (as of 1/27/23 anyway).
This is just going to be about cosmetic customization and accessing the correct blog URL and archive; Tumblr's many other settings and features for how you want to see your Dashboard and how much Privacy control you decide on are for your exploration (or another day and another tutorial, this one's long enough).
The tutorial blog itself literally took me well under 5 minutes to set up, and Tumblr guided me to customizing immediately. Taking the screenshots added a few seconds to the time; it's taken longer to write the first part of this post out. If you didn't customize the blog right away, don't fret! You can always tap the little art palette and cogwheel icons at the top of your blog to sort it out.
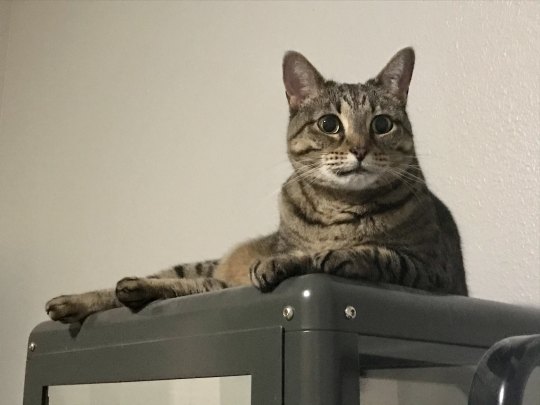
Now go below the link to see written instructions with image examples, including a few more with my cat:
TO BEGIN: In the mobile app, I make a new blog. For me, it's a sideblog under my main and existing sides, but otherwise this is all the same info. The following process also isn't actually all that different in web browser.
Now, you can change your URL later on if you want; a lot of folks do over time. Just be aware: changing your URL breaks any and all previous links to your blog, including any posts others have reblogged under "Read More" cuts, with the same result as if the blog was deactivated; the URL no longer exists, so Tumblr doesn't count it as "there" anymore.
Now that's out of the way, once I make a blog it immediately takes me to the Customization screen:
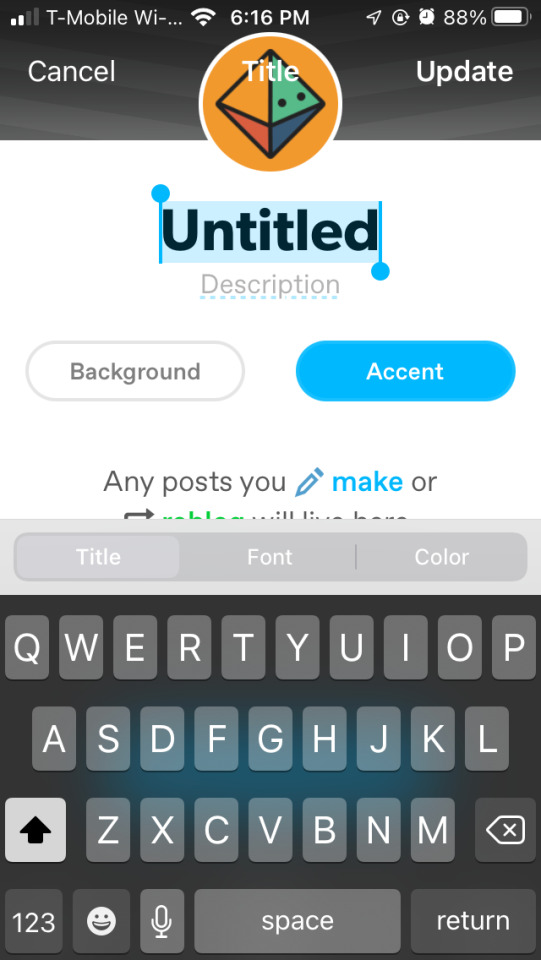
I can--and should!--give my blog a name and a description. Doesn't have to be long or fancy, and can always be changed later with no risk to your links.
I can tap the "Background" and "Accent" buttons to change the default colors, too. Let's go for something easy on the eyes by tapping on the colored circles to find some default options, or the wheel to grab a random custom one. I'm going to go to purple and find a nice shade there.
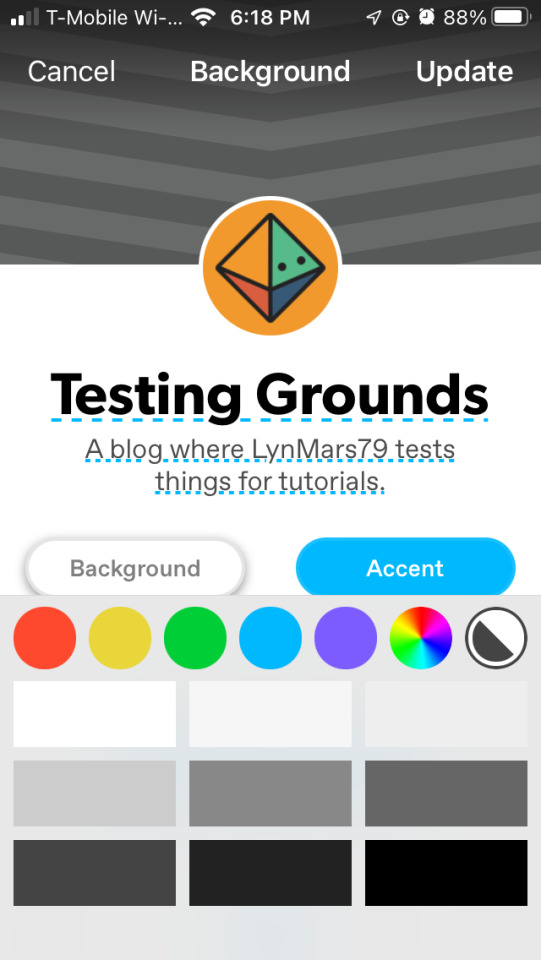
Next I will tap on the little default icon to choose an avatar photo. I can choose not to show it on my blog, and if I do, whether I want it to be square or circle.

I can also tap to choose a header image if I like. I'm just grabbing some images from my phone. I did have to redo the avatar as it didn't want to stay after selecting a header pic for some reason.
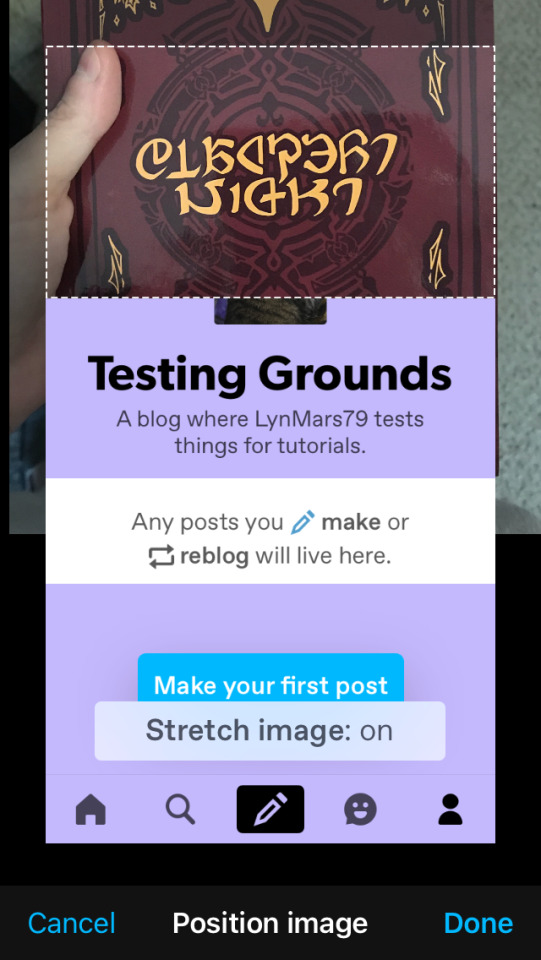
And then I made a quick post and pinned it, to let folks know that I am human and what the purpose of this blog is (lurking for now? A main blog for following while sideblogs get the content? In this case, a tutorial).
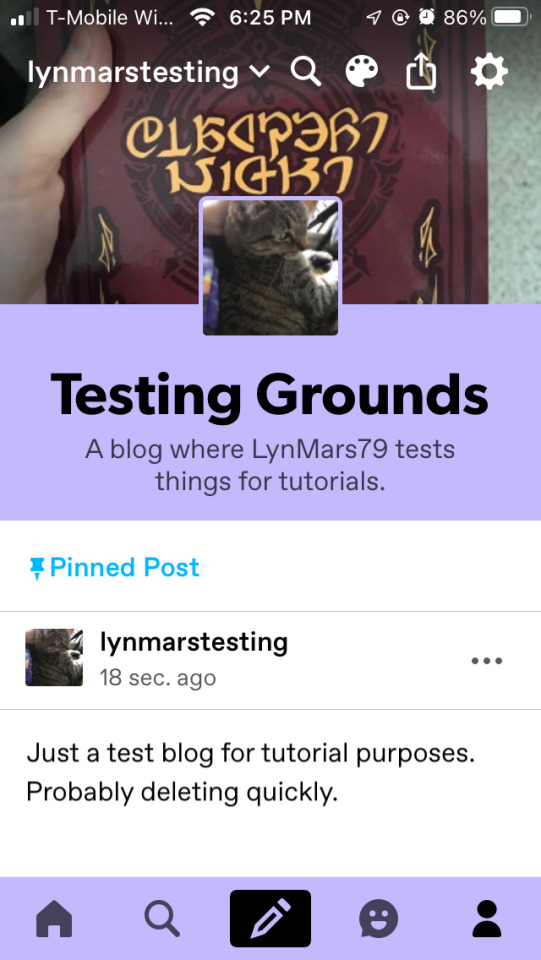
OK, so my cat for an icon, my copy of the fanzine I worked on as a header, a quick title and description, and a short post. Even if I post nothing else to this blog (and if it were a main blog; sideblogs can't follow others, nor send asks or replies), people will be fairly certain I am not a bot, hooray! And if I want to change anything, I can tap on the icons at the top of the blog and get back to these customization screens.
I CAN STOP HERE IF I WANT TO
...BUT WHAT IF I, or buddies, try to open my blog in a browser and it opens a dash panel? What if I (or others) want to access my Archive? Unfortunately, I cannot find the correct option in the mobile app at this point, so onto a web browser we go (on my phone or my tablet, or my computer).
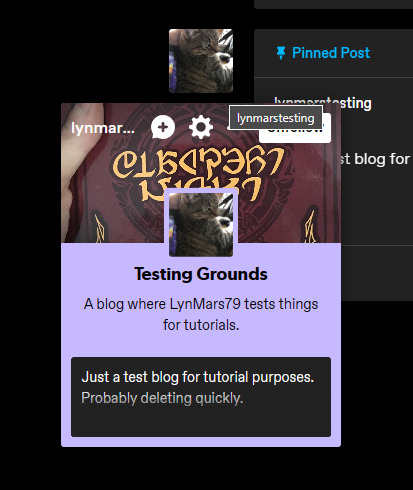
I am using a generic default web browser where I don't have many extensions/plugins/addons enabled (though apparently I did set dark mode). When I tap/hover over my icon, it still shows my color option and everything I selected in app setup.
Here is where I am going to direct you to the side bar and the "Edit Appearance" button so I can point out some Very Important Things, even if you don't customize anything else ever.

When I open my blog's appearance tab, right away it's going to tell me some interesting things I have circled and pointed at on the below screenshot:
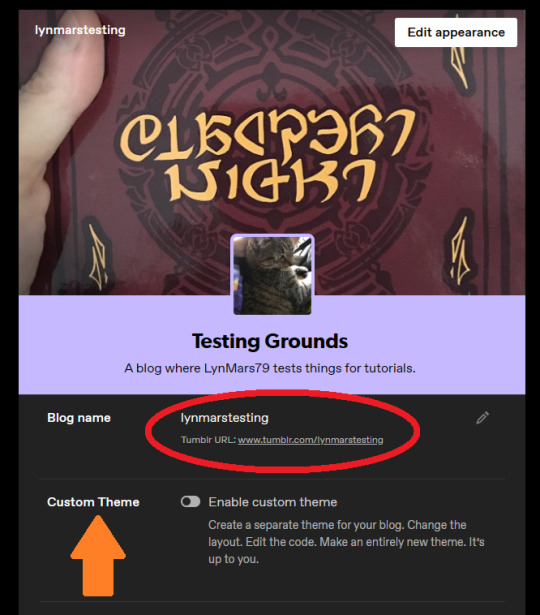
In RED I have circled my blog's URL: www.tumblr.com/lynmarstesting. This is why a blog opens in a dash panel instead of going to an actual blog. This is the new Default URL, I cannot access an Archive or other blog features like this.
The ORANGE arrow points to the feature we want, right below the "Blog name" and URL: "Custom Theme". When I swipe this feature to active, it tells me my URL is updated.
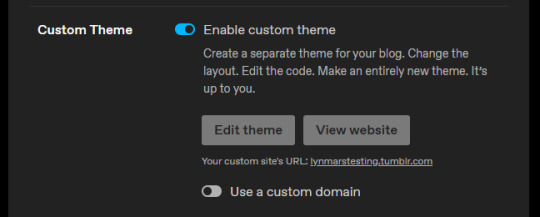
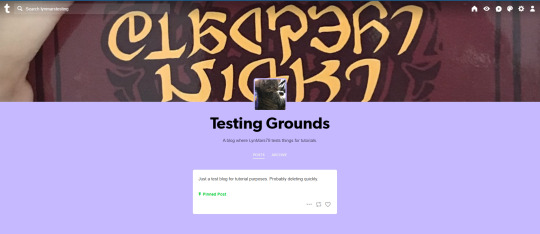
When I go to my blog, the URL in my browser shows the proper https://lynmarstesting.tumblr.com link.

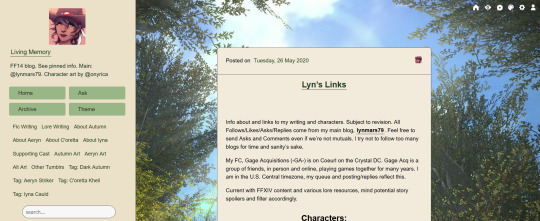
And the blog looks...well, bare bones and empty, but a proper weblog page. And I (and anyone else) have access to my Archive! When, y'know, I have enough posts to make that a thing on this blog.
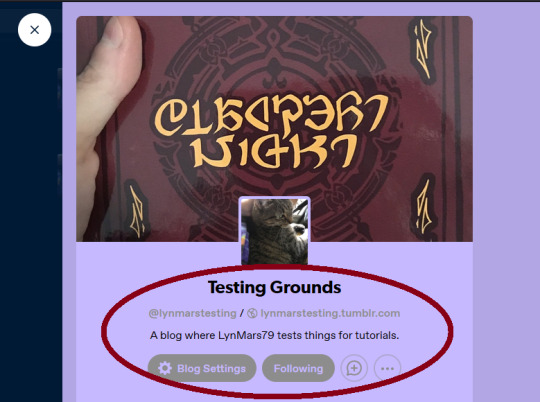
Now, if I or anyone else opens the blog by clicking my username or icon, it'll open a dash panel...but also show my actual @ and my proper URL link, so they can go to the blog itself that way if they want. Everyone wins!
I CAN STOP HERE IF I WANT TO;
there's no need from this point to keep messing around in a browser, we've done everything to 1) make ourselves look human and 2) make our blog properly linkable/accessible.
BUT WHAT IF...??
Once again, the little art palette icon at the top is our clicky-buddy, boxed below in orange:

This opens an "Edit Theme" sidebar panel where one can customize the blog. Each theme has different options, and Tumblr's default theme is honestly really modular; change colors, fonts, have multiple columns, add some pages (I've a whole other tutorial on that), etc.
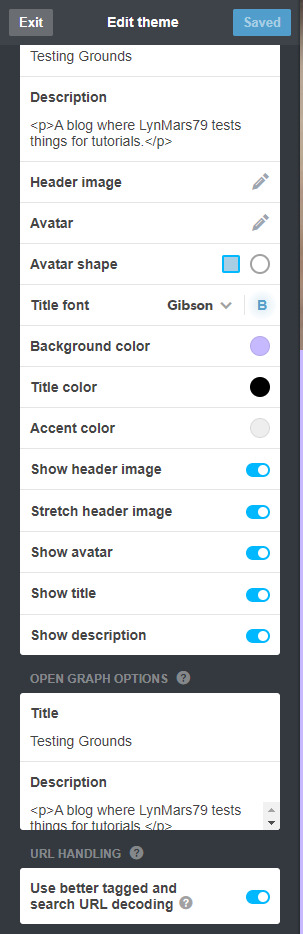
There's also an "Advanced" pane, where you can mess with some other settings (the little ? icon on each line tells you what it does) and, if you're knowledgeable--or just bold--this is where you can add some Custom CSS.
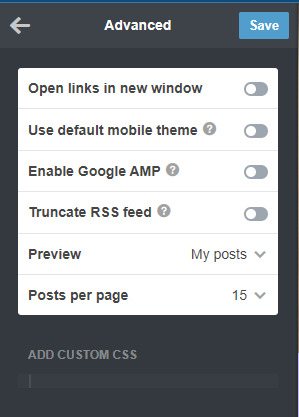
Say the Default Tumblr Official isn't doing it, though; at the top of the Edit Theme pane it tells you your current theme, and there's a handy "Browse Themes" link.

This opens a drop down with multiple sorting options. I don't want to spend money on a premium blog theme at the moment, and the others are a mix, so let's check out the Free Themes options.

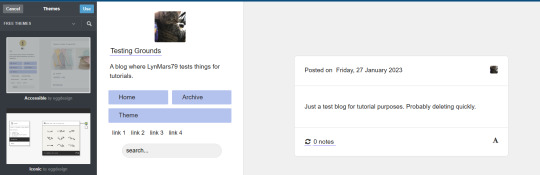
There's a lot of options here! Some new ones, some are sponsored, lots of variety. Even the "Accessible" theme I mainly use is there, in its barren glory, compared to what you can see I've made of it on browser (see that previous tutorial I linked above):
Again: Different Themes have Different Levels of Customization.
Some will let you change every color, the fonts, the frames, and so on. Some let you add links everywhere. Some barely let you touch anything. You can tap "Use" at the top to preview, and the "Advanced" pane will let you preview random pretend posts if you don't have many/any of your own to see how they'd look. If you don't like how something's turning out, just click back on "Free Themes" and look for another one.

PLEASE KEEP IN MIND READABILITY!!
When people follow links to your blog--like a Read More cut--they will see the post on your blog's theme and in your blog's colors. Even on mobile app, especially if you override the default mobile theme, your color choices will have an impact! Aesthetic is all well and good, but frames, fonts, colors, and so on, should be legible and readable to most people, especially if you mean to share a lot of text posts.
Another thing to note: Your theme will NOT appear on mobile app. It defaults to a basic setup in the app, keeping maybe only your colors. Any custom links won't show, and cosmetic site options and access are limited in a lot of ways. The site is usable on a mobile web browser, and will have those features there. I get around the app's inability to show my theme's links by adding them all to my informative Pinned Posts on each blog, but that's me.
And there you have it! How to cosmetically customize a Tumblr, in mobile app and browser, to seem like a real person and access the correct URL and features of your blog. Whether you're new or been here awhile, hopefully this helps answer some really basic questions about how and why to do some of these things.
Have a final full-sized silly Chel pic to say goodbye.

134 notes
·
View notes
Text
GRAVEYARD KEEPER: FIRST THOUGHTS
I heard it compared to Stardew Valley and aside from the silly title screen, it's definitely visually there. Play through? There are a hell of a lot of cons, but they won't keep me from playing it
Con: no character customization, no choices at all. You ARE a heterosexual white male-presenting protagonist with a female-presenting white sweetheart. Any headcannon re either of you being 🏳️⚧️ remains headcannon
Hilarious: you are reading a text from your sweetheart when crossing a road and you get hit by a car. Keep track of your surroundings, kids
Con: the dialog writing starts out real clumsy. You do eventually get choices, but I prefer how SV makes you the strong silent type when you're not actively involved
WHICH REMINDS ME, CON: don't let the dialog bubbles cycle on their own without me clicking??? I missed so much unretrievable info because I was mulling over the first half smh
Plot: she swallowed the dog to catch the cat, she swallowed the cat to catch the bird, she swallowed the bird to catch the spider, she swallowed the spider to catch the fly. I don't know why she swallowed the fly, maybe she died crossing the street and woke up in a shitty little medieval FLAT EARTHER village and she has to rube goldburg her way to and through a magic portal to get back to her sweetheart. Or something.
Pro: I don't play rpgs much so while I don't prefer this style over sv's do-whatever-and-you'll-suck-less-as-you-go gameplay, it's pretty awesome in and off itself BECAUSE it's so different. It also contributes heavily to the swallowed-the-spider-to-catch-the-fly effect because it's got EIGHT TABS OF TECH TREES and I started drawing graphs
Pro: you're on a derelict homestead/graveyard with a familiar need to clear rocks/trees/stuff and bring the area back to life. BUT doing things gives you different xp/knowledge points which is how you advance on the tech trees, so it's different from just a carbon copy SV feel
Con: Jesús Christ you can tell this was made by a dude. So was SV, but where it had nearly equal gender ratios (plus the aforementioned character choices), I've seen... not very many women thus far, and what we get is not exactly impressive. I have no problems with "ms charm" telling me to fuck off until I deserved to talk to her, as half the men I met said the same. But I've met two wives thus far, and uhhhhhhhhhhh one is straight up called sweet but stupid in her bio and the other opens EVERY SINGLE DIALOG with "you should talk to my husband, he's in charge" like jfc lady you're the one I need for recipes, calm down? Does he beat you? What the hell?
Con: let's set aside that I'm pretty sure the "medieval idiots thought world flat" thing has been debunked, because I found info but it didn't have good citations. Also maybe we're going for parody over historically accurate, fine whatever. But whyyyyyyyyyy do you have a guy named "G*psy Traveler" like I know I have an inflated sense of how widely it's known that that's a slur, but it on top of the flat earth thing and the WOW that's bad female-or-anything representation, it builds an image of the creator/creators as the really stereotypical basement dwelling head-up-ass dudes who have never ever looked outside their zone and never ever want to
Pro: like two steps into the tutorial you're slapped in the face with Soilent Green is People and you just live with that
Hilarious: I can tell when I have a first conversation with somebody I was supposed to have met already, because my pre-scripted side of the conversation suddenly backslides in terms of my acceptance of the situation
Pro: time is an illusion and represented only by the cycle of emoji-labeled days. Weeks are not counted, so I legitimately have no clue how many "weeks" I went through last night
Unsure??? I don't know how much I'm going to have to drink the church koolaid to progress? I saw an indication up the tech tree that suggested my good/evil choices MIGHT matter, but I've got no idea how. I told the inquisitor who'd just BURNED A PEOPLE ALIVE IN FRONT OF ME that sure I'd be his friend, and I don't know if the game allows for that to have been a choice made out of the fear that I'd be burned next if I said no
Pro: I still want to play it. The myriad cons will influence how I talk about it to my friends, but it's still giving me dopamine, and that's good enough
55 notes
·
View notes
Text
LittleDica's Cas Room Recoloring Tutorial
Part 1. Walls and Floors
I was asked by the lovely @faaeish to create a tutorial on how I recolor my CAS backgrounds, namely the one by LittleDica.
Now I want to make a disclaimer first: this is the way I go about editing this room, other creators may have different methods but this is how I do it. Idk if my way may be a little funky but I just wanted to make that clear lol. Also I didn't know how detailed to make this so I'm gonna put as much detail as I can without it being tooooo wordy.
Ok I'm gonna assume you have access to all of the tools you'll need to edit this room and some knowledge on how to use them:
Sims4Studio
LittleDica's Room package file and Recoloring Kit
An Image editing program (photoshop, paint tool sai, gimp, etc)
Google (or any site you'd like for images, if you want them)
First things first, open up the cas room in S4S it will look like something like this:
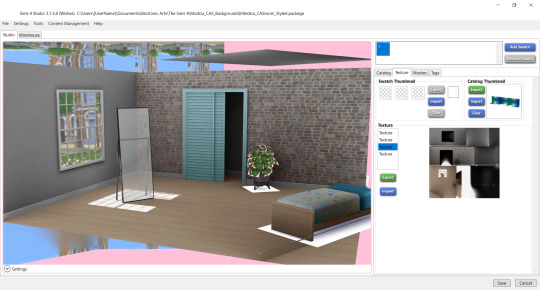
In the texture tab, navigate to the third texture down, that's the walls and floor texture, we'll be starting off with this.
After you've downloaded the Recoloring Kit for the room, extract the files (there should be walls and floor.psd, objects.psd and sky.psd). Open up the walls and floors.psd with your favorite image editing program. I will be using Gimp
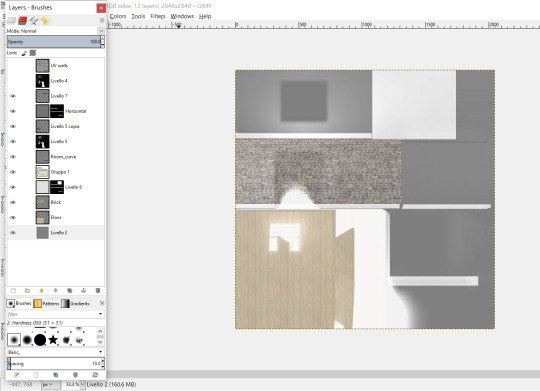
it will look something like this when you open it and have a mess of layers and for me it has an empty group (I always delete it first).
I'll try to describe the different layers in case you want to keep them.
UV Walls -> the UV layer for the walls and floors of the room
Livello 4 -> extra layer that shows the main highlights and shadows of the room
Livello 7 -> a seam shadow for the back wall and the ceiling, in overlay mode
Horizontal -> normal layer in overlay mode with wood texture and layer mask to add texture to the base boarding around the room
Livello 5 copia -> layer in addition mode to add luminosity to the sunlight on the floor
Livello 5 -> layer in addition mode to add sunlight to various places around the room
Room Curve -> layer in overlay mode to add shadow and highlights to baseboards
Livello 6 -> Baseboard and ceiling layer mask
Brick -> Base game brick texture
Floor -> base game floor texture
Livello 2 -> base color for walls
You can keep and use these for your recolor but I usually delete everything except for the UV walls and Livello 4
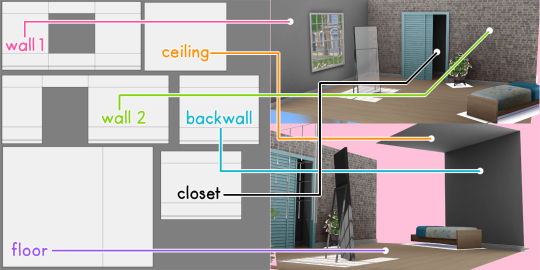
Since I've explained the layers, here is a diagram of the UV layout and what everything represents.
Now is the fun part, once you've gotten use to the different layers and the layout of the mesh play around with different themes, choose what colors you want, whatever designs you like. Maybe you had an idea for a room design beforehand this is your chance to get creative!
*Another thing to keep in mind! The texture on the walls will stretch out and distort slightly once you import it into S4S
Example: What the image might look like in your editor vs what it looks like in cas.
Just scale down the height of your images and it should look better. I don't have a specific science for this, you'll just have to eyeball it till it looks good! (This goes for any other textures that may look stretched out/distorted in your room.)
Before/After
And finally -> The texture for the rooms and walls come in a default size of 2048x2048, if you want to reduce the amount of pixilation in any images you use (cause they will definitely lower in quality once you're in CAS), increase the canvas size to 4096x4096
That's it for now, the next tutorial will be Objects and Sky. Since walls and floors will have the most detail I wanted to get it out of the way first.
285 notes
·
View notes
Text

im trying to like make the new dash usable and just... it dont
heres the main things im having trouble with in no particular order
there needs to be extra padding on top of the site, it feels claustrophobic without the buffer of the previous Top Dash
ad-free, domain, and store dont all need to have separate icons, just incorporate domain and ad-free into the store
settings are always the furthest down, idk if this is a rule but it feels very intuitive, same as account being at the top or at the bottom never in the middle
the icons are too small and more notably the text makes it very cluttered! you can have text for the store but other than the store and activity feed* the icons are generally the same as other sites and dont need explanations
*the activity feed also dont need text because its a tactile tab, as soon as notifications become a thing you have to worry about then you will click on the tab
the simple create a post button should be where the rest of the activity is, hiding it in the corner will do no good to anyone
this is a me specific problem but i have tumblr opened in a minimized window so i can use two tabs on the same screen and it feels crushing to be encapsulated on all sides by Stuff, let us navigate recommended blogs and the radar in the explore tab instead, it feels like that is where theyre supposed to be rather than on the main dash
personally i would love if search went back to the left hand side and maybe the sidebar thats replacing top bar went to the right side but those are minor issues
heres some other changes that i think would be good for the site in general
in the explore tab; dont default to Today, default to For You if you want to drive engagement, or trending, @staffs choice
rename Staffs Picks in the explore tab to Radar since they seem to be the same thing, staff doesnt have a great image so it might get more use in it if the dash name is used
like solitarelee said; it would be amazing to have custom dashs for different blog content, having a tab specifically for content from your followed tags is nice but having separate dashes can really be expanded on (and if you want to consider the option then this could be monetized as in you get 3-5 free custom dashes and then you pay per added dashboard, this should however be brought up to the users first because if the number is too low staff and automattic will simply be seen as evil)
PLEASE rename Manage to Labs or something, its much cooler and is more indicative of what you're getting from the tab as manage usually comes with Manage Settings, adding a beaker icon to the sidebar for labs content could even be a good idea to get people interested in it
i am begging on my hands and knees for staff to have a public dev log, please look at how the minecraft community eats up the mojang patch notes and understand that this would be good here too. warn us about upcoming changes like the dashboard update and treat us as costumers rather than shareholders, we dont want to solve an ARG to understand what you're going to do with our primary social site, we want to be told straight up whats happening so we can continue to make informed decisions about what we want to do with the site
something im surprised hasnt been done is tumblr adding an optional tutorial on how to use the site upon account creation, maybe it exists, maybe it doesnt, it should be optional and also the no tags warning should be able to be toggled in settings
#tumblr#long post#kinda#dude just hire me at this point to be a QA tester#rambles#im very tired dude
13 notes
·
View notes
Note
Hello. I'm trying to use SRWE for the first time and things are not clicking. I feel like I should understand what I'm reading, but I also feel like I missed the beginning of a conversation.
Info: TS4; PC; I currently use Reshade to take my screenshots
The following is from one of your SRWE faqs and I hope you can clarify somethings for me.
-Type in the dimensions of the shape of screenshot you want to take (or leave it as the shape of your current window/monitor)
-Set up your screenshot
---#1 - Without SRWE, to me, setting up my screenshot (usually) means using the tab/cinematic camera (and saved camera positions)
-Tab out to SRWE
---#2 - Does this mean to actually tap the "Tab" key? If so, how does that work when I'm using the tab camera?
-Type in the same dimensions but larger (so, if it’s a square shot, type in something like 3000x3000)
-Tab back into your game
---#3 - Same as question as #2.
-The window will get really big and you won’t see all your game
-Take the screenshot
---#4 - Which program am I using to take the actual shot? TS4? Reshade? SRWE? If the latter, what am I clicking (see SRWE screenshot below)
---#5 - If the case is that can't use the tab camera, how do I hide the GUI?
---#6 - How do I set where my screenshots save?
---#7 - In the screenshot, what are the bracketed sections for?

Thanx in advance!
Hi!
Sorry it took me a couple of days to reply to this. I've been looking forward to answering your questions!
TAB CONFUSION
Okay, on the 'tab out' thing - on a Windows PC you can alt+tab to switch between the windows you have open. You press alt and while you hold that down you press tab, and each time you press tab it will switch to a new window (depending on how many you have open at the same time). If there's only one window open, pressing alt+tab will 'tab out' to the desktop instead. 'Tab out' is just a shorthand way of saying to press alt+tab to cycle through your windows.
As long as the alt key is held down, pressing the tab key won't affect your tab mode camera at all. Alt is a 'modifier' in this instance. Keys like alt, shift and control are all modifiers and mean one key - like tab, or any other key on your keyboard - can have multiple uses, basically extending and expanding the number of keys you have available for certain functions and operations.
So when I say to 'tab out to SRWE' I mean to press (and hold) alt and then press tab to cycle away from your TS4 window and into the SRWE window. And then when you're done you can 'tab back in' to TS4 by doing the same. Remember, while alt is held down it bypasses TS4's regular tab key function, so it won't affect the tab mode camera.
So, set up your shot by going into the tab mode camera and composing everything as you want. Once you're happy, press and hold down alt, and then press tab as many times as needed to make SRWE the main window. When you're done setting up the resolution you want, alt+tab back into the game and it'll still be set up as you left it, and you can take your screenshot.
HOW TO SCREENSHOT
If you use ReShade, you'll be using ReShade to take the screenshot as normal. It'll save wherever you usually save ReShade screenshots, but it'll be bigger!
To set where ReShade saves your screenshots, in the ReShade menu go to the Settings tab at the top and a little way down you'll see a screenshot path section - just point that to wherever you want your screenshots to go. I have a folder inside my main screenshots folder just called RESHADE, that's where mine go, and I separate them out into different game folders from there when I'm ready, but you can set it up into whatever folders you want.
WHAT DO THESE MEAN?
Scale: I've never used that, but I'm guessing maybe you can specify a multiplier of your current window size instead of putting in exact dimensions? Don't quote me on that. You don't need to worry about it.
Window scaling from megapixels: This is fun. This didn't exist when I wrote my initial SRWE tutorial. Do you remember the bit in the tutorial where I talked about megapixels, and how if you work out how many megapixels your computer can handle it can help you to work out the best sizes for each aspect ratio you want to set up? Well this section makes that even easier.
You can use the aspect ratio box (where it says 1:1) to select the aspect ratio (obviously!), and directly underneath in the megapixels box you can type in the megapixel amount you know your PC can handle. It will then fill in the output resolution box on the right for you with the dimensions of that aspect ratio with that specific megapixel amount. So you don't have to go through all the hassle of using the aspect ratio calculator to set up a bunch of profiles if you don't want to, just select the aspect ratio and the MP and SRWE will do the rest. (You may still want to set up a profile for your favoured aspect ratios at sizes that fit on your PC monitor for when you're composing, unless you've already worked out what MP they are specifically. I think profiles in that case are easier.)
BONUS: MY PROFILES
Don't want to set up a bunch of profiles but want a million of them ready to go?
Here you go: MY CURRENT SET OF SRWE PROFILES
Unzip that folder and add all the profiles inside to your Profiles folder, which should be wherever you launch SRWE from. If you don't already have a Profiles folder, just put mine wherever you want, and you can navigate to it when you choose load profile in SRWE.
All my recent portrait ratio shots that I've been taking to showcase Sunblind have been taken in the 6:7 ratio - I love it so much.
29 notes
·
View notes
Text
PRE-ARTFIGHT PREP - SAVING REFS FOR FUTURE ATTACKS! :)
Hey y'all!! I'm so excited for Artfight 2023, especially to be on team goggie :> (You can find my profile here!)
I know I'm responsible for getting a few more folks into AF this year, and I've seen a lovely few tutorials on many aspects; but one thing I haven't seen is a general 'how to' on saving refs pre-fight.
For those who are new to AF, the site... Typically doesn't work the first week or so. Downtimes are getting increasingly better, but since this site is run on donations and volunteers, it's understandable that it's experiencing some hiccups with SO MANY people joining every year! AF is usually extended into the first week of august to make up for this.
HOWEVER, this does mean that all those lovely characters you've bookmarked to attack? You won't be able to access their refs if the site is down! :((
This is why it's EXTREMELY RECOMMENDED that you save them beforehand, as is often repeated!
This is not a universal method for most folks, but if you're like me just hearing 'just do x!' doesn't always help me picture *how* to do something, so I wanted to share my method :) My example will use discord, but you can very well use a google doc or word doc; anywhere that images can be saved.
Now, Let's begin!
For starters, I have my own discord server that I use for various things. I'm the only member in it, and it's great for organizing things I need.
Next, I use a text channel where I'm going to store all of the information I need
Now, while the site is up, i head over to my bookmarked characters:
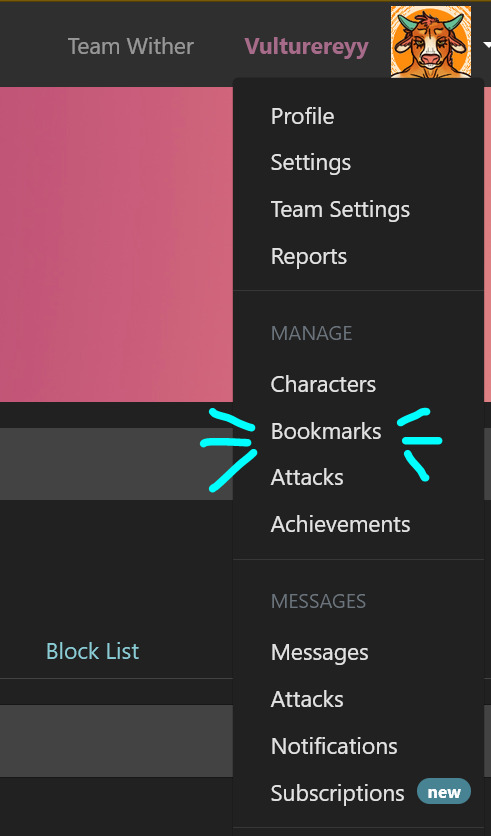
Find a character you'd like to save the refs of from your list, and click onto their character profile! :)
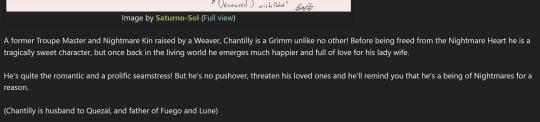
Now, for the important question: What should you save, at the very least? (Hi @saturno-sol I'm using Chantilly as an example :> Go attack fae here!!)
Above a character's main image, you should see this:
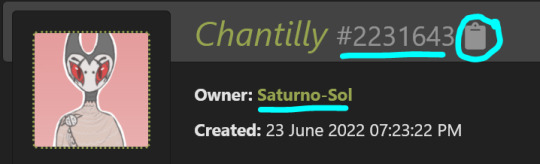
The first thing that may not be obvious to save is that string of numbers, which can be copied by pressing the clipboard. Artfight does not use character names, but character IDs for submitting attacks, and these cannot be found anywhere but on-site.
Second, you'll want to save the username of the person who the character belongs to. I usually format these in my notes like:
Chantilly - 2231643
By Saturno-Sol
The other things you will want to save text-wise will be that person's permissions, found under the images and character descriptions here:
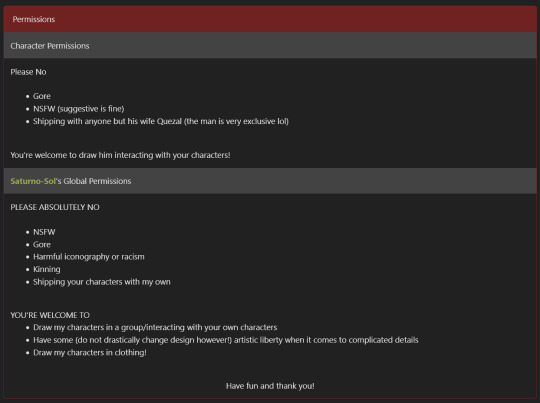
( Please be sure to take note of each person's character and personal permissions! Getting free art is lovely, but so is respecting boundaries <3 )
And the character profile itself, situated above the permissions and below the image gallery
If a character description is longer, I personally tend to pick out important bits from it and paste them together in more bullet-pointed form. But those who won't break the character limit of a normal discord post, I'll simply copy paste both perms and character description :)
Finally, you'll want your images of course! These can be copy pasted into wherever you're saving them, though I highly recommend a format where you can have the above text information and the images together for sake of clarity. Especially if you're going to have a lot of saved characters, like myself :>
In the end, my posts usually end up looking like:
**Name - ID**
By [Username]
**Character permissions**
[character permissions]
**[username's] global permissions**
[global perms]
**Character profile**
[Character information here]
And lastly, images at the bottom, given how discord formats things :) All in one place, off-site, so I may still browse various characters while the site broken. And as soon as it's ready, I don't have to worry about loading multiple tabs on-site to submit the attack, I've got all the information I need right there!
I hope this helps some new and maybe even some old artfight veterans. I'd recommend saving over the amount of attacks you think you'll do, just in case you're an indecisive queen like I am and want some variety to choose from.
Hope to see you all in the fight when it starts! Excited for my fourth year in the brawl >:)
12 notes
·
View notes
Text
Pt. 1 of my (very belated) chaotic corset making process
so way back when in August 2023, I finally got the motivation to make a corset for historical costume purposes, which I’ve been wanting to do for several years now. Most(and not just more) specifically, I wanted a corset that would have been considered fashionable in ~1875-80, especially in 1879, had an elegant silhouette, and was historically accurate.
There’s this one person on Etsy- ateliersylph- and they’ve got a ton of patterns taken from extant antique corsets they own, as well as some other fun sewing things like corset hooks, so I scrawled through their antique pattern offerings to find something that got as close to my specifications as possible. Unfortunately, there isn’t a corset that they dated to specifically the years I was looking for, but Ref P looked close to what I wanted: it had the curvy silhouette, wasn’t too curvy for my liking but still wasn’t too small proportionally for my hips, extended to ~just below the hip, spoon front-opening busk, was versatile enough to be used for more than just one decade in the Victorian era, and didn't support to only under the nipple. The spoon busk meant that it had to have been made in/after 1873, as that was when that style of busk was invented, and it fell out of fashion by the Edwardian era, so it should probably have been made between 1873- around 1900, and more likely closer to 1873 than 1900. It also didn’t have garters tabs attached to it, which became a thing closer to the Edwardian era. Thus, this was the closest pattern they had for what I was looking for, even without them having a date for Ref P’s original corset. I chose the pdf file option instead of a paper pattern to save money.
I also decided to go with a white-greige-light blue color scheme, so I got some white lace and bias binding and coutil, greige lace and cotton sateen(because silk would be even more expensive), and blue silk thread and ribbons for the back lacing, flossing, and decoration. I won’t lie, Bernadette banner’s adventures in ✨the joys of corset making✨ /s definitely inspired my choice of velvet ribbon threaded through lace as trim. Between the 3 commercially available options for boning nowadays, I (1) didn’t want to use plastic so synthetic whalebone was off the table, and (2) getting a smooth edge on the cut ends of steel boning was much simpler and cheaper than spiral steel boning, which needs caps and a cap-setting tool. However, Like A Fool, I didn’t remember that maybe, just MAYBE, I should have waited until I was able to print out the properly-sized pattern and measure to see what size bones I needed(because there are two different widths used, Apparently) before just purchasing a size that I thought was right, but. ://// so that was fun and not something I realized until I had gotten to the point of actually sewing the bone channels on all the panels, but I’ll come back to that later in another post. I also decided that because I couldn’t see the spoon busks in comparison to my body irl, it would be safer to buy a straight busk and just bend it for the curve, and that I was also going to use small-ass floral metal stamps on the busk loops because busks with decorative patterns on the loops were all sold out online to my knowledge :| this all happened over the course of a week where I was looking up materials online and debating whether spending all that money was worth it, until I said fuck it, I’m gonna make it, and bought everything, which took until ~late August/early September to all arrive. So, to pass the time, I searched up all the YouTube tutorials I had watched before of historical costubers making their own corsets for tips and watched them all again, and also went through ateliersylph’s blog posts for instructions and other resources, most of which are in French so get a google translator if u can’t read it like me lol. I finally got the pattern printed out after like, a week or 2, so after that, I was cutting and pasting it together irl, making mockups, etc. until everything else arrived. :D
3 notes
·
View notes
Text
Tutorial On Importing Scripts Into Aseprite!
This Tutorial is also on Newgrounds & SteamGuides
did you know? Aseprite actually has Script support, it can help make Aseprite able to Tasks its not able to do by its own.
I've been using scripts for awhile espcially the Export-as-PSD Script, but theres a lot more then just that script. :>
Here bellow are some good places to search for Scripts for Aseprite-Scripts!
The Aseprite Comunity Form (Under the Scripts Tag)
GitHub and Searching For "Aseprite" + "Script"
Its also pretty common for people to announce their scripts on twitter, thats also a place you could find one :>
Here is some Scripts i've saved on my bookmarks! (you can find a full list of my Bookmarks here)
Aseprite-Scripts-Collection (From 2019)
Frame-Rat-Script (For exporting of video)
Path-Animator-Script (Looks extreamly Cool)
Paralax-Animator-Script
MovingScanLines-Script
PixelLips (AutoMouth Animator)
Export as PSD Script, LCD Pixel-Fliter, Smooth Filter Scripts (I use "Export as PSD" for exporting psd from Aseprite so i can rig them in live2D)
Welp now to the Tutorial / Walkthrough! here i'll show how you simply import Scripts into Aseprite. i'll be showing this with this Script
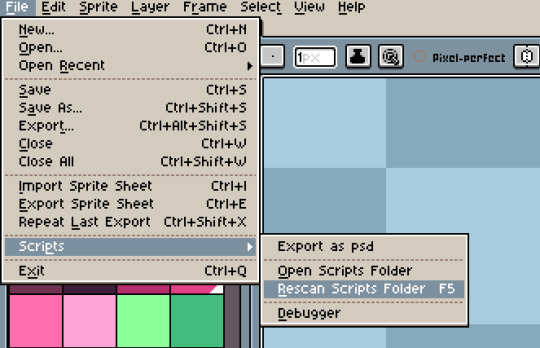
Okay first lets open the Open Scripts Folder under the File tab

Then in the Scripts Folder, you should add your New script, the Scripts are in .Lua Files :>


Add the file, and Then you should close the folder and Go into Aseprite again
Then you should Press the Rescan Scripts Folder button, you could also Restart Aseprite
Then the Script's Content should show it self
Note: that not all scripts does something in the Scripts Tab,
if its something that adds a Filter then what it adds would likely by under Edit or somewhere else
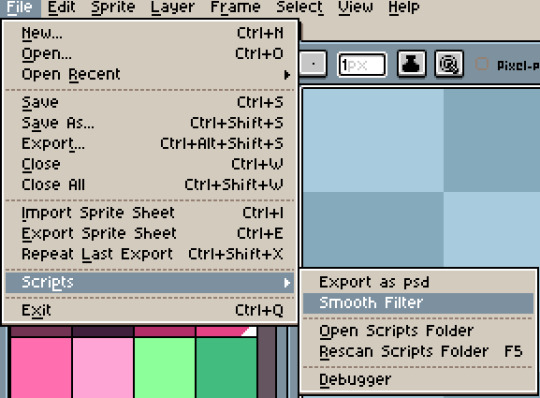
Then it should Show up on the place where it should appear!, for this one Clicking the Script opens its menu.
Then it should Execute the Script doing what it was made for.
(maybe i should have use a newer Script or a bigger sprite, eh, you get it right?)
anyways i hope you found this a little useful, you can as always check out my Twitter!
oh and dont fear to dm me if you do. i'd love help on wording stuff better or seeing what you guys make!
i think thats it, bye! :>
22 notes
·
View notes
Last Seen Blogs

jetcesspoolservice6
Jet Cesspool Service

lt-brittanygravesdpd
I dont mind the darkness, its easy on the eyes
megas-choices
Uluvalir, our Constellation

boring-moon
Luna

asteraws
jimothy