#so i applied that here to make it look less like just fur texture on milk's arms
Text
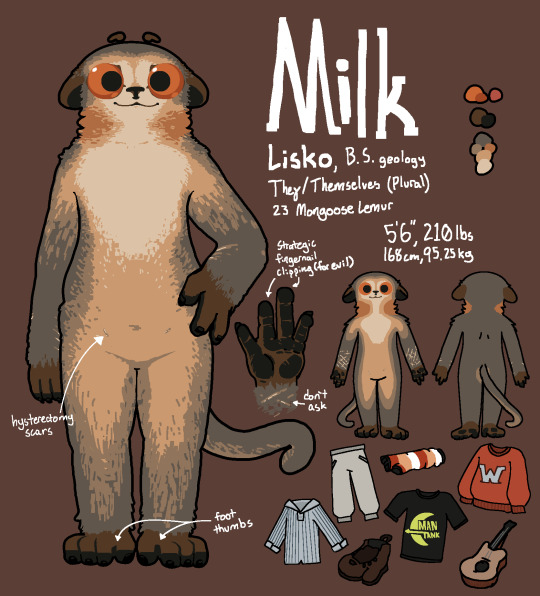
Milk ref sheet done yaHOOOOOOOOOOO lookit my big beautiful baby they filled with joy and happiness
#milk#digital#mogimage#the worst part of making this was their fucked up hands#lemurs gotta lemur and grab fruits and branches and small animals and bugs but y'know its fucked up that they have weird hands#at least i was able to euphemistically state how much fun they have with themselves and their girlfriend#robbie just has fuckin. hoof fingers. it don't work like that for her#very sad about that#ANYWAY i learned recently from a discussion on discord about putting tattoos on furries that scars grow white fur sometimes#so i applied that here to make it look less like just fur texture on milk's arms#might tone it down eventually but im not certain#a side story about that is that milk changes the story behind all of their sh scars every time they're asked by someone they don't trust#like “yeah i broke some equipment in a hs chemistry class and stupidly tried to wipe up broken glass with my arms”#“i tried to hug a big cactus when i was younger”#or “i used to work in a kitchen and i was really bad at paying attention when cutting vegetables”#generally they just don't like to think about it so they wear funny arm socks or long sleeves most of the time but sometimes they don't car
110 notes
·
View notes
Text

@ikkaku-of-heart asked: “Despite your best efforts, it looks like you made it another year,” Ikkaku teased, giving Law a warm, loving hug. She’d been eagerly anticipating his birthday for weeks now, as she’d been putting together his gifts bit by bit. Some of them she figured he’d already gotten a peak of due to his regular scanning of the ship, but others she was confident he hadn’t quite been able to spoil himself for.
The first gift was a thick coat that was a fairly convincing imitation of leopard fur in both appearance and texture. The next was a few new shirts, with the unspoken promise that his thieving engineer would let him actually wear them a few times before they inevitably found their way to her closet.
But then there were the gifts Law couldn’t have known the contents of, even with his powers. One was a sort of handmade coupon book. Inside were slips of paper he could redeem for things like massages, first pick of morgue ice cream flavors, and even two whole opportunities for her to not argue with him on something (some exceptions apply, see fine print for details). The other item was a journal detailing their various cryptid hunts. It was a mix of chronicling the legends surrounding the beasts they’d gone after and detailed descriptions of just how cool Law had been taking them down and capturing them.
“Happy birthday, Law,” she said with a bright grin, kissing him on the cheek. “I promise the journal is a lot less thirsty for monsters than you’re probably assuming. I figured you didn’t need any extra trauma with your gifts. Now hurry up and change! You gotta look sharp for your party!”
Unprompted

Law rises from his desk, stretching out his back after a last minute period of work before the party for his birthday can start. Ikkaku doesn't knock when she comes in, simply throws open the door and presents him with both snark and his gifts. The doctor can't help the small smile that touches his features. The firsts thing he takes is the coat, fingers already toying with the fur and appreciating the calming affect it has on him. He hums in appreciation, liking the colour and form. Yep, he's definitely wearing this today.
The shirts get an appreciative once over but Law has a policy about wearing jackets without shirts so none of those are getting worn today. Then comes the coupon book and it draws out a laugh from the surgeon. He flips through it, smiling at some of the options here. How it reminds him of the coupon book he and Lamy made for their mother when they were kids. A small nostalgia wave of sadness hits him and he sighs as he puts the coupon book down on his table. It gets a lingering touch before he turns his attention to the last gift.
She really went out of her way to make this journal look like one of those old leather bound journals filled with hunting data. It looks good and Law does flip through it some, chuckling at Ikkaku's little illustrations that go along with some stories. He turns about and puts the book onto a shelf just above his desk, where he'll see it every day and have it within reach to read when sleep isn't available.
"I suppose it's a good thing I made it another year," he quips, turning a smirk to his adopted sister. "Now I get to tease you 'bout giving me a coupon book. What are you? Ten?"
He chuckles and steps closer to Ikkaku, pulling her into a one armed embrace as he hangs the furry jacket over his shoulder. He's smart ass about it but he does appreciate the gifts and the clear work that went into these. He appreciates everything his crew of beloved idiots do for him.
1 note
·
View note
Text
Restless Rewatch: The Untamed Episode 12 second part
(Masterpost) (Other Canary Funsies)
Warning: Spoilers for All 50 Episodes!
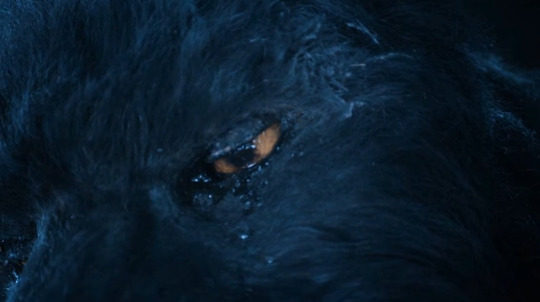
After locking Wei Wuxian into some comically large chains, Wen Chao has him thrown into the dungeon, with an unpleasant surprise.
This Fucking Dog
Being a fan of The Untamed involves occasional second-hand embarrassment, like when they fly on their swords, or the zombies all have the same wig, or a fight sequence moves slower than everybody’s granny. It's ok because each of these things is offset by excellence in acting, story, costumes, weapons, sets, etc.
Then there's this fucking dog.
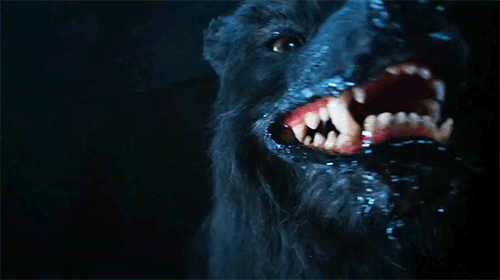
The department of questionable practical effects really outdid themselves with this thing. Just seeing this awful creation on screen gives me so much cringe squick I can barely look at it. But for you, dear readers, I FORCED MY EYEBALLS to watch the entire dog sequence OVER AND OVER. Then I applied some brightness adjustments and looked at it EVEN MORE.
Let's get desensitized! I’m going all in on this monstrosity.

First, this dog does not ever move its body or its feet. Its legs are totally immobile. It appears to be made of a big sawhorse with a stick for the neck. The head swings up and down and side to side. That’s it.
“Animatronic” is too generous of a term for this thing. The animatronics at Chucky Cheese learned to play musical instruments and host birthday parties decades ago. This dog cannot play an instrument and it has to wait for Wei Wuxian to walk over to it before it can attack him.
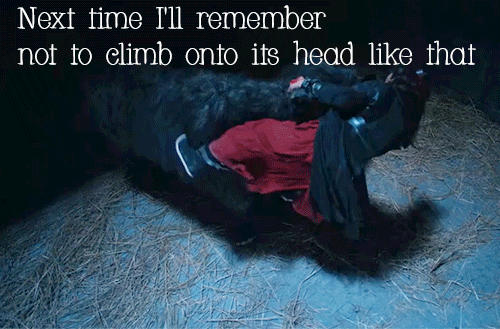
When it falls over after Wen Ning K.O’s it, it’s like a chair falling over. It just topples to the side, legs sticking straight out.
(more after the cut)
Next, It has a mouth full of teeth, which opens and closes. And it has drool the texture of Astroglide Extra-Thick Gel. But...no tongue.

Seriously you guys, it literally does not have a tongue. They just sculpted a little bump at the at the bottom of its mouth, despite dogs being known for, like, lolling their tongues out of their mouths at every opportunity.
Moving along, it has dull, lifeless eyes, and its eyelids are visibly disconnected from the rest of its head, like a doll that mechanically shuts its eyes when you lay it down to sleep.
Finally, its fur looks like a fucking muppet, and it has random shiny spots all around its eyes and lips. These are probably supposed to be body fluids of some kind, but they just look like someone was careless with the cra-z-glue.
Xiao Zhan gamely tries to act opposite this ridiculous fail prop, but there is nothing remotely scary about it.
Here is Wei Wuxian being scared. I replaced the animatronic dog with a reversed clip of my dog Pepper asking for a piece of cheese, and I think it looks more convincing this way.
Ok, let's be done with this stupid fucking dog. Wen Ning knocks it out, Wen Chao criticizes it in the morning, and nobody ever speaks of it again.

Wei Wuxian is so mortified to have endured this farce that when Lan Wangji asks him, much later, “why are you afraid of dogs?” he does not say “don’t you remember that time I got chewed on by a giant animatronic dog at Wen Chao’s place?” but instead pretends that this never fucking happened.
Wen Ning to the Rescue
For contrast, the next dungeon scene is a really touching and important encounter between Wen Ning and Wei Wuxian.
Wen Ning comes and knocks out the creature, and gives Wei Wuxian medicine.

Wen Ning is doing this in defiance of his clan and his sister, simply because Wei Wuxian is his friend. Yes, he feels indebted, but Wen Qing saved WWX’s life once, so the tally is already even. Wen Ning is just super attached to Wei Wuxian, and vice versa; WWX calls him Wen-Xiong in this scene.
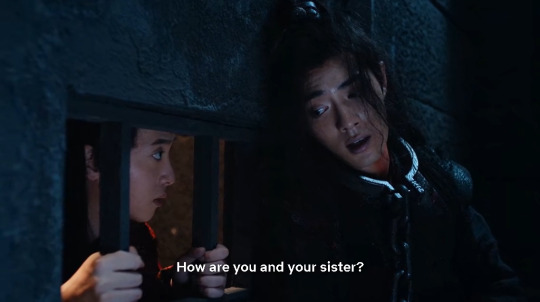
When Wen Ning explains how to use the medicine, Wei Wuxian changes the subject to ask how WN and his sister are doing. He is bleeding, chained up, high on adrenaline and fear, and what he really wants is to hear how his friends are doing. When Wen Ning talks about Wen Qing’s troubles, Wei Wuxian wishes she would accept help, instead of always going it alone.
Wei Wuxian thanks Wen Ning formally, and tells him no words can express his gratitude. Whether this is a literally correct translation, the gratitude both of these young men feel toward each other transcends words. It will become a driving force in both of their lives as they save each other from increasingly awful situations.
Wen Ning tells Wei Wuxian about the burning of Cloud Recesses....the burning of the half we never visit. It would suck to damage that exquisite set, so I’m ok with that production choice, but creates some cognitive dissonance when characters get upset about the fire.
Wei Wuxian reacts to the news of Lan Wangji’s injury by punching the concrete floor of the dungeon, which is dumb but also highly relatable.
After Wen Ning leaves, Wei Wuxian decides to save the medicine for Lan Wangji, who might not even need it, while WWX is bleeding right now and definitely needs it. No matter how bad things are for him personally, Wei Wuxian is always thinking about ways to help the people he loves, and constantly seeing his own needs as less important than everybody else’s.
Breakfast Time

After his night of terror and maiming, Wei Wuxian emerges as chipper as ever. Almost like he is already an expert at hiding his trauma from the people close to him.
Lan Wangji gives him a careful look, taking in the sight of his ripped clothes and bloody neck and hands.

Jiang Cheng is angry at Wei Wuxian for joking about his injuries, so he shoves him, potentially causing more injuries.
Wei Wuxian laughs off the signs of torture and attempted murder and everyone goes along with it. Nobody knows what happened to him other than "dungeon" and what he looks like right now, and they’re all just like, okey dokey, I guess you’re fine.
He’ll carefully laugh off his months in the burial mounds in the same way, later, and Jiang Cheng will accept it nearly as readily as he accepts this. But by that time Lan Wangji will see right through him.

Nie Huaisang mentions the Lan Clan in the course of discussing breakfast, and then everyone pauses awkwardly because they know that mentioning this will make Lan Wangji think about the recent attack on his home and the deaths of many of his fellow disciples. Whereas if nobody had mentioned it, he totally wouldn't think about it. That's how grief works, right?
Insult to Injury
Wen Chao decides to spend some time gloating about battles and insulting people's families, which he does with Wen Qing standing behind his eyeline so that she can warn Wei Wuxian not to let his brother go off.

Jiang Cheng is not going to let anybody who isn't his mother insult his father like that, but in a reversal of their normal roles, Wei Wuxian restrains him and helps keep him from doing something rash.
Monster Hunting
Wen Chao makes everyone read out loud until Nie Huaisang wisely faints and gets carried off. Then he gathers everyone for a monster hunt. It's unclear why he wants to go monster hunting but he sure does, and bringing the hostages along might make them all die, which would be a nice bonus.
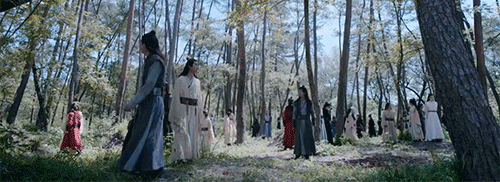
The cultivators wander around en masse in a small section of forest, thoroughly covering every inch of it. This is a great way to hunt for a dead body but not so good for living prey.
Wei Wuxian and Jiang Cheng stand around like bitchy queens at a dance club, talking smack about Wen Chao and his girlfriend.
Wei Wuxian brings out a salty phrase and Jiang Cheng wonders what websites he's been going to.

Dude. Lighten up.
Leave that Boy Alone
Wei Wuxian notices Lan Wangji struggling, and now that he knows the backstory, he's determined to help. Jiang Cheng is determined to stop him.
This is, once again, the fundamental disagreement between the brothers, and it's never going to be solvable. Jiang Cheng's specific dislike of Lan Wangji may be rooted in jealousy, but his belief in not helping outsiders runs a lot deeper than that.

For Wei Wuxian, there is no such thing as having helped enough. If someone is his friend, he will never stop helping them, and he has a lot of friends, and makes new ones wherever he goes. He's always going to be giving something of himself, to the detriment of any conflicting obligations.
Jiang Cheng tells him that Lan Wangji won't accept his help, and Wei Wuxian says that's not the point.
What other people think, want, say, or do, is not going to have any effect on whether Wei Wuxian does what he feels is right. This is a bit of a problem where a person's right to self-determination conflicts with Wei Wuxian's need to help them, as Jiang Cheng will eventually discover.

Jiang Cheng's least effective argument is the one he relies on most often when they disagree: other people's problems are not our responsibility. He's saying this to an orphan who was eating trash and stealing scraps from dogs before Jiang Fengmian came into his life.
Jiang Cheng doesn’t seem to realize the underlying logic of this argument. If it's wrong for Wei Wuxian to help the people he cares about, it was also wrong for Jiang Fengmian to help Wei Wuxian. Jiang Cheng loves Wei Wuxian and would willingly die for him, but he, like his mother, rejects the philosophy that brought them together in the first place.
Wei Wuxian walks away from an upset and shocked Jiang Cheng to offer a piggyback ride to Lan Wangji.

...who won't accept it, but who will remember the offer forever.
Writing prompt: Thoughts of an animatronic dog
Soundtrack: Five Nights at Freddy’s by The Living Tombstone
#fytheuntamed#the untamed#wangxian#chen qing ling#wei wuxian#giant animatronic dog#lan wangji#jiang cheng#restless rewatch the untamed#my gifs#canary3d-original#the untamed spoilers#embarrassment#this dog is why I started writing these#this goddamn dog
450 notes
·
View notes
Text
#Ooooh now this is really pretty! Surprised how smooth the shading looks. Always thought you need some harder shading with pencils
[@joshay98]
referring to the Oro and Ghost drawing I used colored pencils on [thiss'un]
There's multiple factors which can affect how smooth the shading looks (coloring in general, really). Including but not limited to:
- how sharp the pencils are - seriously, make sure you use sharp pencils unless you're doing a technique that requires the tip to be dull
- type of colored pencil - I use prismacolors which are waxy and leave more color with less effort than cheap crayola pencils (though I do keep some cheap crayolas for their color and texture for certain things)
- type of paper - paper with more "tooth" (a type of physical texture) will catch the color differently than smoother paper. for the drawing, I just used computer paper which is smooth paper.
- how you use color - layers are your friend, and so is mixing multiple colors to make the transitions smooth and have depth. (in the drawing, I used indigo, copenhagen blue, violet, and tuscan red for the shadows of oro's cloak, and for the transition to the highlighted part, I used true blue and non photo blue. I think I added a touch of brown in there somewhere too, and I did a... darn, I don't remember the correct term, but whatever the colored pencil equivalent of a "wash" is, I did one of those with cool grey to make the cloak a little duller, especially for the lighter part so it didn't "shine" like the fur collar)
- how you use the pencil to apply color - light, tight, circular motions (called "scumbling") will allow for a smoother application of color and build up of layers. Other methods of applying colors have their uses, of course, but generally I find light, layered scumbling is very effective for creating that smooth color look
- patience - yeah, speed generally isn't your friend here
#wow look at me talking about actual art stuff. my elementary school art teacher would be thrilled to know i still use what she taught me#she was an exceptional art teacher and i am forever grateful for the foundation she gave me. continuing the legacy by sharing what i know#or something#i try to sometimes anyway#um. so yeah! colored pencils are really fun but as with any medium there's more to it than just 'slap some color on the page' haha#art stuff#also! thank you for the compliment joshay! i always appreciate that you take the time to say things in the tags#even when it's not for my art. sometimes you point out things in what you reblog that i didn't see the first time so then i look again! :)
7 notes
·
View notes
Text
tonight i took a closer look at the lower rows of vlad's face textures

iiii think his teeth pull from this part of face_c1? there is that gap, but the gums even line up. i'm a little thrown, though, because face_c0 is his default face texture and those rectangles are... weird in that one.
the lines do not look right if applied to his teeth. and those other rectangles are different colors for some reason? that's his tongue, by the way, and i'm at least confident that the correct colors are c0's based on screenshots. i'm less confident about the square to the left of that, but it might be his inner eyecorners...? those need to be mapped to something, but the angle that you can actually see them at is so particular that i can't find an ingame screenshot where they're visible. putting that aside, i'm not sure why one area of his face would pull from c1 while everything else pulls from c0.... so i feel like i'm making too many assumptions here, i'll double check footage of vlad actually using c1 ingame to see if i notice any of this there, but arcade's capture quality is just so low...
anyway, i finally corrected his lower beard and eyebrow texture. beard.dds seems to be used for texturing over this, but i'm still working on getting it to look how it's supposed to...

i still don't know what the variety of other unaccounted for rectangles are yet.
it's probably not even noticeable, but i also attempted to apply vlad's blush texture/alpha in this screenshot. it doesn't look wrong, and vlad's blush expression from main is definitely really subtle too, but i'm not sure if it's supposed to be this subtle. i dunno, maybe it is. i also still cannot find a visible instance of this being used ingame.
anyway, i also added his eye shines, fixed a slight seam in his neck and fixed the line in the back of his hair that was literally just because his UV maps were misaligned by about 4 pixels.
i'm still getting fucked the most by the shoulder furs' transparency, you can see how blocky it looks even though i got the rest of the fur correct and i'm struggling to fix it.
5 notes
·
View notes
Text
Cleaning Stuffed Animals: A Tutorial
So I have become, among my friends group, the Stuffie Cleaner. When people find their stuffed animals have gotten nasty or dirty, and the washer looks like a scary death machine for their friend, they come to me, and I’ve realized that this is happening enough that maybe there’s people out in the world also going “my poor stuffie!!” with no way of cleaning it and no one to turn to. In that vein, I’ve decided to write up this method for the internet to enjoy.
Below is my method for cleaning any stuffed, fabric thing (animals, pillows, etc) that for one reason or another cannot, or probably cannot, go in the washer/dryer. If you’re worried about it falling apart, ruining the fabric, or getting mildew inside because it won’t dry, this method is your friend.
YOU WILL NEED
- A small tub, bucket, or other basin for water. It doesn’t need to be particularly deep or large, but it does need a wide mouth. Bathtubs can work just fine if that’s all you have. It just needs to hold water and be something you can reach into.
- Baby shampoo. This is also very good for washing wigs, if you need to do so.
- A jug of some kind. Empty milk cartons, water gallon jugs, or large pitchers are fine. It just needs to be able to hold warm water and be somewhat portable.
- A towel. Two if you don’t have any space that you can just get absolutely soaked, for underneath the bucket. If you’re worried about the space getting wet, you can honestly have any number around, but at least 1 is needed for the stuffie.
- Optional: a toothbrush, for set in stains. I have a small travel electric one that’s I love for this. Please do NOT use any toothbrush you plan on returning to your mouthhole, that’s nasty. Also do not use any toothbrush that’s got nasty stuff in it or has recently been used with harsh cleaners or bleach. If you’re worried give it a wash first to remove any chemical nastiness.
- Optional: A swimsuit. If you do this like I do you’re going to get very damp. You might want to dress for it.
- Optional: A hair dryer. Note that if you do use one, make sure it has a setting below Death Hot, as heat tends to be Reason 1 why stuffies should not go in the wash. You can melt fur or fabric with high heat, but as long as you aren’t using a heat gun, my method, used with ample caution, should not harm your fabric (though YMMV). If the dryer is too hot for your head it may be too hot for the fabric.
STEP 0: THE PRE WASH
The first thing to do is remove any gunk, debris, or physical yuck from the outside of the stuffie. You can do this with whatever you want - paper towels, regular towels, etc - but the important thing is that you get your stuffie down to just the bits that have soaked into the fabric. If, say, you dropped pasta on your friend, this is the part where you need to get the noodles off the stuffie. This is not always applicable, but when it is, it’s not something you can skip.
STEP 1: THE SET UP
Now that your friend is ready to be cleaned, it’s time to get your shit set up. Find a space that can get... reasonably damp. We have a basement with a concrete floor that works fine, but bathroom floors, tiled kitchen floors, or spaces like that are also fine. There’s just going to be a lot of water involved and if you’re trying to clean the water off a rug after you’re done it’s not going to be fun. If you’re going to change into a swimsuit, I’d do that here.
Next, fill your vessel - bucket, tub, whatever - with a small amount of warm water. I usually don’t fill it over an inch, which is roughly the distance from the tip of your thumb to the first line in your knuckle (yes, this is a tried and true method, trust me). I usually warm the water up to be just slightly warmer than what I want to touch, as our basement is cold and the water cools very quickly, but ultimately you want the water to be just touchable when you start.
While you’re filling, fill your jug, too. This should be warmer than the tub, because it’s going to sit for longer and will have longer to cool down. It should still be warm when you use it towards the end of the process, so use your own discretion in how warm you have it.
Once stuff is filled, get everything else you need together. Make sure your towel is nearby, lay any other protective ones down, have the rest of the stuff within arms reach. If you have a hair dryer I’d keep it away from the tub.
Lastly, once it’s all ready to go, add a very small amount of baby shampoo to the water, and mix it up very gently with your fingers. It should be just starting to create suds, but not enough to become a bubble bath. Soap lingers and leaves a residue if it’s not rinsed off, so while you’ll want a little for the water, less is better. You can always add a little more.
STEP 2: THE WASH
Once you’re set up, grab your friend, and assess the stain. Old, set in stains from being in boxes or storage may require the toothbrush, but newer things may not. Either way, the process will remain more or less the same: take a small amount of water in your hand and gently apply it to the stain. Think of it like when you are trying to remove dropped sauce from a shirt - you don’t want to get the stuffie soaked, but you want the area to be damp.
DO NOT DUNK THE STUFFIE.
I say this, because the reason washers can be bad for stuffed things is that most of these things are filled with what we call Poly-fill (it’s a brand that’s gone generic, like Kleenex). Poly-fill is a polyester bundle of threads that remain fluffy as to give your friend a shape, and if it gets wet and does not get dry, it can mold. And inside a friend, it doesn’t dry super well or quickly, so the less you get the poly-fill inside the stuffie wet, the better.
Once damp, you can either use your fingers, or the toothbrush, to gently scrub the area. If needed, you can add a little more soapy water to the area to get a little more suds and break up the stains. This is where I love my toothbrush, because being electric, it vibrates just a little, but being a travel brush it’s got the power of a child’s toy, and that means its very gentle. The important thing here is that you don’t want to get too aggressive. You should be massaging the fur or fibers, but you don’t want to put too much stress on the threads, as that can create holes. It’s better to spend 20 minutes being gentle than 5 being rough.
This should remove the nasty stain. I’ve so far had this method take out stains that were 10+ years old and dry. It just takes some time, and repetition.
If you’re just trying to sanitize your friend, you can just gently work a damp hand through the fur. There’s no need to really scrub or get the stuffie super damp, as it’s just about getting a little soap on the surface to remove germs.
STEP 3: THE RINSE
You have by this point conquered the stain, yay! The area may seem darker than average, but that’s because it’s wet, though some very nasty stains can leave the spot slightly darker, which will always be more noticeable when its wet than dry. Now it is time to get the soap off.
Grab your jug. It should still be warm, but hopefully not hot. If you can’t touch the water it’s way too hot still and you might need to cool it down somehow. Gently pour a little of the water into a cupped palm, and then pour that over the sudsy area(s). The goal is to rinse off the suds and soap while soaking the stuffie as little as possible. It’s still definitely going to get very wet, of course, but containing the wet spot and/or how wet it is will be helpful regardless. You may need to follow behind and wipe some suds away in between pours, and if so you can very gently use some fingers to do this. A wet hand is also very good at removing suds if you’re worried about pouring water. You can also pour with the jug if it’s rather small, but the idea is to keep the amount of water being poured as little as possible at a time, so use your discretion. Again, we’re trying to not soak the insides too much.
Don’t use the tub water to rinse it or your hands. It’s still soapy. This is why you got the jug full of clean water.
STEP 4: DRYING
Your stuffie is rinsed and (hopefully) clean! Now it’s time to get the water off. First, grab that towel, and towel dry your friend off. Try and agitate any fur as you do, as that’ll make sure it gets fluffed back up and doesn’t get stuck all pushed down in weird directions. As long as your friend isn’t falling apart you should be able to get a little rough with this portion. You want to aim to get them as dry as possible with the towel in the same way that you try and get yourself dry after a shower or the pool. You’ll likely wind up with a stuffie that’s just a little damp to the touch.
Once you’ve done that, there are two paths.
Path 1: you can, if you want, use a hair dryer to finish the job. If you do so, be very careful. Do not ever keep the heat from the dryer on one space for more than a few seconds. I tend to find passing the nose of the dryer back and forth almost like you’re trying to paint in broad strokes to be useful in terms of keeping the heat distributed. I do this for my hair, too, but I really don’t otherwise know how to describe it. Also, keep the nose of the dryer back about the length of your hand, so the heat has more space to spread out. I know it’s tempting to press the nose right up against the wet spot, and if you think you gotta do that, don’t keep it there for more than a couple of seconds at a time. Heat can murder a stuffie, so using the dryer is about making sure the heat is applied indirectly and making sure it has enough space to distribute across the area.
IF YOU: Smell anything weird, feel like the fabric is changing color or texture, or otherwise get a bad vibe, STOP and assess. Melted fabric tends to have a very hard texture, almost like plastic. You can always go back to it if your instincts were incorrect, but I have no idea how to unmelt fur, so it’s better to keep attentive. Trust yourself.
Path 2 is letting the stuffie air dry. You should put them in a warm space, away from the water, and check on them occasionally. If they’re still damp when you check, you can towel them off again and fluff the fur with it. Keep checking until they’re dry to the touch. This may take some time, depending on how wet they got, but if you’re worried about heat, letting them air dry can’t damage the fur. The less wet you got them during the wash, the less time this will take for them to be fully dry.
STEP 5: YOU’RE DONE
By this point, your friend should be fully dry. Give them a hug, run your hands through their fur, fluff them up a bit, and apologize for your transgressions. (I can tell you that, as a Professional Stuffie Doctor, they still love you regardless).
The only thing now is to just assess the area with the stain. Some very dark stains may leave behind a slightly darker patch, but 9/10 it’s not going to be noticeable without really looking for it. If there’s still some nasty, you may need to repeat the process again, using the toothbrush if you didn’t before. Double check that the area doesn’t smell funny - it should smell like shampoo, but if it smells sour, you may need to give it another wash.
If done right, it should smell fine, feel fine, and look fine in your hands now that it’s dry. If so, it’s time to celebrate! Also clean up because you’re probably very damp and so is the area.
And that’s it! I have used this method for just about everything. I’ve removed old stains, new stains, stains I caused and stains that just showed up. I’ve also used this method to sanitize friends I rescued from places like Goodwill, as the warm water and suds should kill any nasty bacteria from things like colds or COVID. (You have no idea if the people that donated the friend washed it ever, so I recommend a bath to remove snotty germs 100% of the time with rescued friends). I’ve also used this on everything from Mallowfriends to Beaniebabies to traditional jointed bears and everything else. There is no fur type this shouldn’t work on, no size too big or small, and no filling that is off limits.
When in doubt - be gentle, keep the water and suds to a minimum as much as you can, and be patient. This method is an act of love, and you can’t rush tender love and care.
If people have questions, my ask is open. Otherwise, go wash your stuffies!
#stuffed animals#tutorial#wash#cleaning#stuffies#how to make your stinky friends less stinky and your sticky friends less sticky#sometimes I do my own work
16 notes
·
View notes
Photo

Mostly done with these Alpha Legion Outriders for 30K. My first time sculpting something other than fur, and my first attempt at freehanding heraldry worth the name! The “A”s all came out in different sizes, and both hydras are very different - I might redo the leftmost one, since it’s pretty lopsided. I like the lowercase “a”s on the squad sergeant, they sort of straddle the line between a “a” and the greek alpha letter. The chains are not wonderful, and in the future I’m going to try a slightly more elaborate design, but for getting my feet wet and as proof of concept I think it looks pretty decent. Overall it really helps the indigo shoulder pads pop! Some of the highlights will probably be touched up, as well, particularly on the helmets.
The power armour looks much less purple and somewhat less dark, and more blue under a more neutral light, but my desktop lamp is very yellow so the thin layers of purple wash tint the armour quite powerfully. The mud will also receive some more brown paint, to make it less greenish-yellow. Making it was simple - put on your choice of texture paint, wait until dry, slap on liberal amounts of liquid greenstuff (PVA glue or the like will probably do just as well) to make the grains of sand less visible, paint it rhinox brown, apply varnish or (as here) nurgle’s rot technical, then apply layers of thinned down rhinox hide until you’re happy with how much shine is showing through. I imagine you could do snow or normal earth rather than mud like this as well.
They’re converted from plastic Chaos Bikers, with added Alpha Legion MK VI heads from Forge World. The Sergeant has a Thousand Sons head, since it looks a lot like the artwork of the helmet used by Exodus.
In-game, I plan to run 6 of these with meltabombs in an army led by Armillus Dynat. Mutable Tactics lets the army pick tank hunters as a rule, Dynat boosts anti-tank in the enemy’s deployment zone, and these guys come with the scout rule. Scout 12″, move 12″, charge 2-12 “, kill a tank that may or may not be damaged from any Saboteurs I’m running, or shooting.
Pictures that inspired me below cut.
AL’s pre-Heresy look in Index Astartes.

AL in Siege of Vraks, IIRC.
AL in the Black Crusade rulebook.
#30k#40k#warhammer 40k#warhammer 30k#warhammer#heresy#horus heresy#horusheresy#hardforheresy#hard for heresy#alpha legion#space marines#chaos space marines#astartes#adeptus astartes#legiones astartes#xx legion#twentieth legion#legion outriders#chaos bikers#space marine bikers#space marine outriders#armillus dynat#unbroken chain#alpharius#omegon#alpharius omegon#great crusade#the great crusade#the scouring
13 notes
·
View notes
Text
Tips and Tricks: Watercolors Edition.
It always surprises me that more current cartoonists don’t use watercolors. I know that Will McPhail and Carolita Johnson use them, but watercolors haven’t really popped up much in the dozens upon dozens of interviews I’ve conducted over the past several years. Of course they show up more in interviews I’ve done with cover illustrators (Barry Blitt, John Cuneo, etc.), but I think a lot more cartoonists would find a whole world of opportunities in watercolor, if they were to experiment with them a bit. I’ve been painting a lot of watercolor pet portraits recently, and thinking of (and using!) some tips and tricks that I have found useful over the years, but that haven’t come up in any of the interviews that I’ve conducted on this blog, so I thought I would take the time to share them!
Here is some of my more recent work:
You can find more of my art on my Instagram, here.
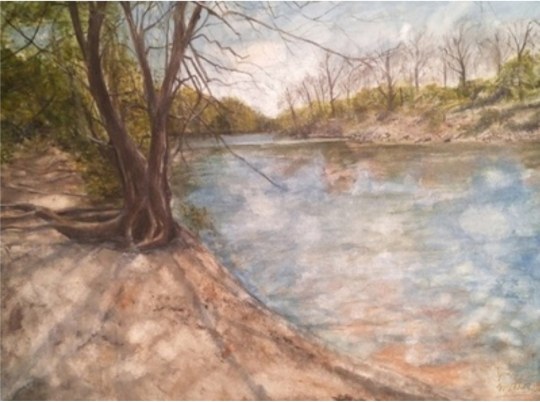
-Watercolor has a similar look to ink wash, but is less permanent. You put down a layer of ink wash and you’re stuck with it. But if you use watercolor, you can take a wet rag and practically erase it! Plus, if you don’t feel confident doing linework with a brush, you can still use ink or a pen for that. Look at this landscape that I did a few years back. The shadowy sand was done by putting down opaque watercolor, letting it dry, and then scrubbing most of it away!
-If you have discovered the joys of lifting up watercolor mistakes, but have gone about it a bit over zealously, and caused your paper to pill up (but haven’t fully dug a hole through the fibers), I have discovered that the Cliceraser, a Japanese tool that Roz Chast recommended in her Case as an ink eraser, is your savior. If your paper is still wet, blast it with a hairdryer until it’s fully dry, and then gently sand off any errant paper fiber until it’s smooth enough to paint on again. Now, this would not work on printer paper (you shouldn’t be using watercolor on there anyways—I generally work on heavy cotton watercolor block), but this has helped me on more occasions than I care to admit. It is basically a grainy eraser. I haven’t tried using sandpaper, but I think the Cliceraser is more gentle, and would allow for more precision.

Image from Roz's Case
-Frank Cotham uses water-soluble crayons, which have a very unique look to them, but I’ve discovered that they can sometimes cause an unwanted glow in photographs. Say you spent ages painting a landscape, and thought it would be a great idea to use water-soluble crayons to paint the leaves. Everything looks uniform and tied together, but when you try to capture an image for your portfolio, you discover that your subtle fall foliage is garishly glaring. Devastation. Use water-soluble crayons with caution, especially when you're doing mixed media, and perhaps take photos of your work as you go along, to make sure that what you see through the camera matches what you see in front of you (or at least to ensure that you won’t be faced with any horrifying realizations at the last second).
-Speaking of water solubility, a very versatile tool that hasn’t been mentioned in any Case interview is one of my favorites, and one that I think would make a lot of cartoonists’ lives a lot easier: watercolor pencils. They blend really well with regular watercolor paint, and work great for detail work, for building up an area quickly, and for outlines (though I sometimes like to have graphite peeking through in a painting, using it for initial sketches can be helpful, especially when using light tones, because you can seamlessly blend your lines into your painting).
A lot of cartoonists will use gouache straight out of the tube for highlights, but that can require extreme precision, and sometimes, watercolor paper will eat up the paint! However, if you use a very sharp white watercolor pencil instead, the highlights won’t get absorbed. If you’re feeling fancy (or using grainy paper), you can trace over the watercolor pencil with white gouache.
Watercolor pencils can also be used for building up an area quickly. I find that if I’m using a thick cotton paper, it can be hard to get colors dark enough, so sometimes I’ll just lay down some watercolor pencil in whatever color is best suited for the task at hand, and then go over that with watercolor paint, which can lead to some interesting textures. I do that often with rocks.
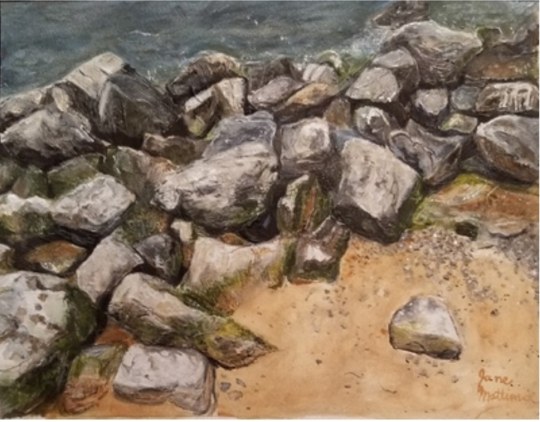
-My rock painting leads me to my next tip, which is if you struggle with drawing something, that’s all the more reason to draw it. I used to struggle with painting rocks, so I sat down and said, “I’m going to paint a very rock-heavy painting,” (well, the painting itself is very light). Did I regret this decision greatly while painting all of those rocks? Yes! But I am now able to paint rocks fairly easily, so it ended up being worth the agony. This applies to many things in life besides watercolors, of course!
-Another tip (which also applies to the above rock painting) is to use the paint’s texture to your advantage. There are some really interesting paints with high levels of mineral separation, that can create beautiful grainy effects. You can do a light wash of a grainy paint over a flat wash of paint, and end up with a fascinating texture with minimal effort. This is an especially great technique for painting dirt.
-Try to use shadows effectively rather than accurately. With portraiture, as with cartooning, you are telling a story. Such as writers use various devices (metaphors, etc.) to tell their tales, we do the same thing with how we use tones. If I’m painting a dog, I want all of the information in the image to go towards showing the dog. Part of this can be using background tones. In my average pet painting, I’m not going to try to make a meticulously true to life shadow, but rather use shading to either convey space or make the dog stand out from the background. If I am painting a pet with light fur, I am generally going to paint a more expressive background in darker tones that contrast with their fur. If I’m painting a chocolate lab, I will do a light shadow to convey that they are occupying space of some sort, but that won't cause them to blend into a dark background. I always want to make sure that the darkest (or sometimes lightest, if everything else is rather dark) color on the page is on the part of the painting that I want you to see first. Cartoonists do the same thing, but in a way that leads the viewer’s eye to the joke.
-If buying a whole set of watercolors is cost-prohibitive, I recommend buying a cheap set, and then buying a nicer tube here or there as you are able. That’s what I did. A lot of high quality companies also offer smaller sized tubes, that are often significantly cheaper than the large sizes with scary prices. Coupons are also your best friend. I’ve used a coupon on almost every single tube of paint I have ever bought. Plus if you work mostly in black and white, you only need two tubes!
I hope this was helpful! I know people of many different levels of ability and knowledge read this blog, and it’s fun to be able to have artists share what they know, because the more we help others learn, the more wonderful art we get to enjoy! If anyone else has any tips or tricks, be sure to stick them in the comments! Also, if you’d like to follow my art, I have a fairly new-ish art Instagram here. Oh, and If you’d like to support the blog there is a Patreon and a Ko-Fi (essentially a PayPal account). And if you are hankering for some more art supplies on your social medias, consider following Case on Instagram and Twitter! Have a nice week!
9 notes
·
View notes
Text
I want to encourage you that, if you're a furry and you want a fursuit but can't afford one- make one!
I've spent the last 8 months working on mine as a personal projects and it's a WHOLE LOT EASIER THAN IT MAY LOOK? Like after you evaluate the steps and watch enough timelapse videos and tutorials, the entire process is extremely simple. I'd to take this time to express how much of a learning experience it's been for me, along with how fun of an experience it's been and how cheap the experience has been (I've kept it under $300!)
First, I'd like to mention that it's a very "trial and error" type process. You WILL make a mistake. Some bigger than others. And that's perfectly OK!
Here's some things I've learned during this process;
-the backing on fur can be very hard to work with, or very easy. I got mine from fabric.com and it's not been too awful of an experience, but the fibers rip a lot easier than you'd think. (Also, be sure to order an amount of fur that isn't going to absolutely destroy your home. For a partial, just know that 1 and 1/2 meters of fur is not only enough, but it's gonna cost you a pretty penny. Be sure to only pay for what you need!)
-Don't trim down fur wity scissors! It can look very uneven and choppy (if you're seeking a specific texture like bird feathers or a pinata like appearance, it might be alright!) but otherwise you should invest in a cheap pair of pet hair clippers. I have a WAHL brand of hair clippers for $25 for walmart and they work absolute wonders and cut evenly.
-Watch as many tutorials as possible before starting anything! Especially tutorials on the head. There are so many different methods on making your head and it's important to start simple. I'd personally reccomend the bucket head method for beginners as there's a plethora of easy to follow tutorials on it
-Seam allowances are no joke. Leave at least 1 centimeter of space between your actual pattern piece and you should have plenty to work with. (You might worry about your extra fabric in the seams causing the fabric to raise or you might sew a little too far, causing your fabric to be loose. I assure you that it will be alright! You're very much so allowed to trim any excess you may have! Just know that it's better to have more than nessesary than less- because it's harder to add fabric than it is to remove it.)
-Line your head! And do it before you build on as it might be more difficult for you to line it after you've furred your base. I'd do it as soon as you have your bucket head base made and apply hot glue onto the very top of the head and work your way down, allowing space for your eyes and mouth as these pieces will need to be cut.
-No shame in references! If you'e unsure how to build specific shapes out of foam, I reccomend googling "fursuit head pattern" and you should very quickly find patterns for things like the brow piece and cheeks.
-If your eyes look too small, they probably are. Don't be afraid to go a little overboard and make the holes for your eyes a bit on the larger side. I'd rather you have large eyes than be completely unable to see. Blindspots are a very real thing and having poor vision can make it worse.
-Shave your fur beforehand! It's stupid hard to sew the edges of fur when the pile is 2 inches long. Trace your pattern onto your fur, cut out the entire square of space, and shave it all to your desired lenght before cutting out your pieces.
-Be prepared for hot glue burns on your fingers and keep burn medications handy. Also be ready to potentially sit and hold foam together while the glue dries for upwards of 3-6 minutes.
-Pay VERY close attention to your fur direction. If anything, mark it on the back of your fur pile. It's crucial you have your pieces aligned with the proper fur orientation before you cut anything out. (As a sidenote, my fur had this incredbly rough edge maybe 1 or 2 inches away from the edge that was incredibly hard to cut through, so I don't reccomend patterning on that. You'll know it when you see it, but mine had this thick thread running all down it.)
-When cutting your fur, I'd personally reccomend scissors to beginners as I found razors to be difficult to work with. When cutting with scissors, stay as close to the backing as possible and use tiny, itty bitty cuts to avoid cutting the fur out of the backing and potentially shearing or ruining your fur.
-Your best friend will be the blanket stitch. It's all I've been using this entire time and it's not only durable but it's easy to do.
1 note
·
View note
Text
KH3 First Impression and Complete Thoughts
BACKGROUND: i've played kh1, com, kh2, bbs, 2.8, and a bit of khux. i've watched coded and 3d on yt, so i know the story relatively well. this is an impression of my first playthrough. i did my run on standard mode and watched the secret ending on yt. i mostly did this for story, so this will have my initial impressions based on my run that will not cover extra content like the phone mini games and cooking. my opinions are subjected to change if i ever do any later playthroughs. pls, feel free to disagree w/ me.
!!! WARNING: THERE WILL BE A LOT OF STORY SPOILERS!!!
AUDIO:
Music: utada is queen!!! that opening song!!! also i kept noticing how lit the songs are in each world esp frozen??? and aqua's. worth a replay just for the soundtrack alone.
Voice Acting: everyone sounded great for the most part. sora’s va have certainly improved and sounds less strained. his vanitas voice has suffered significantly though lolololol. i think i read that someone called it a wannabe dark knight voice? the organization sounded incredible, w/ my fav being xemnas, marluxia, and larxene. the disney and pixar va’s are incredible w/ my fav probably being randall in monster’s inc.
some ppl did not get vas like xaldin and laxeaus. and phil in hercules. which were all very disappointing bc in the scenes that they were in, they would just stand around woodenly, and it’s very noticeable.
VISUALS:
mostly a+. environments are beautiful. water and frost textures are amazing!!! you can really feel that waterga and blizzaga. fur textures in monster's inc. could use some work. little details like the sails moving in potc rly make the worlds come alive. this could be a me prob, but environments in certain worlds make it very hard to see map markers, treasure chests, and disney emblems (which are supposed to be hard to find, but still). mostly in tangled.
strangely enough, this is the only game where i prefer in game graphics to cgi. it's already highly expressive and there's something creepy and uncanny about the cgi esp in the final fight. and it's mostly bc sora's thin chapped lips throughout the entire game suddenly becomes full.
DESIGNS:
i don't love everyone's outfit or sora's outfit changes in this game besides toy story. this is something i alrdy knew going in, but i've always felt like the outfits in kh1 and 2 rly suited each of the character's personalities. and this is not just destiny trio but even chars like roxas, the twilight town kids and the hollow bastion crew. the move towards a uniformed look makes no sense to me like is it to unify the key bearers as one force against the organization? i could understand why destiny trio was wearing plaid but why the twilight town kids also? by the end of the game, almost everyone was wearing black and it's just boring to me. like there's a right way to do uniform while retaining characters' individual looks, and that's the wayfinder trio in bbs. in this game, not so much.
an aside, but i'm sort of disappointed in the hud moving to 3d too. the 2d portraits have always been part of kh so it's kinda a bum to see it go away.
i don't love the lvl designs but it might also be due to a narrative and pacing issue that i'll expand on. any case, vertical maps are a challenge to figure out. i don't consider myself bad at directions but there are so many moments, esp in hercules and tangled where i would be like where the heck do i go next (and i have the map) only for me to look up and find a shotlock teleport point (and this isn't so much a thing that heightens the difficulty but a time waster).
lvls and bosses in previous kh games have always been known for their gimmicks and mechanics, but in this game particularly i found it to be more tedious? and this mostly applies to frozen: who the fuck designed frozen? who the fuck thought it's a good lvl design to have sora climb a mountain, get kick off it twice, and climb it again as good lvl design? who?
all the disney bosses started blending together for me bc they're literally all giant monsters and rly easy. i think the mistake here is the fact that the disney worlds are put back to back whereas in kh1/2/bbs you have the interruption of original worlds and an actually playable important parts to the main story, in this game all the important storyline in radiant garden are locked in cutscenes interspersed throughout the game between finishing disney worlds.
a lot of ppl might disagree w this, but i miss the cinematic reaction commands and limit attacks. we still have them but i find them to be on a much smaller scale in the form of drive finishers and situation commands, but i find them to be less imaginative in kh3 in order to be less """"disruptive""" to the gameplay. i've always found cinematics charming in previous games as a way to show sora interacting with his party members during combat. little things like beast putting a hand on sora's shoulder, aladdin leaning on him, or riku bumping his fist have a way of making the friendships he forms feel organic. outside of link commands/ summons, in this game, he........just throws a lot of ppl around or is thrown around?
GAMEPLAY:
already sort of went through parts of it in the previous section, but overall combat was smooth. i love how mobile sora is in this game. the improvement to his running speed and addition of all the mobile skills like dodge roll, super slide, flow motion, blizzard skating, etc. makes combat feel fast paced and juking so easy.
magic is super improved on ever since 2.8 and feels satisfying to use esp bc i feel like ur given a lot more mp now and with the ability to save the last of your mana for cure, it feels like you're not always budgeting your magic.
underwater combat was smoother than i expected.
it's a mistake putting almost all the commands on the triangle button. there's so much options you can do in combat and you'd mean to activate one thing, but then an attraction flow comes out and you just want to die. it gets a bit easier as i went on and got more used to the controls, but in general, i still think it's a mistake to not to have an ability or something to disable certain features like in kh2 fm.
gummy ships continue to be a thing. why. i don’t like how i have to turn the camera myself now ;;;.
i'm not a speedrunner or anything, so i can't say too much else about fighting. the physical combos to me did feel like he was spinning a bit too much tho.
STORY: oh, fucking boy.
i'm not mad, i'm not disappointed, and i'm not even surprised. i already knew that post bbs, kh has already departed far from the franchise i loved as a kid and still today, at least story wise. but let's walk through it.
Disney Worlds: the disney worlds was literally a retelling of their movies. and unlike in kh2 and bbs, where visits to disney worlds were split into two parts, with the first part following the disney story and the second part being heavily tied to the main kh story and thus having original content, the disney worlds in kh3 only get one long visit. and the integration of kh into disney was just done so poorly. remember how kh villains used to kidnap princesses? remember how they used to actually conspire to take disney characters' hearts and turn them dark? remember, you know, when they were still evil and actually interfered with the worlds? in almost every world in kh3, an org member just comes says vague menacing things to sora, calls him stupid, and then leaves. yeah. and oh, maleficent and pete looks for a black box only to not find it, and leaves. AND THEY DON'T DO ANYTHING ELSE FOR THE REST OF THE GAME.
the pixar worlds + bh6 were the only ones with any actual new content and they feel so fresh. i esp loveeeeeeeed toy story omg. the script was so good, funny, and heartwarming. the pixar consultants should have helped kh all the way tbh.
like previous games, there's an attempt for each disney world to thematically tie into the main kh story. in this game, it was as heavy handed as ever, probably even more so.
Original Worlds: onto the meat of kh, the main story was rushed up until the end. you have a slew of disney worlds, then bam, they slam you with all the human bosses and the important story stuff.
the ‘awakening’ of roxas, xion, and ventus were very rushed. you literally have one moment they’re no there then two seconds of white screen and all of a sudden they’re there.
there’s a shit ton of shoehorned character redemption arcs: vexen, demyx, saix, eraqus, xehanort, xemnas, ansem. all were done either offscreen or by some miracle, they reached an epiphany after sora beat his keyblade into their heads.
the only death scene that i actually liked, that a lot of ppl complained about, was vanitas bc yes, although i thought his character had so much potential, it was at least a consistent and sympathetic death. bless him, born a villain die a villain. same with xemnas bc i loved his last speech.
xehanort was a shitty villain through and through. no one understood his motivation; it’s like nomura took a page from thanos’ guide of how to write villains, gave him some stupid ass goal to have a keyblade war to restart the world, and then just have him...get everything he wanted? his estranged friend comes back in ghost form for whatever reason and is just like ok we’re cool man even tho u took my student and indirectly murdered me and then gets taken up to heart heaven, like O K. and like what’s the most frustrating is that it’s implied they’re keeping him as a villain??? bc fucking ymx is like ooohh imma just go back to my own time via time travel. it’s too late for u sora hurdur.
and the younger members of the organization, the ones that we do know were in khux. we don’t get to know how they became nobodies and they don’t get a redemption??? really???
you can tell they tried, TRIED, hard to give everyone closure. and they miserably failed to close plot points. they actually opened more. who the fuck is the unnamed girl in lea and isa’s storyline? why the fuck did you mention her if you were going to play the pronoun game and not name her??? what the fuck was in the black box??? why are they looking for it when no one know what’s in it??? why the fuck was repliku inside of riku the whole fucking time??? why have org members be norted if they can still have agency and choose to betray xehanort??? why the fuck was BOTH sora and riku in different worlds in the secret ending????? ? ? ?
and tho i’m very glad that wayfinder and sea salt trios get their happy ending, the destiny trio had their characters assassinated. kairi was teased to become an independent character of her own and fight alongside sora, only to get shafted to become a damsel in distress, again, literally replaced by xion in one of the last battles, AND referred to as ‘motivation’ for sora by xehanort lol. sora, the guy who’s always going my friends are my power, ONLY grieves about losing kairi, accrediting all of his strength ONLY TO HER. riku, who spent the first game desperately trying to get kairi’s heart back, and who protected her from saix in the second, suddenly doesn’t give a shit about her and is just there as sora’s moral support. it’s so frustrating that nomura has the audacity to say that this series is primarily about friendship and then pull this shit lol. it’s transparent.
CONCLUSION:
i think for me, the quintessential kh trilogy has always been kh1, com, and kh2. as far as i’m concerned, the story should have ended there for destiny trio. and it’s like nomura said, how he feels more sympathetic towards villains now, i think nomura’s ideas have outgrown his main character.
sora’s journey worked in 1, com, and 2 because he had an overarching goal to find kairi and riku and return home. not everyone has to understand heartless vs. nobodies or dark vs. light but at least, anyone can understand the desperation of saving your friends. when that framework is taken away, sora’s goals and motivations become unclear; he’s a kid and has little reason to be caught up in xehanort’s plans, the keyblade war, or the organization’s agendas. and his failure to grow with the increasing complexity of the plot, to investigate for himself the bigger picture or even come into a similar realization of his own darkness/ balance like riku, makes him unfit; he’s a reactionary character instead of an active one. that’s why this game, being experienced from his point of view, felt mostly like a catch up to speed for sora and a set up to nomura’s next big thing instead of a genuine ending. i honestly don’t think nomura knows what to do with him and with kingdom hearts anymore.
kh3 is a game wrapped in nostalgia and promised something bigger than it could fulfill. and aside from better graphics and improved gameplay, the story wasn’t worth the wait.
9 notes
·
View notes
Note
How do you paint the beaks and eye lids of furbies? And with what? I’m kinda in the dark with that info :/
depends on what you’re tryina do!(*disclaimer: i haven’t done this often so you could probably get more / better advice from more detailed customizers who do this kinda stuff more often, such as @furbo-tastic @kawaiisideboob @noodle @frogfurby n so on!*)
tl;dr - paint, nail polish and sharpies are my go-tos! use sharpies to draw on details / colors / etc, use multiple thin coats of paint and/or nail polish for covering the whole beak / eyelid or specific colors or sparkles from the nail polish or so on!
long detailed version under the cut:
(the main thing to keep in mind is a. the beak and eyelids are moving parts that lead pretty much straight into the mechanics of a furb, so i try not to use anything too runny / drippy / watery / etc that might risk getting inside the furb and possibly messing something up (tho thats just a personal paranoia of mine ah A) n b. you wanna aim for something that won’t flake off or scratch off easily (especially with the eyelids) because they’re moving parts that rub / bump against other parts of the faceplate n whatnot)
buT as far as your question goes, i either use acrylic paint, nail polish or some sort of sharpie / other permanent marker, but again it depends on what you’re tryina do!
for eyelids - you gotta be careful with what you use since they scrape directly against the faceplate edge when they move their eyes, so i’d recommend permanant marker over anything if you can use it since it’s 100% flat against the eyelid there’s no rise like paint or paint pens or nail polish and therefore nothing to scratch off! I did stars on dobey’s eyes with a gelly roll paint pen, and even that was too thick to last very long without obvious damage to said stars. BUT, if you want to cover the whole entire eyelid, i’d use very thin coats of paint / nail polish (as in, do one very thin coat, let it dry, do another one on top, etc etc until you get the full color(s) you want) because one thick coat of paint might be less work, but will most likely rub / scratch off easier too with how much they move when blinking.
for beaks - they have more room to move so you can use either sharpie or paint here as you wish! I’d recommend paint / polish if only because you’re probably gonna be touching the beak often so covering it in permanent marker might rub off on your fingers or on their fur or something similar (unless you seal it in with a clear coat of something like mod podge or nail polish or whatnot, though that seems like more work than just using the paint / nail polish directly imo), so thin coats of paint / polish would probably last better! you can use thicker coats for the beak if you want but i still prefer thin ones to male sure the beak doesn’t accidentally stick together (which you can also prevent by putting a q-tip or small strip of foam or etc in theor beak to hold it open just enough to paint n let it dry properly) + give it a neater / more controlled finish, if thaT MAKES SENSE??
when i say thin coats, i mean taking your brush / whatever else you’re using to apply it and dipping it into your paint / nail polish, wiping the excess off on a paper towel so there’s only a little on the brush, and then using that to paint the eyelids / beak. it’ll look streaky an thin, that’s ok! just let it dry completely, then come back and do the same thing over again, let that dry, etc and etc until you build up the color(s) enough to be opaque as you want n you feel it’s done!
PLUS, because both the beak n the eyelids are smooth plastic, the paint may not stick well at first. that’s another good reason to do thin coats, since when you put the first one down, it adds enough texture to make the next layer(s) stick a lot better and give a cleaner / more even look by the time you’re done!
hope this helps, and good luck! :,D
52 notes
·
View notes
Text
How to sculpt fur
From https://xenite.wordpress.com/modeling-painting-and-hobby-articles/how-to-sculpt-fur/
Recently I was in a conversation with some folks at www.iwfb.org about sculpting fur. I began to try to explain how I go about sculpting fur, hair, or other similar textures, but quickly realized that it would be difficult to give useful examples in a forum post, so I decided to do a brief article on the subject.
I will be using some sculpting terms throughout the article. These are largely in context to the tool that I use to do all the sculpting here. Most smaller, two head sculpting tools will do the job, but if you want to see what I was using, check out the first part of my scale armor tutorial.
cut – press the edge of the flat end or ‘spoon’ of the sculpting tool into the putty to make a slice.
poke – the pointy bit on the end to make a hole, or deep impression into the putty
pat – using the flat area of the spoon, press out details, and other variations in the putty to make a smooth area.
If you have any questions about these terms, or anything else described in this article, please email me: ahschmidt-AT-gmail-DOT-com.

1. Apply putty to the area of your model where you want some fur. Try to make sure that the area is relatively clean. If there is paint, or something that the putty will stick to and cover up, than there shouldn’t be a problem. If there is oil, or something else that will keep the putty from sticking to the model’s surface, that will cause problems when you are trying to form your sculpt.
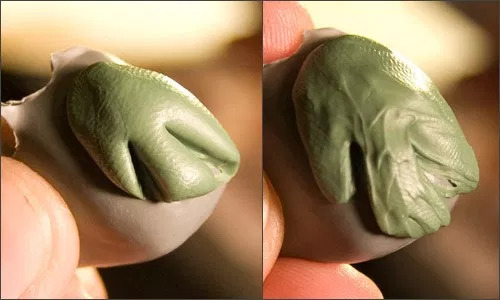
2. Using some cuts in different areas of the putty, you can begin to form the shape of the area that will be covered in fur. These early choices may well get sculpted over as you move forward, but it never hurts to start considering the final composition of what you are sculpting as you move along.

As you start to break the area up a little, pat the putty out so that it spreads a bit more evenly over the model’s surface. You can start to define some detail at this point too if you want. Most likely it will be lost as you work the putty, but you never know if you come up with something interesting that will be useful later.
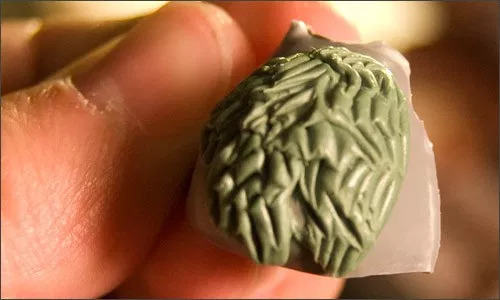
3. The first cuts made with either the edge of a sculpting tool, the edge of the poker, or an old hobby knife, in a broken up, staggered pattern are when you really start to get a feel for what the fur will look like. Don’t worry if this is really rough, and nasty looking. As the putty mellows out, and you work the surface more, this detail will become more refined.
Up to this point lubrication for the surface of the putty really isn’t needed. As you start to refine some of the fur’s detail, you may want to use something to keep the tool from sticking too much. In different times, you may want some tackiness to pull the putty around, or to draw out strands of fur. Be careful to only use a little Vaseline, or other petroleum jelly as it will cause the surface of the putty to be slick throughout the entire time you are sculpting. If you are using water, this is much less of a problem.
4. The staggered cuts will naturally create diamond, and lengthy triangles here and there. You want to refine these areas somewhat as they will become the shapes that really give the impression of fur. Using the edge of your sculpting tool, press in between these fur ‘strands’, and break them up a little as well. If you brush the end of a strand slightly with the spoon end of your tool, it will curve the fur a little which will give a natural look and variation to the overall texture.

5. Now the hard labor is over, and you can start to really shape the area your fur covers. Pat down some strips, or patches in the fur. This will create some layering, and some depth to the surface you are making. If all the fur looks like it is on the same plane, it may look too orderly, and quite boring. Think about the way that actual matted hair clumps up, and lays on other areas of the fur. This is what you are trying to emulate. Don’t worry that you are essentially pressing out work that you had done before. In fact, this is a good time to ‘erase’ parts of the fur that you don’t like very much. Knowing how much to do this will come with experience, and as you develop your sense of composition.
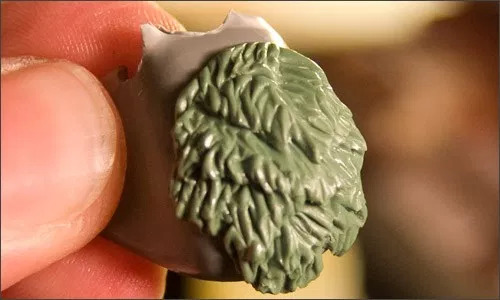
6. Once you are happy with the areas of layering that you have created, its time to start to sculpt the fur strands into the flattened out surfaces. When doing this, it works well to poke the tip of the poker, or spoon (held sideways so that it is perpendicular to the surface of the putty) under the edge of the previous layer, and then pull down to create the strands impression. This will refine the upper layers edge, and give you more hair detail in one move.

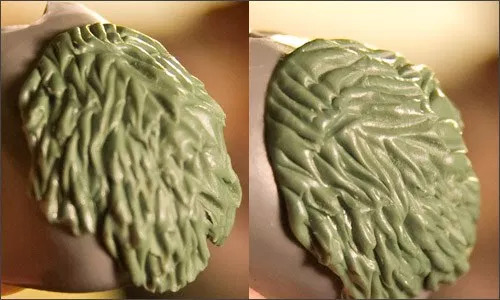
Here is a close up of the refined fur area with the layering applied.

7. The more that you work the areas where the layering meets, the more dynamic the surface of the fur will look. One of the challenges with having very detailed surfaces, such as fur, on models is that the more general shape of the model can get subdued and lost. This is one of the reasons that many professional models you see out there have areas of less clumpy fur (or no fur at all) contrasting those that do have large amounts of fur. The latest Chaos Hounds from GW are a great example of this.

8. Another great way to get more contrast, and visual dynamics across the surface of the fur is to change the direction that the fur flows somewhat. Here the layers flow in opposite directions from one another slightly.

9. Once the general surface of the fur is looking good, consider the areas where the fur overlaps the rest of the model. At this point you can either remove extra putty, or pat it out to mesh into the surface that the fur is on. This is the better method often because it allows you to really work the way that edge looks. You don’t want it to be too uniform (unless your model’s design calls for that of course), or too clean in most cases. Using the poke under and pull method, but with the flat of the sculpting tool’s spoon is a great way to refine this area.

10. This is a great time to look over the whole area that the fur covers, and to break up any areas that look too uniform, or strange in other ways. Refine the ends of strands of fur that may have been messed up by other sculpting, or that just haven’t been addressed yet.
Leave the sculpt to sit for around 20-30 minutes before you do your final pass of cleaning up, and refining the detail in your fur. Greenstuff putty gets more stiff as it cures, and becomes a better consistency for finer detail, even though moving large areas of the stuff will be tough.
This method for sculpting fur has worked very well for me. A lot of what is hear applies to other textures that you may want to make, such as scales, rough skin, and oddball textures that have any sort of pattern or consistency to them.
These techniques can take a while to get a handle of. Do some practice pieces before you tackle a model that you are invested in. One exercise that I learned from pro sculptors was to take a bit of putty, and while watching TV, to put it on a surface, and to sculpt a texture into it. Once done, remove the putty and do it again, maybe with a different type of surface. This is a great way to accumulate experience with sculpting, and to get a feel for putty’s weird properties.
From https://xenite.wordpress.com/modeling-painting-and-hobby-articles/how-to-sculpt-fur/
6 notes
·
View notes
Text
Changeling
Winter has always known there was something strange about him - and not just his name. When a new student arrives with looks similar to him, he is instantly drawn to the strange new boy. But where this encounter leads is not something Winter had expected, for better or worse. (2017)
Featured on my oneshot collection Something Strange on Tapas.
Winter had always known there was something wrong with him - something more than just his peculiar nature name, of course. It wasn't that he didn't feel like "not fitting in" with others of his age: he did, he had friends, and in general he had a good, healthy social life for a 15-year-old boy. Rather, it was the way he looked that caused not only curious looks from other people, but also confusion in Winter himself whenever gazing at himself from the mirror: he had strong, sharp teeth (the dentists had been forced to polish them by Winter's parents, but Winter himself had refused them to be completely flattened; at that age he had thought his fangs were cool), his nails always kept growing in odd ways and he constantly had to cut them, and the texture of his hair was strange at best, feeling like animal fur rather than human hair.
What was even stranger, however, was the hair growing on his lower back, and what undoubtedly looked like a scar on his lower back.
Winter knew it was normal in puberty to notice hair growing in strange and often unexpected places the sex education classes didn't cover, but he had had this strange, white hair there as long as he could remember, and the same applied to the small scar.
Winter had often asked his parents about these and other strange things:
"Why are my teeth like that? Why do I have to flatten them?"
"Why is there fur growing on my lower back?", a question immediately met with an agitated response of "It's not fur, it's hair; your great uncle was the same."
He'd further ask about the odd shape of his ears, and the the scar on his lower back; about the nails and the way his hair felt, and the weird, small bumps on his head.
The answers always varied.
The strange, white hair was said to be an unspecified genetic disorder that ran in the family, but all the relatives with the condition were long gone by now. Likewise, the scar on his lower back was initially claimed to be a scar from Winter falling badly as a child. The bumps on his head were somehow related to his skull's structure, and the sharp tips of his ears were simply a remain from the more primal past of humans - it happened sometimes, with kids being born this way due to how their normally inactive genes were somehow activated in birth.
As younger, Winter would always play with the idea he was some sort of monster child who had then gone through surgeries to look more human.
However, such thoughts were quickly buried until logic and reason when he matured, and for a good while Winter had basically forgotten his odditions. Things changed when his puberty started: with the new changes his hormones brought with them, the strangeness of his body became much more apparent.
"Maybe you're intersex?" one of his school friends had suggested: Winter's strange medical past and secretive parents seemed to align with what he had read regarding the topic.
"No, no, that's not it," Winter had replied. "It's not like that; it's definitely different. I have read about it and I can't find myself relating to most of the things the books mention, let alone what people say on forums."
Things came to change, however, when a new boy arrived to the school.
He was a year older than Winter was, but although they weren't in the same class, it was easy to notice the peculiarity of the new student: he was tall, his ears shaped so similarly to Winter's it was almost uncanny, and when he laughed a row of almost predatory teeth could be shown.
All this interested Winter greatly, and a week later, during one lunch break, he sat opposite of the young man.
"Hi," he said as he placed the food tray in front of of the new guy's own. "Is this place free?"
"Uh, yeah," the other mumbled, somewhat awkwardly: he hadn't expected Winter specifically to come here and was a little confused.
"You're the new student, right? What's your name?"
"It's, um," the boy started somewhat awkwardly and paused, as if to think very hard. "It's Ethan. I'm Ethan. And you are...?"
"Winter," he replied and smiled. "I know, it's a weird name: my parents had strange tastes."
"I think it's cool," Ethan answered. "It's kind of otherworldly somehow, I like it."
Not wanting to teeter around the issue any further, Winter decided to risk it all and asked as casually as it was just possible for him in the situation:
"Speaking of otherworldly... I couldn't help but notice your teeth. What's up with them?"
Like out of instinct, Ethan covered his mouth with his hands and looked at Winter with an alarmed expression.
"No, don't worry, I'm not making fun of you!" Winter hurried to explain. "It's just that... Well, look," he then said and opened his mouth, moving his lips a little with his fingers to show his teeth in their full, animal-like glory.
"You have them too?" Ethan asked, eyes wide and blinking faster than what was normal - he seemed to be very particularly abashed by the sight. "Are you perhaps... " Ethan started carefully but then shook his head. "No, nevermind."
"Your ears, too," Winter continued, now intrigued by the reaction he had gotten out of Ethan. "They're kind of sharp, aren't they?"
"Well, yeah..." the other admitted.
"What about your nails?"
"What about my nails?"
Winter showed his hand and the sharp nails he hadn't cut off in order to show them to Ethan. "Do you also have nails like mine? They grow really fast, I usually cut them and file the tips of them to make them less sharp, but I couldn't be bothered lately. So many school things to focus on - you know, that sort of stuff."
Ethan hesitated for a moment, looking at Winter's fingernails and then his own.
"I cut and file them too," he finally said with a low, careful tone. "But they look almost like yours, although they don't grow all that fast, thankfully."
Winter was overjoyed upon finding someone who shared these strange traits with him, and as the curiosity got the better of him, he continued asking: "Do you have any other strange things?"
"Strange things?" Ethan raised his eyebrows.
"Like, well, um... Surgery scars, or something like that? Especially around lower back?"
Ethan was silent, looking at Winter with a strange expression the other boy couldn't quite read or understand. Had he spoken too much? Was Ethan weirded out? Gods, he shouldn't have spoken this much after all.
"Is there... something strange with your lower back?" the new student finally asked upon being silent for so long. "Like, anything?"
"Do you promise not to laugh?" Winter asked solemnly. "Or be weirded out?"
"I promise," Ethan said and raised his hand to make a gesture of a vow. "I don't think I have any right to make any comments about the bodies of other people anyway, no matter how strange."
"Good. See, I have a surgery scar there, but also this... strange white something, like fur? I don't really understand it, mum and dad just claim it's some sort of rare condition, but that's basically it - I can't find any information even online."
Ethan looked extremely thoughtful as he listened to this. Then, out of blue, he asked something Winter had not anticipated.
"Were you adopted? Are you the biological child of your parents?"
"What kind of question is that?" Winter snapped. "Of course I am! I have almost the same hair colour as my father too!"
"Hmm... If you say so," the boy replied and took a bite of his food he had momentarily forgotten to focus on. "I just wanted to make sure."
"Why?"
"I just... wanted to, that's all."
He moved the fork around his salad absentmindedly.
"Hey Winter."
"Yeah?"
"Do you believe in ghosts? Things like that?"
Winter shrugged. "Can't say I do."
"I see..."
"I mean it's not like I can't deny them either, but since I have never seen with my own eyes... I'm not that inclined to believe."
"What would you do if you did... see a ghost or something along those lines?"
The boy laughed nervously. "What kind of question is that?"
"Just answer," Ethan replied but looked away from Winter as he said this.
"I guess I would. I mean, if I can have a condition like this even though the rest of the world doesn't seem to even know it exist, then I guess I could understand a ghost or a demon too - it'd be strange, but not too strange, you know?"
"Gotcha."
Ethan stood up from the table, still half finished food on his plate.
"You finished?" Winter asked, not having even touched his food yet.
"Yeah. But Winter..." Ethan murmured, and once more lowered his voice. "If you want to talk more about that condition thing whatever... Meet me after school at the school gym."
Winter nodded obediently, and fast forward 3 more hours, he was standing inside the empty school gym. It was part of the main building so it was locked only when the school was also closed, and so getting inside was absolutely no trouble for him. Even better, it was also never supervised, so sneaking in was easy, and he had no fear whatsoever about getting caught by a teacher.
He walked around, the dimly lit room so dark he could barely see: the windows of the gym had been blocked with large, black curtains, and only the small holes time had bitten into them gave him any light to see around.
And then he heard Ethan's voice.
"Here, Winter! Let's go to the changing rooms, it's better there."
His voice was silent and raspy, and Winter felt something akin to anxiety rise from within him: just what was Ethan planning to do? Was he really going to talk more about this condition of what they both seemed to have? Or was he going to punch him and steal his money? Or assault him? Was that it?
Winter hit his cheeks with both of his hands to cast off such thoughts, and Ethan heard the slapping sound.
"Winter, what's wrong?" he asked worriedly.
"Nothing, nothing!" Winter replied and stopped hitting himself.
"You don't need to be nervous," Ethan spoke as he stepped inside the back of the gym hall, into the small stairway leading into the changing rooms. "I'm not going to murder you or anything. This is just the best place to talk without anyone interfering. And if someone does come, we are sure to hear it well in advance."
"You're absolutely right," the other nodded. "I would never consider you murdering me. No way."
They were now inside the changing room, and once Winter had closed the door behind him (making sure it was not locked, just in case), Ethan switched on the lights.
"Alright, look," he started, voice shaking a bit. "What I'm about to tell and show you is very, how do you say it... personal. So whatever you say or do, don't make a ruckus, alright? I'm sure you understand."
Nervous but perfectly understanding the concern of Ethan, Winter nodded. However, as soon as the other boy started pulling his pants down, Winter yelped loudly.
"H-hold on!" he cried. "W-w-what do you think you're doing?!"
"I'm not going to take all my pants off!" Ethan replied, flustered as he opened his belt. When his pants fell down on the floor with the belt clicking against it, Winter saw something so strange none of his earlier scenarios of what could happen couldn't even compare to the sight.
Sticking out from his back was, undoubtedly, a thin, blond tail. It was not particularly long but one couldn't have called it short either, and it resembled a lion's tail with a tuft on the top of it, except it was much thinner. Ethan then turned around to reveal his back and lo and behold: blond fur was growing just around the same place as where Winter had it.
"What's... the meaning of this...?" Winter finally let out after moments of staring. "Ethan, you're not pulling my leg, aren't you? This is not a prank?"
"It's not a prank," the boy replied and his tail twitched a little. However, probably feeling self conscious or maybe getting cold, he soon put his pants back on and hid the tail inside.
"What... are you?" the other boy finally asked, still staring at where Ethan's tail had previously been in.
"A changeling, I think."
"A what?"
"Did your parents never read you fairy tales as a child?" Ethan asked.
"Not really..." Winter mumbled. "So please, explain me..."
"Changeling is someone who has been traded to another child," the young man explained in a very a matter-of-fact way. "A troll mother takes her own baby and trades it to a human baby, so the troll raises a human, and the humans raise a troll. That's how it usually goes in stories. Sometimes it's the fairy folk too, or elves."
"So are you a troll?"
Ethan laughed and shook his head. "No, I'm a human."
"But humans don't...." Winter started, but decided not to say anything after all - he couldn't find the right words.
"I was taken from my human parents as a child by a demon mother. It's said that when you spend long enough with them, your body starts to change too to resemble them more. But this is all I can do - I don't have horns or anything similar."
"Then..." Winter started slowly, looking at his shaking hand he had rose over his face. "Then that means... I must be a changeling too?"
"If you grew with humans, it means you must be a demon child, unlike me, who is a human."
Winter put his hand over his mouth and stared at the floor so hard he could have made a hole into it through the sheer intensity of his pierce.
Of course, that'd make sense. It would explain the surgeries, the two lumps on his head that seemed to have grown in the recent years; the secretiveness of his parents and the fact that aside from the similar hair colour, Winter didn't have much else in common with his family or relatives. Granted, there were some similarities, but didn't most people have some? If you took a stranger from the street that vaguely resembled you and told someone you're relatives, surely they would find at least one similarity.
"It must be a lot to take at once," Ethan's spoke and his voice pulled Winter out of his haze. "But since you seemed to be completely left into the dark with this, I thought it'd be the right thing to tell you."
He rubbed the back of his head sheepishly and then looked away.
"I thought there was a possibility that... maybe we were swapped or something, but then I remembered it would have required us to be the same age. And there is a year difference between us, right?"
"Y-yeah... I'm pretty sure I'm exactly the age my parents claim me to me; there were no secrets, hush-hushes or murmurs regarding that topic."
"So... What are you going to do now?"
Winter looked at Ethan.
"I don't know," he then replied and looked away from the changeling. "This is kind of a lot to take. When I came here... I, uh, absolutely didn't expect this to happen."
"Sorry about that," the blond apologized.
"It's fine, now I understand everything that has been puzzling me since I was a kid. But tell me, Ethan, what are you doing here if you were raised by demons?"
"I learned I'm a human only some time ago myself," Ethan admitted with an awkward laughter. "And so I wanted to know what kind of life humans really lead so I came here. Some of my demon friends came too, although they're in different schools - this one refused to take more in due to lack of space and resources."
He laughed again, but this time his cheeks reddened slightly as he continued: "It's not easy being a human, you know? I keep saying and doing weird things all the time; we look similar, but there are a lot of differences between how we and humans behave."
"Like?"
"Like, the demons I grew up with were really playful, in the same way cats and dogs are regardless of their age. Humans aren't like that, people my age are supposed to be much more collected."
"I'm not playful," Winter commented. "Even though it seems I'm a demon."
"It's not entirely biological - it's in the culture too. You have been raised to control your feelings and stuff, haven't you?"
"... you're correct."
"Then... do you prefer to live as a human, or do you want to find your biological parents and live with the demons?" the boy suddenly asked.
"I-I must think about it," Winter breathed. "It's all very sudden, and I'm perfectly accustomed to this kind of life, so I doubt I'd like to change the pace now. But... "
He took a short break and looked at Ethan before speaking: "But I'd like to meet my other parents, one day. Not now, maybe not soon, but some time... And I want to talk to my parents about this too and about them keeping it a secret."
"Sounds like a plan. But say, have your horns grown out yet?"
"No, just two bumps on the head. I was always told it's just my skull being weird."
"Hm, then you definitely want to get something done with them - they should grow out anytime soon. Usually even children have them but maybe the human influence has made you into a late bloomer..."
"O-oh great," Winter stuttered and instinctively touched the two bumps on his head, imagining them bursting out one day to reveal horns. "Um, does it hurt?"
"It might sting at first, from what I have heard - I never got any horns."
"O-okay..."
The two stood there in silence then, looking awkwardly at each other, then the floor and then each other again. Only Ethan's suggestion to leave finally broke the silence, and they both agreed their business here was done.
They sneaked out, made sure to shut off the lights and went outside through the backdoor, as the front door was probably already locked, and the back exit directly led them outside.
"If you want to, like, call or anything or just hang out, just tell me. I can give my number," Ethan spoke once they were outdoors.
"That'd be nice," Winter replied and took out his phone, and Ethan then proceeded to give his phone number.
"Do you like video games?" he then asked, and Winter nodded: "I'm not very good, but yeah, I do."
"Want to hang out in the arcade tomorrow? I can introduce you to the other demons as well - they're all really chill."
Winter hesitated, but only for a moment, and eventually nodded: "I'd love that."
"Great, it's a deal then. Tomorrow, after school, see you there!"
"See you!"
And the two parted their ways. Only then the entire situation where Winter now was in washed over him, and he had to take a hold of the nearby building's wall to keep his balance.
"I'm... a demon?" he thought to himself. "Those surgeries, those secrets, all those were to pretend I'm a human?"
Frankly, Winter didn't mind the fact his tail had obviously been removed as he wasn't very keen on the idea of keeping such a thing a secret. Nevertheless, the fact his parents had never told him the truth upset him beyond words: telling the truth would have saved him from so much suffering and agonizing over a body he certainly liked, but couldn't quite understand.
Once back at home, he would talk about all this. He'd make his parents tell the whole story so that Winter could understand the circumstances of his birth better.
And, the next day, he would meet with Ethan again and talk to demons... Those he was also one of, despite the fact the idea felt absurd at best.
"But Ethan is there," Winter told himself as he now kept walking back home on the silent evening road. "He seems like a good guy, he explains things calmly and so that I understand them too, and he seemed to be happy to be able to meet with me again."
He stopped and took a deep breath.
"What more, he wanted me to understand my circumstances, despite not knowing me at all. He put himself at risk by revealing himself to me, a stranger, just so he could reassure me and show I'm not alone."
Winter smiled, cheeks burning a little.
"I think he is a good guy, truly."
4 notes
·
View notes
Text
Why Are Colored Pencils So Popular?
Colored pencils are a wonderfully dynamic medium that is highly beloved by artists and hobbyists alike because they’re so easy to use — plus they’re a lot cleaner and require almost no set-up compared to most other art mediums!
Whether you’re completely new to colored pencils or looking to learn more about this versatile medium, in this article I’ll help you figure out which colored pencils to purchase by covering such important topics as quality, consistency, type, permanence, brand, and what I consider to be the best colored pencils. Read on to learn everything you need to know about colored pencils!
Colored pencils have been widely used in classrooms for many decades. You probably used them when you were a kid — remember those hard, gritty sets that were given out to students, with colors that were too pale or too dull to be satisfying? For this reason, colored pencils were long seen as a juvenile (in much the same way that markers were overlooked as a fine art medium).
Even when high-quality colored pencils emerged in the 1930s, they were mostly used by humble illustrators or graphic designers. Fine artists sometimes used them for sketching and planning, but not for creating finished artworks. This attitude began to shift from the 1960s onwards, as fine artists began to embrace colored pencils for their versatility and ease of expression. These days, they’re considered a legitimate art medium and are also hugely popular with colorists.
Colored pencils are capable of rendering art styles that are expressive and abstract, or detailed and photorealistic. While they’re slow to use compared to wet media like paint (in terms of laying down color), they’re almost unparalleled when it comes to controlling and detail.
Because colored pencils are partially transparent, you generally work from light to dark, gradually building up your colors. Colored pencils, like watercolors, are famous for their translucent quality, which can give your artwork a striking luminance, especially on textured paper. If you don’t press too hard, tiny crevices or valleys in the grain of the paper are left untouched by pigment and allowed to shine through.
With that said, the versatility of colored pencils also allows the application of bold, opaque colors, either by pressing harder or by layering and blending. For example, check out this colored pencil painting by Alyona Nickelsen, the author of the book “Colored Pencil Painting Bible”. Note on terminology: colored pencils are mostly associated with drawings, but if they cover the whole support/surface they are called paintings, and you can see why… they really do look like paintings!
In addition to their versatility, colored pencils are also practical and hassle-free! They’re light and portable, so you can travel with them and draw on location. They’ll also last a long time; you don’t have to worry about them drying out as you do with paint or markers. Colored pencils also don’t require a bunch of extra accessories that you’d need for a medium like oil paint, for example, you can achieve a lot with just a simple set, a sharpener, and a humble sketchbook.
While I also enjoy using other art media, like acrylics, few are as relaxing as colored pencils because you don’t have to worry about making a mess, inhaling something toxic, or staining your clothes, and afterward, there’s nothing to wash or clean up. With minimal equipment or preparation, you can settle in and lose yourself in a frenzy of creativity!
Colored pencil blending example
Colored pencils can be blended to create smooth tonal gradations. This can be done easily with layering or burnishing, or with the help of solvents, blender pencils/markers, and even baby oil. You can create blends so smooth that the end result looks like an oil painting!
You can create new hues and tones by layering colors (called optical color mixing), but because you can’t mix new colors directly (like you can with paint by mixing one color of paint directly into another color of paint), many artist-grade colored pencils are available in a wide range of colors that can usually be purchased individually.
Colored pencils can also be combined with other media, such as graphite, markers, gel pens, watercolors, crayons, pastels, and gouache! My favorite combination is to use markers to lay down lots of vibrant colors and then draw on top with colored pencils to add detail and give the artwork a more organic feel.
Colored pencils are generally easier to remove than paint or markers, but less so than graphite or watercolors. The pigment does lift off, but some color will remain. If you press hard (burnish) or have applied many layers of colored pencils, then the pigment will be more difficult to erase and will likely not erase completely.
You can get erasable colored pencils, such as Prismacolor Col-Erase pencils (affiliate link) if your style requires a lot of erasing. They’re also useful for drawing construction lines and base sketches.
Quality
When purchasing colored pencils, there are many different considerations to keep in mind that we’ll discuss on this page, but the most important decision you’ll make is whether to get “student grade” or “artist grade” colored pencils (those are Blick affiliate links).
If your budget allows, my recommendation is to always favor artist-grade pencils, which are noticeably superior. They do cost more, but that’s because they contain a higher proportion of pigment, which yields richer, bolder colors.
Artist-grade pencils are also more lightfast (discussed below), and usually softer, which makes them easier to use and blend. They will also boast a wider color range, and you’ll be able to buy them individually as needed (referred to as “open-stock”).
Consistency: Soft vs hard
One of the biggest factors that will affect your enjoyment of colored pencils is the consistency of the “lead”. This can vary across brands and pencil types, depending on the particular combination of ingredients the manufacturer used.
Colored Pencils buying guide
In general, a colored pencil is just a long circular “lead” — made up of pigment, gum binder, filler (chalk or clay), and wax — that’s encased in wood (usually cedar). Manufacturers tweak this recipe to produce pencils that all perform somewhat differently.
Soft colored pencils are preferred by many artists, including myself, because they lay down color easily, and blend well. Some soft colored pencils are smooth and creamy, while others might be crumbly and grainy.
Most artist-grade pencils are on the softer side, which is partly because they contain less binder and filler, and more pigment, resulting in bolder, more vibrant colors. One downside with soft pencils is that they won’t hold a point as well and they’ll need sharpening more often.
Hard colored pencils can be sharpened to a very fine point that won’t crumble, allowing fine lines well-suited to detailed artwork and certain textures (like hair and fur). Most student-grade colored pencils are hard because manufacturers cut costs by adding more filler/binder and less pigment, which produces dull colors. Hard colored pencils can also be less fun to use because it takes more work to apply color, blending is more difficult, and they make you want to press harder, which can damage your paper and possibly cause hand fatigue.
In summary, your preferred consistency partly comes down to personal preference and the style of art you enjoy. Most people, especially beginners and colorists, will enjoy a soft colored pencil that lays down vibrant color smoothly and easily. Some might prefer a firmer, more versatile pencil that won’t crumble as much and is capable of being sharpened to a decent point when needed.
Types of Colored Pencils
There are three main types of colored pencils: wax-based, oil-based, and water-soluble. You can also get color sticks and woodless pencils, which consist of the same “lead” material. I’ll also briefly address pastel pencils, but they belong in a separate category.
Note: you can mix these different types of colored pencils in the same artwork. They aren’t like oil paint and acrylics (which don’t mix), so you don’t need to worry about committing to a specific brand or pencil type.
Wax-based Colored Pencils
Most colored pencils are wax-based. The right amount of wax gives the pencil a smooth texture which helps the pigment flow across the surface. The wax also helps the mark adhere to the surface or to other layers of pencil, which means that you can put down multiple layers without having to worry about smearing or adhesion (a common issue with pastels).
Wax-based pencils are available in a wide range of consistencies: from the hard pencils made for students to the soft varieties designed for professionals. Because wax-based pencils are so common, there’s likely to be a particular set that fits your required combination of price, quality, and consistency.
The only downside to wax-based colored pencils is wax bloom, which is a natural oxidation process that can cause the wax to rise to the surface of your artwork, leaving a pale haze. It can take hours or days to appear, but it usually doesn’t occur unless you apply lots of heavy, dark colors, like in the example you see here from one of my artworks. When I first laid down the colors, I made the background a consistently dark violet-black, but over the years wax bloom has lightened some of those dark areas, as you can see in this pic, resulting in a “splotchy” look.
Don’t fret though! If you see some wax bloom, you can wipe the affected area with a clean, dry cloth before applying more color. Once the artwork is finished, you can seal it with a fixative, which will prevent wax bloom from returning.
Depending on your style, the wax bloom may never be a problem for you. But artists who use lots of dark colors and heavy layers should consider oil-based colored pencils, which don’t suffer from wax bloom.
Oil-based colored pencils use oil to bind the pigment and distribute it on the surface (but they still contain some wax). What this means in practice is they have a slightly different consistency and they don’t suffer from wax bloom.
Most oil-based pencils are medium-soft: a bit firmer than many wax-based pencils, but still softer than student-grade pencils. Although still quite smooth, they won’t lay down color as quickly as the Prismacolors, for example, but they’re better at holding a point and arguably more versatile. The firmer lead also means that they’re less likely to break, and won’t need to be sharpened as often. Some artists prefer a more restrained application of color because it gives them more control.
Oil-based pencils do have a few drawbacks, though. They’re more prone to smearing and are harder to erase. They also tend to be more expensive and may have a more limited color range (depending on the brand). Despite the bump in price, oil-based pencils are not inherently better or worse than their wax-based counterparts.
I personally don’t notice much difference between artist quality wax-based and oil-based pencils. When it comes to practical concerns, such as blending and color vibrance, I can happily work with both types. I’ve found other factors, like grade, brand, and consistency to be more noticeable than whether wax or oil was used in the binder. As if to illustrate this point, most manufacturers don’t make it obvious if their pencils are oil-based, indicating that it isn’t a crucial difference.
Unless you’re worried about wax bloom or prefer the consistency of oil-based pencils, I recommend a high-quality wax-based colored pencil that will likely offer a better combination of price and performance.
Although there isn’t a whole lot of difference between wax and oil-based pencils, that is not the case with watercolor pencils! They can be used dry, just like regular colored pencils, but the binder they contain is a water-soluble gum that allows the pigments to be thinned out with water. Artist quality water-soluble pencils are essentially dry watercolor paints in pencil form.
Watercolor Pencils
In practice, this means they are fully capable of producing watercolor paintings by combining them with water and a brush or sponge to blend colors or create washes. Other effects are also achieved by drawing on wet paper or dipping the tip of the pencil in water beforehand (creating very soft strokes). Many artists also use them in combination with regular watercolors and other media (including regular colored pencils). They can be difficult to get used to, but if you’re fond of watercolors you should definitely give these a try.
Instead of wood encasing a lead of wax and pigment, pastel pencils contain the same stuff you’d find in pastel sticks. The only difference is that the pastel core is made a bit harder so that the “lead” doesn’t break or crumble.
Pastel pencils, despite their outward appearance, don’t really fall into the same category as colored pencils. While the latter are known for their transparency (discussed above), pastel pencils are opaque and therefore used very differently.
Color
Because you can’t mix colored pencils as easily as other media (like paint) to create new hues and tones, most artist-grade colored pencils come in a wide range of colors.
I generally like to purchase as many colors as I can get, but it’s also easy to go overboard. You don’t want to end up buying pencils that you never use. I recommend starting off with a 24-pencil set and then buying additional pencils individually as you need them.
Once you have your pencils, it’s a great idea to make a color chart. This will help enormously when you’re creating art. The nearby image is the color chart I made for my 120 Faber-Castell Polychromos Pencils.
I didn’t design that color chart myself. You can find free, blank color charts that other artists have created by searching on Pinterest or Google Images. Some manufacturers, like Faber-Castell, also provide blank color charts that you can use.
Permanence
All art media can fade over time as light and humidity break down the molecular bonds of the colors. The ability to resist this process is called “lightfastness” and it’s a major concern for fine artists who want their work to last.
If you’re using artist-grade pencils, and you’re not a professional artist, I wouldn’t worry about lightfastness. Because colored pencils use pigments (as opposed to dyes which fade more easily), artist-grade colored pencils will be sufficiently fade-resistant for most artists, especially if you plan to digitize your artwork for the web and/or print (which is where most of my work ends up these days).
If you’re especially concerned about permanence, be aware that it doesn’t just vary across brands, but also amongst pencils of the same brand, depending on the specific pigment used for each color. For this reason, most artist-grade brands provide lightfastness ratings for each pencil.
0 notes
Last Seen Blogs
splattacks
certified overthinker

snapsbymags
mostly grainy photographs

gimme-that-pen-back
I Dunno Man What Is This

hwspoland
im back from the dead yall
jayders26
JJ