#Add the steaks to the skillet and cook to your desired doneness
Text

Garlic Beefsteak with Mushrooms and Béchamel Sauce
Ingredients:
Steak:
2 beef steaks (such as ribeye or sirloin), about 1-inch thick
2 tablespoons olive oil
2 cloves garlic, minced
Salt and freshly ground black pepper to taste
Fresh rosemary sprigs (for garnish)
Mushrooms:
1 cup mushrooms, sliced (such as cremini or button)
1 tablespoon butter
1 clove garlic, minced
Salt to taste
Béchamel Sauce:
2 tablespoons unsalted butter
2 tablespoons all-purpose flour
1 1/2 cups milk
Salt and white pepper to taste
A pinch of nutmeg (optional)
Instructions:
Prepare the Steak:
Season the steaks generously with salt and black pepper.
In a skillet over medium-high heat, warm the olive oil and add the minced garlic. Sauté for about 1 minute until fragrant.
Add the steaks to the skillet and cook to your desired doneness, about 3-4 minutes per side for medium-rare, depending on thickness.
Remove steaks from the skillet and let them rest.
Cook the Mushrooms:
In the same skillet, melt butter over medium heat.
Add the sliced mushrooms and the second clove of minced garlic, sautéing until the mushrooms are golden and tender.
Season with salt to taste. Remove from heat and set aside.
Make the Béchamel Sauce:
In a saucepan, melt 2 tablespoons of butter over medium heat.
Whisk in the flour and cook for about 2 minutes without letting it brown.
Gradually add the milk, whisking constantly to prevent any lumps from forming.
Continue to cook and stir until the sauce thickens enough to coat the back of a spoon.
Season with salt, white pepper, and a pinch of nutmeg if desired. Remove from heat.
Assemble the Dish:
Place the rested steaks on a warm plate.
Top the steaks with the sautéed mushrooms.
Pour the warm béchamel sauce over the steaks and mushrooms.
Garnish with fresh rosemary sprigs.
#Garlic Beefsteak with Mushrooms and Béchamel Sauce#Ingredients:#Steak:#2 beef steaks (such as ribeye or sirloin)#about 1-inch thick#2 tablespoons olive oil#2 cloves garlic#minced#Salt and freshly ground black pepper to taste#Fresh rosemary sprigs (for garnish)#Mushrooms:#1 cup mushrooms#sliced (such as cremini or button)#1 tablespoon butter#1 clove garlic#Salt to taste#Béchamel Sauce:#2 tablespoons unsalted butter#2 tablespoons all-purpose flour#1 1/2 cups milk#Salt and white pepper to taste#A pinch of nutmeg (optional)#Instructions:#Prepare the Steak:#Season the steaks generously with salt and black pepper.#In a skillet over medium-high heat#warm the olive oil and add the minced garlic. Sauté for about 1 minute until fragrant.#Add the steaks to the skillet and cook to your desired doneness#about 3-4 minutes per side for medium-rare#depending on thickness.
6 notes
·
View notes
Note
I’ve heard Dr Clef can cook, is that so? And if so, what’s his favourite dishes to make? If not, I’ve heard he likes steak so how would like his steak done?
I like to think Dr. Clef (as in the character), and Author Clef (me) share most of our opinions on food. But I think that one place where we might differ is in our opinions on meat. I feel like Clef is probably a roast kind of guy: thick slices carved off a big chunk of meat cooked slowly in an oven. Whereas I'm more of a steak kind of guy: individual servings seared to get a nice crust, then finished at a lower temp until reaching the desired doneness.
-----
A good steak should always be prepared medium rare, or as close to medium rare as you can get it. Medium rare happens when the meat is cooked (not transparent), but has a deep, reddish-pink center, about 135 degrees F. A good crust is also essential: you basically want the outside of the steak to be browned and almost crispy, while the inside is still pink and juicy. To do this, first you let the steak cook in an oven at a low temp (about 200) with a meat thermometer in, until it's about ten or fifteen degrees below desired temp. Then finish it off in a cast iron skillet. Go hot and hard and quick, you want to get that nice brown sear as fast as possible to avoid overcooking the inside of the steak.
The steak should also be rested: allowed to sit for about ten minutes, wrapped loosely in tin foil, before slicing and eating. This lets the juices redistribute throughout the meat, and results in a tastier, moister steak, rather than having all the juices leak out onto the plate.
Most cuts of steak, from the soft and expensive tenderloin to the inexpensive sirloin, have their appeal. If you're still figuring out your technique, practice on sirloins. Once you've got it down, try out many different cuts until you find one that you like. Strip Steak is tasty, but a bit tough. Ribeye tends to be fatty. Tenderloin is lean but soft, but tends to lack flavor. Steak afficionados these days tend towards ribeye cap, denver steak, and picanha (sirloin cap), which are the parts of the cow that have the most flavor.
T-Bone steaks are a combination steak: the larger piece on one side of the bone is the strip steak, whereas the smaller piece on the other side is tenderloin. A T-Bone that has a particularly large piece of tenderloin is also known as a porterhouse. Porterhouse steaks are my favorite steaks for date nights, as I can serve two people off of one steak: I generally give the lady the tenderloin (which is the more expensive portion, and also the softer one), and eat the strip steak myself (there's more of it, and it's a bit tougher, but it's got a lot more flavor).
Always season your steak at least an hour before you cook it. I like to use kosher salt and "Montreal Steak Spice," which is a mixture of peppers and herbs that you can find in the spices aisle of most supermarkets. Use a good sprinkle of salt, then season with the spice. Add enough spice until you think, "Man, I think that's too much," then add a little shake more.
As for sides: some kind of grilled vegetable and a baked or mashed potatoes is fine.
Clef
EDIT: Alton Brown video here sums it up: https://www.foodnetwork.com/videos/pan-seared-rib-eye-steak-0169271
28 notes
·
View notes
Text
youtube
Need to know how to make a quick and easy meal? Uncle has got you covered. Uncle will show you step-by-step how to make your favorite meal in a fraction of the time. The recipe is easy to follow and can be made in around 30 minutes. Salisbury steak is a meal that many people love and many people hate. It’s not the tastiest meal in the world, but it can be made better than a frozen box meal if you know what to do. I will teach you how to make Salisbury steak, including how to make a no-fail gravy. The trick to making it kick is using instant coffee in the gravy, and here is another tip, use bullion not broth for the stock. I use ground beef, but for those that do not eat beef, you can use ground turkey or chicken, though beef bullion is used for the gravy, so I do not know how to change that and not completely change the meal.
Thank You for watching, and if you like my video please give it a thumbs up, then if you are interested in joining the tribe, click subscribe, and don't forget to click the bell for notifications. Don't be shy about passing my video around, share it! If you have a recipe you want me to make, leave it in a comment below.
Again, thank you for watching!
The Urban Chef
PRINT the recipe : https://rebrand.ly/Super-Simple-Salisbury-Steaks
//--------
1 Lbs Ground Beef
1/4 Cup of bread crumbs
1/2 tsp Garlic Powder
1/2 tsp Onion Powder
Salt to Taste
Pepper To Taste
8 Oz sliced mushrooms
2 Cups Water
2 tsp Beef Bouillon
1 tsp Instant coffee
3 TBSP corn starch
Into a bowl, ground beef, bread crumbs, garlic and onion powder, then salt and pepper to taste. Form equal-sized patties.
Oil a heavy skillet or use a dutch oven large enough for everything to fit, sear the patties and cook to medium rare to medium by preference of finished dish.
dice up the mushrooms, add them to the pan, and cook to the desired texture. Remove meat and Mushrooms to a bowl or dish and set aside for now.
In a large bowl or measuring cup water, bouillon, instant coffee, and corn starch. Whisk until smooth and add to the hot pan, bring to a boil while whisking constantly. Gravy should thicken quickly, reduce heat and add back the patties and cooked mushrooms, let simmer 15 to 20 minutes to medium mell to well done.
Serve.
--------//
ABOUT MY CHANNEL
My channel is about cooking food, but more specifically, small space cooking. I cover lots of cool stuff such as Steaks, Breads, and Baking. I do this working in a small apartment kitchen.
Check out My channel here: http://www.youtube.com/@urbantribalcooking
Also, don't forget to subscribe!
#food#comfort food#foodgasm#cooking videos#cooking#homemade#made at home#cooking for beginners#Youtube
3 notes
·
View notes
Note
If you’re still doing breakup requests…
First thought: even though it’s been years and I now have a wonderful, happy loving healthy and wholesome relationship, back in first semester of freshman year of college I was dating this guy. Because this was my first relationship EVER I told him I loved him within a month of dating, right before Thanksgiving break. He nodded, took it well at the time, then we left for break. The night that I returned from break, he made me steak and crème brulée, wanting to show off that he, a junior, had a kitchen and knew how to cook. That night he told me he loved me.
Next night, we hung out again and he showed me the first episode of Game of Thrones because I mentioned that I had never watched it before. Shortly after, while talking about the episode he paused and said, “I don’t think I love you,” and later, “I don’t think I can ever love you.” It was awkward as hell as he drove me back to my dorm that night. Needless to say we broke up.
It’s funny, because even though I’ve since moved on, met the love of my life, graduated college and I’m about to move in with my love - who I’ve dated for years now…I’m still angry that the steak he made for me was so damn good and that I think I’ll never again have a steak and crème brulée like that again - that’s my one regret.
It was an amazing steak.
I am actually maybe the BEST person to ask this too.
As for your song, I picked “Comptine d’un autre été, l’aprés-midi” from the movie ‘Amélie’. This isn’t the song that plays when she eats the creme brûlée but it invokes a nostalgia for things you can’t have anymore.
For the steak you’re going to need
Room temperature butter
Fresh rosemary, removed from the stem and then bruised with your knife. You don’t need to chop it super fine and for this recipe you don’t need a lot of it either.
Two to Three garlic cloves, smashed open but left mostly whole.
Salt and Pepper
Steak, any cut of your choosing but I would recommend something with a decent fat displacement.
When thinking about the doneness of your steak, take the thickness into consideration. If you need your oven, turn it on.
Bring your steak out of the fridge to rest for 30 minutes at room temp before cooking.
While that’s happening, mix together 2 TBS of your softened butter with a bit of black pepper and your rosemary. DO NOT ADD ANY SALT AT THIS POINT.
When you’re ready to start on your steak, preheat your medium/large skillet on a low setting. You don’t want to start with a cold pan, just enough so when you turn the heat up later you’re not starting from zero.
Pat your steak SUPER dry. As dry as you can. Then season with salt and pepper only. It’s always going to be a little bit more salt than you think the first time around.
With your pan now turned up to a medium high heat, add in the butter and garlic. The minute the butter starts to sizzle, add in your steak and DO NOT MOVE IT. Take a spoon and baste the steak with the butter/garlic, waiting at least 3 minutes before flipping over.
Second side, same thing. If you want your steak cooked more to the ‘done’ end of things, extend your time and whack it into your oven.
Now here’s where I might lose you. When you’re not quite at your desired doneness, remove your steaks from the heat and wrap them with aluminum foil with a dollop of that rosemary butter on top.
You want to let the meat rest so that it goes from “tensed” cooking, to “relaxed” so the juices have gone back into the muscle as a whole. Let it hang out for about 5 minutes before serving. The residual heat will continue to cook your meat, so keep that in mind.
Hope that helps!
3 notes
·
View notes
Text
How long to cook cube steak in frying pan
Cooking cube steak to perfection is an art that requires precision, patience, and a good understanding of the cooking process. The tender and flavorful outcome largely depends on how long you cook it in the frying pan. In this culinary journey, we will explore the nuances of cooking cube steak, offering insights into the ideal cooking time, techniques, and tips to elevate your pan-frying game.
Understanding Cube Steak
Before delving into the intricacies of cooking time, let's take a moment to understand cube steak. Cube steak is typically a cut of beef, usually from the top round or top sirloin, which has been tenderized by pounding with a meat tenderizer. The name "cube steak" comes from the indentations left by the tenderizer, creating a cube-like pattern on the meat's surface.
Choosing the Right Cube Steak
Quality cube steak is essential for a delicious outcome. When selecting cube steak, look for cuts with a nice marbling of fat, as this contributes to tenderness and flavor. Additionally, ensure the meat is fresh and has a vibrant red color. If possible, choose organic or grass-fed options for a more premium and environmentally conscious choice.
Preparation Before Cooking
Before firing up the stove, it's crucial to prepare your cube steak properly. Season the steak generously with salt, pepper, and any other desired seasonings. Allow the seasoned meat to sit at room temperature for about 15-30 minutes before cooking. This ensures even cooking throughout the steak.
Choosing the Right Pan
Selecting the right frying pan is another key element in achieving a perfect cube steak. A heavy-bottomed skillet, preferably cast iron, is an excellent choice. The even heat distribution and heat retention properties of cast iron make it ideal for achieving a delicious sear on the steak. Make sure the pan is large enough to avoid overcrowding, allowing the steak to cook evenly.
The Cooking Process
Now, let's dive into the heart of the matter – the cooking process. The ideal cooking time for cube steak in a frying pan varies based on factors like thickness, desired doneness, and personal preferences.
Preheating the Pan: Before placing the cube steak in the pan, ensure it is properly preheated. A medium-high heat setting is recommended. Let the pan get hot, but not smoking, to achieve a beautiful sear on the steak.
Searing the Steak: Once the pan is ready, carefully place the seasoned cube steak on it. Allow the steak to sear for 2-3 minutes on each side. This initial searing locks in the juices, creating a flavorful crust on the outside.
Cooking Time: The actual cooking time depends on the thickness of the cube steak. For a 1-inch thick cube steak, aim for a total cooking time of 6-8 minutes for medium-rare to medium doneness. Adjust the time accordingly for thicker or thinner cuts.
Checking Doneness: To ensure the steak reaches your preferred level of doneness, use a meat thermometer. For medium-rare, the internal temperature should be around 135°F (57°C), while medium should be around 145°F (63°C).
Resting Period: Once the cube steak reaches the desired doneness, remove it from the pan and allow it to rest for a few minutes. This step is crucial as it allows the juices to redistribute throughout the meat, ensuring a moist and tender result.
Tips for Success
Avoid Overcrowding: Cook the cube steaks in batches if needed, ensuring each piece has enough space in the pan. Overcrowding can lead to uneven cooking.
Add Aromatics: Enhance the flavor of your cube steak by adding aromatics such as garlic, rosemary, or thyme to the pan during cooking.
Pan Sauce: Elevate your dish by creating a simple pan sauce. Deglaze the pan with broth or wine and add butter for a rich and flavorful sauce.
Experiment with Marinades: Marinating cube steak before cooking can infuse additional flavors. Consider using a simple marinade of soy sauce, Worcestershire sauce, and garlic for an extra kick.
Conclusion
Mastering the art of cooking cube steak in a frying pan requires attention to detail, from selecting quality meat to controlling the cooking time. By following these tips and techniques, you'll be well on your way to creating a delicious and tender cube steak that will have your taste buds dancing. So, roll up your sleeves, sharpen your culinary skills, and embark on a flavorful journey that will leave you savoring every bite of perfectly cooked cube steak.
1 note
·
View note
Text
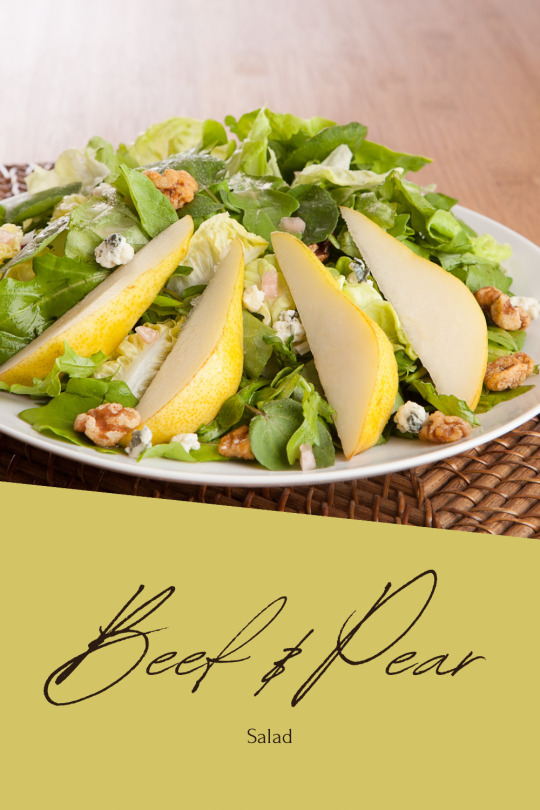
Ingredients:
- 1 pound beef steak (such as sirloin or ribeye)
- Salt and pepper to taste
- 2 tablespoons olive oil
- 4 cups mixed salad greens
- 2 ripe pears, thinly sliced
- 1/2 cup crumbled blue cheese or feta cheese
- 1/4 cup chopped walnuts or pecans
- Balsamic vinaigrette dressing
Instructions:
Season the beef steak with salt and pepper.
Heat olive oil in a skillet over medium-high heat.
Cook the steak to your desired level of doneness (about 4-5 minutes per side for medium-rare, depending on thickness). Remove from heat and let it rest for a few minutes before slicing it thinly.
In a large bowl, toss the mixed salad greens with the pear slices.
Arrange the sliced beef on top of the salad.
Sprinkle the crumbled cheese and chopped nuts over the salad.
Drizzle the balsamic vinaigrette dressing over the salad just before serving or serve it on the side.
For added sweetness I like to add dried currants.
This beef and pear salad combines the richness of beef with the sweetness of ripe pears and the creamy tanginess of cheese, creating a delightful and satisfying salad.
Please note that this website contains affiliate links. If you click through and make a purchase, I may earn a commission at no additional cost to you. I only recommend products or services that I personally use and trust.
0 notes
Text
Perfecting the Art of Reverse Seared Steak - A Delectable Recipe from Rogue Cookers
At Rogue Cookers, we swear by the reverse sear method as the ultimate technique to achieve a best juicy and perfectly cooked steak. Elevate your culinary skills with our tried-and-true recipe that transforms a simple cut of beef into a gastronomic masterpiece.
Ingredients:
Begin your culinary journey by selecting a high-quality steak, preferably a thick-cut ribeye or New York strip. Quality matters, so source your beef from a reputable butcher or specialty market. For seasoning, keep it simple yet flavorful with kosher salt, freshly ground black pepper, and a hint of garlic powder. Additionally, you'll need a touch of high-quality cooking oil, such as olive oil, to ensure a beautiful sear.

Reverse Searing Process:
Preparation: Remove the steak from the refrigerator at least 30 minutes before cooking to allow it to come to room temperature. Preheat your oven to a low temperature, around 225°F (107°C).
Seasoning: Pat the steak dry with paper towels to promote a better sear. Generously season it with kosher salt, freshly ground black pepper, and a light dusting of garlic powder. Let the seasoning meld with the meat while it reaches room temperature.
Slow Roasting: Place the seasoned steak on a wire rack set over a baking sheet and insert a meat thermometer into the thickest part. Slow roast in the preheated oven until the internal temperature reaches about 10-15°F (5-8°C) below your desired doneness. This slow roasting process ensures uniform cooking.
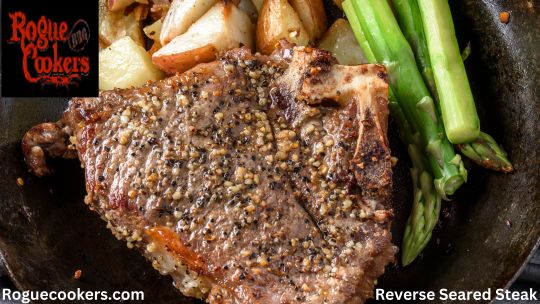
Final Sear: Heat a cast-iron skillet or grill to high heat. Add a drizzle of high-smoke-point oil. Carefully sear the steak for 1-2 minutes per side until a beautiful crust forms. This step locks in the juices and imparts a delightful smokiness.
Resting: Allow the steak to rest for at least 10 minutes before slicing. This crucial step redistributes the juices, ensuring a moist and flavorful bite.
By embracing the reverse sear method, RogueCookers.com guarantees a steak experience that transcends the ordinary. Elevate your culinary prowess and savor the perfection of a flawlessly executed reverse-seared steak.
#smoked chilean sea bass#Reverse Seared Steak#smoked sea bass#chicken halves#bbq chicken halves#texas beef ribs
0 notes
Text
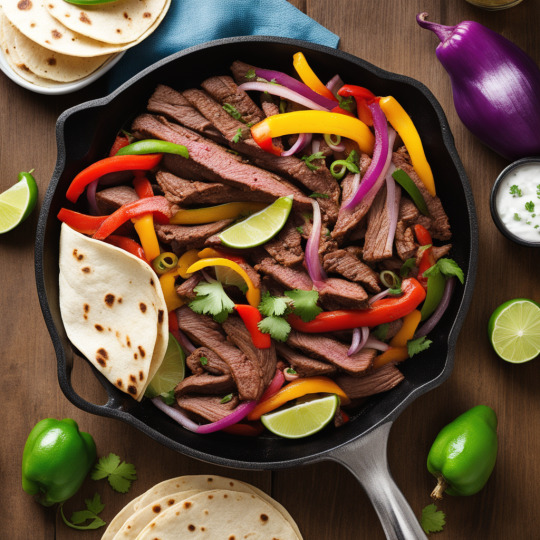
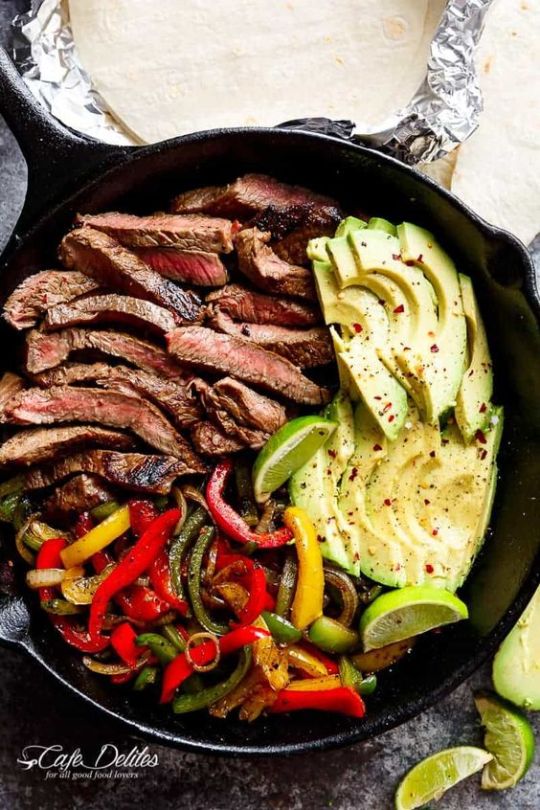
😋 Free Savory Beef Fajitas Recipe : Spice up Your Dinner Table! 🥩🌯🌽
Ingredients for Beef Fajitas:
1 pound flank steak, thinly sliced
1 red bell pepper, thinly sliced
1 green bell pepper, thinly sliced
1 yellow onion, thinly sliced
2 cloves garlic, minced
2 tablespoons fajita seasoning mix
3 tablespoons olive oil
Flour or corn tortillas
Fresh lime wedges, for garnish
Fresh cilantro, chopped, for garnish
Instructions:
Marinate & Enhance! 🍴
In a bowl, combine sliced flank steak, fajita seasoning, minced garlic, and 2 tablespoons of olive oil. Let it marinate for at least 30 minutes to enhance the flavors.
Sauté & Caramelize! 🍳
Heat a large skillet over medium-high heat. Add the remaining olive oil. Cook the marinated flank steak until browned and cooked to your desired level of doneness. Remove from the skillet and set aside. In the same skillet, add the sliced bell peppers and onions. Sauté until tender and slightly caramelized.
Combine & Warm! 🌮
Return the cooked flank steak to the skillet with the sautéed peppers and onions. Mix well to combine the flavors.
Heat Tortillas! 🌯
Warm the tortillas in the skillet for about 20 seconds on each side or until they are pliable and heated through.
Serve & Garnish! 🎉
Spoon the beef and vegetable mixture onto the warm tortillas. Garnish with fresh cilantro and a squeeze of fresh lime juice.
Enjoy & Share! 😊
Serve hot with your favorite toppings and enjoy the sizzling and savory goodness of beef fajitas!
Health Programs: Click Here
See More: Click Here
0 notes
Text
Here's a Healthy Dinner delicious recipe for Beef and Broccoli Stir-Fry:

Ingredients:
For the Stir-Fry Sauce:
1/2 cup low-sodium soy sauce
2 tablespoons oyster sauce
2 tablespoons brown sugar
1 tablespoon cornstarch
1 teaspoon sesame oil
1/2 teaspoon ground ginger
1/2 teaspoon garlic powder
For the Beef and Broccoli Stir-Fry:
1 pound (450g) beef sirloin or flank steak, thinly sliced against the grain
2 cups broccoli florets
2 tablespoons vegetable oil, divided
3 cloves garlic, minced
1 teaspoon grated fresh ginger
Cooked rice or noodles for serving
Sesame seeds and sliced green onions for garnish (optional)
Instructions:
1. Prepare the Stir-Fry Sauce:
In a small bowl, whisk together the soy sauce, oyster sauce, brown sugar, cornstarch, sesame oil, ground ginger, and garlic powder until well combined. Set the sauce aside.
2. Blanch the Broccoli:
In a large pot of boiling water, blanch the broccoli florets for about 2 minutes until they turn bright green and are slightly tender. Drain the broccoli and immediately rinse it under cold water to stop the cooking process. Set aside.
3. Slice the Beef:
Thinly slice the beef against the grain to ensure it cooks quickly and remains tender.
4. Stir-Fry the Beef and Broccoli:
Heat 1 tablespoon of vegetable oil in a large skillet or wok over high heat. Add the sliced beef and stir-fry for 2-3 minutes until it's browned and cooked to your desired level of doneness. Remove the beef from the skillet and set it aside.
5. Cook the Aromatics:
In the same skillet, add the remaining 1 tablespoon of vegetable oil. Add the minced garlic and grated ginger and stir-fry for about 30 seconds until fragrant.
6. Combine and Thicken:
Return the cooked beef to the skillet, along with the blanched broccoli florets.
Pour the prepared stir-fry sauce over the beef and broccoli. Stir everything together and let it cook for an additional 2-3 minutes, or until the sauce thickens and coats the ingredients.
7. Serve:
Serve the Beef and Broccoli Stir-Fry hot over cooked rice or noodles.
Garnish with sesame seeds and sliced green onions, if desired.
This Beef and Broccoli Stir-Fry is a quick and flavorful meal that's perfect for busy weeknights. Enjoy the savory and slightly sweet flavors of this classic dish!
0 notes
Text
Liberty Tree Tavern's Sirloin Steak with Herb Sauce Recipe
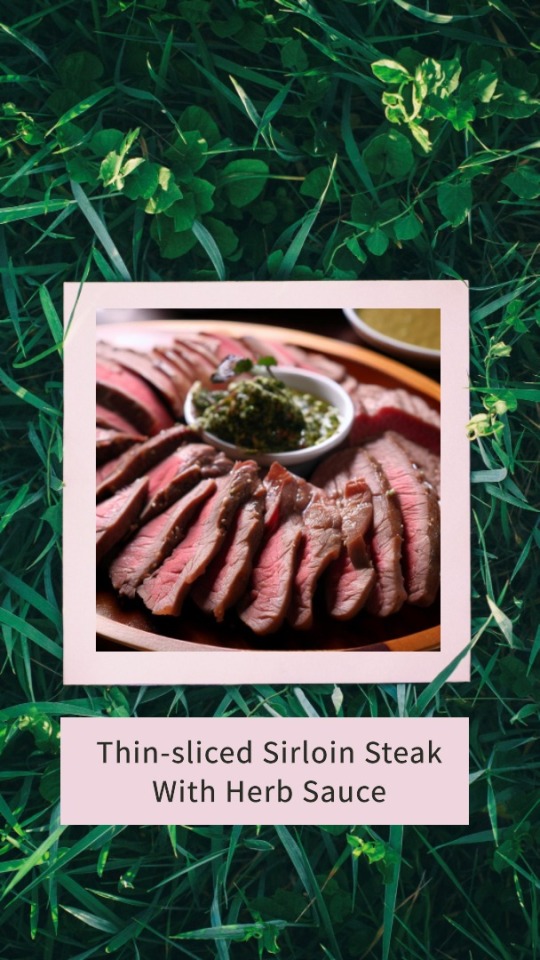
Here’s another one that I was just so excited to try out for one, very fun little reason… This dish has been officially “retired” from the menu, but back in the 80’s, it was one of Liberty Tree Tavern’s signature dishes.
I don’t know why, but it always fascinates me to see how we treated food then compared to how we treat it now. I dare say that there’s no place out there that would thin-slice a sirloin and cover it with gravy before sending it out to a table!
More Delicious Recipes You Will Love:
- Disney-Inspired Spinach Pesto and Lemon Pasta Recipe
- Tie-dye Cheesecake – Disney’s Pop Century Resort
- Tonga Toast Disney World – Kona Cafe
You can tell that every inch of this recipe is very 80’s cooking style, and it’s just so cool. Of course the dish is delicious, but compare that to how Disney treats a steak now… It’s an entirely different experience.
I made no significant changes to the recipe, other than leaving out the mushrooms due to allergy concerns. The steaks themselves were pan-fried, then put in a broiler until cooked to desired doneness.
I’m a rare, medium-rare girl, and I think it looks pretty dead on.
~~~~ °o° ~~~~
Thin-sliced Sirloin Steak with Herb Sauce
As is served at Liberty Tree Tavern, Magic Kingdom
- 6 12-ounce sirloin steaks, broiled or grilled as desired
- 2 12-ounce cans brown gravy
- 2 beef bouillon cubes
- 1/4 cup Dijon Mustard
- 1 clove garlic, chopped
- 1/4 teaspoon black pepper, fresh ground
- 1 tablespoon Worcestershire sauce
- 1 tablespoon butter
- 10 large mushrooms, sliced (if desired)
- 1/4 cup brandy
Keep steaks warm.
In a 4-quart saucepan, mix brown gravy, beef bouillon cubes, Dijon mustard, garlic, pepper, and Worcestershire sauce together. Bring to a simmer and cook 10-15 minutes, stirring constantly to prevent burning and sticking.
In a small skillet, melt butter and saute sliced mushrooms. Add brandy and flambe quickly. Add mushrooms to the gravy and mix well.
Just before serving, thin-slice the steak and fan it on a plate. Serve warm sauce over steak. Also great as a dressing to potatoes.
~~~~ °o° ~~~~
In addition to the delicious food and recipes, Disney World is also known for its unique dining experiences, such as character dining and themed restaurants. Whether you want to have breakfast with Mickey Mouse, dine in a replica of a sci-fi drive-in theater at Hollywood Studios, or enjoy a meal with an ocean view at the Coral Reef Restaurant in Epcot, there's something for everyone. And with the help of Recipes Today and the How to Make category, you can even recreate some of these magical dining experiences in your own home. So why not start planning your next Disney-inspired meal or dining experience today?
Read the full article
0 notes
Text
How to Prepare Sous Vide Steak
Sous vide is a popular French term that means "under vacuum." This method allows you to cook meat at a precise temperature, ensuring perfect texture and even doneness from edge to edge.
This technique is perfect for steaks. The results are tender, juicy, and flavorful.
If you want to know the process of preparing Sous Vide Steak, follow the guide in this article. Visit here to learn more about sous vide steak.

Prep the meat
Sous vide is a French technique that allows you to cook meat (like steak) to the perfect temperature. This technique is hassle-free and saves time.
Vacuum-seal the meat in a bag, and then submerge the bag in water. This precise cooking method produces a juicy steak with a nice seared exterior.
Start by preheating your precision cooker to 130degF (57degC). Then, season each steak with coarse salt, ground black pepper, minced garlic, and herbs like rosemary or thyme.
Once the steaks are seasoned, place them separately into each vacuum-sealable bag. Add a sprig of thyme to each bag, and seal the bags securely.
Take the s water bath and pat them dry. Then, you can serve them or finish them by searing them in a cast iron skillet on the stovetop.
Vacuum-seal the meat
To be perfectly cooked, sous vide steaks must be vacuum sealed before being immersed in the hot water bath. It is an innovative method to trap all the juices and flavors in the bag.
You can also use vacuum seal bags to prepare meals for kids who may not eat certain foods. Soups, casseroles, stews, lasagna, spaghetti, meatballs, and mashed potatoes are easy to make and freeze in these vacuum-sealed bags.
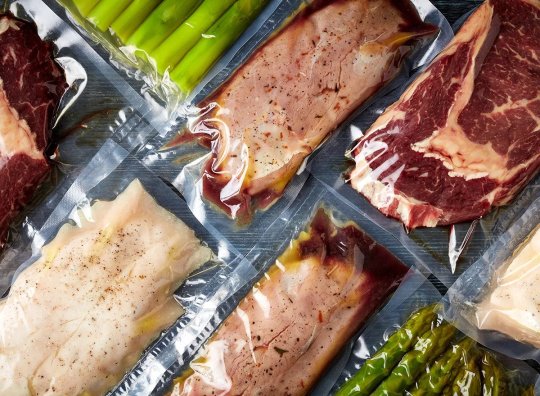
Another benefit to using vacuum sealing is that you can easily season the meat before cooking it in your sous vide water bath. This is especially important if you're using cuts of meat that don't traditionally have a lot of flavors.
Cook the meat
Steak is the crucial and most flavorful food to prepare using sous vide cooking. This method produces an even internal temperature, keeps in all of the steak's natural juices, and ensures that it remains tender.
However, you should not overcook the meat in sous vide water bath. If left in the bath for too long, your steak will lose some of its moisture.
It's best to plan on 1-3 hours of cooking time for a 12-pound steak. A larger meat cut, such as a tri-tip or a skirt steak, may need more time to reach your desired doneness.
Once the steak is finished, you can quickly sear it for added color and delicious char. Then, serve it with your favorite sauce.
Sear the meat
Searing the meat before cooking sous vide is essential for a well-done steak. It locks in the seasoning flavors and develops a tasty crust on the outside.
The key to searing a steak is high heat and a heavy-bottom pan such as a cast iron skillet or grill. This method is easy and fast and produces perfect results for a perfectly cooked steak.

The sear is quick, so you should be able to get the steak on the grill or in the skillet within a minute of pulling it out of the water bath. After the first minute, flip it over and continue to sear until you've got a nice deep brown. Then, based on your taste preference, add a little butter to the pan for more flavoring. You can spoon some of the drippings from the pan over the steak to add extra flavor.
1 note
·
View note
Text
Sous vide tri tip is a delicious and easy way to cook a flavorful cut of beef. It is a great way to get a juicy, tender, and flavorful steak without having to worry about overcooking it. The sous vide method of cooking involves sealing the steak in a vacuum-sealed bag and then cooking it in a water bath at a precise temperature for a specific amount of time. This method of cooking allows the steak to cook evenly and retain its moisture and flavor. The amount of time it takes to sous vide tri tip depends on the desired doneness and the thickness of the steak. In this article, we will discuss how long to sous vide tri tip and the best temperature and time for each doneness.
How to Achieve Perfectly Cooked Tri Tip with Sous Vide
Cooking the perfect tri tip can be a challenge, but with sous vide, it's easy! Sous vide is a cooking technique that uses precise temperature control to deliver consistent, restaurant-quality results. Here's how to achieve perfectly cooked tri tip with sous vide:
1. Start by seasoning your tri tip with salt and pepper.
2. Place the tri tip in a sous vide bag and seal it.
3. Place the bag in a sous vide water bath and set the temperature to 130°F (54°C).
4. Cook the tri tip for 1 to 2 hours, depending on the thickness of the meat.
5. Once the tri tip is cooked, remove it from the bag and pat it dry with paper towels.
6. Heat a cast-iron skillet over high heat and add a tablespoon of oil.
7. Sear the tri tip for 1 to 2 minutes per side, until it's nicely browned.
8. Let the tri tip rest for 5 minutes before slicing and serving.
And there you have it! Perfectly cooked tri tip with sous vide. Enjoy!
What Temperature Should You Set Your Sous Vide for Tri Tip?
Cooking tri tip sous vide is a great way to get a perfectly cooked steak every time! The ideal temperature for sous vide tri tip is 130°F (54°C). This temperature will give you a steak that is medium-rare, with a nice pink center and a slightly browned exterior. If you prefer your steak more well-done, you can increase the temperature to 140°F (60°C). No matter what temperature you choose, you can be sure that your tri tip will be cooked to perfection!
How Long Does it Take to Sous Vide Tri Tip?
Cooking tri tip sous vide is a great way to get a perfectly cooked steak every time! The process is simple and the results are delicious. So, how long does it take to sous vide tri tip?
The answer depends on the size and thickness of the steak, but generally speaking, it takes about 1-2 hours to sous vide tri tip. If you’re cooking a thicker cut, you may need to increase the time to 2-3 hours.
To get the best results, it’s important to use a thermometer to monitor the internal temperature of the steak. The ideal temperature for tri tip is 130°F for medium-rare, or 140°F for medium.
Once the steak has reached the desired temperature, you can remove it from the sous vide and sear it in a hot pan for a few minutes to give it a nice, crispy crust.
Sous vide tri tip is a great way to get a perfectly cooked steak every time. With just a few simple steps, you can have a delicious steak ready in no time!
What Are the Benefits of Sous Vide Cooking Tri Tip?
Sous vide cooking tri tip is a great way to get the most out of your meal. This cooking method is becoming increasingly popular due to its many benefits. Here are some of the benefits of sous vide cooking tri tip:
1. Perfectly cooked meat: Sous vide cooking tri tip ensures that the meat is cooked to perfection. The low and slow cooking method ensures that the meat is cooked evenly throughout, resulting in a juicy and tender cut of meat.
2. Enhanced flavor: The low and slow cooking method of sous vide cooking tri tip helps to bring out the natural flavors of the meat. The flavors are sealed in, resulting in a more flavorful and delicious meal.
3. Time-saving: Sous vide cooking tri tip is a great time-saver. The low and slow cooking method ensures that the meat is cooked quickly and efficiently, saving you time in the kitchen.
4. Versatility: Sous vide cooking tri tip is incredibly versatile. You can use different seasonings and marinades to create a variety of flavors. You can also use different cooking temperatures to achieve different textures.
Sous vide cooking tri tip is a great way to get the most out of your meal. With its many benefits, it’s no wonder why this cooking method is becoming increasingly popular. Try it out today and enjoy a perfectly cooked, flavorful, and time-saving meal!
What Are the Best Seasonings for Sous Vide Tri Tip?
Sous vide tri tip is a delicious and easy way to prepare a flavorful cut of beef. To make the most of this cooking method, you'll want to use the right seasonings to bring out the best flavor. Here are some of the best seasonings for sous vide tri tip:
• Garlic: Garlic is a classic seasoning for beef, and it pairs perfectly with sous vide tri tip. Use fresh or powdered garlic to add a savory, earthy flavor.
• Rosemary: Rosemary is a fragrant herb that adds a woodsy, herbal flavor to sous vide tri tip. Use fresh or dried rosemary to give your dish a unique flavor.
• Paprika: Paprika is a mild, smoky spice that adds a subtle heat to sous vide tri tip. Use sweet or hot paprika to give your dish a flavorful kick.
• Salt and Pepper: Salt and pepper are essential seasonings for sous vide tri tip. Use coarse sea salt and freshly ground black pepper to bring out the natural flavor of the beef.
• Thyme: Thyme is a fragrant herb that adds a subtle, earthy flavor to sous vide tri tip. Use fresh or dried thyme to give your dish a unique flavor.
These are just a few of the best seasonings for sous vide tri tip. Experiment with different combinations to find the perfect flavor for your dish. Enjoy!
How to Achieve a Crispy Outer Layer on Sous Vide Tri Tip
If you're looking for a perfectly cooked, juicy, and flavorful tri tip with a crispy outer layer, sous vide is the way to go! Sous vide is a cooking method that involves sealing food in a vacuum-sealed bag and then cooking it in a water bath at a precise temperature. This method ensures that the food is cooked evenly and consistently, and it also helps to retain moisture and flavor.
But how do you get that crispy outer layer? The key is to finish the tri tip off with a quick sear. After the tri tip has been cooked sous vide, remove it from the bag and pat it dry with a paper towel. Heat a skillet over high heat and add a tablespoon of oil. Once the oil is hot, add the tri tip and sear it for about 30 seconds on each side. This will give you a nice, crispy outer layer while still keeping the inside juicy and tender.
For an even crispier outer layer, you can also finish the tri tip off in the oven. Preheat the oven to 400°F and place the tri tip on a baking sheet. Brush the tri tip with a little oil and season it with salt and pepper. Bake it for about 10 minutes, or until the outside is golden brown and crispy.
No matter which method you choose, you'll be sure to enjoy a perfectly cooked, juicy, and flavorful tri tip with a crispy outer layer. Bon appétit!
What Are the Best Sides to Serve with Sous Vide Tri Tip?
Sous vide tri tip is a delicious and easy way to enjoy a flavorful cut of beef. The sous vide method of cooking ensures that the beef is cooked to perfection, with a juicy, tender texture. To make the meal complete, you'll want to serve some delicious sides to go along with it. Here are some of the best sides to serve with sous vide tri tip:
• Roasted vegetables: Roasted vegetables are a great way to add some color and flavor to your meal. Try roasting some carrots, potatoes, and onions with a bit of olive oil and herbs for a delicious side dish.
• Grilled corn: Grilled corn is a classic side dish that pairs perfectly with sous vide tri tip. Grill the corn on the cob and serve it with a bit of butter and salt for a delicious side.
• Baked beans: Baked beans are a great way to add some protein and flavor to your meal. Try
making a batch of your favorite baked beans recipe and serve it alongside your sous vide tri tip.
• Salad: A fresh, crunchy salad is a great way to add some lightness to your meal. Try making a simple salad with some greens, tomatoes, and cucumbers for a delicious side dish.
• Mashed potatoes: Mashed potatoes are a classic side dish that pairs perfectly with sous vide tri tip. Try making a batch of mashed potatoes with some butter, cream, and herbs for a delicious side dish.
No matter what sides you choose to serve with your sous vide tri tip, you can be sure that it will be a delicious and satisfying meal. Enjoy!
What Are the Best Sauces to Serve with Sous Vide Tri Tip?
When it comes to sous vide tri tip, the possibilities for delicious sauces are endless! Here are some of the best sauces to serve with sous vide tri tip:
1. Chimichurri: This classic Argentinian sauce is made with parsley, garlic, olive oil, and vinegar. It adds a bright, herby flavor to the tri tip that is sure to please.
2. Horseradish Cream: This creamy sauce is made with horseradish, sour cream, and mayonnaise. It adds a zesty kick to the tri tip that will have your guests coming back for more.
3. BBQ Sauce: Who doesn’t love a good BBQ sauce? This classic sauce is made with tomato paste, vinegar, and spices. It adds a smoky, tangy flavor to the tri tip that is sure to be a hit.
4. Aioli: This French sauce is made with garlic, olive oil, and egg yolks. It adds a rich, garlicky flavor to the tri tip that is sure to tantalize your taste buds.
5. Mustard Sauce: This classic sauce is made with mustard, cream, and butter. It adds a tangy, creamy flavor to the tri tip that is sure to be a crowd pleaser.
No matter which sauce you choose, you can’t go wrong when it comes to serving sous vide tri tip. So go ahead and experiment with different sauces to find the perfect one for your next meal!
FAQs:
How long should I sous vide tri tip for?
The ideal sous vide cooking time for tri tip is 1-2 hours at 135°F (57°C). For a more tender result, you can cook for up to 4 hours.
What temperature should I sous vide tri tip at?
The ideal temperature for sous vide tri tip is 135°F (57°C).
Is it safe to sous vide tri tip?
Yes, it is safe to sous vide tri tip as long as you follow the recommended cooking time and temperature.
Can I sous vide tri tip for longer than 2 hours?
Yes, you can sous vide tri tip for up to 4 hours for a more tender result.
Can I sous vide tri tip at a higher temperature?
No, it is not recommended to sous vide tri tip at a higher temperature than 135°F (57°C).
Can I sous vide tri tip in a plastic bag?
Yes, you can sous vide tri tip in a plastic bag as long as it is a food-safe, BPA-free bag.
Can I sous vide tri tip with other ingredients?
Yes, you can sous vide tri tip with other ingredients such as vegetables, herbs, and spices.
How should I store sous vide tri tip?
After sous vide cooking, you should store the tri tip in an airtight container in the refrigerator for up to 4 days.
Conclusion
In conclusion, sous vide tri tip is a great way to cook a delicious and tender cut of beef. It is a relatively simple process that requires minimal effort and produces consistent results. The key to success is to ensure that the tri tip is cooked to the desired temperature and that it is not overcooked. With a little practice, anyone can master the art of sous vide tri tip and enjoy a delicious meal.
0 notes
Photo
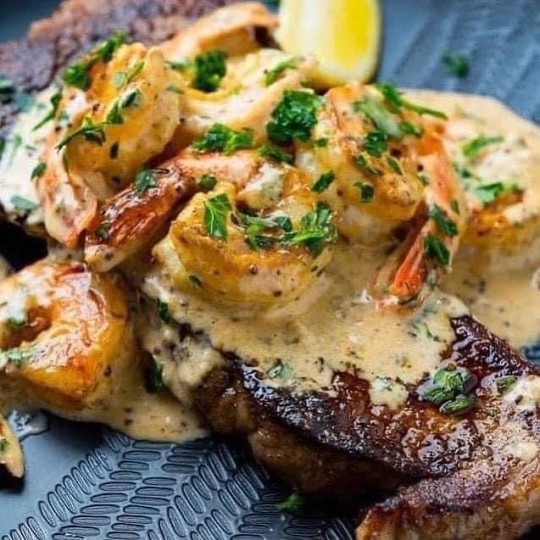
This might be what makes me eat a steak 😜 Surf & Turf in Creamy Cajun Sauce INGREDIENTS: 1 tsp olive oil 5 ounces steak 7 ounces shrimp 10.5 ounces cauliflower 1/2 tbsp butter 1/4 cup veg broth 1 cup almond milk 1/2 tsp cajun seasoning 1 tsp dijon mustard 1 clove garlic 2 Tbsp reduced fat parmesan cheese 1 tsp lemon juice Sprinkle parsley DIRECTIONS: Heat the oil in a large skillet over medium-high heat, add the steaks and sear until lightly browned on both sides and cooked to the desired level of doneness, before setting aside. Reduce the heat to medium, add the butter and let it melt before adding the shrimp and cooking until just pink on both sides, about 1-2 minutes per side, and set aside. In a separate small pot, add the garlic and cook until fragrant, about a minute. Add the vegetable broth and deglaze the pan by scraping up any brown bits from the bottom with a wooden spoon as the broth sizzles. Add the almond milk, mix in the dijon mustard and cajun seasoning, bring to a low boil and let simmer for a minute. Mix in the cheese and let it melt into the sauce. Mix in the lemon juice, parsley and shrimp then set aside. Place cauliflower florets (uncooked) into blender or food processor. Once riced, add to frying pan and steam with a small amount of water. Plate the rice then add steak and creamy shrimp sauce and serve! Makes 2 Servings Per serving: 1 lean, 3 greens, 3 condiments If you’d like to receive my weekly newsletter with healthy recipes like this and tips for living your healthiest life, subscribe here https://forms.gle/294fANVKAafReuQJ7 If you’d like to learn more about the program I coach and how it can transform your life, let’s talk - message me or fill out this form https://form.jotform.com/223644431205144 - I have $75 vouchers available for the rest of this week! #NotADiet #HabitsOfHealth #HealthyHabits #OptaviaHealthyHabits #LifelongTransformation #Optavia #Optavia5and1 #Optavia5and1plan #OptaviaResults #OptaviaCoach #IndependentOptaviaCoach #IndependentCertifiedOptaviaCoach #OptaviaJourney #HealthyLifestyle #OptaviaTransformation #MyJourneyToAHealthyMe #SurfAndTurf #HealthyLife #LeanAndGreen #HopeDealer #creamycajunshrimp (at Greensboro, North Carolina) https://www.instagram.com/p/CqTJH3EOLxf/?igshid=NGJjMDIxMWI=
#notadiet#habitsofhealth#healthyhabits#optaviahealthyhabits#lifelongtransformation#optavia#optavia5and1#optavia5and1plan#optaviaresults#optaviacoach#independentoptaviacoach#independentcertifiedoptaviacoach#optaviajourney#healthylifestyle#optaviatransformation#myjourneytoahealthyme#surfandturf#healthylife#leanandgreen#hopedealer#creamycajunshrimp
0 notes
Text
Chili Lime Steak Fajitas
Serving: 4
Ingredients
For the marinade
2 tablespoons olive oil
1/3 cup freshly squeezed lime juice
2 tablespoons fresh chopped cilantro
2 cloves garlic , crushed
1 teaspoon brown sugar
¾ teaspoon red chilli flakes (adjust to your preference of spice)
½ teaspoon ground Cumin
1 teaspoon salt
1 pound (500 g) steak (rump, skirt or flank steak)
For the fajitas
3 bell peppers (capsicums) of different colours: red, yellow and green, deseeded and sliced
1 onion, sliced
1 avocado sliced
For optional serving suggestions
Flour tortillas (optional)
Lettuce leaves for a low carb option
Extra cilantro leaves to garnish
Sour cream (optional)
Directions
For the marinade
Whisk marinade ingredients together to combine. Pour out half of the marinade into a shallow dish to marinade the steak for 30 minutes, if time allows.
Alternatively, refrigerate for 2 hours or overnight.
Remove from the refrigerator 30 minute prior to cooking.
Refrigerate the reserved untouched marinade to use later
For the skillet
Heat about one teaspoon of oil in a grill pan or cast iron skillet over medium-high heat and grill steak on each side until desired doneness (about 4 minutes each side for medium-rare, depending on thickness).
Set aside and allow to rest for 5 minutes.
For the grilling
Heat barbecue (or grill) on high heat.
Remove steak from the marinade.
Grill for 5-7 minutes per side, or until desired doneness is reached.
Transfer to a plate and allow to rest for 5-10 minutes.
For the vegetables
Wipe pan or grill plates over with paper towel; drizzle (or brush) with another teaspoon of oil and fry peppers (capsicums) and onion strips.
Add half of the reserved marinade, salt and pepper; continue cooking until done.
For the assembly
To serve steak, slice against the grain into thin strips.
Pack into warmed tortillas, extra cilantro leaves, sour cream, sliced avocado (or your desired fillings), and drizzle over the remaining reserved untouched marinade.
Notes
Don't have time to marinade? Don't worry! The marinade has so much flavour in it already, you can let it sit for 5-10 minutes at room temperature while preparing all of your other ingredients!
(Source)
0 notes
Text
Garden Party on a Plate - Fresh Tuna Salad
I’ve been making this Fresh Tuna Salad for as long as I can remember and it’s always a hit! I’m going to be honest and say that I would call it a Tuna Niçoise Salad but I totally forgot the olives and it was still so delicious! It’s a little untraditional because of the cherry tomatoes, but I love the freshness that they add. I sprinkled micro greens (my new obsession) over the top of the salad along with a little red onion for color.
If you’re serving a crowd, this salad is so easy to put together and it’s all you need other than a good crunchy loaf of bread and maybe dessert. The day I made this salad, it was raining and miserable out so I seared the tuna in a cast iron skillet, but usually I grill it…either way it’s delicious. Be sure to buy the freshest tuna you can find and leave it a little pink in the middle. Also…roast your potatoes so they have some crunch and don’t forget the flaky sea salt (I buy Maldon Sea Salt in bulk)!
{"image":"https://i.imgur.com/LWco5Ua.png","name":"Fresh Tuna Salad","prepTime":"PT20M","cookTime":"PT20M","totalTime":"PT40M","description":"This delicious recipe also makes a beautiful presentation!","yield":"As many as you like!","author":{"@type":"Person","name":"Suzanne Smith"},"recipeIngredient":["Fresh tuna steaks - I used albacore tuna","Baby lettuces","Small tricolor potatoes","Green beans","Olive oil","Salt and freshly ground black pepper","Garlic salt","Cherry tomatoes","Thinly sliced red onion","Hard cooked boiled eggs","Micro greens (any kind will do)","Mustard vinaigrette - homemade or bottled (recipe below)","For the mustard vinaigrette...In a small bowl, whisk together 1 teaspoon Dijon mustard, 4 tablespoons white wine vinegar, a pinch of salt and pepper and 1/3 cup olive oil."],"recipeInstructions":["Drizzle potatoes with olive oil, salt, pepper and garlic salt. Roast in a 400 degree oven for about 20 minutes or until crisp and brown.","Prepare the green beans in the same way and roast for about 10 minutes or until they reach desired doneness. I like mine still a little crisp.","Drizzle tuna steaks on both sides with olive oil, salt and pepper. Sear in a very hot cast iron skillet until medium rare - no more than about 5 minutes total for medium rare tuna.","Arrange baby lettuces on a large platter. Slice tuna steaks after they have cooled slightly. Arrange tuna, green beans and roasted potatoes on the lettuces and garnish with halved cherry tomatoes, thinly sliced red onion, sliced eggs and micro greens. Drizzle dressing over all and enjoy!"],"@context":"http://schema.org","@type":"Recipe"}
You can see what a beautiful presentation this salad makes so it’s perfect when you want to impress your guests! As with everything…make it your own by adding a little goat cheese or anything else that sounds good to you and…don’t forget the olives!
Last week was a very busy one! My oldest daughter turned 37 on Monday and we had everyone for birthday dinner and I hosted my book club here on Thursday night for dinner. On Friday, I attended the Art in Bloom exhibit at the Museum of Art in Raleigh and yesterday, went back to Raleigh for lunch at Rosewater Kitchen and Bar (highly recommend) and shopping with my daughter for her birthday! It was a jam packed but really fun week and I’m so behind on everything! I hope you all are having a fabulous weekend! Don’t forget to keep those comments coming!
Thanks for reading today!
1 note
·
View note
Text
Reverse Seared Steak
There’s just no better way to cook a thick cut steak than the reverse sear method. This recipe uses NY Strip steaks, but any steak thicker than 1.5″ (e.g. Ribeye, Filet Mignon, etc.) can be used to deliver a perfectly cooked, juicy steak from edge to edge with a delicious crust on the outside. The added smoked flavor will have this steak rivaling the best steak houses on the planet. Try this Reverse Seared Steak method and you’ll never cook it any other way!
Ingredients
Main
2 steaks, 1.5-2 inches thick
2 tablespoons Meat Church Holy Cow Seasoning, substitute favorite rub (optional recipe below)
1 tablespoon Kosher salt
1 tablespoon high heat cooking oil, like canola
Helpful Tools
1 ThermoPro Instant Read Thermometer, completely optional
Steps
Salt steak before cooking
Place on a rack over a baking sheet so that the air can circulate around both sides. Coat both sides of the steaks with Kosher salt and let sit on the counter for 1 hour (at least 40 minutes) before cooking. If you don't have at least 40 minutes to spare before cooking, skip this step and season right before smoking. Ideally, place in refrigerator overnight uncovered for the best results!
Preheat the smoker or grill
Preheat smoker or grill to 225°F. Most pellet grills don’t need it, but you can add a pan of water in the corner of the smoker to keep moisture inside.
Season the steak
Pat steaks dry to remove excess moisture. Season all sides of the steaks generously with the seasoning. You can use a little olive oil if desired to help the rub stick to the steaks better.
Let's get smoking
Add steaks to smoker and smoke at 225°F until it hits an internal temperature of 120°F for medium rare, approximately 1-1.5 hours. Thicker steaks will cook longer. I recommend using a meat thermometer to help achieve the perfect temperature without overcooking the steak.
Crank up the heat
Once the steaks reach their desired temperature, place on a carving board and tent loosely with aluminum foil. While the steaks are resting, increase the heat of the grill to 450°F (set temperature to "High" if using a Traeger or any other pellet grill with a high heat setting) and place a cast iron skillet or griddle on the grill. Close the lid. Alternately, you can sear the steak in a piping hot pan on the stove top.
Sear the steaks
Once the grill reaches 450°F, add a tablespoon of oil to the pan and once sparkling add the steaks and sear for 2-3 minutes on each side to form a nice crust. This will bring the steaks up to your desired finish temp, 130-135°F for medium rare. See chart below for doneness temperatures.
Rest the steaks
This step is optional as the steaks have already rested before searing, but a little extra rest won't hurt and could allow the juices to redistribute further into the steaks. Remove steaks from pan, place on a cutting board, tent loosely with aluminum foil, and rest for 10-20 minutes.
Slice and enjoy
Slice your beautifully reverse seared steak against the grain and enjoy!
Notes
Why Should I Reverse Sear Steaks?
For thinner steaks, the traditional cooking method of high heat for a short amount of time works fine because it doesn't take long to cook them to a perfectly done center. However, high heat used for searing causes the muscle fibers to contract, which means the steaks will lose moisture. This doesn’t impact thinner steaks as much, but for thick-cut steaks your best bet at retaining moisture is to slow down the process and sear in the moisture at the end.
The reverse sear method also helps prevent an unevenly cooked steak, as well as preventing the steaks from forming a gray edge around the pink interior that we're so accustomed to seeing. The texture contrast will also be really nice, with a tender, juicy interior and a crispy browned crust on the exterior.
What Steaks Are Best for the Reverse-Searing Method?
Not all steaks are well-suited to this method. Because of the longer cooking time, thinner steaks will become dry and overcooked. Flank steaks and similar thin steaks should be avoided, but any steaks over 1.5 inches thick are ideal for the reverse searing method. Thick cut ribeyes, New York Strip Steaks, T-Bones, and even Filet Mignon are excellent steaks for the reverse searing method.
How Long Will It Take to Cook a Reverse-Seared Steak?
The time will vary based on the desired doneness of the steak, but this section should help guide you with temperatures and time spent on the grill for your Reverse Seared Steak. Use a probe thermometer to check the temperature of the steaks, and once they reach the desired doneness, remove them to rest before searing.
Rare to Medium-Rare steak 120-130 °F internally, with a red center.
Medium steak 135-145 °F internally, with some pink in the center.
Medium-well steak 145-155 °F internally, light pink center.
Well-done steak 155-165 °F internally, primarily brown center.
The base time is around 1 to 1.5 hours for a rare to medium-rare steak. For each level of doneness after medium-rare, start by adding 10 minutes to the cooking time, and use a probe thermometer to monitor the internal temperature.
Should I Rest the Steak Before Searing It?
Resting steaks is an essential part of cooking any meat because it allows the juices to redistribute throughout the meat. Similar to the salting process, the juices will seep out of the steak but will then reabsorb into the meat, so you want to allow that process to take place. The meat will become juicy and tender while resting and searing the steaks afterward will lock all those juices into the steaks.
The best part about the reverse sear method is that even though it takes a bit longer to cook, you don't need to rest it again after searing. Take it out of the pan you're ready to eat it!
Can I Sear the Steak In A Pan?
If for some reason you can’t use a grill to finish the sear, a cast iron pan can serve the purpose. Cast iron pans heat very consistently, and well-seasoned pans will allow the steaks to release easily so that the seared crust doesn’t get pulled away or damaged. To sear on a cast iron pan, heat the pan over high heat with a small bit of cooking oil - don’t put the steaks on the pan until it’s piping hot! Sear the steaks for around 2 minutes per per side.
Why Salt Steaks Before Cooking?
Salting steaks - or any meat, for that matter - is an important step in cooking that shouldn’t be skipped! Salt draws out the juices from the meat, and ideally, you should salt the meat for at least 40 minutes before cooking, but preferably overnight. Shorter than 40 minutes and the juices will start to seep out of the steaks, but around 40 minutes most of those juices will have reabsorbed into the meat. This will allow you to get a much nicer crust on your steak.
0 notes
Last Seen Blogs