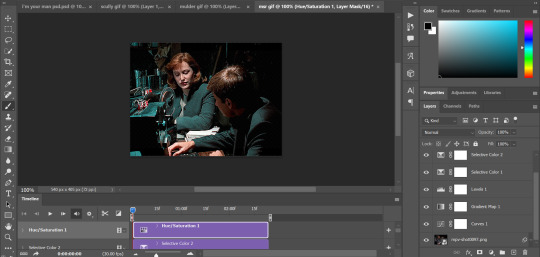
#and NO ... i didn't use 50 layers in photoshop to make this ...
Text
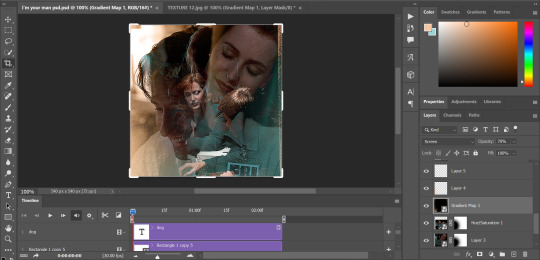
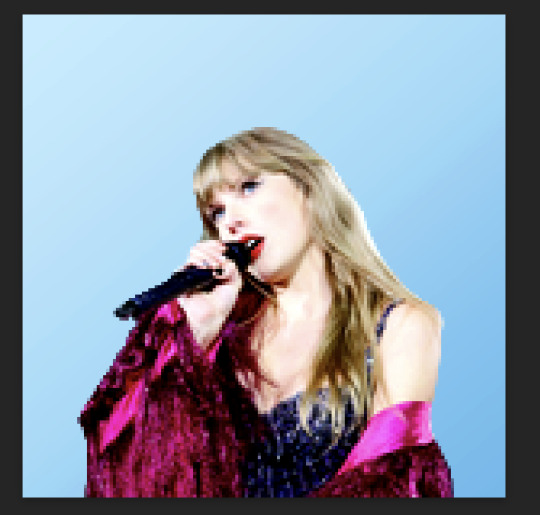
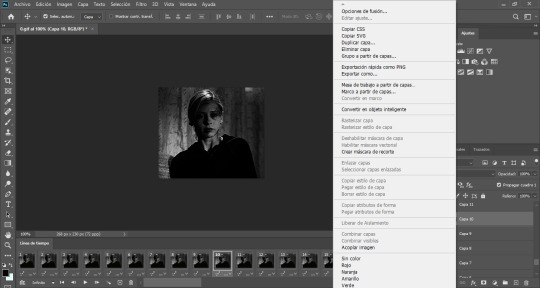
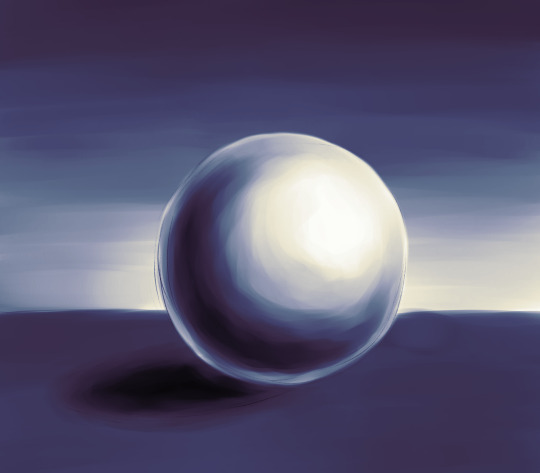
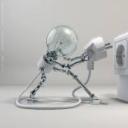
SLEEPLESS IN LONDON

Since this is happening ... have my creation as proof that it will, on some level, work. (I pinky promise). (Trust me).
SLEEPLESS IN LONDON by helloliriels - "I think my Daddy needs a new wife."
@johnlocky @fluffbyday-smutbynight @chinike @rhasima @colourfulwatson @safedistancefrombeingsmart @holmesianlove @kabubsmagga @storytellingdreamer @peanitbear @copperplatebeech @mxster-jocales @missdeliadili @masterofhounds @gremlininthemachine @cupidford @daltongraham @totallysilvergirl @peageetibbs @kettykika78 @shelleysprometheus @7-percent @calaisreno @inevitably-johnlocked @bluebellofbakerstreet @discordantwords @simplyclockwork @whatnext2020 @khorazir @raina-at @arwamachine @topsyturvy-turtely @justanobsessedpan @gaylilsherlock @dinner--starving @meetinginsamarra @john-smiths-jawline @inatshej @janetm74 @sgam76 @t-dalo @kittenmadnessandtea @purplevatican @gregorovitchworld @1-800-get-sherlocked @wizama @jobooksncoffee @crazyatyou @tinchensblog @ohnoesnotagain
#12 days of johnlock#sleepless in london#johnlock#johnlock fan fic#helloliriels#don't ask which one is meg ryan#(neither)#(the answer is neither)#this will be it's own beast#and NO ... i didn't use 50 layers in photoshop to make this ...#why do you ask??#(okay i did)#(55 actually)#god i need sleep#liriels ps#_large#lockout films
320 notes
·
View notes
Text
gif tutorial
@bakedbakermom requested a tutorial on how i made the gifs in this set, so i've put together a little walkthrough of the process for this gif under the cut!
(disclaimer: this tutorial assumes that you already have basic photoshop/giffing knowledge - i.e. how to make and colour gifs using correction layers, how to use things like layer masks, etc. if you don't, i recommend these tutorials, they're very comprehensive)
alright! so as stated before, i'm not going to go in-depth here on the basics of gifmaking. for this one in particular, i blended three gifs, but we'll get into the third one later.
(i should also mention that blending gifs as i did here is usually easier if you have scenes with shadowed/dark areas like the ones above, so to keep that in mind when picking your scenes! i also find it easier to use scenes where there isn't a whole ton of movement going on- again, not a requirement but it's easier to plan and position gifs if the characters aren't moving across the whole canvas)
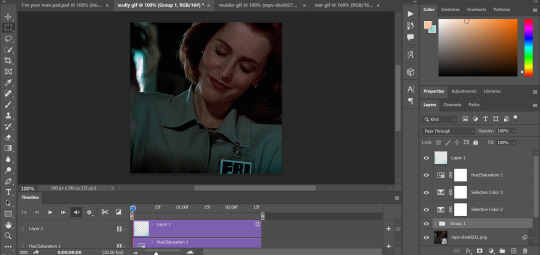
first, i started by making the base gifs of mulder and scully in "paper hearts". both are cropped to 540x540 px, and the same length (around 50 frames). i did some standard sharpening, brightening, and adding contrast (my usual process is curves, a b/w gradient map set to "soft light" at around 20% opacity, and messing with the levels a bit) before using selective colour and hue/saturation layers to highlight the teal and peach colours in the gif. sometimes this is enough colouring on its own, depending on the gif and the look you're going for, but in my case i wanted to add more.
so, on top of my colouring, i used a combination of layers set to "colour" and "hard light" to paint over the background of my gifs in teal and peach. on mulder's gif i also used a gradient fill layer in the two colours set to "colour" and used a layer mask to erase anywhere i didn't want the colour to be. the opacity levels for all of these layers again just depends on how vibrant you want your colours, i just mess with that on a gif-to-gif basis.
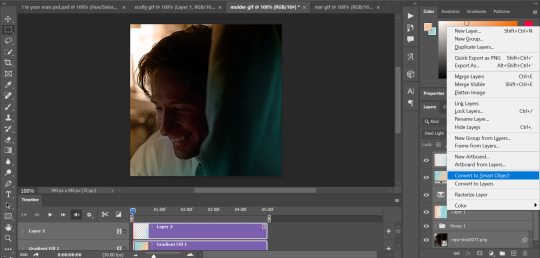
so we have our two gifs, cropped and coloured to fit the palette we want. next, i converted each coloured gif into a smart object, by selecting all my layers, right clicking, and hitting "convert to smart object."
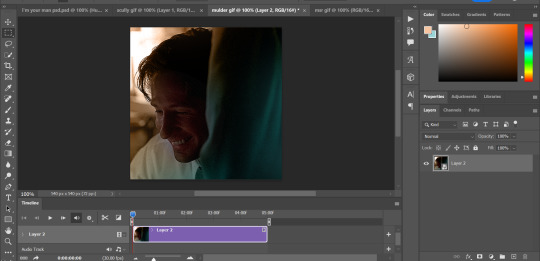
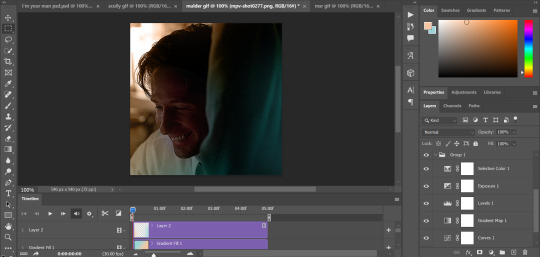
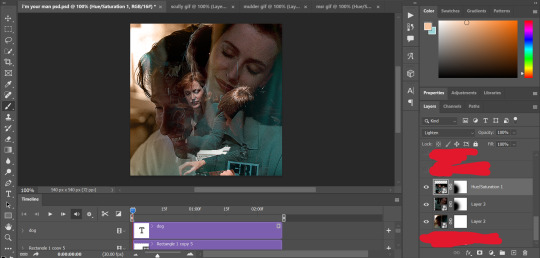
once that's done, you should be able to click and drag one of the gifs onto the other gif's canvas, so that it's sitting on top. then change the blending mode of the top gif- most people use lighten or screen, this again depends on the look you want and the gifs you're using. for this one, i used screen. it'll probably look something like this:
at this point you can move your gifs around and position them as you like. for mine, i just moved scully a little off to the right, as you can see. in order to get rid of the part that's covering mulder's face, i added a layer mask to the scully gif and used a large, soft brush set to black to erase it.
(another note: i didn't need to do it here, but if you want to move/erase parts of your bottom gif, add a layer of solid black underneath both gifs.)
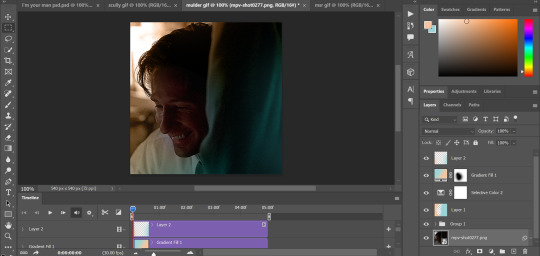
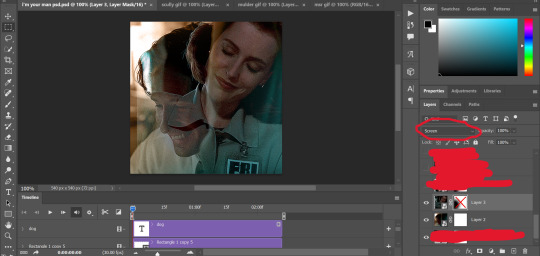
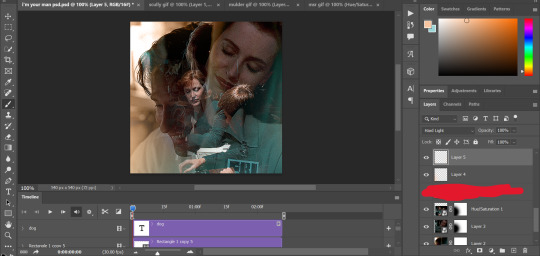
usually i would stop blending here, but for this set i decided to add a third gif, so i made and coloured the gif of mulder and scully holding hands, using the same methods as the first two. this one was cropped to 540x405 px to make it fit better on the canvas, since i knew i only wanted it to cover the bottom part.
i converted it to a smart object and dragged it onto the same canvas as the other two gifs. this time i used "lighten" as my blending mode, positioned it in the bottom right corner, and again used a layer mask to brush away the parts i didn't want.
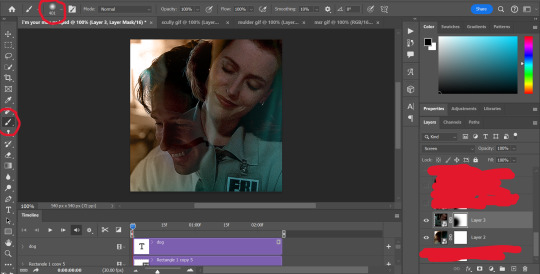
on top of all three gifs, i then used layers set to "normal" and "hard light" to brush some extra colour onto the gif. this part i also just play around with on a gif-to-gif basis, but for this set i mostly used a combo of colour, hard light, and normal layers at varying opacities until i got the look i was going for. i generally just like to use big soft brushes to add colour around the edges, as i did here.
now, i have a bunch of texture/grain pngs saved on my laptop that i like to add to gifs for some extra flair, so i opened one of those and cropped it down to 540x540px. i then added a gradient map to give it that peach colour. (any textured png/jpg should work fine for this, as long as you have your gradient map set to black and white/your accent colour)
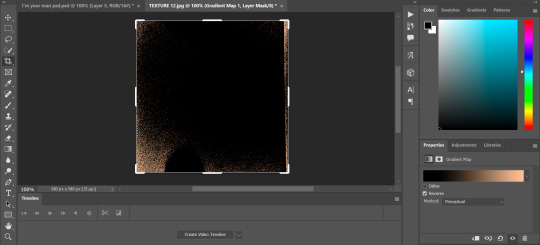
like i did with my gifs, i converted the texture + gradient map to a smart object and dragged it onto the shared canvas. i set the blending mode to "screen", with the opacity at 70%. i like to put these textures underneath the extra colouring i've done on the gif, as seen here. i don't always do this, but i feel like it sometimes helps the texture blend into the finished gif. you can also use a layer mask if needed to erase any unwanted parts of the texture.
now for the text!
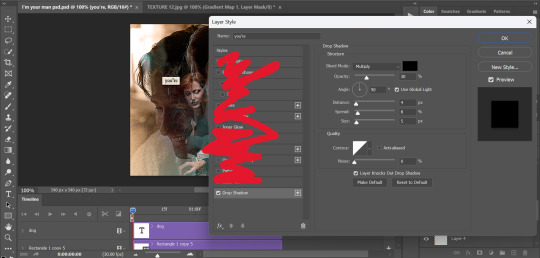
for these gifs i used the font "IM FELL DW Pica" in both regular and italic, in black, at 16px. i didn't do anything fancy with the text itself besides adding a drop shadow in the blending options (right click on the text layer and hit "blending options).
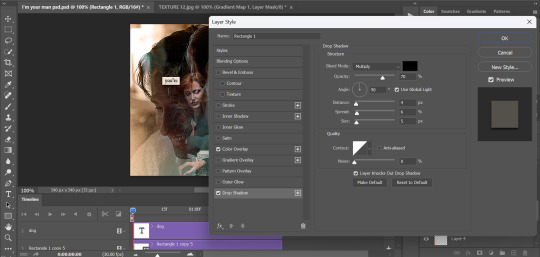
then, underneath the text layer (i was working one word at a time) i used the rectangle tool to draw a small rectangle around the text- i wasn't too picky about the size or evenness since i was going for a collaged look. i set the colour of the rectangle to a light cream colour, and added a drop shadow in the blending options.
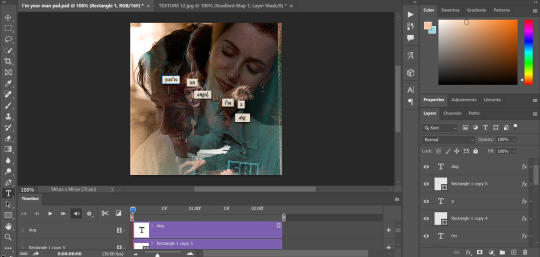
then i just selected both the text and rectangle and duplicated them using ctrl+j, changing the text for each word and adjusting the size of the rectangles as needed. once i had all of the words on my canvas, i just moved them around until i found a positioning i liked. again, since i was going for a purposefully scrapbooked look, i didn't overthink this part.
i exported my gif the way i usually do, with these settings:
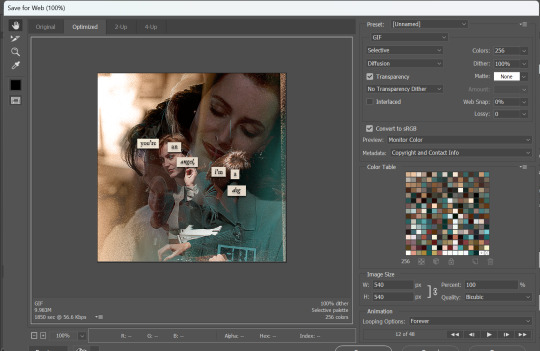
and that's it! i used pretty much the same process for all the gifs in this set, give or take. hopefully this little walkthrough made sense, but i know i'm not always the best at explaining my process, so if anything needs clarifying feel free to shoot me an ask or dm!
69 notes
·
View notes
Note
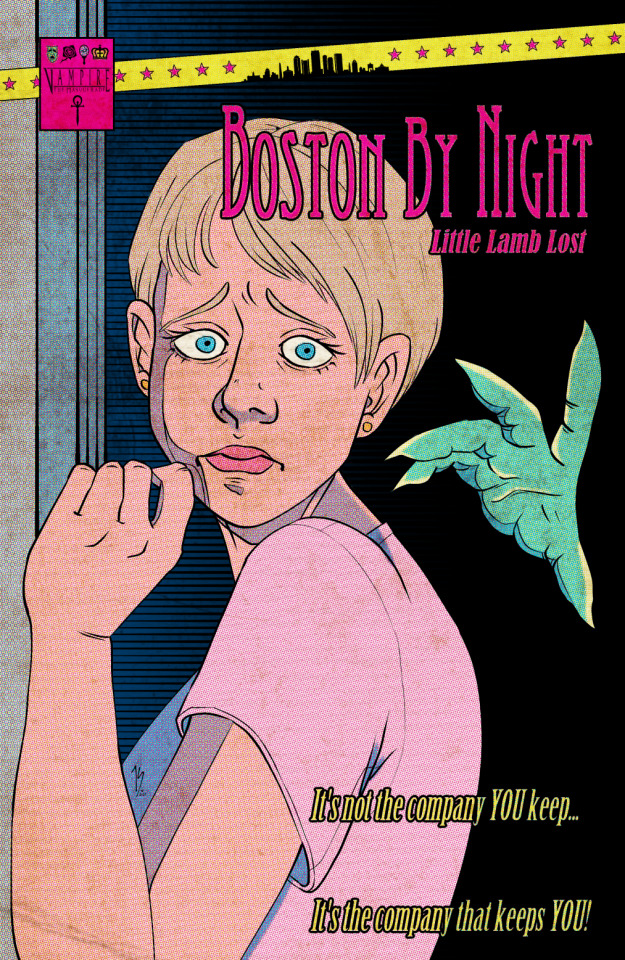
Your VTM comic book covers are simply GORGEOUS, I'm totally in awe! How did you get the super cool halftone/coloured dots effect? It looks super cool and realistic, I love it! Have a lovely day! :)
Thank you so much!
So to get the halftones, I use an old-ass tutorial I got off deviantArt literally....more than a decade ago? (Rosalarian's Golden Age Tutorial). The account appears to be deactivated, but I'll go through the steps here:
For reference, I bounce between Clip Studio Paint and a very old-ass copy of Photoshop, but if you're using other programs that have fun pixelate filters and you can change the color mode, you should be ok.
NOW...
Ink your drawing in straight black on its own layer
Block your colors on another layer (I hunted up some old comic color palettes thanks to madformidcentury dot com/2013/10/mid-century-color-palette-in-comics dot html)
Turn off any and all blackwork (this is INCREDIBLY important), and take your colorwork into Photoshop. (if there are any gaps in your color work, fill a separate layer with white and then merge the layers so it's all solid)
Set the mode to CMYK
Go to Artistic Filters >> Pixelate >> Color Halftone (the only thing I mess around with is the size of the dots; the default for my era of Photoshop is 8 and that's a lil big for my taste--all the VTM covers are between 4-6. It's up to your own best judgement, but I go by how "readable" things look--does the face still look like a face at a reasonable distance or is it just a smudge? If it's not readable, undo and change your dot size)
Add 3 new layers to your document and LABEL THEM: Cyan, Magenta, and Yellow
Then go to your channels panel and click on the Cyan layer to make a selection of it
Back to your Layers panel, make sure you're on your Cyan layer, and SELECT INVERSE
Then FILL the selection with the CMYK cyan that you've picked out
Deselect your selection, move to the next layer (and make sure you've got CMYK magenta in your bucket) and repeat steps 6-8 selecting Magenta and Yellow respectively
NOW you've got the beginnings of retro-feeling halftone. At this point, I import the halftone manipulation back into CSP and turn my blackwork back on.
For the ✨ grunge ✨ effect, I grab an old paper texture (after reducing its saturation and upping the contrast until it's mostly black and white splotchy) and set it to OVERLAY at anywhere from 50-20% (this is a 'let your soul decide' moment) over the whole thing
Then I grab another old paper texture and put underneath the Overlay Texture Layer, on MULTIPLY, at anywhere from 65-25% (again, let your soul decide). Both layers will give you a nice level of funk to go with your halftone shenanigans
A lot of the colorwork is going back and forth and back and forth because what looked ok in flats didn't translate after toning, but it works out eventually!
Some important things to remember:
Cool tones tend to fade back and warm tones tend to move forward if you're gonna use this method on any kind of scene
Keep your shapes SIMPLE; don't get bogged down in tones of gradients and fades and all of that because most of it WILL NOT come across once you start toning! Think of it this way: mass-production doesn't have time for fine detail, that's why comics are a lot of heavy black inks and flat color contrast
Experiment with the colors! You're working in a limited palette (if you're using any of the old Marvel/DC print books especially), and it doesn't have to be photorealistic/absolute. For instance, my Nos isn't actually green, but the tone suited the funky retro vibe so I went with it!
Let yourself fall down the research rabbit hole of pulp covers because they're both hilarious and informative. Same dot energy is an interesting collection website to go through, you can also go through your search engine (remember to add -pinterest -youtube to your search term to filter out that crapola)
HAVE FUN!
💖
24 notes
·
View notes
Note
hi! do you have tips and advice for making gifs? i love your gifs so much!
awww thank you so much, that really means a lot to me as I'm still rusty and a bit insecure because I've learned how to make gifs like 10 years ago? things didn't changed that much in terms of method and yet it's still scary, but at the end people like you make it worth!! 🥺🥺🥺
a little disclaimer: I'm colorblind, I can see colors okay! but I just see them a little bit different than most people so sometimes my edits may seem a little weird and that's the reason
Okay It will definitely be a long answer so I'll put under the cut ☺️
My advices would be:
- Just go for whatever scene you like the most, and try to focus on things you enjoy. I like to gif what I love, things I find beautiful as it gives me so much joy to look at the final result 😌
- Fortunately tumblr is full of people willing to share their knowledge and skills and there is lots and lots of blogs with the main theme being tutorials or even inspo and sources, so I always try to follow them to keep up with whatever is trending and just to learn new tricks and tips, some of my faves are @completeresources @gifmakerresource @allresources and @chaoticresources
- Be patient with yourself, if you are trying a tutorial and it is giving you a hard fight you can always stop and try again another time. It happened to me more than once that a tutorial or a particular idea I was trying gave me such a bad fight that I ended up so frustrated, exhausted, angry and feeling shitty but then I would pick another time to give it try and the thing worked hahahaha, so don't forget to respect your time and wellbeing
In terms of tips and tricks:
- Always use high quality videos, like the best quality available as it really makes a difference in terms of the final result
- Oh always resize your gifs!!! I use the crop tool and then I adjust the image size to keep it high quality, I think this is BY FAR the best tutorial as it explains quite well if you are new to editing
- So far I have tried many many different methods over the years, my fav is to cut the scenes I want to edit and for this use any video editing software really and after choosing a couple of scenes I import all of them to Photoshop (my version is the 2022 edition) and then I use the video timeline method (i don't really remember where I learned it but I found this really good tutorial that might be helpful)
- I slow down the gifs I make (idk how to explain it in english I'm sorry) but I set the speed for something in between 50% to 70%, depending on the scene
- In terms of colouring I don't really have a specific preset or fav PSD, I adjust them one by one just trying to focus on what the scene gives and then I work my way around it depending on what I'm trying to achieve or how do I want my gifset to look like (a good example was the Ron one on my last gifset i didn't wanted to look so yellow as it would be too different from the other gifs, it was a nightmare) BUT I guess I tend to use lots and lots of adjustment layers like I start with brightness/contrast, curves, and levels and then I proceed to selective colors, hue, vibration and saturation, sometimes I even use gradients and/or solid color layers with different blending options like soft light, overlay, opacity and fill settings to correct colors (I always use the color wheel principles of opposites and/or complementaries)
- Use smart sharpening!!! Peopel are so brilliant that they gave us actions, it is literally just a click away from all the trouble to do it manually, and it speeds up my process. Personally I have been using this amazing one I found quite recently, and it's really doing wonders to my edits
anyway thank you so much for being so kind and supportive, my ask box and dm are always open if you have any doubts or just want to exchange ideas. Really hope it helps you ❤️
7 notes
·
View notes
Note
12, 14, 16 ❤️
Hi there! Thank you for these questions - any excuse to ramble about editing.
12. What gifset made you feel the happiest to work on? (link)
There's perhaps some irony in this, but this edit of Crozier and Fitzjames. I was knee-deep in a Terror fixation at the time, and finally feeling inspired to make and edit after a few months of nothing. The idea I had for the edit is almost exactly what I ended up posting, which is unusual for me. I was able to locate good quality screencaps and cut out and colour what I needed to cut out and colour. I was happy because I was editing again, happy because the editing was going smoothly. The point of that edit is to make as many people cry as possible, but I had fun making it, and that's the main thing.
14. What gifset was the most difficult to make? (link)
This edit of Fourteen and Donna turned into a bit of a nightmare, actually, and not in a way that I expected. Two specials deep into the 60th Anniversary, I was very much in the mood to make a Doctor Who edit. I didn't really have an idea, but I coloured that promo photo of Donna and Fourteen and then fiddled around in Photoshop until I came up with the rotating galaxy idea. I did not know, however, that rotating a layer in Photoshop reduces its quality. I was animating the background by duplicating it and rotating the layer by one degree as I went along, leaving me with a stack of slightly different layers. By layer 40 the starry background was a blurry mess. I just didn't understand it. I had to delete all of my rotated layers, and I found another starry background, this time with light trails, but by layer 50 it was also a mess. I still don't know why that happened, but I realised that I could get away with rotating the light trailed stars by about 30 degrees and they looked like they were moving more than they actually are. The finished edit is only three frames or so.
16. Do you have a favourite gifset you made this year? (link)
I'm still very proud of this edit of Silver and Flint. The screencaps of the scene I wanted to use didn't lend themselves to being cut out and coloured very easily, so I decided to just use them as they were. I like the balance I managed to achieve between the two parts. I remember the struggle I had with the second half especially, trying to get that text to look right. When I finally came up with the idea of using the Gaussian blur and flickering animation on both Silver's "shadow" and the text I was over the moon. I think it looks great and also tells a story. I always try to shove as much symbolism into my edits as possible.
gifmakers (and editors) asks | send me an ask
#ask#blakbonnet#thanks again! i hope you were able to understand what i was trying to say#it's really hard to describe photoshop sometimes i just click and hope a lot of the time
2 notes
·
View notes
Note
Hi! Do you have a colouring tutorial for how you make your icons maybe? They look lovely! xx
Hi! I don’t have a general coloring tutorial since I do different styles for every icon! That being said, I can provide a tutorial on this icon specifically. I use Photopea, but this should be the same process for Photoshop.

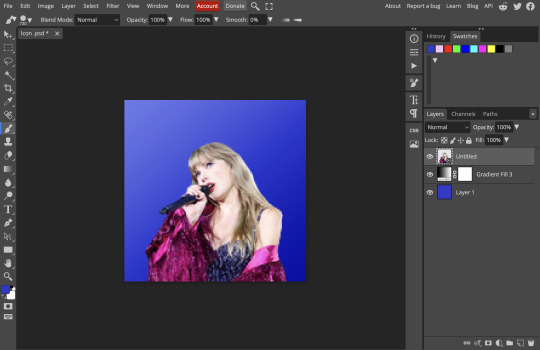
This is what I start out with, I apply a gradient fill layer to the background. I choose background colors based on what matches with the image.
In this case, I duplicated the image and put it on soft light and put the opacity to 50%.
I applied the layers below. Levels is really important! I think it makes a big difference in edits. Here's the two images just with and without levels.
In selective color, I alter the red, magenta, yellow, white, and black. These are all up to personal preference, I increased the yellow by a lot and the magenta in this case. In color balance, I brought down the yellow-blue in shadows to -21%. In channel mixer, they were very minimal changes like bringing up the red in blue to 6%. I also sometimes change the opacity for some layers if I like the settings but think they're slightly much, like for channel mixer I changed it to 70%. I would probably skip channel mixer next time and focus on a different adjustment layer.
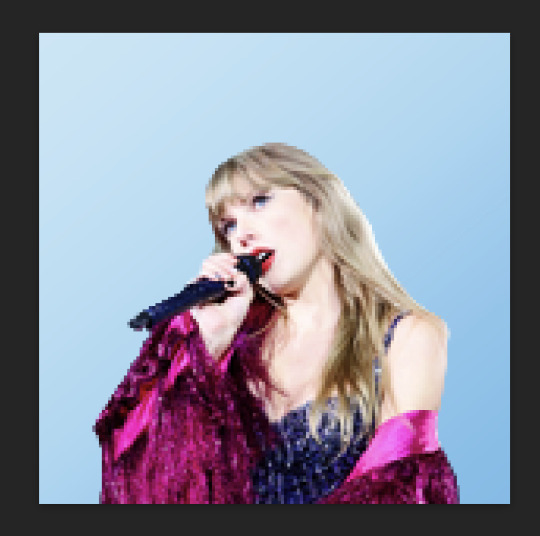
I add a gradient layer on top on soft light at 20% opacity.
I also added a hue/saturation layer to change the shade and brightness of the blue, I thought this one looked better with the image. I tend to go for bright backgrounds! They're easier to work with.
Sharpen the icon! I've used this sharpening action! You can adjust it for icons.
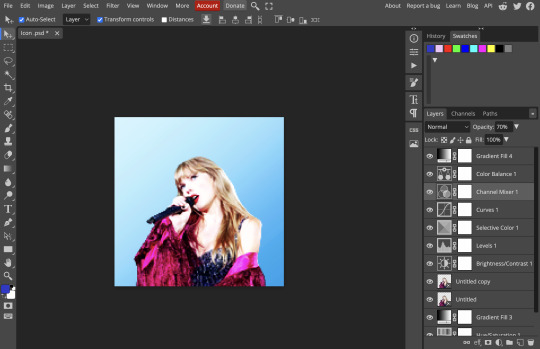
That's all for my coloring process for this icon! Since this image was already well-lit and didn't have any annoying filters, it was only a few steps. For the speak now icons I made, the color balance layers made a huge difference there. Hope this helps!
5 notes
·
View notes
Note
3 7 10 14 22 34 50
3: Pick your 5 favourite creations and explain what you love the most about them!
🖤 ok I know I bring this one of Max and Steve to the table every time I'm asked about my fave gifsets but I still just look at it in awe sometimes I love how it came out so much.
💜 this one of Dustin featuring Eddie, when I first got this song on the Spotify requests I didn't know how I was going to make it fit but I think I pulled it off (even if it hurts lol), I loved the effects of the film strip overlay and also how the colours came out on it.
🖤 this one featuring Nancy because the minute I discovered this song I knew it fit her to a tee.
💜 this yellowjackets gifset the song fits perfectly for them, the blending possibly someone of my finest and I love how the black white and red colours compliment each other.
🖤 and finally this Steve set, because who doesn't love a bewildered babygirl?
7: What is something you want to develop in your future creations?
I'd always say colour because it never feels like I get it as good as others sometimes but also maybe transitions and layouts more too.
10: An old creation that will always have a special place in your heart
see that's a tough decision right there because I've got 11, actually wait I think maybe 12 years of gifmaking under my belt and I can barely remember the gifsets I made in the last week lol, erm let's see (*spends forever scrolling through phone because I'm not on my desktop*) ah here we go, the year was 2014 and this chick just discovered how to use the selective colour layer in Photoshop to make her GIFs bright and bold and she had just got into the walking dead, I've come a long way since this gifset lol
14: A fandom you want to create more content for!
At the minute yellowjackets seeing as I'm rewatching it, I feel like me giffing stranger things though always outweighs everything else I try to get into giffing (hence why the other day I asked for requests outside of it lol)
22: A creation that was difficult to make (but worthwhile!)
I'm gonna cheat a little here and say the entirety of my 4k celebration GIFs, because it took me roughly 6 months to complete it, some of them taking up to a week to individually make because Photoshop hated me making these lol
34: Favourite individual gif from a set you’ve created!
I've got 2 faves that currently come to mind both from yellowjackets;


The first is from one of my five faves above, I love how the water ripple effect came out, and second from my latest yellowjackets set I just really love how I managed to blend her face almost perfectly like that
50. Self-loving time: show us a creation you want your followers to see
if you haven't seen it already check out my latest gifset, a Steve parallel depicting just how smart our fave boy really is 😘
Ask me some creator questions 😉✨
1 note
·
View note
Note
I wish you could provide a tutorial or some kind of guide on how to make these edits that I have seen from you. The only thing I know for certain is you do Photoshop layering and use the brush tool.

Okay so this is gonna be a bit a messy so apologies in advance.
I use Picsart (on PC) because I'm broke. I don't really do all that much other than what you said, but I'll try to show you as best as I can with pictures even though it probably won't tell you much more than you already know lol.
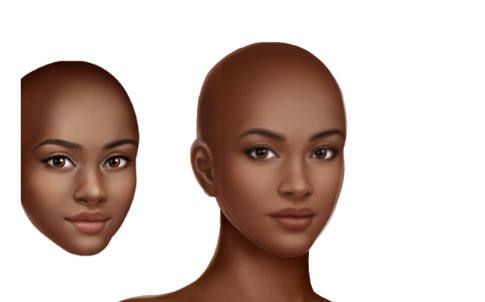
So, I'm guessing what you guys are mostly interested in is the custom face so that's what we'll be doing.
First, I like to use a base face with an already fully assembled body because it makes it easier to get the proportions correct but it's completely optional. I highly recommend @korgbelmont and @abookishcreative 's blogs for getting assets.
This shall be our base:
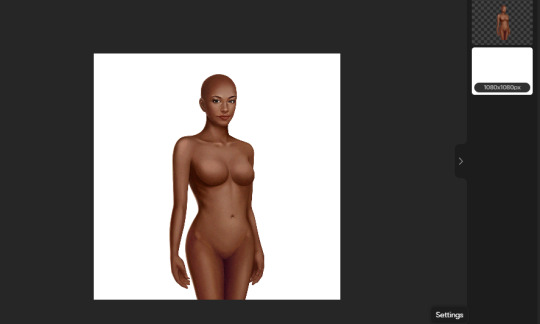
I wouldn't overlay too many faces because it tends to get a wee bit messy.
I like to crop the ears out of the faces I use to overlay because the ears usually overlay very poorly and 99% of the time the hair that you use will cover up any lines on the side of the face (or of course you can smooth them out like I do with some of my male edits)

Now's the fun part: Overlaying! This opacity tool right here is our best friend
The first face you apply you will want it to be the highest opacity out of all the faces you overlay because it will be at the bottom (apart from the base)
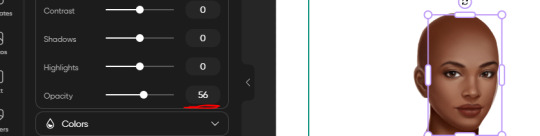
I like putting it somewhere between 40% - 50% transparency but it's really up to you, it just depends how much of the base you want to show through.
Face 2 overlayed...

and face 3 overlayed!
Add as many more faces but I'm gonna stick with just 3 for simplicity. And of course, you will more than likely have to adjust the face on top to fit the faces on the bottom but it's super easy.
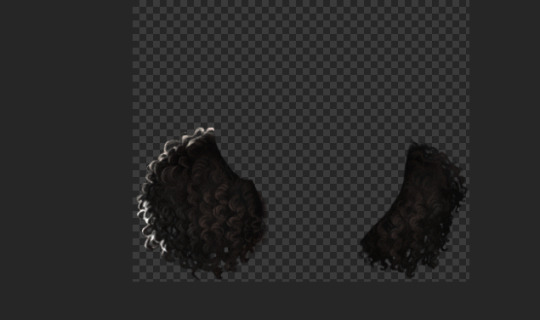
I sometimes like to make new hairstyles so that's what I'm gonna do but don't feel like you have to, I don't make new hairstyles all the time either.
We're combining these two hairstyles:

We only need the bottom half of the first hair so I'm gonna erase the top half
I make a lot of my own outfits by combining assets but I'm not gonna do anything too crazy. Here's an example of me picking out certain assets for one look and cutting out only what I want.
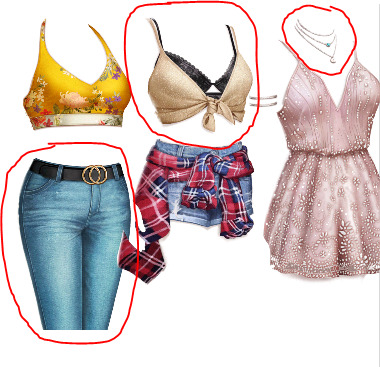
And....Done!

When I'm finished, I usually will put it into a drawing program. I didn't this time because it's a simple edit and I didn't feel like it, but most of the time there will be stuff you want to smooth out and it allows you to adjust to almost anything I don't like that you couldn't fix in Picsart. And sometimes I'll put it through a photo enhancer, sometimes I won't, it's just up to you what you prefer. I use the Remini app when I do.
I hope this was okay, I don't usually do tutorials! I tried my best :) Also may be some grammar errors, I didn't reread through it.
14 notes
·
View notes
Text
Began work on demon character
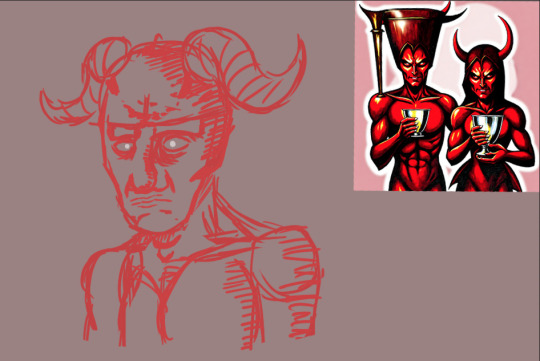
I have Just realised my lack of screenshots showing my process, That's okay as I wasn't happy with how he was coming out anyway so I don't mind working on an entire new character, However to explain my process I began by setting a A3 sized page and coloured the paper immediately to make any colour issues a lot easier to notice before they become a bigger issue, I then selected a hard pen pressure brush as it's the standard for drawing and outlining characters with its ability to give more natural looking lines; After which I changed the opacity of my layer to 50% which I wanted to use as a substitute for changing my brush opacity but I'm not too knowledgeable (however I will look into it next week Wednesday when I have access to photoshop). After finishing my settings I began by drawing a circle which I branched out of with a jaw, what I didn't exaggerate enough was how sharp I should've made the cheek bones, another bad habit I have noticed I have is I seem to stop braking my character into shapes and begin filling in the details before I'm done with the proper sketch
The reason I don't like this design is because the shape of the head is off, I need to make it more sharp which might be a slight struggle for me as the art style that I'm used to is a lot more round and cartoonish, To fix this I hope to look at tutorials as well as references.
0 notes
Text

Here is a screenshot of my finished composite images from the week 3 tutorials. I found this super useful and it taught me a lot of things that I didn't even know photoshop could do. Now I'm just going to have to keep using these techniques otherwise they won't stick. I found that mine looked pretty similar to the exemplar, but just a little less well blended and I felt my train looked a bit more purple that his one and the colours could have matched a bit better with mine, but I'll keep working on it.
Notes I took while watching the videos:
Tutorial 1:
"Blend if" allows you to choose how one layer blends with the other. Two sections. "Tis layer" which lifts and the bottom or the top of the image you want to blend and "underlying layer" that merges the top layer with the bottom.
If you want to split the arrow on the blend if section, hold down option and this allows the line in the middle to splits the arrow, meaning you can have a smoother blend transition.
"L" on keyboard = polygonal lasso tool.
"Delete" key on keyboard will delete previous points if you accidently selected them.
"Spacebar" key allows you to pause the selection process.
Use line tool to create horizon lines in your images so that when you combine the photos they match up.
Tutorial 2:
"Clipping mask" only applies the changes of this layer to the layer that it's clipped to which points down to the next layer it's connected to. Clipping mask is created when you click the adjustments panel, then gradient map, then double click the little square on the layer and at the top there is a little square with an arrow pointing down, then click on that which creates the clipping mask.
A gradient map assigns a colour to each point on the spectrum of dark to white.
Add points on the gradient spectrum to match the top image to the bottom. Points are added to find the midtones. Middle point should sit at 50 and you find this by clicking on where we think the midtones would be on the first image and do the same with two more points that should be sitting at 25 and 75.
Use "blend if" function to selectively alter the light source in the second image to make it match better.
"x" key reverses black and white square selection
When blending with brush tool, if making subtle blends, reduce the flow number up the top as well which usually sits at 100. Make it around 50.
When creating a hue saturation layer, if you only want to desaturate one colour, you can go up to the properties panel and click "master" which then lets you choose which colour you selectively want to desaturate.
Tutorial 3:
Command "I" key on keyboard reverses the selection you have made. If it masks out the background and you wanted to mask out the foreground, just "command I" - shortcut for "invert."
Feathering in the properties panel softens the edges that may be too hard on your image.
"Blending modes" changes the way that one layer interacts with the layer beneath. Deals with different levels of opacity.
0 notes
Note
hi there! your gifs are absolutely gorgeous! i hope you don’t mind me asking, but how did you do the glitch effect for the buffy ruin and rising gifset?
hey thank you soooooo much<333 i tried to use a tutorial for that but it was super long and old and i only understood like 50% of it so i figured out the rest by myself. i'll show you but i have photoshop in spanish. i'll try to be as clear as possible tho.
i made my whole gif first. this for example:

i went through the usual process of making it and saving it for web. then i opened it again, everything should look like this (the frames and the layers):

alright so now you gotta choose which frame you want to add the glitch to. i'm choosing frame 10. so i click on frame 10 and then go to the side and right click on layer 10. click on "duplicate layer" and hit enter when the lil window pops up. now right click on the duplicated layer and click on "blending options"
(the one at the very top). this window will pop up:
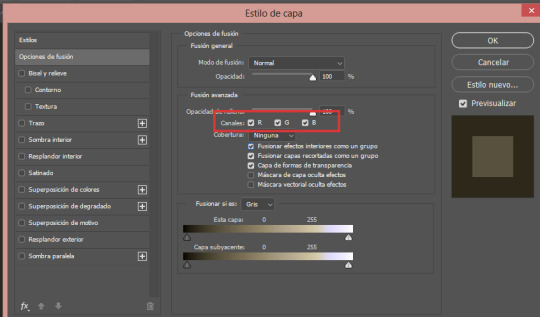
uncheck the letters G and B and then click ok (if you want different colors than red and blue, you can uncheck the other letters and see what you like best)
now, with the move tool, you can move the layer to the sides however you please, like this:
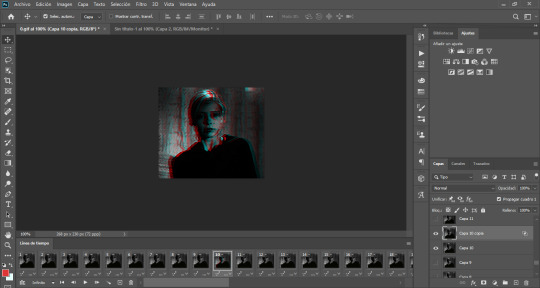
now right click on the duplicated layer again and click on "merge down" (o "combinar hacia abajo") and the two layers number 10 should become one. do this process with all the frames you want and that's it.
if you want a specific section of the gif to have the glitch effect you can do everything i explained before but right before moving the layer to the side and merging down, use the marquee tools to select the section you want for the glitch:

and then move that to the side

then merge down, etc etc. and then save for web and it'll look like this:
do feel free to send me as many asks as necessary if you didn't understand something. i had to google some of the names of things in english so maybe i messed up. hope this helped tho!
#i dont remember what blogs im supposed to tag#im out of the loop#ps ask#completeresources#tutorial#glitch effect#gif tutorial#idk lmao#*#tutorial*#anon#answered
57 notes
·
View notes
Text
Gradient Map Tutorial
Quick art tutorial today, hope it turns out helpful! I'm going to do a quick overview of how I use gradient maps because I swear by them as a way to really quickly add good looking color to drawings you don't actually want to color lol
So here we go!
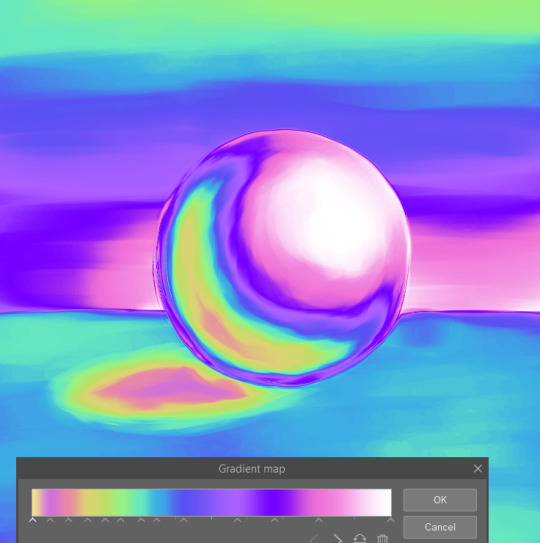
Here's our example ball to help us. I colored it really nicely didn't I? Actually, I didn't color at all, here's what I drew.

What I did was add a gradient map layer on top of this. This is the gradient and I had the layer at 50% opacity

I'm using Clip Studio Paint, I know Photoshop also has gradient maps, and I'm sure a lot of other programs do too. In CSP, under Layer> New Correction Layer> Gradient Map you'll get this menu.
Essentially, what this does is that it take the range of values in your drawing and assigns these colors to them, the colors on the left are applied to the darkest values, and the colors on the right apply to the lightest. I drew my ball just with black and white, but this works the same way if your drawing has colors. You can use that to get some different effects. And you can go crazy with these gradients.
Here's a couple examples of how I've used these in my art.
This is using the first gradient I used on the ball at 25% opacity. (You can color pick from any of these gradients)

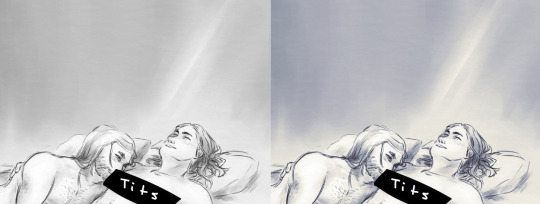
I used two gradients for this one, to get the characters looking different from the background. Here's how I set it up.

One thing to note is that the gradient maps do affect all the layers below it. So here, the cooler colored gradient on top is affecting the layers where I shaded the characters.
This is a bit hard to explain, but since the gradient maps use the range of values in your drawing, it doesn't work the same way with transparency. Using the ball example, I only drew with black, the darker and lighter shades just come from my brush strokes being more or less opaque. So that layer of shading needs to be on top of the solid white layer I have (though it can be any color) for the shading to then be interpreted as a range of values. Here's what it looks like with the gradient map on, but the white background layer turned off.
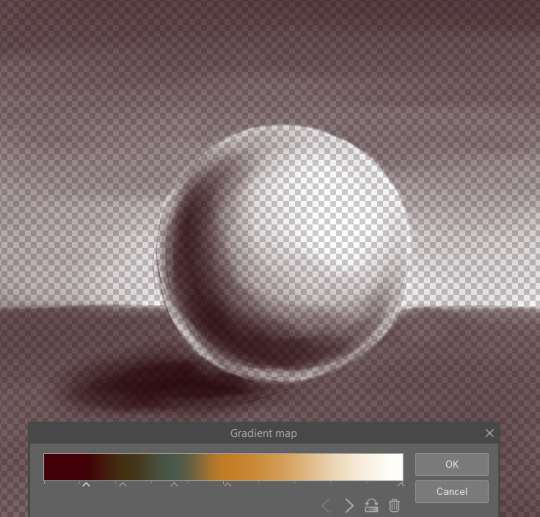
I changed the gradient to show it clearer, but it will apply the color on the left (since I was using black) to my drawing, but it won't use that full range of colors. So, if you want to have a gradient map just on your line art and none of the layers below it, for example, it doesn't really work like that. Though you can switch things up to get an effect like that, such as putting your other layers above both the line art and gradient map layers and then setting them to multiply.
So hopefully that all makes sense! I highly recommend playing with gradient maps and making gradients you like. It's a great way to add some quick colors when you're like me and never ever want to color!!!
#art#art tutorial#gradient maps#tutorial#art ref#reference#idk how to tag this#anyway moral of the lesson is gradient maps are super sexy#theres prob a whole ton more you can do w them that idk about#lazy mans coloring lmao#work smarter not harder#dont look at my poor example ball w the cast shadow in the total wrong place#something something artistic liberties
33 notes
·
View notes
Note
you don't have to post this publicly since I wanted to ask your process on lighting bc I genuinely love it! I still have trouble with it sometimes and usually just use filters. thanks in advance!
the short answer is- i wing it. i use different techniques a lot and it probably shows :')
for the screenshot redraw specifically though, i'll try to write up a rough process with examples.
first thing of note- i use photoshop (my mother pays for it and we share an account), so some of the stuff i do probably can't be done the same in other art programs.

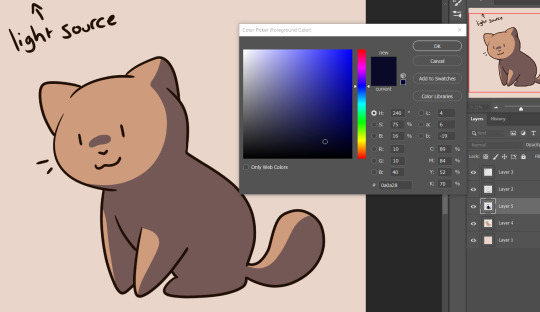
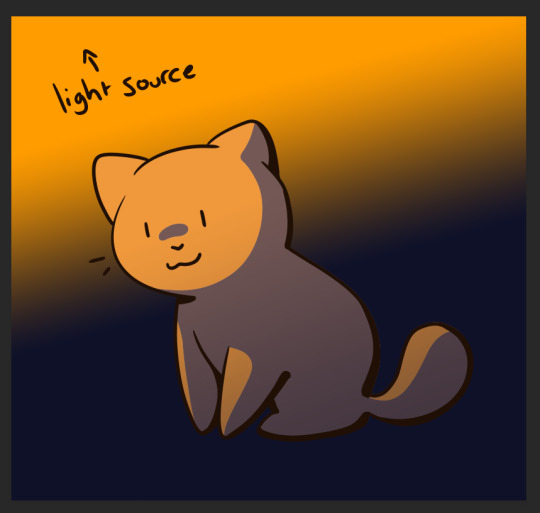
so here's our little unshaded character! one very important thing with lighting is to remember where your light source is coming from.
if we're doing a character lit by fire or similar orange light, i tend to choose a dark gray-blue or gray-purple for the shading, anywhere from 40-50% opacity. of course, this can vary depending on how dramatic you want your lighting to be.
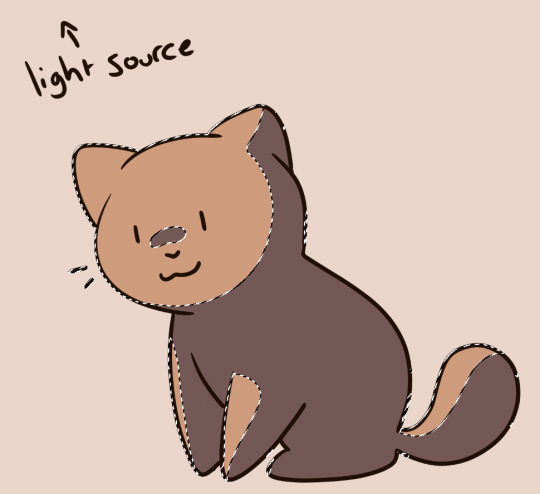
now you want to select around your base colour layer, then invert the selection so that your character is fully selected. i invert it so that i don't have to select each individual colour of a character (this one is just one colour, so i could have just selected it, be ah well).
once your character is completely selected, switch your selection tool to remove selections, rather than add them. then, switch to your shading layer, and click each shaded portion to de-select it.
now, make your colour a bright orange, and create a new layer. set this one to around 60-60% opacity.
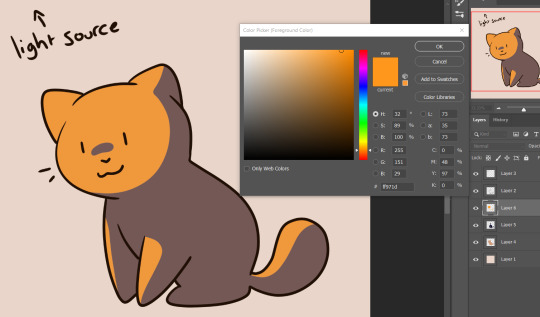
at this point, you could stop here, but here's what i did in the screenshot redraw to make things a little more dynamic.
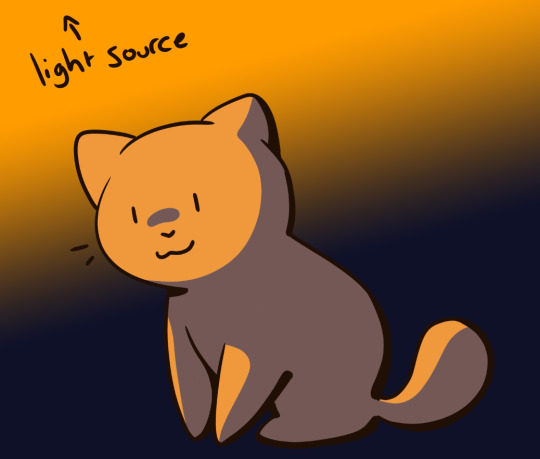
(background added for emphasis) adding some weight to your lines in what would be the darkest parts can add some nice depth!
and so can adding a gradient over your shading layers! here, i used the same colour i shaded with, at 47% opacity.
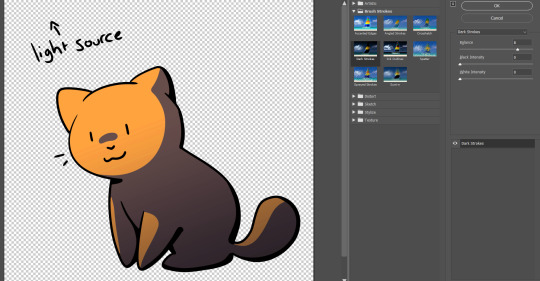
the next thing i did once i was sure i had nothing to change or fix on the characters- and this is a bit risky- is merge the layers and add the 'dark strokes' filter in photoshop. if you want to be careful, duplicate the layers before merging the duplicates, so you can go back and edit the originals if need be. it doesn't look great with this little doodle, but the more detail in your character, the cooler it looks- and don't hesitate to mess around with the filter settings!
finally, and this is something i do just about every time i do a full piece, after i'm sure that everything else is done, i merge every layer (again, you can duplicate if you're hesitant). once this is done, i like to check with photoshop does with the 'auto tone', 'auto contrast', and 'auto colour' options. however, sometimes this can make it look awful, so use your eyes to figure out if using any one (or two or three) or the adjustments will improve your lighting, or if it's best to leave it as is. in this case, this little guy was best as is- again, more detail helps the program to figure these things out, as it gives it more to work with.

the other highlighted settings are good if you want to adjust these things manually. just play around with each of them until you get something that feels good to you! i didn't use them for the screenshot redraw, but there are plenty of other pieces that i did use one or more of them for.
i hope that helped! again, keep in mind that this is just what i did with the screenshot redraw. listing every technique i use would take a very long time. honestly, the best advice i can give is to experiment as much as possible. try not to use pure black or white unless you feel it suits the piece, use contrasting colours and shades when it comes to dynamic lighting, and remember that filters and overlays are your friends 👍
6 notes
·
View notes
Note
yo! i was in your stream the other day and i asked how you did your coloring and you mentioned that a big part of it was having an aliased brush, but i didn't get to stick around long enough to see your demonstration if you did one; would you mind explaining now? thanks regardless
Yeah, no problem! So normally I ink my TH pages in MangaStudio EX 4 which defaults to aliased line art.
Aliased vs Anti-Aliased

This is important because it makes filling my flats a lot quicker and as long as your pages or art are very high resolution, when you resize it, it won't be noticeable.
In Photoshop, to access the aliased brush aka pencil tool, just hold down on the brush option until the brush types appear. Pick the pencil tool.
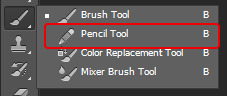
I only use this for touch-ups though. The Pencil tool in Photoshop doesn't make as nice a line as MangaStudio's many varied aliased options. Here's how I would recommend proceeding if all you have access to is Photoshop.
NOTE: You might want to take your lineart into a new file and then port it back it in after completing the following steps. This will require you to collapse all the layers in your file to one image and I hate to see sketches get lost. ;n;
First, ink you art with anti-aliased brushes as you normally would.

Then go to Image >> Mode >> Grayscale. You might get a window asking if you really would like to discard the color information in the file. Say yes, of course. :P
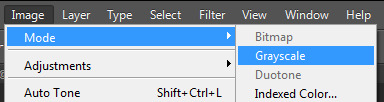
Then go to Image >> Mode >> Bitmap.

Now you'll get a menu like this. If your DPI is 300 (AND IT SHOULD BE), set your Output to 300. Whatever your DPI is, it should match that number. For the Method, use a 50% Threshold. Other Methods generate different looks to your lineart. Experiment.
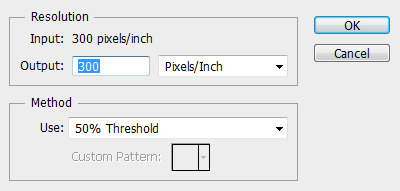
Now your line art should look like this:
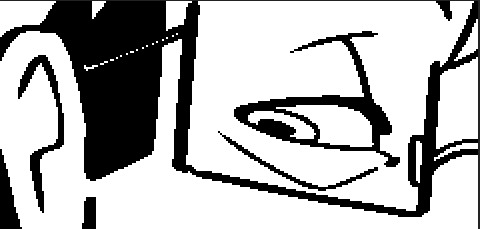
You can take this line art back into your working file and begin coloring it. Remember to uncheck "anti-alias" on your paint bucket and selection tools. I usually duplicate my line art layer and fill in the duplicated line layer below my line art. Here is an example of my work flow next to the finished drawing.

Let me know if you have any other questions!
901 notes
·
View notes
Text
Welcome all, and Goodbye Sun! Spent all day on uni today. So here's a reeeeeally long post. A lot to reflect on. My writing style may seem odd to some, but its how I retain a good memory of it all, by putting a lot of words on paper. So here's my paper of reflections on my first day back in #ctec502 with Roy and our korero.
Also my paint arrived. Hell YES. MORE PAINTING.
Carol Dweck on The Power of Yet,
I like that there is this method of teaching, how we think at a very young age, the power of critical and developing thought. It is innately in built into us from a time perhaps before birth, since it is consciousness that we are transforming and interpreting here, using our capacity to think, but CONSCIOUSLY.
There has been a book available in a well voice acted audio version on YouTube called The Tao of Pooh. This insightful little story teaches us the way of the Tao, as in the perspective of Lao Tzu, a particularly old and equanimous monk.
In the famous Winnie the Pooh by A.A.Milne, the archetypal too-busy-working, close/fixed-mindset, is played by the character Rabbit, a woodland creature that is so caught up in their mind they don't actually interpret what they experience or can learn from others or themselves.
In relevance to Carol Dweck's studies into 'the power of yet', it really is all about culture, ethics, opportunities and social conditioning. Childrens minds are like sponges were told, and we see it everyday, even in ourselves. We understand that yes, there is a need for workers and people who can do repetitive tasks, as how it is taught in a modern conventional schooling system, BUT THE ACTUALITY IS to any student where they are given the opportunity to choose what they want to learn, are made aware of how they can learn and evolve when given a certain challenge, in a non judgemental and constructive environment, we can drastically enhance the collective intellect of our whole interlinked social network within the short span of a year as claimed by Carol Dweck.
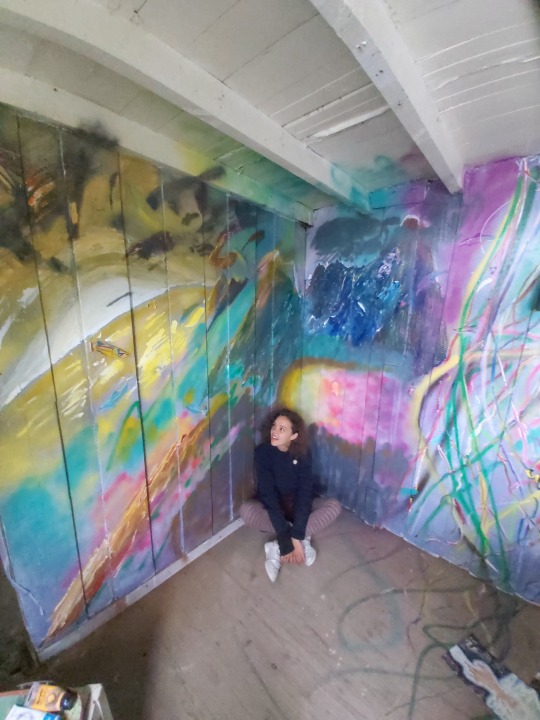
Here is some art that was created by myself during a 4 day Stay at Home MURAL Festival that had the theme of bringing light to issues of the world but in a positive and beautiful way.
With over 700 artists in 50 or more countries... even this simple idea to bring intelligent and simple, beautiful, artistic, childish action, that's bold for its first year running!! All from Covid-19.
Casey Reas on Digital Algorithm Art
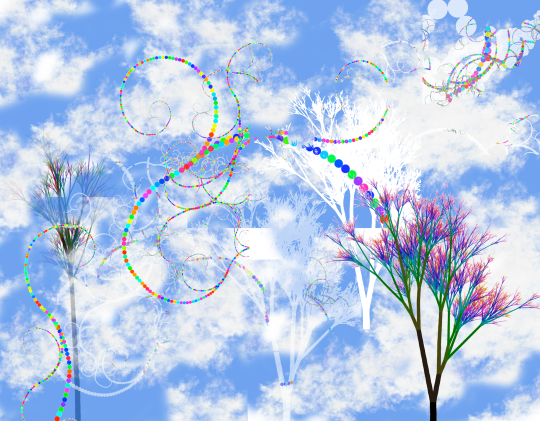
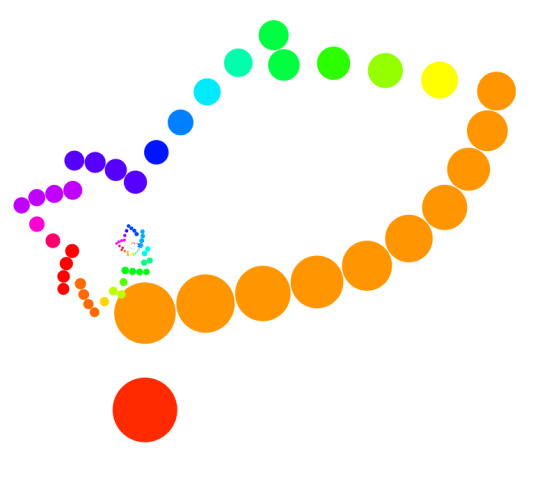
In the first online lecture given by Roy, I was surprised we would be using algorithms so quickly in our physical work, and it took me back to my day of using procedure based processing to create scenes in a program made to generate 3D environments, this program was called Terragen 2.
Using the software called Context Free to render simple shapes and sophisticated 'real' clouds in a 2D representation even if it is generated in 3 dimensions if programmed, (and 4 dimensions if animated) it was interesting to understand why my PC I used up to 10 years ago clogged with animal fur, would die on me when I left it to render a scene in ridiculously high quality over a period of multiple hours. It was because of the amount of shapes I'd set my PC to fully render without understanding that the picture is more sophisticated than a simple blink and reality is made, it is GROWN AS A SERIES OF INTERCONNECTED OBJECTS and it adapts to or from the environment with the interconnectedness that is afforded by their state of consciousness (programming) and the matrix of energy they take form as in this sedimentary moment in reality.
The past affects the future render layer in a moment of rendering. Also the future affects the past layer by building or deleting or transforming itself, this seed from moment to moment. This Animation. To give an object a code or seed to existence, even if you can't control all of its inputs, simplicity can create diversity and complexity and vice versa.
The amount of revelation I can place in rendering in procedural matrix or lattice realities...I would love to see that in my work on mixed media and mixed reality assignments or projects I endeavour to entertain or seek out.
But this in itself is a paradox. Am I pulled to this future by my simple minded flow toward this source, as is entropy, as is the movement of all things. ..There is more than black and white to all situations. Usually it's black and white or white and black. Lighter darks or darker lights.
I wouldn't be at university because I didn't have a revelation to attend it last year. I wouldn't be at university if I felt so depressed I needed to leave. I wouldn't be at university if I wasn't allowed to attend. Nevertheless I know. I know that I am pulled forward to where I'm meant to be, as much as I am falling into old habits, they're not old, they're new, but its my consciousness that calls them old and tries to outdo the habit one moment, while another moment were relieved we didn't listen to the critical mind saying we shouldn't do what we don't want to do. Everything has a cause and effect like the render in window. Like my life on pen and paper. Like my mind engaged in its word spinning and weaving.
I digress back to my art in context of the Casey Rea's YouTube video.
A fun aspect of my art is it would look amazing even in a quick render with plenty of visual noise, but I love the simplicity of procedural based virtual world and object creation and the layers it can develop or devolve into.
Another thing is using Photoshop to apply visual post production enhancements was also something I really enjoyed as a part of the iterative process, and this has been reaffirmed in a book I have just picked up called Photoshop for 3D artists V1 by 3dtotal Publishing.
I watched all the videos recommended by Roy in his pdf today from the lecture and I can summarise my views on them:
Carol Dweck: This type of learning should be more widespread in our culture. Only way it will change is if we change, and teach others the same way. It begins with us. I enjoy the way Roy engages with us in our lectures like we're human beings and not students. I think this is the most important thing about his teaching that enthuses me, and the themes of his classes are quite informative.
Casey Reas: I like his work, I'm not new to this idea of art, but I did like to see his process. I wouldn't certainly seek out a video like that one given but it definitely was insightful into his particular environment and methods of producing ideas.
John Maeda: Wow this guy really looks like he's on the guide for dummies, and he definitely could write a few of them. Was a great insight into his perception of reality and how he expressed his ideas and himself was also simplified complex ideas and that they are readily available to see or interact with including his book. Simple. It's right there in front of you. All it takes is a shift in perception to discover what was currently scanned over as unimportant details by our consciousness. It's all right there in front of us, or if we feel something, from within us.

Warren Berger: Well to be honest, he didn't excite me as many of the other videos because his idea was so simple and not really that much of a paradigm shift within myself. It always can come down to refinement of an unwanted edge. Does one see a wave as something that can be answered? Can you answer that question? How about the question preceding this one? Can a bird fly as well as a fly can bird? Why is a raven like a writing desk? Why do we play 20 questions? We are always in an iterative process of rendering our existence and our legacy in this reality by the choice we have when faced with a question. Depending on its complexity or cryptically contrived hindrances, we will always be faced making a choice, or answer the question of our existence, with our consciousness in this moment. And can we use that moment to ask something we have never thought we had an idea about before...like why isn't my skin purple? Where did my consciousness come from and why is it specifically in belief that I am me, every time I get up at 8 am, but not while I am in the throes of a dream?
Riddle me that and I'll ask you why
Cottleston, cottleston, cottleston pie.
I have seen my lives
In my eye
Simply put, I never die
It's not a riddle, it's who am i
Cottleston, cottleston, cottleston pie.
2 notes
·
View notes
Text
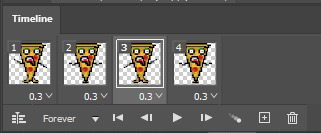
Making animations for my character
I wanted to make four different animations for my character - Idle, walk, jump, death. To animate in photoshop, I went to Window > Timeline > Create. Animation in characters can be made much simpler by reusing old frames, this is a great time-saver and can be seen in all sorts of animations.
My character (A pizza) originally had stick legs, but I really struggled to make them look good, so I got rid of them to an extent. The legs are now really small and make up part of the pizza.
I decided to make the idle position first. For this, I wanted my character to just blink every few seconds and bob slightly up and down. The first frame was just the normal standing position. To make things move in different frames, you have to make new layers and make some invisible. I made a new layer where the eyes were more closed than in the previous frame, and then in the frame after that they were completely shut. I then used the same frames to open the eyes back up.
To make the character bob up and down, I made another layer of the pizza, moved it one pixel down. This just made the whole character go down by 1 pixel though, which I didn't want. I made the character stand at the same level by cutting one pixel off the bottom and readjusting the little legs the pizza has. I found making the idle animation quite tricky because there wasn't really much to add other than blinking. I thought of having cheese drip off the top of the character but ended up scrapping that idea.


Next up, I made my walking animation. This would consist of 3 lopping frames (technically 4, one is repeated)
One leg forward, the same arm raised
Legs are in line with each other, arms are at normal height
Other leg is forward, other arm raised
Legs are in line with each other, arms are at normal height
I made separate layers for each of the arms, for both of them to be up/down/normal. I then had to make two more layers for the legs being forward/backward. To make the legs look right, I made it so they overlap. For the frame where the other leg is forward, I just flipped it around. I really liked how the legs turned out, I took inspiration from the movement cycle in the mega man games and used the same structure.
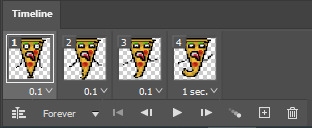
Now time to make a pizza die. I wanted to go for a more silly approach here - the character would crumble and explode, leaving behind a sad-looking face. I wanted to add a little bit of an effect, almost as if the pizza is going out with a bang. To make the pizza crumble, I gradually made it smaller until it just goes *poof*. By adding 0.1 second intervals between frames where the character keeps getting one pixel shorter, I made it work. In the real game obviously I would have this animation only play once.


Lastly the jump animation, this was definitely the hardest to come up with an idea for. I ended up making the bottom of the pizza sort of flick up - kind of like the tail on tanooki Mario. The right arm will launch up into the air when jumping, this was also inspired by Mario. To make it a little bit realistic, I made the eyes react to the force of the jump. The eyes shut a little bit and look in the direction of the jump. I'm really surprised that I made this work, at first I thought I would struggle getting the tip of the pizza to lift up properly. The arms were also a bit of a pain to get right. I turned the opacity of the previous arm to 50% so I could keep its shape when making new layers.

0 notes
Last Seen Blogs
voxplutonia
eyes wide open
alejandrotoloza-blog1
Técnicas De Un
Proyecto De Instalaciones Eléctricas

seroqueldreamsnthings
Untitled
svenspeed
Svenny