#i really wanted to recolor this but i also needed to get the edit out today lmao
Text
Get dressed action on towel racks
A while ago I started using @episims' wonderful towel lite mod that makes our Sims put on a towel or a bathrobe after they shower or bathe. It adds a delightful touch of realism that is really fun. But as much as I enjoy taking my rich lady from her fancy bathroom to her walk in closet in a towel, sometimes I don't want to send my Sim past their bedroom to get dressed. When I shower I usually get dressed in the bathroom, putting on clothes I hung by the towels before getting in the shower. I thought, why can't my Sims do the same? With a little imagination, I re-purposed the actions of the Seasons coat rack to add clothes-changing animations to the towel racks that most of my Sims already have in their bathrooms, so that I can pretend they too put out their clothes on the towel rack before getting in. I wasn't sure if it was worth uploading but you guys loved the idea so here we go! :)
I only added everyday, formal and pyjamas because those are the three I thought it likely I would ever want. Shower during the day? Everyday clothes please! Girlies got ready for a night out? Get glam with your formal wear! A shower before bed? You'll want your pyjamas. The other categories seem unlikely, but I am open to updating it if there's a persuasive reason :)
As you can see in the video Sims are pretty decent about using the towel racks, even if they are on a wall behind stuff. I haven't altered the actual code to navigate to it, it uses the same slot as viewing the deco object did previously, which in my test has worked well. In the end I had to use different animations for children because the coat rack uses a step stool which needs a slot that the deco objects do not have and I could not figure out adding one. It was either different animations or floating in the air, so different animations it is :)
I've edited three of the Maxis towel racks. "Towel on a Metal Rod", "Towel on a Wooden Rod" and "Towel Hanger Plus Plus". I'm also sharing one edited CC towel rack by Simply Styling, which I discovered through @gayars recolors found on her website here.
Get maxis towel rack add on on SFS | Get Jope towel rack on SFS
If any creators would like to add these edits to their own towel racks, please feel free to do so. To make it easier on you, or any simmer that simply wants to update things they downloaded, I prepared a download package with the resources you need and some basic instructions. It's not step by step, it assumes you are familiar with edits. Should anyone want or need more detailed instructions, I am happy to help when I can :) (Update 2024-03-06 I replaced the routing mechanism in the interactions, to avoid a slot-missing error that happens in some CC objects that do not have a routing slot)
Conflicts: The maxis towel rack add on are global plug in for those objects, which means there is a potential for conflicts. HCDU+ will find any conflicts, but I doubt there are any. Indirect conflicts may also occur if you have mods that add additional interactions to deco objects, they would not show on the towel racks because I have overridden their usual pie menu.
Credits: whoward69 at @picknmixsims who taught me how to edit event trees in animations, @episims for the towel lite mod that inspired this, @gayars who taught me how to repurpose animations between objects and for introducing me to the jope towel, and all you lovely people that encouraged me to post this with your enthusiasm <3
280 notes
·
View notes
Text
Three Vintage Simstress Dresses 4t2
My first 4t2 clothing conversions! These too a bit longer than I've expected, and I've definitely learned a lot. Some things were easier than expected and some... not so much.
The AF mesh is enabled for elders, and the TF version is repo'd to the AF files, so it needs those to function. The Casual and Velvet Dresses are everyday and outwear, while the Day Dress is just enabled for everyday.
The original dresses are by @vintagesimstress and can be found here, here and here! Shoes are somewhat edited 4t2 boots by @janika31 and @deedee-sims, and the tights for the TF version are from @oldtimeyskellington.
Files are compressed and tooltipped!
Download: SFS | MF (58MB)

TF version (Day Dress, Velvet Dress, Casual Dress)
Things We've Learned, or Excuses and Justifications:
The original TS4 textures were HQ compatible and too big for TS2, and except for the Velvet dress they didn't want to reduce down without going muddy. So most of the swatches are new based on Vintage Simstress' PSDs and some Victorian color palettes I found.
On that note, there are way too many swatches and almost 300 files. I'll probably make that mistake again.
I found the original pattern and a second pattern I liked for the Day Dress on Colour Lovers. There are also additional swatches using parts of old textures from AAS dresses.
I added a collar to the Velvet Dress, and the cuffs were remapped a smidge to work with the new lace patterns.
These don't have morphs because I couldn't get the 5gd meshes to import into Blender for some reason. I'll update the meshes once I can figure out that nonsense.
Sims can sit down; and the skirt shouldn't clip though most tables, desks, etc; but will still clip though some things. Bars are a notable issue.
I learned a lot doing this, and in classic Nykteia style, I definitely overcomplicated some parts and overthought some things.
I love the original dresses so much and I really hope I did them even an ounce of justice.

Swatches; there are also 3 black mourning recolors for the Day Dress that I didn't save the patterns for.
Credits to @vintagesimstress, @deedee-sims, @janika31, @oldtimeyskellington, colourlovers.com, All About Style, and EAxis.
These are my first clothing conversions, so please let me know if there are any issues!
#sims 2 download#ts2 cc#s2cc#sims 2 cc#4t2#4t2 cc#4t2 clothes#4t2 conversion#historical cc#dl: clothing#dl: af clothing#dl: tf clothing#dl: ef clothing#dl: victorian
409 notes
·
View notes
Note
AITA for my fanart and how I responded to someone's negative reaction of it?
Okay so some background to start. I'm (genderfluid, 18+) in a fandom that was originally a book and got a live action adaptation several years ago. The adaption is MUCH more popular than the book series and honestly very different from it (a lot of characters have different backstories, the main character doesn't have a brother in the adaption, and ages were changed) but very few people have read the book series. (Admittedly, the fandom is not very big. It's actually the smallest one I'm in, which means I'm kinda limited in the number of people to interact with) Anyways! I'm in a discord (it's 18+ tho I don't know the actual ages of anyone else involved) for this fandom and although they promote themselves as being for both book and adaptation fans, according to the roles I am one of five people of the 40+ people in the server who have read the books, so that's not a lot.
Now, for Valentine's day I made fanart of the main couple, the mc and his wife (they get married in the series. In the books they are already together in the beginning but the adaption wanted drama and decided to not have them be together in the beginning. One of the changes that I very much do not like.) They're the most popular ship in the fandom. I love them. Anyways, I shared it in the Discord for Valentines and did not get a nice reaction.
See, in the books, both characters are white, but in the adaptation the wife is black. (The mc looks different in the adaptation too, shorter and with different hair and eye color, but he's still white) I drew the book version, because that's what I like. They're my blorbos.
Another person in the server took MY art and recolored it so that the wife was black and posted it in the server with a comment about whitewashing characters of color. I told them that I didn't whitewash her and that it was really fucking rude to edit someone else's fanart. They replied that she was black, I was racist, and posted a screenshot of a Google search asking the race of the actress who plays the wife in the adaptation. I replied with a screenshot of the her books' fanwiki page and said that my fanart was of the books and if they wanted fanart of the adaptation they could make it themself. They asked how they were supposed to know it was from the books since nobody read them and they were shit. I replied that they could realize the mc AND his wife looked different, that I read the books, and they were better than the adaptation, and how would they know if the books were shit since they obviously hadn't read them?
Anyways then the mods stepped in and made us break it up. One of the mods (the only one to have read the books) dmed me and told me that they understood my frustration and that another mod was talking to the person I had been fighting with about respecting other people's work but I needed to understand that assuming I was racist and whitewashing wasn't going to be uncommon since the books weren't as popular as the adaptation and I needed to be respectful when people confronted me with this. I replied that if the other person had confronted me directly and not just assumed the worst and edited my work I would have been more respectful. The mod agreed that the other person was out of line, but the whole thing seemed to be one giant misunderstanding so neither of us were getting strikes against us this time.
Anyways, the mods added some rules about not editing people's work and a thing in the announcements channel explaining the differences between the books and the adaptation but everything in the server has been really tense especially since people in the server started vague posting on Tumblr, some people favoring me others favoring the other person. I blocked the person I fought with on Tumblr but neither them nor I were involved in the vague posting.
(also idk if it matters but I'm white, idk the ethnicity of of anyone else involved)
So! Tell me, AITA?
What are these acronyms?
102 notes
·
View notes
Note
Hi love! Your sims are GAWJUSSS. Literally breath taking. I’ve recently got back into playing ts3 and am loving it. I was wondering if you can recall the skin and/or makeup&accessories you used in Nyanaath’s makeover update here: https://www.tumblr.com/kosmokhaos/733942789751078912/i-feel-successful-now-cause-damn-ignore-the
I’ve been struggling so bad to find skins of high quality and detail that are darker hues, or eye/nose masks that don’t lose detail the deeper the shade gets. I saw that you gave a resource list of skins a few years back when Nyanaath looked a lil different, so i wasn’t sure if there was anything relatively new that you used or not. I see the pores and details in Nyanaath’s skin and am just dying to know how to get like you lmaoo
First of all, Hiii and thank you! 😁💕Happy new year! Prepare for a bit of rambling but I link to some stuff in the end.
I want to start off saying that most of my sim pics are edited to some degree, especially previous pics from the past. I'm trying to rely less on editing to make my sims looks nice, but of course there is only so much you can do in a sims game.
This is an example of what Nyanaath's skin looks like unedited. EA lighting sucks ass and looks patchy in Sims 3 on dark colored objects in general and unfortunately, sims are not excluded. I end up smoothing the discoloration and patchiness with editing 😭
Before vs After
Skins as dark as Nena's have to be made dark from the start because using a pale/light based skin and trying to use an in-game slider to darken it never turns out good in any game. Dark skin reflects light and shadows differently than light skin and needs its own already-dark base.
I will seriously consider trying to throw together a skinblend for male and female skins that are dark like this because I truly think there are none. BUUUUT LOL rambling aside I do have new recommendations for makeup and skin details since that post:
1. First up is @sourlemonsimblr for makeup. Especially for eyebrows and lipsticks! A lot of their lipsticks are insanely detailed and recolorable enough that they can fit most darker tones.
Their skins are lovely too and they've even recently made a dark skin which I will💗Link Here💗. I haven't gotten a chance to play with it yet but they always have quality stuff. Take a stroll through their Downloads page because it's definitely worth it.
2. Next up for skin detail makeups is @smallsimmer. They have so many good nose makes and eye/lip details that can be recolored to use on your darker skinned sims! If you ever had a skin you really liked and wanted to switch up the nose, eyes or lips, their skin detail makeup will absolutely come in clutch. They even have a few converted for child and toddler sims (something ts3 is lacking in)💗Link Here💗
3. If you want some AF skins for darker sims that are readily available and detailed, I'd suggest @annoyinglydarkblaze I learned a lot about making skins from watching their journey into skin making a few years ago. Since they aren't as active anymore and their posts are a bit scattered I will link the skins I like best:
💗Here💗 💗Here💗 and 💗Here💗
4. My next pick for more masculine/male-centered CAS makeup and CC is @nectar-cellar Their cc has been helpful as I slowly update my male OCs. The Beards/detail makeup torso muscled-torso meshes and clothing are some of the best.
5. I also suggest @simtanico for sliders and their detail makeup. I have just about every slider they've created 😂They also make really well done maxis-match kinda styled clothes for male sims too.
I'm sure there are tons of other people I'm missing but its been a minute since I've been around simblr myself so I'll try to update this list as I go.
I'll also leave you with a little tip: Do NOT be afraid to use the opacity slider and layering with makeup on darker sims. Layering and opacity is your friend!
Happy Simming! 💗✨
69 notes
·
View notes
Text
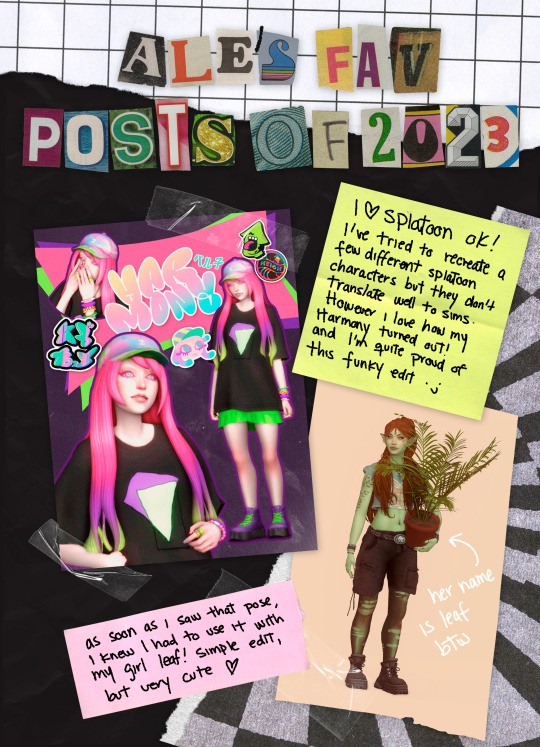

here are my favorite things i did this year :) thank you for tagging me @madeofcc <3
i was just gonna make a simple post and for some reason i decided to make this whole thing i guess, even features my stupid handwriting lol. everything written above + some more thoughts down below so you don't have to decipher whatever i wrote, also links to everything. thanks for following my messy blog and allowing me to rant about splatoon every other day lmao love u friends
harmony my beloved
i love splatoon ok! i've tried to recreate a few different splatoon characters before but they don't really translate well to sims. however i love how my harmony turned out! she's my fav character in the game and i'm quite proud of this funky little edit :)
leaf carrying a plant she stole
as soon as i saw that pose i knew i had to use it with my girl leaf! simple edit, but very cute <3 i wanna post more about my nymph!!!!!
what is this? a crossover episode????????
bojack horseman is my fav show ever. when i saw the horse pack trailer i KNEW i had to make this silly joke :p i didn't expect it to get so much attention but i'm glad it did! fun facts: 1) i painted bojack's face in game but basically redid the whole thing in photoshop bc sims textures are uh bad. 2) i recolored pc's dress and god i wish i could've made something better lmao. 3) i converted mr. pb's glasses and i SUFFERED. they actually look terrible ingame but ✨photoshop magic✨
this edit of an alien oc that i need to name still
i don't really use alpha hairs but ain't this one cute?! and i love this edit! if you read this give me a name suggestion for this sim please
YES THAT'S HAPPENING
I LOVE JUNO BIRCH!!! i literally need to stop myself from making another juno post every time she posts anything online lol. but that hot dog costume is iconic, what can i say.
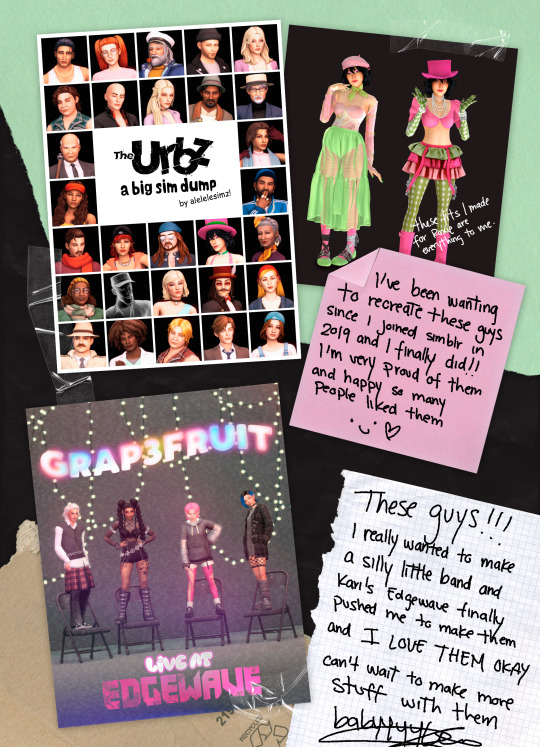
sims in the city, baby + everything i made about them
i've been wanting to recreate these guys ever since i joined simblr back in 2019 (jesus christ) and i finally did! i'm very proud of them and happy so many people like them :) i loved this game growing up but none of my friends played it, so it's really cool to see more people who played it too!
also, that roxanna moxie lookbook i did? peak fashion
GRAP3FRUIT!
these guys!!!!!!!!! i really wanted to make a silly little band since forever and kari's edgewave fest finally pushed me to make them and I LOVE THEM! i can't wait to keep making more stuff with them babyyyyyyyyaskldjalskhdfklasj
95 notes
·
View notes
Text
ok time for an info post about my edited stuff folder and also some new additions to it
a lot of these are pyxis edits, but the others are also creators who dont seem to be active anymore. but if anyone is the original creator of one of the things ive edited and you're mad at me for posting my edit... sowwy. ill take it down if you ask nicely ♥
ssspringrollIntergalacticSpotsM.package
edit of: https://pyxiidis.blogspot.com/2018/02/intergalactic-supernatural-overlays.html
description: so it turns out all these years, the fem frame version of the intergalactic overlay was a little different from the masc frame and i never noticed. so i made a little add on edited version of the fem frame overlay so it fits the masc frame.
before -> after (there's shoulder spots now)
its available in all the original colors. theres 2 versions of each color though, since there were slightly different leg opacities for the masc and fem versions and i couldnt decide which one to go with. they are very minuscule differences, the shoulder spots are really the main event.
feel free to recolor this in other palettes, id appreciate it actually. took a lot of fiddling to get those spots to line up right, please! please use my edit and make recolors!
this shows up in cas (for m frame only, theres no point for f frame, they already have it) as a separate cas part. the thumbnail is the same as the original, except i slapped the word 'EDITED' over top in big red letters. hopefully you will see it.
ssspringrollPrettyVisitorsHeterochromia.package
edit of: http://pyxiidis.blogspot.com/2017/04/pretty-visitors-eyeset.html
description: heterochromia. the meshes are by me (not that i can take much credit for them, its an ea eyeball thats slightly larger than usual. thats it.) but there are L and R meshes for each age (infant to TYAE) feel free to recolor in other eye sets, the mesh follows my usual TOU. the textures, obviously, are not mine. i don't know if i managed to squeeze every swatch from the pretty visitors eyes in there, but i know for a fact all the human colors, the pooklet colors, and some other alien colors are in there. I did not do the vampire colors. sorry. maybe some day.
found in face scar and neck scar (in skin details) but feel free to re slot them to other categories for your convenience. left and right cheek might also be a good spot for them. there are two cas items, L and R, so i wanted them to be sort of close together, thats the only reason i picked the spots i did.
incompatible with glasses.
demondays
edit of: https://pyxiidis.tumblr.com/post/177241795736/demon-days-vampire-stuff-by-pyxis-some-things
description: the original texture of the gradient limb overlays was bleeding out of the leg area a little bit, which clipped into the texture area of some wicked whims body parts, making unexpected splotches. i just trimmed it back a little so it shouldn't do that anymore.
eyes
edit of: https://pyxiidis.blogspot.com/2017/11/arachnophobia-accessory-spider-eyes.html AND https://www.patreon.com/posts/29118520 (v2)
description: converted for all ages. the meshes are addons and should be installed alongside the originals, the arachnophobia overlays (PYXIS_Arachnophobia_SpiderEyes_FaceMarkingDetails_upperRightArmTat.package, etc.) are direct edits of the original package files. Delete the old packages with the same names and replace them with my edits, if you want the overlays to be available for all ages. You don't need the overlays for the meshes to work, though.
An additional slot has been made available for infants -> children in the eye details section. The meshes will not be found in that category for teens and up, just the tots.
Waay'los' folder
this sections formatted a lil different. dont worry about it.
PYXIS_Siren_MermaidGills
edit of: http://pyxiidis.blogspot.com/2018/05/siren-mermaid-accessories.html
description: edited warehouse data so that necklaces can be worn at the same time as the gills. the mesh has not been edited, so compatibility with very close-fitting necklaces like chokers is not likely (gills are bulky and will clip) but i figured thats no reason to close off the option entirely. so necklaces are allowed now. also, i changed the categories. the packages claiming to be necklaces are found in mouth scar and the ones claiming to be rings are found in face scar (skin details section, towards the bottom near acne)
⚠ NSFW [MiniGiles]LoveBelow SkyrimFantasies Reptilia Male
edit of: i dont think this ones available anymore i will be honest. i can't find a link
description: tweaked positioning of the mesh so it lines up a little better with animations. also tweaked the weight painting and uv map. it doesnt animate quite right all the time, but it gets the job done. should still show up in the ww body selector (does for me, anyway)
⚠ NSFW ssspringrollReptiliaOverlays.package
edit of: this ones original content
description: gradient overlays for the reptilia body parts in the same basic rainbow palette as my overlay minipack. found in body scar (right leg). really nothing fancy, just for a little bit of personalization. should be color slider mod compatible
no custom thumbnail
ssspringrollHorns
edit of: https://flapjack-sims.tumblr.com/post/114810983191/horns-for-sims-4-ive-noticed-the-lack-of-horns-in (MESH) https://cherryvanillasims.tumblr.com/post/163956398575/flapjacks-thicc-horns-forehead-in-noodles (RECOLORS)
description: moved the uv map and textures so now the horns are compatible with hats (and any other accessories that use the hat texture space, like lots and lots of the wing cc thats out there)
changed the category to acne. there's two packages of these horns, i think the textures are ever so slightly different between them, but its negligible. I'd recommend the ssspringrollHornsEditedForMyBoy.package version, if you don't want to grab both (which you can, they appear as two separate cas parts)
no custom thumbnail. i dont know if these require the mesh. i dont remember.
Disclaimers:
Just because I've edited these pieces of cc does not mean I'm adopting them. I cannot promise I will offer support if something breaks.
Lots of these are edits of my own personal package files, rather than edits of freshly downloaded versions. They may have been batch fixed, re-slotted, renamed, or otherwise edited over the years I have had them in ways I no longer remember.
Okay looks like thats everything for now.
I will probably add to this pile eventually, but until then, bye bye.
shoutout to @/occultradio for requesting most of the edits that aren't in the Waay'los folder. i straight up did not notice the shoulder spots until they pointed it out and likely wouldnt have done any of the other stuff either if they hadn't asked lol
30 notes
·
View notes
Text
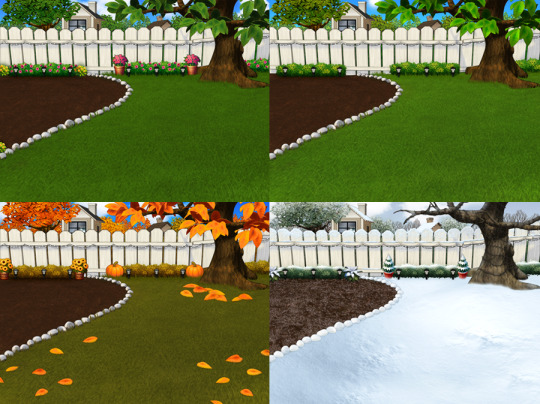
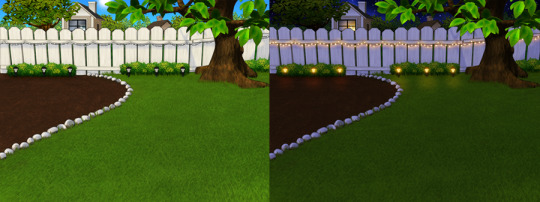
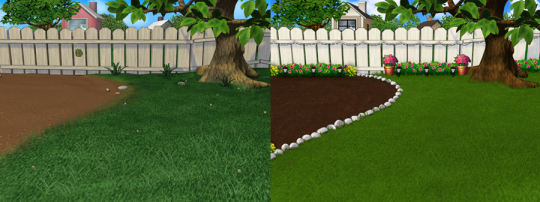
4 Seasons Back Yard Remodel + Crystal Yard
My 4 seasons remodels of the Petz 5 Back Yard are now available for download! And because I went on a bit of a side-quest, I’ve also made a bonus version, a fantasy, crystal back yard!
You can read my creator's notes below:
I somewhat wonder if it's fair to criticize the original Petz 5 playscenes too harshly. It's possible that the development team faced tight deadlines or budget constraints, factors that may not have been entirely within their control. However, regardless of the circumstances, the end result was a disappointingly sloppy product, and it's difficult to ignore some of the glaring flaws. While I can understand that the developers were working with dated software, there are certain flaws that can't be attributed to software limitations. Rather, they seem to reflect a clear lack of attention to detail. Here's what I mean.
The more you look at it, the harder it is to decide which flaw is the worst. The blatant MS paint spray paint "touch-up" in the upper left, that there was no effort put into blending in the skybox, or that they neglected to add textures to the roof.
Alright, enough ranting there. None of this is to say my playscenes are perfect either, but they were a labor of love and I hope that this is evident in the final results.
SPRING
I smoothed out the grass texture to give it a more velvety, manicured lawn appearance. I brightened up the dingy looking fence to a more brighter white. The original playscene had a hole in the fence, and while it might add "character", I opted to cover over it for a more polished look. I added bushes behind the fence to cover up the skybox and to conceal the bottom of the houses.
Speaking of houses. Wow these needed a big work-up. The texture work (or lack of) on these is just bad. I'm no expert in house construction, but even mostly-brick houses will have some accents like trims to break up the monotony of a fully-brick façade.
Because of how fuzzy the brick texture is in the original, I drew in the mortar lines of the bricks to enhance the texture. I added roof shingles, siding, and trim boards to the house to make it look more like a typical suburban house. Despite these edits, it's still not a "great" house - the way it looks through the windows, it looks like the house is one room lol. I wish I could put better houses in the backdrop but because Tinker doesn't allow me to edit the animated blinds, I'm constrained to keeping them the shape that they are. Oh well. We can use our imagination.
I added landscaping rocks to make the flower bed look nicer. I also added some landscaping details like bushes, garden lights, and string lights for ambiance.
[ Enlarged picture of the garden light I made ]
I also worked to improve the skyboxes in all 4 seasons of the of the Back Yard playscenes. It would be lengthy to get into the details of all that but here's a before and after of the night skybox. You got to love them high-quality MS paint stars in the original.
SUMMER
I had a hard time with the summer one because it was hard to come up with ways to make it look different from the spring version. I did make the grass, bushes, and tree leaves slightly more vibrant. Originally I had some flowers by the bushes but I just wasn't really happy with them. At the last minute, I made the decision to remove them entirely. This makes the playscene a little more "plain" but I think some people may want a more "plain", undecorated version so that they can dress it up how they want with toyz.
FALL
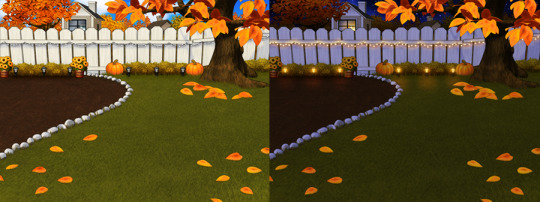
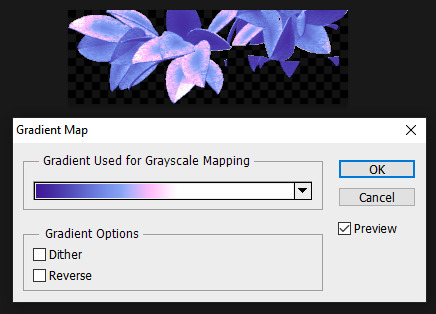
Fall is my favorite season, so this was a joy to make. I toned down the color of the grass and added fall landscaping motifs. Recoloring the tree's leaves was done by using Photoshop's gradient map feature. If time permits, I may do a tutorial on this in the future.

Gradient mapping is a powerful tool for recoloring almost anything. It can give way better results than methods such as hue/saturation, replace color, etc. And thanks to photoshop actions, applying this recolor to all the animation frames took just a couple of minutes.
Unfortunately, the fall leaves look "bright" in the nighttime version of the playscene. There does not seem to be a way to implement a darker version of these leaves for the nighttime playscene. If you look at the sprites in Tinker, you'll see that there are two sets of animations for Leaves A, B, and C and they're labeled "PropsAd" and "PropsAn", which would lead you to think that the developers originally intended for there to be a set of leaves for the day time, and a darker set for the night time. I guess the developers scrapped this idea because this does not work in the actual gameplay. When I experimented with this, the game appears to randomly display the nighttime sprite even during the day time, effectively ruining the intended affect. I'm not sure why the developers scrapped this. Either they had issues coding this properly or were just didn't want to put in the effort to make two sets of leaves.
WINTER
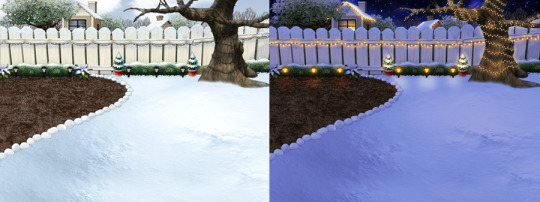
Instead of doing recolored leaves for this scene, I made all the leaves transparent and added holiday lighting to the tree. I know the lights aren't perfect - it was kind of hard to make out which direction a branch was going, so it has hard to maintain 'perfect' perspective.
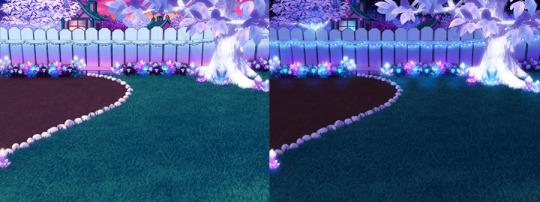
CRYSTAL YARD
This is a bonus playscene that I made because I got a little side-tracked as I was working on the 4 seasons back yards. This is inspired by the Suramar zone from World of Warcraft, so it has a bit of that fantasy, night-elf feel and color scheme. It's been years since I've played WoW but I still appreciate the enchanting aesthetic of the elven zones.
I used gradient mapping again to recolor the leaves to give it this lavender, shimmery, iridescent look. I did a little bit of gaussian blurring and layer effects to make them look a little more "glowy" than the originals.
As before, Tinker won't let me edit the blinds, so it limited what edits I could do to the houses. I would love it if I could have done curtains instead or something. I did my best to make these houses look a little less suburban and more elven. It's not perfect but it was rough working with what I had.
KNOWN ISSUES / THINGS I COULDN'T EDIT
As far as I'm aware, there is no way to turn off the snow effect for seasons like summer where it wouldn't make sense. This probably involves some code-editing that is beyond my technical skillset.
The winter playscene still has the green grass footprint when your petz walk. The sprites for these are not housed within the .env itself but in the Petz 5 Rez.dll file. It would probably involve a bit of tweaking in the code to switch the sprites to something else.
The fall leaves are "bright" in the night time version because there is no way to implement a second, darker set of leaves.
I cannot edit the blinds animation. Tinker gives you an error when you try to edit this sprite. This unfortunately limits what edits I can make to the house and the fence because of where the sprite is positioned.
If anyone does know of solutions to these, do let me know as I'd love to enhance these scenes further!
ICONS
Making the icons for these was also a fun little project. For some odd reason though, the game puts a stray pixel over them when I import them through LnzPro. I did my best to disguise them but there does not seem to be a way to fix that.
BEFORE / AFTER
With all that rambling out of the way, visit my main page over at Magnolia Road > Resources > Playscenes to download the goodies!
22 notes
·
View notes
Text
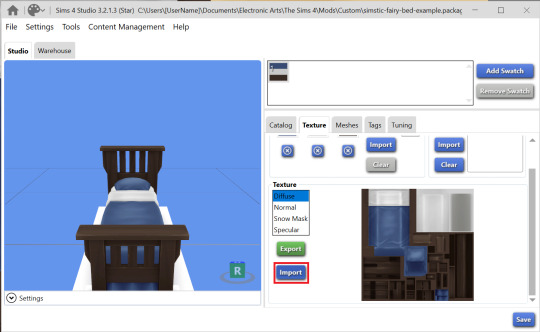
So you want to make a recolor...
I made a quick recolor tutorial for a friend group so I thought I'd go ahead and share here too. This is just a super quick guide for how to recolor an object/cas item.
There are two types of recolors. Standalone and Overrides. Overrides will replace the item/swatches that exist in the game. Standalone recolors create an additional item with it's own swatches. This tutorial works for both kinds, you just pick which one in Step 1, and then the rest is basically the same.
This tutorial also works for pretty much all buy mode items and CAS items. Anything that is tileable...I think maybe that's what you could call it...anything that can be stretched across multiple tiles, for instance, wallpapers, flooring, roofing, fencing...these types of items require a few more steps that I will not be covering here.
Ok so you want to recolor something, you need Sims 4 Studio (S4S) and a photo editing program like photoshop (there are plenty of free alternatives out there too, like Gimp is one I know a lot of people use).
Step 1! Open up S4S and pick either "Standalone" or "Override" depending on what your end goal is. Generally, you'll probably do standalone. I usually reserve overrides for permanent world items I want to change, like changing the images on the billboards in San Myshuno, for instance.
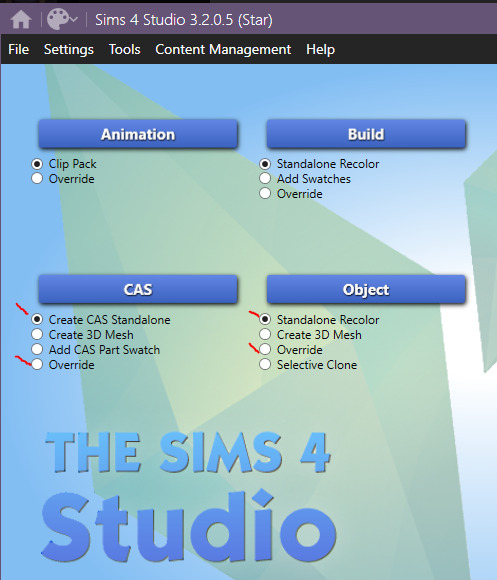
For this, I'm going to make a standalone recolor of an object so you would make sure Standalone Recolor is selected and then click "Object."
Step 2. Find the thing you want to recolor. Across the top there's filters so you can narrow it down by pack or search keywords to help find what you're looking for. Pick your item and click "next" at the bottom. A save window is going to pop up, save your file and make sure to name it something useful that's actually identifying so you can easily find it and remove it/update it/etc in the future. If you just hover your mouse over an item, it will give you the game's name for that item.


Congrats, you've created a Sims 4 package.
Step 3. (Optional) If you want to make changes to the in game display name, description, price, or style tags...you can do that on this first screen and then just hit "Apply To All Swatches." You do not have to make changes here if you don't want to though.
Step 4. This is where the fun begins. Click on the "Texture" tab. This is where you're going to get the file that you actually need to recolor. If there's a plain white swatch, I would pick that one, otherwise, I would go with whatever the lightest and most blank swatch is to make it easier on you to recolor. You just click one of the numbered swatch boxes at the top and then in the lower section make sure you have "Texture" highlighted, in this case it is my only option, and then click "Export." Another save window will pop up, just save that texture file somewhere easy to find, it'll only be there temporarily. (Or, if you want to be really smart and you plan on recoloring many things, you should make a project folder for each thing and save your texture files and things in there so you can always come back to them later.)

Step 5. So the exact tools and steps and such will kinda vary here based on what you want to accomplish and what program you use but, the broader overall process is the same. Open your texture file in an image editing software, change the colors/patterns/etc how you want, and then save that texture file. For instance, on this one I'm just going to change that pink section to a different color by just selecting the pink area with a marquee/quick selection tool and then using the Hue/Saturation tool to change the color.
Another example, this is something James Turner did in a recent video that someone asked about, you could choose some in game frames with images, put your own screenshots onto that image, and then boom you have your screenshots in game as framed photos. You would simply add your screenshot on top of the framed image as a second layer, line it up nice and neat, and you're good to go. Here's an example of what that would look like:
That's also basically how you could quickly add patterns to something. Lay your pattern image over top of the texture, change your layer style to something like "Multiply" or "overlay" depending on the look you're going for. Either way you do these, just remember to save your final product as a .png file.
Step 6. Back to S4S! Same place you were before, except now you need to click "Import" down in that lower texture section, select your texture file you just made. While you're on this screen, you should also update the colors in the "Swatch Thumbnail" section to match your new recolor, and you can also "remove swatch" to get rid of any additional swatches you don't need. Once you're done with all of this, hit save, and then go throw that .package file into your Mods folder.

Step 7. Go in game and check out your items and then pat yourself on the back.
Now you too can be cursed with this knowledge so that every time a new item/clothing is added to the game and you think, "wow I'd really like this if it was in better swatches" you can just...make those swatches.
103 notes
·
View notes
Note
Just wanted to say I absolutely adore your comic! It reminds me of all the comics I would read when I was little (except now they're gay), the style and shading is amazing.
What would you say is your favorite part of creating your comic, and do you have any tips?
Thank you I'm so glad to hear that!
I think my favorite part of making comics is the way it sort of feels like a puzzle. It's super mentally difficult but it's extremely rewarding to figure out plots and work out my best execution of it! I also LOVE editing, it's where things get to really pull together.
As for tips, I'm not sure what you mean! so I'll just share a few tips for a few different ideas...
Saving time
to save time I save every head I've ever drawn in a file so I can reuse the head (I redraw the face) which allows me to skip the sketching stage, since I only need to sketch for heads!

I also make my backgrounds a single very large image so I can reuse parts of it throughout the whole scene, recolor it for different times of day, etc, which saves a TON of time for me. Then, I just add in some spot blacks on top to make it feel cohesive with the character art! (this ALSO has saved me a TON when I've been converting my pages from scroll format to page format, as I have a high quality version of the background to use when I need the panels to be wider!)

But the biggest thing that saves me time is my line confidence.
So, next I'll talk about lineart tips!
most important is to draw from your elbow and your shoulder, instead of your wrist and fingers. this will get you cleaner lines, but will also save your body in the long run! The wrist is extremely fragile, so start learning to draw with more of your arm NOW rather than later.
Next is practicing line confidence! this basically is what gets you to draw the right line the first time, saving you a ton of time! These two tips sort of go hand in hand.
writing tips
First and foremost, you should be having fun! and I'm so serious, if you are working on a scene that feels like a drag to you, it will drag to your readers too. Whatever you feel like that scene HAS to be there for can almost definitely be accomplished in a different way!
but, really, I like to try to keep the big picture in mind. What is this scene accomplishing, what needs to happen to force these character changes, what needs to be revealed, what information about the world is canonized, etc, rather than thinking about your story as "events that have happened and will have to happen"
building off of that, my personal rule for establishing information is 3 times: If you've mentioned something three times, you can expect the audience to remember it. If you've mentioned it once or twice, it's really pretty likely they'll have forgotten by the time it's relevant.
This is getting really pretty long, I could get into character design tips, worldbuilding tips, tips for characters emoting, layout tips, marketing tips, business tips... there are SO many skills that go into making a comic, it's extremely hard to offer tips without knowing what you're looking for!
37 notes
·
View notes
Text
Today's modding shenanigans!

Today I wanted to test out ACM a bit :D I think I'd most enjoy using it as an additional tool for making custom outfits and seeing how different item appearances work together, less as my primary tool to creating custom outfits as such (also, it is a bit buggy for me and I can't seem to export appearances reliably for some reason).
Since you can alter custom appearances with it too, though, you could definitely mod one "base outfit" and then change the colors spontaneously for a different vibe (for example, I could make an apperance for Kerry wearing one t-shirt and then change the shirt decal or color on the fly in game without cluttering his .app file with a dozen different appearances that are virtually the same just different colors!). Wondering though if there exists a resource that lists every item's appearance names (cause some are super specific and hard to guess, like... instead of "black" or "smiley-face" you have appearances like "6th street" or "black_capsules") for this purpose... and if not, I'll probably make one just because I would find it useful to have xD
Also, ACM is really neat for taking off Kerry's jewelry on the fly for certain pics XD Or changing nail colors and things like that! In all these regards this is a super useful resource as is already, but I'm excited where the mod makers will take it :D (also... random sidenote, but can we talk about Dante for a moment? I'm a little bit in love, and I need his shirt not only for Kerry but also for Vince XD).

Then some silly behind the scenes stuff xDD @netcess said that Reed really needs a party outfit with a cool hat, so I put something quick and simple together for her and... I wanted to take a pic and as I went into Photomode, Vince spawned straight across from Reed and looked so disappointed at him partying without him when so many pressing issues are at hand XD Just really fun little moment I wanted to capture, intensified by facepalm XD

Honestly he rocks it XD Might make a recolor to fit his suit when the mood strikes xD

And finally: who wore it better? XD

(giggling and kicking my feet at how his hair and beard match now :3)
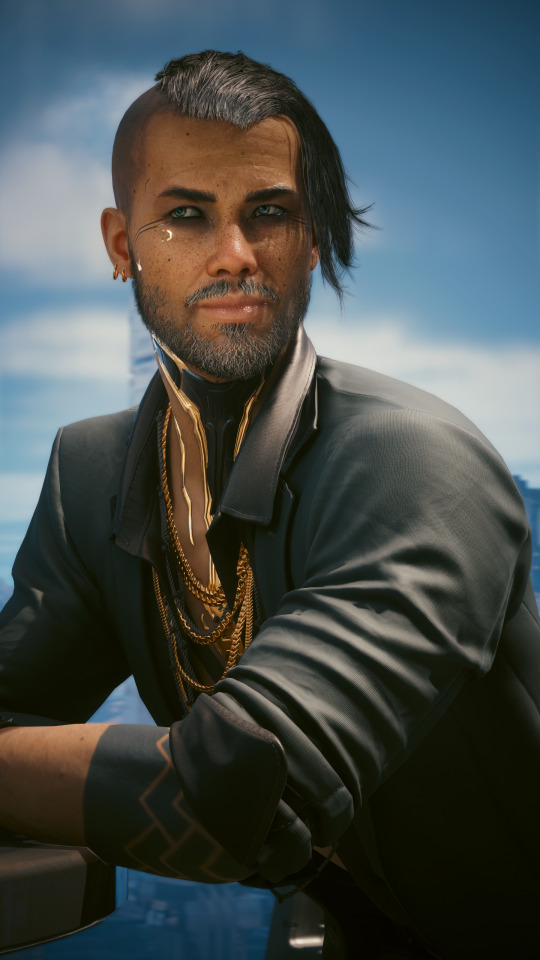
No but I actually tried my hand at editing this hair mesh for Kerry, cause it was clipping a bit here and there! This is done super quick and dirty like... In theory I know I could export his headmesh and then fit it exactly to that, but for now this aint so bad already actually! :D No more clipping into the side of his head and the hairline in the front looks better. I left out Johnny's hair cap and all that because I wanted to go for a really really short, very freshly shaved look for this like...
Something he would've done at the end of his tour right before coming back to Night City. Keeping the long hair consistent for all concerts. And as I said, I 100% get why he has that look, like... It has old, seasoned rocker vibes, it's so much less clean and more himself than his 2077-appearance like... natural hair color, not styled at all, embracing himself again with the whole "I'm gonna name my next album "Kerry Eurodyne" and go back to my roots thing, he looks like he just came off stage, sweaty and tousled, so... yes!! I do love it for all those reasons, but idk... I feel like, it's also at the same time something low maintenance that he doesn't have to pay a lot of mind to, escaping into his music and career after apparently losing V. And I think with the tour over and with getting V back so unexpectedly, he'd change things up a bit again. It's a concert/tour look for me. And this style is also low maintenance, while still Kerry, still rebellious, but a little more cleaned-up, in control of his life, if that makes sense?
@pinkyjulien sorry for stealing your tags from my other post, but you put it into words so well, on point!!
Especially your last point, cutting/shaving your hair to mark a new beginning is 100% such a thing he'd do!! So yeah, I think I'll stick with this for his two-years-plus-four-months-later look xD
#elven tries modding cyberpunk#cyberpunk 2077#phantom liberty#kerry eurodyne#solomon reed#phantom liberty spoilers#just in case
29 notes
·
View notes
Text
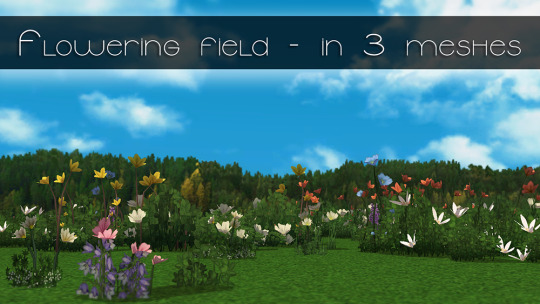
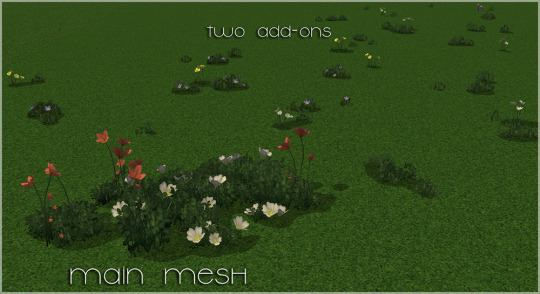
I believe at least one of these meshes has already been converted, but only for neighborhood? Anyway, this is something a little bit different.
These are flowers from ts4, recolored and repositoried. You get one main mesh, which is more compact and clustered together, but also 2 repo'd meshes that are spread out, so you can quickly and easily fill your entire lot with naturally scattered flowers and grass.
It comes with 10 additional recolors, including one plain flowerless grass. I wanted to do more but lost my enthusiasm somewhere along the way.
Although now when I look at it, it really needs more color variety, maybe I'll do more recolors in the future.
256x256 textures
will get procedural snow in winter, but otherwise stays the same
main mesh 1284 polys, second mesh 1224 polys, third - 888 polys
Sorry I had to make it on the higher poly side, but simply editing the txmt in order to add undersides wasn't doing the good job, it comes out too dark and glitchy this way, thus backfaces had to be added directly to the meshes.
SFS / MEGA
318 notes
·
View notes
Text
I've been pretty out of the swing of things, but I finally got around to playing through new "Cryptid Crush" update! Gonna write down a few things bellow. Putting it under the cut to avoid spoilers for people who didn't check it out yet.
"Cryptid Crush" by @cryptidcrushvn @squidinu. Give them support!
SPOILERS BELOW!!!
SO, I decided to actually play the whole thing from the beginning (totally not because I wanted to see August in that patient gown), and I was glad to have done so! Apologies for a bit random list of things I wanted to note down just off the top of my head:
Transparent sprites of Taro and Mike Madhouse are a really neat detail! Also, unless I'm mistaken, I can see some tiny bits of writing edited or added (like some descriptions during fight with Mike Madhouse or that little bit after cemetery fight, with a chat between Robyn and August - it's a small bit, but it allows to introduce a bit more info on the characters).


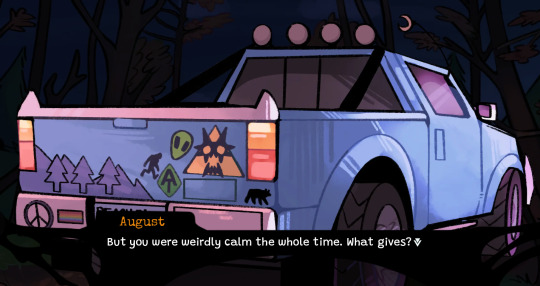
New additional voiced lines! Plus Robbie and Mr. Walker getting their voices!
Loving new look for August! It's also nice to see both August and Oz in alternative outfits in-game. And if I'm not mistaken, Robyn's got a new icon during fights, plus Edith had sprites with a bit different facial expression in Chapter 1.

TONS of lore. So many little bits that show relationships between characters that we previously didn't see interacting between each other. Like August and Atlas talking to Tessie, for example. It's also nice to get glimpses like this on the everyday life of the characters, as well as some hints on their backstories.

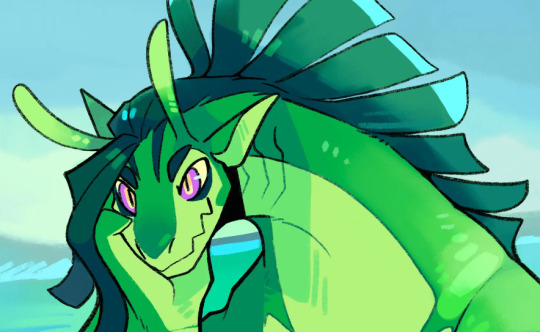
Tessie is absolutely gorgeous, how dare you!
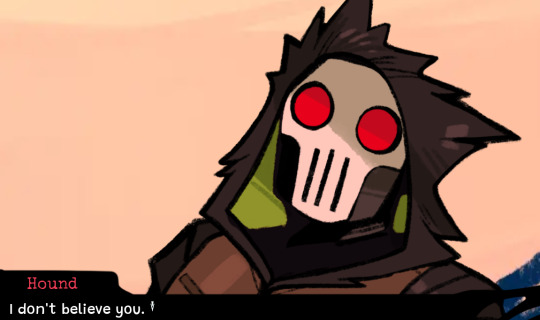
New characters! I love Hound and their attitude. Also introduction of Lex was done great! All the foreshadowing and details (like "twenty bucks" thing) made a good build-up to the great reveal!
Seriously, there are both hillarious bits and the ones that made me want to cry. Like Oz repeatedly falling facefirst onto the ground while Lex is "correcting" the up and down. Or that added small bit with Mike when he meets Mr. Walker. These added lines and that sprite of slimeball Mike made me go "Ouch-".
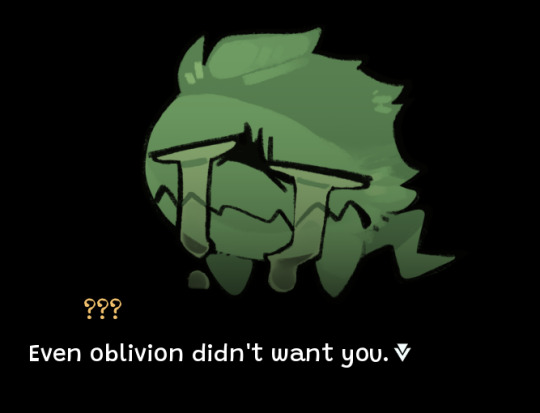
The atmosphere of the "Nowhere" was EXTRA trippy, and this feeling was done so well!! With both music, skipping through game scenes, certain things getting distorted, various Lex's forms and such, and especially later, when it got to the fishing mini-game and Robyn's sprites progressively getting less and less detailed, until it goes down to the very rough looking sketch.

As always, amazing music! It reflects greatly the mood of the atmosphere, like Atlas's theme, or the one that plays in the "Nowhere". And the track "Wrath of the Recolors" that plays during Mike' and Jamie's fight rocks!
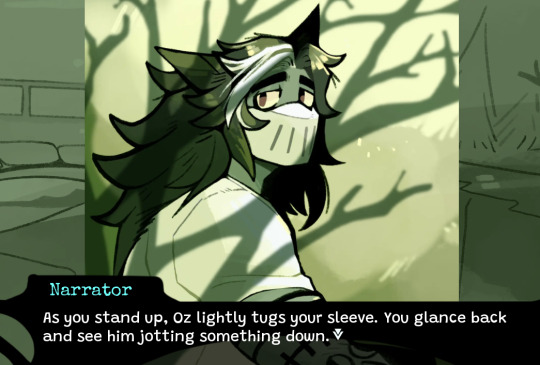
Also, don't mind me, I'm gonna be screaming in the corner from getting to see so much of Oz in the new update. The bit where he gives you a note got my heart. Also, boy needs some rest desperately.
I apologize if I got something wrong, but it was a rather quickly written little thing. In any case, it was a nice treat, and I'm looking forward to when I can draw something again. As always, "Drowsy Drake" team did a great work!
13 notes
·
View notes
Text
Someone sent me an ask while I was on my hiatus about how to make recolors. It was so long ago they probably figured it out by now; but I figured I'd show how I do it anyway.
I'm making this in a extremely simple way with steps some people would think were obvious, so for those people that might get just a little annoying, but I wanted it to be as accessible as possible.
It's very helpful if you already know photo editing.
Bed recolor (not pattern) tutorial under cut
Warning: LONG AS HELL
To start, you need Sims 4 Studio and Krita
Open Studio
We're making a bed so click on "Object", standalone recolor should be automatically selected.

You'll be greeted with a list of every object you have in the game. Yikes! Good thing we can just search the kind of object we want. So we type in "bed"
Click on your preferred object, which will then be highlighted, and click "next"
You'll then get a "save document" pop up. Type whatever you want it to be called and save it in your Mods folder, preferably a subfolder (folder in folder)

Click "Save"

We have our bed! But now there's even more options, that's a little overwhelming! So how do we really start?
At the top there is all the swatches of the bed that are already in the game. We don't need all those so just selected all your undesired ones and click "Remove Swatch".
Then, with the swatch you want to change, (maybe pick one that is as close to the colors you want as possible. Like light or dark frame.) Click "Export"
You also probably notice what we're saving looks pretty weird... That's because all the sides of the bed are being spread flat. It's like 3D folding:
Anyway!

More file saving! This time we are saving a png (this is important, make sure png is chosen in "save as type" at the bottom)
For now, save it to where ever is easiest to get to. If you start to do this regularly you will probably want to get more organized.
Anyway, name it whatever, though preferably (dang I'm using that word a lot) something simple if you need to just search for it real quick.
Open Krita.

Dun, dun, dun! We're really in it now! Go up to "file" at the top and select "open" here just find your png and open it.

Well I don't want to change the color of ALL of the pieces! Let's start with the sheets (the white square). Go to the side and click the "rectangular selection tool"
Carefully (you can zoom in with scroll to get a closer look) drag the tool around the sheets and hit ctrl+X, this cuts the shape out of the rest of it. It disappeared! Don't worry just press ctrl+V. This pastes it back to the project.
Now it has its own layer separate from everything else.
Deselect it real quick (mostly just cuz right now)

Now to actually recolor it. Finally! With the correct layer selected (THIS IS IMPORTANT) go up to filter-adjust-color balance

This give you a pop up of primary color sliders.
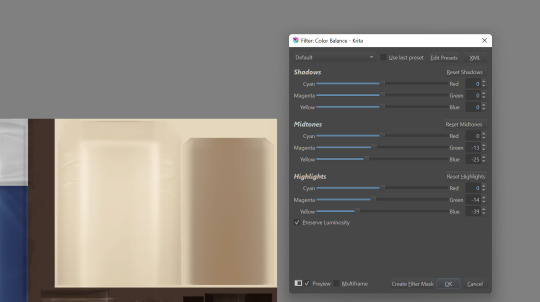
You have three for different shades of the picture. Since there's quite a bit of shading in our sheets we'll need to use at least the bottom and middle options.
Fuck around. No really. I mean it helps (like a lot) if you know how certain colors mix. But really just start sliding! See what happens! Eventually you'll figure out what combo makes a pink-purple vs a blue-purple etc.
Ok, so we've fucked around and now our sheets are a gold-tan. Click "OK"
Well, that colors a little light for what I want. So we go back up to filter-adjust and click "Burn"

More sliders!
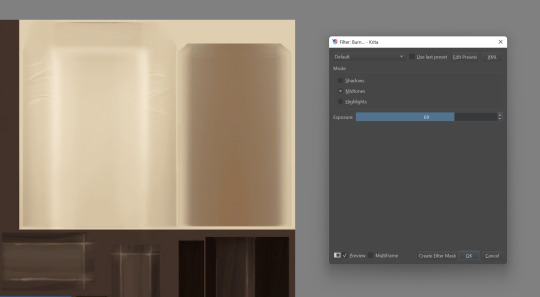
Fuck around!
Note: To get the PERFECT shading you're gonna need to go back and forth sliding different options. Like Burn-Midtones, then go Dodge-Highlights etc. it effects different areas like the color sliders do.
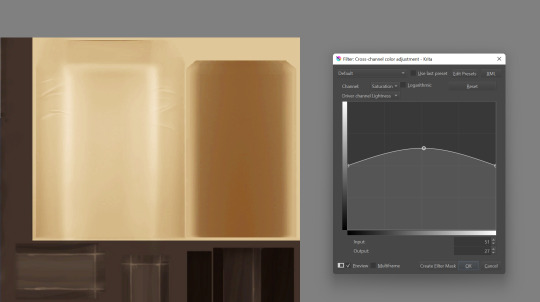
Well that color's pretty dull... Good thing we have cross channel adjustment curves (what a mouthful...)
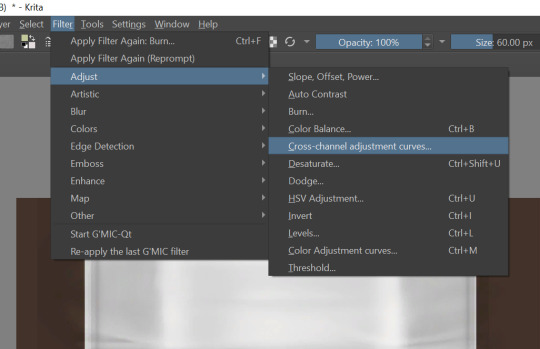
Pulling the curve up from the middle makes the color more vibrant! This is especially helpful after going back and forth form Burn and Dodge which can REALLY dull the color.
We've made our changes! So go up to the top and file-save. Make sure it's still a png!!
Go back to Studio
To FINALLY change our object we click "Import" and select the image we just changed.

It's not to my standards, but it's good I can go back and edit what I already have and just save it again! And do this many, many, many times...
That's recoloring! Maybe I'll do a pattern tutorial idk...
6 notes
·
View notes
Text
TAGGED by @simmerstellar ! Thanks friend!
Come get to know me y'all!
1. What’s your favorite sims death? I haven't had a sim die from anything other than old age in a HOT minute but I saw a LP and the murphy bed death seems so unecessarily violent lmfao.
2. Alpha CC or Maxis Match? BOTH! I consider my style Maxis Mix. We love a nice combo of both.
3. Do you cheat when your sims gain weight? Not anymore but at one point I had to. Let me explain: I don't know if it was a glitch but like after every meal with grannie's cookbook, Indya would gain weight instantly. Didn't happen with anyone else (although everyone else are athletes of some sort). She's always and forever thick but something was definitely up with the food mods I was using. Anyway, we're good now since I'm not playing her HH exclusively anymore.
4. Do you use move objects? Absolutely. Its too restrictive! Gotta play test when I do though because routing errors make me irrationally angry.
5. Favorite mod? Wickedwhims. I don't care! If I want my sims to get freak-nasty I have a blog for that and WW never fumbles. If I want them to do cute little intimate things, WW is there. If you don't like the smut, I feel bad for you son.
6. First expansion/game/stuff pack you got? I've gotten pretty much ever iteration of this game except for almost all of the kits and the star wars pack.
7. Do you pronounce “live mode” like aLIVE or LIVing? ALIVE. I don't understand the other one honestly lol. We're going LIVE as soon as I press play so....
8. Who’s your favorite sim that you’ve made? Obvs Indya Drake!
9. Have you made a simself? Yes! But she needs help lol I'm not good at that at all so there's a resemblance but she doesn't really look like me. When I do gameplay with her I say she's my "sorta-kinda self sim" lol
10. What sim traits do you give yourself? gloomy, neat, loner, romantic
11. Which is your favorite EA hair color? Black but like BLACK Black, not the BLUE Black lol.
12. Favorite EA hair? All of the afro textured ones.
13. Favorite life stage? Young adults.
14. Are you a builder or are you in it for the gameplay? Gameplay mostly stories but I love to decorate!
15. Are you a CC creator? I will recolor the shit out of something! That's about it lol
16. Do you have any simblr friends/a sim squad? All my mutuals and anyone who reads my story! #Squad
17. What’s your favorite game? The Sims 4 is the only game I play. Don't @ me.
18. Do you have any sims merch? Nope.
19. Do you have a YouTube for sims? Nope, but I have been asked to make a channel and got that far at least. No videos lol.
20. How has your “sim style” changed throughout your years of playing? If anything, less alpha and more maxis match.
21. What’s your Origin ID? [redacted]
22. Who’s your favorite CC creator? All of the ones that do it for FREE and for the love of the game. I donate too because I understand its not easy, but also not worth a month long paywall or conveniently forgetting to publicly release something.
23. How long have you had a simblr? 2015 are my earliest posts I think.
24. How do you edit your pictures? Gshade and Photoshop Elements 2020
25. What expansion/game/stuff pack is your favorite so far? Cottage Living is the goat IMO even though I don't play it much anymore. I do very much enjoy Island Living and Growing Together will round out a nice top 3.
26. What expansion/game/stuff pack do you want next? I haven't really thought about it. I just figure the sims 4 is nearing the end of its era and we're gonna start hearing about project rene more and more.
oh! tagging @shesthespinstersimmer @bridgeportbritt @iplaysims4 @beebeesiims @thegloomiestwhim @hazelminesims @therichantsim @omgkayplays @softerhaze @crsentfairy
please ignore if you don't do these or already did this!
34 notes
·
View notes
Text
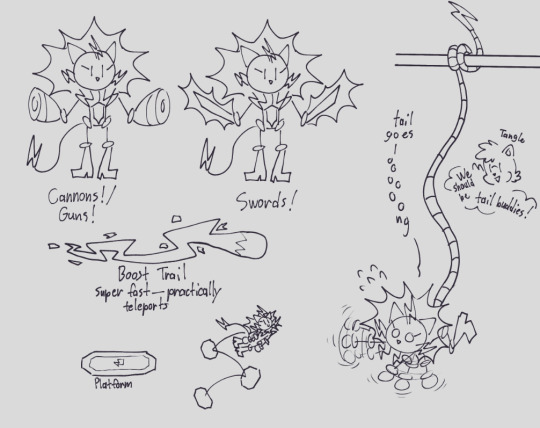
You're looking a little tangled up there, Bolt!

Decided to fill out the questionare that’s been going around the @sonic-oc-showdown!
Name: Bolt the Cyber Cheetah
Species: Asiatic Cheetah (and also cyborg)
Type: Speed
Alignment: Neutral Good
Home: Sol Empire
The rest under the cut! 👇
✨ - How did you come up with the OC’s name?
I didn’t! Bolt originally belonged to my partner Zed! He was a recolor/edit of one of those Sonic character bases you find on DeviantArt lol. He originally had, and still has, electricity powers-- he’s also related to Blaze, and 5th grade Zed wanted a B name, hence Bolt! He also tends to “bolt” off a lot, haha.
I’m the one who made him a cheetah, though. Bolt used to be just a regular old cat. But then I thought “hm, y’know for a series about a fast hedgehog, there is the striking lack of the cheetah rival” so I made him a cheetah! An Asiatic cheetah specifically, since Blaze is Indian-coded! The Asiatic cheetah is dying out :( There are only 12 Asiatic cheetahs left in the whole world as of writing this :(( It’s so sad :(((
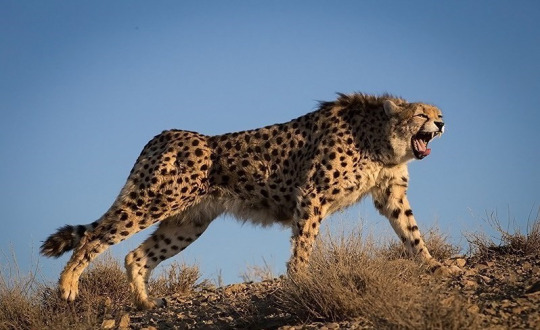
(A cheetah in Iran. Source: Wikipedia)
🌼 - How old are they? (Or approximate age range)
Bolt is 18 years old!
🌺 - Do they have any love interest(s)?
Yes! Bolt has a girlfriend named Chilli, who’s a Chocolate Labrador! They met in junior year high school and are T4T ❤ Don’t ask him how he scored, he doesn’t know either.

🍕 - What is their favorite food?
I don’t know! Since he’s so anxious all the time, probably warm and filling foods, like soup! Since he’s 90% robot, though, he doesn’t really need to eat. He’s powered by his own electricity!
💼 - What do they do for a living?
Bolt does a variety of odd jobs to pay rent. He usually works as a living battery for a lot of people, though, restarting grids and charging people’s phones for a dollar.
🎹 - Do they have any hobbies?
Bolt has a lot of hobbies, usually ones that keep him calm. Visiting museums, going on long walks in nature, anything that handles weaving like crocheting or knitting or plush making... he made his jacket himself!
🎯 - What do they do best?
Worry. And cry.
🥊 - What do they love to do? What do they hate to do?
Bolt loves engaging in his hobbies and hanging out with his girlfriend, Chilli :)
Oh boy does he hate a lot of things. Many things stress him out. Watching a scary movie, trying something new, talking to people who aren’t his usual friend group, loud concerts, big crowds, whatever new adventure Blaze inadvertently drags him into this time, etc etc.
❤️ - What is one of your OC’s best memories?
Going to see the stars with his girlfriend for the first time.
✂️ - What is one of your OC’s worst memories?
Getting kidnapped and roboticized, easy. And [SPOILERS FOR THE UNDEVELOPED AND UNRELEASED FANGAME SONIC RUSH: LIGHTNING SPEED].
🧊 - Is their current design the first one?
Nope! Bolt went through sooo many designs. I’m still figuring him out. Every new drawing of him looks different. I feel like I’m getting close, though!
🍀 - What originally inspired the OC?
Zed wanted to make a cool elemental Sonic kitty ala Blaze. Then I basically took him and transformed him completely. At first he was gonna be another cocky Sonic rival, since I’ve always imagined a cheetah rival for Sonic, but then I was like “hmm, he has a lot of those already... not very unique...” and then I remembered @/thehydroxian-art-blog’s Jeff the Imperfect Shadow Android and though “Ah! I shall make him pathetic. And also a robot.” And thus the current version of Bolt was born!
🌂 - What genre do they belong in?
A sci-fi action comedy film, for sure!
💚 - What is your OC’s gender identity and sexuality?
Bolt is a trans man, he/him pronouns, bisexual. That yellow chestplate you see was originally a binder before it got welded into his body by the roboticization machine!
🙌 - How many siblings does your OC have?
None so far! He’s an only child! He does have his cousin, Blaze, though. Which technically makes him royalty. He doesn’t really live like royalty, though... or know that he’s royalty in the first place.
🍎 - What is the OC’s relationship w/their parents like?
They kinda just peaced out after Bolt graduated from high school. They weren’t particularly close with Bolt, and vice versa. They lowkey wanted nothing to do with him...
✏️ - How often do you draw/write about the OC?
A decent amount! A member in a Sonic server I’m in asks all sorts of prompt questions about other people’s OCs and I love answering them! It’s really helped me develop not just Bolt, but my other OCs such as Faye Moreau, Seafoam the Sailfish, Charlotte Webb, Chaos Clown, Ms. Host, Cabinet Man, and even Kryztal!
💎 - Do you ever see yourself killing off the OC?
Nah, not really.
💀 - Does your OC have any phobias?
Yes. Too many to list, though. He’s practically afraid of everything.
🍩 - Who is your OC’s arch-nemesis or rival?
Blaze is kiiinda his rival, but saying that is kind of a stretch. He’s an alright rival to Sonic when the hog visits, though.
🎓 - How long have you had the OC?
I don’t quite remember. A few months at least. Maybe even a year.
This one is something I came up with myself:
💥 - What are your OC’s powers, if they have any?
Bolt can channel and manipulate electricity! He can also shapeshift his mechanical body into various weapons like energy cannons, guns, and blades! His tail stretch out really far, and manifest temporary platforms!
Aaand that should do it! Hoo, that was a lot of questions! It was fun!!!
24 notes
·
View notes
Text
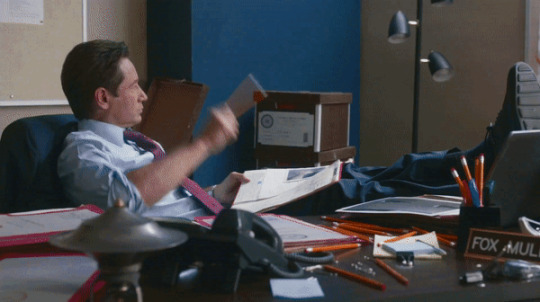
Gif tutorial by Alinelovelace
Alright, I'll be doing 3 things here today:
1.) Sharing the programs and websites I use
2.) Showing y'all a tutorial on how I make my gifs (this is my first tutorial, so if anything doesn't make sense, don't hesitate to message me, send me an ask, or comment on this post!!!!!)
3.) Sharing some resources by insanely talented gif makers (because I learned how to make gifs by following tutorials)
It's probably important(?) to mention that I use a Windows laptop
A.) Programs and websites:
ezgif: to make my gifs and do light editing
You can make gifs with video clips or screen caps. I'm not advanced enough to use screen caps, though they're supposed to make gorgeous gifs. I use ezgif to make the actual gif and edit the timing (which I end up having to tweak on Photoshop but...)
I also like ezgif because no watermarks!! I will do anything in my power to get rid of watermarks from websites and editing programs because they bother the hell out of me!
Photoshop: for the rest of my editing
This is where I recolor and add text.
A great alternative to Photoshop is Photopea, which I've used before I "obtained" Photoshop. It's FREE and online, so you don't have to download anything! I highly recommend it if you really want to get into gif coloring !!!!
Currently, I get my videos from torrents (bc I have a wide selection for my family to watch on our tv). But I used to use the Xbox game bar on Windows to record the clips I wanted on online streaming sites (unfortunately there's not a whole lot up and running anymore), then cropped and cut them. If anyone's interested in that, I could probably post a separate tutorial for that another time :)
There's also screen cap websites out there and YouTube. And probably dozens of other ways to get videos that I don't know about!
Video cutter
If you use full length episode videos and don't know how to crop them on your laptop (like me)
★★★★★★★★★★★★★★★★★★★★★
B.) Tutorial:
I'll be remaking the first gifset I ever made since I've learned A LOT since then! It should be pretty simple since there's only one set of subtitles.
Another time, I could do an edit tutorial like my That 70s Show ones. It's just taking the same concepts as this tutorial though, and playing around with colors, fonts, and font placement.
1.) Find your video/screen caps:
Since I no longer have the video from my first gifset, I just googled "Mulder throwing pencils season 10" on YouTube. After finding the video, I copied the link and pasted it into a YouTube to MP4 site ((this site has never given me popups or tried to get me to download something that isn't my video file)).
2.) If your downloaded video clip is short enough, you can just stick it into ezgif. If not, you may have to cut it using a website or a computer program.
Ezgif.com -> video to gif -> browse -> select your file -> upload video
3.) After clicking upload video, you should find yourself on this page:
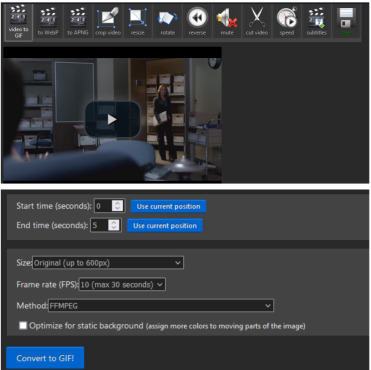
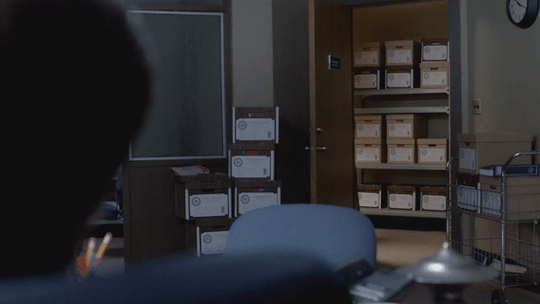
If you need to do any kind of video editing (cropping, rotating, resizing, etc) this is the place to do it! This is also where you make your gifs.
For the first gif, I don't need to change the start time, since I'm starting at the beginning of the video. 0 seconds is fine. But for the stop time, I'm going to play the video, pause where I want my first gif to end, then press "use current position" by end time.
I don't usually touch the settings for size, FPS, or method. If the gif doesn't have a lot of movement, I check "optimize for static background"
Then press convert to gif.
Here's the product I got. Since it's such a short clip, it moves a little fast for me.
I'm going to click "speed" which is below the gif. You're brought to this page:
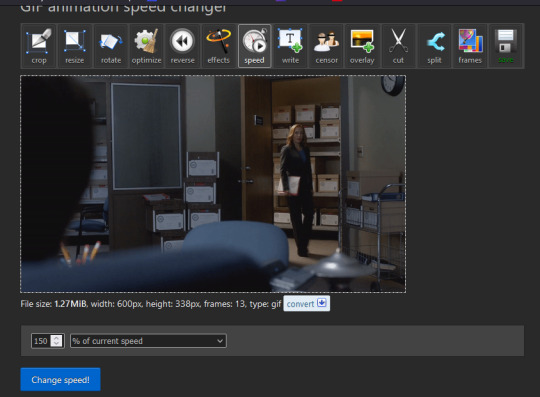
This is completely up to you for speed, but I find that between 60% and 85% end up looking good. If you don't like it, just change the number in the box and press "change speed".
I ended up with mine at 65% of current speed.

A little better, right?
The gifs that turn out best are 3 seconds to 10 seconds in my experience. This one is 1.5 seconds, so it's a little fast.
After that, rinse and repeat for every gif you need to make.
4.) Editing time! This is for Photoshop (if you use Photopea, I very much recommend this tutorial. It's very well explained!)
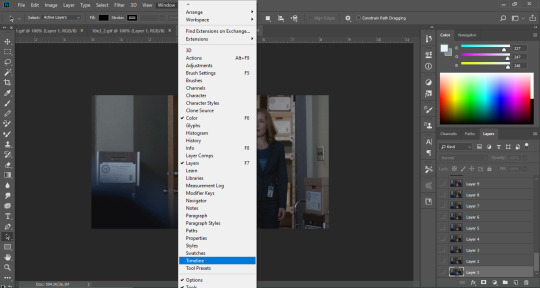
Go ahead and open all of your gifs once Photoshop is booted up. Then click window -> timeline
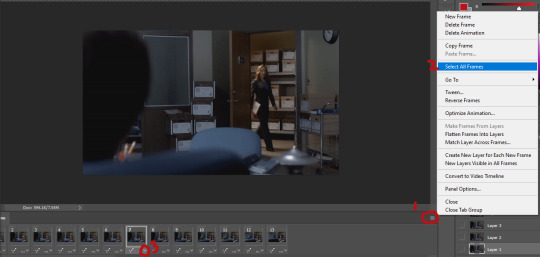
Now you have a handy dandy little timeline on the bottom.
The first thing you're going to do click play and decide whether or not your gifs are running at the speed you want. If yes, move on to next step.
If not: click on the three lines -> select all frames -> little drop down arrow. You should have a variety of times available to choose. Usually, I click other, then put somewhere between 0.04 and 0.08 seconds. Click play again. If you don't like it, try this step again.
If you need to crop your gif, three lines -> select all frames. Press "c" on your keyboard and crop accordingly.
4a.) Color editing
This is where things get complicated. Just remember coloring is subjective and everyone does it differently. This is just an intro to the different tools most gif makers use to alter color.
You don't have to use all of these! I definitely pick and choose depending on how I want the coloring to look. When I'm making a gif set, my coloring isn't as adventurous as when I'm making an edit. It doesn't feel worth it to give away my settings for this gifset since it changes depending on the coloring and lighting of the scene.
All of these tools can be found under "create new filter adjustment layer"
• Brightness/Contrast
This one is the easiest in my opinion. It's pretty straightforward. The more you drag brightness the right, the brighter your gif gets. The more you drag contrast to the right, the higher the contrast is.

• Curves
This adjusts lighting with color values. It's another tool that's hard to explain. I just drag the little circles on the chart until it looks good

• Color Balance
Like every other setting, exactly what you do with this tool is up to you. Color Balance adjusts the overall tint of your gif. I recommend editing highlights, shadows, and midtones for the best results.
• Channel mixer
This one is one of the most complicated tools when making gifs in my opinion. It's best for getting rid of weird colored tints (think the blue coloring in Twilight). I'll just link a tutorial here for it. I don't make enough gifs to know how to explain it.
• Selective color
Hands down my favorite tool, though not only specifically for gif making. This tool allows you to select a color (reds, yellows, greens, cyans, blues, magentas, whites, neutrals, blacks) and edit each color group. For example: my skin in photos usually has a weird red tint. I can edit the reds in my photo using this tool to make it look less abrasive.
You just play around with the different colors and bars for each color until each color group looks good. I recommend hitting the highest value to see how the color changes/what parts of the gif are affected by the change.
In the instance below, I wanted to see how magenta affected the blue colors, so I dragged magenta to 100. Now, knowing what kind of color changes magenta will make to blue, I can adjust accordingly.
Messing around with the each color put me here:
• Vibrance
Another pretty self explanatory tool! Vibrance and saturation bars make the gif colors more colored and vibrant.
• Applying the filters to all frames
Shift click to select all the filters, and drag them above all the layers. They should now be applied to all the frames.
If not, select all frames with the three lines menu drop down like before -> click the little eye to turn off visibility, then click it again to turn it back on. You should be able to see everything now.
In order to carry the same colors from gif to gif, I take pictures of each setting and edit each filter adjustment layer accordingly. I side by side compare and make adjustments if the coloring doesn't match quite right. I'm sure there's a better way to do this, but I'm not experienced enough yet.


4b.) Subtitles
This part isn't too bad. For subtitle text, I use Calibri. Myriad pro bold italic and Arial are also really good options though!
• Text
Go to the sidebar and select text. Drag yourself out a box approximately where you want your subtitles. Type whatever you want. If you don't like where it is, click the move tool and drag it wherever you'd like.
Here are my text settings:

• Blending options
Right click your text layer and select "blending options" at the top. I edit stroke, which adds an outline. I also edit drop shadow, just because it adds a little depth to the text

• Applying to all frames
Drag the text layer to the top, just like you did with the adjustment filter layers when coloring. The same troubleshooting applies.
5.) Exporting
I know there's other ways to do this, but this is the way that makes the most sense to me.
Select all frames on the timeline -> file -> export -> save for web (legacy) -> save
With everything together, you go from:
To:

I had the subtitles in two parts because my first one had the subtitle in two parts (consistency).
Happy giffing!~~
★★★★★★★★★★★★★★★★★★★★★
C.) Resources:
This is a collection of resources both for Photopea and Photoshop
Photopea Resources:
Photopea giffing tutorial by @heroeddiemunson
Photopea gif coloring tutorial by @heroeddiemunson
Photopea removing yellow tint tutorial by @lacebird
Photopea gif making tutorial by @aragarna
Photopea gif making tutorial by @ashleyolsen
Photopea changing background color of gifs by @benoitblanc
Photoshop tutorials:
Giffing tutorial by @dqmeron
Subtitle tutorial by @itsphotoshop
Blurring gif backgrounds by @clubgif
Inverted colored text tutorial by @spaceslayer
Gradient text tutorial by @tawaifeddiediaz
Gif coloring tutorial by @logangarfield
Color consistency tutorial by @clubgif
Channel mixer tutorial by @zoyanazyalensky
11 notes
·
View notes
Last Seen Blogs

darren-douglas
DARREN DOUGLAS

trackerdave
Untitled

turbo1019
TURBO
to-be-a-daintyballerina
struggling
simpati
cheese meatloaf