#picture tutorial
Photo
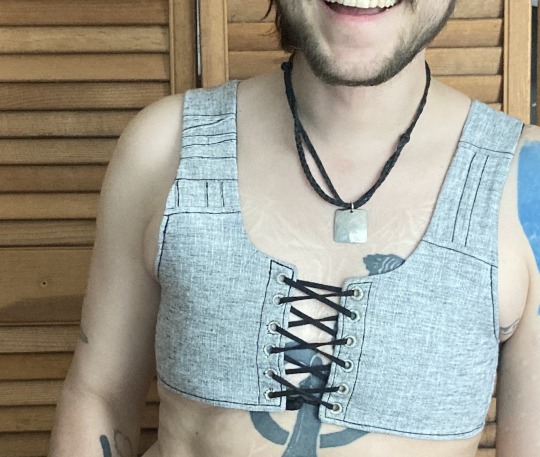
summer binder picture tutorial
this is the third binder ive made for myself recently and the first one i’m writing up. it’s designed to do a few things: 1) allow me to put it on by myself without dislocating my shoulders 2) allow me to breathe well enough to partake in normal activity 3) be cool enough to wear throughout a muggy 90-100F summer 4) not constrict my ribs in a way that aggravates my lack of connective tissue and causes intense pain.
this has become necessary even though i had top surgery many years ago, because when i had it i was extremely skinny and since then i’ve increased in size by about 50%. this has been really fucking good for my health in every single way* except that when my chest is squishy or moves at all it’s So Goddamn Triggering for me. but also since ive had top surgery ive developed and/or been made away of a plethora of chronic conditions that make every single commercially available binding option medically impossible. unbound, my chest is pretty much what you’d expect for a chubby cis guy but venturing out into the world in just a tshirt no longer works for me
*anyone who badmouths weight gain or fat bodies in the notes WILL be blocked
under the cut are a bunch of process pictures and explanations of what they all mean:
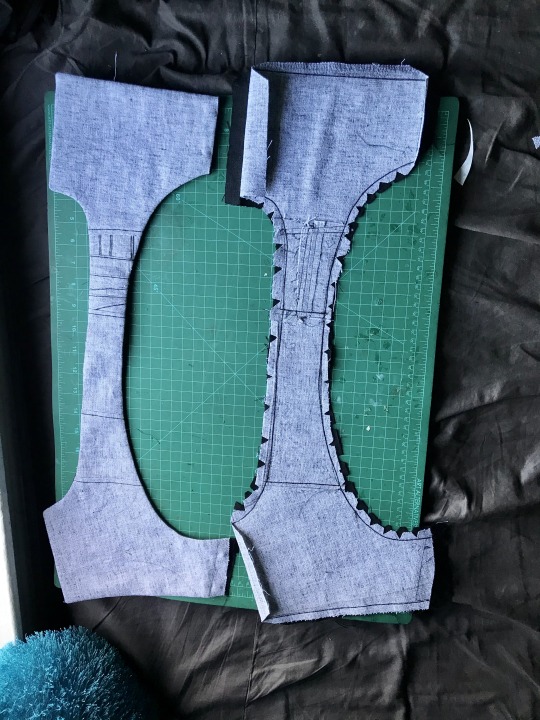
first i’ll give you a look at the pieces and measurements:
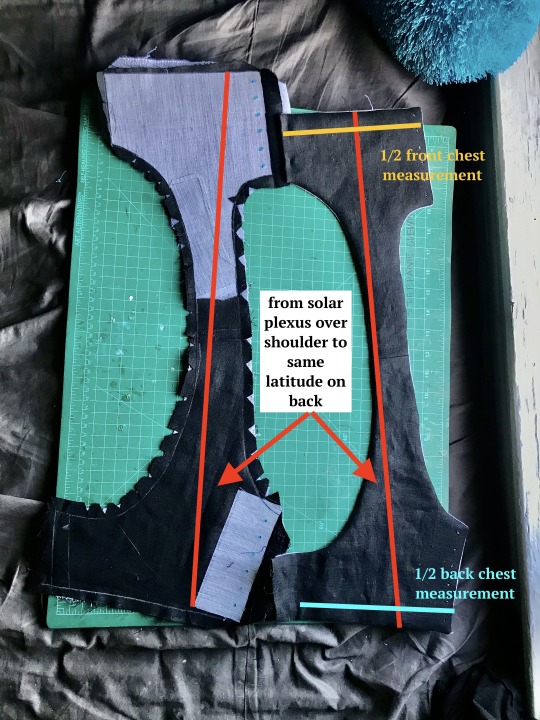
most of the seams are sewn in this picture and one half is turned inside out, allowing you to see both the finished dimensions (right) and the placement of the fusible horsehair canvas that gives this lil scrap of linen any structure at all (left)
to get your chest measurement, you’re gonna have to do some math:
first measure above and below what you want to bind. average these numbers. mine are something like 32 and 34, which average to 33. subtract a few inches--this is to allow the air movement between the laces at center front and back, critical in the summertime. i deleted 3 inches bc i like that number but you can go bigger if you want. the more inches you subtract here, the more youll be able to ratchet all your chest material down later, but at the same time you need to leave enough fabric for a sturdy garment. let’s say a range of 2-6 inches/5-15cm. by taking your measurements this way, you’re essentially measuring the chest you would like to have. that + the horsehair canvas work together to compress any squishy tissue/force anything that doesnt compress up and to the outside (basically into the armpit/lower shoulder--the chest might stick out but it will give a very puffed chest captain america pectoral silhouette)
you can also see how ive clipped my curves and pre-drilled my lacing holes. i used the marlin spike on my knife to open up the holes on the interfacing side, mainly as a way of marking them. this worked well bc the interfacing’s glue kept the linen from raveling
this is the same stage but looking at the non-interfaced grey linen/cotton blend (the black is some 100% linen from my cabbage stash). you can see ive broken the solar-plexus-to-back measurement up into a bunch of pieces to save on fabric but that’s not necessary. my original pattern was just two pieces (front and back) and chopping the straps into thirds on both sides was aesthetic
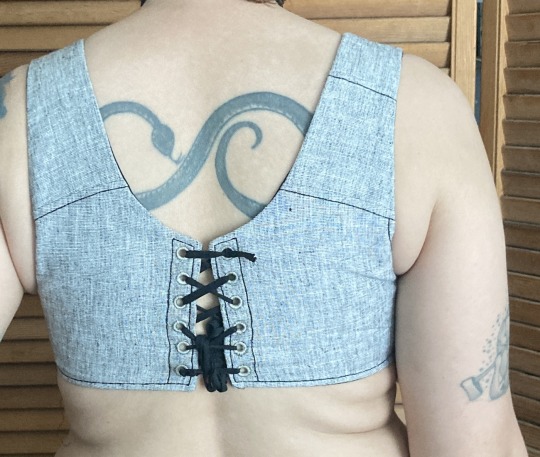
in the following picture you can really see how this is really just overgrown regency stays:
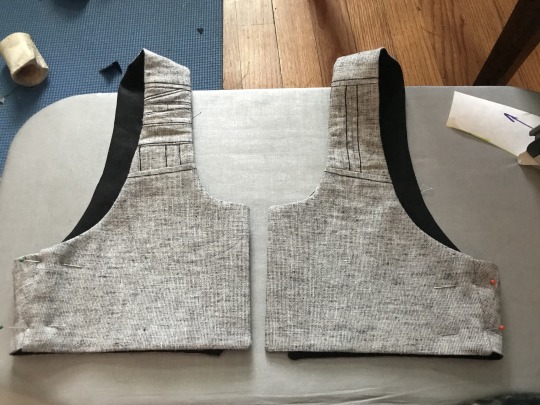
i thought about doing side lacing but didn’t think that would be comfortable for me. on the front, the side seam allowance was pressed inwards before turning to create a finished looking slot. on the back the side seam is left unfinished with an extra wide seam allowance, and is inserted into that slot.
here’s a closeup on it pinned in place (you can adjust the angle of the side seam and the fit during this pinning stage):
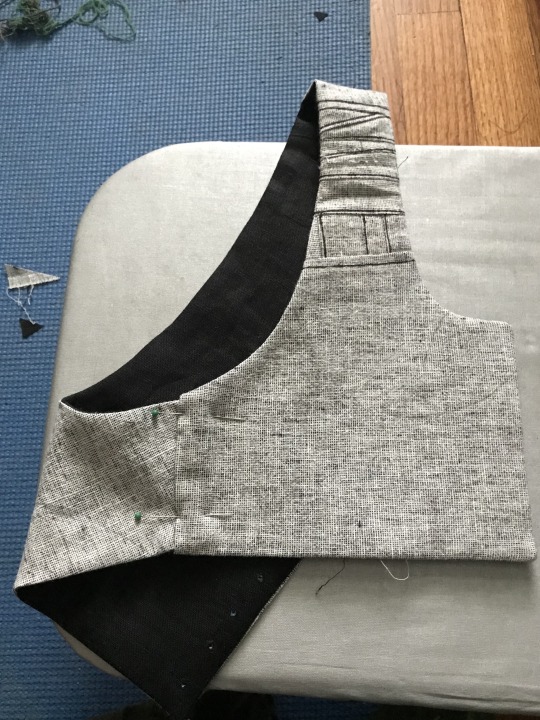
that side seam was just topstitched in place once i had the fit how i liked it, and the armhole was reinforced with more topstitching
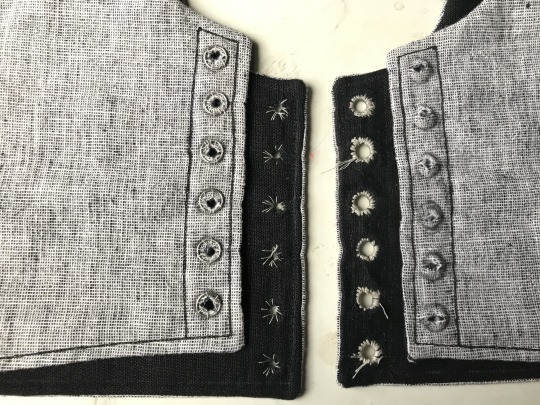
alright, time for eyelets: first, you can see how well the marking worked:
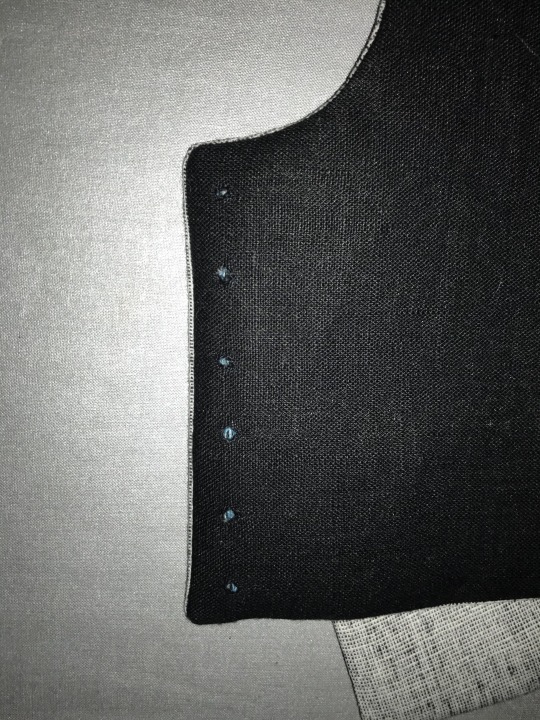
next, two rows of basted eyelets (left), one row of eyelets sewn with a doubled and waxed cotton thread (center right), and one row of eyelets opened and stainless steel rings placed (right).
next time i’m going to mark the eyelets same as i did above, but do this step differently--i’ll mark and baste the steel rings in place BEFORE widening the eyelets. this is bc i had a lot of problems keeping the eyelets on center
eyelets half done on this one! on the left are eyelets sewn with doubled and waxed cotton thread and on the right eyelets sewn with quadrupled and waxed thread. the center is basting again. i was able to force the holes back in line while sewing the eyelets but it was kinda annoying. adding a second picture that doesnt have great focus but hopefully shows how that process worked and shows the spike clearly
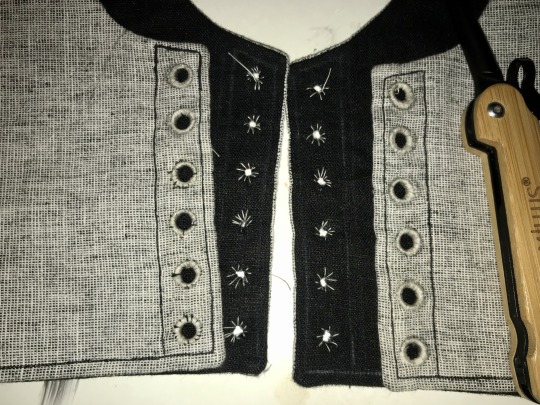

i ended up using this white cotton thread because it’s stronger than my black cotton thread (which the rest of it is sewn with). [eta: after this was first posted, i pressed the whole thing heavily, which effectively de-waxed the thread, and i dyed the whole thing a medium charcoal grey, the thread blends in perfectly on the lighter side and isn’t such a sore thumb on the darker side]
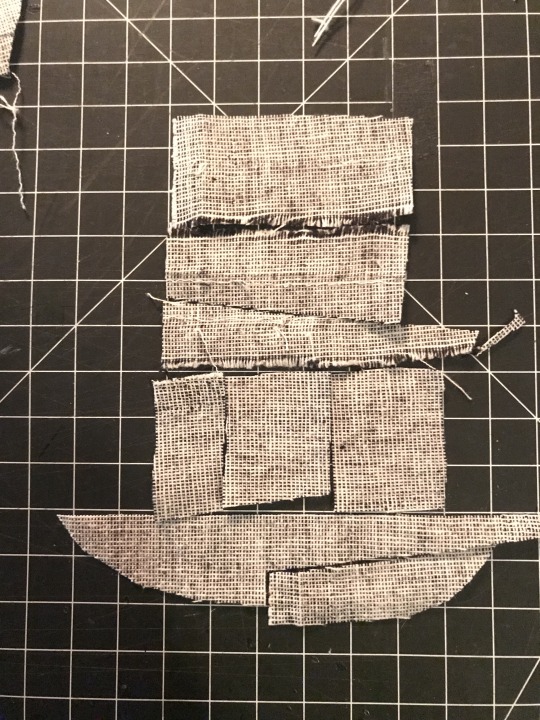
bonus: the piecing layout for that little piece of strap. the whole light gray half of the binder was made from 1/2 of one of the legs i cut off some linen suit pants to make slutty camping shorts last year and i really really didn’t want to break into any of the other three halves for this garment--i have Plans for it
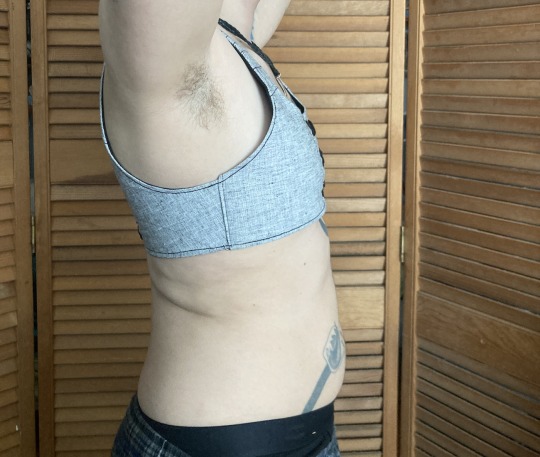
overall the fit of this is incredible. it DOESNT hurt my ribs which every zip-up garment ive been able to find (and it is difficult) does due to really thick elastic at the base. it doesnt aggravate my sensory issues with the synthetic fibers that every commercial option is made of. i can walk up a hill or stairs, or go to pt, without getting too out of breath. i can eat with it tight, or loosen the front easily and without taking it off to make eating easier and less nausea-inducing. it is reversible!
best of all the lacing at the back gives the garment enough movement for me to get it on without dislocating, and the interfacing and steel rings give it structure once it’s on. the shaping comes only from fusible horsehair linen canvas and stainless steel rings like youd use for chainmail, there’s no boning at all, which makes it very quick to sew (except the eyelets, but metal grommets would be sturdy and quick provided theyre of good quality)
there’s a small amount of gaping on the outside of the shoulder strap, which i plan on fixing with a tiny tiny dart in the armpit, i want to add pockets to tuck the laces into, and i need a better lace for the back, but it’s completely wearable in time for the 90 weather next week which is all i wanted. i’ll do a reblog when it’s perfectly finished with an update on the fit but for now it is done enough
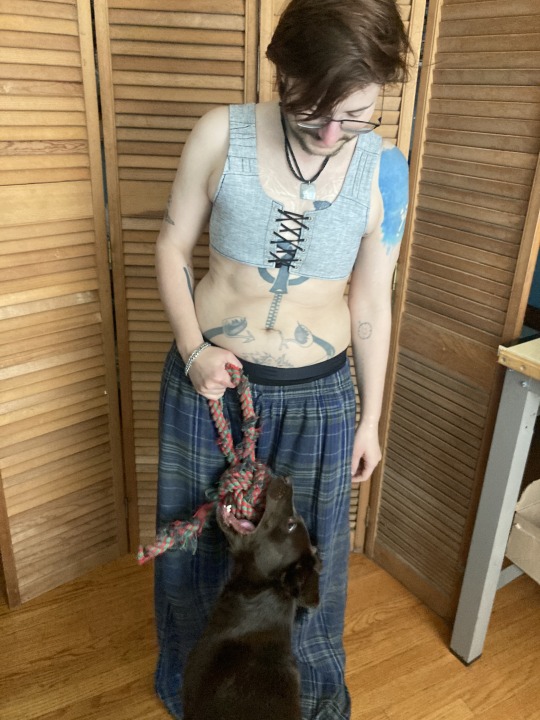
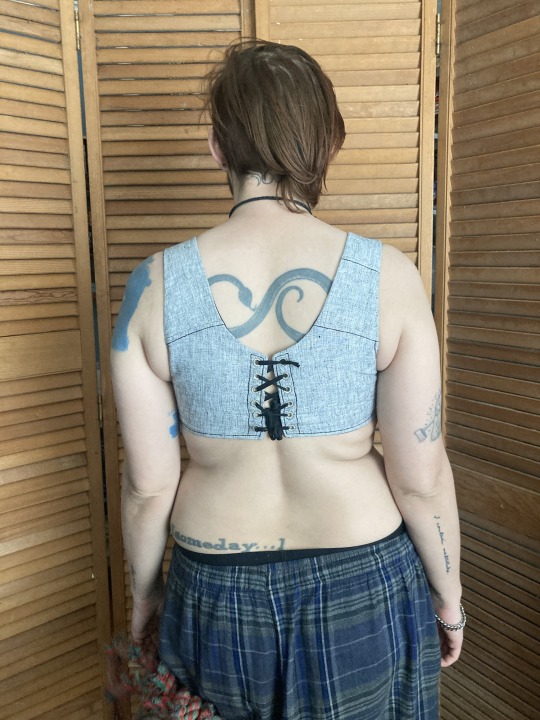
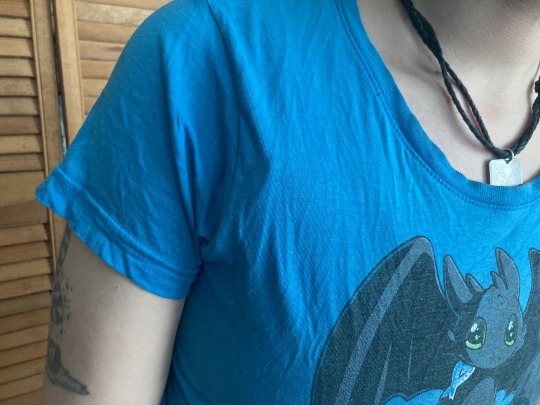
the little ridge where it doesnt lay flat against the shoulder is most visible with just a single t shirt over it. with a flannel or a sweater, it disappears, and by itself, it’s hidden in movement
eta: after dyeing this, i relaced it a bit looser in the back and that gape mainly disappeared. ive decided to leave it in instead of smoothing it with a dart because the loose fabric gives space for my chest to expand when breathing and shapes my silhouette in a way that emphasizes my shoulders
#sewing#trans#trans man#binding#body shaping#cotton#disability accommodations#physical#sensory#eyelets#fusible interfacing#historical fashion#regency#horsehair canvas#lacing#linen#lining#new build#drafted pattern#picture tutorial#piecing is contemporary too#stainless steel#stashbusting#stays#structured garment#treadle machine
1K notes
·
View notes
Text
not to be a little hater, but anytime my fav fictional guys are drawn with perfectly sculpted abs and a six pack and absolutely no body fat, i do feel rage with the force of a thousand fiery suns in my being. stop that. stop it. stop.
#raii talks a lot#this was deleted first time round but I saw one of those posts criticising (rightfully so)#those art tutorials where it’s like “here’s how to draw a man!! *picture of a body-builder*” “here’s how to draw a woman!! *model*”#put some stomach on that beast some chest. by trying to create appeal you’ve destroyed it hope this helps. leave shirou alone also
25K notes
·
View notes
Text

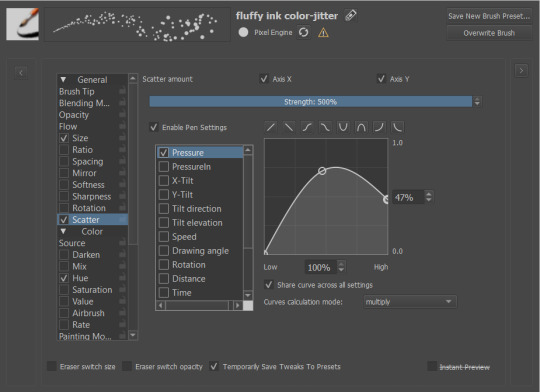
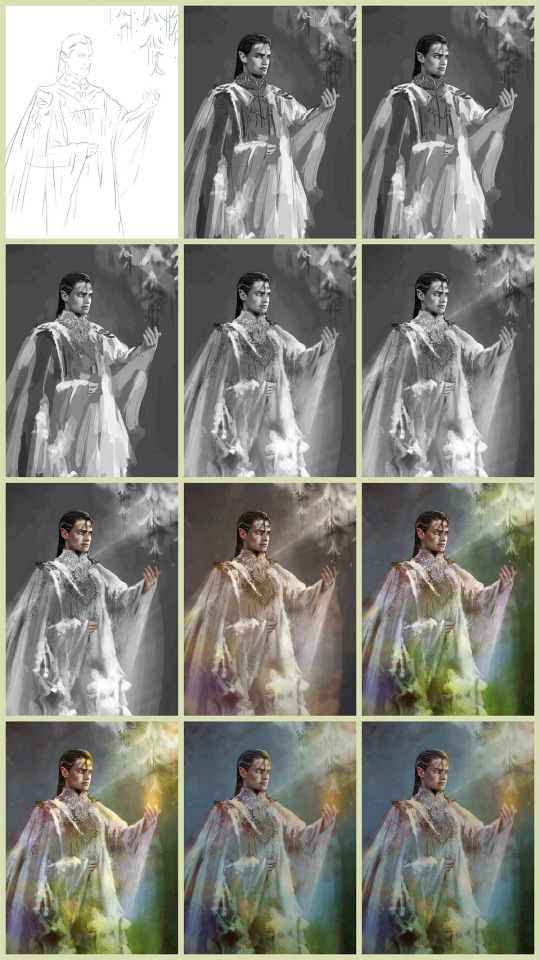
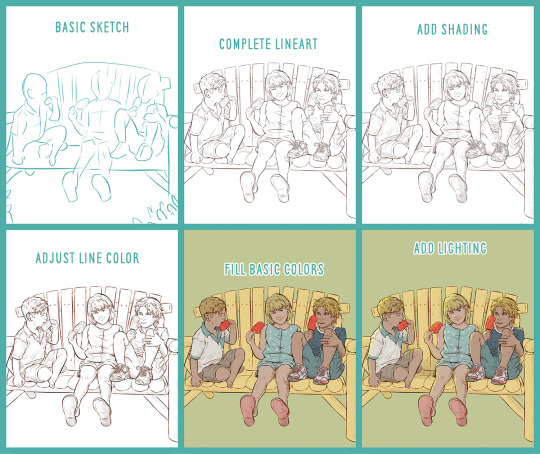
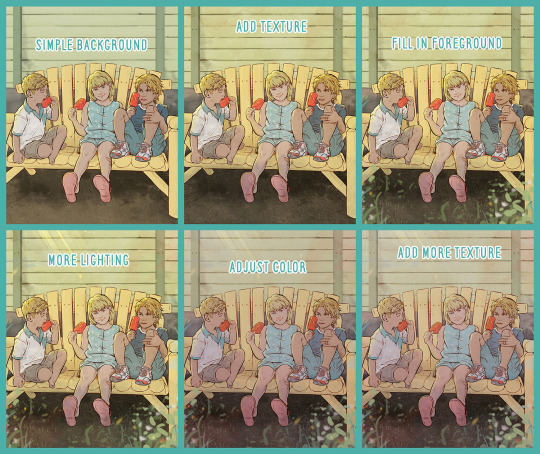
i was asked for a glitter tutorial a couple of times so here it is <3 (i work in krita btw)
if i had to break it down step-by-step:
apply regular shading
add the glitter texture. i do it by turning the scatter feature on
3. add color with a gradient map
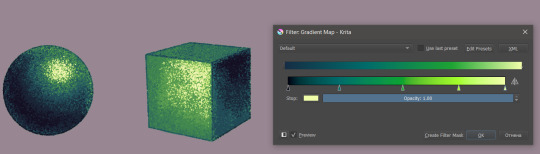
4. add reflected light. i usually go with blue because it's a good fit for my over-all very pink palettes
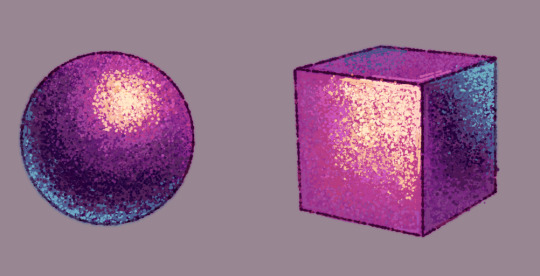
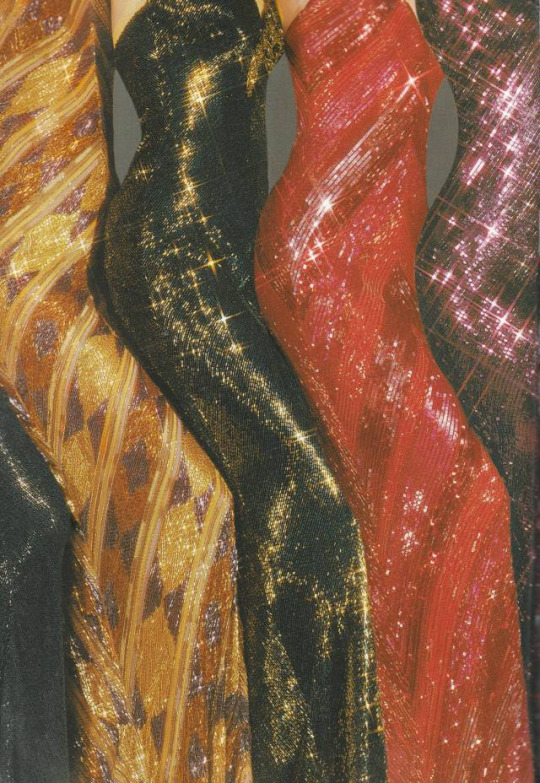
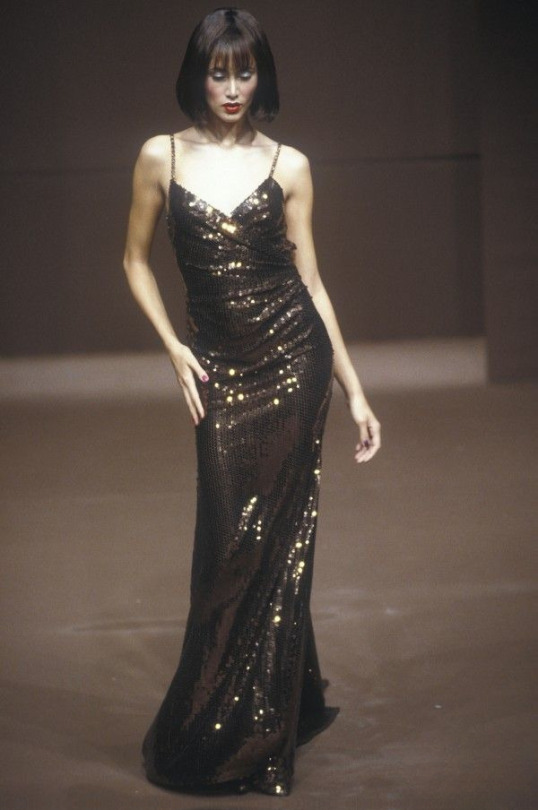
5. and in general: look at reference. glitter looks and feels very unreal and magical but it all exists irl and has been documented in all shapes, materials and lighting


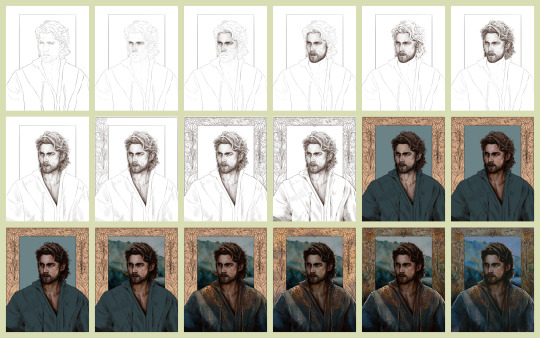
1 2 3 4
that's all thank u <33
#never made a tutorial before#hope that's good enough#let me know if i should elaborate some more on any part#my art#tutorial#glitter tutorial#krita#also if you have more reference pictures for glittery iridescent holographic materials send them my way#i love that shit it's my favorite thing in the world to look at
771 notes
·
View notes
Text
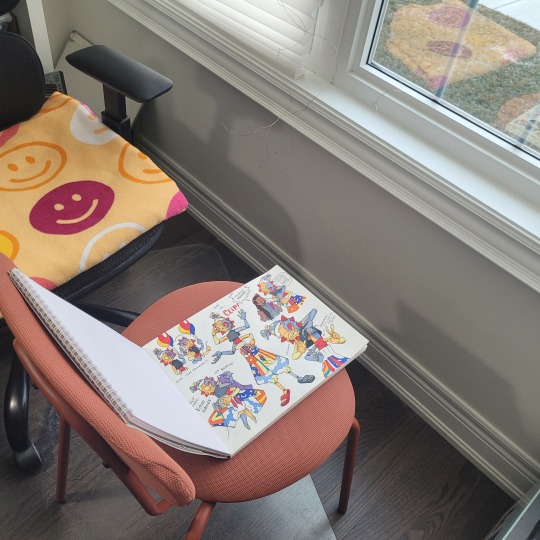
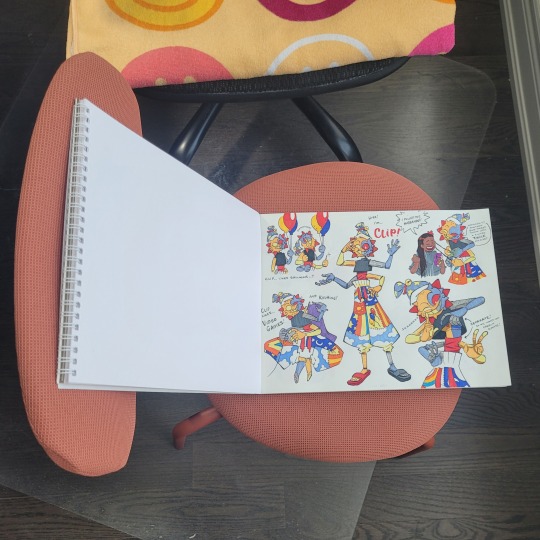
Just a collection of work-in-progress tutorials from my artworks over the years 🙆♀️ For 'educational purposes' only ;))))))

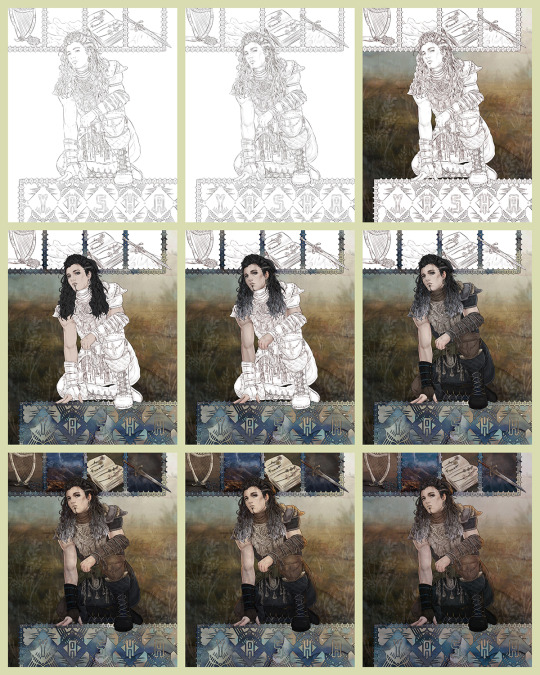
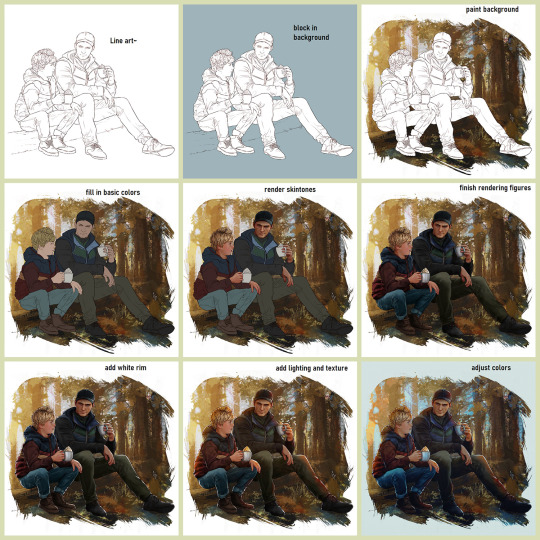
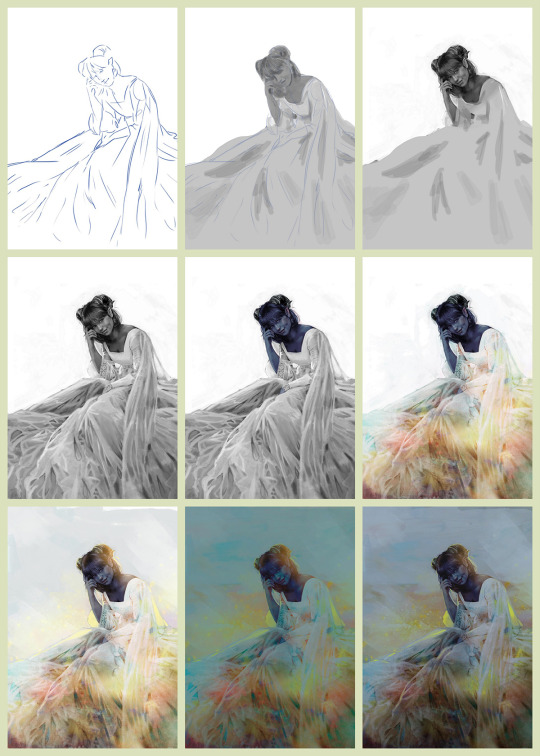
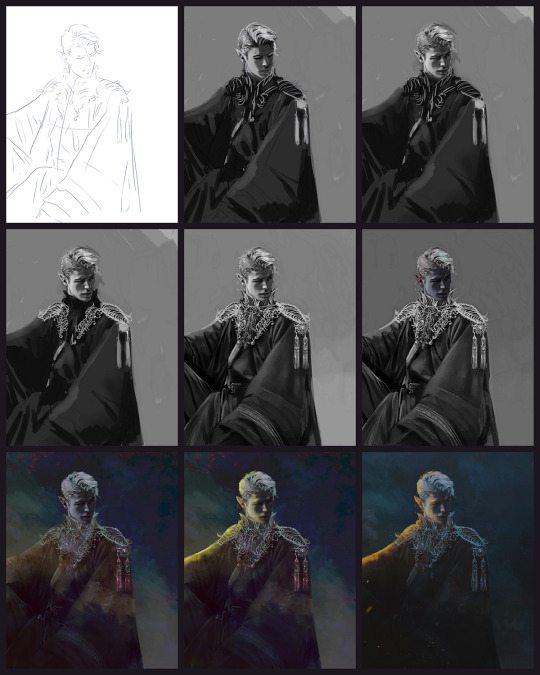
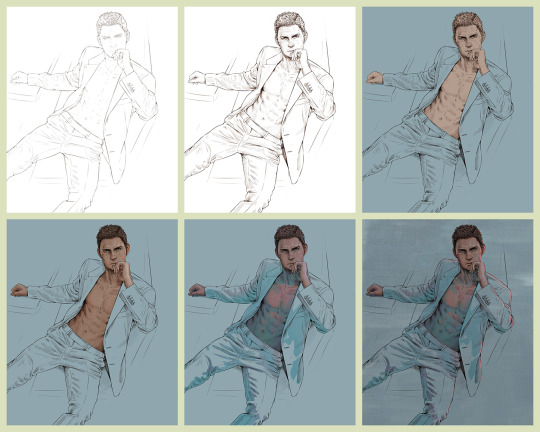
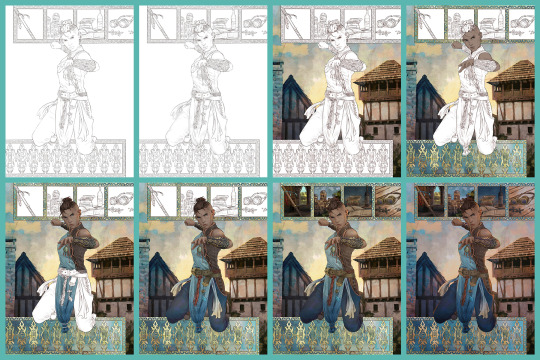
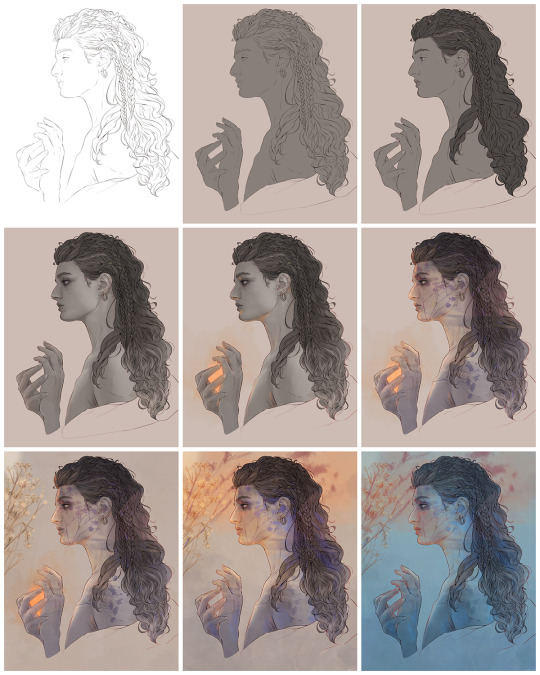
Hope that cleared a few things up 💁♀️💁♀️💁♀️
#tutorials#this is for the juvenile delinquents in the back 🔊🔊#because I know you can't read--I made this picture book for you~
126 notes
·
View notes
Text
.
#good grief im gettin a lil tired of seeing 'DONT DO THIS' kinda art videos#i very much understand its a youtube thing and that clickbait names and thumbs get the views and attention needed#but it doesnt mean it doesnt annoy me or that I cant be annoyed by it#sometimes i just see it in tutorial pictures too#but the large DONTS with red Xs near the supposed ''wrong'' way of drawing is so demotivating#people start and draw in many ways than one#its what makes art their own#but when videos or tutorial posts are made and show the ''WRONG'' way to go about it#its like scolding the new artist or long time artist with that style that they're doing it wrong and that its bad#no matter the intention its not the way to go about helping artists learn to draw#and in my personal opinion#the click bait ''DONT DO THIS WHEN DRAWING'' thing is what keeps me from actually watching the vids#i get theyre probably helpful but i don't like that I have to feel some NEED or DESIRE to click on a vid cause I feel like I did a thing#wrong or that i never should have done it at all#i wish i could see more 'here are some tips that helped me#kinda vids cause yes i would love to learn what helped you rather than being or feeling wronged for drawing in a way that isn't theirs#im rambling but i have been seeing a lot of 'DONT DO THIS' NEVER DO THIS' 'IF YOURE DOING THIS STOP NOW' kinda art vids#im speakin for myself here#but im an artist sifting through art youtube or spaces always willing to learn new ways of improving my art#i dont need to feel click baited like the next 3am don't this kid to learn how to improve my inking skills#if it was more a 'this is my personal preference and I wanna share it with my audience and maybe teach some things' kinda vid#id watch that too#but im just so tired of seeing art youtube going down this need to tell folks 'YOURE DOING IT ALL WRONG. THIS IS THE RIGHT WAY"
34 notes
·
View notes
Text
I know this is wildly different from my usual art posts BUT I have wanted to make it for a long, long time, because I love sharing any knowledge that might help someone else. SO...
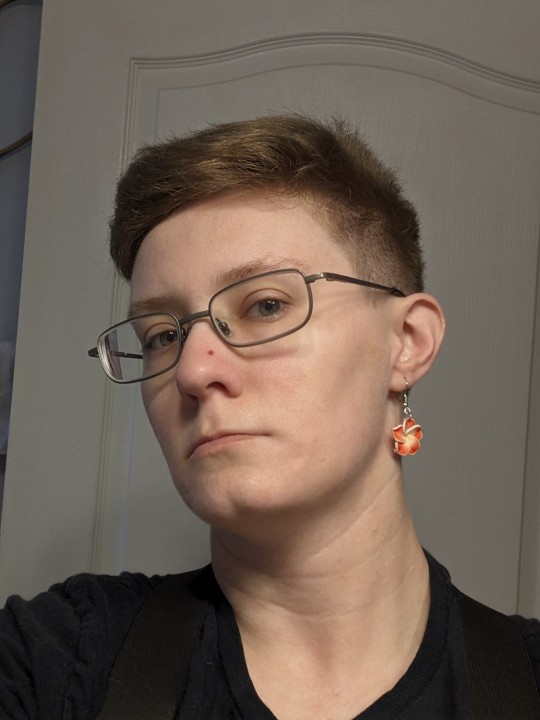
If you (A) don't want to spend more than 1 minute on your face routine, (B) don't want to completely change what your face structure looks like with makeup to have a consistent skin appearance and/or (C) have cystic/nodal/regular acne that just doesn't go away no matter what people tell you to do,
then I give to you:
My One Single Product 1 Minute Makeup Tutorial For People Who Don't Wear Makeup
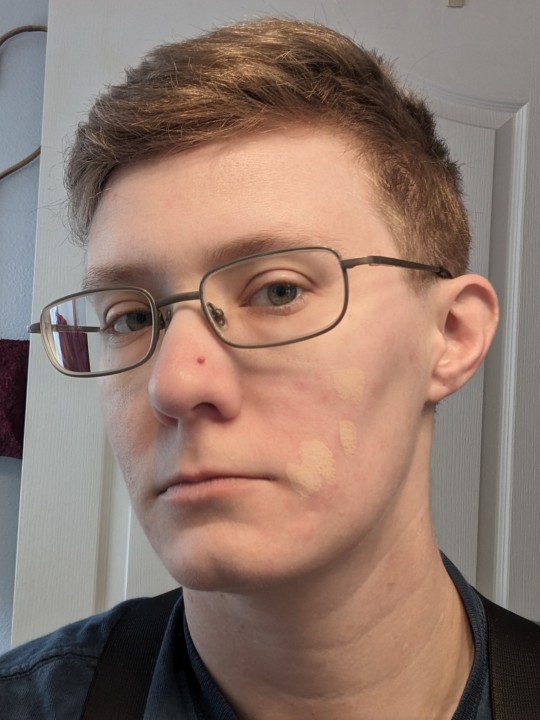
In which I bravely show you my face to illustrate
Before and after on one of my "best" skin days:
It's very likely this is common knowledge for a lot of people BUT I wish I had known it when I was in my teens and struggling with a severe skin condition I thought would eventually go away and never did.
[TLDR: It's a concealer stick that matches your skin]
No, having a skin condition doesn't mean you need to cover it. However, that doesn't mean it can't still hurt your self image, confidence, and relationships with people who give you unsolicited comments on it (because you want to throw them out the window).
SO HERE'S WHAT YOU NEED:

A concealer stick, my preference being Covergirl's CG Smoothers. They're non-comodogenic and somehow seem to help with my acne, maybe just because covering it helps me not pick at it.
Now, I am the pastiest, whitest shade of white, so I use two shades: "Fair" for my face, which has more of a pink hue, and "Neutralizer" (wheeze) for my neck because it gets even less sun than my face, and is both paler and less pink.
You might be able to get along just fine with one tone if you don't get acne on your neck and chest or have a more even skin tone, but the most important thing is to get the shade that matches your skin tone as close as possible.
To do this, either look in a mirror in the most natural light you can find and hold up your hands and arms until you find a spot that matches your face the closest, then compare the makeup in the store to this. OR.... Just bring a little mirror with you to the store.
STEPS:

1. Start with a clean face. (Wipe your face with a wet cloth if you haven't washed your face already that day)
Optional step 2. Put on a little moisturizer if your skin dries out and flakes, like mine does. I'm allergic to my cats so I use a medicated cream in place of moisturizer lmao
3. Swipe the concealer directly onto red spots, scabs, or bumps, and rub it in with your finger making a soft halo that blends in with the rest of your skin.
...and that's it.
You don't have to do your whole face. You're only adjusting the parts that stands out so they blend in and leaving the rest alone. Some days I cover a few spots, other days it feels like my whole face.
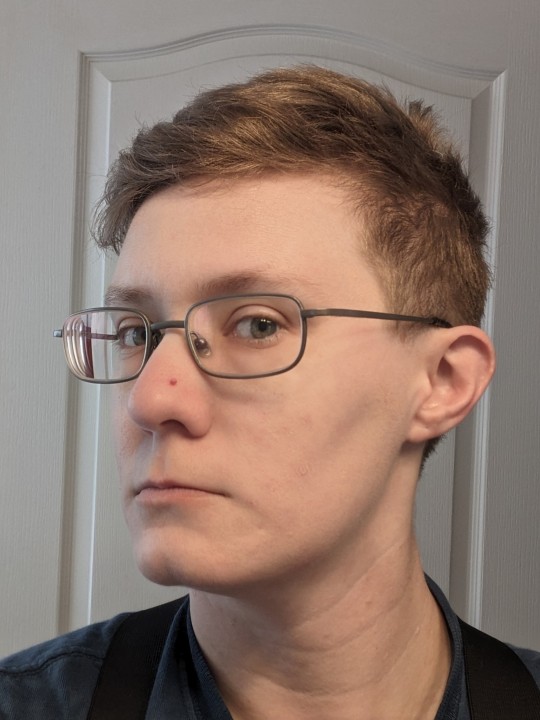
It can't always completely everything, but it makes everything much less noticeable. The shape of scabs may still be there:


It won't cover freshly bleeding wounds well, either... But it will cover the red skin around it:

Like with any makeup, always remove it before you go to bed!!! With makeup remover or a cleanser! Cheap, unscented makeup wipes work great for me.
So yeah, I'm 30 and only just now started finally seeing improvement in my own skin because I did my own research and asked a doctor to try treatments for hormonal acne instead of all the antibiotic approaches, meaning I'm on spironolactone and thus also a mandatory birth control. But hey! It's something.
Having control over how my face looks helps my confidence and self image, like controlling how my hair or clothes look. I don't feel like I have to wear it any more than I don't have to wear my hair short, I just like it that way.
I also hope that this might be able to help guys too, or anyone else who feels like they're not "allowed" to wear makeup but still struggle with the look of their own skin, since the lack of any other product means you really don't look like you're "wearing makeup".
Anyway, long post over, time to flee 🏃♀️
#makeup#tutorial#concealer#acne#cystic acne#nodal acne#no makeup look#no-makeup look#acne cover up#my face#acne tips#makeup tips#makeup hacks#“ok I've waited years to do this I'm finally gonna take the pictures” boom acne clears up for the first time in years
25 notes
·
View notes
Text
How to fix ReShade MXAO, DOF issues
Hey, guys! Recently I moved from GShade to ReShade and faced quite unpleasant issue with MXAO and DOF shaders. I was ready to give up on having any ReShade in my game when finally found a solution from @pictureamoebae. Well, it was rather a hint on the solution in the comments, but nevertheless! Thanks to @pictureamoebae for giving me the right direction!^^ After updating my ReShade I faced the same problem again and decided to make this mini tutorial:3
SO! If you’re *lucky* as I am and after installing (or updating/reinstalling) your ReShade, using MXAO or any DOF you see your game looking like this:
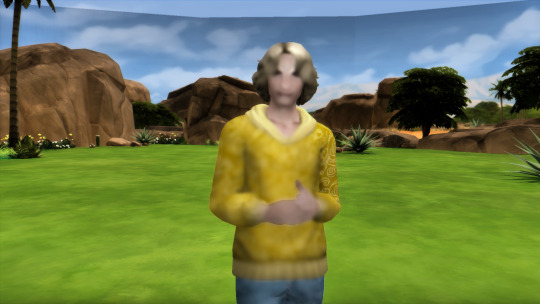
Then, here’s how you can fix it! Open your ReShade, find “Edit global processor definitions” and click on it. RESHADE_DEPTH_INPUT_IS_REVERSED most likely would have 1 annoying cupcake next to it.
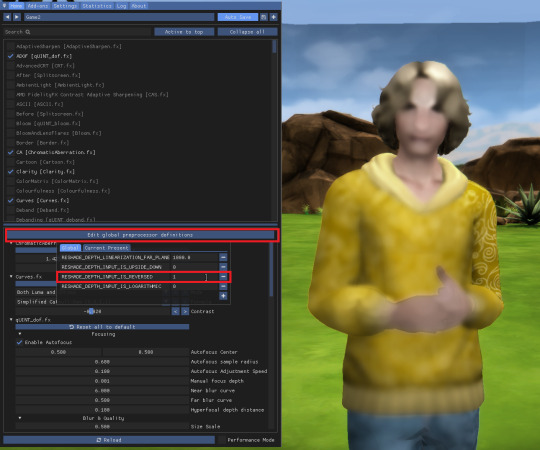
CHANGE IT TO 0! No cupcakes for this line. Not a single one!
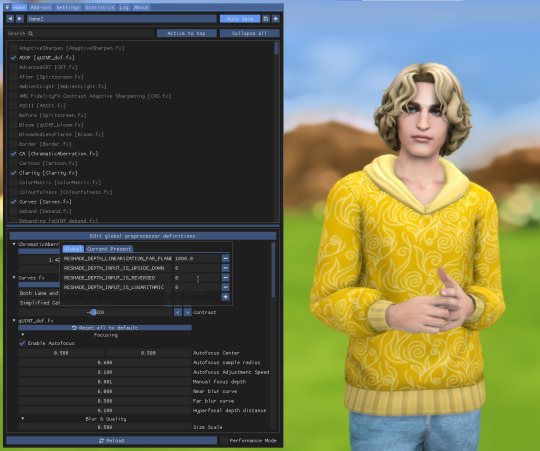
TADA!

#sims 4 tutorials#sims 4 reshade#sims 4 reshade issues#sims 4 reshade issues fixed#reshade fixed mxao#reshade fixed dof#sims 4 mxao issues#sims 4 dof issues#sims 4 reshade mxao issues#sims 4 reshade dof issues#sims 4 reshade the picture looks dark#sims 4 reshade dof doesn't work#sims 4 reshade doesn't work#sims 4 reshade fix#wistfultutorialsims4
199 notes
·
View notes
Text
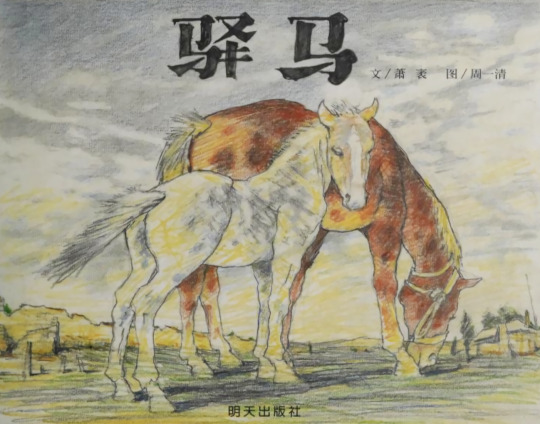
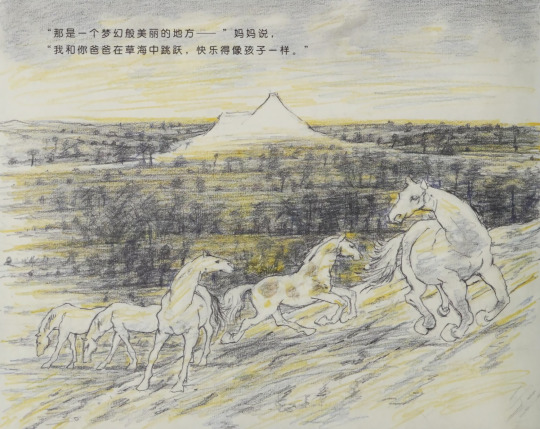
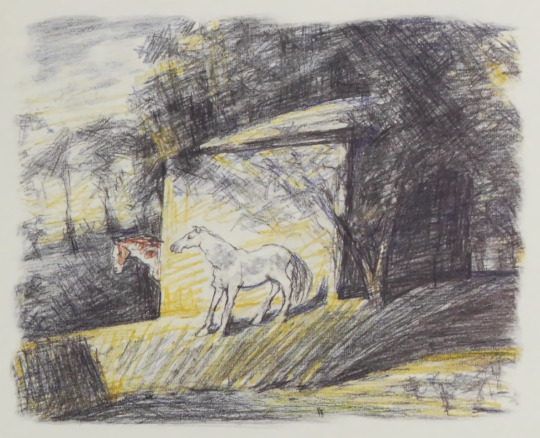

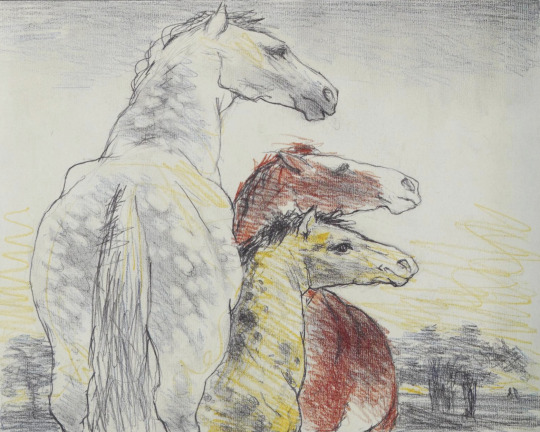
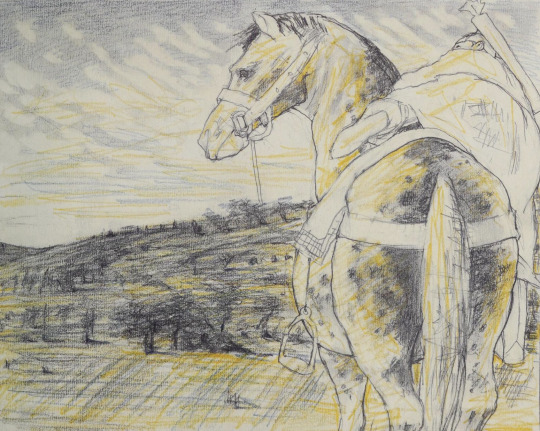
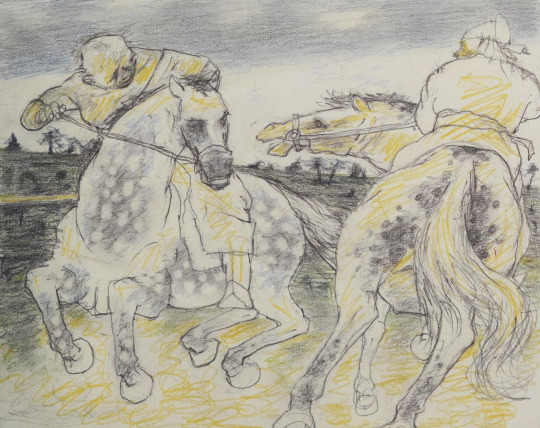
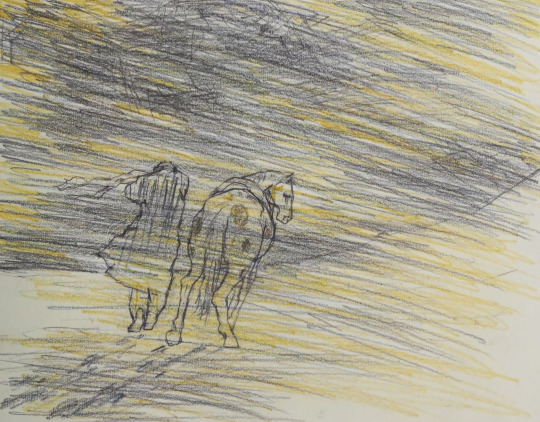
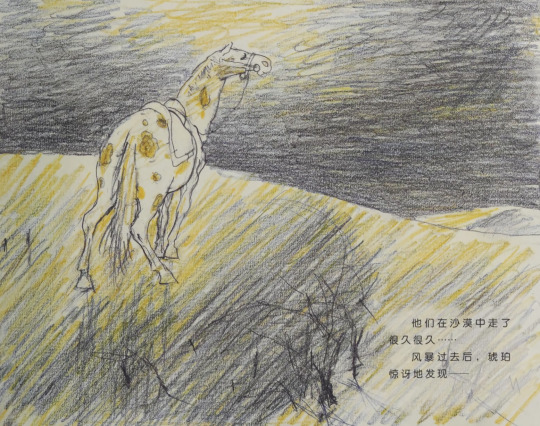
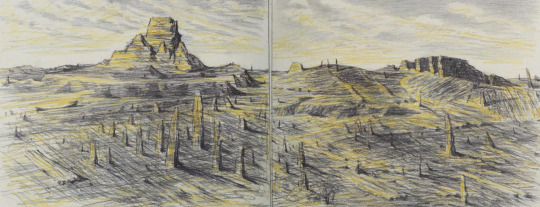
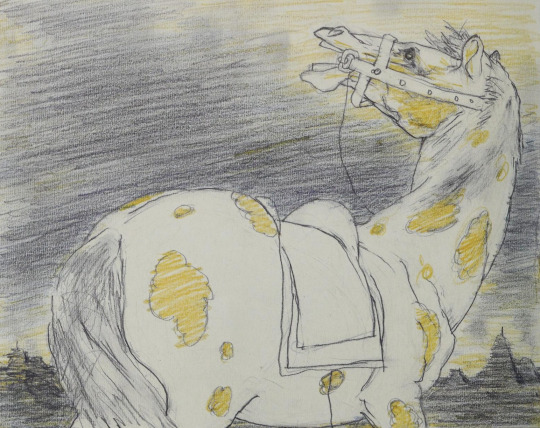
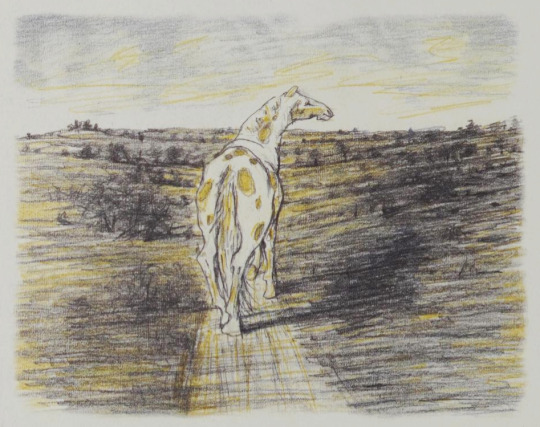
Yi Ma (2008) written and illustrated by Mao Xiao
#my first non-English book!#found on the internet archive#this was the first book to need major lighting change#and i had to watch a youtube tutorial on how to so it#but the drawings look so nice#and theyre easier to see#and the yellow stands out beautifully#today is my birthday#illustration#horse#equids#horse art#horses#china#chinese literature#chinese horses#chinese fiction#childrens books#childrens fiction#picture books#colores pencil#photopia#internet archive#mr crisp#yi ma#mao xiao
103 notes
·
View notes
Note
Hi! I love your work and would pay big fat dolla dolla bills for an art book showcasing your work! I bought that one CDQ issue just because you were featured in it. You’re amazing! AAAAH!
Thank you. That is is. 😌
That's very sweet, thank you so much !
Context : I was featured (alongside some truly incredible artists) in the magazine Character Design Quarterly a year or so ago. I talked a little about character design and what I do. It was a lot of fun !

#This image is from the CDQ site#I wanted to take a picture of the complimentary copy they sent me#but I remembered I gave it to my mother -howls mournfully-#I also did a character design tutorial but they put it in a different issue#maybe I'll post the tutorial sometime#it successfully managed to make me put my '' process '' into words#which is nearly impossible for an inarticulate cave creature like me#Had to string together sentences that were more than simply 'me draw. me draw animal. me draw animal cute.'#trashtalk#anonymous
168 notes
·
View notes
Text
Ocker’s Circular Cast-On.
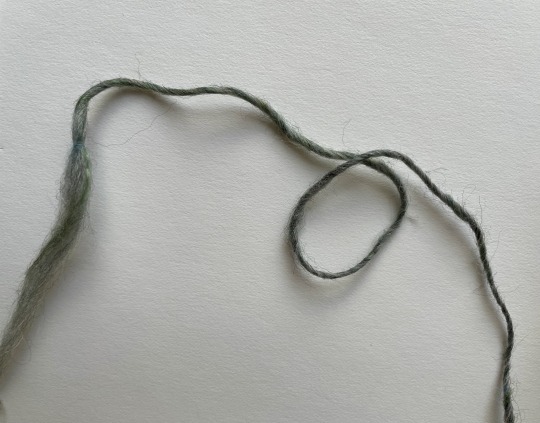
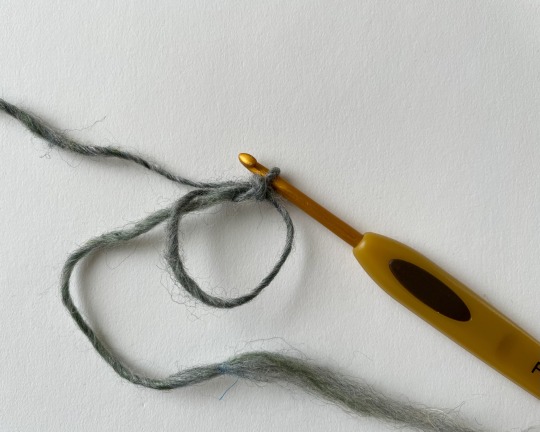
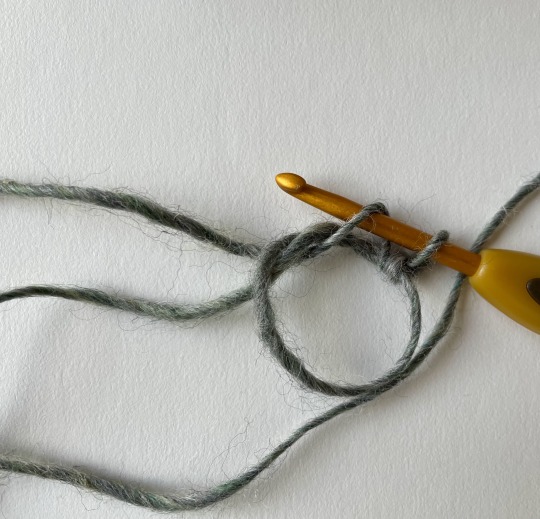
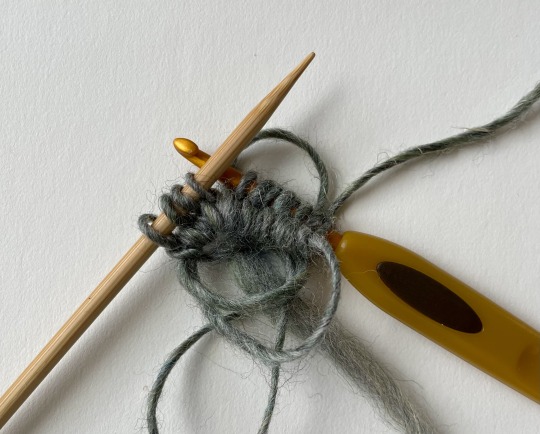
Make a loop near the yarn end. (I have the tail under the loop here, but I don’t think this is vital.)
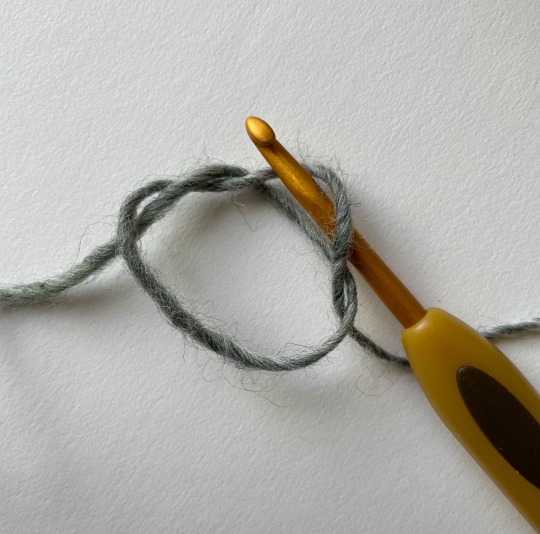
Using a crochet hook, *chain one into the loop with the working yarn. (The first chain looks the worst, having no firm structure yet, but only temporarily.)
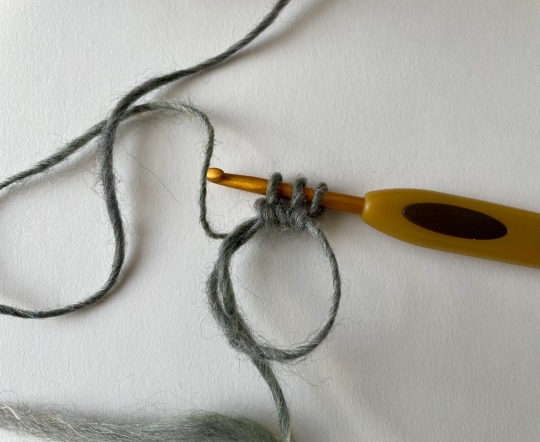
Chain one into the new chain stitch. Leave the stitch on the crochet hook and continue.*
Repeat * to * until you have the number of stitches you need.
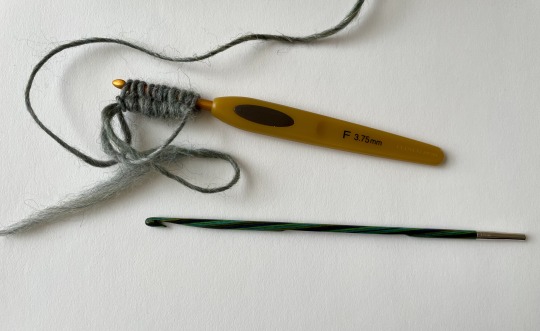
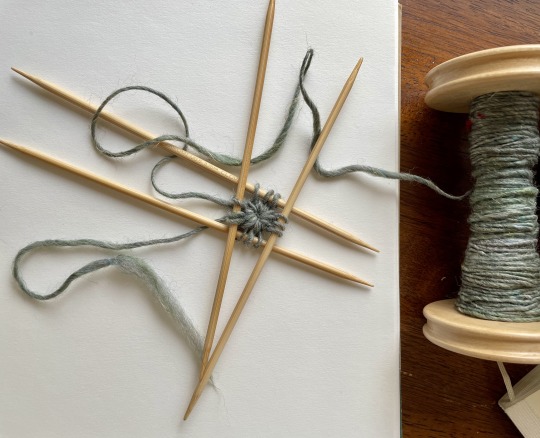
Transfer stitches to DPNs (or another knitting needle as called fro by whatever you’re working on; sometimes I use this cast-on as a really short/gathered cast-on for flat knitting, and in those cases, the pattern instructions will call for you to work flat).
Incidentally, this step can be made much easier if you’ve got crochet hooks that are built like a straight smooth stick, with no ergonomics or ornamentation—you can just slide the stitches off the non-hooked end to transfer to the relevant needle.
Once that’s done, pull the tail drawstring-style (be kind of gentle with a delicate yarn) to draw the center together, and you’ve got a nice beginning for work from the center out!
(I’m going to pull mine apart. You may be able to see why. It’s completely unfinished yarn, but it’s been on the bobbin so long the twist is pretty inert.)
#this was not supposed to be a tutorial! I had a green circular cast-on I took a few pictures of#but I only took pictures of three of the steps and you couldn’t see how the loop was made#Yarn#knit#knitting#ocker’s circular cast-on#handspun yarn#handspun#terrible tutorial#cast on tutorial#Photo tutorial
28 notes
·
View notes
Text

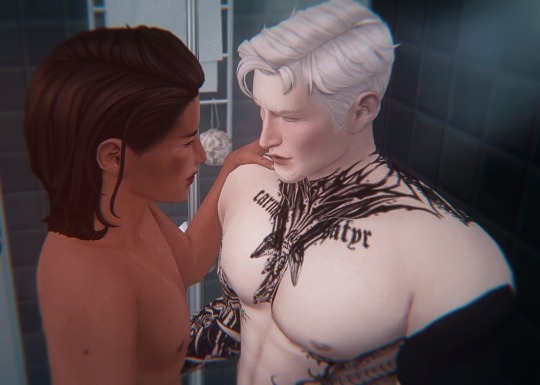
theo was washing matthias's hair :(<3
#river dipping#echthroi#theodore doe#matthias evanoff#a burning house to live in#ts4#ts4 edit#seriously suchhhhh a cute animation it’s just them washing each other <3#i’d love to start making my own animations soon just so i can add a lot of domestic animations like this to my game#with ! the correct height difference and everything#i’ve watched a few animating tutorials already actually i just haven’t put it in action#bc it’s daunting to me…. it just seems really difficult 😭#anyway this was me testing to make sure the shower worked in the master bathroom#during this cute little animation the other version of theo was stuck on a stool in the other bathroom unable to move 😔#so i have to figure out what stopped the chair from functioning properly#probably the clutter around it bc again… theo’s apt. floors are messy#but i’m really glad i got some green tile in one of the bathrooms#idk why but i picture green tile and stained glass when i close my eyes and think of his apartment#and since i fr have zero stained glass cc the tile was the only thing holding me together#….:it doesn’t look green in these photos but that’s just bc my preset messes with the colors#reblogs are OFF 🙅 theo looking gorgeous is for our eyes only#also those are my other oc’s tattoos layered over some random ones so if they look familiar that’s why 😭#carnal satyr is very fitting for matthias too tho lmao
39 notes
·
View notes
Text

A night into town after so long to cause some trouble.
#terrence suave#reginald copperbottom#doodle#this was originally just some different fabric tutorial practice but while it didn't quite work out this idea struck#let terrence and reginald have their reunion and then let them loose#will there be shenanigans or are the two just going thrift shopping#also this picture was brought to you by snow halation by silva gunner on loop
27 notes
·
View notes
Text
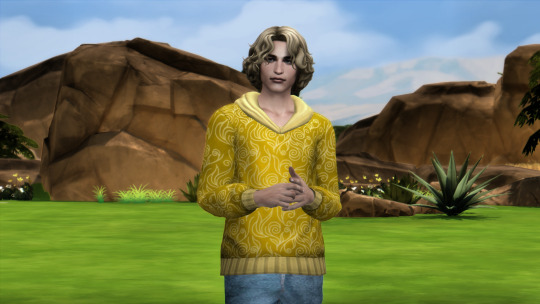
oh wow i forgot how… babygirl rauru is in the tutorial
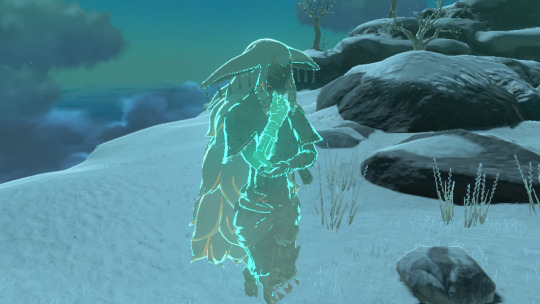
#i’m finally starting my second playthrough!#got annoyed i didn’t take enough screenshots from the tutorial and it all spiraled from there lmao#tears of the kingdom#totk#king rauru#totk rauru#those ah#….childbearing hips??#i love him so much#he’s adorable#it is so easy to picture him like that. sitting between his hands making puppy eyes
43 notes
·
View notes
Note
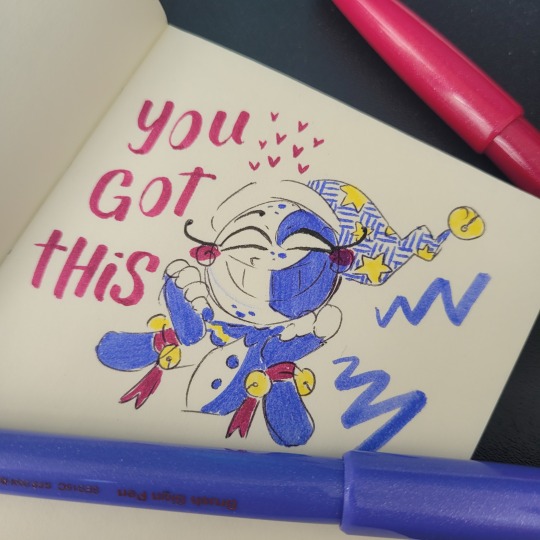
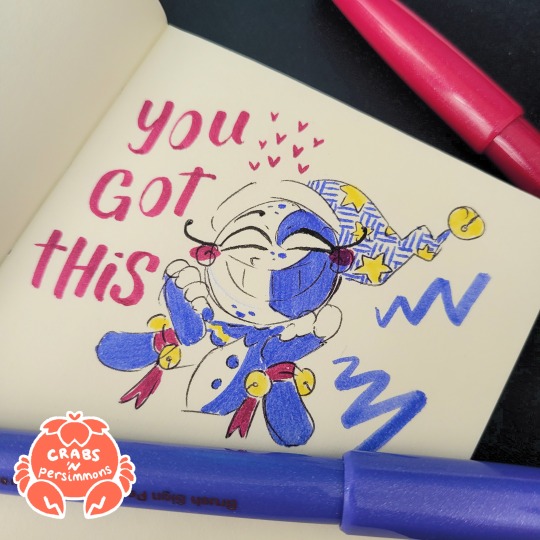
Hey Crabs! I have a small question! 🦀
How do you make the pictures of your traditional art look so good!?
They are always bright and easy to see! But when I take a photo of my drawings, they always have a blue or yellow tint to them. So how do you make it look the way you do?
(Also, I want to gobble up your art it is so yummy and pretty! Sun and Moon are so precious in your style!) ❤️
Thanks! And I hope you’re having a good day! :D
no prob! there's actually a couple things i do, so here's the tl;dr:
Lighting: i use daylight or light from a neutral white lightbulb
Editing: i use my phone's built-in gallery app to lightly edit the colours so they're clear and as colour-accurate as i can get (from my screens at least)
and i'll go into a little more detail with some examples under the cut
1. Lighting
a habit of mine that i got from my IG days (ugh...) is using daylight whenever possible. daylight just lights up the whole area more evenly and relatively neutrally. this is my set up:
glamourous
basically, i put the artwork near a source of natural light and prop up a reflector (in this case, a blank page from another sketchbook) that helps distribute the light more evenly across the page, so that even the side that is furthest from the light gets some light that bounces off from the reflector. i don't always have a reflector tho, like if i'm only taking a picture of a small drawing and not an entire page, there's no need.
now, if it's dark, then i rely on my desk lamp, which uses a neutral white lightbulb. regular lightbulbs come in different temperatures, from warm to neutral to cool—so that might explain why your photos are coming out with a yellow or blue tint. warm lights are common in houses because they're cozy, while blue lights are common in working areas because, like daylight, they keep us more awake. neutral white is in between the two.
here's an example of my Moon doodle that i did recently under different lights: warm (from my bedside lamp), neutral white (from my work desk), and daylight
(i don't have any cooler lights in the house, so i couldn't quite get the blue tint 😅)
now technically, NONE of these are colour accurate. so i always follow up with some light photo editing
2. Editing
now, i have 2 personal rules when it comes to editing my photos:
1) try to make it as close to the original as possible; and
2) don't spend too long on it
these are just my personal rules because... one) i'm lazy and i don't want to spend too long fixing every thing in my drawings, and two) i feel it is dishonest for me to make dramatic changes to my traditional art and still call it traditional art. whenever i do make digital enhancements (like colouring it digitally) i will tag it so no one would mistake it as purely traditional art. that's just me tho! there are no rules when you're having fun with your art and mixed media art is a thing! so do whatever you find fun and enjoyable.
also, i will try to make it as colour-accurate as possible, but i also recognize that not everyone's screens are calibrated the same way. my phone is set to a "Natural" colour setting, but on my new laptop (which i haven't figured out how to calibrate yet) is vibrant as all heck (like oh my gosh, maybe i need to start tagging everything with bright colours now, because what if someone else's laptop is this insanely vibrant and saturated??) but either way, i try not to spend too long on it because i know i won't be able to accommodate every screen.
anyways, for what i actually DO... i kinda just play around with different settings. if i took the picture under daylight, then there's not too much i adjust, usually it's the warm colours that are desaturated, so i try to make the reds pop more without effecting the blues too much.
or for my doodles, sometimes the doodle on the other side of the page is slightly visible, i'll tweak the lights and shadows and contrast levels until the background is clear enough (as long as it doesn't disturb the doodle i'm taking a photo of)
now, if your photos are coming out too yellow or blue because of your lighting, you can adjust that by tweaking the Temperature setting. here's an example of that warm Moon doodle:

already looking a little better, right? so don't worry if your photos aren't coming out accurate, there are work arounds!
here's the before and after of the Moon doodle by the way:
despite having daylight, i still needed to adjust the colours. specifically i needed to brighten up the reds and yellows, and bring back the page's natural yellowness. i also tweaked the Definition setting to make less hazy (sometimes i like the haziness tho, so i'll leave it as is sometimes).
and one other reminder: it doesn't need to be perfect, it just needs to be. a big reason why i keep coming back to traditional art is the fact that i can't control everything. i can't undo lines. i can't move things around. and i can't take the perfect picture. but it doesn't need to be perfect. drawing and sharing my art is supposed to be fun! and i don't want to put any barriers around that, or else it becomes unnecessarily stressful.
all that is to say, try out these tips if you want to, but don't treat them as hard rules and don't focus on trying to achieve perfection. just go have fun!
#ask the crab#sorry this took so long!#i wanted to make sure it was clear#cuz like#i totally understand the struggle of trying to take good pictures of your traditional art#like you worked so hard on a drawing#but then the photo ruins it 😅#so i wanted to share what i know so it might help#there are definitely more in-depth tutorials out there#this is just what i've gathered from some of them plus some advice from a food photographer friend of mine (her stuff is actually legit tho
19 notes
·
View notes
Note
Your swsh art always makes me want to replay the game because i love it and its my favorite pokemon game and every time i play another pokemon game i think of it how i miss certain elements from swsh. Then i boot up the game and im once again caught in the 1 hour 40 minutes hand held intro and im like ah- now i remember why i have been playing other pokemon games instead of this one. Happy (late?) birthday!
you don't want to listen to hop? you don't want to hear him teach you about type matchups? you don't wanna let him cheer u on...? 🥺 waa....?
#ask#bakuspeech#I am joking to be clear lmao#thank u happy bday to me !!#tbh I got real used to pokemon overexpositioning since sumo lol. it's kind of a boon for me#cause I'm not a Gamer™ and my brain takes stuff on Very slowly#so the tutorial stuff and the cutscenes give me time to catch up. also it's still fun to see these guys run around#I am in fact here for these guys lol. weird thing to say about the game built on and with an essential focus on the pokemon I know#I just like humans! I just like watching hop running circles around my player character all excited#and leon being a dick to his hometown people when they're expecting 'leon' back and they get the champion instead#and you get to see sonia used to dealing with it but the frustration never fully fades and how close she is to hop and that picture's bleak#listen this is my bread&butter lol. leon really doesn't show up That much himself around the game he's a shadow casted over the story#it's always interesting to me! does Not mean it's not sluggish to other people who want to play the game lmao#but I like it. also the tutorial at least the first time around was necessary to me bc the difficulty scales way up later on lol#it's a very good first pokemon game I maintain this. sumo never managed to teach me the same way swsh did#I still care drampa tho thank u drampa for being real I love u#lmao it feels like saying I'm not a Gamer™ violates some tenets of having adhd somehow. but its just the case here#the main genres I play are 'itch games tangential to the haunted ps1 people' and 'popcap-style casual games'#my sport's figuring out shapes n movin my stylus sadly. well not sadly why would that be sad
22 notes
·
View notes
Note
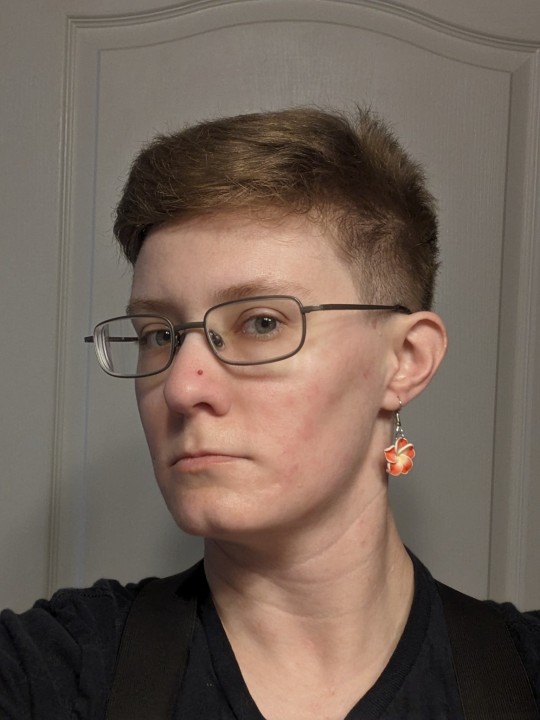
Miss TA, what do you look like?
TUTORIAL AGENT- I'm similar to the Ancient Reptilian Brain and the Limbic System in that I don't often give myself a visual representation. But if you'd like one...
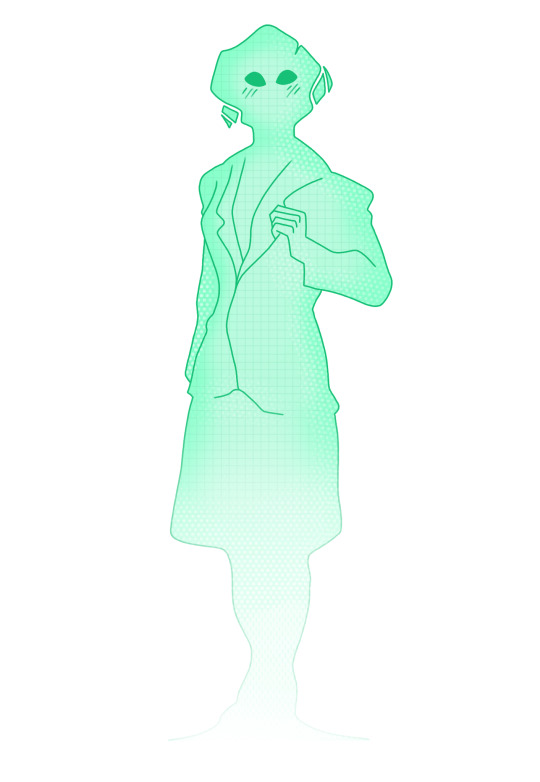
#(fun to anthropomorphize her! I pictured her very businesswoman-like but without any real defining features.)#(she’s like. digital. bc that’s fun.)#ask#/tutorial agent
74 notes
·
View notes
Last Seen Blogs
trilobel
Trilo's fanarts

msrcell
Sin título

raventreehouse
Ravens-treehouse
sincomplicacion-blog1
Complicado...¿Yo?

vterry817
Buy Verified Binance Accounts