#turorial of some sort
Note
I love all your edits!
Do you have any favorite psds that you are willing to share? Or tips on how to make gif colorings looks as nice as yours? 🥹
Hi, anon! Thank you so much! I am really happy that you love my edits. I really appreciate it! (°◡°♡)
To answer your question, I only use one PSD file nowadays for all the edits I make so sharing this one PSD I got for myself would be a bit uncomfortable. I hope you understand. Hehe. ( ̄▽ ̄*)ゞ
But no worries, because I thought of sharing LUT files that you can use as a basis for your color grading. I will only share one LUT file for this post but I might try sharing other LUT files as well in the future. In that way, you can achieve coloring with your own style. I will also be sharing which adjustment layers I use and what are the typical settings I apply.
SOME REMINDERS THOUGH:
I use PS 2021 but all adjustment layers are also available on older versions.
I AM NOT A PS EXPERT. I learned to use PS by reading/watching tutorials. All the things I will include in this post are just my preferences for my coloring. Take anything I said with a grain of salt.
I applied and tested my coloring on anime edits only. You may use it for real-life GIFs/photos but you may want to reduce the opacity or use a different blending mode to make it work.
My coloring deviates a lot from the original coloring most of the time. Some people may find my coloring weird so always keep in mind that this is not the best coloring practice.
ALSO WARNING: BAD ENGLISH AND LENGTHY EXPLANATIONS XD
To start, you may download the LUT file HERE.
This file is basically a compilation of adjustment layers that you may want to apply to other images. So when you use it again on another project, you can simply load this single file instead of the multiple adjustment layers. The disadvantage of using LUT file is that there's no room for further adjustments of the colorings within that file. In my case, I used it as an advantage. You may call it my secret recipe for my coloring. LOL. You can use it but there's a limit to the modifications. Anyways, this LUT file contains multiple layers which is a product of my trials and errors for the past few years since I started editing again.
You may consider using this LUT file as your training wheels. Once you understand further the complexities of the adjustment layers, you may no longer rely on this coloring file. I also did this when I started wanting to develop my own coloring style. And once I understood the basics of the adjustment layers and how to replicate the colors that I had in mind, I got rid of the LUT files and started making my own.
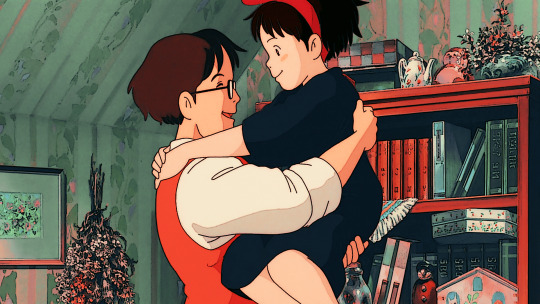
Now, let's use this image for coloring sample:
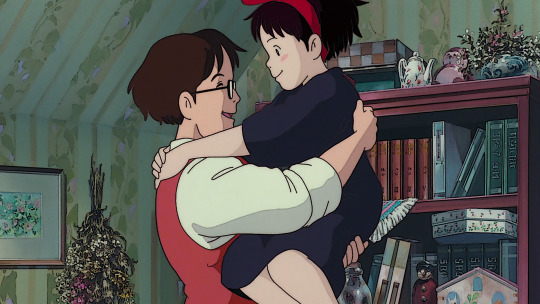
You can also download the image so you can follow my steps easily. This version is already sharpened.
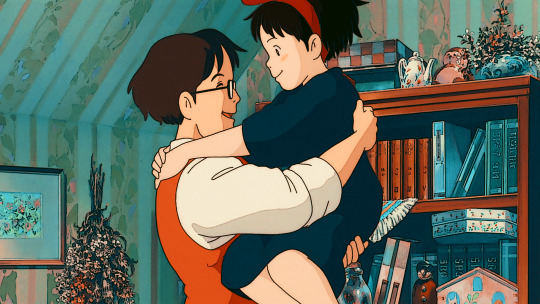
So when I apply the LUT file for this image, this is how it's going to appear.

This color grading has the teal & orange effect. Of course, this is not the final output. This will be the backbone of our coloring as we add more adjustment layers. In my case, I always start with cyan and orange and then make the necessary changes depending on the series and the atmosphere of the image used.
But before we proceed with the adjustment layers, I want to emphasize two things you can explore when it comes to adding adjustment layers. Being aware of these two features of PS actually expands your coloring options exponentially [don't get fooled, I may sound like an expert but this is just really based on my personal experience. XD] Anyways, below are the two:
Opacity - It doesn't have to be black and white when it comes to coloring. You may choose the grey side. If you think the adjustment layer you are trying to add is causing an unpleasant effect on your image, maybe try to lower the opacity first and see if that will help.
Blend Modes - you may want to explore blend modes other than the Normal mode. If you are not used to changing the blend modes, you can check videos posted by Unmesh Dinda on his YouTube Channel. He explains really well when it comes to Photoshop features. I learned a lot from his tutorials and I am now applying these learnings to my current coloring style. You may check this video for starters. He has other videos about blending modes, too.
ADDING ADJUSTMENT LAYERS:
Levels Adjustment Layer - this is always my first adjustment layer but I also modify this in the last part. There are presets available but I am not utilizing those. Instead, I go to Auto Options. This feature is very helpful in heavily dark or bright scenes. Depending on what color correction you used, you may have extremely varying results.
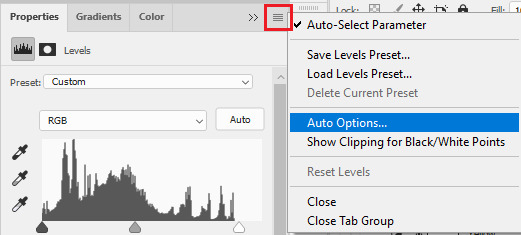
Once you click Auto Options, another dialogue box will appear:
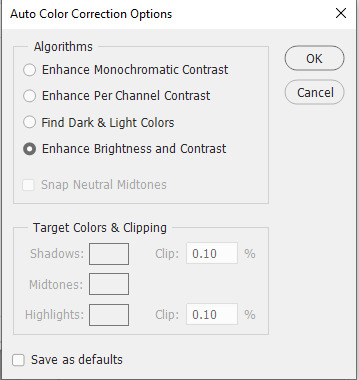
The default option is Enhance Brightness and Contrast. We will choose that option for now then click OK. [We will go back to this layer once we are done with the other layers.]

Color Lookup Adjustment Layer - this is where the LUT file comes in. Once you add the layer, click Load 3D LUT then click Load 3D LUT again on top.
Select the LUT file I shared.
Selective Color Adjustment Layer - for this layer, I always separate my adjustments for different colors and don't do the adjustments for all colors in one layer.
First Selective Color - I will rename the layer as RED and set the following values: CYAN: -100, MAGENTA: -11, YELLOW: -32, BLACK: 15
You can explore the levels of Magenta and Yellow but ultimately, I always set Cyan to -100 and Black is +15. Of course, you are free to change these two but these are my preferred coloring for shades of red. Setting -100 for Cyan gives this warm coloring.

Second Selective Color - I will rename the layer as YELLOW and set the following values: CYAN: -100, MAGENTA: +40, YELLOW: +30, BLACK: 40
Cyan is also set to -100. This adds more warmth to the tone of the image. Then you may change the remaining sliders to your preferred values.

Third Selective Color - I will rename the layer as CYAN and set the following values: CYAN: -60, MAGENTA: +20, YELLOW: +100, BLACK: +40
I don't have a rule for CYAN. This really depends on the color I want to achieve for the shades of blue. Depending on the values, you can make your color look blue/cyan/purple. In this case, I wanted to tone down the brightness of the cyan.

Fourth Selective Color - I will rename the layer as Black and White and set the following values: BLACK: +5
This is just to slightly darken the black shades of the image. I label it Black and White because I sometimes change the value of Black for White but in this case, adjusting the white doesn't help so no changes were made.
Gradient Map Adjustment Layer - I do not use this layer all the time. It really depends on the image. When I wanted to add another shade of colors to the image, that's the time I would use this. And I use a maximum of 2 gradients only.
The image looks okay now to me but let me add some gradient just to show how I use this layer. I use Gray_10 which is one of the preset gradients available in PS. Then I check the Reverse option to emphasize the contrasts of the colors. Then I set Blend Mode to Soft Light, Opacity at 100%.
Then I add another Gradient Map Layer. I use Purple_17. In this case, I didn't check the Reverse option.
Then I set Blend Mode to Soft Light, Opacity at 35%.

Hue/Saturation Adjustment Layer - this one is optional. I use this on my gifs to increase the warm tones of the image.
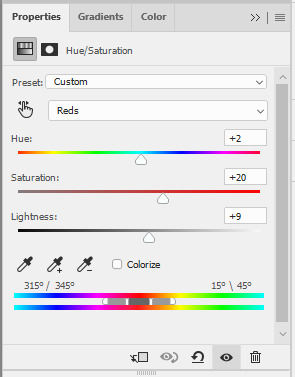
I only change the values of Red for additional warm tones.
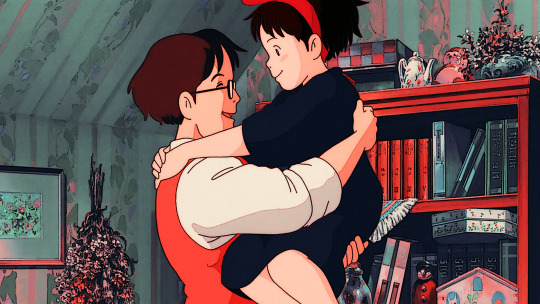
At this point, I also wanted to make the cool colors lose saturation, so I added another Hue/Saturation layer. To have a grayish effect on cool colors and make the reds stand out even more.

Brightness/Contrast Adjustment Layer - you can use the Auto function and then just make the adjustments you want.
In my case, I set the Contrast to -50 most of the time, then the Brightness varies. For this example, I set Brightness to +8.

Then last but not least, I made some slight changes to the Levels Adjustment Layer and then adjusted Brightness to -3.

To compare, I will post the original GIF, with LUT file only, and the final GIF coloring respectively:
I hope this helps, anon!
I might create a specific tag for this kind of post and just include it on my master list pinned post so it's easy to find. Also, if you ever use this coloring style or the LUT file as part of your coloring, there is no need to credit but if possible, please tag me in your creations (#userartless) so I can see how you personalized the file and made it your own. ^^
7 notes
·
View notes
Note
I love your hoard and jewelry posts! Your vibes are so soft and charming and calming 💕
Do you have any tips on jewelry making? All your stuff looks so cohesive and well built, like it looks like its made to last. And i love all the beads and charms you use
♡♡♡ Thank you so much!! ♡♡♡ That's very thoughtful of you to say!! (୨୧ᵕᴗᵕ) .·₊˚❀·₊˚✩˚₊·.<3
ᕦ(^ω^)ᕤ I guess some tips I might have for sturdy jewellery-making would be tying good knots and using thick string when it's possible (or braiding together thinner string). Fishing line is also pretty strong.
ᕙ(>◡<)ᕗ I often tie knots in between beads or bead groups to make sure they stay in place, and if the necklace were to break, only some beads would fall off, not all of them at once.
ᕦ(òvó)ᕤ Another thing that I often do for jewellery strength is a bit of sewing. If there's anywhere I want to reinforce or any loose small ends I want to keep down, I'll take a needle and thread in a matching colour and just stitch them down.
ᕙ(-ᴗ-)ᕗ Some sort of fray-stop (it's a type of fabric glue to prevent frayed edges) can also be helpful, because it's often washable and not very visible.
I tend to graviate towards earthtones and I enjoy limited colour schemes, so that usually helps with consistency. I like to keep warm tones with warm tones, and cold tones with cold tones. I do also often use beads made of more "natural-looking" materials, like wood, crystals or stones, as well as metal and glass.
I'm able to find most charms and stuff at my local craft stores or fabric stores, I also sometimes make them myself with wire, clay, buttons, shells or stones. I've also made a few keychains into pendants before as well.
You can basically make anything into a pendant, if you wrap it with wire or string well enough. There are plenty of macrame or wire-wrapping tutorials online.
I also often add adjustable closures to my necklaces. The way I do it would be kind of confusing to just type out, but there are plenty of good turorials for adjustable knots online as well.
𓍊𓋼𓍊𓋼𓍊𓍊𓋼𓍊𓋼𓍊𓍊𓋼𓍊𓋼𓍊𓍊𓋼𓍊𓋼𓍊𓍊𓋼𓍊𓋼𓍊𓍊𓋼𓍊𓋼𓍊𓍊𓋼𓍊𓋼𓍊𓍊𓋼𓍊𓋼𓍊𓍊𓋼𓍊𓋼𓍊𓍊𓋼𓍊𓋼𓍊𓍊𓋼𓍊𓋼𓍊𓍊𓋼𓍊𓋼𓍊𓍊𓋼𓍊𓋼𓍊𓍊𓋼𓍊𓋼𓍊𓍊𓋼𓍊𓋼𓍊𓍊𓋼𓍊𓋼𓍊𓍊𓋼𓍊𓋼𓍊𓍊𓋼𓍊
I think that's all I've got to say about that, sorry if this is a long read, but I hope there was something helpful in here. Thank you very much again, I really appreciate it! <|:^D
。⋆·₊˚𐐪𐑂 Take care! 𐐪𐑂˚₊·⋆。
16 notes
·
View notes
Text
A list of parallels and similarities between Toriel and Asriel/Flowey, from memory.
It’s been noticed that Toriel’s name is a pun on ‘turorial,’ but one could easily argue that both Flowey and Toriel are tutorial characters. In the Ruins, both spend a significant amount of time introducing both the mechanics and themes of the game to you.
Flowey introduces the saying of ‘Kill or Be Killed’ which has influenced all four of the Dreemurrs. He also introduces the battle system of Undertale and how it’s wise to dodge bullets, and the idea that each character is deeper than they seem, by immediately showing he’s NOT a simple cutesy tutorial character. By the end of the Ruins, he also introduces the meta aspects of Undertale that the game is well-known for, and how the game will remember and react to who you end up killing, judging you for whatever you do during Toriel’s battle.
Toriel walks you through the puzzles of the Ruins, introduces you directly to the Act mechanic through the Dummy fight, and indirectly introduces you to the Spare mechanic through her boss fight. Her fight is constructed in such a way that it’s impossible to spare her peacefully if you rely too heavily on the fight mechanic. Rather, you’re forced to spare her repeatedly.
Both predominantly feature in the Ruins and at the very end of the game, but are referenced when in True Pacifist it turns out a skeleton brother befriended them. (Sans and Toriel, Papyrus and Flowey.)
Only three monsters ‘accompany’ Frisk for a portion of the game. Monster Kid directly follows them for a while in Waterfall... but Toriel leads Frisk through the first part of the Ruins, and Flowey trails them for the entire game.
A bit of a stretch, but one could say Toriel also trails Frisk, from how in most neutral routes she shows up after they’ve left to become the Queen, and in True Pacifist actually succeeds in catching up with them.
It could be argued that Toriel and Asriel are both projecting onto Frisk. Toriel sees the children she failed to save. Asriel sees Chara. (Asgore also sees Chara in a Pacifist Neutral Run, so this is also not something unique to them.)
Toriel and Flowey use the same language to challenge Frisk to ‘prove themself’ in some way relating to upholding or defying ‘kill or be killed.’
There is only one solution to this.
Prove yourself...
Prove to me you are strong enough to survive.
Hey.
Since you defeated me.
I’ve been thinking.
Is killing things really necessary?
I...
I honestly don’t know anymore.
I have a request for you.
Prove to me...
Prove to me you are strong enough to survive.
Toriel and Asriel look quite similar. Not just in how they’re both goat monsters, but in how they dress. Asriel’s robes as the God of Hyperdeath strongly resemble Toriel’s robes. Perhaps he purposefully modeled them after hers.
Both Toriel and Asriel are, arguably, fighting for the same reason. To prevent you from leaving. Toriel because she believes that the Royal Guard and Asgore will kill you, Asriel because he doesn’t want to say goodbye to Chara again and let the game end. The fights are won by convincing both to let Frisk, and Chara, go.
There comes a point in both Asriel and Toriel fights where, if you keep Saving or Sparing them, they demand that you stop... with very similar language.
What are you doing?
Attack or run away!
What are you proving this way?
Fight me or leave!
Stop it.
Stop looking at me that way.
Go away!
Huh? What are you doing...?
Wh... what did you do...?
What's this feeling...? What's happening to me?
No! NO! I don't need ANYONE!
STOP IT! Get away from me! Do you hear me!? I'll tear you apart!
After this dialogue, both will proceed to use the same attack-- fire falls from the top of the bullet box to the bottom, avoiding the Soul. Asgore does not have similar dialogue nor does her display such an attack. This dialogue also comes just before Toriel and Asriel begin opening up about their feelings and fears.
Both put themselves into a sort of exile. Toriel exiles herself to the Ruins before the game began, because of Asgore’s decree. Asriel is found in the Ruins after his battle, and doesn’t seem to want to return to the Surface, because he doesn’t want to break his parents’ hearts all over again.
Someone needs to take care of the flowers.
#undertale#undertale meta#toriel#asriel#asriel dreemurr#flowey#this isn't even getting into the deal with toriel and ralsei and flowey...
104 notes
·
View notes
Note
Hi! I saw u got glossier makeup and I basically know nothing about doing my makeup but wanna learn and get into it. Is glossier stuff good for beginners or no?
Hiya! I would say It’s really lightweight and if you’re not used to makeup, it may seem like it’s doing nothing. but trust me! it is!
I genuinely would recommend the concealer and skin tint for beginners because you can’t REALLY fuck up that much. I only got those two and a powder + the lip glosses. but everything was just so BEAUTIFUL.
honestly, it’s a bit expensive so maybe try some drugstore stuff first so that whilst you’re figuring stuff out you’re not wasting?? I’d recommend watching some youtube videos and honestly Robert Walsh is a proffesional mua and he talks about what looks good in real life, not just turorials on youtube.
If you want to know some good drugstore brands, let me know! but i hope you get into makeup and enjoy it! I really see it as making me confident and just sort of messing about with it and seeing what works for me!
1 note
·
View note
Photo


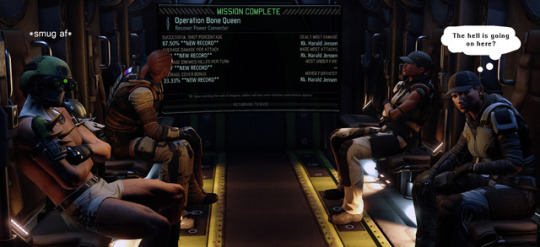
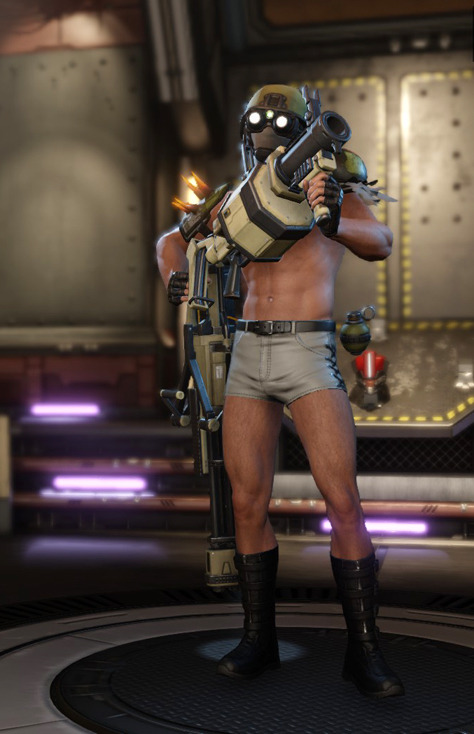

So I started a brand New Game in XCOM 2 with the turorial and all. And behold: the game spawns a true hero. Rookie Jensen from Sweden wearing some sort of freaking S&M outfit or whatever the hell that is. I can’t even customize since it’s during the tutorial so there he goes, running around in the snow killing Advent soldiers, distracting enemies and allies alike.
I already decide to give him a nickname ‘Streaker’ when I can.
He actually ends up being the MVP of the mission (Dat distraction technique be good I tell ya!), gets a promotion and the game makes him a Grenadier. Yes, you keep lovingly stroking that giant phallus looking thing Jensen.
AND THEN the game actually gives him an automated nickname ‘BIG NASTY’. You know what, it’s so perfect I’ll let it be.
I can’t stop laughing!
404 notes
·
View notes
Photo

Going through my art folder to sort some things out, I found a turorial from @loisvb that I had saved and I couldn’t resist following along. I’ve had a lot of fun with this and will post a “step by step” version shortly. Thanks Loish for the great tutorial! #loish #doodlesofinstagram #instaartist #artistsofinstagram #illustratorsoninstagram #illustratoroninstagram #wezzelus #instaart #drawing #portrait #sketch #manga #anime #mangaart #wacom #photoshop https://www.instagram.com/p/BzF7n7Onvc5/?igshid=17fg0x8pon95a
#loish#doodlesofinstagram#instaartist#artistsofinstagram#illustratorsoninstagram#illustratoroninstagram#wezzelus#instaart#drawing#portrait#sketch#manga#anime#mangaart#wacom#photoshop
0 notes
Note
hey! I was wondering, did you do any art tutorials? and could you link them? Because your art is very good and I would love to learn your techniques!
Ah, well, I don’t do full-length turorials, but I did do some in the past for certain things!
This is quite old, but I have this general tutorial on how to draw faces/draw in general! It’s not smth I do often anymore bc Im getting used to it, but it was how the books I read taught me to start out, and I hope it’ll help you out too! http://shiro-hunter.tumblr.com/post/150174471537/pxrfect-storm-hoo-haaahhh-here-we-go-again-with
This one’s a bit old too, but I do still use this technique for both cel-shade and painterly style! http://shiro-hunter.tumblr.com/post/144885098277/hi-its-me-again-haha-i-was-wondering-if-you
Speaking of which, here’s a sort of process-tutorial of how my ‘painterly’ style basically works: http://shiro-hunter.tumblr.com/post/148149592947/welcome-to-shiros-crappy-essay-length-tutorial
This one… is more like process shots, but it does explain a lot of my thoughts during drawing, too. Hope it’ll help as well! http://shiro-hunter.tumblr.com/post/148548579422/process-shots-tutorial-how-i-do-the-stuff-i-did
Ofc, ya can’t forget the magic that is line weight! http://shiro-hunter.tumblr.com/post/151192237387/so-people-have-been-asking-me-how-i-make-clean
I’ve been using this technique a lot more these days, maybe you realize how the face seems more 'glowy’ in my coloring? This is basically how I do it with various color combinations! http://shiro-hunter.tumblr.com/post/153172744857/welp-since-i-managed-to-get-some-process-shots-of
3 notes
·
View notes
Text
I’d gotten a few people wanting me to make a tutorial on how I recolor hairs in WMS palette so I finally got to it and here it is! This is how I do it, so feel free to just, borrow some of my techniques and then develop your own.
Alright. So What you’re gonna need is:
These actions by @wildlyminiaturesandwich
Sims4Studio
Photoshop + a dds plugin
I suggest that you first read everything in the post where you download the actions. It’ll probably all be mentioned here, but there’s no harm!
So what you’re gonna do first is to obviously select the hair you want to recolor. If it’s a custom hair, copy that file and paste it into Documents -> Sims 4 Studio -> Mods
Start Sims4Studio and select “Add CAS Part Swatch”

Sort so you’ll only see Custom Content. If you’re gonna recolor one of EA’s hairs you’ll obviously need so search for it.
Either select all the swatches or try to find only the white swatch because that’s the only swatch you actually need.

Press next and create a new folder that’s appropriately named. My folder for example is named “[Weepingsimmer] Luna Hair”. Make sure you’ve pasted the original package into that folder too. Find this folder and click on the original package - this will give your file the same name as the original - but don’t save it yet! Add (Creator Name) [...] WMSAdons Unnaturals/Naturals to the name of the new package and then save!

Do this two times. So name one package (Creator Name) [...] WMSAddons Unnaturals and the other (Creator Name) [...] WMSAddons Naturals.
You can name them differently, but you have to create 2 packages. One for naturals and the other for unnaturals.
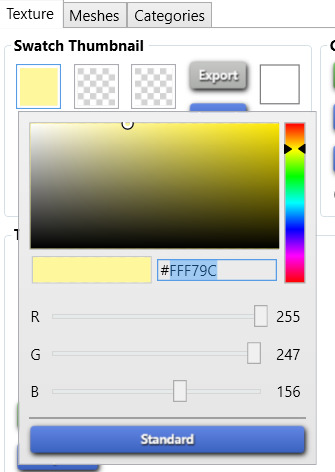
Select the white swatch and click on “Export”, save it as “Base”. Create a folder named “Colors” then inside that one create two more and name them “U” and “N”. Save the “Base” dds file outside of the U & N folders but inside the “Colors” folder.
Remove all swatches except for one - it doesn’t matter which one. Delete the color of the swatch by pressing on the “X” below it. Then go into the Categories tab and look after the “Hair Color” category. Deselect the ticked in colors. Do this for both packages.
Then go into the Warehouse and select your remaining CAS Part. Look after the SecondaryDisplayIndex to the right (you can also search for it in the search field). You’re going to have to change the number in it. So in your Unnaturals package you’re going to have to write 200 but in your Naturals you have to write 400. This is important.
Open up Photoshop and import the “Base” dds file. If you haven’t installed the actions yet do it now. You’re only going to use the “Sandwhich Unnaturals & Sandwhich Naturals”. Remember to save all the dds files with easy names, I for example, save them as 1 - 36 for the unnaturals and 1 - 20 for the naturals so it’s easier to keep track of them when you import them into Sims4Studio.
Now onto the actual recoloring! Go into actions and select the first Unnatural action. Run it by pressing the play button.

When you save name it 1 (for example). Then go into the “History” tag and go to the top and select “Base.dds” or whatever you named it and it’ll revert back to it’s original state - do this after every action & save. When you’ve finished all the unnatural swatches go into your “Colors” folder and paste them into the “U” folder. Do the same when you’ve finished your natural swatches but in the “N” folder.
Update: Don’t forget to make sure the pop up looks like this when you’ve named the file and pressed save. The thing most important to note is that it needs to say “DXT5 interpolated alpha” - you might have to change it to that. And it’ll only have to be done once after installation.

When you’re done recoloring go back into Sims4Studio and import all the swatches. Do this with both packages. You don’t have to fix the colors of the swatches yet.

Follow WMS’s technique to import all the swatch colors.
(Outdated technique) Now what I usually do is wait until I’ve done a few recolors (at least 5) because it’ll save time when importing the hex codes which I’ll show you how to do now.
If this is your first WMS recolor you can download one of my packages because they have all the correct hex codes. Otherwise take one of your old ones. Open it up in Sims4Studio. Then start Sims4Studio again a few times so you’ll have as many S4S programs running as you have hairs you want to import the hex codes for. Open all hairs in their own S4S window. Start with the unnaturals, save and move on to the naturals.
What you’re going to do is literally copying the hex codes from the first package and paste it into the swatches on your new ones.
When you’re done with the unnaturals, save. Then open up your naturals and do the same for them.
Now! You’re pretty much done. But you can also merge your packages together so you only have to share one package (if you do share them)! Here’s a turorial on how you merge packages. When I merge my packages I name it the same as I showed you except I’ve removed the “Unnaturals/Naturals” part! Don’t remove the unmerged packages though, unless you’re absolutely sure you won’t need them.
Tip to keep your sanity while doing this is to do the recolors on half the screen and watch shows or youtube on the other half.
Download recolor [Here] + [Mesh]
If anything is unclear. Please don’t hesitate to ask me!
235 notes
·
View notes
Text
got rid of 2 bags of clothes and like 3 boxes of books. my mom is the bestestest mom in the world for helping me 💜 for dinner i made a modified ramen, and took a 65 cent bag of mi goreng and added green onions, mushrooms, bacon, and a soft boiled egg made in the microwave following a japanese turorial on youtube: crack egg in mug, fill about halfway with water, and microwave for a minute. i ended up cooking for about 30 seconds longer since i wanted the yolk just a little more firm. ended up delicious. also the mi goreng noodles are fucking amazing. it comes with 2 seasoning packets and 3 little liquid packets with oil, some sort of garlic seasoning, and sambal. usually ramen with all the extras cost way more but they never cost more than a dollar at kroger. now i'm full and happy that my apartment is cleaned out, my floor is vacuumed and i got lavender and eucalyptus in the diffuser right now. i want a nap soooo bad, though.
1 note
·
View note
Video
Quick eyebrow turorial of some sort. Putting on eyebrows using my favorite pencils. #holikaholika #esteelauder #maybelline #faceshop #etudehouse Stay safe! Watch the full video at: https://youtu.be/BWzYRFhfG7Y Like and subscribe!!! 🌈🌈🌈 https://www.instagram.com/p/B7-Ha6OnkZt/?igshid=1tk11igh3u1js
0 notes
Last Seen Blogs
softestaura
softestaura

cherryjuiceblues
delicate point of view
antontual
* 𝓁𝑜𝓋𝑒𝟣𝟣𝟫

shmeelaj
Rebel Pathways
gearsscreeching
Furbys, Dude.