ladyyspicee-blog
herbs n stuff
self taught herbal witch |
vague recipes | herbal knowledge |
side blog of @ladyyfoxx
333 posts
Don't wanna be here? Send us removal request.
Last Seen Blogs

wandadelrio
Wanda del Rio

estrangedfantasy
In The Zone

detective-swamp
Waist Deep In A Bog

3lix13
Project 2501

beastpingy
Twisted Knickers
Text
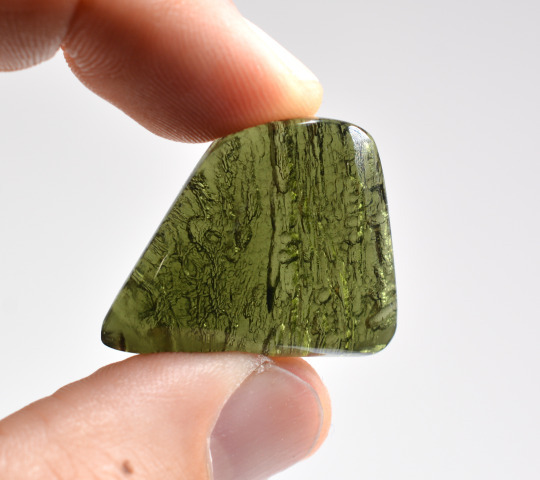
A Guide to Moldavite
What is a Tektite?
Moldavite is classified as a Tektite, or a natural impact glass. It comes from the Greek tektos, which means “molten” or “fused.” Basically, a meteoric impact produces pure silica molten glass (all soil impurities are burned away) because of the pressure and heat, and the cooling glass is launched by the force of the impact as it forms. It lands back on the ground as a hardened piece of silica glass.
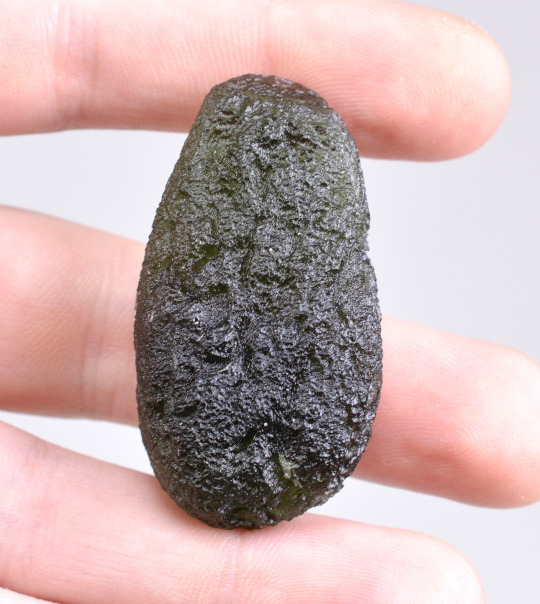
What is Moldavite?
Moldavite (Vltavin) is a green Tektite found primarily in Czech Republic, and only very rarely in other parts of Central Europe. After the impact of the Ries Meteor, Moldavite literally rained from the sky across fields of Czech Republic, where it is now mined from the sandy soil. It’s known for being a high vibration metaphysical crystal and a tool in awakening consciousness, because of it’s partially “extraterrestrial” origins. Some people feel energy from Moldavite so powerfully, they can only wear it in small doses.
So, what type of energy is associated with Moldavite?
Moldavite can help calm the mind for some, but for others, it speeds up intention and manifestation and must be used with care. It is best used during meditation, as one of it’s many spiritual uses is discovering inner truths. You may feel an awakening and an awareness of your own intention and power of manifestation, and may have powerful thoughts of “Why am I here?”, “Who am I?” or “What is my purpose here?” which is all very normal. Another effect you may notice is increased empathy, or perceiving feelings of others within yourself. This is important for anyone who does healing work, and Moldavite can be a great amplifier for that as well.
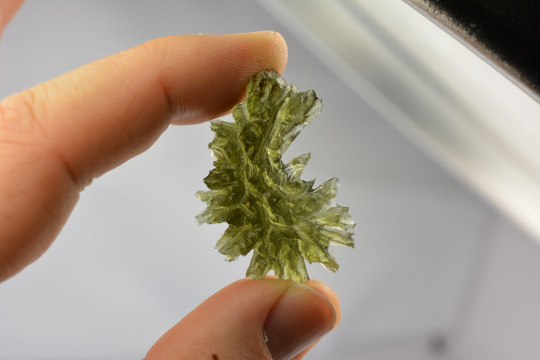
How do I know if my Moldavite is real?
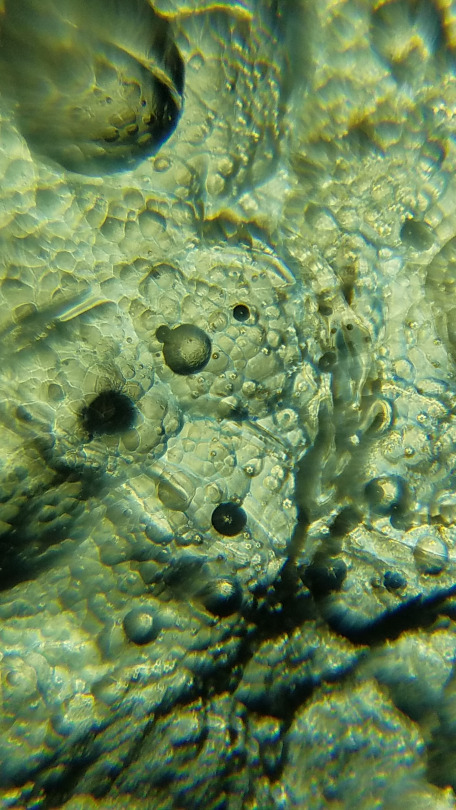
Moldavite is usually sold in its raw natural free-form state, and has very distinct textures, patterns, waves, and bubbles, as you can see in the below photo, taken with a smartphone microscope looking at the surface texture of Moldavite. The colors range from deep green, to bright vibrant green, even olive colored and some have brownish hues, but if you see a piece of Moldavite and you don’t trust the color, hold it up to the light and look for waves, bubbles, or other irregular textures that may be authentic. Some fakes may look very real, and if you ever personally have a question about a specific piece of Moldavite’s authenticity, contact [email protected] with some photos and we will try to help you figure it out! The popularity of Moldavite has grown as people are becoming more conscious and spiritually aware, and it’s important to buy Moldavite from trusted sources whenever possible.
FOLLOW US FOR MORE CRYSTALS
863 notes
·
View notes
Link
When I find myself taking life too seriously, I do my best to reframe the challenges I’m experiencing as a game. Having grown up with Nintendo, naturally, my heart will always belong to the Legend of Zelda series…so if you see a little resemblance here between the naming and positions of the cards and the elements of Link’s adventures? You’re not imagining it.
1: THEME OF THE DUNGEON/TEMPLE
Every level and challenge has a theme. This card tells you what kind of challenge you’re up against (and we pray it’s not a water temple - cue rage-quit!)
2: THE UPGRADE
The universe never tosses us into the thick of things unprepared! This card tells you what mental/spiritual/emotional/physical enhancement is already at your fingertips, granted to you or awakened within you the moment you stepped foot into this new challenge.
3: THE MINI-BOSS OR PUZZLE
Crack those knuckles, stretch those mental muscles. This card here is the test within the test, and that upgrade you got earlier? It’s essential to you working (or hacking) your way through this particular snag in the adventure.
4: THE MASTER KEY
You’re almost there. This card is the key that unlocks the Boss’s chamber. It’s the essential step that literally opens up the path for you to conquer the big baddie.
5: THE BOSS MONSTER
Or “end boss” if you prefer. If you want to conquer it you’ll have to use everything you’ve gained and learned up until this point. This card represents the heart of the challenge.
6: THE SHINY
You did it, you defeated the boss, and you’ll be rewarded. This is your prize. It may be a new skill, accomplishment, or understanding. It could be a shiny new sword! Frequently it’s connected to the theme of the dungeon and the boss monster, so make sure to look at how this reward relates to what you’ve been encountering on this adventure.
7: HEY, LISTEN!
The universe (or sometimes an annoying fairy) is always willing to give you a hint. This card is that friendly tap on the shoulder - it’s the sage advice that will help you all throughout this particular challenge.
Enjoy!
124 notes
·
View notes
Photo
Vegan Food Lovers Features
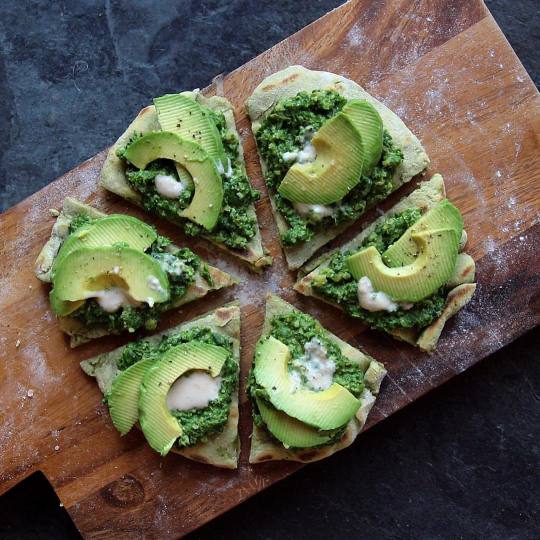
Buckwheat avocado pizza with spinach pesto 💚
By @rebelrecipes
www.facebook.com/Veganfoodlovers
Spinach pesto
3 cups spinach
2 garlic cloves
2 tbsp olive oil
2 tbsp nutritional yeast
Juice ½ lemon
Salt and pepper
To make the spinach pesto;
Pop all the ingredients into a food processor and blitz.
Tahini dressing
1 tbsp tahini
Juice ½ lemon
1-2 garlic cloves
¼ cup water
Pinch salt Himalayan salt and black pepper
To make the tahini dressing;
Add all the ingredients to a mini chopper and blitz (if you don’t have a mini chopper crush the garlic in a pestle and mortar and then add all the ingredients to a jar and shake to combine.
Buckwheat Avocado Flatbread Pizza Base
½ cup buckwheat flour
½ small avocado
1 tsp. olive oil
½ tsp baking powder
Pinch black pepper
1 tsp pink Himalayan Salt
¼ cup water
To make the buckwheat avocado flatbread
1.To make the buckwheat flatbread; pre-heat a griddle pan (or frying pan) so that its nice and hot.
2.In a bowl mash the avocado then add in the flour, oil, baking powder, salt & pepper and then add the water. Mix to form a dough and knead a little so that it comes together and then divide into two.
3.On a floured chopping board roll out the dough and then place on a griddle pan (griddle pans work the best as you get lovely charred stripes on the flatbread but a frying pan also works).
4.The flatbread will literally cook in a couple of minutes, simply flip it over when the underside is starting to char and cook on the other side a minute or so longer.
To compile the pizza;
When the flabread is cooked, top with spinach pesto, tahini dressing.
https://www.tumblr.com/blog/veganfood-lovers
#veganfoodlovers
#vegan #wholefoods #healthy #instafood #cleaneating #wellness #foodporn #fitfood #whatveganseat #eatclean #vegansofig #nutritional #healthyfood #veganfitness #nourish #nourishing #motivation #rawtill4 #plantstrong #fitness #vegetarian #plantbased #veganlife #veganfood #rawvegan #recipes #delicious #feature #glutenfree
2K notes
·
View notes
Photo
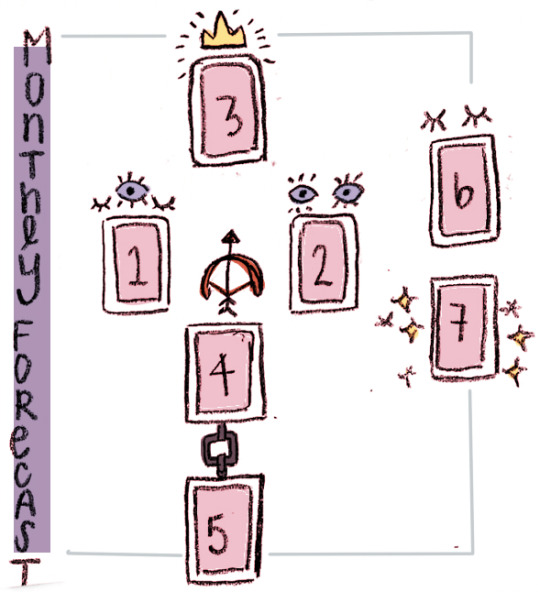
The Monthly Forecast Tarot Spread
Spiritual Focus
Worldly Focus (job, school, relationships, etc;)
Monthly Lesson
Positive Influences
Negative Influences
Deck Comment/Reflection
Advice
Made this monthly tarot spread! Preferred time to do this reading would be either the last day of the month before the new month, or the first day of the new month you are reading for!
6K notes
·
View notes
Text
How To Make A Witches Ladder
A witch’s ladder is one of those nifty things we sometimes hear about but rarely see. Its purpose is similar to that of a rosary - it’s basically a tool for meditation and ritual, in which different colors are used as symbols for one’s intent. It’s also used as a counting tool, because in some spell workings there is a need to repeat the working a particular number of times. You can use the ladder to keep track of your count, running the feathers or beads along as you do so. Traditionally, the witch’s ladder is made with red, white and black yarn, and then nine different colored feathers woven in.
Difficulty: Easy
Time Required: Varied
Here’s How:
Realistically speaking, it makes more sense to use yarn colors that have a significance to you and your working. Also, finding nine differently colored feathers can be tricky if you’re looking for them out in the wild – you can’t just go plucking feathers from local endangered species – and that means a trip to the craft store and some oddly tinted feathers. I’d recommend using either found feathers of any color, or something else entirely – beads, buttons (see our discussion on the magical uses of buttons), bits of wood, shells, or other items you have around your home.
To make your basic witch’s ladder, you’ll need:
Yarn or cord in three different colors
Nine items that are similar in property but in different colors (nine beads, nine shells, nine buttons, etc)
Cut the yarn so that you have three different pieces in a workable length - usually a yard or so is good. Although you can use the traditional red, white and black, there’s no hard and fast rule that says you must. Tie the ends of the three pieces of yarn together in a knot.
Begin braiding the yarn together, tying the feathers or beads into the yarn, and securing each in place with a sturdy knot. Some people like to chant or count as they braid and add the feathers. If you wish, you can say something like this variation on the traditional chant:
By knot of one, the spell’s begun.
By knot of two, the magic comes true.
By knot of three, so it shall be.
By knot of four, this power is stored.
By knot of five, my will shall drive.
By knot of six, the spell I fix.
By knot of seven, the future I leaven.
By knot of eight, my will be fate.
By knot of nine, what is done is mine.
As the feathers are tied into knots, focus your intent and goal. As you tie the final and ninth knot, all your energy should be directed into the cords, the knots and the feathers. The energy is literally stored within the knots of the witch’s ladder. When you’ve completed the string and added all nine feathers or beads, you can either knot the end and hang the ladder up, or you can tie the two ends together forming a circle.
1K notes
·
View notes
Text
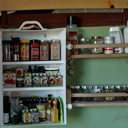
Domestic Garden Witch: When Eggshells Grow
So maybe you’re a college witch with limited space and money, limited to the one window in your dorm. Or, maybe you’re a witch without extensive backyard space who wants to start up a magical garden. Perhaps you’re a kitchen witch who wants the freshest herbs right at her fingertips.
For many witches, having a garden seems to be a bit of a no-brainer. After all, plants and magic go hand-in-hand. Plus, when thinking of a witch, it’s hard not to think of a cottage in the woods with a little vegetable garden out front. Unfortunately for the majority of us, our cottage in the woods is a tiny flat, and our garden out front is a windowsill with limited space.
This is when it comes time to embrace your craftiness and bring your garden indoors! Not only does it place your garden in a convenient location, it also allows you to freshen the air, recycle what would otherwise harm the earth, and embrace your witchy green thumb!
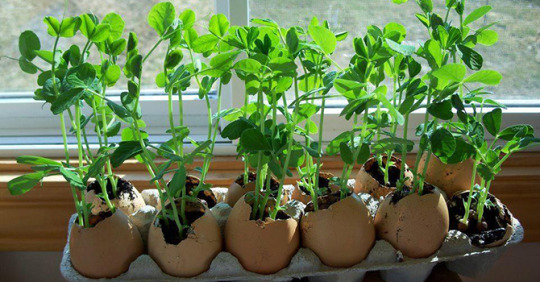
Eggshells for the Garden Witch
The kitchen witch has eggshells piling up on the counter, dried and ready to be ground up for use in protection powders. The garden witch looks at these shells and thinks, “Oh! Fertilizer!”
But if you’re limited in space and have to keep your garden limited to your windowsill, you may find yourself looking at those eggshells and saying “Oh! New pottery!” Not only is creating an eggshell planter a very green practice, but it’s also creative and makes transplanting much easier if you end up having a larger garden later on!
The Container…
Simple enough, you just need mostly intact eggshells. In the picture above, the eggshells are kept in the carton, but I’ve seen eggshells set up decoratively, such as with this picture:

The core of this post is clearly the eggshells, but you can arrange them in whatever way saves space or is aesthetically pleasing!
Carefully fill the emptied eggshell with potting soil. Make an indent in the soil with your finger, and carefully add your seedling before adding a final layer of soil and watering. If you plan on keeping the plants in the eggshells instead of transplanting, you could also carefully poke holes in the bottom of the eggshells so that your plants don’t get over-watered.
How Can I Witch This?
Eggshells alone are extremely protective, and providing your plants with that energy is beneficial. Around Ostara, use died eggshells! Not only will the shells have protective energy, but you’ll be able to use color correspondences and whatever symbols you used for the rite.
Draw symbols or runes of growth, protection, and strength on the shells in order to encourage your plant’s growth!
Bonus points is if you grow protective herbs in the eggshells!
May your harvests always be fruitful!
Blessed Be! )O(
14K notes
·
View notes
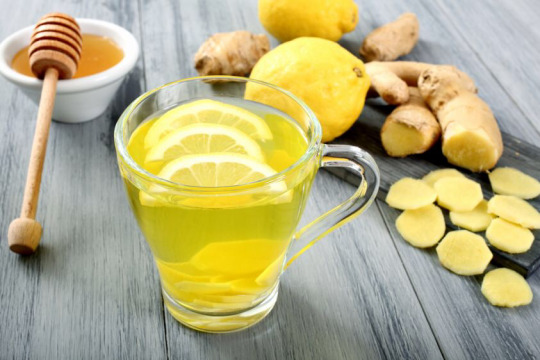
Photo
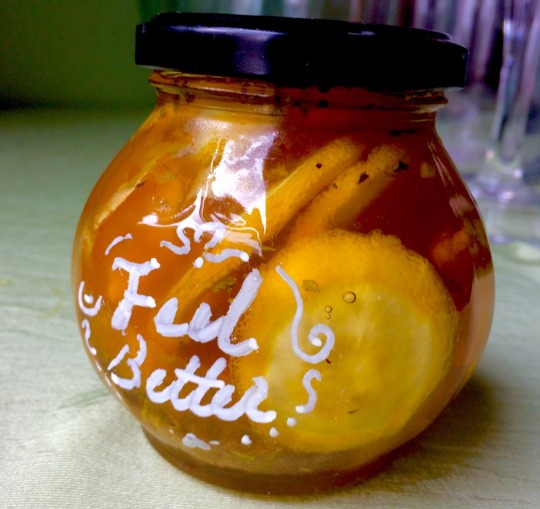
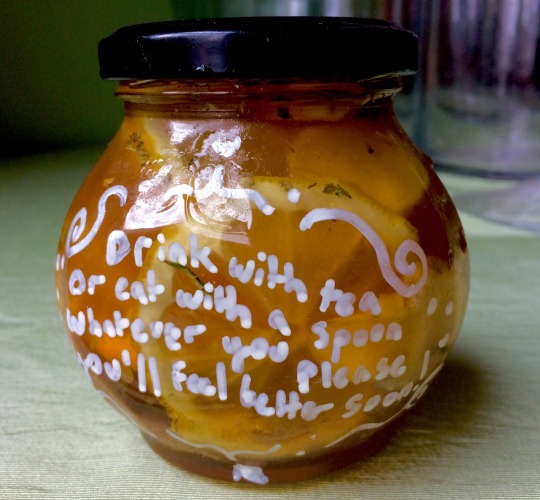
So I made this ‘elixir’ as my coworkers call it for me and a friend cause we are both sick. I bought mine to work for my sick coworkers to try and they loved it. It’s a jar of sliced ginger and lemon and filled with honey and if you let it sit overnight in the fridge it turns into a loose syrup you can use as a cough syrup or to soothe sore throats or mix it in your tea. I added a tiny bit of Damiana cause it helps lift your spirits and a tiny pinch of gold food glitter that makes it sparkle subtly gold to help it feel more magical. It also makes your teas lightly sparkly. My coworkers were calling it a magic brew and potion it was hilarious. I wrote a little thing for my sick friend on it using a paint pen, since she’s a witch too she would find it cute:
Drink with tea
Or eat with a spoon
Do whichever you please
And you’ll feel better soon!
4K notes
·
View notes
Photo
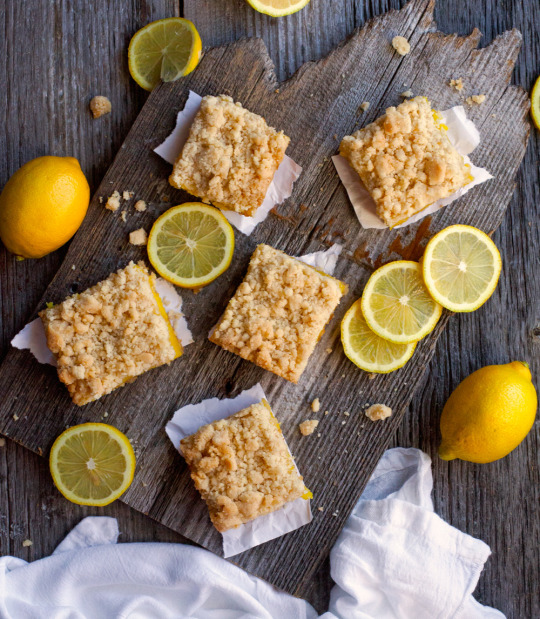
Lemon Pucker Bars
1K notes
·
View notes
Photo
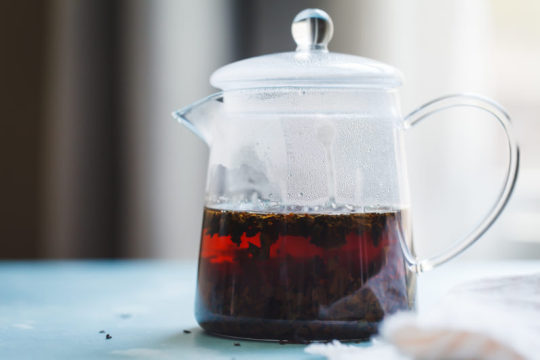
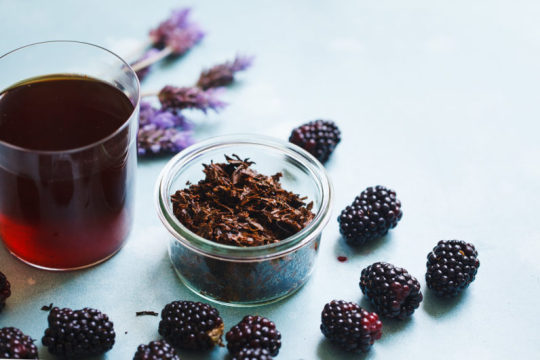
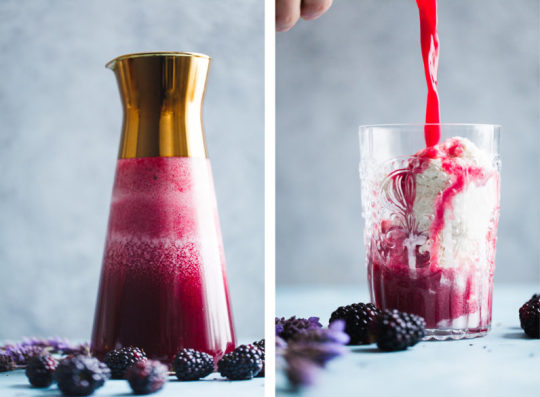
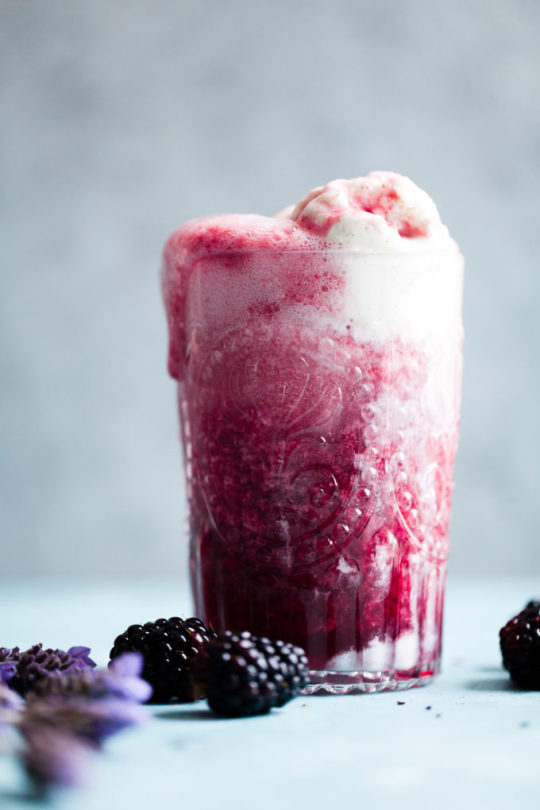
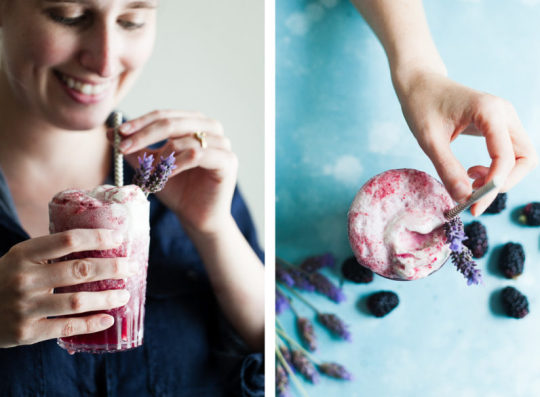
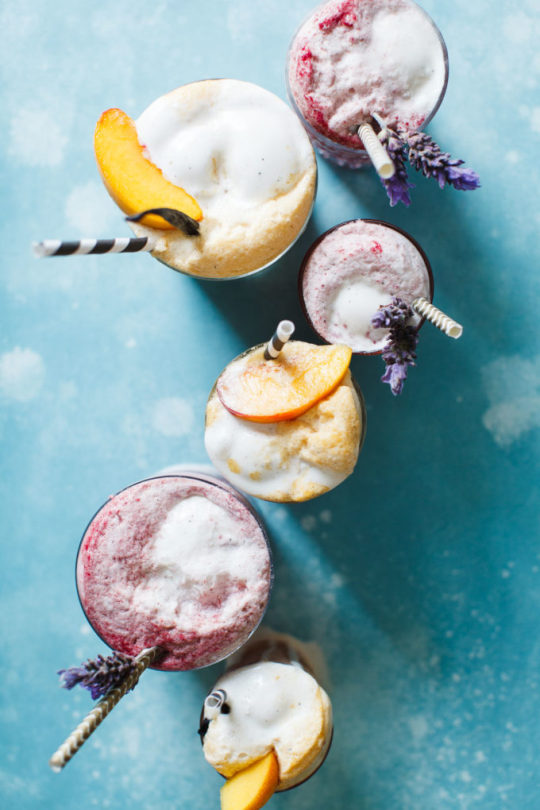
Lavender Earl Gray Blackberry Ice Cream Floats {Vegan}
3K notes
·
View notes
Photo

SIGIL OF REMEMBRANCE
Just a little sigil I made for the cover of my dream journal, this sigil will help you gain clarity when recounting dreams.
🍃Feel free to use, just please credit me🍃
1K notes
·
View notes
Text
Magical Chalks
Magical chalks are amazing tools. You can use them to write sigils, glyphs, or to add some oomph to a circle.
Basic chalk recipe:
Mix up some plaster of paris and water together until you get a stiff paste. Mould it into a cylinder shape and let dry up to 24 hours. If you feel like adding color to your intenet, you can add food coloring to yhe water, or mix the plaster of paris with acrylic paint.
Cascarilla chalk:
Mix one tablespoon of flour, a tablespoon of water and 6 ground eggshells together. Let dry up to 24 hours. You may color this in the same way as you did for the basic chalk.
Cascarilla chalk is used for protection, or to draw the witch’s round.
Banishing chalk:
For this one, I don’t reccomend combining it to the cascarilla chalk. I would go with the plaster method. In a mortar and pestle, combine black pepper, cayenne powder, cinnamon, sea salt, sulfur, allspice, basil, black salt, cigarette ash, garlic powder and chilli flakes. Grind it into a fine powder, the consistency of plaster powder. Combine the powdered ingredients with the plaster, and wet using vinegar instead of water.
Use to draw banishing glyphs, or sigils to repell entities or certain people. Also used to draw boundaries on the go.
Summoning chalk:
Grind dandelion, sweetgrass, thistle, and tobaccco into a fine powder, mix into your plaster or cascarilla mix. Add water and mould into a stick.
Use this chalk to draw the summoning seals of spirits, or to draw unto something you would like to attract spirits with.
Feel free to add to this post! I will be adding ontot it once I have more recipes!
4K notes
·
View notes