#if you do use my tutorial to make gifs i'd love it if you like tagged me in it so i can see
Text

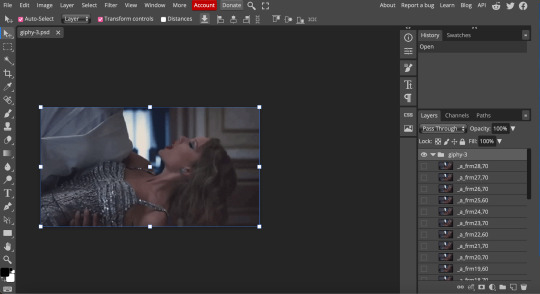
The silent art of gif making
The gif above has 32 layers plus 6 that aren't shown because this is part of a larger edit. I wanted to share it to give everyone a glimpse of the art of gif making and how long it usually takes for me to make something like this. This one took me about an hour and a half but only because I couldn't get the shade of blue right.
I use Adobe Photoshop 2021 and my computer doesn't have a large memory space (I don't know what to call it) so usually most of psds get deleted because I'm too lazy to get a hard drive. It doesn't really bother me that much because I like the art so when it's done, it's done. Off to somewhere else it goes.
Here are the layers:

Everything is neat and organized in folders because I like it that way. I prefer to edit it in timeline but others edit each frame. There's a layer not shown (Layer 4 is not visible) and it's the vector art. Here it is:

Now it is visible. I don't plan to make this a tutorial, but if you're interested I'd love to share a few tricks about it. I'm pretty new to the colors in gifmaking but the rest is simple to understand. Here, I just want to show how much work it takes to make it.

I opened Group 2 and here's the base gif. I already sharpened and sized it correctly but that's about it. Let's open the base coloring next.

Yay! Now it looks pretty! The edits are in Portuguese but it doesn't matter. There's a silent art of adding layers depending on how you want the gif to look but you get used to it. The order matters and you can add multiple layers of the same thing (for eg. multiple layers of levels or curves or exposure).

This was pretty much my first experiment with coloring so I don't know what I'm doing (this happens a lot with any art form but gifmaking exceeds in DIYing your way to the finished product) but I didn't want to mess up his hair, that's why the blue color is like that. Blue is easy to work with because there's little on the skin (different from red and yellow but that's color theory). I painted the layers like that and put it on screen, now let's correct how the rest looks.

I was stuck trying to get the right teal shade of blue so yes, those are 10 layers of selective color mostly on cyan blue. We fixed his hair (yay!) we could've probably fixed the blue on his neck too but I was lazy. This is close to what I wanted so let's roll with that.

BUT I wanted his freckles to show, so let's edit a little bit more. Now his hair is more vibrant and his skin has red tones, which accentuates the blues and his eyes (exactly what I wanted!). That lost Layer 2 was me trying to fix some shadows in the background but in the end, it didn't make such a difference.

This was part of an edit, so let's add the graphics and also edit them so they're the right shade of blue and the correct size. A few gradient maps and a dozen font tests later, it appears to be done! Here it is:

Please reblog gifsets on tumblr. We gifmakers really enjoy doing what we do (otherwise we wouldn't be here) but it takes so long, you wouldn't imagine. Tumblr is the main website used for gif making and honestly, we have nowhere to go but share our art here. This was only to show how long it takes but if you're new and want to get into the art of gif making, there are a lot of really cool resource blogs in here. And my ask box is always open! Sending gifmakers all my love.
#gif making#gif tutorial#resources#completeresources#y'know what that post yesterday got me into this#i love creativity so i send all my love to gifmakers#this is HARD#my tutorials#tutorials
252 notes
·
View notes
Text
Attention all whump gifmakers and visual artists!!!

I am seeking your opinions and advice.
So I am seriously considering creating a whump gif makers challenge for some time in 2024. I'm thinking maybe in August because it seems pretty empty in terms of whump challenges.
I don't know what it would look like or what I'd call it but I want something just for gif makers/visual artists instead of a writer's challenge that gif makers are allowed to take part in as well but are actually just geared towards writing and the prompts are really hard. There's so many writing challenges and I love them. I do. But lately I feel they're getting harder and harder for gif makers to participate in (that might just be my problem though who knows) in terms of prompts.
So I want something made specifically for whump gifmakers. An event to bring everyone together, meet other gif makers, learn and share skills, share our favorite whump scenes and find new ones to loves. I could also share gif making tutorials and resources for people who are new to it or would like to up their skills. From basic skills like screencapping and software and how to use programs like photoshop to more complex things like how to do layouts and blending techniques.
Would this be of interest to you all?
If yes, what kinds of things do you as a gif maker like best about prompt challenges? What do you like least? What would you like to see in a monthly gif making challenge?
Let me know what you guys think! Share your thoughts! I'll even add a poll option but I'd love to hear your thoughts on the comments!
Please reblog for larger sample size thank you
61 notes
·
View notes
Note
do you think you could please do a tutorial for your greys anatomy edit (kinda similar to your brittana edits) i'm shocked if no one has ever asked you before for tutorials (and if you do i'd love to see them) your edits are so gorg and you're incredibly talented !
Totally! Bare with me, this is my first tutorial in like 8 years. Haha. I'll show you how I made this one:
For reference, I use Photoshop CS5. (My computer hates the newer versions. It'll run three different video editing softwares but hates photoshop. Idk lol.)
Okay, first you want to make 2 gifs with the same amount of frames. That's important. And then you want to convert them to a smart object.
So we have these two gifs.

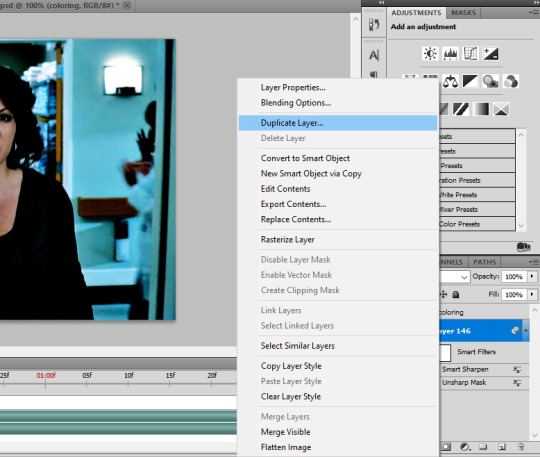
Now, depending on what you're doing, you can do this next step now or you can color your gifs how you like, save them separately and then reopen them with all the coloring on them. Sometimes I do this if I'm working with a lot of effects but since these two gifs have the same coloring, we're going right click on one of them (it doesn't matter which one tbh) and you're going to select "duplicate layer"
A little box will pop up and this is where you're going to select the project name that you want to essentially paste this gif on top of.
Set the top gif to Screen.
The first thing I usually do is sharpen them.
So I use Smart Sharpen and Unsharp Mask with these settings:
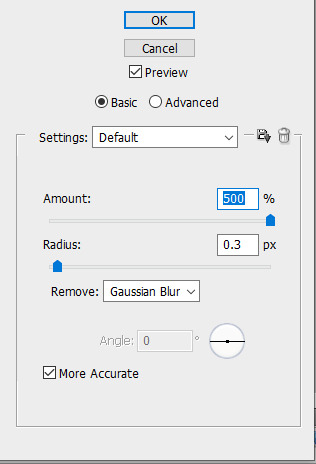

With Unsharp Mask, you have to tweak them depending on the gif, quality, what effect you're going for, etc.
Then we add some basic coloring:
Now, I have a base for specific shows because all shows are colored different. Grey's is more blue toned whereas Glee is more yellow toned. However, since coloring is a bitch sometimes, I'll add a PSD that I use ALOT. You can download it here.
So now that we've sharpened and added some coloring, this is what we have (separately):
This is what it looks like after I set it to Screen (and I moved the top gif a little to the right.)
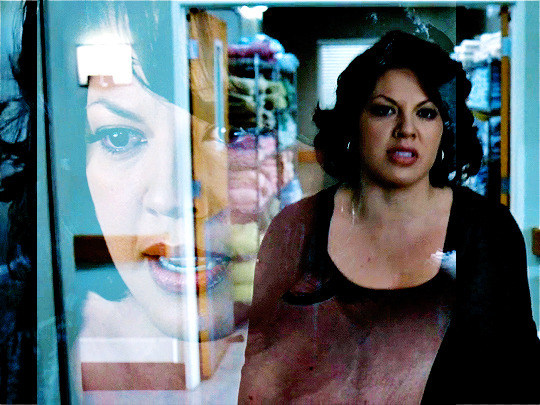
Obviously, we need to get rid of those lines and make it so that each gif is more visible.
So now we blend.
On the top gif, you're going to add a layer mask to that gif. So with that top gif selected, you're going to select the mask button that looks like this:
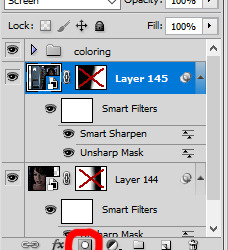
Select your brush tool and use a soft brush to erase what you want from the background of each gif. (Make sure to repeat the previous steps to get a layer mask on the bottom gif.)
I have this now, after using the brush tool.

As you can see, it's very blue and I wasn't feeling blue for this gif so we want to change blue color. That's where the Selective Color comes in.
We're going to get rid of that cyan tone. So you're going to add adjustment layer and select Selective Color.
All I did for this one was adjust the cyan tones in the drop down box.
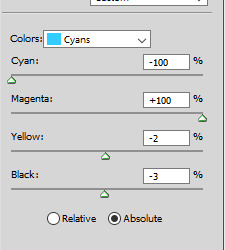
Now we have a pretty purple tone!
Now, we're going to add a light grey squareish box this to outline.
Set the blending mode to exclusion. To get the bar (and we'll do this again with the text) you're going to select the FX icon.
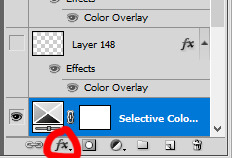
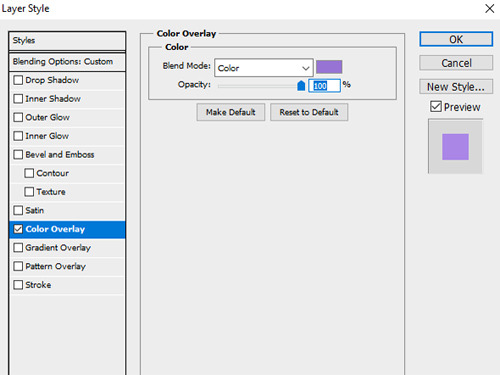
Select Color Overlay. A box will popup. You're going to set the blending mode to Color and then select whatever color you want the bar to be. (If it comes out with too much white, adjust the color of the bar itself to a darker shade.)
Lastly, we're going to add our text. For this gif I used Magnolia Script and Montserrat.
To get the purple effect on the "The Story" text, you're going to do the same thing you just did for the bar.
Voila! I hope this helped. If you need any further assistance, I'm always happy to help!
#tutorial#gif tutorial#blending tutorial#usergif#completeresources#mine#also anon you’re so fucking sweet
101 notes
·
View notes
Note
I would love if you could give some tips on making blended gifs with two dominant colors - for example your friends cheesecake set. I would love to make like that but I have no idea were I’m going wrong
friends cheesecake set
hi!! blending is honestly so hard to give tips on bc it's so dependent on the scenes but i can try! below, i link some tutorials that i have used and try to explain the methods i personally use :)
btw this is very image heavy with gifs as visuals to try and explain my processes!
the tips i give assume you have basic giffing knowledge and at least some knowledge and experiencing of both blending and coloring. if you have any questions on anything i explain, please don't hesitate to come ask!
firstly, here are some very very helpful general blending tutorials that i have used in the past: this one and this one go pretty in depth (both by the lovely @yenvengerberg.
secondly, here are some coloring/color manipulation tutorials that i love:
general color manipulation (different methods) again by @yenvengerberg
manipulating the background by @fionagallaqher
coloring gifs for rainbow sets! by @rhodeys
now, as for combining the two techniques, i use trial and error. again, both blending and coloring are very fickle and the methods can change based on the scene i'm using.
there are two ways that i blend gifs with two dominant colors:
color the gifs separately and then blend
or blend the gifs together and then color the whole gif
first method: color first and then blend —
i usually use this method for gifs with little movement and where the colors can be easily manipulated (see the coloring tutorials i referenced above).
an easy way to tell what colors are dominant in a gif, go to the hue/saturation adjustment and turn saturation all the way up to 100.
for instance, this gif of anakin has little movement and i can see the background has hints of blue.
this gif will be easy to manually color on its own, seeing as i can use selective color and brushes to color the background. here is the same gif but now i have colored the background, and i used the method outlined in this tutorial:

NOW, moving onto the second gif. the second gif/scene i chose also has little movement and a background that can be easily manipulated:

using the same method as the first gif, i'll now color this padme gif on its own.
TIME TO BLEND!!! after converting the two gifs to smart object and putting one on top of the other, i set the top object to screen. for this example, i put the padme gif on top of the anakin one. this is what the blended gif and my layers panel looks like:


now, i'll create a layer mask on the padme gif and get rid of any parts i do not want or expose any areas of the anakin gif i want to see.
next, as you can see, the left side of padme's face is purple and pretty transparent. so in order to make it more visible, i will add a blank layer in between the two smart object and use a black brush to paint the areas i want to see (see this tutorial!!)
and here is the final blended gif:

now, you can totally stop here, but for me, it's pretty purple-heavy and i'd like to see some more orange. so i simply take an orange brush and color some areas i'd like to add more orange, and then set the layer's blending mode to color.
and HERE IS THE FINAL PRODUCT!
second method: blend first and then color —
i usually use this method when at least one of the gifs/scenes i want to use has colors or a background that is difficult to manipulate. or sometimes i do this because i just don't know what i want my coloring to look like and blending first gifs me a better sense of the whole gif.
there are two different ways you can blend first and then color. using the brush tool or the gradient tool.
brush tool:
using the brush tool is the best method when there is little movement and when you have distinct subjects to color around.
for instance, this gif of rhaenyra. while there is little movement, the background is a similar tone to her skin so it would be difficult for me to use selective color.
i could possibly use a brush to color the background, but i do not know how that will blend with my other gif and i don't know what coloring will work best overall. this is why i want to blend first!

and now for my second gif. similarly to the rhaenyra shot, the background of this alicent shot has very similar tone to alicent's skin color, so selective color would not work:
TIME TO BLEND!! i do the same thing as the last method (placing one smart object on top of the other) and this is what it looks like:

following the same steps as last time, i erase what i don't want and paint over areas i want to be more visible. this is what i came up with:
because there is that orange light on the left hand side of the gif (on rhaenyra's side), i decided to play into that and go with orange as one of the colors. sometimes the color scheme i go with depends on the colors i find in the gif bc that's just easiest!
now is when i use a brush to color the background! i color the left side with an orange brush and set the blending mode to 'color':

for the second color, the background on alicent's side is kind of neutral so i'm going to pick any color i want! i decide to go with green bc that is her color lol, and i do the same method, coloring with a green brush and setting the blend more to 'color'.
this is what i came up with:

you can totally stop here, but i like adding colors to the bottom, orange on the right and green on the left, so it kind of ties it all together.
HERE IS THE FINAL PRODUCT! (notice how in the bottom left corner, there is some hints of green. similarly for hints of orange in the right corner)

gradient tool:
another tool i use is the gradient tool (not to be confused by an adjustment layer).
this tool is really good for blended gifs that have lots of movement or where there are subjects that are difficult to draw around with a brush.
for example, this blended gif of yennefer has lots of movement so the brush tool may not be the best method.
here is where the gradient tool comes in! i add a new layer and draw a gradient in the direction i want. this is what my gif and layer panel looks like:
next, i change the blending mode. this heavily depends on the scene and also what looks good to your eye, but i usually alternate between 'overlay', 'soft light', or 'color'.
for this gif i chose 'overlay' and this is what it looks like:

again, you can stop here...BUT i want to go back in and intensify the pink/purple color at the top in the white areas. to do this, i am going to use a large soft brush and paint areas, setting the layer's blending mode to 'color.'
HERE IS THE FINAL PRODUCT:

and those are my methods!! if you made it this far, thank you for reading and following along. i hope that this was at least somewhat helpful and huge shout out to @yenvengerberg who's coloring and blending tutorials basically taught me everything i know.
if you still have any questions at all pls feel free to hope in my inbox :D
#ps ask#ask#anon#userabs#usermorgan#tuserheidi#useraish#rogerhealey#usershreyu#userkosmos#angelblr#tuserabbie#userelio#*tutorial
134 notes
·
View notes
Note
Shaders!
How did you get into making shaders? I've done a lot of modeling and texturing, and while I've hacked together code for other things, I've never tried making shaders and it seems like something that would be really fun.
I'd love to know how to get started making things like your raymarching shader. Do you do it within your modeling program or in an engine like unity/unreal? My modeling program of choice is 3ds max and I am not exactly sure if it supports making custom shaders
i think at some point i was just like, i wanna make cool sparkly rocks!!! so i slowly taught myself to make shaders in unity (since i was already learning unity for school). nowadays unity and most other programs have node-based shaders, which work just as well, but i find myself being a lot faster and more organized with just writing them in hlsl (the shader language unity uses)!!
a lot of the things i learn just end up as a result of little journeys - raymarching is a great example, i learned about it by watching a bunch of graphics gdc talks, and stumbled on it in a talk on how they rendered clouds in horizon zero dawn. i cant seem to find the talk it might be vaulted but this paper goes over basically everything from the talk. so i just started implementing the things from the talk!! or at least thats what i wanted to do. i got very stuck very fast and although i looked up a bunch of different tutorials on raymarching, i couldnt crack through it
so i took a break!! until a year later when i knew more and was like, i wanna try again! so i did and that time i got it working. this was my first little raymarching shader :)
anyways hope this helps a bit.. hard to put into words Exactly how i learned but it was mostly just, looking up resources online of cool things i wanted to do, googling whenever i got stuck, putting it down when i hit walls and tried again later, etc... lots of experimenting and failing and trying again !!!!
bit of an old post but here's one specifically for unity shader resources, but most of the fundamentals between programs are the same
92 notes
·
View notes
Text
My First Week Learning 3D
Do I ever stop picking up random skills and hobbies? Nope. It's my horde. As a dragon I must collect them forever and ever.
Last Friday I decided to learn Blender! Here's how that went:
First I did CG Fast Track's Begginer Tutorial.
There I build a minecraft scene:
Then joyfully tore it down :D
Then in the next parts of the tutorial I made a sword!
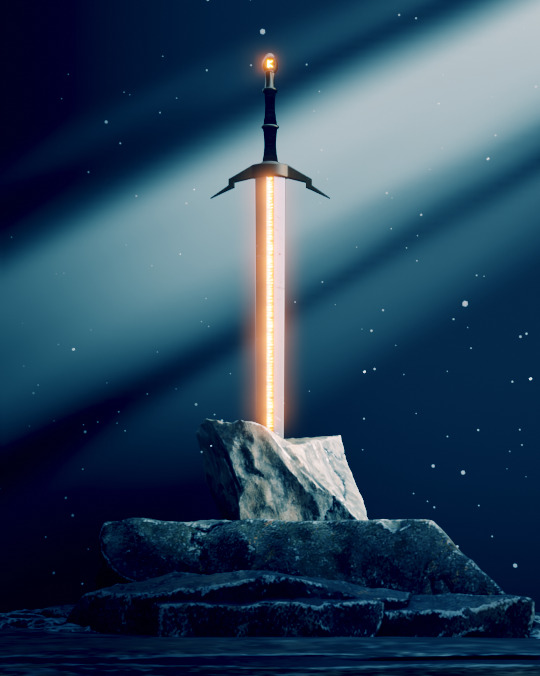
And some quick animations with said sword:

After that I needed to just, make sure I had some control over the movements, habit of changing into the right modes, habit of applying stuff, so I did 3DGreenHorns Smooth living room tutorial.
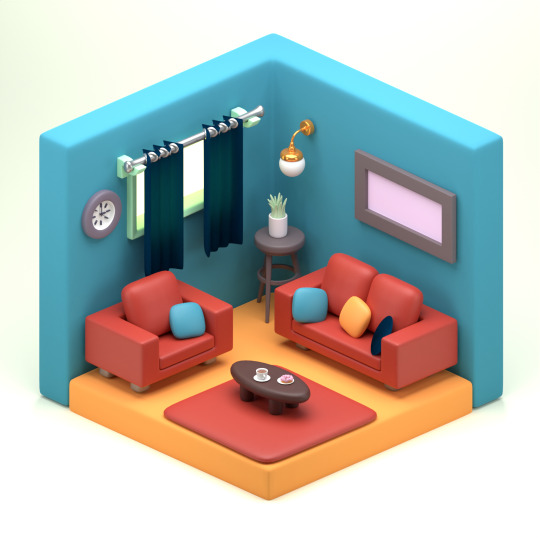
Which may or may not now have me obsessed with the idea of tiny isometric rooms...
I then did Polygon Runway's Spaceship Loop tutorial so I could practice animation.

I learnt soooo much with this one! Like... key framing in blender is AMAZING! I love it! I am obsessed with the idea of animating in this program!
After that I decided to learn to do characters... I tired to make a little Cassandra using Eve Sculpt's character modeling tutorial... But I just got really confused (my fault 100% the tutorial was really good!) and eventually gave up.
But here's some nightmare imagery for you!
This had me feeling a bit sad so I decided to do a quick and easy tutorial, and cause I loved Polygon Runway's first tutorial, I went with their little coffee shop tutorial.
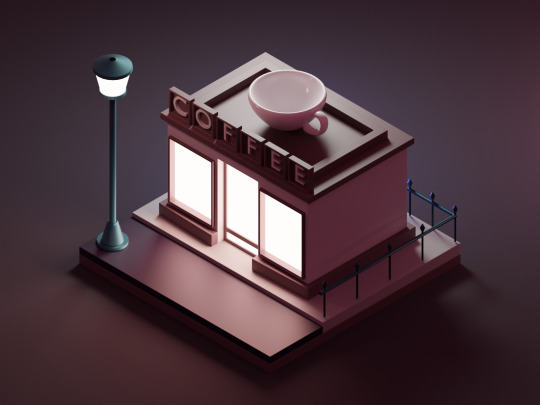
This was so fun to do! It was quick, easy, and I learnt about lighting! :D
After this I allowed myself to indulge in a quick personal project and made a lantern:

Not much to say about this, it's a lantern xD don't ask about the sky, I'm learning, okay!
Then I indulged in yet another personal project as I wanted to test out physics and it's almost October soo....

Little ghost!!
I technically tried to animate it but umm.... my computer does not have that sorta power XD
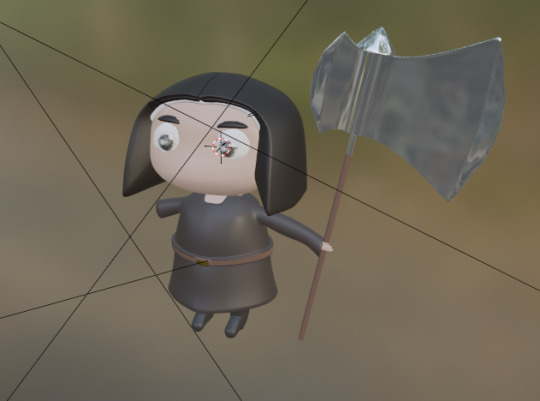
Finally, having picked up my moral I knew I had to learn character modeling so I chose Keelan Jon's character modeling tutorial and this time I pulled it off!
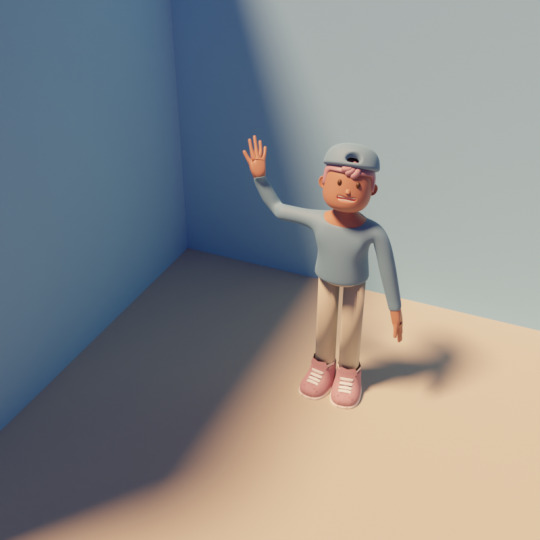
I love how cute this little character is!
There are a few glaring mistakes but.... shush.
I learnt sooo much from this tutorial! It was sooo much fun! And I'm definitely feeling like character modeling isn't too far out of my reach now.
So yeah, that was my first week with Blender. I actually wanted to do a final personal project yesterday to complete the week, but my ex came over and I didn't get the chance. But despite the week being cut short I'd say it was still a very successful first dive into a new program!
I have a few projects planned, but I'm also aware to really get the hang of a program like blender doing a bunch of tutorials is super important, especially just getting used to the keyboard shortcuts, navigation, etc..
Anyway, that's where I've been this week xD
Also, I kinda lied... I said first week with blender but I actually downloaded blender back in February and did one singular tutorials before quitting....
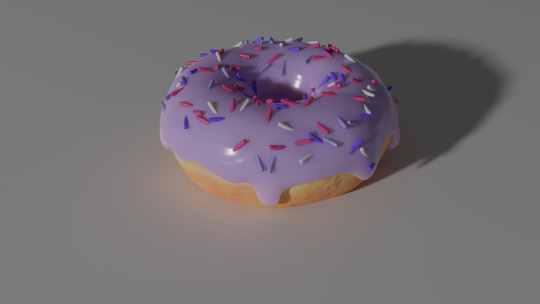
Blender Guru's Donut Tutorial amazing tutorial but... I might suggest starting with something a little less comprehensive xD
50 notes
·
View notes
Note
hii, megan! I hope everything is going well for you. I was wondering if you'd be willing to share how you created the gifs and images overlay effect in this /post/727210103698259968/scott-pilgrim-2010-lgbtqcreators-bingo pretty set? Have a nice day.
I will do my best!
First and foremost shout out to @nelsonnicks Norah whose beautiful gif set here inspired me!
In order to make this as succinct but also thorough as possible, there are some assumptions this tutorial makes:
We are working in photoshop
You know how to make a gif using photoshop
You know how to use the timeline feature to make/edit gifs
Okay let's learn how to make this gif:

(Due to Tumblr's image number limitations, there is a PART TWO linked where I add that "item" and gif, which you can find by clicking this entire sentence.)
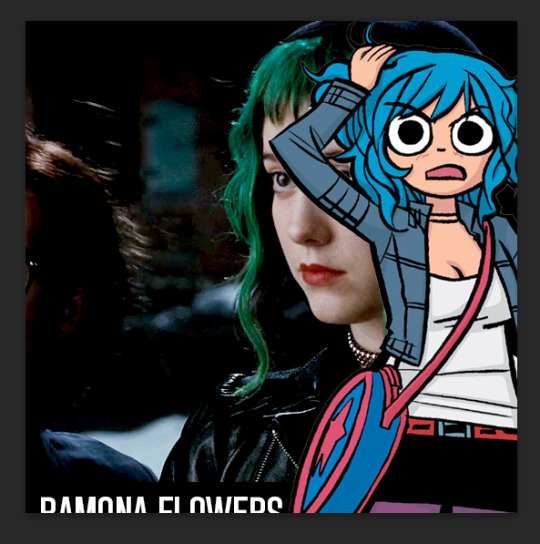
STEP ONE: The Image Overlay
Pick your image! Here's the one I've picked, I cropped a page of the graphic novel:

From there, I'm going to click on that magic wand tool:

And select subject (crudely circled for emphasis)

If it's not perfect, you can either use the quick selection tool to refine the selection before or continue on with these steps and use the eraser later. I do both, but it's up to you.
Now I have a lasso around the subject, and I'll click that "Select and Mask" button next to "Select Subject"
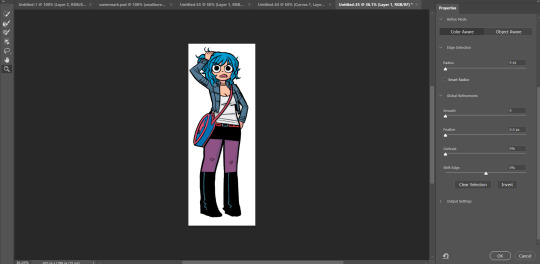
Now I can see what my lasso'd image looks like against a white background, and I see that it's pretty good, nothing I can't fix with an eraser if I really want to later.
If the image looks rougher than you were expecting, use the SMOOTH option and play around with that slider.
If it looks a bit more smooth than you wanted (not clear defined lines where you were aiming for clear defined lines) use the CONTRAST option and play with that.
And if you wanted a little more or less around the edges, you can use the SHIFT EDGE tool to grab like 1px-ish of additional space.
Anyway, I like what I've got, so I am gonna CLICK OK
And I'll either cut or copy it onto a new file, and throw away my scraps.
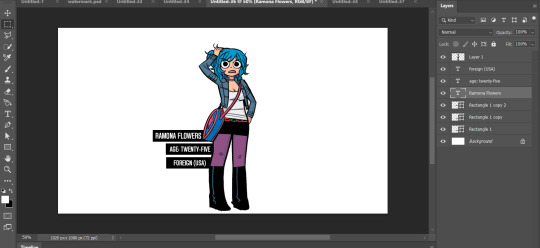
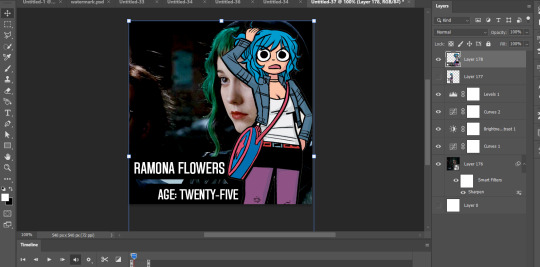
Now it's time to add my character details! I'll use the same format I did for the original set here, and create 3 equal-sized rectangles using this lovely shape tool tool:

So my working file now looks like this:

I move the rectangles closer, I'll want them behind the image of Ramona after but here's just what it looks like while I'm adjusting them.

Then I add the text:
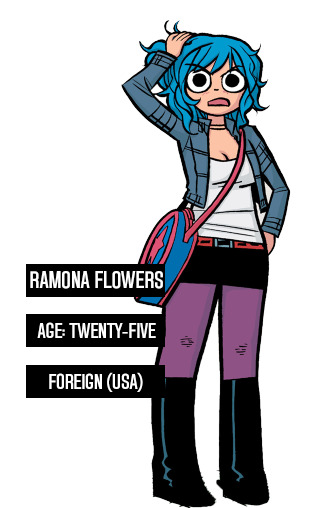
Now, it looks like when I put the bars behind her it'll cut off her name! I don't want that, so I'll adjust the side of the bar for her name and scoot it over....

Nice!
Now I'll adjust those layers to be closer together and behind Ramona...
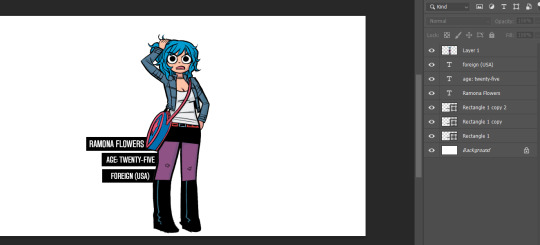
And this is what my screen looks like now!
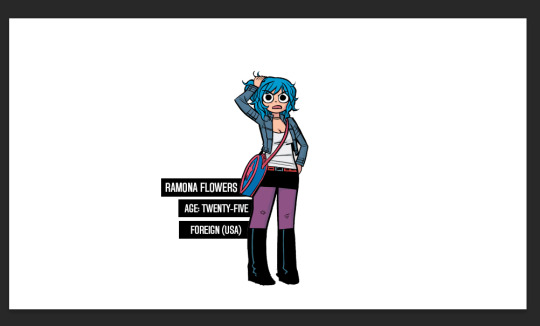
It looks how I want it, so now I'm gonna merge all of the layers EXCEPT the background layer. This makes it so the part that's merged has a transparent background.
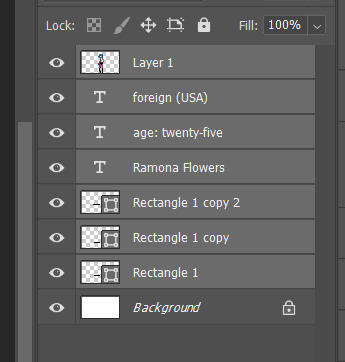
Highlight the layers, right click, and find the "Merge Layers" option
And now it looks like this:
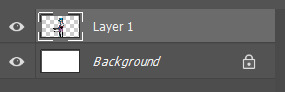
Step one COMPLETE. Great job. Have you been drinking water? It helps you think clearer. Or something.
STEP TWO: Make the gif you want. Sorry I'm not doing this step-by-step it would be so long I'm sorry!!!
STEP THREE: Put Ramona on the gif!
So I just use the selection tool and make a square around my bestie Ramona here to create this:

And then paste her right on top of my gif here:
Woah! She's ginormous!
Let's resize her by hitting CTRL+T....
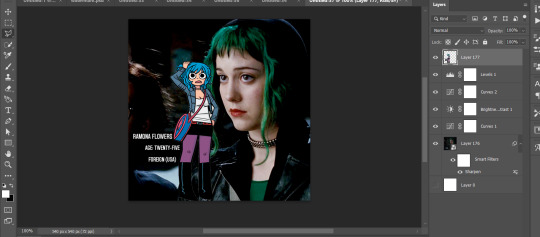
This is where we get a little creative. Personally? I think the font is legible, but doesn't look nice now that I've resized it. So I'm going to back to the original file and UNDO my last action (merging the files):
And hit CTRL + T on the Ramona layer (Layer 1 pictured) and adjust her size:
Time to merge these layers again, and redo the process:
MEGAN SHE'S LARGE AGAIN! I know, I'd rather work with big files I have to make smaller than small files I have to make bigger. Sue me.
Resize the layer, make any adjustments to the gif you have under it in terms of placement/size:
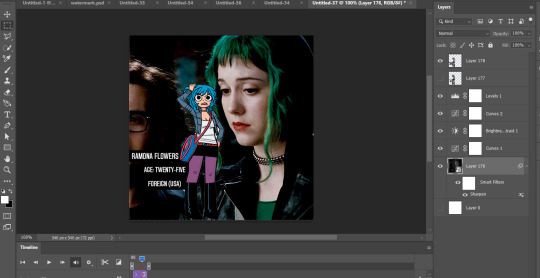
And WHEW we got this part done.
STEP FOUR: Add color overlay
I'm gonna make her color overlay blue like her cartoon hair, so I'll eyedrop tool her hair:
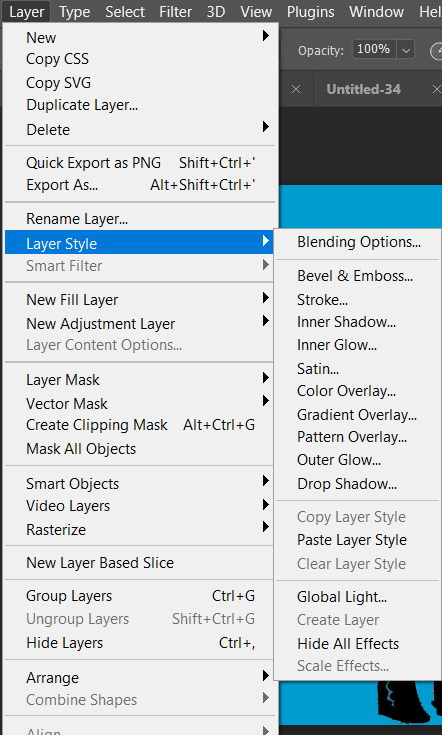
Go to Layer:

Add new, and then using a regular brush at like 5000px just click onto that new layer, and...
Bump that layer under your Ramona cut-out,

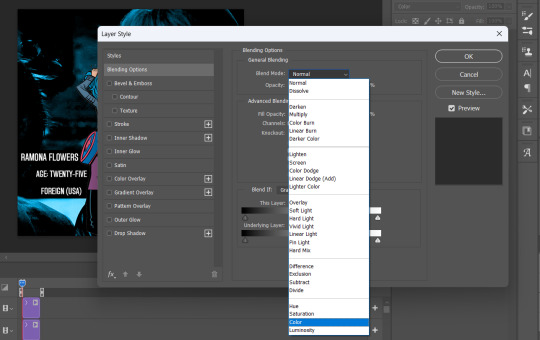
Go back to the layer drop-down menu, and select Blending options...
And this little menu will pop up:
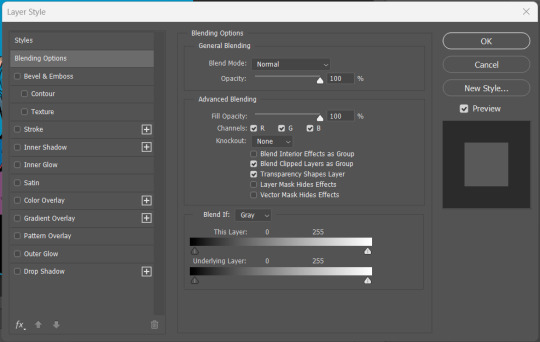
MAKE SURE YOU HAVE THE PROPER LAYER SELECTED FOR THIS. Otherwise you're going to be very confused.
See where it says "Blend Mode" and it has a drop down under normal? For these purposes, I'm gonna use the drop down and select COLOR:
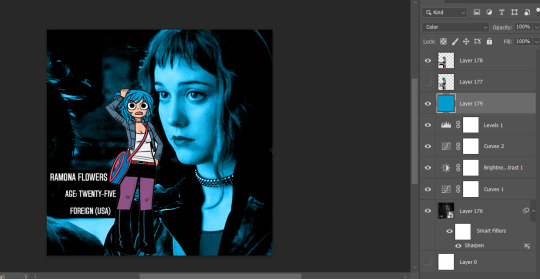
Now you can see that all-blue layer in the background now is showing the original gif behind it, but you know your original gif? "I know of it." It's all blueee. /ref
This is what it should look like:
Before I go any further, I'm going to check my timeline to make sure this is covering the WHOLE duration of the gif:

It does, so let's drag that bar on the right to line up with the end of the gif:
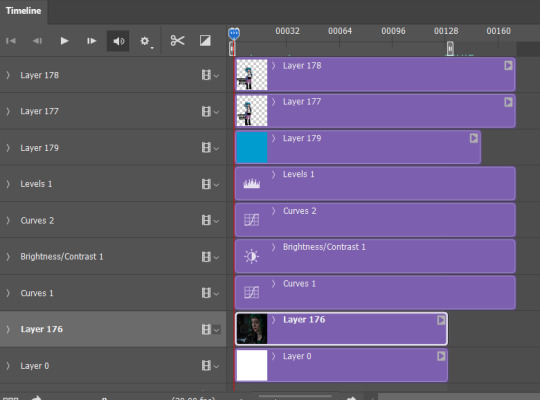
All fixed!
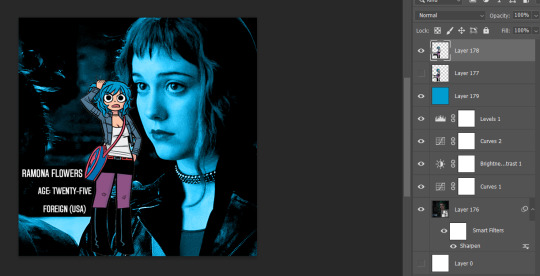
So now we've got this:

Oh man! See those white spaces between her arms? I'm gonna go back and fix those now, fortunately I can edit it directly on the full file itself, by just editing that layer.
Using my magic wand tool, I'm selecting those white spaces between her arms and her jacket and deleting them-
She's not perfect but you can always be nit-picky and zoom in really close and refine with the eraser.
PART TWO
#answered#Anonymous#usergif#userairi#usernorah#userbarrow#userhallie#usercats#tuserheidi#tutorial#gresource#gif tutorial#pscentral
45 notes
·
View notes
Note
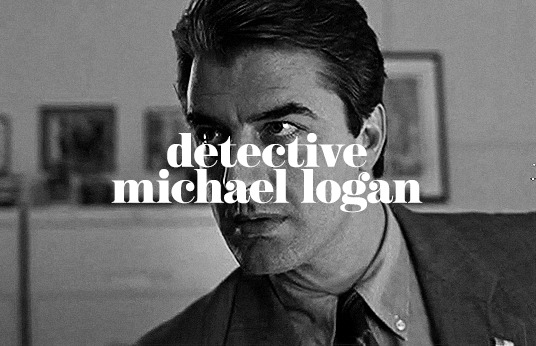
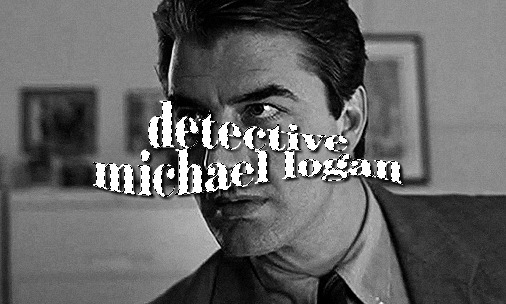
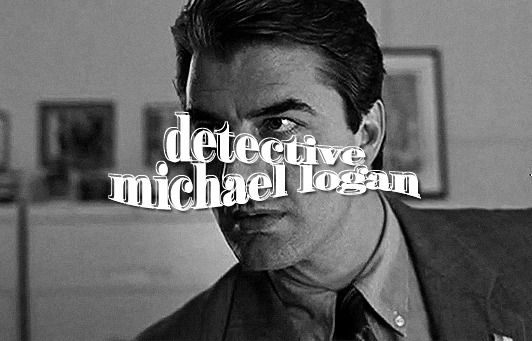
hi your edits are so so pretty!! I was wondering if you could please do a tutorial or give some tips on how you made this Typography? /post/716216798240980992/detective-michael-logan-leader-of-the-nypds
i'd be happy to! it's super easy and fun! ignoring the awful quality and slow framerate, i still love this set tbh
i still have the psd for this, but for some reason, i rasterized all the text layers, so i had to do everything from scratch anyway. i'm pretty sure this is the same font i used, so here are my settings for a 540px gif

so here's our starting point:
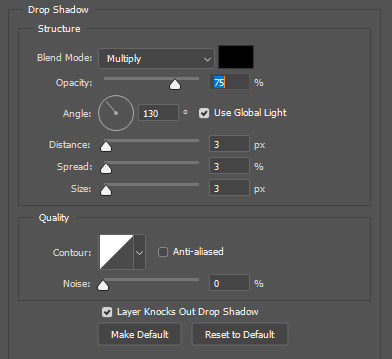
and add a drop shadow, though this will vary by font and gif
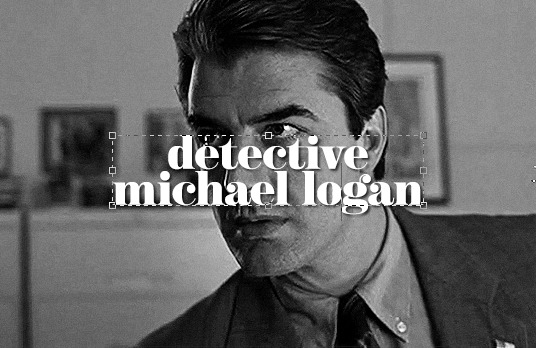
now for the fun part: the text warp tool! make sure you're still in the text menu for this to show up.

the dropdown menu gives you a bunch of different options to choose from. for this particular effect, i chose fish. some of my other favorites are flag, wave, and twist. here were the settings i used. i will say i rarely adjust anything but the bend just out of personal preference. i honestly recommend to just play around with the sliders and see what you like best!

as a side note, when warping text, you'll want to make sure your text box is as small as possible. i'm sure everyone does it differently, but when i make a text box, i start on the left edge of the gif and drag it all the way across to the right edge so it's centered vertically, so when i use text warp, i need to drag those ends back in once i have the size and font settings i want.
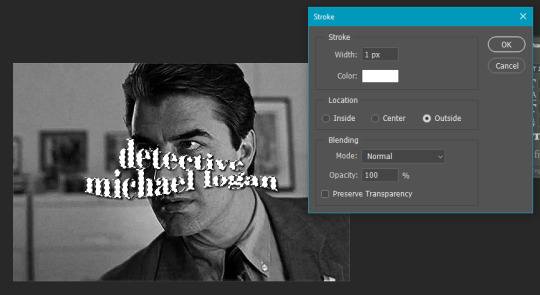
you could leave your text as is, but if you want that extra outline bit, it's also quick and easy! first, duplicate your text layer and then rasterize it (right click on the layer and select rasterize type). then, click on the little thumbnail the arrow is pointing to and click "select pixels"

this is what you'll see. you're selecting only the text on the layer rather than selecting the entire rectangle of your gif. then go to edit > stroke
i do this effect a LOT, and i almost always use 1px. i also usually use white, but that will totally depend on what you're going for. this color is going to determine the color of your outline, though you could always change it later with a color overlay layer style.
your text is still selected, but now you can see the outline we just created. this is the important part! use transform (ctrl+t) and move the selection somewhere else on the canvas where it's not touching your centered text and outline.
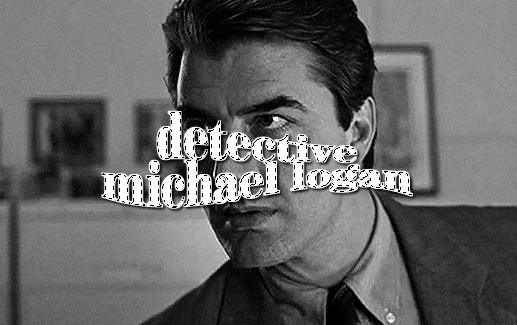
it's still selected (and this ended up being the part i always forgot when i first started doing this effect), so click anywhere on your gif to deselect it. the dotted lines will go away. then erase that text bc we don't need it.

it really doesn't matter when you do this, but switch off the effects on this new rasterized layer bc we don't want the outline to have a drop shadow, just the original text layer underneath.
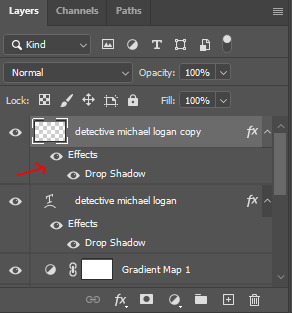
it totally doesn't matter in what direction you move your outline, but i almost always use ctrl+t and move the outline using my arrow keys up two and to the left two.
and we're left with the effect in my set you referenced! this effect looks even cooler when you change the original text layer's blend mode like in these gifs:
please let me know if you have any questions on this or anything else!
13 notes
·
View notes
Text
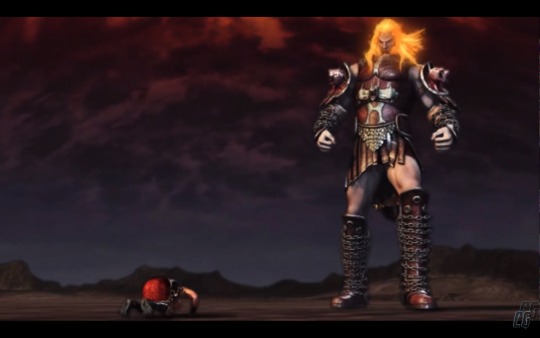
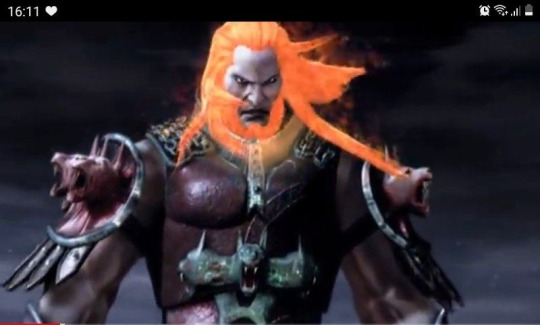
Give me God of War!! (Ares OOAK, Part 2)
Just a reminder that there was Part 1 of this madness.
OKAY
I wanted to wait until I finish sword and spider legs before making a post, but there are three days after finishing the whole armor and I can't wait, I am screaming about Ares's supremacy.
Now I can say, it was hard. And the most hard thing was finding a balance. There are differences between Ares's 3D models from the different years, even in color palette. And I wanted to be as much close to the first game design as it possible. Some features were fully recreated from GOW1, some others I found more good at latest model from GOW3 and reworked them according to it. So at the end we have a good symbiosis I think.
Now let's a take a bow and look a bit closer at the mess under the cut.
Preparatory process
Until eyes are frightened, you can't do anything. To be honest I had no idea from where to start, the plan sounded like a "How to draw an owl" tutorial. Complexity of his armor scared me as hell, and after spending some time with drawings, where I tried to figure out a hook and loop system, which should attach parts to each other, I gave up and started to make his scaly iron belt, it felt more easier. YEAH.
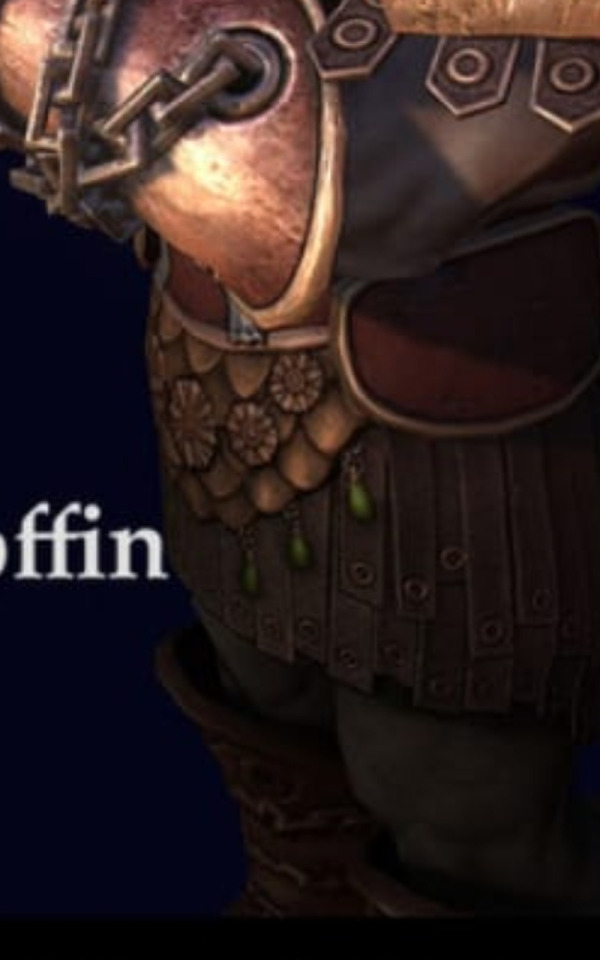
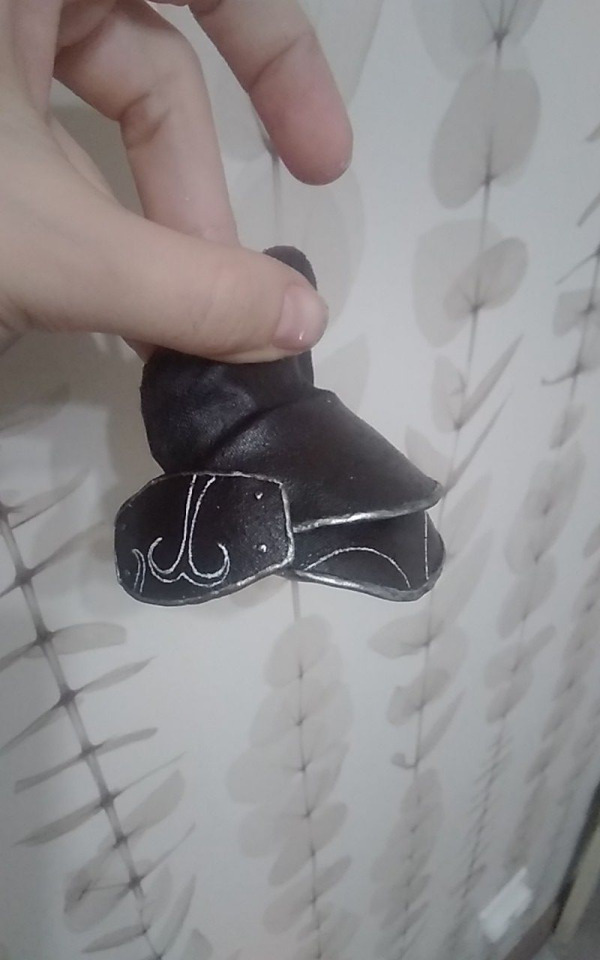
Iron belt
You can see it at the screenshot. Well, one of the versions. Seems, it has no purpose beside decorative, I mean, maybe it can protect the groin, but eh, not really, honestly. At GOW3 model of dead Ares it became more detailed with round flower-like pendants and a little green jewel drops, but also it became golden as all metallic elements. I decided to make everything silver, but anyway, belt is very beautiful and I headcanon it is the same belt, which Ares gifted to his daughter Hippolyte in the past.
I weaponised myself with the smallest crochet hook and red thread and started to knit. WHY KNIT YOU ASK?? I don't know, it is easier for me than sewing all these scales %) Maybe they represents some fishy motives? (His connection with Aphrodite). Or serpent? (One of Ares's children, who was killed by Kadmus). Maybe green jewels is a hint to his mother Hera, because she loves emeralds. Who knows.
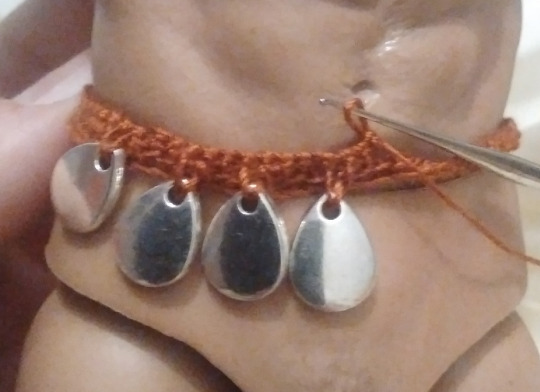

Scales, flowers, suns, glass drops.. If I were Ares, I'd present it to my beloved warrior daughter too.
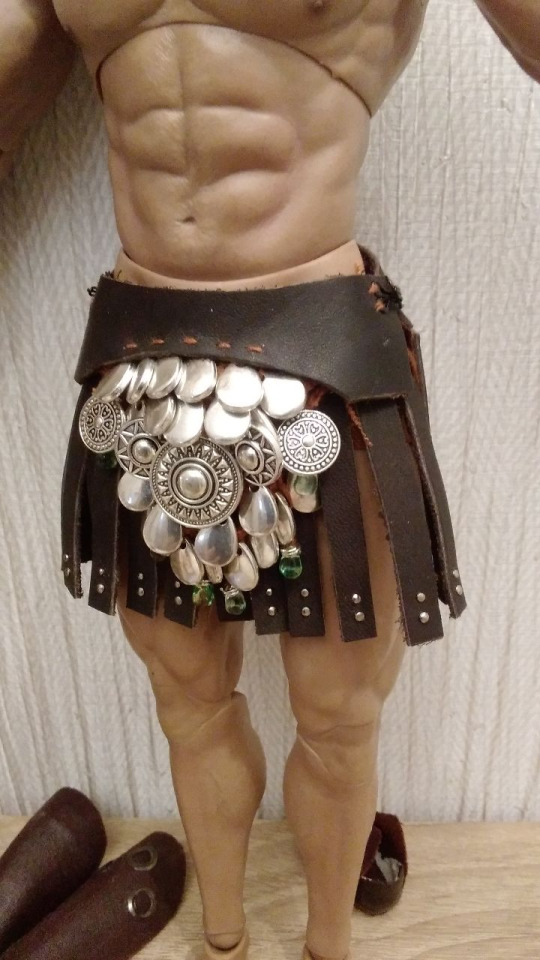
Pteruges
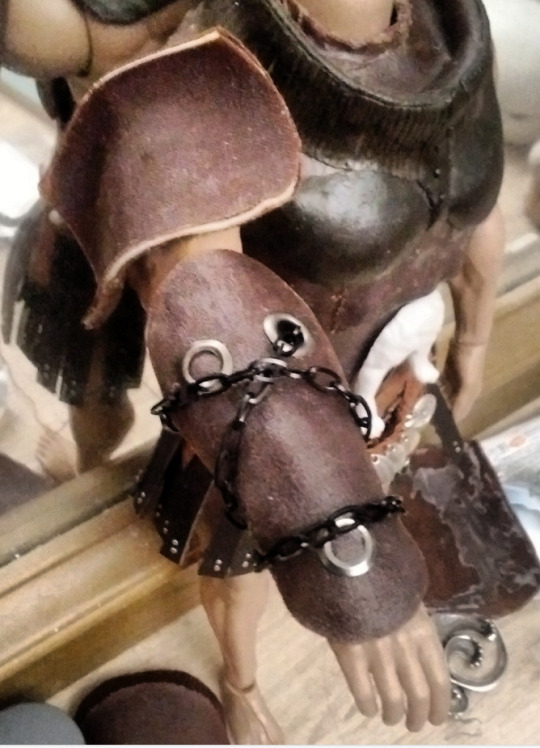
As an example of the true manliness, Ares wears a skirt of course. He is not a barbarian, who hides his beautiful freckled thighs in the pants! How dare we to judge..

The easy part was to make a leather stripes and pierce them with the rivets (little nails, which I cut after this to left a head only). The hard part (which I had a chance to feel over and over again) was to figure out how to attach it to the body and hide all of the fasteners, and how to let stripes flow on his thighs and how the hell it should cover his.. godlike butt, I can't believe I wrote this.. %)
ANYWAY, A MONTH LATER I decided to make it a single piece with the iron belt, by creating a two-part wide leather base, attach knitted waistband to it, then join the each stripe to the separate piece of cloth to make them movable, then attach this cloth to the leather and sew some hooks.
Aaaand the final result!

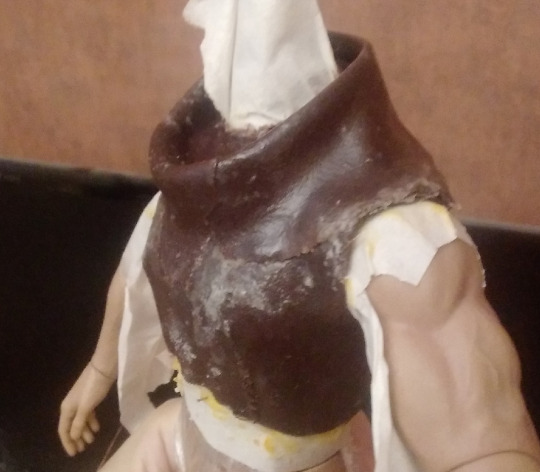
Cuirasse
I just say I literally hanged up myself with it. Here will be ranting...
Let's just think that it is not enough just to recreate appearence. In making 3D you can ignore some aspects like hidden straps and strings, which keeps armor conjoint on the human body. But how to make it wearable to the doll body, which is not soft and has a stable reliefs? How to make armor firm and shaped, but not completely firm, so it can be taken off from the body? Yes, my wish from the beginning was to make whole armor with a possibility to take it off and send nudes dress Ares in different outfit, which i will also make someday. How to make it light, so the doll can stand by itself? How to make it textured, to make it looks rough, to imitate metal or at least used condition? How to make metal parts without using a metal?
OKAY, WE NEED TO BE CANON - I thought and it was a day I decided to not invent armor, but use an experience of the hellenic people, who was smarter than me, I guesse. Because long time ago these people invented Linothorax - composite armor made of laminated linen fabric.
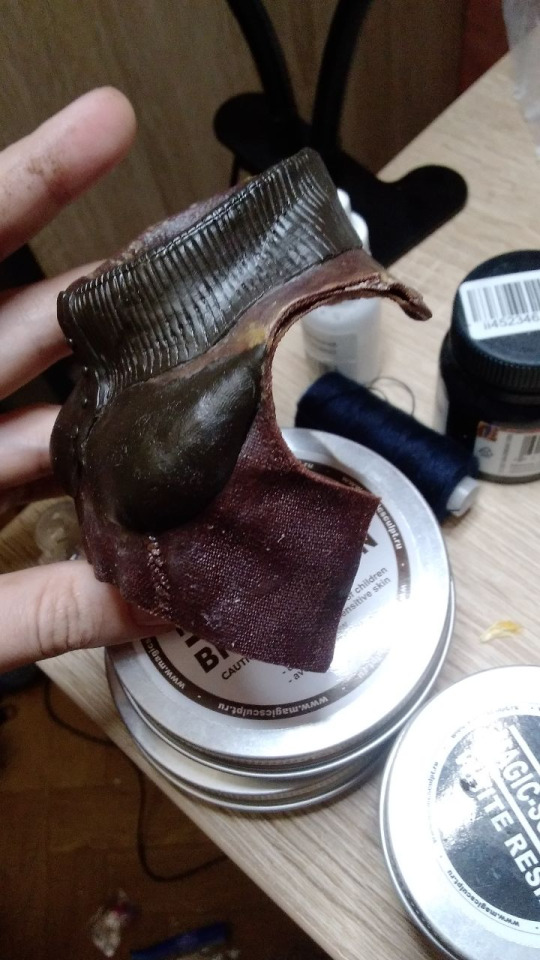
____
First of all, I splited Ares's cuirass to the segments: chest+collar segment, belly segment, spine segment, which emphasizes Ares's love to hunching over a little, and a waist-and-lower segment. Plus cuirasse has chained shoulder straps and side straps.
Well, when you have all elements, it is easier to imagine a complete piece. After that you just buy fabric, glue, chains, 27 hours for your day, new eyes, paint and other stuff. You wrap the body with the film and tape to protect it and start to glue.
And here it is time for me to shut up, I know, you are here to watch a process, not to read an essay.
I started from the front pieces of course. You imagine a pattern, you cut it, you glue it to hold the natural body forms as close as possible.
Collar was formed right here. Gladly we can remove Ares's head when we want to do it...

Waist piece (eheh, spider butt (͡° ͜ʖ ͡°) ) and first attempt to assemble the cuirasse. Here I literally lost my last brain cells and bravery, stopped the process and didn't make straps until the last week.

Anyway A MONTH LATER!!11 after the first assemble I started to sculp a relief of the reinforced chest and the metallic collar. Also we can check how's our decapitated dogs doing. Here you can see a belly piece of the cuirasse, which needed it's own dog decor. I was that meme boy with a knife, yeah..
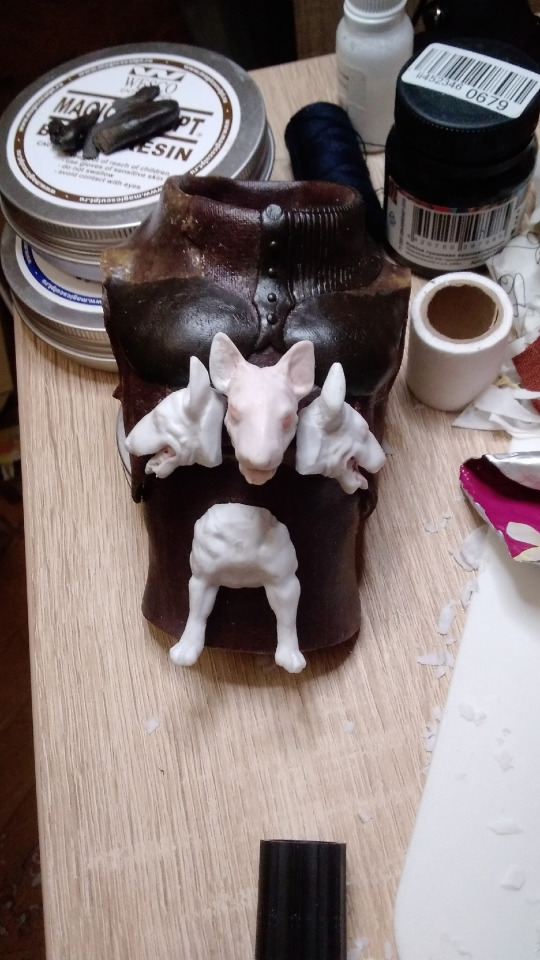
Seemed they doing great! I felt that and decided to finish arm armor.
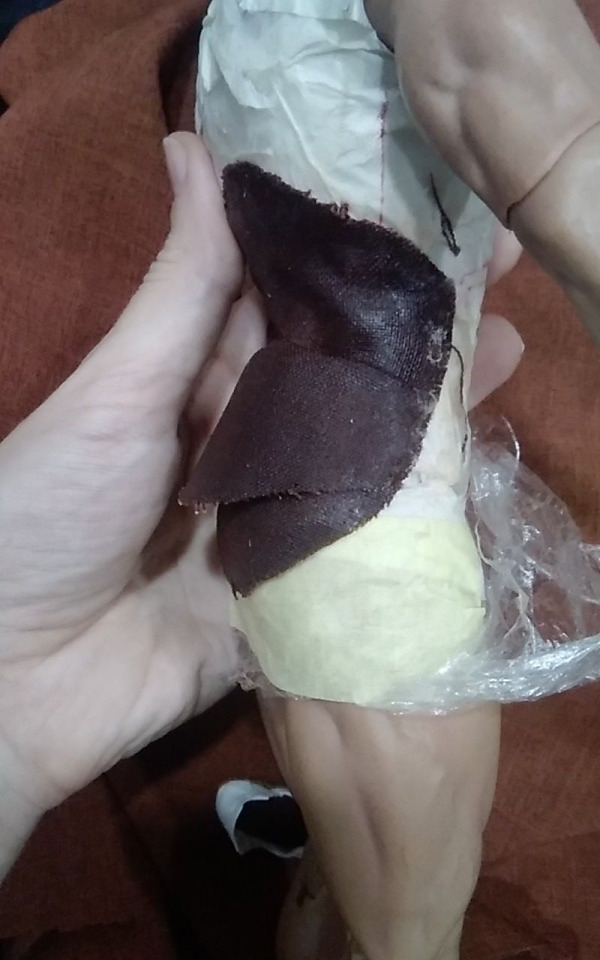
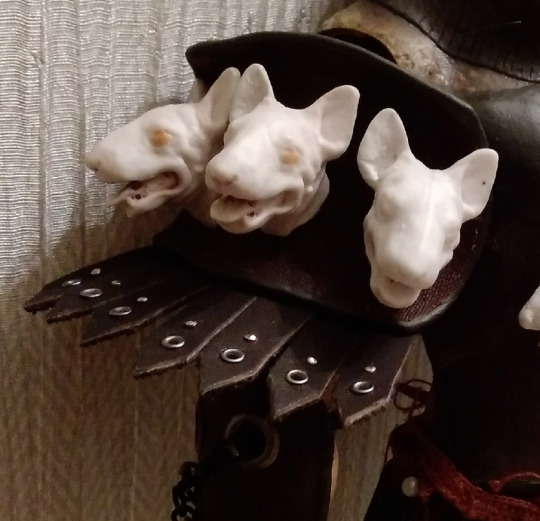
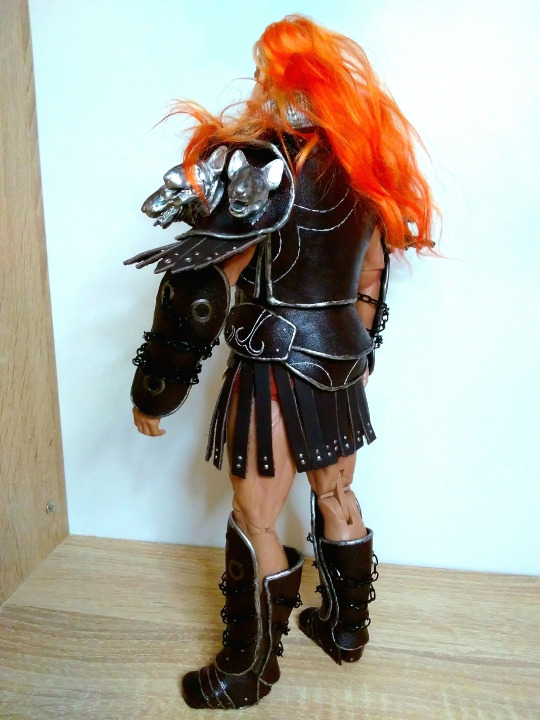
Shoulder pads and bracers
Thankfully making them requires the same process: cut a pattern, glue it, repeat for each arm. Here is close ups of the leather "feathers" pierced by rievets, chained bracers (I am very proud that I recreated it fully like at the Ares model. Bracers has no other strings and stays at arm only because of the chains) and shoulder pads as a base and as a complete, fully Cerbered piece. Actually this part wasn't really difficult, I've just delayed the inevitable.

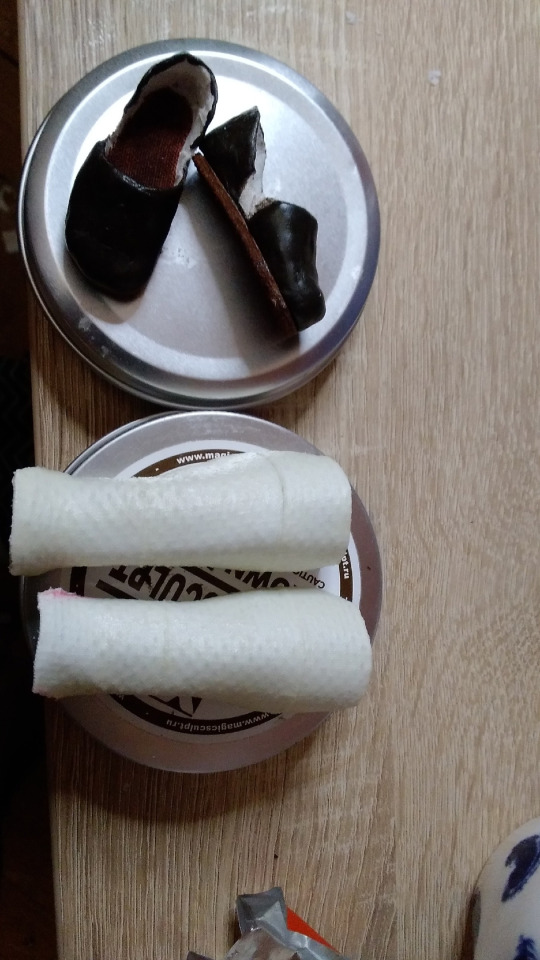
Boots
The first GOW novel says he weared sandals!!! Bloodstained SANDALS! But this novel was written much later, so we are making rocker boots. ᕕ(シ)ᕗ HEY!, we are laughing here, but Ares is smart, Ares don't want to break his toes by kicking someone's helmet! Maybe after having some experience %)))

Well, as I said in my previous posts, his boots was the most agressive part his armor. Heel and shoes toes should be firm, but sole should stay soft. Also the whole construction of the boots should looks monolite with the greavers which cover up the layers of the material above the ankles.
Don't forget about the chains and double emotional damage, because there is two legs!


A little more damage as a person you receive, when you understand that you need to process each edge of each piece, because all armor pieces has visible layers. And only after that you can paint everything, draw Ares's assymetrical ornaments and dress him up.
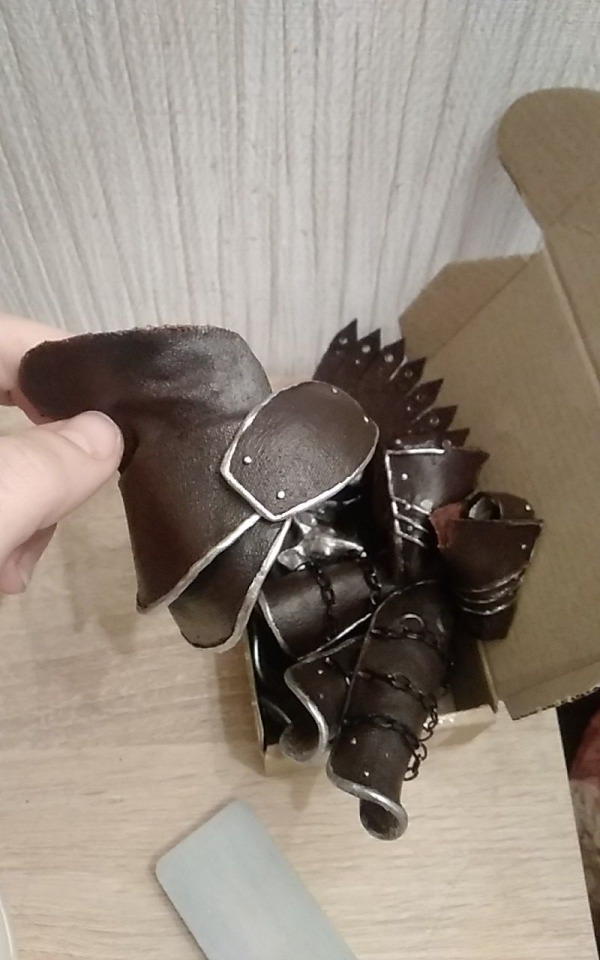
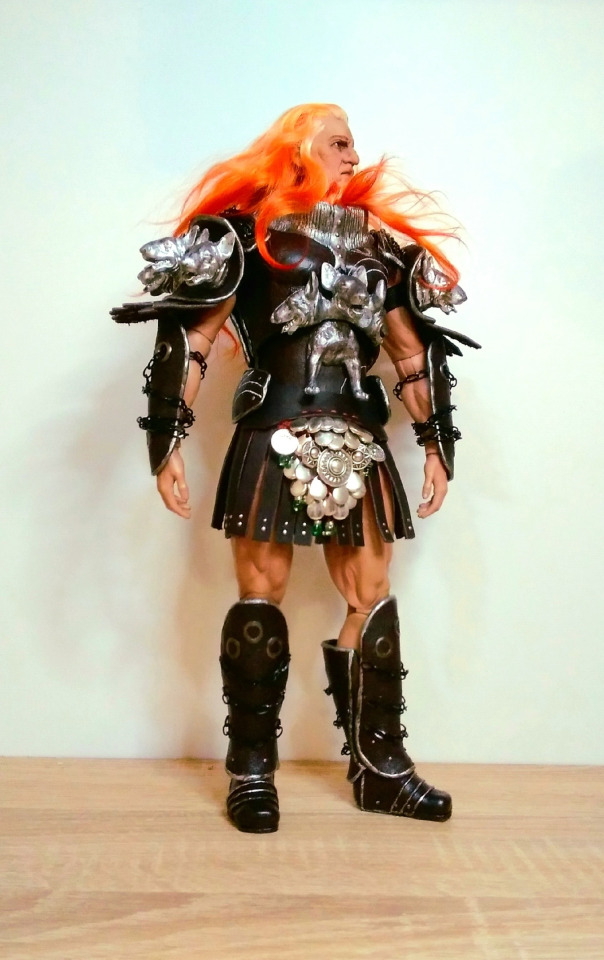
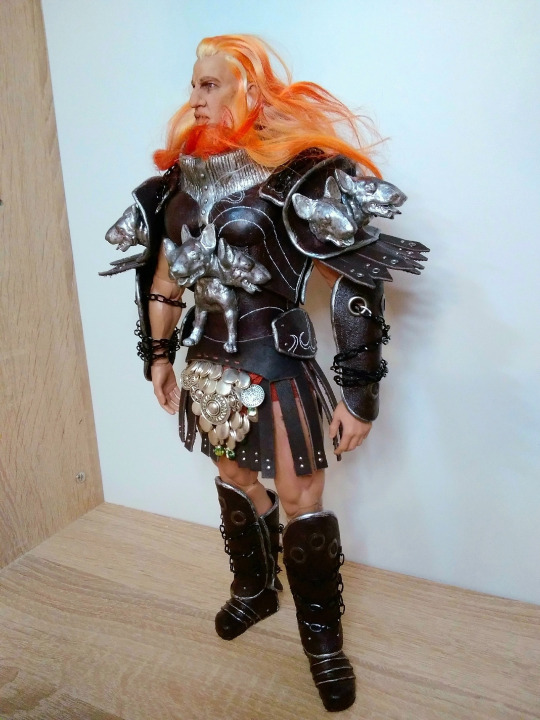
That's how we reach the end.
Here he is. O defence of Olympus, father of warlike Victory, ally of Themis, stern governor of the rebellious, leader of righteous men.
Kratos's yes-homo partner and his personal most vieceful enemy.
Ares! God of war!


Thank you everyone for your patience while reading this duvet cover.
See ya in Part 3, Skeletor will return soon with a sword, spider legs and normal photos. And stay tuned, I will post some portraits next time!

#ares#ares god of war#kratos#kratos gow#god of war#gow#god of war ragnarok#gowr#ooak doll#ooak#action figures#upn the sky handycraft
21 notes
·
View notes
Note
Hello!
I am in awe of your edits and gifs !!! :0
I wanted to try making my own, but I have no idea where to start tbh - do you have any pointers or advice for a good tutorial? Or what programs you use?
I am especially interested in making gifs for bg3, aha.

Hi there, first of all thank you so much! I'd be happy to help, so I made a little tutorial that basically depicts my process. Full disclosure, this is the way I make gifs, so it may differ from how other creators make them. :3 I use Photoshop CC 2018, but the process should be similar in different versions as well.

Things to keep in mind:
gif sizes: when making gifs you should make sure their size is no larger than 10 MB (as of currently), since otherwise tumblr will not be able to post them. the best way to lower gif size is to lower the amount of included frames. you can simply delete them in the Timeline window.
gif dimensions: to avoid tumblr resizing your gifs and turning them into a blurry mess, keep their width 540px when posted one above other, or 268px if you want to post two gifs side by side. the height doesn't matter as long as you keep the width as mentioned above
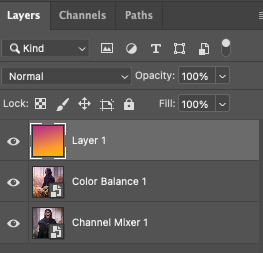
psds and recolors: I use extensive recoloring on my gifs which includes filters like color balance, selective color, gradient fill, hue/saturation, curves and more. many creators offer their own psds as a free download so you can use them for your gifs but these will usually require some manual adjustments as your giffed scenes could have a different lighting situation going on. this tutorial is focused more on the actual "making" of a gif, but I would be happy to make another one that would be more about the actual coloring I make :3
With that being said, let's go! Read on for the full tutorial.
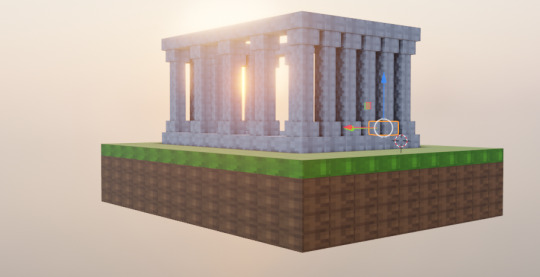
First, you need to know how to actually make a gif. For recording purposes, I use the GeForce experience app since I have an Nvidia GPU, but there are many other programs online that you can use to record footage of your games. Basically, we want to make a short video that we will then turn into a gif in PS.
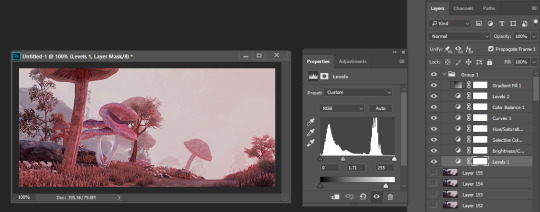
Once you have a suitable footage, open up PS and go to File → Import → Video Frames to Layers...

You will see a window like this. It's possible your recorded footage would be longer than the accepted file size of a gif, so you should choose which parts of the video you want to include (you can see them as two little arrows under my video here). Once everything is in order, hit OK.

Now it's time to resize the gif, I usually use 540x250 for my scenery gifsets, but as I said, it's the width that matters. Since I am planning to post this gif on its own, I chose 540.

Now it's editing time for me, but you can choose to do this after you sharpen the gif, which will be depicted later. I love pastel pink colors so I used selective color / color balance here to make it more pink, and several levels / curves layers to up the brightness more and make it look more pastel and "washed out", but this all comes down to personal preference naturally!
Sharpening a gif is optional, but it makes it look much more crisp, so I highly recommend it! First, you want to go to your Timeline (if missing, you can re-enable it through Window → Timeline), click the menu icon, and Select all Frames. Now we need to do the same for our layers (you can do this by selecting the first layer, holding shift down and clicking the very last layer).

After you have both your Layers and Frames selected, go back to Timeline, click the menu button again and choose Conver to Video Timeline.
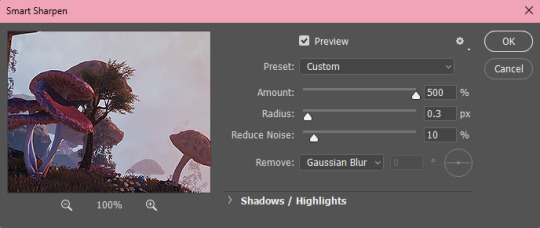
Now go to Filters → Convert to Smart Filters. You can ignore the pop-up message or choose to click the prompt to never display it again. After that go back to Filter → Sharpen → Smart Sharpen.

You can see the settings I use here. Hit OK and ur done!
Now we want to save the gif. Go to Export → Save for Web (Legacy). In earlier versions of PS it might be simply listed as Save for Web. It may take the gif a few seconds to load, depending on the size. In the pop-up window, make sure your looping options are set to Forever.
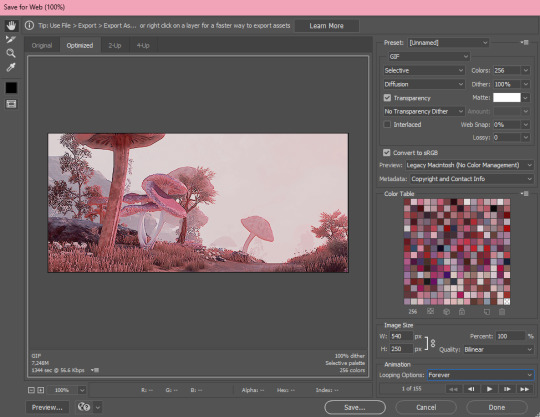
And with that you are done! If you have any questions please don't hesitate to ask me. :3
Unsharpened version:
And sharpened:

#ask#saturnawa#gif tutorial#ps tutorial#ambie's tips#hope this helped! feel free to ask me any more questions uwu and good luck!
45 notes
·
View notes
Text
Little update
Hey everyone! How is everybody doing? I hope you're well :)
With me, things are going well. After three trying months, I emerged from my art block in good spirits. The weather is finally turning for the better and I got some new plants for my room. What more can a gal want, really?
I'm working on some cool projects currently! I'm working hard to produce about 80 illustrations for the book of fairytales. It's tough, but so far so good!
And.. I've gotten a few commissions since I announced I'm open for them, which is great! Illustrating isn't what you call lucrative, so I'm grateful for your support and ideas. My commissions will remain open as long as I can handle the amount of submissions (and right now it's very manageable) so don't worry if you have an idea, but the timing isn't right yet. I'll be here :)
I'm also working on setting up a Patreon... It's a bit confusing for me because I'm not entirely sure what I'm supposed to be doing there and the website is in Spanish, so I have to use Google Translate, which isn't ideal... But! I'm chipping away at it, it's going to be fine.
I was mostly wondering if any of you would be interested in joining a Patreon with me? I would be making some exclusive illustration content, behind the scenes and tutorials... I'm curious to hear what you think, so feel free to share thoughts, feelings, doubts, all that jazz.
I'm just curious, so putting this out there!
The next teacher is almost ready, I'll post them this week :) I think you'll like this one!
Best wishes,
Fleur
12 notes
·
View notes
Text
lovely anons have been requesting a gif tutorial, and while there's plenty photoshop ones out there I think there's only a couple photopea ones (if you dont know photo pea is like an internet photoshop basically) so I thought I'd make a little tutorial on how I do my gifs!
first you're gonna want to use any gif making platform to actually turn your video clip into a gif. I personally use giphy but I know there's a bunch of other platforms for this. then you're just going to open the gif in photo pea either by clicking "open from computer" on the home page or dragging it in from finder (Mac) or files.
IF YOU'RE MAKING A GIFSET: the first thing I do is make sure all of my gifs are the same number of frames. its important to do this if you want all of your gifs to restart at the same time! to do this I just go to the side where all the frames are listed - this one has 29 frames (note: it says 28 on the top frame, but the very first frame is listed as 0, so always add 1 to the top number to know now many frames there are). what I do is find the gif with the least amount of frames and then make all the gifs the same number - depending on what part of the gif I want to keep/delete I'll delete frames from the beginning, end, or both which usually requires some basic math
next, I click on the top frame, press shift, and then press on the bottom frame to select all (unfortunately there's no keyboard shortcut for this I don't think). then I'll click filter -> sharpen -> smart sharpen that way I can freely customize the sharpness of each gif depending on it's original quality. usually I do 200% at 0.5 pixels but I'll adjust if necessary.
now comes the actual coloring of the gif! all of these will be adjustment layers (layer -> new adjustment layer).
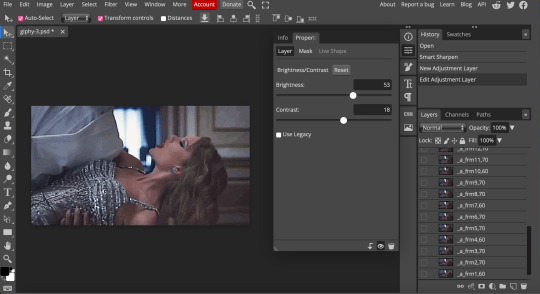
first I'll select the brightness/contrast layer and play around with those settings until it looks good to me.
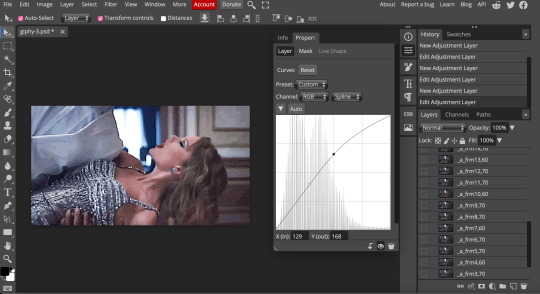
next, I'll play around with the levels and curves layers until it looks how I want it.

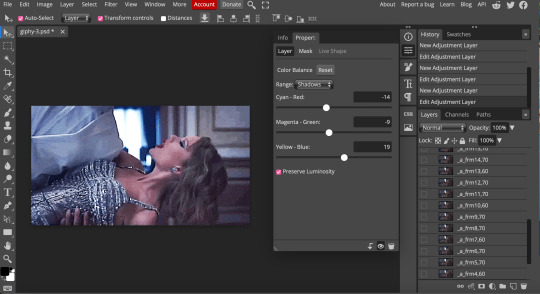
sometimes I'll stop here if it looks good, sometimes I'll play around with the saturation adjustment layer, or in this case I'll edit the color balance to deepen some of the shades that aren't popping out how I want.
IF YOU'RE MAKING A GIFSET: the easiest thing I've figured out for coloring multiple gifs to save time is duplicating these adjustment layers to each gif in the set (layer -> duplicate layer into; it'll prompt you to select the psd you want to add the layers to). when I do this I turn off the visibility for each one and one by one turn them back on (starting with brightness/contrast) and adjust them if necessary.
if I'm not adding text this is where I'll end, but sometimes I like to add texts to more of my creative gifts. usually I'll follow a tutorial (@usergif resource directory has a bunch of good tutorials that can be adapted to photo pea, or I'll just look them up on Tumblr itself). sometimes I like to do things a little simpler, which is what I'll show here.
you're going to click on the T towards the bottom on the left sidebar, type put your text, change your font (photopea has a ton and I'm not too picky but you can download fonts from the internet and upload them), as well as color and size (don't forget to select all of the text when you do this!!) then click on the cursor icon to move the text to your desired placement.
then click on the layer in the right sidebar and select blending options.
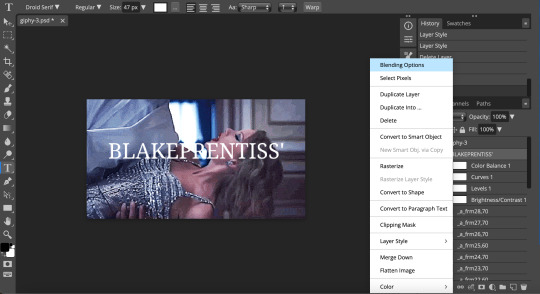
I'm going to add a stroke of 1px in black to my text and position it to the center. I do this on every text I add to gifs (even if the text is black, which I ended up changing this one to) to add some extra size/detail.
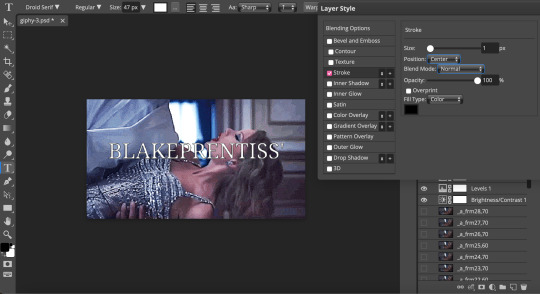
you're more than happy to stop here, but I like to play around with some of the other blending options until I'm satisfied. sometimes I'll lower the fill to 0-30%, or in this case, I changed the blending option to overlay to get the desired effect. (both under blending options)
I followed the same steps with my second row of text, except I changed the font and then warped the text a bit after placing it where I wanted by T -> warp -> arch and changing the settings.

and you're done! file -> export as -> gif to save it! I also like to do this periodically throughout the process to make sure the gif is giffing if you know what I mean

#gif tutorial#photopeablr#photopea#photopea gif tutorial#mine*#tutorial*#tutorial#gif making tutorial#gif making
11 notes
·
View notes
Text
Special Informal Devlog
Hi-ho, Wudge here! Aaaa. I missed the update last week... as we crawl closer and closer to release, it's become harder for me to write devlogs. I'm making progress every single day, and that makes me so frustrated that it isn't done yet, you know? 😭 Something something curse of perfectionism...
Anyway.
I thought I'd try something a little different with this post by chronicling a specific screen I've worked very hard on, from start to finish!
(Pictured: a preview of where we're gonna end up)
It all began on... August 2021?! Yowza, two years ago! When I posted a poll on tumblr and on itch about how I should handle flirt indicators. The votes were split 50/50 between two popular options, and I was able to surmise that yall would really, really love an option to toggle between the two.
It didn't take me long to figure out how to implement the toggle itself.
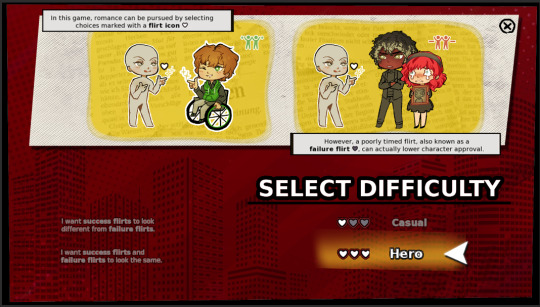
The following year (September 2022), I came up with the idea of putting in an illustrated tutorial on how my flirt indication system works - after all, poll participants had told me that they loved the idea and had never seen it before in other games. I was on a treadmill at the time, so I quickly doodled the idea on my phone. It looks like this:
Then when I got home, I did a rough pen draft to solidify the idea...
I worked on the digital version over the next 2-3 weeks, and asked my friends for help with editing the text to ensure clarity.

.... Then I took a looong break from the infographic to, uh.... write, edit, playtest the game, draw expressions for Griffin CG, draw expressions for the landlord, work on a new Clammy Lady sprite, playtest the game again, make all the characters blink, make the first glowing animation for Jade's powers, code in Griffin's CG expressions, stress about paypal making changes in my country, do concept art for upcoming npcs, write some more, playtest some more, draw a birthday picture for Dart, write devlogs every single week, make sure all my files were safely transferred to my new laptop before my old one completely died... etc.
So it was February 2023 by the time I came back around to try implementing the infographic in code :')

... It was functional, but no matter what I tried, I didn't like how it looked with everything crammed into one page.
... Then I got really sick... but after I recovered and did some more work (drawing, writing, playtesting, etc) I came back to the infographic with the intention to learn how to code pages in renpy.

Still didn't look phenomenal, but there's a whole lot more breathing room! This was in April 2023.
I took another "break" (worked on a million other things) and then... FINALLY... in late August 2023, just a few weeks ago, I had an art breakthrough!
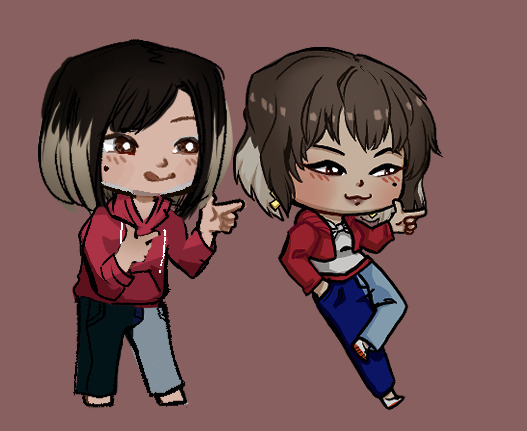
I had garnered a better understanding of color and poses, and as a result my chibis became a LOT cuter! I was able to redraw most of them without too much hassle - whereas when I first started, it would take me all day to draw a single one.
I also drew custom heart icons (a plain heart, a golden heart, and a broken heart), figured out how to make text buttons look more fun and intuitive..
And here's where we're at now!!! I still need to draw eyes for Dart.... but I researched and absorbed a lot about screen compositions, and had a rather late realization that I could re-use backgrounds and assets I already have in the game.
That's it for the special edition. I'll update with more soon!
Stay safe and keep warm,
Wudge.
#herotome update#herotome highlights#interactive fiction#indie game#oelvn#otome#visual novel#otome game#english otome#indie#chibis#anime
48 notes
·
View notes
Note
Hi! Can you pls explain how you can do red lips on your gifs? Your colorizing is so vivid always especially on lips. I'm so impressed!
HI! yes, I for sure can explain this to you because its actually really easy. so under the cut I'll make a tutorial on how to get this lip focus effect on my gifs.
I'm going to be using oscar because he is the most naturally blushy person on the grid but I'll also quickly explain things you'll have to watch out for with different skintones.
so, the big trick to this is to make sure your lips/blush are a contrasting colour in comparison to the rest of your gif.
(think about the colour wheel, green is the opposites side of purple)
lips tend to have a more purple/red hue to them while skin tends to be more orange/yellow in undertone. so what we're gonna start with doing is adding contrast and making sure greens and blue's are heavier then the yellow/red is.
I prefer using curves and colour balance for this as you can play around a lot and use the dropper tool in curves to make your life easier
now, I like adding a few more layers of colour balance and channel mixer to try and neutralize the colour even more but this all depends on the raw footage and on the skintone.
now that we're happy with our neutralizing colour we're gonna be grabbing hue/saturation which is THE big trick to this colouring
you're gonna grab the lil hand tool at the top left and click on the darkest part of the lips
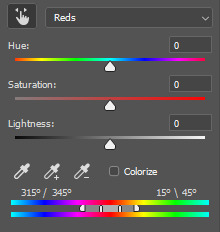
now this is what your hue/saturation should look like. we're going to focus on the little bottom part and we're going to expand the little tabs and slide it to the more puple part of the colour line.

then, we're going to slide UP the saturation so far as it looks natural, you should be able to instantly see a difference (if you dont, slide around the little tabs until you do see the lips brighten up) I like to darken the lightness too to make the colour a bit more neutral.

with this part you have to watch out with different skintones.
every person has different under tones, people with white skin tend to lean more pinkish while darker skintones especially lewis has more yellow skintones, because of this you will probably make lewis's skin FAR to yellow which is obviously NOT good.
you can still use this style with those skintones you just have to watch out more, neutralize better and get the sliders more purple as their lips also tend to have more purple tones in them.
here's a fantastic tutorial how to get rid of yellow tones in black skin if you do run into this problem with your colouring.
now, you have your basic lip blush, from this moment on you can do whatever you want with the colouring, I like to neutralize more after this, so adding another few layers of colour balance.
then I tend to go into the red and yellow of selective colour and manually play around with making the lips/blush more coherent with the rest of the lighting.
to simplify this I'm only going to show yellow and red but I normally use all colours on selective colour.

and then I just add my normal colouring which can be whatever you like to do. I like adding more contrast and highlight spaces to add more depth to his face and I almost always add one more layer of hue/saturation which will make his blush and lips pop out even more.
which makes this my final colouring result
I hope this was coherent and logical and ya'll understand what my thought process is with my colouirng. if it's not or you want some more explanation on something please dont be scared to ask!!
if yall do use this style and colouring please do tag me I'd love to see what ya'll make!!!
16 notes
·
View notes
Note
Hi! I was wondering how you get such high quality gifs? Do you have Topaz or maybe sharpen in Premiere/After Effects? I’m new to making gifs; I’ve been exporting 1080p clips from Final Cut and recoloring + turning into gifs in Photoshop at the 540p width for tumblr. The results are passable but nowhere near the quality you’re producing. Even exporting 1080p gifs for Reddit, while lovely, don’t compare. Yours must be 4k or even 8k. If you don’t mind sharing, I’d love to know your process!
Hi! Gosh, really, thank you for the kind words ♡ That means a lot!
I don't do anything special with mine, I just use the same files that are in 1080p. I do have an upscaler but that can only upscale any photo to x4 the size. I think I can probably upscale gifs, but I'd have to manually upscale every frame and then make the gif in Photoshop, but ngl.... I'm a lazy gifmaker hahahaha.
My sharpening process is very simple. I only use Photoshop in making gifs. I've pretty much used this process in all types of media/fandoms (Anime, dramas, tv shows, kpop, etc.) Feel free to experiment on your style as it varies with everyone else. You can find the full tutorial under the cut.

Edit: Maybe I shouldn't have used such a dark gif as an example hahahaha oops
I use the timeline method in Photoshop to make my gifs. Here is a tutorial that's a bit similar to how I make gifs. For Arcane, the frame speed I use is either 0.04 or 0.05.
I've based my sharpening process on a tumblr tutorial years ago by another blogger but I can't seem to find their blog post :(((( if anyone knows it, please let me know!
My sharpening process are as follows:
First, I duplicate the base gif in photoshop

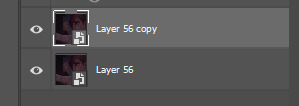
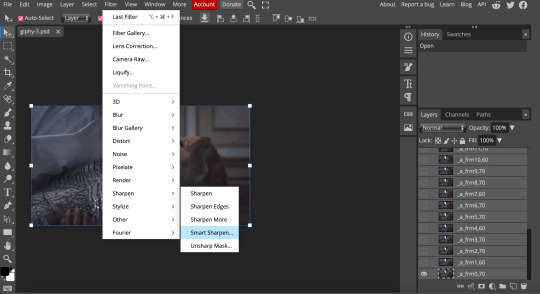
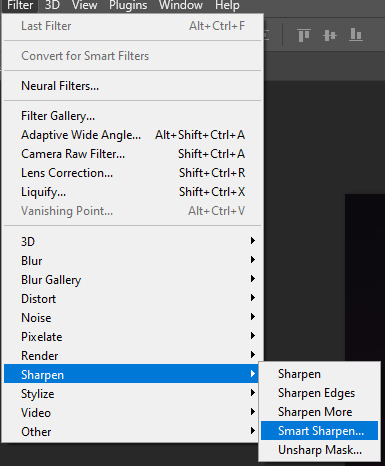
So now, I have 2 copies of the gif. Then, I'll be sharpening the duplicate layer, so go to Filter -> Sharpen -> Smart Sharpen
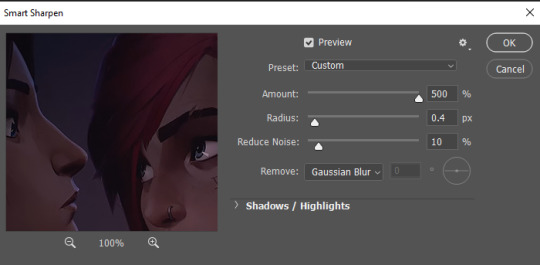
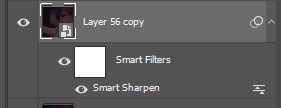
Here are the settings I use to sharpen gifs:
Click okay, then you will see this under your layers
Some people stop there and then color their gifs, but I prefer to add another layer of Gaussian Blur to make the gif less noisy.

Here are my gaussian blue settings:

Click okay, then your duplicated layer will look like this:
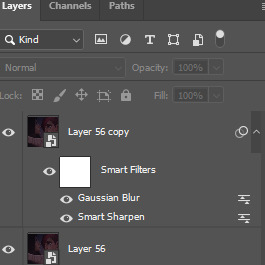
Next, make your layer opacity to 80%.

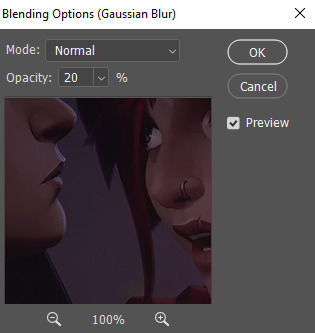
Then, double click the right adjust icon on the gaussian blur settings

Set the opacity to 20%, but you can adjust as needed.
And you're done sharpening the gif! You can color and add PSDs to it right after. As always, dark scenes are going to be difficult to sharpen and color, so try to experiment and tinker around.
Hope this helps! If you have any questions, feel free to send an ask/message!
#answered#littlewildbouquet#maybe i shouldnt have used such a dark scene sdkfjskfsf oops#ofc im gonna use caitvi as an example tho LMAOOOOOO#tutorial
48 notes
·
View notes
Note
Hi! I love this /post/708273065503653888/paying-attention-to-things-its-how-we-show gifset so much! I was wondering if you could tell me how you achieved that line/text effect or if you maybe have a tutorial or something 🥹 thank you so much 💖
Hi there! It's actually super simple, but I can absolutely show you how!
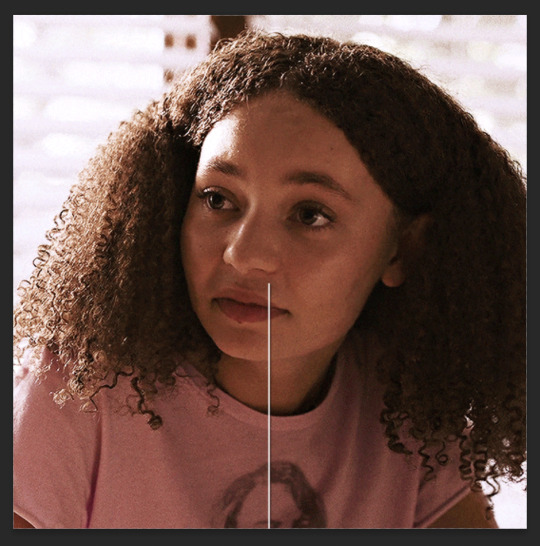
How to do a through-line effect on gifs
The gifset in question is this one here.
First, start off by making and coloring your gifs. Make sure they're all the same size (I usually go for 540x540). I would go for somewhere between three and four for a continuous effect, and it helps if they're related. I'm going to start off with this one:

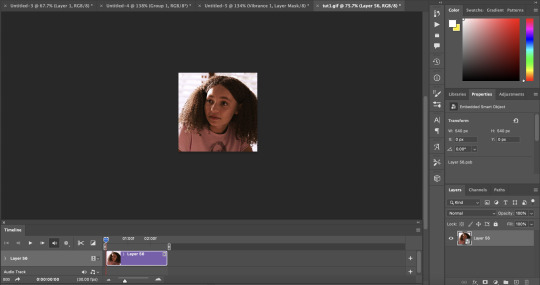
Once you have all of them made, save them and reopen the gif you want to be the first in the set and convert it to smart filters. It should look like this:
Now add a new layer and using the marquee tool (m), set a fixed size of 2 pixels by 540 or more pixels for the height. I usually make the height a little taller for safety so I don't fall short on the top and bottom of the gif. For the instance of the first gif (as well as the last), you can either go down to half that height or just drag it to the middle of the canvas after the following step. This is because we're eventually going to put a circle marker at the center point.
At the bottom of the layers panel, click the fill/adjustment layer icon and go to solid color. Set the color to white and hit ok. Label your layer as line or something similar that way it's easier for you to find it while making the other gifs for the set.
Drag the line a little under halfway down the canvas, then set the opacity to somewhere around 85% and fill to 100%. You'll have to adjust the opacity as you go based solely on the brightness and coloring of the scenes you use. For this gif of Sarah, I have it at 75%.
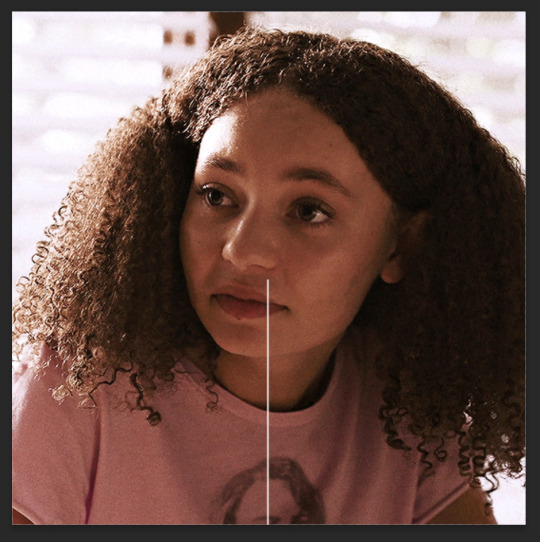
Once you've got this settled, the next step is to add a drop shadow. For this, I kept the opacity at 80% and made sure to move the angle so you can actually see it.
Next up is the marker! You're going to make another layer and go back to the marquee tool, this time going to the circle. At this point, I'd highly recommend grouping these layers together for ease of access.
Doing the same as before, go to fixed size and set your parameters as 10x10 pixels, and add a solid fill layer. Make the opacity is the same and change the angle of the drop shadow a little so there isn't a stark overlap, and drag it so it sits at the top of this line.
Keep in mind that since both the line and the circle have lowered opacity, you'll be able to see them overlapping, so make sure you zoom in and adjust their placement.
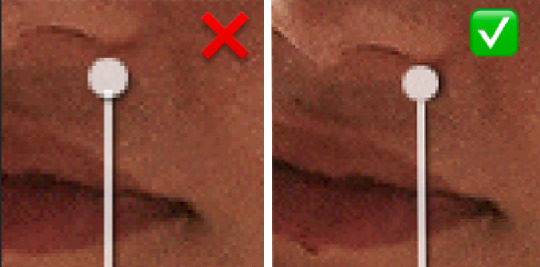
Now your gif should look something like this:

From here, do the same thing for the next gif(s), leaving the circle out until the last gif, where you'll bring it back in and add it to the bottom of the line, with the line coming in from the top like this:
My best advice for this is to keep a canvas with the line and circle layers accessible and drag your remaining gifs onto that canvas so the line stays even through the whole set. That way all you have to do is move it up and down, not left or right. But keep checking as you work.
Once all your gifs are made and your throughline is added, your set should look something like this:
And that's it! I'll usually add words or some sort of text to break up the lines but it works either way.
If you have any questions, feel free to ask!
#anonymous#answered#gif tutorial#usergif#usersteen#userlang#useream#usermorgan#photoshop help#tutorial#photoshop tutorial#*#my edit#tlou hbo#tlouedit
67 notes
·
View notes
Last Seen Blogs
royalxshock
♔ Royal Shock! (ap.)

jonnydevil-blog1
Untitled
rarailustraciones
Rara Ilustraciones
dovesick
dovesick

dipperdesperado
The Ranch