#put it in a stir fry or a fried rice with plenty of fresh garlic. u are welcome
Text

legally obligated to post this every time i use it
#put it in a stir fry or a fried rice with plenty of fresh garlic. u are welcome#credit to aaron huh on youtube. i would die in battle for him#cooking tag#<- i should actually use this tag more. cooking is like my one creative hobby i do daily
8K notes
·
View notes
Text
Ingredients
When the shift is over what is the first thing you think of? What is my recovery drink, what is for dinner, did I make enough money to pay the bills? First, the drink drowns the buzzing anxiety as the liquid cools the heat of the mind. The last call is made and the patrons leave allowing for the final call to really be made. Glasses clink and the floor is swept as we divulge the chaos of the night. Who was a bitch, which local drunk was slumped on the stoop, who was going home, and who was going out?
All I can think of is what the hell I am going to consume the moment I get home.
Something about the bar ruins your love for food: grease, liquor, and bar grime are the worst kind of ingredients. You would think that being a cook means you love food. Sure, I love food…my food. Not the shit I make at work that is deep-fried and smothered in calories. I think I just like to make people happy. Cooking for those around me and chatting with patrons make my night go by quicker. Without the food, I don’t really think I would be who I am today. It may be cheesy but I put everything into what I cook. Whether it is for myself or those around me, everything goes into my food. I finish polishing up my station and returning my knives to their roll as I flip through the recipe Rolodex of my brain. Something quick tonight I am exhausted, pasta is off the list because I hate boxed pasta and have zero effort to make it from scratch. I could make a salad but that is if I still have lettuce leftover from the Thai lettuce wraps I had the other night.
I know I have some tofu hidden in the fridge and plenty of scraps that need to be used up so a stir-fry it is.
I send my love and thanks to the bartenders and toss the trash out as I slam the backdoor. Finally, fresh air, the sweat, and the scum of a Saturday night infest my lungs as I take a deep breath. A cigarette enters my lips as I make it down the block, unlit but the notion is still there. It is just a habit at this point, keeps me sane as I make my last turn toward my apartment.
Thankfully at 3 in the morning, I don’t encounter any neighbors as I pad through the halls of my complex. The dark halls are comforting as the lock of my door clicks open. Finally, sanctuary. No yelling, no glass breaking, and absolutely no one else to invade my space. My keys clink on the counter as I drop my bag to the floor and kick my shoes off in one swift motion. One thing I have adapted from working in the bar is the sheer speed I have getting it off of me. Hot shower, clean sweats, and in minutes I am back over the flame of the stove.
Vegetables snap and sizzle as I toss them about in the wok. The leftover veggies from the week mix in the oil as they begin to blister and brown. Some bell peppers, an onion, frozen carrots, a handful of snap peas, and shit ton of garlic because I’m not a vampire. The pan crackles when I toss the sauce in, a little soy sauce, sesame oil, rice wine vinegar, a teaspoon of brown sugar, and a large pinch of chili flakes, even with the heaping swirl of Sriracha that ends up on all of my food. As for the protein, I know I have tofu in the fridge but, as for those scraps I mentioned, those need to be used up before anyone gets suspicious of their disappearance.
Perks of the job, I can cook anything.
4 notes
·
View notes
Text
Chicken Stir fry Recipe| stir fry chicken
Share button


Introduction of chicken stir fry:
Not wanting to eat the same food every day, thinking of changing to taste So the best food for you can be chicken stir fry.This is an American dish. It is very easy to make. It is a delicious dish made with chicken and vegetables that you and your family will love.Those who want to lose weight,try this dish and get quick results.If you want to make something quick for house guests then try this dish.However, today I will tell you how to make chicken stir fry very easily.
Ingredients needed step by step instructions:
- Boneless Chicken = 500
- salt = 1/2 tsp
- white pepper powder= 1/2 tsp
- Dark soya sauce =1/2 tsp
- Broccoli florets = cut small pieces
- carrot sliced = 100 gm
- Red bell pepper = 90 gm
- yellow bell pepper= 90 gm
- Garlic chopped = 2 tsp
- Ginger chopped = 2 tsp
- chicken stock = 1/4 cup
- Red chilli sauce = 3 tsp
- Honey = 1 Tbsp
- corn slurry = 2 TSP
- sesame oil = 2 TSP
- salt = to taste
- Black pepper powder = 1/4 TSP
preparation:
- First, heat the oil in a pan, when it gets a little hot, drop the chicken pieces in the oil and fry a little.
- Then add pepper powder, salt, and soy sauce to the chicken and fry on high heat for 3 minutes.When the chicken is fried, put it in a bowl.
- Heat oil in a pan again, now add chopped ginger garlic, fry 30 sec , then add chopped carrot, red and yellow bell pepper Fry them for 2 minutes.Then add broccoli after frying for 1 minutes, add salt and black pepper powder and stir well.
- Now add the fried vegetables to the fried chicken and mix well.
- Now add dark soy sauce, chicken stock, red chili sauce, and honey to it and fry well for 2/3 minutes.
- This time it has to be added corn slurry and sesame oil have to be stir for 1 minutes and taken down in a container.
- Now your dish is ready to serve.
Cooking and preparation Time:
Cooking and Preparation for this recipe is 30 minutes .
Tips and Tricks:
- Always do Raw Chicken Use. Don't use the frozen chicken so the taste will go bad.
- You can use any meat instead of chicken if you want.
- Use plenty of fresh ginger, garlic, in your stir fry.
- If you want then season the chicken well with salt and pepper before cooking.
- when cooking the chicken, be sure to use a hot pan or wok so that the meat can sear and cook evenly.
Note :
There are many different ways to cook chicken stir fry.But this recipe is very easy, try it at home.when serving, be sure to garnish with green onions and sesame seeds for added flavor and texture. You will like to eat it with rice and Noodles and enjoy.
FAQ:
Q. What is chicken stir fry?
A. Chicken stir fry is a non veg dish it's made with vegetables and chicken.Its taste awesome.
Q.What kind of vegetables can be used in chicken stir fry?
A.There are many different vegetables are used like brocolli,red and yellow pepper,carrot,ginger garlic,spring onion etc.
Q.What kind of rice is best with chicken stir fry?
A. Long grain white rice served with chicken Stir fry.
Q.Can I use other meats instead of chicken?
A. Yes,you can use also mutton,beef,pork,shrimp,tofu instead of chicken.
Read the full article
0 notes
Text
Cheap and Easy Vegan Meals
Vegan food doesn’t have to be expensive, complicated, or time consuming. It can be affordable, easy, and delicious. No crazy ingredients, no long recipes, no animals harmed.
- Peanut butter sandwich: Go a little crazy and put some banana slices on your sandwich, it’s delicious! Eat it with fruit and/or chips. Yum!
- Grits: I like mine seasoned with vegan butter and black pepper. Serve it up with some peanut butter toast, waffles, or fruit!
- Oatmeal: You can put all kinds of things in it: maple syrup, brown sugar, cinnamon, black pepper, fruit, nuts, non-dairy chocolate chips, raisins, etc. Don’t like oatmeal? Put some raw oats in a bowl, sprinkle in some cinnamon and sugar, mix in some peanut butter and vanilla extract, and bake it in the oven at 325 degrees Fahrenheit for about 20 minutes. Bam! Healthy homemade cereal!
- Pasta: You could sauté some mushrooms, spinach, and/or any other vegetables you like and mix it in marinara sauce. Don’t feel like chopping a bunch of vegetables or just don’t have the time? That’s okay! There are plenty of sauces and noodles already full of veggies you can get right off the shelf! If you have some nutritional yeast, sprinkle it on top like parmesan cheese! Tomato sauce not your thing? A little bit of olive oil, dried Italian herbs and red pepper flakes make a tasty meal! Cool off the noodles, throw in some raw veggies, and soak everything in salad dressing in the fridge for about half an hour for an easy pasta salad!
- Wraps: Whether it’s fajitas, tacos, burritos, or breakfast wraps, wraps are simple to make and the possibilities are endless! Just cook up some beans, tofu, tempeh and/or vegetables in yummy spices of your choice and put them in a wrap! You could also add extra toppings, such as hot sauce, salsa, rice, fresh spinach or arugula, tomatoes and onions, etc. Raw veggie wraps are delicious, too, especially with hummus!
- Beans and rice: Easy and delicious. You want to know what’s good? Mexican rice and black beans with sautéed spinach and taco sauce.
- Stir-fry: Fry or bake some tofu and sauté some vegetables and make a sauce with soy sauce, garlic and a little sugar. It’s so good! Serve with some rice and get your tummy nice and full! Another good sauce to make is garlic, soy sauce, onion powder, sugar and sriracha. Mix it all together on the stove on medium-low heat, combine about 1/2 Tbsp cornstarch with about 5 Tbsp water until cornstarch dissolved, add it to the sauce and let it thicken. Instead of rice, you can also use noodles or couscous! For some natural sweetness, add pineapple to your stir-fry!
- Noodles: Instant ramen is one of the cheapest foods you can buy. Unfortunately, many flavors and brands use animal products. A couple of affordable, technically vegan ramen noodle cups are Nissin Cup Noodles Very Veggie Soy Sauce flavor and Nissin Top Ramen Soy Sauce flavor. You can also buy ramen noodles and season them yourself. Cook them in water or vegetable broth/stock, add spices and vegetables, and you have yourself a warm meal. For those of you who like things spicy, allow me to share with you the way I cook noodles: Boil some water with red pepper flakes, black pepper, sesame seed oil, hot sauce (Frank’s is the best), kimchi and jarred jalapeño slices. Cook the noodles according to package directions and, once done, add chili paste, sriracha and soy sauce. Stir until well mixed and enjoy the burn!
- Potatoes: Baked potatoes, boiled potatoes, mashed potatoes, microwaved potatoes, fried potatoes. Potatoes cubed, seasoned and baked. Potatoes and onions cooked on the stove or in the oven. Potatoes with hot sauce, sriracha, or barbecue sauce. Potato fritters, fries, tots, soup. Potatoes.
- Salads: Raw veggies, leafy greens, cooked lentils or chickpeas, salad dressing (either homemade or store-bought) or a little olive oil, lemon juice and vinegar of choice. Boom, salad!
#cheap vegan meals#easy vegan meals#vegan#vegan food#vegan meals#vegan recipes#plant based#food#vegan recipe#cheap vegan meal#easy vegan meal#cheap vegan food#easy vegan food#vegetarian#vegetarian food#veganism#vegan on a budget#cheap vegan#affordable vegan#frugal vegan#easy vegan#what vegans eat#what vegans cook#meal ideas#cheap vegan meal ideas#easy vegan meal ideas#easy to be vegan
116 notes
·
View notes
Text
Asian Foods Recipes - Simple Chinese Dishes Made Simple
Chinese People rely on employing herbs for recovery plus they use many different Oriental food recipes for curing and general well being. Not simply in the kitchen nevertheless in Oriental Classic Treatment as well, because it's believed to have got healing attributes also. There are plenty of ways for you to include herbal remedies to your meals, on this page a few of the countless you should consider: - To enrich your taste attempt marinating various meats and poultry in ginger, soy products or garlic herb. - To have an persian twist, use ginger and garlic cloves along with ovum white colored for any mix-fried delicacy.
- Oriental Tacky Noodle, likewise known as Extended Coffee bean Sprout is a very popular dish. It can be typically stir fried. - Cantonese Pork ribs is an extremely delicious meal that might be provided with duck or beef. - Fried rice is quite nutritious, it packs a great deal of healthy proteins and carbohydrate food.
Chinese Tacky Noodle is made with ground beef, red onion, ginger, sesame oils and garlic clove. This beef combination is then deeply-fried and added with seasonings like ginger, soy products and garlic clove before being mixed with normal water. This preparation is perfect for Chinese New Years and also other crucial festivals as this wealthy and flavorful meat is utilized as a significant part of Asian foods.
Oyster Marinade is made from soy products beans, sugar, mirin and salt. Soybeans are a good source of protein plus they help build muscle groups. Mirin can be a sweetish red-colored red wine and is used mainly in Chinese dishes where it may help reduce the quantity of spruce and taste. To produce a far more mild variation of the sauce you can add sugars instead of iron, honey as opposed to soy products and white vinegar as an alternative to h2o.
The Braised Coffee bean Threaded Dessert is an additional intriguing Chinese food items that is super easy to help make and yes it emanates from the Szechwan location of China. The ingredients are dried up bright white various meats, bean threads, vinegar and sugar. You just need to bathe the meats then prepare it to put together the meal. The meal is dished up having a steamed whole wheat part and it may be ready as a aspect recipe or consumed with all the rice.
In no way continue on Asian food items without including the Oriental fresh mushrooms. Chinese mushrooms are utilized to make many different China foods from stir fry to mix fry fresh vegetables. https://simplechinesefood.com There are various strategies to get ready these mushrooms. Usually, the fresh mushrooms are reduce into tiny sections and mixed with the unprocessed various meats as well as vegetable gas and natural herbs. These are then steamed until they become sore and also the flavour is improved.
Yet another popular China ingredient is the Coffee bean curd which is made from corn flour or grain and flavored with ginger herb, soy marinade and eggs. It is usually observed in mix fry or dished up along with other China foods. Other popular components consist of coriander leaves, raisins, dried up Oriental natural results in and bright white species of fish models like mussels and oysters.
China stir fry is amongst the finest Chinese food products. This recipe is manufactured by mixing ovum noodles, made rice and greens within a pan. By way of example, chicken eggs cooked in a frying pan with sesame gas and nuts. When the ovum noodles are mixed with rice and prepared in certain minutes or so, they grow to be delicate and soft. Some well-known tasty recipes for Oriental mix fry include chicken, meat and sea food, and in addition include a multitude of Oriental spices and herbs.
Several Chinese preparing food components are prepared in numerous various ways, based on what assortment of cuisine how the dish is supposed to stand for. There are many Asian cooking food substances that are available in the north east of Asia and much more specifically around Beijing. These are the basic territories where the bulk of Asian immigrants are living. These are acquainted by using ingredients like ginger, soy products sauce and chicken eggs within their daily lives and possess produced these quality recipes after a while. The north-eastern side Chinese food quality recipes are extremely simple to make and so are often dished up throughout Asian New Year.
You can find many of the components that you have to get ready these recipes in your nearby food store. In order to attempt some thing a tad bit more exclusive, then shopping online is the greatest alternative. Chinese foods quality recipes are available in libraries, guide merchants and on-line Oriental meals stores. They are also wonderful locations to get Chinese cooking elements simply because they generally hold items for each and every form of recipe that you can picture. Some internet retailers even specialize in promoting distinct Asian food preparation substances, especially if they cannot discover them within your local food store.
One of the more well-known Oriental meals quality recipes that you could discover on the internet is stir fried various meats. This recipe is prepared by serious-frying meat in China elements and including sesame oils to help you close from the preference. A lot of the beef is constructed from meat but you will additionally discover pork, chicken and fish in lots of Asian quality recipes. The meat is initially marinated in Chinese substances such as soy products sauce and cornstarch, then deeply fried. After that, the meat is prepared in huge amounts of cornstarch. Ultimately, it is together with popular sauces and provided for you.
1 note
·
View note
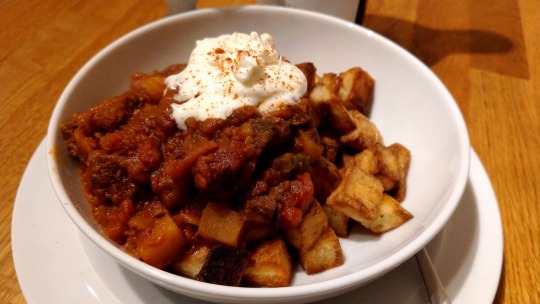
Text
Isolation Goulash

This is a “what was available in the house” reduction from my personal goulash recipe, based on a combination of Gyorg Lang, Karoly Gundel, a few Hungarian things run through Google Translate and some tweaks by me. This version was put together “on the fly”, out of my head, but when a couple of @dduane’s Twitter followers asked for the recipe, this is what they got: :-)
Ingredients
2 tbs lard (preferred) or sunflower/corn/ordinary olive oil. (Not Extra Virgin, you’re wasting it.)
2 large onions, chopped coarsely
4 cloves garlic, minced
1 tbsp caraway seeds, crushed (mince the garlic and caraway together with rocking knife technique – the sticky garlic keeps the seeds from flying about. A bit, anyway. See below.)
1 lb / .5kg stewing beef in 1 inch / 30mm cubes (which is usually how it’s sold)
3 tbsp Hungarian paprika, if possible 1 tbsp Hot, 2 tbsp Sweet (or 2 tbsp regular supermarket paprika and, cautiously, up to 1 tbsp Cayenne. Don’t use smoked paprika unless using European smoked sausage like kabanossi or kielbasa instead of beef, then go for it, the result is delish.)
2 tins chopped tomatoes and ½ tin water
1 green pepper, seeded and cubed
4 potatoes, peeled and cubed
youtube
You can zone out doing this chuckchuckchuck(scrape)chuckchuckchuck routine, especially if you’ve got music playing, and end up with garlic that’s almost a purée. Same goes for ginger and fresh herbs. Unless you need a bit more structure, like ginger matchsticks in a stir-fry, it’s not a problem. Just don’t involve any fingers...
Method:
Melt the lard in a heavy pot and sweat the onions until soft, glossy and turning golden. Add the garlic and caraway and stir-fry for a few more minutes. Add the beef and stir-fry until all the cubes have changed colour.
Remove from the heat and let sit for a couple of minutes, then add the paprika (paprika + excess heat = bitterness.) Stir well together, add the tomatoes and water, return to the heat, bring to a very gentle simmer, cover and leave for about 2 hours.
Check the beef for tenderness. It should be at the “a bit more will be perfect” stage, so add the pepper and potatoes and give it a bit more; about 20 minutes should do.
Serve topped with a dollop of sour cream (ours was 30%-fat Lithuanian from Eurospar, yum!) over buttered noodles, rice, mashed potatoes, tarhonya (Hungarian “egg barley”, a very small pasta similar to orzo)…

Or do what we did tonight: “Bratkartoffel” – potatoes cut into ½ inch dice and slowly pan-fried until crunchy outside and soft inside, then sprinkled with salt and pepper. We finished ours in the oven – 20 mins at 180° C / 350° F – for less greasiness; NB that this also makes a great snack by itself (try sprinkling with curry powder, spice bag mix, sea salt & cider vinegar, whatever) and using the oven makes them far less trouble than deep-frying home-made chips.
This goulash, like most of my one-pot dishes, has provided @dduane and me with a hot main meal for three days: Day 1, all by itself; Day 2, with tarhonya from the store cupboard (1 cup tarhonya, fried for a couple of minutes in butter, then cover-simmered for 10-12 minutes in 2 cups of water and stirred a lot near the end to keep the grains separate while the last of the water absorbs / evaporates), finished with a slosh of lemon juice and lots of black pepper; Day 3, with Bratkartoffel; after frying in three batches, all of them fitted in the oven at once.
When they came out and got their spicy sprinkle, we had to force ourselves to stop eating the side dish so there'd actually be some side dish left...
There’s still a bit of goulash left, but a pack of minced beef is out of the freezer and initial discussion suggests chilli con carne; we have plenty of rice, and if you’ve never tried chilli on a bed of Mexican pilaff (that’s fluffy rice with beans, chopped pickled jalapenos, toasted cuminseed, grated cheese and minced raw garlic) you’re missing out.
This is the time to try all those aggressively garlicky dishes that you and the SO adore but which will get you not just a seat but a carriage all to yourself on the LUAS or any other public transport you care to name. Long ago I worked in an office - before smoking bans - opposite a woman who chain-smoked Gauloise cigs, which stink worse than most cigs.
My response was garlic. Lots of garlic. It took a while, but I won. :->
#food and drink#kitchen adventures#one-pot#goulash#garlic#stews#more garlic#chilli con carne#winging it#did I mention garlic?
43 notes
·
View notes
Text
Worldbuilding - Food and Recipes

*The chart above illustrated the dietary resources available to the majority of the nation.
Culture of Food
Food is a huge part of what makes a culture and Verdant is no exception to this. They pride themselves as a nation in which no one goes hungry. In a country where most of the land is desert, this is much more difficult to achieve than one might think. But thought centuries of trial and error they have not only learned to take advantage of the county which the land provided, but to cultivate their own food by utilizing the unique seasons to their advantage.
Verdant food is colorful, packed with flavor, and prepared with passion. The hearth is the center of the household and as such the kitchen and living area are usually inseparable in all but the most wealthy estates. Something is always cooking, and as such it is considered polite to offer an unexpected guest food and drink, and considered very impolite to refuse! If invited over, it is an absolute scandal not to bring something along, even if it's just goat cheese rolled in garlic and chives or a bottle of homemade wine.
Accessibility
When one looks at the scope of what the people of Verdant eat, it is important to remember the wide range of territory in which their nation covers. For instance in the capitol city which straddles the coastline, the bounty of the sea is plentiful. This means that people in the capitol can obtain fresh fish, seaweed and such for next to nothing. However in the further reaches, such as the Speckled Pond Oasis, their ability to serve food like swordfish or lobster is severely limited.
As in all countries, the wealthy always have access to more than those in lower classes. The more processed or refined something is the more likely you have to be wealthy in order to afford it. The more elaborate and time consuming it is to obtain and cook, the more likely you must have thralls or servants available in order to ensure it gets accomplished. Domestic pigs, for instance, do not do well in the Verdant heat and are difficult to keep content. So much so that pigs are considered to be a status symbol and kept like very spoiled pets by the super wealthy and socially elite. Goats and chickens on the other hand are a much more common source of sustenance and can be obtained by all but the most impoverished folk. Even then, foraging and trapping is a common chore given to children. Verdant has only a few laws regarding hunting practices, allowing for easier access to food sources.
Preservation
Food must be properly preserved to last as long as possible. With a flooding season and a sandstorm season to factor into the equation, Verdant folk must ensure their larder will hold for as long as possible. Most meat is cured in salt or smoked to prolong it's shelf life. Jerked meats are fairly common, especially among the working class. Packing in animal fat and storing it in a cool, dry place is an excellent method for ensuring the meat remains tender for months. Herbs are air dried and ground into powders,or drowned in oil or vinegar. Fruits and vegetables are often pickled or soaked in a sweet brine which is often then turned into alcohol. Waste is the enemy, and if anything can be used it will be used. Bone broths are immensely popular as a method for stripping the most nutrition out of an animal.
Household Staples
Some things are just a ubiquitous part of the culture, and Verdant is no exception. There are staples served on every table from rich to poor, though the amount and embellishments may differ. As a part of their initiative to ensure everyone is fed, monthly stipends of grain and rice are provided to the poorer districts, the amount depending upon the size of the family. These come from the silos kept by the Queen's government, which are filled through yearly taxes collected at harvest time. Each meal has rice with herbs, pickled vegetables, and flatbread lightly fried in oil. The most popular dish through out all the nation being a saffron crispy-rice cakes. They keep well and can be stored in cloth and reheated for meals or handed off to a worker to take with them for mid-day meals.
Saffron Crispy-rice Cake
Ingredients
2 cups basmati rice
3 ½ cups water
2 tablespoons kosher salt
¼ teaspoon crushed saffron threads
1 cup plain yogurt
3 eggs
2 tablespoons unsalted butter, melted
½ cup olive oil
1 cup vegetable oil
Instructions
Put your rice in a bowl with enough water to cover and let soak for about 30 mins. Rinse thoroughly until the water runs clear.
Place 3 ½ cups water into a large pot and add a generous sprinkle of kosher salt. Bring to a boil and add the drained basmati rice. Bring to a boil and give it a stir. Reduce heat and let cook till tender.
Sprinkle small amount of salt and saffron threads in mortar and crunch until powdered. Add 2 tbsp hot water and stir lightly. Let steep for about ten mins until deep reddish-orange color.
Mix 3 egg yolks, yogurt, ½ cup olive oil, and 2 tbsp salt into large bowl. Add saffron mix when steeping is done.
Pour 1 cup vegetable oil into skillet and heat.
Fluff basmati rice mixture and test to see if fully cooked. Slowly integrate it into the saffron mixture until every grain is thoroughly coated. Don't skimp! You want it to be saturated with this mixture.
Once your oil is hot, put in a small bit of rice to test and see if it is ready. If it begins to bubble immediately, you are ready to proceed! Form the saffron and rice mixture into patties with you hands and carefully place in skillet, frying on each side until golden brown.
Remove from skillet and place on rack to drain. Serve with choice of topping.
Note: I have personally made this recipe and let me tell you it packs a LOT of flavor. I've put a fried egg on top, mixed it with sweet coleslaw, tossed it with chicken and even put a thick slice of mozzarella on top and stuck it under a broiler until bubbling! It's addictive and it keeps in the fridge forever! The saffron threads are a little bit pricy, $7.99 for 1 tblsp where I got them. But since it made like five meals it was worth it.
Another staple of the Verdant meal is flatbread with garlic oil drizzled over it. The garlic oil is easy enough to make by chopping and frying large amounts of garlic in copious amounts of oil, then straining. The oil is useful for just about every dish in Verdant and is used liberally. The chips are kept and dried out, then ground as a topping or crusting for meals.
Garlic Flatbread
Ingredients
½ cup warm water
1 teaspoon sugar
1 package dry active yeast (2 1/4th tsp)
¼ cup plain yogurt
2 cups bread flour
¼cup garlic oil
2 tbsp crushed garlic chips
1 teaspoon kosher salt
fresh parsley
Instructions
Dissolve sugar in ½ cup of warm water and add yeast to mixture. Leave for 10 mins until the yeast begins to foam.
Mix flour and salt together. Slowly incorporate yogurt until you have a loose, flaky dough.
Add yeast mixture and knead thoroughly until smooth. Place in a bowl and drizzle generously with garlic oil. Cover with a plate for about an hour or until doubled in size.
Lightly dust flat surface and pour dough onto surface. Gently shape into rectangle and cut into 8 pieces. Form each piece into a ball. Arrange on plate and cover for another 15 – 20 mins.
Place skillet on stove top and add 4 tbsp olive oil to pan.
For larger flatbread, roll balls on floured surface until about 1/8 inch thick. For smaller, cut each ball in half and roll till about the length and width of your hand.
Add flatbread to hot skillet and fry on both sides. One side will puff up, creating bubbles of air. Once you flip, DO NOT PRESS FLAT! Cook until golden brown around bubble rings and transfer to rack.
Once finished, arrange flatbread on plate and give a drizzle with garlic oil. Add sprinkling of salt, garlic chips and parsley and serve.
Note:These are spectacular on their own but tbh I love them with some goat cheese and some of the broken up saffron cakes above. You can also do them sans garlic/salt/parsley and heat one up in the oven before smearing it with blackberry preserves. It's chewy and lightly crispy and just so satisfying to eat.
The pickled vegetables may very day to day depending upon availability. Children are typically sent out as soon as they have eaten to go forage for wild edibles which can be added in to make for a more hearty fare. Knowing how to source edible plants from their environment is a necessity, as it may save their lives during the Trials needed to become a Citizen.
Sweet Pickled Vegetables
Ingredients
1 Eggplant
1 Cucumber
1 Carrots
1 Red Cabbage
1 Leek
1 Squash
1/4th tsp salt
1/4th tsp ground pepper
1/4th cup Olive oil
1 Red oranges
2 tbsp Brown sugar
Optional:
Pine nuts
Goat cheese
Instructions
Turn oven on to 400°.
Slice your eggplants,squash, and leeks into widths about the size of your pinkie finger. Toss in drizzle of olive oil, salt and pepper and place on baking tray. Place in oven for 20 mins or until cooked through.
Chop cucumbers, red cabbage and grate carrots into large bowl. Mix to combine.
Take 1/4th cup olive oil and add 2 tbs brown sugar. Juice one red orange and add juice to mixture. Stir to combine until sugar is dissolved.
Once roasted veggies are thoroughly cooked, turn on broiler and roast till lightly browned. Keep a close eye on them. Broilers work quicker than you think.
Once browned, remove from oven and allow to come to room temp. Mix in with rest of vegetables and drizzle the orange dressing over top. Mix generously.
Top with pine nuts and crumbled goat cheese for an extra burst of flavor.
Note: You can really serve this at room temp like a warm salad but it's just as good second day as like a slaw. I love to add it onto rice and chicken for a lunch bowl.
One of the easiest sources for protein across Verdant is the ocean and all the bounty it provides. Even if one doesn't have a boat, they can search along the rocky beaches for mussels and dig into the sand for cockles. Just about everyone has a trap for crabs or eels and takes advantage of this as they taste wonderful when grilled. Spearfishing and diving for urchins are popular methods for obtaining harder to catch food sources. However under Guild law, anything which requires a boat in order to catch requires a Guild permit.
Mussels with Leeks & Tomatos
Ingrdiants
1 lb mussels
1/4th cup olive oil
1 Leek
6 Garlic cloves
1 cup Multicolored cherry tomatoes
½ Red onion
1 tbsp Ginger
1 Lemon
1/4th tsp salt
1/4th tsp pepper
½ tsp cayenne pepper
Instructions
*Check your mussels thoroughly before use!
-rinse thoroughly
-trash any cracked or opened mussels
-if you find a 'thread' on the mussel, remove it
Take a deep saute pan and add in olive oil.
Thoroughly clean leeks between the leaves. They're noted for being dirty.
Chop leeks, red onion, garlic cloves and tomatoes. Add to hot olive oil and cook till lightly browned.
Add in your mussels and cover with lid. Steam for 10 – 15 min until all the mussels have opened up. Stir gently to combine.
Juice 1 lemon and grate 1 tsbp lemon. Stir together with cayenne, salt and pepper until combined.
Scoop mussels from pan into large bowl. Pour lemon juice onto mussels while stirring. Serve.
Note: Mussels are one of my favorite things to eat! There really is no end to the different things you can combine to them but sometimes the simplest is the best!
69 notes
·
View notes
Text
Chicken Ramen Recipe
So I looked at like 4 different recipes and just sort of compiled them all into one, picking the bits I felt I’d like most as well as what was actually available at the store. It’s simmering on the stove now and smells delicious, plus the broth tastes pretty good to me so far. Though I haven’t actually eaten it yet (that will be later tonight).
I think total prep time for me so far has been just under 2 hours, but about half of that was either waiting for water to boil for the ramen eggs or cooking chicken/letting the broth simmer for about 20 minutes. You could cut this prep time down a bit by not cooking the chicken first. Instead, you would cut off the raw meat into bits and then toss it in after you’ve added the chicken broth (and all the other stuff that goes in at that points), letting it cook while the pot simmers there.
Also worth noting you could totally do an even bigger batch of this, it would still only take about 2 hours, and you’ve got a few meals ready to go throughout the week. Just have to heat up the broth and prep the noodles.
Ingredients:
4 chicken thighs, with skin, on the bone
3 TBSP miso
1 TBSP oil
1 onion
4 oz shiitake mushrooms, stems removed
1/2 cup soy sauce (this and the water are the only things I actually measured, everything else was eye-balled and then I just tasted the broth and adjusted)
1/2 to 3/4 lbs bok choy (I think I ended up using a little over a pound)
4 cups chicken broth
1 cup water
1 TBSP chili sauce
4 cloves minced garlic
1 TBSP fresh grated ginger root
Instructions:
First, if you want ramen eggs to go with this, prep this first part anywhere from a few hours ahead, to the day before. For best results, let them marinate over night.
Mix 1/4 cup soy sauce with like, iunno 2 TBSP of miso. The actually recipe I have says to use 1/4 cup rice vinegar or mirin, not miso. But I don’t have those things so... and lastly, 3/4 cup water. Mix that all together and set aside. Also my container didn’t allow me to fully submerge 6 eggs with this much, so I doubled up on everything. If you only do like 2 or maybe 3 eggs in probably a tall glass (or individual cups?), this is probably plenty.
Bring a pot of water to a soft boil and (gently, with a slotted spoon) toss in however many ramen eggs you want. Let them go for 7 minutes, then remove and put in an ice bath for 3 minutes. From there, carefully peel them and put them in the marinade you made above. Set in a fridge for up to 12 hours. You can keep the eggs for up to 3 days in a fridge, but if you do that you’ll want to transfer them out of the marinade and into a dry air tight container.
Now for the actual ramen.
I started with my chicken thighs. Took my ramen pot and put it on the stove with that 1 TBSP of oil and let it heat up a bit (med-hi heat). Plopped the thighs down skin side down in the bottom of the pot and let that fry. Added some salt and pepper and then just made sure they didn’t get stuck to the bottom of the pot. Flipped ‘em after about ten minutes and went another ten minutes. Then I removed them to a plate.
The pot now has some chicken grease and oil and bits of fried chicken in the bottom. Toss your onions (I diced them, but all the recipes I saw showed bigger chunks, so do what you want there) on top of all that and scrape the bottom a bit to get all that flavor intermingling. Sweat the onions for about 5 minutes.
Then you toss the mushrooms and miso in with that. I quartered my mushrooms (my wife doesn’t like mushrooms so she should be able to avoid them more easily this way, otherwise I would have diced them as well). Let that fry in with the onions for about 3 more minutes.
Then we toss in the garlic and ginger. It only needs to be in there about 30 seconds to a minute. Just enough time to get aromatic. After this we toss in almost everything else.
The soy sauce, chili sauce, water, and chicken broth all goes in now. Bring this concoction to a simmer and let it go for about 15 to 20 minutes. While it does that...
Take two forks and shred up your chicken that you’ve had set aside. And if you’re like me you’ll now see that your heat was a bit too high so this chicken isn’t cooked all the way through. No worries. Shred off what you can then toss it all back in the pot. After about 15 minutes you can fish out those bones and pick the rest off them. Stir in your bok choy and let it go just 3 more minutes.
Now if you aren’t eating any right away, let this stuff cool off and keep in the fridge in air tight container for about a week.
Whenever you do want to eat it, heat your noodles as recommended on the package (if using instant noodles as I’m stuck doing this time around, obvs I’m not using the flavoring packet that came with them and I’m also going to make sure they’re just a little bit under-done. They’ll finish in my broth and hopefully not get soggy). Put it a bowl and ladle your hot broth over top of it. Warm one of those ramen eggs (preferably briefly in your broth) then cut it in half and add to the bowl. I’m going to serve mine with a sheet of nori, some green onions diced and sprinkled on top, as well as some poppy seeds sprinkled on top.
Note that if the broth is too salty or spicy for you (do a taste test before you put the bok choy in), you can stir in 1 tsp of sugar to cut those flavors and taste again. Do this until it tastes how you like, just a tsp at a time, well-incorporated.
Also note that you can totally sub in things you like or specific types of like miso or chili sauce or whatever that you prefer. My miso of choice here was “mild and sweet.” Instead of miso you could use mirin or rice vinegar or even sake (about 1/4 cup), or one recipe called for 1 TBSP fish sauce and 2 TBSP oyster sauce instead. You could toss in carrots or other veggies. You could add a lime wedge or cilantro when you plate at the end instead of things like nori and poppy seeds. Switch from chicken broth to some other stock and this probably works just as well as a base for a beef or seafood ramen. Like it’s just versatile and easy to mess with. Tweak things and use what you have and what you know you like.
@sumguyhunglow
#food#ramen#I'm pretty happy with this broth currently#like it's better than I expected#maybe a bit salty#but for me that's fine#and that was before I added the bok choy so
13 notes
·
View notes
Text
Homecookings [May ed.]
Cheers to the end of another month~
I had my 2nd staycation of the year in mid-May, & it was productive! I got a lot done, for real! I did some watercolour practice~ Below are some works I did during this month; I used my Korea photos as a guide. It was fun!


I also watched some Kdramas; I highly recommend Rugal! If you’re into Kdramas like The K2 or City Hunter, you’ll like Rugal. There’s action, a little bit of sci-fi, crime (gang/organizations vs NIS teams), & excellent cinematography. Born Again is another Kdrama I watched; it’s not done airing yet so I guess I’m still technically ‘watching’ it. Despite low ratings, I am enjoying it! I like the 3 leads A LOT!
As you all know if you’re in Alberta (/Canada), things started to reopen. I’m not sure if it is a wise decision, but I will still keep on practicing social distancing. I mean, that only means I’m going to/from work anyway - again, this whole thing hasn’t impacted me all that much. In fact, when my BFFs & I had another video chat session to catch up/celebrate a birthday, a question discussed was “how has quality of life changed during the pandemic / how it’ll affect short term and/or long term QOL once it’s all over?” Tbh, my QOL has improved! Not significantly, but there has been some positive changes. I actually feel happier to be seeing less ppl (friends included). This reclusive life while keeping in contact via “wifi” has been the best of both worlds for me. I do miss going to Hmart... lol but other than that, I’m pretty self-sufficient at home. I’ve got loads of coffee, adequate amount of snacks, plenty of books to read, not running low of art supplies anytime soon. .. I’ve literally got everything that I need, you know what I mean? I even have things that are on my to-do/to-try lists that I can start if I want to *shrugs* I consider myself one of the lucky ones that aren’t affected, & I’m super grateful for it.
PS: I do need to watch out for the “Quarantine 15″ HAHA but I don’t think that will be an issue for me. Actually, who knows.. . continue reading this post & let me know if you think I’ll gain the Quarantine 15 :P

^ This is my cocktail consisting of cold milk, hot chocolate powder, instant coffee powder, & the cappuccino honey. It’s basically a cold mocha (not iced! Bcos I had no ice in it!). It was refreshing~ Some days in May were hot!

^ My homemade kimchi wrapping (cut up) pork loin. The kimchi I made (the 1st jar that I opened was kinda sour so it paired well with meats or to be eaten on its own; not the most ideal for soups). This was very refreshing! I only lightly seasoned the pork with salt & fresh ground black pepper. Then I peeled longitudinal strands of my napa cabbage kimchi & wrapped small pieces of the pork loin. Excellent appetizer, if I do say so myself :D

^ Hearty soup! I’m slightly surprised I haven’t shared this on here yet (at least I don’t think so). You know the Campbell brand creamy Thai chicken & rice soup? I LOVE LOVE LOVE that soup so much. I’d say it’s in my top 3 of the ones I’ve ever tried. Anyway, on its own, it is too salty for me. So what I do is dilute it with more veggies + water. Using about 1/3 of the can each time, I add anywhere between 1-2 cup of water with it into a pot, then add in whatever veggies I have: green cabbage, napa cabbage, mixed frozen corn/peas, tomato, cauliflower, & broccoli. These are my main choices. The amount I add depends on what else I have for the meal. The natural sweetness from the veggies give it a very good flavour, but the “background” Thai taste is still present.

^ My fancy hot chocolate with a book.. . This is my 3rd Sophie Kinsella book. I didn’t think I would be into her books but surprisingly I am.. . Her female protagonists are all kinda similar lol at least for the ones I’ve read anyway. But umm the fancy hot chocolate! It is a gourmet hot chocolate mix I purchased from the Butterdome Craft Fair back in December. I put it away & then the holidays passed.. . anyway, this was the Noel-blend, so it has a very chai feel to it with nutmeg & cinnamon. I tried a little bit of it before, & got no allergic reaction from it, so I up’ed my amount this time.

^ Random May afternoon snack while on staycation.

^ 2-ingredient baked wings. There are a lot of Asian-inspired sauces for marinating/cooking meats, I find. Like you always hear soy garlic, honey garlic, or ginger sesame, teriyaki, etc.. . you know what I mean? 1st of all, as a Chinese person, do I particular cook with these combos of condiments/sauces? No... lol I think it’s a very Westernized concept... OR the other good one is, “drizzle sesame oil on everything!” Which I also don’t do... Recently, there has been a lot of wings happening in my household, so I’m trying diff things with them. For these baked wings, I marinated the wings in (diluted) hoisin sauce + fish sauce. Hoisin sauce is sweet, while fish sauce is super salty. I think I added about the same amount of each...then added some water. Marinated these 8 wings for 5-6 hrs, then baked them for ~40mins. I didn’t turn them around, so only the skin side is dry-ish, while the bottom is moist + juicy.
PS: I prefer this 2-bone wing piece (rather than the drumlette, aka the mini drumstick that’s attached to this wing piece). How about you?

^ Upgraded rice cake + dumpling soup. I added cheese, furikake flakes, as well as 3 kim-mari’s (deep-fried seaweed rolls).

^ Simple fried rice (just egg + leftover rice, with a tsp of soy sauce)

^ Grilled meat (pork + beef), kimchi, rice, & radish + pollock soup. 1st time using the electric contact grill in 2020! It has been around for so long, but we just don’t use it; so it made its way down to our basement storage...... It now resides in the kitchen but unsure how long it will stay........ Mom thinks it’s in the way, esp for such an infrequently used appliance. Tell me, what else should I use it for so it can stay around for longer?! :P
^ Jjapa-guri wings! THIS WAS SO AMAZING! Okay, have you guys watched Parasite? If not, that’s ok, just familiarize yourself with “jjapa-guri”. Long story short, it is a combo of 2 instant noodle (flavours): blackbean sauce + the Neoguri powder. The name is a compound term of the 2 essential components. For these wings, I used my blackbean sauce (from jar), with the Nongshim (instant noodle) kimchi powder. Can’t see the redness bcos the blackbean sauce is so dark. But anyway, I pan-fried the wings, & then they’re about 50% cooked, I added spoonful of the blackbean sauce & added some kimchi powder in (also some water so there’s a bit of a sauce created). So tasty!!!
^ Basa fillet stir-fry with rice. The stir-fry contains: choy sum stalks, green cabbage, bell peppers, & thin rice cakes. For the sauce, I used abalone sauce + sugar. Abalone sauce is more salty & has a more deeper flavour than oyster sauce, so a little bit goes a long way (at least the brand we have anyway). For my singular serving amount of ingredients like this for a stir-fry, I normally add 1 almost-overflowing tsp of oyster sauce. I added the same amount of abalone sauce & it was too salty for me personally. So I added sugar (not sure how much I added.. . maybe 2 tsps?). I don’t think abalone sauce is very common to the Western population, but it’s an item easily purchase-able at Asian grocery stores! Next time you’re in one, you should buy a small bottle & try it out!

^ “Hotpot leftover special”. Threw some leftover things from hotpot & made it into a soup. Over a bed of instant noodles :P Bcos it is my staycation, so I’m eating 2 instant noodles within 1 week *gasp*
PS: I normally like the plain white surface for my photos. What do you think about this colourful tablecloth? Personally speaking, too colourful, vibrant, summer-y & bright for my liking.

^ Nestle drumstick (the fudge flavour). 1st one in 2020~ Does anyone know how long these can be stored for in the freezer? No expiry or best before date on the box; this was a Costco product & there are 18 drumsticks (9 fudge; 9 caramel). 1 box of 18 probably lasts us like... 7 months HAHA bcos we eat it so infrequently. It’s crazy, I know. Looks amazing in the photo, but the cone part is like getting kinda soft. Esp at the bottom, it’s kind of.. . chewy. Still tastes fine & everything; but the cone is softened.
This is it for now. Hope you’re staying healthy & safe, wherever you are.
1 note
·
View note
Text
We loved New Orleans, so I brought a little home.
Hi, my name is Alan. Some people know me as Spooky, while, hopefully some of you know me from various food columns and recipes published in the Cadiz Record, the Kentucky New Era and the Paducah Sun.
I love to cook, especially for my friends and family. For the longest time, my sidekick was my colleague and buddy Hawkins Teague. We’ve both moved away and met and married beautiful wives, but that’t not what this is all about.
My wife Holly and I live in Paducah, where I’ve been working for myself as a freelance writer for the past six years. My specialty is role-playing games, though an old college friend from Tampa, Fla., Kali Robinson requested I should blog with my recipes again. That’s what iSabroso! is all about. Food, fun and friends!
Why iSabroso!? I grew up in both Texas and Florida surrounded by some of the best Latino cooks in the world. When something is really good we said iSabroso! I used that my name for my column in Hopkinsville.
So what’s for dinner? I am glad you asked. Holly and I vacationed in New Orleans last year and loved every moment. Some of the best meals I ate there consisted of shrimp and grits. The natives even eat it for breakfast, and it’s great in the morning with a Bloody Mary, just in case the party ran too long the day before. Our first night there, we tried it in a fine dining restaurant called Luke, while on another occasion, I got a bowl at the famous Ruby Slipper Cafe.
Ruby Slipper was especially fun, with a helpful and friendly bartender/server we nicknamed “Sarah Silverman,” who kept our boozy iced coffees full. Another waitress told us about grits when she brought out our food. Her boyfriend worked at another restaurant, and she shared some of the grits he made earlier. New Orleans is one of those places with no shortage of great places to eat.
To get to the point, both types of spicy, cheesy and creamy grits tasted amazing, and the barbecue shrimp I had with it was amazing. Luke’s grits and shrimp were great too, with some extra crabmeat. And when I came home, Holly and I talked all about how to cook it for ourselves.
I went selected the barbecue shrimp, because I could not get enough of it, and it contained one of my very favorite ingredients, beer! And if you have a little leftover after you cook, it’s quite refreshing on a hot summer day.
The Method to the Madness:
So this is also a fairly simple, two part recipe. Shrimp and grits, which around here, I refer to simply as “Shrimpandgrits” all one word. You have to say the whole thing, like “A Tribe Called Quest.”
Entonces.. (So?) we start with the grits. And do NOT used instant grits. That’s a hard no because they just don’t work for this recipe. We’re not discussing just some mush with a bit of cheese tossed on top. Other grits work, though I could only find quick grits, which work for the recipe. That just means they’re milled a little finer.
For the Grits:
Take two tablespoons of butter and saute about two roasted red peppers, a quarter cup of onions and about a third cup of diced jalapenos, just until the onions soften a bit.
Add three cups of water and one cup of milk, then bring it to a boil. Add a cup of dry grits, return to a boil, reduce the heat and cover, cooking for about 5 minutes at a low simmer. After this, remove the lid and add a cup of grated sharp Cheddar cheese, and another cup of Monterrey Jack? Why two kinds of cheese? The Cheddar gives it a full flavor, but is a bit dry, so the Jack adds just a bit of moisture and creaminess. Season with about a teaspoon of pepper and a like amount of salt. Stir it all up and keep it on low heat on the back burner while we go to work on the shrimp.
Para los Moriscos... (Guess what that means?):
We’re not starting with shrimp here just yet, but instead some bacon. I prefer a brand cured right here in west Kentucky. Chop up about two slices of bacon and put it in the skillet while cold, turning the heat to medium to render some fat.
When the bacon is done to your preferred level of crispness, add it to the grits, and stir them into the grits, while reserving the fat.
Into the bacon grease, fry about a pound of sliced green onion sausage to doneness. Green onion sausage is a popular New Orleans product adding a bit of spice and a lot of flavor. If you can’t find it, you can use Andouille, Kielbassa or other smoked sausages.
Then, add a good half-bag (16 oz). of frozen “Trinity” seasoning blend vegetables. What’s Trinity you ask? Brilliant question. The “Holy Trinity” of Cajun cuisine is onion, bell pepper and celery. Season with just a bit of salt (a pinch really) and a fair amount of pepper and cook til the onions soften, then add about three tablespoons of garlic cooking just a minute longer. Burnt garlic can be bitter.
I’m not quite sure why it’s called barbecue shrimp. It’s neither grilled nor smoked, but it sure comes with a sauce. For the sauce, add about a quarter cup Worcestershire sauce. We’ll season it up with 1/2 teaspoon of Cayenne, and about a tablespoon of Cajun seasoning. With the encouragement of Holly’s friend Michelle Divito, a longtime New Orleans transplant and a fellow Heathen with my wife, I tried some Slap Yo Mama. It adds both salt and spice, and tasted great. I added more black pepper to taste and a teaspoon of dried rosemary. A couple of bay leaves would have been good, but I ran out. I added the juice of one lemon, though my favorite is two limes.
Now take a half cup of the beer, I prefer Abita, but could not find any yesterday. Yuengling (with a satellite brewery in Tampa!) came to my rescue. Add it into the vegetables, sausage and sauce for about 10 minutes to reduce. Then in goes a pound of shrimp!
A note on shrimp: Get the freshest you can find. A little seafood shop here in town had it and the sausage. They take a truck down to the Gulf of Mexico, buy fresh seafood straight off the dock, and throw it on ice, driving it back to Paducah. Wild caught, and not farmed, frozen and shipped from abroad, it tastes great. They’ll even peel and de-vein for a modest charge.
So shrimp in the sauce, cook for only 2-4 minutes until your shrimp turns pink. Any longer than that, and your shrimp can get tough, rubbery and not a lot of fun to eat.
But Wait, Alan! There’s No Veggies:
Well, we have to make it a balanced meal. Chop and fry about three strips of bacon, rendering as above in another skillet, then toss in about 3/4 a head of chopped green cabbage. You can season it with about a half teaspoon of salt and pepper, though again, I replaced the salt with Slap Yo Mama. Stir fry until the cabbage is wilted.
When it all comes out, get a bowl of the grits, top it off with shrimp, sausage and sauce, with a generous side of fried cabbage. Hint: When you get the beer, get a six pack, and enjoy a few with dinner. ;) We didn’t have a bread, with plenty of starch with the grits. If you prefer, the shrimp works with French bread, steamed white rice, buttermilk biscuits or hush puppies. Be sure to get some sauce, though and garnish with sliced green onions.
We love hot sauce. Any Louisiana brand works great, though I went with Zaterain’s while Holly selected Chrystal’s. And yes, we have multiple types of hot sauce for different types of food. Tabasco, Louisiana, Slap Yo Mama and others are perfect for Cajun food.
Evening’s Entertainment:
So as I cooked, I put on Silence of the Lambs on TV, followed by the series Hannibal, teasing My Better Half, “This might not be appropriate with supper!” And true to form, when I sat down, she asked me to change the channel without my Jame Gumb impersonation that Holly despises.
As we ate, I switched to the Hulu series, “A Handmaid’s Tale.’ It’s one of Holly’s favorites, though, as they’ve now moved beyond the source material, I am looking for direction in the story. This week’s episode seemed t provide it, and it provided good viewing as we scuzzled generous plates of shrimpandgrits.
Well, I’m back to work, cooking for all the friends and family I love, and last night, a good time was had by all, with authentic New Orleans food, and an entertaining show. Good eating.
3 notes
·
View notes
Link
Pakki Mutton Biryani.

Hey everyone, it's Brad, welcome to my recipe site. Today, we're going to make a distinctive dish, pakki mutton biryani. One of my favorites food recipes. For mine, I'm gonna make it a bit unique. This will be really delicious.
Pakki Mutton Biryani is one of the most popular of recent trending foods on earth. It's enjoyed by millions every day. It is simple, it's quick, it tastes delicious. Pakki Mutton Biryani is something that I have loved my entire life. They are fine and they look wonderful.
To begin with this particular recipe, we must prepare a few components. You can have pakki mutton biryani using 32 ingredients and 15 steps. Here is how you cook it.
The ingredients needed to make Pakki Mutton Biryani:
{Make ready 1 KG/2LBS (approx.) of Fresh Goat Meat – with Bone cut medium to big size piece.
{Prepare 2 tbsp of Ginger-Garlic Paste –.
{Get to taste of Salt.
{Make ready 1/4 tsp of Turmeric – (use less turmeric as it will spoil the colour of your final biryani).
{Prepare 2 tsp of Red Chilli powder –.
{Make ready 2 of Lemon juice – Juice of 2 medium-sized lemon.
{Get 1 & 1/2 tsp of Cumin Powder–.
{Prepare 2 tablespoons of Biryani Masala – (I prefer Shaan).
{Prepare 1 & 1/2 tsp of Coriander Powder-.
{Take 5 of Yellow Onions large, sliced.
{Make ready 1 of Fried Onions – Fry large sized onion in home or we can buy the fried onions from store.
{Make ready 1 of Tomato medium.
{Prepare 1 &1/2 cup of Yogurt.
{Get as needed of Water – To cook rice and.
{Take as needed of Oil for cooking.
{Prepare 2 tbsp of Caraway seeds/Shahi jeera –.
{Get 1 & ½ flower of Star Anise –.
{Make ready 1& ½ inches of Cinnamon – stick.
{Take 2 of Black Cardamom –.
{Make ready 4-5 of Green Cardamom –.
{Prepare 4-5 of Bay leaves –.
{Prepare 2 of Mace – flowers.
{Take 10-12 pieces of Cloves.
{Prepare 10-12 pieces of Whole Pepper –.
{Prepare 6 to 7 of Green Chilies –chopped into 1 inches pieces.
{Take 1 bunch of Mint leaves –.
{Get 1 Bunch of Fresh Coriander or Cilantro-.
{Prepare 1/2 cup of Warm Milk –.
{Get 1 big pinch of Saffron strands –.
{Get 3 tbsp of Pure Ghee –.
{Take 5 cups of Basmati, Long Grained Rice –.
{Make ready 2-3 Drops of Kevra Essence.
Instructions to make Pakki Mutton Biryani:
Wash the meat and let all the water drip off. The meat should be dry and clean before we being the cooking process Wash the rice well with gentle hands, soak in water, and keep aside Warm the milk, add the saffron strands to the milk, and let it soak in milk – we will need this at the end for layering Garam Masala – We usually use whole spices in Biryani but many people do not like the whole spices in their mouth while eating food and more so if you have kids at home..
Take meat in a large bowl for marinating add the ginger garlic paste,lemon juice, salt, turmeric and red chilli powder, mix well and keep aside in refrigerator for 30-45 minutes Since Goat Meat is hard to cook We cook the meat in a pressure cooker and then cook for biryani. This will ensure a juicy and well-cooked meat in the final biryani. Heat 3-4 tablespoon of Oil in a pressure cooker, once the oil is hot add 3 to 4 whole red chilli, 3 to 4 bay leaves, add all of the sliced onion and saute..
Once the onion is translucent add chopped tomatoes, 1/2 tsp of Salt and 1/4 tsp of Turmeric Powder Add marinated meat into the cooker, give it a good mix and close the lid of pressure cooker with weight and let it cook for 2 whistles on medium flame..
Open the lid once the stem is settled and now we are ready for our next process to cooking meat further Heat a large pan add 1 tablespoon of oil in the pan Add the pressure cooked meat into the Pan Once the meat is cooked for about 5 minutes add the coriander powder and cumin powder Add 1 & ½ cup of yogurt to the meat and cook for 10-12 minutes on high flame until the yogurt is fully cooked and the water is dried up and your meat starts to separate the fast.
At this point add 1/2 cup each of coriander and Mint leaves, 1 and 1/2 tbsp of biryani masala. Finally add 1/2 cup of fried onion, cook it for 2 to 3 minutes..
Meat is ready and we need to start cooking the rice..
Take plenty of water (2 & ½ times the rice) and keep it in an open and wide pan to boil. Add plenty of salt to the water (taste the water and it should taste salty). Along with it, add few bay leaves and caraway seed to the water for flavor and let the water come to a boil. Take a muslin bag to it add 1/2 tsp of Shahi jeera, 1/2 inch piece of Cinnamon, 1 Black cardamon, 2-3 Green cardamon and Mace Tie the mouth of the muslin bag and put it into the boiling water for rice..
Once the water starts to boil add rice to the boiling water and gently mix it once so that the rice does not stick to bottom and the rice does not break Lower the flame to Medium-high and let the rice cook. Stir gently in between. The good trigger to know when rice is about to cook is when the rice grains will start floating on the top of the vessel and kind of swim with boiling water at that time take few grains of rice and they should feel hard and break easily..
This is the time when we take out the rice in a strainer and remove the water completely.
Now take an oven safe pan. Divide the meat and Rice you separately cooked earlier in 2 parts..
Sprinkle some chopped coriander and mint, some biryani masala and a handful of fried onion Take one portion of the meat pieces with some masala and spread it evenly at the bottom as the first layer. Now take the one part of the rice and spread it evenly over the meat Take the remaining portion of the meat and gently spread over the layer of rice Now take the remaining part of the rice as spread gently and evenly over the meat completing the fourth layer..
Make sure you have some (around 2 inches of space left in the container. We need this for rice to swell further and the air to circulate inside when we put this on dum. Sprinkle some more chopped coriander and mint, some biryani masala and a handful of fried onion on the fourth layer Take the warm milk with saffron and pour it evenly over the rice Take the ghee (melt it if solid) and pour evenly around the walls of the container..
Add few drops of Kewra essence over top and biryani is ready for dum..
Cover the container with Aluminum foil, place the lid tightly over it, and make sure even the sides of the aluminum foil are tightly tucked over the surface Preheat an oven at 190C/475F for 5 minutes Put the container in the oven and leave it at 180C/450F for 30-35 minutes After 30 minutes take the container out of oven, be very careful, as it will be very hot (exercise caution while removing the foil as the steam will escape and can burn).
For plating take out the biryani by inserting a spatula vertically till the bottom and scoop out. Yammy delicious biryani is ready serve with Raita..
So that is going to wrap it up with this exceptional food pakki mutton biryani recipe. Thank you very much for reading. I am confident you will make this at home. There's gonna be interesting food at home recipes coming up. Remember to save this page on your browser, and share it to your loved ones, friends and colleague. Thanks again for reading. Go on get cooking!
0 notes
Link
Broccoli, Mushroom, Potato, Peas & Chickpea Curry (Vegan/Veg). Potatoes with Saffron Milk Cap Mushrooms Recetas del Señor Señor. I have repurposed my "Vegan Alfredo Sauce" recipe used in the instructional video below to make a wonderful tasty version of a traditional stuffed baked. Broccoli can also be stuffed in potatoes and baked with a little cheese to make Baked Potatoes Chick Pea, Broccoli and Carrot Stir Fry, Protein Rich Recipe.

Roasted broccoli and mushrooms is a simple side dish that is both delicious and easy to make. When I am planning new recipes for the blog, one of the first things I do is ask myself this question We eat it with some simple grill pan chicken or grilled salmon, plus a yummy "baked" Instant Pot sweet potato. This is a Spicy Savory pie made with Spicy Potato Pie Crust and a Mushroom and Broccoli Filling. You can cook Broccoli, Mushroom, Potato, Peas & Chickpea Curry (Vegan/Veg) using 28 ingredients and 7 steps. Here is how you cook that.
Ingredients of Broccoli, Mushroom, Potato, Peas & Chickpea Curry (Vegan/Veg)
It's 140 mls of Coconut Milk.
It's 500 mls of Vegetable stock.
It's 1/2-1 Can of Chickpeas.
You need 3 of Potatoes (cut into thick chunks).
It's 2 Cups of Broccoli (chopped).
Prepare 2 Cups of Button Mushrooms.
It's 75 gms of Fresh or Frozen Peas.
Prepare 1 of long Sweet Pepper (grated or finely chopped).
Prepare 1 of Medium Onion.
You need 2 of Garlic Cloves (crushed).
It's 1 tbs of Ginger (grated).
You need 1 tsp of Mustard Oil.
You need 1 tbs of Olive Oil.
It's of The Spices.
Prepare 4 of Cardamom pods.
It's 4 of Cloves.
It's 2 of Bay Leaves.
You need 2 of Star Anise.
It's 1 of Cinnamon Stick.
It's 1 of tsb Garam Masala.
You need 1 of tsb Ground Corriander.
It's 1 tsp of Ground Cumin.
Prepare 1 tsp of Ground Tumeric Powder.
It's 1 tsp of Sweet Pepper Powder.
Prepare 1/4 tsp of Hot Pepper Powder.
You need of Garnish.
It's of Chopped Corriander.
You need 1 tbs of Coconut Yoghurt.
The crust is made with chilled chopped boiled potato, chilled chopped butter, flour and chili powder. For the filling, the mushroom and broccoli is cooked in a creamy spicy white sauce. Broccoli and Mushroom Salad. this link is to an external site that may or may not meet accessibility guidelines. Arrange onions, broccoli and cheese in the potato crust.
Broccoli, Mushroom, Potato, Peas & Chickpea Curry (Vegan/Veg) step by step
Heat Mustard and Olive Oil.
Add Onion, garlic, ginger, yellow pepper & saute for approx 10mins.
Add spices and fry until fragrant (Approx 1 minute).
Add Potato, Mushrooms and fry (Approx 2 minutes).
Add Chickpeas & Broccoli.
Add Vegetable Stock, Peas & Coconut Milk. Bring to boil and turn down to simmer until potatoes cooked through.
Serve with chopped Corriander and coconut yoghurt.
Whisk together the eggs, milk, salt, pepper and nutmeg. I stir fried mushrooms broccoli cauliflower and onions and put them all on the quiche. I also substituted soy milk (which I don't really like but I use it in recipes like this for health reasons) and. With nothing more than vegetables, potatoes and plenty of Indian spices, this simple and healthy side dish is vegetarian, vegan, and gluten-free. Serve it alongside rice or any gluten-free grain such as quinoa or kaniwa for a simple gluten-free and vegan meal.
0 notes
Text
I was first introduced to falafel, hummus, and tahini in my college days in Minneapolis back in the 90’s. The flavors were unlike anything I had ever tried before, and I fell in love with the new tastes and smells. It seemed so “exotic” at the time, which is funny to me now that I’ve tried so many different cuisines and developed a true love for good food around the world.
Homemade flatbread, falafel, hummus with grilled chicken & rice
For many years, I had a lovely neighbor who made the most wonderful Lebanese food – she would bring me fresh hummus, stuffed grape leaves, and baklava whenever she made some for her family. And when she entertained, she always put out the most delicious spread. I haven’t yet tried to make the grape leaves (which are my favorite) but I did make a batch of hummus this week, as well as homemade falafel, a tasty lemon tahini sauce, and some homemade flat bread.
Falafel with Lemon Tahini Dressing and Za’atar seasoning
I have made falafel from a mix before, but this was my first time making it 100% from scratch starting with dried chickpeas and I’m pleased overall with how they turned out. The tahini sauce I made to drizzle on them is so good! I think that may be something I just keep in the fridge to use as a dressing. The flat bread recipe was easy, but it was time consuming to fry them all up. I think next time I’ll use an electric griddle so I can do more than 1 or 2 at a time.
I have included links to the original recipes, as well as copied them below. I made a half batch of the hummus, which is more than enough, and cooked the chickpeas in my slow cooker on high for 4 hours using Alton Brown’s recipe. I don’t like a ton of garlic in my hummus, so if that’s your thing you may want to add more.
Falafel
Falafel
Original recipe is posted on the Downshiftology blog, and copied below. The only changes I made to the original recipe were to substitute an gluten-free flour blend for the chickpea flour and I used canola oil for pan frying:
1 cup dried chickpeas, soaked overnight (don’t use canned chickpeas)
1/2 cup onion, roughly chopped
1 cup parsley, roughly chopped (about a one large bunch)
1 cup cilantro, roughly chopped (about a one large bunch)
1/2 jalapeno pepper, chopped
3 garlic cloves
1 tsp cumin
1 tsp salt
1/2 tsp cardamom
1/4 tsp black pepper
2 tbsp gluten-free flour
1/2 tsp baking soda
canola oil for frying
The night before, soak the dried chickpeas in water in a large mixing bowl for 8-12 hours. Make sure the water covers the chickpeas by 2-3 inches, as they’ll triple in size.
When you are ready to make the falafel, drain and rinse the chickpeas and add them to your food processor. Add the onion, parsley, cilantro, pepper, garlic, cumin, salt, cardamom and black pepper to the food processor and pulse several times until it resembles the texture of coarse sand.
Transfer the falafel mixture to a bowl and add the flour and baking soda. Stir together, then cover and refrigerate the mixture for 30 minutes to one hour.
Use your hands, an ice cream scoop or falafel scoop to form the falafel into balls or patties (I made small, rounded patties). If you find the mixture is too wet, you can add another tablespoon of chickpea flour. If it’s too dry and crumbly, you can add a teaspoon or two of water or lemon juice.
Once the falafel are formed, you can cook them by your preferred method: either deep fry, pan fry, or bake:
Pan Frying (patties): *This is the method I used: Add a couple tablespoons of oil to a large skillet and fry the patties for 2-3 minutes per side until golden brown. Remove to a paper towel-lined plate.
Deep Frying (balls): Add about 3 inches of oil to a pot on medium heat. Heat the oil to 350F. Cook the falafel in batches (about 6-8 at a time) for 1-2 minutes or until golden. Use a skimmer to check the color of the falafel and make sure they don’t over cook. Then remove them to a paper towel-lined plate.
Baking: Heat your oven to 425 degrees and line a large sheet pan with parchment paper. Spritz the parchment with oil and place the patties in the pan, then spritz the tops of the patties with additional oil. Bake for 15 minutes, flip, and bake another 15 minutes.
Serve the falafel immediately, while warm and crispy on the outside with Lemon Tahini Dressing. They are delicious alone, on a salad, or on flatbread! I sprinkled some Za’atar seasoning on mine.
Falafel with Lemon Tahini Dressing and Za’atar seasoning
Lemon Tahini Dressing
Original recipe is from Cookie and Kate’s blog post for Best Tahini Sauce Recipe. I have copied it below with the only modification being a little less garlic. This is soooo yummy!
3-4 small to medium cloves garlic, pressed or minced
¼ cup lemon juice
½ cup tahini
½ teaspoon fine sea salt
Pinch of ground cumin
6 tablespoons ice water, more as needed
In a medium bowl, combine the garlic and lemon juice. Let the mixture rest for 10 minutes, to give the garlic time to infuse the lemon juice with flavor.
Pour the mixture through a fine-mesh sieve into another medium bowl. Press the garlic solids with a spatula to extract as much liquid as possible. Discard the garlic.
Add the tahini, salt and cumin to the bowl. Whisk until the mixture is thoroughly blended.
Add water 2 tablespoons at a time, whisking after each addition until smooth. (It may seize up, don’t worry.) After about 6 tablespoons, you will have a perfectly creamy and smooth, light-colored tahini sauce.
Hummus – delicious on pita, chips, or cucumbers
Hummus
This is Alton Brown’s recipe, available in the Food Network app or on their website. I made a half batch (which is what is shown below; the full batch version is available at the link above) because I used some of my chickpeas to make falafel so I didn’t have enough, but I’m glad because a half batch is plenty!
3 1/2 cups water
8 ounces dry chickpeas, sorted and rinsed
1/8 teaspoon baking soda
1 cloves garlic, minced
1 teaspoons kosher salt
3 tablespoons freshly squeezed lemon juice
3 tablespoons water
1/4 cup tahini, stirred well
3 tablespoons cup extra-virgin olive oil, plus extra for serving
Powdered sumac, optional
Place the water, chickpeas, and baking soda in a slow cooker. Cover and cook on high heat for 4 hours, or on low heat for 8 to 9 hours, or until tender. Drain and allow to cool at room temperature.
Place the chickpeas, garlic, and kosher salt in the bowl of a food processor. Process for 15 to 20 seconds. Stop, scrape down the sides of the bowl, and process for another 15 to 20 seconds. Add the lemon juice and water. Process for 20 seconds. Add the tahini. Process for 20 seconds, then scrape down the sides of the bowl. With the processor running, drizzle in the olive oil.
To serve, transfer the hummus to a bowl and drizzle with additional olive oil and sprinkle with sumac, to taste, if desired.
Ready to roll out the dough
Mediterranean Flat Bread
I found this super easy flat bread recipe on the All Our Way blog. I made no modifications to the recipe, however I did *accidentally* let the dough balls rest a little too long, because I got stuck on a conference call for work. So, then ended up rising a little bit, but they still rolled out easily and puffed up a little bit when I fried them.
2 teaspoons instant yeast
1 teaspoon granulated sugar
1 3/4 cup warm water (about 100 degrees, warm but not hot to the touch)
1/2 cup warm milk (about 100 degrees, warm but not hot to the touch)
1 tablespoon olive oil
2 teaspoons salt
6 cups flour — keep 1/2 cup out and use as necessary
In the bowl of a stand mixer fitted with the dough hook mix the yeast, sugar, water, milk and 2 cups of the flour until well combined.
Add another cup of flour, the salt, and the oil. Continue to mix. When that’s mixed in gradually add the rest of the flour reserving the last 1/2 cup.
Continue mixing until a soft dough forms and the dough pulls away from the sides of the bowl. The dough will be soft to the touch. Knead the dough for 5-6 minutes until it is soft and smooth.
Place the dough in a lightly greased bowl and cover with plastic wrap. Let rise until doubled, about an hour.
Divide the dough in half, then from each half measure out 8 pieces. They will be about 3 oz. each. Form each piece into a tight ball. Cover with a cloth or plastic wrap and let the dough pieces rest for about 10 minutes — this helps the dough relax so that it’s easier to roll out.
Work with one piece at a time on a floured surface. With a rolling pin roll the dough from the center out. Turning the disc as you work. Roll the dough out to about 1/8-inch thick into a 6-inch circle, cover with a small piece of plastic wrap, and repeat until you have 16 pieces of round flat dough.
Heat a lightly oiled skillet to medium heat. When the skillet is hot, cook the flatbread for 2-3 minutes on the first side until it bubbles and puffs. Flip it over with tongs or spatula and cook on the second side until it is golden and spotty brown. Make sure the skillet is hot! If the bread cooks too long it won’t bend and can turn out dry. The right amount of heat is 2-3 minutes per side. If you have a large electric griddle or flat top, you can cook more than one at a time and this will go much faster! Transfer to large platter or cookie sheet and cover with a towel until ready to serve
The flatbread can be frozen with excellent results: Let the bread cool and wrap each flatbread with plastic wrap. Gently reheat in aluminum foil in a low oven. Our kids didn’t wait for the reheating process – they were too anxious to get to the bread.

Hot, fresh flatbread: delicious!
Middle Eastern Fare I was first introduced to falafel, hummus, and tahini in my college days in Minneapolis back in the 90's.
#chickpeas#falafel#flatbread#homemade hummus#hummus#mediterranean food#middle eastern food#tahini#tahini dressing#tahini sauce
0 notes
Text
Recipes from Lombardy - Risotto, cutlets, polenta, a quiet but tasty cuisine

The typical Lombard cuisine has many facets. Having plains lakes and mountains differs a lot from province to province. However, let's start with the best-known dishes in the world, namely risotto with Milanese and cutlets in Milan. Milan is also home to the famous panettone. Instead, from the other provinces, renowned are the PIZZOCCHERI OF VALTELLINA or even the SBRISOLONA of Mantua. To taste definitely the risotto with perch and the perch in carpon, typical recipes of Lake Como. The appetizers are mostly made up of cured meats and cheeses of which this region is rich. we remember the carpaccio of bresaola which is a typical appetizer of Valtellina.
Carpaccio di bresaola della Valtellina
This starter should be prepared at least an hour before eating it to give the meat time to macerate in its seasoning
Necessary for Valtellina's bresaola carpaccio
400 grams of bresaola in rather thin slices
40 grams of rocket
Parmesan flakes just enough
olive oil, salt, pepper and lemon juice, just enough
Preparation of Valtellina bresaola carpaccio
In a serving tray put a layer of rocket and over the slices of bresaola, trying not to overlap them too much. Now mix the olive oil, salt, pepper and lemon juice in a bowl and with this emulsion wet the slices of bresaola. Above all the flakes of Parmesan cheese. Let the meat taste at least an hour before serving.
Milanese risotto
The first dish of the Lombard tradition known all over the world. It's not an easy recipe to prepare even if it looks simple. here the great cook does the difference.
Required for Risotto in Milan
500 grams of Carnaroli rice
50 grams of ox marrow
a litre and a half of meat broth
100 grams of butter
1 small onion
a sachet of powder
100 grams of grated Parmesan cheese
Preparation of risotto in Milan
In a rather large pot put the meat broth and when it boils add the saffron saffron sachet that will give it that characteristic yellow color.
In a large saucepan fry the finely chopped onion with half butter and the marrow, cooking everything over a very low heat and very slowly. After about ten minutes add the rice, stirring often so that it does not stick to the bottom and toast it. Now slowly add the meat stock until the rice is cooked through. Turn off the heat, add the butter and cheese and stir and serve the very hot risotto
PizzoCCHERI of Valtellina
Necessary for Valtellina PIZZOCCHERI
300 grams of buckwheat flour
250 grams of white flour
100 grams of butter
400 grams of fresh cheese
3 cloves garlic
500 grams of cabbage or cleaves
100 grams of grated gratturated grit cheese
salt as much as you need
Preparation of Valtellina PIZZOCCHERI
First we prepare the PIZZOCCHERI. Then mix the two kneads and knead with a little warm water until you get a smooth and firm amalgam. Flatten the pastry with a rolling pin about 3 millimeters thick to cut into lasagna 5 or 6 centimeters wide and then in the other direction in noodles about half a centimeter wide. Leave them on the floured pavement while you clean and cut the cabbage, which will be put on the heat to cook with plenty of salted water. After about 10 minutes dive the PIZZOCCHERI and cook about 8 - 10 minutes. Drain the pasta and vegetables little by little, placing them in a rather large tin. Sprinkle each layer with grated grana padano and very fine slices of fresh cheese until all the ingredients are used. Finally, flavor the butter with the garlic cloves that should be removed once the butter is melted and put this butter on the last layer of the PIZZOCCHERI. They should be served very hot.
Risotto with perch
Necessary for risotto with perch
300 grams of perch fillets
400 grams of rice
8 sage leaves
1 glass of white wine
1 onion
butter, grated parmesan cheese, flour and oil to fry just enough
fish or vegetable broth, salt, just enough
Preparing risotto with perch
First, in a large frying pan, brown the finely chopped onion in butter along with two chopped sage leaves. When it starts to brown, put the rice and roast it and turn it around all the time.
Blend the rice with white wine and when it has completely evaporated continue cooking the rice with the fish stock or salted vegetable for a fortnight.
Meanwhile, pass the parched fish fillets in the flour and fry them in a pan with butter and sage leaves. Remove the fillets from the pan and dry them on paper towels. In the pan where you have fried the fish fillets add a little butter and let it brown. Once the rice is drained and put in a serving dish add on top the fillets of perch and sprinkle with melted butter. Serve very hot.
Now to the second with the dish that most distinguishes the Lombardy region, the famous cutlet in Milan.
Milanese cutlet
Necessary for Milanese cutlet
4 veal cutlets with bone, cut from the ribs
2 eggs
breadcrumbs, butter for frying, salt and lemon (optional) just enough
Preparation of cutlet to Milanese
The meat suitable for the Milanese cutlet is the cutlet with the bone cut from a part of the milk calf that is called carrè. It must be at least a couple of centimeters thick.
Before preparing it, take off the nervetti and the furs and flatten with a meat beater. They are salted and passed in the beaten eggs and then inthe breadcrumbs making it stick evenly on the meat. Cook in a pan with plenty of butter until golden on both sides. Dry them with paper towels and after a sprinkling of salt until served immediately very hot. There are those who like to accompany with a slice of lemon.
Perch in carpon
Necessary for perch in carpon
500 grams of perch fillets
200 grams of carrots
2 medium onions
1 bunch parsley
1 bunch of tarragon
2 bay leaves
10 centilitres of vinegar
half a glass of white wine
1 celery
salt and pepper just enough
olive oil just enough
Preparation of perch in carpon
Wash and dry the parsicfish fillets and season with salt and pepper. Peel the onions meanwhile and chop finely. Clean the carrots and strip them with celery.
In a saucepan with a few tablespoons of olive oil brown the onion, celery and carrots. Add the bay leaf, the bunch of tarragon, half the parsley, white wine and vinegar and bring to a boil, if it is too dry add half a glass of water. Continue cooking until the liquid is reduced in half.
Meanwhile, place the parsing fillets on the bottom and drizzle with the mixture in a buttered baking tin. Bake in an already hot oven at 180 degrees for about 8 minutes.
Bake and leave to cool. The perch in carpon is left in the refrigerator once cold for at least 24 hours. It is eaten cold sprinkled with fine chopped parsley.
SBRISOLONA of Mantua
250 grams of flour
250 grams of cornflour
200 grams of sugar
200 grams of almonds
3 egg yolks
200 grams of butter
the zest of a grated lemon
1 vanilla pod
Preparation of the SBRISOLONA of Mantua
Chop three-quarters of the almonds in a mixer, pour the butter in to a bowl and knead with the ground almonds. Pour in the flour, cornflour and sugar, mixing the ingredients well. Add the zest of a grated lemon. Finally add the egg yolks and knead the dough with your hands. It should not come a smooth and firm dough but rather coarse. Put the dough in a cake tin, try to crumble it with your hands as much as possible. Put on top of the remaining almonds and sprinkle with a tablespoon of sugar. Bake already warm at 180 degrees for about an hour.
This cake is yummy soaked in wine.
Paradise Cake
Needed for paradise cake
150 grams of flour
230 grams of butter at room temperature
230 grams of icing sugar
130 grams of potato starch
8 eggs
1 grated lemon
1 packet of baking powder
Preparing the paradise cake
Whisk the butter for a long time, combine the sugar and grated lemon zest. Now add the eggs, 4 whole and 4 egg yolks. Beat them slightly first and mix them a little at a time in the melted butter. At this point add the flour, potato starch and baking powder sachet by slowly mixing the ingredients.
Bake the cake in an already hot oven at 170 degrees for about 45 minutes.
Read the full article
0 notes
Last Seen Blogs

dentalhospitalkukatpally
Untitled

kaatokunart
Kurt (KaatoKunArt)

kennylikessalt
kenny

louisentheirbees
louise

autism-polls
Polls about Autism!