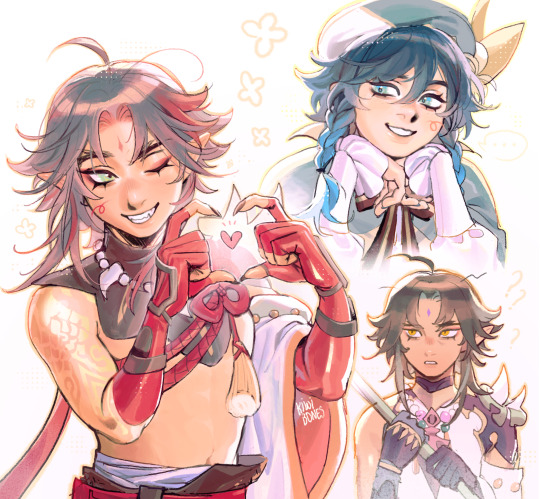
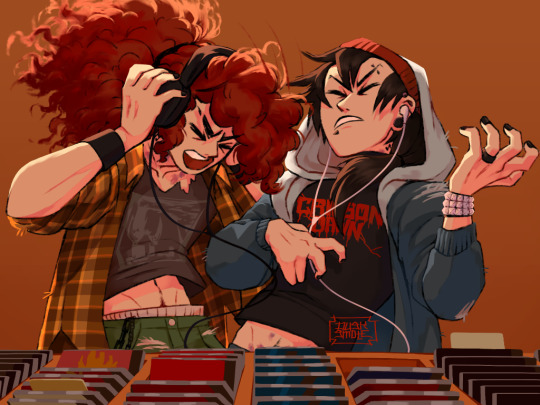
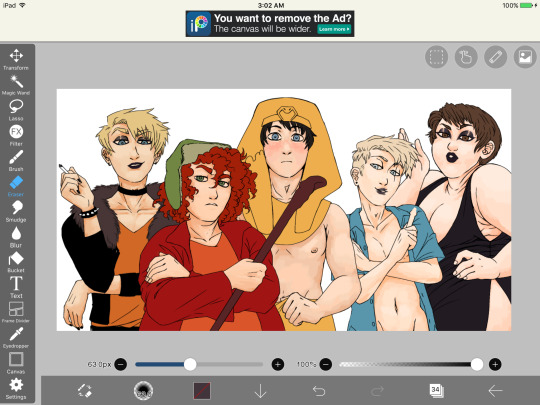
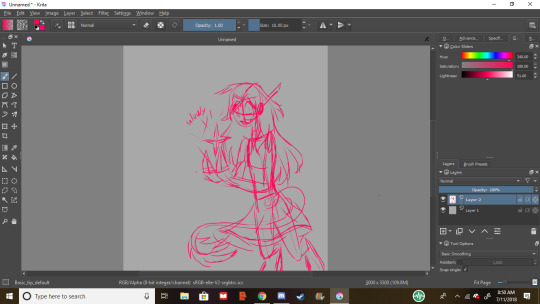
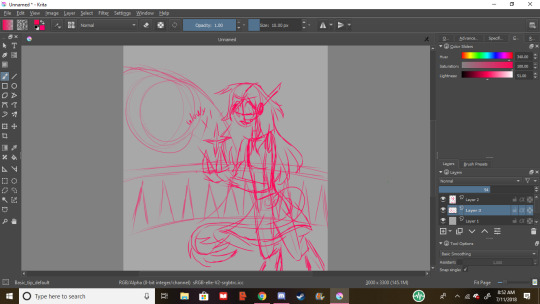
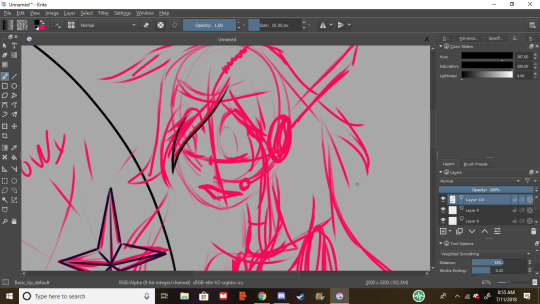
#style practice ! trying to use a style with darker lineart and light colors
Text
taking my chance 💐
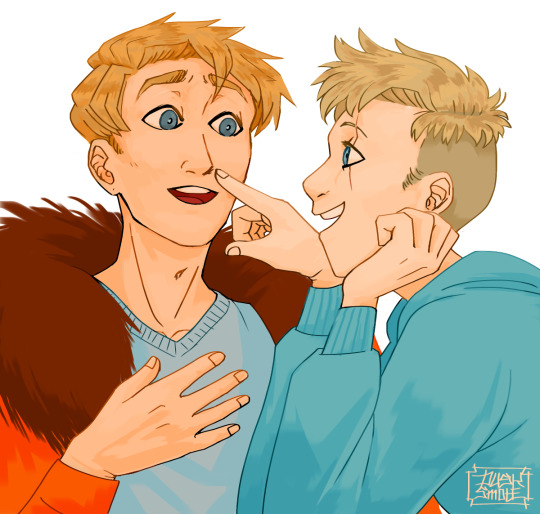
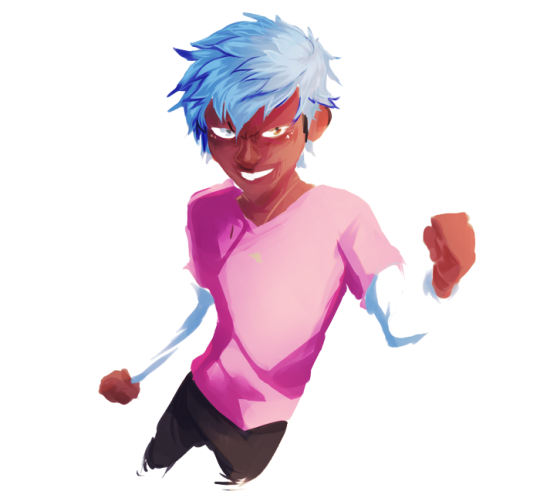
#r u serious man#right in front of my primordial jade winged spear#xiaoven#genshin impact#genshin impact fanart#fanart#my art#i wanted to draw a xiao being a tiny jealous but I think he looks more disturbed than anything lol#style practice ! trying to use a style with darker lineart and light colors
254 notes
·
View notes
Photo

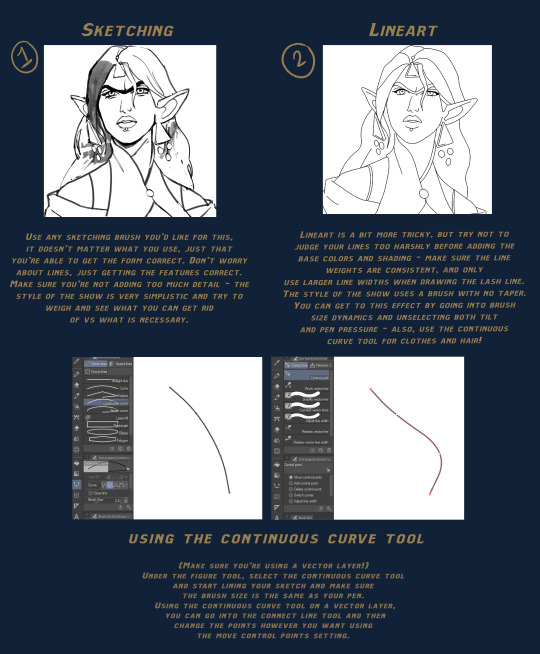

Dragon Age Absolution tutorial!
Note: All you will need to draw this is a tapered pen and a pen with no pen pressure for lines.
Here is a link for the brush I used for lines: Download
Written Steps in the Read More!
Before you start drawing:
Practice and study the style of the show before putting pen to paper. This can be in the form of tracing over stills of the show and trying to get a feel for the line weight, features, and amount of detail the characters in the show have. Do not be afraid to rely on images from the show, always use references!
Steps:
Sketching - Use any sketching brush you’d like for this, it doesn’t matter what you use, just that you’re able to get the form correct. Don’t worry about lines, just getting the features correct. Make sure you’re not adding too much detail - the style of the show is very stylized and try to weigh and see what you can get rid of vs what is necessary.
Lineart - Lineart is a bit more tricky, but try not to judge your lines too harshly before adding the base colors and shading - make sure the line weights are consistent, and only use larger line widths when drawing the lash line. The style of the show uses a brush with no taper. You can get to this effect by going into brush size dynamics and unselecting both tilt and pen pressure - also, use the continuous curve tool for clothes and hair!
Continuous Lines - (Make sure you’re using a vector layer!) Under the figure tool, select the continuous curve tool and start lining your sketch and make sure the brush size is the same as your pen. Using the continuous curve tool on a vector layer, you can go into the connect line tool and then change the points however you want using the move control points setting.
Flat colors - For flat colors, it may be helpful to place or paint your background first to get a sense of lighting and tint. Feel free to adjust and use color balance, the style of DA Absolution uses solid and saturated colors.
Cell shading - Now - for cell shading, use a solid tapered pen on a clipping mask above your colors. For highlights, set the layer mode to Add (Glow) and adjust opacity and color as necessary. For shadows, use either multiply or soft light layer with a darker color to create dimension - as before, adjust opacity and color as necessary. Try to keep the shapes sharp, but if the edges are too rough, use a small amount of blur.
Final Touches - Using a black tapered pen, create shadows around the folds of clothes, the chin or jaw, and hair - add highlights in the same method as before for smaller details and add a shine to the eyes and lips. If the image is pixelated, use a small amount of blur - and you’re done!
#step by step#art help#art tutorial#digital art tutorial#clip studio paint#dragon age absolution#da absolution#dragon age#dragon age fanart#long post#brushes#resources#bioware
1K notes
·
View notes
Note
I love your art so much, you’re part of the reason I started drawing again. Your old art is cool, and your new art just has so much emotion and detail in it, it deserves so much praise. Do you have any advice on how you upskilled so well into the amazing art you do today? I really want to learn to be skilled like you are and improve to your level
Dude, thank you so much. I'm super flattered but also have major Impostor Syndrome right now lol.
The biggest thing that helped me was getting a drawing tablet and learning how to use digital art programs like Canvas or Procreate. I am a very messy artist - my traditional sketchbooks were always a nightmare because of how often I erase shit, so being able to use programs where I can simply undo or reposition a line was a game-changer.
I'm also incredibly indecisive and struggle with linework, but I found some great brushes that mimic the effects of ink pens and watercolor so I can achieve the messy, painted look. (This Sketchbook set and lineart set are the two I use the most)
Use as many references as you need! Gather a bunch of base poses to get the hang of proportions and anatomy (my go-to artist is Mellon_Soup. Screenshots from movies and shows work great too)
Try out posing tools like this one
A fun exercise that helps me is to paste a photo or drawing on one layer, and then on the layer above, sketch the main aspects in 30 seconds. Delete the first layer and then work solely off of the sketch (and yes it will absolutely look spooky and/or silly). If you need more time at first, start with 60 seconds and work your way down as you get the hang of it:
Take pictures of yourself in the poses you want to draw
Find artists with a style that resonates with you and study their work
The Multiply tool on Procreate is AMAZING for adding depth to artwork. I use this on almost everything. Add a slightly darker color on top of the whole set of layers, switch it to Multiply, and then go in with the eraser to mark the areas where the light hits
Keep practicing, no matter how shitty you think it looks! Just keep going!!
Uh I think that's it? I'll add more if I remember anything else.
I wish you the best of luck on your art journey! <3
19 notes
·
View notes
Note
hi! I saw your post about critiquing another persons art work and it made me realize i dont like my current drawing process
Mostly because I have shaky hands and don’t really like line art because it takes me too long and i still dont like how it looks so im trying to switch to a more painterly style
Do you have any advice? Particularly on defining 3d forms?
P.S.
(I love your art style! You draw so beautifully and I love how you stylize anatomy and hair particularly)
yeah i feel you, i think everyone starts digital art with a lineart heavy style in mind and then gradually drop it as it is pretty hard to master
i'm not sure i'm the best person to ask about defining 3D forms as i myself struggle with that, but i thing that i noticed is that if you don't have a stable base or foundation to paint over then the process will become exponentially harder. So what i do is i make sure i have a cohesive sketch. Not a clean one, not a pretty one, but one where i am sure where everything goes and one that helps me predict and better visualize how things will end up once i get there. If the sketch is so messy to the point where i can't tell a leg apart or i don't know the general form of the fabric then i'll have a much, much harder time rendering later on.. So i think making sure the "skeleton" of your art is set in place. Again it's not about it looking good or clean it's about knowing what you'll be doing with it in the later stages.
But let's say you do have a clean sketch, or even lineart. I think the easiest way to give form to your subject is by choosing a light source ( it doesn't have to be dramatic, it can just be ambient light ) and then paint shadows in the areas where light can't reach. It depends on your style really, but for me i use a darker (but still saturated) color under the chin, under the eyes, where the bangs/hair meets the face and for the nose area i kinda just make a blob (i don't paint noses that much as you might have noticed bdshj but you know,, check out other artists you like and examine how they handle shading). Just try to think of everything as oversimplified shapes. limbs are cylinders, the torso is like a parallelipiped or a box or a sack of beans or whatever you see fit, the head another box etc... just keep it simple, Less is more
Oh and also, for a painterly style, i suggest avoiding overkilling it with the rendering. Let the brush strokes speak for themselves and keep it vague/ abstract. Our brains are smart and they loove filling in blanks for us if they're given some general information so let the viewer do the hard work, don't explain everything.. this is also a good way to practice developing an artstyle but i'm getting off topic if i wasn't blabbering enough already. A painterly style is imperfect and messy and vague at times and you should let it be that way, don't force perfection onto it as you'll deprive it of humanity
these are my two cents on the matter hope it made sense and helped in any way? if not you can always watch yt videos or listen to more qualified people than me
#sinix marco bucci ahmed aldoori#i think that's the holy trinity#they explain stuff pretty well#also don't forget to analyze other's work and see what They do#no need to reinvent the wheel u know#ask iztea
20 notes
·
View notes
Note
How do you ink and color? Any tips? I love your art! 💜🖤
oh shit i got this ask months ago and forgot to answer
inking: god i hate lineart so much. the trick is to not do it 😂 unfortunately, i still find myself spending hours on lineart all the time @_@
the biggest thing i’ve found is making your lines varied in thickness. it adds to the interest. i also try to make my outside line thicker than my inside ones to break up the figure from the background. don’t be afraid to skips some lines and imply them with shading instead. i will color over my lines at the end to make them not as strong, but i’ve learned to still keep some lines black for extra emphasis.
^ here’s one of my older pieces that i’ve been considering redoing. it has very little line variation, ALL the lines are colored so there’s no solid black, and there’s very little hard contrast in shading values. overall, it looks flat and uninteresting and if i had the time i’d redraw this one.
this is a more recent example of lineart that i think works a lot better. the characters are really well defined with a strong outline, but the inside lines aren’t harsh and distracting. you can see i recolored the lineart in kyle’s hair to be a dark red, and in some places it blends with the shadows to imply areas with more highlights. stan’s pants don’t have and lines in them, just the outside shape and pockets.
you can see in this wip what the lineart looks like before i do all the shading and fancy stuff. stan’s pants look totally flat and straight until i start shading.
a lot of the time though i won’t even do lineart, especially if it’s a big scenic piece. the more zoomed out less detail you can convey, and lineart takes up a lot of space.
^ this piece is an example where i do both, lineart and no lineart. the mirror image of kyle isn’t the focus, and i honestly didn’t feel like going in and drawing exact lines because they’d probably look fucked up anyway. i typically don’t put hard lines in backgrounds because it would take FOREVER and just be distracting.
the one thing you do have to be careful of with lineless art is contrast. hard lines are good contrast that show you what you’re looking at, and without them your image can blend together.
here’s part of a painting i did last august, when i was first experimenting with lineless styles (full image on my NSFW twitter). can you tell what’s going on here? i sure as fuck can’t. there’s no contrast, and it makes all the skin tones blend together in an unintelligible mush.
contrast has always been one of my biggest weaknesses as an artist, so i’ve been trying to improve over time. here’s a more recent lineless drawing:
this one works because it had high contrast. the highlights are really bright and the shadows are really deep. you can still make out the facial features too, but there’s no ‘lineart’ layer’. everything was painted on in the same layer.
-
-
coloring: oh my god i love coloring. it’s my favorite part of drawing and the reason why shit takes forever. a lot of the same stuff from before comes into play, like contrast. you can also portray some really interesting moods based on colors if you’re being stylistic, but also pay in mind to your environment.
i always color my background first. in fact, a lot of the time i’ll do the entire background before coloring a piece. the environment establishes your light levels and light source, and it’s typically easier for me to tweak colors on a figure than the ones in the background. in the above example with kenny, the background is a mostly solid black with a beam of light from the left. i picked kenny’s colors to fit in this environment.
it’s also important to use references.
you can see in this wip i’ve got a reference image for how light from a TV looks against figures and the way their shadows are cast across the wall. it also helped me figure out what colors to use in this situation.
a lot of coloring is just trial and error to see what works. i usually start with a flat base color and add value to it. if you put all your colors on different layers it’s really easy to change them quickly.
here’s an example:
i got my base colors down and here i can see the skin tone is blending with the background, so i lightened it up for better contrast

i typically shade the skin first, then clothes. you can see here i did a dull skin tone with a bright colored shadow. this adds more contrast and interest. i always try to avoid doing dull shadows where you shift toward black. black shadows are really uninteresting and they can make your piece look muddy. i’ll typically shade with an orange, red, blue, or purple.
the final piece has a really bright highlight on it coming from behind. this just adds more visual interest and contrast. you can also see i’ve gone back into the pink shadows and added an even lighter, brighter peach value in places to show reflected light. this also gives the darker pink shadow an added outline effect, because it touches the base skin tone but looks lighter within.
^ this one’s a good example of light and shadow (full image on my NSFW twitter lmao). there’s not a lot of color because it’s dark out, so everything had to be conveyed in values. there’s hard light across the stomach and then a shadow over the chest, but there’s still light being reflected up into stan’s face that lets us make him out. the rest is deep shadow and unimportant, so it’s all black.
that’s the other part, color and value determine where your eye is gonna look, so consider that when drawing.
^ consider this piece i drew like a year ago. it has a lot of blues and reds, and originally i was going to make stan’s guitar blue. i don’t have the wips anymore, but it didn’t stand out and it didn’t look right with the image. after a lot of playing around i went with yellow because it’s bright, it breaks up the image, and it adds another color to the piece to balance it out.
the same thing happened when i was working on the cover image for What They Say About Us.
you can see in this really early wip that i’d blocked in the colors and butters is totally naked. for one, i was like “damn that kid is WAY too naked in this image” and he also blended in with stan and cartman. additionally, there was a lot of warm colors on the left, a lack of color on the right, and an overall lack of blue.
first change i made was throwing a shirt on him and it made a huge improvement. the image looks much more balanced now and he’s not super distracting with his naked-ness.
other than that, coloring is just picking your base colors, blocking in shadows, adding highlight, and cleaning it up. if you wanna improve, look at photo references. look at other people’s art and examine how they use color and value. practice practice practice. have fun with it. the most fun i have coloring comes from figuring out interesting textures like the pharaoh headdress or kenny’s leather jacket.

i find stock photos like this and study them to see how the light works
other than that, the rest is just playing around, seeing what works, and making things up as i go!
69 notes
·
View notes
Text
i got bored so i thought i’d share some art tips ‘cause why not!!
- start with a sketch. seriously no artist i’ve ever met starts a drawing with lineart
- construction lines like boxes and circles are a godsend and the more you use them the more you’re able to make different body types that are proportional. eventually you’ll be using them less and less as you commit different body types to memory
- study some realism first because it’s a good way to build skills in lighting and proportions. this doesn’t mean you can only draw realism obviously, but having that knowledge does help for future reference
- anime is a valid style and fuck anyone who says otherwise
- originality is a myth. take ideas and inspiration from other artists, movies, whatever and build your own style from that. it’s gonna take time but it’ll come i promise
- use references if you don’t know how to draw something. as long as you don’t trace it or claim it as your own, you are totally valid if you look at other poses online for how to draw something. if it’s heavily referenced just mention + credit where you got the pose from
- don’t be afraid to ask artists for tips and tricks. personally whenever someone asks me about brushes n stuff i get super excited and am like “yes here and here and here” and i’m p sure other artists feel the same
- flip!!! your canvas!!!!! you’ll hate it at first but it really does make your drawings 1000x better i promise
- try not to shade too much with black ‘cause it looks muddy. there are some exceptions, like light diffusion and differences in lighting, but if the object is colorful or around something colorful try to shade in a darker color similar to that one
- don’t be like @staff. learn basic color theory
- watch!! tutorials!! and speedpaints!!
- color dodge is so good for glowing. seriously. those glowy effects i use? all color dodge. it highlights the saturated colors while casting the rest in shadow
- overlay is your best friend
- use multiply for shading if you’re not sure what colors to use
- use many many layers, there is nothing worse than doing something wrong and messing up the whole thing trying to fix it because you don’t have a different layer for it
- draw what you want. no rush. no pain. it’s for you. it doesn’t have to be perfect
- practice practice practice!!! drawing is a skill, anyone can learn. y’all should see my drawings three years ago. it’s all practice.
- there’s this weird culture around filling up your sketchbook with only clean drawings and stuff which is, uh. bullshit. your sketchbooks can have whatever mess you want. that’s why it’s called a sketchbook and not a masterpiece book. do whatever you want
- don’t feel discouraged if your art doesn’t get as much attention. time zones + filters + a lot of things may be a factor and it doesn’t mean you’re not good
- don’t compare yourself to other artists unless you’re looking to learn from them because everyone’s style and level is different and you won’t get anywhere if you feel bad because you think you’re “not good enough”
- “not good enough” is also bullshit btw, art is fluid and creative and the standard is whatever you want it to be
- ignore cringe culture that should be abolished immediately anyways
- you don’t owe anyone anything. you do you.
- if someone tells you you can’t draw something, that’s a perfect motivation to draw lots of that thing to spite them
- drawing is supposed to be fun. if it’s super stressful for you, it’s okay to take a break
- experiment!!! there’s so much you can do for art, don’t be afraid to try new things!!
- ily you’re valid
- keep drawing, i believe in you
#art tips#i'll be honest i'm still learning lots abt color theory#also anatomy and body parts and expression#can't wait to get better ahh#hope this helps someone#:))
3K notes
·
View notes
Text
Review of Kaitogirl’s Underfell

Plot & Other Details
Like many works that trace Frisk’s journey through the Underground, the plot is pretty simple and linear. Frisk rewinding time when killed slightly complicates the timeline, but Frisk has only died three times so far.
As Underfell works go, the work is mild. As expected, there's sometimes blood (though rarely in large amounts), and plenty of swearing. Despite the setting, characters are often mean, cynical, and aggressive rather than outright evil or murderous, and are easily pacified. Situations are also rarely very frightening or violent. Along with its simple, rounded, relatively well-lit style, it's much milder than HorrorTale or the famous Flowey is Not a Good Life Coach.
Characterization
Frisk

Given the situation, Frisk is rather bold, though still friendly and pacifistic. At first, they think they’re dreaming, explaining their unworried approach. However, when Toriel kills them in an escape attempt, they realize they’re not dreaming and break down, sobbing. Yet they quickly recover after dreadful realizations, fights and even death, becoming a happy camper once more. Literally: it's like Frisk is just an experienced camper lost in a bear-filled forest, rather than a strange land of monsters trying to kill them. They even feel safe enough for Flowey to read books and history plaques to them, despite Flowey’s reminder they’re in a hurry. (This might be explained by Frisk being too young to understand the danger they’re in, or realize their power makes them unkillable)
While friendly and forgiving, sometimes Frisk is insistent, such as yanking Flowey out of the ground to put him in a boot and thus carry him into Toriel’s house.
Flowey
In many Underfell works, monsters' morality is basically flipped: good characters are now 'evil'. Thus, the murderous, sociopathic Flowey is now a helpful companion, often carried by Frisk. Though that's true here, Flowey is not sweet or innocent. He is prone to anger, frustration, and indignant outbursts, and sometimes intimidates weaker monsters with a scary face. He says he "can't console people", and smacks Frisk to make them stop sobbing. Flowey knows "in this world, it's kill or be killed", but is sad and resigned about it. Overall, he might be as Flowey once was before choosing murder runs.
In this work, Asriel was once a jerk: he took Chara to his parents while eagerly asking about killing them. Thus, it's likely Flowey is only 'good' because Asriel was once bad. Notably, Flowey mentally calls himself 'Asriel', apparently only coming up with 'Flowey' when Frisk asked for his name.
Toriel
As expected, Toriel is meaner and more violent than in canon. Indeed, Flowey is afraid she'll kill him and Frisk if she spots the two of them, and is surprised when she doesn't. It's likely she outright kills monsters in the Ruins: Flowey notices one hallway is "dustier than usual", and afterward her clothes have dust stains. She’s more disdainful of Flowey than in canon, calling him a 'weed', threatening him, and initially refusing to let him into her house.
Her sadness and long isolation apparently damaged her social skills, or even sanity. Her pie is very burnt, and has so much cinnamon it makes Frisk cough. Having run out of butterscotch, she put in monster dust instead, which isn't at all reasonable. Though she would surely know how bad the pie was, she aggressively insists Frisk eat it and not even think of throwing up afterward. When Frisk tricks her to escape, she calls them ungrateful and burns them alive at the exit.
Yet, she can still be kind: she sheltered Frisk, gave them food, tucked them in and gave them a plushie as they slept. (Though she glares at Flowey for noticing the latter two) Frisk points out her kindness in the fight: they say they don't really want to leave, and that's she's not evil, just lonely and sad. Toriel is stunned. She breaks down, sobs, and says: "Why are you being...so nice to me?” However, she is so deranged she soon "realizes" Frisk's kindness is a trick, a prelude to greater horrors, and she chases them out of the Ruins.
Papyrus & Sans
Sans hasn’t actually changed much. He has a taste for meaner, darker jokes. Compared to other characters, he is uncommitted: he’s neither especially helpful nor harmful to Frisk, though a few of his actions could have gotten Frisk hurt or killed anyway. While he does kill Frisk with an electric shock from a joy buzzer, when Frisk reloads and refuses to shake his hand, he guesses that the buzzer would have probably killed them anyway.
Here, Sans definitely knows about Flowey. Though he knows Alphys had been looking for Flowey, he didn't report him: he found it more entertaining to keep seeing Alphys throw a fit. (Notably, he asks Frisk's name, unlike in canon.)
Papyrus is even more confident and egotistic than before, as shown by the even more muscular snow sculpture of himself. While canon Papyrus never dismissed others for his self-enhancement, this Papyrus does just that, calling Frisk a "pathetic weakling". He is still a skeleton with high standards: while more vicious, he insists on fair puzzles and fights. (despite talking about how much he'll benefit from capturing Frisk)
Art
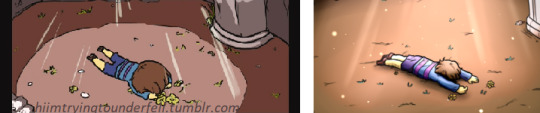
Left: The first page. Right: A re-do of the first page, showing improvements in shading and lighting.
Though not as polished and precise as other comics, the art improves over time. Indeed, there's a big jump in quality on the last page of the Snowdin arc and later in Waterfall, too. The lineart is crisper, the shading better, and the colors richer. (if very purple) While the hand-lettering has tight and irregular spacing at first, it improves a lot midway through the Snowdin arc.
As appropriate for an "edgy" setting, characters are toothier and spikier, to the point even Moldsmal and Papyrus's house (using icicles) are spiky. As expected for Underfell, characters look scarier, with duller, darker colors. Red and black (unsurprisingly) dominate the work: not only are many characters’ clothes red and black, but even attacks are often red. (Except fire, oddly enough: that's blue instead.) Colors are changed to darker, duller, and redder shades overall.

The right image illustrates about half the colors in Snowdin.
Often, this results in shades one could broadly call "purple", especially reddish purple.
For example, the walls of the Ruins are reddish-purple, and sometimes Snowdin's snow is purplish-taupe. The purple-ification is especially obvious with the Echo Flowers (once cyan, now phlox), Waterfall (once dark blue/indigo, now dark bluish purple) and the gratuitous purple Moldsmals. Indeed, it's so purple one could easily call this work "that purple Underfell".
Yet, one could also call this "that low-green Underfell". Other than Flowey's (often dull) green stem, there is practically no green in the Ruins. Things get greener in Snowdin, though the trees are a fairly dull shade. (Oddly so: the trees were actually blue in-game). In Waterfall, green becomes rare once again.
Yellow and orange are rare, too, if less so. Frisk's skin is not mango-yellow, but an only slightly yellowish beige. Monster Kid is mostly a washed-out orange (who gets even less yellow by Waterfall), and wears red-and-black clothes. Even monsters' outfits have less yellow, such as Papyrus, Shopkeeper Temmie and especially the Nice Cream Man. In some cases, though, the work adds yellow: Napstablook and Toriel have yellow eyes, Sans has a yellow tooth, and Undyne's armor has yellow accents.
One can get used to the limited color scheme over its hundreds of pages. But the bright, green-and-yellow palette of Flowey’s dream sequence in Page 126 and Waterfall’s yellow history-plaque flashbacks remind the reader of the limited colors.Even the comic itself lampshades its dark, limited palette: Papyrus's color tile puzzle is various shades of grey, black, and white.
Conclusion
For those who want something a little scarier and unhappier than canon Undertale, but aren't quite ready for darkfic or standard Underfell approaches, Kaitogirl's Underfell is a perfect middle ground.
28 notes
·
View notes
Note
hello! i was wondering what program&brush settings you use for your artwork? im new to digital art and i really like the way you colour! Especially those light effects they're so extra cool!
omg Anony you’re such a wonderful being, thank you for liking my art enough to ask me that!
now watch me failing trying to explain things to you lmao. I’m self taught and I’m in no way the best at this, so what I’m going to tell you might still be flawed but this is how I do things o/
hmm it’s gonna be long so I’ll put it under a cut!
1) I’m using Paint Tool Sai for everything in my art but if I still feel the need to, I’ll use Photoshop to correct colors and lighting. for example in this progress gif:

you can see where I decided “no, I don’t like this cold blue feeling” so I went to Photoshop (because it allows changes much easier than Sai when it comes to colors) and I changed it to a warmer purple! you can always play in Photoshop and try to see different versions of your art, different colors will give off different feelings
most of my artworks don’t look the way they do at the end because while drawing I tend to be focused on other things (line, where to place shades, lighting, etc) while when the picture is done I can focus on the feeling I initially wanted it to have!
2) My usual brushes are really basic. also ignore my ugly writing.
Sketch: I use this to sketch because it has a nice and easy flow, I can get messy lines that look good (the latest Brahms Heelshire drawing I did is entirely drawn with this one!)

you can always switch between your brushes depending on what feeling you want your art to have
Lineart: this one has nice, smooth and bold lines. I like to play around with it’s size. I believe it’s the basic one Sai has
little advice: if you’re not happy with your lineart try to alternate heavy lines with tiny ones. for example:
you can see how bold her hair is, but adding thinner lines to the glasses, the folds of her clothes, hair etc. it will create a better dynamic of your picture and will leave the eye of the viewer to run around it! I’m honestly awful at explaining stuff fdkjsnjkfds ofc this is a personal preference but my linework improved since I started to think like this
Base color: this is the color tool sai gives you, I changed my names so I can’t remember its default name. I like it to be bold because when I was little I used to color entire coloring books, so even now digitally I like to color every bit like I’m using crayons haha. time consuming and useless but shhh. basically I put down every base color with this one

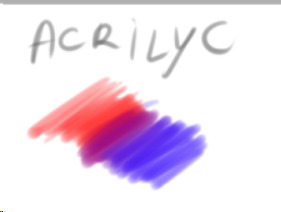
Acrylic: now this one is tricky, when I got it the first time I wanted to use it to shade, but using it I discovered it’s much better for blending. after I put down the main colors and shades I just use this one to blend them together and I sometimes paint with it too

Blending: it’s literally the blur brush Sai provides you xDD
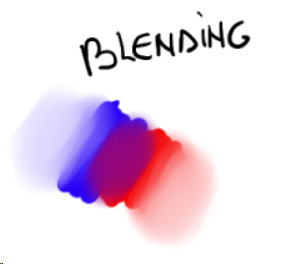
now keep in mind that using its settings (the things near the “Normal” option!) you can get different types of blur! always play around to see what looks good in your art. also remember that not every shadow has to be blurred or blended out, there are many ways shadows can look, using both blurred and heavy (cast) shadows in your art will definitely improve it. using real life references might help
Airbrush: the very brush Sai gives you. I’m using this one mainly for lighting. what I do is basically put down a hard light, like literally take a light color and place it where I see fit on the character, then I give it a bit of glow with the airbrush. one thing I noticed is that depending on the surface, the glow will change!

in this one you can clearly see the light on his cheekbone, but then there is a much weaker light on his face, that’s made with the airbrush and then blended into the structure of the face.the glow on the cheekbone and the ear is made with airbrush, using orange and playing around with the layer modes (overlay and luminosity, these are your best friends when it comes to lighting!)
lastly I want to present another best friend for us artists, the eraser

you can make highlights with the eraser too! you can cut the light in different shapes to give different feels and many other things, the eraser is definitely your best friend and not only in erasing mistakes. try to play around with it sometimes
Other things I learned:
try to use a different color for shading, using the exact color but darker will only make your art look dull, lifeless. the same goes for lighting! there are lots of tutorials on color theories and practices out there to help you with it
don’t be afraid to get wild, use oranges, reds, blues, purples in your skin and play around with the layer modes, you’ll see how much more alive it will feel. also don’t be afraid to try different styles, constancy is not the friend of a creative mind. experiment, try things, go out of your comfort zone. make it fun, make it personal. if you like drawing dogs then keep drawing dogs and enjoy it! don’t let labels and others to influence you and your spirit
ik this is obvious but never compare yourself with others. your journey is yours, you have a different hand, a different brain and a different being. this also goes to drawing things others did already! who cares there’s 0284e4895 other pictures with Kitbull already? draw yours, it will be unique and special because it has something from YOU in it, and no one can replicate that not even with tracing
watch people online! of course when you sit down to draw it will be completely different, but involuntarily you’ll learn and exercising you’ll find your own way of doing things. there might be much better ways for drawing lighting than I do, but this is how I feel good and I like to do it!
I know you hear this everywhere but really, practice, daily if you can! in October 2017 I tried to to the inktober challenge for the first time, I haven’t finished it and I was late anyway but I can tell you that trying to draw daily definitely improved my art. now I’m able to draw a picture per day with not much effort (yesterday I was able to draw three pictures with pretty good quality! o/ always start small and be proud of every step!!)
lastly, don’t be hard on yourself. every picture is a lesson, doesn’t matter how it came out. maybe the anatomy is wonky af, but you learned and your brain will remember what not to do next time. try and try and try and never say “my art sucks”, say “this pic doesn’t look how I wanted, but I still like it. I’ll do better next time!”. the moment you start to like your art you’ll see how much it will start to shine hehe
I might come out with more stuff but this is already really really long xD just be yourself, love your art and enjoy it!! lots of luck for you Anony, I hope I didn’t bore you and this will be helpful for you and others! :D
#ira geneve#art advice#tutorial#sai brushes#art tips#anon ask#ira rambles#wah this was long sorry#but it warms my heart to know some people look up to me for things#and I'll do all I can to help anyone
66 notes
·
View notes
Note
Hey! Do you have any advice for people new to digital art!! I started recently but I'm having a really hard time especially with lineart and colors ;-;
Well digital art is such a huge and scary beast and it’s more than normal that you have difficulties with it. Tbh I still struggle with it a lot because I’m always afraid that i could do it better or that I should have been to choose absolutely another style for myself. Now my main struggle is a choice between more simple coloring with more sharp shadows and some kind of volume and more realistic lighting. I doubt very much now about all of this and wonder if my arts would be better and audience loved them more if I’d draw with sharp lineart and simple coloring.
Idk if I’m the only one who thinks that lol. I think that’s mostly because you have a really large amount of possibilities in digital art. Thousands of brushes, effects, instruments - all of this use to scare and make you confused. You don’t know where to start from or what you want from your style and how it should look like. And it’s normal, especially if you only started getting used to it. And you should be ready for that it’s gonna take a while before you finally feel comfortable with your style and digital art at all. However it all depends from the person.
So I would like to write some basic tips based on my own experience and thoughts and maybe it could help someone.
Find yourself a nice software you’d feel comfortable with. I wanted to make another post about my software but it’s for another time. I would recommend SAI or Sketchbook Pro for those who start. I still love them more than Krita and photoshop tbh because of simple interface and configurations.
Find tutorials for anatomy, expressions, all that stuff. Learn color theory, because that shit is really important in good illustration. Same goes to the laws of composition, lighting etc. Youtube has a lot of this things, also you can search on Pinterest.
Probably the most important tip: Don’t try to start from some difficult kind of drawing. And go to some kind of realism. Instead try to make a lot of pics with simple lineart and coloring, it will help you to get used to the pen and brushes and feel more confident. Many artists who only start try immediately to draw some very cool difficult idea with cool lighting and volume and details (trust me I was lterally that person) but I think it’s better to make just a lot of simple colored pics probably even with lineart + solid colors + blush for example instead of one big and “detailed’. I failed with that so much.
Make studies. Make a lot of studies. Of everything - poses, faces, environment. Just try to copy screencaps from shows or cool pics on Pinterest with trying to analyze how lighting and stuff works or which instruments are better for you. Plus studies often help to understand how color theory and composition work especially when you make them from someone’s already made pieces such as photos and movies. that’s just like in real life when you sketch smth or smb from real life, or make gestures drawings. It’s easier in digital because you can train yourself in coloring too without a need of thousands of coloring art stuff.
Make a lot of observation. Open an acc of your favourite artist. What features of their style do you like the most? Maybe they have a certain way of drawing eyes or noses, or maybe they usually add to line bright colors or make those good looking outlines with lighten color? Try to note these features and use in your drawings so you’d feel more satisfied with final result. Go watch their speedpaints so it would be easier to understand how stuff works. Don’t try to copy, just note some things you love the most about them.
Use references. It really can help with understanding what atmosphere you want from your piece, lighting, environment => it would be easier to imagine it in your head and I think that it’s already a half-finished work if you have a really clear imagine of the final piece in your head with poses, lighting and stuff. I always spend a while for imagining what I want from drawing, often while being on my way to university in a subway, listening to some themed music. Also I used references for my latest Halloween and autumn pieces. It’s not that you copy stuff - more like try to analyze how to make your drawing more realistic and detailed.
Use different modes of the layers. That’s honestly the best what the God of Digital Art could gift us. My leaders are definitely Glowing and Overlay. Also I would recommend to use rather Multiply mode for shadows than trying to draw them with just same color but darker. You can draw shadows with just purple or brown and than just use Multiply so the they would look more natural. The same goes to everything else - from backgrounds to lighting. These modes can become your true saviour in tough times.
Flip your canvas horizontally all the time to see the mistakes in anatomy, faces and stuff.
Don’t use too much texture brushes. Seriously they are good but sometimes you only need the most simple ones to create a decent piece.
And of course the very-very main advice. Without it everything I told above loses its sense completely. PRACTICE! Just practice-practice-practice, draw thousands of pics, sketches, try different styles, experiment. It’s the best way to get used to digital art and understand what is comfortable for you and what is not. Experience is really important in this field. Don’t expect that it would turn out immediately perfect and remember that with every piece you become better and more confident. Every finished drawing makes you closer to success and satisfaction from what you do. The most important thing is to not give up. Look for inspiration in songs, people, everything around you, try to make drawings of it, sketches, whatever. Just make a lot of that. Really a lot. Of course with analyze and permanent observation. That’s the only valid way to success.
These are very rough and maybe I forgot some important parts but tbh I wish someone told me these while I just started to draw digitally. Honestly a really good observation and practice make perfect and I understood it pretty good for these months.
80 notes
·
View notes
Note
Hiya! You're art is really good! I was wondering if you could show your drawing process? I'm trying to develop some tips and stuff, heh.. thank you!!! - ♡♡♡
Well for starters, thank you so much! I’m glad you enjoy my art! But I’m very sorry if this isn’t as in depth as one might hope, I’ve been in a bit of a rush this morning, so my apologies (also please forgive my uncropped screencaps)
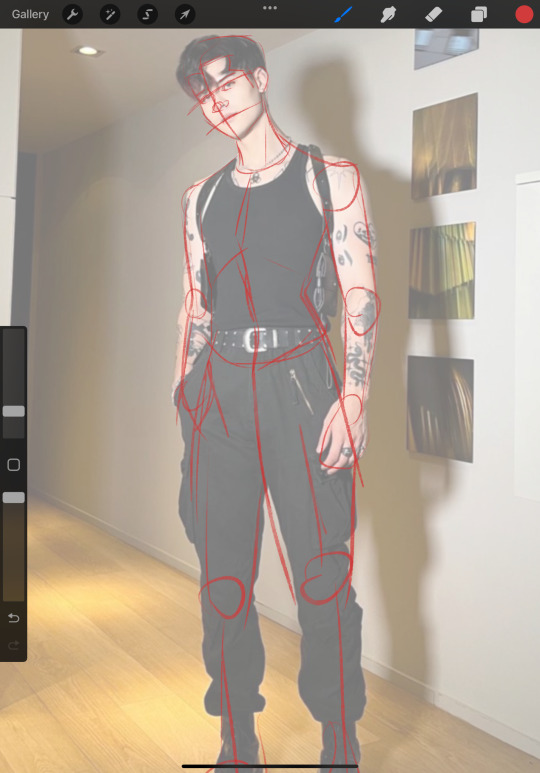
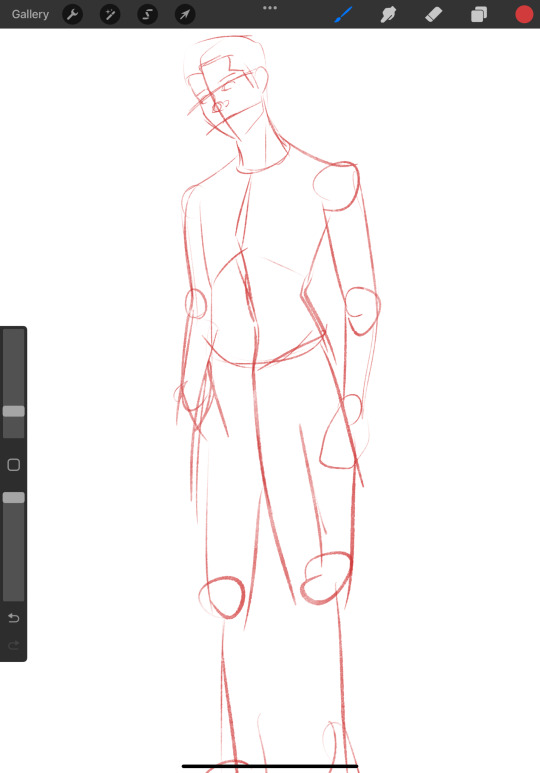
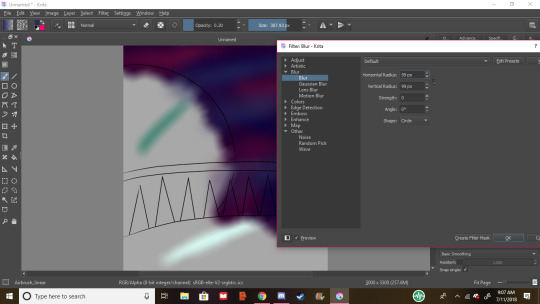
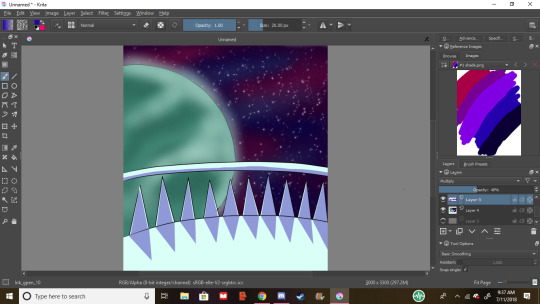
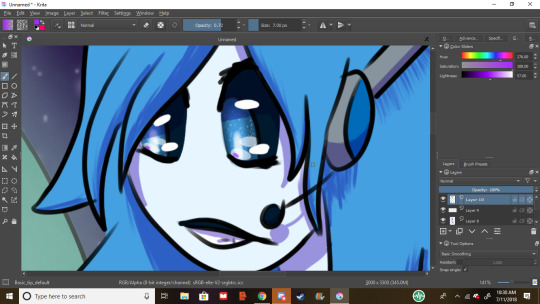
To start off, I either sketch it out on paper and take a pic, or sketch in krita. I typically use krita for almost everything I draw digitally. To start, my default canvas size is around 3300 x 3000, and if I’m not feeling lazy, I fill the canvas a nice grey. I don’t know why, but it makes the drawings nicer.
I like to start off with a basic idea of what posing I want, with a loose crosshair on the head to figure out where the character is looking, in this case, the weird floating thing we got here

Next, I start putting in shapes and finalizing our pose. most drawings of mine are built with shapes (usually most obvious with DKtDW Michael, he’s very rectangular.) For hands I use that pentagon shape, this helps me plug in the thumbs and fingers. Our character here is very slight, so i used sort of a tube, ect, ect,

next, I refine the crosshair. Most artists who use a crosshair only have a line for the bottom of the eyes, but I never got the hang of that one, so I have it for the top and bottom (also I gave her a tail. Because.) And then I place the face stuff on. Eyes I like to do “anime style” (sparkly, only the top and bottom lash line are lined, ect, ect,) unless it’s robots, and by exenstion animatronics. One thing I’ve learned is a good idea is if your character has pupils, sketch the iris first, then the pupils. This will work better for you and gives you a nice ratio of iris to pupil.
Next, plan the hairline. I usually have two hairlines I apply, rounded, and widow’s peak. This will help you plan the hair out easier, which is beneficial for short and long hair.
I’ve never known how to describe the way I draw hair, but generally, make it flowy if it’s long. Hair tends to be curlier with shorter hair, because it’s less weighed down, and please, practice different hair textures and styles, I may go into that more if anyone wants me to try to do a hair tutorial.

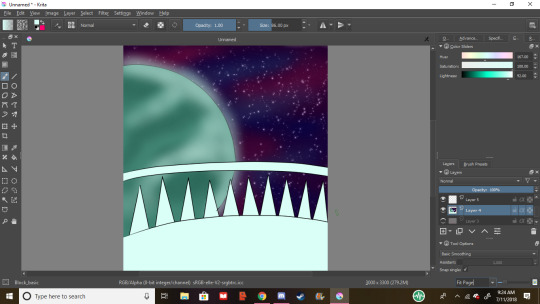
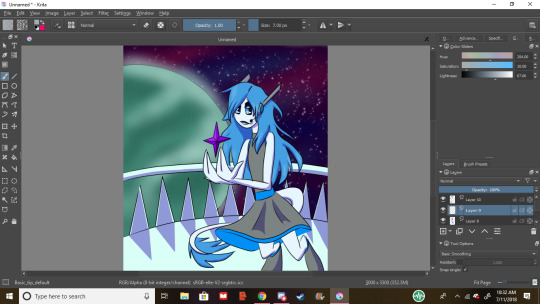
Next, move onto clothes, and refining other details. I like to make skirts flowy, flowy is fun, dynamic, and interesting, visually.
uhhh let’s refine that glowy thing, right? Let’s make it a crystal. Crystals are fun.
Next, let’s give her a background.I wanted to draw space, so we’re drawing space now. I gave her a planet.
Line the background! I use Basic_tip_default on weighted smoothing for almost all my lineart. Don’t be afraid to use the line and circle tools. They’re helpful, and denying yourself the tools that the program comes with is dumb, and limiting.
Rad, the lineart’s done on the background!
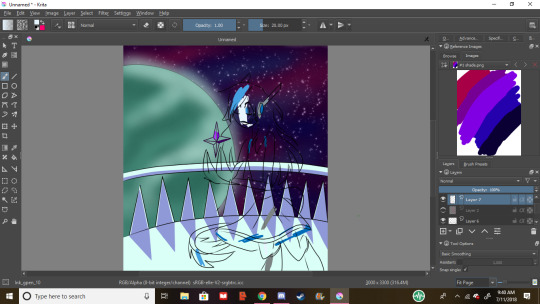
Next, let’s line the character. For hair lining, use gentle strokes, it creates a feathery and light feel
For lining around the eyes I turn off weighted smoothing, and feather ‘til it looks like eyelashes

lineart complete, nice

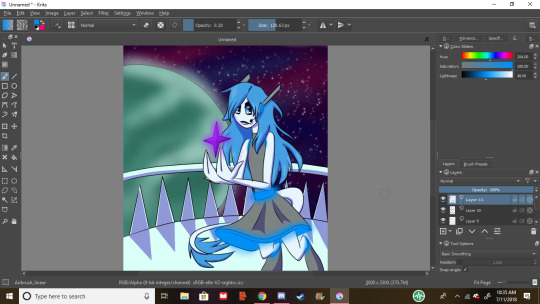
Next, let’s lay out some background colors. Try not to make them too overpowering compared to the character, or you’ll the character as the focal point. I’ve chosen my main galaxy colors, and my color for the planet. The balcony will be a sleek white. I’ve been taught not to use pure white or pure blacks and greys, but you do whatever makes you happy, don’t let anyone boss you around unless you’re paying them to teach you, or they’re paying you. I use pure black for lines, and pure white for eye shines, but it’s important that you work out what makes you happiest. Art isn’t about what’s the standard of the time, it’s about what makes you happy. If neon ponies is what makes your heart soar, then make all the neon ponies you could ever dream of, you beautiful soul.
Next, fill in the bg’s most prominent color with either the fill bucket or a large brush, this is my galaxy base.
I like to airbrush the other colors, but sometimes it’s too sharp, so let’s
b l u r i t o u t. I used the 99 x 99 radius to get it absolutely dreamy
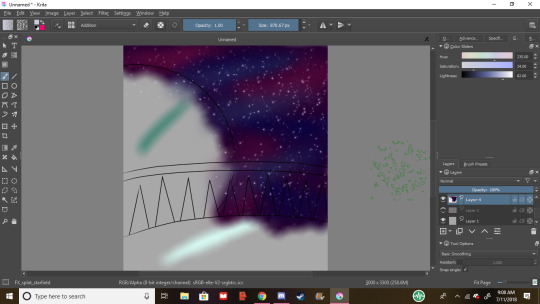
star it up baby, bc you’re a star. my favorite brush for sparkles and stars is FX_splat_starfield, it’s lovely
next the planet, I airbrushed some darker and lighter teals for detail, as well as gave it a haze around the edge for because.
Then we’re all colored!
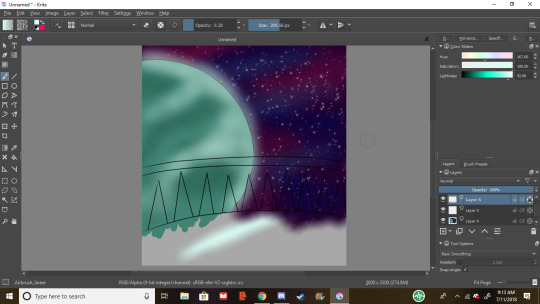
shade it up, babey. In this piece’s case, our light source is the planet, so we shade accordingly. the shades in the ref docker are my go-to’s. Good rule of thumb is the warmer the light, the warmer the shade, but my default is the purple-ish blue color, i set it to multiply and the opacity to 40%
Next I block in the character’s colors, I only do this if this is my first time drawing them, if not, i use the previous image or the character’s ref sheet

flats are done, and she looks spiffy, let’s shade her
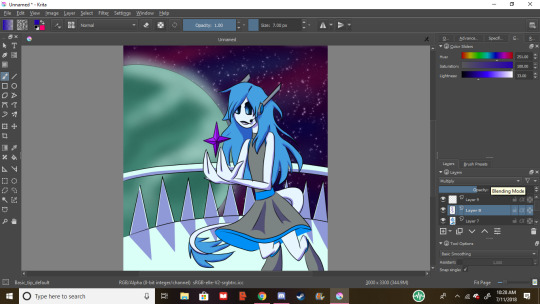
cool
close up of the hair shading. i always take my lining brush, and make it thinner for hair shading, it looks fluffy, and nice. this is also the beginning of the eye shining process, for fancy eyes like hers, i take white and lower the opacity, that way no detail is lost, and it’s still nice and shiny, for plain eyes, i just up the saturation and lightness
next, over the lineart, put pure white like this, it make the eyes have lots of depth. and an option if you have a light source that’s a different color, a shine of that will really tie it together.
nice, she’s shaded and highlighting. but now we need some… glowies
much better. if your light is especially bright or your character is pale, some reflection goes a long way. i use the airbrush for glowy stuff and these reflections on matte surfaces
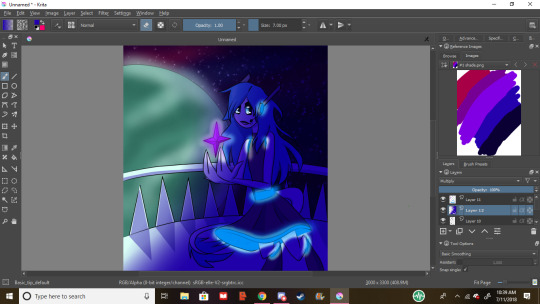
Now we shade in a way that effects bg and character, i call envo shade. I went ahead and took my airbrush set to erase where stuff glows, but now it looks too sharps, so…
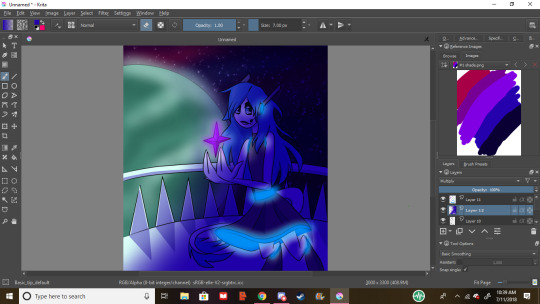
We blur it up again. Perfect.
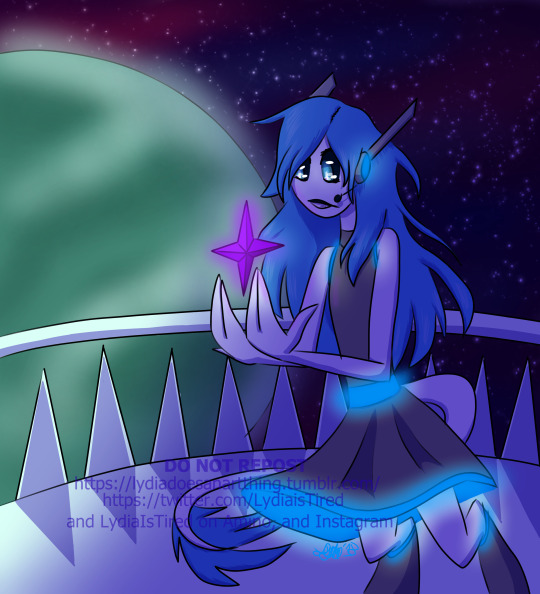
Never forget to sign and date your work. Dating is so you can look back and see how much you’ve improved, and signing is just good practice, but i won’t get into it. i tend to watermark my stuff after it being reposted so many times, but that’s something you can decide on. Again, please keep experimenting and trying different things to develop how you draw, and if you ever use these methods, feel free to send me the link so I can see ^^, have a lovely day, and if you need me to explain anything further, shoot me another ask.
Commission info
#lydiaistired#lydia does an art thing#art process#art tutorial#ish#digital art#artists on tumblr#autistic artists
34 notes
·
View notes
Note
Could you give me any tips on the basics of drawing?
I feel so honored to receive this ask :)Here are some tips I, I hope you find them useful ^^
1. Use guidelines, break down the object or the character you’re drawing into smaller shapes. Circles for the head and joints, lines for the limbs, squares or rectagles for the shoulders and hips etc. Lines to indicate where something starts and ends, like the eyes! Same with objects. This is important and useful for anatomy, perspective, proportions and even folds. It helps making sure everything is in its correct place so pay most attention to this point!
Make sure these lines are erasable, specially if you’re a traditional artist! draw the guidelines in pencil and don’t press hard on it!
There are artists who don’t use guidelines and still manage without them. However If you’re a begginer I encourage using them, once you get more experience you can get rid of them gradually or just use less shapes. I personally prefer using lot’s of them and my sketches are always messy thanks to that.Whenever I teach people how to draw I start by making them draw lines and basic shapes until their hands get used to them so they can be prepared to draw guidelines.
A site to help with this: https://design.tutsplus.com/articles/human-anatomy-fundamentals-basic-body-proportions–vector-18254
2. references are friends! Don’t feel bad for using them specially for practicing. If you don’t use references while you’re still learning you will get used to making mistakes and it will be hard to get over them later. Referencing anime and people’s art is good but mostly reference from real life, if you just copy people’s art you’ll make the same mistakes as them and you don’t want that. Most importantly make sure you’re not violating any copyrights when you post referenced art! If you don’t have permission from the artist then just don’t post the art. PLEASE BE CAREFUL.
More information: https://sweetmonia.com/Sweet-Drawing-Blog/is-it-bad-to-use-a-reference-when-making-drawing-art-the-beginner-guide/
3. Lineart: I’d say just don’t pay much attention to it, just put lines randomly and your linearting style will be developed by itself over time and then you can try new things. For some people lineart is just the lines they don’t erase after finishing a sketch.
4. Base colors: Choose colors that make you happy and think look good together! There’s the color theory you might wanna study it but I personally never got it. Just remember different characters should have different skintones and don’t make the white too light or the black too dark and you should be good. for this step I usually put the base colors on one layer and just leave it. Shadow and highlights are on separate layers so I can get back to it and change some colors If I don’t like them.
5. Shadows: Before you start shading make sure you have a defined light source! Think where the shadows should be and apply them there with your preferred brush on a separate layer. Personally I choose a random color (usually blue) for shading if I think it looks good for most art but I try to apply the rules when I paint a full picture with a background to give the right feel. Using multiple colors is also good but you need to make sure they’re of balanced values so no part of the drawing looks much darker than rest. I usuallt set the shadow layer to multiply or color burn.
6. Highlights: For this step I use any light color (usually yellow) and apply it with a brush on a separate layer to the areas that should be directly in front the light source. I add some lines here and there too, it looks better. Make sure the highlights are lighter than any other color you used as a base! If you need to, make the highlights fainter on the darker colors and stronger on the lighter colors. I usually set this layer to overlay or color dodge.
7. last touch: I use the eyedropper tool on the shade color and highlight color of the hair and draw random rebelling strands on a layer above the lineart layer. Make sure it’s not too messy unless you’re going for that look. If I think I over did it I just take the base color and draw some strands with it, or erase some of the earlier strands. Then I merge all layers and play around with filters until I’m satisfied.
aand that’s it folks! If anything isn’t clear feel free to drop another ask! Also check my #art reference and #art talk tags for more useful information! ^^
#art tips#art reference#art talk#asks#anonymous#sorry this is late!#I intended to answer this on Thursday but we got busy and I wasn't feeling so good#long post
8 notes
·
View notes
Text
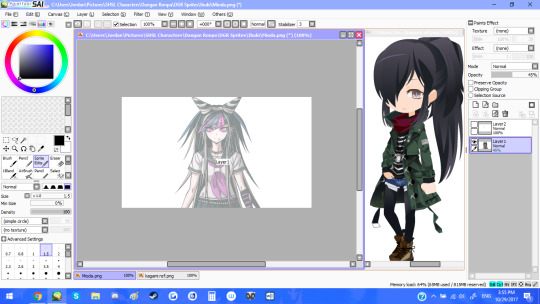
DR Sprite Edit Tutorial!
So this has been in the making for a couple of months due to a lot of art blocks and stuff, but!! I think this will help some people who have asked for some advice on how to draw your ocs dr ocs in the DR style (or at least close to it)! I’m gonna try and make this as simple as possible without all the complicated steps!
Just to say it now, I use Paint Tool SAI and I have the download file as well for anyone who would like it as well. The download link will be at the bottom as well. This is gonna be long so bear with me!
Let’s get to it!
Okay so first off!! You wanna have a ref of your oc! I usually use dreamselfy cause it gives you a lot of options (I used the japanese version and the simulator to put it all together. If you guys want those links, I’ll put them down at the bottom for you guys.)
This is an old character of mine named Kagami that I’m gonna use, they needed a redesign and to be re-written so I thought this would be the best opportunity for them! They are non-binary and so I think the best base sprite to use is Ibuki’s! It fits their body type.

What I’m gonna do first in sai is load the sprite into it and lower the opacity and add another layer on top of it. (I also load the ref in there next to the base sprite so that I have something to look off and draw it how I want it.)
This is the brush I will be using for all the lineart:
(I tend to keep my stabilizer on 3 so that it gives me a little more steady lines when i draw)
The first thing I do is trace one side of the sprite on the new layer. It’s important to remember to make sure the lines are clean and it’s okay to redo the line as many times as you need until you get it to how you want it!

After this I’ll take the layer, copy, paste it and then flip the layer and line it up to the other side like so:

Now before I do anything, I start on the face so that I won’t forget it later or that it doesn’t look too unproportional to the face when I draw the hair. I’ll repeat the same thing I did for the bust in the previous image and go from there.

If you see off to the left, I’ve made separate layers for the eyes, mouth and eyebrows. This is really important that you do this if you want to make expressions for your oc to use in posts and such! Plus it’s just nice to have it all separated. You’re going to now start drawing the hair! Now Kagami’s hair is really simple, I’m going to draw it as I see it until I get it to what I want it to look like! Make sure the hair is on a separate layer so that you can erase what you don’t need of the head.

Now that I have their hair done, I’m going to make sure that the hair is on another layer before making it invisible so that I can start on the clothing. You’ll add another layer and begin drawing on that. It’s important to note that clothing folds, it moves, and makes the character look a little bigger. It happens often that you can draw too many folds and wrinkles or too little. Points where limbs can move tend to have more wrinkles placed near them on clothing.

So i’ve drawn half the jacket, and to make it so much easier on myself, I’m going to copy, paste and flip it to put it on the other side, and then add the scarf and some other details to make it a little less like I copied and pasted it. (I ended up changing a few things because I am indecisive, but overall you should have a complete outfit on your oc.

What you’re going to have to do next is get rid of the excess lines from the bust layer and make it to where lines aren’t going through each other. You’re gonna wanna do that with the hair layer as well, erasing things that don’t need to be there. After some time of cleaning up lines and erasing, I now have the lineart of my sprite!

Now the next step is very important, it’s how you make your sprite transparent. Circled in Green is what you want to click on and you're gonna click on the outside of the sprite so that it looks like this:

Circled in green on the sprite is spaces where you want to use the select tool (that’s in the brushes) to fill in the empty spaces. After you get it filled in, you want to go to the top where it says ‘Selection’ next to the ‘Layer’ dropdown and click invert. Your sprite should look something like this:

The next thing you want to do is create another layer. Take the color white and use the bucket tool ON THE NEW LAYER. The sprite should be completely whited out. On that layer, you’re going to want to set the layer to multiply so that you can see the sprite again. That layer with the white on it, merge it with the lineart layer. Create another layer and set that layer to a clipping layer (circled in red). The layer should be set to ‘Multiply’ as well. Now what you can do is color on the sprite without having to erase! Like so:

This is what your layers should look like!

The clipped layer should be the layer you color on! I personally only use 1 or 2 layers to color so I’m just gonna do ahead and use 2 layers to make it easy. You want to use the first layer for the base color:

Make another clipped layer and met it to multiply so that you can start shading. You want to use colors that are a little bit darker so that the shading looks a little more natural. Rule number 1: NEVER shade with black, unless the base color you’re shading is black itself. It causes the shaded part to look muddy and you don’t want that. It’s hard to explain shading and how you do it because it depends on where your light source is. The light source on this sprite is coming in from the right, so most of the darker areas will be on the left.
Now when you color the eyes, you want to create another layer under the eye layer and color the inside of the eye white. Merge the eye layer and that layer you colored and create another layer on top of it and set it to ‘Multiply’. I would look up a ref of another dr character and see how the eye is colored and shaded there because I tend to do it a bit differently. After you’ve colored it, merge the two layers again and then you’re all set! You should now have a sprite!
When you go to save, save it as a .png file. It will prompt you with this:
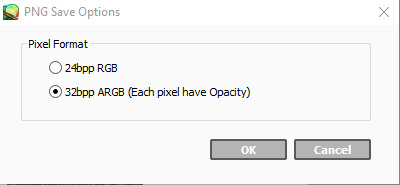
Click the second one so that it turns out like this: (If you drag it around you can see that there’s no white background, making it transparent!)
Congrats!! You did it! Sprite editing takes time to get used to and it's not always eyes, but all I can do is urge you to practice. It’s the only way you learn and get better. You don’t have to take everything that I said seriously, either. If there’s something that works better for you that you’ve found a lot easier, then do it! It’s all about doing it how you want to and what makes it fun for you! Art should be fun to draw, isn’t that the whole point?
I hope you guys found this really helpful!! I’m actually really impressed with this sprite it came out better than I thought.
Thank you for reading!!
Here are the links from the top!
SAI Download: [Link]
Dreamselfy Simulator: [Link]
Dreamselfy @Trade: [Link]
#fangan ronpa#fangan ronpa sprites#dr oc#dr oc sprites#dangan ronpa sprites#dr sprite tutorial#art tutorial#this is really long#i am so sorry
17 notes
·
View notes
Text
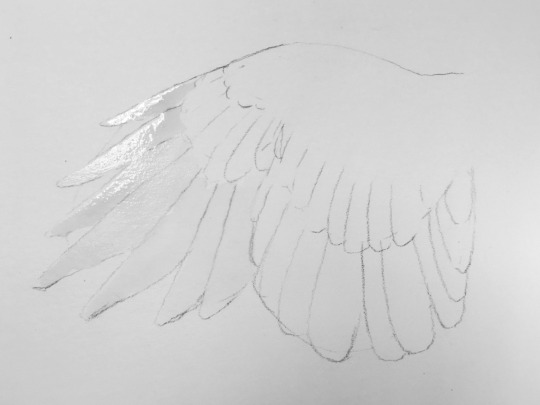
Realistic Wings Tutorial: Part II
(Part I can be found here.)
In my last tutorial, I went over the different types of wings, different feather shapes, some dos-and-don’ts, and how to draw wings overall. In this tutorial, we’ll be talking less about realism, and more about how I paint wings in general, using watercolor techniques such as “wet on dry” and “wet on wet”.
Step 1: Decide the shape and pose of the wing.
Here I have lightly sketched out the shape of my wing. I chose an elliptical wing shape, since I don’t do those often, and loosely determined the shape of the secondaries and primaries. Keep in mind, with watercolor you want to sketch lightly especially if you know you will be painting with light or transparent colors later.
Step 2: A little more detail...

Unless you are very confident with what you are painting, I recommend further detailing your drawing to make sure the details (in this case, feathers) that you have in mind, will look alright once put down on paper. Again, work lightly. Even this pencil here is a bit too dark. (Ideally, you would sketch with an H pencil, not mechanical, but I don’t follow my own advice there. ;’D )
Step 3: Pick your colors!

This could be it’s own tutorial, but I’ll get to that another time. For now, you can see that I cleaned up my sketch to the lightest bare minimum I could, while still being able to see what I’m doing.
Then I take a scrap piece of paper (I save watercolor paper scraps from my paper cutter and keep them for this purpose) and experiment with colors that I have in mind. Generally, I try to pick out three separate colors for light, medium, and dark values.
In this case, I knew I wanted light Manganese Blue wings that faded to a rich Windsor Blue, but I wasn’t sure what my dark color should be and what would really go well with my other two colors. So I laid out some options I thought might work, compared them, and decided on Indigo!
Step 4.0: Washes
When a wash of color, you have to work somewhat quickly. You want to put down and blend your color before the water dries, but you also don’t want to put down SO much water that your color “floats” above the surface of the paper, or your paper buckles excessively. I personally pick out manageable sections to apply my washes to.
Here, I started with only the primaries, and laid clean water down ONLY where I wanted pigment to be, then I applied color at the tips since I wanted my wings to have a dark to light (nearly white) gradient. Then I moved onto the secondaries, and then up to the coverts.
4.1:

While my first washes were drying (very important!) I decided I wanted to add in another color for the primary and secondary coverts, maybe like a parrot wing of some kind? I decided I wanted to include one of my favorite colors: “Cobalt Turquoise Light” and then decided on Cobalt Turquoise as the medium color, and Perylene Green as the dark color.
It’s very important for my blue wash to be COMPLETELY dry before I add in the turquoise in the middle, because if it’s damp, my turquoise and green will bleed into the blue and I won’t get clear edges and it will get wonky pretty fast.
4.2:

A few things happened between the last picture and this picture:
1. Once the Manganese Blue Hue wash was dry, I applied a clear wash of clean water to the middle feathers, and made a nice gradient of Cobalt Turquoise Light just like I previously did with the blue on the primaries and secondaries.
2. Once the Cobalt Turquoise Light wash was dry, I went back to the blue areas and applied clean water over those feathers again, and created a second layer for a gradient of Windsor Blue, just to add in more color.
4.3:
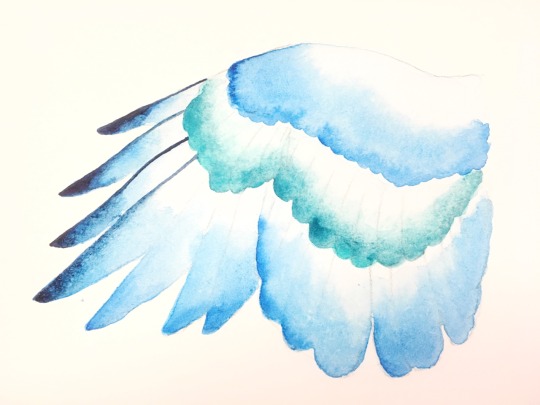
In this picture, I added in the darker turquoise to the middle feathers with the same gradient technique as with the blue, and begin adding the Indigo.
Once all of my previous work is dry, I then decide that it’s time to start getting more detailed with each layer. I want there to be a nice gradient between a very light blue (almost white), to a rich vibrant blue, to that dark indigo color I picked out earlier. At the same time, I want to add in some clean lines.
I accomplish this by using a mixture of watercolor techniques known as “wet on dry” and “wet on wet” as shown below.
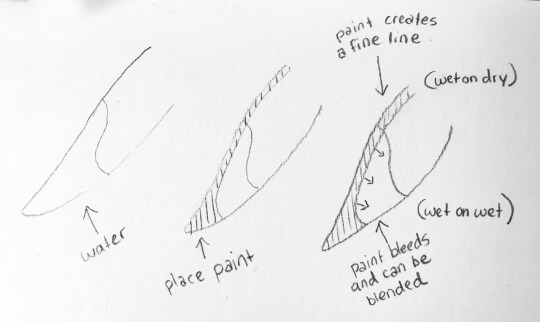
This technique allows me to create dark-tipped wings that refine into a clean line up the front of each feather as shown in the painting above.
Step 5: Adding the details!

Once I decide that I’m done adding washes and gradients of various colors, I add in all the details! Here I used indigo to detail the blue feathers and coverts. I loaded my brush up with dark color, and began at the darkest parts of the feather, naturally allowing my pigment to become thinner and thinner as I reached the lighter parts of the feather, and added more water to my brush.
With small details, it’s important to not let your brush get dry. I don’t let my brush run out paint and water, I just use more water in relation to the amount of pigment in my brush. Controlling the amount of paint vs the amount of water in your brush is a good thing to practice, and not allowing your brush to get dry keeps your lines smoother. Also, for most detail, I do “wet on dry”, therefore there is no bleeding or blending that occurs, with a very small brush, you can almost get a “lineart” look going, if that’s a style you enjoy. ^_^
Step 6: Complete!
I didn’t complete my mini-painting above, but you can continue building layers and then adding detail to your hearts content! This techniques can be used anywhere, not just wings. I use very similar methods for the layering and detailing of scales, fur, hair, etc.
Hope this helps in some way. Thank you for reading! :D
2 notes
·
View notes
Note
Also!! (It's the Bill's jumper slut here) I recently got into digital art but I am,,, really bad. Can I get any advice for it? Like with colours and shininess and backgrounds because ugh background and stuff? Idk what exactly I want advice on but please help because I am,, really bad and you are definitely the opposite of that
Yo!!! Thats a lot. Digitial art? Just as hard as traditional; it has its own rules. I can give you some tips but the most important thing out there is ehhhh TWO things.
1.) USE REFERENCES, DRAW FROM REAL LIFE. I hate doing this because I feel like a cheap printer, but think of it this way if you do too; if you use references and draw inspiration from real life, you’re making a base for what you make later one. Practice drawing one thing often enough and you have it memorized so you never have to look at it again/can warp it to your own exaggerated devices. You can’t draw anatomy if you don’t understand it! You can’t draw perspective if you don’t observe it critically! You can’t walk until you crawl yadda yadda yadda do as i say not as i do lmfao
--this is helpful for basically everything, including backgrounds and colors and shininess
2.) LEARN FROM EXAMPLE. There’s tons of artists from around the world who put their portfolios online. There’s tons of youtube videos based on learning art! Check out art throughout history, even! Check out your favorite styles, be it traditional or cartoon, and observe what you like about them specifically. Test it loads of them yourself; after awhile of trying style after style your personal preferences will develop.
Aside from those two, here’s some of my personal tips. They might not work for you! I’m not a professional here, these are just some things I enjoy doing with my art.
COLORS:
-if you use a color once in a picture, use it again to balance it out.
-made a character and colored it in but having trouble deciding on the bg colors? Use the ones already on your canvas/in the character. unite that canvas under one palette. Even just an abstract shape in the bg of one color is better than a blank; make it the least used color in the character if thats the case, or at least one not near the edges.
-try analogous color schemes or monochrome schemes to get a feel for colors you dont normally use.
- try coloring without lineart too, thats a fun exercise.
-sometimes if you put yellow next to blue it looks green. either decrease the intensity of said blue or adjust the yellow; same with other odd pairings. your brain is weird just go around it.
-if two colors of the same intensity are right next to eachother your brain might blend the line between them; again depends on if you want it but it happens with painting so i mean have at it i guess.
SHININESS:
-make sure you know the direction where light is coming from; that dictates where lightspots go
-putting lightspots against areas of intense color makes em pop
-try making them not just white, but also pastels or just intense color. It’s good to experiment!
-A hard lightspot gives an area a smoother, almost rubber like or wet texture. making it jagged makes it look a bit more leathered? Again, experiment as to what you like best. I enjoy putting a hard blot of white on a darker bg and then airbrushing around it to make a nice glow effect.
-if the lightsource is anything but white, make lightspots that color.
-BACKGROUNDS:
-I prefer to use references for backgrounds. rough out a few examples of various angles or object placements if you need to. I actually made a sort of room scheme for the parlor in Recovery, as seen below:
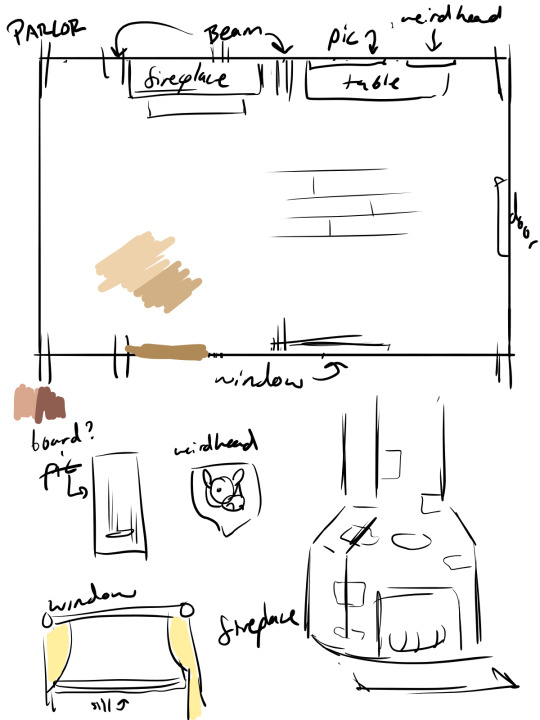
(its ok they can be shitty and still be useful)
-know that for bgs there’s the foreground, mid-ground and background, and it makes more sense to have all of them haha
-also good: make your characters interact with the bg/environment! Really brings the whole thing together.
-most digital art programs have grids available; use those for making buildings and such, much easier than dragging over a bent-out-of-shape ruler and hoping for the best.
MISC:
-if you know you’re bad at something in particular don’t shy away from it. Don’t avoid drawing hands bc you feel like you’re bad at drawing them! You gotta practice that shit, even if its hard/you dont like it.
-generally if you’re going to draw something hard just do it with enthusiasm; a sort of fuck-you to despair.
-if your wrist hurts stop until it doesn’t, Repetitive Strain Injuries are Bad and so is Carpal Tunnel Syndrome.
-flipping the canvas after drawing one eye lets you draw the other one without making it crooked, but if you’re lazy like me you can just...copy-paste it and reverse the layer and also maybe transform it to fit LMFAO. Still though flip the canvas just in case.
-for some reason if you’re drawing a stack of objects start in the middle or do the contour first it helps with sizing.
-draw at least once a day unless in pain lmfao
-Praaactice makes Peeeeerfect
-tbh anything goes in art, i’ve seen cheese with hair stapled to it in a museum just do what you want just get the basics down first makes things easier haha
113 notes
·
View notes
Text
Digital Painting: tips for beginners
Heyo! I got asked if I could make a tutorial on digital painting so I’m gonna throw together some advice meant for people who are starting out and want to figure out exactly how this stuff all works. Because it’s hard! What I hope to accomplish here is to make painting more approachable for you.
Firstly, I have put together something like this before, so for archival purposes here it is: http://holy-quinity.tumblr.com/post/89594801811/i-dont-know-how-much-of-this-kind-of-thing-you
For those of you who don’t wanna bother reading that, here are the main points:
1. Learn your program and its tools, from brush properties to layer styles. And I mean learn them. Make a cheatsheet that shows you exactly what each button and scale does, both in isolation and in conjunction with other buttons and scales. Refer to this as much as possible until it is intuitive. The end goal is to know exactly what to do to your brush’s settings to achieve a given effect.
2. It’s perfectly okay to use your sketches, linearts, and other forms of line in your paintings. They can help guide the form and there’s no need to make something fully “lineless”! I never make things “lineless.”
3. Study other people’s art and try to think how they could have possibly achieved the effects they did. You can learn a lot just by observing and mentally recreating the process stroke by stroke---muscle memory is a powerful tool at your disposal. This becomes easier to do once you’ve started doing item 1 above.
OKAY!
So where the heck do you even begin?
What I’m gonna do is try to make digital painting as approachable as possible for someone who’s never really done it. The main idea here is that digital painting is just like real painting. So if you’ve ever done real painting, you already kinda know what’s coming.
I’m gonna assume you know the basics of digital art: you can sketch, line those sketches using layers and opacity changes, and fill the lines with color, maybe even opting to add some shading...and you’ll get something like this:

You know, cell-shaded, or maybe the shading’s blended, but you’ve still obviously a line drawing with color put down on layers beneath the lines.
The next intuitive step is to try going “lineless”...but when you remove the lines you get this:
idk about you but I’m laughing at how stupid this looks
When I was first teaching myself to paint digitally, I didn’t really know how to deal with this. Without lines, the form of the subject vanished or became a mess like the above. Even if I was meticulous and careful about placing down the color such that without the lines layer turned on, the shapes fit together, it didn’t look quite right. There’d be gaps, I wouldn’t know how to incorporate the subject into a background, the contrast wouldn’t be high enough, or it’d just in general look too much like a screenshot from Super Mario 64.
Painting requires a different process than the above. You’ll have to let go of some of your habits and conventions. Such as staying in the lines. Such as fully relying on the lines. Like, I love my lines, I love my sketches---but in painting, they are guides for form, and are not the form itself. So let me go through how I approach a given painting:

My painting process starts with a sketch (here a boring portrait for demonstrative purposes). I make the opacity of the sketch layer something like 30%, and then throw down my base colors on a new layer underneath. I’m not being meticulous about the sketch itself, because again it’s just meant to guide my placement of color. I’m also not meticulous about my placement of the color.
We’re essentially sketching with color. Because ultimately what we want is for the color to take on the form and shapes conveyed by the sketch.
There’s a lot going into this about how to use value, how to shade, how to use color, etc. that I’m kinda skipping over because it takes a lot of time to explain...but there are hundreds of tutorials out there on those topics so please, google around! I found some helpful tuts that way when I was starting out.
Something I find v useful is to keep selecting colors that already exist in your image for shading and hue adjustment. This is why I start with really blendy, low-opacity brushes when throwing down color on top of the background. I can then select colors within there that are a mix of the two.
For instance, I’ll select the color of the lines here:

...and use that to shade:

And maybe I’ll select one of the darker shades around his eye, but not the darkest, to make the shading a smoother gradient...and so on.
What I do in general at this point is go over the shapes and lines of the sketch. Such that I can turn off the sketch layer and see this:
I’m replacing the lines with shading and value. I’ll continue to do this as I keep adding color.
This is all super loose. I am not dedicated to any particular stroke. I just want the colors and shading and light source to be right. I’ll use overlay layers to boost contrast or add a hue.
Here are other examples where I used this process:

I am constantly changing brushes and brush settings as I paint. It really depends on what effect I want where. I am also constantly selecting new colors and applying or blending those in. I don’t believe in having some uniformly applied base color and then shading with only one or two...that’s what I’d do if I was cell-shading like the first drawing I showed you here, but painting should be about messing with color and opacity and blending to make millions of hues!
Good rule of thumb: Hard, opaque brushes for applying color. Soft, dilute brushes for blending colors. Sometimes hard, dilute brushes can make some cool blending effects! I personally prefer harder edges on my shading so that’s a brush I use often.
This is getting a bit long so I’m gonna split it up into multiple parts, but really what I want you to get from this is:
1. learn the tools at your disposal until they are intuitive
2. sketch and line are guides for form, not the form itself
3. rather, hue and value will produce the form
And of course, practice makes perfect!!! Every drawing you make, every painting you make, will bring you one step closer to the artist you want to be, and thus every drawing and every painting, no matter what, is a success.
9K notes
·
View notes
Note
any art tips?
Oh. Well, I can try to give tips? I’ve never really done that before honestly. My level of arting is nowhere near professional and I haven’t tried a ton of stuff to have opinions on them, but I can try.
This kinda turned into a supply list, but for my own drawing process look at the bottom of the post!
Paper
Since I am a traditional artist over a digital artist, paper is kinda a big deal. My current personal favorite is the Strathmore 400 Series Sketch 9 x 12″ fine tooth surface sketchbook. The thickness of the pages keeps it from getting ripply as you work with it, hard coloring in with pencil does not cause bubbles, and pens/markers do not bleed onto the next page. However, it will leave an indent on the next page if you press too hard.
I highly advise against standard 70 page spiral notebooks for anything more than little doodles. The pages are much thinner than they used to be, and will ripple, bubble, fall apart under heavy marker use, and indent many pages. Heavier paper is honestly just the way to go, plus no annoying blue lines.
Price-wise, I know the standard spirals are usually extremely cheap and easy to buy in bulk, but I can’t remember the price of my Strathmore. It’s not too terribly expensive though.
Pencils
Honestly? Pencils aren’t a big deal to me. I use a variety ofcheap, basic mechanical pencil brands. My current preference however, seems to be Bic. Any brand should work fine, but if the lead constantly breaks, I’d suggest moving up to a larger lead size, or buying a different, stronger brand of pencil.
Personally, I never use 0.5mm lead. It is far too delicate, and I have never found myself needing such a small point to draw with. I find 0.7mm to be the best, as you can achieve both thick and thin lines easily, and press fairly hard with it. I mainly use 0.9mm, as I can press veryhard for dark lines, sketch large and clearly visible soft lines, and it compliments the exaggerated features of my casual art style.
Pens/Markers
So this one is a doozy. I use a very large range of pen products with varying standards of quality. For black pens, the Pilot Precise V5 was my trusty pen for many years before the ink ran out. Now, I currently use a 3 pack of Sakura Pigma Micron pens (specifically 01 (0.25mm), 03 (0.35mm), and 05 (0.45mm)) and previously also had a 005 (0.20mm) Micron as well. The clarity and ease of lines with Microns in my experience is excellent, but the ink quality itself, not so much. It is quite pale compared to other inks, and can be worn away by an eraser even after fully drying. Overall though, it’s quite nice.
My general rule of thumb with pens is that the point shouldn’t indent the page, and if the ink is black,it should shine black under a light and not purple. (Lower quality inks will shine purple when tilted to face a light).
With colored pens my use isn’t as narrow. My favorite is my Uni-ball Vision red pen (I also have a green one), but I also use Bic intensity pens, Inc R-2 Blast pens (careful with these, they release a ton of ink), and even Sharpie pens.
For markers, I can’t really suggest what to stay away fromand what’s good, but I can tell you what I use. On the higher quality end, I have a trio of Prismacolor Premier markers which I’ve found have excellent color, and cover space quickly, but can spread and bleed easily. But what do I mostly use? Sharpies. You have to be careful with these. Sharpies bleed very easily, and will darken very clearly when you overlap it, so coloring has to be very neat and a one-time thing unless a darker color is desired. The color range of Sharpies from what I’ve seen, also isn’t very diverse if you don’t go hunting for the stranger colors, so if you use them, have something to color over them to adjust to the color you desire. In my case, I often use a mixture of Sharpies as a base color, and colored pencils over it to adjust.
I won’t make it’s own section about it, but the brand I use of colored pencils is also Prismacolor, as they work really well with the Sharpies, and can even solidly color over the marker. The larger the set the better, as it gives you more colors to adjust with. However, they’re not cheap.
Technique?
So this is less tips I guess and more my own personal routine with drawing. Feel free to draw your own way, or if you think the way I do it may help you improve your own art, go ahead and try some of the stuff I do! This by no means is any standard of a good art practice, it’s just personally how I draw.
I always start with a sketch, as many artists do. I make sure it’s very light that I can erase it, but clear and visible even after erasing it. Which is the odd thing I do? I erase a sketch immediately after I finish it. My sketches are less posing and positioning than they are quick, sloppy, simplistic versions of my final product. I do not usually draw basic shapes and lines for anatomy and poses, but I do sometimes. If you struggle with anatomy, I suggest still using basic shapes, as they help a lot.
Here this can go one of two ways. If I decide to ink the piece, I do not erase the sketch, and simply clean it up while doing the new lineart. This can be risky, and can result is messy lines or concave shapes that weren’t intended, so redrawing in pencil first can always be helpful. If I decide to not ink the piece, I erase the sketch, leave it visible, and draw a much darker and more visible clean version.
When it comes to colored pens, I usually only use them to supplement the drawing, blood being the most often example. Coloring large areaswith pens is messy, and a waste of ink, and I advise against it. Coloring in a pencil piece with colored pencils is also a big no-no to me personally, as it will cause the colors to blend with the gray lead, can smudge said lead, and they will pop much less against the lead as opposed to ink.
I hope this means something/helps I guess? I’m not very good at the whole tip thing, sorry!
0 notes
Last Seen Blogs
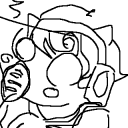
catboy-beb0p
All horses are libertarians

sundayschoolboy
The Glen Tiopez Blues
ryooolu
@_ryooolu

a-mind-full-of-starlight
Untitled
spideynovaweek
SpideyNova Week