#alumilite resin
Photo


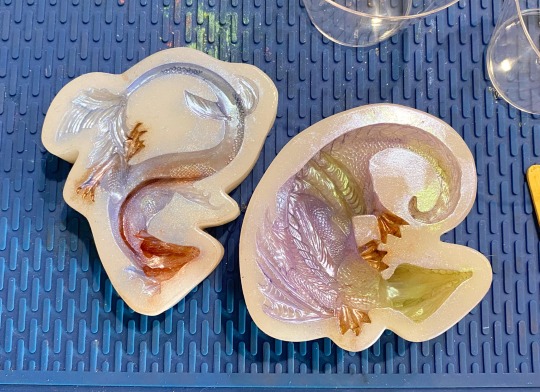


Resin casting with dragon molds. I brushed dust onto the mold first, then filled with a white pearl Alumilite resin
2 notes
·
View notes
Photo
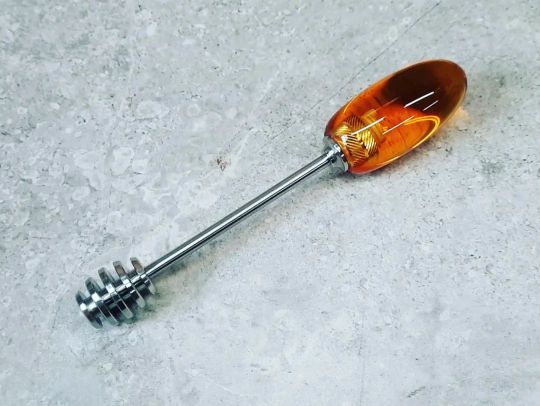
Honey Dipper, the part I made (The clear part) was almost twice the diameter it is now.... I need a smaller mold... #honey #dipper #stainlesssteel #alumilite #resin #makestuff #imadethis #gift #giftmaking https://www.instagram.com/p/ChNF8TwO603/?igshid=NGJjMDIxMWI=
0 notes
Photo

Dropped off multiple heart trinket trays at @eastdallasvintageshop! There are other colors to choose from, so go grab yourself one or two! Also save the date for next Thursday to sip and shop at @eastdallasvintageshop! You won’t want to miss out. 💗 ✨ 🫶🏼 #mspattycakemakes #mspattycake #maker #dallasmaker #resin #trinkettray #shelltray #kawaii #cute @alumiliteco #alumilite #eastdallasvintageshop #eastdallasvintage #eastdallas #heart #sparkle #stashtray (at Deep Ellum) https://www.instagram.com/p/CgUdJgouX8u/?igshid=NGJjMDIxMWI=
#mspattycakemakes#mspattycake#maker#dallasmaker#resin#trinkettray#shelltray#kawaii#cute#alumilite#eastdallasvintageshop#eastdallasvintage#eastdallas#heart#sparkle#stashtray
0 notes
Photo
Available Saturday May 14th for the Live Stream Event! I know what you're thinking. "But Nicole you already made a post for the ice cream dinocats" Well take a second look because these are not dinocats, they're CATSHARKS! They still have those super cute brows but instead of looking grumpy, they look more curious or maybe they're just trying to give you the ol puppy dog eyes in hopes that you will share your snack with them. Either way, I'm not sharing. 😜 . . #sharkcat #darlinghomebody #minifigure #resinart #resinfigure #icecream #sundae #catdecor #sprinkles #cuteshark #arttoy #handmademini #resin #alumilite #sweettreat #fisharefriends #catshark #resintoy #resinmini #chicagoartist #makersgottamake https://www.instagram.com/p/CdZcqatM2oR/?igshid=NGJjMDIxMWI=
#sharkcat#darlinghomebody#minifigure#resinart#resinfigure#icecream#sundae#catdecor#sprinkles#cuteshark#arttoy#handmademini#resin#alumilite#sweettreat#fisharefriends#catshark#resintoy#resinmini#chicagoartist#makersgottamake
1 note
·
View note
Text
NOW! For the main event! The armor!
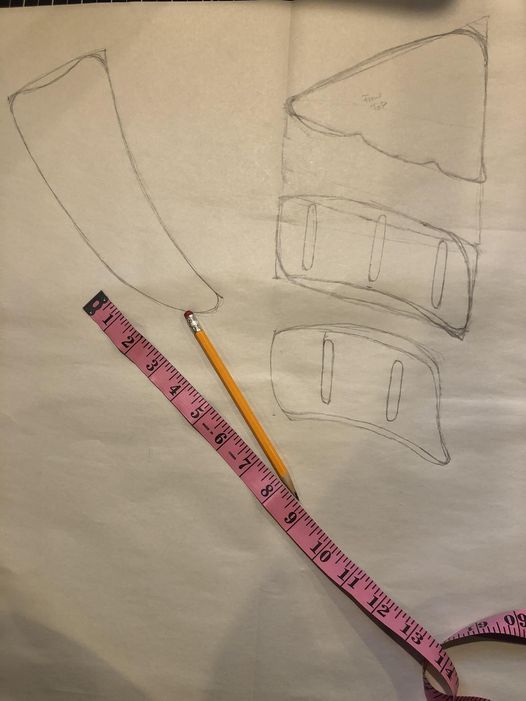
First you will need to draw out and pattern your pieces.

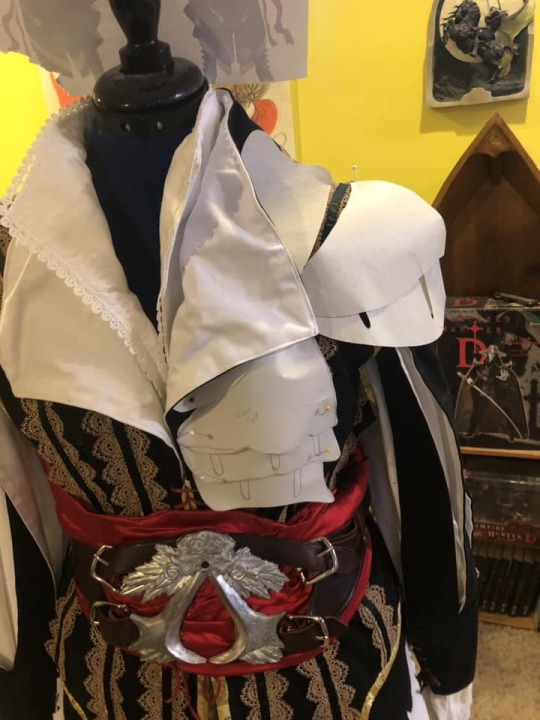
Pin your pattern pieces to your doublet and make any adjustments.

Cut out your armor from the thicker veg tan leather (7-9 oz)
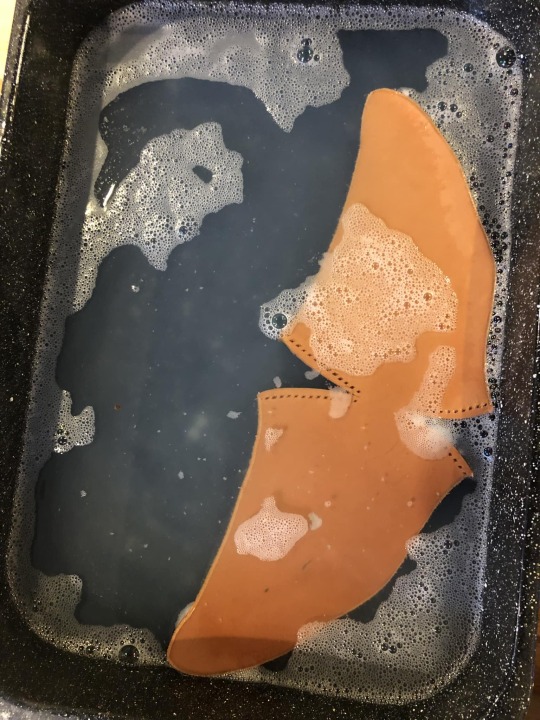
After beveling the edges and poking and punching any holes needed, each piece was placed in a bath of water with a bit of vinegar and dish soap. Soaked until nice and soft and floppy.

Stitch your pauldrons together while moist then form as they should be.
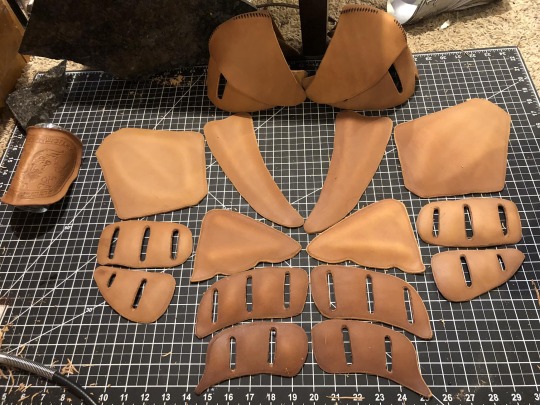
Form your armor while damp and moist.

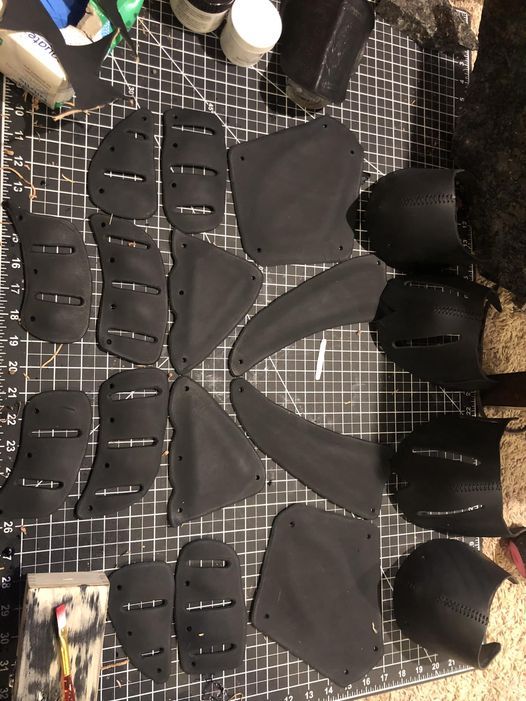
Now dye your pieces. You may need a couple coats.
Punch riveting holes.
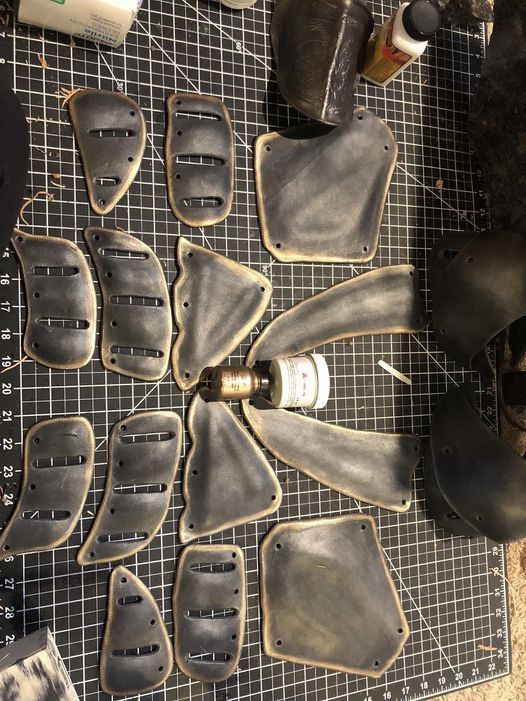
After dying, I lightly brushed Alumilite silver powder over the black and then wiped it off to give it that metallic shine followed by dusting the edges with a gold powder.

Don't forget to burnish your edges. This is a finishing touch that will round your edges and take out the roughness and tool marks.
Instead of wax, I used a burnishing gum called Tokonole
https://www.amazon.com/gp/product/B017X8GL9A/ref=ppx_yo_dt_b_asin_title_o00_s00?ie=UTF8&psc=1
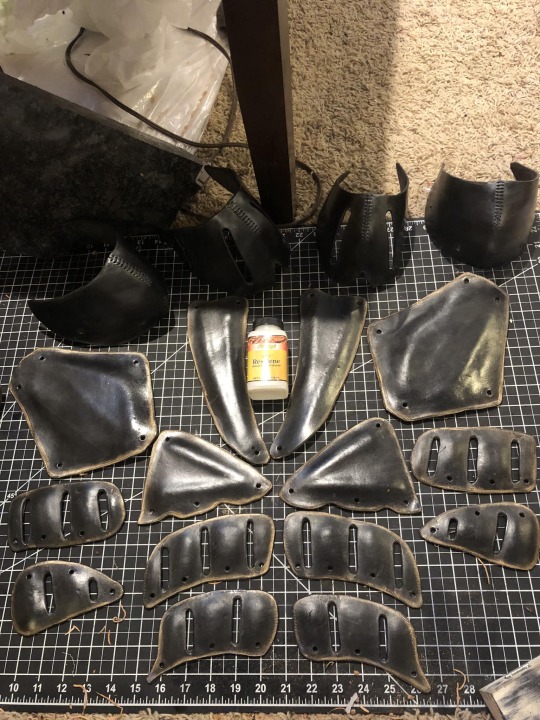
I finished the leather with Resolene to give it a nice shine.
But wait! We're not done!
We need to harden the leather!

To harden my pieces I did a few coats of UV resin. Hitting each coat with the UV light.

The top parts of the pauldrons you are going to cover in the same fabric as your doublet with the trim/bias also. The triangles cut out with a heat tool to seal the edges.
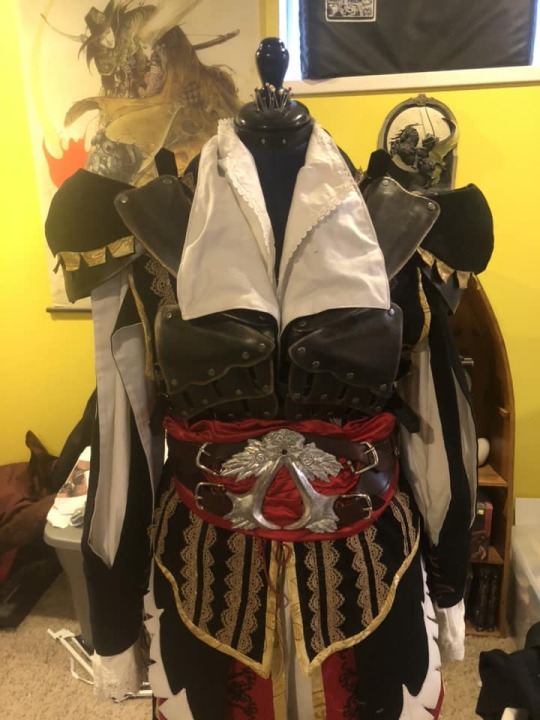

Rivet your armor together and you are now complete!
#cosplay#armor making#leather#assassins creed cosplay#assassin's creed#ezio assassins creed#ezio auditore
53 notes
·
View notes
Text

This B Part resin gets crusty and the lid sticks. That’s why I keep this old wrench handy. But, I’ve been using up my Smooth-On and this Alumilite resin sat for awhile. The wrench didn’t cut it this time. The lid stayed, and cracked! Now I have a convenient pour spout.
#always look on the bright side#mef#memgician#art toy#capsule toy#designer toy#capsuletoy#designer toys#handmade#resin#process#casting
3 notes
·
View notes
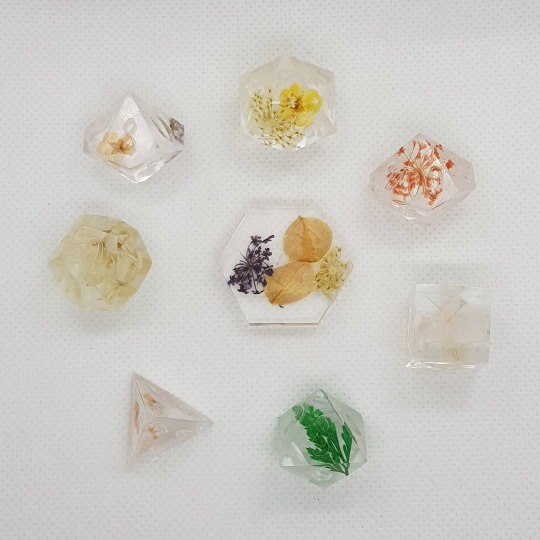
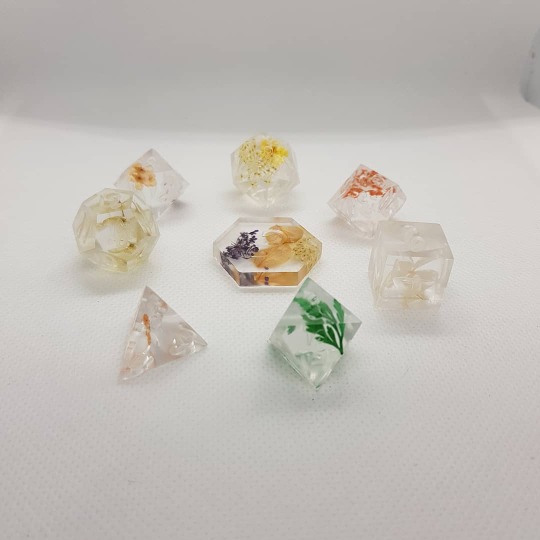
Photo

:t.h:e.n:d.1:4.2: :t.r:e.s:c.o:l.o:r.s: :t.h:e.f:l.a:m.e: File Name: Hexagon Coaster File From: Hexa100 Project Design by: :t.h:e.n:d.1:4.2: Scale: 132% Nozzle Size: 0.4mm Layer Height: 0.22mm Infill Density: 0% Print Speed: 30mm/s Supports: None Nozzle Temp: 230 Bed Temp: 60 Filament(s): Various PLAs Print Time: 2 hours & 3 minutes Printer(s): Anycubic Vyper (Standard stock) Additional Materials: Alumilite High Gloss Resin Additional Time: Splicing, cutting, trimming and resin - 6 to 8 hours. 24 for resin dry. https://www.instagram.com/p/CjJ_b1PrC2A/?igshid=NGJjMDIxMWI=
2 notes
·
View notes
Text
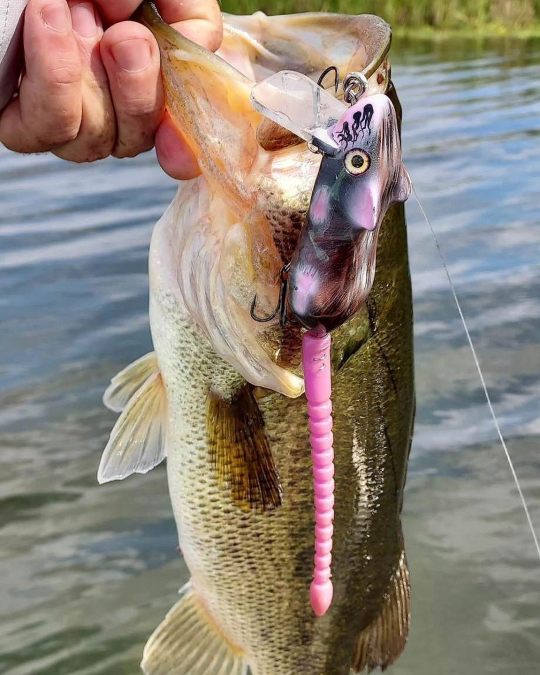
Jeremy hooking up with the @sacpigbaitco Mischief Travel. As the weather warms up, there’s no better fun than throwing a topwater lure and experiencing an incredible blow-up! Tight lines and go get’m 💪
#shakethatbooty #bootyshaker #rats #rats4life #mischief #wakebait #topwater #crankdown #rattify #ratty #fur #iwata #airbrush #alumilite #smoothon #silicone #resin #uvresin #kvd #assistcord #ownershooks#shakethatbooty #bootyshaker #rats #rats4life #mischief #wakebait #topwater #crankdown #rattify #ratty #fur #iwata #airbrush #alumilite #smoothon #silicone #resin #uvresin #kvd #assistcord #ownershooks https://www.instagram.com/p/CtRQfK9LOzJ/ https://tackle.net
0 notes
Photo

I've been home for about a year now, but had made a deliberate decision to not do any woodworking and to focus on fixing the problems with this house. However I also have a supply of Alumilite resins that I'm afraid are close to expiring, so I'm taking a moment to cast a few items. #resin #resinart #resincraft #woodworking #woodturning #christmas #pinecone https://www.instagram.com/p/Cm2CgGVrUc3/?igshid=NGJjMDIxMWI=
0 notes
Link
Check out this listing I just added to my Poshmark closet: Handmade resin black, silver and gold earrings.
0 notes
Text
#dnd#dice#dice set#dnd dice#d20#polyhedral dice#dice palette#handmade dice#flower dice#alumilite resin#alumilite#DiusDice
39 notes
·
View notes
Text
Mold Making with Alumilite Brand
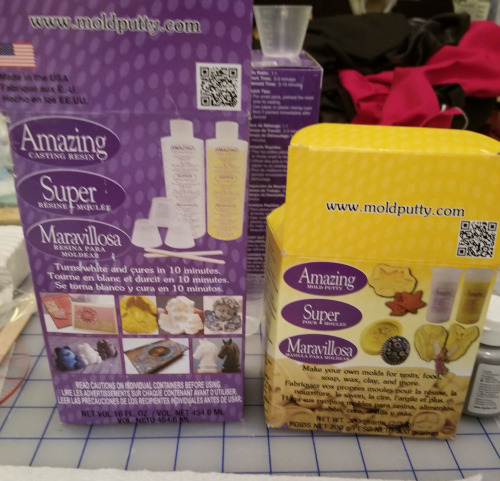
I tried this product last year and I really like it! Thanks to @trows for recommending it!
This was used to make Jeanne’s Umbran Watch and buttons for a Bayonetta cosplay I made.
I won’t lie, it’s a bit expensive. ( Cosplay in general is expensive, but I know some cosplayers out there have a tighter budget than others.) The amount of product you get vs. the price is kind of up there. None of my local hobby/craft stores carry it, so I had to look online and buy it.
If it helps, I even had the luxury of trying the Smooth-on product (and by trying I mean buying and going through trial an error). It didn’t go so well...
As a point of reference between the two products, the blue is the Smooth-On brand and the yellow is the Alumilite brand. My first attempt was to cast some buttons as Jeanne’s buttons are an odd shape/ I couldn’t find any online or in-store. As you can see, Smooth-on was a bit misshaped while Alumilite retained shape fairly well.
My theory is that Smooth-On is better for bigger props as the mold making product is thick liquid, has a longer curing time, and therefore better equipped for larger products.

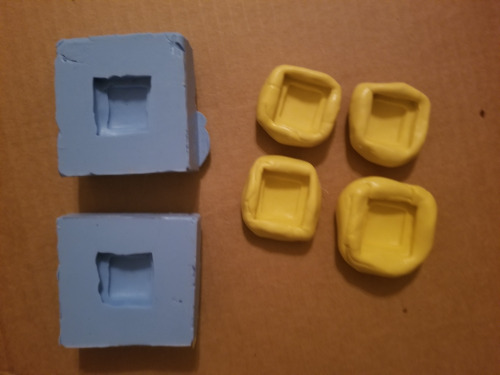
Here are the results! (White unpainted and silver painted) I found out later the resin in this kit is fairly soft and was able to sand away the pointed edges with a common nail file. As per the directions/all the tutorials I saw online, I painted the pieces fairly quickly after the cast.

As for the Umbran Watch itself, I first made it out of Sculpty baking clay. I then pressed it into the mold. I will warn you, this is about the largest I would go when trying to make a mold in this brand. (The ruler below is accurate and in inches) Even then there were some imperfections.
As you can see by the cast (left) it took bits of the mold with it! What wasn’t pictured was the gaping hole in the side that I (foolishly) filled with hot glue but then remembered Molding Paste is my best friend and filled it properly with molding paste. (But honestly, Molding Paste is my best friend and helps fill all my cosplay prop holes)
While probably not the SMARTEST way of doing it, I got it in my head that inserting safety pins during the curing process would help fasten it to my cosplay. This was true, however... the Umbran watch was quite heavy and pulled it down. (Causing other problems)
Regardless of the cons, I would definitely use it again! (And again and again) I bought a 2 pack and still have leftover product.
See the table above with all the stuff I made.
(If you were wondering, I super glued the buttons to my costume and they stayed put)
#Alumilite#Cosplay#Cosplay Tutorial#Bayonetta#Umbran Watch#Amazing resin#Amazing mold putty#Alumilite resin#Alumilite Mold Putty#long post#large post
45 notes
·
View notes
Photo
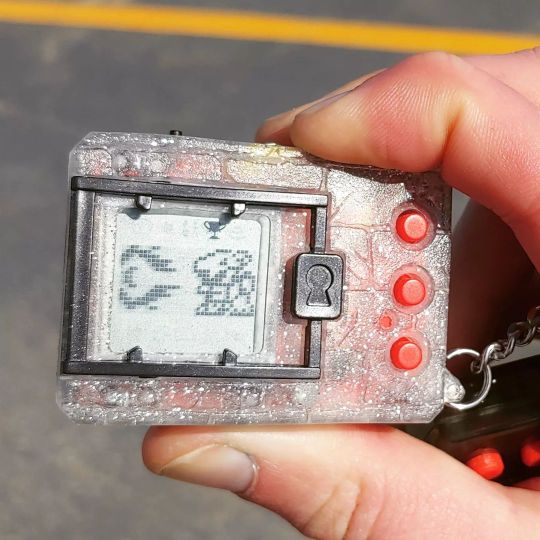
Decided to take one of my re-casts for a test drive! While its not all sunshine and rainbows, (theres alot of progress to make still) its pretty rad to have something physical that I made out in the testing grounds. #digimon #digitalmonster #digitalmonsterver20th #dm20 #tamagotchi #resin #custom #resincasting #alumilite #maker #makersgonnamake https://www.instagram.com/p/CbTcEh1AUNV/?utm_medium=tumblr
#digimon#digitalmonster#digitalmonsterver20th#dm20#tamagotchi#resin#custom#resincasting#alumilite#maker#makersgonnamake
2 notes
·
View notes
Photo
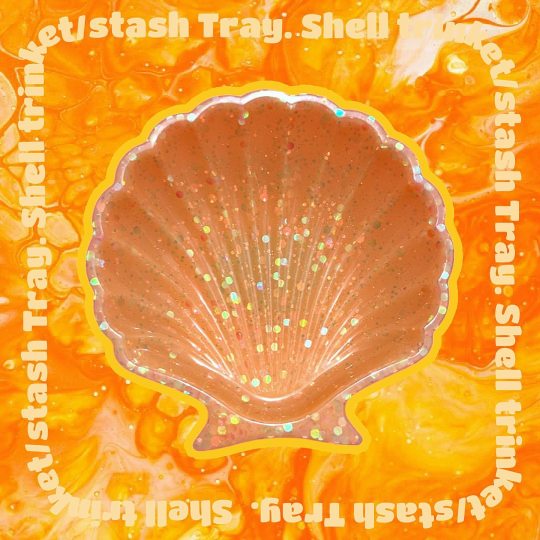
Dropped off all of the shell trinket trays off at @eastdallasvintageshop! There are different colors to choose from, so go grab yourself one before they’re gone! 🐚 🌊 ✨ #mspattycakemakes #mspattycake #maker #dallasmaker #resin #trinkettray #shelltray #kawaii #cute @alumiliteco #alumilite #eastdallasvintageshop #stashtray #tray #shell #glitter #pearl (at Lochwood, Dallas) https://www.instagram.com/p/CgR9w6rObw9/?igshid=NGJjMDIxMWI=
#mspattycakemakes#mspattycake#maker#dallasmaker#resin#trinkettray#shelltray#kawaii#cute#alumilite#eastdallasvintageshop#stashtray#tray#shell#glitter#pearl
1 note
·
View note
Photo

NEW! From http://www.darlinghomebody.com or link in bio⠀ Defensive Glow in The Dark Bat Keychains! This time its green with little glow in the dark stars. Should I do other glow colors?⠀ Amazing Clear Cast Resin @alumiliteco ⠀ Glow pigment @solarcolordust Glow Stars @michaelsstores .⠀ .⠀ #darlinghomebody #makeitwithmichaels #bat #bats #selfdefense #glowinthedark #spoopy #halloween #goth #pastelgoth #pastelpunk #lolitagoth #kawaii #resin #handmade #resinkeychain #resinart #resinartist #alumilite #starry #witch #witchy https://www.instagram.com/p/CU0HV63reb3/?utm_medium=tumblr
#darlinghomebody#makeitwithmichaels#bat#bats#selfdefense#glowinthedark#spoopy#halloween#goth#pastelgoth#pastelpunk#lolitagoth#kawaii#resin#handmade#resinkeychain#resinart#resinartist#alumilite#starry#witch#witchy
1 note
·
View note
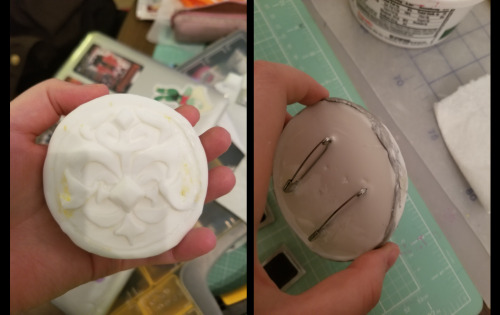
Text
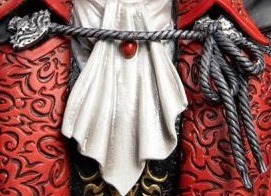
Cape pt. 2
Now onto the clasps!
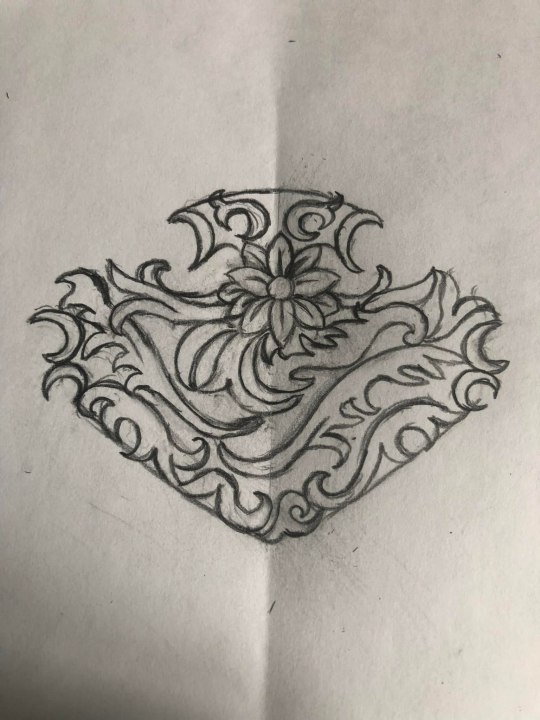
I studied and looked at every single angle I could find online of the cape clasps and this is what I came up with.
The flower most likely representing his late wife, Lisa, who loved lilies. I dunno. But it was pretty!

Seeing as the clasps were opposite/mirror of eachother, that meant I would need to make 2.
Out comes the Monster Clay.
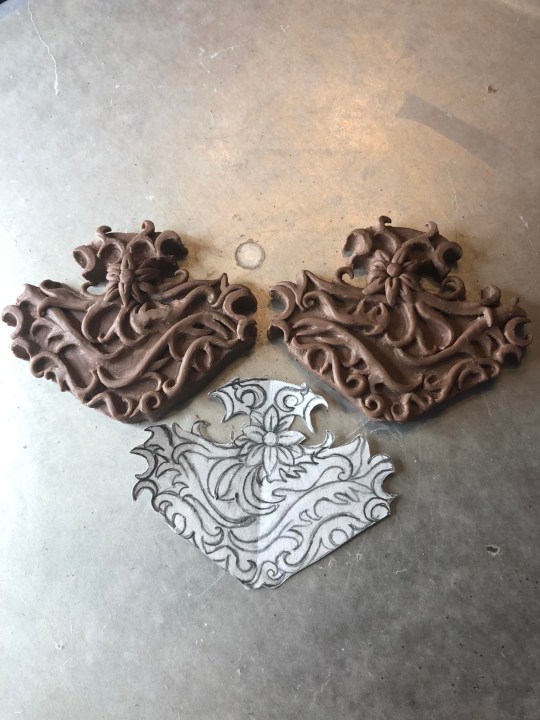
Now, when sculpting, you are going to want to make sure there's no space under your shapes for the silicone to sneak into..
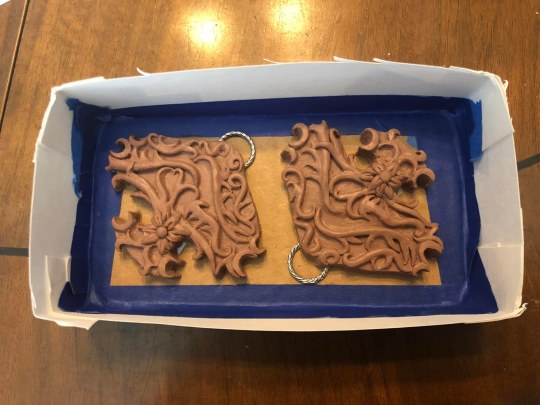
Place in your metal o-rings, set in a box that is sealed. Remember not to leave any space between the box bottom and the sculpted piece.
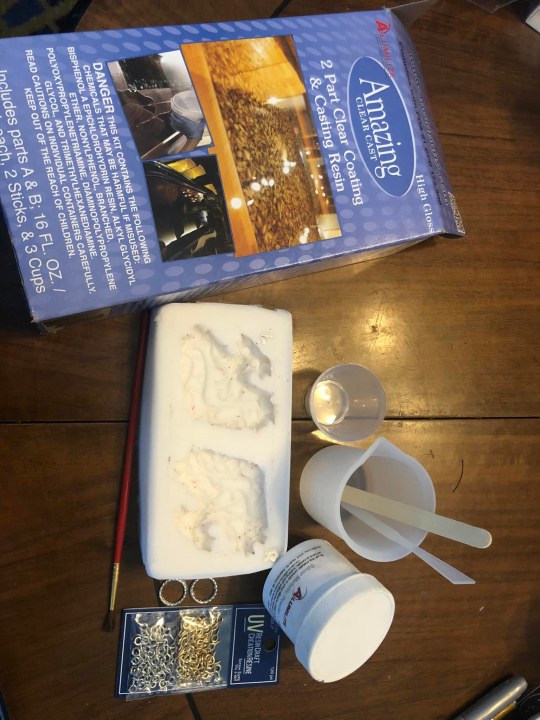
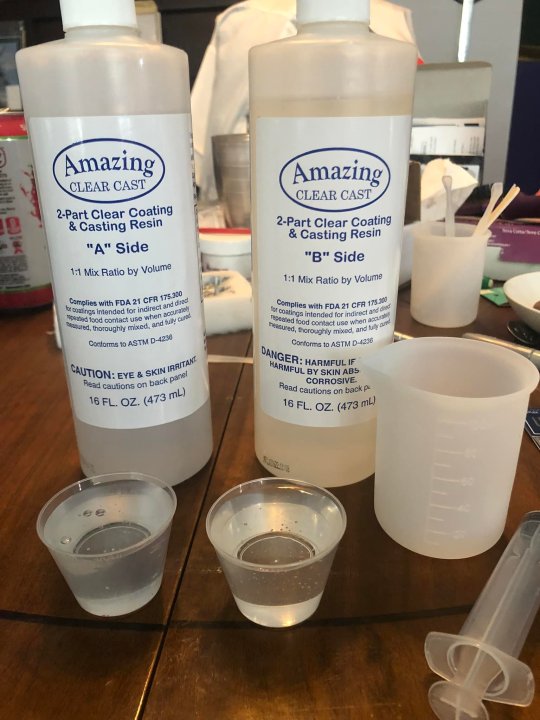
Now you are going to want to mix your 2 part silicone resin and pour. Make sure you get enough over the top of your molds (1/4'').
I have recently discovered the best silicone molding next to Oomoo.
https://letsresin.com/collections/silicone-rubber
This stuff is great!
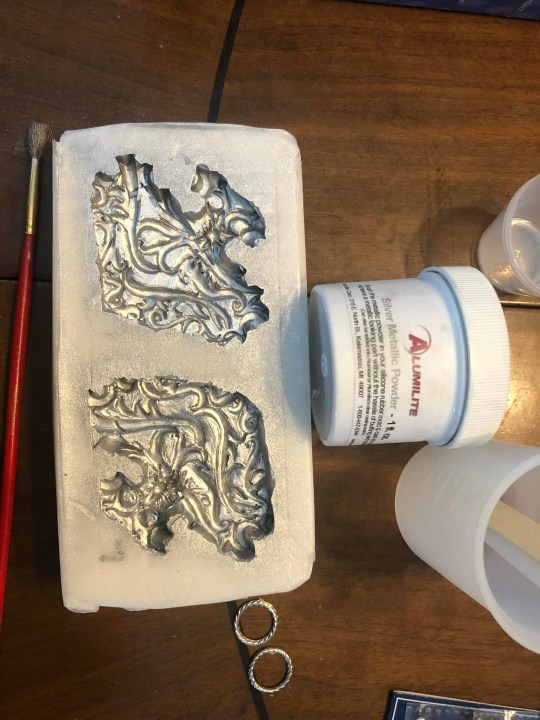
Once your mold has cured, remove the clay and o-rings. Remove the o-rings from your clay and prep your mold with a fine silver powder. https://www.alumilite.com/dyes-colors/alumilite-metallic-powder/
You can now mix your resin and pour in.
When pouring, pour from a height of 1 ft or so from the mold. This will help airbubbles to escape.
Once your mold is filled, return your o-rings into the resin.

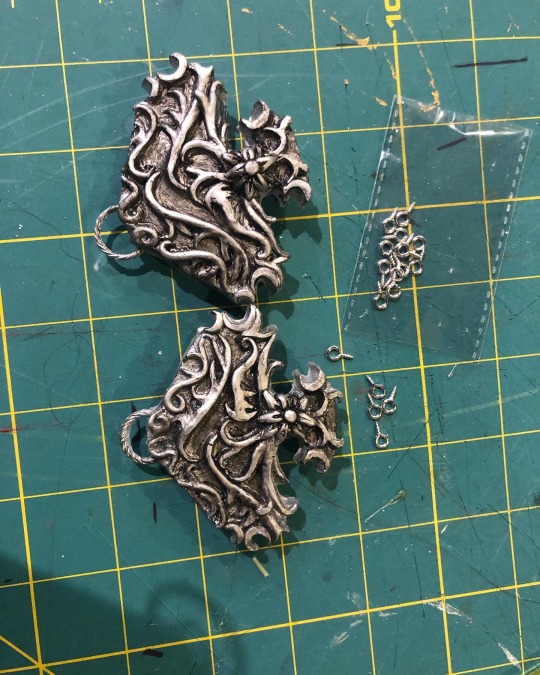
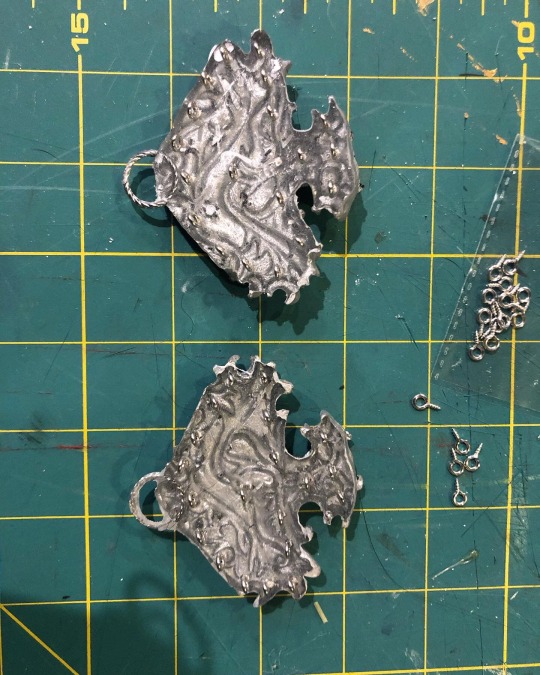
Resin set over night. Remove and you now have nice silver clasps. But you're not done yet!
Get some black paint. Paint over your clasps then rub off to leave black in the nooks and crannies. This will make a nice antiqued look and bring out more of your details.
With the finest bit you can get, drill about 20 holes into the backs. Making sure your holes are evenly spaced and not going all the way through.
You will then insert 4mm screw eyes
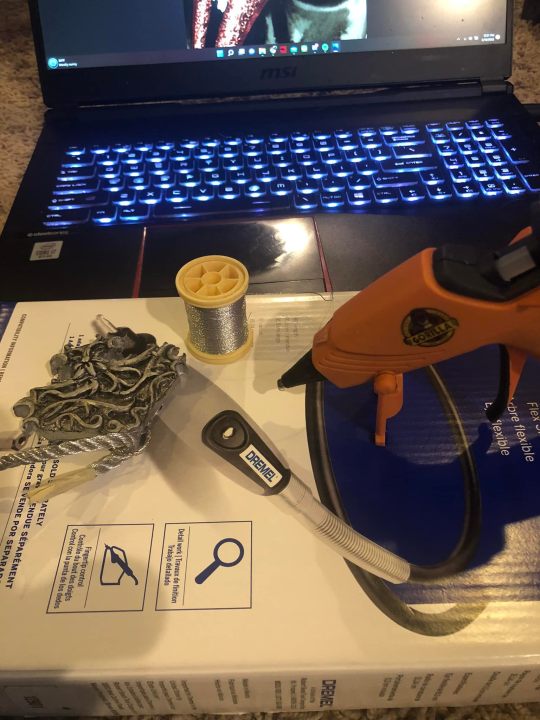
For the silver roping you will need some silver thread, hotglue, silver roping trim.

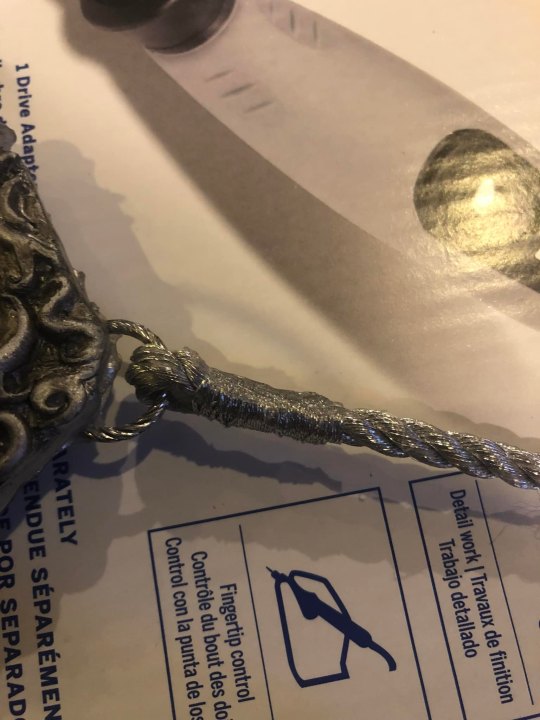
Bring your silver rope through the o-ring of your clasp, Glue in place.
Next, wrap with your silver thread until you no longer see glue or the end of the trim.

Cut a separate piece of trim and glue that about foot away from your finshed/clasped end. Wrap with thread.

Finish the ends with a little bit of glue and more thread wrapping.
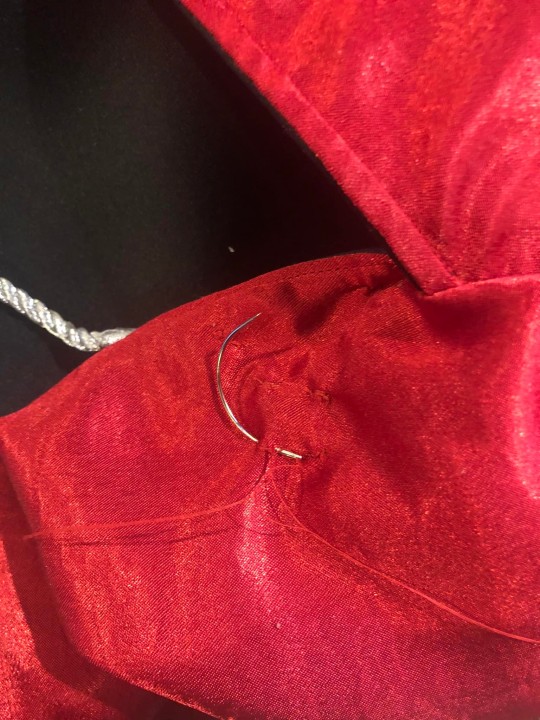
Place your clasps onto the cape.
Using a curve needle, stitch into each of those screw eyes.
The reason you have so many screw eyes is to help evenly distribute the weight of the cape and prevent tearing.
Later you will want to install snaps under these to attach to the coat just above the lapels to REALLY hold your cape in place.
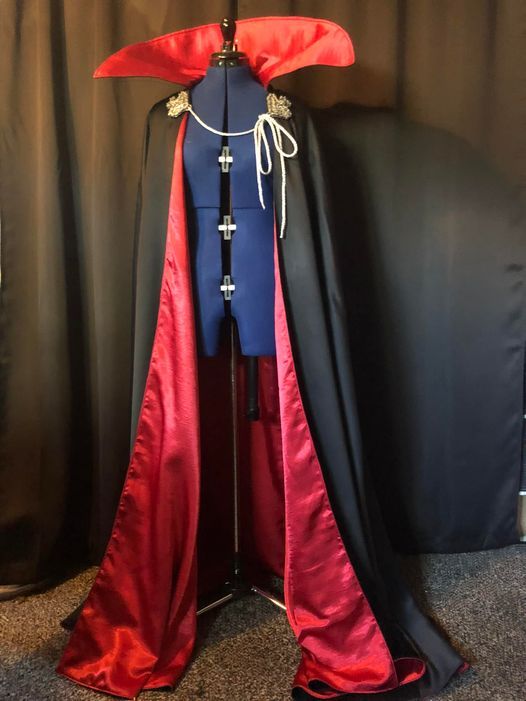
Cape complete!
30 notes
·
View notes
Last Seen Blogs

trashyspud330
• art and trash •

jigoloblog
JİGOLO ANTALYA


anglicanj
My life as an Anglican Priest

katsukiclaus
moved to KatsukiClaus for December