#backgrounds free to use from unsplash
Text
Just made the “android in disguise” version, because I liked that version too

[ID: a circular pin design on a transparent background. It has the background of dozens of old-fashioned heart monitor screens, arranged in rows, with various heartbeats displayed on them. The screens are all various shades of dark teal, and the pattern has accents of purple and pink. The design has wavy yellow text that says “Android in disguise.” The text is curved so it forms an arch, and is placed over a gold infinity symbol. /End ID]
#The background was uploaded by Mingwei Lim on Unsplash and then slightly edited by me so it’s just a little darker#I got the font from dafont#and the infinity symbol was a free-to-use png that I added color to#my art#actuallyautistic#autistic pride#actually autistic#autism pride#autistic artist
14 notes
·
View notes
Text
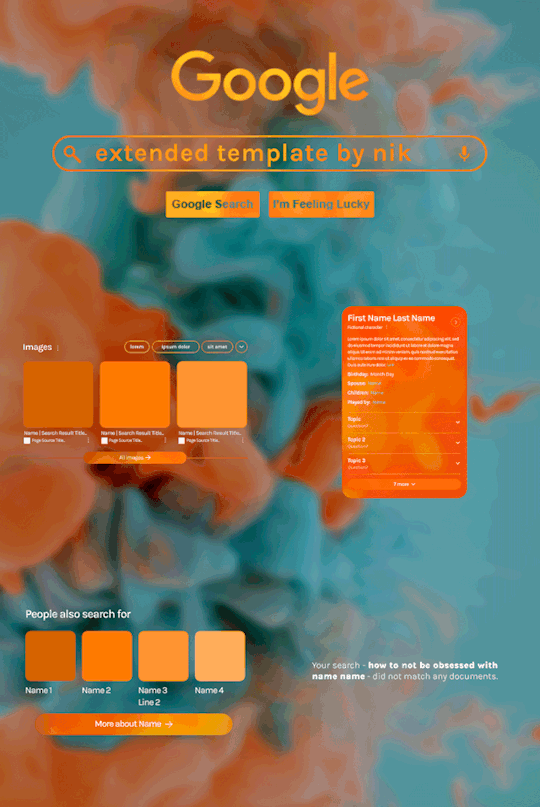
Hi! I've been asked for a tutorial on my new Google layout, originally seen here and here. So, to make it easy, here are FOUR free templates! All I ask is that you give me proper credit in your caption if you use my template or take inspo from my design. Enjoy! :)
Get the NEW Google templates free via ko-fi! (Donations appreciated but not required <3) Includes PSD templates with pre-made layer masks, shapes, and animations, plus tips for the following designs:
– Image search results
– Biography
– Related searches
– Animated "no search results"
Additional resources:
– My original animated Google search overlay tutorial & template
– Karla Google Font (this is the only font used)
– Background via Unsplash

#gif tutorial#completeresources#usershreyu#usernanda#useryoshi#userzaynab#userrobin#usersalty#userhella#alielook#tuserabbie#useraish#userabs#mialook#resource*#gfx*#google*
459 notes
·
View notes
Text
How to Write a Quality First Draft

Every year, we’re lucky to have great sponsors for our nonprofit events. ProWritingAid, a 2023 NaNo sponsor, helps you turn your rough first draft into a clean, clear, publish-ready manuscript. Today, author Krystal N. Craiker shares some tips on how to make sure your first draft has some good bones to start with:
One question I often hear about National Novel Writing Month is, “Won’t my novel be of terrible quality?”
It’s true that writing 50,000 words in 30 days won’t give you a polished manuscript. And it’s always great to embrace the creative mess of the first draft.
However, there are some tricks to ensure that your first draft has plenty of usable content. These tips are also a great way to move your story along when you get stuck.
1. Have a Plan
Pantsers, this might be hard to hear. But having even a basic outline of your story can ensure you stay on track. You don’t have to sacrifice creativity when you outline. After all, you’re still the author creating a story.
A detailed outline can even act like your messy first draft. The more work you put into planning, the better your first draft will be. When I spend more time plotting, I spend far less time cutting things from my later drafts.
2. Make Every Scene 3D
Okay, I get it. Not everyone is a plotter. Luckily, there are other things you can do to ensure your first draft is good quality. One is adding enough sensory detail to bring your story to life.
I like to use a 3D method: have at least three of the five senses in every scene. It’s a great trick to improve the flow of your scene. Take a few minutes to immerse yourself in your story and write what your characters are experiencing.
You might change it or move it around in your final draft, but you’ll save yourself time during revisions if you add sensory detail from the beginning.
3. Reword Your Writing
Sometimes we get stuck after one bad sentence. The imposter syndrome kicks in, and the scene just falls flat.
Ideally, we completely turn off our inner editor during NaNoWriMo. But when you encounter that one pesky sentence, it’s okay to rewrite it.
You can use a tool like ProWritingAid’s Rephrase. Just highlight your sentence, click Rephrase, and select a new sentence. Rephrase uses your own words and enhances them. And don’t worry about security and privacy—ProWritingAid never uses your writing to train AI.
4. Embrace the Chaos
Of course, the most important thing about National Novel Writing Month is to embrace the messy creative process. It’s okay not to have a perfect manuscript at the end of the month—no one will.
Everyone will need to revise, edit, and rewrite after November ends. That’s why NaNoWriMo includes "I Wrote a Novel... Now What?" resources. And when you’re ready to turn your mess into a masterpiece, ProWritingAid will be there to help.

Krystal N. Craiker is the Writing Pirate, an indie romance author and content writer who sails the seven internet seas, breaking tropes and bending genres. She has a background in anthropology and education, which bring fresh perspectives to her romance novels. When she’s not daydreaming about her next book or article, you can find her cooking gourmet gluten-free cuisine, laughing at memes, and playing board games. Krystal lives in Dallas, Texas with her husband, child, and basset hound.
Top photo by No Revisions on Unsplash
#nanowrimo#writing#first draft#writing advice#writing tips#by nano sponsor#firstdraftpro#krystal n. craiker
131 notes
·
View notes
Text

Fringeclan allegiances
I'll do my best to keep this updated!
I purchased the floral assets from Ekachaka's shop on Etsy and the background image is a free to use photo by Jill Dimond off Unsplash.
59 notes
·
View notes
Text
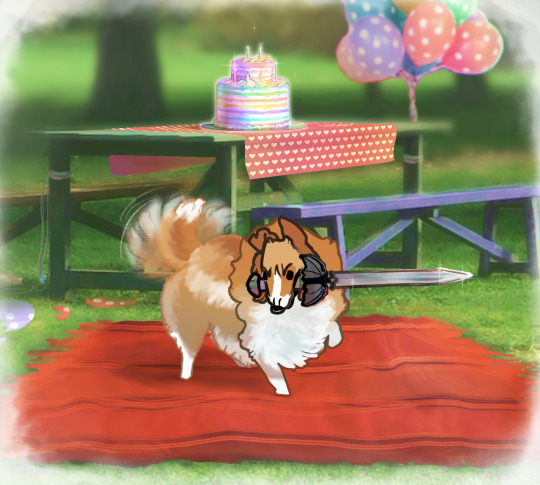
HAPPY (bELATED- it was yesterday) BIRTHDAY COLLIN! (oc)
He eagerly awaits any guests who dare challenge him!! (To get a slice of cake you must either duel him or bring him an offering. But if he doesn't like the offering you have to duel him anyway.)
The cake is a magic cake! If you get a slice it changes into whatever your favorite flavor is. Do you dare challenge him for a piece??
(Swords not provided - you gotta bring your own.)
*(Got to experiment with photo bashing again! Having fun c:
Photo Credits and links:
All photos used were from Unsplash.
The main bg photo link doesn't seem to work any more but for the background/picnic table I used was taken by Taisiia Shestopal.
Cake reference: https://unsplash.com/photos/rainbow-covered-cake-m4A2KWBU7xI (by Deva Williamson)
Balloons : abjwekl freakin forgot to save link, but was also a free to use image on Unsplash. )*
#Everyone who attends will receive a party favor in the form of a picture of his face and a single sock#hand crafted from his beautiful floof#coymasqarts#my art#ocart#oc: collin lucius michael#FlimFlamBirthdayJam#flimflamstrawberryjam
16 notes
·
View notes
Note
can you please make a tutorial for your santa gift graphics? i'm not totally new to photoshop but i could use some help <3
Ohh okay, this will be a bit long, so bear with me, dear Anon.
I'm going to use this one as an example:
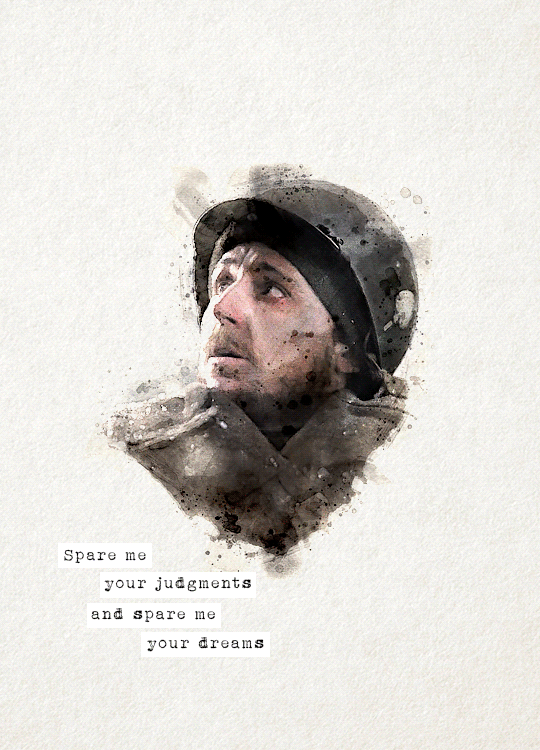
You'll need three new documents: one for creating the watercolour portrait, one for the watercolour elements in the background, and a third one for the final edit.

Let's start with the portrait. I'm using a free photoshop action for the watercolour effect, which you can download here with a complete tutorial. After using the action, you'll need to make some adjustments, but it's still faster this way. Change the blend mode of the "watercolor artist" group to screen and slightly turn down the opacity if needed to make the details more visible

In the second document, use the watercolour action the same way again to create the red elements in the background. You can download the photo I used here. I highly recommend using Unsplash, they offer plenty of free high-resolution stock photos, and unlike on Pinterest, the photographers are actually credited.
Create the third document; mine is 540x750. I used an ivory paper as a background, but it should work with a canvas texture or even a simple white/light layer. Pick whatever you like.
After you're done with the watercolour actions, paste the portrait into your third document. Adjust the size and position, then change the blend mode to multiply. Name the layer "portrait."
Next, paste the background elements too, and also change the blend mode to multiply. I changed the saturation and vibrance to make the red pop more, but it's optional. Name the layer "background elements."
Now that you see everything together, you can play around with different adjustment layers, contrast, colouring, etc.
Now, open the video you'd like to use for the animation, in a separate document. I used this one, but there are other similar free videos on this website, pick what you like the most. If you want to make the process quicker, pick one that's already a high-contrast black and white.
After you've opened it, you can use the timeline to cut out the part you'd like to use, adjust the speed, etc. In this case, I just doubled the speed which you can do by clicking on that little triangle, and used the full video.

Create a video timeline in the third document. Go to Window -> Timeline -> Create Video Timeline. It's an important step, don't forget about it. Once it's done, copy and paste the video layer into the third document, and name the layer "video." Make sure the "video" layer is right above the "background elements" layer because you're going to need to create a clipping mask. You can do that by right-clicking on the "video" layer and choosing create clipping mask, or you can hold down the alt key and left-click between the two layers. When it's done, you can adjust the size of the "video" layer, rotate it, flip it, etc., depending on how you want your animation to look
After that, set the blend mode of the video layer to screen. If you've done everything correctly, you should have your animation now.
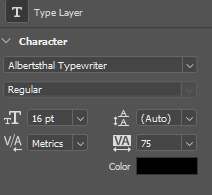
It's time to add the text. I used this font, size 16. I divided the text into 4 lines for easier adjustment of the position.
Once you're happy with the layout, create the white stripes, each on a different layer. This way, you can move them around separately if you'd like to change the position of the text. I like to make the text and stripe layers into a group so the layers are less chaotic, but you can skip this step.
The only thing left in the editing part is the invisible frame. Click on the "background elements" layer and add a layer mask. Select the brush tool, 50px, 100% hardness, and set the foreground color to black. Now, draw a line from corner to corner. Holding down the Shift key, click on one corner using the brush, then click on the next one, and repeat until you're done with all four sides. Your layers should look something like this now.

Before saving, make sure that all the layers on the timeline are the same length and start/finish at the same time.

If you're done, go to File -> Export -> Save for Web (Legacy). These are the settings I used for this particular edit, but feel free to experiment and use what you like the best.

I tried not to complicate it too much, but it's difficult to explain everything in writing, so if you have any questions, I'm always available :)
16 notes
·
View notes
Text
Well this took a while-
this took...hours.
I wanted to do a cute illustration of Espresso in the snow- It looks like someone...someone who may be taking a little nap somewhere in this image, may have nocked some snow off the tunnel onto him.
and up ahead theres only more lights to distract him from his work. How's he supposed to get anything done?
I did some photobashing with this one!

I'm trying to make it rotate but it's not letting me rotate it properly so I guess you get it sideways instead, sorry about that- Even so I think it turned out really good and I'm so prou dof how it turned out!
The background was done with photobashing, using images specifically from unsplash I checked to make sure were for free use and modification before using of course.
#cookie run#cookie run kingdom#crk#my art#artists on tumblr#espresso cookie#fanart#my fanart#espresso cookie run#cookie run espresso#espresso fanart#christmas#holidays#lights#photobashing
14 notes
·
View notes
Note
wow looking at your rat king thing, you improved SO MUCH in the last two years. what did you feel helped you improve?
There’s a handful of things I would say but the main one was switching from a screenless tablet to an iPad!! Obviously iPads are kinda pricey so I can’t recommend it for everyone, but I genuinely feel like switching from a screenless tablet (I used to use Huion) to screened one REALLY helped me get a better grasp of everything, along with procreate just having an easier layout to use compared to the other programs I used (SAI and CSP) which made me less afraid to mess around with brushes and other fun things like halftone textures and chromatic abbreviations, ect ect . Definitely play around with brushes!! While a different brush won’t suddenly make you the Best Artist Ever, finding a brush that works well with your style/art process can help a TON (almost all my brushes are from @/thedawner brush packs, I highly recommend their brushes!! Lots of free packs too, I use the bonobo chalk as my main painting brush)
The other big thing is references!! I rarely used any references until like last year, I’ve been taking my own pose/expression/ect references (yes that means looking at a weird picture of you for like an hour to get the pose right but you get used to it) and going on walks to get nice landscape shots for my work (all my giant ass floating fish drawings are based on images I personally took), but if you don’t wanna do that websites like unsplash, Pexels, and pixabay are great for royalty free (VERY IMPORTANT, I have seen LOTS of artists end up in legal battles because they just used a random photo they got off Google that ended up being copyrighted) pictures and vectors to help get ya started.
The last major big thing is my drawing process in general!! I was hardwired to believe you HAD to do art in the steps of sketch, lineart, color, then shading all on separate layers. Don’t be afraid to use what process works for you! When I threw lineart out the window and started painting all on one layer it became WAY easier for me to block out shapes (highly recommend doing greyscale paint studies, it helps SOO much with more coherent color pallets and lighting) and really helps the entire work fell connected rather than a character that feels poorly overlaid on a separately drawn background.
Don’t be afraid to fuck around! Its art! It’s supposed to be messy and weird! Merge your layers! Use 30 different brushes because you feel like it!! Have fun and mess around with the process and see where it takes you!!!
#there’s two other attributes which was finally getting art classes that were more geared towards developing my style rather than the basics#and my brain fully developing at 25. I wish this was a lie but I feel like my brain can just suddenly understand anatomy better#ask#long post#behold my text wall
14 notes
·
View notes
Text
Werewolf: the Artpocalypse. Earlier this month, World of Darkness had to issue a public apology after readers of Werewolf: the Apocalypse 5th Edition corebook preview found New Zealand Māori activist Tāme Iti's likeness was used in one illustration without permission. The photo of Iti that was used in the book was found on his Wikipedia page and although licensed under Creative Common license (CC BY-SA 3.0 in this case), a public figure's likeness is not free to take as it violates his right of publicity.


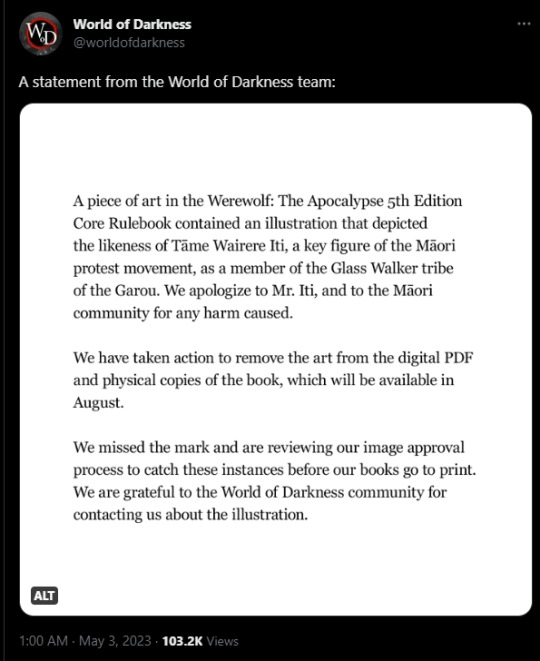
A single slip up and a timely response, not too bad. You thought that'd be the end of it, yet people are finding more and more images that the illustrations bear a striking resemblance to.
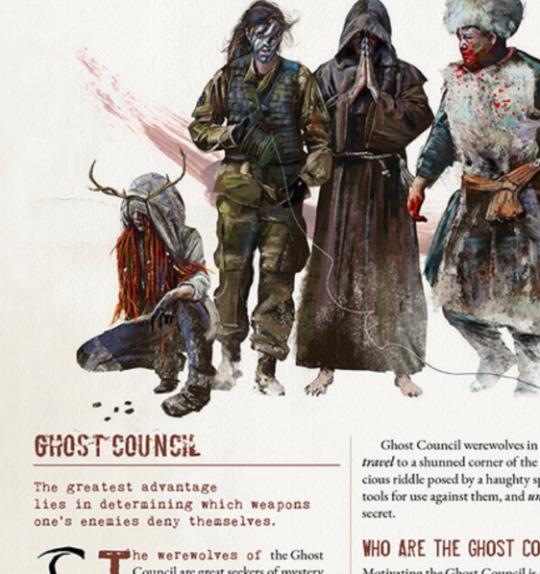


It isn't even tracing, everything matched up so perfectly. My conclusion is the artist just straight up incorporate these photograph into their illustration, or had used it as a base to directly paint over.
Using photographs in illustrations isn't new. Digital art techniques photobashing and kitbashing, commonly used by concept artists, involves taking part of purchased/free licensed stock photos and 3D models and incorporating them to their final illustrations, often times, painting over it. Think, Clip Studio Paint Asset Store 3D models being used in a Webcomic's background or taking many stock photos from Unsplash photoshop it into a complete piece. Yeah, you get the gist of it. The emphasis here is the artist should only use properly licensed stock photos and 3D models.
It's unclear if the images the artist uses are stock, public domain, creative commons licensed, allowed for commercial use or not. Reverse image search did nothing for me.
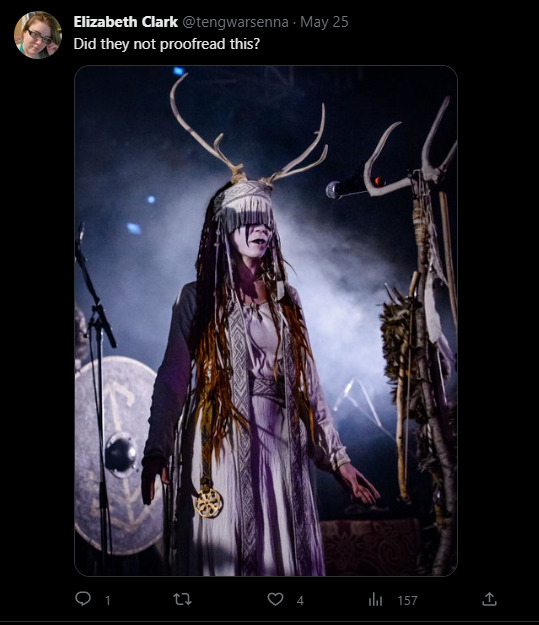
However, this artist's track record of using what they shouldn't have does not instill confidence. The antler woman illustration was made of Morgin Riley's photo and Heilung's lead singer Maria Franz's stage costume.
The whole thing is really giving W5 a rough start.
WoD's apology on the first incident state they are reviewing all the images again, so I doubt they'd make another statement.
38 notes
·
View notes
Text

Happy wip Wednesday! I don’t wanna tip my whole hand so here’s just a slice of a Rudy portrait I’m working on in the lead up to roudise week. It’s not near done yet. Probably. I don’t know we’ll see.
I also included the reference (even though I strayed heavily from it) which is a photo by Jennifer Burk and free to use / royalty free on Unsplash. Not trying to say anything about gender here I just needed help properly achieving a child’s features.
This was done on infinite painter as usual with my little blocky portraits.
[ID:
A screenshot of the interface of infinite painter on an iPad screen. The canvas being worked on is a zoomed in portrait of Rudy Stieblitz from Bob’s Burgers done in messy bright colors on a light blue background. A reference photo of a girl with curly red hair is included in a smaller window with the photographer’s name “Jennifer Burk” and “Available for hire” written under the photo.
/end ID]
#bob's burgers#my art wip#wip wednesday#artists on tumblr#infinite painter#my portraits#rudy stieblitz#regular sized rudy#digital art#fanart#dianadeadwing
8 notes
·
View notes
Text
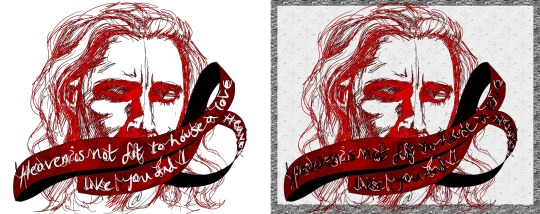
The Girl Who Waited
by cuteasdeath

"Fourteen years since fish custard. Amy Pond, the girl who waited. You've waited long enough."
- The Doctor, The Eleventh Hour (5x01)
Reference images used:
Karen Gillan Photoshoot by Cameron K. McEwan
Background photoshopped from:
Free photo ultra detailed nebula abstract wallpaper 4
High definition star field background
Photo by Paul Volkmer on Unsplash
#free to rb#do not repost#digital art#art#The Girl Who Waited#doctor who#amy pond#eleventh doctor#amelia pond#the eleventh hour#dw#karen gillan#cuteasdeath#cuteasdeathcreations#inktober
11 notes
·
View notes
Photo

A simple Photoshop Template for a Pinterest Start Site
The post preview is a cutout as the template is quite large, comes without a gradient background.
Font: Arial
Template size: 1000/1077 px
Uses: Clipping Masks, Smart Object, Rectangle (Tutorial)
Rules
- Edit it as much as you'd like but please do not use this in other templates.
- Do not claim it as yours.
- Please like/reblog this post if using!
Picture Credits
- all example pictures in the template photos from unsplash
- all pictures in the post preview are from the artists instagrams / twitters
This is an experimental template, the edges of the pictures aren’t clean so feel free to adjust it. Requested by a friend who didn’t want to make new pinterest boards for their characters all the time.
[ Click the Source Link to access the download ]
#pinterest template#psd template#rp template#roleplay template#mine: template#by: r.#other : request
94 notes
·
View notes
Text
How to Unstick Your Camp NaNoWriMo Project

Every year, we’re lucky to have great sponsors for our nonprofit events. ProWritingAid, a 2023 NaNo sponsor, helps you turn your rough first draft into a clean, clear, publish-ready manuscript. Today, author Krystal N. Craiker shares some tips on how to push through to the end of your writing project when you’re feeling stuck:
Camp NaNo is the ultimate test of your creativity. You push your writing skills and habits to a new level.
It’s inevitable that at some point this month—or any time when you’re writing a novel—you’re going to get stuck.
You’ll run into a plot conundrum, or you’ll feel creatively drained. You’ll stare at the page and have no clue what to write next.
It happens to all of us, so don’t worry. Here are some of my favorite ways to get my stories unstuck and my creativity flowing once again.
1. Go Outside
Writing is an isolating process, and writers are notorious for losing hours of the day to the computer screen. But when you’re stuck in a rut, staring at the page stressed out doesn’t make things better.
Get up. Go get a drink of water. Then go outside. What you do next doesn’t matter. You can get some exercise in or drive to the coffee shop. Birdwatch, play with the kids, splash in some puddles—you get the idea.
A little movement and some sunshine will help you feel refreshed when you sit back down at the computer.
2. Brain Dump
This is my tried and true method for NaNoWriMo. When I reach a point in my novel that I don’t know what to write (or just don’t want to write), I insert a random brain dump.
I’ll write what I’m feeling about this scene and type out what I think the issue is. Sometimes, it’s just a bulleted list and others it’s a stream-of-consciousness flow. Here’s an example:
“I don’t know what to write here. I was going to kill off that character but didn’t. Somehow I need to get to X plot point from here. How do I do that? This is so frustrating. Now that I didn’t kill them off, I need a good reason for them to stay in the story. What are their motivations?”
If that’s all you write during a writing session, that’s okay. You were still working on your novel, so it still counts.
3. Use AI
It’s the first NaNo event since Chat GPT opened to the public and countless AI tools are popping up. AI can be a great way to brainstorm and spark inspiration.
As writers, we often get hung up on finding the perfect way to say something. But you don’t need to let one sentence slow down your writing flow.
Rephrase by ProWritingAid is a brand-new feature meant for writers like you. You can highlight any sentence, click Rephrase, and generate a new sentence. Shorten or lengthen a sentence, change the tone to formal or informal, or add sensory detail.
Here’s a boring sentence I wrote: “Quinn entered the dark and cold forest.”
And here’s a sentence Rephrase gave me: “Quinn shivered as he stepped into the cold, dark forest, the air thick with the scent of damp earth.”
I can build off that! Now I’m more excited to write this scene that was feeling bland.
Sign up for ProWritingAid to get access to Rephrase and more than 20 in-depth writing reports.
4. Keep Going
Whatever you do, don’t give up! Getting stuck is part of the process. When you hit that creative wall, give one of these methods a try.
Your story still wants to be written, so keep writing.

Krystal N. Craiker is the Writing Pirate, an indie romance author and content writer who sails the seven internet seas, breaking tropes and bending genres. She has a background in anthropology and education, which bring fresh perspectives to her romance novels. When she’s not daydreaming about her next book or article, you can find her cooking gourmet gluten-free cuisine, laughing at memes, and playing board games. Krystal lives in Dallas, Texas with her husband, child, and two dogs.
Top photo by Kelly Sikkema on Unsplash
69 notes
·
View notes
Text
Hello!
My name is Zev and I am a writer and artist in my 20s. I'm Jewish, disabled, and trans, and I like to include themes and representation of all of the above in my writing. I am white, allistic, and transmisogyny exempt. I use they/he pronouns.
I grew up assimilated and disconnected from my Jewish heritage, and am learning about and reconnecting to my culture partially through writing Jewish characters. (I am Ashkenazi specifically.) I would absolutely love to connect with other Jewish writers!!
Wear a mask 😷 and free Palestine! 🍉
I don't have any specific plans for this blog, it will most likely be a combination of reblogs of research for my writing, other writers' and artists' content, and my own short stories, and a Jumblr. I may post art sometimes too. Fantasy is my favorite genre to write, and I love writing in others as well! Not all of my work will include representation from all the groups I've mentioned, but it will be a common theme in short stories, poetry, or anything else I post. With AI on the rise, I don't feel comfortable posting my biggest WIPs unfortunately 😔
This should go without saying but antisemites, racists, transmisogynists, general transphobes, homo/lesbo/bi/aphobes, ableists, islamophobes, fatphobes, etc - including anyone who still engages with h*rry p*tter in 2023 (congrats on ticking every single one of those boxes) as well as prosh*ppers - will be blocked.
I am a leftist and anticapitalist and won't tolerate right-wing and other violent or harmful ideologies. If you're pro-US military, pro-cop, or a Zionist, I do not want you here. I won't argue with you about any of this, don't waste your time.
My cover photo is by Robert Lukeman on Unsplash:
https://unsplash.com/photos/_RBcxo9AU-U?utm_source=unsplash&utm_medium=referral&utm_content=creditShareLink
My pfp is by me :)
Image descriptions of both under the cut!
I hope you enjoy my writing!
Tumblr icon description: A digital painting of friendly-looking dragon colored the blue, pink, and white of the trans pride flag with feathery spikes along their head, neck, chin, and back of their paw who has large curved white horns, a white kippah lined with deep blue and with a blue star of David on the top. The dragon smiles with one tooth poking out and holds a black and silver pen, writing something. Behind them is a fading sunset, the sky dark blue, then dark purple, then light magenta, then orange, contrasted with dark hills in front of the sunset. [End ID]
Header image description: A photograph of a green grass field on Syke island in Scotland during sunset. In the foreground, concentric circles alternate on the field between plain beige dirt and raised bright green grass, the latter lined with evenly spread dark grey rocks. In the center of the circles is a large pile of these same rocks. In the background, grassy hills line either side of the island, with a grey craggy rock structure overtaken by more grass in the front right view. A dip in the very front of the hills frames the brilliant orange setting sun, the blue sky above it melting into yellow as it gets closer to the sea, which reflects the orange dazzlingly. Dramatic wispy white clouds spread across the beautiful sunset. [End ID]
11 notes
·
View notes
Note
hey i am SO sorry if i have you mixed up with someone but you always have the really cute desktop background displays, yeah? could i see ur november set up for inspo or could u share your methods? im having the worlds worst time getting things to look nice
That's me!! I haven't had a chance to make November yet, but I made October as a shareable template here since I use Canva (the free version)!
I normally change the colours/put filters on the photo elements (the torn paper, washi tape etc.) every month and insert a verse from Scripture or something similar, and the tan rectangles are where I insert pictures. The calendar is also manually updateable!
For pictures I normally use the Feast days that month to guide me (like this month I used St. Luke, St. Faustina and St. Jude for varying inspiration) and otherwise generic pictures of the Mass/altars/Eucharist/etc from free sites like Unsplash
I also have side monitors that I normally do a prayer or another photo in the corner taped up if you ever want to see, but that's how I do my main monitor! I will search for free version pressed flowers to add to those
6 notes
·
View notes
Text
Art Advice #15 - Overlay textures in digital art!
Hi!! It's been a while since I did an art advice post like this and since I've recently been using a new technique (well, new to me lol) for adding texture to my artworks I thought I'd share some tips on how to do it!
Brief introduction into overlay textures:
So I suppose I should start by defining what I mean by 'overlay textures' and why you might want to use them! Overlay textures can add real dimension to your work, and they're especially good if you want to give your digital work the appearance of being a traditional painting! Another great thing about these textures is that most programs will come with some great pre-set texture layers that can be customised, though you can also find great downloadable textures to add to your works too!
To give you a better understanding of what overlay textures are, below are two of the same artwork, one without and one with a texture placed over the top.

This particular texture I created from MS Paint (which I'll get a little more into a bit later) and you will get completely different looks (and can drastically change the colours and feeling of the piece) depending on what blending effect you use to add the texture to your artwork! In the above example I used the 'burn' effect (which is good for deepening colours whilst keeping the highlighted areas semi-bright).
A quick note before I get into the specifics I will say that a thing to remember is that adding texture to a digital work will drastically changed the file size, especially if you are saving things as .pngs!
What types of pre-set texture layers do I use?
I have a few go-to textures that I use regularly!
First is the 'sand' and 'cloud' filter effects on Firealpaca (I'm sure other programs have similar pre-set effects).

The sand one (on the left) is the only I use the most regularly because it gives a more dispersed effect. You can change the colours of the background and the texture by using the foreground and background picker (in the examples below you can see the background is set to the automatic white).
Next selection of textures you can add to your art are from MS Paint (an example of one of these is the above artwork by the way). This is something I only really discovered recently whilst playing around with MS Paint.
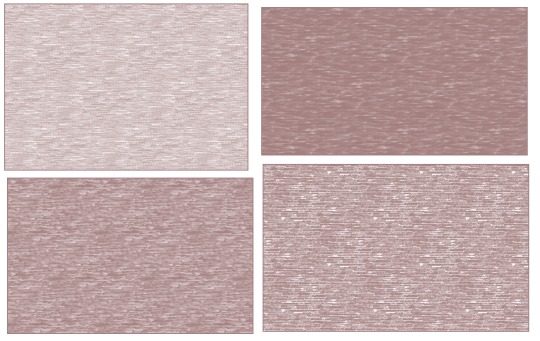
These are four examples of the textures you can create on MS Paint! The way you do it is use the rectangle shape and change the 'fill' option to either 'crayon', 'natural pencil', 'oil' or 'watercolour' (the other options in the drop down list aren't textured by the way) and changed 'colour 2' to whichever colour you want the texture to be and voila!
I usually then save that texture and copy it into my usual program (Firealpaca) so I can blend it down onto my artwork. The natural pencil (top left) is my personal favourite since it's more subtle than the rest, but they are all really interesting textures and I'd definitely recommend playing around with them!
What about downloadable textures?
I also regularly use pre made textures that I've downloaded from various places over the years! These are usually either real canvas or paper textures that give your works a traditional appearance!
I'd honestly recommend just giving a quick google of 'free paper/canvas textures' and you'll find some resources. Unfortunately some of the places I used to get textures have been deleted, but I'd definitely recommend checking out Unsplash! It's great for reference images and for textures that aren't copyrighted! There are also some Flickr groups that have free textures that are pretty good!
At the moment I've got a folder filled with ones that I've collected over the years and would really recommend you do the same if there are particular textures you like to use! I also regularly layer these textures on top of each other to give the piece more dimension!
Also you can take your own pictures of canvas/paper textures to use which is just as easy as using ones others have used! Below are a couple art examples of works I've added these kinds of textures to.

How do I add the overlay texture to my artwork?
As I've already mentioned, a lot about using overlay textures is learning how to apply them to an artwork where they don't overpower it, and a lot of this can be controlled by careful use of blending options, the opacity of the texture layer, as well as how and where you layer the texture on to (or underneath) your artworks!
So for example, because I wanted the above left artwork to look more like it had been drawn onto the paper texture, rather than floating on top (which the right line art is), I used the overlay blending effect on one layer of the drawing, and then added a full opacity layer below that, which gives a sort of effect of the drawing 'bleeding' into the texture layer below. I will sometimes use a couple layers of my drawing with the overlay effect blending them into the texture layer to give it a real appearance of it being drawn directly onto the paper.
Sometimes, however, you want to leave the drawing sitting on top of the texture to make it stand out a little more! It really depends on what kind of effect you're going for to be honest. The way you keep these things separate is by putting the texture on the bottom as a background. (You can also have part of your art with the texture over it and part without, like the above artwork on the right which has the line art hovering and the colour overlaid onto the texture!)
Below are a couple more examples of artworks that I've done with some of these textured effects in comparison to the same works without the textures!


Happy texturing! ~
I hope I explained this alright, some of the techniques I talked about are a little hard to put down into words so if you ever need me to clarify anything please feel free to message me!
Thank you for reading and if you enjoy my work please feel free to either commission me or tip me/go to my kofi <3
#art advice#digital art#digital art advice#digital artist#firealpaca#ms paint#art tips#artists on tumblr#i just want to clarify that i'm no expert on digital art lol! just a lil artist with like 10 years of experience of messing around with it
8 notes
·
View notes
Last Seen Blogs
zukosdualdao
"but i am ready to forgive you."
theseabear
A Drop Of Jupiter
tsubomipsycho100
what the heck?

hardeggwombathoagie
題名未設定

erosandanteros-blog
Eros & Anteros