#edwardian sewing
Text
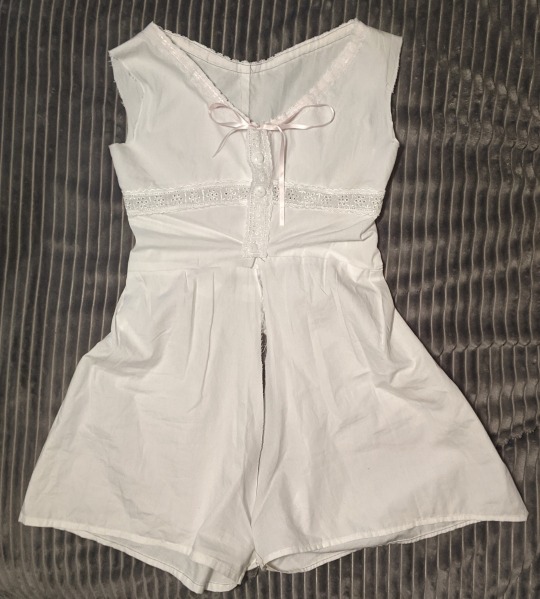
Utilitarian Edwardian Combinations
April 13, 2023
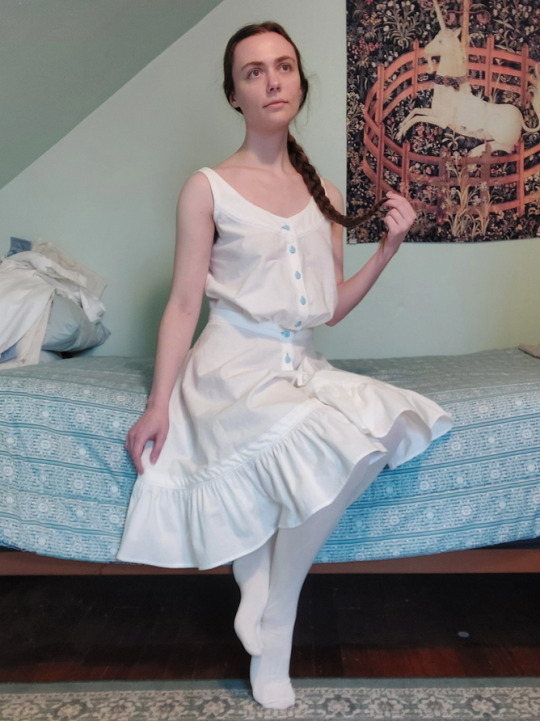
[Image ID: a photo of Alex posing seated on the edge of a bed, wearing white stockings and Edwardian combinations.]
Sometime last summer, having finished my 1890s corset, but not started planning the corresponding wardrobe, I bought a pattern for Edwardian combinations, dug some slightly-discolored white cotton from my stash, and cut out the pieces.
(Now, I want to say that, yes, I understand that these combinations are a few years too late for the 1890s. I prefer the Edwardian shape of combinations over the chronologically-correct 1890s shape. They're underwear, so when I'm dressed no one will be able to tell that they're not accurate. And frankly, everyone's doing it.)
Part of the reason I had put them aside for so long was the fact that I cut out the front bodice pieces as-is, when I had originally wanted to add pintucks. When I got the fabric and pattern back out in mid-March I decided I didn't care enough to do that, so I just started sewing.
Well, actually, I started ironing. There were seven (7) facing pieces that needed to have certain edges ironed down before starting to sew. Then I could actually start sewing - attaching the facings to the front and back bodice pieces, sewing the legs, attaching the leg facings, and making the leg ruffles into a closed loop. More pressing, then more sewing, then more pressing. I skipped the bodice ruffles, though, because they would have been uselessly bulky under a corset.
And then I had an idea.
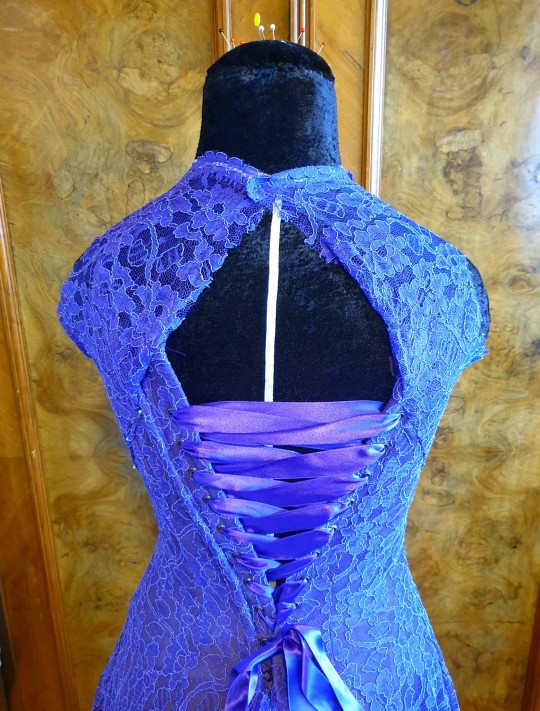
I didn't intend to add much (if any) lace or decoration to these, but all that white was getting boring. So I decided to spice things up with colored top-stitching. I still have thread left over from my corset, so I top-stitched the bodice facings and the ruffle's hem in light blue! The effect is subtle, but super cute.
I did add a tiny bit of lace, though. I had two lengths of quarter-inch wide lace that I salvaged from... something I can't remember. They were the perfect lengths to add to the bodice just under the facings!
Then it was ruffling time. I didn't want to hand sew the gathering stitches for the leg ruffles, but I was worried that the thread would break if I used machine stitches to gather them. I ended up using the "zigzag stitch over a piece of string" method. I also ended up resorting to an old Pinterest trick where you do two lines of gathering stitches - one above and one below the stitching line - in order to help control the gathers and make them neater.
I'm so glad I did! It was a tedious process but the results couldn't be prettier!
To cover the raw edge of the ruffle, I made bias tape of the same white cotton I used for the rest of the project and used blue topstitching along the top and bottom to hold it in place around the leg.
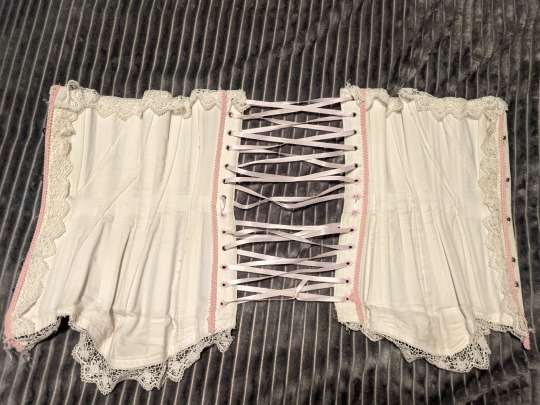
With the bodice and legs completed, it was time to attach them to the waistband and make it one single garment!
The bodice went first, with a bit of gathering at the center front. I put in two lines of gathering stitches by hand. The result was not as neat as the two lines of zigzagging over string, but oh well. That gets sandwiched between the inner and outer waistbands, sewn, and ironed.
Then the legs get some gathering at the center back. Having learned my lesson on the bodice, I did the gathering with string again. The legs get sewn to the outer waistband first, then ironed. The legs are just barely supposed to meet at the center back (because these are split drawers), but I opted to overlap the facings for a bit more modesty.
I added some more decorative top stitching along the edges of the waistband, which served to attach the bottom edge of the inner waistband as well.
Finally, it was just buttonholes (in blue thread) and buttons (also blue)! The pattern calls for six down the front - one on the neckline facing, one on the waistband, and four in-between. I ended up adding two on the leg facings below the waistband for some more coverage.
And, with that, my combinations were done!
These are easily one of the weirdest garments to put on. I can't explain it, but the way the legs are disconnected just makes it so odd to get into!
I'm mostly pleased with how these turned out, even if my top-stitching doesn't hold up well to close inspection.
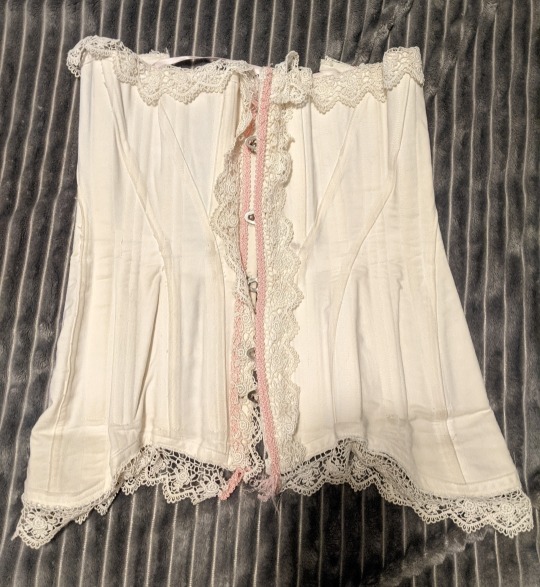
There is one thing I want to point out, though. Becuase this pattern (the TV one) is technically for a corset cover and drawers, and the combinations are just a 'pattern hack', the bodice is a bit oddly shaped for wearing under a corset.
As an Edwardian corset cover, the bodice is meant to encourage the pigeon-breasted look of the era, so there's a lot of extra fabric at the bottom front of the bodice. Because I was making a garment to wear under a corset, I could have shortened the center front by an inch or even an inch and a half and the garment would have been a bit more suited to my purposes. It will work fine as is, but it could have been better.
Next up in 1890s sewing is a bust improver and bum pad. I'm hoping to order a bodice and skirt pattern later this month, too, so I can finalize my plans for clothing. I will need a petticoat eventually, but I'm not sure I have the budget to buy fabric for that right now.
My next few sewing projects will not be 1890s, though! I've got a secret project brewing in a new era that needs to be done before the end of the month and then a quick modern project that is already cut out and waiting for me. Then maybe back into the Regency for a bit, but who knows.
Until then,
Stay warm. Stay safe. Stay healthy.
1 note
·
View note
Text
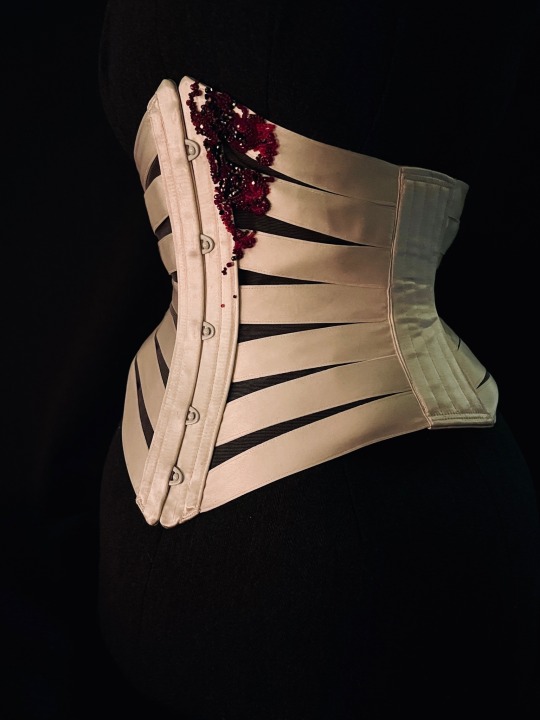
The Saddest Girl In The World
Edwardian-ish ribbon corset with beading, 2023
Silk ribbon, cotton taffeta ribbon, Czech glass beads
#project: crown prince kiriona#project: ribbon corset#project: historical sewing#cosplay#media: the locked tomb#tlt#the locked tomb#historical costume#Edwardian#Nona the ninth#historical sewing#costume#poetry in costume#beading#excuse the iffy lacing I used what I had on hand which is too wide and I didn’t want to unlace Helga#EDIT: upsetti#I captioned it something sensible rather than WHITHER THE HAMBURGER???#there’s time#not sure why this has broken 1000 notes but it is releasing all the brain chemicals
3K notes
·
View notes
Text
there is a reproduced 1909 magazine story in this book I read recently (The Female Economy by Wendy Gamber it is amazing oh my god) that just makes my soul depart my body
it's about a woman who decides to make her own new dress undersleeves to save money, and enlists a dressmaker to do the actual sewing. but she can Totally Cut The Sleeves Out Herself With This Paper Pattern So She's The One Making It Really
for reference as to why this is absolutely insane, cutting/fitting is the single hardest part of Victorian and Edwardian dressmaking. this is where all the Mathing and Thinking and Make Two-Dimensional Shapes Into Three-Dimensional Garments come into play. and contrary to popular belief, while most women at the time were accomplished seamstresses- in the sense of "putting fabric together using stitches, and likely also mending" -they didn't necessarily have a clue how to shape a garment. especially not the highly fitted bodices and imaginative sleeve shapes of the day. custom-made clothes from dressmakers were commonplace for most social strata in urban and suburban areas; even lower-middle and working-class women had "lesser" dressmakers they patronized
you do start seeing commercial patterns and home dressmaking manuals steadily increasing throughout the latter half of the 19th century and the early 20th, but in general there was no reason to assume that a random woman on the street could make herself a properly-fitted gown- or even just sleeves -from scratch. (not even with a pattern, which were notoriously scant on instructions back then)
a modern hobbyist historical costumer probably has more knowledge of how to actually make clothing from 1909 than the average woman living in 1909
so anyway this lady tells the professional dressmaker to stop giving her advice, she's got this, she's FINE HONEST. and then gets pissed at the dressmaker for not telling her she needed to include seam allowance in her pieces
for more reference, that is...
...the absolute most basic Day One sewing knowledge
#sewing#history#I am on the astral plane#someone page instagram user Can You Sew This For Me#edwardian
732 notes
·
View notes
Text

Didn’t have my sewing machine in London, so I hand-stitched this tea dress using a 1905 pattern!
#sewing#historical clothing#edwardian#hand sewing#historical costuming#princesscore#royaltycore#light academia
434 notes
·
View notes
Text
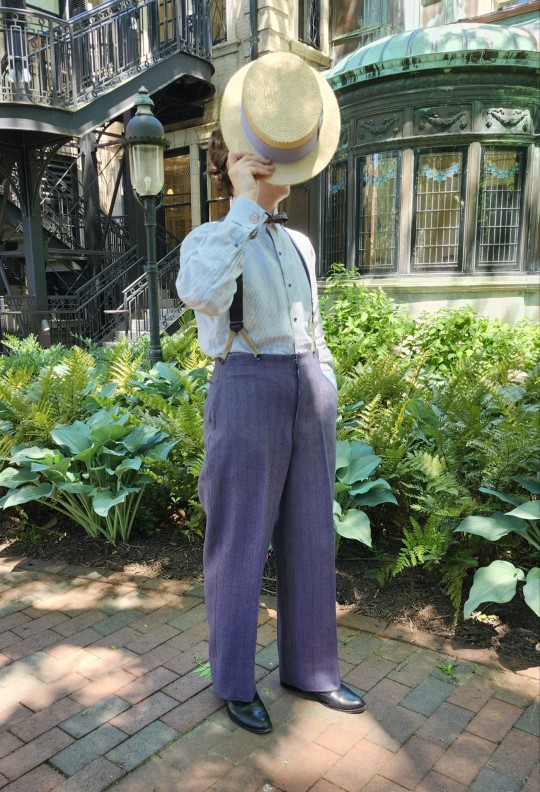
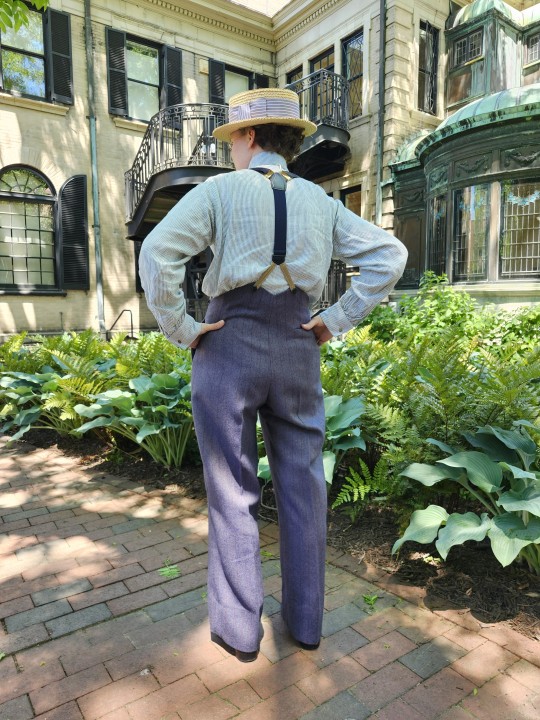
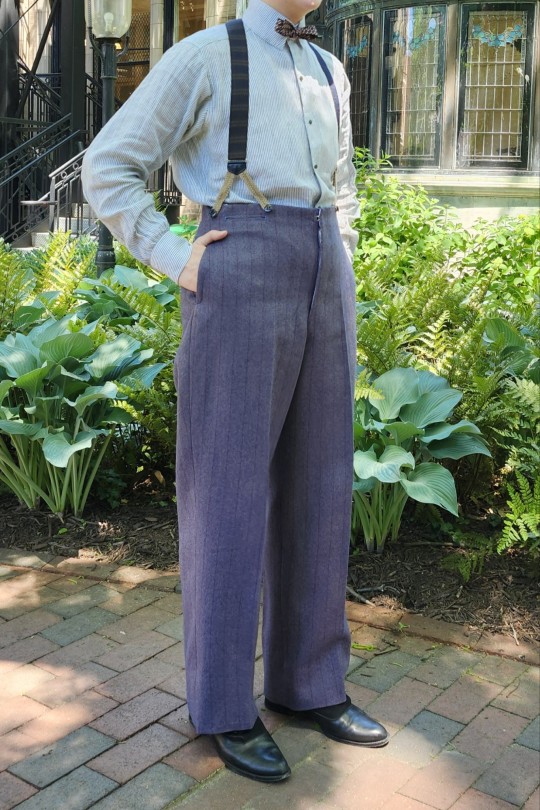

I've been meaning to post a picture of this shirt for a while, I made it almost a year ago. I just finished making the trousers as well. The shirt was copied from an original arrow shirt and collar I own. The trousers were drafted from an original 1890s manual online, and the construction methods were based on a pair of 1930s trousers I have to fill in the blanks. I replaced the hat band on my boater as well.
I got the fabric for both the shirt and trousers at Fabricmart. My buttons, cufflinks, other accessories/notions were gotten second hand or I already had them.
#vintage menswear#historical fashion#menswear#1890s#1910s#edwardian#victorian#victorian fashion#sewing#my post#I want to make a matching jacket for this at some point
110 notes
·
View notes
Text
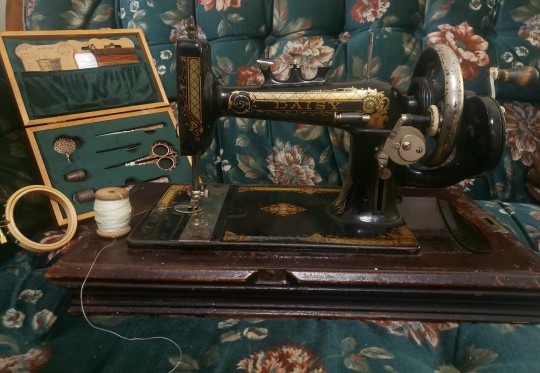
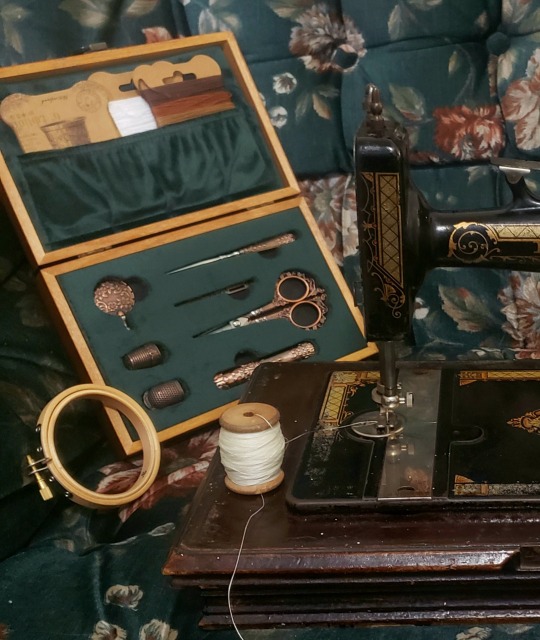
Antique sewing machine and vintage-style sewing kit.
#im super excited about this sewing kit and everything is so pretty and nice! and also the wooden box smells cozy#cottagecore#cottagecore aesthetic#crafts#crafting#artists on tumblr#cottagecore crafts#sewing#sewists of tumblr#hand embroidery#embroidery kit#embroidery scissors#sewing supplies#antique decor#antique sewing machine#vintage sewing machine#sewing machine#daisy#victorian era#edwardian era#antique#antiques#vintage#maximalist decor#needlework kit#needlework supplies
348 notes
·
View notes
Text
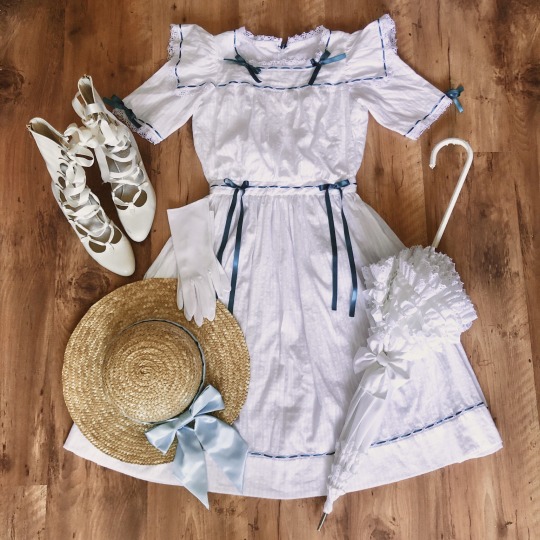
Dress : Handmade ♡ Based on a LeFlacon dress
Hat : ahgdfhjgd actually an official One Piece merch that I modified
Gloves : Vintage
Shoes : MollyPolly on Taobao
Parasol : Angelic Pretty
I made a new dress based on my favorite LeFlacon dress (which is sadly starting to get really worn) and I'm so happy with the result. The peacock blue ribbon wasn't the initial color I had planned but it's actually so cute ♡ And unlike the og dress, it's in full cotton ♡♡♡
#what style do I even tag that#edwardian children core ???#historybounding#dolly kei#classic lolita#lolita fashion#light academia#sewing#handmade#my coords
265 notes
·
View notes
Text
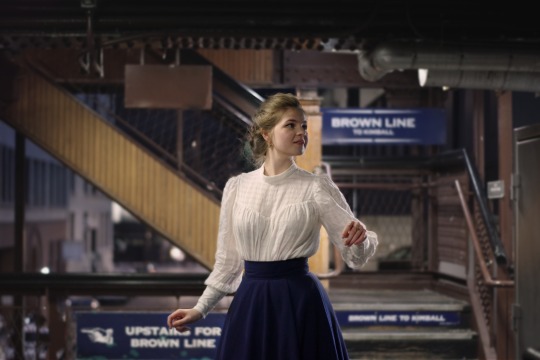
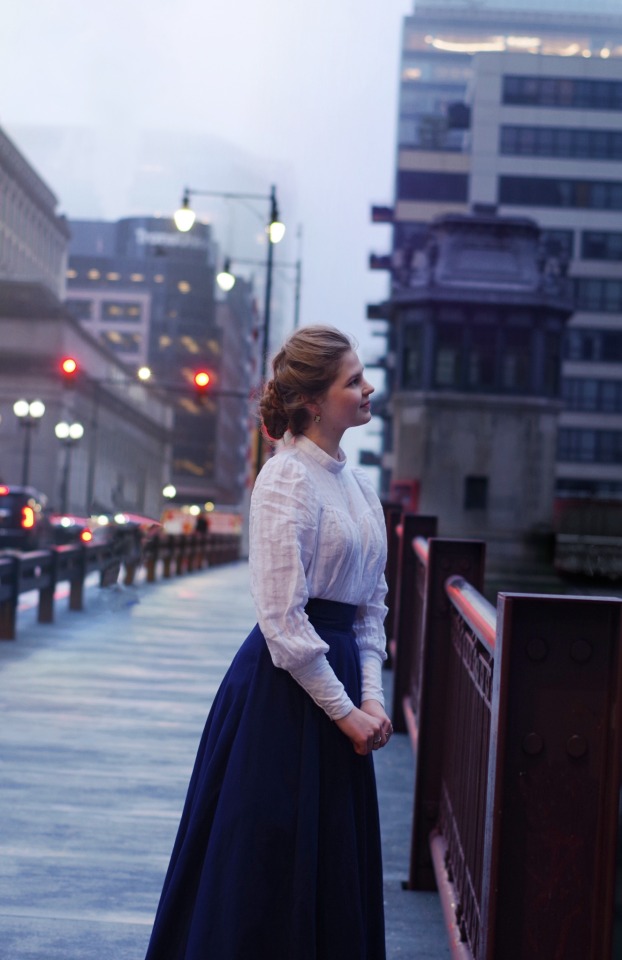
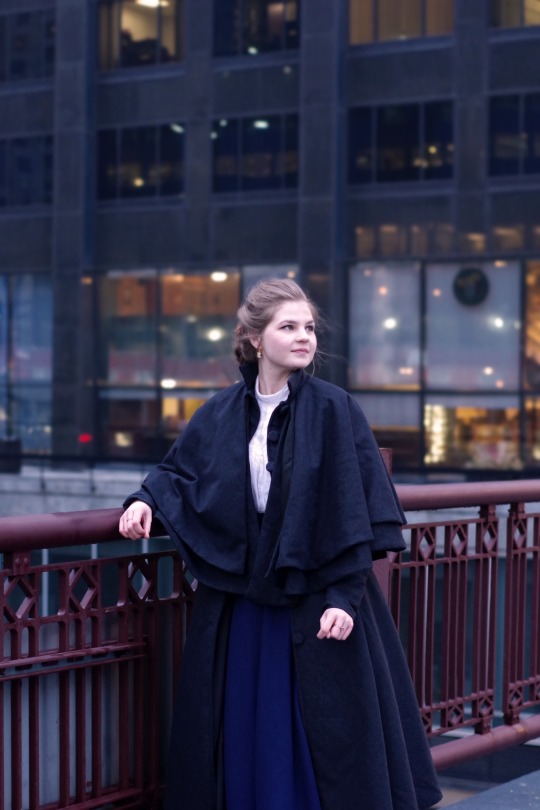
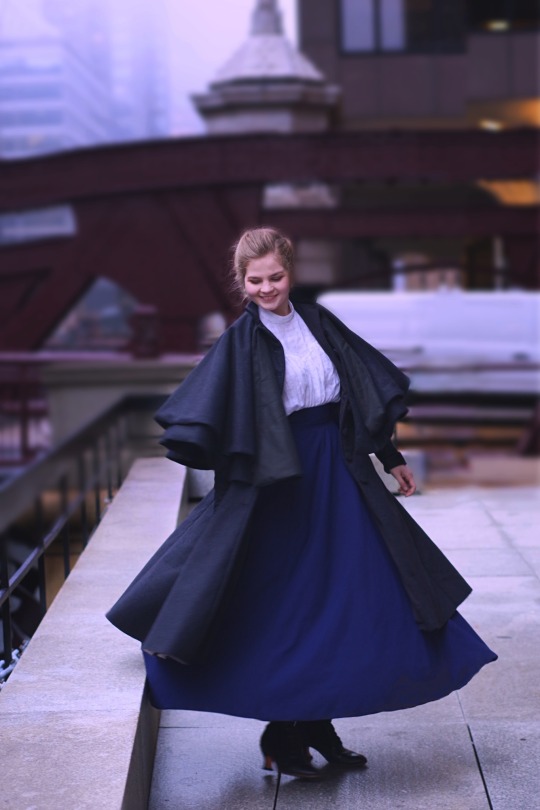
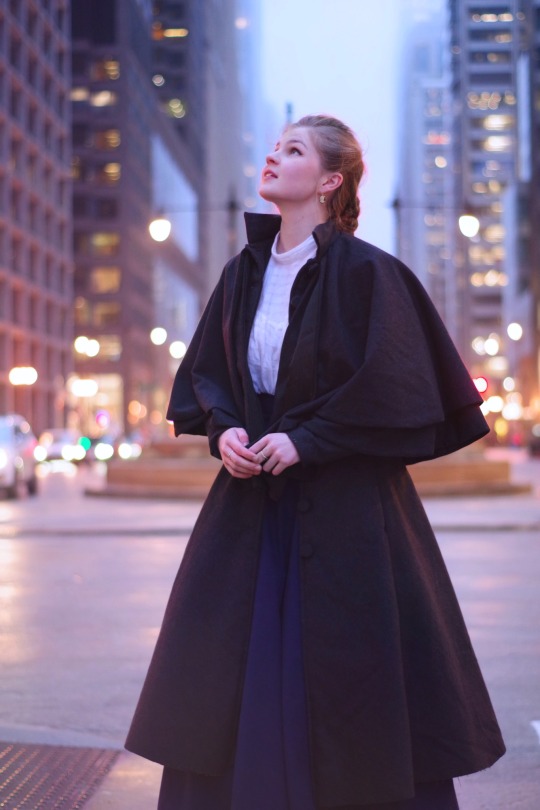
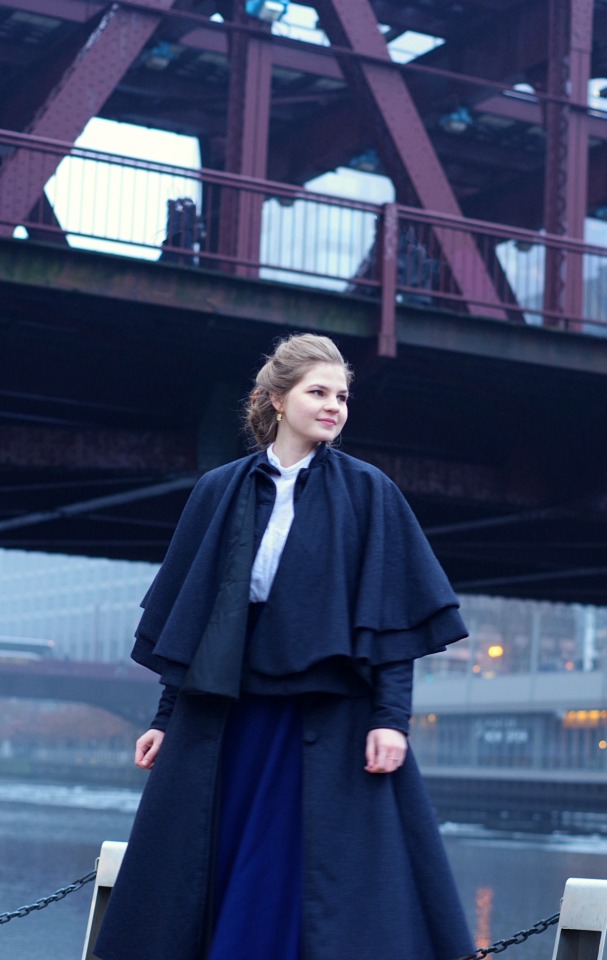
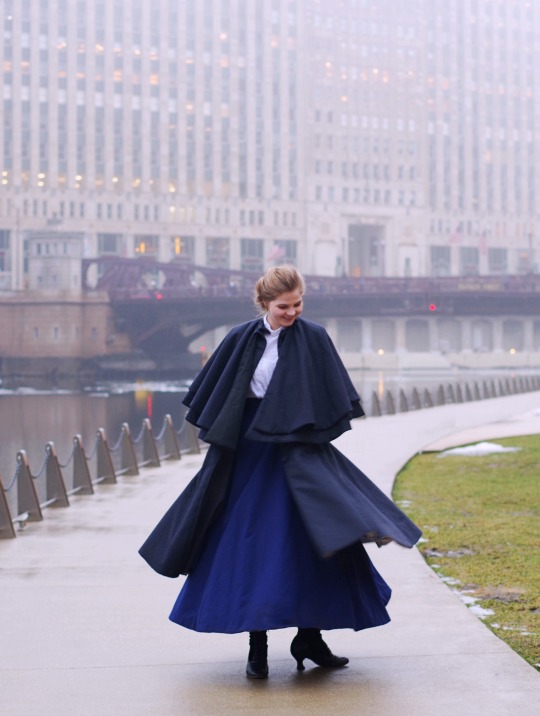
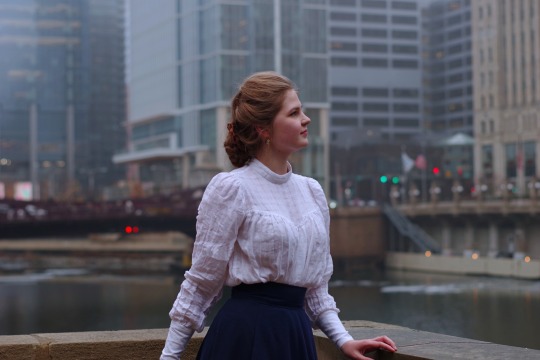
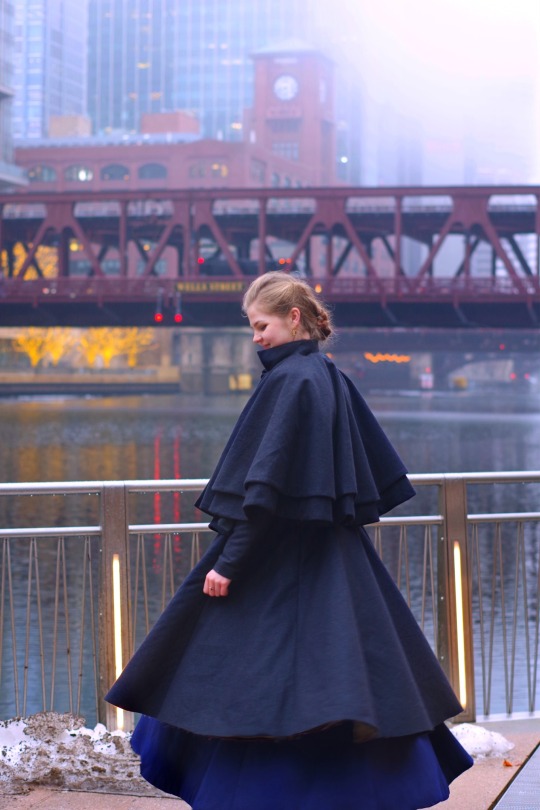
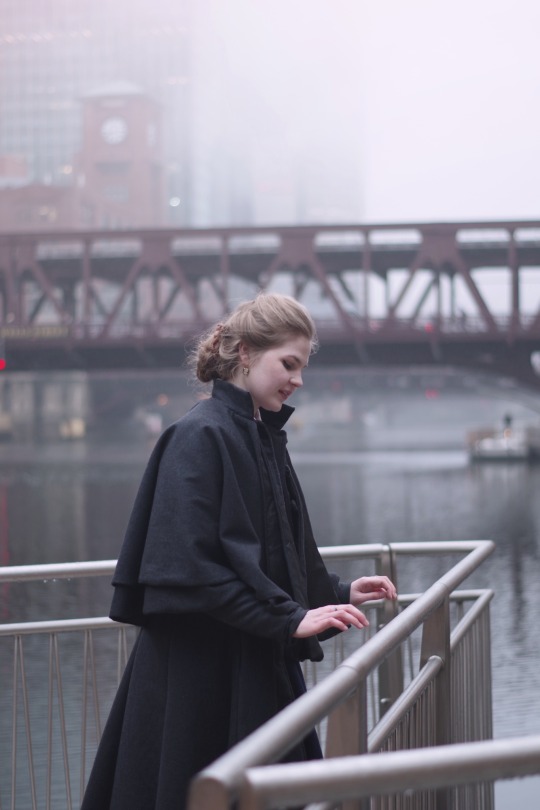
A Victorian/Edwardian inspired outfit I made! Skirt and coat also patterned by me but the blouse pattern is from Stitchmaiden (a video of my process on making the blouse is available on my Instagram for anyone interested! I'm trying to add the link but it isn't pasting so my Insta is zetamakesthings)
Credit to my friend Talia for all the photography! Her Insta is theoneandonlyailat
#fashion#historical costuming#historical fashion#sewing#vintage fashion#edwardian fashion#victorian fashion#historybounding#chicago
87 notes
·
View notes
Text


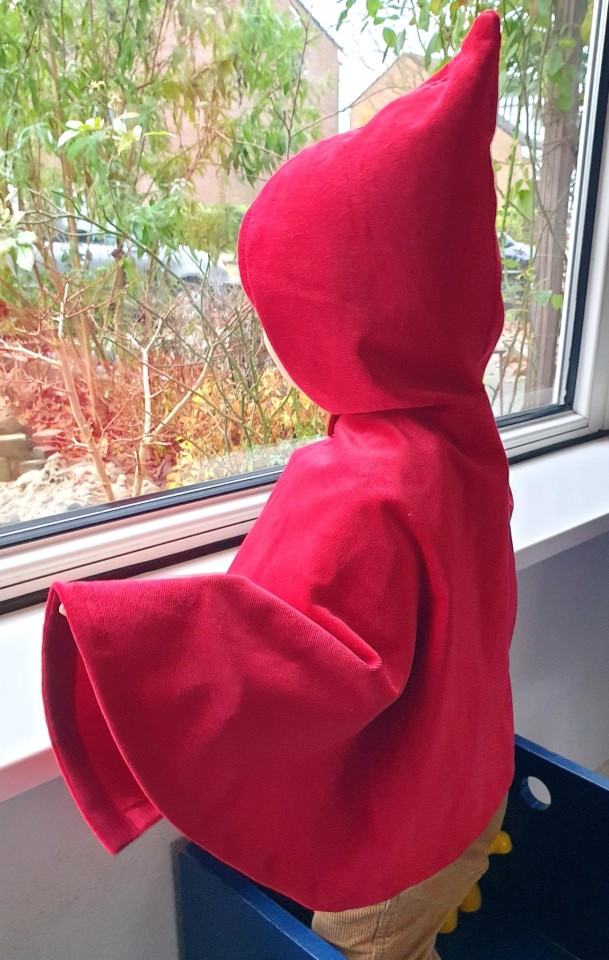
Happy New Year! In 2023 I have sewn approximately 22 things, these are my favourites~✨
#like 4 of those 22 are edwardian belts#a talia original#talia's adventures in dressmaking#year in review#sewing#Astarion's shirt#my friend's birthday ballgown we sew together#and the baby's cape are my favourites in think#honestly the one day possession babygirl shirt recreations were the most fun#in a very manic way
93 notes
·
View notes
Text
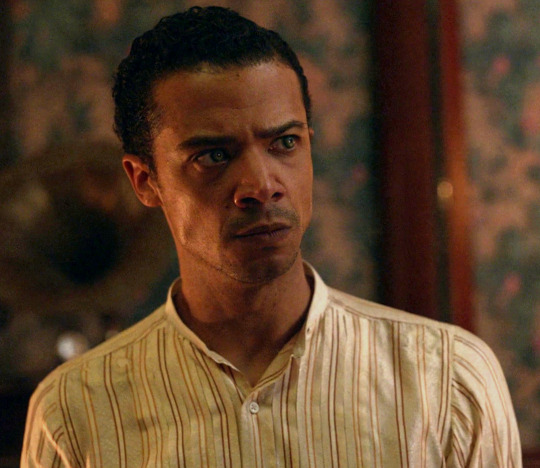
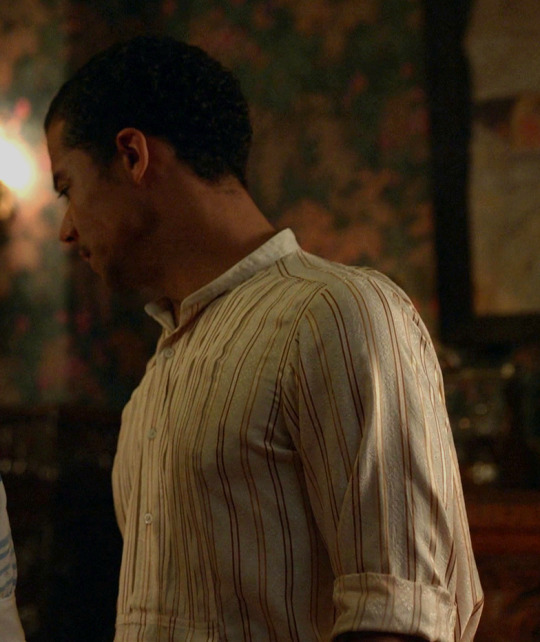
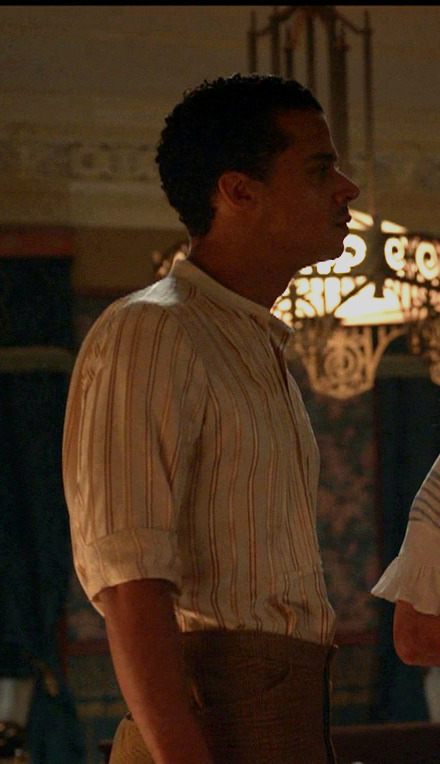
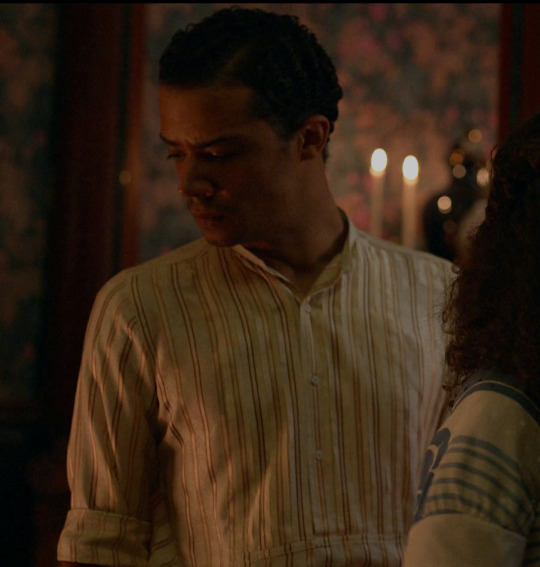
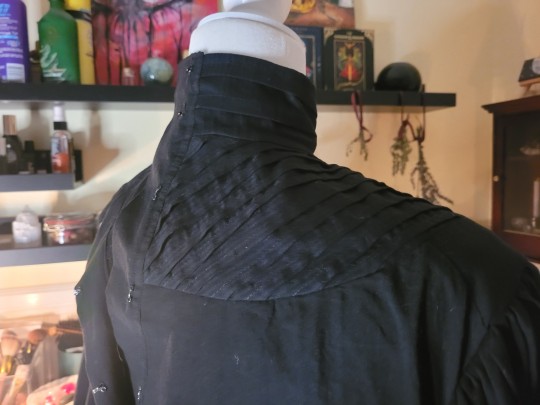
Nerdy post about this shirt below the cut.
I'm not a dress historian, but I do have 10+ years of experience sewing (mostly as a hobby). Here are some things I can tell you about it.
First, what we can see from the show:
-It was made to be worn with a removable collar*.
-The Front opening doesn't go all the way down*.
-It has a pleated bib piece in the front.
-It has pleats below and to the sides of said bib.
-It has a very short yoke (at first I thought it had a saddle shoulder because the stripes of the yoke and the stripes of the sleeves match perfectly... mwah chef's kiss).
*these seem to be common features of shirts from mid 19th century to mid 20th century.
Here is what I imagine the whole thing looks like
[Note: when I first posted it, I forgot to delete one line on the side view that divided the yoke]
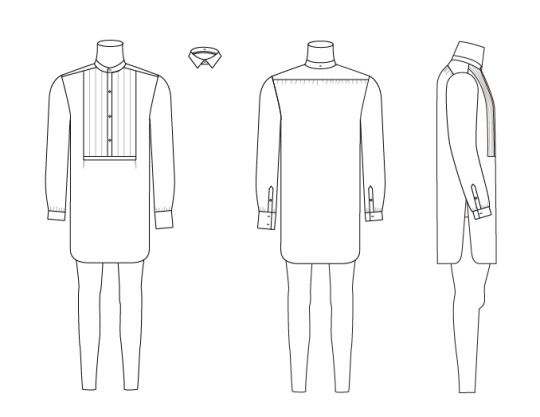
I think the back piece is gathered, but maybe it has a center pleat or two pleats above the shoulder plates. So I assume the sleeves echo this and are gathered at the cuffs too (it may have two pleats instead). I imagine it has double cuffs, meant to be worn with cuff links. The length was a guess on my part, but shirts of this time seem to have been longer than modern ones. The gusset where the front and the back piece meet at the bottom is common feature of this kind of shirt.
And here is a detail of how I think the pleats work:
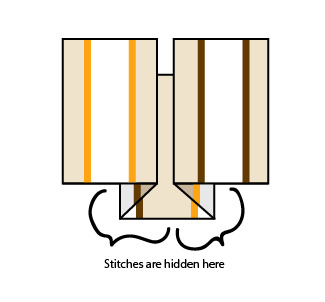
I'd bet the measurements of the bib piece are determined by the stripes of this particular fabric. The pleats could be thinner, wider, have a gap between them, etc. if the fabric were different.
Here are some real (I mean not costumes) shirts, similar to the one worn on the show:
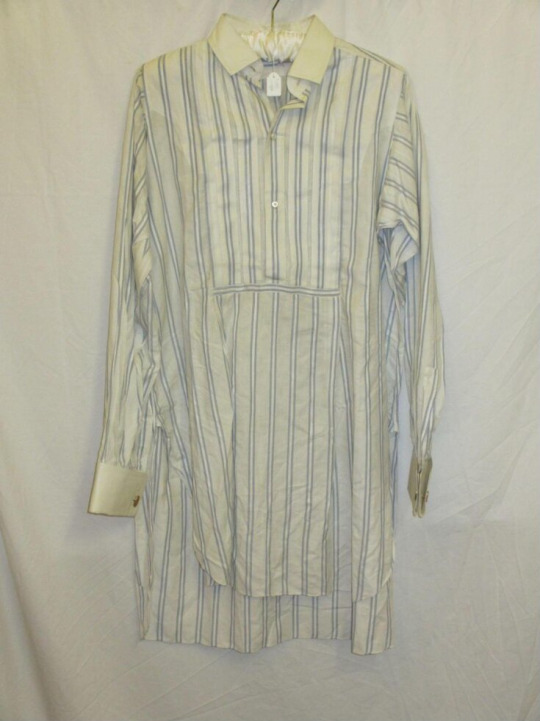
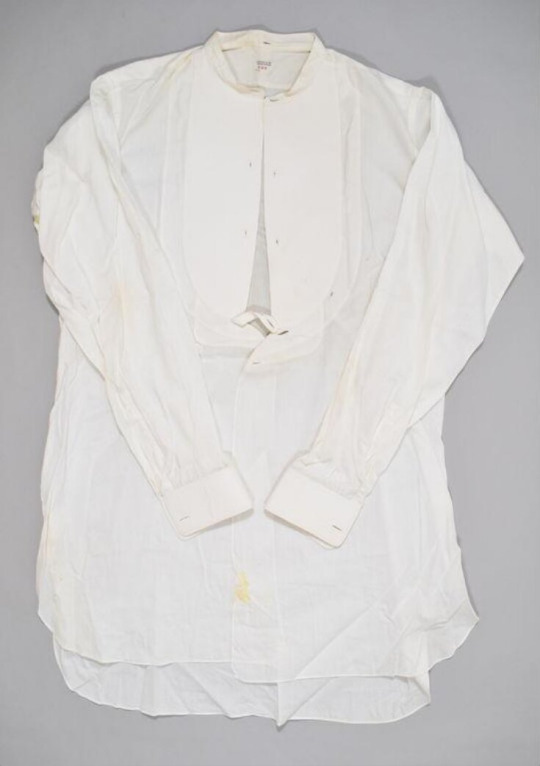
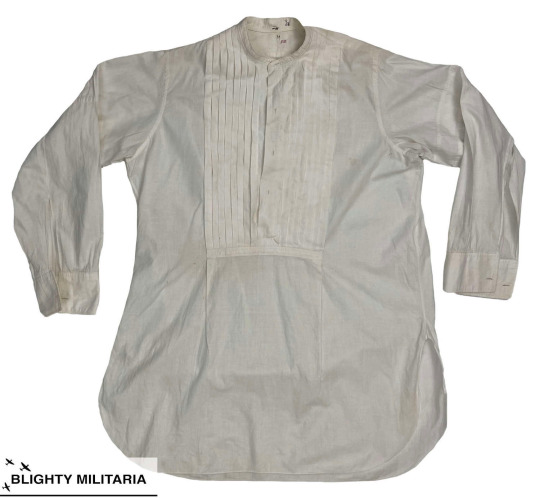
Made between 1900 and 1910. (source)
Made in 1953. (source)
Just listed as "Edwardian". (source)
If anyone wants to sew something similar, here is a drafting manual from 1890 (I think it's funny that it says the pleated front was fashionable 25 years prior but not anymore... and yet there are shirts from the 1970s in a similar style). But also you could frankestein it from a modern commercial pattern (make sure it has a yoke and a standing collar, tho). This video may also be useful.
... and that's all folks!
#interview with the vampire#iwtv#amc iwtv#amc interview with the vampire#costume design#historical costuming#edwardian fashion#sewing#men's fashion#fashion#louis de pointe du lac#carol cutshall#jacob anderson#whenever i think i might be too extra about something I remember sam reid bought a special software for his audition#i need someone to pay me for falling into rabbit holes
201 notes
·
View notes
Text
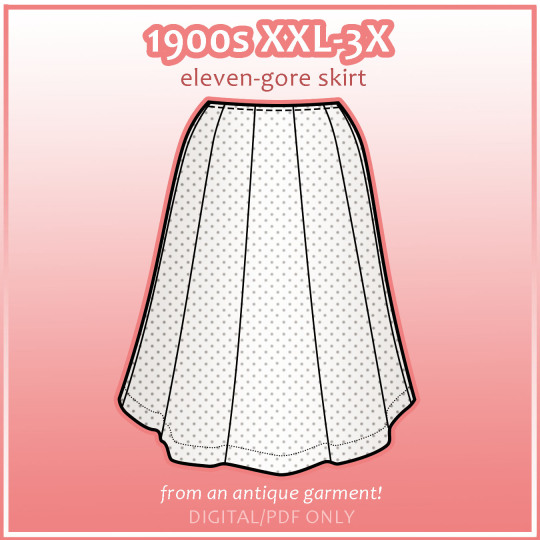

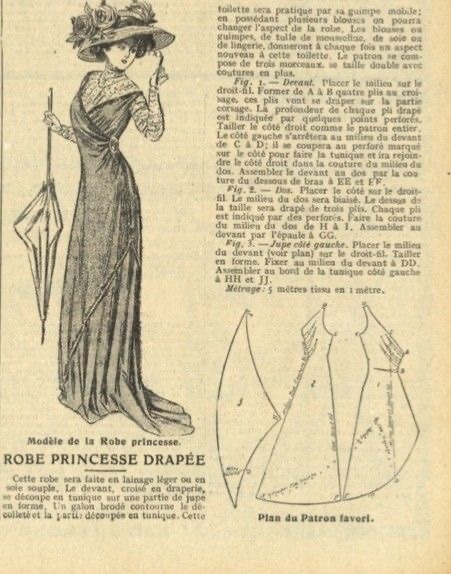
The two newest patterns that I have in testing right now, based on antique plus-size garments...
c. 1909 eleven-gore polka-dotted cotton day skirt
The size as-is is a 37”/94cm waist with 60”/152cm+ hips, and ungathered it’s a 46.5”/118cm waist. It was made for a very short person, so I’ve provided the original length (32”/81cm) as well as an extended version (40”/102cm) on the pattern for whatever you need. On Etsy here.
c. 1915-17 silk day dress with beading
This has a 60” (152cm) bust and 45.5” (116cm) waist and was made for a relatively tall person. On Etsy here.
Both are now up on Etsy!
51 notes
·
View notes
Text

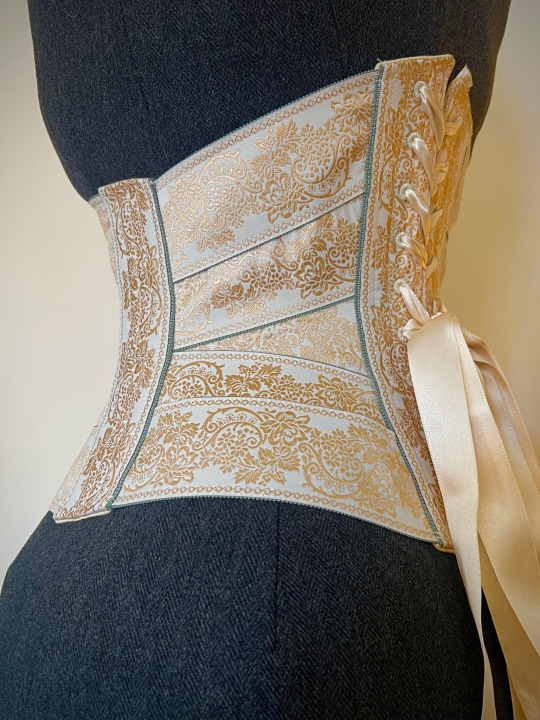
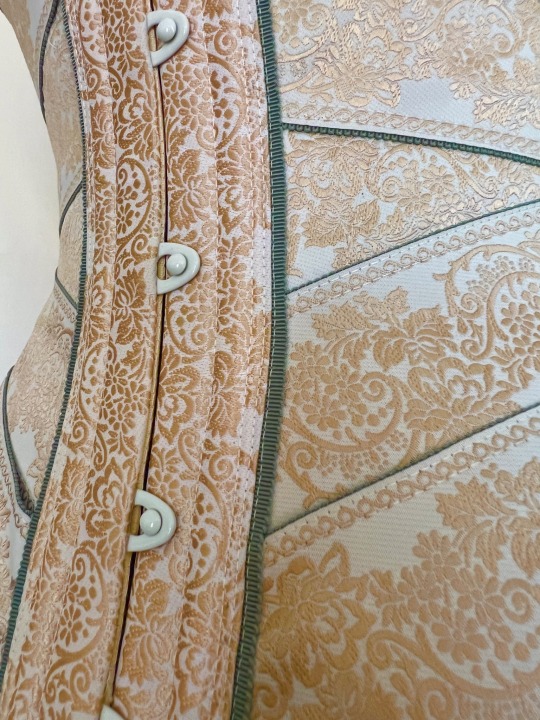
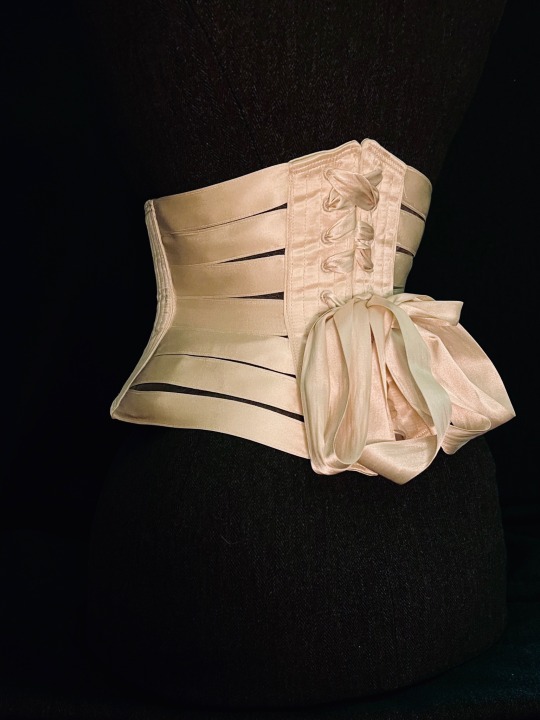
Helga Sinclair
Edwardianish ribbon corset, 2023
Jacquard ribbon mounted on grosgrain ribbon
#project: ribbon corset#project: Helga Sinclair#media: Atlantis#Edwardian#historical dress#historical costume#cosplay#poetry in costume#sewing#I have half a making post written but oh my glob how has anyone been posting on this site?#I think I last regularly posted around 2016/2017 and it is a NIGHTMARE#Tumblr dot com keeps eating my draft swapping my pictures around eating my pictures eating whole paragraphs reformatting AASRGGGHHH#I’m too tired for this#my curves are more secure than my dress form here (my new one!) so#she’s not quite sitting right here
330 notes
·
View notes
Text
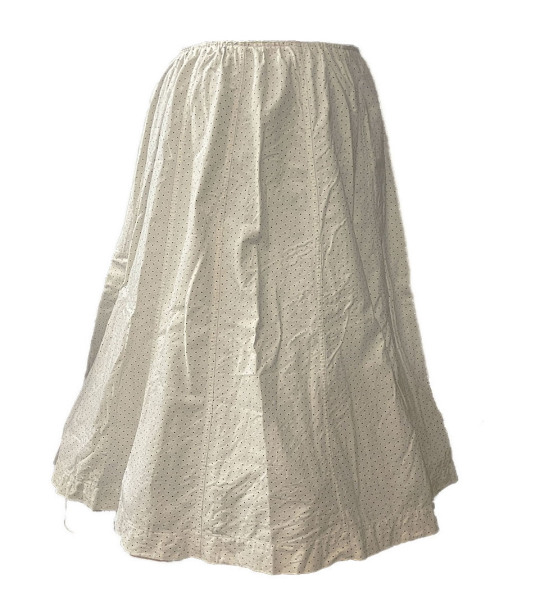
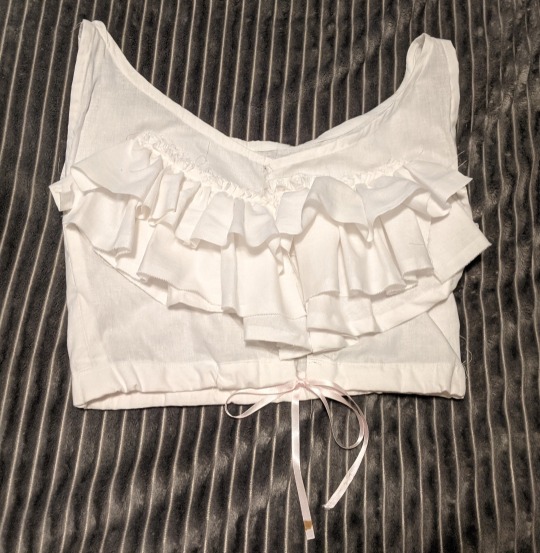
I decided that since I have all my under garments I'd make a post with them all!
Starting with combinations!
Then we have my corset ( I didn't make it I purchased it at a college theater costume sale for $6 and it appears to be some part of the Edwardian period
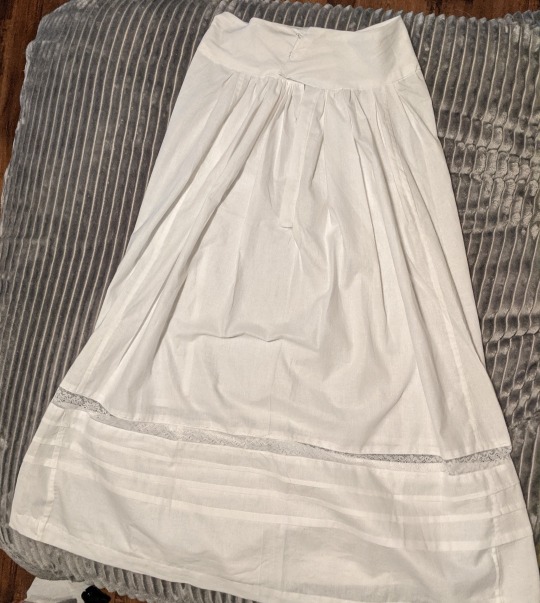
Then my corset cover
More in depth of how it was made (which isn't detailed much but gives an idea)
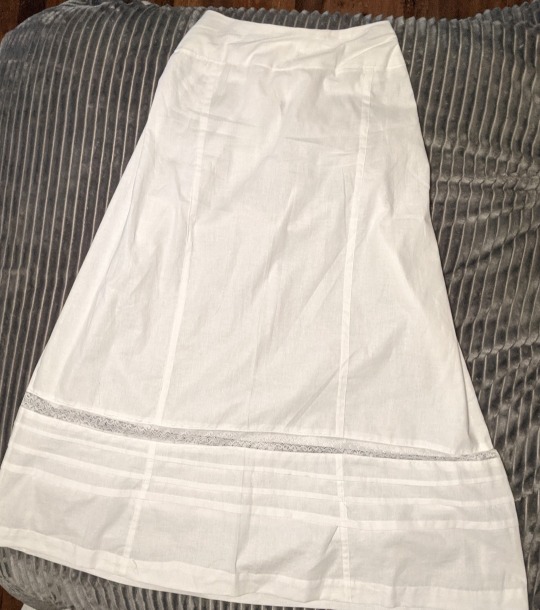
And lastly my petticoat!!!
23 notes
·
View notes
Text
Update 6: its done!!!!! Sort of.
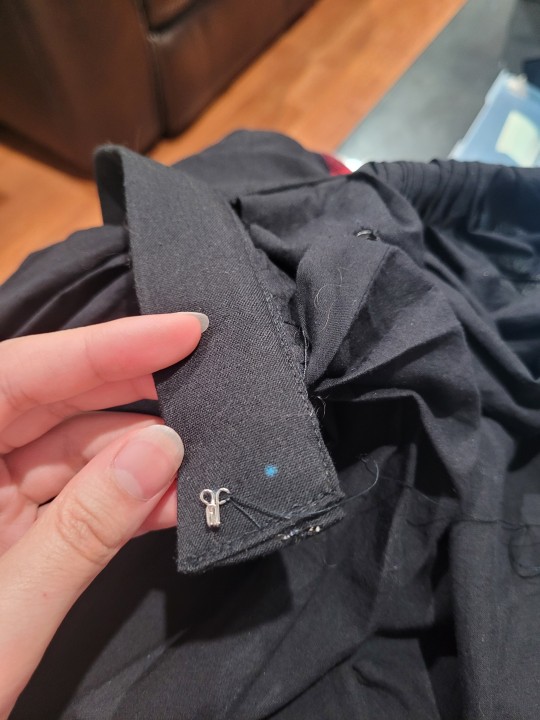
I put in a new waistband, its kind of shitty but it is made of much sturdier stuff than the thin cotton voile it was previously. Im not sure what type of fabric it is, some kind of thick wool blend i think. I added a layer of thin canvas in between the fold to help it stand up because the voile waistband would fold when i bent over.
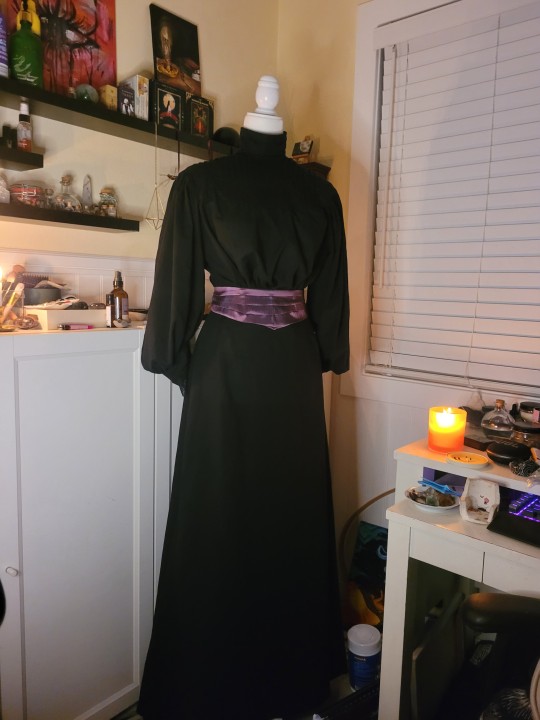
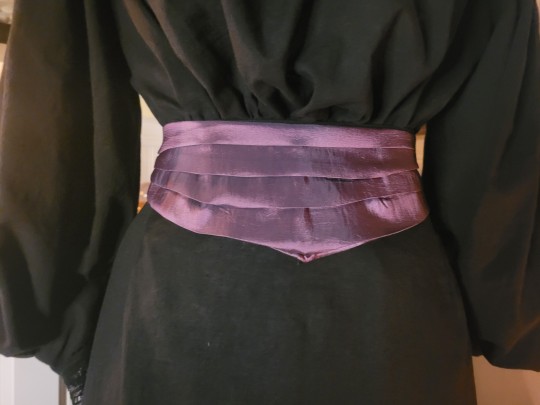
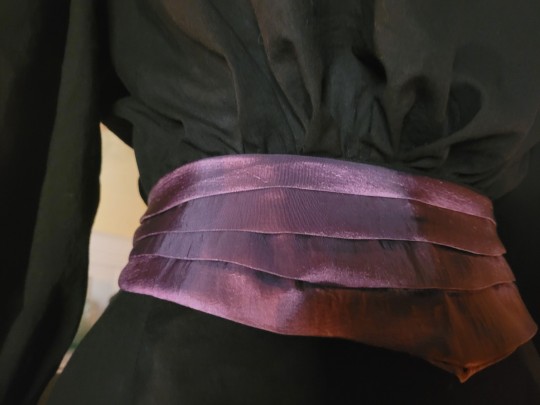
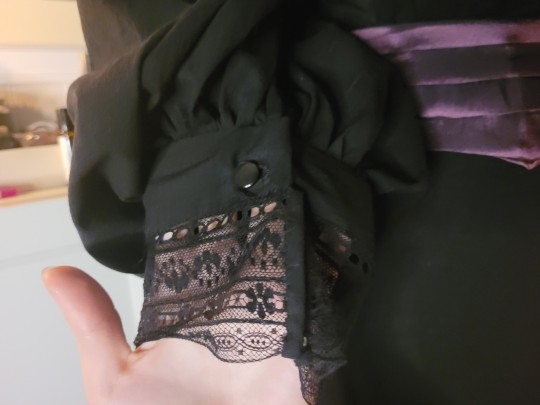
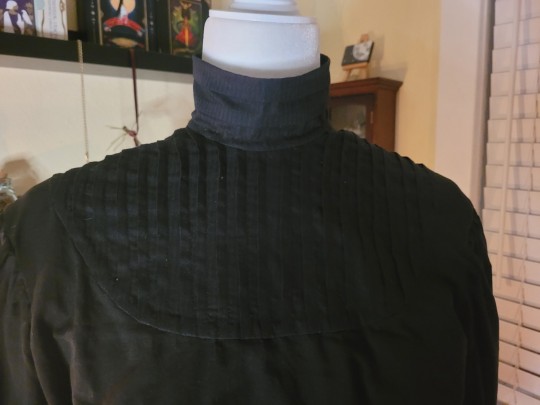
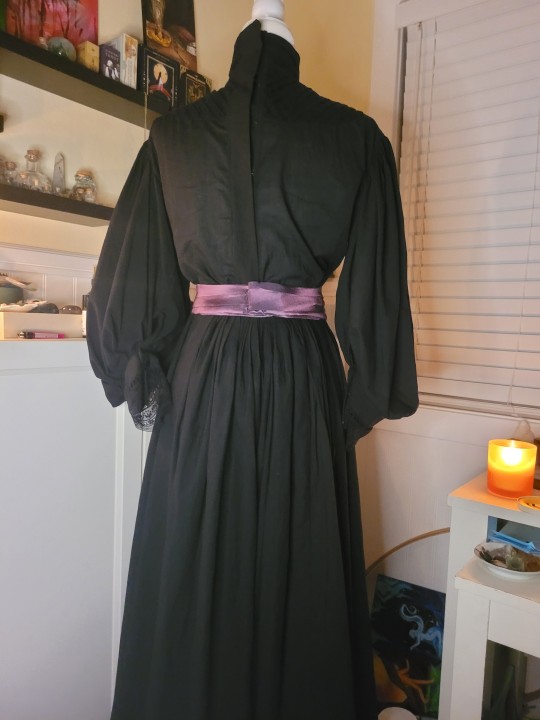
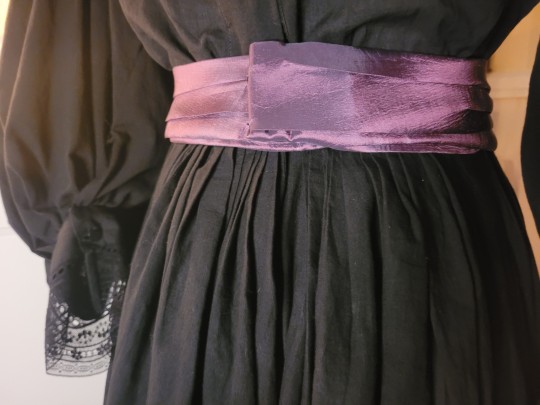
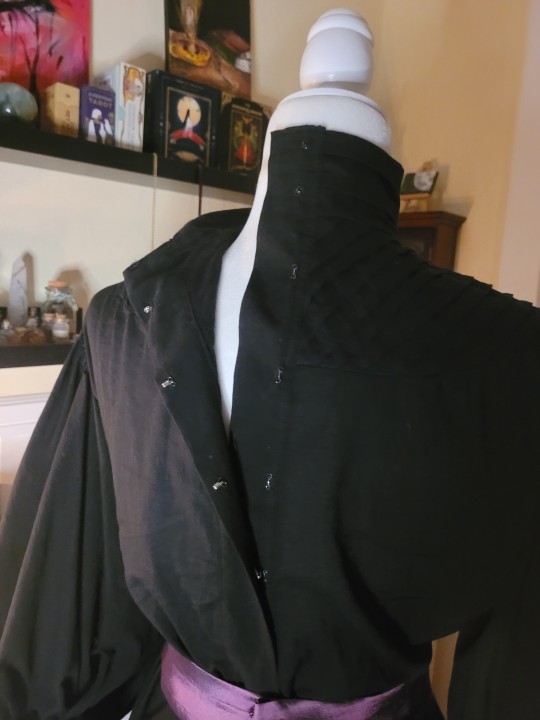
The belt/sash closure looks a bit chunky but thats just because my dress form's waist is a bit too large and it bunched up weirdly. You can sort of see the outline of the bones because i put them in very lazily. Overall im pretty happy with how it turned out!! I will definitely be incorporating each individual garment into my everyday wardrobe.
Link to the finished video coming soon!!
Date: 5/7/24
#historical costuming#fashion history#historical dress#1900s#victorian dress#early 1900s#edwardian era#victorian mourning#edwardian#sewing#historical fashion#dress history#edwardian fashion#fashion design#victorian era
17 notes
·
View notes
Text
#historical fashion#fashion#historical#history#historical clothing#historical dress#long dress#victorian#victorian era#textiles#edwardian costume#historically#historical costume#historical pattern#sewing patterns#patterns#artwork#crafts#textile
22 notes
·
View notes
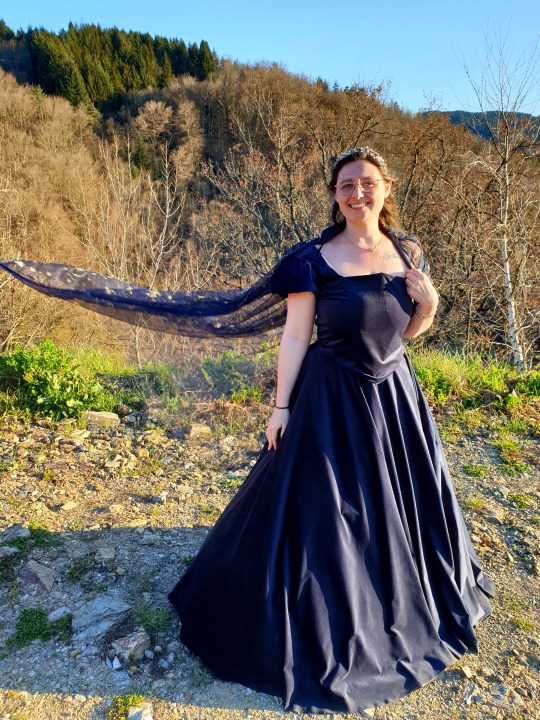
Text
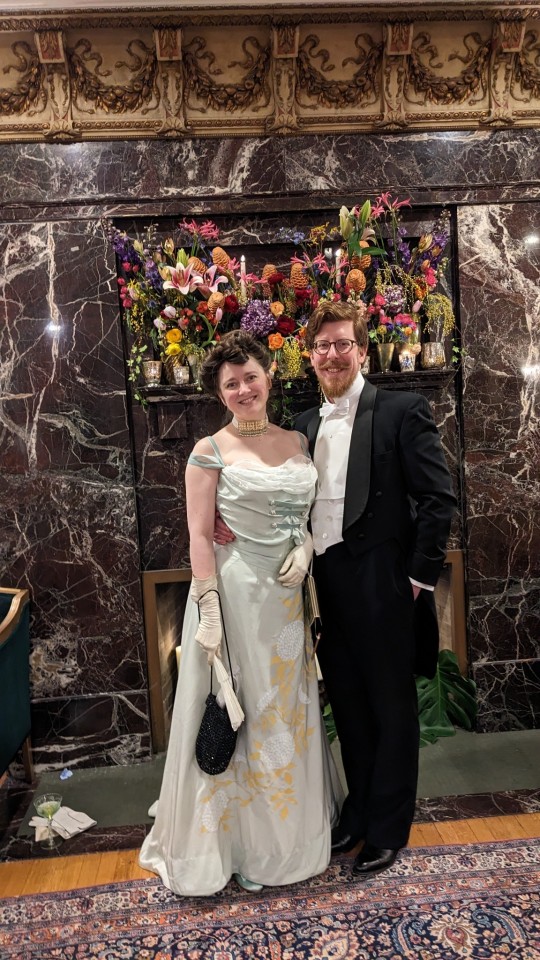
We had a lovely night at the ball! And here's the (almost) finished dress! I also made Husband's waistcoat and tie. I was still sewing the day of the event and we arrived very late. 😆. But it was totally worth it. (The drink in the lower left corner is a cocktail made with absinthe and champagne, and was garnished with fresh violets)
110 notes
·
View notes
Last Seen Blogs
titaneventing
Titan Eventing

quadrantmodelquotes
Quadrant Model Quotes from 2013 Lectures

cardioa
Untitled

purble-moth
Untitled

sokaktakispreyy
Sokaktaki Sprey