#like I could talk about that for 5 ever
Text
Love! - digital sketch - 1 hr - Aziraphale, Good Omens (TV)
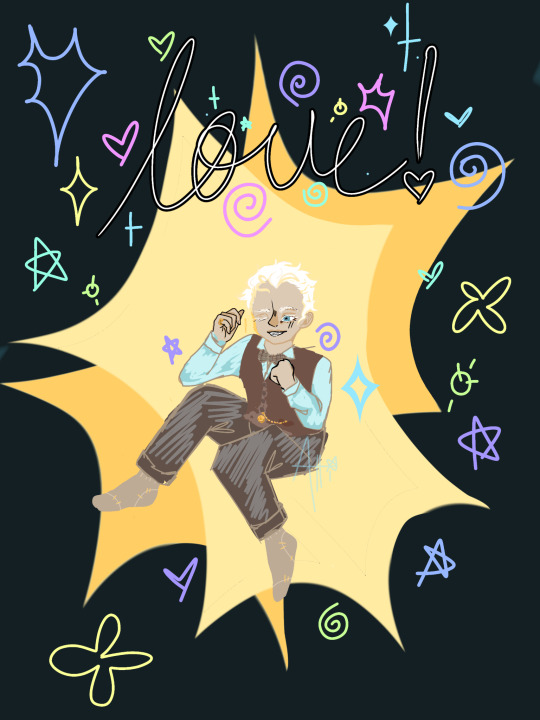
Based on this Original work also by me, entitled Beat of A Star

The original piece was meant to show how I feel like my heart is constantly bursting and overflowing with love and empathy and compassion & it has nowhere to go. Love! Was meant to evoke something similar but in a more positive light & I feel like that reps. My own personal growth (viewing it as a struggle, burden etc. vs. viewing it in a positive light) bc I teeter on that line of autism w/ the struggles with empathy, I happen to feel far too much of it & feel with such volatility that it frankly scares me sometimes.
Dont forget 2 reblog for the tumblr economy
#good omens#aziraphale#aziraphale good omens#autistic coded character#my art#autism#autistic#feelings#emotions are weird#like I could talk about that for 5 ever#but we won't get into it#not right now#artist#digital art#coloured pencils#can you tell I'm not a digital artist#bc i can
7 notes
·
View notes
Text
Just curious what the average level of personal investment in these sorts of things is. Like, how much do people usually get into silly stuff like this their friends ask of them? etc. etc. Which I know, only surveying a small sample on a very specific website means I'm not getting an exact average idea lol, but.. curious nonetheless .. Maybe reblog for bigger sample size but also this is not very serious at all/not worth a call to action gbhjbhjb
#which I know this could be context dependent like.. maybe you'd normally dress up but on a week that#you feel sick you wouldn't or etc. etc. - but I mean.. GENERALLY. in the most general average scenario#where you have the average amount of health and free time that you always do. etc. just based on your personality#and level of investment in these things - what on AVERAGE are you most inclined to do#also of course assume they communicate with you ahead of time and are not like planning a part last minute#like 'throw together costume in 5 hours and show up tonight randomly' or etc. I would hope that if we're going with the#AVERAGE of things - most people's friends have better communication skills than springing entire parties#on people last minute lol#assume you have like.. a few days-a week or so to prepare. however ealrly people usually start talking about#birthdays. In my experience it's usually one or two weeks ahead of time. Like 'oh next weekend' or 'oh two weeks from now' etc.#ANYWAY.. feeling a little Sick again of course but still trying to get some photos or something posted#AGAIN i promise I am not going to exlcusively post polls and ntohing else forever hgkjgnekj#I just really really love the ability to post polls and have always my whole life been obsessed with surveying people#I used to think I wanted to do that as a career somehow like.. be one of the people that does psychological interviews#or produce interview asessments for a company or etc. etc. I am always the one friend in the group thats giving out custom made#surveys or asking for other simialr stuff (did you ever take an mbti quiz? how about enneagra#m?? oh yeah I know they're not really scientifically valid or antyhing but like... DID you take them?? huh?? did you??please?? ghjj)#I simply cannot resist.. posting a little poll every once in a while.. as a treat#whilst I still fall behind on like actual content and costumes and stuff gbjhbjh#New poll adventure should be not as much of a wait as the last one was though since I already have the writing#for it really. I just have to do the ms paint sketch. hopefully no unexpected other health issues will get in the way#*** *** ***#< (anytime I do these three star patterns it is an ocd compulsion not me bleeping out words or something just ignore it lol)#(it means something secret in my evil brain just pretend you do not see it. significant only to me)#BUT YEAH.. ... poll... what type of costume party atendee are you?#:0c
692 notes
·
View notes
Text
crashes ur board meeting n drags u out by the collar but its fine bc youre the one always saying shit like "im looking for people i can use" ok lol. get used idiot
#just tracing like. the sequence of events that had to take place in order for this to come to pass#1. natori and his shiki are skulking around homura stalking ban. possibly it's just his shiki and natori is elsewhere.#either way 2. natsume shows up and natori learns about it either bc he witnesses it or a shiki comes to tell him#3. natori gets in his little richard scarry apple car (this is my mental image for some reason) & fucking. BOOKS IT to the matoba compound#4. goes inside. presumably matoba lackeys try to stop him bc their boss is in an important meeting but somehow he gets past them#(possibilities here are v fun to think about. maybe natori does this all the time and they're used to it. maybe he's never done it before#but they're all on orders to let natori in if he ever shows up. maybe natori convinces them he's supposed to be IN the meeting#which is great because it sounds like some important clan thing so what is he in the clan now??)#5. interrupts matoba's meeting like 'i need you' and matoba's like 'bye everyone whatever this is is more important'#6. they get in natori's comical apple car (again the apple car is not canon don't worry about it)#& natori drives like a bat out of hell back to homura. (SOURCE: matoba is so scarred he refuses natori's offer for a ride later)#i wonder what they talk about on the way there? because they don't talk about why natori is stalking ban until much later#so they must be busy talking about something else. but what??#that or they're both too distracted by all the near-death experiences from natori's crazed driving lol#natsume's book of friends#natsume yuujinchou#homura cats arc#horrible exorcists#my posts#sidenote i feel like that page at the end where both matoba and sensei refuse natori's offers of a ride is really funny because#sensei's reason is that it will take too long. but sensei did you know natori drives like a speed demon? think it thru...#also like. how long did it take him to decide to involve matoba? was that his backup plan all along?#also it's pretty lucky that he found matoba at all considering he could be anywhere...the matoba have like 15 houses...#he has matoba's schedule memorized lol#natori sparkling to the assorted clan members in the meeting: sorry ladies and gentlemen i just need to borrow this~#*throws matoba over his shoulder and fireman-carries him to the parking lot*
62 notes
·
View notes
Text
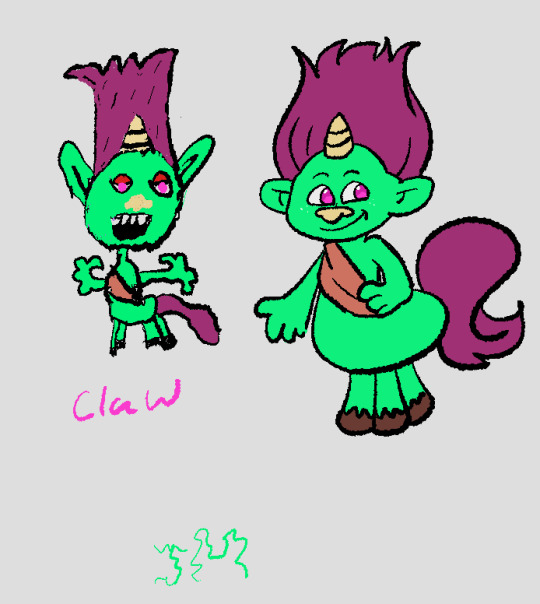
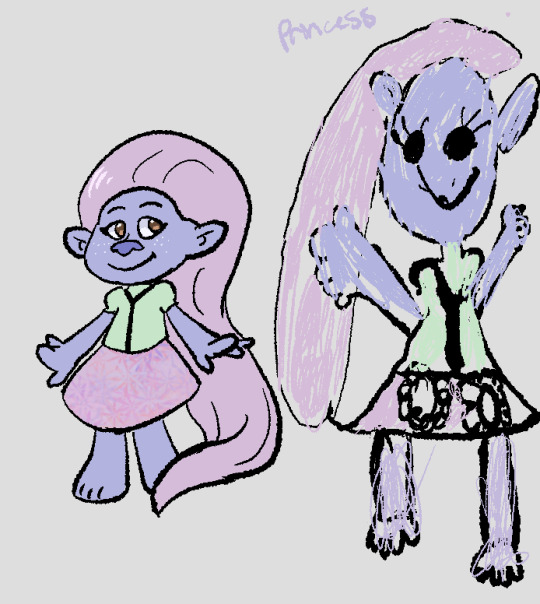
My cousins made their own troll Ocs and I drew them in my style.
They were very excited about it
#my art#not my art#both#trolls#dreamworks trolls#they had a lot of fun making these#i actually really love the color palette for princess i think my cpusin did a very good job on that#claw is something else#he is a unicorn troll#neon green was an interesting choice but hey claw is an interesting guy#is it obvious idk how to draw country trolls lmao#ever since i told them i also liked trolls we have had our own little club#im their person who they can talk to about it#they will also just sit and ask me to draw tiny diamond and guy diamond over and over and over and over and over again#they really like tiny diamond#but hey i love those little guys so i draw the trolls they demand of me#they also asked me to draw poppy and branch so they could color them#i still have to finish my viva coloring page for them#the younger of the two who made princess is really good at color picking and color matching#she colored poppy without a ref and its p accurate to her colors#the older one who made claw used the ref for every color but he got pretty close when he tried to guess#the older one also misunderstood me when i said id been practicing art since i was 5 and thought i was this good since i was 5#he was very depressed for about 15 minutes#it was really funny but dw i assured him that was not the case#but like for those 15 min he did not believe me#even his sister was like 'nono you didnt hear it right' but he was already in the emo zone#he was fine later tho and continued on making his troll#and also proud teacher moment but i had taught princesses creator some art techniques off handedly#not expecting her to remember any of it but then she did and apparent shes been using it ever since#im like omg i actually taught another human bsing something its insane
25 notes
·
View notes
Text
Hello there, I am a space nerd, a fact I’m sure no one guessed from the fact that I go by Stars on the internet. I am here to explain how the moon works, because I think it’s cool and also something that most people don't know. This is mostly an infodump just for fun, but may also be vaguely useful for artists, writers & stargazers.
By “how the moon works,” I mean that although pretty much everyone knows about the moon’s phases, not everyone really gets how they affect things like when & where the moon is in the sky. See: the common idea that the sun is in the sky in the day, and the moon is in the sky at night. You know this isn’t strictly true if you’ve ever seen the moon in the sky in the daytime, but do you know how it actually works? If I gave you a moon phase and a time of day, would you be able to tell me whether the moon was in the sky or not?
I am here to (hopefully) explain how you can do that! With scribbly diagrams! Please join me under the readmore if you would like to come to my TED talk.
First of all, to avoid any accidental curse-of-knowledge assumptions on my part, let me define some terms!
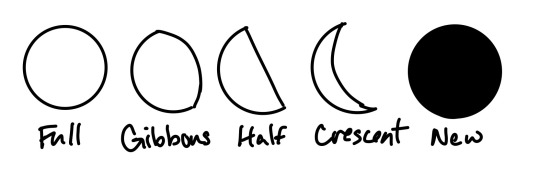
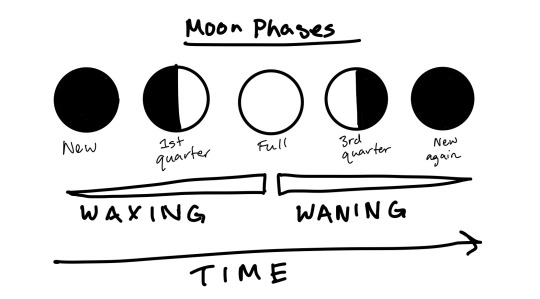
First off, the phases of the moon, which you probably know most of, but bear with me. A “full moon” is when the moon is fully illuminated and appears as a circle in the sky. A “gibbous moon” is when the moon is more than half full, but not completely full—it appears large and roundish, but not a circle (not everyone knows the name for this one). A “half moon” is when the moon is half illuminated and appears as a semicircle—this one has some other names that I’ll get to in a second. A “crescent moon” is when the moon is less than half illuminated and appears as a concave curve. A “new moon” is when the moon is completely dark from Earth’s perspective and can’t be seen in the sky.
Also, “waxing” is when the moon is transitioning from new to full, or getting bigger in the sky, and “waning” is when the moon is transitioning from full to new, or getting smaller in the sky.
Speaking of “half moon,” I frequently confuse friends by calling this a “first quarter” or a “third quarter” moon. Those names refer not to the illumination of the moon but to the full cycle of phases. If you think of the moon phases as split into four quarters, starting from zero at a new moon, then halfway to full is 1/4, full is 1/2, halfway back to new is 3/4, and then we’ve reached the end/beginning of the cycle with another new moon. So one of the half moons is a first quarter moon, and the other (with the other half illuminated) is a third quarter moon.
This is where I have to add a disclaimer—I am in the northern hemisphere, and I am familiar with astronomy in the northern hemisphere. If you are in the southern hemisphere, to you, I am looking at the moon “upside down.” Yes, really. If you’re using my diagrams, flip them upside down. I’ll try to be clear when I’m talking about stuff that flips between the hemispheres, but it’s something that I struggle to wrap my head around too, so apologies if I’m confusing or miss something.
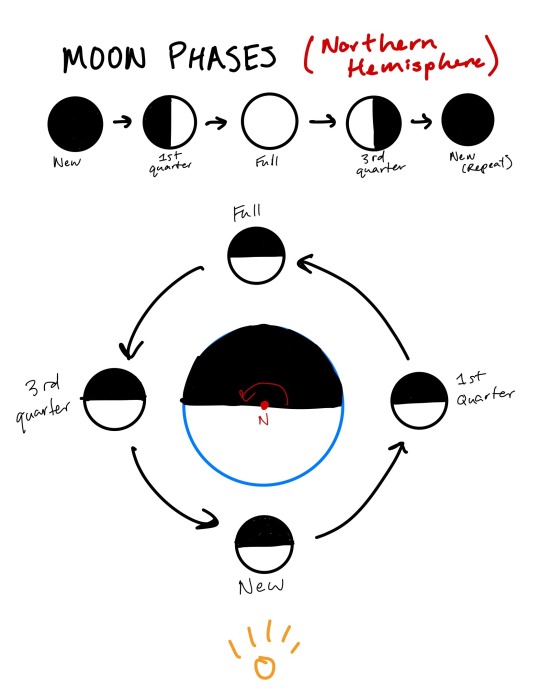
So, here’s a diagram of the moon phases to show you the difference between first and third quarter moons, but if you’re in the southern hemisphere, please flip it over to see what they would look like for you. (The chronological order still goes in the same direction as the arrow, the moon itself is just the other way in the sky.)
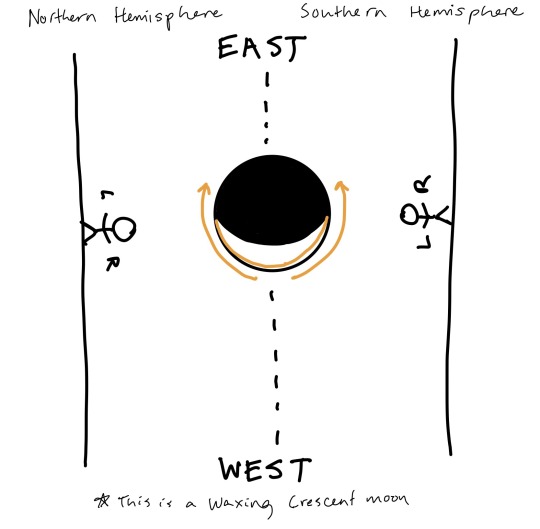
The fun trick I was taught to remember which way the cycle goes is “light from the right.” (Southern hemisphere people, you’ll have to flip this one.) Light, or shadow, moves from the right edge of the moon to the left. So if the moon is a crescent and the right edge is lit up, it’s waxing, or moving towards full. If the moon is a gibbous with a dark right edge, it’s just past full and will be waning towards the third quarter over the next few days. If you look at the diagram above (and imagine the crescent and gibbous phases transitioning in between), this might be easier to imagine.
Like I said, for the southern hemisphere this would actually be “light from the left.” If you’re near the equator and the moon is overhead, you could use “light from the west,” because that’s secretly the real rule. Another thing that’s useful to know for stargazing—the moon, sun and planets follow a path in the sky called the ecliptic, which is roughly over the equator. (Not exactly—it wiggles around relative to earth’s surface, because of the tilt of the earth’s axis that causes the seasons, but it stays near the equator.) If you’re standing in the northern hemisphere, the equator is south of you, so the ecliptic is also in the southern part of the sky. When you look at the moon, it will always be in the south, so the west-facing side of the moon will always be to your right. Likewise, if you’re in the southern hemisphere, the moon (and sun, and planets) will always appear in the northern half of the sky, so west will be to your left. Light moves across the moon’s surface from the west to the east.
Now you can impress people by looking at the moon and saying, “Oh look, what a lovely waxing gibbous!” (I don’t actually know if the is impressive, but I do it all the time. For bonus points, get an app on your phone that tells you the phase of the moon and check it frequently so you can plan when to stargaze. Then you can casually mention that the moon will be full in a couple days when it’s not even in the sky, and maybe people will think you’re a werewolf.)
Now that I’ve explained the moon’s phases, I get to explain how they’re related to the time and place that the moon is in the sky. See, most people (I assume) don’t think twice about things like, say, a book describing a crescent moon in the sky overhead at midnight. But that actually can’t happen! And it has to do with the moon’s position in the 3D solar system, and how that maps onto our sky. This is kind of hard for me to explain without a lot of 3D hand gestures and pointing at the sky, but I’m gonna do my best to show it in two dimensions.
So, most people probably know that the moon’s phases are caused by the sun’s light illuminating half of the moon, and since the relative positions of the moon, sun & earth change throughout the month, the half that’s illuminated moves around the moon and changes how it looks from our viewpoint. So, a very basic rule: the side of the moon that’s illuminated is the side that’s facing the sun.
So, when the moon is full, that’s because the side that faces us is also facing the sun. This means the sun is directly opposite the moon. Here’s a very scientific diagram:
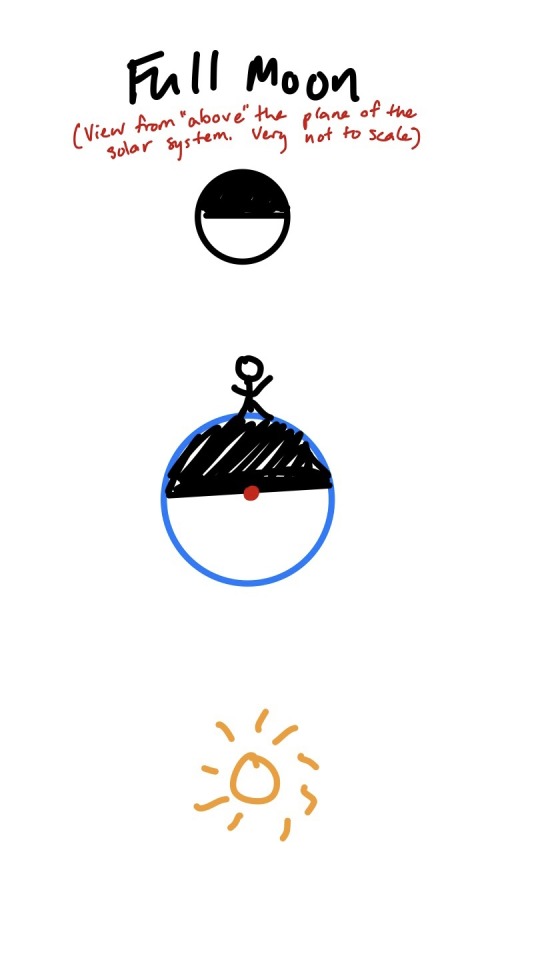
In case it’s not clear, this is a “top-down” view of the solar system where the moon, earth and sun are all in the same plane (in this case it doesn’t matter if we’re looking at the north or south pole, the positions would look the same). It’s also obviously not to scale and very simplified, but the point is to demonstrate that the moon is opposite the earth from the sun.*
The little person on the earth is of course spinning around as the earth rotates once per day. But at this point in the lunar month, you can see that when they are on the side of the earth where they can see the moon, they are also on the side facing away from the sun. When the moon is full or close to full, it’s opposite the sun—it rises around sunset, sets around sunrise, and is at its peak in the sky around midnight. This is how lots of people tend to think of the moon rising and setting, but it’s only true when the moon is close to full!
If that doesn’t make sense, here’s a diagram of when the moon is at the opposite point in its cycle, a new moon:
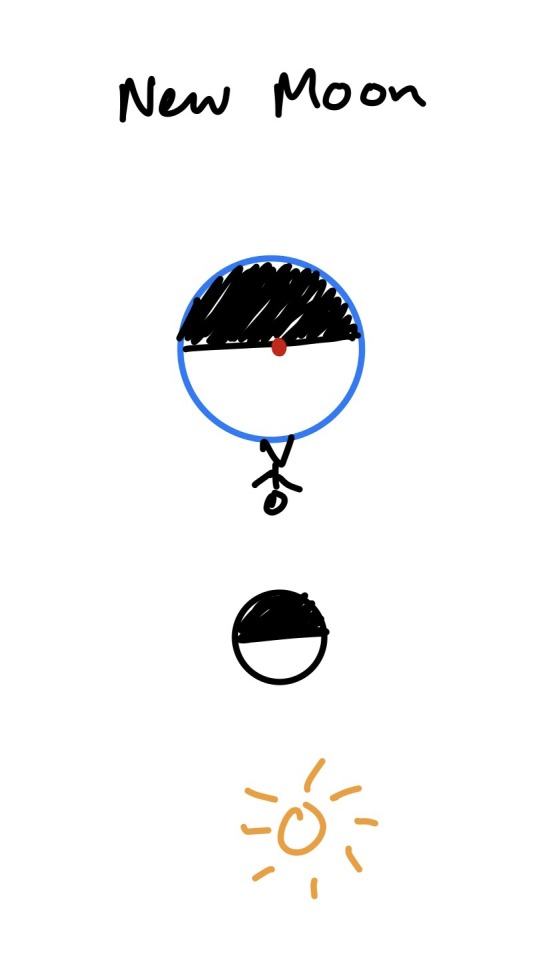
When the moon is new, the side that faces the earth is dark, which means the opposite side is facing the sun. The moon is on the same side of earth as the sun is. The little person spinning around the earth won’t see the moon in the night sky, because the moon is close to the sun in the sky,* and it’s actually rising in the morning and setting in the evening at this time of the month! You can’t easily see the moon when it’s new, but it might be visible a few days before or after this as a crescent. You’ll only see a crescent moon in the sky during the day, or close to dawn/dusk—it will be close above the horizon where the sun has just set or is about to rise. (The light edge faces the sun, so if it’s near the horizon in twilight sometimes it will look like the light edge is actually pointing down, with the tips of the crescent pointing up in the sky.)
*A side note on eclipses: My diagram is oversimplified! The moon, earth and sun aren’t actually all in the same plane all the time, they’re slightly misaligned. So even when I say the moon and sun are “directly” opposite each other, or aligned, they aren’t lined up perfectly enough to cast shadows on each other most of the time. When they do line up perfectly at the right time, that’s when you get a solar eclipse (when the moon is new) or lunar eclipse (when the moon is full).
Okay, so when the moon is full it’s in the sky at night, and when the moon is new it’s in the sky during the day. What about in between?
This is where it gets a little confusing, especially for those of you in the southern hemisphere, who are going to have to flip everything I say. Apologies in advance, but it kind of hurts my head even to explain how this works in my own half of the sky.
So, when the moon is half-full, at the first quarter and third quarter of the phase cycle I explained above, the sun’s light is coming (from our perspective) from the side. The moon is ninety degrees away in its orbit from full or new, and the sun’s light is effectively perpendicular to our viewpoint, instead of parallel. This time it matters which way we’re looking, so these are a top-down view from the northern-hemisphere side. If you’re in the southern hemisphere, I think you can flip which is the first & third quarter to make this accurate.
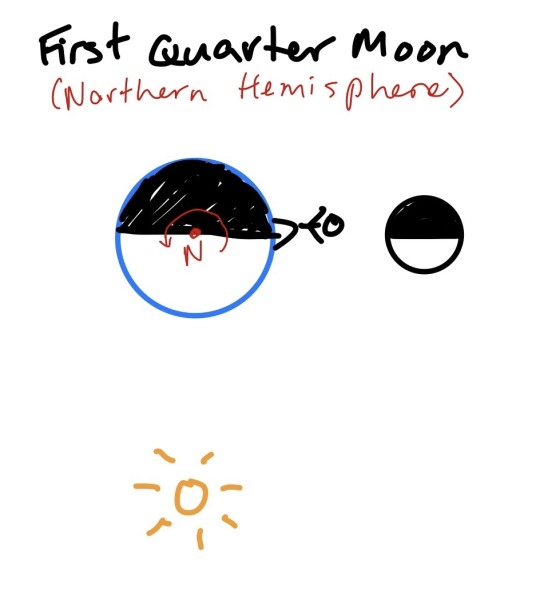
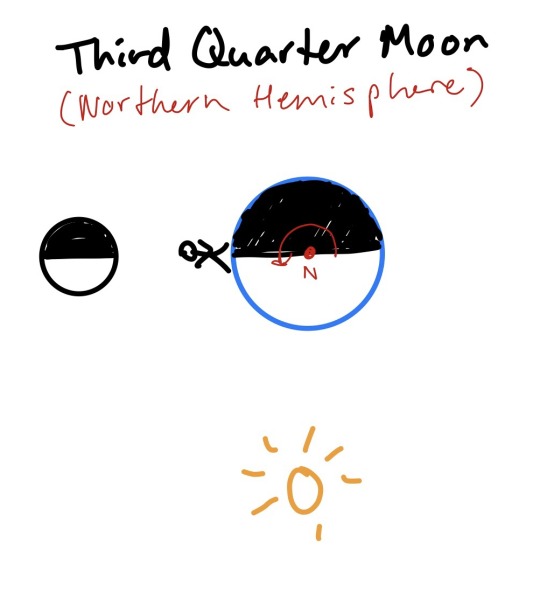
As you can see, when our little person is spinning around the globe, they’re going to be seeing the moon high in the sky right around the line between night and day. From a northern perspective, the earth spins counter-clockwise (vice versa from the south), so if you picture the person spinning around their little earth, you can see that the first quarter moon is going to be visible when they’re spinning from light to dark (sunset) and the third quarter moon is going to be visible when they’re spinning from dark to light (sunrise).
Bonus fun trick: If you remember the rule of “light from the right” in the northern hemisphere and how that determines the order of the phases, and look at these diagrams again, you can figure out which direction the moon orbits the earth from this viewpoint. (This is, in fact, the only way I can remember which direction the moon orbits the earth, despite being far more complicated than just memorizing it. If you’d like to make a game of it, I’ll put the answer at the bottom of the post).
Remembering how this looks from this top-down floating-above-the-earth perspective is hard, but you don’t really have to. I only explained it so it would make sense when I went back to my earlier visualization, from when I was explaining how “light from the right” works. I’m a very spatial learner, and I like picturing things relative to my own body, so this is how I remember when the different phases of the moon appear in the sky:
Imagine you’re standing, facing the ecliptic, where the sun and the moon travel through the sky. In the northern hemisphere, you’re facing south, with east to your left and west to your right. Imagine that the sun has just set, falling beneath the horizon to your right. Imagine that the moon is full, and hopefully I’ve explained well enough that now you know where it will be—cresting the horizon at your left. Imagine the opposite too—the sun is rising in the east at your left, as the full moon sinks in the west at your right. The new moon’s position, if you’d like to visualize that, is effectively the same as the sun.
Now, the difference between the two half-moons. Light comes from the west—in the northern hemisphere, your right—so when the right half is illuminated, it’s the first quarter of the lunar month, waxing to full, and when the left half is illuminated, it’s the third quarter, waning to new. One is high at dusk and one is high at dawn. Which is which?
You’re facing south. Picture a first quarter moon, right side lit up, at its peak in the southern sky. The light side is always facing the sun. Where is the sun? It must be to your right, touching the horizon in the west, setting. The first quarter moon is in the sky before, during and after dusk.
Picture a third quarter moon, left side lit up, at its peak. The light side faces the sun. The sun is to your left, touching the horizon in the east, rising. The third quarter moon is in the sky before, during and after dawn.
When I imagine this, I’m standing on my back porch, where I often go outside and stargaze. My telescope is small and one of the few things it can see with any detail is the moon. I want to be able to look at the moon just after dark, without having to stay up too late—and this memory device, of facing south and imagining the sun at my right hand to the west, is how I remember that the first quarter is the best time for me to observe the moon. It will be high in the sky at sunset, easy for me to see over the houses and trees.
If you remember that the moon waxes and wanes from the west (right in the north, left in the south), then you can fill in all the gradations of crescent and gibbous moon between the four main quarters. (As an example, if I wait a few days past first quarter to go outside and look at the moon, it’s waxed into a gibbous moon and it rises later in the evening, peaking in the sky closer to midnight. Another example: a waxing crescent is between a new moon and first quarter, so it will trail behind the sun and be above the horizon in the southwest at sunset.)
I hope that all of this makes sense and is useful to someone, whether for figuring out when you can observe the moon and where in the sky to look, or for thinking about how to place it in the sky in your writing and art. If nothing else, I hope I have brought you entertainment, and/or ruined the way the moon works in Minecraft for you forever. (It rises and sets directly opposite the sun!! Even when it’s a new moon!!! Light doesn’t work like that!!)
And finally, if you were trying to guess, the moon orbits the earth counter-clockwise if you’re looking down from the northern side.
#stars has thoughts#space#the moon#amateur astronomy#thank you for coming to my ted talk#and thanks discord friends for saying 'write the moon infodump post!!'#when i was like 'i wonder if i should write a moon infodump post'#i am a humble space nerd slash backyard astronomer with a 4inch scope#but explaining how i visualize and remember space stuff in simple terms is one of my favorite things to do ever#i could do a bunch of other posts about stuff like this. why venus is the morning star. how telescopes work (explain it like i'm 5 edition)#perhaps i will#undescribed#(i will try to come back with image descriptions later but i have already done all the explaining of visual concepts with words#that i can manage today. apologies)
72 notes
·
View notes
Text
I've reached season 5 on my CSI rewatch and I'm a few episodes past "Swap Meet", where a woman is murdered after attending a swing party with other couples from the neighbourhood. Near the end of the episode there's a moment that made me jump from my seat:
(Grissom walks up to Sara and takes the seat next to her. He's holding two cups. He hands her a cup of tea.)
[INT. POLICE DEPARTMENT - BRASS' OFFICE]
Erin Brady: Everybody fantasizes about other people. (She glances at Grissom.)
Even you, Mr. Grissom. A neighbor, a friend ... girl at the office.
[INT. POLICE DEPARTMENT - HALLWAY]
(The door opens. Paul Brady walks out of the hallway. Erin Brady walks out into the hallway. Sara is sitting in the hallway chair watching them. She watches as they meet and kiss.)
(Grissom walks up to Sara and takes the seat next to her. He's holding two culps. He hands her a cup of tea.)
LIKE!!!!!!!
Right after Erin ends her sentence with 'girl at the office', the first time Sara and Grissom meet again, he brings her tea. This might be an innocent interaction but to me it seemed like a nod to this relationship they have where both are into each other, know about the other's feelings, but can't/won't do anything about it (although Sara has kind of given Grissom an ultimatum). I don't know if it was intentional - I'm guessing it is, because I picked it up immediately. I might or might not have squealed in delight.
#csi#gsr#i'm very Normal about them btw i don't think about them 50 times per day or anything#need to talk more about these two here#because im obsessed about them in a Normal way#sara is like. my dream wife. i totally get grissom being in love with her for years and barely holding it together#i would not though#i'm 1000% sure she's bi. but the writers have been cowards so far#also she and i dress THE SAME. yes i love 2000s clothes so what#i could talk about her forever she's everything to me#and grissom. oh grissom. i also get why she's been in love with him forever#i mean what the FUCK went down in san francisco did they hook up and sex was so good it scared them#and now they have to live with that tension and they're scared of crossing that line#nah i'm guessing with these two they just REALLY clicked. like. they were an instant match and they knew it#but grissom didnt want to lose focus on work or whatever and they lived in separate states you know#but oh my god i totally get sara. grissom is such a silver fox. he's like one of the hottest old men i've ever seen in my life#you know what i 100% get tumblr sexualizing old men it's completely valid i'm in this now too#he has this LOOK. whenever he's angry at a suspect. and he looks angrily at them. i'm chewing on my keyboard just remembering it#and his smirks#AND THE WAY HE LOOKS AT SARA#im losing my mind#i love all of gil grissom but seasons 4-5 jesus fucking christ#ok enough with the sexualizing i love him as a character SO MUCH. he's absolutely fantastic#one of the things i love the most about him is that he doesn't judge people. whenever the team is confused about someone#or this persons' lifestyle#he's always trying to understand them and not judge them#like a true scientist he wants to understand the nature of things and people#and he's such a sweetheart i love him so much#like there are so many things i love about him i can't fit them all in the tags. same for sara#they're a perfect match for me
19 notes
·
View notes
Text
they werent lying that knuckles series barely has knuckles in it
#i pirated that shit Btw just so we're clear. also gonna talk about it a little bit in the tags#nothing too spoilery but also might not wanna read if you want to go in knowing absolutely nothing? idk#anyway he WAS a main character still he was present for a decent amount of the first couple episodes#but the amount of screentime he gets just starts dropping after that . hes barely there at all in the second half ???#and it feels like theres a lot of scenes mostly focusing on wade and his problems and not near as many for knuckles and his whole deal#overall it feels more like a wade show with knuckles in it than a knuckles show with wade in it. which sucks#and human characters having plot relevance isnt the problem here i dont mind human characters at all i think they can be really fun#its the fact that the human characters are taking over the story and spotlight when the show is called knuckles#and all the marketing makes it look like knuckles is the main focus#and i also would have preferred if they just went with a differnet character to be knuckles' human friend#because i dont particulraly care about wade. and the knuckles (and sonic and tails) i know would not be friends with cops </3#well at least the story wasnt knuckles training wade to be a better cop like a lot of people were expecting but thats like.the bare minimum#also aside from the issues relating to knuckles' screentime (or lack of screentime) i thought the ending was unsatisfying#regardless of all that though there WERE some parts i enjoyed or found kind of funny or whatever. because knuckles so cutesy as always#knuckles being a cute little guy is the most important part of the show actually#and i liked the parts with sonic tails and maddie even if they were only there for like 5 minutes#(i really wish those three had gotten more screentime. i feel like they could have easily worked in at least one more scene with them)#and its a minor thing but the opening sequence is cute. was honestly expecting just a title card or something#overall the show is just . kind of okay i guess. not the worst thing ive ever seen but still disappointing ? idk how to explain..#my expectations also werent very high in the first place#so maybe im being a bit more generous than i would have been otherwise. idk#and i definitely would not recommend this to anyone who already dislikes the sonic movies . youll probably hate this more#like people who thought the human characters got too much screentime in the second movie would lose their minds if they saw this
16 notes
·
View notes
Text
i also have been testing pngtuber+ vs veadotubemini and heres rhe fruit of a 49 layer model
#not all the emotes are shown in this lil demo theres one i keep forgetting where it is lmao#return of the coke heartthrob#i like that i made a pngtuber despite the fact that i am extremelt averse to being percieved in video formats. i used to stream more#n would do drawing streams specifically while working on projects but. ive been outta the game so long im not. too sure how i feel about#like. going back#i also did yt for like. 2 videos during lockdown to try and chronicle that whole art school mess and ended up exploding#this boy is not made for audio/video formats 💔#this is actually to test run how efficient i could be if i were to make pngtuber a commission option when i open those#this took 5 hours and all his psrts including clothing are separate and he has skin under there (i dont save the images like thst tho)#so i can swap out outfits n stuff n not have over 49 moving parts#the ONE issue with this lineless style though. is recoloring parts#i tried to do recolored mouths for s paragon model and it was a pain so i didnt rlly finish or save it.#i think i still prefer veadotubemini tbh. the blinks feel more natural in it than in pngtuber+#but i rlly like the bounce that pngtuber+ provides for just Talking#so. hit or miss#and before anyone asks no i will not be learning live2d vtubing and will not make a 3d vtuber#all of that is just too scary for me i respect everyone i see who does it WAY more now that ive like. LOOKED it over#scary shit. leaving that to the professionals#my 3d model is strictly for fun and because i like vr and vrchat. but i do not think ill ever make a vtuber in 3d.
8 notes
·
View notes
Note
realizing it is probably better to Use The Askbox For Its Intended Purpose than to attempt conversation in tags ^^; anyway. YEAH I WOULD LOVE FWHIP THOUGHTS. MY LITTLE GUY. MY DUDE. I LOVE HE. fwhip's throughline IS SO VERY MUCH AVOIDANCE YOU'RE SO RIGHT (haven't seen scott s1 so can't comment on that yet). feel free to elaborate on any of [fwhip's avoidance, the thing about fwhip instinctually shooting sausage, fwhip's relationship to the rest of the WRA]! (also, 13:05 - 13:12 on the twelfth episode in fwhip's e1 playlist, "MAKING PEACE and NEW SKIN!", has the moment with the bow, if you're curious)
Ooh yes, okay. I’m gonna go into Empires season one fWhip and the Wither Rose Alliance, how fWhip handled the rise of Xornoth and the proceeding corruption of Sausage, as well as Sausage’s curing, and the reconciliation of the WRA. Basically, I’m gonna talk about why I love the WRA so much, as well as highlighting some really interesting character moments for fWhip, and his overarching theme of avoidance. Welcome to my Ted Talk.
(If you’ve only ever heard about empires season one through osmosis, or never watched any of the Wither Rose Alliance POVs— fWhip, Gem, or Sausage, this might be a good way to kinda figure out what their deal is. I ended up explaining a lot of context for things, for the sake of saying what I wanted to say, so I feel like it’ll be comprehensive even if you don’t have much prior knowledge of season one.)
At the start of the season, fWhip and Sausage got pretty close pretty quickly. They were partners in crime, if you will, each often helping each other out with various schemes and pranks, such as fWhip helping Sausage get back at Pix for stealing Sausage’s villagers, [fWhip e9, 7:18], even before the proper foundation of the WRA [fWhip e10, 17:25]. Which is to say, they were very close, even before everything went down. After fWhip steals the Codfather head— which he seems to be happy to deflect partial blame onto Gem for, trying to avoid any accountability— the WRA together gear up to create a sort of trap vault, to secure the Codfather head.
The tentative rise of Xornoth began before the vault was constructed, with fWhip having an encounter with the demon happening just before the vault plans were solidified, in his episode 17. In that episode, he makes a log of things he knows about the demon, including a list of things the demon seems to like, which includes two notable entries— “I think [the demon] likes MythicalSausage? And, they really like the idea of the dragon being killed […] they really dislike the dragon. I think their goals are […] the death of the ender dragon, it really keeps coming back to that, and they keep saying, if we kill the ender dragon, they’re gonna be free” [12:43].
This, combined with the need to create a secret vault, would ultimately result in the items being hidden in the End. fWhip, tasked with finding the location of the vault, decides on hiding the items this way, saying “With everything, especially the demon being so scared? Of the dragon? I feel like leaving the Codfather’s head with the dragon, as like a final form of defense, might not be a bad idea. Because, then Jimmy will never be able to get it. He’ll never be able to get it. Nobody’s gonna be able to take out the dragon” [17:21]. He presumes that everything will be safe with the dragon, that nobody will be able to take it down.
Meanwhile, Sausage seems to have almost made friends with the demon. When fWhip visits him to bring him some firearms, he says “Xornoth is uh, is planning some things, it’s great! […] For the demon! For armageddon!!” [fWhip e17, 30:20]. fWhip becomes, understandably, somewhat nervous, yet even here he still seems to… deflect. He laughs, nervously, telling them to have fun, before heading home. fWhip flies off, saying “What a weird guy— people say I’m the evil one. Quite worried about him.” fWhip sees that something is… definitely wrong, with Sausage, and yet he still can’t bring himself to properly have that confrontation. He’s avoiding it, maybe just hoping that things will turn out alright.
Another moment right in this era that I think about often, that I’m not sure where else to put, is the moment where Sausage and Gem have a brief stand down, when Gem says that she’s the most powerful wizard on the server, to which Sausage bites back that she only is for now [fWhip e18, 32:40]. This happens right around when Sausage was starting to get corrupted, and Xornoth promised him great magical power— power that Gem had said he would never have. And I think often about this moment, in the context of the WRA as siblings, right— you’re fWhip, and you’re standing there as your younger brother and older sister are doing the magical equivalent of holding guns to each other’s heads, and just… how do you react? What do you even do? He’s not sure, which leads to that horribly nervous little song he sings, and it’s just… god. It’s so much. Caught in the middle of all the things he’s been trying to look away from, unable to do anything as the two most important people in his life are a hair away from taking each other out.
Finishing up the final preparations on the WRA vault, fWhip expands on his reasoning to hide the Codfather head in the End: “Right now, the only way out of the End is either by killing the dragon, or by jumping into the void […] there’s a little bit of a demon, on the server right now, who keeps trying to tell people to kill the dragon to unleash it upon the world. And, there’s one thing I’m pretty confident in: Jimmy does not want to free Xornoth. And, well, at this point, neither do I. So, if I put the cod head in there, I think Jimmy’s gonna find an ultimatum where he’s like, hm, nope, I can’t get it back. Or, if he does, and he wants to bring it to the overworld, he has to unleash the most evil thing, on this entire server, into the open. So, uh, hopefully he doesn’t do that. I think he’s smart enough” [fWhip e19 9:43]. He tells Gem about the plan later in that same episode, to which she agrees that it seems like a good plan. The idea is foolproof. Surely, Jimmy won’t risk the entire server’s safety, all for the cod head, right? It feels reasonable enough to assume that Jimmy wouldn’t willingly doom the world by releasing the demon, and that’s something that he banks on— it’s the perfect way to get rid of the Codfather head, in a way that Jimmy can never get it back. Surely, nobody would be so foolish. Problem successfully solved!
Right?
Wrong. But… it wasn’t just Jimmy.
The collapse of the Wither Rose Alliance, in fWhip’s episode 20 [4:10 - 7:28], is what finally forces fWhip to really face what Sausage has become. Xornoth demands a sacrifice to allow the WRA to escape the Nether, and Sausage, imbued with the power of Xornoth, takes Gem out quickly. As fWhip is left alone to face an invincible Sausage, Gem pleads with Xornoth: “I was sacrificed! You have to let fWhip out!” Of course, it’s to no avail, and fWhip is forcefully dragged out of hiding to face Sausage once more, being taken down. fWhip and Gem reconvene in Mythland, where fWhip hides Sausage’s dog Bubbles in the ground. Sausage returns, demanding to know where Bubbles is.
This moment, right here, is one I find very chilling. fWhip, a character who so often avoids direct serious conflict, one who worries for people on the sidelines, takes his stand. While Gem demands their stuff back, he says “I told you, [Bubbles is] gone until you get rid of the demon.” He knows this isn’t good, that Sausage is making a mistake siding with Xornoth. He tries the last ditch effort he can think of to get his little brother to snap out of Xornoth’s control.
It’s not enough. Sausage begrudgingly returns their things, and as the two sort through their jumbled items, Gem mutters that they can’t be allies anymore, after this. fWhip agrees, with a haunting certainty, “Sausage, you chose a side… you chose a side. […] We tried to save us all, you chose.” The two stand on the bridge in Mythland, opposite Sausage, and fWhip says it seems like their endeavor that day may have been their last, as an alliance. Sausage shouts for them to leave, and as they take off, Sausage swings, hitting fWhip.
Gem and fWhip fly off, without Sausage. As they make their way back to their lands, fWhip says, in a shaking voice, “Gem, it’s back to just you and me here,” to which Gem assures that they’ll be fine, that they’ll stand up for each other. He quickly accepts her words, saying “Yeah, it’s— it’s all good, it’s all good… it’s all good. He— he took the powers of the demon to kill us, there, that is— that is one too— one too far. That is— it’s one too far.” He’s afraid, having just firmly ousted one of his oldest allies— his own brother— from his oldest alliance, despite knowing that it was the only thing he could’ve possibly done. There was no other option… and yet, he barely gives himself a single sentence to essentially mourn that loss, before he’s trying to pave back on the mask of indifference— look away, avoid, avoid— it’s fine, he says, it’s all good, as if he didn’t just have to do the hardest thing he’s ever done in his life.
But it’s not over yet. Not even close.
(Continued under the cut. This got Really Long)
In that very same episode, a meeting is held [16:30 - 18:03] where fWhip and Gem happily tell the others about how they hid the Codfather head in the end. Everyone else is, of course, terrified. Scott tells them that Jimmy’s just gonna kill the dragon to escape, and that if Xornoth is released, it’ll bring about an eternal winter. Gem and fWhip, realizing they’ve messed up, devise a plan to prevent the Cod Alliance from killing the dragon— they need to heal it, keep it alive at all costs. Gem insists to everyone that they have to be a team, that even though they’ve messed up, that they can fix it.
It’s now or never. They head into the End.
[End scene from 19:20 - 22:57] fWhip immediately flies around to the main island, before stepping down onto the bridge in front of Jimmy. He begs, pleads for them not to do this. “Jimmy— Jimmy, I’m sorry. Jimmy— Jimmy— I’m sorry, Jimmy, we need to not kill the dragon here.” Jimmy demands the Codfather head, and fWhip immediately agrees to return it, reiterating that they must not kill the dragon. It’s this— this moment of being immediately and forcefully thrust into the face of the problem he caused, the problem he’d been trying to avoid, by hiding the Codfather head away in a place where he was sure that Jimmy would never dare to go. It’s this moment of fWhip pleading with Jimmy, to please, please not do this— they’ve lost so much to this demon, they can’t let this happen. He can’t let the demon be freed because of his mistake, he’ll do anything to prevent it from happening. The absolute, terrified resolve of a man faced with a problem he can no longer run from.
Jimmy says he’s gonna kill the dragon, barging past fWhip, up the main island. Chaos breaks out, and fWhip leads Jimmy down, beneath the portal frame. Jimmy says it better not be a trick, and he assures it isn’t, voice panicked. He returns the head, and begs them not to do this, in a soft, shaking voice, “We gotta keep the dragon alive, don’t— don’t let— don’t let Sausage kill it, don’t… […] Chaos, chaos is coming, we can’t— we can’t let the dragon die.” The fear, and absolute certainty… he can’t let this happen. Can’t let his mistake ruin the world.
Jimmy, uncertainly, says “fWhip, I think, whether you like it or not, this dragon is dying.”
fWhip desperately attempts to prevent the dragon’s death, to no avail. Chaos, as the two sides wage war in the end, with Jimmy caught conflicted in the middle. Sausage and Joey, corrupted by Xornoth, cheer for the carnage.
From the moment the Codfather head was stolen— perhaps even from the moment Jimmy started a confrontation with Sausage at all, all that time ago— it was too late. Xornoth would be released.
In a single episode, fWhip’s entire world is turned upside down. The WRA is shattered, the world is fast approaching an eternal corruption, and… he doesn’t know what to do. Gem says they can fix it, that she has the dragon egg, but… what else can he do but to just… shut down. He turns away from it— from Sausage, from Xornoth, from everything. He avoids it all— doubles down on the construction of his city, Eastvale, resolutely looking away from everything else.
With Xornoth freed, and Sausage well and truly corrupted, fWhip becomes extremely cold towards Sausage, to the point of being openly defensively hostile. The brother that he knew… that isn’t Sausage, anymore. One of the best examples of this can be seen in Sausage’s episode 32, 12:54, where Sausage and Pearl go to invite fWhip to their arena. fWhip answers the knock on his gate with a drawn bow, immediately and coldly asking what they want with him, even as Sausage still greets him as a friend. While fWhip is willing to speak to Pearl, he refuses to even entertain the idea that Sausage isn’t here to hurt him, shooting him a few times throughout the conversation, to the point where Sausage is sent away from the gate so that Pearl can speak to fWhip alone.
And… god, isn’t that just so much? You’re fWhip, and whatever thing is possessing the person in front of you, he isn’t your brother anymore. He’s not your friend anymore. He’s not safe, and you’re not safe with him here, even though… he used to be one of the safest people for you to be with. Not anymore. That’s not him, anymore.
And, it’s not unwarranted, with Sausage later saying to Pearl “I try my best around him, but sometimes I just wanna choke him out, Pearl” [15:24]. Yet… Sausage still greets fWhip as a friend, at first. Still tries to talk to him, insists that he’s “not evil today,” and… well, Sausage really did still care very much about the WRA, even while corrupted.
In Sausage’s episode 33, he opens by reading his last will and testament, knowing that soon enough he’ll be taken by the corruption. Within his will, he writes out things that he wants the other emperors to have, should he not return: “To fWhip, you can keep all my deepslate redstone ores… I don’t know what you want them for, they’re kind of useless to me, but… I kept a lot, […] Gem, you can have my great staff of Mythland. Uh… in your hands, it’ll probably be very effective. And to the Wither Rose Alliance, you can have access to my iron farm still” [1:07]. He still thought about them… still cared about them. The fact that Sausage kept collecting deepslate redstone— something that fWhip loves and cares for very much, for the sole purpose of giving it to him, even though they were on such horrible terms… I think about that. He loved them, even still. Even through the corruption, he loved them.
Gem never turns her back on Sausage in quite the same way fWhip does. It was she who cured him, in the end— killing him, at his own request, voice corrupted as he struggled against the influence of Xornoth. She finds him in Mythland, after he’s free from the corruption, and asks if he’s okay, saying she’s so glad to have him back again. He shakily asks her if he can be back in the alliance again, now that he’s cured, and Gem says “We’ll have to talk to fWhip about it, how about for now, you just… heal up over here” [Sausage e33, 33:25].
Gem knows that she forgives Sausage, that it wasn’t his fault. But… she also knows fWhip, and she knows it won’t be so easy for him, that it’ll take time. It has to be his own choice, in the end, to forgive Sausage for everything he put them all through.
Gem brings fWhip around to see Sausage, now that he’s uncorrupted. [Sausage e34, 24:00 - 34:25]. Once fWhip realizes that Sausage is there, he draws his bow, asking coldly why they’re here. Sausage asks what’s going on, and Gem says she’s brought him fWhip. Sausage is immediately distracted by Gem’s wizard hat, and fWhip happily jumps on the bandwagon of teasing Gem. Gem tells fWhip that Sausage is cured, and while fWhip is skeptical at first, having to kill Sausage himself to make sure he’s no longer unkillable, the three seem to fall back into their old patterns. Gem sends the two running into the river, lightheartedly chasing them with her sword, and as they both climb out giggling, she says “I missed this.”
This scene, this moment of the WRA, finally back together again after so long, it’s so… god. They’ve been apart for so long, they haven’t been able to hang out and laugh with each other, and this is the first time in so, so long, that Sausage has been able to hear that light in fWhip’s voice again— that he’s been able to speak to fWhip on any terms that aren’t cold and callous and unloving. They have each other again, they have their family back, unsteady as it is.
Sausage asks if he’s back in the alliance, and Gem says it’s up to fWhip. He seems… uncertain, but says that Sausage can be tentatively back— like he’s still nervous, still feels like something could go wrong. The three of them agree that Sausage owes them both three favors, and then he’ll be back in the alliance for real.
In Sausage’s episode 35, fWhip cashes in his first favor [9:30 - 10:17]. He asks Sausage to come by to help him with something, and as Sausage flies in, fWhip immediately shoots him with a flaming arrow. Sausage flies away, circling around before making his way back to land near fWhip. fWhip greets him with that old harsh coldness, a curt “Hi, can I help you,” how fWhip used to speak to Sausage, while he was corrupted. Sausage says he didn’t come to fight, that he’s good now, and fWhip lets out a slightly nervous laugh, saying “oh, right, right… sorry, sorry, I’m still just a little… it’s gonna take a while, it’s gonna take a while— you can’t just expect me to like— just like, forget, instantly, right? It was just— you know,” fWhip trails off, and Sausage says that fWhip hit him in the face, to which fWhip laughs, slightly, before restating his initial greeting in a much more friendly tone.
And it’s just… god. Isn’t that so much? Isn’t that So Much? Like, you’re fWhip, and you see your own little brother coming, and your immediate instinct is that you have to protect yourself. That you aren’t safe, that he’s gonna hurt you, prepare to fight back— god. Could you imagine what it must be like to be feeling that way? To be trying to reconcile the feelings so ingrained in you now, with the person now before you? He’s trying— he’s trying so hard to let Sausage back in. But… it’s not that easy.
I think this essay has definitely gotten long enough, but I do wanna leave off with one final moment. In Sausage’s episode 41 [11:25 - 14:22], fWhip finally feels able to fully accept Sausage back into the alliance. He tells them that he wants to make them all a new meeting room. The three end up falling back into their old antics, playfully attacking each other, and Sausage ends up getting killed. fWhip picks up a bunch of his things, including a splash potion of invisibility that he had. fWhip cheekily says he’ll keep the potion, and Sausage asks for it back, to which fWhip starts to walk off to where he wanted to show them anyway. Gem follows, and in a disapproving tone, says “fWhip, give him his things.” fWhip turns around, says “Okay, here you go,” and splashes the invis on them all, to which Sausage indignantly says “I can’t believe this!” fWhip immediately starts laughing, with Gem giggling as well, and both fWhip and Sausage quickly realize how silly Gem looks while invisible, with her massive hat floating in the air.
I point out this moment because it really encapsulates why I love the WRA so much. They’re such a chaotic bunch— acting like three siblings who love to tease each other, who get into fights and have falling outs and still, in the end, they make up again. They find each other again. They never stop caring about each other, even through everything. It’s a really sweet little moment— the WRA, finally, truly whole again.
#empires smp#THIS GOT SO LONG. OOPS.#i spent like. over 5 hours making this#and I could keep going. i could talk more about fWhip and Gem#about the moment where Scott accidentally blasts Gem with the magic. how worried fWhip was#how he insists that she get help#but honestly that gets into territory that I haven’t yet seen myself#and I can’t tell it properly#and honestly this is long enough#also thank you for the timestamp for the bow thing!! it’s very interesting#i reckon it’s more about them wanting to create peace in that moment than it was about Jimmy specifically? if that makes sense?#but! who’s to say#you’ll notice I ended up talking a lot about Jimmy here#this is because it is impossible to talk about fWhip without talking about Jimmy literally ever#thank you so much for the free excuse to talk about empires one fWhip and the WRA. this is been so enriching for me#i love them so much#and e1 fWhip is my favorite character across both seasons of empires#uh. can you tell?#ANYWAY. thank you to anyone that ends up reading my whole essay.#it is over 3000 words in total.#umbrify talks#umbrify answers#erstwhilesparrow
21 notes
·
View notes
Photo
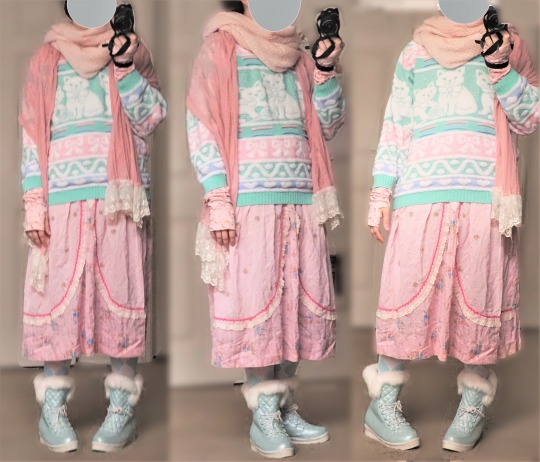
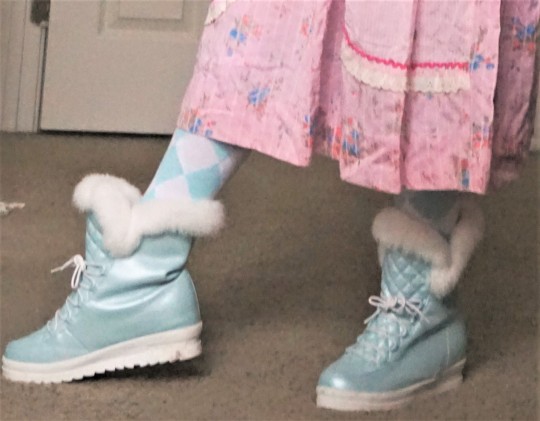
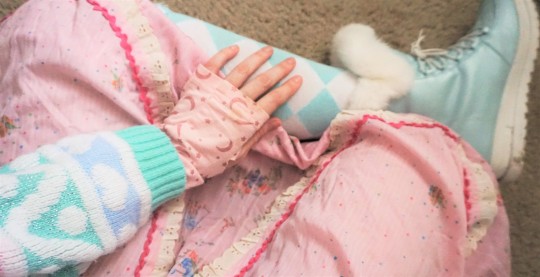
Found a very cool pastel cat sweater at the bins but I have literally nothing that matches it well, so I always struggle to make outfits with it lol
#ootd#pastel#I really really want to SELL CLOTHES I keep talking about selling clothes.. its just such a process..hhhhhhh#Because you have to take pictures. edit the pictures. list them somewhere. write descriptions. choose a price. advertise the fact you listed#it somewhere. Repeat with literally hundreds of items (since I get bulk clothes at the bins and etc.). I have a lot of cool stuff that I thi#nk people into similar styles would want to buy. and I always need money to fund art and healthcare expenses and eventually moving to a diff#erent place someday. replacing broken electronics. etc. etc. So a wise decision is 'well sell a lot of the old clothes you have'. It is so#difficutl with my specific functioning issues though since it's such a long process and also packing things up. taking them to the post offi#ce etc. takes timing since I always have to be driven by roomates and stuff. etc. etc.#I think the way I was considering getting around this was to sell clothing in 'packs' like.. A pack of 5 or 6 matching items the same shade#of pink. or all green items with flowers so it's the same 'nature theme'. Or even selling full outfits or something. so that way I can kind#of bundle items. Instead of the effort of photograohing and listing literally 50 individual items. Turn them into 5 packs of 10. Or 10 packs#of 5. etc. ? But I think I never got too far with that because I was uncertain how that'd actually go over in terms of whether people would#buy groups of items instead of just individual. Especially whole outfits or something like. I think you'd get a wider audience giving people#more individual choice to choose seperate things instead of putting them together and going 'this is just what you get' or etc.#but I could also see it being cool. You already have some guaranteed stuff that matches. They have a theme. Especially if it's something you#like. Love brown themed mori kei items? here's 5 of them already together. etc. etc. etc.#ANYWAY. Came to mind because as much as I love anything with cats on it that's a light color. I also am chronically warm natured due to my#health issues so I overheat immensely if I wear sweaters. even in the winter I don't wear that many layers lol. So a sweater like this is ju#st impratical for me outside of taking one or two outfit photos with it. but I don't think I could ever actually wear it even if I really wa#nt to. But it's nice! and very cool!! so a good candidtate for selling. Give it to someone who would be happier to have it than I would in#the sense that maybe they could actually WEAR it lol.#ANYWAY... rhgh#everything......... difficult.......... whye#Also sweater is too hot for me and doesn't match anything I own even though it's perfect and I love cats..... whye....... cruele world#self
49 notes
·
View notes
Text
being a child of divorce will make you conscious of things like 'bird misogyny' and 'bird grounds for divorce'.
#making a post about it because i've reached rito village and i find it SO FUNNY how no one mentioned that the two most prominent rito women#(saki and amali) talk like they're being oppressed. saki is like 'my husband is teaching my toddler how to be a warrior even though i dont#want him to become one and also he's gone on some murderous revenge rampage that will likely get him killed and leave me a single mom.#could u help.' and it's like. girl im not sure ANYONE can help you now. leave him. meanwhile amali is juggling 5 kids while kass is off#doing... what /is/ he doing? fulfilling his teacher's wish? smtg like that? anyway they should both leave. it's not worth it.#freya talks loz#it's so funny. literally all i've ever heard about botw's rito is that they're warriors so i walked in assuming that meant everyone#and also the very many fanfics/art/comics talking about how teba would feel conflicted about leaving medoh to link because he's so young#like sorry babes i know he's hot but teba does /not/ feel conflicted about rearing child soldiers. he's creating one in his own house.#maybe he's different after the vah medoh quest or in totk but the whiplash of expecting that and warrior rito women and realising that's#not how it is at all is SO FUNNY.#rito women need to fly south to meet the town filled with hot muscular women to teach them about feminism. and bisexuality#i think i've met harth's wife too but i dont recall either her or him saying much about each other.
13 notes
·
View notes
Text
"fnaf is the scariest game ever" "no its silent hill" "well i think its resident evil" everyone shut up!!!!!! youre all wrong. its actually zack & wiki quest for barbaros' treasure (on the nintendo wii) but only the level "keeper of the ice". that level scared me so bad as a kid and you can tell because its the only individual level i remember the name of off the top of my head. like there is nothing scarier than a) being chased and b) being on a time limit. and you know what this level has? BOTH OF THOSE. this level is still scary to me im like AHHHHH!!!! and then i die
#i had to google horror games after i thought really hard for silent hill and fnaf#because like. resident evil is just not a horror game in my mind... its just cool zombie game...#to be fair though. the only one i actually played a portion of was re6 which is probably the least scary one in the whole series#anyway do the kids still find silent hill and fnaf scary. i dont know.#well the former id say yes given how prevalent ps1 horror has been in recent years#fnaf i have no idea. im a massive wuss so its scary when i play it for myself#but watching someone else play them especially when i know them well isnt scary#and ive watched fnaf videos for YEARS#so i dont know. (old man voice) these damn kids... back in my day we watched markiplier scream at freddy fazbear and we LIKED it!#anyway its objectively a horror game and thata literally fine thats all i needed for this post#MY POINT HERE. my point here#IS THAT HIT ZACK AND WIKI LEVEL KEEPER OF THE ICE. IS SOOOOO SCARY#its not that scary but i see tjat level and im like 3 years old making my mom play this level for me again#and for the record yes me and my sister really did make our mom help us with z&w#she remembers helping us with frost breath the most because we like did notttttt get that one at all#and she could never remember how to do the mirrors based on what combination of stands is there (because tjeres like a few variations)#so she always had to look up a guide 😭😭#my poor mother on fucking gamefaqs or something in like 2010... legends only#anyway if you have no idea what level im talking about (any of my oomfs reading this that isnt end) (hi end) PLEASE look up this level#and i need you to think of like a 5(?) year old making her mom play this game.#this aforementioned child is still a massive wuss as an adult btw. some things never change#anyway watch that level and think about how someone like me. whos already a scaredy cat!#imagine how someone like me felt at age 5 possibly younger playing this level#I WISH I COULD LIKE CONVEY EMOTIONS OVER TUMBLR. why cant i attach a .emotion file to this post#anyway ramble over <- hes said that like a million times today#scariest level in a game ever...!!!!! FUCK that keeper of the ice bitch im GLAD he died#muffin mumbles
5 notes
·
View notes
Text
put 712 of the worst words ever put in a google doc tonight BUT! it is 712 more words in the google doc than i had yesterday. this fic will be more than 2k, so help me god
#the past six months have been so weird after posting over 200k last year (including the longest fic i've written since bandom)#i think i would have been fine continuing to post 1-3k one shots all year if i had not just had to request extended time off of school#but between that + having no idea if i have a regular schedule at the library + my nonprofit boss sending a harrowing welcome back#i'm like by god jason robertson we are going to take a couple of leisurely 7-10k+ strolls to get you a boyfriend or two this summer#well all that + being horrendously writers blocked on the other two longer projects lmfao oh my god#10k deep in one and every time i open the google doc a portal to hell opens up in my living room#0k into the other bc every time i open my outline another different portal to hell opens up in my shower#i get no rest. i get no peace. every morning i wake up and 5 more demons are- oh my god#bro my fucken train of thought just got completely derailed by spotify. i know i'm the last person in the world to know this but#3oh!3 and big freedia remixed rebecca black's friday?? and it's completely unlistenable?? girls what did you do#3oh!3 kill me bc no time traveler ever took their faces in hand and kissed them gently on the forehead and looked into their eyes#said ''please focus on coloradosunrise it will literally course-correct the trajectory of your career from frat house gimmick to#rowdy but respectable indie edm artists. you can remain true to your warped tour dirtbag origins but you HAVE to develop THAT sound''#like the chainsmokers are a joke but i feel like THAT + ANGRY EMO GIRLS + THEIR TOTAL DISREGARD FOR MARKETABILITY... could have been THEM#when the piano drops?? hello?? i had so many mental breakdowns in college listening to that song they could have defined a generation#like who else is gonna get noah cyrus and ashe and gayle and olivia rodrigo's vision. only warped tour dirtbags.#me @ myself [so lovingly]: what are you talking about. how old are you#me @ myself: talk to me abt earth 2 in which 3oh!3 remixed i got so high that i saw jesus....and it whipped ass#also. i had to google how old i was. THREE TIMES last week.#the minute i turned 32 apparently i was like i'm in my mid-30s now the rest of this decade is NOT my business until i turn 38#this post was supposed to be an uplifting reminder to myself to keep pushing forward and trying hard and to not let the rot consume me#but i think i just drove off a cliff like fully my god#i need listen to big freedia more she rules#fresno oilers.txt#another banner day in the tags with kasper moregraceful
19 notes
·
View notes
Text
S2e6 Truth/Dare, when Mr. Farouk said, "Well, when you don't figure out you're gay until your late 20s, you tend to miss out on those beautiful gay teenage experiences." I broke.
#im at that 7 minute or 8 minute mark and im literally bawling#its OFMD all over again lol#the way biphobia and bi erasure had me never talking to girls. literally was snapping a girl tonight about date plans#i dont think 14 yo's who *know* who they are could ever understand those of us who just dont realize it til way later lol#it really feels like a loss. a genuine loss lol#ive been growing to like Mr Farouk but now hes my favorite#he's me and I'm him in that way. that moment#im still fucking crying lol#a 5 min text post is about 15 mins in with me ugly crying lol#heartstopper spoilers#heartstopper s2 spoilers#heartstopper#heartstopper s2#💖❤️🧡💛💚💙💜#💖💜💙#<me bi. not Farouk before any of yall who need validation thru internet discourse jump all up my ass about it#aunt posting
14 notes
·
View notes
Text
i know i kinda have a reputation to uphold as an astarionposter but like. he's not even my fav character in bg3...
#my ranking of the companions would be:#1. shadowheart 2. jaheira 3. lae'zel 4. astarion 5. wyll 6. halsin 7. karlach 8. gale and then minsc/minthara bc i haven't recruited either#idk i just really love how jaheira was portrayed in bg3 and i feel like she doesn't get enough love#+ lae'zel's story arc may not be as compelling to me personally as astarion's but. gith lore is like my absolute fav thing and i love her s#and i've already talked loads about how shadowheart is my no. 1#re: wyll i actually really like him and he would've been ranked higher if i hadn't played early access. i miss his more playful side tbh#halsin ranks higher than karlach or gale because of how much his being canon polyam means to me. also he's funny as hell#karlach and gale's stories just didn't resonate as hard with me ig?? i love them all they're just not my favs#there's literally no companion i actively dislike which is v strange bc in most games i usually HATE at least one.#in dao i HATED sten. in da2 it was seb. in dai it was cassandra. in poe2 it was pallegina. in nwn2 it was bishop. in wotr it was daeran#anyway i could go on and on about how larian made fundamentally flawed but still likable characters. i just love them sm.#edit: even though gameplay-wise wotr is one of my top games ever. i actively hated like half of the companions lmao#lmk if you want me to make a post about who i like and why in pfwotr bc i am Very Opinionated
13 notes
·
View notes
Text
im not gonna act like its as severe as hindutvas make it out to be but if you deny hinduphobia exists you're just a dumbass i think
#1. christians default mode is hating every other religion and ESPECIALLY the ones they deem satanic (no surprise that includes hinduism)#2. a lot of yall anti theist types only ever give more fuel to the idea that theres hinduphobia so maybe stop being a fuckin anti theist#if you want ppl to stop talking about it#3. any push to erase hindu history or historical sites is hinduphobia idc what you say#4. a lot of people in the west treat hinduism as a joke religion like thats the default emotion yall have for it and the way you approach#it. like ye'all treat buddhism with way more respect than you treat hinduism. tf is up w that. why is that a thing.#probably a combo between thinking eastern asians are more ideal and south/se asians as less ideal and also thinking hinduism is 'cringe'#and 'weird' and 'funny' and 'wacky' or whatever.#stg if i could go in to every piece of media that treats indians in general as a joke and strangle said media i would.#5. there has been many attempts at getting rid of hinduism before by many people and you cant act like that doesnt have a lasting effect#both on the hindus that were oppressed and the ppl who thought they were justified in oppressing their 'savage' religion 😒#and no im not gonna sit here and act like muslims are the problem or whatever tf its a small minority that are shitty so stuff it before#you even try it rebecky.
5 notes
·
View notes
Last Seen Blogs

shepardt0ne
Misantropia En Meskalina
yodaveganwas-blog
HNTD visual art

cheesecent77
The Blogging of McKinnon 421

twistlittlecloser
Long live the Queen

jack-loves-bella
Jack "The Boss" Crawford