#metaball
Text
Metaball PS5 gameplay 4K - prime impressioni
youtube
No no no
#imperodelletenebreblog#recensione#opinioni#youtube#videogiochi#videogames#review#playstation 5#playstation#ps5#gameplay#metaball#free to play#f2p#sci fi#sport#psn
0 notes
Text
1 note
·
View note
Text

wetopia
#y2k#y2k aesthetic#webcore#2000s#y2kcore#2000s aesthetic#wallpaper#neo y2k#graphic art#y2k cyber#cybercore#blue#yqueuek#art#graphic design#metaballs
197 notes
·
View notes
Text
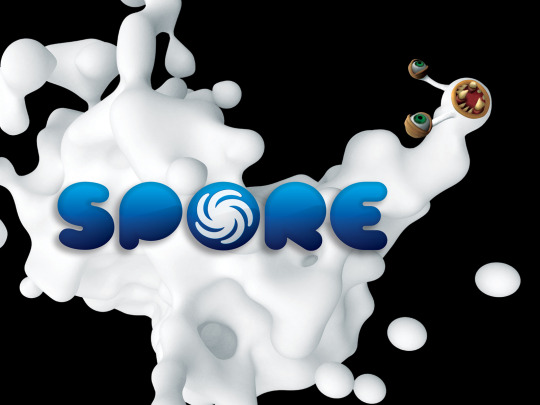
So, this is apparently an official Spore wallpaper...
98 notes
·
View notes
Text
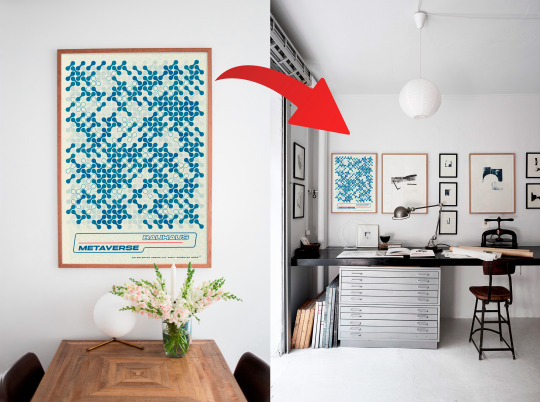

#interior design#wall decor#house decor#decoration#living room#bauhaus#abstract#poster design#poster art#retro tech#retro art#retro style#vintage#retro aesthetic#retro rides#metaverse#metaballs#etsyvintage#etsysale#etsyshop#arquitecturedesign#inspiration#design inspiration
2 notes
·
View notes
Text
youtube
this is better than like every disaster movie made in the last two decades
0 notes


Note
how was ur banner made
oh boy now this is one we're excited to answer just because we love talking about behind the scenes 3D stuff so much!
plus we have behind the scenes stuff saved already because we talked about this on patreon back when it was first made. This will be a long one so strap in.

This is the closest thing we have to a "logo" which was made in a day Blender back in may 2021 so its coming up on 2 years old now! wow. (this is a raw render without the touch ups applied to the version used on twitter and tumblr, I'm not sure where that version went atm)
There were 2 Major sources of inspiration, the first one being this Paul Wiley logo render (who has inspired a Lot of our work tbh):
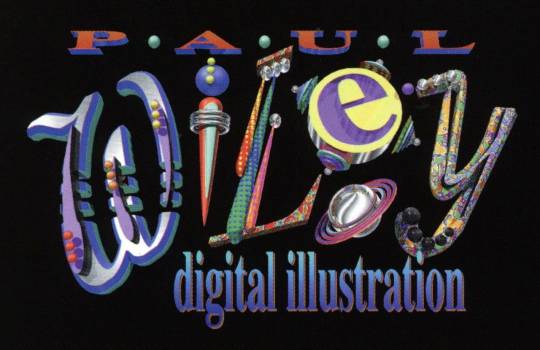
And the other is, comically, this logo for the Robots movie:

The inspiration from both should be pretty obvious. Doubt we have to say more on that one. We really have a love for these 3D logos made out of objects and wanted to make our own. So we did.
most of the ideas was done from the start. We knew for sure that the O had to be a planet, and that it would involve a paint brush of some kind given our art focus. M and R were the hardest to come up with ideas for, hence we gave up and just made them letters. But we still tried to go with a look for them that felt appropriate


The background was largely born out of accident. We were playing around with ways to direct the lighting in a way we wanted and after playing around with an invisible plane we made it visible and just played around with the colors quick out of curiosity. At some point it hit us that with a dark green color it looked a bit like a chalk board. We liked that idea so much it stuck around and we leaned into it more.
The earth was an interesting one. We grabbed an map image to use as a height-map texture and UV'd it onto a sphere with a displacement modifier while trying to give it a globe type look. Its a little high resolution from that method and could use with some mesh optimization but y'know. 2021 us didn't care.

The paintbrush had another weird specific form of inspiration, there was some video we watched on an nvidia RT demo (the one with marbles) from that time that had a paint brush in it that was impressively detailed. That kinda just got us stuck wanting to make a very detailed paint brush to see if we could.
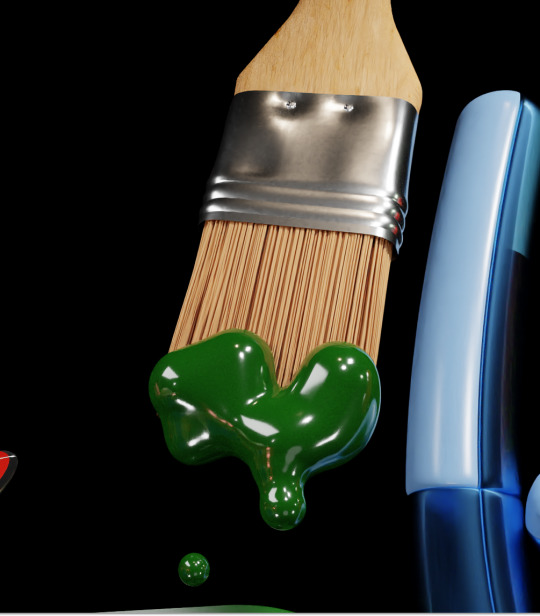
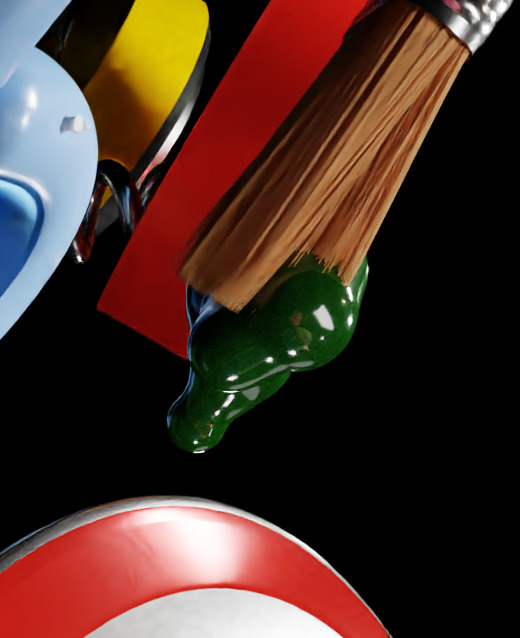
The nvidia one is still better, but for our knowledge of blender at the time its not too shabby. We were much less experienced with texture making at the time and relied more heavily on detail via raw modeling. The bristles are just using blenders built in hair system.
The paint on the paintbrush and coming out of the straw are just made using metaballs, lol. In part intentionally because we wanted it to have a fake looking quality to it like early 3d representations of liquid, but we cant lie and say it also wasnt in part from not caring to learn how to do any kind of fluid simulation. It was a win-win.
this post is getting very long so we'll spare you the details on the rest of it, but we hope you found this interesting! We've actually been meaning to go back and touch up the logo as its remain unchanged since its creation, but its still something were very proud of!

87 notes
·
View notes
Text
Anyway this episode I'm planning to do the unthinkable and rig *metaballs* because I can't do anything normally until I've destroyed myself proving to myself what a bad idea it is to do it my own way
21 notes
·
View notes
Text
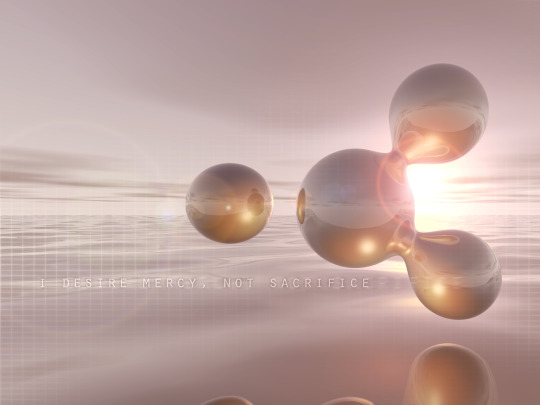
"I desire mercy, not sacrifice," says the Lord.
#y2k#y2k aesthetic#2000s#y2kcore#2000s aesthetic#webcore#wallpaper#neo y2k#graphic art#graphic design#cybercore#cyber y2k#y2k style#y2k cyber#metaballs#ocean#sunset#golden#orange#visual art#art#yqueuek#kaybug#y2k nostalgia#early 2000s#blender render
121 notes
·
View notes
Video
THRUST//DOLL devlog 9: push to prototype
Here’s the latest devlog update for my game project THRUST//DOLL!
(For anyone new to the project, the concept is an acrobatic bullet-dodging speed game in which you’re a jet-powered disposable cyborg body sent into the strange biomechanical AI-created environment. Tech-wise it’s pure Unity DOTS/ECS as far as possible, which is to say the esoteric constantly-changing high-performance side of Unity, plus raymarched environments; I’m making all the models and animations as well. Huge project but it’s going pretty well..!)
What’s this one about? With a two week deadline looming to make some sort of presentable bare-minimum sketch of the game, I worked on getting nice animated wall kicks against my soft, smooth metaball levels. This involves such tricks using the distance from the wall to drive the animation “time” parameter, which I thought was a pretty neat idea.
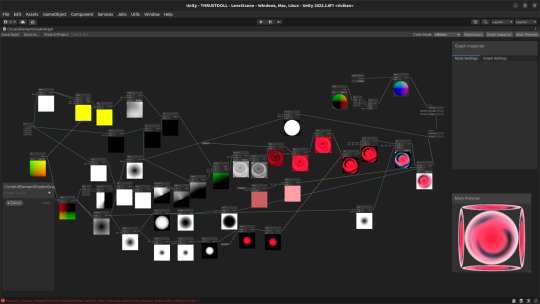
This week I’m working on bullets. They’re looking pretty fancy! More on that soon...
19 notes
·
View notes
Note
Dear Metaball, focus on your mental and physical health. You'll come out of this stronger and not take anyone sht. Real ones don't leave you and don't insult you, these are just antis pretending to be "fans" ;) !
Stay strong darling 💙💙💙
💙
3 notes
·
View notes
Photo
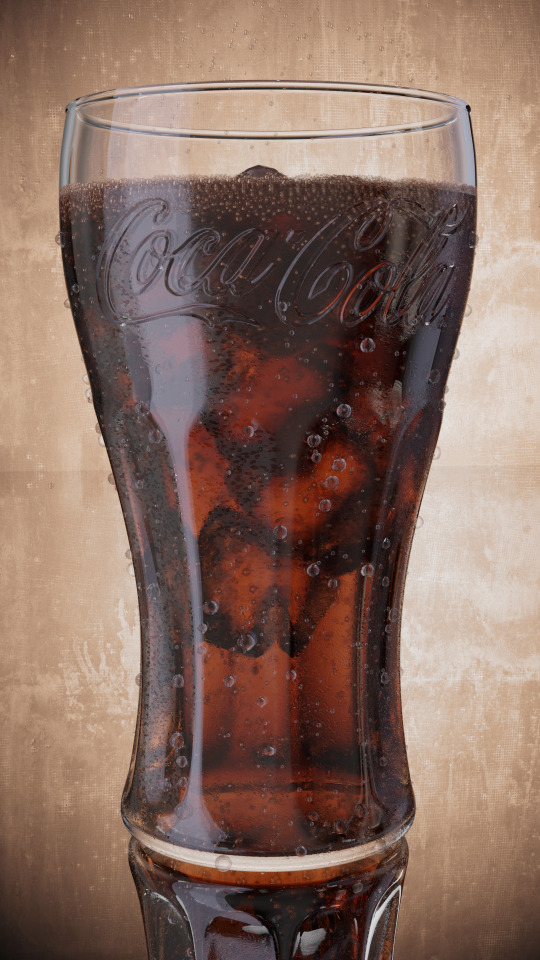

Burger On The Grill
Part 16: Pouring a Drink--Condensation
After completing the donut tutorial by BlenderGuru, I was challenged to create something similar by myself, so I made a burger. I will make that burger into a meal with a soda and fries.
In the last parts, I showed how to make carbonation foam and fizzy bubbles. Now, I'll reveal how to add condensation to the outside of the glass.
Adding Droplets
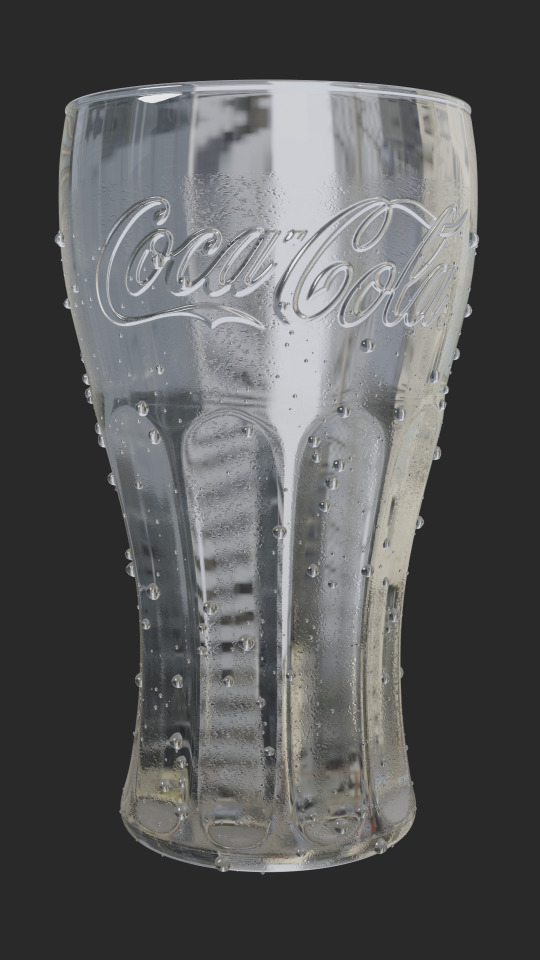
In a previous part, I showed how to add dewdrops to tomato slices by creating metaball instances with geometry nodes, a method that is shown in this tutorial by Weil Labed. This method was problematic from the start, requiring multiple workarounds.
In Blender 3.3, metaball instances may show up in the render preview window but disappear in the actual render. Using Eevee, you can go to View and select Viewport Render Image; however, the resolution may be less than what you'd get from an actual render. Since we are using Cycles as the render engine, I had to move on from metaballs.
Joey Carlino offers an alternative method of generating water droplets with geometry nodes by converting Points to Volume and Volume to Mesh.
Water Droplets with Geometry Nodes by Joey Carlino
Start by creating a duplicate of the soda glass. Add a geometry nodes modifier with these nodes and values.
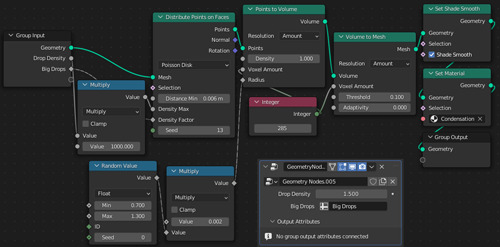
In weight paint mode, paint the entire glass blue and then paint warm colors where you want your droplets. Under Object Properties > Vertex Groups, name this weight paint “Big Drops.”
Repeat the process a second time, adding smaller droplets. Increasing the voxel amount will yield better resolution on a smaller scale. Create another weight paint vertex group named “Small Drops.”
I used the same node setup but with these values:
• Drop Density Multiplier: 6000
• Distribute Points of Faces > Distance Min: 0.002m; Seed: 9
• Random Value > Min: 0.13; Max: 0.35
• Volume to Mesh > Voxel Amount: 1000
There are now water droplets on the glass, but at a glance, they can be easily mistaken for carbonation bubbles. How can we get a more integrated effect?
Painting Drip Trails
Blender Guru combines image textures with a particle system that instances a collection of droplets.
How to Make a Rainy Window by Blender Guru
I liked how some of these droplets had trails behind them. This is a good method if you have the water rolling down a flat surface; however, with a complex curving surface, like we have on our glass, the trails would stick out unnaturally as instances.
Jonathan Kron demonstrates a method that solves this problem, using instanced particles in combination with dynamic paint to create trails in the roughness of the texture of the container.
Realistic Condensation by Jonathan Kron
It turns out that dynamic paint works just as well with geometry nodes as it does with the particle system.
Let's make some drip trails for the big droplets!
With the Big Droplets selected, go to Physics Properties and add Dynamic Paint with these settings:
• Type: Brush
• Paint: Mesh Volume + Proximity
• Distance: 0.001
With the Glass selected, add Dynamic Paint with these settings:
• Type: Canvas
• Format: Vertex
• Frame End: 19
• Drip: Checked
• Weights > Gravity: -1
• Output > Wetmap Layer: Click + sign
If you run the animation now, you’ll notice the trails being painted up are a bit messy and out of sync with the droplets. To fix this, add a Subdivision Surface Modifier to the glass set at 2 and drag it above the Dynamic Paint in the modifier stack.
On the Dynamic Paint canvas, under Cache, click Bake. This will produce an attribute called “dp_wetmap” which can be dragged into the Shader Editor of the Glass to drive the texture.

Adding subdivisions to the glass helps to get a cleaner wetmap, but at the cost of nearly maxing out my graphics card. To prevent failed renders, it is necessary to reduce the load.
Our wetmap is operating as vertex color, which is intrinsically tied to the vertices of the highly-subdivided mesh. In this form, the wetmap cannot be transferred to a lower poly mesh. How can we get around this problem?
The answer is baking. We can bake this wetmap to an image texture which can be used on a simpler mesh.
Converting vertex painting to texture maps by Taylor Hokanson
Connect the color sockets between the wetmap attribute and a diffuse shader. Add an image texture node and create a new 4K image with a black background and no alpha channel. Add a UV map node and connect it to the vector input of the image texture node.
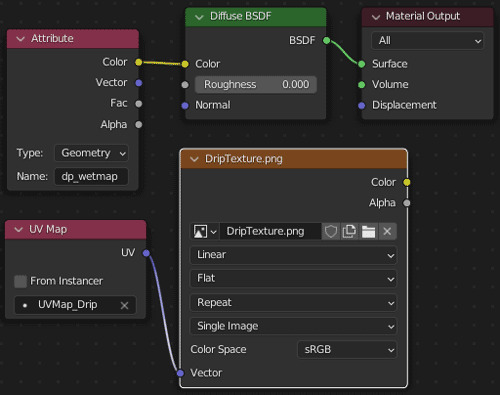
Create a new UV map named "Drip" to be referenced by this UV map node. Since we already have a UV map for the Coca Cola logo, we will be working with multiple UV maps.
Texturing with Multiple UV Maps by The Observatory
Go to Object Data Properties > UV Maps and click the + sign to create a new UV map. Open the new black image in the UV Editor, mark seams in discreet areas, unwrap the UVs and position and size the islands to maximize the area taken up by the drip trails.
Go back to the Shader Editor and select the name of the new UV map in the UV map node. Make sure the image texture node is selected. Then, go to Render Properties > Bake. Set the Bake Type of Diffuse and make sure only the Color Contribution is checked under Influence. Bake and save your image to the hard drive as "DripTexture."
Now, we need to transfer the "Drip" UV map from the high-poly subdivided glass ("source" object) to the low-poly unsubdivided glass ("target" object).
Go to Object Data Properties > UV Maps on the source object and make sure the UV Map for the drip texture is active. For the target object, click the + sign to add a new UV map and make sure it is active. Select the target object and then the source object. Go to Object > Link/Transfer Data > Copy UV Maps. The new UV map of the unsubdivided glass object will be replaced by a copy of the drip texture UV map from subdivided glass object.
Set up the following nodes for the low-poly unsubdivided glass.
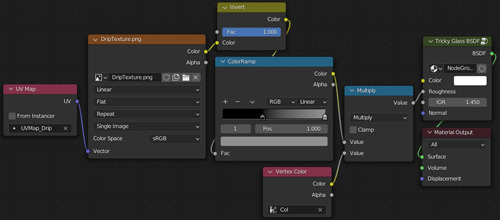
Feed a UV Map node referencing "Drip" into the Vector socket of an Image Texture node referencing "DripTexture." Invert the color and add a Color Ramp to decrease the maximum brightness.
Using vertex paint, paint the entire glass black. Paint white on the outside of the glass below the level of the liquid, creating a soft transition at the level line. Add a Color Attribute node and reference the vertex paint which needs to be named "Col" to avoid render problems.
Feed the Color sockets of the ColorRamp and Color Attribute nodes into a Math node set to Multiply. Feed the result into the Roughness socket of the Tricky Glass Shader.
This effect looks good on a metal can, but increasing the roughness on a glass material makes it difficult to see the details on inside the glass, the ice cubes and carbonation bubbles we worked so hard on.
Adding an Image Texture
To add more spaces where the roughness is lower and further integrate the droplets to the glass, I decided to add another image texture.
Blender Guru uses multiple materials and adds a condensation texture to his coffee glass.
Condensation by Blender Guru
Create a new UV map for the Glass and name it “Condensation.” In the UV Editor, bring up the Condensation Image Texture in the background.
Mark seams around the base and the fill level of the glass. Choose a discreet place to mark a seam down the side of the glass. Select the glass and UV > Unwrap. You might notice that the result is somewhat curved, causing the texture to stretch along the glass.
To fix this, we need to use a different unwrapping method.
Add a camera and change the lens type to Orthographic. Name the camera “UV Cylinder Projection.” With the camera selected, go to View > Cameras > Set Active Object as Camera. Position the camera to face the vertical seam through the glass as shown in the image below.
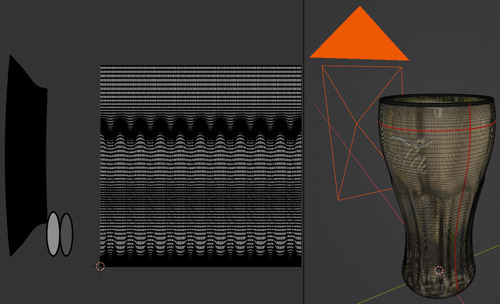
Drag the UV islands outside of the Condensation Image Texture. Then, select only the island where you want the texture to appear on the outside of the glass.
Go to UV > Cylinder Projection. Set the Direction to View of Equator. That island should now fill the whole square of the image texture, maximizing resolution without stretching the texture.
In the Shader Editor, drag in the Alpha Masked and Normal textures for the Condensation. Feed a UV Map node into the Vector input and use a Mapping node to scale them. The Normal texture will drive the Displacement while the Alpha Masked texture will contribute to the Roughness of the Glass Shader. Use a Vertex Color to control where the condensation appears on the glass.
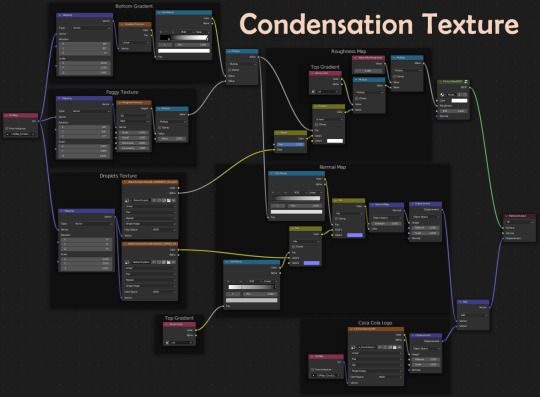
Reference Condensation Texture Shader Nodes at the top of this post.
The Foggy Texture creates some randomness in the application of the condensation and the Bottom Gradient decreases the amount of condensation as you move down the glass and away from the ice.
Combining Effects
Pulling it all together requires an even more complicated node tree, but essentially all that is left is to add the Wetmap Drip Texture frames and feed it into what we already have.
Reference Condensation + Drip Trails Shader Nodes at the top of this post.
Organizing node trees into frames is a good way to communicate your process to your future self and to others. Whole segments can easily be copied from one material to another.
Finally, we have completed our soda!
Follow me to keep watch for the next part! Now that we have our burger and our soda, we can start to set up our burger meal scene.
Review the previous part.
See overview for links to all parts of this tutorial series!
See more of my work: Check out my archive.
Join me on my journey: Follow me on tumblr.
Support my creative profession: Buy me a coffee on KoFi.
#blender#tutorial#soda#glass#condensation#texturing#water drops#droplets#geometry nodes#coca cola#3d art#art process#food art#3d artist#art#digital art#3d render#blender3d#blendercommunity#blendertutorial
7 notes
·
View notes
Text
The Erection Man.
Elections in NZ are coming up, don't forget to register to vote.
A friend asked me to make this. Made with Blender using metaballs and grease pencil
9 notes
·
View notes
Last Seen Blogs