realmofconservation
The Realm of Conservation
An active portfolio of paper conservation.
No more nail polish, lets get down and dirty with some science and time travel.
Click through each post for more images of treatments and research, and feel free to ask me anything!
24 posts
Don't wanna be here? Send us removal request.
Last Seen Blogs

dick-the3rd
bitchcraft

the-cozy-morning
the cozy morning

mortal-sarah
She’s BonBon

nastiakazvan
Nastia Kazvan

taeyeon-crq-blog
city of love
Text
Ghosting into the Private Sector
Hello, Tumblr!
Apologies for my disappearance (and this sudden long post). I’ve had a huge shift in my life over the past six months.
I’ve moved back to England after receiving my EU residence card (right before England decided they didn’t really like Europe in the first place…), I’ve started working for a single art collector, both as a PA and preservation advisor, and most importantly, I’ve nearly finished my private conservation website!
I’ve started a bespoke, onsite in call conservation service with my good friend and amazing conservator, Angelina Bakalarou. Rather than spending money and energy renting a studio, arranging logistics and paying for extra insurance, we’ve decided to have our service come to the customer.
I’ve spent a lot of time in conservation studios within larger institutional bodies, with conservation professionals who have all at some point work independently, and the biggest issue they’ve had is about workspaces. Most treatments on paper can be executed within any clean, environmentally stable environment, as we know well from research into disaster planning. So essentially, Why should you pay for a studio when you do three or four wet treatments per year?
Additionally, private conservation should be tailored to the customer. Whether it’s a private owner or a private gallery, no one wants to worry about art/archival material in transit. We plan to come anytime that suits the client between 9am and 9pm. If the client isn’t comfortable leaving us alone with the object, they can schedule us for a time when they’ll be around to supervise. And because we know how hard it can be to find permanent conservation positions (omg it is so hard, y'all, no one wants to pay employee benefits, especially not museums and galleries), we hope to provide our fellow conservation professionals with short contract opportunities when Angelina and myself aren’t available.
The site should be finished by the end of August, so keep a look out for a follow up post to this one. And let me know your opinions regarding this concept! I know it’s not the most readily acceptable solution to a growth of qualified workers in an emerging profession, but I hope that this will provide work to those who need it, and will educate an often forgotten but certainly influential group of clients to the importance of conservation.
After all, if conservation doesn’t boil down to asset/wealth management, what is?
#omg paper#paper conservation#private sector#galleries#gallery#art conservation#artifacts#archival#archives#london#conservation#Art#documents#paper#preservation
3 notes
·
View notes
Text
Conservation Valentine
Because @conservethis is on a roll! How do I love thee? Let me count the ways... You never dog-ear corners, You never tear out pages! My love respects my library, He always dotes and dusts, He monitors humidity, And there's never mold or rust* *red rot doesn't rhyme well...
1 note
·
View note
Text
Happy New Year from NYC!
Happy (very belated) New Year, Tumblr!
Long time no see! I know I haven’t been around of late, but I was fortunate enough to experience New York City the last two months of 2015, doing what I love - paper conservation.
I’ve been pleasantly busy working on a conservation project at the American Museum of Natural History in NYC. The project involved surveying, treating and rehousing two collections of biological illustrations for the AMNH Library, and I was so lucky to work with Library Conservator Barbara Rhodes, and Project Conservator Paula Schrynemakers. Aside from being a renowned conservator in the New York State area, Barbara is also an expert on the history of photocopying and invisible ink. The AMNH Library illustrated collections that I worked on were extremely interesting both historically and visually, though - as you’ll see - some may not be as enamoured with the content as I was.
The Collections

The first collection that I treated was a set of biological illustrations created by an artist named R. Deckert over the span of a decade (between 1931 and 1947). However, we were unable to find any immediate indication or reference to a specific publication or book for these illustrations. They consisted of roughly 150 watercolour and gouache illustrations of frogs and snakes (and one turtle) on a variety of papers - mainly thick watercolour paper that was hand cut to size.
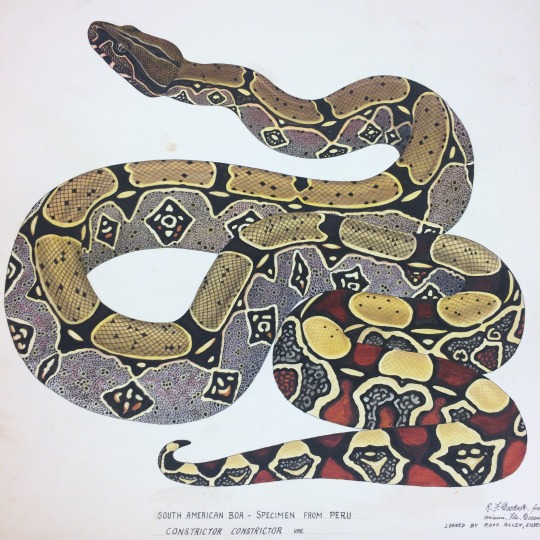
As you can see, the illustrations are lush and extremely detailed. Deckert clearly enjoyed putting his own personal touches to the works by posing the creatures so enigmatically. He also created at least ten illustrations that compiled a variety of specimens and posed them in an imagined (but feasible) natural setting, exhibiting his clear talent for natural illustration.

The second collection had me recoiling in horror the moment that Barbara opened the box of illustrations. Created by illustrator and arachnologist Nicholas Hentz between 1832-1859, the collection consists of over 230 illustrations of North American spiders and 20 notes on the various genera of the spiders. Yes. Why wouldn’t I want to work with 230 images of spiders that are native to my location… Despite the initial arachnophobia the project induced, I grew to love the delicate and extremely vibrant illustrations, as well as the elegant hand of the scientist who clearly was as passionate about spiders as I am about paper.
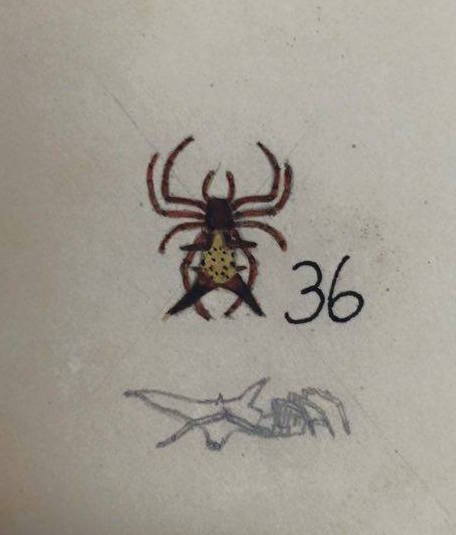
Drawn to scale (this one is about the size of my thumb, eek!)
Treatments
Both collections are (or have been) handled quite frequently and were beginning to show evidence of deterioration from use. Fortunately, a new donor to the museum decided to devote some much needed financial attention to the library to maintain these collections. To our good fortune, the donor was as interested in preserving the collections as learning about the field of conservation. I’ll keep them anonymous, but I was pleasantly surprised to have them visit the lab not once, but twice, to see how the project was going, and to ask questions both specific to the project and to conservation treatments/practices/ethics writ general. Note to the public: conservators love talking about conservation.
The treatments I performed on the collections were extremely non-intrusive as they were in relatively good condition; most of my work dealt with future storage conditions, creating appropriate enclosures. The Deckert illustrations mainly required surface cleaning with light cotton gauze and Staedler vinyl eraser powder.
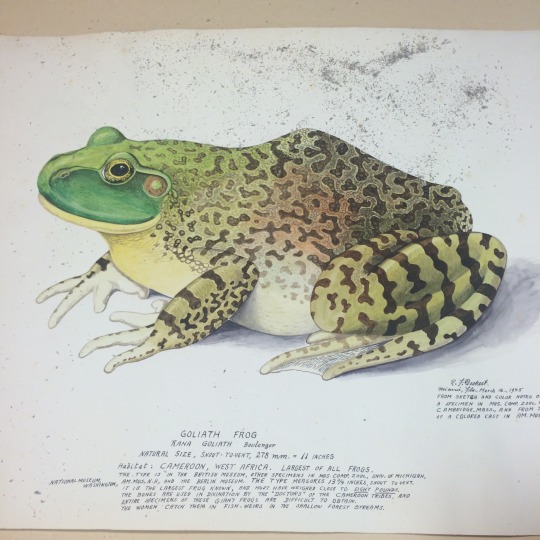
Goliath Frog illustration with eraser powder at the top edge. The image area and inked text was avoided.
Seven of the Deckert illustrations weren’t on the sturdy watercolour paper, but on papers that were of varying size and diminished quality; six of the seven illustrations were on machine made paper of high lignin content, and all had signs of staining from external materials and acidic migration offsetting on the versos, creating shadow images on the back from accelerated or decelerated acidic migration (I attempted photography, but the contrast wasn’t very visible in any of my images, so here is a link to an example of the phenomena). They all had issues of uneven acidic migration that darkened and embrittled the paper, and most of them had heavy edge tearing. They were subsequently sprayed on the verso (non-image side) with Bookkeeper (a non-soluble solution of magnesium oxide in a non-reactive carrier with a surfactant) to protect the paper from further acidic migration, and the edges were repaired with Japanese Tengujo tissue and wheat starch paste.

A Deckert illustration corner that had been torn after a tack was used to pin up the image. The tear was later repaired, but not the pinhole itself.
I had never used Bookkeeper before, but the practice is common in large 19th libraries and archives with collections that have high potential for acidic contamination (Harvard’s libraries faced a similar ‘epidemic’). The AMNH is one of the nations oldest museums, with first building built in 1869, so it is understandable that the library’s collection of machine made paper materials may be susceptible to more erratic pH variation within the library stacks.
Hentz genealogical note page, with stains and losses apparent. The edges were stablized with Japanese tissue. Pink tone of image caused by my shadows, apologies!
All of the Hentz illustrations of spiders and the genealogical reference notes were more delicate and brittle from age, so it wasn’t constructive to spray them with the Bookkeeper solution. Instead, they were lightly surface cleaned, and any edge tears or losses were conservatively treated with Japanese Tengujo tissue and wheat starch paste.
Storage
So we now approach a conflict of interests: how do you stabilise and house a collection that will be heavily used and probably subjected to further damage without the stabilising treatments and storage options being intrusive and irreversible? Most of the Deckert illustrations were sturdy enough to be placed in individual folders, and once foldered they were housed in boxes. However, the seven illustrations on poor quality papers were too delicate to leave in a folder without further protection, and the Hentz illustrations were not only delicate but also so small that they could be lost or misplaced over time as some had been in the past.
Some housing options we considered included lining the illustrations to add stability before housing in folders (only one Hentz illustration had writing on the verso), and even reducing the public accessibility of the original illustrations as they had been digitised. We decided that the safest (and subsequently easiest) thing to do would be to encapsulate them by ultrasonic welding sheets of Mylar (also known as Melinex) together around the illustrations. Encapsulation would provide stability, and the ultrasonic welder enabled a strong, airtight, and resealable option: if an illustration was needed for an exhibit, it could be cut out of the encapsulating Mylar, and when it was put back, the Mylar could be re-welded.

The seven Deckert illustrations were encapsulated and then placed into individual folders along with the rest of the collection. Box storage was ideal for the Deckert collection, as the illustrations were quite large (about A3 size), and there were too many to post bind for accessibility.

A typical encapsulation for the Hentz drawings, with backing papers interleaved at a standard size to protect the verso of the drawings.
The Hentz illustrations were encapsulated into four window sheets, and bound into two posts bound volumes to enable easier access and a simpler archiving. Additionally, the Hentz illustrations had interleaved sheets on each page that was blank on the verso (all but one illustration and one sheet of notes). Problem solved!
Barcodes aren’t just for supermarkets...

One very interesting practice that I encountered at the AMNH Library was their barcoding system. It’s simple enough to barcode books, magazines, and other publications, but how does one of good conservation conscience barcode illustrations and three-dimensional original content with 3M barcode stickers made of unknown materials?
The library staff had come up with the simple solution of photocopying the barcodes to archival quality paper, and then adhering the paper with wheat starch paste to the back of the illustrations (or the least visually obtrusive part of a three dimensional object).
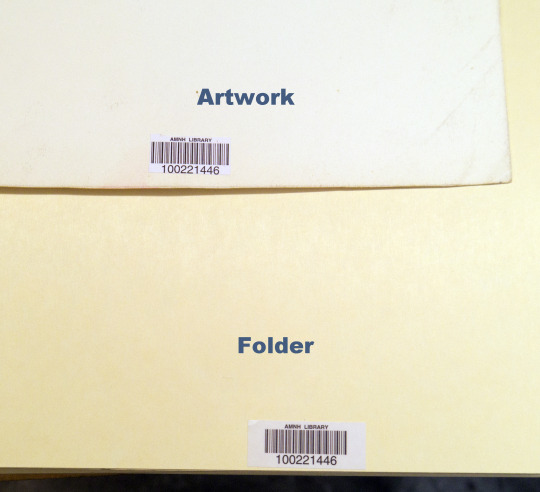
The barcodes had to be staggered, of course, to prevent the stacked illustrations from being thicker in one area versus the others, but this method of cataloguing was one of the simpler methods I’ve seen utilized. The photocopied barcodes were easily read by the barcode reader, and the library staff were able to monitor loans and reference item movements much easier. When the simplest solution is also the best one, everyone wins.
I truly enjoyed my time working at the museum – I always pick up so much from working with a new team and observing how another institution functions, but this was probably one of the most enjoyable conservation experiences I’ve ever had! I had an amazing time with Barbara, I worked on two fascinating and beautiful collections, I cured my arachnophobia, and I got to spend a few months living it up in the Big Apple. [Please, New Yorkers, this is the first time I’ve ever called it that – don’t we all get a pass the first time?]
The two collections mentioned will be available online to the public once the digitization project is complete. I’ll make sure to provide a link as soon as it’s available.
#conservation#cons4life#paper conservation#illustration#art#art conservation#amnhnyc#amnh#biological illustration#spiders#snakes#frogs#encapsulation#storage#barcodes#cataloguing#archives#library
1 note
·
View note
Text
New Materials in Conservation: Plastic Money Part 3
The last part of this new materials discussion focuses on my polymer degradation research, with a little reflection on some universal aspects of new material research by conservators.
Let me get one thing clear: Biaxially Oriented Polypropylene is an excellent replacement for paper in monetary production. It is far more durable while still retaining recyclability, beautiful design, and security. All organic materials must bow to time, however, and polymer notes are no different.
Secure Your Bills
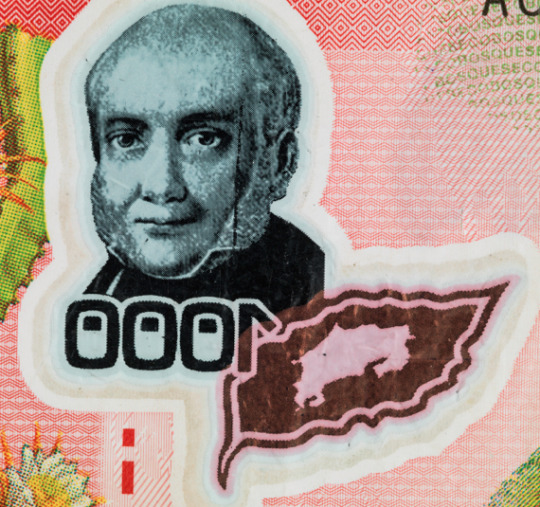
OVD Security Microimage of a 2011 1000 Costa Rican Colones, Courtesy of Jaqueline Nash and the Smithsonian NMAH.
Above is the OVD security image from the verso of a 1000 Colones note from the Banco Central De Costa Rica from 2011. It may not be very degraded, but the portrait, the leaf with the outline of Costa Rica, and the ‘1000’ are not printed with white and black ink, but with white microscopically structured ink on and surrounded by laminated layers of clear plastic to create a computer-recognizable topography. This is the security device that authenticates the notes when they are scanned by anything from ATMs to large central bank note scanners at treasuries. The line of ink loss on the right side of the portrait can inhibit this authentication in scanners, thus reducing the usability of the note as money.

This is an excellent example of an OVD’s microscopic structure, as explained by CSIRO scientists, captioned: “Example of an Exelgram portrait OVD (of RA Lee) at one angle of view. A small section of the microstructure in the forehead region of the portrait is also shown. Height of the portrait is 12 mm. Optically variable kinematic and switching effects are shown in the background.” [Source: Robert A. Lee, via CSIROpedia, 2013]
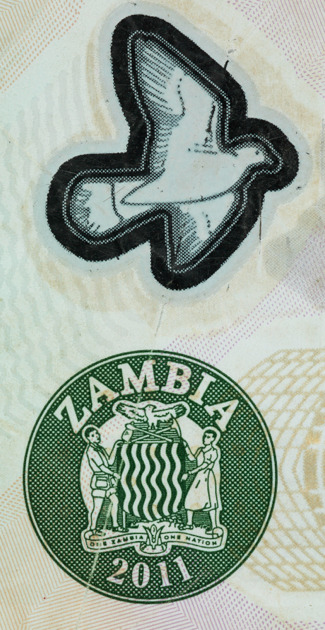
Above and Below: detailed and micro images of the treasurer’s seal and OVD of a 2011 Zambian note. There are significant losses in the OVD from the crease, which would inhibit the identification of the note on a computer scanner. Image courtesy of Jaqueline Nash and the Smithsonian NMAH.
While surveying the polymer notes used for the Value of Money exhibition at NMAH, I noticed that along any heavily creased area of the notes, the laminated BOPP layers had begun to shift and create small crevices; any ink printed in these areas was lost or disintegrating. Under 60x microscopic view, I could see that the most heavily creased areas had small discrete polymer pieces within these crevices, indicating that some parts of the laminated polymer layers had indeed fully separated, causing losses. I was unable to discern whether the initial point of fissure was caused by the outer opacifying and/or the core BOPP layers.

Another micro image of the 2011 Zambian note. The creasing at the top of the image shows significant fracturing of the OVD ink and BOPP layers. Image courtesy of Jaqueline Nash and the Smithsonian NMAH.
The losses and fragmentation was understandable; in the previous post, I explained that the structure of the polymer note is a built-up stack of BOPP layers, which are then pressure laminated together with opacifying ink coats in between and detailed ink coats on the surface. Imagine these creases as tectonic plates that have shifted apart; the fragments of BOPP and ink that have fissured from their laminated layers are bits of rocks that have crumbled down into the crevice. As seen in the microscopic photographs, the outer layers of the BOPP ‘stack’ are clearly susceptible to losses from repetitive creasing, but the losses are more visually significant on the areas with higher transparency (i.e. less layers of opacified BOPP), mainly near the OVDs.
Loss of ink and/or polymer near the OVDs compromises the security of the notes and inhibits the notes from being properly scanned and recognized as authentic, valid currency. However, as these notes exist currently in a museum context, these losses from creasing do not greatly compromise the visual integrity of the notes nor the amount of information they deliver to a museum viewer. The museum audience can still ‘read’ and recognize the notes as particular national currencies, so there is little need to perform visual infill conservation treatments. While the structural stability of the note is at risk due to the damage to the support and the media, losses were only intermittent along creases, showing that these areas may have been heavily handled or were areas of week structure in the BOPP to begin with. The risk of further damage is drastically lowered with appropriate/minimal handling and storage. So although we have identified a type of damage that reduces an object’s original functionality, in their current context, the notes are better served with simple stabilization treatments by conservators.
My research mainly concluded that the BOPP deterioration reduced the functionality of the notes as monetary devices. In an archival setting however, I found the issues to have little chance of worsening (unless some significant mishandling or environmental disaster occurred to the notes), and even less chance of hindering the appropriate storage and/or exhibition of the notes. Furthermore, the treatments for similar types of damage in paper money are inapplicable due to material constraints (as mentioned in the previous post, there is little information on the various inks and particular micro-detailing of each OVD).
Any Possible Treatment Approaches?
That’s what I’d like to know! For various reasons, I’m not quick to label as a ‘quick fix’ the introduction of a consolidant to the area of loss, as might be appropriate with paper. In fact, conservation aside, the easiest way of fixing the ink and polymer losses from heavy creasing would be to recycle the note for a new note of equal value. For archival/museum/library professionals, this is never an option, as all objects acquired (however common) are accessioned assets of the institution.
So, What Are Some Possible Treatment Methods to Consider?
Applying a treatment method used in paper conservation, like consolidation, would be extremely time consuming for such a small treatment area (think back to the days of ‘an hour an inch’ for tape removal, but without the threat of imminent aggressive degradation) and possibly costly if it involved using materials similar to those used in the actual production of polymer notes. There is a chance that while working at a national institution, one would be able to request similar materials from national treasuries to consolidate and infill losses of BOPP and ink, but these chances narrow dramatically if you are working on a private collection. Removing the fragments from within the creases of the notes might be simple enough with an extremely small fine pointed brush or a micro spatula; but replacing the losses with new uninked BOPP layers, or even attempting to readhered the remnants correctly, would require god-like hand skills and taxing amounts of patience - all for a treatment that would not significantly add or detract from the original information the object was intended to deliver to the museum audience.
This discussion and case study hopefully exemplifies the uphill (but never daunting!) battle that conservators face with any new material introduced into their collections. For example, what if the Smithsonian’s future National Numismatic Collection (or any other museums that display money) exhibitions focus on the functionality of OVDs, and attempt to display micro images, or even the original notes under high magnification? The museum audience will see the damage, and so the curators and conservators will need to identify and talk about it on the object labels.
Conservation of new materials requires a lot of research, a willingness to find access to information when it isn’t always available to you, and a drive to discuss it amongst fellow colleagues and researchers. I have researched polymer money as far as I can without directly contacting CSIRO or a national treasury. I am still interested in contacting CSIRO or other parties to get more information on the production of OVDs and polymer note inks, and I leave it to you, dear Tumblr readers, to continue researching and sharing information about polymer notes.
Has anyone had experience working with a variety of media that have archival quality but a similar opacity and color to the original inks printed on BOPP (i.e. any objects conservators that have worked on candy wrappers, etc.)? Are there any ex-CSIRO scientists out there that have ever micro cross-sectioned an OVD ? And are there any other known, inert plastics or consolidants with similar surface qualities that could be used to stabilize losses in sheets of BOPP?
These are the questions that I’m left with at the end of this study, and that I hope to answer in the future. For now, I’d like to thank the Smithsonian National Museum of American History and the following people from their staff: Photographer Jaqueline Nash, Curator of the National Numismatic Collection Ellen Feingold, National Numismatic Collections Manager Hillery Dikker, NMAH Senior Paper Conservator Janice Ellis, and especially Paper Conservator Laura Bedford, who’s edits helped immesurably.
More research is underway, so tune in soon for more information about the wonderful world of conservation!
#art#art history#art conservation#conservation#paper conservation#plastic#plastic conservation#plastic money#numismatics#NMAH#National Numismatics Collection#Smithsonian#Smithsonian Institution#Paper#omgMONEY#omgplastic#omg paper#omg science#omgpaper#yay science#new materials#material science#cons4life#a.b. conservation
0 notes
Text
New Materials in Conservation: Plastic Money Part 2
Part two of this series of posts on new monetary materials will focus on how most polymer bank notes are made. First, we need to understand what the two primary materials involved are, based upon current publicly available information. Polymer bank note producers tested various materials for decades before finding an internationally accepted plastic that successfully meets all durability requirements.
History of Polymer Notes
Polymer notes were first created in Australia in reaction to two important discoveries: the detection of a large quantity of counterfeit 10AUD notes in circulation in the mid-1960s; and the knowledge that photocopiers were capable of producing high-quality money replicas and would soon be readily available to the public. Therefore, the Commonwealth Scientific and Industrial Research Organisation (CSIRO), an Australian group that researches new materials, were given a federal mandate to research alternative materials to paper that were suitable for monetary production. The American Banknote Company, an American private currency producer that successfully produced currency through the 1970’s and 80’s, considered Tyvek as a possible material for monetary production in the 1980’s, despite the fact that it was invented in 1955 and not considered by CSIRO as a suitable material.
The ABC proved to be heavy competition for CSIRO, with contracts for national polymer currency production in Costa Rica, Ecuador, El Salvador, Haiti, Venezuela, and Honduras, with the first notes being made for Haiti and Costa Rica. Now, anyone who’s worked with Tyvek knows that it may not be a woven material, but it is certainly porous and can hold water. It also isn’t a suitable support for the solvent-based ink printed on its surface. Other plastics were tested by CSIRO and the ABC until finally a laminated layer of Biaxially Oriented Polypropylene (don’t worry, we’ll get into that soon) was created by CSIRO. They chose a laminate of this plastic because of its durability and its ability to hold optically variable devices - small, iridescent or microscopically structured images, also abbreviated to OVD - to impede counterfeiting. BOPP bank notes are currently used in over ten countries instead of paper money, and with the UK’s switch to BOPP polymer notes in the next three years, the need for polymer note production is growing.
BOPP’s production process almost ensures long-term durability due to the pre-stressing of the plastic without additives. Additives in plastics aren’t always preservatives but can be compounds called plasticizers that impart flexibility or rigidity to a plastic depending on what’s desired. However, plasticizers often contain undesirable chemicals that affect the degradation process. Since BOPP is pure polypropylene, the plastic is inert and easily recyclable. So if your money ever gets damaged, just send it back to the plant to redeem it and get the damaged note recycled into new money.
For more information on the history of bank notes, check out this article by two former CSIRO polymer note engineers, as well as CSIRO’s own publication on the history of bank note production in Australia.
Intaglio Printing on BOPP
We all know what intaglio printing is (and if you’ve forgotten, here’s a reminder); rotogravure is the same process but with cylindrical presses to maintain consistent quality while printing large amounts. During high-volume runs of printing, rotogravure produces highly accurate images due to the amount of ink transferal onto the support, especially onto such thin films as BOPP laminate layers. There’s no direct heat applied throughout the printing process either, even though the machines require a lot of energy to run and maintain.

Rotogravure printing process. Image courtesy of Design Context
What is BOPP?
Yes, yes, knowing how to print the money is all well and good, but what about this crazy acronym?
Biaxially Oriented Polypropylene is polypropylene that has been pulled and stretched like taffy in one direction (machine direction), then pulled and stretched again along its width (transverse direction), and finally pulled again by being wound up in the machine direction before being used. This ‘taffy stretching’ has the same effect on BOPP as it does on taffy candy: the plastic looses rigidity yet retains strength. If you look at the image below, the last step in the transverse direction stretcher causes the polymer molecules to align in a criss-crossing matrix that imparts some serious stability to the plastic. In the end, you get a thin film of plastic that is flexible, easy to tear along an axis point, and has a surface most similar to calendared papers, giving it idyllic dimensional stability for printing.

BOPP processing machine diagram. Image courtesy of Mitsui Chemicals Tohcello, Inc.
As you can see, both the plastic production and the printing require a large amount of machinery. Despite a process seeming so cumbersome, BOPP is used for everything from hospital supplies to candy wrappers. It is easily mixed with other materials such as metals like aluminium, and it can maintain tensile strength and printing receptiveness despite variations in thicknesses and transparencies. However, while different printing inks, coatings, and adhesives have helped make BOPP one of the most common forms of polypropylene available, chemical data sheets about these new inks, coatings and adhesives is very difficult to come by and even more difficult to comprehend without a doctorate in chemistry. A lot of brands and treasuries make their own specific printing inks, and in the case of polymer notes, CSIRO does not release material information about their printing inks because of security risks.
How is BOPP processed for money specifically?
Above is the treasurer’s seal from a 2011 Zambian polymer Kwatcha. There are small transparent micro-dots of BOPP on top of the seal. Image courtesy of Jaclyn Nash and the Smithsonian NMAH.
Processing BOPP for currency can be both more and less complex than processing paper for currency. Polymer notes are made with the single intention of being more difficult to replicate by piling on security measures that make the notes a challenge (but with the right machinery, not impossible) to accurately reproduce. For example, this image of a treasury seal on a Zambian Kwatcha is overlaid with micro-dots of BOPP as a further security measure to protect the note from counterfeiting. These varying layers of BOPP, along with additional security devices, make polymer notes unique compared to paper notes, as they implicate micro-3D authentication.
When used as a support in monetary printing processes, BOPP goes through a process of production and printing. First, two layers of BOPP are pressure-laminated. One area of this base layer is always left transparent, and that is where the Optical Variable Device can be placed and/or printed. Different countries manufacture their OVDs differently, depending on their particular security risks. Next, the OVDs are put into place (the image below calls the OVD a ‘vignette’) before another second or in some cases, third opacified or printed BOPP layer is laminated on top; this additional layer always surrounds but never overlaps the transparent area for the OVD ‘vignette’. Finally, solvent-based ink is printed onto the surface of the plastic through rotogravure, before a final laminate layer of BOPP is applied. All of this information is readily available to the public, as it is a similar process to how candy wrappers are made (sans OVDs, of course).
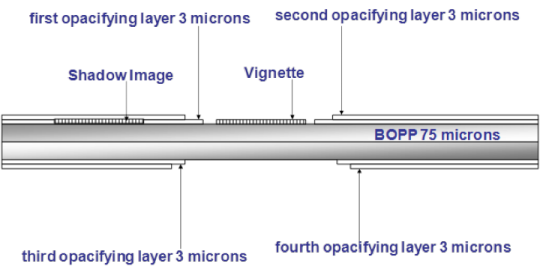
Layers in a polymer note. Image courtesy of Innovia Security.
Now we have the final multi-layered product: money that is water resistant with stable media and a high resistance to tearing. Sounds perfect, right? Then why did I find losses of ink and plastic in a number of newer polymer notes in our collection?
Tune in next time, for the FAILURE OF PLASTICS or, Part Three of the New Materials Discussion.
#conservation#art#art conservation#art history#numismatics#NMAH#National Museum of American History#yay science#science#polymer#biaxially-oriented polypropylene#polypropylene#plastic#omgplastic#omgmoney#money#plasticmoney#BOPP#new materials#material science#history#archival#archives#archival conservation#books#preservation#how is money made#money money money
0 notes
Text
New Materials in Conservation: Plastic Money Part 1
Hello, Tumblr!
I must apologise for baiting you with new material every month or so. I’ve been working on a very fun conservation project at the Smithsonian’s National Museum of American History and have been not only tied up with work but with a transatlantic (and temporary) move back to the UK, where it all began for me ‘conservationally’-speaking. For the past five months, I’ve had the pleasure of working closely with NMAH Senior Paper Conservator Janice Ellis and Curator of the National Numismatic Collection Ellen Feingold on preparing historic currency for the newly opened exhibit, The Value of Money (and no, I have not been making it rain…).
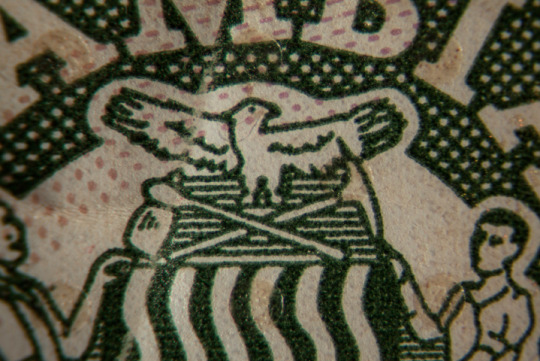
The notes chosen from the National Numismatic Collection for the exhibit included plastic-based money, which originated in Australia and is now used in over 15 countries worldwide. Plastic money is a relatively new preferred alternative to the typical paper note; it’s water resistant, lightweight, very easily recyclable, much more malleable, and made to last.

One side of the Bicentennial Australian $10 Note. Image courtesy of sterlingcurrency.au
But time is a cruel mistress regardless, and with the help of some microscopic investigation, I’ve been able to pinpoint some instances of deterioration in this new material already. So over the next few posts, I’d like to highlight these issues while discussing how conservators might approach these new materials.
This first post will definitely be on the philosophical side (i.e. not technical enough for some toolheads), but in any profession, a good plan of attack requires some forethought. So without any further ado…
The Constant Researcher
Any conservator who works with modern artefacts can attest to the struggle of determining the chemical composition of modern man-made materials. ‘Modern’ to a conservator (and most specialist historians) generally implies anything younger than 30 years old. Some materials created within the past 70 years are grouped under the ‘modern’ umbrella because they have unique compositions (and by unique, I mean extremely complex and difficult to research). This series of blog posts will focus on a particular type of plastic, but there are thousands of new materials entering museums with each year’s new acquisitions. There are some pros and cons to working with new materials, which when properly identified, can really help speed up your assessments and treatment planning.
‘New’ to a conservator means within the past 20 -30 years, which implies two things: One, ‘new’ is clearly relative as any historian will tell you, but this means that whatever ‘new’ materials conservators come into contact with are already beginning their degradation process, so degradation is always the first aspect to keep in mind. Two, because the materials are made for other industries and professions, we as conservators have to ‘vet’ materials to assess their composition and ‘life-cycle’ before asserting full comprehension of the behaviour of the material.
Pros and Cons
Let’s break down some of the pros and cons of working with new materials.
Pros:
Data sheets for new material: Modern materials often have product data sheets that detail the chemical composition of the material. They’re usually available to the public on the company website, especially if the material is used in an industrial environment.
Most companies are still around and can be contacted: these industrial chemical/material manufacturers usually have a contact number/email/address. So, contact them! It never hurts to ask about the information they put out.
A lot of new materials are more inert than the materials we are used to: many new materials are plastics, and some plastics take an extremely long time to begin their degradation cycle. This isn’t always a particularly good thing (especially for the environment when the material finally does degrade), but it is a very good piece of information for conservators. The known rate of degradation should be the first question asked when searching for information about the material.
Cons:
When they begin their degradation process, many plastics degrade startlingly fast, (see Table 4 in this great general study of plastic degradation by Webb, Arnott, Crawford and Ivanova) and most new materials that are manmade include some type of plastic. Additionally, only the slightest difference in chemical composition will cause one plastic to deteriorate exponentially faster when compared to another plastic of similar composition. So always make sure you know what you’re working with!
Some companies will only have contact information available for use by the trade, not private buyers like small conservation practices. Some companies keep their material compositions to themselves, as private trade secrets (the mystery behind Starlite is still unknown….). Identification of plastics can be extremely difficult without any clues as to its composition, so you might be left in the dark.
As a paper conservator, how can treatments like infills, mends, or consolidation be attempted with materials without access to complete compositional information about the materials to be treated? It’s one thing if you’re working with a plastic three-dimensional object, but something as thin as polymer money can’t exactly be welded back together without reducing the intangible integrity. And once you’re up against that barrier, it is time to put the tools down and think about what any treatment would actually contribute to the object as a museum artifact.
If conservation didn’t exist, we could just ‘fix’ the polymer notes as one would tape up a torn dollar bill that came out of the wash, but it is important to remember that once an object enters the collection at a museum or an institution, its primary function is as a static representation of original functionality. The way we use money in our day-to-day lives gives a temporal physicality through nicks, creases and losses gained over time. And as mundane as it may seem, it is this use that gives money (and all objects) a history – a ‘life,’ if you will - that we as museum professionals interpret and exhibit. ’It’s easy to get caught up in the fact that it is money, but its function within a museum setting is the same as all other objects within the museum – representational information. What’s a conservator to do?
Tune in with the next post, which breaks down some of the chemical composition of polymer notes!
#conservation#art conservation#paper#paper conservation#omgpaper#omgplastic#poylmer#plastic#plastic money#currency#material science#BOPP#biaxially-oriented polypropylene#polypropylene#new materials#ethical standards#books#ethics#museums#archives#libraries#library#Heritage Studies#heritage#preservation#history#science#fibre science#yay science#aesthetic philosophy
17 notes
·
View notes
Photo
Check out my friend and former classmate Nicole Monjeau's collection of unique conservation tools at cmog!
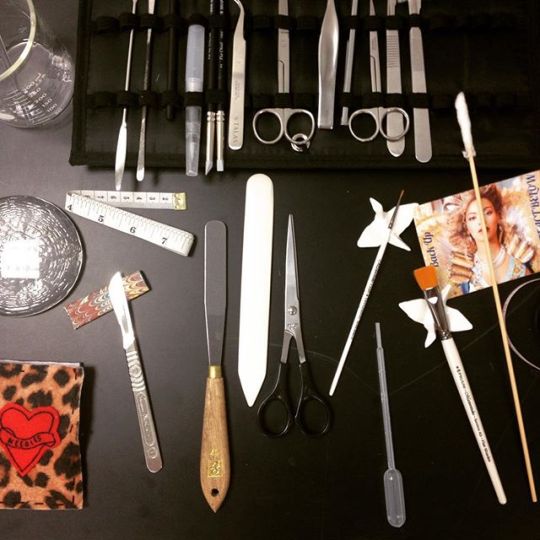
Happy Friday afternoon! Nicole and Natasa here for #CMoG. Ever wonder what kinds of tools can be found in a #conservation lab? Here are some of our favorites! http://ift.tt/1eGPPeQ
44 notes
·
View notes
Video
Keep up the good work!
vine
Michelle Krause, NYU MIAP ‘16 & @nyplpreserve intern, makes #adhesivecoated #paper #repair #materials for future #conservation #treatments
nypl
46 notes
·
View notes
Photo


174K notes
·
View notes
Text
I probably shouldn’t...
Especially since this is my first post in ages...
But please please please vote for the National Museum of American History in this years Museum Dance Off 2!!! We’ve really worked hard and due to legal constraints are unable to publicise as well as the other museums (not everyone can get on the national news, Canada...).
I’ve been lucky enough to work with the wonderful people at NMAH for nearly a year, both as an employee and as an intern in the past, and I promise you’ll get a good laugh out of us.
You can vote as many times as you like, for anyone you like. So vote for everyone (just us a little more)!
http://whenyouworkatamuseum.com/
#when you work at a museum#museumdanceoff2#nmah#nationalmuseumofamericanhistory#smithsonian#mchammer#mc hammer#hammer time#pleeeeeeeeeeeease#please vote#america#history
0 notes
Photo
Bedazzled Googly-eyes #science #cons4life #conservation #fabo #thehustleisreal #bedazzled
2 notes
·
View notes
Link
Long time no see, tumblr. I have a few posts in the pipeline, but snow and my new(ish) job have kept me very busy!
I thought I'd share this article to acknowledge these brave archaeologists and art historians. It takes a lot of passion to decide to risk your life preserving history and culture. Politics and beliefs aside, the destruction of historical and cultural evidence is detrimental to everyone - if someone you know doesn't know this, tell them! The fire of the Alexandria Library is evidence enough; imagine the entire internet got erased, and you needed to learn how to bake that cake, or make that science project, or filter your water. Exactly.
The men and women featured in this article are an inspiration; not to say everyone should go out on the front lines for art, but they certainly make others like myself proud to work in the fields of conservation and archaeology.
Light Super Hero Reading
If you haven't read about the Monuments Men, I recommend it (this is one of the best books I can recommend). Also, for some more modern, cross academic heroics (that doesn't involve war), the Archimedes Codex is a great and easy to read non-fiction about the rediscovery of the great mathematicians work.
Up next, more tools, more methodology, and more science (I know you all love that last bit)!
ON FEBRUARY 26, ISIS released a video of its militants smashing ancient Assyrian artifacts in the central museum in Mosul, Iraq. In a matter of minutes, they jackhammered the face of a famous 1,400-year-old Assyrian winged bull and broke apart four 2,000-year-old statues of the kings of Hatra....
#artheroes#archeology#arthistory#art#archeologicalnews#cons4life#conservation#history#hero#war#destructionofculture
556 notes
·
View notes
Photo
Now isn't this so much kinder than dog-earring pages? Happy belated New Year! Let's have more sweet surprises like this one!


Someone folded up their library check-out receipt into a paper crane, and left it in the back of this book.
11 notes
·
View notes
Text
A Brief, Boxy Interlude

Apologies for the delay in posts! Before we get into more conservation science and treatments, I just wanted to pause and talk about enclosures like this box, handmade for the Smithsonian National Museum of American History. Enclosures are a vital part of the preservation process, and conservators give a lot of attention to detail when it comes to this particular subject.
We got Chemistry
The first thing to think about when making an enclosure is the chemical stability of your materials. What is the object made of? Does it need to to keep a particular pH or does it just need to be kept neutral (around pH7)? Certain paper and photographs require acidic conditions, but most require neutral or alkaline (basic) conditions to maintain a 'healthy' object pH. As I work with paper, we generally want to keep objects and documents from acidic degradation that makes paper brown and brittle. So always use materials that are pH appropriate and keep this pH and general chemical stability for a long time (+100 years).

Cool it
Temperature and humidity are vital! Your enclosure and storage location need the correct temperature and humidity or else all of this will be for naught. There is no perfect temperature and humidity for all materials, the range will vary to accommodate your object. However, consistency is the most important thing. An example: most paper should be kept at 70°F± 5°, 50%RH ± 5% according to most american requirements. Brits (and others) should use standard PD:5454 2012 for a guide to appropriate environmental requirements.
It's Couture, Darling!
Bespoke enclosures may be considered time consuming, but the benefits for the object enclosed are vital. Each enclosure should be made specific to the item. Book shoes are a perfect example; if you don't know what book shoes are, don't just Google it or you'll get tons of comic book shoes. They are essentially folders for books, but with an added square support for the text block of the book. If you're outfitting a library with book shoes, you'll realize in an instant that if all books are different dimensions. Thus, the square support has be different for each book, if they're going to work.
Don't worry, all of that hard work in making different, perfect enclosures for each object may seem tedious, but in the long run, a well stored object will survive the test of time much better than a similar object in desultory conditions.
For more information, check out these links!
https://www.nedcc.org/free-resources/preservation-leaflets/4.-storage-and-handling/4.4-storage-enclosures-for-books-and-artifacts-on-paper
https://www.library.cornell.edu/preservation/librarypreservation/mee/preservation/stabilizationandhousing.html
http://www.loc.gov/preservation/care/paper.html
http://www.nps.gov/museum/publications/conserveogram/19-15.pdf
http://www.indiana.edu/~libpres/manual/glossary.html
Happy boxing!
#boxes#omgboxes#omgpaper#paper conservation#paper#conservation#art conservation#artifacts#archive#archival#preservation#storage#National Museum of American History#cons4life
4 notes
·
View notes
Photo


The Final Countdown!
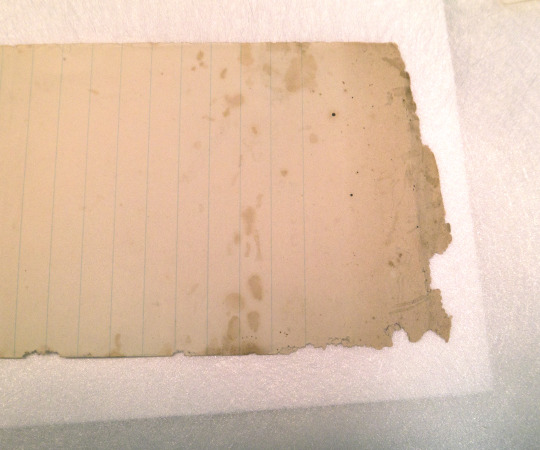
My blood pressure is climbing just from writing this post and remembering the tense few hours spent doing this treatment after ten weeks of intense research. And yet, I'm smiling like crazy at the same time, because I know it was a success!
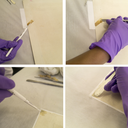
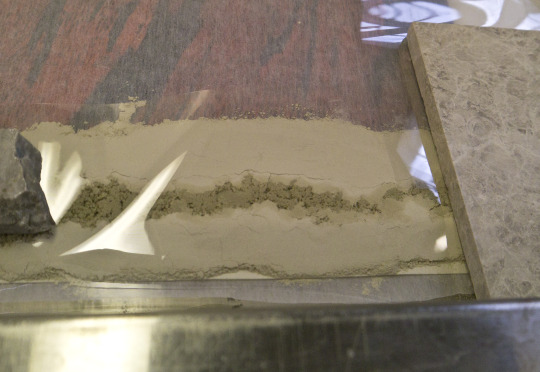
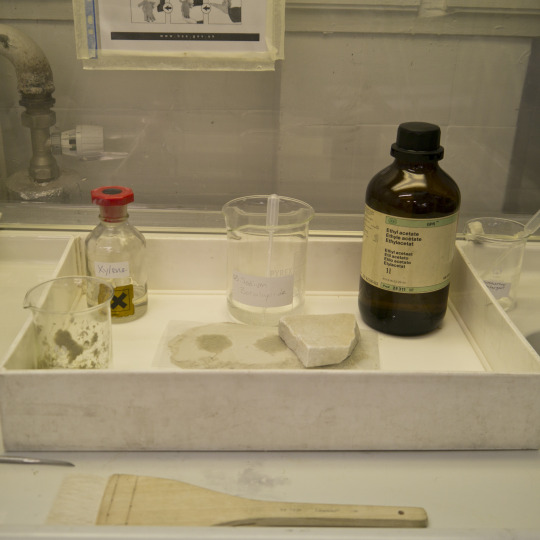
Let's get into this. Before any treatment was handled, I tested Hong Feng After testing the solvents, and calculating (with assistance from my lovely lovely classmates) the risk of using fuller's earth (diatomaceous earth) with multiple solvents of varying polarity, as well as sodium based solvents that could grip the silica in fuller's earth and make water glass that would be irremovable from the paper substrate, we proceeded with the final treatment on the print. Taking care to only treat the outer edge of the stain, we first applied lipase in agar onto the print, over a photographic hot plate (not pictured)
Then, two 'walls' of dry fuller's earth were applied to the treatment areas on the verso of the print (with thin, tightly knit polyester webbing protecting the recto and verso of the image area). A mixture of 1:1:1:3 - Xylene:Ethyl Acetate: 0.01% w/v Sodium Borohydride:Fuller's Earth - was made into a paste and applied between the lines of dry fuller's earth. The system was left in a fume cupboard overnight, and was removed in the morning.
The Result?
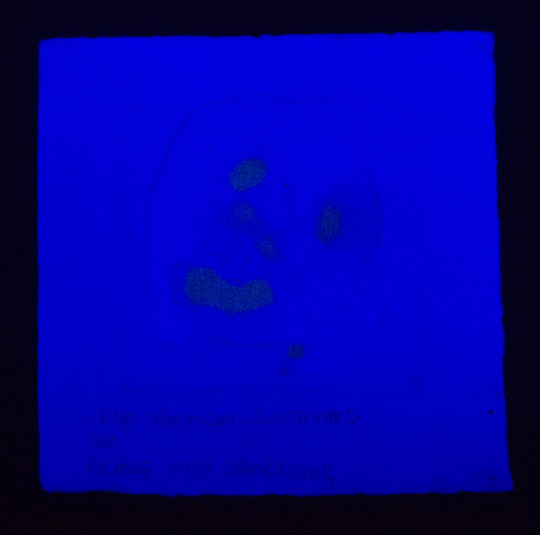
The fuller's earth poultice was removed before being completely dry (even after 24 hours), so some tidelines were created. Luckily, the final rinse of acetone over a suction table cleared them right up, and removed any residual discoloration and oil. The stain was visibly lighter along the edges in visible and UV analysis.
Any further thoughts?
I think I could have expanded the testing significantly with better analytical tools - especially an NMR machine, to really figure out what type of linseed oil I was actually dealing with - but above all, I think I needed better pH meters, so that I could have included pH readings in my analysis. Unfortunately, our lab only had wet pH meters, which would have been difficult to use on the resin stains. Otherwise, I'm interested to do further research in oil stain removal tests, and am glad I had this experience!
#cons4life#art conservation#conservation#paper#paper conservation#dissertation#stain remover#oil stain#linseed#linseed oil removal#stain
0 notes
Photo


Disseration Part 4: We've Got Chemistry!
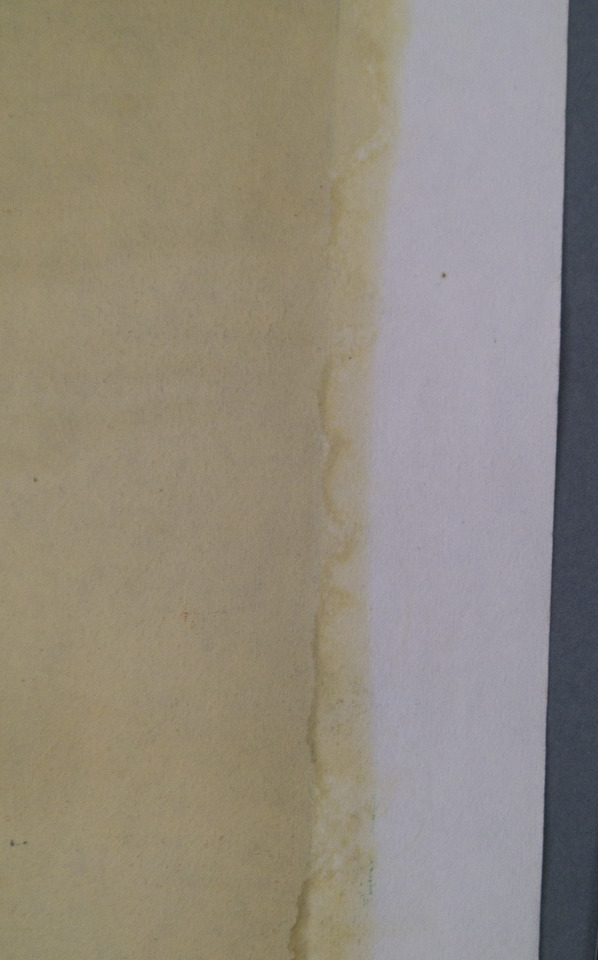
Short post today, as this part of the testing went by so swimmingly! So, we left off at artificial testing. However, ideal world situations can only happen in an ideal world, so I was fortunate enough to test the lipase-chemical-bleach combo on some naturally aged samples provided by a printmaker in Canada.
What chemicals were finally chosen? If you look back a few posts, I put up a picture of a few artificially aged samples cut into slices. That was an initial permeability experiment with chemicals that were between tryglycerides and water in polarity, to help the lipase in breaking down the dried oil coating the paper fibres. The most successful of these chemicals were ethyl acetate and the xylene, applied slowly and in succession. However, these chemicals are harmful in prolonged exposure times, and are too aggressive to leave on the paper. So, a fuller's earth poultice of ethyl acetate, xylene, and 0.01% water per volume solution of sodium borohidryde (a wood pulp bleaching agent). While some lateral spread of the solublized oil occurred, the increased permeability and dramatic reduction of the stain proved that these materials, if not this application, were the best methods of stain removal possible for linseed oil stains.
The experiment went very successfully, reducing the amount of oil within the paper without reducing the amount of oil left as a binder in the ink, increasing permeability, and reducing the appearance of the stain. A small sample area along the border of the print was also tested, and the results proved conclusive enough to test the whole border. Success is sweet.
Next up, The Final Countdown!
#cons4life#conservation#paper conservation#omgpaper#chemistry#stain remover#oil stain#dry cleaning science#art conservation#art
0 notes
Photo


Dissertation Part 3: Testing, testing, 1 - 2 - 3!
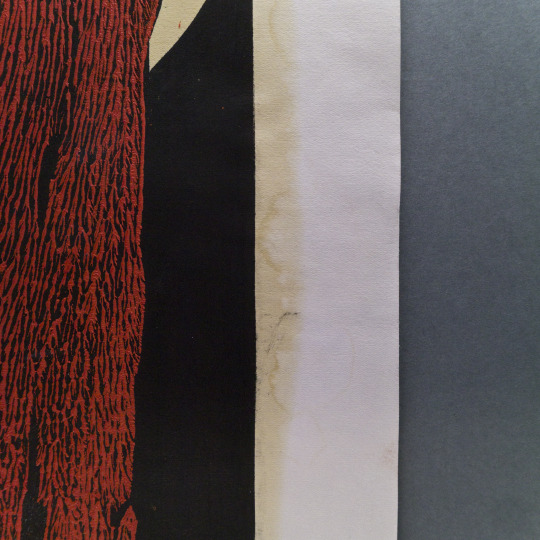
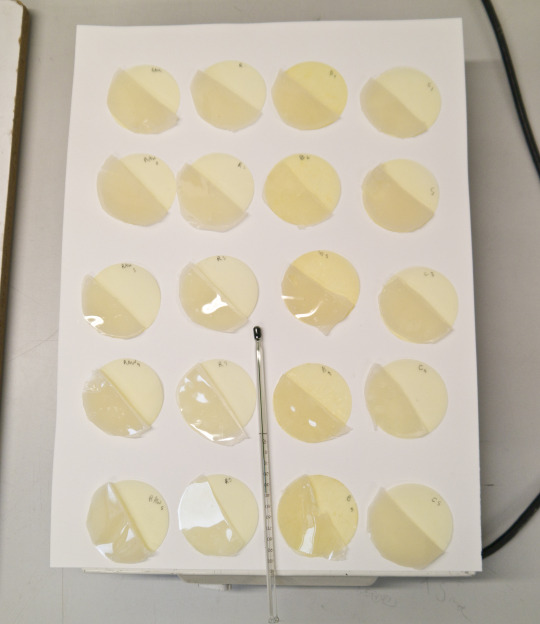
Well well well, what do we have here? Sorry I'm late with this post, to the few who are watching. Got a little caught up in the present, learning how to make book/object boxes. However, I am back and ready to talk about artificially aged sample testing. Get ready for some serious experimental research!
So, what are these little circles of paper? I needed a 'perfect world' sample to start my linseed oil removal tests, so I chose Whatman Filter paper no. 1, made of 100% pure cellulose fibres. I call it a 'perfect world' sample, because it is very rare for any paper companies to use 100% pure cellulose to make their paper, be it for printing, drawing, painting, etc. This is because pure cellulose fibres are not the most economical or practical material for the purpose of paper use, but that is a story for another day. So, 'pure' paper is used in testing to provide a relatively accurate depiction of what happens to the cellulose component of paper.
What do you mean, artificially aged? Artificially aged means that I used various techniques to replicate the ageing process of paper. Paper ages like most organic things do; with a combination of heat and other chemical reactions over time. In this situation, I just baked the paper in an artificial ageing oven at 100˚ C for 72 hours. That provided more than enough time and heat to cause the exothermic degradation of cellulose that I needed.
Then what are those oils and what is that crazy jelly on the samples? I applied a few drops (less than 10 ml) of linseed oil to the samples before ageing them, to replicate the ageing of the print Hong Feng. After ageing the samples, I began testing my method of oil stain removal, starting with Lipase in agar gel. I applied the gel to half of each sample for 45 min while on a photographic hot plate (photographic hot plates are easier to regulate, and enzymes generally die around 50˚C), and then tested the samples with water over a suction table to test permeability, or the ability of a liquid to pass through the oiled paper. And lo and behold, success! Permeability achieved, albeit a little on the weak side (and apologies for the weak quality of the last photograph).
Stronger stuff was clearly necessary to break down the last layer of oil that resided around and within the paper fibres. While there was some worry about how much treatment the aged cellulose fibres would be able to handle, research has shown that the fibres were literally encased in oil/resin, both protecting the fibres from damage as well as acidifying and accelerating damage. Furthermore, no change in the colour of the samples was noted from this first step, and the main goal of linseed oil stain removal is the stain removal part. So, I needed chemicals that could break down the rest of the hardened oil without damaging the paper fibres, and something to bleach the soluble discolouration (yellow stain) that accumulated from the ageing linseed oil.
Next up, Playing with Chemicals!
P.S. If anyone is curious, I analysed colour change with a Minolta Colorimeter, which is a wonderful machine that analyses colors based on the human visual spectrum.
#lipase#dissertation#cons4life#conservation#paper conservation#science#yay science#geekery#omgpaper#minolta#colorimeter#sample testing#science girl
0 notes