#//anyway just posting this now because i Finally finished the colours + background + shading + effects + text and i'll never finish it if i
Text
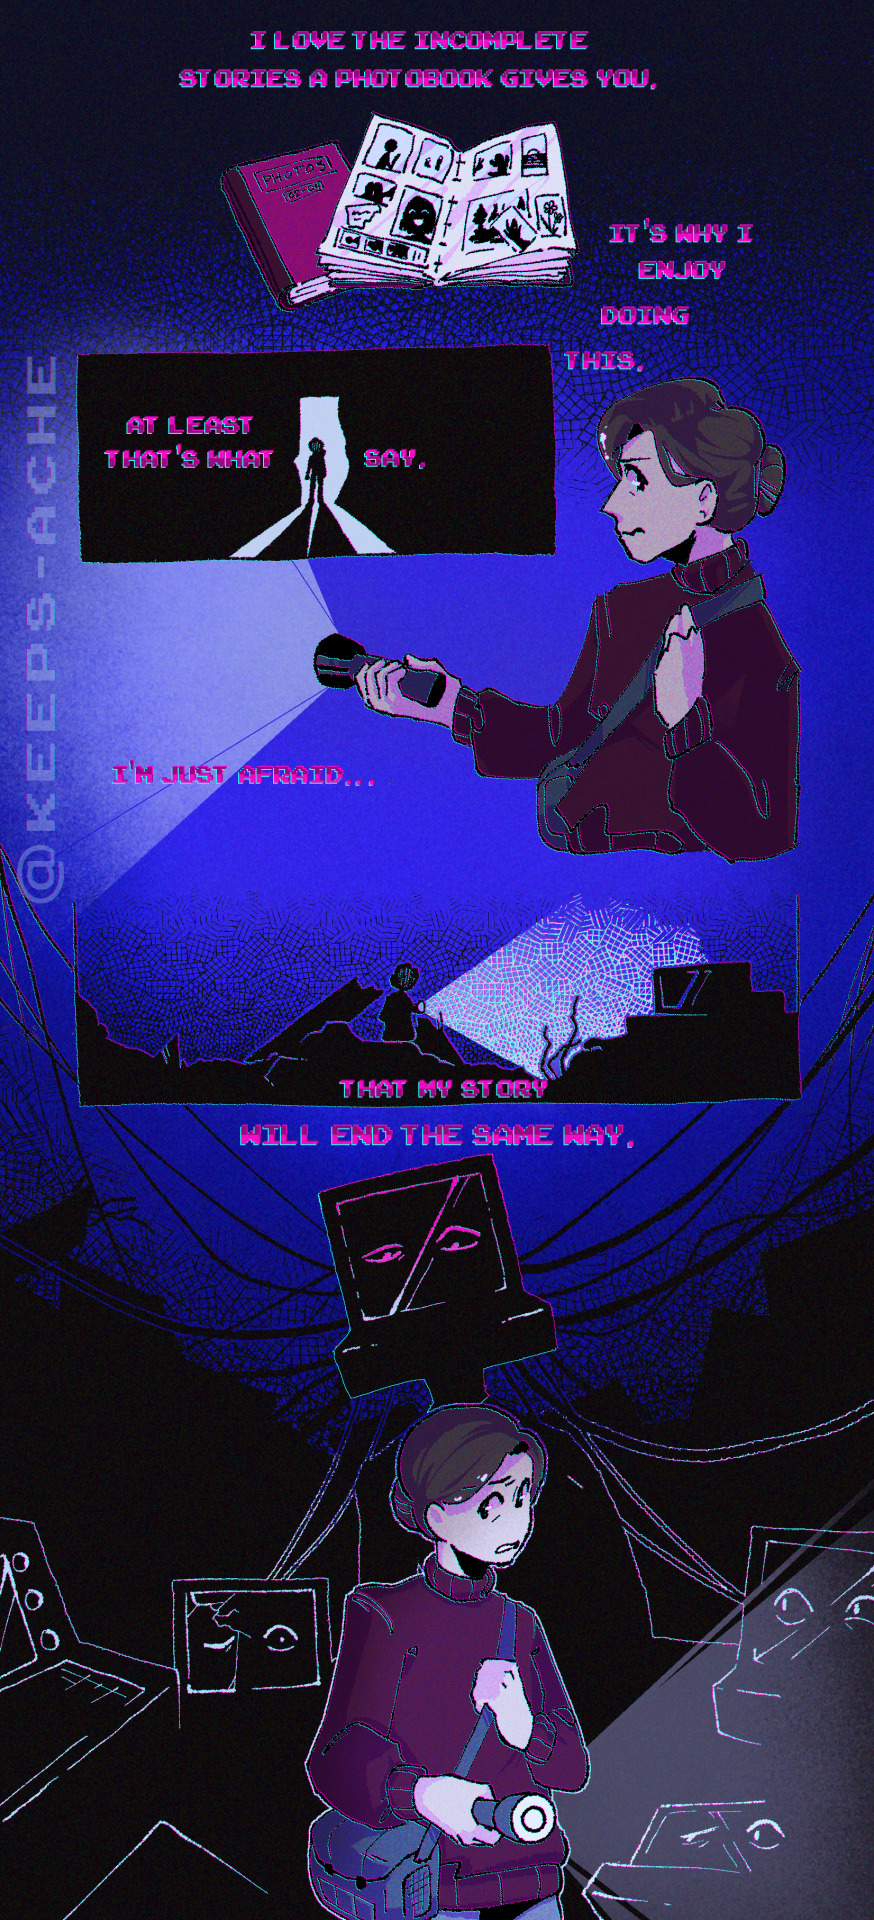
hobbies can be pretty scary
#art#my art#artists on tumblr#digital art#oc#not a zip file#a scary#tw scopophobia#this is kinda spoopy but also i don't know what else to tag fhvsh#lmk if i gotta add tags 👍 fvsh#//anyway just posting this now because i Finally finished the colours + background + shading + effects + text and i'll never finish it if i#don't stop now lol#//Charlie does photography :>#they especially like documenting and learning about abandoned sites#though of course that's not the safest thing to do but they enjoy it :)#/they're currently in West Warren Laboratories which was known for some funny accidents#i'm having fun coming up with the things that happened there before the main characters meet though :3#//oh stars how am i supposed to post this on artstreet fvhshf#//okey i'm going now !! by- [vanishes]#//edit: i just realized i left one of the layers off fvshvsbfhvsjfj (fixed it rn hhh)
20 notes
·
View notes
Photo
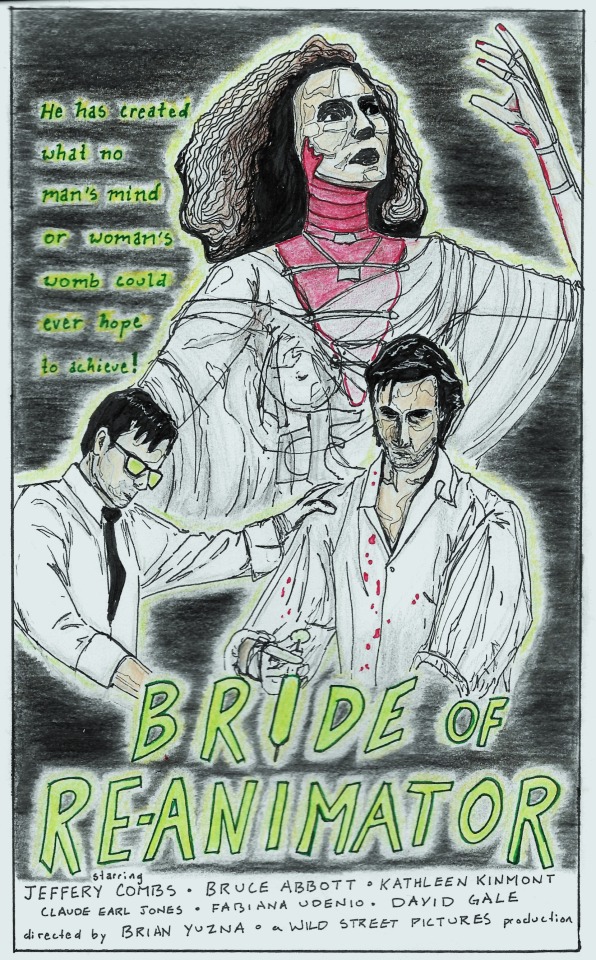
My (dubiously successful) attempt at a vintage/pulp style inspired movie poster/cover for Bride of Re-Animator!
okay!! so i started this ages ago for the “inspirations” day of martch because while I wasn’t sure what’s actually influenced/inspired my usual art style but I did know that 1) I really love those hand painted vintage horror movie posters with the eye-catching colours and dramatic shading and compositions and over-the-top taglines, especially the really pulpy ones, and 2) weird 80s body horror movies and campy b movies give me life, and 3) for a little while I’ve been wanting to do a project redesigning the posters for some of my favorite movies in that vintage poster style, and that prompt finally inspired me (ha) to start!! but
it took me a while to finish because I never actually finish projects / do a proper thing with pencil first then pen then coloring and needing to actually look how you want it to etc etc and then I did finish but I was afraid to post it for a few days... i made some stupid mistakes while inking it while sleep deprived and I couldn’t get the background solid and dark enough and the shading on the faces wasn’t showing up in pictures so i drew some lines and regretted it! and the colours were still all showing up funny but anyways!! green and red are complimentary so let’s just pretend this works for day 8 too? I’m maybe viewing this less as a finished project and more as a mock-up for something better later on, and i do still want to do more of these for other movies even though i feel silly for having spent so much time of this already but whatver this was fun and I definitely have even more appreciation now for the artists behind those old posters because this shit is hard!!
#mARTch#martch 2022#martch2022#bride of re-animator#re-animator#horror movies#movie poster#pulp horror#jeffery combs#bruce abbott#kathleen kinmont#except somehow she kind of looks like whats her face fiona shameless here idek how#actually every aspect of this is fucked up in some way but like... maybe all together it works? idk I spent too long on it too not post it#somehow i feel like fanart hidden in a sketchbook is more embarrassing than just posting it on tumblr but idk if that's true or not#like the night after i finished this i had an insane dream abt bruce abbott that has also been sitting it my drafts...#art#pls love me#this looks better when it's small go look at it in the tags and pretend that's just how it looks pls#also i'm legit proud of the syringe-as-I thing except maybe if i were to do it again i'd use it as the i in reanimator and have bride up#above?#except dan is injecting it into the bride in the scene it it does work like this too
44 notes
·
View notes
Photo
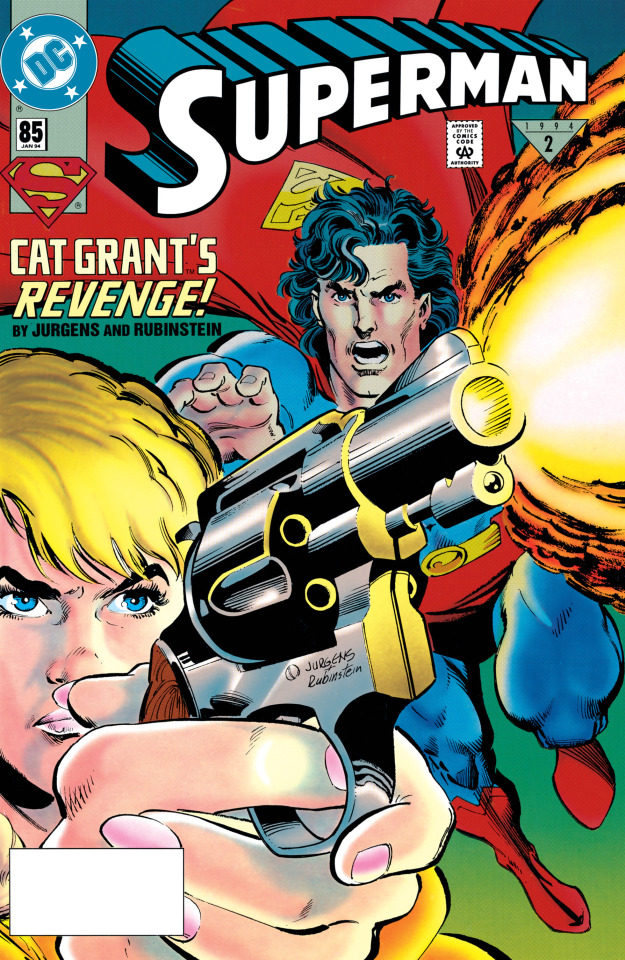
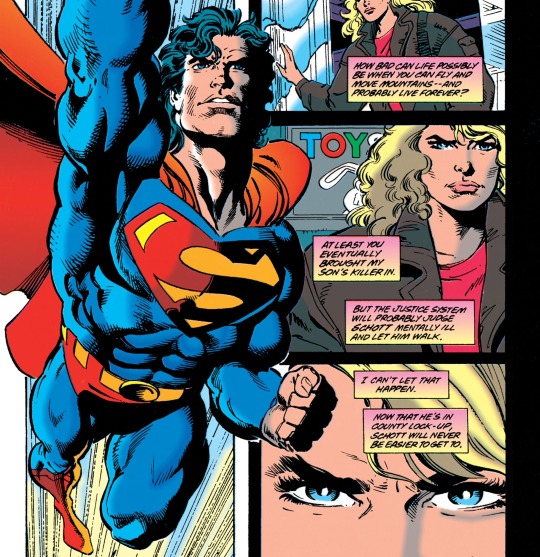
Superman #85 (January 1994)
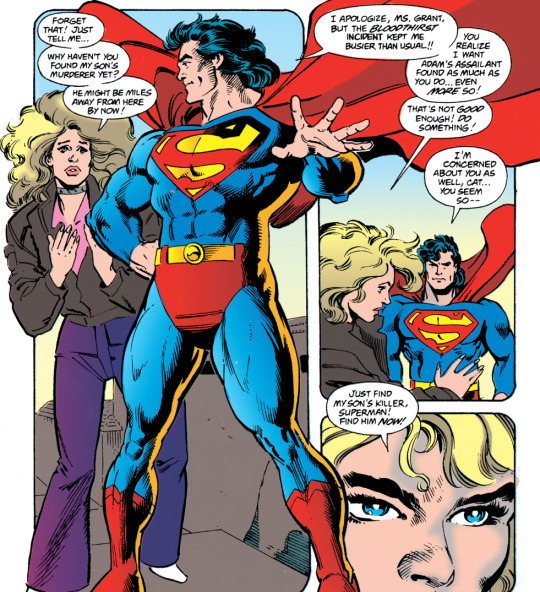
Cat Grant in... "DARK RETRIBUTION"! Which is like normal retribution, but somehow darker. On the receiving end of Cat's darktribution is Winslow Schott, the Toyman, who suddenly changed his MO from "pestering Superman with wacky robots" to "murdering children" back on Superman #84, with one of his victims being Cat's young son Adam. Now Cat has a gun and intends to sneak it into prison to use it on Toyman. She's also pretty pissed at Superman for taking so long to find Toyman after Adam’s death (to be fair, Superman did lose several days being frozen in time by an S&M demon, as seen in Man of Steel #29).
So how did Superman find Toyman anyway? Basically, by spying on like 25% of Metropolis. After finding out from Inspector Turpin that the kids were killed near the docks, Superman goes there and focuses all of his super-senses to get "a quick glimpse of every person" until he sees a bald, robed man sitting on a giant crib, and goes "hmmm, yeah, that looks like someone who murders children." At first, Superman doesn't understand why Toyman would do such a horrible thing, but then Schott starts talking to his mommy in his head and the answer becomes clear: he watched Psycho too many times (or Dan Jurgens did, anyway).

Immediately after wondering why no one buys his toys, Toyman makes some machine guns spring out of his giant crib. I don't know, man, maybe it's because they're all full of explosives and stuff? Anyway, Toyman throws a bunch of exploding toys at Superman, including a robot duplicate of himself, but of course they do nothing. Superman takes him to jail so he can get the help he needs -- which, according to Cat, is a bullet to the face. Or so it seems, until she gets in front of him, pulls the trigger, and...

PSYCHE! It was one of those classic joke guns I’ve only ever seen in comics! Cat says she DID plan to bring a real gun, but then she saw one of these at a toy store and just couldn't resist. Superman, who was watching the whole thing, tells Cat she could get in trouble for this stunt, but he won't tell anyone because she's already been through enough. Then he asks her if she needs help getting home and she says no, because she wants to be more self-sufficient.

I think that's supposed to be an inspiring ending, but I don't know... Adam's eerie face floating in the background there makes me think she's gonna shave her head and climb into a giant crib any day, too. THE END!
Character-Watch:
Cat did become more self-sufficient after this, though. Up to now, all of her storylines seemed to revolve around other people: her ex-husband, Morgan Edge, José Delgado, Vinnie Edge, and finally Toyman. After this, I feel like there was a clear effort to turn her into a character that works by herself. I actually like what they did with Cat in the coming years, though I still don’t think they had to kill her poor kid to do that -- they could have sent him off to boarding school, or maybe to live with his dad. Or with José Delgado, over at Power of Shazam! I bet Jerry Ordway would have taken good care of him.
Plotline-Watch:
Wait, so can Superman just find anyone in Metropolis any time he wants? Not really: this is part of the ongoing storyline about his powers getting boosted after he came back from the dead, which sounds pretty useful now but is about to get very inconvenient.
Don Sparrow points out: "It is interesting that as Superman tries to capture Schott, he at one point instead captures a robot decoy, particularly knowing what Geoff Johns will retroactively do to this storyline in years to come, in Action Comics #865, as we mentioned in our review of Superman #84." Johns also explained that the robot thought he was hearing his mother's voice due to the real Toyman trying to contact him via radio, which I prefer to the "psycho talks to his dead mom" cliche.

Superman says "I never thought he'd get to the point where he'd KILL anyone -- especially children!" Agreed about the children part but, uh, did Superman already forget that Toyman murdered a whole bunch people on his very first appearance, in Superman #13? Or does Superman not count greedy toy company owners as people? Understandable, I guess.
There's a sequence about Cat starting a fire in a paper basket at the prison to sneak past the metal detector, but why do that if she had a toy gun all long? Other than to prevent smartass readers like us from saying "How did she get the gun into the prison?!" before the plot twist, that is.
Patreon-Watch:
Shout out to our patient Patreon patrons, Aaron, Murray Qualie, Chris “Ace” Hendrix, britneyspearsatemyshorts, Patrick D. Ryall, Bheki Latha, Mark Syp, Ryan Bush, Raphael Fischer, Dave Shevlin, and Kit! The latest Patreon-only article was about another episode of the 1988 Superman cartoon written by Marv Wolfman, this one co-starring Wonder Woman (to Lois' frustration).

Another Patreon perk is getting to read Don Sparrow's section early, because he usually finishes his side of these posts long before I do (he ALREADY finished the next one, for instance). But now this one can be posted in public! Take it away, Don:
Art-Watch (by @donsparrow):
We begin with the cover, and it’s a good one— an ultra tight close up for Cat Grant firing a .38 calibre gun, with the titular Superman soaring in, perhaps too late. An interesting thing to notice in this issue (and especially on the cover) is that the paper stock that DC used for their comics changed, so slightly more realistic shading was possible. While it’s nowhere near the sophistication or gloss of the Image Comics stock of the time, there is an attempt at more realistic, airbrushy type shading in the colour. It works well in places, like the muzzle flash, on on Cat Grant’s cheeks and knuckles, but less so in her hair, where the shadow looks a browny green on my copy.
The interior pages open with a pretty good bit of near-silent storytelling. We are deftly shown, and not told the story—there are condolence cards and headlines, and the looming presence of a liquor bottle, until we are shown on the next page splash the real heart of the story, a revolver held aloft by Catherine Grant, bereaved mother, with her targeting in her mind the grim visage of the Toyman.

While their first few issues together meshed pretty well, it’s around this issue that the pencil/inks team of Jurgens and Rubinstein starts to look a little rushed in places. A few inkers who worked with Jurgens that I’ve spoken to have hinted that his pencils can vary in their level of detail, from very finished to pretty loose, and in the latter case, it’s up to the inker to embellish where there’s a lack of detail. Some inkers, like Brett Breeding, really lay down a heavier hand, where there’s quite a bit of actual drawing work in addition to adding value and weight to the lines. I suspect some of the looseness in the figures, as well as empty backgrounds reveals that these pencils were less detailed than we often see from Jurgens.
There’s some weird body language in the tense exchange between Superman and Cat as she angrily confronts him about his lack of progress in capturing her son’s killer—Superman looks a little too dynamic and pleased with himself for someone ostensibly apologizing. Superman taking flight to hunt down Toyman is classic Jurgens, though.
Another example of art weirdness comes on page 7, where Superman gets filled in on the progress of the Adam Morgan investigation. Apparently Suicide Slum has some San Francisco-like hills, as that is one very steep sidewalk separating Superman and Turpin from some central-casting looking punks.
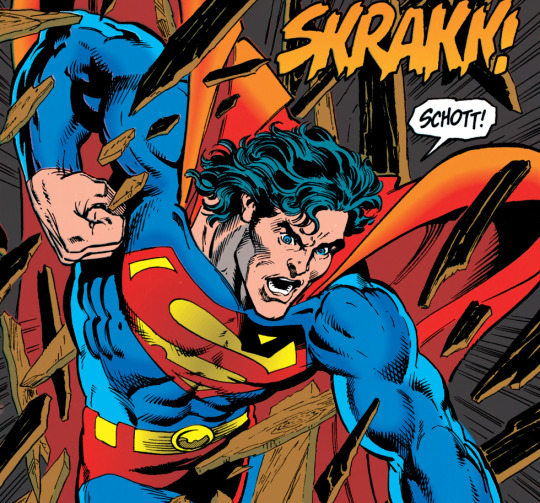
The sequence of Superman concentrating his sight and hearing on the waterfront area is well-drawn, and it’s always nice to see novel uses of his powers. Tyler Hoechlin’s Superman does a similar trick quite often on the excellent first season of Superman & Lois. The full-bleed splash of Superman breaking through the wall to capture Toyman is definitely panel-of-the-week material, as we really feel Superman’s rage and desperation to catch this child-killer.
Pretty much all the pages with Cat Grant confronting Winslow Schott are well-done and tensely paced. While sometimes I think the pupil-less flare of the eye-glasses is a cop-out, it does lend an opaqueness and mystery to what Toyman is thinking. Speaking of cop-outs, the gag gun twist ending really didn’t work for me. I was glad that Cat didn’t lower herself to Schott’s level and become a killer, even for revenge, but the prank gun just felt too silly of a tonal shift for a storyline with this much gravitas. The breakneck denouement that Cat is now depending only on herself didn’t get quite enough breathing room either.
While I appreciated that the ending of this issue avoided an overly simplistic, Death Wish style of justice, this issue extends this troubling but brief era of Superman comics. The casual chalk outlines of yet two more dead children continues the high body count of the previous handful of issues, and the tone remains jarring to me. The issue is also self-aware enough to point out, again, that Schott is generally an ally of children, and not someone who historically wishes them harm, but that doesn’t stop the story from going there, in the most violent of terms. In addition to being a radical change to the Toyman character, it’s handled in a fashion more glib than we’re used to seeing in these pages. The mental health cliché of a matriarchal obsession, a la Norman Bates doesn’t elevate it either. So, another rare misstep from Jurgens the writer, in my opinion.
STRAY OBSERVATIONS:
I had thought for sure that Romanove Vodka was a sly reference to a certain Russian Spy turned Marvel superhero, but it turns out there actually is a Russian Vodka called that, minus the “E”, produced not in Russia, as one might think from the Czarist name, but rather, India.
While it made for an awkward exchange, I was glad that Cat pointed out how her tragedy more or less sat on the shelf while Superman dealt with the "Spilled Blood" storyline. A lesser book might not have acknowledged any time had passed. Though I did find it odd for Superman to opine that he wanted to find her son’s murderer even more than she wanted him to. Huh? How so?
I love the detail that Toyman hears the noise of Superman soaring to capture him, likening it to a train coming.
I quibble, but there’s so much I don’t understand about the “new” Toyman. If he’s truly regressing mentally, to an infant-like state, why does he wear this phantom of the opera style long cloak while he sits in his baby crib? Why not go all the way, and wear footie pajamas, like the lost souls on TLC specials about “adult babies”?
I get that Cat Grant is in steely determination mode, but it seemed a little out of place that she had almost no reaction to the taunting she faced from her child’s killer. She doesn’t shed a single tear in the entire issue, and no matter how focused she is on vengeance, that doesn’t seem realistic to me. [Max: That's because this is not just retribution, Don. It's dark retribution. We’ve been over this!]
#superman#dan jurgens#joe rubinstein#cat grant#adam morgan#toyman#dan turpin#joke guns that only exist in comics#cat grant the dark retributor#coming soon to image comics
20 notes
·
View notes
Text
Ginger Snap, Chapter 4
A/N Here’s the next chapter installment of Ginger Snap. I now have this story mentally plotted to its conclusion. It will have a total of 6 chapters, with perhaps a wee epilogue. In keeping with the theme, the title of this chapter is “Where There’s Smoke”.
Previous chapters are best enjoyed on my AO3 page, because I have a bad habit of going back and editing them after they’ve been posted.
I glanced around the sitting room, trying to see it through a stranger’s eyes. Well, not a stranger. Through Jamie’s eyes.
We had sold most of our furniture before leaving Boston, not considering it worth the expense of shipping across the Atlantic. Frank hired an interior decorating firm to furnish the third floor Southside flat before we arrived. The overall impression was stylish, if a bit soulless. Having grown up a virtual nomad, there were no mementos or heirlooms to speak for my personal journey. For the first time, I regretted their absence.
The buzzer rang, and I shook away my wistfulness. Jamie’s tousled curls and reckless grin greeted me as I opened the door. Today he wore a fitted navy jumper, faded grey jeans with frays about the ankles and the ubiquitous work boots. A messenger bag was slung across his broad chest.
“I hope I wasn’t supposed to supply the ingredients for today’s lesson, because my cupboards are bare,” I remarked after inviting him in.
“Jus’ as well. I wouldna squander yer food. I have all we need right here.” Reaching into his bag, he removed a clear container filled with chunks of pink meat swimming in a broth of blood. I wrinkled my nose in disgust.
“What sort of dish will I be making with those?”
Those summer eyes shone in merry provocation.
“No’ a dish, Arsonist. An experiment.”
Two saucepans were set on the stove. Jamie had me place a few pieces of meat into the water of one pot before it warmed. To the other I added a pinch of salt and a clove of garlic, but waited until it came to a boil before adding the chicken. After five minutes, I used tongs to move the now-pale flesh to waiting salad plates. Neither looked particularly appetizing, but the first pot yielded a glutinous blob.
“I suppose this is the control group,” I remarked, looking at Jamie where he leaned against my countertop, ankles crossed like a cover model. “I’m already quite familiar with what culinary failure looks like, thank you.”
“No’ failure. Variability,” my teacher argued. “See here? If ye want meat tae dissolve til it doesna hold its texture, low heat is key. An’ if ye want tae infuse it with flavour, always combine heat an’ seasoning at the same time.”
I took a small nibble of chicken from the second pot, and sure enough it tasted mildly of garlic. It was otherwise quite bland, though. When I commented on this, Jamie nodded in excitement.
“Aye, verra good. Nature seeks equilibrium, as ye well know. Sae now ye have poultry tha’ tastes o’ water and water tha’ tastes o’ chicken. If ye were makin’ a stew or chicken stock, t’would be a good thing. Fer anything else, tis shite.”
I laughed, getting into the spirit of his well-executed game.
“Have ye any music?” he asked while we cleared away the results of round one. “I always cook better with a bit o’ background noise.”
There was a high-end stereo system in the living room, but I doubted Jamie would be interested in Frank’s collection of Brahms, Mahler and Celtic harp. Seeing my hesitation, Jamie dug out a portable speaker from his bag.
“Do ye mind?” I shook my head and soon my kitchen hummed with guitar chords and plangent vocals.
The lesson lasted far longer than the scheduled hour. Jamie had me bake, fry, roast and braise different samples, each time explaining why a particular technique might be used and insisting I taste the result. It was so much fun, I shed my habitual reticence while cooking.
“An’ now fer the pièce de résistance,” Jamie announced in dramatic tones. From his seemingly bottomless messenger bag he removed what appeared to be a miniature flame thrower.
“What the fuck is that?” I asked, forgetting myself.
“I wanted ye tae ken there’s a place fer fire in the kitchen, Arsonist. Tis only a question of picking yer moment.”
With a flick of his lighter, he set the butane alight and handed me the small kitchen torch. Using extreme caution, I seared the outside of the two remaining morsels until they were a rich caramel colour. Jamie then wrapped them in foil, placing them in the oven to finish cooking. When they were cool enough to sample, the outside was pleasingly crunchy and sweet, while the inside swam in moist chicken-y flavour. We both declared them the winner.
“Tis a funny thing about fire,” Jamie remarked as he packed up his bag to leave by the more conventional front door route. “It can remain hidden beneath the surface, burying its secrets deep inside. Doesna mean it doesn’t burn, though.”
I thought about what he’d said long after he was gone, leaving me alone with his signature scent of rising bread and salt air.
That weekend, I blamed the poor weather when I declined Frank’s offer to shop for an engagement ring.
***
The next week, instead of asking to be buzzed inside, Jamie requested that I join him downstairs.
Grabbing a Mackintosh, my purse and slipping into comfortable walking shoes, I joined Jamie outside my door. He was particularly animated, despite the foul weather.
“We should ha’ started wi’ this lesson, but t’wasn’t the right day fer it,” he explained as we walked towards the farmers’ market that took place twice a week in the shadow of Castle Hill.
I considered protesting that I already knew how to shop for food, but Jamie’s enthusiasm was contagious.
We stopped at every stall, sampling the foodstuff on display, which was surprisingly varied despite it being November. Jamie knew most of the merchants by name and our progress was regularly halted by conversations on topics as varied as his family’s health, the latest rugby results and Scottish politics. I envied his wide circle of acquaintance and apparent ease interacting with them. There was no pretense, no stiffness, just a man who inhabited every square centimetre of his life to the fullest.
Jamie insisted that I taste various produce before adding it to the cloth bag he’d provided. Honey-crisp apples. Peppery radishes. Herb-infused venison sausage.
“Close yer eyes,” he instructed when I was practically dizzy with all the flavours. Still, I complied immediately. A rubbery moisture tickled my lips. “Open,” he said simply. I opened. “Tell me what ye taste, Arsonist.”
I chewed the morsel of cheese thoughtfully, letting the taste and texture coat my mouth before finally swallowing.
“Creamy. Thick. Salty. Sorrel.”
I opened my eyes only to fall into the inky vortex of Jamie’s pupils, which had expanded to almost eclipse his irises. His hand still hovered near my mouth, muscles frozen in abstraction. The cheesemonger let out an awkward little cough. Jamie blinked, and the moment vanished.
“Sorrel?” he asked a bit gruffly.
“Yer lass has a fine palate, Fraser. My sheep graze in fields full o’ it.”
I allowed myself a smug little smile. Neither of us corrected the merchant’s presumptive pronoun.
Later that evening, I sat cross-legged before the fire with a picnic for one. Frank had called from his office earlier to say he was working on notes for an upcoming symposium. Before me lay the results of the afternoon’s market adventure. Closing my eyes as I ate, every mouthful set my senses ablaze.
We never found time to visit the jeweler that weekend either.
***
The next week, I fell ill with a miserable head cold. Frank was in Oxford for his symposium, so I called Ginger Snap myself and explained to Jenny in a hoarse voice that Jamie should avoid coming to my flat at all costs.
I was curled up in a mentholated daze when there was a series of knocks. It took several minutes to free myself from my blanket cocoon and shuffle to the front door. Glancing in the entryway mirror, my hair called to mind an electrified poodle and my nose was twelve shades of raw, but I opened the door anyway. No-one was there. Leaning out to peer down the hallway, I practically tripped over a brown paper bag resting at my feet.
Inside was a metal thermos, still quite warm to the touch. As I unscrewed the cap, my stuffed nose was assailed by fragrant steam. Homemade cock-a-leekie soup. I felt a glow fill my chest that had nothing to do with my fever. Pouring a helping into a mug, I shuffled back to my couch-nest. I felt better already.
***
The following week, Jamie was distracted. I’d thanked him profusely for the soup, and asked if he could show me how to make it for myself. As the chicken thighs and stock began to warm, however, I caught him glancing regularly at his phone, fingers drumming against his thigh.
“Are you expecting an important text?” I finally asked.
“Hmm? Och, Arsonist, I’m verra sorry. Tis only that we got a last-minute request tae cater a big corporate Christmas party, an’ Jenny is beside herself wi’ worrying.” He tucked him phone into the pocket of his cargo pants.
“When’s the party?”
“T’morrow,” he confessed.
“What! Jamie, what are you doing here? You should have called me to reschedule.”
“T’wouldna be fair, what wi’ us missing last week on account of yer sniffles. An’ wi’ Christmas ‘round the corner, I didna ken when I’d... er, when we’d have time for another lesson.”
I turned off the burner with a decisive twist. Jamie opened his mouth to lodge a protest, but I beat him to the punch.
“Jamie, the soup will keep. Growing your business is more important. I wish there was something more I could do to help, but under the circumstances...”
“Come wi’ me?” he blurted out.
I was nodding before the words finished leaving his mouth. Notwithstanding the fact that he had just literally been teaching me how to boil water, I didn’t want to lose his company so soon. We likely wouldn’t see one another again until after the New Year.
It was a thirty minute walk to Leith. Jamie could probably have covered the distance in half that with his long strides, were it not for me trotting along beside him. We stopped at several shops along the way to pick up provisions, arriving at Ginger Snap with our arms laden with the freshest food Edinburgh had to offer.
I had expected Jenny and Jamie to be working alone, but the fire station was abuzz with activity. I was hastily introduced to Angus, a distant Fraser cousin; Mary, a childhood friend of Jenny’s; and Murtagh, Jamie and Jenny’s godfather. They worked together like a well-oiled machine, and I stood awkwardly to one side, wondering what the hell I was doing there. I was preparing to make my excuses when Jamie called me over to a spare station. He gestured to the commercial-sized sink, which was full of vegetables of every dimension and colour.
“Claire, I need ye tae rinse and then cut these inta nice even pieces. Can ye do tha’ fer me?”
"Consider it done, chef,” I said with a jaunty salute.
There was a feeling of camaraderie as we each went about our assigned tasks. I chopped. Mary baked. Angus filleted. Jamie cooked, and Jenny plated the various canapés, salads and sauces and stored them in the enormous refrigerators that lined the back wall. Murtagh’s role seemed mostly to keep the troops in line with an assortment of verbal barbs.
Music played in the background. Volleys of witty banter flowed between us, but never at the expense of the work or anyone’s feelings. Angus nicked himself with his filleting knife, and Jenny sent him to my station for treatment, saying I was the team’s resident doctor. I couldn’t remember the last time I’d felt so at home.
Time passed quickly and before I knew it, it was dark outside. The bulk of the work was done and the pace slackened, the pressure of the looming deadline relieved. One by one we cleared our stations, meeting at the small seating area to share a well-earned drink.
Jenny sunk into the couch beside me and let out a loud sigh.
“Ouf, I canna believe we got it all done. Claire, ye were a godsend. Normally I do most o’ the prep work, but it leaves me no time tae arrange the dishes.”
I demurred, uncomfortable with the praise.
“Nay, Arsonist, ye were amazing,” Jamie began to object, but he was interrupted by my phone buzzing. Glancing down, I felt my face fall. I’d completely forgotten about Frank. Now he was texting, asking me where I was. I quickly fired off a reply, then stuffed the phone into my pocket.
“Everything alright?” Jenny asked.
“Oh, yes. It’s only my fiancé, asking when I might be home,” I answered, still distracted by my uncharacteristic lapse. As I glanced up, I ran straight into Jamie’s iceberg gaze.
“I didna realize ye were engaged,” he looked pointedly at my bare ring finger. “Congratulations.”
He said the word as though every syllable pained him. I quelled the urge to explain, to say it wasn’t a real engagement because I’d never agreed, that I’d only been looking for a sense of security, but somehow found myself in a cage.
Instead I hastily finished my drink, called myself an Uber and quietly wished everyone a good night, all while avoiding the many questions written across Jamie’s expressive face.
70 notes
·
View notes
Text
woah a pq sprite edit tutorial ft. mod kk (paint tool SAI)
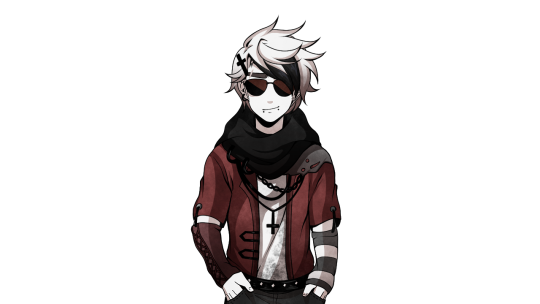
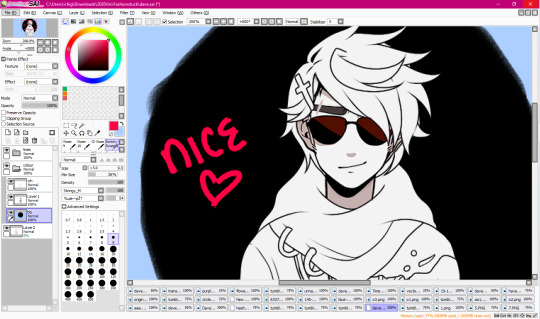
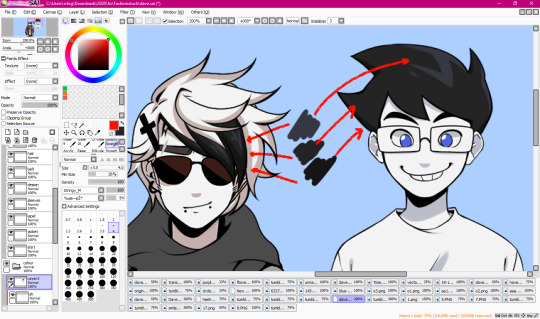
MOD KK....: SO UH. this is primarily to help a pal of mine, but like i thought it’d be good to make a post / tutorial in general, so here’s a tutorial which features the process of how i did this dave
since i use sai, this is a tutorial mainly for sai, but you can follow along easily on other art programs since functions are similar and etc. the link to the sai i use can be found here.
tutorial starts under the read more:
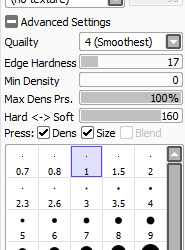
BEFORE WE START, any sai users, here are my brush settings regarding lineart / linking, and in general, these are the settings I use for all my art and edits. Size wise, I usually draw with 1, but for line width, I’ll change between 1, 0.8, and 1.5.
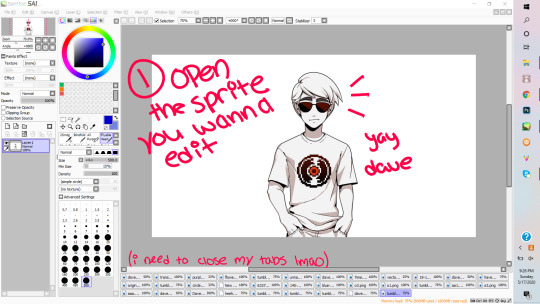
1. So first and foremost (wow, look the way I’m typing got more formal), you want to open the sprite you want to edit on. Here I have Dave. A good resource for sprites / assets from PQ is from this blog, in case any one needs it.
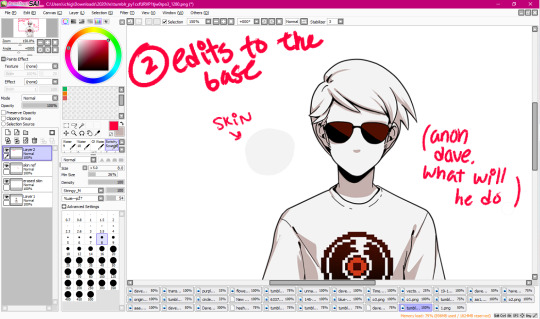
2. If you need to, make edits to the base. Usually, if not the hair, I’ll make an edit to the character’s shading colour or their face. In this instance, it’s going to be the latter. So in this picture, what you want to do is colour pick from his skin, make a new layer and on that layer, you’ll ‘erase’ (draw over) his expression.
2.1. Lower the opacity on the coloured over layer so that you can see his original expression- mainly I do this so I can see the proper placement of his facial features and such. Here, I’ll sketch the change I want.
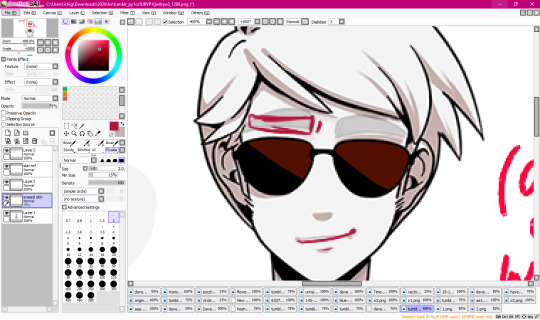
2.2. After it’s sketched out, I’ll line it proper and fill it in, and now he’s like smug (shame that it gets covered up by his bangs in the finished edit).

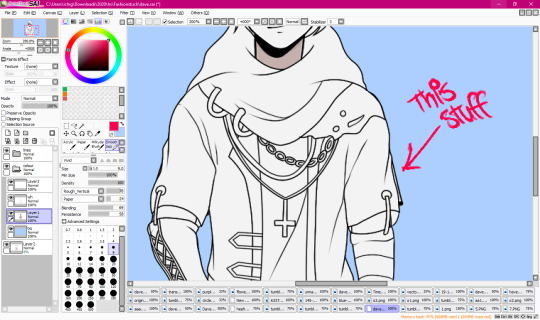
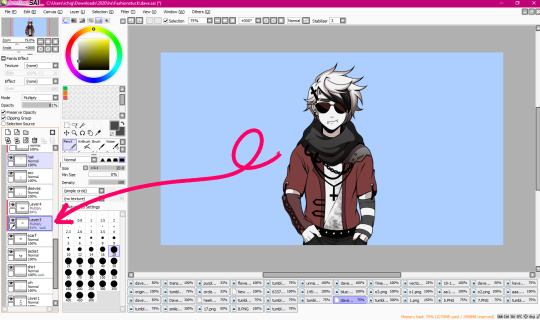
3. Now we’re to the fun part! Well, onto the more fun parts. Here is where we’ll start our sketching. Sketching isn’t mandatory, especially on smaller, minor edits such as changing shirt colours or adding small accessories, but if you want do things like drastically change their haircut, or to give them a new outfit entirely, sketching is probably a good idea. Anyways, lower the base’s opacity, and then decide what kind of outfit you want to sketch on your base, and do it.

4. After sketching, you’re gonna line! Lower the opacity on both the base and the sketch- though that’s probably a given. Completely optional, but I tend to put my layers in a folder set for organisation purposes. Also, please name your layers, it’ll help you good (OKAY SO LMAO. I forgot to take the screenshot of me mid lining, so I eyeballed all my finished lines out to make it look like it was incomplete.)

4.1: Anyways, yay! The lining’s complete. I know this is supposed to be a tutorial, but process photos are fun too.
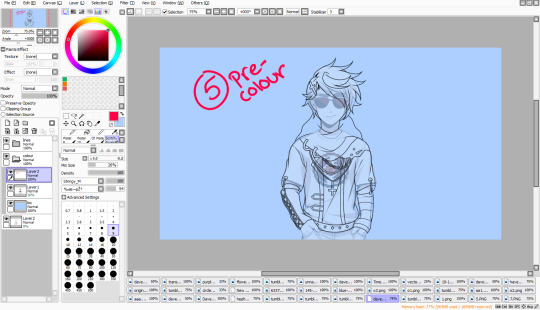
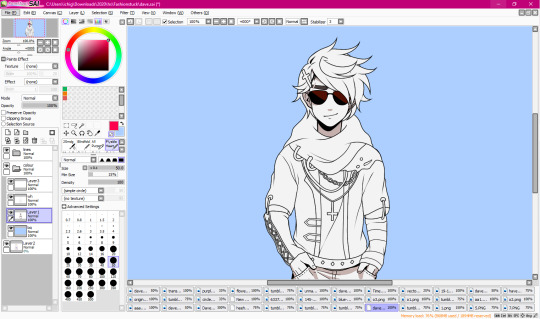
5. Now we’re onto pre colouring. I say pre colouring because this is like setting the base for colouring? Yeah. Anyways, I’ve made another folder set for colouring, pulled the base sprite into it, and then set a coloured background under the base for transparency and etc- I usually go with a colour which will contrast the piece’s main palette, which in this case, is blacks and shades of red.

5.1. Now we’re going to put the base colour into the newly created lineart. What we’ll do here is turn the transparency on the base sprite down till it’s completely gone, and then we select every inside of the lineart.
5.2: With the base ‘white’ (the greyish white) colour from Dave’s original sprite, we’ll fill the lineart.
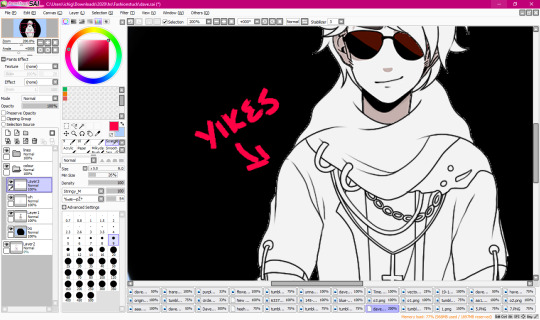
5.3 However, after this, you’re going to want to check your transparency because it won’t always be perfect- actually, it won’t be perfect. Usually, you’ll get that small, shitty white outline which overall imo ruins the piece when it’s transparent.
5.4. What you’re going to want to do to rid of this, is- going back to 5.2, after you’ve filled it, and you still have the selection on, you’re going to reverse the selection (arrow pointing to it, ‘pologies for non sai users because I don’t know the equivalent), and then erase. It’ll seem like you’re just erasing the background, but I swear it’s worth it.
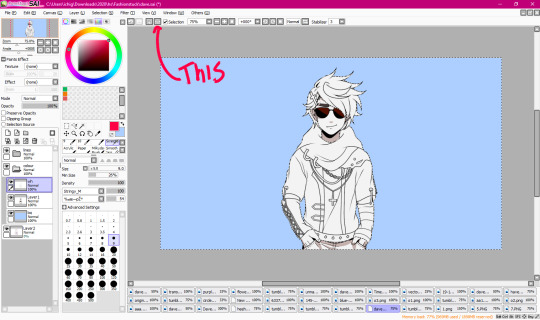
5.5 See? Now it’s clean. Yay!!!
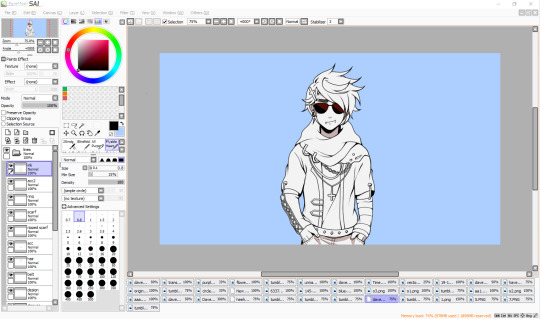
5.6 After that’s figured out, you’re going to want to redirect your attention back to the base sprite, and then erase all the shit that’s leftover from it, such as Dave’s sleeve which is poking out from the side, as shown in the pic.
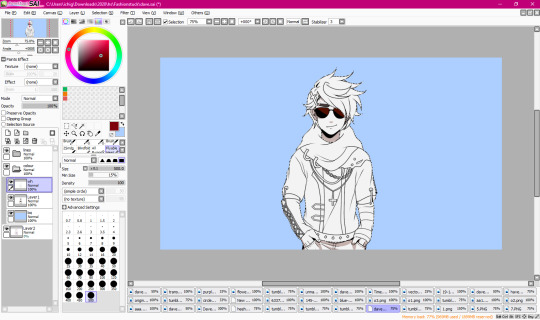
5.7 Bam. And now he’s all cleaned up proper and ready to roll.
5.8 A completely optional step, but my favourite since I love lining. What I usually do, so that the lines look smooth(er), and more precise with the style, is that I ink it a bit to create line width variation in certain parts of the sprite, and also to create shadows.

6. Finally on colouring- I’m probably numbering all this shit wrong, but you know what, I sucked at math. Anyways, colouring- figure out your palette, and basically base colour parts of your sprite. The blackish part on the shirt is an airbrush texture.
6.1. Tip: If you’re using dark greys or blacks, I’d recommend just picking the exact shades from other PQ sprites so they’re all??? Idk, the same? To put it simply??? Yeah.
6.2. Shading is- another probably basic thing, but I’m explaining my particular process, but how I go about shading is by making a clipping layer over the layer I’m currently shading on to ensure that it only colours on that part. Then, I put it on multiply, and then toggle around till I get a good mid shade. To each their own, however, these are just my tips and tricks that I use personally.
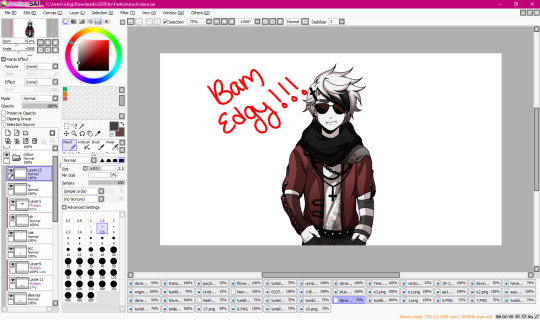
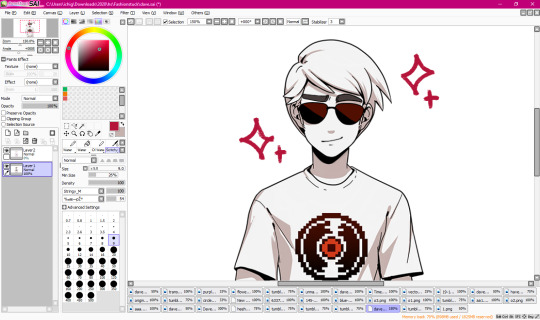
6.3. And after you’ve shaded your entire piece, you’re done! Yay, he’s edgy now!

6.4. Though I did make my end sprite with a texture, and for SAI users, it’s relatively easy. Just open the png file of your sprite so that all your layers are in one and it’s a happy pic, and then go to to the textures drop down menu and select your texture. For this, I decide to use the grunge texture. I also used this texture on my Derse Prince edit, and I used a TV screen texture on one of my Hal edits. I don’t know if texture packs come with other art programs, but if they do, just experiment and see what you like! It’s not obligatory, but it’s a nice touch for some edits.
Other than that! We’re finished! I hope you enjoyed- apologies if anything said was over complicated haha ;;.
#mod karkat#kk edits#sprite tutorial#homestuck sprite edit#homestuck sprite edits#pesterquest sprite edit#pesterquest sprite edits#homestuck sprite tutorial#pesterquest sprite tutorial#homestuck edit#pesterquest edit#dave strider#im not mass tagging this im lazy;;;;;#also that carpel tunnel is kicking in lmao
178 notes
·
View notes
Text
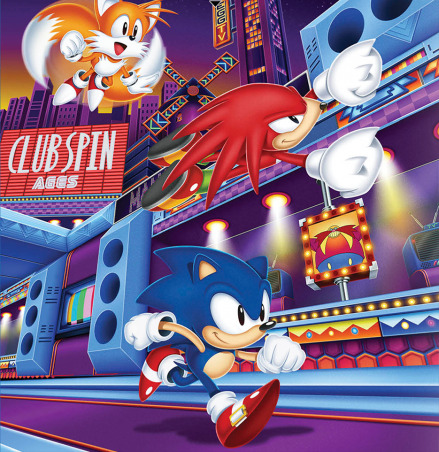
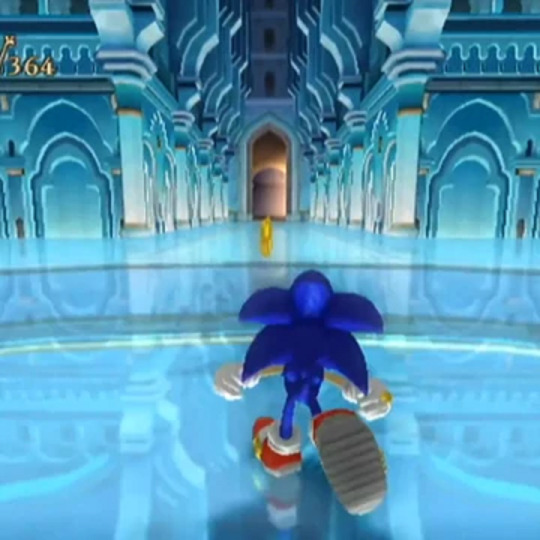
Crusher Elaborations #1: Thoughts on the Aesthetic of Sonic’s World
If someone came up to me and asked “Which do you prefer, Classic Sonic or Modern Sonic?”, my answer would start off with “Well, technically Classic Sonic because...”, and then I'd get cut off by the other person immediately lecturing me on why I'm wrong and why I'm the worst kind of fan imaginable. Should they finish their rant, I would then explain to them in the midst of them basking in their flock of easy Twitter likes that I didn't necessarily mean it in the way they predicted.
If we were talking about the games, the characters, or the character design, I'd be fairly neutral, since I like both halves equally for the most part. In fact, when it comes to characters, Modern might actually have the edge believe it or not, since the sheer number of characters introduced from SA1 onwards naturally means a lot of my favourites were introduced from that point on, such as Tikal, Rouge, Gamma, Omega, Blaze... But then again, Classic introduced Eggman and Tails, and the Hard-Boiled Heavies are technically Classic as well despite being relatively new...
Anyway, the point is, I'm not talking about any of that today. I'm talking about the world that Sonic and his multicolored chums live in. Or rather, the aesthetic of it.
NOTE: This is purely about the game universe. While I do have my thoughts on Sonic’s world as presented in other continuities, that won’t be the focus here.
If you're familiar with my blog, you'll know that as a general rule of thumb, I much prefer colorful and creative worlds in my Sonic universe, and that rings true for my reasoning here. And I know what you're gonna say: “But Crusher, isn't there plenty of that in the Modern games as well?” Yes, there is, and I appreciate them very much. But this is why I feel the need to make a post of this sort to begin with, because I'm NOT saying “Classic cool, Modern boring” and calling it a day. There's a little more nuance to my tastes here.
When I say I prefer the Classic aesthetic for Sonic's world, I don't mean it in the literal sense of disregarding everything about the Modern aesthetic. Let's put it like this: when you're asked to paint a picture of these two sides of Sonic's universe in your head, a specific image will likely come to mind. When you think of Classic, you'll probably think of Green Hill first and foremost, whereas with Modern, you'll probably think of something like City Escape or Rooftop Run before anything else. In other words, when you think Modern Sonic, you're probably imagining the more realistic kind of locations first. And between the two mental images that come to mind, I personally prefer the Classic image. Shock, horror.
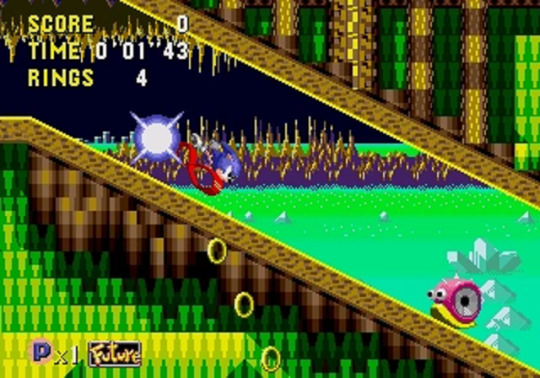
I wish I could swim in a sea that’s probably radioactive.
Now keep in mind, I'm not saying that City Escape, Rooftop Run, and all similar environments in the series look bad, because they don't. Unless they're painted with the '06 brush, they generally look fine, and the locations in Unleashed in particular are undeniably beautiful from an graphical standpoint. The problem is that although I can picture this as a world that Sonic could be in, I can't necessarily picture it as Sonic's world specifically. Because when it comes to the more realistic environments, I feel there's not much of an attempt to let it branch out as its own thing.
I know that might seem harsh, especially for Unleashed, since the real world angle was the deliberate theme of that game. And Sonic taking cues from real places is a fine concept, there's no issue there. I'm not gonna complain if there's a France Zone with an Eiffel Tower in the background. In fact, Sandopolis Act 1 has one of my favourite aesthetics in a Classic zone (mainly because the background is really pleasant to look at), and that zone is essentially Egypt Zone. But if you're making a Real World Zone, there needs to be more to it than that, otherwise you don't truly get a Sonic interpretation of our world... you instead have our world as it is with Sonic characters awkwardly stapled on.
When I look at City Escape, it may not be completely unfitting for Sonic (the posters and billboards in particular are actually a really nice touch), but when I look at it, I don't see Sonic's interpretation of San Francisco. I see San Francisco with Sonic shoved in. When they morph these places to Sonic's liking, they'll add rings, loops... and that's it. They rarely take the concept any further, which is a huge shame, particularly in the case of Rooftop Run, where I otherwise do like its visuals a lot, but it just doesn't go far enough with the concept for my liking.

At least you get to murder car owners, and give G.U.N. a legitimate reason to arrest you.
So which Modern games do I feel did the best job at making Sonic's world... er, Sonic's world? Well the truth is, most of them actually do a decent job in this area, regardless of the level design quality or the game’s quality period. SA2 has Pumpkin Hill, Eggman's Pyramid Base, and... SOME levels aboard the A.R.K (mainly the “outside” ones, like Final Rush). Shadow the Hedgehog, a game that reveled in how brown and gritty it was, still had highlights like Circus Park and Digital Circuit. Even '06 of all games had Aquatic Base, which was pretty cool from a conceptual standpoint. And although Unleashed as a whole might be a touch too vanilla in the creativity scale, it still had the glorious Eggmanland at the very end. But if I had to say which of the Modern installments did the best job overall...
- For starters, I'm gonna give a shoutout to SA1, because even though it was the first Modern game, and thus it was technically responsible for the more focused angle of realism in Sonic's world in the first place, it didn't take it quite as far as later games would, and although it may not be a perfect 1-to-1 representation of the world we saw in the Classic games, it does well enough with what it brings to the table that I can still accept it without any issue at all. Some of that has to do with the fact that you still have wilder areas like Windy Valley and Red Mountain to balance things out, but even with the other half, the game's use of colour is enough for it to go a long way, oddly enough. Take the At Dawn section of Speed Highway for instance:

From innocent times, when the radar wasn’t a piece of shit.
Technically, it's really not that different to the urban environments you see in SA2 or Unleashed. But something about the sleepy morning approach gives it a subtle, almost dream-like edge to it that I really dig, and despite it being pretty similar to the likes of City Escape, somehow I have an easier time buying into the idea of this place being part of the same world as zones like Sky Sanctuary.
And seeing how I already mentioned Red Mountain, let me compare it to Flame Core:
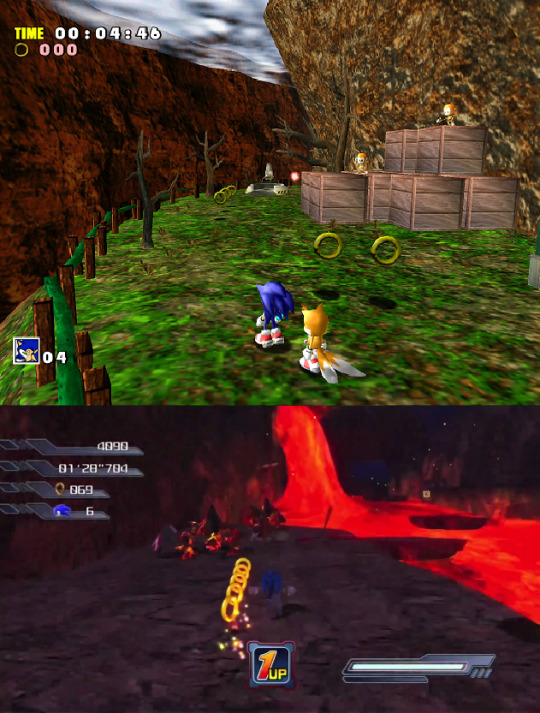
Yes, I know bringing '06 into this discussion at all is inherently and hilariously unfair, but let's put aside the game that Flame Core comes from for a moment. Aside from maybe the purple crystal caves indoors (and that's assuming you can even see where the fuck you're going in there), Flame Core is pretty boring to look at as far as Sonic levels go. Red Mountain is vastly more interesting, even though it's basically the exact same concept, and a lot of that has to do with - you guessed it - colour. Sure, it's day time, that's one thing, but you'll also notice that for a lava/mountain stage, it surprisingly has a few grassier sections, sort of like Hill Top in that regard. A little bit of green among the brown and red, and a great contrast to the volcanic nightmare you'll experience when you head inside.
Now this might seem like a fairly minor detail... and yeah, it is, but the thing that SA1 does so well is that it combines so many of those small details to make a complete, well-rounded package. This is why SA1 meshes well with the Classic style despite not being an exact replica, because just as the Classics excelled at, it wasn't afraid to use colour in interesting ways. It understood that a fire level could have more than just red and orange, in the same way that a grassy level could have more than just green and blue.
But of course, as I mentioned, SA1 is not an exception. There are other Modern games that did a great job on the whole...
- Heroes is an obvious answer, since it's translation of Genesis-style environments to 3D is probably one of the most recurring praises the game receives, and rightly so. Not much to say here, except that Hang Castle is still cool as hell.
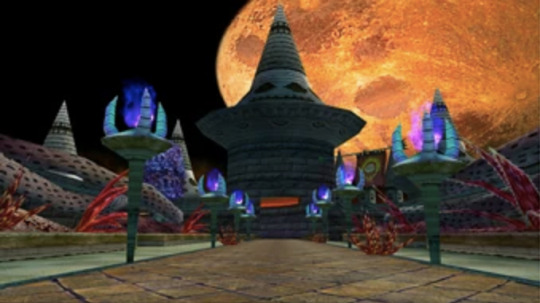
And plenty of opportunity to admire the not-broken-in-half moon.
- Colours is another obvious one, though something of an ironic one given that the premise of the game involved going to other worlds, and those worlds were all converted against their will by Eggman. Yet, they did an equally superb job at creating fun, unique locales, and Aquarium Park in particular remains a favourite of mine.

Gotta love that red/blue contrast.
- The Riders series has a more futuristic bend compared to the rest of the series, but even when it's not all high-tech, it's got some pretty cool environments of its own, and I feel they even do well at mixing the real world side of things on top of that. Gigan Rocks comes to mind, as does Aquatic Capital.
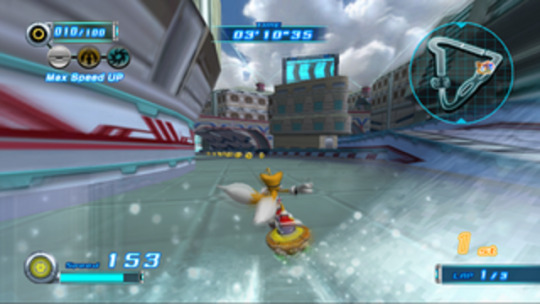
Reminds me of when Perfect Chaos peacefully protested against Station Square.
- Regardless of my thoughts on the game itself, Secret Rings had some undeniable winners in this depertment. You tell me with a straight face that Night Palace doesn't look amazing.
A wonderful palace for a domestic abuser.
- And lastly, they might have had an early advantage since they're already 2D, but the Advance trilogy and Rush duology deserve a mention. They had some fantastic ideas for zones, like Planet Sonata Music Plant, and they did great with the colours as well. Hell, throughout these five games, the sky was practically every shade of the rainbow at one point or another.
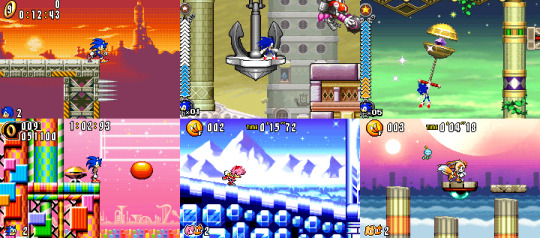
Oh look, another completely whole moon.
Also, quick shoutout to another minor detail akin to the grassy sections of Red Mountain: these pink tunnel sections in Ice Mountain. No elaborate point to make here, just another perfect example of how much I adore these games' use of colour and contrast.

Seriously, I could go on for hours about good contrast.
Although I do bring up these small details for another reason, and in turn, another layer to my more nuanced take on Sonic aesthetics. By this point, we get the basic jist: Crusher likey when Sonic levels unique and pretty. But this can - and has - lead to a couple of misconceptions, so I'd like to address those and then laugh at them.
“So you want Sonic's world to be exactly like Mario?”
A common complaint that Lost World received was that it was too much like Mario, in more ways than one, and part of this was to do with the game's visual style. The zones may have been upbeat, but they often consisted of a bunch of things floating in the air and not much else, ala 2D Mario. While I didn't outright hate it, it’s definitely not what I have in mind for Sonic.

Of course, all complaints about being too much like Mario suddenly turn into praise when Eggette gets brought up...
And why is that? Because yes, I like my Sonic locations to be fun and lively... but I also want them to be firmly established within the context of this universe. The Lost World approach is fine with Special Stages and the sort, but outside of that... well, Studiopolis is a perfect example of what I'm talking about:
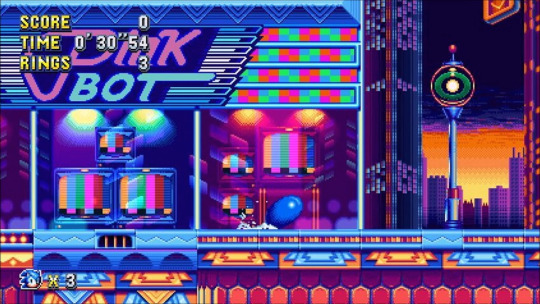
On one hand, it's very unique when compared to other cities in this franchise, and it's full of quirkiness, great use of colour, and all that good stuff I've went on about. But at the same time, it's grounded just enough so that it still feels like an actual city that the people of Sonic's world could feasibly live in, rather than a basic and empty video game level with a tacked on city background. Studiopolis may be a level from a video game, but you can totally believe it's a fully fleshed out place from its own perspective.
Naturally, this praise also rings true with the Modern games I listed earlier, and is yet another reason for why I approve of their settings.
“So you think Sonic can't have darker locations?”
It might be easy to take my compliments at face value, and assume that I'm immediately opposed to a zone that's not brightly colored. This is... very obviously false, as even the Classic games have their share of less-than-cheery areas, such as Scrap Brain and the Bad Futures in Sonic CD.
However, when you're making a grittier location in Sonic's world, regardless of the context, it still needs to be interesting. The problem with a lot of them in Modern installments is that they're boring. Crisis City is a generic city on fire. Westopolis is a generic city with aliens firing lasers from above. The prison levels in SA2 - and the indoor ARK levels not named Cannon's Core - are just grey hallways for the most part. That shit isn't exciting, and it doesn't get my mind speculating. It just makes me want to move on.

Let the eggsperts take care of this.
By contrast, Eggmanland is a prime example of how to do it right. Eggmanland is a magnificent theme park as envisioned by the good doctor, but it's also, at its core, a giant metal hellscape fueled by the energy of a dark entity, and it only gets more ominous the further you go through it or try to before you give up because it’s too fucking long and you died at the end. So it sets the mood to be sure, but it's still visually compelling to look at, and interesting to think about.
And since Eggman is apparently the only one who can show us how it's done, here's a shoutout to Titanic Monarch as well:

Like Heavy King, but Heavier and Kingier.
When comparing the final zones in Sonic games, I especially love this zone's visual approach, because it manages to be dark and colorful at the same time, and in a strangly organic way. It's got a spooky atmosphere, with a moody moonlight backdrop to match, and the titular robot is foreboding as hell as you climb up it and traverse through it... all the while having red floors, green and yellow wires, blue and pink buildings, and stained glass windows of Eggman and the Heavies for you to marvel at. So even putting aside the unique scenario of climbing up and then through a Kaiju-sized mech, the mood of the zone alone manages to be extremely memorable.
So what have we learned from all this? Aside from the fact that I’m way too interested in this subject? We now know that when I say I prefer the Classic “style” over Modern when it comes to the way that Sonic's world is presented:
- I don't mean that literally.
- There are certain qualities that although both of them possess, they tend to be more immediately associated with Classic in the collective consciousness, even within the fandom.
- The environments that I love the most in Modern games are often the ones that would also fit perfectly in the Classic style.
So whenever I express the basic nature of this opinion in the future... just imagine a small asterisk at the end of my sentence.
54 notes
·
View notes
Text
Learn Log #2 - Pixel Art Basics 2
This week I continued learning the basics of pixel art and ended up making some pretty alright-looking RPG items. The topics covered this week were colour, shading and dithering and you can read about them below.
Colour
To understand colour in pixel art, you first need to understand colour. Colour theory explains the existence, and relationships, between the primary colours (red, blue and yellow) and the secondary colours (green, orange and purple). These colours and everything in between appear on the colour wheel, which we’ll get to in a second. What’s important to know is that these different colours can contrast against each other, complement each and give off different moods. I’m not going to go into depth but having some understanding of colour theory is essential in creating any artwork, including pixel art.
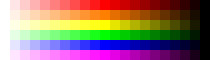
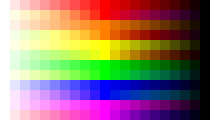
Anyway, that colour wheel I mentioned is vital to pixel art. Every digital art program you use for pixel art will include some form of the colour wheel which will allow you to select colours for your artwork. Below I’ve made a rough image of a colour bar with the very left pixel starting at hue 0 and the furthest right being hue 360 (each pixel increases hue by 15).

You’ll notice that hue 0 and 360 are both the same red. This is because a revolution around the colour wheel has been completed and we’re now back at square one. Remember that even in bar form this is a colour wheel – this information is key to utilising the colour wheel.
Now, looking at these colours, your eyes might start to tear up a bit. They’re very bright and harsh. If we put two contrasting colours, such as green and red, next to each other, this would only get worse. This limits our creativity and makes our games a bit irritating to play. So, if we lower the saturation and value of the colours a bit, it can make our pixels pleasant.
You’ll see here that I’ve reduced the value by 10 points making the colours a little darker and more comfortable on the eyes. You can also see the saturation decrease the further down the image the pixels are. Desaturation can also make your pixels less harsh. However, keep in mind that adjusting value and saturation will affect the mood of your game. Lighter, brighter games give off a friendly vibe while darker, desaturated games will give off a more serious vibe. You can also use these techniques on black and white pixels if you replace the white with a highly desaturated yellow and the black with a desaturated, dark purple as shown below.
Finally, if you’re looking for what colours to use in your pixel art piece or video game here’s some advice. 1) Make a colour palette – this will serve as a constant reference for what colours you’re using in the art. 2) To develop a palette, make a mock-up of your art – this will help you pick colours that work together and create a cohesive mood. 3) Remove unnecessary colours – keeping your colour palette simple or simplifying it as you go will make animation easier and make the art less noisy.
The final thing I’ll say is; use the HSV (Hue, Saturation and Value) measures and forget about RGB (Red, Green, Blue). I used RGB before this week and it pails in comparison to HSV. It might take some time to get used to, but it is crucial for nice shading, which I’ll explain later on.
Shading
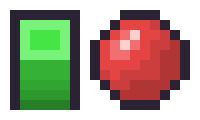
To discuss shading, we’ll be using this box and this sphere. Of course, they don’t really look like a box or sphere without shading, but we’ll get to that.

Someone starting out with pixel art, like myself, would usually just adjust the saturation and value measurements of the colour to achieve a brighter or darker tone. A lower saturation will give off the impression of brightness even if the value is at 100 by moving closer towards white. Meanwhile, decreasing the value moves the colour towards black making it darker. These new colours would be applied as shadows and highlights and often with gradients moving between the colours.
However, there is a much more interesting method of shading called hue shifting. In an environment, we will have a light source which may not be 100% white light. With hue shifting, we move towards the hue of the light source for brighter colours and for darker colours we move away from that light source (typically towards the opposite colour). This is why it is so important to ditch RGB and remember the properties of the colour wheel. Below are some examples of the different types of shading: the first image is of standard shading, the second is of hue shifting, and the third is a comparison.

You’ll immediately notice hue shifting is a lot more colourful and nicer to look at than standard shading. You’ll also see some colours seem a bit off (yellow, for example, shifts too far green and orange. This is because I simply followed the numerical values of the colour wheel. When using hue shifting, DO NOT do this. It can help a bit if you need guidance, but if you strictly follow the numbers, you’ll end up with weird colours. Go with your eye and what looks best.
Now let’s apply hue shifting to our box and sphere.
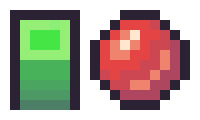
Looking much better! You’ll also notice I added another highlight to the sphere. This is because the sphere is also receiving indirect light bouncing up from the ground.
The formula for hue shifting goes:
Lighter = Hue Shift – Saturation + Value
Darker = Hue Shift – Saturation – Value (you can instead add saturation if you want brighter shadows)
The extent to which you manipulate these values will be part of your art’s style.
Dithering
Another method of shading used in retro machines that can still be used today is dithering. Dithering is used by alternating between colours in a pattern to trick the brain into thinking that the colour present is a combination of two different colours. There’s a couple of different ways to dither such as:
Uniform dithering – alternating each pixel between the colours
Pattern dithering – making a pattern transition between the colours
Random dithering – scattering the pixels randomly
Dithering is useful if working with limited palettes and works great with larger pieces. However, dithering between similar colours might not make a difference, and too much dithering can make an image noisy.
Week 2 Practice
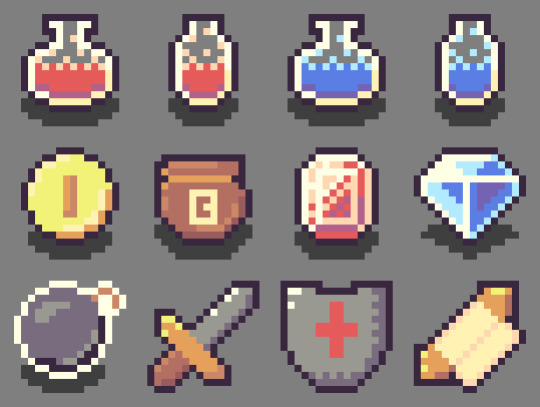
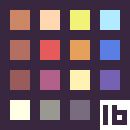
I wanted to make some fantasy RPG items for this week’s practice following HeartBeast’s and Davit Masia’s videos on item and gem icons. The first thing I did was create a colour range, as shown below. To make this, I picked out the six primary and secondary colours on the colour wheel and adjusted them to a tone that fit what I wanted. Next, I hue shifted them to create two brighter and two darker tones each.
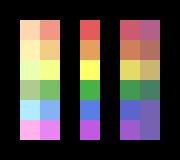
This range allowed me to easily pick and choose colours for my colour palette. If I felt any of the colours from the range needed to be different, I just adjusted them in the palette. I decided on working with a small palette for the twelve items I was making and choose 16 colours as I was working in a 16x16 space. Within the palette, there are fifteen grids with the colour white and fourteen others. The sixteenth colour used was the black outline surrounding the palette.

I based these colours off a list of ideas I had which include health and mana potions, currency (coins, a bag of coins, gems), and weapons (bombs, sword, shield, spell scroll). To test out the colours I’d picked for my rough palette, I made line art of the items and roughly coloured in each item (Note: the grey background was not part of the colour palette).
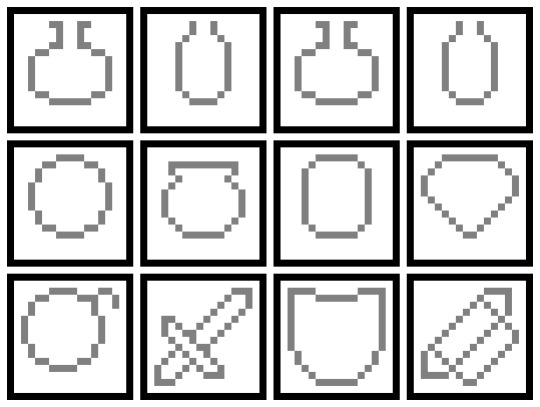
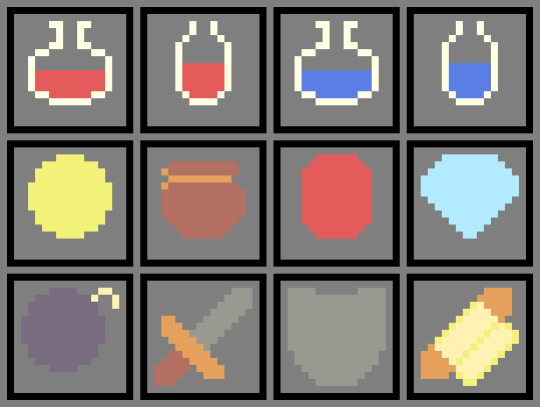
I assessed what I had and realised I wasn’t going to use green anywhere. I removed both shades of green from the palette giving me two spaces if I needed any new colours. I then proceeded to add more detail to the icons, including shading, and outlined each object so they stood out from the background. After a while, I realised that I needed some more brown tones as the coin bag and sword lacked some necessary shading. I used the new two spots in my palette for a lighter tone and a darker tone and finished my items.
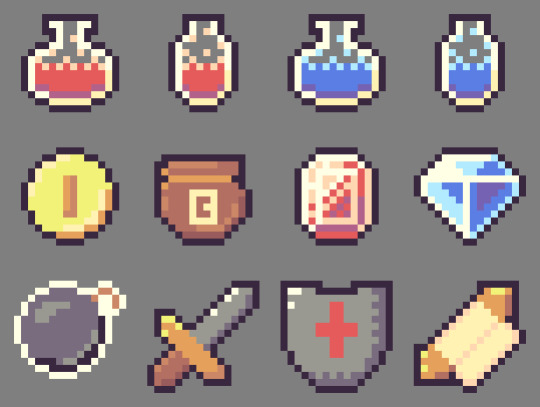
Now that I felt happy with my items, I quickly added a small shadow beneath each of the items I’d consider ‘pick-ups’ and animated them into a little GIF (apologies for the watermark). This was where I completed the piece.

Reflecting on the piece, I think the items look pretty good. The form of the sword could use some work – the addition of the outline made it a bit big, turning it into a toy sword. Also, the shading of the coin, bomb and shield could all be a bit better, but I feel like I did an ok job with the limited palette.
The End
So, that concludes this week’s learn log. Next week I’m moving away from learning the basics and starting with GUI pixel art including logos, fonts, buttons and cursors so follow my blog if you’re interested.
My learning and this blog post wouldn’t have been made possible without these amazing resources. Go check them out if you wanna learn some stuff about pixel art!
Pixel Art 101: ‘Colour Palette’ by Pixel Pete
How to Colour Pixel Art by TutsByKai
How to Pick Nice Colours by MortMort
Pixel Art 101: ‘Shading’ by Pixel Pete
Hue Shifting in Pixel Art by Brandon James Greer
Dithering and Pixel Art by Armitage Games
[Let’s Pixel] 18x18 Item Icons by HeartBeast
How to Start in Pixel Art by Davit Masia
3 notes
·
View notes
Text
Not Home For the Holidays
Hey there, day-one bug fix. So we've finally laid that long nightmare we call Suicide Squad behind us. And now we're officially out of the holidays. So what better way to celebrate than a My Little Pony holiday special~?
Here's the cover:
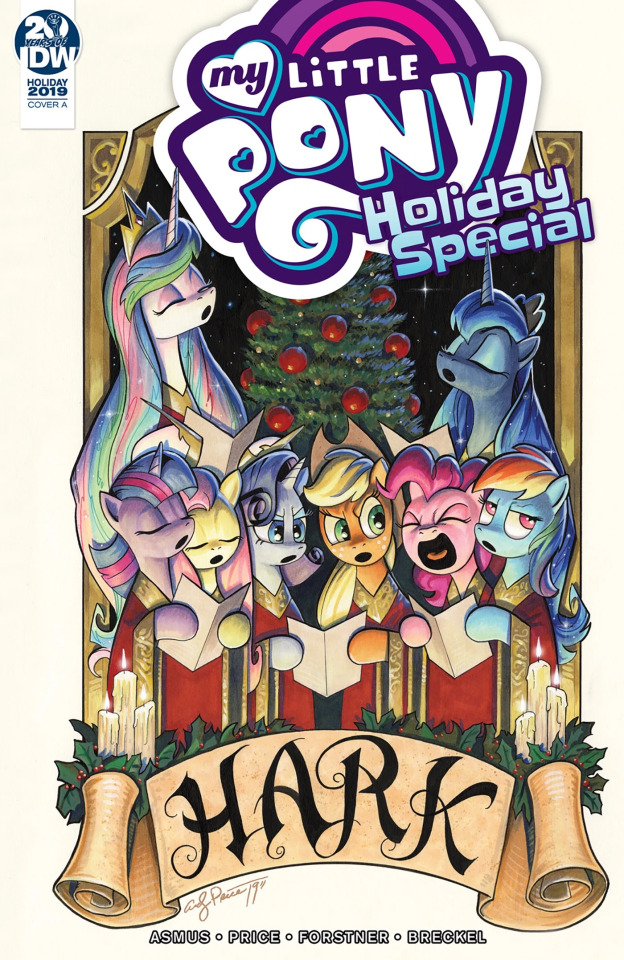
Ah, a typical depiction of caroling, and well in character. Half of them are just singing nicely. Pinkie Pie, meanwhile, is belting out her own death metal versions of the songs, by the look of her expression, which is obviously not to Applejack and Rarity's taste. Rainbow Dash, on the other hand, doesn't care about Pinkie's antics. She'd look just as not-thrilled to be there even if all of them were singing nicely. Otherwise, the rest of the cover has some nice, gentle holiday imagery. The brighter colours of our cast contrast nicely with the darker forest green and such~
So it's been a while since the last holiday special, eh? Seems like it goes every other year. 2015, 2017, and now this one. That's fine with me, doing it every other year makes the stories more unique and interesting. Anyway, we open with Pinkie decorating--but it's Applejack's leg she's decorating. Applejack's all laid up with a broken leg. Her friends are all here to keep her company--it never addresses why her family isn't here for this role--and Rainbow Dash even suggests they make it an early Hearth's Warming party. Unfortunately, Rarity announces that she has another engagement in Manehattan that night.
Here's the wrinkle: Celestia is also holding a royal gala that night, and Rarity has overscheduled. That's the big plot here: Rarity has overscheduled, and intends to attend all her events in one night. And if you think the gala and the soiree are the only things on the schedule, there's also a fireworks show in Ponyville that night as well. Spike in particular wants to attend that one, but he gladly joins Rarity as an assistant while she tries to get to each of these events. And while all this is discussed, Pinkie goes a bit Christmas Vacation cat on Applejack's leg in the background~
So we start that evening in Canterlot, with Rarity in a long gown and Spike in the top half of a tux. The pair of them arrive, noting with some confusion that the royal guards aren't posted to announce them. They enter the main ballroom, only to find everypony still in the midst of setup. Seems Twilight over-extended her stay at Applejack's (further playing into the comic's theme of overscheduling), and also didn't take into account not having Spike around to assist. So they're still getting the party together. There's almost an exciting moment where you think the chef hurrying in is going to drop the cheese fondue on Rarity, but it doesn't seem to end up that way.
Rarity and Spike instead end up helping to set up the party instead of mingling with the guests, and the time comes for them to rush out to Manehattan for that party just as the princesses arrive. The pair jump on the train, and Spike tries to console Rarity a bit. She's a bit bummed about having to run out on her friends just as the party started, and wishes she had considered swapping the order of events. They're off to meet her friends in the fashion world instead, and she's not wearing her most up-to-date gown. While on the train, they go over a series of signals to guide each other to ideal conversation. Two fingers for a change-up, three for a knuckleball, right?
This is a much smaller party, and also is also sort of a meetup of fashion-minded individuals to exchange ideas. Andy Warhol here has a difference of opinion on colour shades (he's so pretentious, they're both just red), and while Spike actually meets a nice pony named Chiffon Ruffles who's wearing a clever candy cane dress with real candy canes (Pinkie would approve so hard), Rarity ushers him out the door as the clock suddenly ticks over. There's a minor error where it says they have to get back "to Equestria" and not "to Ponyville", but it's fine.
The pair are back aboard a train, and Rarity wonders if they might stop and find a way to get him back to Ponyville while she returns to Manehattan to chat Chiffon up, and Spike finally cracks a bit. He is still young, after all, and he might be a bit tired. But he explains that he didn't get the things he wanted at the other parties--not even a candy cane off Chiffon's gown--and the one thing he was promised by Rarity was the chance to see the fireworks. He gave up all that stuff to spend time with her. And that's when the avalanche suddenly knocks the train off the tracks~
I'm not even kidding. There's a full-page spread of it and everything. And since it's another Andy Price issue, it's gorgeously drawn. Fortunately, nopony is hurt, and Rarity even uses her magic to dig a way out so the other passengers can escape. Since they're going nowhere fast, Rarity takes a moment to apologise to Spike. She expected the night to be a whirlwind of connections and conversations, but everypony at the gala was too distracted by setup, and all the fashion ponies were more interested in being seen than heard. She ended up treating Spike the same way, and now his holiday's ruined.
She offers to make it up to Spike by carrying him back to Ponyville personally. Fortunately, they don't get too far before they instead hear jolly laughter from overhead. Yes indeed, the pair are visited by none other than... Rainbow Dash and Twilight, who are here with a rescue team. What, did you think it was Santa or something~? The other passengers board the rescue sleds the pegasi brought, but suddenly there's a loud explosion. No, it's not another train wreck, but the fireworks show going off. The rest of the story is a wrap-up of what was learned: it's the quality and not quantity of the connections you make over the holidays. And so the Mane Six and Spike just spend the rest of their evening at Applejack's~
Before you think that's all there is, the comic has a short four-page story to finish off the issue. This one features the Student Six and Pinkie Pie. The Six are in exactly the kind of mood you'd expect kids to be in around the holidays: excited, goofing off, and throwing snowballs. In order to get them to behave, Pinkie tells them about Krumple Horn, who is essentially a MLP-friendly version of Krampus. Over the next page, each time they stir up trouble, something karmic happens to them. And Ocellus goes missing, leaving behind a bed full of mud. Now that’s horror. The end result is that the Student Six are eager to clear out and go home for the holidays, to their teachers' relief. And of course, Discord appears to reveal he was the one who set up all the karmic retribution, because frankly the role suits him a little too well~
Another holiday, another nice Hearth’s Warming story from our friends in Ponyville. I like this one, and encourage you to go out and read it for yourselves, if only because I summed up the ending sentiment of the main story a bit quickly. It goes on for quite a bit more, and the nice sentiment is much better read in full. And just because the holidays are over doesn’t mean you shouldn’t keep the spirit of them going, yeah~?
5 notes
·
View notes
Text
A SUBTLE DATE NIGHT BEAUTY LOOK
Creating a subtle date night beauty look with the Chanel Le Blanc 2019 collection Pierres de Lumiere releases. Perfect for a natural makeup look.


MY 2019 VALENTINES BEAUTY LOOK
Last week I went back into the Chanel Beauty boutique to try out the newChanel Le Blanc 2019 collection Pierres de Lumiere. It launched just in time for Valentines Day, which is what I had this look done for. Actually, we were a day early but since Mario and I had the afternoon free we had a late long lunch to celebrate. (Cue roses and delicious honey cake!)
Below is the full look Zara from the Chanel Boutique in Claremont created for me, with a bold bright lip colour. By the time I got home and shot a few extra pictures, Id taken off the bold lip because Id wanted to see the look with a subtle nude shade. I loved either option but will share more of this bold lip outfit in another post. Either was a beautiful, subtle look for any date night.
Oh and if you are now crazing honey cake, my bad! This was at The Flour Factory and it was amazing!


Turn on your JavaScript to view content PIERRES DE LUMIERE
Of theChanel Le Blanc 2019 collection Pierres de Lumiere releases, I was probably most taken by the White Opal highlight with a touch of the transparent Baume Essentiel on top. The White Opal is pearlescent and makes for a soft highlight. Because Zara and I always talk about beauty trends and what we have seen our favouritemakeup artists creating on Instagram, we decided to add a touch of gloss over the top too.
New to Chanel and very on-trend is the two shades of Baume Essentiel.They are essentially a glossy balm to wear on your eyelids for that gloss finish, lips or highlight. Zara just used it along the top part of my cheekbone, where I usually highlight. It picked up really well on camera.
A SUBTLE DATE NIGHT BEAUTY LOOK
What can I say?! I was seriously impressed with the Tweed Beige blush!Which as the name suggests, is baked to look like the Chanel tweed. How cool is that? It has a shimmer through it so creates a beautiful light catching blush or bronzer. Since I am probably not going to be able to afford one of those insanely stunning Chanel tweed jackets anytime soon, this might be the closest I get!
For the pretty, subtle eye look, Zara used a cream eyeshadow in Pierre de Rose and the Quadra Palette 314 Lueurs Ambrees. The bold orangey-red matte liquid lip colourRouge Allure Ink in Cornalie is fresh and felt vibrant with the subtle eye-look. It reminds me a bit of the So Chaud Mac Matte lipstick without being as drying. And the Rouge Allure Ink lasted for our long lunch too, so I was very impressed!
Finally, with the release of two new nail colours in a subtle shimmer, I had to buy theshare Eau de Nacre. It reminded me so much of something my Nana would have worn. You guys already know I miss her so its nice to be reminded of her when I look down at my hands.
MY NEXT SPLURGE WILL BE
One very cool thing that Zara did while she was doing my eye makeup was pop on some of the uber cool eye patches under my eyes. I wish Id snapped a mirror pic of how cool these look on! You may have seen them on Pinterest. They are the Firming Anti-Wrinkle Flash Eye Revitaliser. These also come with a roll-on anti-agingserum with a whole lot of vitamin-C to reduce dark circles and puffiness in all of about five minutes. I have to save up for these!!
Anyway, what did you do for Valentines Day? Is it something you celebrate? We ended up working on the actual day but later had a really nice homemade dinner by candlelight outside. With one of my Spotify playlists in the background, it was so nice. Id rather stay in than battle crowded restaurants on Valentines Day. Would love to hear your thoughts or rituals!
Wearing:White Opal highlight,transparent Baume Essentiel,Tweed Beige blush,cream eyeshadow in Pierre de Rose, Quadra eyeshadowpalettein 314 Lueurs Ambrees,Rouge Allure Ink in Cornalie, Le Volume Revolution mascara and Eau de Nacre nail polish.Follow
FOLLOW VIA BLOGLOVIN
PHOTOGRAPHED BY:MARIO RECCHIA
JOIN MEIN MY PINTEREST OBSESSIONHERE
http://www.inspiringwit.com/subtle-date-night-beauty/
0 notes
Text
YCA Asset Creation: Queen Elizabeth Illustration + Cover Design
20.03.19
Today I started working on my illustration of Queen Elizabeth for this project. I wanted to have her on the front cover of a graphic novel that I would be designing. The background would have Big Ben, which you can see in the previous post below.
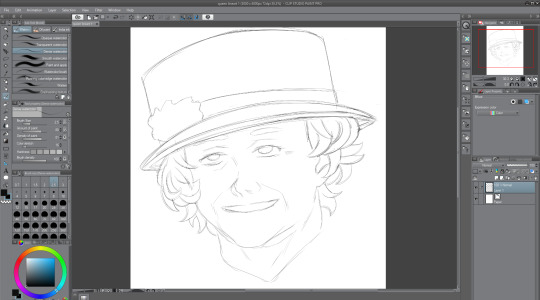
Rough Linework
So, to start with, I sketched out a rough drawing of the Queen in a drawing program called Clip Studio Paint. Out of Paint Tool Sai, Photoshop and this, I find this to be my favourite program to draw and paint in. For this rough sketch, I used a thin watercolour brush like I usually do. I used various different reference images from Google. I decided to draw her like how she looks most of the time. I think that the hat and the curly hair are kind of her defining parts. The hair was really challenging to get right—I’m not very good at drawing curly hair/hair in general. The hat looks pretty good too I think. I tried to get it to look like her as best I could, as far as this particular style will let me, and I think I kind of pulled it off, but I still need to improve on my faces in general.
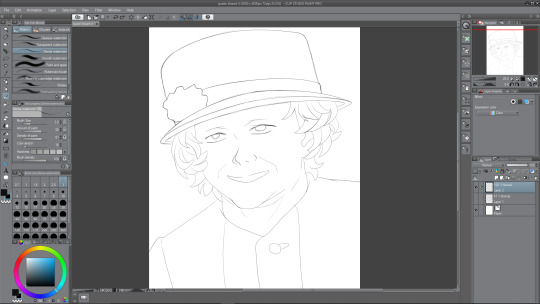
Polished Linework
After finishing the rough sketch of the Queen, I thought it time to go over the lines. To do this, I created a new layer, and then lowered the opacity of the sketch layer, so that I could go just make out what I was drawing over. I don’t really like how the lines turned out once I compare it to the original sketch work, because it kind of lost the sketchy and rough charm, but I thought that I could probably make up for that when it comes to painting it. In this screenshot, you can see her outfit now—it is her usual outfit that she appears in public wearing. I went with this one because it was simple, and I would prefer to keep the focus on her face if possible. Overall, I’m not a big fan of how it looks right now, but I’m confident that I can improve this soon.
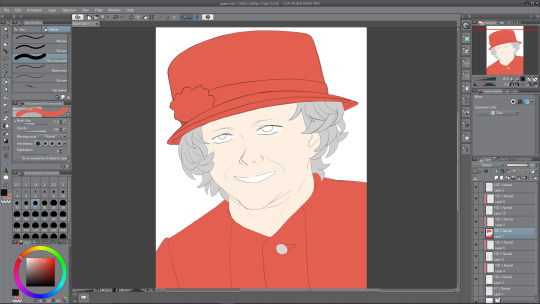
Colouring
The next thing to do after finishing the linework was to colour in the Queen’s main parts, so I’d decided that I wanted her outfit to be coloured red, since I was adhering to the colour palette of the Union Jack; red, white, and blue (the blue will be the sky, white for clouds). I chose a regular not-too-saturated but not-too- desaturated red shade for her clothing and her hat. For the moment, I want to have the rose thing on her hat red, but maybe it will look good if I am to make it white instead. I chose a middle shade of grey for the hair, because I would need highlights for it as well as, obviously, darker tones. A regular white skin tone and plain white for the eyes and mouth for now. The mouth is white at the moment as I plan to show teeth, but later on I change this.
So, to colour this in, what I do is I create two layers—one where I will colour whatever I want, so the hat and torso for example. And how I colour is I use a pen to draw around the outside using the red, and then I just fill in the rest because it is much more easy and efficient than colouring in the hat, and then doing the outlines. Anyway, after I’ve coloured the parts, I use the second layer above the coloured one, and apply a clipping mask of sorts. This enables me to paint on this layer, only on the colour that I’ve filled in, an extremely useful feature.
Painting Face I
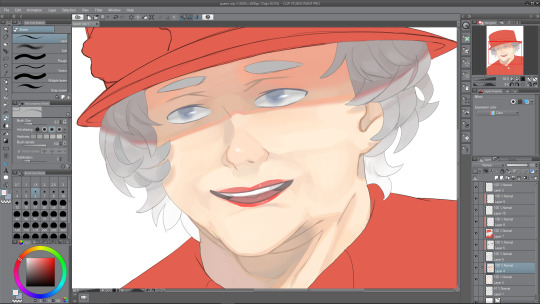
Now it was time to paint the face that I’d coloured in with the skin tone. I added the necessary shades first, like with her face lines, which I’ve exaggerated in her favour, the shade under her nose and shadows being cast by her hair, look to the left and right of her face. Also, you may have noticed that I completely forgot to draw the eyebrows from the second screenshot onward, so i corrected that below. I painted in the inside of the ear using dark shades also. It was fun to paint underneath the head, where a shadow is being cast. The shadow being cast from her hat makes her look almost evil and scheming right now, I think it may be because the eyes aren’t painted yet. There must be a relatively harsh lighting right now with how dark I’ve made the shadows—probably midday sunlight or something. There are all sorts of shades among the shadows, underneath the hat are a mix of greys, oranges and also a bit of red and pink nearer the top, where the colours from the hat bounce off. The shadow below the head has multiple shades too, mainly the same as the shadow from the hat, except from reds. There is a slight pinkish shade on the left side of the of the shade, bouncing off of the clothing, and an orange shade just under the chin.
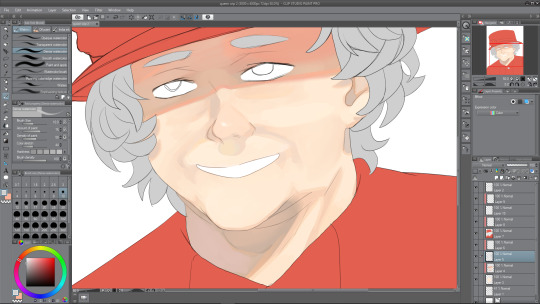
Painting Face II
Next I decided to work on the face some more to try and finish it. I started with the eyes. The eyes were under the hat’s shade, therefore, I needed to paint them accordingly. This meant that the main white in the eye would be a darker shade; grey. I painted her eyes a greyish blue, like her real eyes, and kept the shading quite minimal. After I finished the iris, I went over the outside using the blur tool to give it a soft look. Then I went back to the brush tool and did one white stroke on each of the eyes, and airbrushed a slight white over the middles of them. I think that it really adds to the painting and makes her eyes look less dead, which is something that often unintentionally happens when I’m drawing eyes. After finishing the eyes up, I moved to the mouth. After a bit of experimenting, I realised that making her grin was a bad idea, mainly because I just couldn’t get it to look right, but also because, once I drew her with her mouth open, presumably in joy, it looked a lot better.
I also tidied up the face shading, using the blend tool to blend parts that looked like they were too harsh and intruding. Next I continued on with the mouth area, and painted her red lips. Right now they don’t look very good, like they’re too thin or something, I fix this somewhat later on. I painted a small white dot on her lips to look like a highlight, which I think really goes far. Finally, I worked on the hair—easily my least favorite part of the illustration. For starters, even the sketches don’t look good to me, so adding depth to the hair via color wasn’t sounding too thrilling. But alas, I continued on, and painted them in a way that is acceptable, not great but I’m okay with it, so I continued with the shade from the hat, and painted a dark shadow coming from one edge of the hat to the other. It kind of dips, down and then up at the edges, which corresponds to how close the hair is to the sides of the hat. There aren’t many different shades among the hair, but I did decide to make it get lighter as it went down, no particular reason really, I just thought it would look nice and kind of a little less boring.
Painting Outfit I
Next I worked on her outfit, which wasn’t too difficult to come up with something I was pleased with. I looked at references of her wearing this kind of stiff outfit when I was sketching, and the reason I call it stiff is because there are minimal wrinkles on the outfit, not really any lines to introduce any shading to, and the lighting that I went with doesn’t really help me there either. Instead I used some of my usual tricks to add some kind of nice depth to something that is really flat otherwise. I painted a gradient from a desaturated purple-ish red from the bottom of the composition, to the red that I started with nearer the top. Although, this isn’t to say there’s no shading whatsoever, there is a nice shadow that continues on from the neck from the one that is being cast by the head. This shadow has a nice variety of shades in it, some greys, some purples and reds, and a slight desaturated orange as a bounce light from the skin tone that is very close by. There’s also some other shading as you can see in the illustration. Also a dark shade where the button is sewn through.
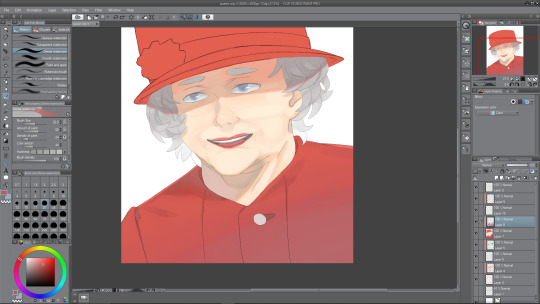
Painting Outfit II
I am nearing the end of the illustration, and next is to do the hat, which I thought would be difficult. Luckily so, I got kind of distracted by my linework—it was really messy still, therefore, I needed to clean it up, which took quite a while to be honest, though I think it was worth it. Essentially, I went over the hat lines with a thicker brush and then erased the thicker parts to correspond with the rest of the lines throughout the drawing. Now, it was a hat, not much I can think to shade really. I did the same gradient trick that I used with the outfit, and then also did a slight darker shade down the right hand side of the hat, to give it a slight beveled effect—make it look as though it was rounding off towards the edges, as a hat would do. I may still work on the hat some more later. I made the strip across the bottom of the hat a darker shade so that it didn’t look too boring. Now, for the white flower thing, I’m not sure what to call it, it was a challenge at first. I started by trying to make each of the points join together at the center where it would be darker, but as that looked terrible to me, I decided on a much more appealing way of painting it. As you can see, it looks quite soft and pastel-themed almost. I used a slightly large brush size to paint these blobs everywhere to create the effect of something that was puffed out. I’m really pleased with how it turned out, and I love the colours that I used in it. Again, looking at it now, the hat will probably need some more doing to it, but right now, I was roughly done with the painting.
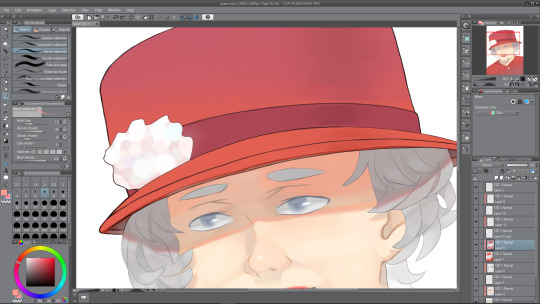
Finished Queen Elizabeth Illustration with Cover

0 notes
Text
It Isn’t What it Looks Like, Really!
For @crazylazydays prompt- sorry it took so long it started out short and fluffy and then my semi-angsty ass decided to get intense AND NOW IT’S 2400 WORDS OOPS. I hope you enjoy it :)))))
“It’s not what it looks like, really!”
“It looks like Nursey’s head is stuck in-between the posts of the stairs...”
“Oh, then it’s exactly what it looks like.”
Earlier That Day…
Derek Nurse was a klutz. It wasn’t exactly something he could deny considering within the last week he had fallen up the stairs, smacked himself in the face with a plate, and nearly pulled off Chowder’s pants when he tripped into him. It was just something he embraced, even when someone threatened to safely secure him up in bubble wrap until he graduated to ensure his game wouldn’t suffer. There was a common trait between all these instances however, that somehow no one had yet noticed. Every time Derek’s body betrayed him, be it tripping, injury, or a complete wipeout, William Pointdexter had been shirtless.
Currently he was lounging in the Haus on the forbidden couch doing readings for his British Literature class when Dex had walked in covered head to toe in mud. “Yo, dude, what happened to you?” Nursey could tell, even though most of Dex’s face was coated in drying brown patches, that Dex was a very angry shade of red.
“The fuckin’ Lax Bros just happened, THEY LITERALLY JUST DROPPED A BUCKET OF MUD OUT OF A WINDOW WHEN I WALKED BY. I HAVE A MIDTERM IN AN HOUR AND I CAN’T GO BACK TO MY DORM RIGHT NOW BECAUSE MY ROOMMATE IS GETTING LAID AND-“
Nursey decided to interrupt Dex before he somehow managed to get redder and possibly explode, “Dude, go take a shower in Chow’s bathroom. Both him and Bitty are out in class right now and I don’t think they’d fault you for needing one.”
Nursey settled back into the couch and continued his readings, the sounds of a slighty less angry Dex showering in the background. Nursey tried to ignore the fact that Dex was very naked right above him, and focus on the probably queer readings he was trying to take notes on. He finally heard the shower go off, and figured that he’d try to lighten Dex’s mood before he left for his midterm. It wasn’t like Nursey was a total asshole and wanted Dex to go off to his midterm still seething, that wouldn’t help anyone. Nursey’s plan was genius, he was convinced it was genius anyway, until it became obvious it wasn’t.
In this genius plan, Nursey had planned to wait at the bottom of the stairs with his head near the poles that attached the railing to the stairs. He was going to wait there with a creepy look on his face until Dex noticed him and would die laughing because Derek Nurse was hilariousTM. In retrospect, none of the above was accurate because Nursey was not funny, nor was he careful and those two concepts were a large dependent in his plan. He heard Dex begin to descend the stairs, and he got his face ready perching his head semi-wedged into the bars on the stair to be sure he wouldn’t be missed. What Nursey was not expecting, however, was Dex, whose only coverage was a very small towel, to be so easily spooked. When Dex saw Derek, he screamed.
“wh-AH FUCKING HELL”
In response to Dex’s yelp, and the severe towel slippage that had occurred, Derek Nurse’s head slipped inbetween the bars of the railing and got stuck there. Dex began reaming Nursey out, his frustration showing based on his returned to red face.
“-AND ANOTHER THING WHY DID YOU THINK THAT WAS A GOOD IDEA I COULD’VE FALLEN DOWN THE STAIRS-“
As Dex screamed Nursey discreetly tried to pull his head out from between the bars, not realizing this was going to be more difficult than he anticipated. It wasn’t until he made a very squeaky noise of frustration that Dex stopped screaming and realized where Derek was and why he hadn’t moved yet.
“Are you stuck?”
“No… I just haven’t quite figured out how to remove my head”
“So you’re stuck.”
“Yes.”
There was a pause, but the unthinkable then happened. Dex’s face went red again but instead of yelling, this time he was laughing- no sorry he was full on chortling.
“H-HOLY SHI-IT, YOU-YOUR HEAD IS STUCK, OH MY GOD I CAN’T BELIEVE THIS- ”
And then it hit Dex, that Derek was stuck and he was the only one in the house to help him get unstuck. And it seemed that Derek was not handling it well based on the heavy breathing that had started up during his laughter. Oh, well that wasn’t good.
“Nurse, are you okay?”, Dex realized his question was probably pretty lame considering the state Nursey had already managed to put himself in within the last minute and a half. The lack of response from Nursey other than a semi-shake of his head indicated he probably should try to do something before this got worse. He shot off a quick text to Bitty, (SOS, Come back to Haus ASAP please!!!) and then turned back to his pale-faced teammate. “Okay, Nurse, breathe please. I don’t really know what I’m doing in this situation, but I know you need to breathe to live so please please do that… uh count to 7 while you breathe in and 5 while you breathe out, there you go, okay.”
As Dex worked to reassure Nurse, his phone pinged and Bitty had indicated he’d be back in 10 minutes and to just stay put. Dex realized Bitty didn’t understand how impossible it would be to move, so he turned back to Derek who appeared to be calming down slightly with the change in breathing, colour returning to his face. Finally in a shaky voice, Nursey was able to say something.
“Can you hold my hand?”
Dex figured he wasn’t really in the place to argue, so he took Nursey’s hand and began to stroke it with his thumb. He decided that the best way to help Nursey was to distract him from the situation until Bitty arrived. So Dex rambled, told Nursey about the time his cousin had superglued himself to the toilet in an attempt to prank his sister. He noticed that Nursey began to calm down while he spoke, small reactions to avoid jostling his head’s position between the bars. He realized he was still holding Nursey’s hand, he also realized he kind of didn’t want to let go. The truth was, Nursey and Dex didn’t know how to deal with the tension between them but they weren’t oblivious to why it existed. They had started out rough, constant fighting and screaming but it had turned from aggression to light-hearted chirping and realistically some of their chirps were so mild they were essentially flirting. The team had picked up on it, but they all realized it wasn’t their place to say anything- Dex and Nursey would figure it out themselves sometime or another.
Dex and Nursey didn’t realize how silent they had been until they heard a car rush by outside the Haus, both thinking about things, not caring that Dex’s story had just trailed off. They just kind of looked at each other, and they watched each other, neither expecting anything from the other. Slowly, Dex moved closer to Nursey. The situation wasn’t exactly appropriate for anything Dex had in mind, but he hadn’t really considered that when he moved. He realized Nursey couldn’t really move anywhere so he watched, hoping he wouldn’t push any boundaries and half-expecting Nurse to start wiggling away from him. But he didn’t, Nursey just watched him with his eyes wide as they moved closer until there was a loud bang and Dex jumped two feet backward while Nursey whacked his head off the rail in shock. He turned to see Bitty staring with a look of shock on his face, he didn’t know what to do but he was ready to bullshit something, “It’s not what it looks like, Bits, really!”
“It looks like Nursey’s head is stuck in-between the posts of the stairs...”
“Oh, then it’s exactly what it looks like”, Dex giggled nervously to himself as Bitty went into the kitchen muttering under his breath about wasting butter and klutzy frogs. It wasn’t like he didn’t want Bitty to know what was about to happen, he just didn’t want Bitty to know before Dex knew what was going on. He saw Derek getting pale again, and wasn’t entirely sure whether it was from the stairs, Bitty, or him- but he figured any of the above probably weren’t good. He took Derek’s hand again, rubbing his thumb in circles while Bitty came back with a couple sticks of butter and a look severely lacking in shock considering the situation. After a few minutes of buttering Derek’s face, and much more muttering, Derek was finally freed from the stairs.
“I don’t know how y’all managed this, but I also don’t know why you didn’t just take out the bars he was stuck between, considering you did that last week to fix a cracked pole Dex.”
Dex realized that would have worked really well, unfortunately well, but he also didn’t think it was his place to reveal to Bitty he was busy trying to calm Derek down. So he just kind of shrugged and indicated he hadn’t really though the situation through, then he realized the time and the whole reason he ended up here and the fact that he was still in a towel (which Bitty thankfully hadn’t mentioned). He grabbed his bag, moved to the bathroom, changed into his back up gym clothes, and ran off leaving Nursey with Bitty. Nursey opened his mouth to say something, he wasn’t really sure what to say at this point, but Bitty cut him off.
“I don’t know what happened, I don’t know if I want to know, but for heaven’s sakes y’all need to have a talk and I’m buying you a bubble to live in, hmph.”
Nursey decided Bitty was right, he needed to talk to Dex and he probably needed to finish the conversation they started earlier- especially if it meant what he thought earlier meant.
***
Dex’s midterm had gone well, he couldn’t complain, but he was exhausted after the afternoon he’d had. He was headed back to his dorm to finally get some rest until he noticed a very quiet Derek Nurse sitting outside the door of his room. His roommate was clearly out because otherwise Derek would’ve been waiting inside, so he figured he had a good enough reason to invite him in and watch Netflix. Other than nod at Dex Nursey hadn’t said anything which wasn’t unusual, but his mood seemed to be even more subdued than normal. Once they settled onto his bed, laptop set up on a chair across from them so they could sit widthwise and stretch out more, Derek finally spoke up.
“Thanks for uh, not walking away earlier, or whatever”
It was still quieter than Dex was used to hearing from Derek, and he seemed almost uncomfortable. Dex’s reply didn’t seem to make him anymore comfortable though.
“Dude, I wouldn’t have left you in that situation unless my midterm had been starting in the next few minutes… and even then I probably would’ve waited until Bitty showed up.”
Derek seemed to be trying to take up as little space as possible, a 6”2 hockey player curled into a ball not passing for taking up little space, but nonetheless trying. Dex shifted closer to him, taking another chance in his actions, and covered Derek’s hand with his. Neither one looked at the other as the show in the background continued to play on. This continued for a few minutes until Dex finally found his voice again.
“I- uh- wanted you to feel better… you looked… not okay?”
Nursey let out a very shaky sigh, Dex finally turned to look at Nursey and saw that there were tears running down his face. Something inside of Dex panicked slightly, he didn’t like this, had he caused this? Nursey still wasn’t look at him, so Dex lightly put his hand on Derek’s face and turned him to face Dex’s face. Nursey continued to look everywhere but at him, so Dex waited. Finally Nursey spoke.
“Someone shoved me into a locker in middle school, and I got stuck. It- that situation… reminded me so much of that,” he sighed heavily.
“The difference was that last time, someone I cared about very much didn’t stick around. They ran, and they never came back. I was there for almost an hour before someone finally did something. I transferred to Andover soon after that, my parents appalled that someone had managed to do that to me and get away with it.”
At this point, Dex felt heavy. He knew that Nursey had just hinted at the unspoken feelings they shared, and he was angry that Nursey had gone through all that but neither of those emotions would help Nursey. So he waited some more, hopefully silently urging Nursey to continue, which he did.
“I know, it wasn’t the same thing. It wasn’t a locker, and I wasn’t stuck the same way, and I know if you’d left someone would’ve come along. But in that moment, you were laughing and I know it wasn’t mean but like… I just couldn’t figure out what to do about any of it. Dex, I-“
Nursey stopped speaking suddenly, like he wasn’t sure he knew how or what to say next. So Dex spoke instead.
“Nursey, Derek, I really care about you. I want to be there for you in every situation, even if it means sitting with for days you while your head is stuck in the railing on the stairs. I want to protect you even if it means getting hurt myself. I want… you, basically just you.”
Dex wrapped his arm around Derek, slowly so as to allow him space if he chose to wiggle away, and when Derek settled up against him he felt good and Derek in turn felt safer than he ever had before. With a light but hesitant kiss to Derek’s forehead, the two hockey players finally settled into each other knowing that they had all the time in the world to talk about things- but right then they just wanted to feel the other beside them
86 notes
·
View notes
Text
graphics tutorial !!
hey guys !! i’ll be doing a tutorial on how to get this effect:

find the post here
before going on, you must have SOME basic knowledge of how to use photoshop. for example, how to use the tools, undo, copy and paste, colour adjustments, etc.
this tutorial will be pretty straight forward, but still pretty long so beware. this was requested by an AMAZING anon who is too pure and sweet for this world. i’m only doing the first image in the two-image set because i figure the second image is easy to do :)
what you ( might ) get out of this tutorial:
how to make this graphic
how to do shadows based on a light source
how to be a bit better at photoshop ( not that i’m like really super at it but )
how to cut out teeny tiny hairs and details on a person without it looking ( too ) gross
some fonts, textures, techniques
some happy feelings :)
rest is under the cut !! if you’re on mobile, draft it to look at it later ;)
( NOTE: in all honesty, this is not my idea. i saw someone else’s graphics a long time ago of this and a few weeks later, on a whim, i decided to try it. i don’t know the person’s url or have the link to the graphic that inspired this, but all i can say is that i can’t take credit for the idea, but i can take credit on how i did it )
1. how to cut out a person ( or basically anything with lots of detail )
ok so the first graphics is the most difficult one ( not that it is difficult, but more difficult than the second one ) i’m using photoshop cc, but any photoshop i think will work with this. ( i suggest as old as you can go is photoshop cs3 )
you also got to have SOME experience using photoshop already, like how to use most of the tools and stuff on here. if not, this may be a bit confusing.
1a) first off, go find an image. you’ll want a pretty high resolution picture if you want to be able to cut out all the little hairs. i suggest anything over 1080p, so basically either REAALLY good screencaps or promotional pictures.
( NOTE: when picking a good photo, make sure to take in the fact about the background as well. if you’re going to try cutting out the little hairs and such, it’s good to have a sorta solid background or something that isnt like very complex. you can still do it, but it’ll be more difficult and might not look as good as it could if you had chosen a picture with a simpler background. )
i chose this one ( it’s a promotional picture and is 3000 x 4000 pixels, so it’s a guaranteed good cutout ) :
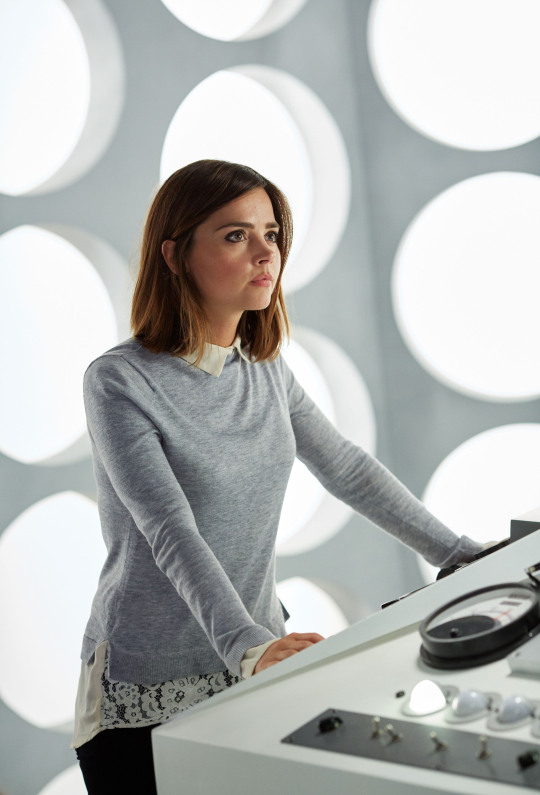
now the arms and stuff is pretty straight forward cutting out, so lets zoom in to clara’s head. ( if you look closely at the hair on the right side you can already tell its going to be difficult to cut out. i like this photo though so i’m gonna do it anyways )
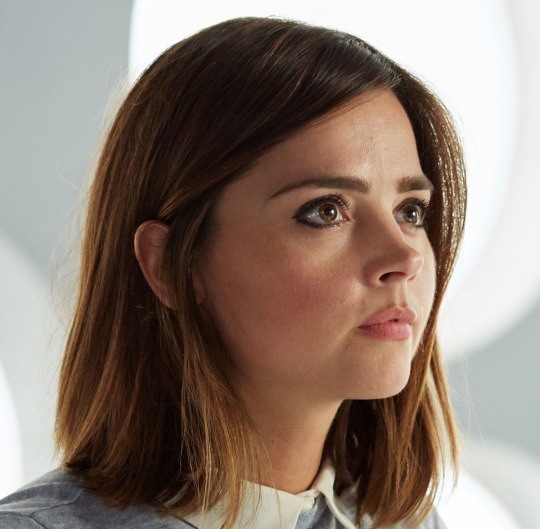
( she’s so pretty i can’t akghslgdjlkgjlhjl )
you can adjust the colours or shadows if you want, but i usually do that later.
1b) select the lasso tool ( just the regular one ) and outline all the hair that’s in front of the white circle light thing like this:
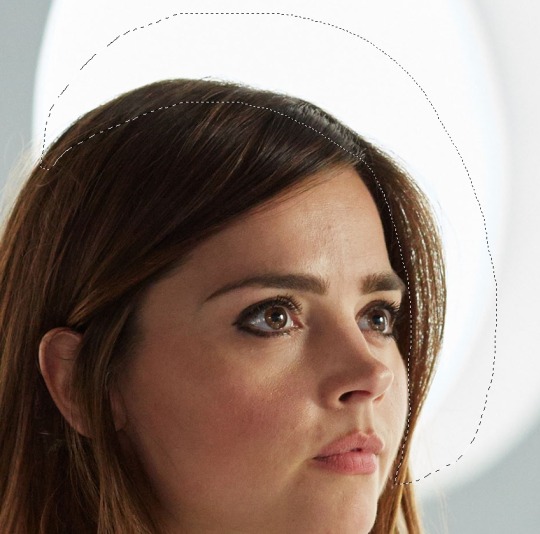
( NOTE: if you’re trying to cut out the little bits of hair and stuff, don’t do it all at once unless the background colour is one solid colour. )
now go to select > colour range.
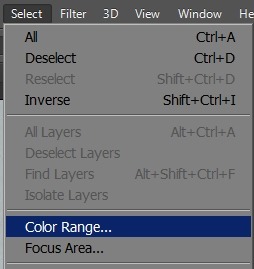
once you’ve opened that, you get this pop-up window beside your image and it’ll look something like this:
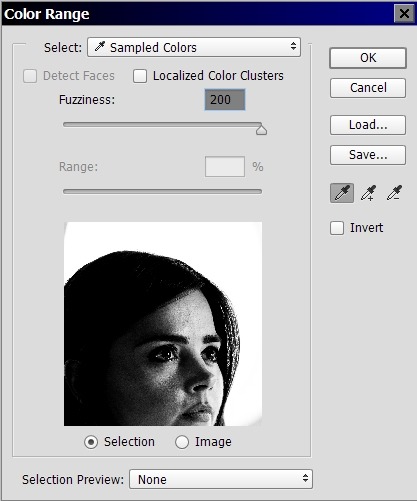
click the part of the image that you want to delete, then and drag the fuzziness bar until you see the part you want to keep is all black.
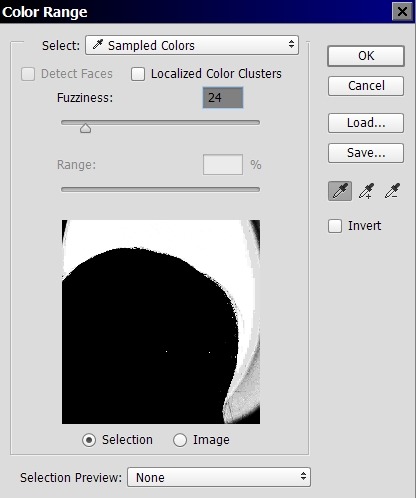
click ok and now look at your image.
now press delete and add what’s going to be the background colour of your graphic on a separate layer behind it to see what else you need to get rid of for your image to look good. my background is black, so it’s going to require more effort into getting rid of the little bits. if your image background is a light colour, you’re probably done at this point.
we still have a little bit around her head and in between the hairs by her head, and that’s bad if i want to make the background of the graphics black ( which i do ) so i’m going to select the hair to the side of her head and repeat the process, clicking the white in between the hairs because that’s what i want to delete.
it’s not perfect yet, but it’s close !! click on the eraser and choose a soft edge brush. make the brush size pretty big and click AROUND the hairs, softening the edges so it looks less harsh. ( you can turn down the opacity of the brush too if you feel like its taking away too much of the image ) if you’re worried about erasing the face by accident, do a selection around the face, invert that selection, then erase. this will protect the face so it doesn’t fade away like the hairs. during this, also erase any unwanted bits that make your image look kinda ugly.
now, all you have to do is cut out the rest of the image and you’ll get something like this:

it looks odd right now because we haven’t edited the colours or added shadows yet so it matches, but that’s going to be the last thing we do.
here’s some other examples of this cut out method:

2. how to make the mask effect on your image
2a) first, make a selection on part of the face that’s going to be the mask.
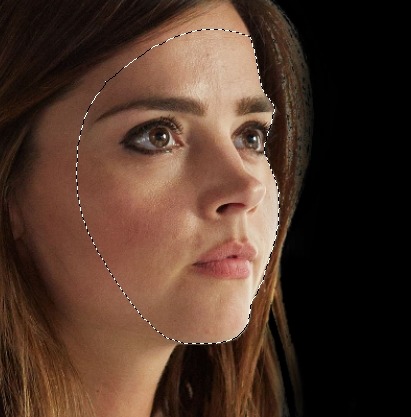
2b) copy it ( control + c, or command + c if you’re using a mac ) THIS IS IMPORTANT, DON’T FORGET TO COPY. the copy will be your mask.
go to select > modify > contract and contract by 10 pixels.
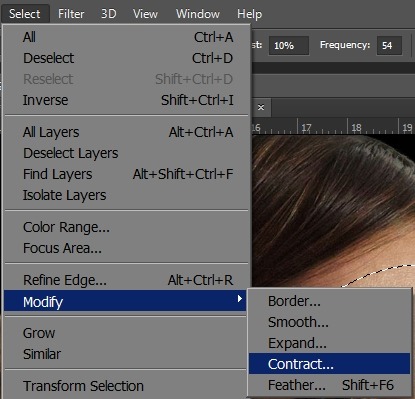
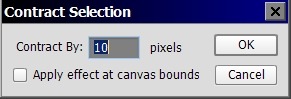
press ‘delete’ and you should have something like this:
paste the face we copied earlier onto a new layer and, if it’s not already, align it back over the cutout. control click ( or command click ) on the image of the layer so you have a selection like this:
this part is going to make it look like the mask is real, rather than just cutting out her face and placing it somewhere, which would look fake.
2c) lock your layer so the brush strokes that we’re going to do stay only on the image.

with lock:

without lock:

after you’ve locked it, select the skin colour and pick a few shades darker than it. using a soft brush, colour the part selected based on where you’re going to put your light source. my light source was here:
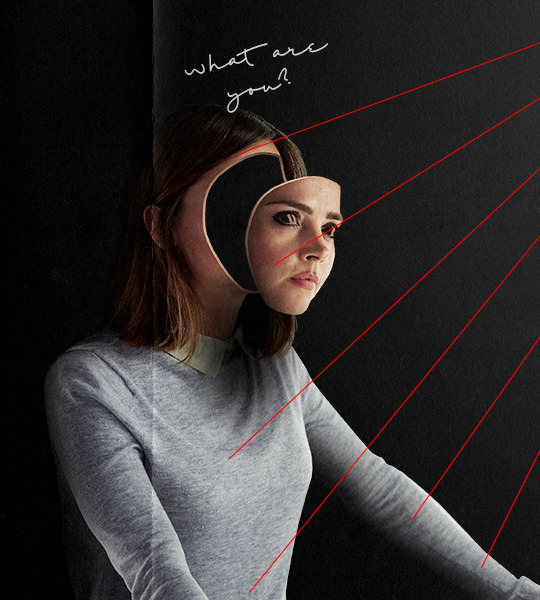
this means that the left side should be lighter than the right side. knowing that, i can go ahead and colour it so it looks like this:
2d) now we can deal with the copy of the face we made !! go to that layer and place the face ( mask ) where ever you want. then, do the same thing we did for the body and add a outline to make it look more realistic. finally, cut out the eye so we’re left with a real-ish looking mask.
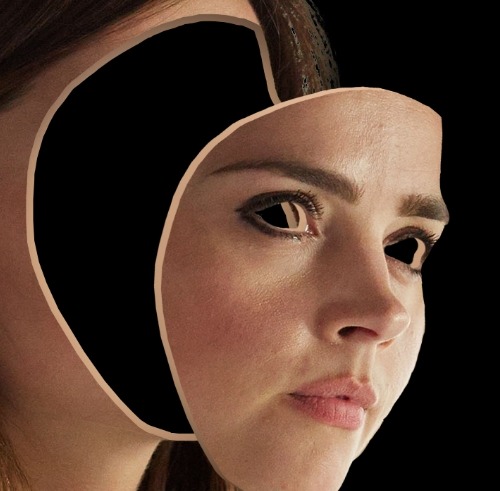
now, time for the shadows !!
3. how to put shadows and make it more realistic
3a) so we already have a light source, so we now know where to put the shadows accurately.i’m doing the shadows on the mask first. take a soft edge brush and make a new layer above the mask layer and set the layer style to multiply. this will make the image darker, but not black, so it won’t look fake.
right click > create clipping mask on the new layer. this is like locking a layer except it will make it so the shadows are on a new layer, but don’t go on anything else except the mask. now you can brush on your shadows so you have something like this on the mask:
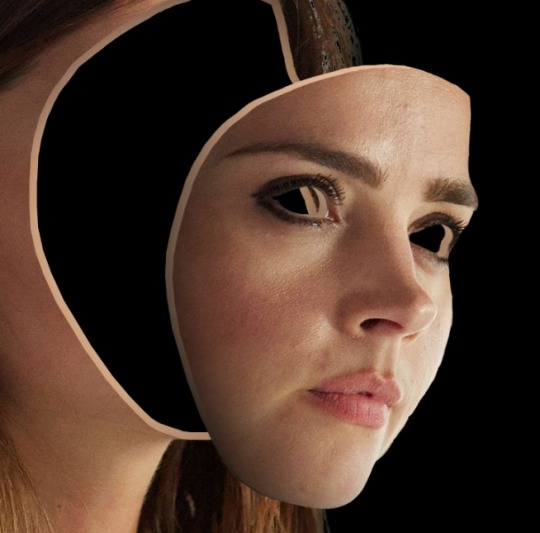
do it to the body as well so it blends in better with the background. finally, i put in my light source ( i just used a soft edge brush and made a white circle, then positioned it where i wanted my light source to be ). here’s what my image looks like now:

now on to the textures !!!
4. finishing touches ( textures, adjustment layers, etc. )
4a) first, adjustment layers. they’re basically just filters to make the colours look better or match your background. i won’t go into too much detail because if you’re reading this, you shouldn’t be new to photoshop and would probably know sort of how to do this.
i want to edit the lights and shadows, so i’m going to use curves. to do that, go to layer > new adjustment layer > curves.
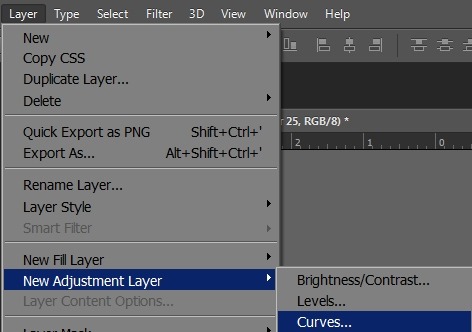
then, you’ll get a popup and just drag the points and fool around until you like how your image looks.
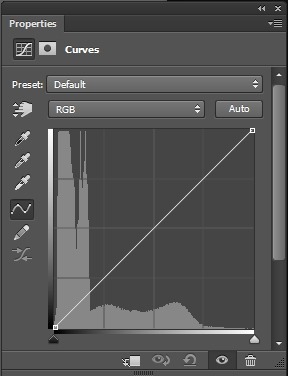
next, add selective colour. selective colour is important if you don’t like the colours of your image, or if you want to change the colours. i usually use it to make the reds and yellows more pinkish. go to layer > new adjustment layer > selective colour. play around with the slide on each colour level until you like how your image looks.
( NOTE: if your image has a yellowish tone to it, go to the yellow option and drag the yellow slide to the left. this will turn down the yellows in your image and make it a more pinkish-neutral colour. this applies to any image that has a color tone that you don’t like. )
here’s my image now:

4b) for textures, i love the grainy ones. i usually use a paper kind of texture. i’m using this one, which is my favourite:
drag it over your image and set the layer style to linear light. this will really bring out the detail in the texture.

here are some of my other favourites ( set these layer styles to screen ):

4c) font is important. the font can either ruin the whole thing you have going or make it 20x better. sadly, i’m not good at picking fonts, so here’s a pack of good ones that will for sure make your graphic look good.
i really like hand writing / messy looking fonts. the one i used is called shopping script and can be found here. place the text where ever you want.

aaaaand there you have it !! those are the two images side by side. you can go back to the very top and click the link to see both images in HD.
thank you for reading all this and making it this far, and good luck with photoshop !! i only started a year ago so that’s just proof that practice makes a huge difference :)
#agjhgjkdhdhg aahHHHHH#clara oswald#completeresources#doctor who#dw#dwedit#itsphotoshop#mine#my resources#photoshop tutorial#resources#tutorial#yeahps
664 notes
·
View notes
Text
Personal Illustration Process
04/06/18
For my final piece, I have pretty much decided that I will be having an illustration in my final piece, the illustration will be of me. There is more context and rough sketches of ideas in the 10-page sketchbook work post below which detail the ideas which I had relating to the illustration. Anyway, I’ll talk briefly about some ideas that I have for my final piece. My main idea now is to draw myself have a cityscape background behind me. The illustration will include me wearing a striped t-shirt, which will be added in Photoshop when I have finished the whole illustration - the stripes will be lines which I will distort so it looks like a striped t-shirt, but also not at the same time because it will look manipulated and unshaded - I think that this will look pretty good when it’s done. The background will be hopefully transparent so that I can export it into Photoshop, but if this doesn’t work, then I will try my best to cut around it using the tool available to me in Photoshop such as the pen tool, it will just come down to my own accuracy. The reason I’m keeping the background plain is so that I can have a cityscape background which I will create in either Photoshop or Illustrator, I say Photoshop as I recently created a scene for an animation there, and found that as long as I don’t use complex shapes such as shapes that involve the line tool to create, then creating a cityscape scene shouldn’t be too tricky - the whole reason for using Photoshop for this at all is because of the effects it offers as opposed to Illustrator.
So I started by sketching out some line art, which I think looks okay, but the face needs some working on. I decided to kind of exaggerate the eyebrows because I think it resembles me more that way. I think the hair looks relatively similar to my own, though probably a bit straighter-looking, but I tried to get the curl on the right hand side, and the hair which you can see at the back of my neck. The glasses may look a bit too big, but the neck and clothes look fairly good in my opinion. For this line art I used a very thin black watercolour brush with brush sensitivity on, as I’m using a Wacom drawing tablet - not really expensive one with a screen, but it does the job.

I started adding some basic colour to the segments which need to be coloured in, in this case being the hair, the visible skin and the jacket - I also thought that I would colour the shirt in white, so that when I export it when it’s finished, it’s not transparent because it wasn’t coloured in. The colours aren’t flashy or anything, but I think that it will still look good when it’s all finished. When colouring, there’s a specific way that I do it. I colour the different parts on their respective layers, and then add another layer above it, and enable something called ‘clipping layer’ or I think that’s what it’s called - basically, it means that whatever I do on this layer, will only happen on whatever I did on the layer below it, so it’s extremely useful for shading different parts of a drawing. This will take effect on the part below.

I began to start shading in places I thought would fit, like on the neck, where a shadow is cast from the head. I also shaded under the hair above my glasses, as the hair would be casting a shadow there too. For the shade I used mixes of orange and grey. Because of the blue jacket thing that I’m wearing here, I tried to reflect the colour from it slightly onto the neck shade, on the right. This was also the point at which I drew the glasses, which took a really long time to get right as I did it freehand with no shape tool or anything. I think that they turned out alright.
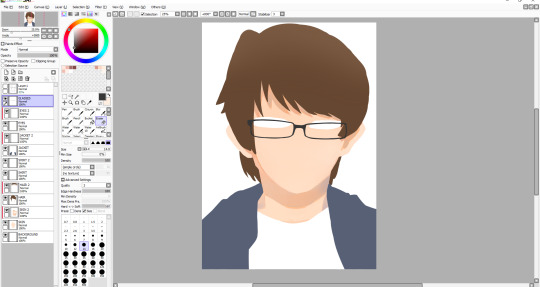
Next I shaded the face slightly, so that it didn’t look so flat. I also added a shade on the face to give the impression that there’s a nose - I also added a subtle highlight on the nose too. I drew a facial expression and also a little detail under the mouth to show that the chin is there. After this I decided to start working on the hair. I started by adding shade and lines where I thought my hair kind of parts, and then I added some highlights mainly near the left hand side. I didn’t have any particular idea for a light source in this illustration, though judging from the shadows on the face and neck, I would assume that it’s coming from the front. I also added a small shade under the middle of the glasses - I haven’t yet decided whether I want to have a shadow being cast from the glasses themselves, because it would be frustrating to draw them all over again except this time I’ll need to be even more accurate. I might be able to duplicate the layer and change the colour to the skin shade and have them underneath the glasses.
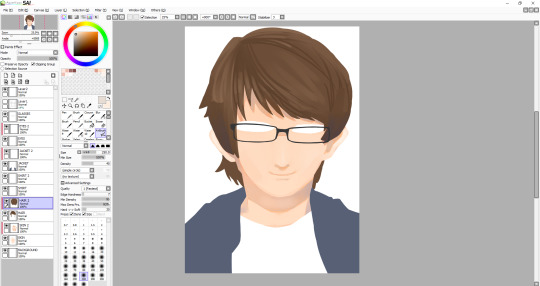
I worked on the hair for a while to try and get it to look kind of smooth, which I think I’ve pulled off for the most part, although I might work on it some more when I’ve done everything else. The hair contains a range of shades. I even used a desaturated purple, as well as some saturated browns and some greys. For the highlights, I tried to smooth them out and they’re just regular browns, with a bit of desaturation to them. After doing the hair, I decided I was unhappy with the eyes once I tried adding pupils, so I changed the shape of them a bit. I also added a more noticeable highlight on the nose as well as add one below the nose. I’m not very good at caricature, so facial features don’t tend to look a whole lot like how they should, so I have to rely on getting the hair right to some degree for now. I added a kind of gradient thing to my jacket, though I may remove it - I still plan on shading the jacket, I just thought it might be a cool touch.
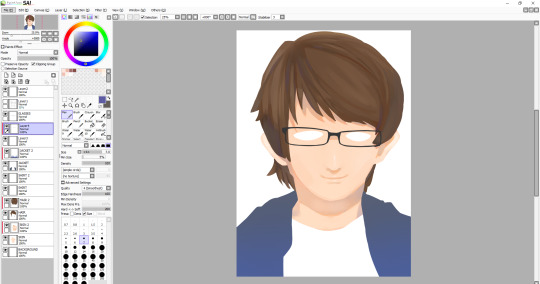
I decided to work on the hair some more, and added some more highlights, most notably on the left side of the hair. One of the more prominent things which I added here is the eyes. I think that they look alright, maybe it bit sad-looking, which wasn’t my intention - maybe I’ll work on them later. The face still needs things adding such as the eyebrows, which I think will be the thing to make it look more like me. The whole illustration still needs line-art around it, so I will add that when all of the colouring is done - though if line art doesn’t work then I’ll leave it as it is now. A problem that has been raised by my tutor, and that is that since my composition is going to be landscape eventually, with the illustration looking like this, the sides of my arms are cut off. I don’t know how I didn’t think of this, but I’m glad that it was pointed out much sooner than later. I suppose I’ll have to draw the arms on, which in theory might actually be quite difficult, since I’m working with quite a few layers, and also I’m not even sure if I’m able to expand the canvas, I’ll have to research this soon, as the deadline is creeping up on me, and I can’t spend too much more time on this illustration.
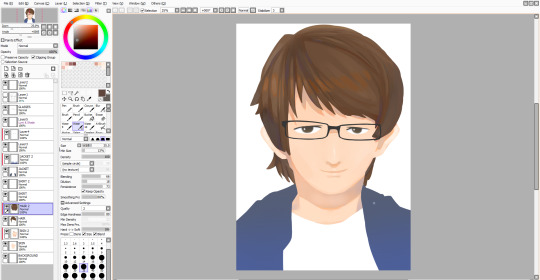
Luckily, I was able to expand the canvas as much as I wanted so I could draw on the sides of the arms. I decided not to sketch them first, so they may look a bit off, or that could be because I really need to improve on drawing anything from the head down. Alongside this, I drew on details around the eyes, most notably the eyebrows, which I think turned out well. I also changed the eyes slightly, though I still look sad. Also - I made the hair a bit rounder near the top, as I thought that it just looked a bit off before.
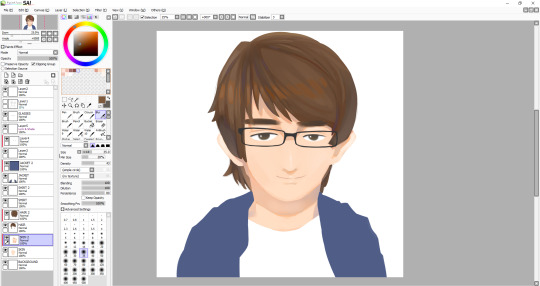
I am almost finished - except not, because now I have to work on the jacket, which was the part I was least looking forward to, so if the drawing doesn’t look as good now, I’ll be blaming it on the jacket. Anyway, to start, I very loosely stuck to my original lineart, though there are some differences between them. I stuck with one of the watercolour brushes that I’d been using throughout this whole illustration, though maybe I should’ve used something else because the texture just doesn’t really look like clothing. I suppose just a different type of brush may have done the trick, though it still comes down to how I handle the shading and where to put it. I usually like to draw things like hair and clothing in segments, like with hair, there’s different parts to, and with clothing, there’s folds, which I need to vastly improve it seems. After I finished with the dark tones, I decided to add highlights I deemed necessary, that or I just added them because it looked empty - though perhaps I shouldn’t have added highlights, and just worked on the darker shades because I’m not particularly pleased with how it turned out. Anyway, that was the end of the illustration, I thought I would add a kind of inner glow in the illustration, as I plan to have this illustration in front of a city. To do this all I had to do was go on each layer and use a large white airbrush. Also, I’m leaving the shirt blank as I still plan on adding some black lines in Photoshop which I will manipulate to look wavy.
Final Illustration

Overall, I think that this illustration turned out well, in particular the head and neck. As I mentioned, I’m not very happy with the jacket, but I think that no matter how many times I redo it right now, I won’t be able to make it look good - it just comes down to me needing much more practice drawing and shading clothes. Looking back at this, I noticed the head looks a bit too big for the body, which wasn’t what I had intended, but I guess after all, the whole thing is just an exaggerated drawing of me.
0 notes
Text
Making the Intro!!
Am I going overboard? Yes. Do I regret it? Not in the slightest.
I started out with the template I wrote about in the previous post, edited the colours a little because I decided the light blue was a text colour I wanted to keep and would no longer be very helpful as a contrasting guide. I created a video layer and used the magic wand to create a, i don't know, perimeter?? Whatever it is in photoshop which means you can’t draw outside of it?? Here,
that dotted line thing. Anyway, I did that to make it easier while animating and just filled in the letters as I went.
I wanted to do multiple colours, since I wanted the tail to have a gradient of white to the original blue, soooooo, I copy and pasted the finished white one, moved it along the timeline by a frame or two so that it would start later, then changed the colour with the paint bucket tool frame by frame. I repeated this for all the shades of blue I wanted until I finally reached that one specific blue!
However, now i’m stuck on what I want the texture to be, here are my options:


The plain one is obviously just plain, I have done nothing to it, the second one was done with an airbrush pen in the colour of the background on a layer on top of the animated text, and the third was done in the same way but with a charcoal brush. I think I’m leaning towards the third?? I don't know.
OK, I have now run somewhat of a survey between my small amount of friends (including mum&dad, obviously). The scores are:
Option 1: Dad, Lolly, Kat, Daniel
Option 2:
Option 3: Mum
Lolly said that plain was ‘more vibrant and cheery’ which I didn’t realise I agree with?! Mum did originally go for option 1 but the more she looked at it the more she liked 3. Kat’s opinion was that the plain worked better with the animation and Daniel said he liked 3 but 1 was neater and better for a showreel.
Plot twist, I choose option 2.
jk, it’s clearly option 1, isn’t it really.
I spent 1 hour animating and drawing a botanical thing coming out of one of my letters, hated it, angrily deleted it and I have now decided that there will be no botanicals.
vimeo
I exported my animated name from Photoshop as an image sequence and then shoved it into After Effects where I could then add my title. Because I don’t want this to be too extreme, I just simply used too rectangles the same colour as my background (with the shape tool) and made them into masks for that text layer. I moved them from the middle out to reveal the text in a non-attention-stealing fashion, super easy stuff really.
HOWEVER, so much goes into mask paths that I didn’t realise like scale and position and what not that I just had to find a tutorial for it because I had literally no idea what I was doing. https://www.youtube.com/watch?v=-HEbnR3QEWg is the one I used and it was really helpful!!

So after faffing around with the pen tool and cutting and pasting and everything else, this is what my bee path looked like!! How fun!! Here’s some key things I figured out:
easier to change the scale of my bee in photoshop and not after effects because otherwise my mask changes size too??
make sure the object your making a path for is at 100% scale, otherwise it just messes up the whole process
the pen tool isn't as scary as I remember it being from college
Never mind, that mask path looked terrible in motion, here’s the new one

I’m sorry everyone, but I have to give up on the bee. For now anyway?? Idk man.
Basically, when I was trying to keyframe my wings at different points, you know, the same way I did for the lip sync, no matter how far I put them apart they would just cancel themselves out leaving me with multiple key frames of the same point on the remap. Honestly, the whole reason this wasn’t finished last week is because of that damn bee. I googles, I researched, I reached out to adobe and nothing. I want to cry.

This is the second time i’ve tried this chat thing, since the phone lines aren’t open and I don’t trust them to reply to an email before Friday yet I have no answers. I sat here for 40 minutes waiting, so I agreed with my Mother and decided to move on from my bee dream. It’s sad, I know, but one day i WILL HAVE A BEE ON MY SHOWREEL INTRO!!!
I’ll call it a day for now, even though this post is spread out over more than just a day but anyway?? I’m not too sure about where I am at the minute, like I’m struggling to see where we’re going with this, but I still have confidence that I’ll bring it back around.
06/05/18
0 notes
Text
A SUBTLE DATE NIGHT BEAUTY LOOK

Creating a subtle date night beauty look with the Chanel Le Blanc 2019 collection Pierres de Lumiere releases. Perfect for a natural makeup look.

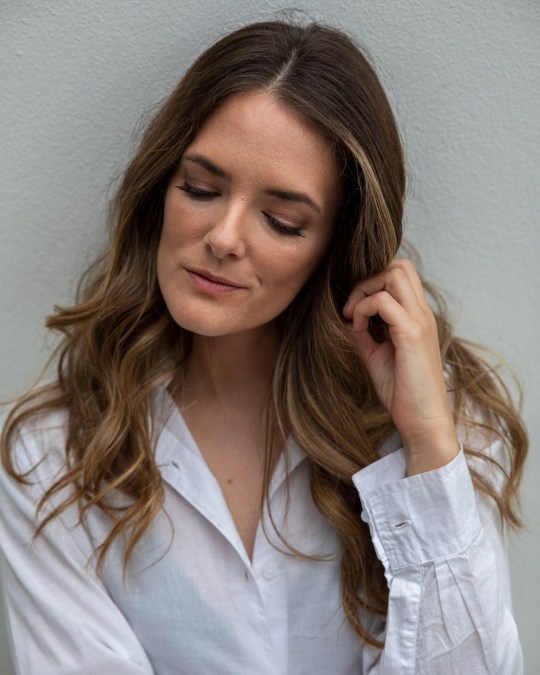
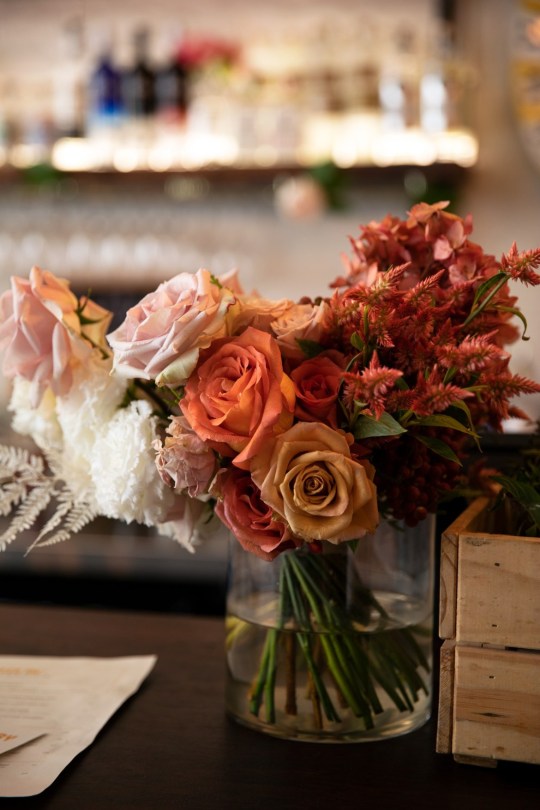

MY 2019 VALENTINES BEAUTY LOOK
Last week I went back into the Chanel Beauty boutique to try out the newChanel Le Blanc 2019 collection Pierres de Lumiere. It launched just in time for Valentines Day, which is what I had this look done for. Actually, we were a day early but since Mario and I had the afternoon free we had a late long lunch to celebrate. (Cue roses and delicious honey cake!)
Below is the full look Zara from the Chanel Boutique in Claremont created for me, with a bold bright lip colour. By the time I got home and shot a few extra pictures, Id taken off the bold lip because Id wanted to see the look with a subtle nude shade. I loved either option but will share more of this bold lip outfit in another post. Either was a beautiful, subtle look for any date night.
Oh and if you are now crazing honey cake, my bad! This was at The Flour Factory and it was amazing!
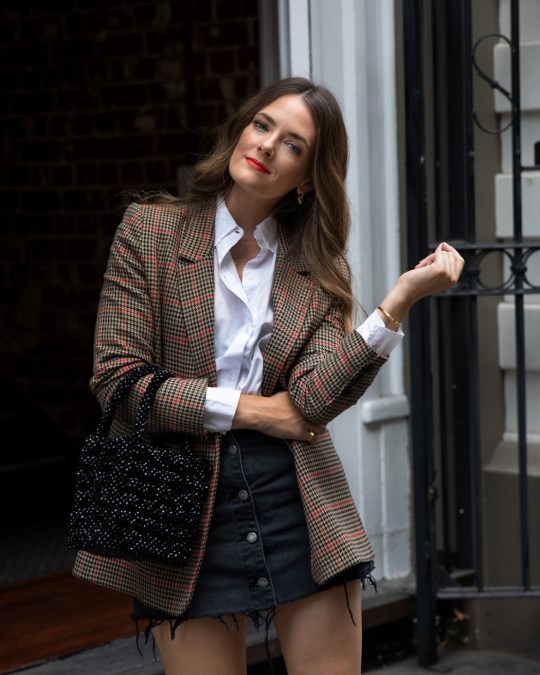


Turn on your JavaScript to view content PIERRES DE LUMIERE
Of theChanel Le Blanc 2019 collection Pierres de Lumiere releases, I was probably most taken by the White Opal highlight with a touch of the transparent Baume Essentiel on top. The White Opal is pearlescent and makes for a soft highlight. Because Zara and I always talk about beauty trends and what we have seen our favouritemakeup artists creating on Instagram, we decided to add a touch of gloss over the top too.
New to Chanel and very on-trend is the two shades of Baume Essentiel.They are essentially a glossy balm to wear on your eyelids for that gloss finish, lips or highlight. Zara just used it along the top part of my cheekbone, where I usually highlight. It picked up really well on camera.
A SUBTLE DATE NIGHT BEAUTY LOOK
What can I say?! I was seriously impressed with the Tweed Beige blush!Which as the name suggests, is baked to look like the Chanel tweed. How cool is that? It has a shimmer through it so creates a beautiful light catching blush or bronzer. Since I am probably not going to be able to afford one of those insanely stunning Chanel tweed jackets anytime soon, this might be the closest I get!
For the pretty, subtle eye look, Zara used a cream eyeshadow in Pierre de Rose and the Quadra Palette 314 Lueurs Ambrees. The bold orangey-red matte liquid lip colourRouge Allure Ink in Cornalie is fresh and felt vibrant with the subtle eye-look. It reminds me a bit of the So Chaud Mac Matte lipstick without being as drying. And the Rouge Allure Ink lasted for our long lunch too, so I was very impressed!
Finally, with the release of two new nail colours in a subtle shimmer, I had to buy theshare Eau de Nacre. It reminded me so much of something my Nana would have worn. You guys already know I miss her so its nice to be reminded of her when I look down at my hands.
MY NEXT SPLURGE WILL BE
One very cool thing that Zara did while she was doing my eye makeup was pop on some of the uber cool eye patches under my eyes. I wish Id snapped a mirror pic of how cool these look on! You may have seen them on Pinterest. They are the Firming Anti-Wrinkle Flash Eye Revitaliser. These also come with a roll-on anti-agingserum with a whole lot of vitamin-C to reduce dark circles and puffiness in all of about five minutes. I have to save up for these!!
Anyway, what did you do for Valentines Day? Is it something you celebrate? We ended up working on the actual day but later had a really nice homemade dinner by candlelight outside. With one of my Spotify playlists in the background, it was so nice. Id rather stay in than battle crowded restaurants on Valentines Day. Would love to hear your thoughts or rituals!
Wearing:White Opal highlight,transparent Baume Essentiel,Tweed Beige blush,cream eyeshadow in Pierre de Rose, Quadra eyeshadowpalettein 314 Lueurs Ambrees,Rouge Allure Ink in Cornalie, Le Volume Revolution mascara and Eau de Nacre nail polish.Follow
FOLLOW VIA BLOGLOVIN
PHOTOGRAPHED BY:MARIO RECCHIA
JOIN MEIN MY PINTEREST OBSESSIONHERE
0 notes
Last Seen Blogs

wingroup
无标题
wingroup
无标题

censer-with-double-damage
HellO'men

spamtonhub
RandomJasper

elliott99235335-blog
Untitled