#4 DIY Tutorials
Video
youtube
4 Amazing Miniature wooden | Tutorials For doll house | diy Furniture
2 notes
·
View notes
Text
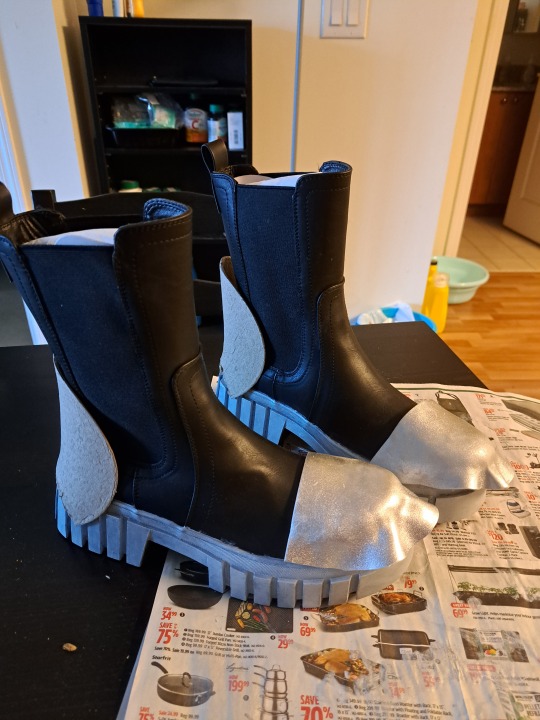
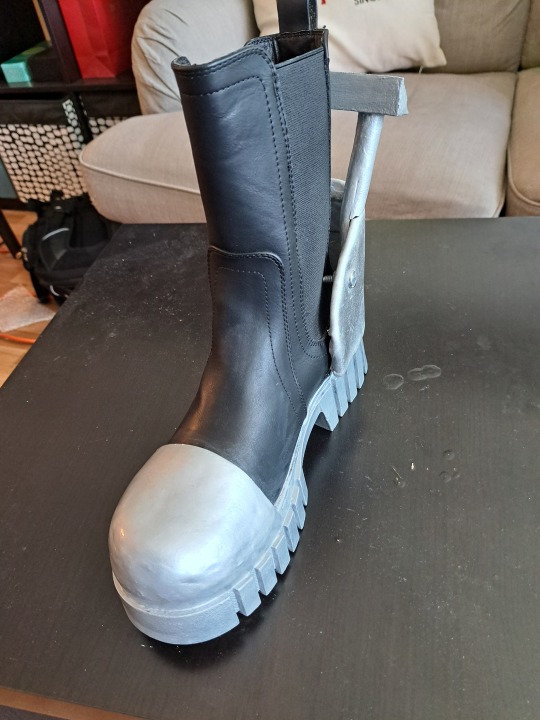
Infinity Train Boots!
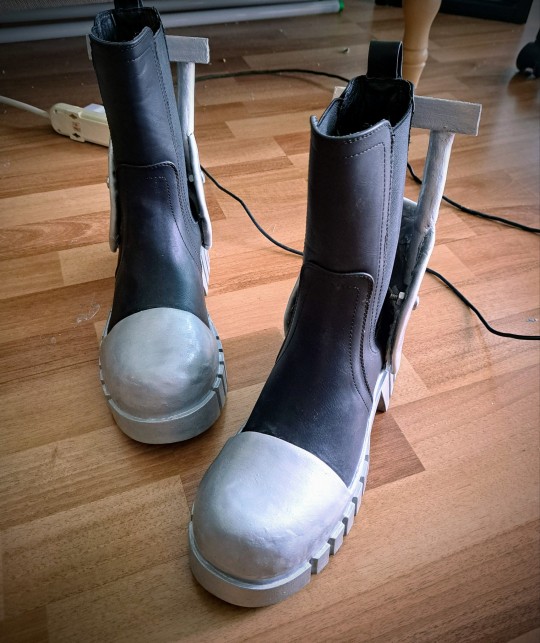
Made these a while back as part of my Simon cosplay, must have been almost a month, but I didn't post the process!
(EDIT: hey I did some fixing up of my cosplay which you can see here in this post!)
Not actually sure if anybody would care because it's so niche, unlike my Spider-Gwen suit, but I did write about how I did the Infinity Train harpoon pack, so I'll discuss this too!
STEP 0: Acquire reference pictures:


Yep, pretty straightforward.
Note that Simon's boots have an extra bar/strap thingy, whereas Ryan and Min-Gi's do not.
I didn't include it because it kinda looks ugly and I didn't know how fragile the strap might be.
NEXT!
STEP 1: Acquire Boots!
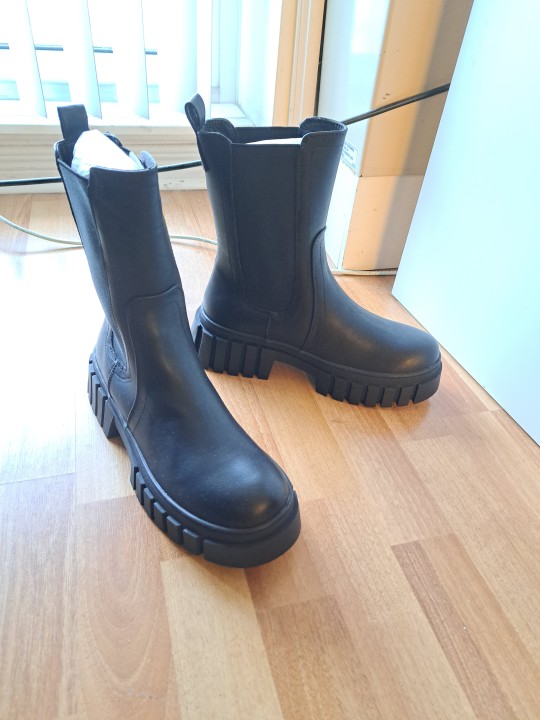

I got these MIA boots from Journeys Canada. They only cost around 60 bucks which is a bit pricey for cosplay, but I'm not about to go thrift shopping when I'm in a time crunch and I can just order online and get free delivery within 2 days. (Also these days 60 bucks for boots from a retail store is considered cheap. Inflation is nasty.)
They came with these cardboard thingies inside to keep the structure of the boots. They have "left" and "right" written on them in Chinese which was helpful for me when I got a bit confused about which side was which.
Save those for later. You'll need them.
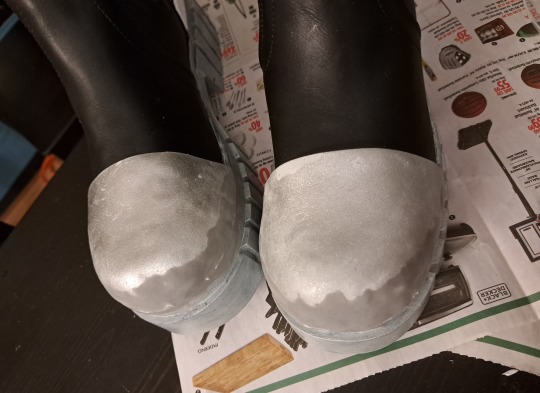
STEP 2: Paint the soles silver
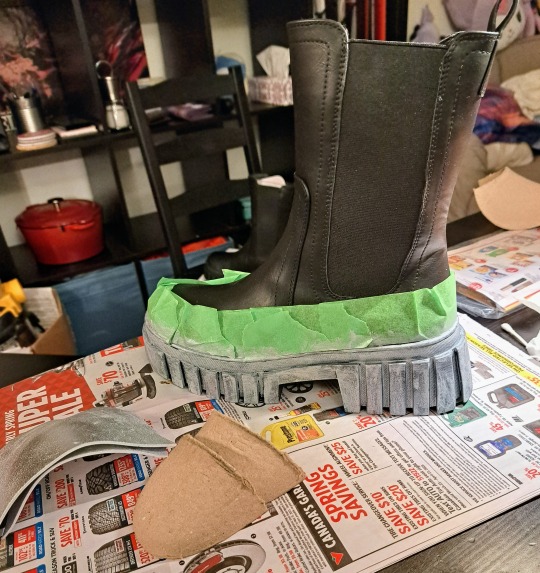
Literally any acrylic silver paint works. May take several layers. Make sure to put masking tape around the top edge of the soles.
I didn't use a primer on the base but you probably should. Any white acrylic paint or Gesso would do and you wouldn't need like 8 coats of silver. Do as I say not as I do.
And make sure to seal everything with a varnish or mod podge!
Here are also the cut toe caps and some silver craft foam. The craft foam was kind of a mistake I'll get into it soon.
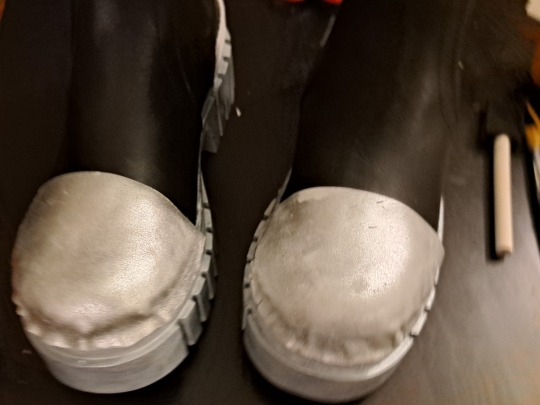
STEP 3: Make toe caps
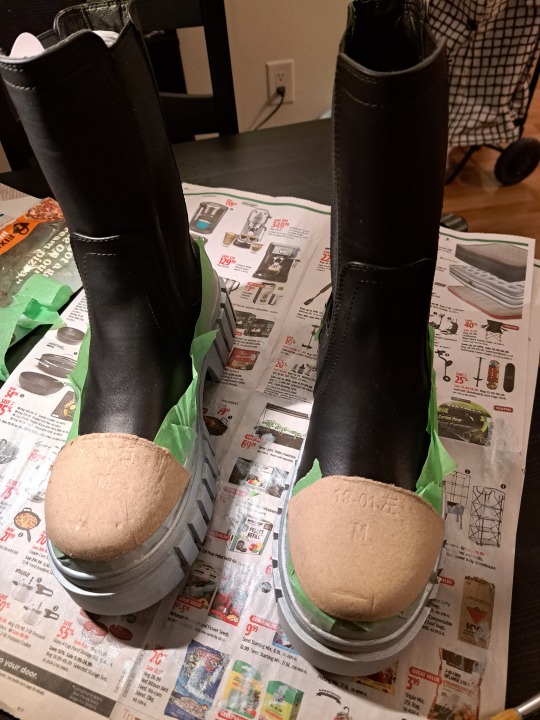
Here's me making sure the placement is good.
I glued the craft foam onto the cardboard caps, and then I was thinking "well the little bit hanging over it isn't going to be a problem, nope! I'll just glue them down and it'll blend right in!"
HAHAHAHA. WRONG.
STEP 3.1: Fuck up the toe caps because you were winging this and you have no idea how crafting materials work you idiot
GROSS. DISGUSTING. VILE.
The hot glue melted the craft foam and now it's got this weird melty edge all around it that's all goopy and shit. Anyway you dont want your boots to look fucked up, you want them to look smooth like polished steel, or whatever they were made of in the show.
STEP 3.2: Fix toe caps
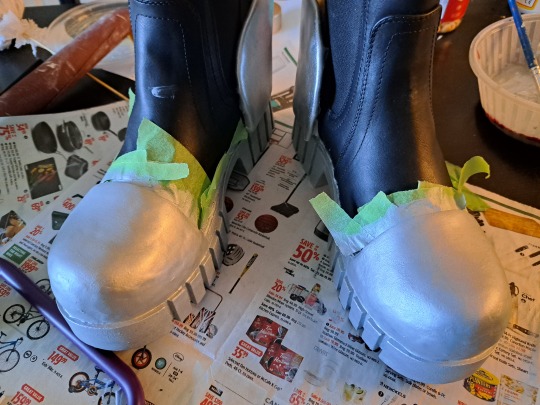
Everything can be fixed with Model Magic and acrylic paint! (and seal your paint with a sealant again!)
I just took some model magic (a type of lightweight air dry clay from Crayola, the cheapest you can get. Other more legit craft supply brands make similar materials as well), and squished it into the ugly bits, making a mostly seemless transition from craft foam to clay to sole.
TIP: to make model magic smooth before sanding, dab your fingers in some water to smooth it out! This also works for Paperclay as well if you decide to use a more higher end type of air dry clay.
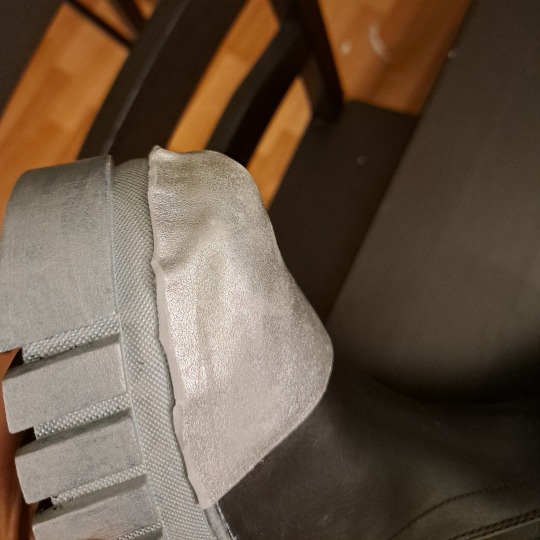
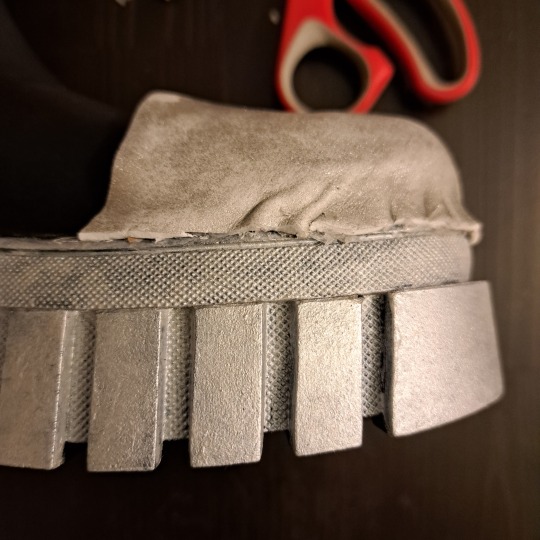
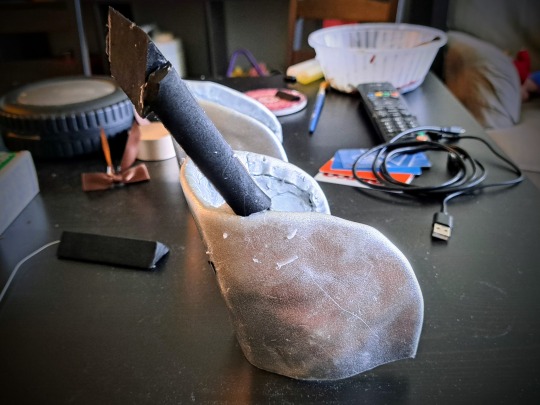
STEP 4: Make the back metal thing that goes around the heel
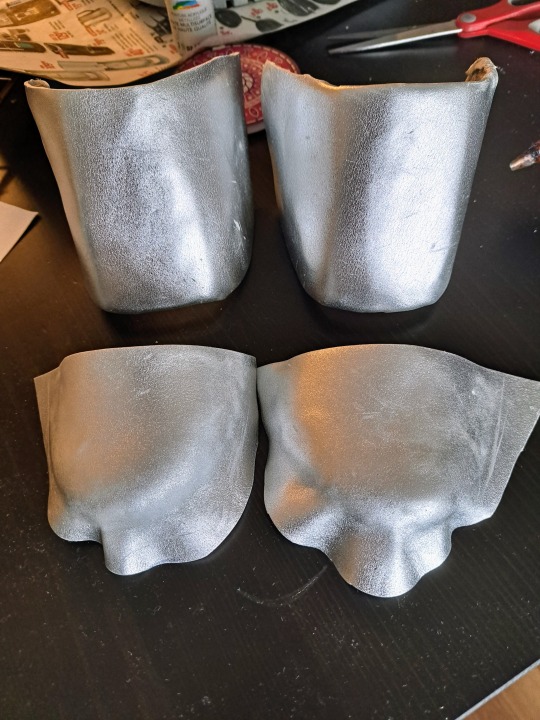
So I did this kinda in tandem with the toe caps which is why the pics will look a little out of order but essentially, I took the parts of the cardboard that I cut off, and I cut them in half, put some other cardboard in between, and then sandwiched the thing in metallic craft foam.
This time it was a bit more successful because I was able to hide the weird gross melted edges on the inside. Also paint that shit silver!
Now you can glue the "heel caps(?)" directly to your boots, but I decided to use stick-on velcro instead so they're kinda removable, and may be easier to transport or clean or something? ehhh.
STEP 5: Make those handle things
So I also hit a bit of a snag with these. I ordered EVA foam dowels with a semi-circle cross-section as well as a triangular one, but I quickly realized they would be too flimsy sticking out like that unless I put something hard in between them.
So this isn't pictured, but I got some thin crafting wire from Dollarama and just bent them into L shapes, and glued the smaller dowels around them. I also shoved them into the bigger down and glued it down.
You can also see from these pictures that that leaves a weird gap in between the smaller dowels. Again I just used model magic to cover them up. There's probably a better solution but this was the one I went with.
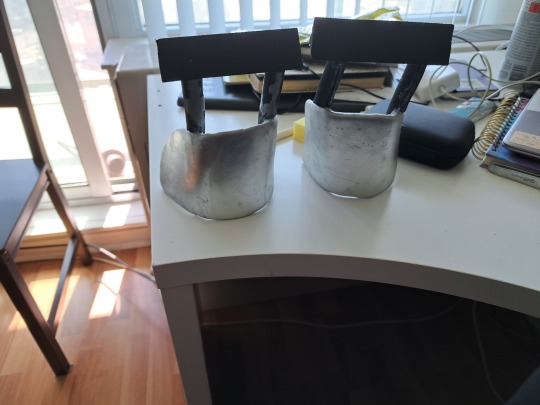
I also lengthened the top "handle" part eventually because it looks better that way. (Please ignore the mess on my desk >_<)
Then I just paint them silver like everything else!
COMPLETE!
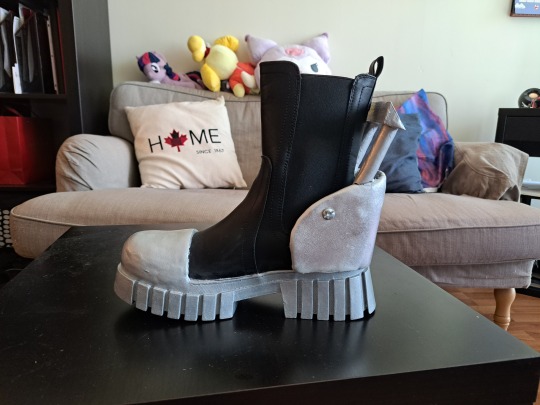
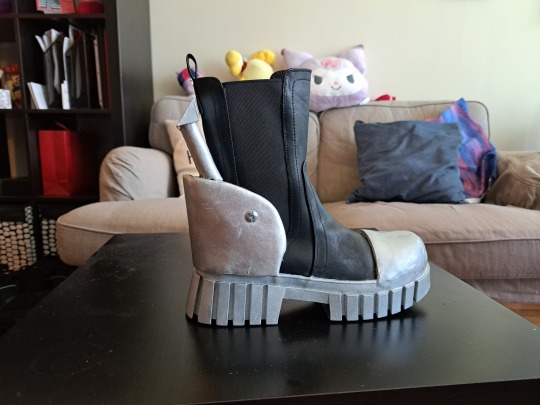
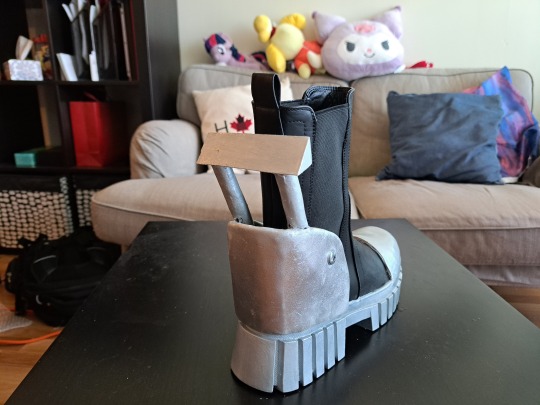
The nut and bolts are actual nuts and bolts. Since the base was just craft foam and cardboard, you can poke a hole in them easily and insert the bolt.
Hope you found this helpful! Or are just willing to indulge me and my notes on my silly crafting journey!
#cosplay#infinity train#infinity train cosplay#simon laurent#ryan akagi#min gi park#tutorial#crafting stuff#i have no idea what im doing#but it worked out#infinity train book 3#infinity train book 4#stuff i made#diy
218 notes
·
View notes
Text
Pintrest ppl are fucking wild
#came across some drama channel talking abt a callout post of some content creator publicly shaming 1 of their fans#for doing the shit they were putting out there on their *DIY CHANNEL*#like bestie your ideas are not original. the shit isn't copyrighted. your fan even bought shit FROM YOU to make it. shut the fuck up!!#you are not that special!#you cant just have a fucking home decor diy bullshit channel and then complain when some1 does the diys u posted the tutorial 4#dumb as hell#elliot rambles
3 notes
·
View notes
Photo

Full step by step photo tutorial on the Basket Weave Stitch #4 is up on my blog! 💙😃💚
https://crochetml.com/photo-tutorial-how-to-crochet-the-basket-weave-stitch-4/
https://crochetml.com/crochet-tutorials/
Playlist featuring more Basket Weave Stitches here!
#4#yarn#fiberartist#crocheterofinstagram#crochet#crocheting#crocheted#youtubers#youtube#phototutorial#crochetphotos#crochettutorial#crochettutorials#diy#howtocrochet#stepbystep#craft#crafting#crafty#tutorials#tutorial#patterns#pattern#crochetstitch#crochetstitches#yarnaddict#crochetaddicted#crochetaddict#crochetcreations#crocheteverything
8 notes
·
View notes
Text
youtube
4 Different Ways To Use Lipstick | Beauty Basics | HT Lifestyle
Did you know that you can do so much more with one lipstick? That’s right. Today, I will show you how you can use one lipstick in multiple ways. Let’s get started.
#1 lipstick 4 ways#different ways to use a lipstick#lipstick hacks#lipstick#makeup tips#makeup hacks#beauty hacks#beauty tips#different ways to apply lipstick#lipsticks#liquid lipstick#lipstick tutorial#how to apply liquid lipstick#diy lipstick#matte lipstick#how to apply lipstick perfectly#4 easy makeup hacks with one red lipstick#lipstick hacks every girl should know#liquid lipstick hacks#liquid lipstick mistakes to avoid#lipstick trends 2023#ht lifestyle#youtube#beauty#Youtube
0 notes
Text
hey punkz here's a tut for wrist cuffs/bracelets since some of u are new 2 tha scene

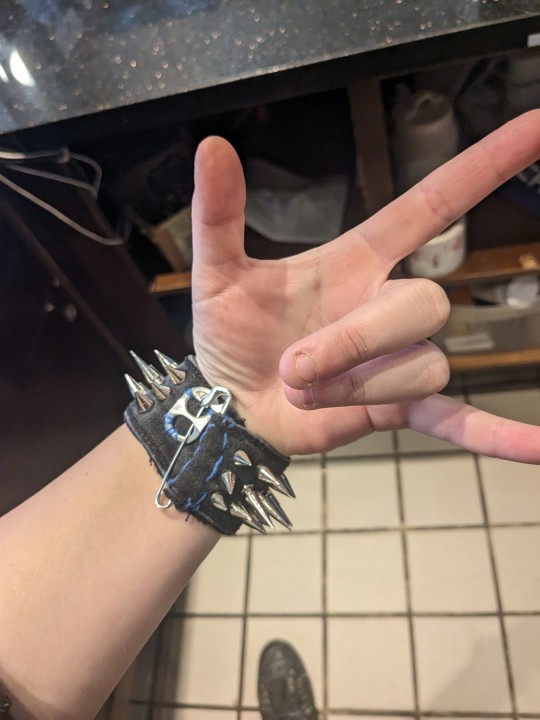
written out 4 ease of access
HOW TO: WRIST CUFFS DIY
Step 1: Old Jeans Waistband
- Cut off waistband from rest of pants
Step 2: Cut to Wrist Size (X2)
- measure around your wrist and cut
Step 3: Add Closure
-button + buttonhole or safety pin + soda tab works best imo
- Sew down soda tab to one side, safety pin to other
Step 4: Add Hardware
- good options are spikes, more safety pins, more soda tabs, staples, chains, and whatever else you can find
Step 5: SHOW OFF!!!!
feel free 2 add any other tuts on this thread or tag #punk tutorials
973 notes
·
View notes
Text
👑Tips for littles on a budget👑
This is some tips for tinies (or carers looking for gifts for kiddos) on a budget! Of course you don't need any gear to be a good regressor but a lot of us like toys etc. and it's okay to want them!
🧸thrift stores, a lot of thrift stores have toys and plushies, sometimes they are a bit broken or dirty but there are lots of tutorials on YouTube for cleaning and restoring plushies and toys🧸
🐾e-books, you can find kids books online as e-books which are often pretty cheap or you can watch tiktoks of people reading those books🐾
🩷diy onesies, a lot of regressors like onesies but the prices are pretty steep, if you can't afford them don't fret! Its super easy and affordable to make one yourself all you need is an old t-shirt and snap buttons plus a way to attach them, just get a big t-shirt, sweatshirt or even hoodie and add 2-4 snap buttons in the crotch, boom you have a super cute and discreet onesie!🩷
🧸diy toys, there are lots of toys you can make yourself either by sewing or crafting and there's lot soft videos on YouTube for it, or get creative🧸
🐾mobile games, I love to play video games when im regressed but game consoles are expensive so free mobile games are a great alternative🐾
🩷dollar store etc, while you shouldn't rely on stores or websites that use cheap labor for everything it's okay to make exceptions every now and then, especially for toys, pacis, sippy cups and similar🩷
🧸pull ups, instead of cute printed diapers get big kid pull-ups in the baby-section or medical diapers from a drugstore, they are less then half the price of a pack of adult diapers from brands like tears etc.🧸
🐾learn to diy, making things yourself is often the most affordable thing to do, not with everything obviously but with a lot of things, learn as much stuff as you can so you can make lots of gear yourself🐾
🩷look for affordable stores, lots of paci stores on Instagram are very affordable and the ones that aren't often have sales so keep an eye out for that, lots of shops also have promoter codes they are happy for you to use, for example with my code 'bunnybab' you get a small discount at pacisbybunnie and cozypacicorner🩷
🧸buy second hand, thrift stores are a great place but if you want little specific stuff looking on vinted, swoop or even insta is a great idea! Lots of people sell gear they no longer connect with🧸

Fun fact of the day: Bluey's pilot was only a minute long and never actually aired
#agere post#boyre#noncom agere#safe agere#sfw agere#boy regressor#boy regression#agere blog#age regressor#ageregression#agere tips#caregiver tips#agere resources#noncom regressor#noncom regression#non community little#sfw little boy#sfw littlespace#agere cg#cg advice#innerchildhealing#age regression#sfw agereg#agere carer#toddler regressor#baby regressor#noncom#sfw little post#sfw little community#agere
622 notes
·
View notes
Text

The silent art of gif making
The gif above has 32 layers plus 6 that aren't shown because this is part of a larger edit. I wanted to share it to give everyone a glimpse of the art of gif making and how long it usually takes for me to make something like this. This one took me about an hour and a half but only because I couldn't get the shade of blue right.
I use Adobe Photoshop 2021 and my computer doesn't have a large memory space (I don't know what to call it) so usually most of psds get deleted because I'm too lazy to get a hard drive. It doesn't really bother me that much because I like the art so when it's done, it's done. Off to somewhere else it goes.
Here are the layers:

Everything is neat and organized in folders because I like it that way. I prefer to edit it in timeline but others edit each frame. There's a layer not shown (Layer 4 is not visible) and it's the vector art. Here it is:

Now it is visible. I don't plan to make this a tutorial, but if you're interested I'd love to share a few tricks about it. I'm pretty new to the colors in gifmaking but the rest is simple to understand. Here, I just want to show how much work it takes to make it.

I opened Group 2 and here's the base gif. I already sharpened and sized it correctly but that's about it. Let's open the base coloring next.

Yay! Now it looks pretty! The edits are in Portuguese but it doesn't matter. There's a silent art of adding layers depending on how you want the gif to look but you get used to it. The order matters and you can add multiple layers of the same thing (for eg. multiple layers of levels or curves or exposure).

This was pretty much my first experiment with coloring so I don't know what I'm doing (this happens a lot with any art form but gifmaking exceeds in DIYing your way to the finished product) but I didn't want to mess up his hair, that's why the blue color is like that. Blue is easy to work with because there's little on the skin (different from red and yellow but that's color theory). I painted the layers like that and put it on screen, now let's correct how the rest looks.

I was stuck trying to get the right teal shade of blue so yes, those are 10 layers of selective color mostly on cyan blue. We fixed his hair (yay!) we could've probably fixed the blue on his neck too but I was lazy. This is close to what I wanted so let's roll with that.

BUT I wanted his freckles to show, so let's edit a little bit more. Now his hair is more vibrant and his skin has red tones, which accentuates the blues and his eyes (exactly what I wanted!). That lost Layer 2 was me trying to fix some shadows in the background but in the end, it didn't make such a difference.

This was part of an edit, so let's add the graphics and also edit them so they're the right shade of blue and the correct size. A few gradient maps and a dozen font tests later, it appears to be done! Here it is:

Please reblog gifsets on tumblr. We gifmakers really enjoy doing what we do (otherwise we wouldn't be here) but it takes so long, you wouldn't imagine. Tumblr is the main website used for gif making and honestly, we have nowhere to go but share our art here. This was only to show how long it takes but if you're new and want to get into the art of gif making, there are a lot of really cool resource blogs in here. And my ask box is always open! Sending gifmakers all my love.
#gif making#gif tutorial#resources#completeresources#y'know what that post yesterday got me into this#i love creativity so i send all my love to gifmakers#this is HARD#my tutorials#tutorials
252 notes
·
View notes
Text
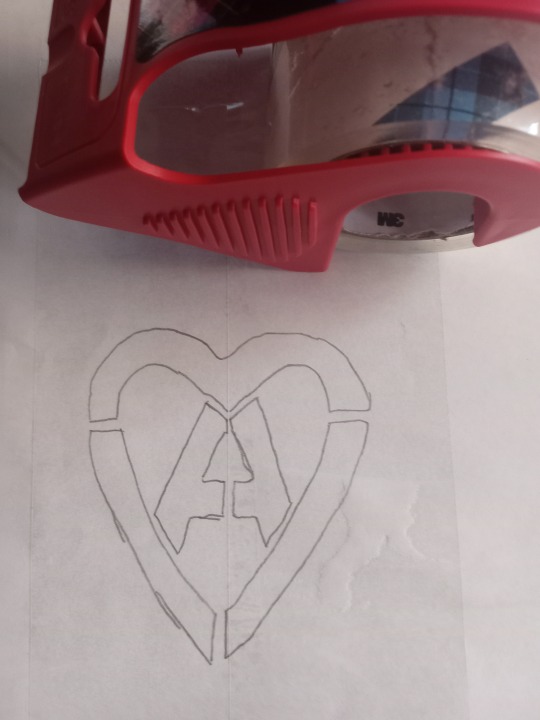
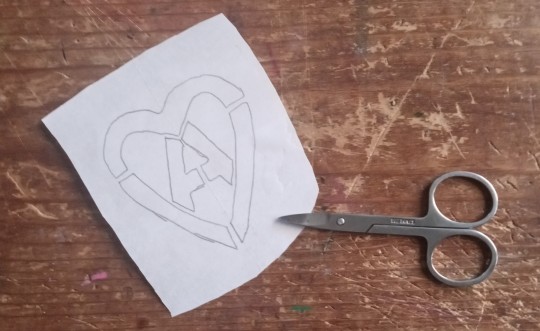
Easy Paper and Tape Stencil Tutorial
made one for reddit so I might as well post it here as well
Materials
writing utensil (pen, pencil, marker, etc)
paper (i usually use plain printer paper but most other scrap paper works fine as well, just be aware that thicker paper makes it harder to trace existing designs/logos)
clear packing tape
scissors and/or exacto knife (those little scissors you can get in cheap nail care kits work great
Optional Materials: Device w/ screen of your choice, printer

Step 1:
Draw out your design, trace from device, or print out design
(in example image I am tracing from a screen)
r/AnarchoStencilism (Deviantart link if you prefer) is great for free stencil designs

Step 2:
Cover both sides (front and back) of the design in packing tape
Step 3:
Cut it out
Step 4:
Use your exacto knife/scissors to cut out the design

Step 4:
Apply to whatever you want!
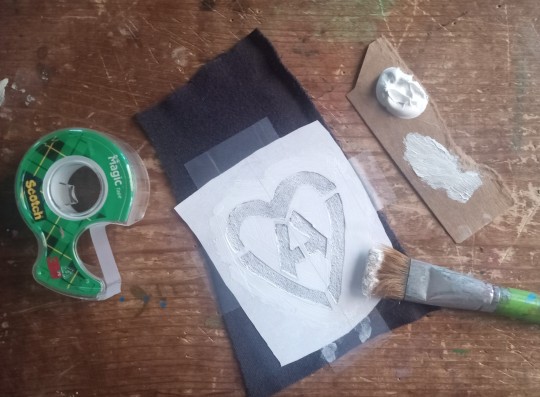
Happy DIYing!

#kahvi draws#patches#stencil#diy stencils#diy tutorial#punk diy tutorial#stencil tutorial#punk diy#folk punk#diy patches#pat the bunny
242 notes
·
View notes
Text
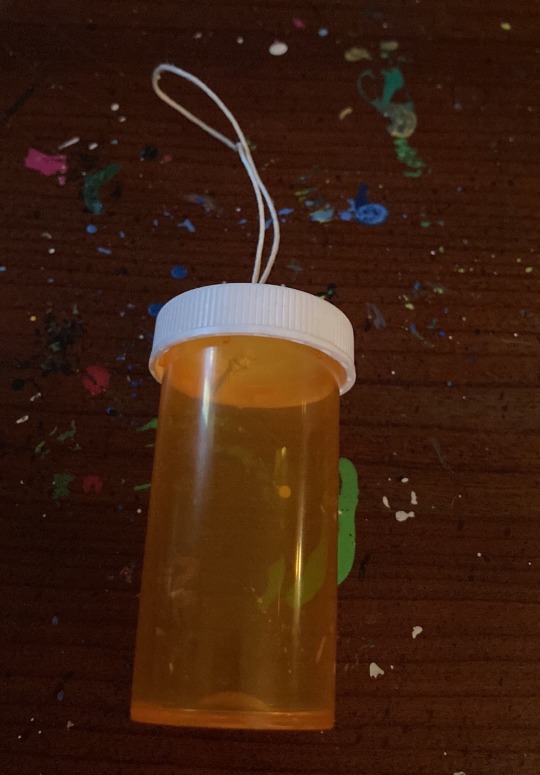
DIY Tutorial - Pill Bottle Container Keychain thing
So this is a really basic ass project that can be done in multiple ways, you can use what im using or theres ways to make it different and better, im just going to show how i made mine here. I made this for holding lil tiny things i find on my outings like small bones, dead bugs and things of the sort
Supplies:
- small plastic bottle of your choice, im using an orange pill bottle because thats what i have
- drill, dremel or other sharp object, if you use a knife or something without a motor, it may be wise to heat it up with a lighter first to make it easier to poke through
- string/wire/chain in any length you choose, im using hemp cord because thats what i have
Optional supplies:
- super glue, if you want the hanging mechanism to be more secure
- key ring/clip/carabiner, i include this as optional because tecnically you can do this without it, like if you wanted it as a pendant or something, i will be using a keyring clip thing because i plan to clip it to my bag
- beads or charms to decorate because that could be fun
Alright tutorial time now
1.) pop the lid off your lil bottle, put the rest to the side.
2.) prepare your drill/sharp object and make a hole in the lid, make sure said hole isnt too big !
3.) feed the string/chain/wire through the hole, tying a knot on the underside of the lid and/or supergluing it.

4.) at this point you’re essentially done when you put the lid on !
After this i just added beads and a keychain clip because i wanted to but of course you can do as you please with this
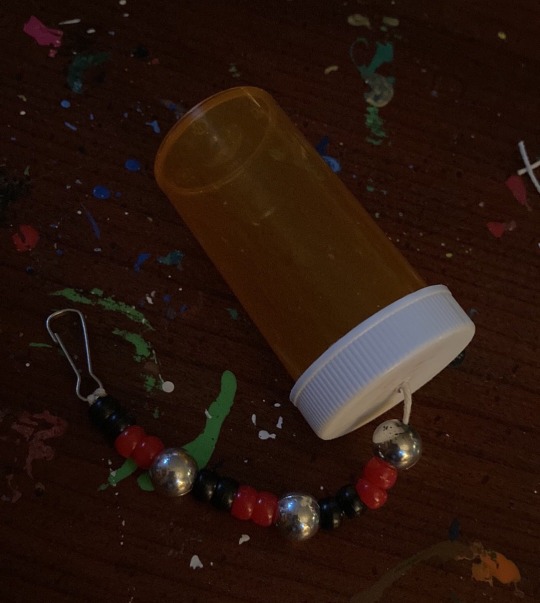
This is the final product on my bag !

201 notes
·
View notes
Text
RESOURCES
resources tag | tutorials | challenges
RESHADE
my own preset
MODS
MCCC
UI Cheats
TOOL
ravasheen ISO Love Photo & Llamazon Marketplace
POSES
ts4-poses
helgatisha
ratboysims
rebouks
mel-bennett
sciophobis
BB
peacemaker-ic
illogicalsims
maxsus
brazenlotus
harrie-cc
felixandresims
pierisim
imfromsixam
CAS
eyes
mausmaus eyes & addons
pralinesims DIY eye kit & addons
skin
luumia vanilla skin
skindetails
pyxiidis about face
miiko face-kit no.1 & no.2
miiko mouth-corners
sammi-xox skindetail pack & dump & belly overlay
peachyfaerie FLORAL skindetail pack
nesurii little details
okruee misc. face details
obscurus-sims maxis match genetics set
northern siberia winds mm overlays
ratboysims kiwi eyebags
pralinesims maple syrup freckles
littledica nipple skindetail
makeup
pralinesims
pyxiidis
eyebrows
twisted-cat eyebrow set 2 | 3 | 4 | 5 | 6 | 7
rheallsim eyebrow pack 1 & 2 | 3 & 4
eyelashes 2D
s-club eyeliner 12 (tsr)
s-club eyelashes conversion 01 & 02
eyelashes 3D
radeu mm (3D) eyelashes v2
tattoos
wrixie
valhallansim blackwork tattoos
eirflower blackwork tattoos v1 & v2 (tsr)
hair
simandy
okruee
simstrouble
clumsyalienn
simtric
sheabuttyr
marsosims
facial hair
igorstory
clothing
aharris00britney
trillyke
pixelunivairse
nucrests
its-adrienpastel
serenity-cc
sentate
solistair
joliebean
sliders
obscurus-sims esotropia and exotropia
miiko eyebrow slider 1 & 2
teanmoon mouth scale slider
presets
vibrantpixels a body preset
other
northernsiberiawinds better in-game lighting
squea realistic cas room lighting
simandy spotlight v1 & v2
joshseoh lighting overlay 1 & 2
66 notes
·
View notes
Text
Time for another lace style...
We will eventually get around to learning all of these, which one do you want to learn first?
Also we have many more styles planned, these are just the styles we have good tutorial resources for so far.
These styles all require some specialty tools/supplies, which I've listed below the cut in case that's a deciding factor for people. Pretty much everything can be DIY'd or repurposed from some other common objects, and this information will be shared as part of the lace-along :)
Bobbin lace:
Thread (e.g. sewing thread, embroidery floss) (edit by mod Rex: crochet cotton or perle cotton preferable for beginners)
Bobbins (24 for the sampler we will do)
Bobbin lace pillow
Pattern printed or drawn out
Pins with small heads (a whole lot of em)
(edit by Mod comfy: I dipped my toes in this already, you can use clothespins as bobbins (basically everything that holds some thread and can be moved around comfortably), and some sturdy cardboard as a pillow. Your "pillow" just needs to be sturdy enough to keep the pins in place for the time you work on the lace, so if you have a couch pillow that could work, go for it)
Drawn thread lace:
Plain-woven linen or cotton fabric, with large enough threads you can comfortably see individual threads at a comfortable working distance
Sewing thread in the same colour as your fabric
Fine blunt-tipped needle
Fine tipped scissors or seam ripper and a steady hand
Lacis/ filet lace
Sturdy thread/ twine/ crochet cotton
Netting shuttle/ netting needle
Netting gauge/ mesh stick (e.g. dowel, knitting needle, smooth popsicle stick or similar)
Blunt tapestry needle
Some method of tensioning the net for embroidery: mesh frame/ embroidery hoop/ stiff paper to tack net down to
Needle lace:
Paper pattern printed or drawn out
Backing fabric (e.g. sturdy medium weight calico) (will not be part of finished piece)
Sticky backed plastic/ clear packing tape
Lace thread (e.g. crochet cotton, perlee, stranded cotton, silk thread)
Regular sewing thread in a contrasting colour for tacking down pattern (will not be part of the finished piece)
Sharp needle to tack down pattern
Blunt needle to make lace
Tweezers
Fine tipped scissors
Thimble (optional)
Sprang:
Sprang frame (e.g. empty backless picture frame, DIY frame made of sticks, two dowels tied to sturdy objects an appropriate distance apart)
Sturdy cord or crochet cotton
Smooth dowels/rods, 4-6 of them?
#lace race 2024#lace along#lacemaking#lace making#bobbin lace#drawn thread lace#lacis#filet lace#needle lace#sprang#poll
75 notes
·
View notes
Text
After running my handmade mandala shop for over 4+ years, here are some popular questions I get asked:
Are these really handmade, or do you import them in from somewhere? - Yes, these are handmade by myself. Every order that comes in is handcrafted as you see in the video above.
If you don't have a style I want, can I request my own personalization? - Absolutely! I love custom requests, and can discuss with you about creating the perfect mandala. If I don't have the beads, I will go out and get it. :)
Where are you located? Do you ship to Italy? - I am in Edmonton, AB Canada, and just recently I now offer worldwide shipping, which includes Italy.
I want to try making it! Can I ask you how it's made? - Of course! No gate-keeping here. I believe the process is as soothing and enjoyable as the end product itself. I sell DIY kits with prepared pieces. All you have to do is assemble it. I also have many tutorials on my TikTok and Instagram accounts. Please feel free to ask me any questions as well.
What are some ways to use this mandala thingamajig? - Some ways I use mine, as well as how customers use theirs include: fashionable bracelet, hair bun basket, Christmas tree ornament, sensory fidget toy, unique desk decor, meditation tool, fruit holder, mantle display, air plant holder, gift idea, and more!
Shop my 3D wire mandala stims, bracelets, and Orbi Loops™ from my Etsy shop! Use this share & save link www.merakisphere.etsy.com | Use Code: TUMBLR for a special discount. :)
Thank you for your support! Please consider sharing this so others know my handmade mandalas are #actuallyhandmade! In a world of industrial goods and manufacturing, it’s sometimes hard to know which products are truly made by hand. 🙌🏼
Music: Wander
Musician: @iksonmusic
40 notes
·
View notes
Text
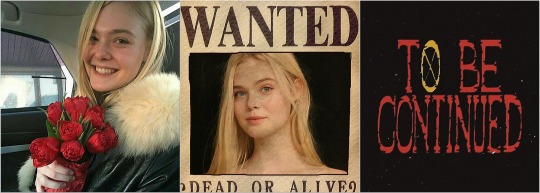
✿ tell 'em how the crowds went wild! tell 'em how i hope they shine!
⎯ in which you look back on how grateful you are for the opportunity bestowed upon you. aka: you joined the opla's cast!

#STARRING. iñaki godoy, mackenyu, jacob romero, taz skylar, emily rudd ft. fem!reader [elle fanning 4 faceclaim but u can imagine y/n anyway u wish!].
#TAGS. sfw, kind of context, a bit of smau but its tiny. mentions of covid just in case it's triggering?
#NOTE. pardon my rusty writing but i really wanted to get this out!!! i added an oc from one piece for the sake of the story but she's barely mentioned so uuuh yuh! timeline may be wrong but i work with what i'm given please bear with me. let me know if you would like more fics of this y/n??? ALSO IGNORE THE WATERMARKS ON THE PHOTOS I NEEDED TO MAKE THEM NEATER
© midnightbears on tumblr, apr 2024. please do not repost to another platform, plagiarize, translate, use for AI-related purposes or claim as your own.
In the past, if someone were to come up to you and tell you that you’d be a part of the One Piece Live Action main cast in the future, you would’ve probably laughed in their faces despite your wishful thinking.
At that time, you were content with your work, doing short theatre plays with companies or gaining minor roles in musicals. Everything changed when you landed the role for the one-woman show Fleabag for a limited time on London’s West End after the leading actress underwent emergency surgery for an appendectomy. You only acted as the sex-obsessed mess of a woman for about three weeks, but it was enough time for people to notice you, to really see you.
You believed your career had reached its pinnacle when you were cast as Katherine Howard in Six: The Musical in London. Your name had become somehow well-known in the musical theatre world, and you had a small but dedicated fan base who liked uploading edits of you being a dork during the Megasix on YouTube and TikTok.
Months later, you were bound to play as Fantine for Les Miserables when COVID abruptly struck, and you were dismayed that your job was ripped from you so abruptly. Your best friend, the sweetest person on earth, insisted on you moving in with her in fear that you’d be evicted from your apartment.
Months passed, and you eventually found a small way to help your friend pay rent by offering singing and acting lessons online to musical-aspiring teenagers. Since you had gained many followers from your earlier work on social media, it didn’t surprise you when the classes became sold out.
Your friend also convinced you to create a YouTube channel for you to upload videos of yourself (sometimes joined by her) where you watched and commented shitty movies, followed DIY tutorials just for the fun of it, performed covers of your favorite songs, and just generally vlogged your life (along with reactions to Taylor Swift’s (From The Vault) songs).
At first, you thought it was pretty stupid, but you were delightfully proved wrong when your videos harbored over 200k-300k views on a bad day, so you found no reason to stop as COVID-19 continued, growing to gain a little over five hundred thousand followers. Your reactions were often used for TikTok audios or clips, so you found your popularity growing and evolving during that year.
You believed yourself to be a general, simple woman. People liked you because you were elegant and levelheaded, although you could sometimes be chaotic. You also had a subtle sense of humor that many found charming. But mostly, you grew a steady fan base because your videos and presence comforted countless young adults and teenagers.
You were an optimist and a reassuring one, so during the times when COVID was so prominent, people sought refuge from the monstrosities of the world in your videos, where you seemed to connect with them even though you were on the other side of the screen.
However, everything changed somewhere in 2020-2021. That evening, your best friend got home from work with excitement practically oozing out of her every pore. You and your best friend were avid anime watchers and manga readers, so you couldn’t help the face you made when she told you that One Piece was getting a live-action.
Although you were skeptical, your friend practically insisted you send an audition tape. You grimaced at that. It was well-known that live anime actions were almost always corny and cringeworthy compared to the original work, and people never liked them. You had learned that much from Death Note and a couple of others. However, your best friend convinced you with this argument:
“If it’s that bad, then at least you’ll gain more followers out of the memes that people will make, and if it’s good, you’ll still get famous anyway!”
Eventually, you sent a video of you performing one of the lengthy monologues from Fleabag to your agency and simply hoped for the best. Your friend was practically rooting for you to get the role of Anastasia, one of the first integrants of the Straw Hat crew, joining before Sanji and after Usopp. You adored her as she greatly reminded you of your late mother, although you would be happy with any role.
Somewhere in November 2021, you remember a lot of screaming and crying. When you try to look back on it, all you remember is the happiness you felt when you received confirmation of the role of Anastasia. You were practically over the moon, and you and your friend celebrated inside your small apartment. You were entirely alone, just two drunk girls dancing and cheering, until one of the neighbors knocked on the ceiling with a broom.
liked by inakigo, emilyrudd and 574,949 others
yourusername actually lost for words and filled to the brim with gratitude...... i cannot express how excited i am to play my girl anastasia and bring her to life. from the bottom of my heart, thank you to everyone who has supported me. your faith in me means everything. congrats to iñaki, emily, jacob, mackenyu and taz, thank you to onepiecenetflix, thank you to my best friend for convincing me to audition for the role, and thank you, oda sensei, for putting anastasia's heart in my hands. love u all <3
view all comments
November 10, 2021
y/nsfanclub.02, AAAAAAAA SO EXCITED FOR THIS I ACTUALLY CANT BELIEVE IT
⤷ starl6ighwnb, LIKE FR IM GNAWING AT THE BARS OF MY ENCLOSURE THIS IS INSANE
user8392y3r927y, HELLO YOUR GRACE ANASTASIA
inakigo, Congrats!!!!!!!!
taz_skylar, 🔥🔥🔥
The One Piece fan base dearly loved the character of Anastasia, a well-mannered, bubbly, upbeat, fashion-loving duchess who always spoke in a Transatlantic accent but also had a quick wit and a bit of a sweet tooth. Anastasia’s dream was to become the most dangerous pirate to ever grace the seas and prove everyone who doubted her wrong.
Of course, with a big character came a big responsibility.
Sometimes, insecurity nearly got the better of you. You had to fill huge shoes, and there were many people to convince and impress. However, your love for this project was bigger than the gnawing uncertainty on the back of your neck, so you continued strongly until the end of Season One, finding comfort in your cast mates and the countless people who counted on you and, most importantly, believed in you.
Oda handpicked you, and that argument alone was enough to shoot any insecurities away.
Well, needless to say, people loved you!
Critics acclaimed your portrayal of the character, as well as the commendable chemistry you shared with the rest of the cast. The fans found it incredibly funny that your character was the complete opposite of how you actually acted in real life, and you often found yourself blissfully immersed in the fan base's love and praise.
Your channel and social media suddenly grew tenfold. Although you had stopped uploading videos every week due to the recording of season one, your followers were more than happy to wait for your return, and as one would expect, they were thrilled to have you back once you did upload a vlog explaining everything.
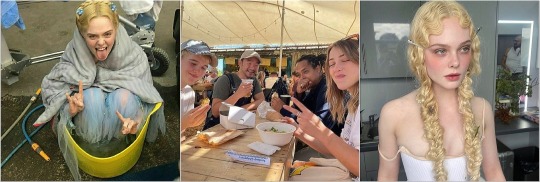
Over the course of the six months, you had been recording from time to time for a YouTube video in the set. Previously, you had asked the producers for permission to record some behind-the-scenes for your channel and your usual interactions with the rest of the cast with your personal Sony camera, as you felt it would be a nice way to bring the fans and the cast closer.
The producers gave the okay on the condition that you would wait until the first season aired on Netflix. You happily agreed and carefully began recording some scenes of your dressers and hairdressers as they prepared you, a few shots of your instructor showing you how you were supposed to use the guns that Anastasia employed... simple things.
Back in the day, you were still getting acquainted with the other cast members, and you didn't want to seem rude by forcibly making them appear on your videos, so you waited for a few weeks until you could properly call yourself companions. Then, you invited them to appear in the videos.
Iñaki, Taz, and Jacob liked to take advantage of the little free time they had between scenes they didn't appear in to innocently steal your camera and use it to their heart's content. One day, you got home only to find the memory card was completely full. It was an extensive video of them walking around the set, with Taz recording while Kiki and Jacob pointed out random stuff to the people who lived inside your camera, as Jacob liked to call them.
Mackenyu, being more reserved and introverted, mostly liked to act as a cameraman for you as you showed the props you used and other things, often making comments or turning the camera around whenever you referred to something.
Meanwhile, Emily had a natural knack for being in front of the camera. Whenever you asked her to join in, she effortlessly slipped into the co-host role, bantering with you and adding her own insights into the behind-the-scenes world of the show.
With the first season out of the way, you took the time to carefully pick what videos you wanted to use in the final tape, and it took you a little over a month and a half to properly edit it and turn it into a wonderful thirty-minute-long behind-the-scenes. You even sent it to the producers and your co-stars in case there was a scene they wanted deleted. Fortunately, they all gave you the okay.
You teased the video a bit on your Instagram before uploading it a few days later, and the support it received was out of this world. It gained over two million views and hundreds of thousands of likes.
You were kind of expecting this. While some BTS had already been uploaded on YouTube, yours was different because you were showing it from your perspective. The fans loved every second of it, and even started asking for a second or third part. You even saw new videos on YouTube of recompilations from your video with the titles being silly things like The One Piece Cast Being Chaotic for Seven Minutes.
At that moment, your life felt so full. You were getting contacted by industries who wanted you to appear on their videos and their stages, thousands of fans who loved you, and a feeling so peculiar that this would be eternal.
liked by taz_skylar, morganlogoff and 1,523,199 others
yourusername missing my wig and my gang hours ☹️
view all comments
November 10, 2023
morganlogoff, love love love you��💗💗
curlikaqy, NO ONE KNOWS I'M YOUR BIGGEST FAN
emilyrudd, GIRL I WANT TO SEE YOU COME BACK TO AMERICA
bookofjacob, missing your camera hours💔
#one piece#one piece live action#one piece la#opla#one piece x reader#one piece x you#one piece live action x reader#one piece live action x you#iñaki godoy#emily rudd#jacob romero gibson#jacob romero#taz skylar#mackenyu#one piece x y/n#opla x reader#opla x you#midnightbears
34 notes
·
View notes
Text
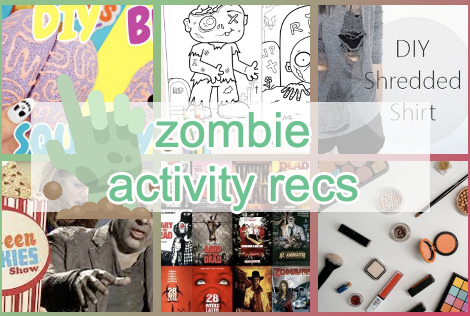
activity recs for : a zombie
requested by croptop zombie anon!
1. make a diy squishy brain
2. print and color some zombie coloring sheets
3. diy some shredded/distressed clothes
4. practice your zombie behaviors
5. watch some classic zombie films
6. try out some zombie makeup tutorials (cw fake blood and bruising)

#💫activity recs#💫for you#💫blue line | queue!#zombiekin#zombie kin#undeadkin#undead kin#kin care#kin request#kin stuff#fictionkin#mythkin#myth kin#cw zombies
73 notes
·
View notes
Note
Im an aspiring punk here ive wanting to start making my own stuff maby start a batle jacket or patch pants or somthing but those projects sound a bit intimidating. Do you have any recmondations on a good place to start?
hey ey!
to begin sorry for the late reply, i got a lot going on currently
to begin id advise collecting inspo for what kinda jackets/pants you want first. i use pinterest, tumblr and etsy to find inspo for my diy stuff. i like to sketch out different designs for my projects before making them, so i can try out what fits and what doesnt.
to practice id say starting by making patches and sewing them (use dental floss, its cheap and incredibly strong and durable) on for example a bag is the simplest way to introduce urself to patchmaking and sewing. i advise using the whip stitch to sew them on. when youre a bit more confident in ur skill level one of the easiest projects to start is a battlevest, since its mostly flat and straight fabric its easy to sew on and modify. most people find denim more difficult to sew on cause of its sturdiness but i prefer it for exactly that quality, it prevents the fabric from moving/stretching too much
you dont need expensive supplies, even stuff that might be seen as trash is very useful for punk diys, some old cloths and acrylic/fabric paint will already be enough for patches. i got a tutorial on my blog for stenciling them (let me know if you want me to link it). soda tabs can be used to make buttons/pins, chainmail, chains, and so much more. bottlecaps can also be made into different types of buttons/pins and chains (and more stuff i cant think of rn). you can get chains for cheap from hardware stores, id also keep an eye out for those chain dog collars in yardsales and such, theyre often very good quality (i got 3 all secondhand).
on that note, where can you find ur stuff for projects?? i get almost all my stuff secondhand. ive got at least 4 thriftstores nearby, and there are often fleamarkets around my area, which i always try to go to when i have the chance. fleamarkets are often announced in local newspapers or on posters around town. you might also find em by googling ur towns name and then "fleamarket" or "yardsale". if you live in a remote area where these things just dont exist i advise asking family/friends if they got old stuff they wanna get rid off. or to use online secondhand stores like vinted or depop (altho depop sellers often overprice, keep an eye out for cheap deals) for stuff you really cant get secondhand like spikes etc. i advise etsy. also if youre US based studsandspikes.com has tons of different spikes for cheap.
an important thing to remember is that your stuff wont and doesnt have to look perfect. your stuff will be messy and sometimes a project totally doesnt end up how you want and thats okay. fuck around and find out!
63 notes
·
View notes
Last Seen Blogs

viewwhip4
The Journaling of Yde 827

luckycigarus
Lucky Cigar
streetshaman
shadowrun appreciation station
jjneeps
JJNeeps (^_^)
viewwhip4
The Journaling of Yde 827