#Tutorial Java
Text
Tutorial Belajar Java: Cara Membuat Array 3 Dimensi
Tutorial Belajar Java: Cara Membuat Array 3 Dimensi
Tutorial belajar bahasa Java kali ini akan membahas hal yang sedikit advanced. Kita akan pelajari cara membuat array 3 dimensi di dalam bahasa pemrograman Java.
Pengertian Array 3 Dimensi
Array tiga dimensi adalah sebutan untuk array yang penomoran index-nya menggunakan 3 angka. Analogi yang sering dipakai seperti titik koordinat dalam diagram kartesius 3D.
Diagram kartesius merupakan diagram…

View On WordPress
0 notes
Text
I do not want to hear monotone voices explain concepts to me I want to read I WANT TO READ. DOCUMENTATION / WRITTEN GUIDES AND EXPLANATIONS ARE SUPREME
#codeblr#studyblr#coding#programming#java#python#javascript#study blog#self study#documentation#code#tutorials#comp sci#productivity
114 notes
·
View notes
Text
hey guys so im finally putting actuall thought into one of my crossover aus heres some “thumbnails” and doodles i did. im calling it MergePoint
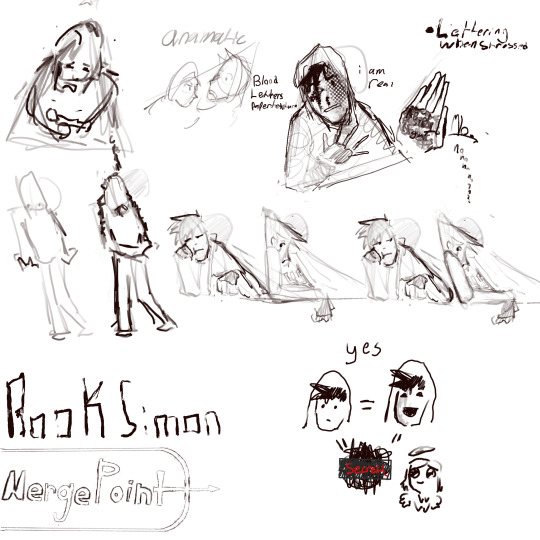
Yes its book simon! the entire page except for David, ill explain better in a separate post probably but heres my logic:
Theres simon before the crash, Book Simon, And real Simon(Sick Simon). The bloody version we see is book Simon after he goes through the events of the story. So hes like progressively getting more bloody. This just a short explanation ill make a separate post i swear
As for the AU the gist of it is basically a shit ton of characters were spat into this one big unstable universe thats a mixture of vast blank white void, settings from their home universe and other things. thats kinda like a general idea of it theres more to it but i dont want to explain too much on this post (⇀_↼)
youll catch me DEAD before i stop making 50+ crossover aus
closeups:


#yes i stole the circle thing from an old java art tutorial or whatever his yt channel name is#i love making aus so much#art#artist#digital art#doodles#artwork#fanart#art work#cof#cry of fear#aom#david leatherhoff#simon henriksson x david leatherhoff#afraid of monsters#simon henriksson
42 notes
·
View notes
Text
Despise coding tutorials that spend 30 minutes explaining what a videogame or coding language is
I Don't Care
How Do I Create A Window
#andndjfjffjfkvjvk#3:<#“i hope you're a little familiar with c++”#NO BITCH ITS WHY IM WATICNG YOUR SHITTY TUTORIAL#like for python and java i had to create the actual perameters for the game window#DO I NEED TJAT FOR C++ OR ARE YOU JUST LAME#RAAAAA#qrb#real?#im mad#coding#c++
8 notes
·
View notes
Text
refactoring
I lied when I said I was going to work next on loading a 3-D model. Sorry, old habit! Actually, I went straight into refactoring. Let me explain...
The English Wikipedia defines refactoring as "the process of restructuring existing computer code . . . without changing its external behavior", which is fairly accurate, though lacking in motivation.
My back-of-mind definition would be "changes to code whose primary purpose is not to add features or solve issues, but to make the codebase easier to maintain".
Back when I worked for corporations, I got in the habit of never mentioning refactoring around anyone who wasn't a software developer. If my boss (or my boss's boss) knew I was making changes (and spending work hours) on something other than approved features or known issues, awkward questions would arise. (Like, do we have a billing code for that?)
Anyone who's worked intimately with a large software project knows that if changes are made only for features and issues, the project will accumulate "technical debt" that makes it difficult to maintain: hard to explain/learn/understand/remember how it works and hard to make changes without introducing bugs.
Both of today's refactorings focussed on the BaseApplication class, which became unwieldy weeks ago. Last night the source file for the class reached 1901 lines of Java code (not counting blanks, comments, and javadoc). I don't place a hard limit on lines of code in a class, but a file containing 1901 LoCs positively screams technical debt. It's especially painful these days, since I'm working on a laptop with a tiny screen and using a track pad instead of a mouse. (I spend lots of time scrolling back and forth, hunting for the lines I need to change.) Cramming as much as possible into a single file makes some sense for a tutorial, but I see the V-Sport project as something I'll be maintaining for many years.
First I split off all the code that deals with physical devices and put that in a new PhysicalDevice class. The change greatly clarified which properties of the physical device matter and how that information is accessed.
Then I split off all the code that deals with texture data into a new Texture class. The new class bundles up 3 related Vulkan resources and provides a clear lifecycle of create/use/destroy. I expect it to minimize duplication of code when the project transitions (sometime in the near future) from a single texture to multiple textures.
I'm subjectively pleased with how smoothly today's refactoring went. One measure of its success is that BaseApplication shrank from 1901 to 1650 lines of code. Still plenty of room for improvement, though!
#refactoring#making progress#software engineering#3d graphics#vulkan#technical debt#java#coding#software development#lying#tutorial#locs
26 notes
·
View notes
Text
♡ how to make mob skins into resource packs minecraft java ♡
here's a super easy tutorial on how to add mob skins to ur game just like any other texture pack! (for java) (❀❛ ֊ ❛„)
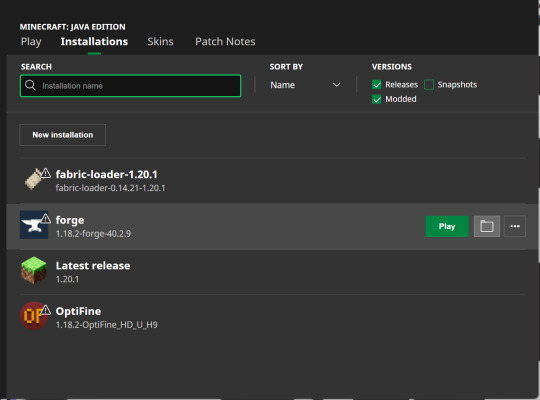
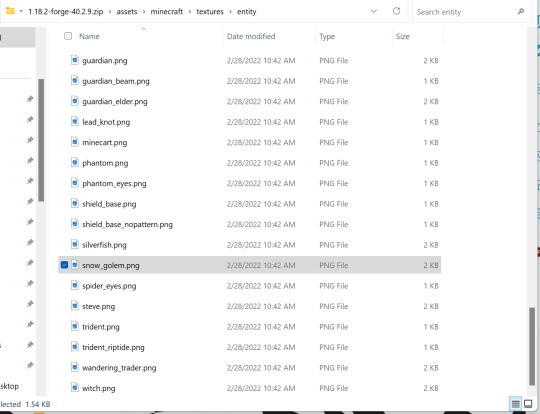
first, open ur minecraft launcher. press on installations and find the game version you're using, (for example I'm using forge 1.18.2-forge-40.2.9). if you hover over it, next to the green play button should be a folder icon.
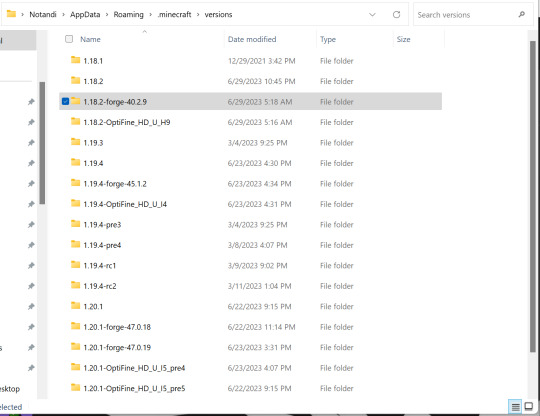
click the icon and find the folder titled 'versions'. click on your version of minecraft, (for example mine would say forge 1.18.2-forge-40.2.9). and click on it! inside should be a .jar file with your minecraft version.
while keeping this tab open, create a folder on your desktop called minecraft mob skins and COPY and paste the .jar file inside. rename and change the .jar to .zip (you can now close the versions window).

open the zip file, it'll be easier in a new window (right click and press open in new window) and type pack in the search bar, find the file named pack.png (keep the tab open).
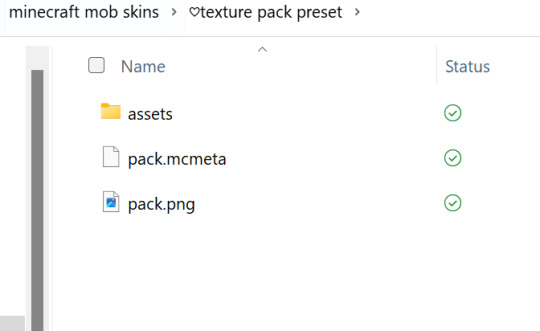
now going back to the minecraft mob skins folder we made, create a new folder called texture pack preset, open this folder and copy and paste the pack.png file inside.
we now have our resource pack icon that will show up in game ! ♡₊˚ 🦢・₊✧
next we need the pack.mcmeta file with our minecraft version so download that here!
once downloaded, drag and drop into your texture pack preset folder.
now, still inside the texture pack preset folder, create a folder called assets. inside that make a folder called minecraft then inside that textures and inside that entity. like this, assets > minecraft > textures > entity
YAYY we now have a preset folder that can be used for every mob!! *:・゚
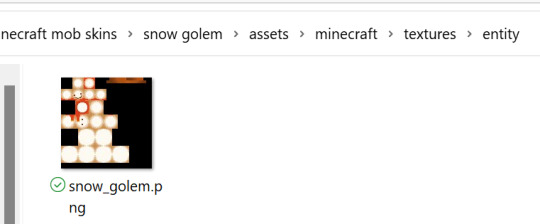
now back out of that and create another folder inside minecraft mob skins. name it after the mob you want to re-skin. (for example, cow, enderman, axolotl etc…)
inside of that create a folder and name it whatever you want. i always name mine the same name as the skin i want to use. for example 'toasted marshmallow golem'. (this is a super cute skin for your snow golems btw!) to make things easier I'll refer to this folder as the skin folder.
leaving the skin folder we just created open, go back to your desktop and click on minecraft mob skins. open up the texture pack preset folder and copy all the files inside, (assets, pack.mcmeta and pack.png should be highlighted). go back to the folder you have open and paste. (you can now close texture pack preset but keep still keep the skins folder open).
go back to your desktop and open minecraft mob skins again. click on the zip folder we pasted earlier with your game version, (open as a new window), and press on assets > minecraft > textures > entity, and find the mob you want.
at the top you'll notice the file path is exactly the same as our assets folder! that's because literally all you're doing is copying the exact file path so that minecraft can read it!
this means that if your mob has a folder with it's name on it, (for example assets > minecraft > textures > entity > goat) you'd create another folder named goat inside the entity folder YOU created
once you've found your mob or mob folder you should see one or multiple .png files.
if you only have one .png file (for example goat.png), then all you're going to do is rename the skin you want to use to goat.png and move it into the entity or mob folder YOU created.
(you can also keep a copy of the skin and keep it in your skins folder).
if you have two or more .png files (for example strider.png, strider_cold and strider_saddle or skeleton.png, stray.png, stray_overlay.png and wither_skeleton.png) then it's very simple.
with the strider example, strider.png would be your default strider when it's in lava. the strider_cold would be when it's on land and as the name implies 'cold', (which gives it a paler complexion). and strider_saddle.png is where a saddle has literally been pixel painted onto it.
if the skin you wanted to use only had one default .png file available yet you want for example the strider_saddle version, then you could open up the skin image in planetminecraft's PMCSkin3D or novaskin (which are both on browser) and to make it yourself!
if the skins resolution isnt too high it shouldn't take long, just search on google images, for example 'minecraft strider saddle' and try to copy it!
on the other hand, the skeleton example shows the different types of skeletons found, with stray_overlay refrencing the armour/apparel it wears.
if you come across a folder like rabbit which has black.png and brown.png etc… then all you have to do is name the skin you want to use as one of those file names, (for example black.png or brown.png), and it will replace that colour rabbit.
once you've renamed your skin to the file or files shown and made sure you've used the correct file path you're 80% done!!!
you can close the zip and back out of entity/your mob name folder till you can see assets, packmcmeta and pack.png
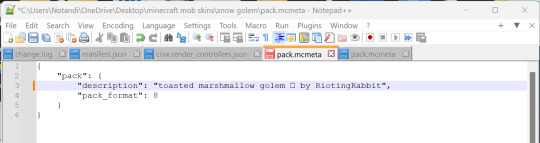
you'll need to download Notepad++ so you can edit the code in pack.mcmeta
once that's downloaded right click on pack.mcmeta and press edit with Notepad++
where it says description in quotation marks, type whatever description you want, (for example, "mossy axolotl by MeNylo"), and make sure pack_format is correct for your version. the pack_format for my version 1.18.2 is 8. it should be correct but just in case!
check here!
now press file and save!
if you'd like the resource pack to have a different icon I'd recommend downloading paint.net
click where it says, Get it now (free download):paint.net 5.0.7or whatever version it says.
now right click pack.png and press open with paint.net
to make a quick icon I use the snipping tool to cut an image of the mob, remove the background with
and paste that image to
where i made the pic cuter.
then going back to pack.png, open it up in paint.net and press on file then open the image you made. this will put it in a new tab which you then press edit and copy onto your pack.png image. make sure to paste into new layer and press keep canvas size!!!
zoom out a little as pack.png is quite small and scale the image you made so it lines up with the pack.png image.
now press save as and save to your skin folder. make sure it's .png!!!, (when it asks you if you want to replace the previous pack.png file say yes).
press OK and it will ask if you want to flatten which you say yes to. and your folder is all done!!!!!!!!!
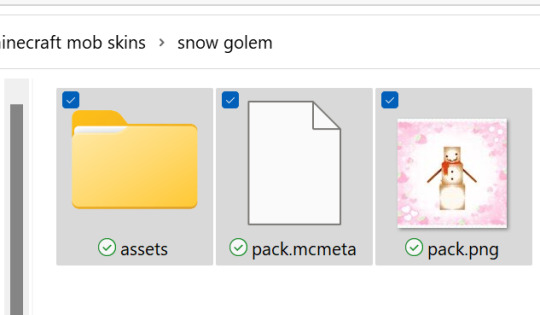
the resource pack now has a custom image.
finally you just highlight all three files, assets, pack.mcmeta, pack.png, right click and press send to compressed zip folder. (i usually name it the name of the skin).
if you can't see the zip option just press show more options and it'll be there. ˶ᵔ ᵕ ᵔ˶
LAST STEP, copy and paste the zip folder into your minecraft resource pack folder (don't unzip) and load up your game!!! now just do the usual, open your game world > esc > options > resource packs and if it worked you should see the resource pack with the description and icon you set. add it and you're all done!<3 if this was helpful please save this for reference ♡

/ᐢ⑅ᐢ\ ♡ ₊˚
꒰ ˶• ༝ •˶꒱ ♡‧₊˚ ♡
./づ~ :¨·.·¨: ₊˚
`·..·‘ ₊˚ ♡ also i use
& for my snow golem/pumpkins
♡‧₊˚🍓
♡‧₊˚🍓thanks for reading!! good luck 🍵 ⋅* ‧₊
#minecraft#modded minecraft#minecraft skin#minecraft java#minecraft mobs#minecraft tutorial#minecraft texture pack#minecraft resource pack#tutorial#guide#cute
20 notes
·
View notes
Text
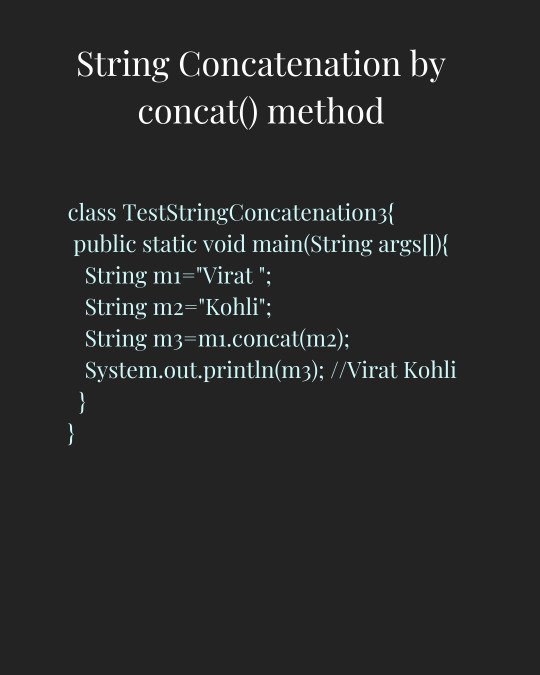
String Concatenation by concat() method
In Java, you can concatenate strings using the concat() method. This operator allows you to join two or more strings together. Here's how you can use it:
#javalanguage#javaprogramming#programming#coding#code#trending#education#technology#tech#training#engineering#software#development#softwaredevelopment#besttraininginstitute#online#onlinetraining#traininginstitute#tutorial#java
3 notes
·
View notes
Text
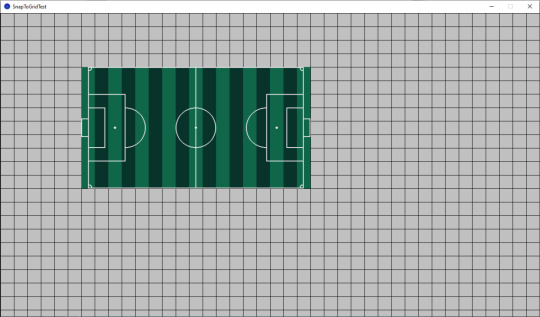
Snapping images to a grid in Processing
Learn how to draw a grid and snap images to the grid using Processing and Java. Easily portable to other programming languages.
View On WordPress
#coding#Creative Coding#Education#game development#gamedev#grid#grid snap#Java#Math#tutorial#Video Games#Processing#Programming
3 notes
·
View notes
Text
Hacks to Boost Your Java Skills in Computer Science

Introduction:
Are you a computer science student looking to level up your Java programming skills? Java is a powerful and versatile programming language used in a wide range of applications, from web development to mobile app development. Mastering Java can open up exciting career opportunities in the field of computer science. In this blog post, we'll share some hacks to help you boost your Java skills and excel in your Programming techniques and computer science studies.
Practice Regularly:
Like any other skill, programming requires consistent practice to master. Set aside dedicated time each day to work on Java coding exercises, projects, or challenges. The more you practice, the more confident and proficient you'll become in Java programming.
Build Projects:
One of the best ways to solidify your Java skills is by building real-world projects. Choose projects that interest you and align with your career goals, such as developing a web application, creating a mobile game, or building a desktop application. Building projects not only helps you apply your Java skills but also enhances your problem-solving abilities and creativity.
Explore Online Resources:
Take advantage of the wealth of online resources available for learning Java. Join online coding communities, participate in forums and discussion groups, and follow tutorials and video lectures.
Collaborate with Peers:
Learning Java doesn't have to be a solitary journey. Collaborate with your peers on coding projects, participate in hackathons or coding competitions, and engage in pair programming sessions. Working with others not only fosters a sense of camaraderie but also allows you to learn from different perspectives and approaches.
Solve Algorithms and Data Structures Problems:
Java programming is not just about syntax; it's also about problem-solving. Practice solving algorithms and data structures problems using Java, as these topics are fundamental to computer science.
Take a Java Course:
Consider enrolling in a Java programming course at a reputable institute or training centre. Look for courses that cover the latest Java technologies, programming techniques, and best practices. A structured course can provide you with a solid foundation in Java programming and help you stay updated with industry trends.
Stay Updated:
The field of computer science is constantly evolving, with new technologies and frameworks emerging regularly. Stay updated with the latest developments in Java by following tech blogs, attending webinars and conferences, and joining Java user groups. Keeping abreast of industry trends will ensure that your Java skills remain relevant and in-demand.
By incorporating these hacks into your learning routine, you'll be well on your way to mastering Java programming and excelling in your computer science studies. Whether you're taking a computer science skills course, exploring programming techniques, or seeking training at a reputable institute, these tips will help you become a proficient Java programmer. So, roll up your sleeves, dive into the world of Java programming, and unlock your full potential in computer science!
Suggested Blogs:
Java programming tutorial
C++ development process
principles of data structures
Python coding techniques
#computer science skills#Programming techniques#Java programming tutorial#C++ development process#computer science
2 notes
·
View notes
Text


If you refer Java Revision Notes, you don’t need to install any other apps or web search to prepare the interview questionnaire or examinations.
9 Significant Benefits of Learning Java with Chirag Khimani;
i.) The book is specially prepared for those who want to revise basic concepts before examinations
ii.) Provides Quick and Efficient solutions
iii.) It is color-coded like an elementary book
iv.) This can be handy before the interview so no tedious surfing required
v.) Each topic has purpose and descriptive write-up
vi.) Syntax and example for each concepts that explains clearly
vii.) Books are Pocket Friendly (Cost Effective)
viii.) Overcomes the previous misconceptions which you might had before
ix.) Learning of Java Coding Programs with Chirag is a thrilling experience because he always applies the real world problem to Java puzzles and provides easy solutions which are simple to use
#technology#software#automation#development#selenium#software testing#javaprogramming#java assignment help#developer#code#java interview preperation#java revision notes#java tutorial
2 notes
·
View notes
Text
i love coding tutorials bc you never know what flavor of autism.mp4 you're gonna get
#9 speaks#got the urge to work on my terraria mods again but then i remembered why i stopped#(getting annoyed at tmodloader's documentation + wanting to change shit that's not editable with tmodloader)#so now i'm doing a monogame tutorial. just gonna scrap the idea of a mod and make my own thing#i would've just gone with unity again but i got too used to not using game engines bc of java swing and i'm not going back
3 notes
·
View notes
Text
Hnnngb <trying to code a neocities page
#wacky watermelons#i tired renpy (python ish) last year but that was. a year ago#i guess I'll be learning java soon too (class im taking)#but even like. very basic things feel like banging my head against a wall#although.. you know what might make this better? a little treat (the treat is drink mix)#anyway. itll get easier. probably.#and maybe doing it sink or swim style isn't the best for my brain#ill look up some actual tutorials
3 notes
·
View notes
Text
youtube
Find below how to use Spring property file, you will learn:
- how to use available Spring properties.
- create your custom properties.
- read your custom properties using Spring annotations in java class.
subscribe on my youtube channel to learn more about upcoming courses.
2 notes
·
View notes
Text
#java coding#java#java programming#javafullstackdeveloper#javaonlinetraining#java tutorial#programming
7 notes
·
View notes
Text
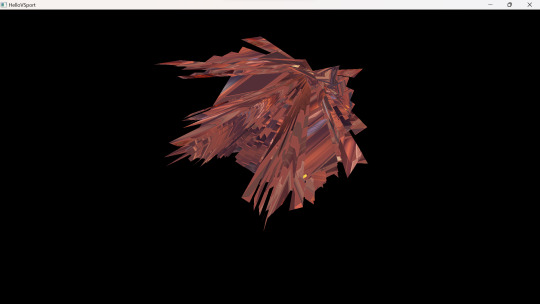
It's an interesting render, but not the result I was hoping for.
I've begun Chapter 27 of the Vulkan tutorial. On Monday I got my app to load the "Viking room" 3-D model without crashing. It's clear, however, that there are bugs in my code, since the render is supposed to look like this:

Luckily, I've seen similar distortions in OpenGL. Based on visual comparison the renders, I strongly suspect my issue is caused by incorrect mesh-vertex indices. My plan is to carefully review my code changes, and if that doesn't reveal the root cause, I'll dump the first few indices at various points in the process and see if they're correct.
Since both images above are derivative works, I should credit the creator of the 3-D model:
This work is based on "Viking room" (https://sketchfab.com/3d-models/viking-room-a49f1b8e4f5c4ecf9e1fe7d81915ad38)
by nigelgoh (https://sketchfab.com/nigelgoh) licensed under CC-BY-4.0 (http://creativecommons.org/licenses/by/4.0/).
#vulkan#3d graphics#3d model#open source#creative commons#software bugs#jvm#java#3d render#tutorial#3d mesh#troubleshooter#continuing education#my screenshots#sketchfab
14 notes
·
View notes
Text
Some of you didn't went through the Tumblr tutorial and it shows
#dutchmanjk#tumblr#why the hell is there a java tutorial on javatpoint right next to TransactSQL and ReactJS wth
6 notes
·
View notes
Last Seen Blogs

comickergirl
'Tis a Silly Place

cholozpe
choloz.pe

blackzone26
Untitled

fairyvani18
Poems|quotes|advices|memes¦

amykhall
Antidote to Accident