#east portal
Photo

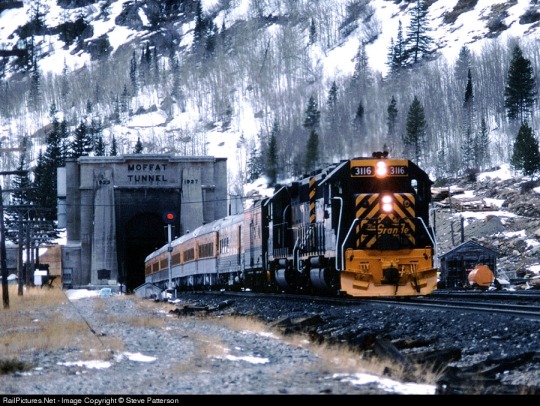
With a snow-covered Continental Divide looming above, the Rio Grande Ski Train heads for the Moffat Tunnel at East Portal, Colorado, on February 16, 2008. Carrying the markers today’s train is the customary Ansco private car No. 100, the “Kansas,” which was once Rio Grande business car “Wilson McCarthy.”
#ski train#ansco#d&rgw#rio grande#2008#denver#winter park#trains#passenger train#history#east portal#colorado#dome car#business car
16 notes
·
View notes
Text


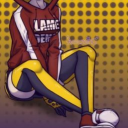
chell cosplay that i wore to pax east this year :D
(i used this forum thread as a guide for making the long fall boots)
(a video of me walking in the boots)

havent drawn this style lately... i drew the face based on canon chell but then colored it like myself to match the rest of the photo. no face reveal today suckerss
#portal#portal 2#chell portal#portal chell#cosplay#aperture science#pax east#soph's art#you cosplay glados bc you like glados. i cosplay chell bc i like glados. we are the same.
98 notes
·
View notes
Text
I STILL CANT BELIEVE THIS HAPPENED,,,, I FOUND THE S4M STAND AT PAX EAST AND DAY LANE WAS THERE 😭😭❤️SHHSHGGG SHES SO NICE AND I GOT MY ARTBOOK SIGNED…, BEST DAY EVER. I CRIED IHHGG IM NEVER GETTING OBER THIS. @daylane
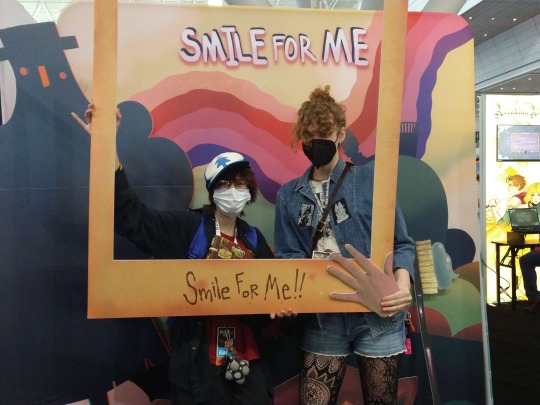
ALL THE PEOPLE AT THE STAND WERE SO KIND TOO…. THEY SAW HOW EXCITED I GOT AND KEPT GIVING ME THINGS,, I CRIEEDDD.
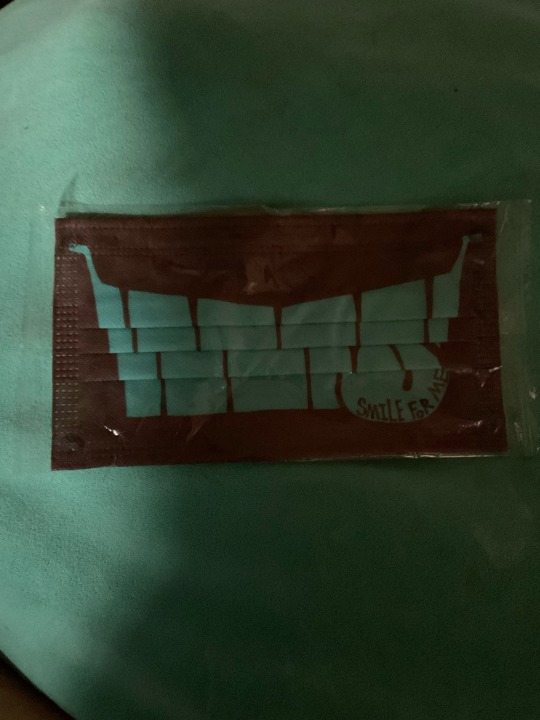
literally the best expierence meeting the creator of a special interest, and getting a hug??ohhh my god. OHHH MY GOS,,,,, the staff were so kind , they kept talking to me to calm me down when I was crying and stimming and gave me a mask w ohh hold on let me get it
YEAS!!!!! THE PERSON AT THE STAND ALSO LEAD ME OVER TO SAY HELLO, TO DAY ,, SHE WAS SO SWEET AND DREW A LIL DOODLE FOR ME EUEGGGHHE UE UÉ UÉ UÉ /POS.
This is how it felt
#artists on tumblr#queer artist#digital artist#portal#spamton#smile for me#day lane#s4m game#dr habit#yugo limbo#limbo game#pax east#gravity falls#Spotify
84 notes
·
View notes
Photo
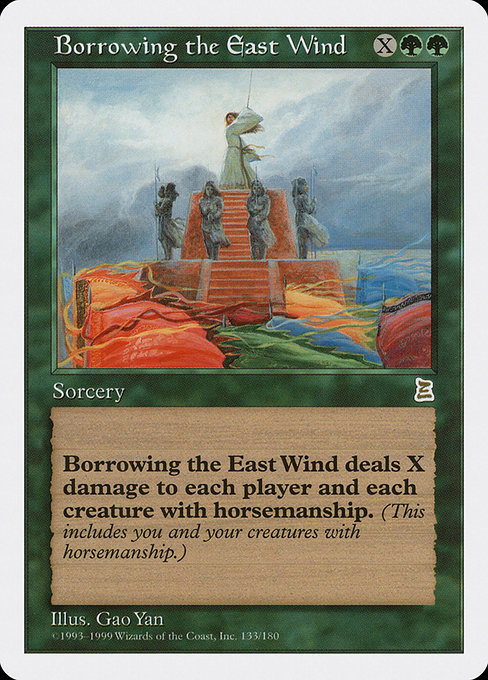
Borrowing the East Wind
Artist: Gao Yan
TCG Player Link
Scryfall Link
EDHREC Link
15 notes
·
View notes
Text
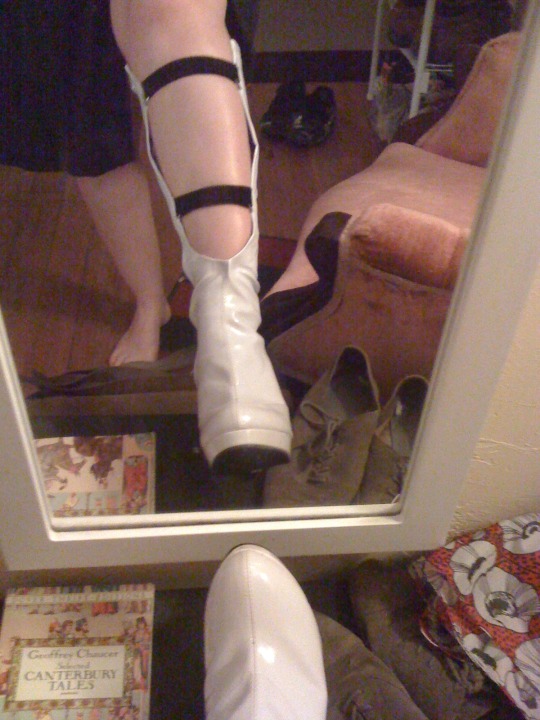
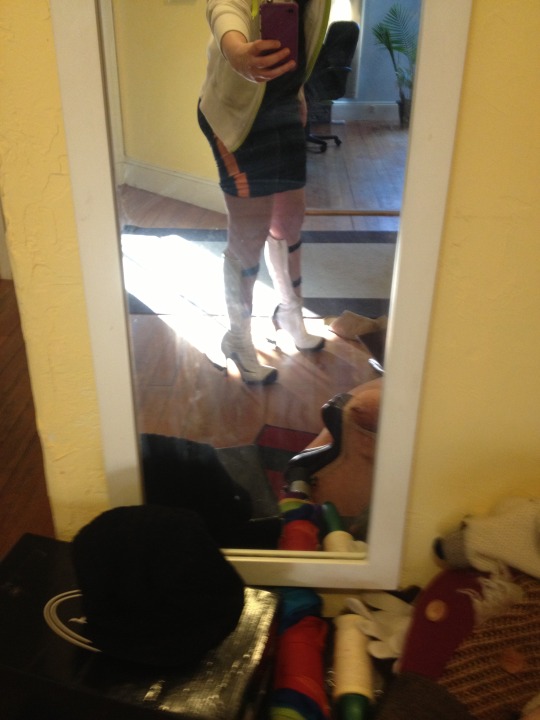
Oct. 2012: Chell Cosplay
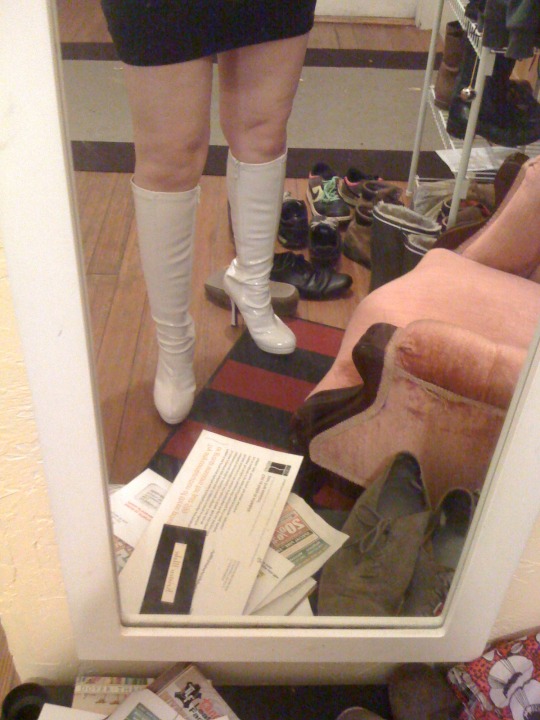
As indicated in one of the written pieces from this month, I cosplayed as Chell circa Portal 2 for PAX East 2013. Most of the costume was me buying things to create the right look, but I created the boots myself from some go-go boots and a wreath hanger. These are progress shots related to that!
Here's the final boots so you know where we're going:

Here's her character model for reference:

The boots before any modification:
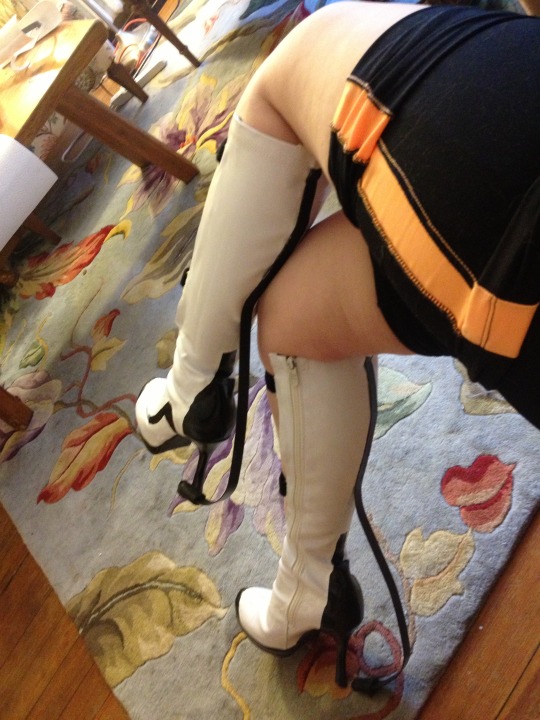
First, I made the open front with straps:

These are the steps as I remember them:
Create a cardstock template and fold it over the boot in the correct place so you can make sure you're cutting the shape you want at the right size.
Trace around the cardstock template using a pen or pencil you can wipe off the boot. I think I used an Expo marker.
Cut out the shape you traced.
Fold over the ragged edges of the shape and find four spots to cut symmetrical slits into, for the bands. This may take some finagling to be sure of.
Cut the slits, but make sure they're tight to the D rings used in the next step.
Take a D ring and slip it through each slit so the rounded edge protrudes and the flat edge is contained in the folded over flap.
Glue everything down with so much Krazy Glue.
Take some felt and cut strips of it to cover the ragged edges and glue on the interior of the boot. This is for your comfort.
Take some double-sided velcro and thread it through each set of D-rings.
Put your foot in the boot and adjust the velcro until its the right tightness. I recommend flipping the velcro so the soft side is toward your skin.
Leaving a little bit of extra for leeway, cut the velcros to size. They should basically form a closed loop.
While these boots had a zipper, after I modified them, I generally got out of them by undoing the velcro and sliding out. Either method was possible, but I found that easier and less likely to damage the D-ring situation.
I also generally adjusted the Velcro strips over the course of the day when wearing these. This was less about loosening and tightening and more about varying the feel of the straps against my leg so that they weren't bothering me over time.
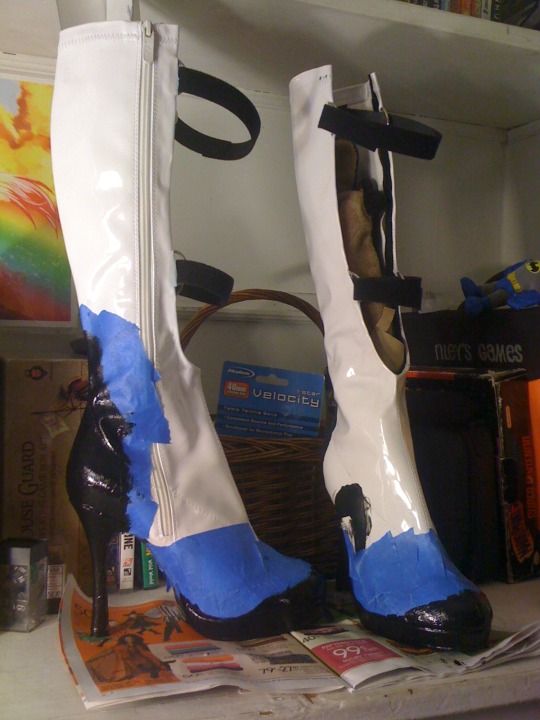

The next steps were getting the right markings on the boots and trying to disguise the heel.
I decided to not go for the hoof style shoe, given I'd be walking around in these for a long time, so I needed the support of the stiletto but didn't want it to draw the eye.
I recognize that "walk for a long time in a stiletto go-go boot" probably sounds absurd, so this is where I remind you that I'd been wearing exclusively high heeled shoes for two solid years, such that flat shoes were painful for me. Wearing something like this for a long time was actually totally feasible. I did, however, get little gel inserts for the ball of the foot/toe area and stick those in there, as I found that the way the front platform was shaped caused me to roll otherwise.
Steps for the painting:
Stuff the boot full of stiff paper or, ideally, a boot hanger so that it holds the shape it will be in while worn.
Based on reference images, sketch out the shape of each black area of Chell's boots onto cardstock.
Apply the cardstock to the boots and, using a pen or pencil you can wipe off easily, trace the shape of the cardstock onto the boot. Use the same piece for each boot so they match.
Take a generous amount of painter's tape and apply it around the edges of each shape that you need to paint. Make sure to give yourself an inch or more of space between the edge of the shape and where the tape ends.
I used some kind of acrylic paint for this, but I'd recommend researching a better option if you're working with pleather or vinyl like I was. Similarly, I'd recommend gently roughing up the surface of the shoe in the area that you're painting to try to encourage the paint to stick better, but maybe research if that makes sense, too.
Paint all of the shapes black and paint the heel and platform black, too. The heel should blend into the sole/black shapes as much as possible. Be generous with the paint.
Let the paint dry. You may need multiple coats.
Remove the painter's tape and use a white paint equivalent to the black paint to cover up any areas where the black paint bled past the tape or spots where the shapes of the designs look off. This may also take multiple coats.
Let dry.
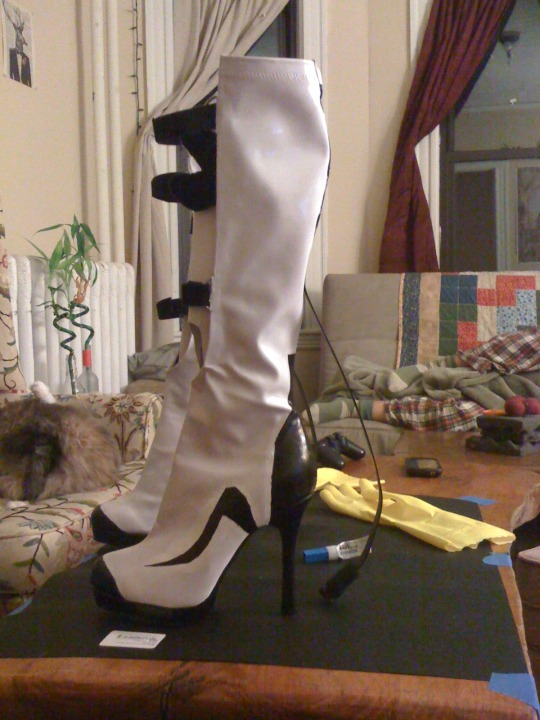
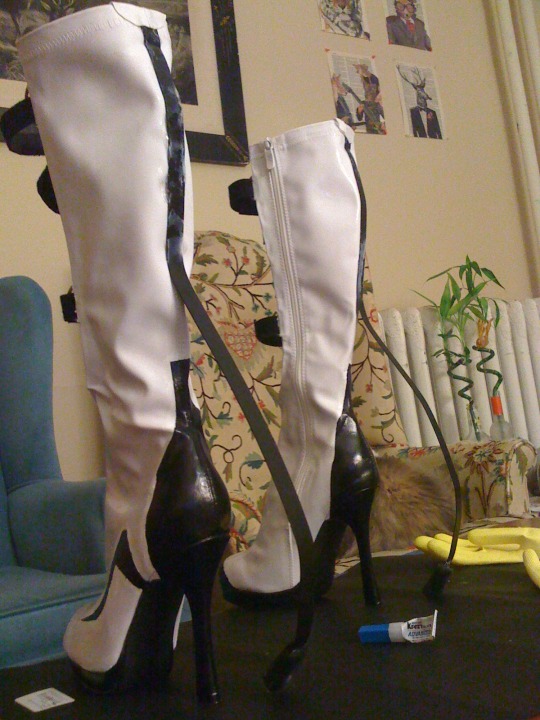

The final step was adding the struts to the back of the boots!
Acquire an over-the-door wreath hanger or two. I used 1 that had hooks for both sides of the door. You want the metal of the hanger to have some give, such that you could bend it by hand but it isn't going to lose shape at a slightly resistance.
Using a jeweler's saw, cut the wreath hanger in half so that you have two separate hooks.
Put on the boots and use your hands to adjust the shape of one of the hanger halves so that it conforms to your calf and then juts out from the boot in a smooth curve. Use reference of Chell's boots to get the right look.
Repeat that step for the other boot and hanger half.
Find paper or a boot hanger to stuff the boots with so that they hold their shape without you having to wear them.
Use a generous amount of crazy glue to attach each hanger half to each boot in the shape you made. For the hanger I had, I aligned the top edge (where I'd cut it) along the top of the boot and had the hanger follow the back seam of the boot.
Allow the glue to dry.
Put the boots on and walk around in them a bit to test the struts. If you find gaps forming between the boot and hanger, take the boots off and apply more glue. If you find the bottom of the struts are scraping the floor or getting caught on things, use your hands to adjust the curve of the struts so they have less direct contact while still retaining a visual of contact.
If you lined the top of the strut up with the top of the boot, you'll want to take some scrap fabric from the piece of boot you cut out previously, cut off a couple of inches of the curved bottom, and fold it over the top of the boot where the strut is glued on. Glue this down and let dry. (Your legs will thank you.)
Acquire some pliable black crafting foam sheets and thick-ish black felt.
Cut out rectangles of craft foam and fold it over the bottom tip of each strut, gluing each piece on, until you've built up a softened nub. This is to be nice to floors.
Cut a piece of felt to the width of the bottom of the foam pads where they touch the floor and glue this on as well. This is to reduce catching.
Put the boots on and walk around in them to test them one more time.
Use your hands to adjust the curve of the struts if you find yourself catching, stepping on the struts, or otherwise having difficulties with the struts. Also use this time to do a final stress test on the D-rings and velcro straps. Use scrap fabric from cutting the boots before to strengthen the bind between the D-rings and the boots if you find them slipping out of place.
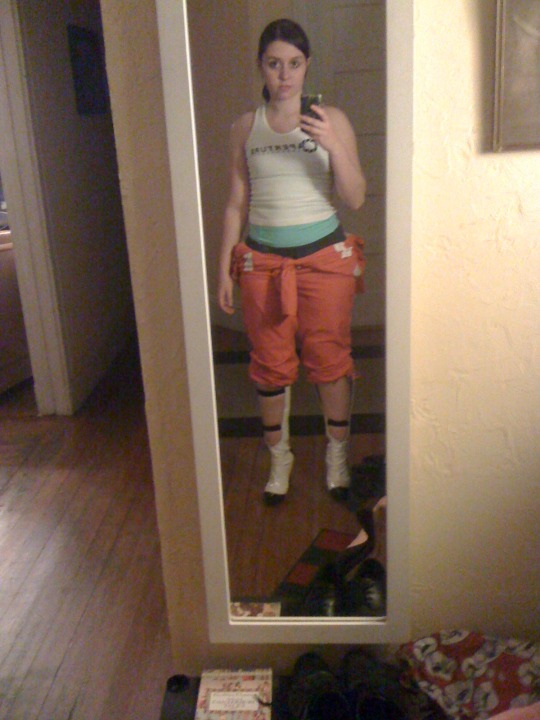
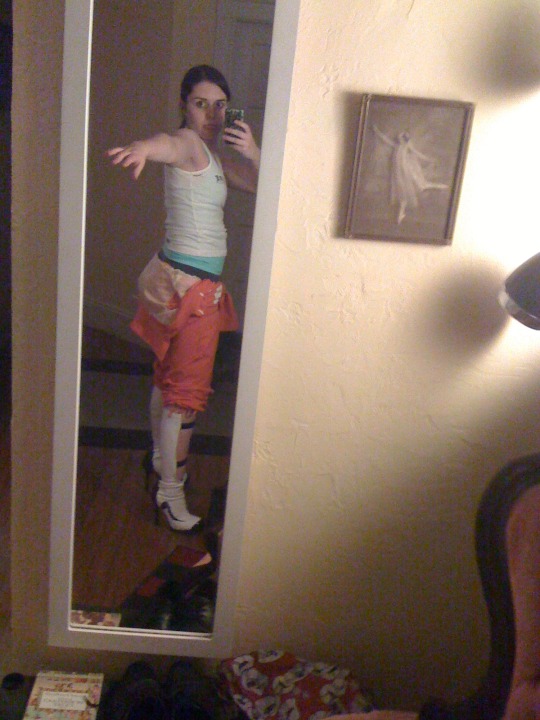
All done~
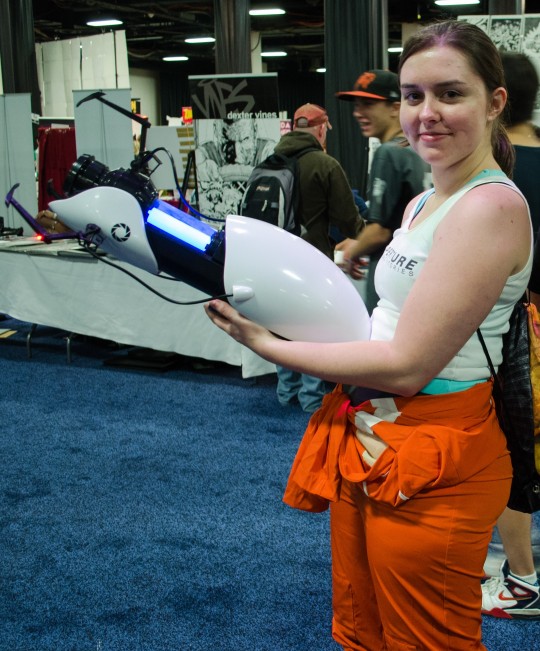
For the Portal Gun, I just bought a thing, but here's some goof photos:
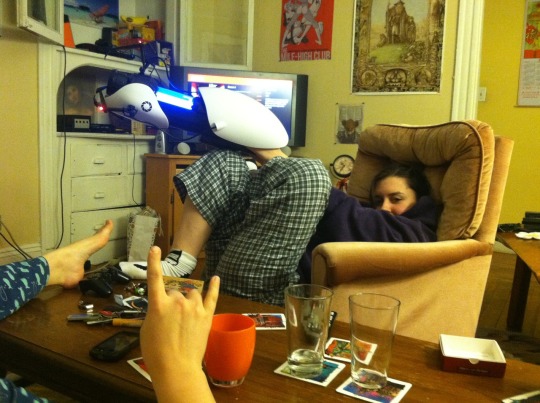
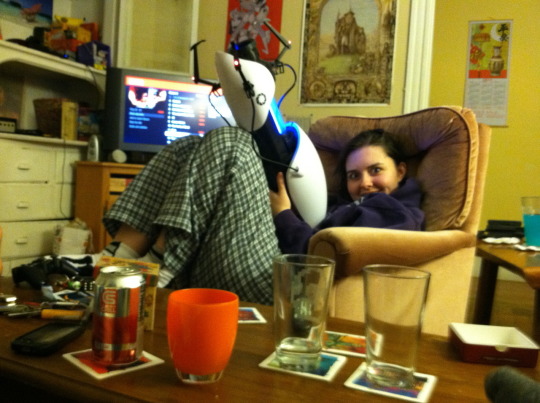
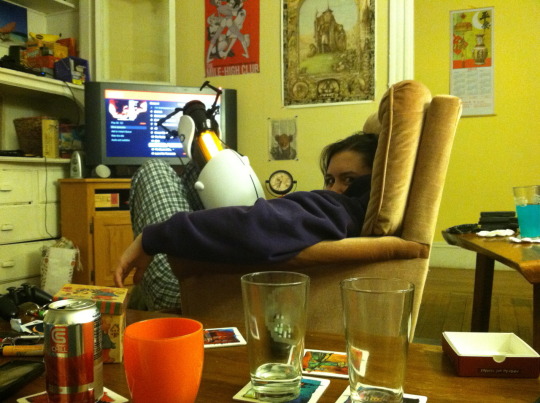

While buying that instead of making it is less impressive, I've found it to be a big hit with kiddos both at the con and when handing out Halloween candy. Since I bought it, it's not all that delicate, which means I could hand it off to the kids to play with for a bit. I particularly remember that when nerdy families would want to snap a pic of my cosplay, they'd often have their kid in the photo with me, and I'd give the Portal Gun to the kid to hold. They loved it.
Unfortunately I don't actually seem to have pics of the complete cosplay that shows all the bits of it. There's a non-zero possibility I find some in future archive folder, tho.
As far as longevity for my heavily glued monstrosity? I do still have the boots to this day, meaning they outlasted literally every other part of the costume except the Portal Gun (which hangs out with my video game figures in my living room). Every other piece eventually got destroyed (mostly by me sweating or gaining weight).
That said, they did generally need repairs after each wear. Most commonly, the paint would flake off, and I'd need to fill in gaps.
The other common failing was the D-rings which slipped out very frequently until I increased the leeway on the velcro straps and used scrap fabric to make the connection between the rings and the boots stronger.
Similarly, the felt bits on the interior had a tendency to rub off, which I honestly never fully solved. I'd generally just wind up stuffing things around the edges of the open front to make it not chafe, which sometimes meant just stuffing the felt back into place. I did find that adding wider felt strips helped a bit, possibly because the placement didn't have to be as precise.
Interestingly, the struts literally never caused a problem. They just worked.
One fun story: when I first wore this cosplay to PAX, I went with the jumpsuit on for convenience, and the looks I got on the T were priceless~ I think some commuters thought I was literally fresh out of prison, haha.
#old art#art archive#cosplay#costume#Portal 2#Chell#portal boots#PAX East#Age 21#10s#2012#CRAFTSMANSHIP#in a sloppy i-refuse-to-learn-to-sew kind of way#me#process#progress shots
16 notes
·
View notes
Text

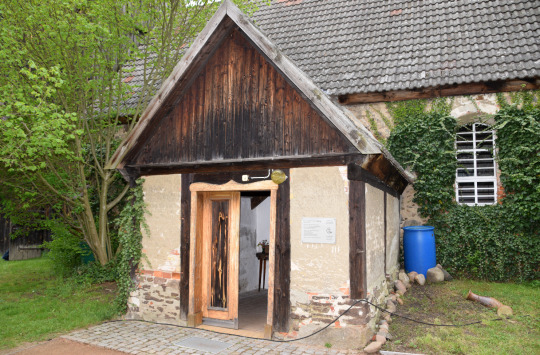
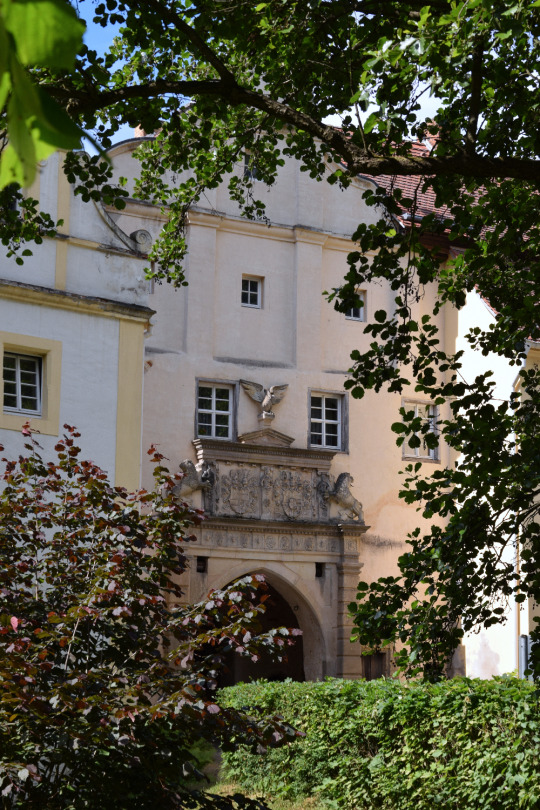
Das Portal
The portal
Eine kleine Kirche in der Niederlausitz und ihr altes Eingangsportal. Sparsam errichtet, wie die Niederlausitzer eben sind aber zweckmäßig und solide.

Auf den Fundamenten aus Raseneisenstein und eiszeitlichen Findlingen wurde ein Ziegel-Fachwerkbau errichtet.
#niederlausitz#lower lusatia#east germany#kirche#Breitenau#small church#Raseneisenstein#bog iron stone#Fundament#Base#architektur#portal#eingang#Tür#Kirchentür#church door#historisch#historisches#old house#gott#entry#Sockel#Grundmauer#naturstein#door#the doors
2 notes
·
View notes
Photo

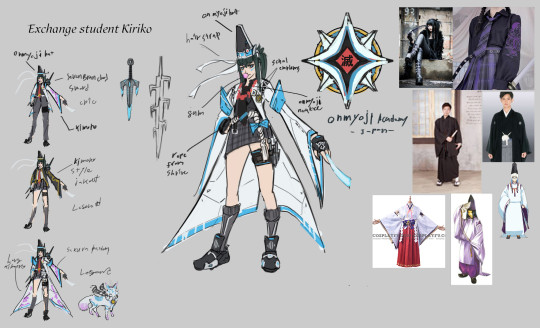
Onmoji Kiriko by Sungwoo Jo (Goblin Portal)
#kiriko#Overwatch#Fan Skin#fanskin#Sungwoo Jo#Goblin Portal#Halloween#japanese culture#East Asian Culture
5 notes
·
View notes
Text
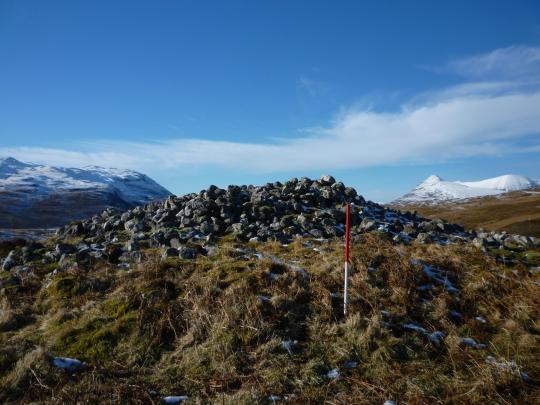
Cairns in Clusters: Chambered Cairns in Assynt
By Gordon Sleight
Carrachan Dubh chambered cairn near Inchdnadamph
Over the last twenty years I have thoroughly enjoyed tramping around Assynt, sometimes on my own and sometimes with groups of friends. That sense of enjoyment is often enhanced by surprises. It might be disturbing a mountain hare and seeing it race away at speed or watching an overhead confrontation between golden and…
View On WordPress
#AOC Archaeology#Assynt archaeology#Audrey Henshall#Bad na Cleithe#Chambered cairn#historic assynt#John Barber#Loch Borralan East#Moine Schist#Orkney Cromarty type chambered cairn#portal stones#Scottish archaeology#Syenite
0 notes
Text

Dream: Shape Shifters Circus, Castle Portal Room, Levitation, Dancing
September 26, 2023 There was a group of shape shifters going down the road together laughing and having fun together. I was trying to talk with one of them and they all shifted into kind of Norwegian people and put on some Norwegian accents, which were good but I knew that they weren’t really Norwegian and they didn’t really speak Norwegian normally. They were being a Norwegian circus of some sort, and laughing and playing as they walked, one was juggling and they were also dancing. I started dancing with one guy shape shifter and he was really strong and could even push me into the air. We paused after awhile on our journey, near a tent, and I wanted him to bring me up into the air like a sort of reverse sky dive. He was on top and pulled me spiraling into the air with him, levitating about 30 feet up. It was a bit scary, but pretty fun. People on the ground were watching and got some videos of us levitating up into the air. Then we went into the woods, walking past all sorts of colorfully and vibrantly painted wooden gnomes, fairy houses, and little mushrooms of a Norwegian style. Then we apparently came to somewhere like a marketplace in Norway that was like Santa’s workshop at the North Pole and we were elves fashioning tiny Christmas ornaments and figurines out of wood and cloth, and selling them there or giving them away to passersby. Then I went to a castle in the Middle East, where there was a portal on the left and a portal on the right, basically into the same type of room but the left side was brighter and newer looking and the right side looked softer, but more aged and not quite as bright. I knew I wanted to go to the right but ended up having to go through the left and around the corner to the right. There were dancers there and we all had on some flowing garments and scarves. We would run at a pool with water and begin levitating just enough to be able to run on the surface of the water, dipping our scarves into the water on either side. That was our dance.
#dream#shape shifters#Norway#portals#castle#Middle East#levitation#dance#circus#gnomes#fairies#happy
1 note
·
View note
Photo
Eastbound DRGW Ski Train exiting the Moffat Tunnel
February 27, 1983
#ski train#d&rgw#rio grande#1983#denver#winter park#trains#passenger train#history#east portal#colorado
12 notes
·
View notes
Text
Trabaja en Aldi: Tu próxima gran oportunidad.
Trabaja en Aldi: Tu próxima gran oportunidad.
Trabaja en Aldi: Tu próxima gran oportunidad. Conócenos más de 100 años detrás del mostrador ALDI es uno de los principales grupos de distribución alimentaria a nivel mundial. Nuestro nombre nace de la suma de las primeras sílabas de Albrecht, el apellido de los fundadores, y Discount.
Nuestros orígenes
Érase una vez en la pequeña población de Essen,…

View On WordPress
#administrador de fincas#american express burgess hill#bricodepot#busco trabajo urgente#como encontrar trabajo sin experiencia#donde encontrar trabajo#east of england co op jobs#empleo marketing digital barcelona#empleo ofertas#freelance web developer london#guia turistico en ingles#health education england jobs#historic england jobs#homes england jobs#hotel busca musicos#Indeed#linkedin#listado empresas limpieza#live in care london#los mejores portales de empleo#marketing digital#Mercadona empleo#nutricionista madrid#office cleaning london#php developer london#portales de empleo gratuitos#se ofrece informatico#ss great britain jobs#técnico informatico en ingles. enfermeria como profesion#trabajo administracion y finanzas
0 notes
Text
College Hoops Chat - Final Show of Season: Iona Coach Tobin Anderson, Changes at Syracuse, Big East Additions & Portal/NIL Impact on High School Recruits!
Listen to NEW episode of College Hoops Chat - our last show of the season! Terrific episode: New Iona Coach Tobin Anderson, Changes at Syracuse, Big East Additions & Portal/NIL Impact on High School Recruiting!
CLICK LINK!
LINK TO SHOW: https://podcasters.spotify.com/pod/show/college-hoops-chat/episodes/Last-Show-of-Season-New-Iona-Coach-Tobin-Anderson–Changes-in-Syracuse–Big-East-Additions–PortalNIL-Impact-on-High-School-Recruits–42423-e22virl
CLICK ABOVE to listen to April 24, 2023 episode of the College Hoops Chat radio show (47 mins). This is our final episode of the season!
I chat with following guests:
New…

View On WordPress
0 notes
Text
Best School of School of Social Sciences in Kenya - Mount Kenya University
Mount Kenya University School of Social Sciences comprises the departments of Psychology, Humanities and Languages; Social and Development Studies; Journalism and Mass Communication; and Institute of Security Studies, Justice and Ethics.
We cultivate the ability of students to think critically, conduct research and draw logical conclusion while at the same time expressing their thoughts effectively, with the overall intention of providing them with learning experiences to position them to serve and function in a dynamic global environment.

#Law program in kenya#E-learning portal in kenya#Mku academic programmes#Top reasons to join mku#Top medical schools in east africa#Best diploma courses in kenya
0 notes
Text
Israeli non-profit saving street cats from horrific abuse and diseases
New Post has been published on https://petn.ws/ZFlts
Israeli non-profit saving street cats from horrific abuse and diseases

Two years ago, the Agriculture Ministry reported there were over a million stray cats on the streets of Israel. Various non-profit organizations working to help the animals, however, say the ministry figures represent a drop in a bucket and not even close to real numbers. Ronen Solomon, the head of “The Solomon Project,” which is […]
See full article at https://petn.ws/ZFlts
#CatsNews #Aharonoth, #Ahronoth, #Arab, #Beitar, #Hapoel, #Hebrew, #Intifada, #Israel, #Israeli, #Jerusalem, #Jewish, #Maccabi, #MiddleEast, #News, #Newspaper, #Palestine, #Portal, #Quotes8211, #Search, #TelAviv, #Update, #WestBank, #WwwYnetCoIl, #Yediot, #Yedioth
#aharonoth#ahronoth#arab#beitar#hapoel#hebrew#intifada#israel#israeli#jerusalem#jewish#maccabi#Middle East#news#newspaper#palestine#portal#quotes&8211;#search#tel aviv#update#west bank#www.ynet.co.il#yediot#yedioth#Cats News
1 note
·
View note
Text
Schlossportal
#nobelty#schloss#castillo#portal#niederlausitz#lower lusatia#east germany#architektur#schlossportal#sonnewalde#sonnewalda#history
0 notes
Photo

🖥 #Meghalaya #Residents #Safety & #security #Act, 2016 #portal has been launched in #State which will be implemented in 7 localities in #East #KhasiHills. #Developed by NIC it will #Help in security vetting of #tenants & safety & security of #Citizens (megrssa.nic.in) https://www.instagram.com/p/CiXSwjeuO9I7VaVHFZPR4_uNpG1ZTlcV_Hh0ms0/?igshid=NGJjMDIxMWI=
#meghalaya#residents#safety#security#act#portal#state#east#khasihills#developed#help#tenants#citizens
0 notes
Last Seen Blogs
tcstoryfell
TS! Storyfell


bonnieprincegnarly
A Serious House on Serious Earth

moltomond
molto

raji205
Untitled