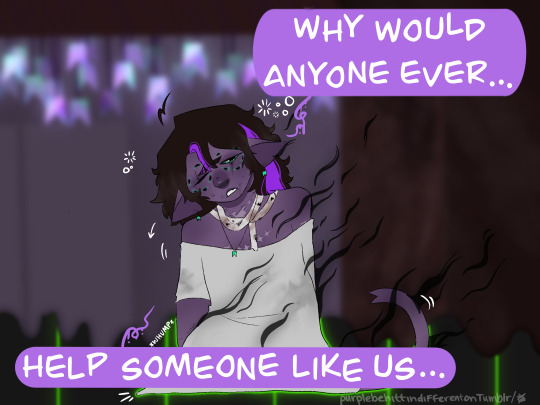
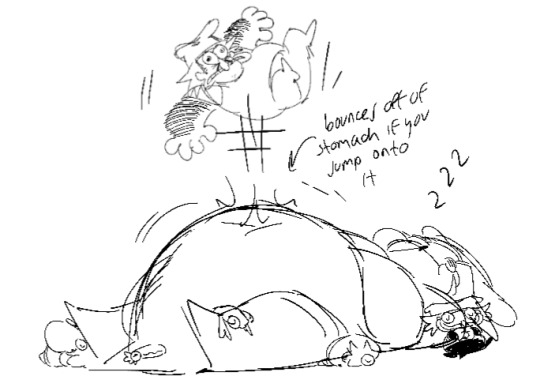
#thank you for the question friend!!!!
Note
Going for the sjörå since I'm vain as fuck and scales are so pretty!!! can still be one if we want a male mc? since it says they are all female? thank you!!!
hi hi!!!! the short answer: YES! there is no gender locking for the MC backgrounds or for the ROs. male MCs can 100% be sjörå :)
the long(er) answer: this is the biggest change between norse mythology and folksaga, and a big reason why the backgrounds are drawn from multiple different nordic countries. nykur/nøkke (iceland, denmark, norway, faroe) are traditionally only male, so they’ve been combined with the swedish sjörå. huldrekall, the male counterpart of the huldra (norway)/skogsrå (sweden) have been merged into the same folklore as the female because the males are described as little underground trolls, essentially.
the bergsrå can actually be any gender in folklore, but have also been altered to be more humanoid/more solitary to fit in with the storyline more.
tldr; yes, despite the gender specifications in norse myth and folklore, all origins are available to be played by any MC of any gender! ❤️
#ask#folksaga-if#folksaga#origin: sjörå#origin: skogsrå#origin: bergsrå#thank you for the question friend!!!!
41 notes
·
View notes
Note
every time someone calls moirallegience just an alien qpr i wilt a lil like YEAH thats more or less the CLOSEST human thing but its also Literally Not That. like a qpr is fundanmentally not romantic and thats not even going into moirails whole Actual Purpose of calming ppl down. its just. aughhhhh pisses me off i see the confusion but, as aformentioned, aughhhhh
OH MY GOD THIS HAS BEEN BOTHERING ME TOO.... but i don't want to get petty at the people in my notes always saying "moirails are QPRs!" because in some ways that is the closest human thing so it's hard to be mad...
i think there's definitely some overlap in some ways. but NOT because moirallegiance and qprs are the same at all really, but INSTEAD because both relationships have unconventional boundaries defined by the people within them.
you know... like every relationship.

like the only reason the two have overlap is because they are both partnerships that emotionally care for each other but can choose to not bang (which is true for any romance anyway, even if it's considered abnormal). they're both just romances* that are unconventional to human norms, which makes people view them as the same thing when they're not.
i think the REAL issue here is that humans insist on using human words to understand things that are just, fundamentally, alien. can't we just appreciate alien romance for being... alien romance?
no, it's not platonic, it's romantic. it's just romantic in a way you aren't quite wired to understand, is all.
*in generalization, most QPRs are not romantic, because they are made up of aroaces who are life partners in a non-romantic way. however i want to disagree with you that none of them are romantic, because that is up to the partners in question.
#quadrants#homestuck#moirallegiance#BEEN THINKING ABOUT THIS FOR SO LONG OMG THANK YOU FOR THE ASK#its just i USED to think they were the same#and then recently i kept getting pissy when people said they were the same so i was like. okay let's unpack this#what's the overlap here and what's the differences?#and really people THINK theyre the same because they think theyre both like. 'im gonna platonically marry my friend!' ^w^#(which is obviously not actually what either of them are like. lol)#when REALLY what they have in common is 'hey you're a person i want to have a committed partnership. but potentially not sex or tradition'#and it's not really fair to compare them because they come from totally different places and have totally different standards#QPR was created as an ALTERNATIVE to allonorms. its about saying 'hey lets make up our own rules. my life partner can be platonic if i want#whereas moirallegiance IS a norm and its not counter any culture. it's just 'trolls have biological romantic feelings/needs in This way.'#idk idk how to explain it any further because ive spent a fucking hour on this post and i have a massive headache so feel free to ask me--#more specific questions if the shit i said here doesnt make any sense (; ̄ー ̄)..#<- wow haha the troll fictive autism really jumped out with this post huh. whoops#hsmeta#long post#op
331 notes
·
View notes
Text


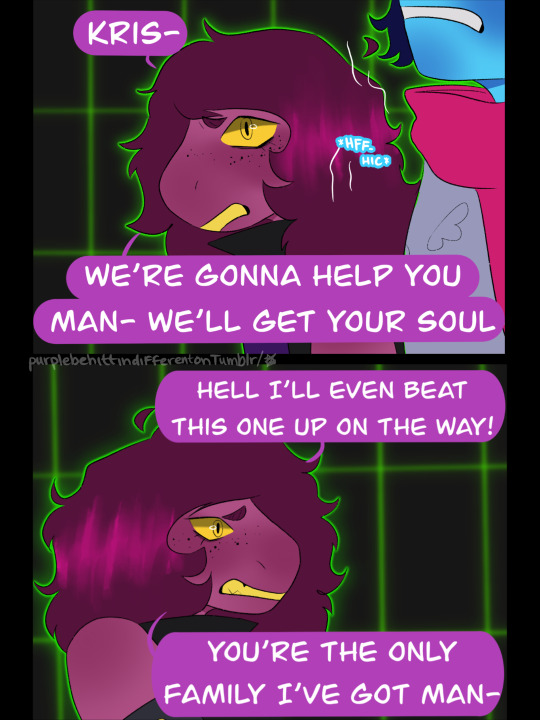
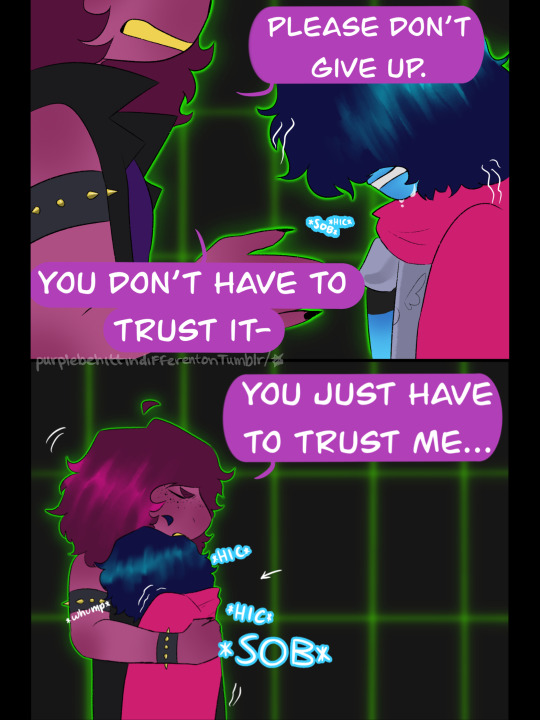


Battle won! You got 66g and crushing guilt!
That’s the end of chapter 2! Who’s ready for chapter 3? ME! ME! But wait- what’s THIS?
Masterpost
Prev (ch:2::8)/ End of chapter 2!
Next (INTERLUDE)
#reconnecting#tissue warning b******#art#my art#fanart#deltarune#kris#deltarune comic#reconnecting comic#well yeah I got mildly sniffly drawing#can’t wait to see the dub of this :3 no rush tho my friend#deltarune fanart#undertale#got questions? ASK EM! visit my askbox if you wish#interlude is a one shot 30 panel long thingy before chapter 3#so not a long wait don’t worry!#also hiiii! all my new followers!#and Lily if you read this I want to extend a thanks I would have#never gotten this far if you had never found my page#FOLLOWERS IF YOU DONT READ LILYBUG02 S COMIC NOW IS THE TIME#SHES WONDERFUL#:3333
288 notes
·
View notes
Note
How many holes does a straw have?
@i-send-you-random-asks
(asking you specifically cause i think you'd have an interesting answer)
Ohhh, yes, this is my question! Thank you, dear!
Short answer:
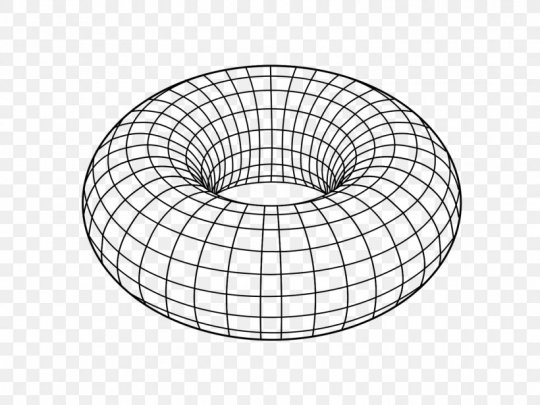
That depends on your definition of 'hole'. Topology says 1.
Long answer:
Since this depends on your definition of hole, I can think of 5 answers that can be rationalised and make some flavour of sense:
(@marvellouspinecone helped me with some of these a while back and might have additional info, so I am going to credit her here.)
0 holes
You can define a hole as something that makes an object broken, or at least as something you have to put into a finished object AFTER construction. This could be something like a tear in the fabric or a hole you have drilled into the 'wall' of the straw. Ergo, a functioning straw does not have any holes. It looks exactly as it was designed to be.
1 hole
This is the math answer. As said in the infamous post, a straw is 'topologically equivalent' to a torus. To be precise, it is homotopic to a torus.
First question: What is a torus?
Answer: Basically a donut. It looks like this:
[ID: image of a torus. It looks like a donut with a checkered surface. end ID]
Second question: What does 'homotopic' mean?
Answer: This is where it gets math-y technical, but in a way it means that we can continuously transform either of the objects into the other - in a nice way.
Imagine, our straw was made of super-clay: we can't rip it or glue it together at any point, but we can pull and push it together however we like, even changing its density. So we could stretch some parts to become very big and shrink others a lot. We can also bend and twist it a little.
So, we take our straw and we push it together in the direction of its length until the very long straw becomes short like a ring. And then we pull on the 'walls' to make them nice and fat and round. Tada! We have made a donut!
(We can do this in the other direction, too, pull the torus (donut) out long and then make the walls thin - then we get a straw.)
The thing about such homotopies is, they preserve the number of holes an object has. Hence, the straw has exactly as many holes as the torus (donut)!
Third question: How many holes does a torus have?
Answer: In topology, we have something called the Euler characteristic. It is a number that gets assigned to surfaces based on their properties (you can calculate it via triangulation but let's not go there.) A sphere (ball) has Euler characteristic 2. Each hole in a surface lowers the Euler characteristic by 2. The torus (is an orientable surface and) has Euler characteristic 0, so it has one hole.
(If you'd like to have the more exact explanation, it is attaching handles to a surface that reduce the Euler characteristic by 2 and add a hole. And a torus is homotopic to a sphere with one handle attached.)
Thus, a straw has one hole.
2 holes
If we define a hole as an indentation in an object that allows us (or something else) to enter a certain distance into the object, a straw has two holes. One on the top and one on the bottom.
This definition actually makes sense, since we call holes we dig into the Earth 'holes'. In the mathematic sense, they aren't, they're indentations that can (with the super clay idea) be flattened out. But with these holes we don't care about whether it will lead somewhere or just have a floor somewhere at the bottom, you can go in, so it's a hole.
If we forget about the fact that the straw leads 'one hole into the other', so like, if we were very small (or the straw very big) and we would merely walk across the outside and look into the holes, we would find two holes on the straw, one on the bottom, one on the top. If we don't enter, we wouldn't even know they were connected.
With this definition you have to be a little bit careful about when you start calling something a hole. I would reckon there needs to be a certain percentage-relation between depth of hole vs circumference of entrance to hole before you call it such. And maybe also something about size and shape and sharpness of edge - like, you wouldn't call a valley a hole, probably? But like, the straw fulfils the requirements of this hole easily, and twice.
3 holes
Okay, this one is merely for fun and play, don't get mad at me. But, say we define a hole kinda like above, as an entrance to the inside of an object. And we further define hole as any way through an object. Then we end up with something I like to call a 'hole-interval' through the straw.
So, we have one hole (rim at the top) to get into the straw, one hole (the straw, basically) to get through the straw and a third whole (rim at the bottom) to get out of the straw.
This is nonsense, obviously, but I like it, because there is a very nice mathematical feeling to it, resembling a closed interval. A closed interval [a, b] is just one object, but it has three parts that are often regarded independently of the others: the open interval (a, b) in the middle and the edge points {a} and {b}. For example, if you were to test the continuity of a function, you would often regard these three cases separately. So, in a way, there is beauty in regarding the 'three holes' of the straw as separate as well.
Infinitely many holes
This one is kinda nonsense as well, but I like the implications. If we define a hole as any instance of an object that is part of a tunnel through the object - I am using the word 'tunnel' here because actually, that tunnel would be the one hole in this case but for the sake of the definition, it can't be - then a straw is an infinite number of holes, stacked on top of each other. It is important to notice here that a hole cannot possibly have any depth in this case, just like the top and bottom holes in the last case.
This leads to two likely interpretations:
A) We have a hole at any real number (if we consider the straw as an interval along its length again). Then the straw would be made from uncountably infinitely many holes - which I think is an awesome concept.
B) We have a hole at any rational number. This would only give us a countably infinite number of holes in the straw and since Q is dense in R (don't worry about what that means), it would LOOK like the whole straw is made of holes, when in reality most of the straw would actually NOT HAVE ANY holes in it. Now isn't that the best thing you have heard all day?
And the best part : By this definition, not only would any straw be made of infinitely many holes, but any object with a hole in it would have infinitely many holes in it. Remember, for this to make sense, we needed to have holes with 0 depth. But any hole in reality has some depth. Punch a hole into a piece of paper: BAM infinitely many holes stacked on top of each other! :D
What have we learnt?
The most likely answers are 1 hole or 2 holes, depending on whether you take a more mathematical or more language-oriented approach. I think those were the two opinions most vocal in the original post as well.
But if you want to have fun, you can come up with very nice concepts and definitions to count holes by that give you a range of correct answers. Just make sure to think of the implications :)
#Thank you for this question <3#I think you can tell I had a blast#On a related note: me and my friends were talking about the euler characteristic of the Earth the other day#Bc in meteorology you often consider the Earth as a torus#But with all the tunnel systems it is more likely to be an n-torus with n the number of holes and n being a VERY large number#Instead of - what you would initially guess perhaps - a sphere#math
69 notes
·
View notes
Note
If piepoe happend to be in the game, would they be a boss or a secret room in the hub world? I'm just curious :]
Definitely a secret room in the hub world!! It's actually where Piepoe exists in their own little universe, just in a hidden room within the tower. It'd be tricky to find but once it is found you can see her!!

(I'd also think if you taunted near him and his little children they'd all taunt with you as well!!) (Along with some sketches of other interaction ideas...!! Just for funs!!)
#Piepoe arts#but thank you for this very fun question!!! Oh to have piepoe seeable in a secret hub room...#sending lots and lots of love your way!! be safe!! make sure to eat and rest and drink water...!! take it easy!#💘💓💘💖💓💘💓💘💓💖💘💖💘💖💓💓💖💘💖💓💖💘💖💓💘💓💖💖💘💓💖💘💖💓💖💘💓💘💖💓💖💘💖💓💖💓‼️‼️‼️‼️#another little thought of a thing you could do is take a little crafted creacher with you if you hold up on it sitting upwards#both as a cute little friend to follow you around and also to help you during Pizza Time :3!!
429 notes
·
View notes
Note
Favorite whump trope?
Oh this is hard. Love the hiding an injury scenario and the whumpee thinking they are alone/unloveable/uncared for and then eventually is just loved on by one person or a group.
#most all whump is cat nip to me#thank you my lovely friend!!#always happy to talk whump#whump whump whump#whump tropes#ash asks#cross country questions#ask box is always open
83 notes
·
View notes
Text
#faye's polls#writeblr questions#writeblr polls#writing polls#writing questions#neurodivergent#neurotypical#neurodiversity#adhd problems#writers with adhd#writers with autism#just adhd things#adhd writers#i HATE having adhd yet also being a super creative person lmao it's like WHY did i get this super creative yet broken brain#i'm really curious to see the results because i love writing but it's so damn hard#i have adhd and it's SO challenging for me to even do tasks that make me happy WITH medication#so i am really hoping to connect with other writers who are going through the same struggles as me#and see if we can share tips and help each other out#because this world is NOT built for people with neurodivergent brains and it's hard out here! *cries in adhd*#so i think it's so important to interact with others and be part of a community that helps each other thrive#please and thank you if you reblog this i really appreciate it#have a blessed day my creative friends <3
55 notes
·
View notes
Text


Birthday time :D
I doodled this on the 18th, figured it’d be nice to save for today.
This past year has been the most wildest year of my life. To everyone I’ve come to known, old and new.
You mean the fucking world to me. Here’s for an even better rest of our year, together.
@f0rtunesfuture @amberluvsbugs @garbagechocolate @darkxsoulzyx @kandidandi @just-a-drawing-bean @cacaocheri @bunmuffin @sleepykas @xitsensunmoon @justaduckarts @skizabaa @starsketchez @fernzwing @smoljeanius @ilsole @tuzesdays @magicclownjuice @ohno-the-sun
(If I haven’t tagged you there is a Very(tm) high chance I am either unsure if you’d want to be tagged or too much of a coward to do it anyways but that does not mean you’d mean less <3)
#nebula art and doodles#i was gonna digitalize this but i thought it’d be funny if it wasnt#thank you to everyone who has come with me on this wild journey#only about 7-8 months since i first joined the dca fandom#since i joined ao3 and tumblr#and ever since then i have made some fucking incredible friends#i am so goddamn thankful to every single one of you fuckers /aff#for every goofy bit#every silly question i get#every ounce of serotonin ive gotten for people enjoying my things#you’ve all made my day just a little bit better for everytime i see someone like the things i create#to all my followers#to all my mutuals#to all my friends#thank you for making my life better#thank you for everything#i know for a lot of my moots i dont interact or talk to you#but do know i see you#and i appreciate you for sticking around#feeling sentimental as fuck thumbs up#anyways the fact that i share a birthday with sonic the fucking hedgehog sure is something#gotta go fast i guess
252 notes
·
View notes
Note
Hey I’m new to the LMK fandom, why do so many people ship Sun Wukong and Macaque??
A lot of people like the hurt/comfort potential because of their backstory and because they’re just really good counterparts lol. Macaque even makes a whole play about their past relationship, which is where a lot of that fuel for the ship comes from and the whole “the hero and the warrior were like the sun and the moon” spiel that people love using for shits and giggles. There’s also a really strong enemies to lovers sentiment and i think it’s kinda sweet
Personally, I just really like riffing off the divorced energy. To me, these idiots would rather beat the shit out of each other than make up and I really really eat that up. Not just as a joke, maybe as a way to cope with their feelings like “I want things to go back the way they were but this is all I can do”
#I don’t think there will be a /perfect/ answer to this question but this is just my insight lol. I think a lot of people are weak for#enemies to lovers content cause we just don’t get enough of it. and nobody’s doing it like themmmmm#it’s fine not to ship it ofc!!#enemies to friends is just as good and I don’t see any reason to appreciate it less#we’re also on the cusp of finding out what exactly happened between them either in the s4 special or s5#not going to give anything away but. they were REALLLYYY fruity when they were friends if we get anything more I will die >///<#ALSO I FUCKING LOVE KNUCKLEHEAD X KNUCKLEHEAD CONTENT. FUCKING MORONSEXUALS#step aside heartfelt apologies it’s time for offering you a bandage after a huge fight. can we get some hand lingering on fist content#because that is the closest youll ever get to holding their hand like back then?? feeling their palm against your face in a hard punch HELLO#you’re only ever gonna get them ‘insulting with each other and finding it comfortable because it’s kinda like banter’from ME#thank u for the question btw!! this made me think a lot about what exactly appeals me in their relationship /gen#yapping#lmk#Lego Monkie kid#shadowpeach#doodles#ask
372 notes
·
View notes
Text
I'm turning that Sanuso Modern AU (In which they meet because Zoro forgets to pay at the Baratie and Usopp and Waiter!Sanji end up flirting all night while they wait for him to come back with the money) into a whole fic called "The very first night" that will approximately have 9 chapters and it's actually about Sanji going on a quest trying to find Usopp again and failing miserably. Congratulations, y'all have convinced me to write a long fic when I usually write one-shots. Let's see how this turns out!
#I'm actually really thankful because I haven't written a long fic since ummm my stranger things era#And I want to write my own book soon! Maybe this is good for practice!#And the story is really funny ngl I think y'all will like it#If you have any questions or are curious about some things just send me an ask bc It's gonna take a long time for me to post this one#I'm posting EVERYTHING at once and not chapter by chapter btw I prefer having everything already written down before posting#Lil spoiler of the friend groups:#Sanji is friends with Luffy/Law/Kid#Yes poor Sanji I feel sorry too#And Usopp is friends with Zoro/Nami/Vivi/Kaya#one piece#black leg sanji#usopp#sanuso
77 notes
·
View notes
Photo


#thank you northernlion#my friends and i were laughing to this dumb question all weekend#anyway plat would totally keep worm nearl in her wallet or something#worm nearl is a word#arknights#margaret nearl#platinum
304 notes
·
View notes
Note
Helloo! My name is Lyla and I like your concept of Dandy! I would like to ask, did anything inspire them? Also, which gender are they? (IMO, they look like a girl to me....😊 but if you think otherwise, that's fine❤)
OH HELLO!!! Thank you I'm so glad that people like Dandy so much, it makes me so so giddy!!! Um, Dandy is inspired by a lot of things! Lots of my personal interests soaked into Dandy when I was designing them.
If you don't mind me rambling a little about Dandy's process, Dandy took me 3 months to make! Give or take at least. And they went through three other revisions before I was happy with their look!
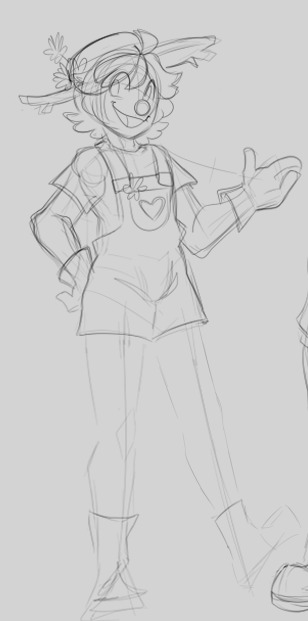
THESE WERE ALL THREE GOING TO BE DANDY! I was a little directionless when I made these three. I just knew "flowers" and that was...it. But otherwise I was kinda just throwing things at a wall and seeing what sticked. The last one is the closest to what Dandy ended up as but still wasn't quite right! Eventually I had to put these away and make a sort of inspo board, look at colors and clothes and puppets I liked. BUT YES there is one BIG MAIN INSPIRATION that really cemented Dandy's silly look. And it's THIS GUY!

Boober from Fraggle Rock! Like when I saw him I realized I remembered the show growing up and I just... AUGH it filled me with joy to remember so I picked him up, picked up some color palettes I liked, picked up some clothes images, and ran with it. Eventually they ended up as the little goober we all know today!
OH RIGHT! GENDER! yes yes um. Dandy is androgynous! On purpose! They're inspired by characters I grew up with, like Crona from Soul Eater, where no one could seem to agree what pronouns to give them. So Dandy is meant to be a character the writers couldn't seem to agree was masculine or feminine so the show and physical illustrations flip flopped between he and she. That is to say, all are correct! Dandy goes by any! I use they/them to try and be consistent but otherwise you may call them what you wish! So you may use she/her when addressing them if you so wish!
#welcome home#welcome home puppet show#welcome home oc#fraggle rock#boober fraggle#boober#puppet characters#sketches#my art#ask#dandy leon#THANK YOU FOR THIS ASK BTW!!! I love babbling about my silly#Dandy was a whole process... Took me ages. So long#So much suffering and sketching and showing my friends and then hating it later lmao#BUT I LOVE HOW DANDY ENDED UP!!! So it was a process worth having#Dandy was the first oc that took this much time and revisions#but ya know! Sometimes it do be like that!!!!!#Hope this answers your question!!!!!!!!!
83 notes
·
View notes
Text
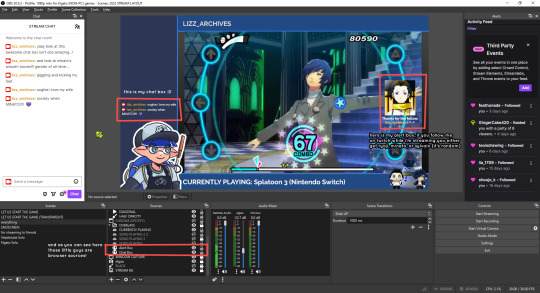
so you want to use OBS
hello! i’ve decided to compile information on my OBS setup and some resources that have helped me along the way. this is mostly for personal reference, but maybe others can make use of this information!
some notes before i get into it:
i use OBS for both offline recording and (twitch) streaming. any footage i record is edited using DaVinci Resolve 18, which is free.
most of my OBS captures are of video games (through a USB capture card, specifically elgato), and the occasional screen/application capture (like clip studio paint, and sometimes PC games).
as such, the information here is reflective of these experiences. this post is not comprehensive to all of OBS’s features- this is just an overview of the settings and configurations that are most relevant to me.
with that out of the way, all the information will be under the cut!
Basic Setup
file format:
how to change: settings -> output -> recording -> recording format -> press “apply” once finished!
I save most of my recordings as .mkv files- it supports multi-track audio! i prefer .mkv over .mp4 because if your power goes out, you still have a recording to work with.
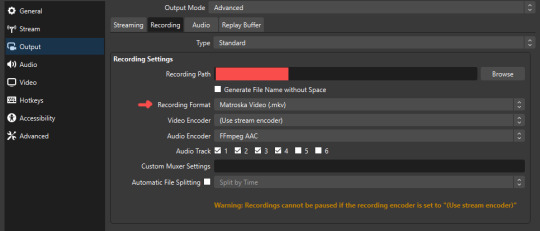
.mkv files can be read by DaVinci Resolve without an issue- but for Adobe software, they'll need to be remuxed to .mp4 within OBS! (file -> remux recordings -> press the … to select a file -> press the “remux” button)
video resolution and framerate:
how to change: settings -> video -> output (scaled) resolution
my obs canvas is @ 1920 x 1080p (16:9)
i switch between 720p and 1080p as needed! if you're concerned about space, you can probably just go for 720p. i also record at 30 fps, simply because that’s what my capture card supports.
video bitrate:
how to change: settings -> output -> encoder settings (located in both the streaming and recording tab) -> press “apply” once finished!
bitrate is a bit of a doozy to explain, but the most important thing to know is that bitrate affects your video’s quality. lower numbers = lower quality, while higher numbers = higher quality.
generally speaking, you'll want higher bitrate when you're recording things with high depth of information (e.g. you’d want a higher bitrate for something fast-paced like splatoon, compared to a slower-paced game like animal crossing).
my video bitrate is either set to 3000 or 4000 kbps! and here's some of my other (related) settings while i'm at it:
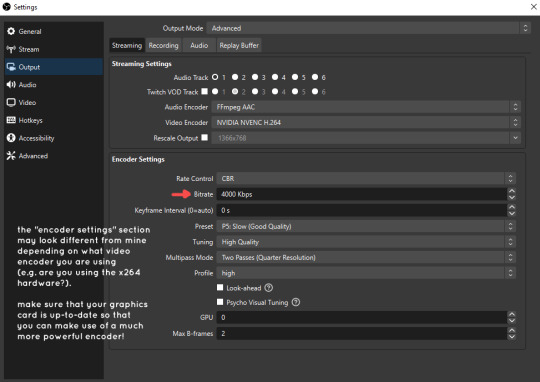
you can put your bitrate at much higher values than me if you're a stickler for quality- but keep in mind that a higher bitrate means:
bigger file size
more information to upload (when streaming)
your computer will need to encode more
i’d recommend reading twitch’s guidelines on encoding, bitrate, resolution, and framerate to get an idea of what values to pick. for people who are doing offline recording or streaming on a different platform, i suggest googling the appropriate resources!
multi-track audio:
this is mostly applicable to anyone looking to do video editing!
multi-track audio basically allows you to separate your audio sources (e.g. discord, game audio, and your own microphone) into different tracks.
this is an immensely helpful tool because it lets you adjust audio levels in post-production (editing). some examples of how this can be used:
increasing someones microphone volume if they speak too softly
increasing/decreasing game audio
muting swear words/sensitive information
completely muting voice call + microphone if you want to upload a no commentary video
and more!
to set this up, take a look at your audio mixer panel, and press the ⚙ icon. this will bring up advanced audio properties.
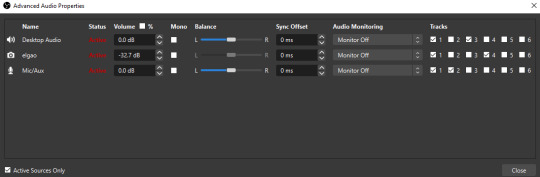
by checkmarking a track box, it puts the audio on that track. to make the above screenshot easier to digest:
track 1 consists of ALL three audio sources- desktop, elgato, and microphone.
track 2 only has the microphone audio.
track 3 only has desktop audio (i use this for voice calls)
track 4 only has the elgato capture card audio (game audio). the volume has also been lowered so that any speaking voices can be heard clearly.
tracks 5 and 6 are unused.
you might be wondering, “why do all three of these have 1 checked off?” this is what i call the universal audio track. i recommend having a universal audio track for a few reasons:
when you stream from OBS onto twitch/youtube- you have to select ONE audio track.
it’s also a nice backup in case you didn’t separate your audio correctly.
if for whatever reason you need to move around your individual audio tracks in editing, the universal track acts as a nice reference point.
mark off your audio tracks for each audio source as you see fit! once you’re finished with the advanced audio properties, go to settings > output.
for the streaming tab, you’ll want to have the number of your universal audio track selected. in my case, that will be audio track 1.
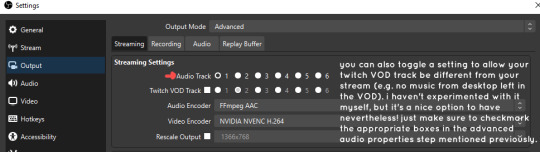
for the recording tab, checkmark all the audio tracks that are applicable to you (in my case, audio tracks 1, 2, 3, and 4). by default, only audio track 1 is selected.
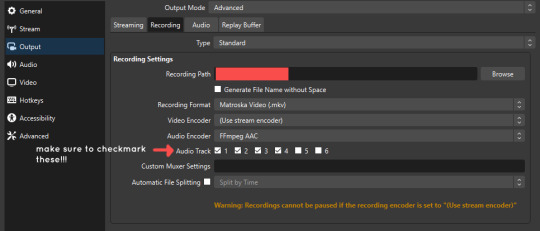
if you don’t check off the additional audio tracks in the output > recordings section, you will not have access to those audio tracks in editing, and you won’t be able to edit your audio tracks independently of each other. so don’t forget to do this! 👍
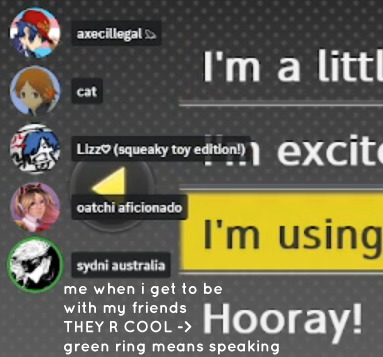
custom browser docks
custom browser docks are a great tool for when you’re streaming and want to have access to your twitch chat and/or activity feed! (or if you wanted to have some other web browser on OBS).
to create one, go to docks -> custom browser docks.
you’ll be given a table interface that asks you to put the dock name and URL. for streamers who want to have chat and alerts available, do the following:
on twitch’s homepage, go to the upper right and click your icon
then, click creator dashboard
once you’re on your dashboard, go to stream manager
click the vertical “...” on my chat OR activity feed.
press “pop-out chat” OR “pop-out activity feed”
copy and paste the link into the table back into OBS
press apply once you’re done
click and drag the docks around at your leisure to put them where you like!
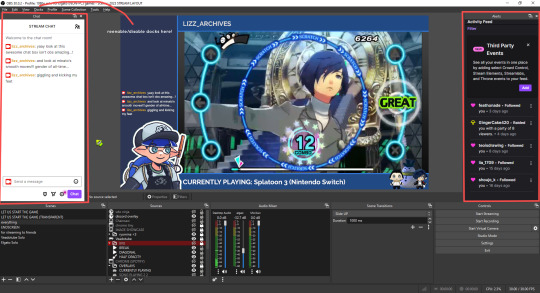
if you ever decide you don’t want to have something on your OBS dock (or want to bring something back), go to the toolbar, click “docks,” and click the appropriate dock!
third party things
a section of optional things that you may enjoy having.
streamlabs alerts
this is basically for anyone who streams and wants to have their chat and/or follower notifications visualized on screen!
streamlab alerts can be added to OBS by adding a browser source into your scene, and the specifics can be customized on streamlabs itself. it’s pretty self-explanatory, so i’ll just leave a link to streamlabs website, where you can log in using the streaming platform of your choice: https://streamlabs.com/
discord overlay
this is a browser source that can be set up to show people who are in a server's voice chat and who speaks. i recommend this to people who make multiplayer content- it can help viewers distinguish who is who but also it can be helpful in editing.
to set this up, go to https://streamkit.discord.com/overlay, click “install for OBS,” and after logging in with discord, go to “voice widget” and click the server and voice channel you want.
you are able to apply CSS if you'd like more control over the visuals, but the standard layout tends to work fine for me! a search of “discord overlay css” on youtube can help you get more information.
veadotube mini
this is a pngtuber software that a friend recommended to me! no webcam is required- mouth opening and closing is based on your microphone input!
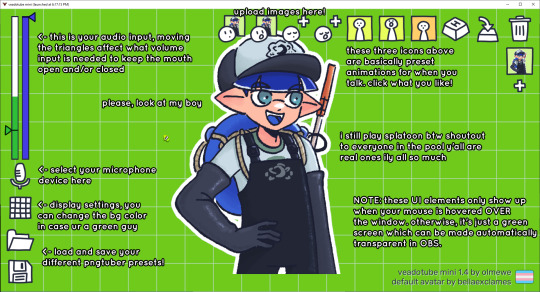
you can download it here (it’s pay what you want!): https://olmewe.itch.io/veadotube-mini
for a proper tutorial on how to use it, i recommend checking out the app's documentation, which you can read here: https://veado.tube/help/
source record
have you ever wanted to stream something with a chat overlay/layout, but wanted your recording to ONLY be the gameplay? or maybe you wanted to record BOTH your gameplay AND your webcam so that you can have a crisp zoom-in on your webcam!
source record is a third party plugin that can help you with that!
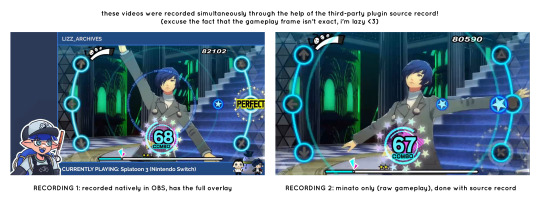
the general gist of source record involves applying the “source record” filter on either a scene or source, and customizing the encoding settings accordingly. the exact details of how to set it up is beyond the scope of this post, so I'll just direct people to this video instead (it was very helpful to me):
youtube
⚠ a quick note about source record: this plugin can be intense for your computer. be sure to do test recordings and the like to see what your computer can handle (and see if the recordings come out the way you like). it took me a few tests before i settled onto something i liked!
you can download and install source record here: https://obsproject.com/forum/resources/source-record.1285/
vdo.ninja
have you ever wanted to do a collaborative video or stream where you feature someone else’s video on your stream? or maybe you’re doing a multi-person streaming event! vdo.ninja is the perfect tool for you!
vdo.ninja turns your OBS virtual camera into a browser source link- which your collaborator can add on their stream! this is a new tool that i’ve added to my arsenal recently- since my friend and i are planning to stream a side order challenge together! i’ve still got to iron it out a bit more, but i like what i’ve used of it so far.
try it out for yourself at their website here (with documentation and demos available on the homepage!): https://vdo.ninja/ (no downloads required!)
ok! i’m set up! what now?
and with that, that’s all of the settings and tools that i thought would be worth mentioning! while most of my setup was written with video games in mind, some of these plugins and setups may be applicable to other types of videos (e.g. tabletop gaming with a physical camera)!
now that i’ve outlined all these settings, i have one more thing i have to say: regardless of what you're using OBS for, do a test recording before doing anything “official” with it. this recording can be as short as 30 seconds. it’s a good habit to develop that can make sure your streams/recordings turn out the way you want them to!
here are the kinds of things i like to check! it’s not an exhaustive list, but this can be a starting point:
video:
does my video look the way i want it to (and can my computer handle that)?
can my computer handle the load of encoding? - OBS will note in the bottom if the encoding is overloaded. if it can’t handle it, turn down your bitrate or adjust other encoding settings (e.g. i had to toggle psycho visual tuning OFF because it was causing lag)
this is especially the case if you're recording PC games- you don’t want to have slowdown on either your game or the recording!
audio:
are my audio sources (e.g. desktop audio and microphone) correct? - if you plug/unplug devices a lot, be sure to check this (settings -> audio).
are any of my audio sources muted? - make sure you don’t have anything on 🔇 if you don’t want it to be muted! otherwise the audio will be lost forever… (i lost my friend’s VC audio once… it was sad)
are my audio tracks separated properly? - requires you to boot up your editing software, but it's worth doing! for the test recording, just have something from all your sources playing at once, and see if your editor has things separated into tracks.
can i hear the voices clearly? or does the music and/or game overpower them?
if for whatever reason your OBS crashes, or you want more information on anything “critical” or “warning” worthy in your set-up, you can go to help > log files > upload current log file > analyze. crash logs currently can’t be analyzed by the log analyzer- but they’re a valuable tool when asking for help on the OBS forums!
and that’s all! for real, this time. i hope that some of these tools and settings can help anyone wanting to get more out of OBS. there’s definitely other things i didn’t touch upon (e.g. audio filters for noise compression, suppression, etc.), so i suggest doing your own research and trying things out!
happy recording/streaming, and thanks for reading! ✨
#lizzy speaks#this was a fun little write up!! i've been slowly getting some of my friends into video making teehee and its SO FUN!!!#(digital) video is like one of my other passions next to art. everyone say thank you splatoon for getting me back into it again <3#i've been using obs since like 2018 so i wanted to share some of the things i learned for funsies... i really love video...#but also i like having reference posts like this in the case people have questions they want to ask me...#because i don't always remember what video tutorials i watched and it's nice to document that somewhere...#warning to anyone who reads it this is like 2.1k words. i do want to stress that this isn't comprehensive but there's still a lot of info#that i wanted to put for this post...! that said topics like designing your own stream layout + assets for it are NOT in the scope of this#post and nor is this a beginner's guide to obs (i wrote this with the assumption that you know how to record and/or stream and that-#people already have an idea of how to use scenes and the different types of sources obs can use).#i hope everyone's had a lovely march 5th! i would love to look at the fanart but im still not done with reload...#but im hoping to finish it by the end of the month!!! yipee!!!#Youtube
45 notes
·
View notes
Text

Hi tumblr I'm back 🫶
#shoutout to my friends#they encouraged me to post this#thank you guys sob#tangotek#tangotek fanart#hermitcraft fanart#question mark
34 notes
·
View notes
Note
ohhhhh please I wanna know….what does piepoe think about Noisette…..pink creacher solidarity
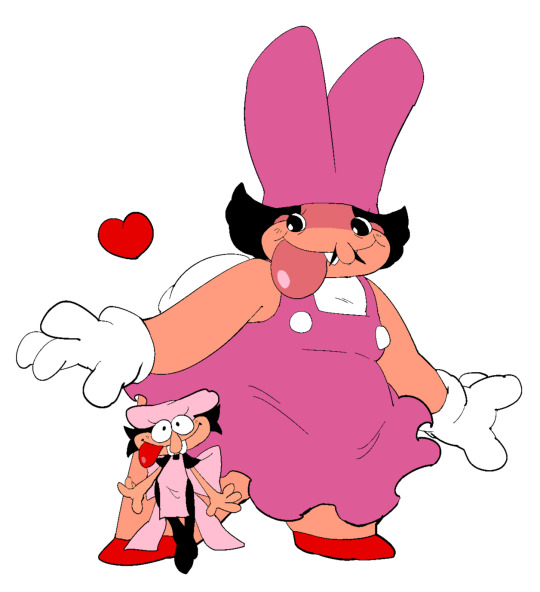

I really like to believe they are friends!!!
#the outfit swap was just for funs but i love how noisette looks with piepoe fit tbh!!!!#he really thinks she is like... so fun to just sit next to. she can talk for HOURS and they dont have to say a PEEP the entire time#she never pushes piepoe to speak either bc she will just keep talking anyway. its like just having company while not needing to interact#friend! piepoe appreciates her. she probably also leaves her crafted toppins around too so thats trust times 200000#but thank you for this lovely question!!! i love these pink creachers very dearly...!!#make sure to rest and eat food and drink water! be safe...!! sending lots of love your way!! thank you again!!#💓💖💓💘💘💖💓💘💓💓💖💓💖💖💘💓💖💘💖💓💖💘💖💓💖‼️‼️‼️#Piepoe arts
222 notes
·
View notes
Text
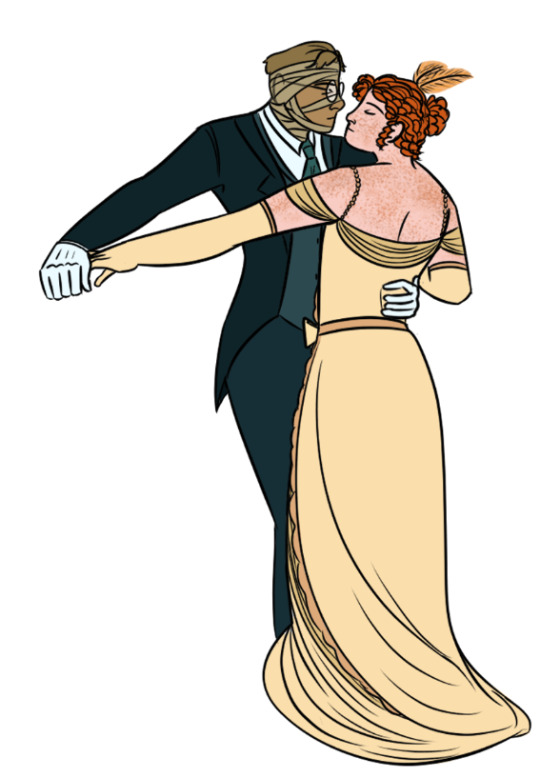
The great news is that Florence and @letters-of-fire 's Howard are in an RP right now that will absolutely and definitely not end in disaster for one of their emotional wellbeing
(painting referenced was Clarence F. Underwood's "The Last Waltz")
#sometimes you're just dancing in the parlor room together while you both lie about your pasts and who you are as people#''tell me about yourself'' is a dangerous question to people who manipulate for a living#but I thought the painting was very pretty and it popped up while I was looking for pose references#btw thank you for letting me borrow him for art <3#I thought they should look happy for just a moment#fallen london oc#no image id#friend's character#Florence Penbrook
45 notes
·
View notes
Last Seen Blogs