#and a paper slicer with rulers on it
Text
I've bought myself some stationary stuff for the new planner i'm making myself and its the first time I've been able to afford this stuff and holy shit I am already addicted to the fun little rounded corner cutter
idk how anyone leaves any piece of paper unrounded with one of these things
#stationary#gadgets#idk this is random as fuck just I am really enjoying my silly little paper items#I have a hole puncher now!!#and a paper slicer with rulers on it#and an exacto knife!!#I feel powerful
4 notes
·
View notes
Text
d100 Table of Mediocre Treasure (value: $0-10)
Roll of antacids
Asparagus tongs
Bagel
Ball of twine
Bent paperclip animal
Bezeling planisher
Book of matches
Bottle of hand sanitizer
Bottle of lemon juice
Bottle of Sovereign Glue with the lid stuck on
Bottle of vinegar
Box of toothpicks (x30)
Breath-freshener strips
Bust of local ruler (pocket-size)
Can (roll d6: Beans, Corn, Chicken Soup, Tomato Paste, Dog Food, Treasure)
Celery-vase
Chapstick
Chalk
Cherry-pitter/olive-stoner
Chopsticks (one pair, reusable)
Chicken bones (2d4)
Clipboard
Coffee mug (boring)
Coffee mug (humorous/novelty)
Coin: brass farthing
Coin: double-headed quarter
Coin: lucky dime
Coin: rare nickel
Collectible figurine (roll d10: 1-7 common, 8-10 slightly rare)
Condom (still in wrapper)
Cool feather (not magic)
Cool rock (not magic)
Coupon for half-price at local tradesperson (see Table of Tradespeople, https://randomencounters.tumblr.com/post/631120108774948864/)
Date stamp
Decent pen
Decorative gourd (inedible)
Doorknob of unknown origin
Ear candle
Ear plugs
Edible mushroom (non-psychedelic)
Egg slicer
Empty vintage soda can that collectors insist is valuable
Fake gem
Fake mustache
Five dollar bill
Fly whisk
Garden-haxby
Guitar string
Hair pick
Handful of paper napkins
Handful of sauce packets (roll d6: ketchup, mustard, mayo, BBQ, zesty ranch, Goodberry)
Hard-boiled egg
Horseshoe
Humorous novelty headband (roll d4: cat ears, unicorn horn, demon horns, Beholder eyestalks)
Incense (see Table of Scents & Flavors, https://randomitemdrop.tumblr.com/post/631160696571314176/)
IOU from local Orc
Jar (roll d8: spaghetti sauce, salsa, sofrito, dry pasta, marmalade, cocktail onions, glitter, empty but it’s still a pretty nice jar)
Library card
Lint roller
Lunchable
Makeup mirror
Makeup brushes
Nail clippers and file
Novelty rubber dog doo
Opera glasses
Orange Circus Peanuts (3d6)
Packet of gum
Packet of instant oatmeal
Packet of spices
Pad of sticky notes
Pair of socks (roll d10: 1-3 plain white tube socks, 4-6 black dress socks, 7-9 poorly-knitted homemade socks, 10 amusing novelty print socks)
Peanut butter wrench
Political button for locally popular candidate
Political button for locally unpopular candidate
Pop Tart
Protractor
Reading glasses
Replacement shirt button
Runcible spoon
Safety razor
Scrunchie
Selfie stick
Silly-Straw
Slap bracelet
Small wooden crab-mallet
Smelling-salts
Snoring strips
Souvenir hat (roll d12: local harvest festival, local fertility festival, famous traveling musician, famous traveling morality-play, obscure cult-classic traveling morality-play, faraway city, enemy empire, tourist attraction two towns over, local funfair, local baseball team, local rival baseball team, Outer Planes)
Squeaky rubber hot dog
Squeegee
Step-stool
Tape gun
Teabag
Tooth of unknown origin
Tube of acne ointment (roll d4: 1-3 anti-acne, 4 pro-acne)
Turnip-twaddler
Universal ten-silvers-off coupon
Wax flower
Wig (roll d4: Fashionable, Unfashionable, Clown, Rave)
Yo-yo
3K notes
·
View notes
Text
haikyuu!! characters + weird things that are in their backpacks (university!au)
helloo!! more hc’s for funsies because you can tell a bit about a person from the contents of their backpack
Hinata - a framed picture of the Little Giant. the picture was actually from Google Images and he printed it out when he was six
Kageyama - an entire volleyball, also if you look inside one of the pockets there’s a cursed amulet that Oikawa bought from an antique shop and slipped in
Tsukishima - fairly normal backpack aside from those dinosaur-shaped, 'Grows in Water' foam capsules that he bought at a dollar store
Yamaguchi - a great number of overdue library books. he just keeps adding them into his bag and wondering why his back hurts every day
Ennoshita - a whole book full of Sudoku puzzles. the scary part is that 3/4 of it has been filled out. in INK
Tanaka - TotalGirl magazines. he likes to use them for advice when it comes to dating girls and to know whether Joe Jonas would think he was cool
Nishinoya - a whole jar of mayonnaise which he uses for everything: seasoning his food, giving to his friends when they don’t have energy (its mostly Tanaka who gets in with the mayonnaise), adding to his hair, lube haha jk,,,unless??
Daichi - five travel-sized toothbrushes, five travel-sized toothpastes, and five travel-sized face towels
Asahi - VSCO Girl stuff !! scrunchies, an over-sized shirt, a Hydroflaskskskksks, that mario badescu spray stuff. he wasn’t aware of the trend he just happens to like it
Sugawara - a lock-picking set, a bag of salt, pieces of paper with strange writing on them, a face towel, a cursed, glowing amulet that he picked up in IKEA
Oikawa - nothing. he carries backpacks for show and puts nothing in them (except for maybe styrofoam packing peanuts)
Iwaizumi - nothing except for a neck pillow (man has priorities)
Matsukawa - the ‘Party Rock’ album by LMFAO
Hanamaki - the ‘Sorry for Party Rocking’ album by LMFAO
Ushijima - a book of ‘Top 100 Jokes for Casual Conversations’ (given by Tendou)
Tendou - his backpack is basically a Lost and Found box. there's hairbands, someone's extra shirt, a phone case, a pair of glasses, a bottle of nail polish. he's basically a magpie
Shirabu - a water bottle shaped like a pineapple that’s filled to the brim with vodka. also one of those triangle rulers that he uses to cut his hair
Semi - a ziploc bag full of guitar picks because he always loses them. he also likes to keep all of his old guitar strings and braids them all together
Goshiki - a small container of slime, like the glittery transparent kind. also some leg weights that he puts on in the bathroom (Rock Lee taught him well)
Kuroo - the occasional stray cat or kitten that he'll feed and pet in secret during lectures. a giant tub of hair gel and the reused plastic tub of hair gel but filled with catnip
Kenma - an actual map of the campus which he uses to track poke stops and a laser pointer to mess with the cats that kuroo brings to class
Yaku - you know those toys that are like extended robotic claws that some store employees use to reach stuff? yeah, that
Lev - a whole bunch of brochures, flyers, and product samples. he's too nice to say no to the people who hand them out 🥺🥺
Futakuchi - a sheet of paper that has 'i can do whatever i want' printed on it. he doesn’t have a driver’s license.
Terushima - a set of needles, spare earrings, and a lighter. he basically runs a piercing salon in the back of the class
Bokuto - surprisingly, he has an actual plastic folder inside his backpack. except, when you open it there are gummy worms inside
Akaashi - a clear binder full of coupons, arranged by which shops they came from and expiry dates
Atsumu - a TWICE lightstick you can't convince me that he isn't a fan also a photocard of Momo somewhere in his wallet
Osamu - a shit ton of kitchen gadgets like the triangle mold for onigiri, a banana slicer in the shape of a banana, pot holders that look like crocodiles
Kita - a whole bunch of paper charms that his grandma gave him (apparently its bad luck to throw them away), also lots of healthy snacks that he likes to give to his friends and classmates
Suna - a nerf gun
Sakusa - other than an absurd amount of cleaning products, he has a 25m long scarf that he stress-knits
taglist (open to anyone who wants in): @montys-chaos @miyumtwins @strawberriimilkshake @pocubo @sugawara-sweetheart@akaashisbabydoll @laure-chan@therainroguefanfiction@atetiffdoesart@stephdaninja@oikaw-ugh @charliefredb @dramaqueenweeb1469 @tremblinghearts
#haikyuu!!#haikyuu!! headcanons#hc's for funsies#i witnessed a person bring an entire cat to an orientation#and it was awesome#hinata#hinata shouyo#kageyama#kageyama tobio#yamaguchi#yamaguchi tadashi#tsukishima#tsukishima kei#ennoshita chikara#ennoshita#tanaka ryuunosuke#tanaka#nishinoya#nishinoya yuu#daichi#sawamura daichi#sugawara koushi#azumane asahi#sugawara#asahi#oikawa#iwaizumi#matsukawa#hanamaki#ushijima
1K notes
·
View notes
Text
How to Get Real-World Shapes (especially weird ones) Into the Computer for 3D Printing
Many 3D printers end up used mostly to create knick-knacks, though we justified buying the machine with all the useful stuff we could make! One of the reasons for this is that Baby Yoda’s dimensions aren’t exactly critical to it’s purpose, but the broken knob you wanted to replace has a weirdly shaped fitting that won’t work unless it’s just right, and how do you measure that? Then how do you design something to fit it?
There are a few methods! What follows is my low-cost, low-math method for replicating weird shapes for 3D printing.
You’ll need: the part you want to work with, paper large enough to cover it, a pencil, a ruler (the finer the measurement, the better), your 3D design software of choice, and your slicer.
For my example, I needed to make porthole trim rings with a lip. My boat had 10 portlights with beautiful cast bronze trim rings on the hull, but on the stern it had four strangely shaped holes cut roughly, exposing the edge of the plywood.

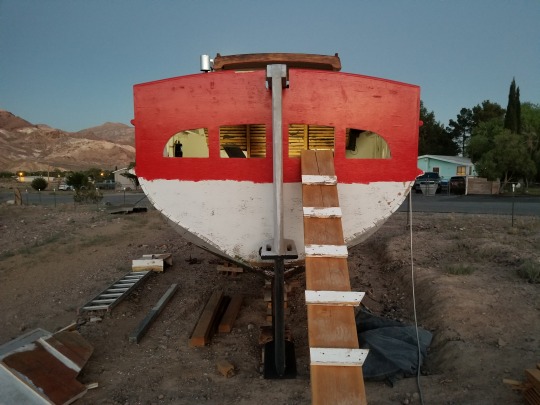
I taped paper over the portholes, and traced the outline from the inside. If you’re working with a small piece or can’t get inside the thing for whatever reason, take a rubbing by rubbing the side of a pencil lead or a crayon on the paper where the edges of the object are. The edges should come out clearly enough to take measurements from. Then, draw a grid on your tracing or rubbing.
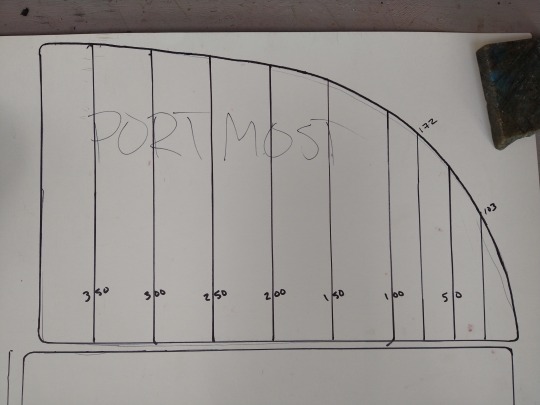
The more curved your piece is, the more reference lines you’ll want in your grid. This piece had a nice right angle with two flat sides to reference, but if yours doesn’t, just extend the lowest and leftmost parts of your piece so they meet at a right angle, and build your grid from there.
This is how I gather measurements to input into a 3D design program- how you input them will depend somewhat on your program of choice, and I’ll save an in-depth description of that for a later post. Here’s how the rest of this project went, though.
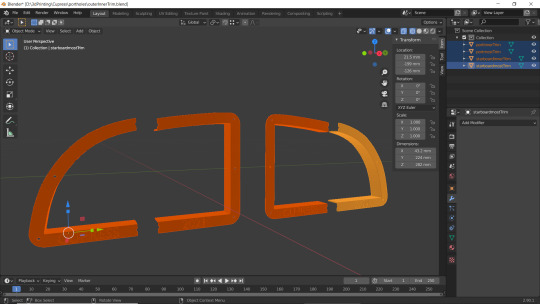
I created a rectangle in Blender, then used the slice tool to create vertices at each of my measured distances from the y axis (Fusion 360 is more optimized for dimensional design, but Blender can do it and is open source). In Blender, you can make a slice and then input the exact measurement for its placement. Then I did the same from the x axis. That placed vertices at the measured points along the curve of my object. Deleting faces from the rectangle and joining vertices into new faces “carved” the basic shape from my rectangle, and then I mostly used the extrude tool to get my final shape.
Turn on mirroring to save yourself time if it applies to you, but also pay attention to when to turn it off! For me, I created the object, but turned off mirroring to emboss the words I wanted into the design. Your slicer can be a good tool for checking whether your design is “manifold.” Usually it’ll highlight the areas that aren’t, and show an error. Sometimes you can print even if it isn’t manifold, but it’s best practice to fix it, because it can affect printing in unpredictable ways.
I printed a prototype in cheap, recycled PTEG.


Then in bronze filled filament from Protopasta!
https://www.proto-pasta.com/collections/all/products/bronze-metal-composite-htpla?variant=7154346098733


This filament has so much bronze in it that it will patina like bronze, and can even be polished. It isn’t cheap, but this was much more doable for me than casting from real bronze, and having all four portlight rings custom cast would have been over a thousand dollars.
#3D printing#3d design#diy#product design#design#design process#measurements#protopasta#portlight#boat#woodenboat#budget#Blender#Fusion360#Cura#slicer#3D printer#3D#window#sailboat#liveaboard#crafting#self sufficiency#weird shapes#dimensions
3 notes
·
View notes
Text
Convenient Chocolate Packaging Machines That Can Help Your Small Chocolate Business Show off its Brand’s Personality
It would have been very easy to produce chocolates in bulk and just wrap them in a foil and sell them to the consumers. However, things have changed so much in the past few decades, and good packaging and branding of your most precious chocolate bars, in this competitive world of sweet treats, is absolutely essential.
Your Packaging Shows Off Your Brand’s Personality
Like it or not, good packaging speaks on behalf of your brand, especially when it comes to chocolates that many people love to eat. Only professional packaging, which can be achieved by using expertly designed chocolate packaging machines and manufactured by reliable chocolate packaging machine manufacturers, can work to pull your customer’s attentions towards your brand.
So, let’s start from the basics first!
When you initially think of packaging, you certainly have to make use of some materials like a metallic sheet roll or a paper roll that can be cut to match each chocolate’s size, shape and packaging.
As we all know, this is not manually possible in small factories where thousands of chocolates are produced every day.
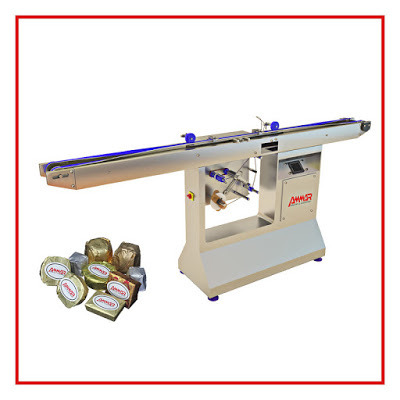
To make this process easier, you can look at investing in a chocolate wrapping paper slicer, like SC-L30 from Ammar machinery, that is precise in cutting your big packaging material rolls into smaller ones using a customized ruler. Furthermore, this amazing machine works at a great speed and can give you packaging sheet at 30m/minute.
On the other hand, if you want a chocolate paper cutter that can cut packaging papers of different types like aluminum, padded paper, cellophane, etc., to suit your chocolates. The CT-P120 machine works like a wonder. It also has a servo motor and PLC that adjusts the packaging sheet by elongating, shortening or lengthening it to fit your packaging requirements and it even counts the paper it has cut.
Next Begins The Main Business
Once you have the sliced rolls and cut sheets ready for packaging, the main business of packaging begins. Especially if you have to hand pack large bars of chocolates, that need double wrapping, you know how tiring and lengthy the process can be.

However, with a chocolate packaging machine like W-CH200BSB, you can achieve a speed of packaging almost 60pieces of large chocolate bars per minute and change molds easily while congratulating yourself for investing on a machine that is easy to clean and maintain.
Hence chocolate packaging machine manufacturers like Ammar machinery understand the exact needs of small chocolate factories when it comes to packaging their chocolates.
You can without a doubt rely on a company like Ammar machinery that has more than 25 years of experience in chocolate packaging machine manufacturing, and you can get expert advice by just contacting one of our company staff immediately.
So, leave all your packaging worries to chocolate packaging machines and let people start recognizing your brand.
0 notes
Text
RESOURCES
Readings
RESERVED BOOKS:
Product Design and Development – Karl T. Ulrich;Steven D Eppinger (TS171 .U47 2016)
Understanding Comics – Scott McCloud (PN6710 .M335 1994)
Emotional Design why we love (or hate) everyday things – Donald Norman (PN6710 .M335 1994)
Toys as Culture – Brian Sutton-Smith (HQ784.T68 S88 1986)
The First Book of Toys – Helen Hoke and Walter Pels (TS2301.T7 H58)
ONLINE BOOKS AND ARTICLES:
Play Makes Us Human I: A Ludic Theory of Human Nature
Homo ludens: a study of the play-element in culture Chapter 1: Nature and Significance of Play as Cultural Phenomenon
The Play Pyramid: A Play Classification and Brainstorming Tool for Toy Design
The First Book of Toys
Karakuri by Keisuke Saka. Chapter 2: How Karakuri Works
Marcel Duchamp: “Twisting Memory for the Fun of It” or a Form of Retroactive Interference?—Recalling the Impacts of Leaving Home on the Readymade
READYMADE, Tate Art Terms
The Future of Design: When you come to a fork in the road, take it. Donald Norman
How to Make Almost Anything, Neil Gershenfeld
Metamaterial Mechanisms
Making Things Move
Other Resources
Objectified
Arvind Gupta: Toys from trash for learning
Toys from Trash
DRAWING AND ILLUSTRATION
Ed Emberley
Allemaal Artis
E-TEXTILES
http://etextile-summercamp.org/
PAPER TOYS AND MECHANISMS
Free Automata
Paper Toys Flickr Resource
Kazuyuki Motoyama – Paper Mechanisms
Rob Ives – Mechanism animations
Paper Mechanism – Penguin
Papier Machine
Mechanical Toys
Cabaret Mechanical Theater
Kazuyuki Motoyama – Paper Mechanisms
Paper Mechanism – Penguin
3D MODELING CINEMA 4D:
eyedesyn
greyscalegorilla
3D MODEL TO PAPER:
MeshLab
Slicer for Fusion 360
Fusion 360
Panda 3D Model
ILLUSTRATOR
DIY rubber stamp on the Laser Cutter
MaterialsCRAFT SUPPLIES
Craft Supplies: Knitting and Sewing, ONE DAY SHIPPING
Yarn 2mm
Yarn 3mm
Yarn Needles Plastic
Yarn Needles Metal
Pompom Maker Set
Ergonomic Crochet
Toy Eyes
Toy Eyes: Buttons
Purse Magnets
TEXTILES
Furry Cloth:
furry cloth
furry cloth
lamb fabric: jacket inside fabric
felt fabric
plush fabric
decorative fabric (Peruvian Syle)
Dish Sponge Rectangular Shape for Stuffing
ART SUPPLIES
Micron Sketch Pens
Color Sketch Pens
Staedtler Erasers
Staedtler Pencil Sharpener
Faber-Castell 9000 Pencils
Shape Drawing Rulers
Shape Drawing Rulers
Shape Drawing Rulers
1 note
·
View note
Text
Week 10 - Measurements and Model Making
Tutorial
This week we were taught how to measure our chosen product and had to construct the profile and contour lines. There were multiple tools such as skewers, calliper and profile gauge to measure out the contour of the object. I found the profile gauge to be the most useful for the contours and irregular faces.
Prac
During the practical lesson we were divided into different groups to learn about the tools we could use in order to complete this task. I found this very helpful as the tutors were very informative on how the tools worked and what they were used for.
Method
I used fusion 360, which i learned from high school when doing Design and technology, to create my object in 3D. As my object was a metal kettle, which meant it had a lot of curved surfaces. Knowing that i couldn’t just use regular ruler to measure the diameter, i used string to measure around the kettle. While doing this i measure diameter every 1cm. After inputing the measurements onto the fusion 360 and creating my object, i used an application called Slicer in order to split my object into individual sliced pieces. This allowed me to see all the different shapes and slits that were needed in order to create my 3D object. The total pieces i had to cut was 42 pieces and was printed on an A3 paper with 1:1 scale. I placed the printed shapes on a 3mm foam-core, cutting the foam-core following the print. When all cut, i joined each pieces together, weak or flimsy pieces glued together to hold it together.

(Above Picture - my chosen object on Fusion 360)
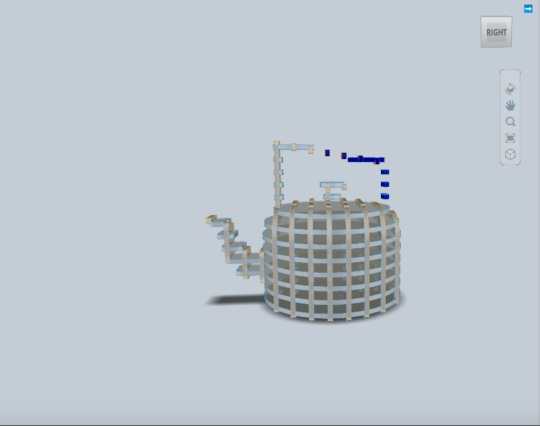
(Above Picture - my kettle imported from Fusion 360)

(Above Picture - my 2D pieces)
Outcome
What did i enjoy and dislike? Why?
I enjoyed using the Fusion 360 to create my object in 3D form. I disliked the measuring the contour of the kettle as it took a long time and effort.
What went well/ what difficulties did i face? Why?
Creating my object on Fusion360 went well as i had some knowledge on the software, however i did face difficulty when measuring the tip of the kettle which was curvy.
What did i learn?
I learned how to export things onto slicer, which will create 2D shapes that will form into a 3D shape. I also learned how to measure contours and curvy shapes.
What do i need to improve on?
I need to improve on learning how to finish my product more neatly and aesthetically pleasing. My object had little glue stains and accidental cuts that were quiet visible, downgrading the objects aesthetics.
3 notes
·
View notes
Text
12.01 | Project construction
Tools that I used? A paper cutter/slicer, cutting knife, rulers, scissors and a hot glue gun.
I printed the pieces at Dinkums as I had various loose pages inside the small zine. I printed it onto two different paper/cards as the A2 paper didn’t have many options than the smaller sizes. The A2 paper and printing quality was also lower. The main long card piece has a matte surface and the loose photos and cards had a silky surface.
I first cut the long piece of card - I used my old ruler because the card was tough to cut into. And then I folded it accordingly into 6. However the folds were uneven! The double sided pages didn’t align well!

I was doing this at night, while also watching the livestream of the Royal wedding on my phone. Which I probably shouldn’t have done, as I made many errors while cutting the pieces of cards, especially in the insert page! I folded the extra page with the photo of Alessa that would fold out of the first page and pasted it with the long piece of card.

For the front and back covers, I used a scrap piece of cardboard that was lying around my room and wrapped it in fabric and stuck it together with hot glue. I was planning on printing one of Alessa’s patterns onto fabric. However while researching on how or where to do it, they required a minimum of metres, and it was also very expensive! I only needed 1 metre or less for this one project. So I just went to Spotlight and Lincraft to look for a printed floral pattern that was similar to Alessa’s work and matched the aesthetic of the zine.
I attached the covers to the long card with hot glue and lastly printed the title/label onto craft paper that would hold the fold out/accordian zine together.

3 notes
·
View notes
Text
Ingento GT Paper Trimmer no. 1102 Guillotine School Tool Slicer Cutter
Ingento GT Paper Trimmer no. 1102 Guillotine School Tool Slicer Cutter
A guillotine style paper trimmer. In overall good lightly used condition Still cuts very well and will cut card stock. Thicker stacks of paper are tough to cut at the very end, but it will do it. Only apology is that it is missing the ruler guide. Handles 12 12″ paper.
Shelf B5 – SBC/S
We sell mostly USED and UNIQUEitems. Expect minor evidence of use or imperfections from age. We…
View On WordPress
0 notes
Text
Here’s a Halloween recipe everyone loves.
Candy corn.
Here are the ingredients.
4 1/2 ounces confectioners' sugar
1/2 ounce nonfat dry milk
1/4 teaspoon kosher salt
3 1/2 ounces granulated sugar
3 3/4 ounces light corn syrup
2 1/2 tablespoons water
2 tablespoons unsalted butter, at room temperature
1/2 teaspoon vanilla extract
2 or 3 drops each yellow and orange gel paste food coloring
Here are the instructions
Combine the confectioners' sugar, dry milk and salt in a food processor. Pulse 4 or 5 times, until the mixture is smooth and well combined. Set aside.
Combine the granulated sugar, corn syrup and water in a 2-quart pot. Place over medium heat, cover and cook for 4 minutes. Add the butter, clip on a candy thermometer and bring the sugar syrup to 240 degrees F. Kill the heat and remove the thermometer.
Add the vanilla and the dry mixture and stir continuously with a silicone spatula until well combined. Pour onto a half sheet pan lined with a silicone baking mat or parchment paper. Cool for 10 to 15 minutes, until the mixture is cool enough to handle.
Divide the dough into 3 equal pieces. Add 2 or 3 drops of yellow food coloring to one piece and knead until the color is consistent throughout. Add 2 or 3 drops of orange to the second piece and knead until the color is consistent throughout. Leave the third piece white.
Roll each piece of dough into a strand about 18 inches long. Cut each strand in half and roll each piece into a strand that is about 1/2 inch thick and 22 inches long.
Lay the strands side by side (yellow, orange, then white) and press them together using your fingers. Cut into 4-inch pieces. Then, using a ruler or bench scraper, press each log into a long wedge, keeping the yellow section wide and making the white part come to a tip. (This color arrangement is classic but if you want to rebel, change up the combo.)
Use a wire butter slicer, thin knife, or pizza cutter to cut each wedge into individual candies. Lay the candies on a piece of parchment until dry, at least 1 hour.
Now you take your candy corn to the bin and dump it in because that shit’s nasty.
0 notes
Text
Ingento GT Paper Trimmer no. 1102 Guillotine School Tool Slicer Cutter
Ingento GT Paper Trimmer no. 1102 Guillotine School Tool Slicer Cutter
A guillotine style paper trimmer. In overall good lightly used condition Still cuts very well and will cut card stock. Thicker stacks of paper are tough to cut at the very end, but it will do it. Only apology is that it is missing the ruler guide. Handles 12 12″ paper.
Shelf B5 – SBC/S
We sell mostly USED and UNIQUEitems. Expect minor evidence of use or imperfections from age. We…
View On WordPress
0 notes
Last Seen Blogs

thefemaleface
TheFemaleFace

whackwriting
th
invertebrates
invertebrates

mxchixmiri
mxchixmiri

johuxemiqis
Untitled