#hat tutorial
Note
Hello!! I love your art!!
And I also have a question!! H o w in the world do you draw cowboy hats?? Idk if you ever answered this before but I just can't get them right and I love how you draw them on your cowboy au!!
Thank you!
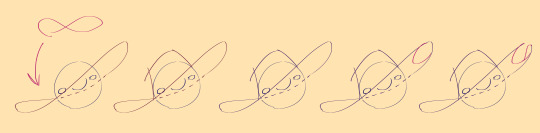
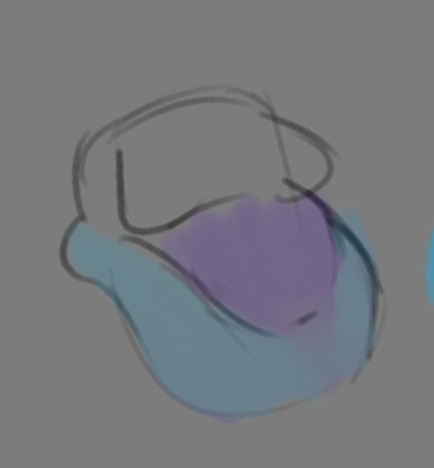
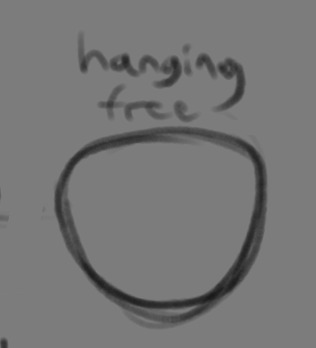
For hats I just draw infinity loop and add detail
169 notes
·
View notes
Note
If you don't mind my asking, how do you go about drawing fat? :3
JUST THE EXCUSE I WAS LOOKING FOR
So, for me personally, a lot of the time when I draw fat characters, I'm not looking to specifically capture the specifics of fat as much as the feel of fat. Bulkier, rounder shapes in the right places that has a feeling of weight to em! A lot of that is intuition and simplification at this point, but it all works on the same frame as just any ol' person. Like take this-

For example. This is the basis for any body shape, not just the more average one that it may imply. Sure- it can be that average body shape:
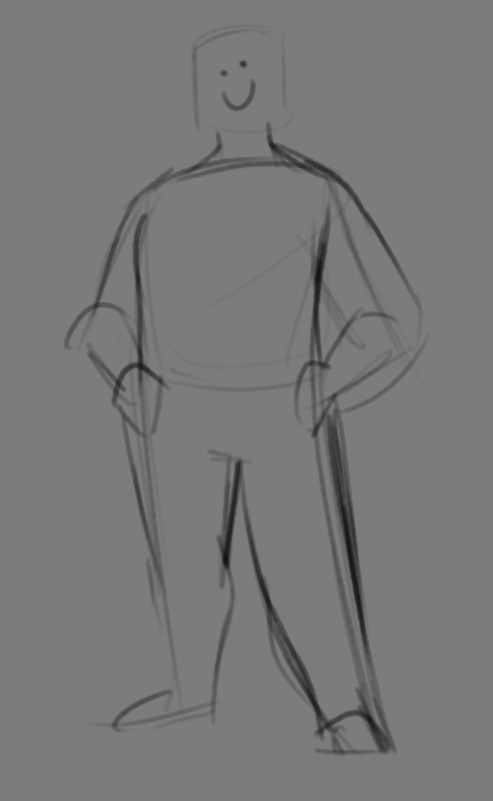
But also a fat one too!

And a big part of that is knowing where fat usually tends to bunch up on the body, so lets take a look piece by piece! (Please keep in mind this is very simplified, and not completely precise in some parts)
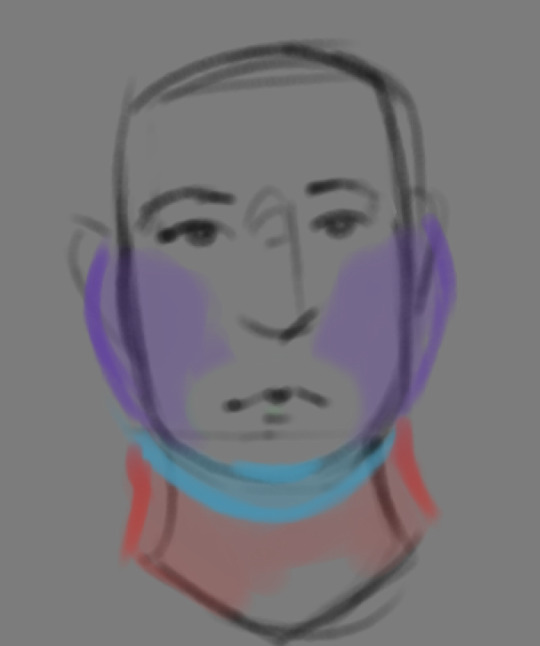

THE FACE: Cheeks (in purple) and especially the chin (in light blue) are the places where a lot of the fat is gonna wanna gather and round out on your face! Additionally, theres a small pocket of fat beneath the cranium on the backside of your head. It's small, but it is there. I believe fat can build up elsewhere like the bridge of your nose and forehead, but generally speaking, you're gonna have a whole lot more buildup in other places first.
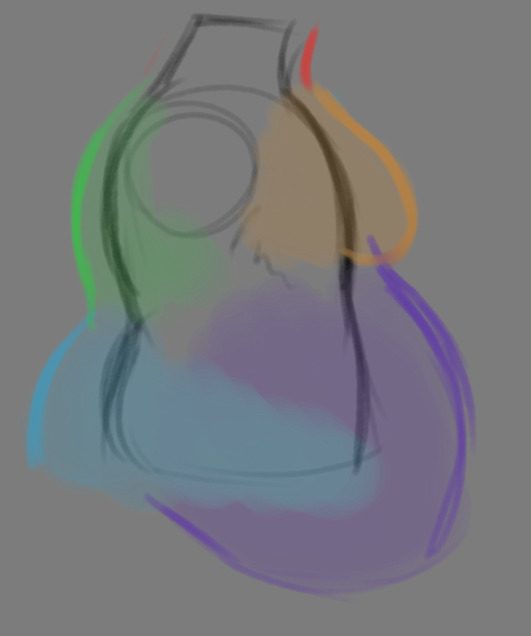
THE TORSO: A lot of the fat built up on the torso is gonna be sent to your tummy. More cushioning for vital organs, mostly out of the way, it just makes sense. Additionally, the lower backs fat builds up and joins with a patch of fat on your sides that forms what is typically referred to as the love handles to make that double belly look. Along with this, the immediate next target for the torso is the breasts, followed by the upper back!
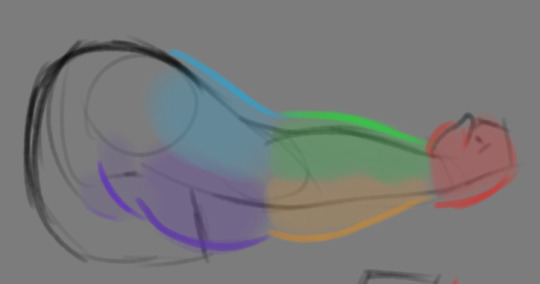
THE ARMS: For this limb, a VERY notable amount of the fat present builds up on the tricep and bicep areas, lessening once you get towards the flexor and extensor areas. You can almost think of the arm as a sort of triangular shape, wide side starting from the shoulder and tapering towards the hand, which itself mostly builds up fat around the back of the hand and the fingers. The shoulders themselves don't build up too much fat unless you got a lot
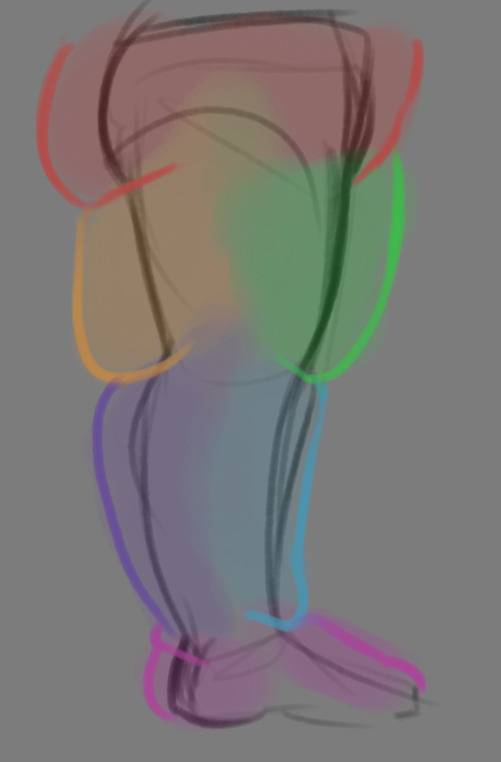
THE LEGS: And finally, you can think of the legs having pretty similar curves to what you're probably already used to thinking. The front of the thighs getting a big buildup, along with the back of the calves, the other parts being flatter in turn. As far as the feet go- similarly to the hands, the top of the feet, along with the heels get most of the buildup, as fat on your soles would impede mobility. The glute, hip and crotch area will also especially build up fat, lending to the same triangular shape that you can see in the arm!
A big thing to note with fat is that it tends to taper off towards joints. Your knees, elbows, shoulders, hips, and all the other places are gonna have significantly less fat so that you remain mobile and flexible, as that's important!
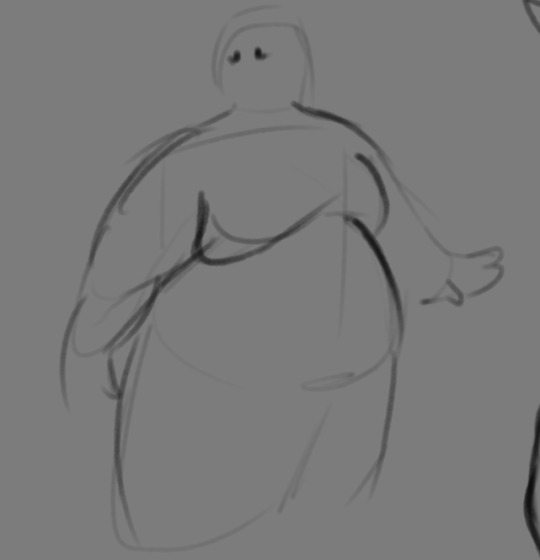
Now that we have an idea of where fat builds up on the body, you might have something that looks kinda like this
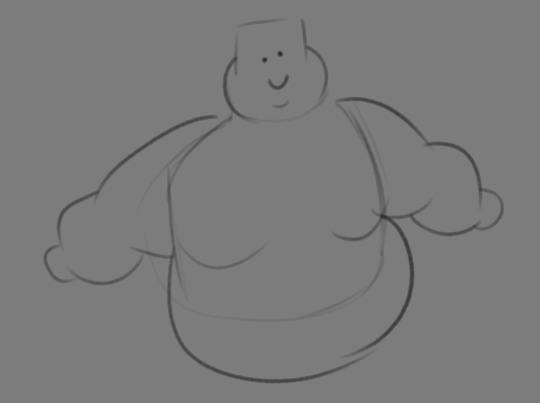
Which yes, does demonstrate a solid understanding of the places fat builds up, lacks the weight you're probably trying to convey, which brings us to out next point! Fat is well... heavy! Gravity is what gives fat much of it's shape, especially as you tread towards larger and larger bodies.
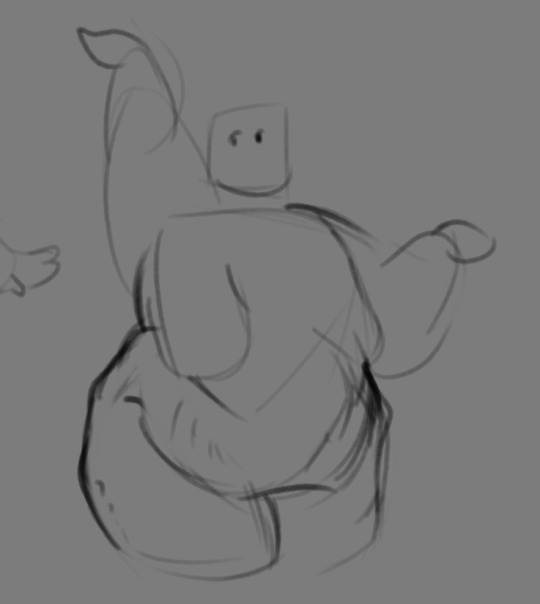
This is demonstrated really well on the arms especially-


Those big ol' bits of fat'll really start to sag when left hanging, and they will squish like hell if they run into something. I like to think of these bits of fat as big ol' ovals that squash and stretch depending on if there's an obstacle in their way or not


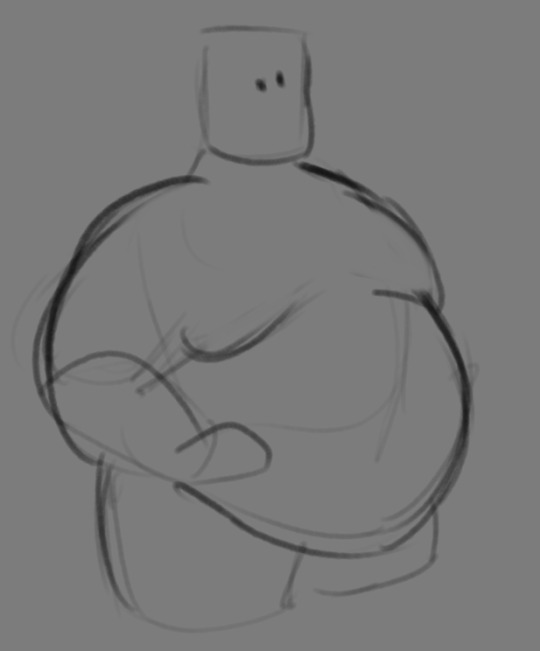
These are the important shapes to remember when it comes to the weightiness of fat! If you take all of this into mind, you should be getting something a lot closer to that shape you've been after!

Oh, and always remember that fat bodies come in all variety of shapes and sizes! Play around with a whole lot, and seek out all the resources you can! it'll really lend to your knowledge when it comes to this kinda stuff!
And as I always recommend when it comes to learning art- look at what your favorite artists do with fat bodies. See what you really like about the fat bodies they draw and try to replicate it in your own work, I promise you it's one of the most helpful things ever.
This is like the most basic of basics when it comes to drawing fat bodies though. If there's any additional thing about fat bodies, or maybe you want clarification on something, don't be afraid to ask! If there's enough to cover, I'll make an addition to this post!
#hat answers#my art#design talk#tutorials#yeah im unfortunately pretty tired so this gets a liiiitle rambly at the end but i think this covers like the basic basics#i hope this was helpful at all#and again dont be afraid to ask questions and stuff#if theres enough traction/questions on this i will most definitely try to clear up as much as i can in an addition to the post#whoops this took a bit!
3K notes
·
View notes
Text
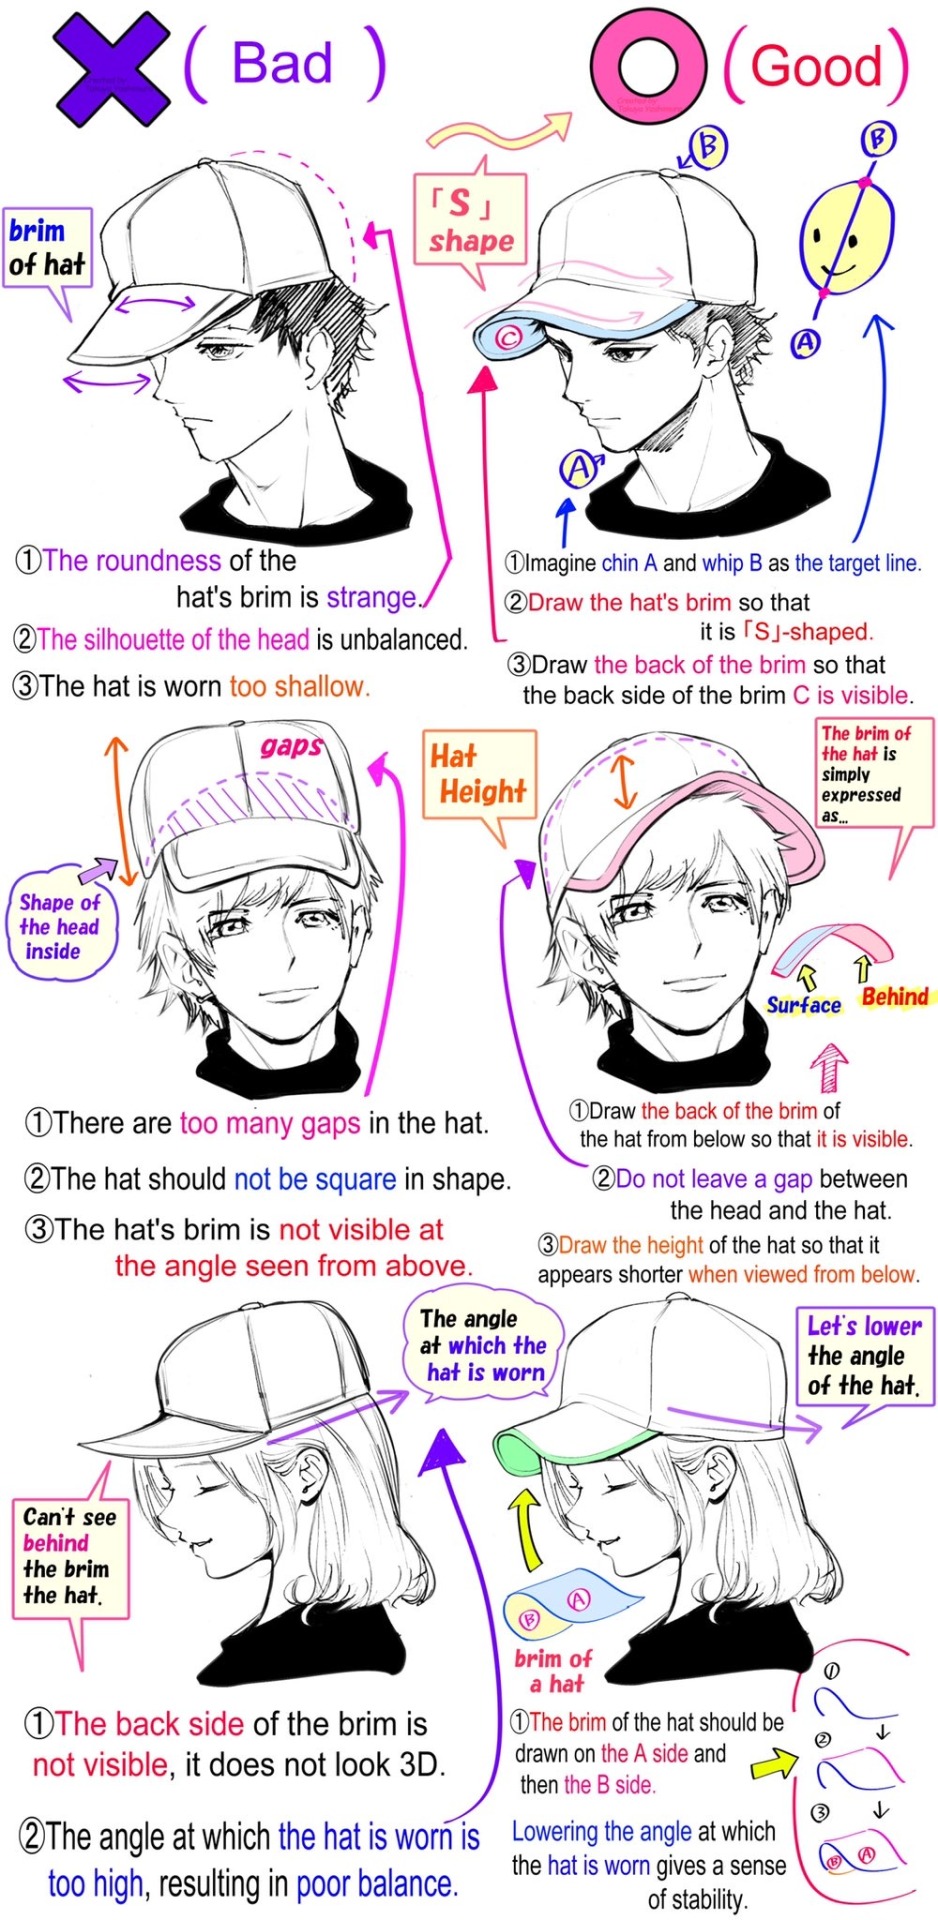
“Drawing techniques to improve the shape of baseball caps.”
Source: Twitter
1K notes
·
View notes
Text


Totally real and canon older Staroba sprites from the upcoming Undertale Yellow 2 game
#undertale yellow#north star#uty starlo#ceroba#uty ceroba#staroba#starlo x ceroba#the cowboy hat draws#Okay but I have barely attempted pixel art before so these might not look stellar. I just wanted to practice with a tutorial I found#Obviously drew some heavy inspiration from their canon sprites!#lucky clover au
285 notes
·
View notes
Text
How to draft a Witch Hat
I love makeing witch hats. They are pretty simple to draft, and don't use too much fabric. so here are my instructions:
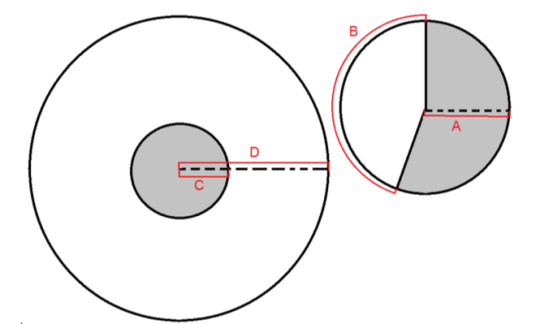
A = height of hat
B = circumference of head + 1 inch
C = radius of head (calculate from B)
D = C + width of brim
For the cone draw a circle with radius A, and measure B along outside.
For the brim make 2 circles with the same center point, with radius C and D.
Cut 1 of cone, and 2 of brim. I also like to line the cone with felt, and use canvas or something heavy to interface the brim.
Just inside the seam allowance of the brim, zigzag over a wire to help give the brim shape.
Right sides together, sew the side of the cone and the 2 brim pieces along the outside. Then sew the cone to the center of one of the brim pieces and flip it inside out. Then sew the bottom brim to the top in the center.
#had this sitting in my drafts for ages and I guess I should ist it since witch hat season is upon us#sewing#tutorial
2K notes
·
View notes
Text

nervously holding out & rattling a Little Tip Jar
#entirely voluntary no pressure i appreciate anything including just your presence here#i am gentle nudging the jar out of the door to be ignored or noticed At Your Leisure#that weird guilt is upon me! so! Insert Unnecessary Apology Here#i dont have any 'exclusive' stuff as of right now#in the future... probably! maybe tutorials! or behind the scenes things!#im thinking and ill continue to consider and Muse#suggestions are welcome!#absolutely unprompted#none of it will feature welcome home tho#i dont want to put it in a space where its like... for money#one-off comms are one thing and Allowed! kofi and such is a different beast entirely#ive been hesitant on making a ko-fi#but then i saw a post where someone described it as just a tip jar.#its like street artists leaving out hats or open instrument cases for people to choose to throw a buck into or ignore#and that. took a lot of stress off! more people should have tip jars. we all deserve it i think
144 notes
·
View notes
Note
HOW DO YOU GET THE STRAW HAT BADGE???
Ok, I'll give a step-by-step tutorial to hopefully help you because it took me a hot minute to figure it out with Tumblr's new layout.
1. While on desktop, go to TumblrMart (it's on the left side of the dash, just beneath Settings) and click on that.
2. You can either go to Badges or just stick with All because it's thankfully right there. Click the "Claim it here" button. It's free and thankfully can be added to sideblogs. When you do this, you'll be taken to this window where you click the "Claim this badge for free" button.

3. This will take you to the Edits page of your blog and you'll automatically be able to add it there. You can apparently collect multiple of the straw hat badges to add to your blog (I've heard up to 50), and they can be distributed to sideblogs too!

4. Hit save and you're good to go! If you get lost like I did the first time around, just go to your Edit Appearance page for your blog. There will be a little button under your icon that says Add Badges if you don't have any. You should be good to go!

#Time for Maintenance (OOC)#straw hat badge#straw hat badge tutorial#(figured I'd make it a tutorial with visuals to make it easy for anyone who might not know)#(visual aids definitely work better for me)#luffy#one piece#tumblr badge
368 notes
·
View notes
Text


💕🐇🎀❄️⛸️
#dandelionapril#i did film a little tiktok tutorial for this look!#i needed to lower my hat tho tbh#oh well
116 notes
·
View notes
Text
Check out my new YouTube video
youtube
FREE CROCHET PATTERN Traffic Cone Hat for POSSUM
#opossum#possum#crochet#pride#crochet opossum#crochet possum#possum memes#opossum memes#lgbtq#memes#free crochet pattern#clown crochet pattern#crochet pattern#traffic cone#traffic cone hat#crochet traffic cone#free crochet tutorial#crochet tutorial#Youtube
37 notes
·
View notes
Photo

Drawing his hat always frustrates me. But I think I’ve found this method that’s easy to understand. So, I wanted to share in case anybody else found it useful.
I forgot to fix the order of the steps lol. plz ignore that.
#the reason i think the trihold hat is so difficult to draw is you never see anyone wearing a hat like this#no one knows what it looks like noone has that visual library#its just so hard to draw#but hes so cute i want to draw him oml#hancock#jhon hancock#hancock fallout 4#fallout 4#fallout art#art tutorial#drawing hat
472 notes
·
View notes
Text
I'm going to be starting a series about making clothes for furby's, however I am lacking a 2005 model so would anyone with a 2005 furby be willing to give me dimensions? I want to make all of my tutorials available to ALL furby's, as there is a significant lack of tutorials for furby clothing. Most will be crochet or sewing as I don't know how to knit. The dimensions I would need is the base diameter, the diameter below the beak, and the distance between the base and the beak. I am willing to give you pre/beta access to the tutorials since I do not have the money to ship anything right now!!
#furby 2005#furby#furby fandom#furby community#furblr#all furby#furby tutorial#grrrr I hate having awesome ideas n then having to exclude ALL of the furby friends and also a whole main furby!!!#they all deserve cute clothes the SECOND i get my hands on a shelby I am making a miniature hat tutorial
30 notes
·
View notes
Text


Alternative Cut for the ending scene with more bleeping
#Puss in Boots#Yea i dunno#I did this in such a rush#I hate having stupid ideas and not being able to do them justice#I actually wanted to practice drawing Roger Rabbit stuff#But then i thought maybe i should do Perrito some justice and draw him properly for once but whoops#I also wanted to experiment with style but tjat backfired horribly so i did this lazy colouring instead#Maybe i should look at those tutorials for drawing hats on cats#Howlings Aroundabout#My stupid art tag#Puss in Boots: The Last Wish
51 notes
·
View notes
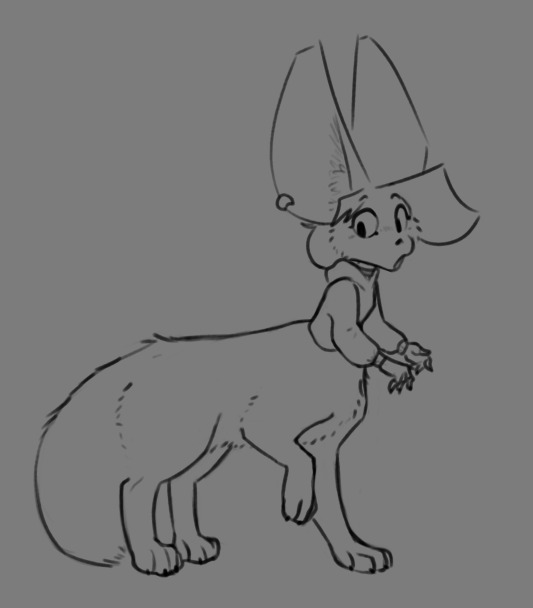
Note
SHAKES YOU how do you draw taurs. i need help i genuinley cant wrap my head around the anatomy of it. optionally i need help with fat taurs but any kind of taur is okay
Ooh, I love these sorta questions!!!
So there are two main things folks usually struggle with when it comes to drawing taurs as a whole. 1, they struggle with quadrupedal anatomy and 2. connecting the humanoid upper body to the quadrupedal lower body. Obviously there's no shame in either of these things, drawing four legged animals, especially if you're more used to the anatomical structure of something more humanoid is quite tough! And finding the sweet spot where humanoid and quadruped meet to make a taur is a bit of a struggle for folks who're still figuring it out.
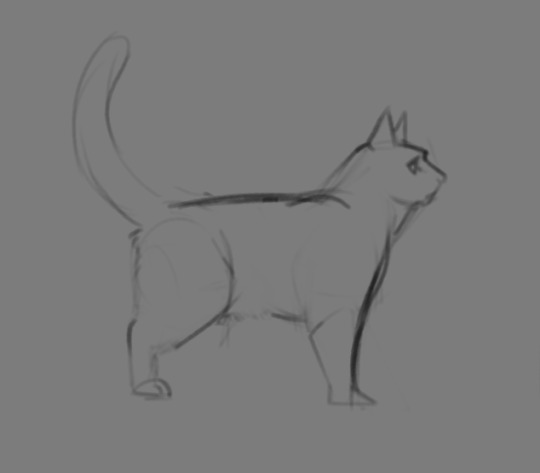
So! The first thing you wanna do really is just familiarize yourself with quadrupedal anatomy. Look at the skeleton of the creature you're trying to taur and see how things like their limbs bend differently or how they're just differently naturally posed as compared to someone who walks upright.
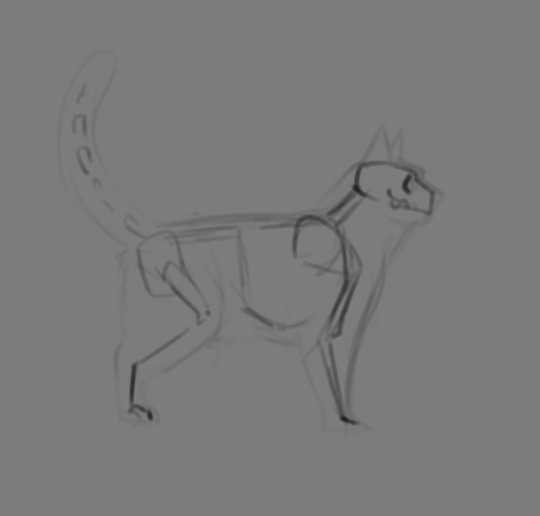
This is a very simplified skeleton of a cat, but you can pretty immediately see how differently everything bends. And I'm not saying it's something you have to perfectly master to know how to draw a taur (especially when you get to drawing fat taurs), but i highly recommend becoming familiar with how a quadrupedal body is structured, the silhouette of most animals is quite misleading! And absolutely use reference!
Heck, our first go at drawing taur Riley was super heavily referenced (I'll even share the ref image if anyone is interested!), and this still came out real jank. Practice makes perfect!
As for connecting the upper body to the lower body, this is a little more subjective and up to you, but I'll lay out some general guidelines.

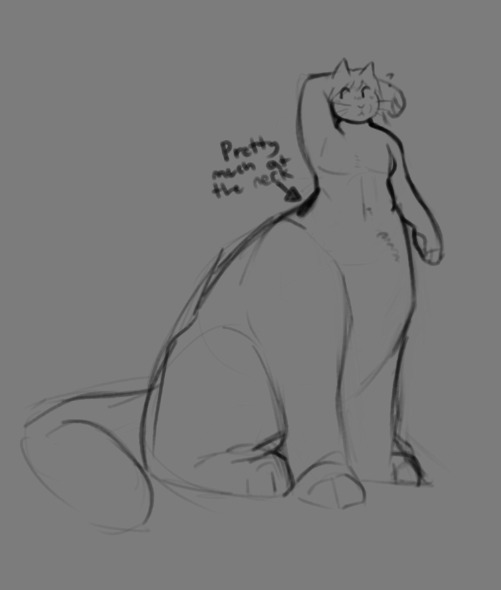
Generally speaking, you wanna put the humanoid torso where the base of the neck is, the front of the torso kinda merging with the rest of the taur body just after the tummy, basically just before the crotch starts.

As for the back, you're gonna want to shoot for just shy of where the butt starts, waist having curved back outwards. It gets a little awkward if you go higher or lower than that. And obviously, you wanna make sure the torso is firmly planted in the center of where the neck should be, ehehe.
That's pretty much the basics though! As always, i recommend looking at how your favorite taur artists draw the creatures and studying off of that! Familiarize yourself with quadrupedal anatomy, and use reference!! You will absolutely get it down with time. I will absolutely cover fat taurs if there's interest in it, and ofc, lemme know if there's anything I missed or need to go over! I hope this helps!
#hat answers#my art#my ocs#Riley Foxglove#design talk#tutorials#taurposting#i imagine this one'll find a much more niche audience but i really do hope its helpful!#these are the two things that definitely gave me grief when i was first figuring out how to Taur#but im sure theres plenty more i missed!#never be afraid to ask about stuff!!!!!!
152 notes
·
View notes
Text
Drawing Hats on the Head Tips

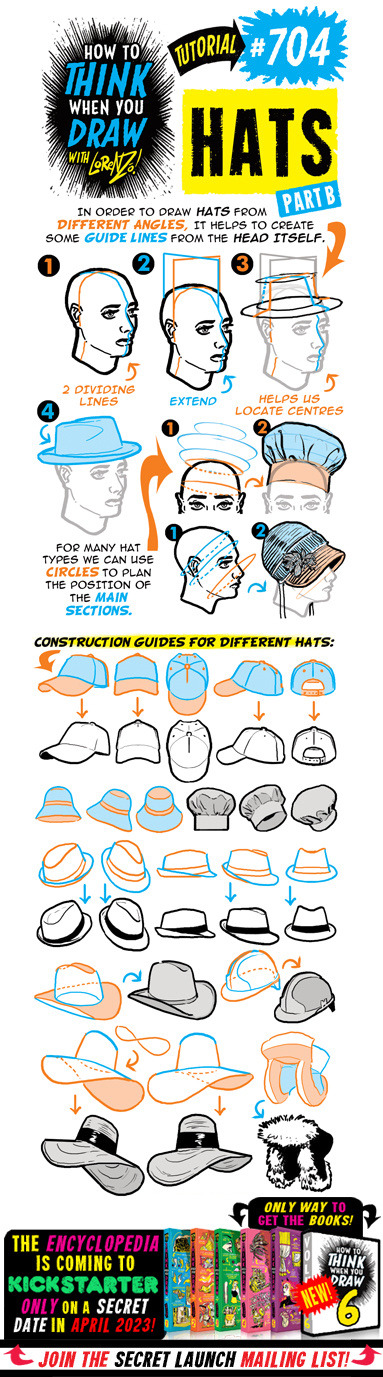
Credit: Etherington Bros
#703#704#art tips#art tutorial#art tip#art tutorials#drawing#drawing tip#drawing tips#drawing tutorial#drawing tutorials#hat#head#hats#accessories#clothing#clothes#costume#outfit
87 notes
·
View notes
Text

#i saw that and felt like this needs to be done#my art#fanart#random#lupin the third#daisuke jigen#jigen#hat#meme#stupid#sorry not sorry#youtube#his YouTube channel wouldn’t be hats and gun tutorials
552 notes
·
View notes
Text
I think I want to learn how to crochet, but every time I’m looking up yarn and shit I keep getting flashbacks when I was eight and my mom was try to teach me how to knit and she got SO angry and frustrated that I didn’t understand how to do it ( I thought it was supposed to be easy like in the cartoons) and mom kept throwing needles and yarn across the room and was yelling. I didn’t touch yarn for over a decade after that. But this time will be different I’m a level headed individual with the patience to learn and make mistakes!
#I know knitting and crocheting are different#but that memory keeps popping up every time I look up a tutorial on crochet#rant#I want to make a scarf but I’ll start small maybe a hat first#I would like to make big plushies for me myself and I lol#crochet#knitting
25 notes
·
View notes
Last Seen Blogs
aqrilene
Aquatic Corn

dizison-com-blog
İsimsiz

young--lovin
Things i never told

hoppt
HOPPT BATTERY

alicestark26
Beautiful Loser