#my computer is not even an option that thing can only do basic google searches and open word documents it's so old
Text
let me know if you want updates. so far i've ranked one sixth of the songs, but i already have a vague idea of how the rest is gonna go because i know all of these songs by heart and listen to them daily and i've watched glee more times than i care to admit :)
i am ranking every single glee song from worst to best. this is my rule book for it basically.
there Will be a video btw
#i made a 'every glee character's best solo' video six years ago#which btw i would probably disagree with today lol#so it's not like i'm new to making unnecessarily long and tedious and software killing glee ranking videos#the only thing i'm worried about is downloading all of these videos to make the edit#the only device where i have enough storage for that is my phone but do i really want to make this video on my phone? no#my computer is not even an option that thing can only do basic google searches and open word documents it's so old#i could use my iphone but it's out of storage space so i'm gonna have to delete some stuff and also probably make that video in sections#so i don't overwhelm my editing app#rain's glee breakdown
8 notes
·
View notes
Note
After pulling my hair out getting a VM of Win95 running, only to forget to install the graphics drivers and wonder why the colours of my game were all wrong, i can only marvel at your soft-hardware necromancy. How do you learn this stuff? What do you do when you encounter a filetype you've never seen before? (What do i even do with the file CD_AUDIO.kpx?) Can you download all your knowledge into my brain?
I mainly learned this stuff by just fucking around with computers for a long time (I think I got my first computer in 1993, so I'm coming up on my 30th anniversary of being a Big Nerd). You pick up stuff eventually.
Also yes. Setting up Win95 VMs is hard (real hardware is also hard, for the record) . The bearsoftware VBE drivers seem to have some glitches but they work well enough, and the scitech display doctor drivers work better... If they work. Sometimes they are a nightmare to get working. My advice is start your win95 VM setup, immediately work on getting everything working (graphics/sound/networking drivers), then clone or savestate that shit. Then you have a working base to build on. Don't dirty your clean base, just clone it when you need to start fresh because you've messed it up somehow.
As for an unknown file, my first approach is usually a hex editor. Look for signature info towards the top of the file, Google that. I find that's more useful than searching on the extension, because extensions are reused too often. Sometimes you can search the full filename or game name plus extension and hit gold, but sometimes you just get nothing, and then it's up to you to figure it out.
So the first step is make sure you have a hex editor that can do integer decoding. I usually use HxD. See the data inspector on the right?
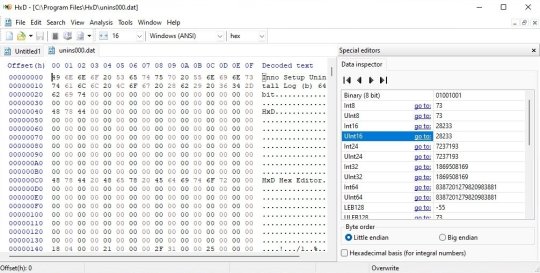
It's decoding the value of the number at the position of the cursor. This is very handy. File formats tend to have commonalities, like a count of how many sub-files there are, either right up front or at the end. (up front is more common these days, but in the Old Times it was easier to put them at the end, because of RAM limitations. That's why Zip has the index at the end)
That's a good place to start, because once you know how many subfiles are in there, you can figure out where they are, and deal with them separately. Often you only care about one part, so this lets you ignore most of the bits.
The other big tip I can give you for figuring out files is to be hands on. You don't have to just stare at a file and go WHAT DOES THIS MEAN?!
Change the file. Make a backup and then edit parts of it. See what changes in the program when you do that. Or if it's something the program writes out, save a basic file, than change something minor, then save it out again to a different file. Now you can compare the two and see what changed!
The next step up for figuring out an unknown file format is to reverse engineer the program that reads/writes them. Use a tool like Ghidra/Ida Pro, and disassemble the EXE. Figure out where it reads and writes the datafiles. This is often easy to find, you can look for imports on CreateFile/OpenFile or search for strings like the filename.
Another option is to hybridize your tools: use a debugger (I use OllyDbg usually, but it is getting long in the tooth sadly) and set a breakpoint on file opening. Run the program and step through all the files it opens and then you'll find the time it opens the file you care about. Now that you know where it is, you can locate that same function in the disassembler/decompiler.
Anyway. There's a bunch of tools and they all can help with different parts of this sort of reverse engineering, and it's often just about collecting as much info as you can, and then trying to compile it together. I usually have a text editor open on another monitor, and just keep a sort of running journal of anything I learn, so I can easily refer back and cross-reference things.
Also keep in mind that even if you can't solve the whole problem, you can learn some things, and it's useful to share that with the world. Sometimes just getting part of the solution means it'll inspire others to help finish the work, or point out stuff you missed.
111 notes
·
View notes
Text
UUUUGGGGGHHHHH
uuuuggggghhhhh
I'm not 100% sure how we got back here, folks, but I'm 100% obsessing over music and guitars for the first time since I was a teenager.
Guys...it's bad.
And for those who've known me for a long time here you may be hearing about this for the first time, but I could not get enough of playing guitars, reading about guitars, and listening to as much guitar music as I could when I was a teenager.
Could I actually play? Not really. I mean, not if you're talking about any lessons at all or trying to learn from a book or anything. I just kind of picked it up and kept playing around for years, just laying down riff after riff and playing with solo after solo. Just fucking around.
And then, eventually, I needed money and didn't have space anymore and I had to sell everything. I thought that door was closed by the time I was in my early 20's, starting to really work for a living and trying to live an adult's life. I looked back on those years a bit wistfully but with a real feeling that I had left childish things behind me...
Until the last month or so. I think I can point the finger squarely at us attending the Guns N' Roses show. Even with 100° F heat and me wishing that I had brought my earplugs I got swept away with it all, specifically with Slash. He'd change guitars regularly, usually for something that I was familiar with him playing. After the show I got curious and looked up his gear online to discover the web pages devoted to his guitars and his playing in general. Then I started Googling some guitars to see if they're still around, and any variations...and how have amps changed in the last 25 years...oh, emulators sure have come a long way...and they're fairly affordable...and while Fender's lineup has changed significantly since the 90s they still have a lot of decent guitars at reasonable prices...
All the while I'm also getting back into bands and songs I haven't heard in up to decades, just gorging myself on all the 90s rock I also "put away" at some point in my 20s, like one of my favorite bands, Hum, and getting into groups I could have really dug at the time, like My Bloody Valentine, and exploring newer stuff like finally getting more into Red Fang's discography...and then new bands and sounds spiraling off of those listens and searches...
And guys...GUYS...since I was into guitars this whole internet thing exploded, so I can hear guitars and amps and pedals and interviews that simply weren't available to me when I was previously obsessed. I can get a far better sense for things than driving an hour away to the nearest Guitar Center only to keep my hands in my pockets as I look at gear and equipment, too afraid to do anything in public, eventually going home and noodling by myself for a while.
And did you know that there are a ton of free or paid online classes where you don't have to interact with a human if it makes you feel self-conscious or anxious? And did you know that the Fender Mustang Micro Amp can fit in your pocket, has some EQ and preset sound options, a headphone jack, and can plug directly into your computer? And it's only $120 for an amp that's more versatile than the one I had 30 years ago AND it can help you can basically use it as a direct-to-computer recording device? And, holy crap, but GarageBand, while simple, is still a very competent recording suite and it's just free, right there on my Mac and everything?
Okay, breathing.
Because this is how it goes for me. I get all interested in something, all wound up, and I imagine how cool things can be, what I'll do, how things will turn out, all with an overactive imagination, until I'm just done with it and I move on. Except I don't know if I move on because I never follow through or if it's because I just fixate on things in a capricious manner. If it's because I never follow through then I should change that by following through (hello, writing ideas from five months ago that turned into nothing). But if it's because I'm capricious then I should just let it be and it'll ride itself out.
Now: how can I tell the difference without a lot of time, money, and effort? That's the question.
But it's been kinda fun as a weird hobby, just looking and reading and watching and listening. Maybe the fear of disappointment will be enough to keep me away from actually doing it, which isn't great, and maybe I should pursue more things that I think will bring me joy, even if I never truly get into it or keep it going for long, because life is short and pursuing happiness should be one of life's goals.
#if you're new to me this kind of ramble will happen about once or twice a month#no need to do anything about it#just getting some thoughts out in public#guitars
15 notes
·
View notes
Text
Step 0: Know what you’re working with, know what you need
Before you start installing Linux on your computer, it’s a good idea to familiarize yourself with your system and to know ahead of time what issues, if any, might arise when you start the install. You should also know: will the Linux distro you’re considering, or any Linux distro, support the programs you use daily, and if not, are there any alternatives or workarounds that will work for you?
I’m writing this making the assumption that most people are going to be coming from Windows. If you’re using a Mac, the steps here will be broadly similar, but the actual install might be somewhat different. Unfortunately, I can’t seem to find a good up-to-date guide to installing Linux on an Apple computer, and I haven’t personally touched one in over a decade, so I may not be much help here. I will update this section if I can find anything. If you’re on a Chromebook, I’m going to send you over to MrChromebox.tech. Chromebooks are extremely locked-down and incredibly finicky; my one attempt at helping a friend install Linux Mint on their Chromebook ended in miserable failure (couldn’t even get the damn thing unlocked), so...good luck, I guess?
The first thing you’ll want to do here is get your system information. The info that will be most relevant here is your computer make and model, the CPU, your RAM, storage space, whether you have a 64-bit or 32-bit system, and GPU. In Windows, use the Windows search bar to look for “system information” or “msinfo32” (more info here). Take screenshots of the relevant information, and also make sure you save this information somewhere that is NOT on the computer you’re going to be installing Linux on! Taking a picture with your phone or writing it down are probably the easiest ways to accomplish this.
If you haven’t done any physical modifications to your computer (adding or removing RAM, changing any of the graphics cards or anything, etc), the make and model might actually be enough to go off of here. Do a search (use DuckDuckGo or SearxNG, don’t use Google, for the love of all that is holy do NOT use ChatGPT for this) for “[make][model] linux” or “[make] [model] [specific distro].” For example, for the computer I’m using right now, I would search “Dell Inspiron N5010 linux,” “Dell” being the make and “Inspiron N5010” being the model. Look at the results and try to sift through to see what, if any, specific issues people might be having with it, and any solutions or workarounds people might have come up with.
The CPU, RAM, and storage are necessary to make sure the distro you’ve chosen will work on your computer! That said, Linux hardware requirements are much smaller than the comparable Windows version, so if your computer was made in the last ten years or so, any of the distros I recommended in my distro chooser guide should work for you. Likewise, if your computer was made in the last ten years, it’s almost certainly a 64-bit system. If it’s not, your distro choices are much more limited. MX Linux is the only option I’m aware of from my shortlist that still supports 32-bit architecture.
The GPU is mainly an issue if it’s NVIDIA. NVIDIA is still very much a thorn in the side of Linux users. I highly recommend using Pop!_OS as your OS if you’re new to this and have an NVIDIA GPU. Nobara also has built-in NVIDIA support, and MX Linux has an NVIDIA driver installer. My daily driver has an NVIDIA GPU and runs on Linux Mint, but it was a pain in the ass to get it working and it’s not something I’d recommend for people new to the whole Linux thing, if you can avoid it.
The second thing to know before getting started in Linux is what software you need and whether it’s supported in Linux. Make a list of all the software you use on a daily or near-daily basis. Fire up DuckDuckGo again and search “[name of software] linux” and see what comes up. There are four basic outcomes here:
There’s a native version for Linux! This is usually the best option, because it’s likely to be feature-for-feature compatible with the software you’re already used to using, and you don’t have to fiddle around with WINE or anything. Internet browsers (Firefox, Chrome [NOTE: don’t use Chrome], etc) and chat programs (Discord, Skype, Zoom) usually just have native Linux versions. You might even find that a program you already use is open-source! This is true for VLC, Blender, Audacity, OBS, and others.
There’s no native version, but the software does run well in WINE. WINE is a compatibility layer to run Windows programs in Linux. It works very well for some programs, and others...not so much. Check WineHQ’s app database to see if your chosen program will run in it. If the program is a game, check ProtonDB as well. Proton is Steam’s compatibility tool, and there’s a version called ProtonGE that’s community-maintained that works very well for most Steam games. There’s even a tool called ProtonUp-Qt that will install it for you! Gaming on Linux has literally never been easier.
There’s no native version of the software, and it won’t run in WINE, but there is a good open-source alternative! This is often a better solution as WINE can be somewhat finicky. LibreOffice, for example, is a very good alternative to the Microsoft Office suite. Photoshop tends to be a sticking point for a lot of people, because the most often-used alternative, GIMP, works very differently and has a steep learning curve compared to PS. Take a poke around AlternativeTo and see if there’s anything that works for you. One really nice thing about open-source programs is that they’ll often have a Windows version that you can download and check out before you commit to using it. Do note that programs tend to run better in their native OS, so the Windows version of a program might not give you an accurate picture of how well the software will run on your computer in Linux. It should still give you an idea of whether the program will meet your needs or not, though.
The last, sad option is that you might just be SOL. There’s no native program, it won’t work in WINE, and you can’t find a good alternative. In this case, you might have to find another workaround (using a couple different programs to achieve the functionality of the one you currently use), or ask yourself if this program is a “need” or a “want.” If it’s a “want,” can you live without it? Are you willing to live without it in order to switch to Linux? These aren’t questions I can answer for you. If it’s something you need for work, say, you still have a couple options. You can look into dual-booting Linux and Windows (having two OSes on the same computer, a post about this is forthcoming)...or you could get a second computer (probably not feasible for most people, but it IS, technically, an option!).
Unfortunately, if dual-booting isn’t an option, or the software or feature you need is an accessibility tool that you can’t use your computer without, your Linux journey may have ended before it started. That’s OK. Linux is a technology, and just like any other, it has its limitations, and won’t be a good solution for everyone. You can still use open-source alternatives to many other programs, though, and there are ways to generally decrapify Windows if you’re interested.
On the other hand, if you’ve gone through these steps and you’re satisfied that Linux will work well on your system, and that you’ll be able to do everything you need to with it, you can move on to the next step: actually installing Linux. Another post about that will be coming up shortly.
7 notes
·
View notes
Text
Hi friends! So, if you buy a lot if print chinese stuff like me, may I suggest to you:
https://www.books.com.tw/ open in computer browser and go to top bar and theres an obvious language option, you can switch to English. This book store ships international, sometimes ships extremely quickly (I've gotten books in 2 days before), has traditional and simplified print books and comics, and has a lot of stuff. I found both the simplified print 镇魂 with all the extras, and the traditional print version with the really pretty covers on here.
https://www.aliexpress.com it basically is a taobao reseller. What that means is, it is selling stuff you'd find on taobao, directly on its site. It ships international, prices are usually cheap and shipping is cheap or free. I find it very convenient, it ships slowly (can take 1 week-3 months to ship depending on item) but it's very affordable and reliable. Search chinese books by English name or by pinyin like "mo Dao zu shi" etc, searching in hanzi does not always give you results. Once you do find what you want, it helpfully recommends you more novels/comics regularly. Their app also is easy to use. Usually when I want something on taobao, I check here because if it's been out 1 month or more it's probably for sale on aliexpress. Sometimes aliexpress even has the pre-order brand new stuff. I found the tgcf comic volumes on here and get them as soon as they come out in print, same with 吞海. I find books.com.tw is easier to search through if I'm looking for a very specific version of a print since I can search with hanzi, but aliexpress has a ton of stuff too and will often have older stuff that may be sold out on books.com.tw. I got 4 volumes of 残次品 on here for 20 dollars, sometimes the bookstores have good sales/deals.
Amazon and ebay.* I think Amazon overcharges on chinese print materials, like a 20 dollar book is often 40-60 on Amazon. So I highly recommend checking alternatives first. The only thing I think Amazon sells okay, is chinese ebooks (and I've only bought the Chinese ebooks on my co.jp account so I don't know if it's even an option on English amazon). But if you really want a book and can't find it anywhere, it might be there (it was the only place I could find 他们的故事 vol 1). Ebay is much more affordable, with prices comparable to reasonable sites. Search eBay in pinyin, English name, and hanzi because sometimes results use different ways of labeling. I've found my favorite version of 镇魂 on there (and the Japanese DVD version but of course my DVD player can't play it - but that's where it is if you've been hunting for it), DVDs of cdramas, etc. It is where I found 默读 before I found aliexpress. There's some decent stuff for sale if you look around, and you can sometimes find specific things if you have a particular thing you're looking for.
Amazon.co.jp honorable mention. If you are buying Japanese stuff, amazon.co.jp is the most convenient ebook option and can also sometimes ship international if you want print materials. You simply make an account like usual on Amazon, may need to put in a japanese address, then put in a 2nd shipping address to your house if you plan to buy anything physical. If you plan to read ebooks on kindle, I recommend making your japanese account have a different password than your .Com account. I used the same email for both my jp and us account, but if you use the same password kindle will automatically always log you into your us account. So if you use 2 different passwords (and/or 2 different emails) then kindle app will let you log in to us and jp accounts.
https://www.superbuy.com/en/ a taobao shopping agent, if you want to buy on taobao but cannot do that. It ships to some countries but not all so check the site first to make sure it works for your country. Otherwise Google "taobao shopping agent" and your country's name to find alternatives. I've used superbuy when I can't find the item I want anywhere else but taobao (like when I wanted the brand new 盗墓笔记重启 ost cd, when I wanted the newest 杀破浪 version asap etc). If you can wait, it's usually cheaper to find things on other sites. But if you absolutely want one specific thing you can only find on taobao, a shopping service will allow you to get it. How a shopping service site works: you make an account. You use the shopping service site (like superbuy.com) to search items and select what you want to buy, then buy it like normal. Then the shopping service buys it for you and puts it in storage, and let's you know when it's in their storage. Once it's in your storage, you pay to have the item shipped to you. So you do 2 purchases basically - first buy the item, then buy the shipping to you. It's fairly simple and usually the sites have good directions. But shipping can cost a BIT so if you know you want multiple things it's usually cheapest to buy them all, wait for them all to reach storage, then pay for their shipping together. (Buyee.jp is the shopping service I use for japan).
14 notes
·
View notes
Note
How do you make your gifs have high quality? Do you use any presets or have any tips? Your edits are amazing, it would be AMAZING if you could share. <3
Ah thank you anon!! 🥰🥰
My tips are basically the same any other creator will give you tbh for good and crispy gifs your source material should be 1080p MINIMUM , I cannot stress that enough. For film search for files between 5-10gb for good results, but if you have space in your drives for even bigger files then go with these, sometimes files under 3-4gb are compressed as fuck and will only give you a headache when you try to color and The Pixels™ will inevitably show themselves. For tv anything under 1gb will be questionable, good streaming services rips are over 1gb for sure.
There is however good files not compressed for film under 3gb sometimes and they are encoded as x265 so if you don't have much space but still want to gif in quality get these downloads, in their name usually they say if they are 264 or 265 so look up for that. So in short:
Under 3gb encoded in 264: shit
Under 3gb encoded in 265: good!
If you need a place for downloads come of anon and I'll link you a trusted place for gifmakers only.
Okay enough on the files 😂 for doing the actual gifs I either screencap or use an external tool to trim an specific scene I want to gif. For screencaps I recommend mpv or mpv.net, both are open source programs and work really well and gifs will look the best imo. For trimming videos I use ffmpeg on my computer's CMD but it's not very user friendly if you don't know how to use ffmpeg well, I know people recommend handbrake though so there's that option and then use video frames to layers.
For sharpening I use 3 different settings depending on my source material:
Animation: I use a smart sharpen with 500 0.3, if it's ghibli or anime I'll lower the opacity of the sharpen around 80-85%
Tv/Film: a good source (files over 3gb) will only need a 500 0.3 sharpen sometimes. If I want it to look a bit more crispy I add another sharpen of 100 1. For not so good sources I apply a 500 0.4 sharpen and I lower its opacity to 80-85%
Youtube videos/music videos: first, YouTube is a bitch on quality so there's that, but if you can't find the thing you want to gif elsewhere (like our lord and savior Vimeo or the ShareMania forum) for YouTube I get my videos using Jdownloader, it will download the biggest file possible and more often than not it's the best quality possible. If the video even being 1080p looks kinda shit I use Topaz to denoise and clean my gif and then I apply a 500 0.4 lowered to 85% smart sharpen (gif making for kpop taught me many things lately 😂) and it looks like it was a video from a good source! There's also avisynth and vapoursynth but I don't use them, if you wanna check that out you can Google and lots of tutorials will show up, mostly from kpop creators.
After that, it's all coloring tbh. Know that shit files won't be able to handle vibrant coloring very well so be careful with that. If it's too bad I try to bring up the darks more to no make it too visible but you will always get pixelated stuff with bad quality source.
My saving settings vary between adaptive/diffusion and adaptive/pattern, if I'm working on animation or too heavily colored sets (like with gradients) I'll go with pattern, if not it's diffusion.
Okie I think that covers everything 🙈 if you ever need more help with gif making you can message me again and I'll gladly help!
You can also join the @pscentral server on discord where there's ton of gif makers (from beginners to well established ones) that will always be there to help and always give good feedback ☺️
33 notes
·
View notes
Text
This is just another vent post, but this really pisses me off. Why can't Youtube actually have a blacklisting or blocking feature that works? I'm tired of seeing offensive shit pop up in the algorithm, even when I dislike a video or hit not interested it still gets recommended to me, especially in Youtube shorts. I've dealt with some not so great algorithms before such as Instagram, but atleat I could block a user and never see them again.
Blocking channels on YouTube doesn't work at all. In fact, I don't even think you can block people anymore, now you can only "hide" users from your channel. It's great that these hidden channels can't comment on my videos, but I can still see their content despite them being "hidden" from my channel. I'll search something in the search bar and still have videos from channels that I've hidden show up.
There's apart of me that wants to continue to use youtube as I grew up with it, and there are alot of amazing content creators on it, but using it feels like such a chore sometimes that I'd rather not use it at all. Honestly, it's gotten so unbearable to the point where I only try to use youtube on my computer because it's the only place where I can use the Youblock extension .
I just want to watch my favorite channels and content without being recommended fatphobic, sexist, racist, LGBTQ+ phobic, etc stuff. I'm reminded enough that people hate me for existing, especially in public or even just looking at the news, so it would be nice if I could actually enjoy my time on the internet without being shown bigoted shit.
Google has so much information on its users, but it still can't be bothered to implement blocking features so that users can curate their own feeds. I swear the basic functions on YouTube keep getting worse. I can't even look for specific videos without being recommended content that has nothing to do with what I searched for. You can't even filter videos in the search bar by oldest date. This makes it harder to find older videos, especially if they aren't popular, essentially making them lost to time. It would be nice if there were settings where I could turn recommendations off in the search results. Like give your users options, don't just decide what they should watch.
This makes me wish there were more companies like Tiktok to compete with YouTube. I am in no way saying that Tiktok is perfect or even less bigoted than YouTube, however, due to Tiktok's successful algorithm, it does pressure other companies to hopefully do the same and upgrade their own algorithms to actually be more relevant to their users.
One of the main reasons why I spend so much time on the internet is to find and engage in things that bring me joy, further my understanding of certain topics, or help me feel empowered. It just sucks to have some of this taken away from me because YouTube can't be bothered to care more about the wishes of it's users than forced engagement.
#ventpost#Youtube is pissing me off#shittyalgorithms#all youtube needs is an actual blacklisting feature and maybe I wouldn't resent using it so much#random vent#Why are so many social media algorithms shitty? Like most of these social media companies have so much money#Is it really that hard to invest in basic features to block channels and accounts effectively?
0 notes
Text
Do we Need a Server?
This week, I managed to finish the sketches for the login screen, but most of the day was spent experimenting with AWS Amplify.
I found AWS amplify while searching for an AWS service that could help me with authentication (login/sign out) for the app. Authentication and security are very serious topics when it comes to building applications. While I can build the authentication system from scratch (I’ve done that before), It’s a lot of work, and it’s not as secure as something that a large company like Amazon could provide. Cloud services providers like AWS and Google also offers the option to login via phone number or social media platforms which can be convenient. These are the major reasons wy I decided to look into AWS’s authentication services.
AWS Amplify a service that bundles other AWS services to make it simpler to deploy apps. It provides an authentication system that stores login information and sends emails to confirm a user’s email address or to allow them to reset their password. AWS amplify also provides a database.
The ap that I’m building will need to support only the basic CRUD operations (Create, Read, Update and Delete). The role of a server is to tie together services like a database and authentication system. Since AWS Amplify handles these things, it’s possible that I will not need to build my own server.
Normally, a developer would need to know about virtual machines and private networks to get all these features working. While I’d like to become familiar with these technologies, I’m not comfortable using these technologies yet. Even if I was familiar with those topics, I’d probably use AWS Amplify. The app that I’m building is going to do simple CRUD operations on the database as well as sending notifications. To build the system from scratch using the most granular AWS services would be overkill.
Once I decided to use AWS Amplify, I needed somewhere I could mess with the different features. So, I spent a few hours setting up a boilerplate application on my personal AWS account. Fortunately, AWS Amplify has a generous free tier, so I shouldn’t need to pay for the services that I’ll be testing.
To get the app set up, I followed the instructions on the AWS Amplify documentation pages. Along the way, I encountered to challenges. The first was in setting up authentication for the CLI. The second was in creating permissions for the app to use other AWS services.
The AWS Amplify CLI is used to deploy the code from the developer’s computer and to manage some of the services. It took me a whie to get the CLI authenticated with the app that I was setting up. Fortunately, AWS provides clear instructions and I was able to troubleshoot the problem.
In order to set up permissions for my app, I had to create an account for it on my AWS account and assign it permissions. This required me to follow instructions from a completely different section of the AWS documentation before returning to the Amplify docs. Although it was a hastle, it’s necessary for security purposes.
Next week, I’d like to build out a To Do application on this test site. It’s a simple project that will allow me to become familiar with the authentication and database services before bringing it into the main project. By the time I’m done learning about AWS Amplify, I should have the Login and Sign UpP screens designed and ready to be added into the app.
Today: 8 hrs
Total: 24 hr
0 notes
Text
driver sandboxie
1) Ubuntu: Ubuntu (for your basic user) is the easiest entry point into the wonderful (and mostly free) world of Linux. If you find yourself a quite a while Windows user and hate paying the cost for an upgrade every time a new operating system comes out you might give vid shot. Carbohydrates download it or order a free disc they will ship to a person. The only downside is that it is much more hard to run programs you purchase in local store on Ubuntu (or any Linux build for that matter), though it is still possible one does take period to uncover to use programs pertaining to example Wine.
First things first. Clean up your programs and personal files. When you go to certain websites, they may leave cookies behind. You may have used three different printers and two different cameras since you bought your PC; those items require programs to rush. You may have downloaded some programs that you thought looked really cool, but in fact never take. Get rid of all this bits and pieces. Go to your control panel and employ the delete programs approach to get rid of all outdated or unused programs. Call at your Internet tools option and clean increase Internet as well as delete cupcakes.
Click the start button and point to manage Panel. For the Control Panel window, click System and Security and subsequently navigate to Administrative Tools, System Layout. If prompted, enter your admin password and then click the Continue button. Alternatively, you can click start off button and kind 'msconfig' (without quotes) on the Start Search box. Do not hit the Enter key and look in the listings.
Nancy what puts you showing us one of the most money making programs? Truth that is that you simply could spend years purchasing programs this internet and waste a fantastic amount of one's hard earned money. Achieve is to save you money and time, the same money and time I wasted hottest. I have obtained over 50 some successful programs, slim down these programs I purchased did seriously have A reimbursement Guarantees! Whenever i downloaded the actual making ebook they were worthless. You think I prospective smarter than that, but i got "taken." It is a bad feeling; especially a person have are not in employment to throw money in the market.
To some extent, this can be done by tweaking some settings, like adding more room to your partition. If you opt to try the Mac cleaner to clean-up some drive space on your own Mac, which will in turn help from the CPU and RAM era. You'd be surprised how often this you will save from for almost any get additional storage, RAM, or even CPU renovations. However, sandboxie Crack 2023 to your RAM sandboxie might still be needed eventually.
I always find certain freshness in my computer after i reinstall the Windows. This is probably because the application of the computer results in accumulating a number of rubbish data in the memory. Feel the first thing to do is to format the C drive and reinstall Windows periodically, once in six months or 1 yr. You can then reinstall the programs stored in the D motivation. The latest versions of Skype, Adobe reader and Irfan view downloaded from impact on your F drive, are quickly installed of having them fresh on personal computer without the interference among the earlier updates.
There furthermore the possibility that may a Windows 7 Pro system running the FAT32 file system instead of NTFS. The FAT32 file system does not have the in-built security of NTFS and will not allow in order to definitely allocate Deny permissions on files, folders or opportunities. You can however, easily convert the FAT32 file system to NTFS though using tools in XP. To uncover out how, do a Google search for "convert FAT32 to NTFS".
0 notes
Text
Recipe manager free

#Recipe manager free update
#Recipe manager free full
#Recipe manager free professional
Therefore, you can’t create shopping lists - by recipe - automatically. Pros & Cons of Keeping Recipes In Google DocsĪside from the ease and convenience of using Google Docs to store all of my favorite recipes, there are a few other pros & cons worth mentioning…įor the true recipe aficionados out there, one of the biggest downsides to storing recipes in Google Docs is the fact that the “ingredients” aren’t stored in a separate “ingredients database”. And even for importing just one recipe found on the fly, the copy & paste method for Google Docs is just quicker and easier. I have no interest in downloading entire databases of recipes that others put together and share online.
#Recipe manager free professional
Yes, there are simpler “import” options with the professional recipe organizers - making it easy to copy several recipes at once, but how often do you need to use that option? For me, only once: the day I start using the program for the first time and want to bring all of my recipes over. There are typically lots of individual steps to copy recipes into professional recipe programs. With other recipe organizers, you have to enter most of that info line by line manually, and then you have to type each piece into its respective “field,” and then you have to physically upload the photo. Or, you select only the parts you’re most interested in by dragging your mouse and then typing CTL+C (to copy) and CTL+V (to paste). That’s right, little or no typing is required to copy recipes into Google Docs! You simply choose “Select All – Copy” to get every single thing on the page.
even comments others have posted to this recipe - if I’m interested in those.
With Google Docs, you simply copy & paste the part of a page that you’re interested in (either a recipe stored in another program like Big Oven, or a web page online for example), and you get everything in one click: I moved all of my recipes, one by one, from Big Oven into Google Docs (aka Google Drive) - as seen here: So the #1 priority for me was to be able to view ( and edit) my recipes on the fly, no matter where I happen to be.Īfter exploring all of my options and not feeling satisfied with any of the professional recipe programs created specifically for organizing recipes, I decided to think outside the box a bit. You get the idea… I never know when or where I may want to access my recipes.
On my computer at work (back when I used to work outside the home) - when I simply wanted to browse all of my recipes and find an interesting one I hadn’t fixed in awhile.
On my mom’s computer in a different state - when I decide on a whim I want to cook up something special for her when I’m visiting.
On my desktop upstairs - when I’m importing and sharing recipes.
On my laptop in the kitchen - when I’m cooking at home.
But the biggest thing that I, personally, wanted in a recipe program was the ability to access (and edit) all of my recipes from any computer (or my phone) at any time. Yes, Big Oven is a fairly sophisticated program, and there’s a lot that it can do. (See the “update” at the end of that article and my comments.)
#Recipe manager free full
But it was time to start looking for a recipe organizer that fit my needs better.Īfter trying it free for 30 days, then buying the Big Oven software ($29.95) and using the full program for a short time, I realized that BigOven wasn’t exactly what I was looking for either. For example, MealMaster and MasterCook were my longtime favorites - and they served me well (in a very basic sense) for many many years. I’ve actually tried quite a few different recipe programs.
#Recipe manager free update
If you buy thru these links, we may earn a commission at no additional cost to you.įollowing is an update on my search for the perfect recipe organizer…
1 note
·
View note
Text
Artificial Intelligence | Namjoon

Summary
Namjoon after wondering the internet, came across a website Ad for a personalized A.I made for him and only for his viewing pleasure.
Words 3k
Cyber namjoon au! College namjoon! A.i reader!
Warnings: smut, masturbation, virtual reality, moaning and heavily, medium amount of plot, kind of vanilla, riding, dirty talk, muscular joon. Oral (f), heavy whining, begging, dom joon, verbal joon.
With his eyes glued tiredly to the computer, his hand moved the curser to press play. This was his third year in college, being who knew what at the end. After years of tiredness from research papers to fieldwork, being a chemistry major wasn’t paying off one bit. Not his student debt either. Yawning, his arms stretched up and then out before returning them back to the slightly chipped computer to type the URL in.
With each little tap and click, he answered the questions before being brought back to the previous page. Groaning in utter frustration, he closed his computer and put his head on the computer before meantly screaming. He was half way through the questions and it took him out and how knows if he had 200+ more to do. Sighing, he lifted his head uttering, “at least its not the actual test”
With slight relief, he lifted the mac screen and saw he exited everything on accident. Giving up, he searched for a virtual teacher. With no luck, he stumbled across and Ad for an A.I. with an obvious lack of how the cyber world was or knowledge on A.I, he opened a new tab. With searching the key word. ‘A.I’ a small little text box appeared.
A.I ( Artificial Intelligence )
is an intelligence demonstrated by machines, as opposed to the natural intelligence displayed by humans or animals
After looking up the word and its definition, he thought he had a solid idea of what it was. Therefore he exited the tab and searched the subject and then Ai. After doing so he scrolled and clicked what he assumed to be a cite and looked at what it had to offer.
“This is neat. Ah, Let’s see where this goes! Maybe if I do this I can study with a human, I think?” He spoke aloud, looking at the options. Waking up a bit from the sudden excitement, he stretched his body and looked around for a notepad and pen. While doing so, a pop up appeared.
Stacy is single and is 65 miles away from you, wanna interact
Once namjoon returned, he saw the women and clicked off. He figured this wasn’t an appropriate or free ran website. Itching the back of his head, he continued until another pop up this time an ad appeared.
Create your own human A.I with unlimited uses here
Curiously he clicked the ad and saw you had to buy it, immediately he got up from his desk. Legs numb a bit from the lack of moment, he grabbed his wallet and took out his student card. Shopping he looked at the computer than a card. “Yeah no,” he laughed to himself, knowing he could catch a case he didn’t want so he grabbed his credit card before swiveling the chair to sit down. After blindly trusting the site, he was taken to the tutorial and saw a fully naked man on the screen. In shock, he shut the computer down to realize it wasn’t that A. I he needed. Sighing, he flipped the top back up and immediately felt hopeless with the exam. Seeing there’s a female version, he looked around to make sure none on the body was there. He knew he had the room to himself, but it’s still worth it. You never knew, who could be watching.
From there he closed his blinds, turned off the lights, and got back to the computer. He started to create your body down to the smallest detail. He had time as his classes for the week were canceled for finals and other school-related activities like college tours etc.
“Finally, you’re done and now we give you a name!” he smirked softly, rubbing his palm over his jeans on accident. With a few glances and searches, he named you y/n. Smiling, he pressed continue and saw there was an outfit room and spent a few more moments picking something cute, casual and sexy for your body frame. After that was done, he pressed continue. Suddenly there was timer and another pop up.
TIME REMAINING: 23hours 59mins and 23seconds
Thank you for ordering “Y/n” the A.I, everything is processing as you read. While you wait, please pick from the available voices and chose which one suits your needs “Namjoon!”
He had no clue what to expect, but it was worth the wait. Meanwhile, he spent an hour going through the types of voices he wanted you to have, till he could find your voice a perfect match for his needs. After pressing finish, he plugged his computer in and left his computer on as he got out of the chair and brought himself to his bed to sleep. Thankfully, he took a shower hours ago and was already more steps to sleeping than ever. Soon after, his head laid softly on the white pillow and his eyes began to close asleep.
The next day, around 5minuets, until it was time to see what he had gotten himself into. He moved his viewing location to his bed as it was simply more comfortable. Beforehand, he ate and cleaned out items he thought might me helpful with what he thought he’d get into in any minute now. While waiting with pain, he watched the minutes drop one by one until it was less than a minute and he grabbed his seanna drift, a virtual reality set made for his computer and recommended from an email sent to him earlier. He figured it came with more than just the yearly plan he paid for.
As his wallet cried, he read the direction of the screen ok how to connect the device to the website and began following the video instructions. As they told him where to find things and hook it up, he saw that it needed to charge and groaned loudly in annoyance. So he spent that saddened hour, cleaning his room till he saw green and followed the instructions once again.
“Okay ready!” he said, as the Vr headset and earbuds sat softly on his head. With wow and o’s he saw you in this basic room with the lights off and sudden shoe-making noises. Turning his head, he saw you turn on the lights and sat on the bed in front of him. Looking around he took note of his virtual surroundings before grabbing his flashlight and pouring lube he had trouble finding on the table and poor it inside the toy.
Waiting for you to make a move, he got up and placed his computer on the bedside table, and laid on his back. As shirtless and gray sweatpants he was, he still felt clothed. In that moment he took off his sweats, leaving his boxers on he noticed the screen changed onto the bed and it spoked him slowly. With you laying on his chest, he grabbed a free pillow and hugged it as if you were there.
“You feel warm” you chuckled, as namjoon blushed in the shock.
“Thanks, I guess you can see and hear me?” He asked, rubbing you “the pillow softly”
“I can, my system works like an actual person” you mentioned look g him in the eyes. Confused, he hummed in agreement. Whining, he was very pleased with how human you were and a bit concerned as well. He was amused and amazed at how advanced society had become.
After small talk, he warmed up to your very realistic body, voice and actions. Not to mention his hands moving slowly up and down his length as he watched you shower and how cute you looked when you did. Moving a bit faster, you looked and the system told you he was jerking off.
In a surprise you turned around and looked at him, covering your body. With him in tune with idea, he smirked. “what’s wrong baby? You don’t like when I view your body like this?” He asked, grinding his hips against the pillow.
“Well, um I do. Its just new to me okay” your system lies, as it registered grunts from namjoon.
“Well can you turn around for me?” He adds, taking his toy and liking it up to his actual length. Nodding, you turned around and bent over. As namjoon said his movements as listed in the tutorial earlier, you opened your legs as if he was spreading them for you. Holding onto the wall, he said more commands, and eventually, it looked like he was fucking you and it caused an involuntary grunt from his mouth.
“Fuck!” He cursed, sliding the toy up and down in a slow pace as he watched how his camera was moving. Looking at you he got up from a lying position, to his knees and moved the pillow into a u shape and placed his toy so it could feel more real to him.
Hearing your soft moans and a good view of your ass, he began to thrust faster into the toy, holding the pillow down as if he was your back and began moaning curse words. Luckley his head gear caught that and made your moans shift to match his rhythm.
“Ah! Ah! Please don’t stop!” You moaned, griping the shower walls looking back as his eyes wondered your body and all heard from him were grunts. Keeping your ask, he tried pacing himself so he wouldn’t cum too soon as the feeling was slowly building the more he got more into it.
“God! Fuck” he cursed again, as his head went back imaging you bounce back on him. Moving the toy to the desired speed, he kept going closing his eyes and listening to your moans as he reached his end. Jerking forward once more, his cock twitched as his cum spilled inside the toy. After coming down from the slight high, he looked at you who was hard breathing, body slightly shaking and a stream of cum laced your ass with grace.
After today’s use of the A.I he unplugged the device and let it charge. Shortly after, he exited the screen you were on and went to take a shower. Reflecting and thinking how could he make this experience even better and with that thought, he googled the company and saw they made Bluetooth connected toys. Browsing he found a torso toy and paid the extra $15 for the next day delivery. Smiling, he closed his computer and went to beg shortly after.
The next night, he had the box that contained the sex toy. He took it out and realized he picked the right color and body for you. As he read the directions he plugged it to charge and went to do some light reading verire coming back. Seeing the full bars on the side of the torso toy, he grabbed his headset and plugged everything in and made sure the section was secured.
You have connected toy 1251819, your system will now function off of movements from the toy and vr audio. Please speak select the place you wish to be in
After reading namjoon said “library” soon after, you showed up in the same outfit as he picked, sitting in the chair.
“Oh hi namjoon! What are you doing here?” You asked, smiling and putting the book down?
“Well I’m light studying for our test, mind if I join you?* he tells, as the vr moves his view next to you. While he looks around in his vr set, he notices your in a secluded area. As his hands move around the half thigh it registers and you blush slight.
"Sorry” he apologized, looking you up and down. As you told him it was okay, the screen of consent popped up and he knew it was okay to touch you. In that moment, he got on his knees again this time with a body like toy underneath. He instructed you to strip and as he watched you take off your clothes he rubbed his length in his bare hands.
“Good girl now gets on your back for me on the table,” he praised, watching you as your legs reminded closed. Opening them on the toy, you followed. He rubbed his hands around your thigh and rubbed around your lips till he found your clit and gently rubbed you in circles as you began moaning for him.
“You want me to stop?” He smirked, nodding no he stopped.
“Then tell me what you want” he adds, rubbing and teasing the area slowly. After explaining that you want him badly and would do anything, he removed his hand and rubbed his tip around your entrance.
“Please, please namjoon. I want it badly. You felt so good the last time” you told whining softly.
“Oh, you liked that?” He smirked chuckling softly under his breath. Nodding, he lubed you up hearing you moan to his touched, and soon began softly thrusting into you. Griping your shoulder softly, he stuped down your breast. As he began sucking on them soft, he moved in deeper feeling the toy clench on him. Surprised he jerked forward and went faster. It really felt similar to phaycal and actual human body. He continued thrusting, leaning over the you and the sting harder as grunts and your moaning filled his ear.
“S-so big namjoon, it feels-” you interrupted with a moan and he groaned feeling the toys warmness and the wetness of the amount of lube in you.
“Mm keep talking baby, tell me how good it feels!” He demanded, groaning and curing as he went harder. After a few words, his body started going faster as it started to feel too good on him. He told you to just moan and take him as he began chasing his high, which was beyond what he knew. As you moaned his name and reacted to his length and speed, namjoons grunts turned into soft whines and moans as he enjoyed himself with you.
“Oh you feel so good baby” he breathed out heavily. “Ah don’t stop cumming for me” he added, as the system didn’t stop cumming on him causing namjoon to thrust harder as the machine started releasing water already put in the toy on him. Feeling even more organic, he rubbed your clit getting you to choke on your moan as he went harder. Groaning deep and now at an animalistic speed the bed started speaking and his body kept going as he became more vocal with the feeling.
“OH GOD IN CUMMING!” he announced yelling, cumming so hard he started feeling sick and breathing so deep it made the feeling even more unbearable. Coming once more, he fell on top of the toy and laid there till he was able to come down from his high and plug his stuff back up. Looking he saw that not only did his toy break, but his computer was also malfunction with errors on the screen.
With not a lot of energy, he closed his computer and sat the now broken toy beside him as he breathed heavily. Not to mentioned the multiple knocks at his door, he assumed where from one of his neighbors.
“Just his luck” he whispered as he softly passed out sleep.
#bts fanfction#bts x reader#bts smut#bts#bts fics#namjoon x reader#namjoon smut#namjoon fanfic#kim namjoon#namjoon#au#bts fanfic#kim namjoon x reader#kim namjoon x y/n
83 notes
·
View notes
Note
omg hiiiii i am here from cat (@luvdsc) wondering if you could offer any advice about college apps 🙏 especially about the uc piqs? thank you so much i hope ur doing well!!!!!!!!
yes yes hello friend !! 💝 miss cat directed you to me because i did my college apps last year !!! (yikes one year passed already?? why does that feel ages ago 🤧)
first of all, congratulations on making the decision to apply to college !! i know it’s been hard for a lot of people our age to figure out the college situation recently, so i’m proud of you for choosing to take the extra step this summer to buckle up and write those essays 💞
i’ve compiled a few tips on answering the PIQs (i was actually in the middle of typing this up when i received your ask haha), but some of them can be applied to other essays, as well !! they’re all under the cut (because, unfortunately, being brief is not my forte) 😊
(and for reference, the prompts i chose were #2 (creativity), #6 (subject), #7 (community), and #8 (anything) !!)
tip #1: understand the prompt.
before you even begin writing, it’s important to understand what the question is really asking. for the UC PIQs, this will look different depending on which four prompts you decide to do.
in question one, for example, they want to know about your skills in leading others, but notice that they’re also curious about your resolution abilities and teamwork experience. or in question two, they don’t want to know that you paint and that you love painting—they could be asking how resourceful you are, how you think outside the box when you have an idea.
once you know the question you’re going to be answering, you can move on to brainstorming!
tip #2: write down three (3) key takeaways.
these are like the most basic, not-even-a-sentence answers you would give to each question. so for me, in response to question eight (“what do you believe makes you stand out as a strong candidate for the UCs?”), my answers were perseverance, courage, and character. i had a story about that, so i wrote about my experience with martial arts.
i recommend you do something similar. decide on three things that you want to communicate to your audience, and write them in the footnote of your document. your goal is to cover all three points so that, if anyone were to read your essay, they would walk away understanding those three things about you.
i found this strategy really helpful for keeping my essay streamlined while writing—if a sentence didn’t relate to any of those main points, i would cut it since those words would take up valuable space in the word count. stay focused on what needs to be in this essay, and if you have extra words left in the word count later, you can add those details back in.
and once you’re done with your essay, make sure to refer back to your takeaways and check that you covered all of them sufficiently!
tip #3: highlight your stories.
i sent cat an ask a couple days ago with a few pictures of my response to an end-of-year college counseling survey that referenced this tip (you can find it here). basically i said that, when choosing what topics to write about, pick things that interest you! if you get excited talking about it, your audience should get excited about reading it, because they’ll pick up on the passions you have and then everyone’s excited !!! :D
i’ll tell you a secret: everyone you meet, everyone you see, has countless unique experiences that few others may have. me? i spend hours making mashups out of kpop songs. i earned my black belt years after a traumatizing experience during training. i get russian harry potter and spanish dr. seuss books from the library. and i created a collaborative online google photos album for my classmates that now has thousands of entries. although these aren’t necessarily unique to only me, they’re still special enough to the point where, when you put them all together, you get a better image of the person i am, and what i value.
so find a story, a habit, a hobby that makes you different, because i believe that everyone has them. give them some food for thought, or that one-liner that sticks in their brain and won’t go away. and remember: these stories don’t all have to be extraordinary—they should be about people or moments of special value to you, because that’s what matters.
personal tip: when i was brainstorming ideas, i decided that the best way to get ideas out there was to go on a rant (because sometimes it helps to just have a conversation with yourself !!) and i recorded myself, so i could replay what i said !! this was so so crucial to me finding my own voice for writing essays. notice the way you word things when you talk—a good line or two may make it into the final draft :)
i found it helpful to read sample essays as well! they give a lot of great ideas on the kinds of topics people write about. (also, it’s kind of fun, because who doesn’t love a good story?)
but the people reading your essay won’t be there to just enjoy your story; what they really want you to do is to tell them what you learned from your experience. they want to know whether you’re teachable and willing to grow both as a student and as a young adult. so make sure to take note of the life lessons you learned, experience you gained, character you built, etc.
minor tip on ending your essay: if you’re telling a story that happened in the past, then close with what you learned and how you can apply that to your life moving forward. if you’re telling a story that has no definite end yet (like a passion or dream you have), you probably don’t have everything figured out (and you can say that in your essay!), so it might be better to close with your hopes for the future.
tip #4: ask your family for help.
peer-editing is one of the most effective ways to detect errors and inconsistencies in your writing, because, after staring at your essay for so long, you might gloss over glaring contradictions. for all of my essays, i printed them out and asked my parents to help me revise them. we’d meet every other night (or every night, depending on how much time was left) to review and discuss improvements.
i actually kept some of those printed drafts (only the first and the final ones for comparison), and let me tell you from experience—you’re probably going to have a lot of drafts (i think the most i did was seven? but you don’t need to go that far!). this part of the process does take some time, so remember to be patient and kind to yourself :) these essays won’t happen overnight!
enlisting the help of others also helps keep you accountable. one of the struggles many seniors face while writing essays is just... setting aside time to do them. and even though the constant reminders from your parents will definitely get repetitive and a bit stress-inducing, i can tell you from personal experience that i’m so glad they did; otherwise, i don’t think i’d have my essays done in time :’)
while writing college essays is challenging, your family will be there supporting you each step of the way. chances are that they’ll have their own pointers to pass on to you, since they probably remember doing this process themselves! and, out of everyone in your life, they probably remember the most about you (because you probably don’t remember much when you were four or five), so they might have a couple starter ideas for topics when brainstorming. you can rely on them for their advice and their experience.
tip #5: self-editing.
here’s the part that takes the longest time.
use action words. this is probably something you’ve heard all throughout elementary school where they didn’t like you to say “said” because it was “boring”… but honestly, the difference between “doing my own version” and “infusing it with my personality” could go a long way. also, use words that you would actually use in an essay—then it’ll have your own special flair, and not sound like it’s taken from some stuffy 80s textbook!
here are some of the words i used (once again, you shouldn’t use these words if they don’t sound like something you’d write/say): potential, overlay, wrestle, launch, analogous, weave, infuse, experiment, outlet, revel, fascinate, satisfaction, pursue, expand, distinction, capture, range, archive, engage, beyond, build, adversity, cultivate, preserve, commit, explore, convey, naturally
also, be on the lookout for repeated words. i once wrote an essay without noticing that i used “hope” three times in the same paragraph. don’t do that! use synonyms :) personally, i tended to run short on synonyms, so i always kept a tab or two open on my computer reserved for searching up new words.
side note: unfortunately, during my search for synonyms, i discovered that thesaurus.com just didn’t give me what i was looking for. i highly recommend using wordhippo instead; it has so many more options and they’re grouped by the different definitions of your word! i found the synonyms i needed really quickly and it was very satisfying!
avoid the passive voice! my teacher gave me this tip for theses or any other college-level writing. here’s an example of the passive voice: “there was a large part of me that wanted to turn back.” that’s twelve words taking up precious space in your word count! instead, say something like, “i considered turning back.” you’ve just freed up eight words :)
tip #6: final revisions.
this is the step where you fine-tune your essays. meet that word count.
read your writing out loud. does it sound like you? it should. every writer has a different voice, and you need to ensure that yours is pervasive throughout your essay. feel free to use contractions—not only do they reduce your word count (this was a good thing for me, since i had a problem with getting under 350 words), but they also give a more casual tone to your essay, as if you’re telling a story to someone in the room.
next, pretend to be an admissions officer and have someone else read your essay to you. do you get excited hearing about this student who shares your name? if you do, there’s a good chance the real admissions officers will love your essays, too. this also gives you a chance to review to your essay as a whole. pay attention to the overall flow. is there a clear beginning and end? do you resolve the issues and overcome the trials you brought up? listen to it as if it’s a story, and take this time to enjoy what you’ve written. you worked hard!
final thoughts / encouragements.
oh my goodness, did we make it to the end? honestly if you did, thank you so much 🥺
okay but despite my relatively optimistic tone throughout this post, i’m still going to be honest with you—the college essay writing process is difficult. it requires you to look inside yourself and analyze the “why” behind some of the things that you love, and that isn’t easy to do at all. it’s intellectually and emotionally challenging, because not only do you need to use so much energy writing, but you also have to dig deeper to understand yourself, and that’s not easy, either.
but i wanted to encourage you, too. no matter what you may think of yourself at 12am, 2am, 4am writing these essays, believe you have a personality that others love and will love when they meet you. you are an interesting person with unique experiences who deserves to share your thoughts with others. you have so many people behind you, supporting you during these next few months. and when you find that you can’t write any more, remember to take time to care for yourself. have a warm shower. go to bed early. i could go on and on about why sleep is good for your brain but i’ll spare you the details in this post 😉
one last thing: keep the bigger picture in focus. remember, by december or january, you will be finished with most of the application process. that’s no small accomplishment. you can do it. 💝
i really hope you found tips that you were looking for, and that they’re applicable to your own PIQs and other essays !! if you have any other questions, feel free to send in another ask (i promise my response won’t be this lengthy LOL) 💘💓
oh, and if you feel comfortable enough reaching out about anything in particular, i’m only a DM away 💕 i wish you the best of luck on writing your essays and i hope you enjoy your final year of high school !! 💗🌸💟💖
29 notes
·
View notes
Text
To-Do Apps Just Aren’t That Effective
I’ve written about my search for the perfect productivity system to help me complete my tasks. What I naively didn’t realize at the time was that this search for a system that ‘just works’ was not limited to me alone. It is something that a lot of users engage in, as they hop from one to-do app to another, without really getting on top of due tasks.
Task management software, or to-do apps as they’re commonly called, are an important tool for most professionals. The myriad options that exist in this space is a testament to that. Consider the following from Clive Thompson’s article on Wired,
Most common office tasks have well-settled software “solutions”. If I asked you to write a document, you’d probably use Word or Google Docs. To make a presentation, you’d pull up PowerPoint or Keynote or Google Slides.
Not so for to-dos. There is no Way That Everyone Does It. It’s a crazy Pokémon deck of options: Trello, Todoist, Gmail’s tasks, Microsoft To Do, Remember the Milk, Things, OmniFocus, Any.do, Evernote’s Tasks, and Clear, to name just a few. And that doesn’t even count the whackload of us using on big ol’ Notepad file on our computers, or even plain old paper.*
The reason to-do apps are so popular is that they help close the open-loops created in our brains when a task is unfinished. Referred to as the Zeigarnik effect[1], these unfinished tasks cause us to return to them and fret over them and eventually, complete them.
Delegating the task of remembering our due tasks helps resolve these open-loops and lets us focus on only the current task at hand. But from my own experience, and what Thompson has written,
The mere act of making a to-do list relieves so much itchy stress that it can, paradoxically, reduce the pressure to actually get stuff done. “People feel that when they put all their tasks somewhere, they’ve already done most of the work,” Perchik[2] says. But it’s an illusion. The pile of work is still there.*
The list grows over time and users continue with their lives until the sheer immensity of the list scares them into starting afresh. Almost every method of task management discussed in the article- including pen and paper methods like the Bullet Journal- ends up with the same predicament- users add in their tasks, but seldom complete them.
People were lousy at finishing their to-dos. Chen and Guzman could see an accumulation of sprawling, ambitious lists of tasks that users utterly failed to accomplish.*
So why do we insist on using to-do apps when the evidence clearly states that they don’t work for the majority of us. As always, the answer seems to lie in the societal expectations we have set up over decades, with respect to work ethic. The need to be seen as productive members of the workforce, to quantify the work being done is what drives users to hop from one app to another, all in the promise of ‘enhanced productivity’. And in this way, writes Thompson, task management software is a cut above regular software,
To-do lists are, in the American imagination, a curiously moral type of software. Nobody open Google Docs or PowerPoint thinking “This will make me a better person.” But with to-do apps, that ambition is front and center. “Everyone thinks that, with this system, I’m going to be like the best parent, the best child, the best worker, the most organized, punctual friend,” says Monique Mongeon, a product manager at the book-sales-tracking firm BookNet and a self-admitted serial organizational-app devotee. “When you start using something to organize your life, it’s because you’re hoping to improve it in some way. You’re trying to solve something.”*
The only feasible way out of this conundrum seems to be accepting that to-do apps don’t work the way our minds do. As with the problems that arise when organizing knowledge in notes, users need to bend themselves to how the apps work, to gain any benefit out of it.
Everything gets measured in the pursuit of extreme productivity - number of tasks completed, day streaks and much more. But at what point does this become too much?
[1] A basic primer on the Zeigarnik effect
[2] Omer Perchik is the founder of to-do app Any.do
#knowledge workers#productivity#bullet journal#bujo#to do#to-do apps#todoist#evernote#any.do#zeigarnik effect
7 notes
·
View notes
Text
My GIF making process!

I’ve been asked many times for a tutorial, but because I get really detailed, I always get overwhelmed by the idea. But I finally decided to buckle down!
Just so you know: I don’t use PSDs in this, and I don’t import layers to frames or anything like that. I like the hard way—at least in gif making, I believe you get higher quality gifs. Join me as I show you how to make gifs by loading videos directly into the Photoshop timeline and my coloring and sharpening techniques.
Tools used:
Mac OS X (only necessary for the first step, and there are other ways around it with a PC)
Adobe Photoshop
YouTube Purchases (any streaming service will work)
Topics covered:
Obtaining the Source Material
Loading the video file into Photoshop
Prepping, Cropping, and Resizing the Media
Adjustment Layers
Sharpening
Exporting
Obtaining the Source Material
There are a few different methods for obtaining video to work with. Proper YouTube videos are nice, but finding any major motion picture in that format is difficult, if not illegal.
Once I realized I could get really great quality video by doing screen recordings from streaming services, I stopped worrying about finding (and pirating) high resolution video files. So now, I just go to whichever streaming service I need to, pick out the movie or show, find the spot, and record small snippets.
Mac screen recording instructions:
On a Mac, Command+Shift+5 will bring up the screen recording dialogue.
Resize the frame of what you want to record within the browser.
Go to a second or two before, press the “record” button, and then begin playing the video, remembering to keep your cursor out of the recording box.
Use the Space bar to pause your video when you’ve gotten the snippet you need. Stop the screen recording by clicking the ⏹ button that is in your menu bar at the top of the screen.
Important: when the recording appears in the bottom right of your screen, click on it, and then trim the video on either end. This will help your computer convert the video file to the type that can be opened by Photoshop.
Click “done” and it will appear on your desktop, ready to be used!
PC Users: ??? Here’s a Google search I did for you
Loading the video file into Photoshop
Lots of people use this process for making gifs (a great tutorial!). I didn’t even know it existed until last summer, when I’d already been giffing for years. I wish I could still do something like that with these screen recordings, but the files are absolutely HUGE, especially on Macs with double retina displays, which actually increase the dpi by a lot. Making screencaps of them fills up my hard drive, almost immediately—even when I’ve got 20 gigs of free space to work with. So what do we do? We just. Open the file. In Photoshop. Et voila!
You can do this with any type of video, not just screen recordings.
Prepping, Cropping, and Resizing the Media
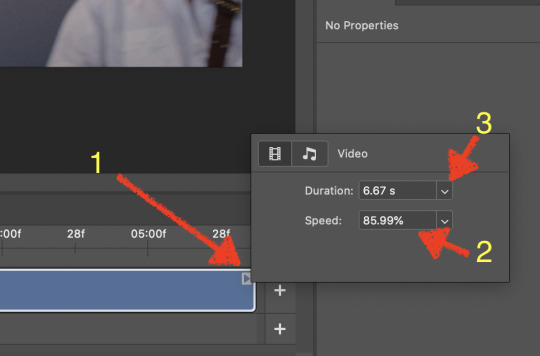
When Photoshop loads your videos up, it makes the video hilariously fast (something about frame conversion). You must slow it down for it to look natural. THIS MUST BE DONE BEFORE YOU RESZE. Your Photoshop timeline window should be at the bottom of the screen. See that little triangle in the top right of the video?
Click on it, and a menu will appear to change speed and duration.
Change the speed first- usually between 80-85% will seem realistic. (I actually went a little faster than I usually would on this at almost 86%—I don’t recommend this)
Press the button next to duration and pull the toggle all the way to the far right (if you don’t do this, full length of the video will be cut off).
Now you’ll want to crop it. Ever since Tumblr upped its GIF size limit, I have been playing around with 7:5 ratios, but let’s go with 3:2 for now. Use the Crop tool, pick out 3:2 in the top left (it may say 2:3, but you can switch that) and then find the most suitable spot in your gif for that. Hit enter on your keyboard.
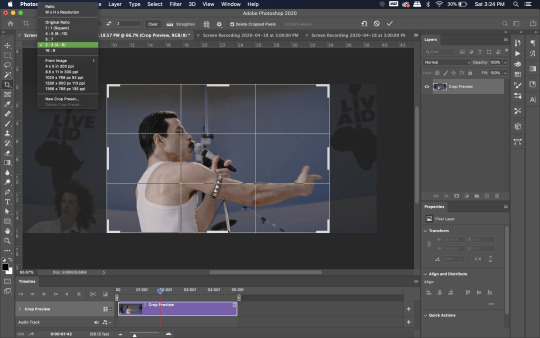
Some things to keep in mind when cropping:
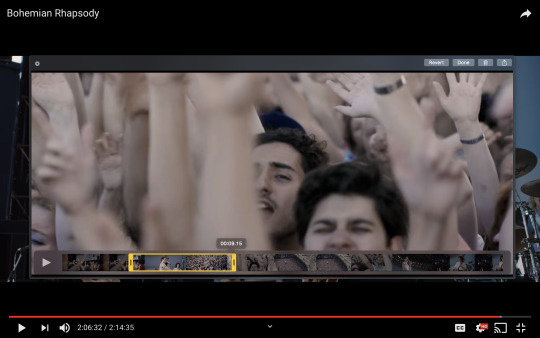
Most videos come in 16:9 ratio (BoRhap is even wider). If it’s a wide shot, you’ll need to do the full 16:9 to not lose anything. Of course, experiment and find what’s right for you!
As you can see above, I moved forward in the timeline and made the crop to a point in the video when the broadest movement was happening.
Certain videos WILL have a black or red bar that may be imperceptible until you’ve already exported the gif. Just crop in a little tighter on top and bottom to avoid them.
Now you’ll need to resize your gif to be the correct size for Tumblr. If you don’t use Tumblr’s exact dimensions, your gifs (as uploaded) will appear blurry or pixellated. We’re doing a full-width gif here, which is 540px. On a Mac, I use Command+Option+I (for “Image Size) to open the resize dialogue. You can also find it under Image->Image size...
Make sure to also have “Resample” checked. Lately I’ve been playing around to see if different options are better. Most GIF makers use “Bicubic Sharper (Reduction)” and they are not wrong to do so. I’ve just been unhappy with it lately, so I have been trying this other setting out, “Bicubic (smooth gradients)”.
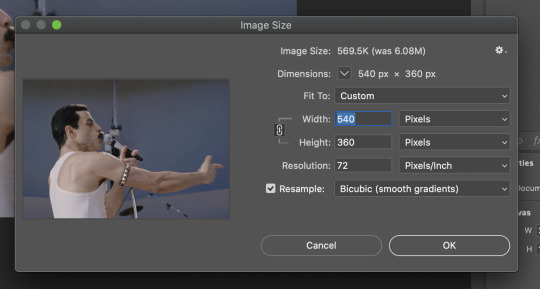
Click OK. A dialogue may come up that asks if you want to convert to a Smart Object. The answer is yes, okay, do it. The only major caveat is that you can’t go back and change the timeline speed. That’s why we did it first. But you can preview the speed now that it’s smaller, and if you don’t like it, use Command+Z (or “Undo”) and go back a couple steps to get the speed you like.
You may find, especially on a Mac screen (and possibly other displays), that at 100% your gif looks too small to be 540px. That is the curse and blessing of working with super-high resolution hardware. Zoom in to 200% and proceed about your business. This is what it will look like on Tumblr.
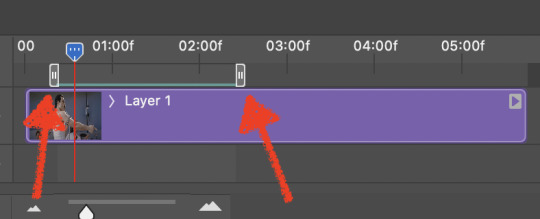
You may find it helpful at this point to begin by defining the beginning and end of your gif by moving around these bumpers. It’s safe to keep gifs under 02:00f in length. Under half of 01:00f will be way too short. (I tend to overshoot in length and then trim the beginning and the end once I see how big the gifs are upon exporting.)
Adjustment Layers
Now the creativity and fun begin!
There are a LOT of ways to get creative here. I’m going to keep it simple, very simple, but I strongly recommend opening up a new adjustment layer of each type and trying to figure out what each does!
You’ll find the adjustment layer menu at the bottom of the Layers window.

Curves
There are a lot of ways to make Curves work for you! It can do the job of Brightness/Contrast, it can do Levels, it can do Color Balance! We’re going to use it mainly to help with brightness here, but also to level out some of the tones. One of the quick tricks you can do is use the droppers on the left side of the Properties window. There are three- one with a white tip, one gray, one black. These can help define what your white tones are (and whether they need to be more of one color or another), and so on with your blacks. Sometimes it works, sometimes it doesn’t; in this case, I think it doesn’t:

That looks totally blown out and somehow also too dark!
So instead, we’re going to use that little hand with the finger pointing out and some arrows pointing up and down. This lets you define which sections you want to get brighter or darker, and how much. It doesn’t do color correction. In the example below, you can see I dragged up on a white spot and down on a dark spot. Then, I moved points around on the curve itself to refine (which the gif here doesn’t show...).
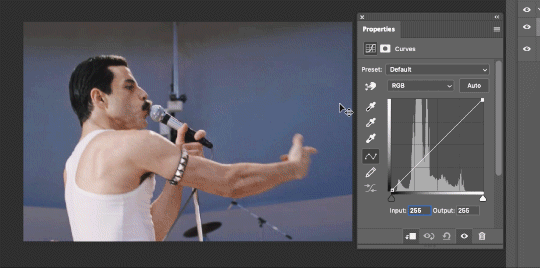
Vibrance/Saturation x2
Next, I’ve been using @gwil-lee‘s Vibrance/Saturation trick (I know you said you learned it from someone else, but I learned it from you!).
Create a Vibrance Adjustment layer, bump the values up a bunch, and then change its Fill to somewhere between 2-9%. Change the Blend Mode to Color Burn. Then make a copy of that layer keeping everything the same, but make it Color Dodge. I can’t quite define what these do, but it makes it punchier!

Color Balance
Most people are familiar with this. For this gif, I’m going to make the shadows more Cyan/Blue and the highlights more Red/Yellow. Just a few points each.
Exposure
I brought the Exposure up a bit, but not enough for you to need to read about, haha.
Selective Color
Here’s where you make fine adjustments to colors. This particular scene is extremely simple, color-wise, so keep it simple. I’m going to bump up the cyans/blues, take up the black by just a point or two, and maybe bump up the yellows and reds a tiny bit. (And as always, remember, the “opposite” of cyan is red, the opposite of magenta is green, and the opposite of yellow is blue. CMY/RGB!)

I think at this point I’m going to call it with the adjustment layers. You can go absolutely hogwild with more of them! But at this point, I’m ready to start sharpening!

Sharpening
I do three sharpening filters these days. These are all under Filter->Sharpen. Make sure your media layer (default called Layer 1) is selected as we go through this! (Also, this can really take a toll on your processor, so don’t say I didn’t warn you.)
Sharpen- This layer does the basic job
Smart Sharpen (Amount: 10%, Radius: 10, Reduce Noise: 4% Gaussian Blur)- This layer gives texture
Smart Sharpen (Amount: 500, Radius: 0.3, Reduce Noise: 12% Gaussian Blur)- This layer gives refined sharpening and smoothing
Fiddle with these as needed! Let your gif play all the way through- this may go slowly as your processor works on it. Make sure the beginning and end points make sense.
Exporting
After You’re going to have to use File->Export->Save For Web (Legacy)... or use the shortcut of Shift+Option+Command+S. This could take some time for the dialogue to pop up! Be patient.
In my opinion, these are the best gif export settings for crisp edges and no noise:
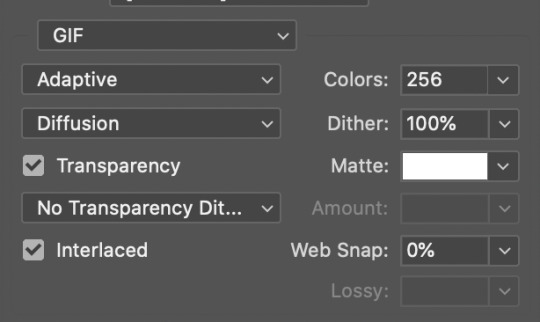
Now you see how big the file is in the bottom left. Tumblr won’t let you upload anything bigger than 10MB and it’s safer to stay under 9MB, in my experience. When your gif is too big, you have a couple options. You can close the dialogue and change the length of your gif.
OR, you can uncheck “Interlaced” and bump up the lossy to 1 or or more. This will create noise. Sometimes, that’s a good thing!
Here’s without lossy:

Here’s WITH lossy: (Honestly in a fast moving gif like this, it’s almost imperceptible, but I can see it!)

And now that I’ve exported, I can see what there’s a little black line on the bottom! So I’m going to trim that off and call it good! You can see the full gifset here.
Hope you enjoyed! Reblog if you try this out or learned anything. Feel free to reach out with questions any time!
311 notes
·
View notes
Text
How to Download Marvel comics for free!
I’ve been thinking about writing this for a while especially since we’re all stick inside but last week Marvel made the shitty decision to transition various print titles to digital only, meaning they’re directly taking revenue away from local shops rather than delay the titles, so since Marvel thinks digital comics is such a cool idea I’m gonna show you how to download as many as you’d like! (oh also this is for windows only, idk how to do it if you own a mac but also you’re rich anyways so who cares buy the comics richie)
I don’t want to take money away from the people that need it, not the actual companies of Marvel and DC fuck them they’re dying and they deserve it, but for my own rationalizing I want to take a minute to plug the Hero Initiative, basically what it is an organization that provides for comic creators that are having hard times, comics are a rough industry and you don’t get into it to get rich, I won’t go into it too much you can read for yourself but it’s been endorsed by Stan Lee, Justin Ponsor, Mike Grell, Skottie Young, Rags Morales, a lot of big names, so I’d ask if you do follow this guide and download some comics for free please consider donating to the Hero Initiative (they also sell autographed prints and you can commission some really famous artists)
anyways onto the good stuff! I’m going to be doing a fairly brief but easy to follow guide, there will be links at the bottom of the post so look for those, I’ll probably be making a few other posts with some more info so also check back for those if my blog is still here
What do I need?
You’re going to need 4 basic things if you want to do this as easily and safely as you can
1) a good anti-virus
2) anonymous web browser (Tor)
4) a safe and reliable source for the comics
4) a torrent program to download the comics
Also optional: VPN
Anti-Virus
it’s good to remember when torrenting that no one is your friend, everyone is out to trick you and no one cares, honestly you should also have a good anti-virus though, I’m not really gonna tell you which one you should have but Norton 360 is pretty good but say that in a room of CS majors is the quickest way to start a fist fight, honestly just google it, you’re gonna have to do some research, but really you’re good as long as you don’t go with Avast or Kaspersky, I’m going to go over typical tricks and traps later to ensure safety, this is just basic overall security thing
Anonymous Web Browser (Tor)
next we’re gonna download Tor (you can do this before getting a VPN, like I said either one is going to put you on a list but using one to cover you getting the other at least mitigates it lol) Tor is a great open source project that allows for basically complete anonymous web browsing, it’s a project dedicated to privacy and disruption of corporations ability to control every aspect of our lives, also a friend of mine bought K off silk road with it once in highschool, really not too much you need to know about it before using it, just download it, let it configure and you’re good, also use Duck Duck go that it comes with, don’t switch it to chrome or anything, Duck Duck go is anonymous search service which better lends to Tor’s protection
Where to get the torrents
Now this is really important because you can have everything else set up but without a safe reliable source none of this is gonna do any good, but this is the dangerous part, torrent sites are notorious traps (I bricked more than on family PC on limewire) and this is why I said earlier to remember these people are not your friends and are out to hurt you, don’t click banner ads, don’t believe pop ups, make sure your virus protection is on and it’s a very good idea to have an adblocker on, also look out for another post I’ll be making on what download buttons to trust for different popular torrent sites
when talking comics (and remember specifically only Marvel comics) there’s no other name out there than Nemesis43, he is a god and he’s going to be your new best friend, there are groups and sites out there that do comic scans that you have to pay to join or like apply to join, that shit’s dumb as hell and I’ve never used them once and I’ve got more comic than I can read in my lifetime, you don’t need em and you especially don’t need to give them money, donate to the Hero Initiative instead
Nemesis has moved around a bit in the past (if you remember the WWT debacle) right now the main site for him is ettv (there will be a link at the end of the post) sites a bit barren but he’s there, he also has a reddit he gives updates on very rarely, generally if he moves he adds where his new home is in a text doc in his recent uploads, I fully trust him and his uploads, he’s been doing this for years and I’d never have a second thought downloading from him, also because he uploads so much he’s often very highly rated and verified on whatever site he’s on
The second place I’d recommend is getcomic (again there will be a link at the end), now this is very important, never donate to them, they kinda suck, basically they’re plugged into a bunch of different scanner groups and just steal those scans and put them up and then ask for donations, basically they’re just an aggregate (Nem kinda is too but he doesn’t ask for donations and stuff), they usually use browser downloads which are a complete pain so I’d really recommend Nemesis over them but they do have TheComicGuy on torrent galaxy for larger files but that updates a lot less frequently then the main site, again I trust these guys (as long as you’re on the actual site) but don’t trust any banner ads or pop ups, also for downloading they give multiple options, a lot are very sketchy, just use the main server
also there’s other sites like readcomics or newcomics, never used em, don’t like em, use at your own behest
On sites like ettv you’re gonna want to use the magnet, someone years ago told me it was safer and I just believed them and have always used em, not sure if it’s true but it’s worked so whatever, really you shouldn’t be too worried about this stuff and if you follow this guide you’re going to be way over prepared to download comics, really no one cares about comic torrenting, movies, video games, tv shows that’s the stuff people really get caught on, this is just nerd shit
I’m going to be making another post showing how to use these sites, and other sites comic can be found on so look back at my blog for that
Torrent program
This is pretty basic, just get utorrent, it’s what I’ve always used, it works, whatever, definitely look this up with a VPN on or on Tor, it’s simple to use, I’ll be doing a short tutorial on how to make it even safer
Lastly this one is optional but a pretty good idea, for more than just this
VPN aka Virtual Privacy Network
honestly you can get the anonymous web browser (Tor) or the VPN first, their both going to help cover you downloading the other and honestly both are going to put you on a list for googling them (which is why I suggest looking for someone who just already has the .exes ((I always keep them on a thumbdrive for when I have to reset one of my computers)), I might try to make a google drive with em but also I might not bc that sounds like work and I’m already typing all this up), anyways I’m not really gonna explain what a VPN is, there’s a lot of resources that can explain it better than I can but basically it masks what you do on the internet, there’s a lot of choices when picking a VPN but the big thing I looked for when choosing mine was 1) non-US based so it’s harder for US investigation agencies to request stuff for them or get anything from them 2) one that doesn’t keep logs, honestly they all do even if they say they don’t, but you wanna look for one that hasn’t turned over many logs to US agencies and 3) unlimited peer 2 peer connections which is complicated but basically means you can torrent stuff anonymously and with decent speed. Like Anti-Virus there are a ton of different VPN’s out there, you really have to do research because there are actual accounts of FBI agencies crating VPN’s telling people they’re anonymous when really they had direct access to all the info, I haven’t done any research but NordVPN seems kinda like one of these, really the more they advertise the more suspicious I am, Just google “best vpn 2020″ and look at like 5 lists and read the the stuff, personally I use IPvanish which unfortunately is US based and while it gave over logs in 2016 even thought they said they didn’t keep any but now they’re owned by a new company that super double promises they don’t (again who cares they all do) but they’ve allow P2P and use 256-bit AES encryption
I wanna take a second to mention that this isn’t going to be free, this is the only place you’re going to be spending money (besides donating to Heroe Initative of course), a good VPN is about $100 a year which all in all isn’t terrible, technically you can just get by on the anonymous browser but this gives you an extra layer of security to pretty much ensure you won’t get caught and plus in the ever worsening internet hell world a VPN is becoming more and more important, I’m sure you can find articles about it but yea you don’t technically need a VPN but it’s useful for more than just this
How to work it all
Ok so this is gonna be a little stream of consciousness, as this all kinda has been, so sorry but I’m gonna try and explain it as best I can and also feel free to ask any questions on this blog, I’ll check back eventually I’m sure
So first thing first, make sure you’re virus protection is on and you’re connected on your VPN if you’re using it (you can google “what is my IP” to double check it’s working) then load up Tor, let it load and connect up and whatever, then go to https://www.ettvdl.com/user/Nemesis43 (I’m just gonna show this with Nemesis43, maybe I’ll make another one for getcomics but that’s pretty straight forward, also nem is better)
now remember we’re only here for Marvel comics, so scroll past all those thousands of other comics this would work exactly the same for, I’m gonna go for Ant-Man #4 which was released on the 13 as a digital only comic despite the first three issues being physical copies and now sit on my shelf forever unfinished making me look like a complete penis

it may take a while but it’s going to look like this, click on the blue words, it’s gonna take you to a page that looks like this
now from here we’re going to get the magnet link, right click and select copy link address, I like doing this because it limits my interactions with the page, note the advertisement at the top telling me I need a VPN despite thinking I’m in Guadalajara (which for legal reasons I am)

just copy that and then go to utorrent and click the add link

it’ll open a little box, it should add the link automatically, if it doesn’t just hit ctrl+V
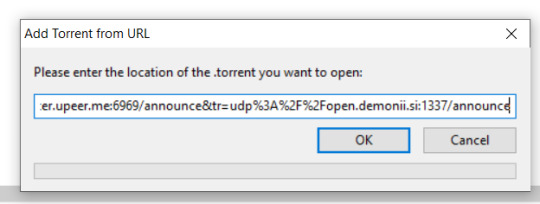
hit ok and it’ll load it up, it might need to download some metadata but after that it should be good, oh also it might bring up a window basically asking where you want to save it and what to name it, you can set all that up in preferences, I did so I just turned that window off and can’t be assed to turn it back on, just hit ok if you don’t wanna bother with that stuff, it’ll go into your downloads by default

and that’s it really, it’s that easy, I might make another thing talking about how to make utorrent more anonymous or whatever so look for that, but stock it’s fine, also when it’s finished downloading it’s gonna start seeding (like uploading to someone else) I’ve always been a scumbag and I never seed but Nemesis seeds stuff so much you really don’t need to anyways, just select it and hit the stop button (the black square on the tool bar)
here are all the links I could think of
Hero Initiative
download Tor
here’s a guide for VPNs
download utorrent
song I found recently that I like
getcomics
Nemesis
so yea that’s pretty much the basics, be smart, be safe, any viruses you get are on you but I hope you found this helpful and feel free to ask any questions
oh and also this is all parody and I’ve never actually torrented anything, I don’t even own a computer
155 notes
·
View notes
Text
sandboxie web browser
1) Ubuntu: Ubuntu (for your basic user) is the easiest entry point into the wonderful (and mostly free) world of Linux. If you find yourself a quite a while Windows user and hate paying the cost for an upgrade every time a new operating system comes out you might give vid shot. Carbohydrates download it or order a free disc they will ship to a person. The only downside is that it is much more hard to run programs you purchase in local store on Ubuntu (or any Linux build for that matter), though it is still possible one does take period to uncover to use programs pertaining to example Wine.
First things first. Clean up your programs and personal files. When you go to certain websites, they may leave cookies behind. You may have used three different printers and two different cameras since you bought your PC; those items require programs to rush. You may have downloaded some programs that you thought looked really cool, but in fact never take. Get rid of all this bits and pieces. Go to your control panel and employ the delete programs approach to get rid of all outdated or unused programs. Call at your Internet tools option and clean increase Internet as well as delete cupcakes.
Click the start button and point to manage Panel. For the Control Panel window, click System and Security and subsequently navigate to Administrative Tools, System Layout. If prompted, enter your admin password and then click the Continue button. Alternatively, you can click start off button and kind 'msconfig' (without quotes) on the Start Search box. Do not hit the Enter key and look in the listings.
Nancy what puts you showing us one of the most money making programs? Truth that is that you simply could spend years purchasing programs this internet and waste a fantastic amount of one's hard earned money. Achieve is to save you money and time, the same money and time I wasted hottest. I have obtained over 50 some successful programs, slim down these programs I purchased did seriously have A reimbursement Guarantees! Whenever i downloaded the actual making ebook they were worthless. You think I prospective smarter than that, but i got "taken." It is a bad feeling; especially a person have are not in employment to throw money in the market.
To some extent, this can be done by tweaking some settings, like adding more room to your partition. If you opt to try the Mac cleaner to clean-up some drive space on your own Mac, which will in turn help from the CPU and RAM era. You'd be surprised how often this you will save from for almost any get additional storage, RAM, or even CPU renovations. However, sandboxie Crack 2023 to your RAM sandboxie might still be needed eventually.
I always find certain freshness in my computer after i reinstall the Windows. This is probably because the application of the computer results in accumulating a number of rubbish data in the memory. Feel the first thing to do is to format the C drive and reinstall Windows periodically, once in six months or 1 yr. You can then reinstall the programs stored in the D motivation. The latest versions of Skype, Adobe reader and Irfan view downloaded from impact on your F drive, are quickly installed of having them fresh on personal computer without the interference among the earlier updates.
There furthermore the possibility that may a Windows 7 Pro system running the FAT32 file system instead of NTFS. The FAT32 file system does not have the in-built security of NTFS and will not allow in order to definitely allocate Deny permissions on files, folders or opportunities. You can however, easily convert the FAT32 file system to NTFS though using tools in XP. To uncover out how, do a Google search for "convert FAT32 to NTFS".
0 notes
Last Seen Blogs