#And I've looked at so many tutorials
Text


#same, lewis, same
#lewis hamilton#valtteri bottas#f1#valewis#grill the grid#remy.gif#i completely forgot how to do text effects and spent two hrs looking for tutorials n then another hour doing it#i'm on the phone w hera right now and i've cried so many times while she's just laughing#n e way. here it is.
279 notes
·
View notes
Text
I have 3 sketches done and 4 more planned and im lining and coloring a drawing rn I just wanna draw!!! I dont wanna have to go to work!!!!
#rambles#lord give me the strength to finish these artfight attacks#I hope to get them all done but if I don't im still gonna give my mutuals the stuff I planned out#struggling rn on a stupid grassy flower field scene#dont know how to draw backgrounds so im forcing myself to figure it out#I've looked at so many reference photos and tutorials and it ain't clicking babes!!
2 notes
·
View notes
Text
I want to make myself a hero suit, but I’d be too embarrassed to wear it...
13 notes
·
View notes
Note
Ahh! you make the prettiest lokius/loki show gifsets!! Please tell me your secrets oh talented one (aka do you have any tips for the new gifmakers out there?)
Oh my god you're too sweet?? Thanks so so much for the kind words and taking the time to send a message, always means a lot to hear 🥰💖
Haha and as much as I treasure your talented compliment in all honesty to this day I don't actually understand what each layer option in Photoshop does and just make things up along the way which is the best advice I can give! Coloring, cropping, font selection, really everything is extremely specific to your own personal tastes and even my own is a constant work in progress 😊
Overall curves is a solid base for any edit but because my gifs are usually extremely bright and saturated (probably overly so if we're being honest 😂) the adjustments that make the biggest difference there are almost always levels to add strong brightness and contrast (don't like the actual brightness/contrast option for this, who knows why), color balance to achieve the most natural looking tones, and selective color to make shades pop so those are great places to start!
Best of luck if you're getting ready to try gifmaking out and please feel free to ask or message about anything specific you might have questions about in the future 💕
#really just take your time in finding out which adjustments look best to you bc the personal touch people put in their gifs is everything#it's so cool and special and exciting to see how certain scenes play out in someone's mind and how they brought that to life <33#and once again you're very sweet to say all this and i hope i at least helped a bit or will more in the future lol#it's hard to give tips bc i've honestly never seen anyone who gifs with as many layers as i do so my method is like. furthest from the norm#but just another point toward building your own style bc tutorials didn't work for me at all it was all trial and error#good luck again and i hope you have a lot of fun!! thank you again for the lovely ask <3333#ask
5 notes
·
View notes
Text
Currently making small bookmarks and listen to cool playlists while I internally despair because of all my fear, my compulsions and my depressive feelings. <3
I feel like shit. I know that this hell hole will pass too like all my other horrible panicky/depressive episodes but that doesn't mean that I won't feel absolutely worn out, desparate for a relaxed and happy day and scared.
#i delete this later#does this count as vent already?#I'm a mess atm#but it already got better#I've been in a even worser state last week so uh I got a lot better I guess?#I mean. I'm not stuck in bed anymore#this is a cry for help#my mind is too full atm#can someone help me#the bookmarks look super cute tho!#I'm glad that I found this little tutorial for them#they look like little hearts <33#I'm gonna need to make a bunch considering how many books I'm reading atm#My mind can only produce sadness;emptiness;utter and horrible fear and worry or a neutral feeling with too little excitement rn#a crumb of serotonin please#anxiety#panic disorder#ocd#depressive episode#anxiety awareness#panic disorder awareness
2 notes
·
View notes
Text
Had a few folks interested in how I made the patches I posted for Solarpunk Aesthetic Week, so I thought I'd give y'all my step-by-step process for making hand-embroidered patches!

First, choose your fabric and draw on your design. You can use basically any fabric for this - for this project I'm using some felt I've had lying around in my stash for ages.

Next, choose your embroidery floss. For my patches I split my embroidery floss into two threads with 3 strands each, as pictured. You can use as many strands in your thread as you prefer, but for the main body of my patches I prefer 3 strands.
Next you're going to start filling your design using a back stitch.

First, put in a single stitch where you want your row to start.

Poke your needle up through the fabric 1 stitch-length away from your first stitch.

Poke your needle back down the same hole your last stitch went into so they line up end-to-end.
Repeat until you have a row of your desired length (usually the length of that colour section from one end to the other). Once you have your first row, you're going to do your next row slightly offset from your first row so that your stitches lay together in a brick pattern like this:

Make sure your rows of stitches are tight together, or you'll get gaps where the fabric shows through.
Rinse and repeat with rows of back stitch to fill in your patch design.

When you're almost to the end of your thread, poke your needle through to the back of the fabric and pull the thread under the back part of the stitching to tuck in the end. Don't worry if it looks messy - no one's gonna see the back anyway.
This next step is fully optional, but I think it makes the patch design really pop. Once your patch is filled in, you can use black embroidery floss to outline your design (or whatever colour you want to outline with - it's your patch, do what you want). I use the full thread (6 strands, not split) of embroidery floss to make a thicker outline.

I use the same back stitch I used to fill the piece to make an outline that adds some separation and detail. You could use most any 'outlining' stitch for this, but I just use back stitch because it's just easier for me to do.
Once you're finished embroidering your patch, it's time to cut it out!

Make sure to leave a little border around the edge to use for sewing your patch on your jacket/bag/blanket/whatever, and be careful not to accidentally cut through the stitches on the back of the patch.
If you have a sturdy enough fabric that isn't going to fray, you can just leave it like this. If not, I recommend using a whip stitch/satin stitch to seal in the exposed edges (I find that splitting your embroidery floss into 3-strand threads works best for this).

And then you're done! At this point you can put on iron-on backing if you want, or just sew it on whatever you wanna put it on. Making patches this way does take a long time, but I feel that the results are worth it.
Thanks for reading this tutorial! I hope it was helpful. If anyone makes patches using this method, I'd love to see them! 😁
#solarpunk aesthetic week#sewing#tutorial#sew on patch#punk diy#diy punk#punk aesthetic#handmade#solarpunk#handcrafted#embroidery#embroidered patch#how to#how to make a patch
17K notes
·
View notes
Note
Any tips on learning to make buttonholes? I've been putting it off for.... *checks notes* like three years.... but better late than never and all that. I don't have any fancy machines so I gotta do it by hand but that seems right up your alley.
Thanks!
It IS up my alley, yes, I do most of my buttonholes by hand!
I'm actually part way through filming an 18th century buttonhole tutorial, but I expect it'll be a few more weeks before I finish that and put it on the youtubes, so in the meantime here's the very very short version. (The long version is looking like it'll probably be about 40 minutes maybe, judging by how much script I've written compared to my last video?)
Mark your line, a bit longer than your button is wide. I usually use a graphite mechanical pencil on light fabrics, and a light coloured pencil crayon on dark ones. (I have fabric pencils too, but they're much softer and leave a thicker line.)
You may want to baste the layers together around all the marked buttonholes if you're working on something big and the layers are shifty and slippery. I'm not basting here because this is just a pants placket.

Do a little running stitch (or perhaps a running backstitch) in fine thread around the line at the width you want the finished buttonhole to be. This holds the layers of fabric together and acts as a nice little guide for when you do the buttonhole stitches.

Cut along the marked line using a buttonhole cutter, or a woodworking chisel. Glossy magazines are the best surface to put underneath your work as you push down, and you can give it a little tap with a rubber mallet if it's not going through all the way.

I'm aware that there are some people who cut their buttonholes open using seam rippers, and if any of them are reading this please know that that is abhorrent behaviour and I need you to stop it immediately. Stop it.
Go get a buttonhole cutter for 10 bucks and your life will be better for it. Or go to the nearest hardware store and get a little woodworking chisel. This includes machine buttonholes, use the buttonhole cutter on them too. If you continue to cut open buttonholes with a seam ripper after reading this you are personally responsible for at least 3 of the grey hairs on my head.
Do a whipstitch around the cut edges, to help prevent fraying while you work and to keep all those threads out of the way. (For my everyday shirts I usually do a machine buttonhole instead of this step, and then just hand stitch over it, because it's a bit faster and a lot sturdier on the thin fabrics.)

I like to mark out my button locations at this point, because I can mark them through the holes without the buttonhole stitches getting in the way.
For the actual buttonhole stitches it's really nice if you have silk buttonhole twist, but I usually use those little balls of DMC cotton pearl/perle because it's cheap and a good weight. NOT stranded embroidery floss, no separate strands! It's got to be one smooth twisted thing!
Here's a comparison pic between silk buttonhole twist (left) and cotton pearl (right). Both can make nice looking buttonholes, but the silk is a bit nicer to work with and the knots line up more smoothly.

I've actually only used the silk for one garment ever, but am going to try to do it more often on my nicer things. I find the cotton holds up well enough to daily wear though, despite being not ideal. The buttonholes are never the first part of my garments to wear out.
I cut a piece of about one arm's length more or less, depending on the size of buttonhole. For any hole longer than about 4cm I use 2 threads, one to do each side, because the end gets very frayed and scruffy by the time you've put it through the fabric that many times.
I wax about 2cm of the tip (Not the entire thread. I wax the outlining/overcasting thread but not the buttonhole thread itself.) to make it stick in the fabric better when I start off the thread.
I don't tend to tie it, I just do a couple of stabstitches or backstitches and it holds well. (I'm generally very thorough with tying off my threads when it comes to hand sewing, but a buttonhole is basically a long row of knots, so it's pretty sturdy.)

Put the needle through underneath, with the tip coming up right along that little outline you sewed earlier. And I personally like to take the ends that are already in my hand and wrap them around the tip of the needle like so, but a lot of people loop the other end up around the other way, so here's a link to a buttonhole video with that method. Try both and see which one you prefer, the resulting knot is the same either way.


Sometimes I can pull the thread from the end near the needle and have the stitch look nice, but often I grab it closer to the base and give it a little wiggle to nestle it into place. This is more necessary with the cotton than it is with the silk.
The knot should be on top of the cut edge of the fabric, not in front of it.

You can put your stitches further apart than I do if you want, they'll still work if they've got little gaps in between them.
Keep going up that edge and when you get to the end you can either flip immediately to the other side and start back down again, or you can do a bar tack. (You can also fan out the stitches around the end if you want, but I don't like to anymore because I think the rectangular ends look nicer.)
Here's a bar tack vs. no bar tack sample. They just make it look more sharp, and they reinforce the ends.

For a bar tack do a few long stitches across the entire end.

And then do buttonhole stitches on top of those long stitches. I also like to snag a tiny bit of the fabric underneath.

Then stick the needle down into the fabric right where you ended that last stitch on the corner of the bar tack, so you don't pull that corner out of shape, and then just go back to making buttonhole stitches down the other side.
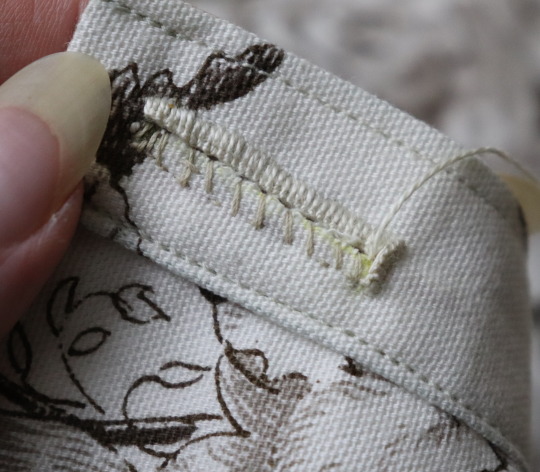
Then do the second bar tack once you get back to the end.

To finish off my thread I make it sticky with a bit more beeswax, waxing it as close to the fabric as I can get, and then bring it through to the back and pull it underneath the stitches down one side and trim it off.


In my experience it stays put perfectly well this way without tying it off.
Voila! An beautiful buttonholes!


If you want keyhole ones you can clip or punch a little rounded bit at one end of the cut and fan your stitches out around that and only do the bar tack at one end, like I did on my 1830's dressing gown.

(I won't do that style in my video though, because they're not 18th century.)
Do samples before doing them on a garment! Do as many practice ones as you need to, it takes a while for them to get good! Mine did not look this nice 10 years ago.
Your first one will probably look pretty bad, but your hundredth will be much better!
Edit: Video finished!
youtube
And here's the blog post, which is mostly a slightly longer version of this post.
#ask#buttonholes#sewing#hand sewing#sewing tutorial#I've been procrastinating on the video this week#I want it done! I don't want to work on it I want new projects! I want to cut out more gloves!#currently forcing myself to do the last few buttonholes on these pants and then maybe I can cut out new gloves? as a treat?#but I hope I get some filming done tomorrow too
3K notes
·
View notes
Text
i think i am giving up on gouache for the time being 😐 it does not spark joy. in fact it sparks only confusion, depression, and most of all, a deep and bitter rage
#art diary#I've watched so many tutorials and yet#I do not get it !!#my colors look so muddy!#and my paint consistency is either dry and sticky or runny and diluted with no in between#where's that perfect butter consistency everyone talks about 😩#anyways I've had enough!!#good riddance!!!!!!!#there's too much bullshit going on in my life to deal with this rn -_-
0 notes
Text
How to start a pair of punk patch pants
(a potentially really shitty tutorial)
I've seen a couple videos on this but a lot of them seem to skip out on some really key information and tricks so I thought I'd just write a probably really long and really rambly post about it!!!
Step one: gathering supplies
In terms of supplies the main things you'll need are:
The pants
Approximately 4 rolls of dental floss (this can change depending on number of patches and your pant size)
A needle with a big enough eye to fit the floss through
Acrylic paints
Brushes
Scrap denim or other scraps of fabric for the patches
Pins
Some kind of marker or pencil that will work on the fabric you've chosen
I will be going into some detail below about why you need each of these items!!
The pants themselves
personally I prefer either using a pair of jeans I already own or thrifting a pair to be as sustainable as possible, however if you really need to go out and buy a new pair for whatever reason get a high quality pair, this will help in the long run with preventing them from falling apart as easily.
The second main point I want to make is that the pants should not be skinny jeans. This is because when you sew on patches it slightly cinches in the fabric, and with skinny jeans generally being stretchy, this is going to result in the thread of the patches stretching out and snapping. Your patches will all just start falling off and it'll ruin your hard work.
This is why I'd recommend using a pair of jeans or pants that are a bit looser of a fit, such as straight legged pants or a pair of pants a size up from your actual size if possible!
Dental floss
The reason it's generally suggested to use dental floss rather than actual thread is because dental floss tends to overall be a lot stronger than your average thread, as well as often being more easily accessible to buy.
Needle
This ones pretty self-explanatory, just make sure you get a needle with a long/wide enough eye (the hole the thread goes through) for your floss to be able to fit through without trouble.
Acrylic paints
You may be wondering why I'm suggesting acrylics over fabric paints and there are a few reasons!
The first is simply that they're both cheaper and far easier to purchase for the average person than fabric paints, and I want this tutorial to be as accessible as possible for as many people as possible.
The second reason is that fabric paints require a lot of fucking around with setting the paint, whereas acrylics can just be left to dry and be finished, and so long as your pants are hand washed, the paints won't come out (unless you layer it on super thick or are really rough when you clean them).
Brushes
Another pretty obvious one, these are needed so you can actually paint your patches!!!
Fabric/spare denim
You need fabric or scraps to be able to actually create patches for your pants, so this is essential.
Any kind of scrap fabric can do, a lot of fabric stores tend to have bins of scrap fabric that are either pre-priced or priced by weight and that can be a really good opportunity to acquire the fabric you need!
Another way (the method I tend to use) is thrifting a few pairs of jeans alongside the pair I want to patch and then ripping them up into patch-sized pieces!
Either way, I really advise against buying straight up new fabrics by the metre for this as it kinda goes against the entire idea of sustainability and reuse.
A really big tip I have for when you're cutting the fabric of your choice up for patches is to actually only cut a little slit, and then rip. This produces a really nice distressed edge and will help add some texture and more of a fucked up look to your pants a lot quicker than if you waited for the fabric to fray by itself!
Marker/pencil
This is literally just so you can draw your designs onto your patches! I've personally found that either a black or white (depending on how dark the fabric you're using is) pastel pencil is generally good enough to get the general gist of what you want down well enough for you to paint it on.
Pins
These are literally just to hold your patches in place and literally any kind from proper sewing pins to safety pins will work! (just don't forget they're in the jeans before you put them on I promise you it isn't fun to put on a pair of jeans full of pins).
Optional: a sketchbook
You may want a sketchbook or alternatively scraps of paper if you have any kind of original concept for a patch so you can draw it out a few times first to really nail it, and it's also helpful to have if you aren't as confident in your painting and drawing abilities!
Step two: patch making
I personally pre-rip/cut all of my patches before I paint anything on them generally speaking and then fit whatever design I want onto whatever piece I think it would fit on, however if you want to paint your patches and then rip/cut the design out that's also an option (and probably a much smarter one I'm just incredibly stubborn).
For punk pants you want a good mix of both punk bands, politics, and also maybe something a bit daft (I have the "he scream at he own ass" possum on the back pocket of a patched skirt for example). If you don't have bands and such, it kinda defeats the point of them being punk patched pants.
I personally generally pick a theme (eg. colourful patches, all black and white) when making anything patched because I think it makes everything look a bit more cohesive, but that is by no means a rule you actually have to follow I'm just autistic a fuck tbh.
Step three: the assembly
I personally put my main/bigger patches on first and put them on in a few different places until I get the placement I like, and then sew them on with the floss like this:

The main thing you want to do to make sure your pants don't wind up looking a bit weird or bare is to fill in any gaps between your painted patches with small, blank patches. Like this:
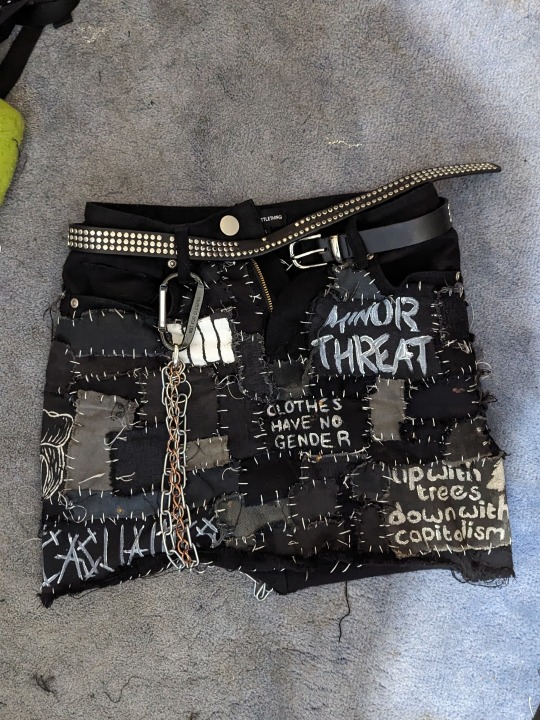
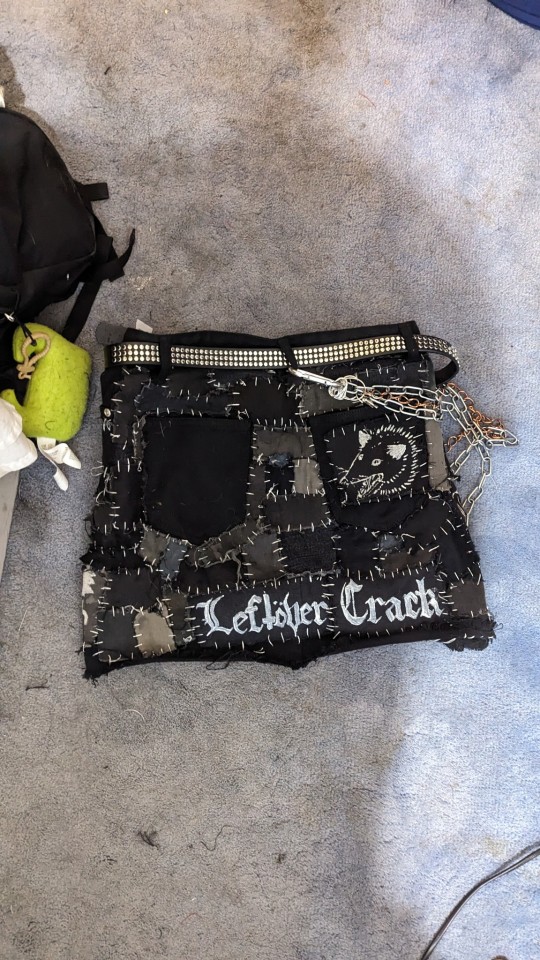
and that's pretty much it!!! I can't really explain via written text how to sew and how I personally tie off etc but if anyone would like a video tutorial lmk!!!
#punk#alternative#cripple punk#queer punk#diy or die#punk patches#diy punk#punk diy#patched pants#crust pants#patched skirt#punk skirt#crust skirt#punk pants#crust punk#punk style#punk fashion#punk culture
2K notes
·
View notes
Text
Things to Do that Aren't Related to Growing Plants
This is my second post in a series I’ll be making on how to increase biodiversity on a budget! I’m not an expert--just an enthusiast--but I hope something you find here helps!
Some of us just don’t have much luck when it comes to growing plants. Some of us simply want to aim for other ways to help that don’t involve putting on gardening gloves. Maybe you've already got a garden, but you want to do more. No problem! There’s a couple of options you can look into that’ll help attract wildlife in your area without even having to bring out any shovels!
Provide a Water Source
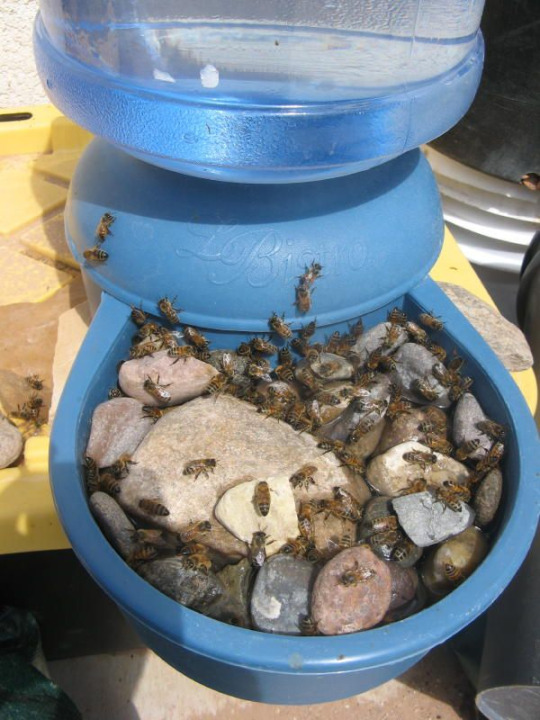
Oftentimes when I see ‘add a water source’ in informational articles about improving your backyard for wildlife, it’s almost always followed by an image of a gorgeous backyard pond with a waterfall and rock lining that looks expensive to set up, difficult to maintain, and overall just… not feasible for me. Arguably, not feasible for a lot of people. And that’s okay! There’s still ways to add water in your garden for all kinds of creatures to enjoy!
There’s tons of ways to create watering stations for insects like bees and butterflies. A self refilling dog bowl can work wonders! Add some stones into the receiving tray for insects to land on or use to climb out, and you’ve got a wonderful drinking spot for all kinds of insects! You can also fill a saucer or other dish with small stones and fill it, though it’ll likely need refilling daily or even several times a day during hot times.
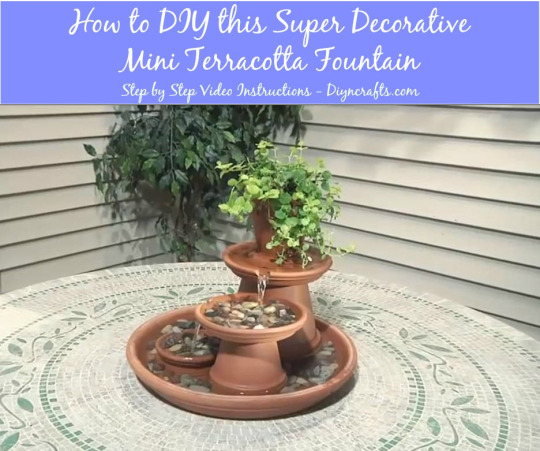
I've seen people online use all kinds of things to make water features. Some go with terra-cotta pots, pebbles, and a cheap pump to get a small and simple fountain. Others use old tires, clay, and a hole in the ground to create an in-ground mini pond system. If all else fails, even a bucket or watertight box with a few plants in it can do the trick--though do be wary of mosquitoes if the water isn’t moving. In situations like these, a solar-powered fountain pump or bubbler are great for keeping the water moving while still making it a drinking option for wildlife (it not even more appealing for some)--and these items can be obtained fairly cheap online!
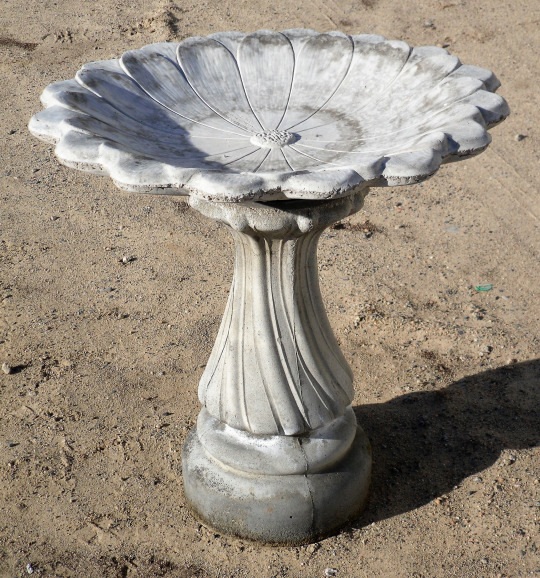
Bird baths are an option as well--a classic way to provide for birds in your area, they can be easy to find online or in a gardening store! The only downside is that a good, quality bird bath can be pricey up-front. However, a nice stone bird bath should last a long time, be easy to clean and refill, and be enjoyed by many birds! I’ve also seen tutorials on how to make your own with quickcrete! Bird baths will be a welcome sight to birds, as they provide a space for them to drink and bathe to regulate the oils in their feathers for flight and insulation. Putting a stone in the middle will also help insects to escape if they fall in, and provide a place to perch so they can get their own drink. You’ll want to change the water and clean the baths regularly--as often as once a week, if you can manage it.
If possible, it’s highly encouraged to fill and refill water features with rainwater instead of tap water. Tap water is often treated, so instead of using hoses or indoor kitchen water, collecting some rainwater is a great alternative. Collecting rainwater can be as simple as leaving cups, bins, or pots outside for awhile.
Butterflies and other creatures will also drink from mud puddles. If you can maintain an area of damp soil mixed with a small amount of salt or wood ash, this can be fantastic for them! Some plants also excel at storing water within their leaves and flowers (bromeliads come to mind), making them an excellent habitat for amphibians as well as a drinking spot for insects and birds.
Bird Feeders and Bird Houses
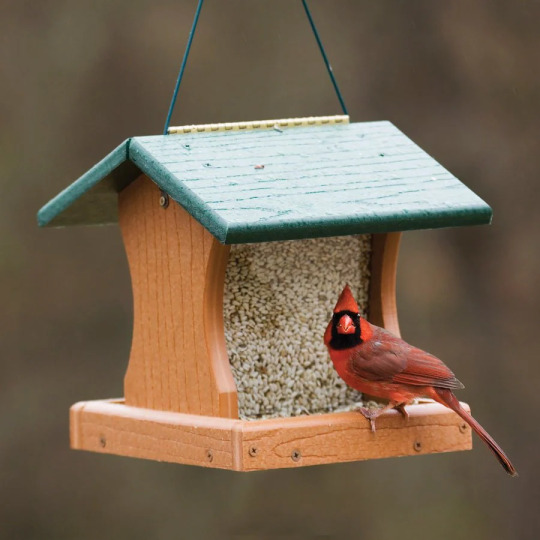
Some of the fancy, decorated bird feeders are expensive, but others can be pretty low-cost--I got my bird feeder from Lowe’s for around 10 dollars, and a big bag of birdseed was around another 10 dollars and has lasted several refills! If you don’t mind occasionally buying more birdseed, a single birdfeeder can do a lot to attract and support local birds! If you’re handy, have some spare wood, and have or can borrow some tools, you may even be able to find instructions online to make your own feeder. You may not even need wood to do so! Even hummingbird feeders, I’ve found, are quick to attract them, as long as you keep them stocked up on fresh sugar water in the spring and summer!
An important note with bird feeders is that you have to make sure you can clean them regularly. Otherwise, they may become a vector for disease, and we want to avoid causing harm whenever possible. Also keep an ear out and track if there’s known outbreaks of bird diseases in your area. If local birding societies and scientists are advising you take your birdfeeders down for awhile, by all means, do it!
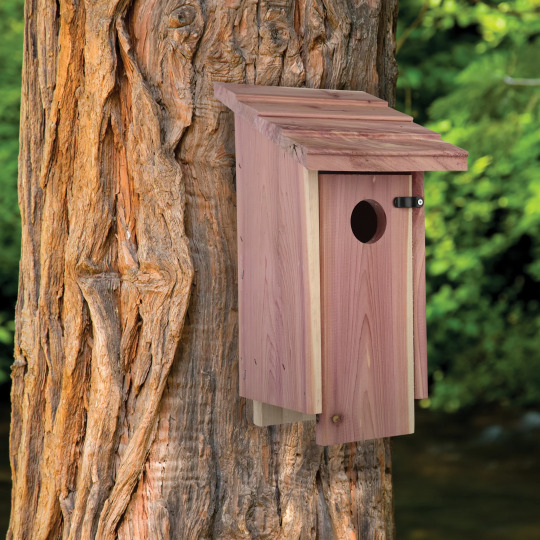
Bird houses are naturally paired with bird feeders as biodiversity promoters for backyard spaces, and it makes sense. Having bird houses suited to birds in your area promotes them to breed, raise their young, disperse seeds, and generally engage in your surrounding environment. Setting them up takes careful selection or construction, preparation, and some patience, but sooner or later you might get some little homemakers! Keep in mind, you will need to clean your birdhouses at least once a year (if not once per brood) to make sure they’re ready and safe for birds year after year--you wouldn’t want to promote disease and parasites, after all. But they could be a valuable option for your landscape, whether you purchase one or construct your own!
Again, do make sure you're putting up the right kind of boxes for the right kinds of birds. Bluebird boxes are some I see sold most commonly, but in my area I believe they're not even all that common--a nesting box for cardinals or chickadees would be far more likely to see success here! And some birds don't even nest in boxes--robins and some other birds are more likely to use a nesting shelf, instead! Research what birds live in your area, take note of any you see around already, and pick a few target species to make homes for!
Solitary Bee Houses
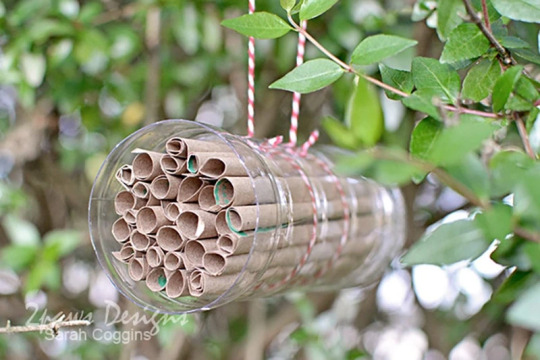
A bee house or bee hotel is a fantastic way to support the solitary bees in your area! For a few dollars and some annual cleaning, you can buy a solitary bee house from most big box nurseries. Alternatively, you can make one at home, with an array of materials you may already have lying around! You can even make them so that they’ll benefit all kinds of insects, and not necessarily just bees.
Though you don’t even necessarily have to break out the hammer and nails, buy a ton of bricks, or borrow a staple gun. Making homes for tunneling bees can be as simple as drilling holes in a log and erecting it, or drilling holes in stumps and dead trees on your property. You might even attract some woodpeckers by doing this!
Providing Nesting Area
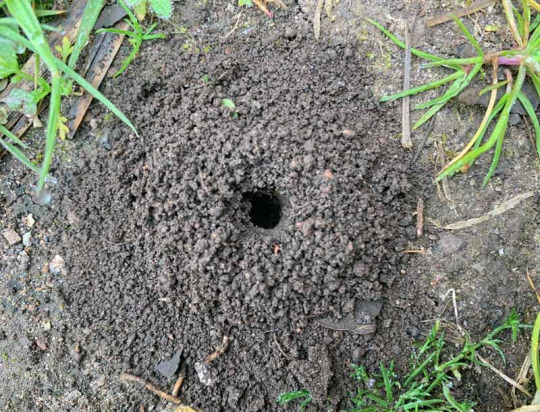
There are tons of different kinds of bees, and they all make different kinds of homes for themselves. Not all of them make big cavity hives like honey bees, or will utilize a solitary bee house. Bumblebees live in social hives underground, particularly in abandoned holes made by rodents--some others nest in abandoned bird nests, or cavities like hollow logs, spaces between rocks, compost piles, or unoccupied birdhouses. Borer, Ground, and Miner bees dig into bare, dry soil to create their nests. Sparsely-vegetated patches of soil in well-drained areas are great places to find them making their nests, so providing a similar habitat somewhere in the garden can encourage them to come! I do talk later in this document about mulching bare soil in a garden--however, leaving soil in sunny areas and south-facing slopes bare provides optimal ground nesting habitat. Some species prefer to nest at the base of plants, or loose sandy soil, or smooth-packed and flat bare ground. They’ve also been known to take advantage of soil piles, knocked over tree roots, wheel ruts in farm roads, baseball diamonds and golf course sand traps. You can create nesting ground by digging ditches or creating nesting mounds in well-drained, open, sunny areas with sandy or silty soil. However, artificially constructed ground nests may only have limited success.
Providing Alternative Pollinator Foods
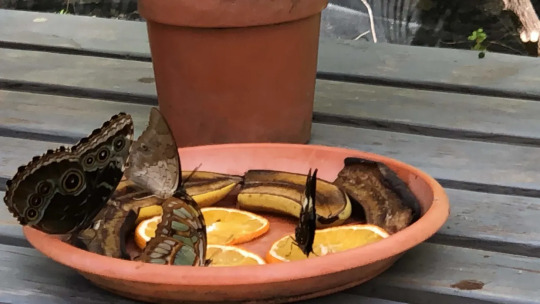
Nectar and pollen aren’t the only foods sought out by some pollinators! Some species of butterflies are known to flock to overripe fruit or honey water, so setting these out can be an excellent way to provide food to wildlife. You may want to be cautious about how you set these out, otherwise it can help other wildlife, like ants or raccoons. Butterflies may also drop by to visit a sponge in a dish of lightly salted water.
Bat Houses and Boxes
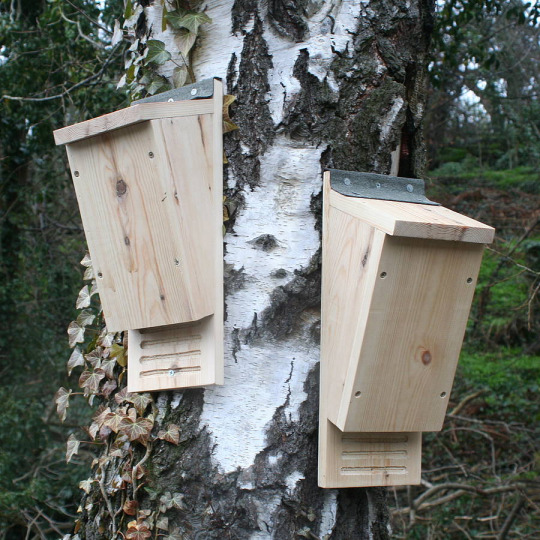
Big or small, whether they support five bats or five hundred, making bat boxes and supporting local bats is a great way to boost biodiversity! Not only will they eat mosquitoes and other pest species, but you may also be able to use the guano (bat droppings) as fertilizer! Do be careful if you choose to do that though--I’ve never had the opportunity to, so do some research into how strong it is and use it accordingly.
Provide Passageway Points
If you want your area to be more accessible for creatures that can’t fly or climb fences, allowing or creating access points can be an excellent way to give them a way in and out. Holes in the bottom of walls or fences can be sheltered with plants to allow animals through.
In a somewhat similar manner, if you’re adding a water fixture, it’s important to provide animals a way to get into and out of the pond--no way in, and they can’t use the water. No way out, and they may drown. Creating a naturalistic ramp out of wood beams or sticks, or stepped platforms out of bricks, stones, or logs can do the trick.
Get or Keep Logs and Brush Piles

I’ve already mentioned logs a good handful of times so far in this post. To be used as access ramps, or as nesting areas for solitary bees. But they have value as much more than that! Logs on the ground provide shelter for all kinds of animals, especially depending on size--anything from mice, reptiles, and amphibians to things like turkey vultures and bears will use fallen logs as shelter. Inside of a decaying log, there’s a lot of humidity, so amphibians are big fans of them--meanwhile, the upper sides of them can be used as sunning platforms by things like lizards. Other animals can also use the insides of logs as nest sites and hiding places from predators too big to fit inside. Fungi, spiders, beetles, termites, ants, grubs, worms, snails, slugs, and likely much more can be found inside rotting logs, using the rotting wood as food sources or nesting places. They can then provide food for mammals, amphibians, reptiles, and birds. They can also be regarded as a landmark or territory marker as wildlife get more familiar with your space.
So how do you get logs for cheap? Try Chip Drop! I talk about them more in a future post, but you can mark saying that you’d like logs in your drop, so they’ll give you any they have! In fact, you may even get a drop faster if you're willing to accept some logs. You may also be able to approach arborists you see working in your area and ask for logs. There may also be local online listings for people selling logs for cheap, or just trying to get rid of them. If there’s land development going on near you, you may be able to snag logs from trees they cut down to make space. Do keep in mind, you don’t need to have huge gigantic logs laying around your property to make an impact--even small logs can help a lot.
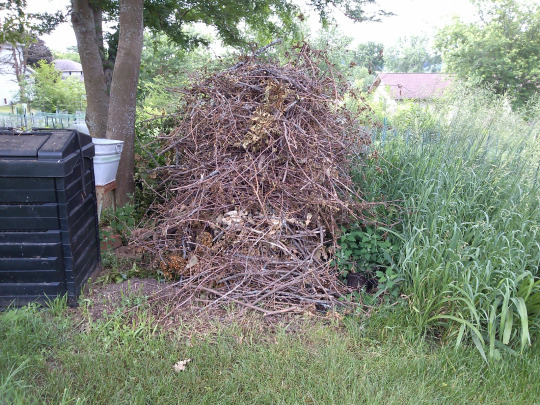
If possible, creating and leaving brush piles on the edge of your property can be a great boost to biodiversity--even if you may not see the wildlife using it. They’ll provide shelter from weather and predators, and lower portions are cool and shady for creatures to avoid the hot sun. The upper layers can be used as perch sites and nest sites for song birds, while lower layers are resting sites for amphibians and reptiles, and escape sites for many mammals. As the material decays, they also attract insects, and as such they’ll attract insect-eating animals too. As more small animals find refuse in your brush pile, their predators will be attracted to them as well. Owls, hawks, foxes, and coyotes are known to visit brush piles to hunt. Making a brush pile can be as simple as piling branches and leaves into a mound, as big or as small as you want. You can even use tree stumps or old fence posts near the base, and keep stacking on plant trimmings and fallen branches. Do note that you don’t want to do this near anything like a fire pit.
Don't forget, with all of these, your mileage may vary for any variation of reasons, so don't worry if you can't take all of even any of these actions! Even just talking about them with other people may inspire someone else to put out a bat box, or leave a few logs out for wildlife!
That's the end of this post! My next post is gonna be about ways to get seeds and plants as cheaply as possible. For now, I hope this advice helps! Feel free to reply with any questions, success stories, or anything you think I may have forgotten to add in!
#biodiversity#solarpunk#environmental stewardship#gardening#outdoor gardening#(i know this is literally the Dont Gotta Garden post but these could also be excellent additions to a preexisting garden so)#ani rambles#out of queue#the biodiversity saga#here in the tags to once again emphasize your mileage may vary with all of these#my mom is scared of bats theres no way in hell shes gonna let me put up a bat box#but I have been able to put out a shallow bird bath and a little solarpowered hummingbird bath fountain#do what you can! every bit counts! You may be able to do something that I or your neighbors can't!#for example my nextdoor neighbors have literally no trees in their backyard where the hell would they put a bat box#meanwhile i have trees in my backyard but still can't put up a bat box. maybe the neighbors next to me could!#similarly brush piles are a no go for my family but someone somewhere else could set one up!#i am rambling in the tags now uh long story short do what you can don't stress about what you can't
4K notes
·
View notes
Text
Ok! I've finally decided to put together a (somewhat) comprehensive tutorial on my latest art~
Please enjoy this little step-by-step 💁♀️
First things first--references!
Now I'm not saying you have to go overboard, but I always find that this is a crucial starting point in any art piece I intend on making. Especially if you're a detail freak like me and want to make it as realistic as possible 🙃
As such, your web browser should look like this at any given point:

Since this is a historical piece, it means hours upon hours of meaningless research just to see what color the socks are, but...again. that isn't, strictly, necessary 😅
Once I've compiled all my lovely ref pics, I usually dump them into a big-ass collage ⬇️
(I will end up not using half of these, alas :'D)
Another reference search for background material, and getting to showcase our models of choice for this occasion~

When picking a reference for an actor or model, the main thing I keep in mind (besides prettiness 🤭) is lighting and orientation. Because I already kinda know what pose I'm gonna go with for this piece, I can look for specific angles that might fit the criteria. I should mention that I am a reference hound, and my current COD actor ref folder looks like this:

Also keep in mind, if you're using a ref that you need to flip, make sure you adjust accordingly. This especially applies to clothing, as certain things like pants zippers and belt buckles can be quite specific ☝️
Now that we've spent countless hours googling, it's time to start with a rough sketch:
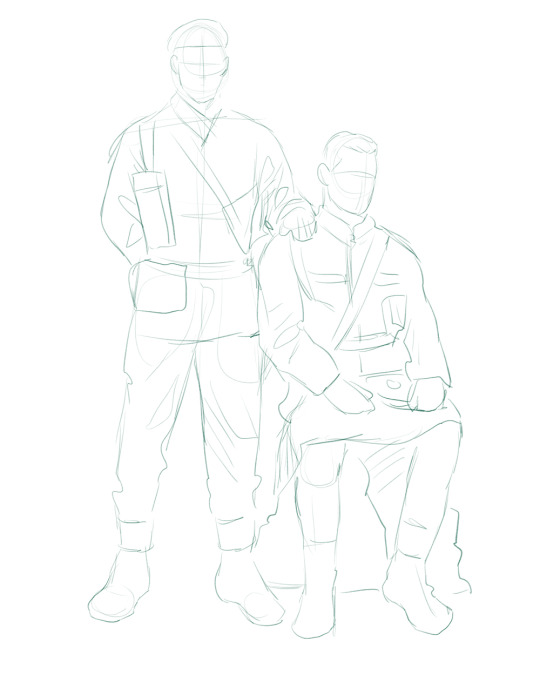
It doesn't have to be pretty, folks, just a basic guideline of where you want the figures to be.
The next step is to define it more, and I know this looks like that 'how to draw an owl' meme, but I promise--getting from the loose sketch above to below is not that difficult.
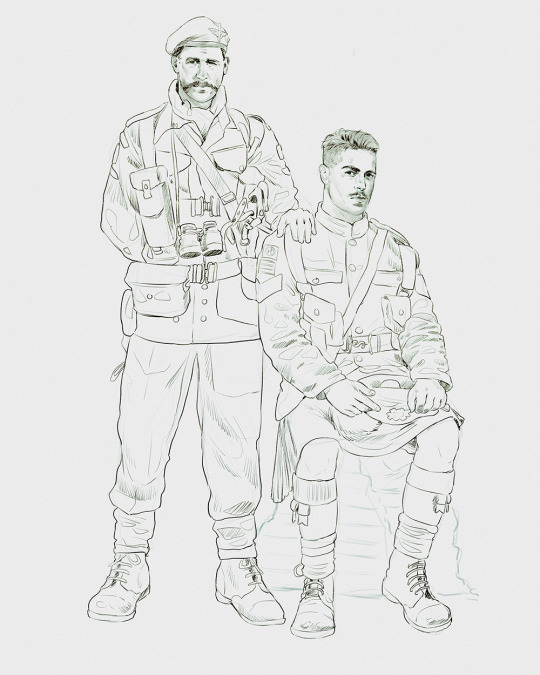
Things to keep in mind are--don't go too in-depth with the details, because things are still subject to change at this point. In terms of making a suitable anatomically-correct sketch, I would suggest lots of studying. This doesn't even have to be things like figure drawing, I genuinely look at people around me for inspiration all the time. Familiarize yourself with the human form, and things like weight, proportions, posing will seem a little more feasible.
It's also important at this stage to consider your composition. Remember to flip the canvas frequently to make sure you're not leaning to one side too often. I'm sure something can be said for the spiral fibonacci stuff, which I don't really try to do on purpose, but I think keeping things like symmetry and balance in mind is a good start ✌️

Next step is just blocking in the figures. Standard. No fuss 👍
Now onto the background!
It's frankly hilarious how many people thought I was *hand-drawing* these maps and stuff 😂😂 I cannot even begin to comprehend how insanely difficult that would be. So yeah, we're just taking the lazy copy and paste way out 🤙
I almost always prepare my backgrounds first, and this is mostly to get a general color scheme off the bat. For collage work, it's really just a matter of trial and error, sticking this here, slapping this there, etc. I like to futz around with different overlay options until I've found a nice arrangement. Advice for this is just--go nuts 🤷♀️
Next, I add a few color adjustments. I tend to make at least 2 colors pop in an art piece, and low and behold, they usually tend to be red and blue ❤️💙There's something about warm/cool vibes, idk man..
Now we move on to coloring the figures. This is just a basic block and fill, not really defining any of the details yet.
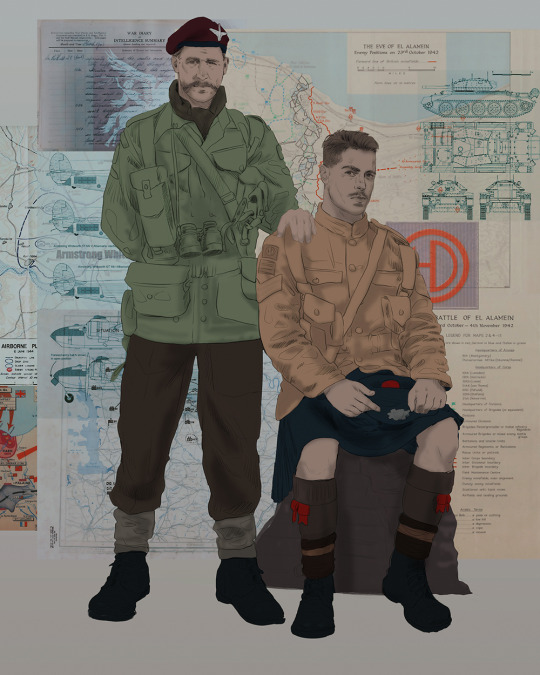
Next, we add some cursory values. Sloppy airbrush works fine, it'll look better soon I promise 🙏
And now--rendering!
I know a lot of beginner artists are intimidated by rendering, and I can totally understand why. It's just one of those things you have to commit to 💪
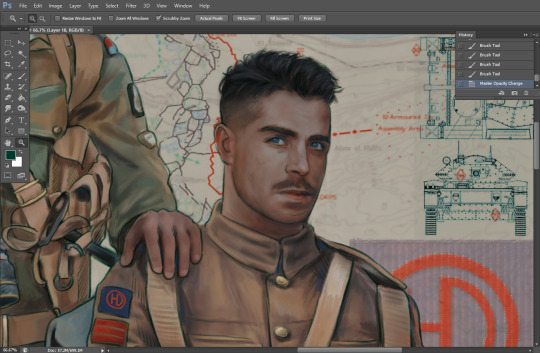
I've decided to show a brief process of rendering our dear Johnny's face here:
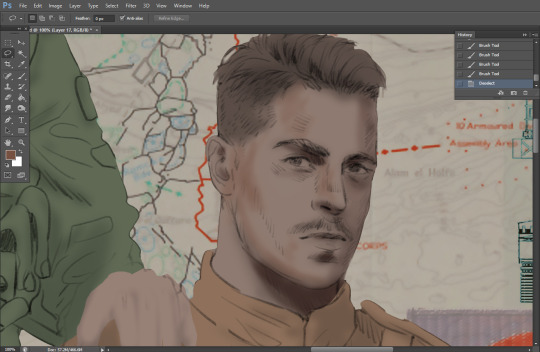
Starting off, I usually rely on the trusty airbrush just to get some color values going. Note--I've kept my sketch layer on top, but feel free to turn it on and off as you work, so as to not be too bound to the sketch. For now, it's just a guideline.
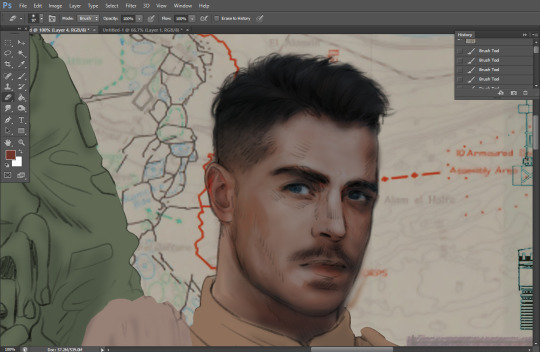
This next stage may look like a huge jump, but it's really just adding more to the foundation. I try to think of it like putting on make-up in a way~ Adding contours, accentuating highlights. This is also where I start adding in more saturation, especially around areas such as ears, nose and lips. Still a bit fuzzy at this point, but that's why we keep adding to it 💪
A boy has appeared! See--now I've removed most of the line layer, and it holds up on its own. I'll admit that in order to achieve this realistic style, you'll need lots and lots of practice and skill, which shouldn't be discouraging! Just motivate yourself with the prospect of getting to look at pretty men for countless hours 🙆♀️
I'll probably do a more in-depth explanation about rendering at some point, but let's keep this rolling~

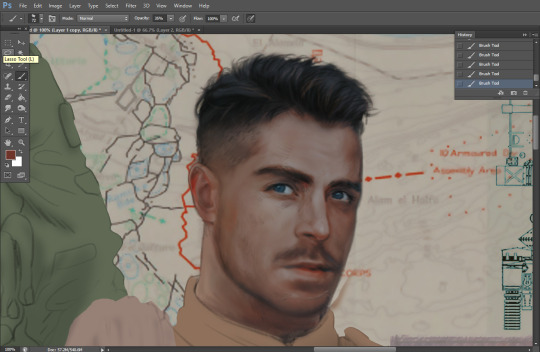
Moving forward is just a process of adding to the figures bit by bit. I do lean towards filling in each section from top to bottom, but you can feel free to pop around to certain parts that appeal to you more. I almost always do the faces first though, because if they end up sucking, I feel less guilty about scrapping it 😂 But no--I think he's pretty enough to proceed 😚
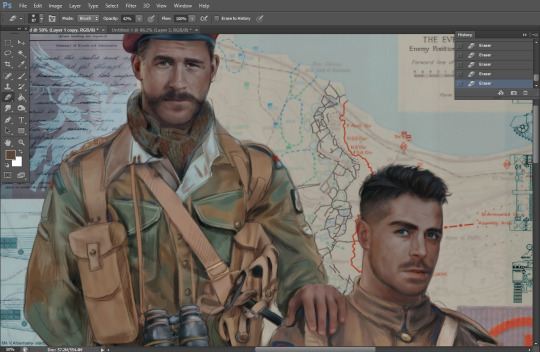
They're coming together now 🙆♀️ Another helpful tip--make sure you reuse color. By that, I mean--try to incorporate various colors throughout your piece, using the eyedropper tool to keep a consistent palette. I try to put in bits of red and blue where I can
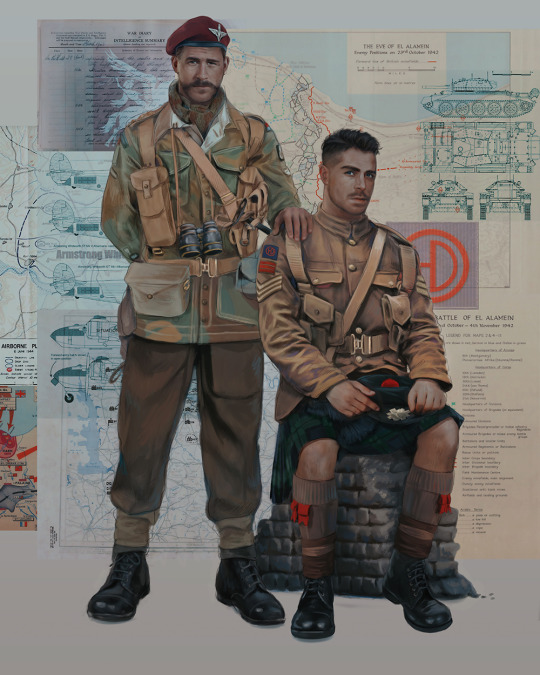
Here they are fully rendered! Notice I've made a few subtle changes from the sketch, like adjusting the belt buckles because I made a mistake 😬 Hence why you shouldn't put too much stock in your initial sketch~
The next step is more of a stylistic choice, but I usually go over everything with an outline, typically in a bright color like green. Occasionally, I can just use my initial line layer, but for this, I've made a brand new, cleaner line 👍
And the final step is adjusting the color and adding some text:
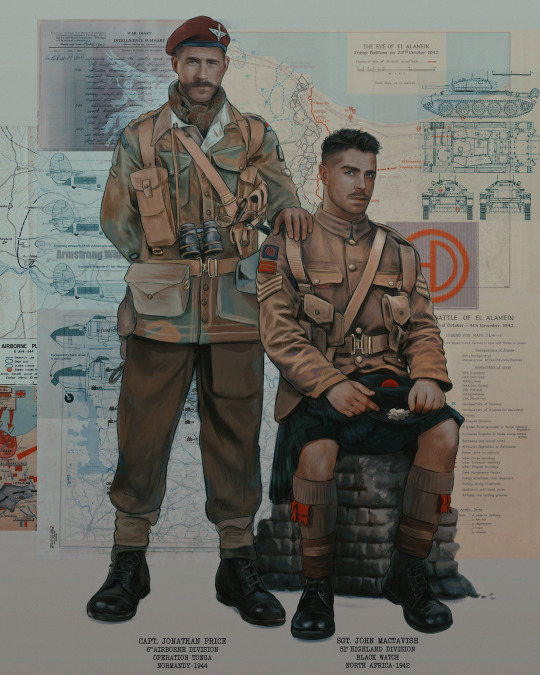
Tada!! It's done!
All in all, this took me the better part of a week, but I have a lot of free time, so yeah ✌️
I hope you appreciated that little walkthrough~ I know people have been asking me how I do my art, but the truth is--I usually have no clue how to explain myself 😅 So have this half-assed tutorial~
As a bonus, here is a cute (cursed) image of Johnny without his mustache:
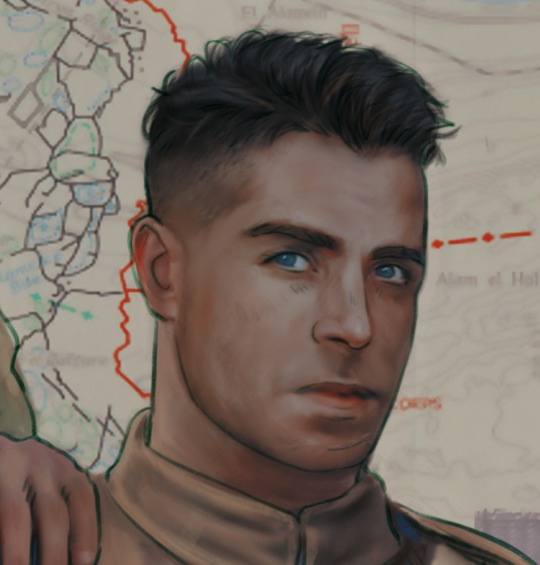
A baby, a literal infant child !!! who put this wee bairn on the front lines ??! 😭
Anyway! peace out ✌️
#tutorial#my art#art tutorial#since people have been asking#I remembered to save my process from this latest work~#enjoy 🙆♀️
1K notes
·
View notes
Text


Let's fundraise for eSims for Gaza! AGAIN! Here's some of the art from the last fundraiser, and I'm going to run it again! I've seen multiple posts saying that Gaza is running even lower on eSims than last time I ran this fundraiser, so I'm running it a second time during the February 18th-25th global strike (which started TODAY, here is some info on the strike) to get more eSims to Palestine!

As of now, here are Nomad's prices for eSims! We're going to be fundraising for as many of the 3 GB 30 Days eSims as possible, and as you can see, they are 16 USD each right now! So for 16 USD you can get an icon, half body, or full body drawing from me in a simple, cartoon style! You can pay me on Paypal or Cashapp (my cash tag is $sketchyshark btw) if you struggle to purchase eSims yourself, and I will provide you with and publicly post the receipt. You can also purchase the eSim yourself and show me the receipt to get a drawing! If you just want to donate and not sweat over what you want me to draw for you, that's fine too!
Here is the Gaza eSims site with a tutorial on how to purchase and send eSims!
And for transparency here is the post showing most of the receipts from the last time I ran this fundraiser if you want to take a look!
For the entirety of this strike, I will only be posting about this fundraiser on this blog. Showing art made for it and receipts. Please share this! And feel free to reach out to me with any questions!
The goal will be the same as the first time, and if we exceed it before the strike ends, that would be fantastic!
0/30 eSims sent! Please reblog!
647 notes
·
View notes
Text
Dm's: Jason Todd x Fem! Reader

TW: Alcohol.
jasontodd: I'm in love with you.
y/nl/n: i literally have no idea who you are.
It started a few months ago when you were followed by some random guy on Instagram. He had a racking of 28 Million followers and you were just a girl with 2K posting GRWM's and make up tutorials.
jasontodd: you looked so pretty in your livestream like MARRY ME TF??? ♡ liked by y/nl/n
y/nl/n: thank you, baby ♡ liked by jasontodd
You didn't get why you were so special.
y/nl/n: *voice memo* I'm serious like is there a reason you think I'm soooo pretty? ♡ liked by jasontodd
jasontodd: Damn. Even your voice is hot.
jasontodd: I'm sorry for inhaling the same oxygen as you🙏
y/nl/n: LMAO
It was kinda cute, kinda stalkery. Every single thing you posted he liked, seconds after. Praising you like you were an absolute goddess. At first you thought maybe it was a fake account but no, he was the real deal (he sent you a picture of his ID with blurred out details). When you Googled his name, you didn't expect his adoptive dad to be the BRUCE WAYNE. You might not be Wayne obsessed but everyone in Gotham know who Bruce Wayne was.
jasontodd: You busy??????
y/nl/n: no, why?
It was late almost 3 in the morning and you'd been occupied by messaging some guy who slid into your dm's six months ago. You were surprised when a incoming video call notification popped up on your phone. You were hesitant to but answered it. "Hello?" His camera was moving a lot but it was quite on his side, you could hear how heavy his footsteps were. You were laying in bed cozied up holding your pillow in your arms, another propping up the phone.
"Gimme a second." You watched him set the camera up in his bathroom, toothbrush hunging from his mouth. "There." He continued brushing his teeth. "Where are you going dressed so handsomely?" He snickered. "Well, pretty lady. It's not where I am heading but where I've been. I just got home from a friends after party."
"Probably using the art of back bending to bring home chicks?" You tilted your head. "Unless the chick was you, pretty, Ion want her near me." You smiled, He yawned causing you to do the same. "Dick is making me brush my teeth cause I threw up in his car and now my breath stinks." You nodded, listening to his little rant. "He's getting me a bucket so I don't choke on my vomit in my sleep, how many people do you think died like that?"
"Well-" You attempted to answer but he cut you off unintentionally by throwing up off screen, thankfully before returning to the screen, rinsing his mouth and rebrushing his teeth. "Who's Azealia Banks? Is she a influencer?" You smiled. "She's in the music industry, a real controversial person." He hummed.
"Who are you talking to?" Jason picked up his phone. "My girlfriend and you can't see her cause she's mine, your brain will hurt with beauty." Jason kissed the screen before you heard Dick approach him. "C'mon Jay get in bed now."
"No." You watched Dick attempt drag Jason— who was throwing lowsy kicks and punches at Dick— to bed. You giggled watching the camera angle change in the hands of drunk Jason before the phone fell somewhere. "Get. In. Bed."
"No." It was funny hearing Jason have an actual sibling bond. "Fine, I'll just call in the big guns. ALFRED!" You could hear Jason mumble a 'fine' before a ruffling of blankets as he got in bed. "NOT ON YOUR STOMACH!" Dick yelled, picking up the phone, looking at you. You waved at him sweetly. "Jason, there's no way you pulled her. She's so pretty and nice and you're... Jason." Jason snatched the phone frowning. "I don't like you." Jason laid on his side, Dick was on his way out of the room before turning to Jason to say something. "Hey, Y/n, do you wanna get married tommorow?"
"Uhm, I'll discuss this with sober you, okay baby." Jason hummed. "Can you stay with me until I fall asleep?" You smiled. "Okay." Dick smiled leaving the room.
He fell asleep a little over a hour later. You pressed a kiss to your screen before hanging up and going to bed. He woke up with a throbbing headache. He grabbed his phone seeing you posted on your story 30 minutes ago. He opened it seeing a picture of him and you on a video call. Did he call you last night?
"don't go! what if I choke on my drunk vomit and die?!" - jason todd. He chuckled reading that. He liked the story immediately getting a reply.
y/nl/n: alive then?
He smiled.
jasontodd: Sorry about last night lol.
y/nl/n: lol don't worry about it :))!
After that you sent him a picture of lots of you cooking, which he liked. What you did next though surprised him.
y/nl/n: 📍live location
y/nl/n: join me? we can discuss our marriage, boyfriend ;)
He never got out of bed faster.
#jason todd#jason todd x fem!reader#jason todd x reader#red hood#Drunk Jason Todd#he makes me so soft#timmyyyturner
750 notes
·
View notes
Note
Hi! So what about BAU!Reader and Spencer are fresh into their relationship. Like weeks into it. Reader is just as shy and nerdy as Spencer was in early seasons. (This can be any season of Spencer) anyways it’s Spencer’s birthday and Spencer begs reader to not buy anything for him so instead she knits him a replica of Dr. Who scarf because she remembers him mentioning to Garcia he was trying to find the perfect replica for his Dr. Who cosplay (7x23 when Garcia and Spencer go to that convention) so reader, who never watched it before, watches the entire series while knitting the scarf bc she knows how much Spencer loves Dr. Who and she wanted to understand his interests more. Maybe she makes herself a matching scarf or hand warmers in the process. And then she’s like “I have a ton of questions about the series though” and pulls out a notebook of her questions as she’s asking them Spencer realizes she’s THE ONE and it’s all just fluff and two nerds in love 🥰
I've never consumed any content about Doctor Who so I'm sorry if this is a bit vague BUT the idea was so cute so I had to give it a shot x
You and Spencer were both nerds, it’s what drew you two together and keeps you both joined at the hip. Even though you two had been together for less than eight weeks, both of you had your eyes on one another for a good while. When mutual feelings were finally admitted the only thing different from before was that you got to hold hands and kiss each other on the cheek comfortably without having to worry if it’ll make the other person uncomfortable.
Spencer’s birthday was coming up and with Spencer being the way that he is, he was adamant about not letting you splurge on his big day. You were a bit annoyed by it because a part of you did want to go out and treat your special boy the way he deserved to be treated. However, you did not want to argue with him so you decided to get a bit creative.
Long before the relationship had been established, Spencer had talked about how he was searching for a replica of the Doctor Who scarf for his cosplay. Knitting was something you had learned before, although it had been quite a few years since you last picked it up, you decided to try it out again and hopefully make Spencer’s face gleam with joy.
After digging out your old knitting needles and yarn you looked up some tutorials online to familiarize yourself with your old hobbie. A few hours and some messy pathworks later, you managed to remind yourself of how everything went down and began work on the scarf. Luckily the pattern wasn’t difficult at all and as you began working away you thought about looking up the show and getting a feel for what Spencer talks about all the time.
After many weeks and countless trips to the store to get more yarn the scarf was finished and you were both excited and nervous to hand it over to Spencer. A million thoughts ran in your head as he undid the bow on the carefully packed present and removed the scarf from the paper, his eyes went wide and he was speechless for a whole minute.
“Y/N, how did you…”
“Surprise?” you chuckled and Spencer was still speechless, he ran his thumbs over the carefully knitted garment. He wrapped it over his neck and walked over to the mirror to have a closer look, his heart was melting over how you took so much time and effort to make him this. He walked over to you and placed his arms around you in a bone crushing hug which only made you laugh.
“I’m so glad you like it.”
“Like it? That doesn’t even come close to how I feel about it, I love it.”
Spencer held your cheeks as he kissed you and as you parted a thought came to your mind.
“Oh also, I watched a bit of the show!”
“Really? Did you like it?”
“Mhm, I have a few questions though, firstly…”
As you went on about your questions regarding the show Spencer stared at you while a smile crept on his face. He loved how you took interest in anything he was fascinated in, and in return he would do it with your interests as well, it was one of the ways you both showed love to one another.
Spencer guided you back to the couch, pulling you to his lap as he cleared his throat and explaining the questions you just layed out for him. You looked up at him and nodded along as he got into the topic and you were reminded of one of the reasons why you fell for him in the first place, his passion, and that same passion grew now that he had someone like you in his life.
Taglist: @radioactiveinvisible @whoisspence @sreidisms @lanascinnamongirls @luvkatryna @sp3ncelle @iluvreid @khxna @keiva1000 @reidstheyfriend @hiireadstuff @pleasantwitchgarden
If you want to be a part of my taglist go here!
You can find my masterlist here!
My requests are open so feel free to send one in! (SFW only)
#spencer reid#spencer reid au#spencer reid x gn reader#spencer reid x gn! reader#spencer reid imagine#spencer reid scenario#spencer reid oneshot#spencer reid one shot#spencer reid headcanons#spencer reid headcanon#spencer reid hcs#spencer reid hc#spencer reid fanfiction#spencer reid fanfic#spencer reid blurb#spencer reid drabble#spencer reid dialogue#spencer reid fluff#spencer reid x reader fanfiction#spencer reid x reader#spencer reid x self insert#spencer reid x y/n#spencer reid x you#criminal minds fanfiction#criminal minds headcanon#criminal minds imagine#criminal minds
447 notes
·
View notes
Text
Finding Deleted Fics: A Multi-Method Guide

i feel like we are the fandom who needs this post the most any fandom has needed it ever.
all of these methods require you to know the title, author and/or link of the fic.
[disclaimer: the fic i am using as an example is not deleted, i just can't think of any other fics to use as an example right now.]
Method #1: Wayback Machine
this is my go to method that i always try first.
steps:
every fic on ao3 has a url of archiveofourown.org/[specific-numbers]. you're gonna need that url, doesn't matter if it doesn't work anymore.
eg.

2. now you're gonna go to archive.org and enter your url in the search bar.
3. something like this will come up. it probably won't be saved as many times though, just once or twice.

just click any of the links now, either the dates marked blue on the calendar or the earliest/latest date. that's it.
drawbacks:
often, a problem arises when searching for fics rated mature or explicit.

the site will have archived this page but not the actual fic. though, maybe lady luck is on your side and clicking proceed will lead you to a saved version of the actual fic. but usually not. and not all fics are saved here. in those cases, i have some more methods.
Method #2: Search Engine Cache
search engines like google and yandex often save a cached version of sites, though yandex is much more reliable than google. i'll give you a tutorial for both.
steps (yandex):
the link isn't completely necessary, just the title and author of the fic will suffice.
go to yandex.com and search for your fic by either entering the url or entering the title and author as such.

3. this will probably immediately come up.
just enter the captcha and it should let you in on the first go but there's a glitch i've encountered where you could be entering the captcha completely correct but for some reason the site still won't let you in. for that, you just have to keep trying again and again until eventually the site lets you in. might take more than 10 tries.
4. once you're in, search results will pop up. directly clicking them will only lead you to the not found page. what you're gonna do is hover over the box of the search result and you'll see 3 dots pop up on the right.
click those and a dropdown menu will appear. click the first option 'saved copy'.
and thats it! this is a much more efficient method especially for explicit or mature fics.
drawbacks:
for some reason, when i open yandex in google chrome, i can't see the 3 dots. i can in firefox though. don't really know what thats all about.
i'll show you how to do it with google too just in case yandex doesn't work.
steps (google):
in the url bar, type cache:[link of fic]. that's pretty much it. google doesn't have a lot of fics saved though so you'll probably get a 404 page.
Method #3: Reddit
there's a subreddit called r/DeletedFanfiction that can probably help you out. either search for the fic as it may have already been posted or req it and someone will probably get you a google drive link soon enough. u/throwthisaway11112 is my lord and savior.
afaik it's still up and running fine despite the reddit protest thing (which i recommend taking a minute to look into).
Method #4: Archive.org Database
okay, now you're gonna need a lot of memory on computer for this one. i'm not gonna even bother and try to explain it, i'll just link you to the original post. thank you once again to the anon who sent me this method!
Method #5: Fandom
if absolutely none of those methods work, you can still just send me an ask and maybe my followers or i will have a saved copy. same for any other fandom, i recommend asking around in popular fandom spaces, someone is bound to have it.
#deleted fics#kay talks#save#ao3#internet archive#excuse my poor graphic designing#i wanted to add my photo thing#but this isnt a#fic rec#so i just slapped ao3 hacks on#decent imo#hope this helps someone out#ao3 hacks#how to ao3
1K notes
·
View notes
Last Seen Blogs

crazymomof4boys
Crazy Sailor Moon Loving Mom Of 4 Crazy Boys

info-mibm-brawijaya-blog
Info MIBM, Informasi MIBM, Info MIBM Vokasi, MIBM

sweet-sakura-soju
Avanee

0ktavian
Paper Planes Launched to Space
crystal23sblog
Crys23