#border animation css
Photo
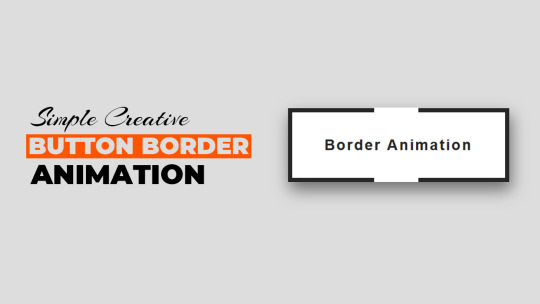
Creative CSS3 button border animation
#html css buttons#css button animation#border animation css#css border animation#css animation examples#pure css animation#learn css animation#css animation#html css#button border animation#code#codingflicks
8 notes
·
View notes
Text
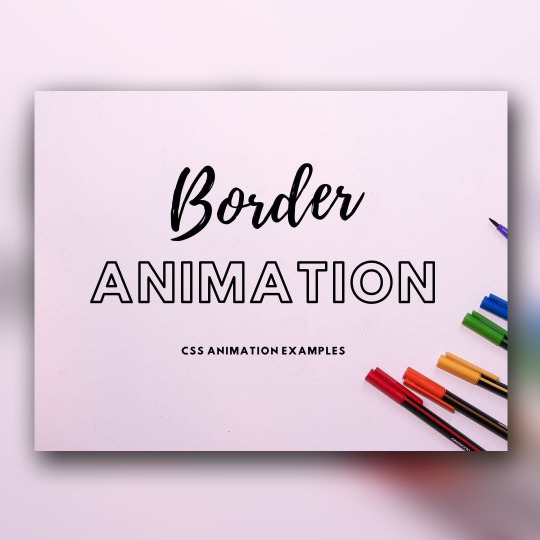
CSS Border Animation
#css border animation#html css#frontenddevelopment#css#html#css3#pure css animation#css animation examples#css animation tutorial#divinector#html5#html5 css3#css3 animation
0 notes
Text
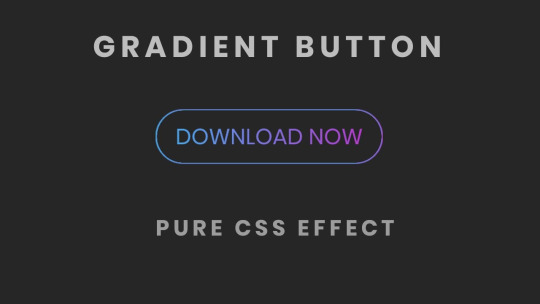
CSS Gradient Border Button
#css gradient button#html css buttons#gradient border button#css gradient#css effects#pure css effects#html css#frontenddevelopment#code#css#pure css animation#html5 css3#codenewbies#html and css
0 notes
Link
Best CSS Generator Tool of 2022
#box shadow generator#css grid generator#gradient generator#css box shadow generator#css shadow generator#css generator#text shadow generator#best css generator#top 10 css generator#border generator#border radius generator#css animation generator#css text shadow generator#css shapes generator#css3 generator#css drop shadow generator#css filter generator#css border generator#css background generator#filter css generator#css maker#css tool#css code generator#image shadow generator#css image shadow#css cursor#cursor generator
0 notes
Text
#elementor snake border animation#elementor animated border#elementor fancy border#elementor custom border#elementor moving border#elementor border animation#elementor css animation#wordpress elementor pro tutorial#elementor tips and tricks#wordpress animated border#elementor gradient border#elementor multicolor border#jim fahad digital#elementor#elementor tutorial#elementor pro tutorial#wordpress#wordpress elementor#elementor pro
0 notes
Note
Hii ! I’m in a bit of a problem rn and I’m wondering if you could help ( sorry for bothering you )
So school just finished and I’m on vacation for like 3 months so I really want to learn how to code ( I mainly want to make cool websites and stuff ). So I started to learn html and css but it just seems so overwhelming especially seeing all the ressources and tutorials online, could you please help me know what to learn first ? 💖

Hiya! 💗
Yeah, I can help! It can be overwhelming at first, but it's best to break it down into chunks and tackle them bit by bit.
For now, as a complete beginner, use these 3 resources:
HTML and CSS course video - LINK
W3School (for extra help) - HTML LINK | CSS LINK
MDN (for even extra help) - HTML LINK | CSS LINK
After that, work on projects to test your knowledge:
List of 11 projects to tackle - LINK
Here is the list of things you want to cover in HTML:
Basic structure
Tags and elements
Attributes
Forms
Semantic markup
Tables
The same but for CSS:
Selectors
Box model (margin, padding, border)
Typography (fonts, text properties)
Colours and backgrounds
Layout and positioning (floats, flexbox, grid)
Responsive design (media queries)
Transitions and animations
Now that you have a list of what you need to cover, tackle them one by one, making sure you understand the topic before you head over to the next. The video tutorial covers all of this and more. If you don't understand a bit in the video, stop and look on W3School and MDN for further understanding and then continue on with the video. Also, tackle the video slowing. Don't rush, don't do it, it'll just make the learning process even longer if you getting not understand things.
The resources I listed are my complete go-to. After that, as you've noticed, there are hundreds more. Go through the ones you need for the specific project you're working on or the topic you're studying only.
Hope this helps and good luck! 💻💗
#reources#coding#codeblr#programming#progblr#studying#studyblr#comp sci#tech#html#css#html css#coding resources
99 notes
·
View notes
Text
Classic Minecraft AO3 Site Skin

The temptation was too strong...
Themed after the dirt block and grass block! I like this one but personally I think I could do better with maybe some other blocks. I just feel like this one ended up being a little lackluster. Maybe it's the grey? Though when trying out other colours to swap it with, they seemed worse so I kept it as is.
Thinking of maybe an animated Nether Portal skin would be neat - it's always trying to balance cool colours/themes with actually being able to use and read things properly though...
Anyway, feel free to take and modify however you want!!
CSS:
#header ul.primary, #footer, .autocomplete .dropdown ul li:hover, li.selected, a.tag:hover {
background: #000 url('https://wallpapercave.com/wp/wp9822789.png'); background-size: 500px;
}
#header .heading a, #header .actions a:hover, #header .actions a:focus, #header .dropdown:hover a, #header .open a, #header fieldset, #header form, #header p, #dashboard a:hover, .actions a:hover, .actions input:hover, .delete a, span.delete, span.unread, .replied, span.claimed, .draggable, .droppable, span.requested, a.work, .blurb h4 a:link, .blurb h4 img, .system .latest h3, .system div.news h3, .system .tweets h3, .required, .error, a.cloud7, a.cloud8 { color: #000;
}
#outer #header #greeting .icon, #dashboard.own, .error, .comment_error, #header ul.primary, .LV_invalid, .LV_invalid_field, input.LV_invalid_field:hover, input.LV_invalid_field:active, textarea.LV_invalid_field:hover, textarea.LV_invalid_field:active, #header .primary a, #header .primary .current, #header .primary input, #header .search input { border-color: #000 !important;
}
#outer { background: url("https://i.pinimg.com/474x/0e/1f/c2/0e1fc2e0638e878d3ba8db495152164c--custom-fabric-spoonflower.jpg");
}
#main { background: #854f2b; max-width: 90%; opacity: 0.9;
}
.group .header, .blurb ul.tags, .blurb blockquote, #outer .current { background: #477a13;
}
#outer #footer .heading, #outer #footer .actions a, #header ul.primary a { color: #432412;
}
WIZARD:
Font: Helvetica
Percent of browser font size: 117
Vertical gap between paragraphs: 1.5
Background color: #61371f
Text color: black
Header color: #477a1e
Accent color: #888c8d
I've also made other AO3 Site Skins HERE
72 notes
·
View notes
Text

CSS Landscape | 2024 #2
Welcome to CSS Landscape digest, where we curate the latest articles, tutorials, and videos to keep you informed and inspired in the world of CSS. In this edition, discover techniques for breaking words effectively, explore innovative CSS button styles, and learn how to handle dark mode with CSS and JavaScript. Dive into advanced tooltip design, captivating border animations, and much more. Stay ahead in CSS trends and techniques with CSS Landscape digest.
https://freefrontend.com/css-landscape-2024-03-29/
2 notes
·
View notes
Text
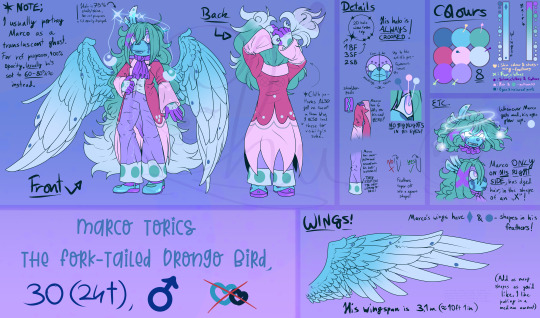
IT'S NEW YEARS OVER HERE SO LET ME LAUNCH MY BABIES AT YOU FOR IT!!!!
In case you want their backstories, I just recommend you go over to their Toyhou.ses respectively, as- typing on Tumblr is a pain for my PC. My PC hates Tumblr in particular for some reason, whenever I format text, and I can't LIVE without formatting text as a hobby-author man. xD
LINK TO MARCO'S STORY
LINK TO ZORRO'S STORY
For new users; Marco was made by Heavenly-Hellfire and Hollowed-Hartlocke. I bought him back in 2019! Still love him like it's day 1. My best, most adorable boy <3, he's become my actual role model, I love him sm ;:
In case you never read them before, hopefully you enjoy the reads!!! I hope you can forgive the older grammar on Zorro's. I def plan to rewrite it, once I finish working on my raider-code. (It's been taking so long bc I'm trying to learn to use the CSS mixin z-index class-type. I still can't figure out image borders for the life of me, but I learned rotation class-types LOL.)
I've wanted to redraw both their reference sheet for almost YEARS now. Ever since I've gotten Marco, I continuously evolved how I draw him, over and over, to a point his old ref had become a detriment, due to how differently I draw him nowadays LOL. One thing that desperately needed a redo for him especially, how his hair is supposed to be drawn + his wings. His wings looked like floppy chicken nuggets on the old one LOL. PLUS! I added a section of details, where I see artists I commissioned, struggle with or fail on. Hopefully the detail section is sufficient in fixing that! I'm not sure, if I should also add a mention, of Marco's dot details below the pink pattern, as even the distance between the dots is different. + I LOVE DRAWING EXPRESSIONS. So to also add a small box of extras for Marco's cool glowy eyes was a treat. <3
I plan to redraw his refs for his magic wind attacks perhaps, as for now, I have a shabby drawing, and I got a free animation program lately, so I can FINALLY unleash my years of experience animating, in the appropriate program now LMAO. My own limitations of using SAI to animate, was making my animations look choppy and bad for years unfortunately, so my art always looked very amateur-ish when I actually know how to animate..
Speaking of that, for the attentive...Yes, I plan to possibly try and draw a 360° turnaround of my characters, as the next natural progression of refs next. I am SO close, so so SO close to making my art finally look like it's part of my project I've been working on for years in private. Ever since this year, people have proven, that you CAN start an animated series on the internet, and it will receive an audience. I also wanted to start an animated series when I was a teen, and now that I'm an adult I can make it happen for sure, with the right talents. When the time comes, I might seek out a music producer and perhaps, if I'll have the money, hire animators, so that I'm not the only one who has to work on the series I planned.
For Zorro....He had it coming. Last time I drew his ref, he looked like a 16 yo/ mobian child, it pissed me off for so many years, once I learned how to properly make adult characters look adult lol. THE CEREAL SPITTER NOW ACTUALLY LOOKS ADULT AND LIKE THE BASTARD SELF HE SHOULD BE. I don't have too much to add to him, but I consider him still a WIP in my brain bc- RAIDER PAGE CODE. I WANNA FINISH. GRABBY HANDS. I CAN FEEL THAT IF I LEARN Z-INDEX FINALLY I CAN REALISE THAT CODE. I've wanted to make a code for my raiders 3 years ago already y'all it's painful to be patient w/ myself sdgkldslgdsg
I'm so satisfied, with my ref sheets finally looking, like a professional drew them imho!! If you disagree w/ that notion, feel free to tell me what's missing or where I need to improve on! :D
My 2024 started amazing and with laughter and appreciation for my friends, I'm so happy finally. 3 years in a row, all I did was cry each new year, and be in pain. 2024 feels like it could be my year. Year of the dragon, bless me with your energetic and powerful spirit please,, 🙏
ANYWAY. Forgive me in advance for watermarks, but I kind of? Am paranoid now over my art a bit bc my work is good now? Like I think I'm in the final stages of my artistry. I can feel, that I might find the perfect style soon. I need to experiment just a bit more. Just a bit more...I might consider loosening up my linework in 2024. I honestly still? Hate lineart? Like..My lineart looks good now, don't get me wrong but. I just love sketchy artwork so much more??? Sketching is so fun, creating is so joyful, when it's a sketch..But lineart kind of.....Ruins my art. I think I should loosen up. It's why I might change my approach a millionth time, but my artstyle has potential now. I don't feel, like my art is awful anymore or worth nothing, it now HAS worth, I now HAVE the right to have an ego about it, but some pieces still are missing, to give me the ultimate happiness and relief in my work. Perhaps if I do some more commissions, I might unlock my final potential? We'll see.
My aspirations for 2024;
Pass the prep-exam for my workplace (I LOVE MY WORK. I SINCERELY WISH I'LL PASS. I love work so much omg I don't wanna be fired so badly)
Draw more art of Finn & Marco so they finally pass Chloe in most images on TH (I REALLY DON'T WANT HER TO HAVE THE MOST IMAGES STILL. It should either be my comfort boys or C.I.Ta)
Be more experimental with mixing medias traditionally (I wanna start mixing mini craft-projects + my drawings or mix more pencils + markers and also glass pens + watercolours. I rlly rlly wanna experiment and go loose.)
Animate more and possibly even post said animations. I know animation takes me HELL OF A LOT of time, as I lack so much time to do so, but I'd love to do that
Stop stressing so hard over OTA's and commissions. I know I tell myself each year, "this year will be the year I wanna finish all my owed art!!" But every once and a while, I need to be a realist to myself, my optimism may be good, but it sometimes..Is a little over-eager. But I noticed in 2023, I really heavily strangle myself out. I haven't drawn any private art since 2020, really.....It says a lot about an artist, if they now haven't drawn a personal drawing and finished it, in the same quality of their owed work for 4 years now. I haven't been really honest to myself and my heart, and I'd like to forgive myself slowly, by allowing to both work on owed work, and start creative, passionate art-projects again, again, where I can let loose and just. Experiment. Do something new. Push the boundaries of my art. Combine medias, collages, etc, anything under the sun I wanna try. I limit myself so hard, over chasing a goal, I can't achieve, if I won't acknowledge, I'll cause my own death as an artist, if I continue to chase unattainable goals, I can't achieve, if I won't be gentle to myself.
Finish revamping my commission sheet. It requires, I draw new examples of course. The big thing I need to warn ahead; I will have a fat price-increase, due to work taking all the time I can have now. I can only work around 4hrs a day on art. My art takes around 20 hours to be finished. Every piece is done with love, with time, with effort. I'm not an artist, who adheres to algorithms. I'm an artist who lives with passion, with freedom in mind. I have an endless amount of ideas, I have an infinite amount of space and ways to create it. I am not a machine, I am, what an artist strives to be. To simply...Create. AI can go to hell, and drag NFTs along with it. I to this day get attempts to be hacked, by tech bros, believe it or not. I pissed off BAYC on Twitter once, and some butthurt idiot, is still trying to get to my Insta and Steam to this day. Won't happen anymore with 2FA idiot, lmao. I won't allow a 2nd hack to happen.
Finish giving ALL my characters on TH a floatie icon. I know w/ 100% certainty, that I got this task in the bag. This one is of no problem at all.
With that, thank you for reading my world-salad! Almost as tasty, as mom's olivier-salad. Yumyum. Btw secret lil teaser ig below here lmao. I started Finn's sheet too, and I've got it 1/3rds done, but I don't wanna burn myself out on ref-sheets, so perhaps you'll see Finn also reworked in a few months! ✨
#new years post#new years resolution#artwork#my art#digital art#art#artists on tumblr#character art#original art#semi realistic#sonic fan character#sonic oc#sonic ocs#sonic fan characters#reference sheet#reference sheets#character reference#character ref sheet#ref sheet#oc design#my babies#angel#raider#criminal (fictional)#happy new year#new year#new years eve#happy new year 2024
2 notes
·
View notes
Text
Hoe to √$ #code a card game
#StellerCharm #MagicCardGame $ #ConstellationClash #HoeToCode #FisherPriceKnows
Sure, I can provide you with a basic framework for an online strategy card game using HTML and JavaScript. Keep in mind that this is just a basic structure and you will need to add your own game logic and design elements to make it fully functional.
HTML Structure:
The first step is to create the basic HTML structure for the game. This will include the game board, player hand, and any other elements you want to include. Here is an example of a basic structure:
```
<!DOCTYPE html>
<html>
<head>
<title>Strategy Card Game</title>
<link rel="stylesheet" type="text/css" href="style.css"> <!-- link to your CSS file for styling -->
</head>
<body>
<div id="game-board"> <!-- div for the game board -->
<!-- add your game board elements here -->
</div>
<div id="player-hand"> <!-- div for the player's hand -->
<!-- add player's cards here -->
</div>
<button id="play-card-btn">Play Card</button> <!-- button for playing a card -->
</body>
</html>
```
JavaScript Functions:
Next, we will create the JavaScript functions that will handle the game logic and interactions. You can either write the functions in a separate JS file and link it to your HTML, or you can write it within a `<script>` tag in your HTML file. Here is an example of some basic functions you can start with:
```
// function to shuffle the deck
function shuffle(deck) {
for (let i = deck.length - 1; i > 0; i--) {
let j = Math.floor(Math.random() * (i + 1));
[deck[i], deck[j]] = [deck[j], deck[i]];
}
}
// function to deal cards to players
function dealCards(deck, player1, player2) {
for (let i = 0; i < deck.length; i++) {
if (i % 2 === 0) {
player1.push(deck[i]);
} else {
player2.push(deck[i]);
}
}
}
// function to play a card
function playCard(card) {
// add code to handle game logic and interactions
}
// function to end the game
function endGame() {
// add code to determine the winner and display a message
}
```
Game Logic:
Now, let's add some game logic to our functions. Here are some ideas to get you started:
- The game will start by shuffling a deck of cards and dealing them to two players.
- Each player will have a hand of cards and can choose which card to play.
- The player can click on a card in their hand to select it and then click the "Play Card" button to play it.
- The game will compare the cards played by each player and determine the winner based on the game rules.
- The winning player will receive points or some other form of score.
- The game will continue until all cards have been played or until a certain number of rounds have been played.
- At the end of the game, the player with the most points/score will be declared the winner.
Styling:
Finally, you can add some CSS to style your game and make it more visually appealing. Here are some elements you can style:
- Game board: background, borders, layout, etc.
- Cards: design, size, position, etc.
- Buttons: design, size, position, etc.
- Player hand: layout, position, design, etc.
Conclusion:
This is just a basic structure for an online strategy card game. You can add more features, game rules, and design elements to make it more complex and interesting. You can also use HTML and JavaScript to add features like a timer, animations, sound effects, etc. with some additional coding. Good luck with your game!
1 note
·
View note
Text

Border animation on hover
#border animation css#html css#neduzone#css#html#frontend#codingflicks#frontenddevelopment#webdesign#css3#css animation#css border animation
1 note
·
View note
Text
CSS Button Border animation
#css button border animation#css animation#css animation examples#css buttons#html css buttons#learn to code#html css#divinectorweb#frontenddevelopment#css3#css#code#html
1 note
·
View note
Text
CSS Button Maker
In the realm of web design, buttons play a pivotal role in enhancing user interaction and navigation. They serve as clickable elements that guide users through various actions, such as submitting forms, navigating to different pages, or initiating transactions. While the functionality of buttons is crucial, their visual appeal is equally important in creating an engaging user experience. This is where the CSS Button Maker steps in, offering designers a seamless way to create captivating buttons that seamlessly integrate into their websites.
Understanding CSS Buttons
Before delving into the CSS Button Maker, it's essential to understand the significance of CSS (Cascading Style Sheets) in web design. CSS provides the styling instructions that dictate how HTML elements should appear on a webpage. By leveraging CSS properties and selectors, designers can customize the look and feel of buttons, including their size, shape, color, and animation effects.
Traditionally, crafting CSS buttons involved writing code manually, which could be time-consuming and prone to errors, especially for complex designs. However, advancements in web development tools have led to the emergence of intuitive solutions like the CSS Button Maker, simplifying the button creation process and empowering designers to unleash their creativity.
The CSS Button Maker: A Game-Changer for Designers
The CSS Button Maker is a user-friendly tool designed to streamline the creation of custom buttons without the need for extensive coding knowledge. With its intuitive interface and robust features, it enables designers to generate stylish buttons quickly and effortlessly. Let's explore some of the key functionalities offered by this innovative tool:
1. Template Library:
The CSS Button Maker provides a diverse range of pre-designed button templates, catering to various styles and purposes. Whether you're aiming for a minimalist look or a vibrant, attention-grabbing design, you can find templates that suit your needs. These templates serve as a starting point, allowing designers to customize them according to their preferences.
2. Customization Options:
Flexibility is a hallmark of the CSS Button Maker, offering a plethora of customization options to tailor buttons to your exact specifications. From adjusting dimensions and border radius to selecting colors and typography, designers have full control over every aspect of button design. Furthermore, advanced options such as hover effects and transitions enable designers to add interactive elements that enhance user engagement.
3. Real-Time Preview:
One of the standout features of the CSS Button Maker is its real-time preview functionality, which allows designers to visualize changes instantaneously. As you tweak various parameters and apply different styles, the preview pane reflects these modifications in real-time, providing immediate feedback. This iterative design process enables designers to fine-tune their buttons until they achieve the desired aesthetic and functionality.
4. Code Generation:
Once the desired button design is finalized, the CSS Button Maker generates the corresponding CSS and HTML code automatically. This eliminates the need for manual coding, making it accessible to designers of all skill levels. The generated code is clean, concise, and well-structured, ensuring seamless integration into any web project.
Conclusion
In conclusion, the CSS Button Maker is a versatile tool that empowers designers to create visually stunning buttons with ease. By combining intuitive functionality with robust customization options, it streamlines the button creation process and enhances the overall user experience. Whether you're a seasoned web designer or a novice exploring the world of CSS, the CSS Button Maker offers a user-friendly solution for crafting captivating buttons that captivate and engage users. Embrace the power of CSS Button Maker and elevate your web design projects to new heights.
0 notes
Text
VeryUtils Smooth Zoom Pan Image Viewer is an easy-to-use JavaScript
VeryUtils Smooth Zoom Pan Image Viewer is an easy-to-use JavaScript source code for mobile and desktop that adds "pinch to zoom" or "mouse scroll to zoom" functionality to your HTML content.
VeryUtils Smooth Zoom Pan Image Viewer is a JavaScript/CSS-based image viewer designed to display product photos, maps, or any image within a custom-defined small area. It can be configured and implemented on web pages with simple copy/paste steps. It supports all major touch-enabled devices and platforms, including iOS, Android, and Windows.
VeryUtils Smooth Zoom Pan Image Viewer is a straightforward pan/zoom solution for SVGs and images in HTML. It adds event listeners for mouse scroll, double-click, and pan actions, and optionally offers the following features:
JavaScript API for controlling pan and zoom behavior
onPan and onZoom event handlers
On-screen zoom controls
It is cross-browser compatible and supports both inline SVGs and SVGs within HTML object or embed elements.
✅ VeryUtils Smooth Zoom Pan Image Viewer Key Features:
Initial Zoom level
Initial Position
Maximum zoom level
Minimum zoom level
Animation Smoothness
Animation Speed for Zoom
Animation Speed for Pan
Fit or Fill the image
Enable / Disable Pan buttons
Enable / Disable Pan Limitation
Adjustable Button Size, Color, Transparency, Alignment and Margin
Button Auto Hide and Delay Time
Mouse Drag / Touch Drag
Mouse Wheel zoom control
Mouse Cursor location zoom on mouse wheel
Mouse Double Click zoom
Border size, color, transparency
Full browser size option
Max width and height (for window resize)
Touch-enabled:
This feature provides familiar touch gestures for zooming content on mobile devices.
Fully responsive:
The plugin is capable of adapting to any screen size, ensuring an optimal viewing experience whether you're using desktop or mobile devices.
Cross-browser and compatible with iOS and Android:
Whether you're using iOS, Android, laptops, desktops, or even an older browser like IE9, this plugin should function seamlessly.
Simple setup:
Whether you're an HTML beginner or a seasoned jQuery developer, setting up the plugin is a breeze. With just a single line of code in either JavaScript or HTML, everything works automatically.
Developer API:
This plugin offers developers greater control through the Smooth Zoom Pan Image API.
Multiple instances on one page:
You can add multi-touch zooming capability to as many content elements as you'd like on a single page.
Zooming DIV content:
Different elements such as images, text, etc., can be placed inside a DIV and zoomed.
Fullscreen toggle support:
Small-screen devices often require maximum screen space. This feature allows users to toggle fullscreen mode to view content without clutter.
Adaptive image loading:
Optimize load time, resources, and minimize lag by delivering the correct image size for any screen resolution.
Marker and tooltip support:
Add markers, zoom to markers, or include tooltips on markers. This functionality is particularly useful for maps, floor plans, or product displays.
Mouseover zoom support:
Enable zooming by mouseover on desktop while retaining pinch-to-zoom functionality on mobile devices. This option maximizes user interaction across various devices.
✅ Supported Browsers:
Chrome
Firefox
Safari
Opera
Internet Explorer 9+ (works badly if viewBox attribute is set)
0 notes
Text
8 CSS Snippets for Creating Bento Grid Layouts
New Post has been published on https://thedigitalinsider.com/8-css-snippets-for-creating-bento-grid-layouts/
8 CSS Snippets for Creating Bento Grid Layouts
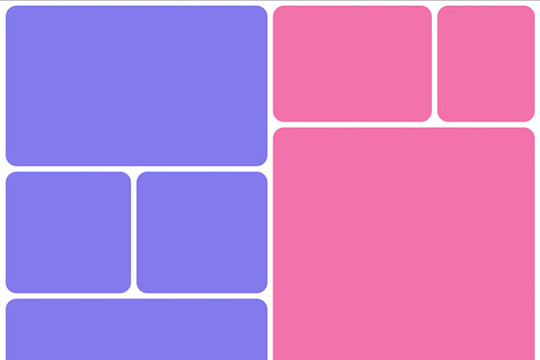
Another day, another design trend! Bento grid layouts are the subject this time around. They’re bold and beautiful. Plus, they satisfy those with a need for symmetry.
So, what exactly is a Bento layout? Think of it as a puzzle. Different-sized containers fit together to create a seamless look. Inspired by Japanese culture, it’s popping up all over the web.
There’s good reason for Bento’s growing popularity. You can use these layouts in a multitude of ways. Everything from listing blog posts to product features is possible. They’re also perfect for dashboard screens.
We should also mention the role that the evolution of CSS has played. Both CSS Grid and Flexbox make these layouts easier to build. No hacks or workarounds are necessary!
With that, here’s a look at 8 beautiful Bento grid layouts.
Complex Bento CSS Grid Layout
CSS Grid packs a lot of power into a tiny bit of code. For example, this complex grid layout requires only 43 lines of CSS. The layout is both efficient and naturally responsive. Therefore, you won’t have to play around with media queries.
See the Pen Complex Bento Layout
Bento-Style Responsive Dashboard
Here’s a gorgeous dashboard layout that benefits from Bento. The layout offers a great way to display relevant content. Everything is neatly organized and easy to follow. The use of photography and color makes this example stand out.
See the Pen Responsive Dashboard | Bento Style by Ecem Gokdogan
Bento Design Concept Layout
This page layout is a different take on the Bento aesthetic. There’s a sidebar featuring in-page navigation. Clicking a button expands it. Meanwhile, the content container maintains a consistent height.
See the Pen bento design concept by Abhishek Bhardwaj
Bento-Box-V1.0.1
Bento layouts also benefit from minimalism. This layout features fewer bells and whistles. Notice the use of white space and legible typography. The animated charts catch your eye without being overwhelming.
See the Pen Bento-Box-V1.0.1 by Gwenaël Guiraud
Sticky Bento on Scroll
This “sticky” presentation adds special effects to the mix. Watch how certain elements stick as you scroll. The idea is that you can go beyond static grids. Bento can be fun, too!
See the Pen Sticky Bento on Scroll ✨ by Jhey
Bento Grid Using CSS Flexbox
Let’s check out another fun example using Flexbox. This grid has a neon look and includes cool hover effects. Bonus points here for maintaining legibility and responsiveness.
See the Pen bento grid – challenge (Chrome +111) by EaterUsr
Card-Based Layout with Gradient Borders
Here’s an example for those wanting to stand out from the crowd. This card-based layout features animated borders, “wipe” effects, and beautiful hover styling. The layout remains clean – even with all those goodies.
See the Pen Cards (gradient border) by Dan
CSS Grid & :has() Grid Layouts
We can achieve a lot with the CSS :has() pseudo-class. This example uses it to adjust the layout as boxes are added and subtracted. Watch as the layout maintains perfect symmetry throughout.
See the Pen Always great grid – CSS grid + :has() + view transitions by Adam Argyle
Use Bento Grids to Keep Your Layout Nice and Tidy
The idea of using Bento aesthetics in web design isn’t new. However, older CSS layout techniques made them difficult to build. That’s no longer the case.
Perhaps the best part is that modern CSS does all the dirty work. We don’t need to compute complex calculations. CSS Grid and Flexbox can do this for us.
That leaves us free to experiment. The examples above demonstrate what is possible. And you can get as creative as you like.
Want to see more Bento grid examples? Check out our CodePen collection!
Related Topics
Top
#amp#Blog#box#challenge#charts#chrome#code#Color#container#Containers#content#CSS#CSS Flexbox#CSS Grid#CSS Layout Snippets#CSS Layouts#CSS Snippets#dashboard#Design#display#easy#effects#Evolution#eye#Features#grid#grids#hover#how#it
0 notes
Text
Personal Portfolio website using HTML, CSS and JavaScript

Introduction:
Are you eager to share your projects and accomplishments with the world? If so, building a personal portfolio website is an excellent way to demonstrate your skills and stand out to potential employers or clients. In this blog post, we'll take you on a journey through the process of creating your own personal portfolio website using HTML, CSS, and JavaScript, providing you with the tools and guidance you need to succeed.
Let's embark on this exciting adventure together:
Visualize Your Vision: Before you delve into the technical aspects of coding, take a moment to visualize your portfolio website. Consider the projects, skills, and experiences you want to showcase, and envision the overall look and feel you wish to achieve. Whether you prefer a minimalist design, a modern layout, or a creative approach, let your imagination guide you as you plan your portfolio.
Prepare Your Workspace:
To bring your vision to life, you'll need a conducive workspace and the right tools at your disposal. Set up your development environment by selecting a text editor like Visual Studio Code or Sublime Text. Create a dedicated folder on your computer to organize your project files, including separate HTML, CSS, and JavaScript files for clarity and organization.
Craft Your Canvas with HTML:
HTML serves as the foundation of your portfolio website, providing the structure and framework for your content. Begin by designing the layout of your website using semantic HTML elements such as <header>, <nav>, <section>, and <footer>. Organize your content logically, including sections for your bio, projects, skills, and contact information.
Style Your Masterpiece with CSS:
With HTML in place, it's time to add style and personality to your portfolio website using CSS. Create a separate CSS file and link it to your HTML document to apply visual enhancements and customizations. Experiment with CSS properties like font-family, color, margin, padding, and border to achieve the desired aesthetic and layout.
Infuse Life with JavaScript:
JavaScript breathes interactivity and dynamism into your portfolio website, elevating it from static to engaging. Incorporate JavaScript to create interactive elements such as navigation menus, image sliders, and contact forms. Showcase your projects in a captivating manner with animations, transitions, and interactive galleries powered by JavaScript.
Optimize for Seamless Experience:
In today's mobile-centric world, it's crucial to ensure that your portfolio website is optimized for mobile responsiveness. Utilize CSS media queries to adapt the layout and styling of your website based on the screen size, ensuring a seamless experience across desktops, tablets, and smartphones.
Test and Refine:
Once you've crafted your portfolio website, it's time to put it to the test. Thoroughly evaluate your website across different browsers and devices to identify and resolve any compatibility issues or bugs. Utilize browser developer tools to fine-tune your code and refine the user experience.
Launch Your Masterpiece:
With your portfolio website polished and perfected, it's time to share it with the world. Choose a hosting provider and register a domain name for your website. Platforms offer easy and cost-effective deployment options. Share your portfolio website with pride, showcasing your skills and accomplishments to potential employers, clients, and collaborators.
By following this roadmap, you'll create a captivating personal portfolio website that showcases your talents and achievements in the field of computer science. Whether you're a student embarking on your career journey or a seasoned professional looking to expand your online presence, your portfolio website will serve as a powerful tool to showcase your expertise and make a lasting impression. Remember to continuously update and , building a portfolio website as you embark on new projects and acquire new skills, ensuring that it remains a true reflection of your capabilities and aspirations.
Suggested Blogs:
Advanced Java concepts
Java framework evolution
Data structure fundamentals
0 notes
Last Seen Blogs

7-ng
I Only Support Teams That Make Me Sad

dailycisco
DAILY CISCO

paintingbetweenbooks
paintingbetweenbooks

alessaless
nella profondità della mia anima