#line weight tutorial
Text
LINE VARIATION TUTORIAL (& THOUGHT PROCESS)
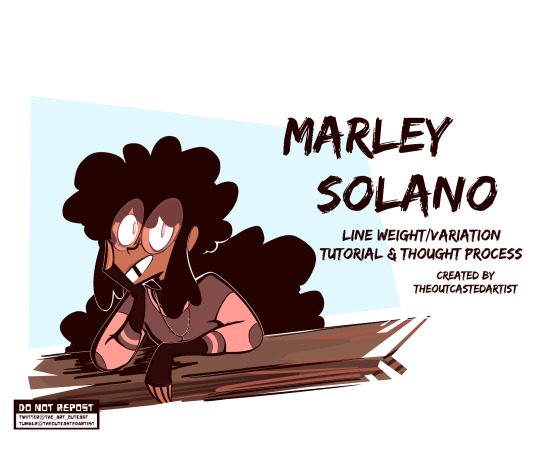
I will be using my character, Marley Solano, to demonstrate my process of doing line art, while explaining the best I can. I will reblog the full chain containing all parts when it is complete.
#lineart#lineart tutorial#art tutorial#tutorials#line variation#line thickness variation#line weight tutorial#Marley Solano#artist on twitter#artist on tumblr#digital art#how to draw#how to draw lineart#line art#TheOutcastedArtist's art
63 notes
·
View notes
Text

I needed to draw young Joshua Wei & Jane Corvin (absolute need). I think from the time they were elementary school kids to age 15, they just constantly nerded out at each other.
They are assigning pokemon teams to the justice league! 😭😭😭
Joshua & J. Corvin from The Fernweh Saga (@lacunafiction)
#fernweh saga#okay like#this is why joshua has never fallen in love with anyone in a romantic sense since leaving fernweh (he's clueless tho or maybe in denial)#who could ever match up to j corvin#j corvin secret nerd? it's more likely than you think#his romantic partners are losing in a contest they don't even know they're in#lmaooooo after josh's (not decided yet) 2nd or 3rd failed relationship he got a regrettable tattoo about being heartless#help i'm drawing#practicing inking and line weights - i look at a million art tutorials but i hardly ever practice :')#also working on another Joshua piece that's spoilers so I can't show it#although it's only 10% done - less than 10% it's more like 2 ideas and a sketch#so not like I would be able to post it anyway
58 notes
·
View notes
Text
Inking Tip: Line Weight
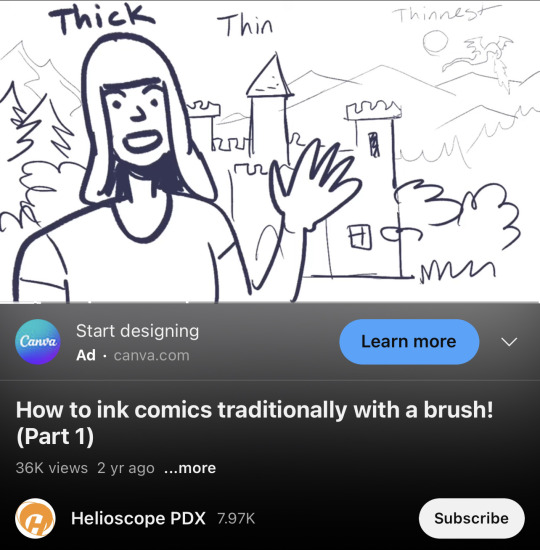
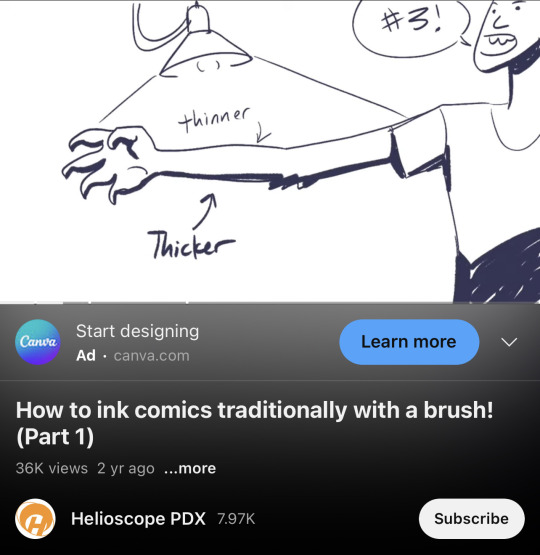
In contact with light = Thinner lines
Further into the background = Thinner lines
Credit: Helioscope PDX
#random tip#random tips#inking#line#lines#linework#line weight#pen#ink#composition#drawing#art tips#art tutorial#art tip#art tutorials#drawing tip#drawing tips#drawing tutorial#drawing tutorials#art#tip
119 notes
·
View notes
Text
My birth day is coming up on the 27th, so I re-did my Throne wish list to fill it only with items that help with my health and job, or my cats' well-being. I've turned crowd funding on for every item that costs more than $50. I am not the kind of guy who can ask for gifts just for fun, lol ;;
The only things I couldn't put on here are an instacart gift card, and the cost of a medical card for THC + a vape rig, which would allow me to treat my chronic pain/PTSD symptoms inexpensively.
Thanks for takin a look, no obligation to share this or any thing like that !
https://ko-fi.com/neonbuck
#.txt#even the plushes are on there because i plan to learn how to make them weighted/scented down the line and make a tutorial for patreon
30 notes
·
View notes
Text
Sanrio: Let's make the design for each character really simple so that children can easily draw them :)
Me: I'VE DRAWN KITTY 100 TIMES, WHY DOES SHE STILL LOOK UGLY
#What's even better is on one of their youtube channels there's a tutorial on how to draw My Melody#And it's like 'step one: draw My Melody'. No sketch or nothin'#Something something a drawing with only a few lines is easier to mess up because so much weight rests on each line#you mess up 1 line on a drawing with 100 lines total then only 1% of the drawing is ruined vs 1 line out of 5 which is 20%#Blah blah words words
7 notes
·
View notes
Text
Its very fun how you can see my evolution of drawing with tamarack cause i went from hard inks and soft shading to sketch lines being used for inks and hard shading to a pencil brush with soft shading.
Babygirl lets me ✨️experiment✨️ so i can figure out how to draw her more accurately
#if anyone needs tips on how to draw tamarack and especially drawing her actually fat i can make. a tutorial?#idk if its needed but its very much a “make sure your line weight is light around her jawline and thicken her neck” kind of deal#candy girl.txt
6 notes
·
View notes
Text
The line thickness of your artwork can have a huge impact on how it looks!
Learn about different line weight styles in my tutorial video:
youtube
2 notes
·
View notes
Text
some Emmet and Ingo doodles to figure out how drawing works
4 notes
·
View notes
Text
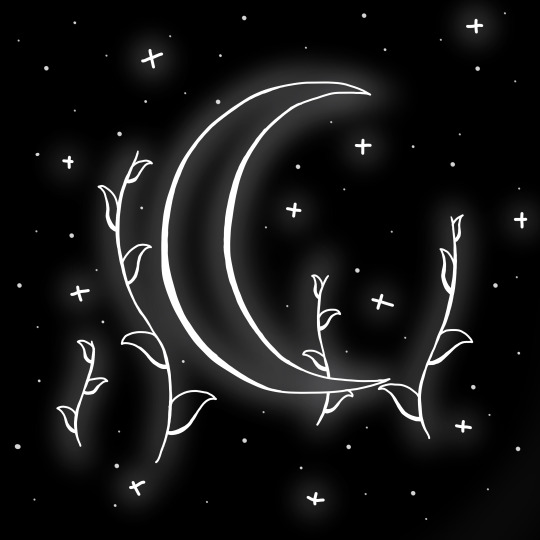
I have figured out how to do differently thick lines
behold
#digial art#artists on tumblr#crescent moon#stars#vine plants#whimsical#witchy aesthetic#none of the art programs#ive used have the line#build in line weight thing#so ive never bothered to try before#but i saw a tutorial thing#and decided to try#and man#they weren’t lying#it makes a difference lol
1 note
·
View note
Text
It's hilarious to me how when I first started drawing I refused to use any thick lines because I hated how they looked and was stupidly stubborn that everything had to be thin. And now I can't draw thin lines lol, I can only draw thick
For example, this is my OC I drew about 2 years apart. 2 years ago I could only draw with thin lines lol. And now all of my lines range from thick-super thick. Idk I just find that hilarious
#art#art growth#why was I so stubborn as a beginner#it was stupid#literally any art tutorial I looked at told me to use line weight#i never listened#I regret it
1 note
·
View note
Text
This is just a personal pet peeve of mine but i feel like a lot of online art tutorials overstate the importance of stuff like guidelines to get “correct” anatomy every single time and while those are typically really good handgrips for beginners we should also tell beginners about gesture drawing. Like maybe i’m being too animatorbrained here but being able to pump out a pose in anywhere from 15 seconds to 2 minutes and quickly move onto the next drawing without lingering on every little mistake is a really really good way at getting good at drawing people proportions quickly. If you make mistakes fast you learn from them fast. So here’s a little exercise:
Sit down, grab some reference images, draw ten poses in twenty minutes (or do ten poses in ten minutes if you’re feeling adventurous or confident) and take a step back and look at your work after the fact. Be sure to move from drawing to drawing quickly once your timer is done. Pretend you’re in a model drawing class and the model has already changed pose whenever your timer hits - finish up whatever lines you were drawing, move on to looking at what the model is doing now.
You will make a lot of shitty drawings, of course, but that’s not so bad. You only spent a minute or two making each one. Focus on the drawings you do like, and look at them as a whole.
Look at all the drawings together and how they fit together on the page. Look at little details and lines you’re proud of. Take note of things you found difficult to get right in such a short time. Take note of the things you liked doing. Do the exercise again, and focus in on the things you want to improve or explore.
Maybe you want to focus on how the torso conveys its weight on the legs. Maybe you want to focus on how shoulders and arms bend around the neck. Maybe you want to focus on how to convey depth on the torso. Maybe you can learn something more about how to draw a body if you only draw using sharp lines and angles. Maybe you can learn something more if you only draw using squiggly, overlapping lines. Maybe you can learn more about how to draw a body if you only fill out the shadows with thick, quick lines. Congratulations! You’re not just learning how to draw a body, but you’re now also exploring your tastes!
This is a fine exercise to do alone, but it’s a lot more fun to do as an activity with a small group so you get to discuss the art you made together.
5K notes
·
View notes
Note
How did you learn to draw fat bodies but still keep it cartoony? I love how you draw different types of bodies and make them all seem normal instead of certain body types sticking out like a sore thumb next to others. I struggle to draw fat bodies without it looking weird with the rest of my art. Do you have a specific tutorial you followed or something?
This is a really good question! I'm glad you like my depictions of different body types, i worked really hard to get better at that so im happy folks enjoy em!! I didn't actually learn from a book or tutorial, it was mostly looking at fat bodies IRL and learning to incorporate those features onto what I already drew. As it turns out, we're all human, so if you understand the anatomy enough to draw a skinny person, you have the tools to understand the anatomy of a fat person.
So, like, here, this is my sketch of someone with a very average build. If I were to draw a fat body, I would still use all the basic principles I use here. One mistake I think folks run into is "isolating" parts, which can lead to things like this
which isn't necessarily bad, but if its not what you're going for, the issue is pretty apparent. Weight affects ALL of the body, not just the stomach or the face or the limbs. If you think about how that weight affects everything in tandem then you can start drawing fat bodies that work more in your style.

for this, this is the same quick sketch using the same pose and principles as the first one. but! I allowed the weight to be distributed across the body. Notice how the legs, belly, arms, etc all got thicker? The key to drawing fat bodies and making them look like they fit is allowing that weight to affect everything. without it, it just looks like you're adding on features to someone rather than considering everything at once.
my other tip is: don't be scared! things like fat arms or chins or bellies or stretch lines are not something that's bad to depict. if you want to draw fat bodies, you gotta not be scared to draw things the way they are. someone having a fat body is not bad, and you drawing that fat body is not bad either. Experiment! To me, art is about representing ideas, and the only way to get better is to experiment with how you represent those ideas. I'm by no means an expert, and I think you can also get a ton done by looking for resources aside from me, but I hope this helps, and have fun!!
4K notes
·
View notes
Text

I've been sitting on this pattern and tutorial for a while now! so time to finally share it with you!
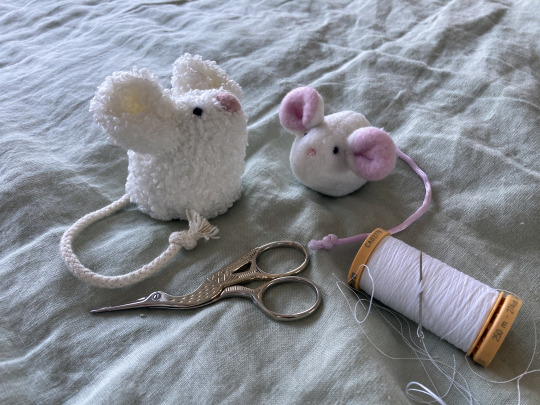
I was lamenting that the jellycat pip and sugar mice were long retired and difficult to get your hands on unless you are willing to pay much more than they retailed for each mouse, so i decided to try and eyeball a pattern and make some myself! they're not exact as i only used constructed visual references but they're close! please note that this pattern set is intended for personal use only. Rough tutorial under the cut!
This pattern is for printing onto A4 but you can check your scale with the measurements I've provided or just play around with how big or small you want to try and make them! i didn't really get any wip photos of pip mouse but it's method is largely the same with the nose being the major change, which i will detail in text in the instructions below.
for sugar mouse i would recommend using polar fleece as it will act the right way for the ears to do their squishy marshmallow looking thing. but minky should also work or other similar fabrics! for pip mouse if you can find a similar curly looking fabric with a thin backing that'll be ideal but fleece will also work well, you just wont get the furry texture, you want a fabric with a little bit of stretch to it. i however would not recommend fabrics like felt or non stretch cotton for these guys as it's likely to not take shape the same as there's no give to the fabric.
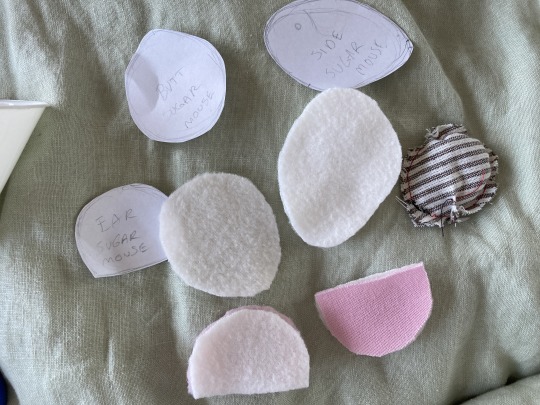
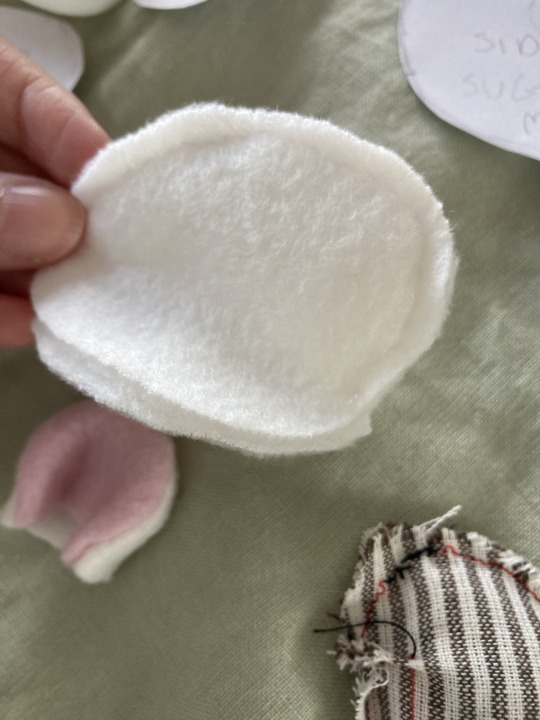
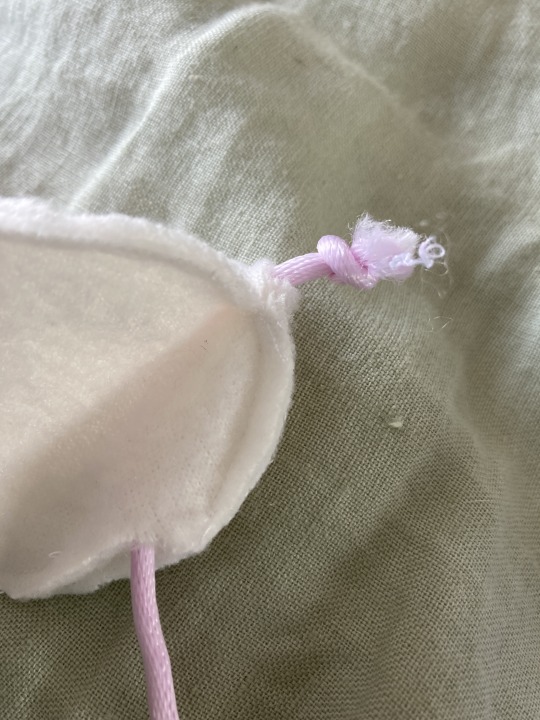
once you have printed out the pattern and cut the pieces in your fabric, you'll want to sew the ears up and turn them inside out, then put them aside for later. just leave them as is for now but here you can see i was playing around with pinching the turned through ear into shape.

Then moving on, sew the back pieces together along the spine and front of face. you then want pull the bottom open ends apart gently and place the open sides flat up against the base piece so that they're aligned, it can be good to pin this in place so it doesn't shift.
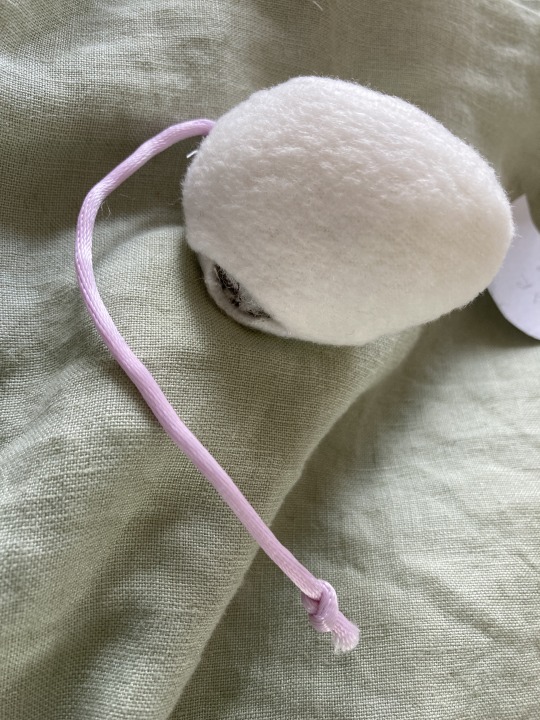
then, get your tail rope, and tie a knot at either end, placing the base of it inbetween the seam at the butt so that it'll sit in the right place, then sew the seam up directly with the tail in place, make sure you sew through the rope to secure it and make sure it doesnt shift. Sew around the bases seam leaving a hole in one side so that you can then turn your mouse through.
once turned through you will want to stuff your mouse with polyfill quite a bit so it takes shape! i like to put weighted beans in mine for extra effect, you can use dried rice or wheat too, just sew a little circle pouch a bit smaller that the mouses base with scrap fabric and fill and seal! then insert into the turning hole while you stuff. once stuffing is done you can sew the hole up with a ladder stitch. the weight from the beads will allow your mouse to sit up quite well.
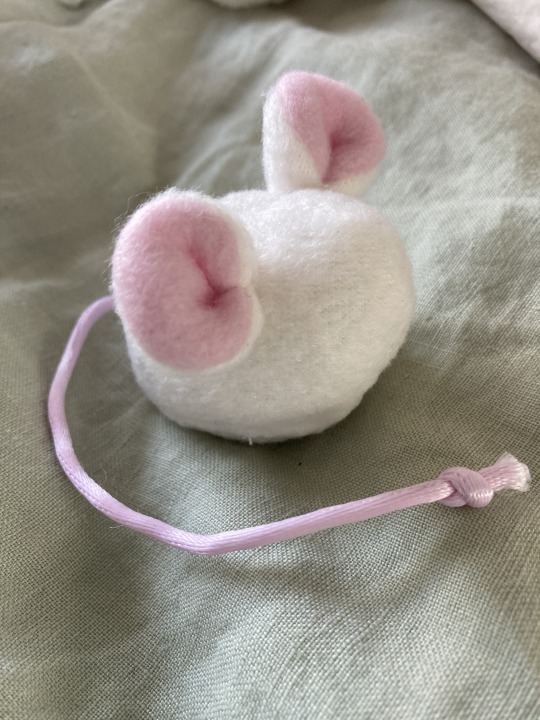
next you will want to get those ears you put aside, take each corner and bring the ends together in the middle. then sew them gently together at the ends with one or two stitches in about the same spot. you want them to look 3d so dont sew the ends to the back of the ear, just end to end so they meet in the center.

Then pin the ears in place on the head
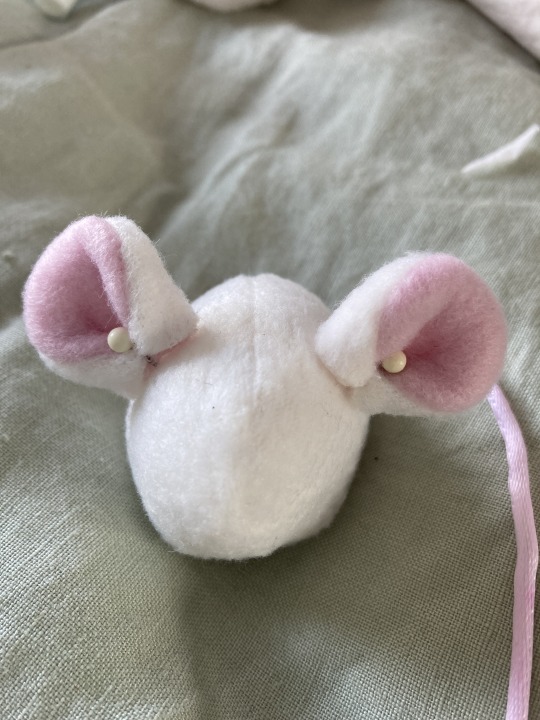
then you need to ladder stitch the ears in place while they're pinned so they dont shift around, go all the way around the outside edge of each.
now you're almost done! next they just need a face! sugar mouse only needs embroidery by way of a french knot for both the eyes and nose (you can find good video tutorials on how to sew a french knot online), pip mouse will also need a french knot for the eyes but has a separate process for it's nose.
(for the pip mouses nose you will need to leave the marked nose hole open and then stitch the nose fabric to the square nose backing in line with the dotted direction on the pattern, (it should look kind of baggy when it's unstuffed) sew it up completley with no hole, then cut a tiny slit in the backing and add polyfill there before closing with a basic stitch, then you ladder stitch the nose directly to the marked nose hole)
in order to hide the embroidery anchor knots i find the best way is to start by going down through the middle of the ears and then coming back up where you want the eye to be, and then going back down and up through the ear for the finishing knot, as it creates a very easy cover for them and looks nice and clean!
then you have yourself a little buddy!

haha they're great to squish!
if you use this pattern i'd love to see your results!
2K notes
·
View notes
Note
Any tips on learning to make buttonholes? I've been putting it off for.... *checks notes* like three years.... but better late than never and all that. I don't have any fancy machines so I gotta do it by hand but that seems right up your alley.
Thanks!
It IS up my alley, yes, I do most of my buttonholes by hand!
I'm actually part way through filming an 18th century buttonhole tutorial, but I expect it'll be a few more weeks before I finish that and put it on the youtubes, so in the meantime here's the very very short version. (The long version is looking like it'll probably be about 40 minutes maybe, judging by how much script I've written compared to my last video?)
Mark your line, a bit longer than your button is wide. I usually use a graphite mechanical pencil on light fabrics, and a light coloured pencil crayon on dark ones. (I have fabric pencils too, but they're much softer and leave a thicker line.)
You may want to baste the layers together around all the marked buttonholes if you're working on something big and the layers are shifty and slippery. I'm not basting here because this is just a pants placket.

Do a little running stitch (or perhaps a running backstitch) in fine thread around the line at the width you want the finished buttonhole to be. This holds the layers of fabric together and acts as a nice little guide for when you do the buttonhole stitches.

Cut along the marked line using a buttonhole cutter, or a woodworking chisel. Glossy magazines are the best surface to put underneath your work as you push down, and you can give it a little tap with a rubber mallet if it's not going through all the way.

I'm aware that there are some people who cut their buttonholes open using seam rippers, and if any of them are reading this please know that that is abhorrent behaviour and I need you to stop it immediately. Stop it.
Go get a buttonhole cutter for 10 bucks and your life will be better for it. Or go to the nearest hardware store and get a little woodworking chisel. This includes machine buttonholes, use the buttonhole cutter on them too. If you continue to cut open buttonholes with a seam ripper after reading this you are personally responsible for at least 3 of the grey hairs on my head.
Do a whipstitch around the cut edges, to help prevent fraying while you work and to keep all those threads out of the way. (For my everyday shirts I usually do a machine buttonhole instead of this step, and then just hand stitch over it, because it's a bit faster and a lot sturdier on the thin fabrics.)

I like to mark out my button locations at this point, because I can mark them through the holes without the buttonhole stitches getting in the way.
For the actual buttonhole stitches it's really nice if you have silk buttonhole twist, but I usually use those little balls of DMC cotton pearl/perle because it's cheap and a good weight. NOT stranded embroidery floss, no separate strands! It's got to be one smooth twisted thing!
Here's a comparison pic between silk buttonhole twist (left) and cotton pearl (right). Both can make nice looking buttonholes, but the silk is a bit nicer to work with and the knots line up more smoothly.

I've actually only used the silk for one garment ever, but am going to try to do it more often on my nicer things. I find the cotton holds up well enough to daily wear though, despite being not ideal. The buttonholes are never the first part of my garments to wear out.
I cut a piece of about one arm's length more or less, depending on the size of buttonhole. For any hole longer than about 4cm I use 2 threads, one to do each side, because the end gets very frayed and scruffy by the time you've put it through the fabric that many times.
I wax about 2cm of the tip (Not the entire thread. I wax the outlining/overcasting thread but not the buttonhole thread itself.) to make it stick in the fabric better when I start off the thread.
I don't tend to tie it, I just do a couple of stabstitches or backstitches and it holds well. (I'm generally very thorough with tying off my threads when it comes to hand sewing, but a buttonhole is basically a long row of knots, so it's pretty sturdy.)

Put the needle through underneath, with the tip coming up right along that little outline you sewed earlier. And I personally like to take the ends that are already in my hand and wrap them around the tip of the needle like so, but a lot of people loop the other end up around the other way, so here's a link to a buttonhole video with that method. Try both and see which one you prefer, the resulting knot is the same either way.


Sometimes I can pull the thread from the end near the needle and have the stitch look nice, but often I grab it closer to the base and give it a little wiggle to nestle it into place. This is more necessary with the cotton than it is with the silk.
The knot should be on top of the cut edge of the fabric, not in front of it.

You can put your stitches further apart than I do if you want, they'll still work if they've got little gaps in between them.
Keep going up that edge and when you get to the end you can either flip immediately to the other side and start back down again, or you can do a bar tack. (You can also fan out the stitches around the end if you want, but I don't like to anymore because I think the rectangular ends look nicer.)
Here's a bar tack vs. no bar tack sample. They just make it look more sharp, and they reinforce the ends.

For a bar tack do a few long stitches across the entire end.

And then do buttonhole stitches on top of those long stitches. I also like to snag a tiny bit of the fabric underneath.

Then stick the needle down into the fabric right where you ended that last stitch on the corner of the bar tack, so you don't pull that corner out of shape, and then just go back to making buttonhole stitches down the other side.
Then do the second bar tack once you get back to the end.

To finish off my thread I make it sticky with a bit more beeswax, waxing it as close to the fabric as I can get, and then bring it through to the back and pull it underneath the stitches down one side and trim it off.


In my experience it stays put perfectly well this way without tying it off.
Voila! An beautiful buttonholes!


If you want keyhole ones you can clip or punch a little rounded bit at one end of the cut and fan your stitches out around that and only do the bar tack at one end, like I did on my 1830's dressing gown.

(I won't do that style in my video though, because they're not 18th century.)
Do samples before doing them on a garment! Do as many practice ones as you need to, it takes a while for them to get good! Mine did not look this nice 10 years ago.
Your first one will probably look pretty bad, but your hundredth will be much better!
Edit: Video finished!
youtube
And here's the blog post, which is mostly a slightly longer version of this post.
#ask#buttonholes#sewing#hand sewing#sewing tutorial#I've been procrastinating on the video this week#I want it done! I don't want to work on it I want new projects! I want to cut out more gloves!#currently forcing myself to do the last few buttonholes on these pants and then maybe I can cut out new gloves? as a treat?#but I hope I get some filming done tomorrow too
3K notes
·
View notes
Text
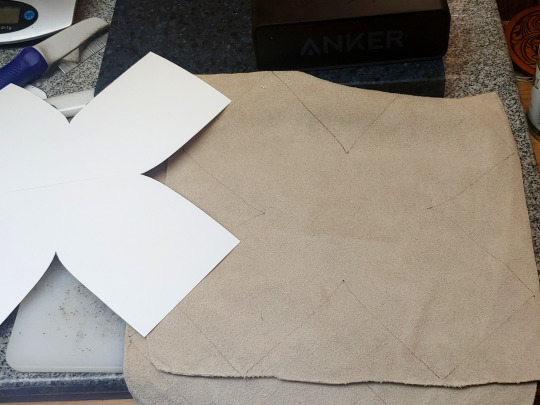
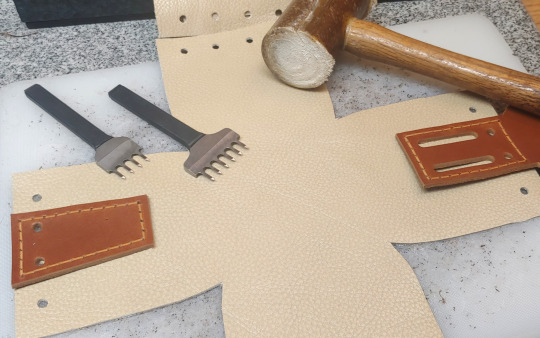
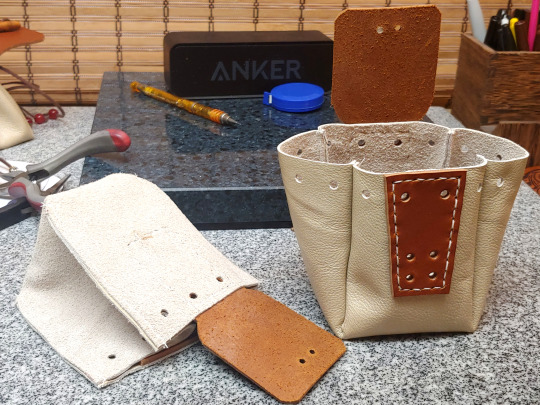
COUCH POUCH!! Free Pattern & Tutorial
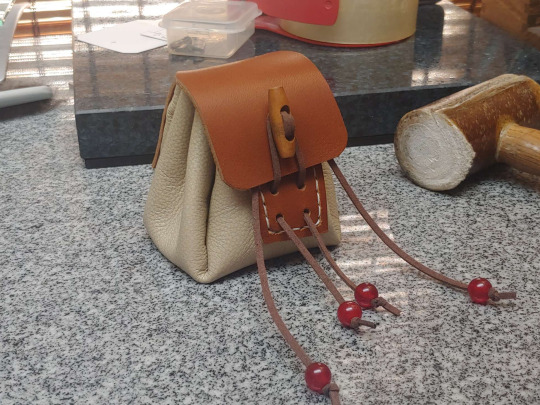
...called thus because they use upholstery-weight leather for the bag body, that in my case was in fact skinned off a couch. 🤣 Turns out they are relatively quick and easy to make, so I tidied up the pattern for printing and took pictures to document the process when I made another five of them.

First off, print your pattern, 100% scale:
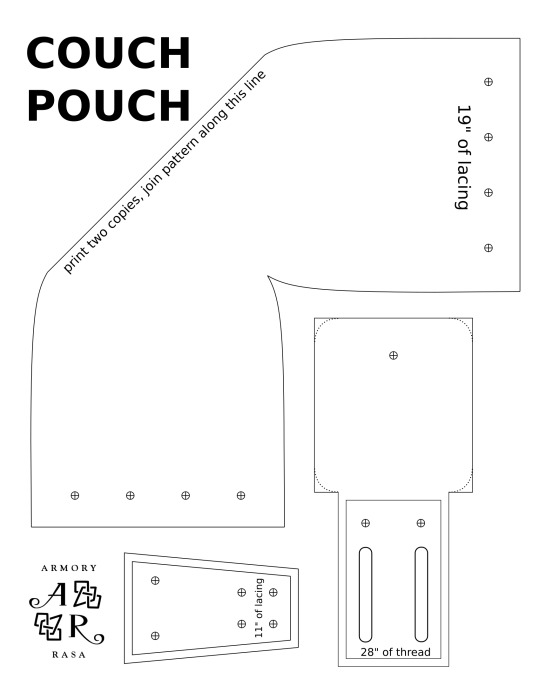
The bag shape was a modified version of the pattern I used for the Morpheus sandbag, but sized to fit in the roughly 11" squares that my couch skin came in. It makes a bag that sits very well on a tabletop, thanks to the flat base.
Though it turned out to not be the most efficient use of material, because that plus-shaped pattern tessellates well, if you're cutting them out of a full hide, but makes a lot of waste when you're cutting them out of squares of material. A more efficient design would have a half-rounded front and back, and a gusset between them, like so:
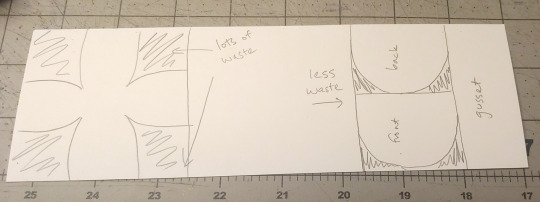
Ah well. It's not like I have any shortage of couch skin, though for the next round I'm going to experiment with a more efficient pattern.
First step, trace and cut out the bag body from your chrome-tan leather:
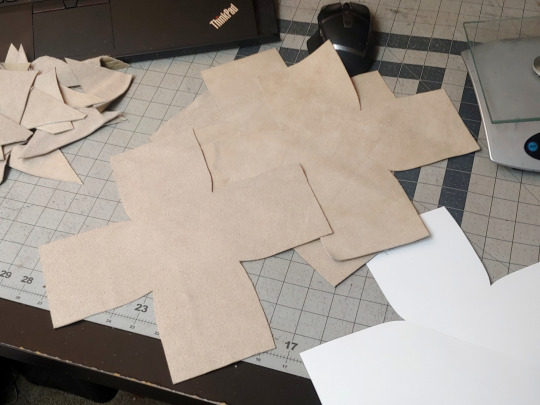
Like I said, this was upholstery leather, but anything that's flexible and ~1.5 mm thick will do.
The flap and front need to be a stiffer leather though -- I used 7 oz latigo, but veg-tan would work equally well. (And then you could ✨tool it!✨)
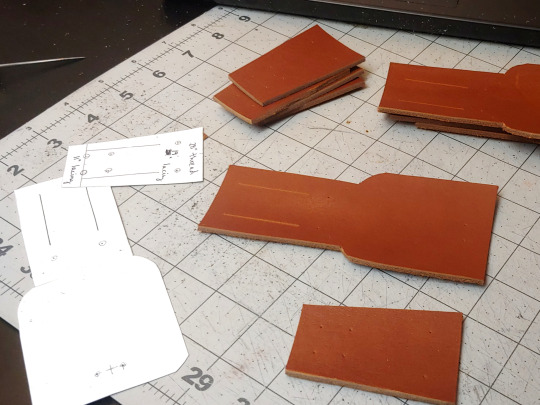
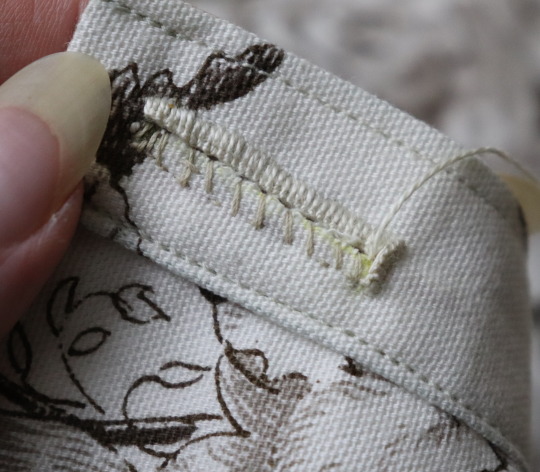
Cut them out, and then use the pattern to mark where your holes are going to be. Mark the holes on your bag body too:
The latigo pieces get hand-stitched to the bag body, so I used a stitching groover to carve out little channels for the thread -- it's not strictly necessary, but it makes your stitches lay a lot more neatly:
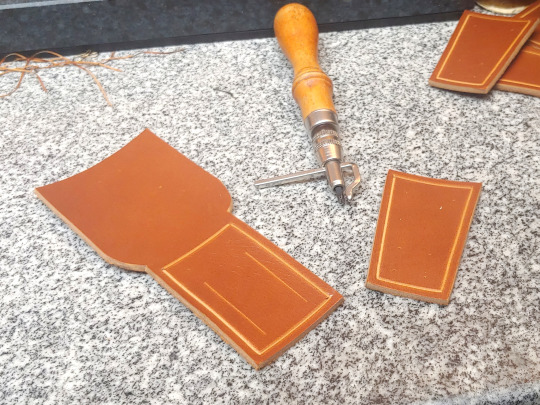
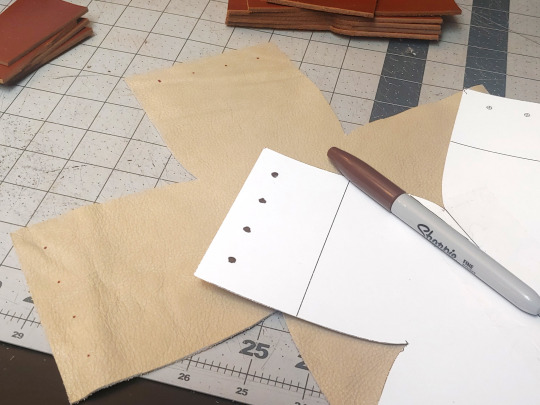
Punch the holes shown below:
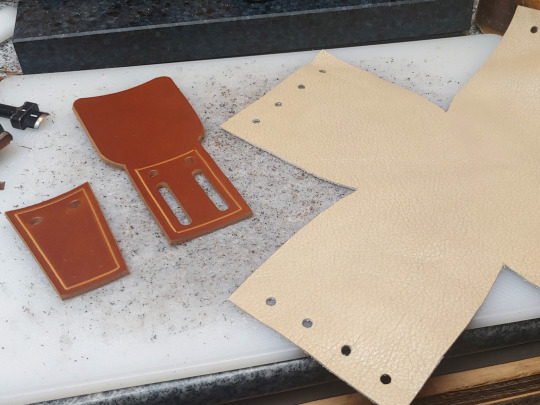
I used a ~5 mm hole punch for those, and a 1.5" slot punch for the belt loops. Some of the holes on the front piece you're not punching yet, because they need to go through both layers.
I put a dab of contact cement on the pieces (circled in white) to help hold them in place when I go to punch the stitching holes:
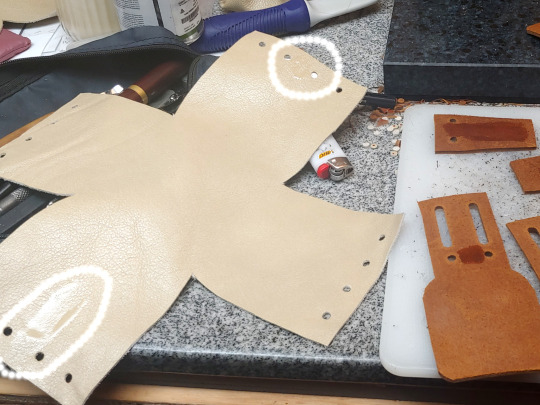
(Make sure you're not putting glue between the belt loops)
Wait fifteen minutes for the contact cement to dry until tacky, and then line up the holes and the edges and press the pieces together:
Punch stitching holes:
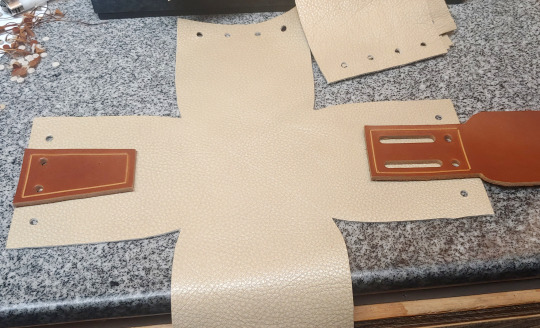
Saddle-stitch both pieces in place (takes 28" of thread per):
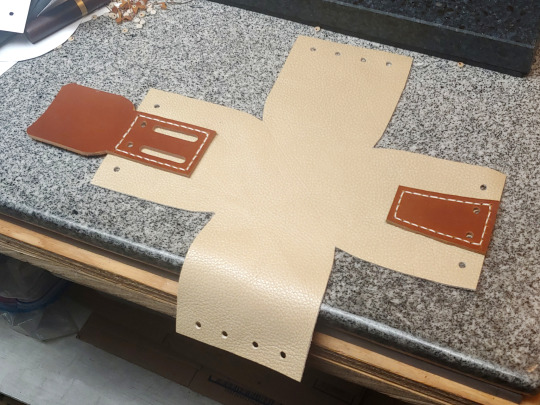
Now you can punch these holes:
(I used a slightly smaller hole punch than for the others, but it doesn't really matter.)
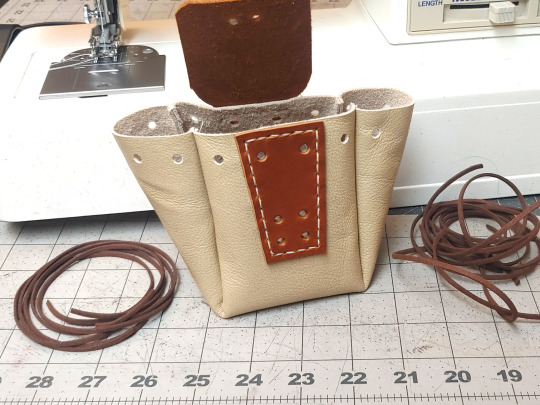
Now press the right sides of the leather together and sew up the seams from the inside:
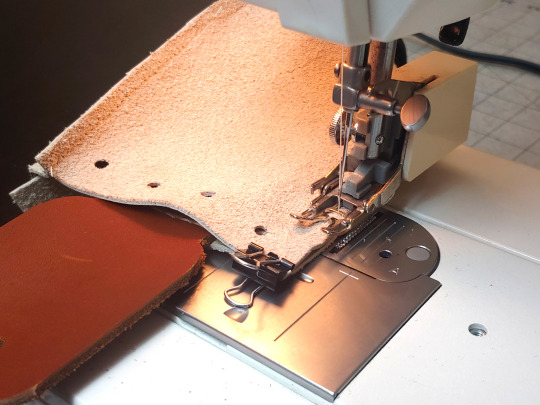
A regular sewing machine should be able to handle this, though you will need thicker thread, a heavy-duty leather-sewing needle, and a walking foot attachment. (If you don't have a walking foot attachment, it is SO WORTH getting one, even if you don't expect to sew much leather. Seriously, I use it for everything -- once you go walking foot, you don't go back. 💀) Because you can't pin leather without leaving permanent holes in it, tiny binder clips can be helpful for keeping your material lined up.
What they look like when you're finished sewing:
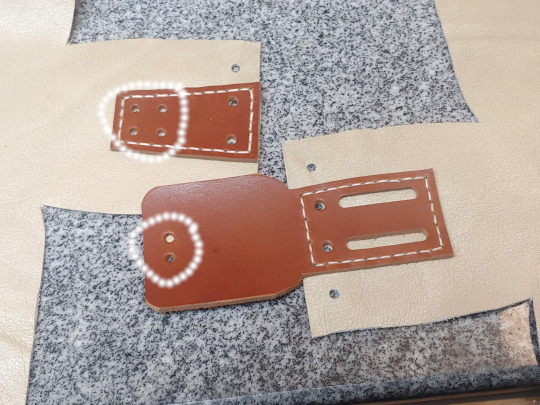
Cut 19" of lacing for the drawstring, and 11" of lacing for the toggle:
I use the 1/8" EcoSoft lace from Tandy, I think it's stronger than real leather would be at that thickness. The only important factor here is that you need something with a bit of texture and friction -- a silk cord isn't going to stay closed, it's going to slip open.
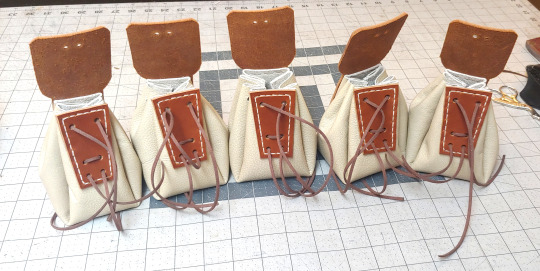
MANY BAGS.
For these I used a wooden toggle -- cut another 8" of lacing, looped it through the toggle twice, and then made a tight square knot on the back:
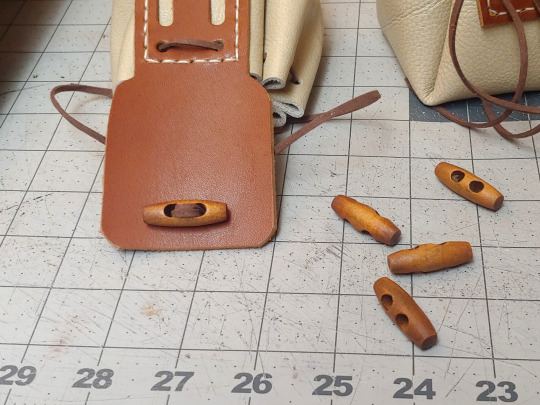
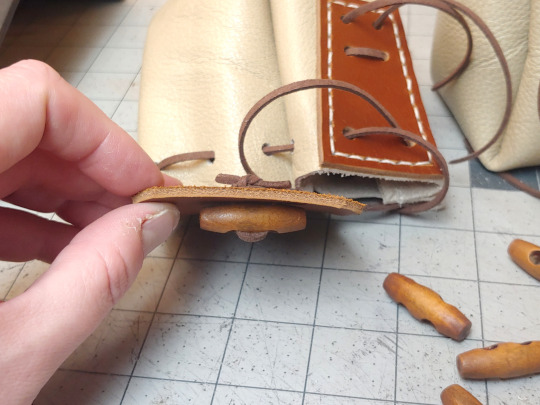
But another option is putting a concho or a large button on the flap. The bag I copied this design from, in fact, uses a concho toggle:

Thread some beads on the laces to keep the ends from getting lost, and you are DONE! 😁
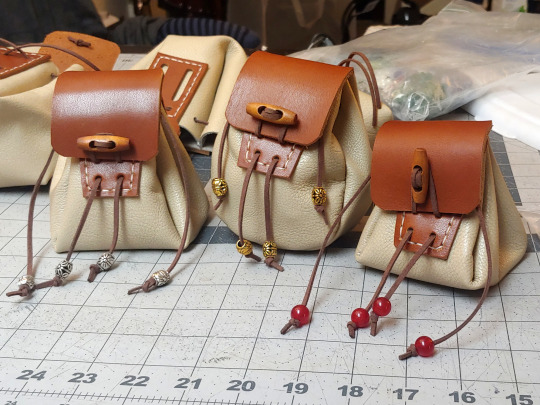
Happy Bagging!
568 notes
·
View notes
Note
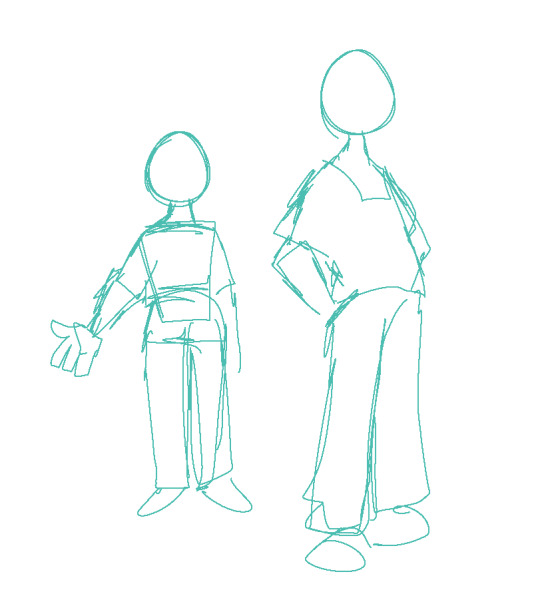
I just wanted to say I think your art style is awesome! I was wondering if you had any tutorials on how you draw anatomy in your style (hips and legs especially)? Sorry if there's already one posted and I just didn't see it 🥲. Happy New Year :>
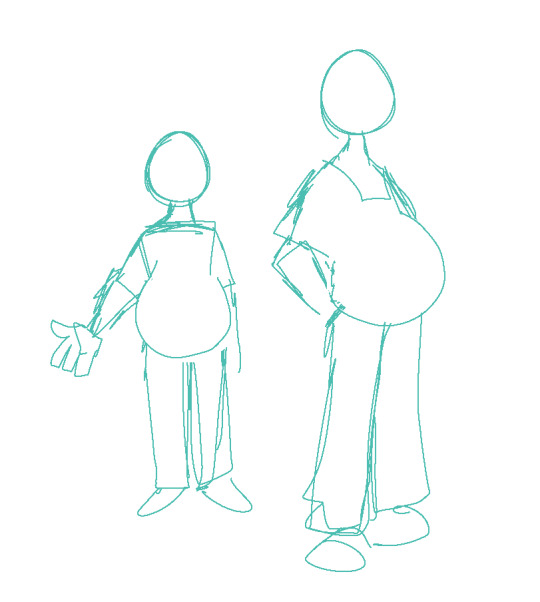
thanks for the kind words. i tend to draw people pretty stylized and then some so a good bit of artistic licence gets used. these tips are just what i use so feel free to take them with a grain of salt. with anatomy in particular you can kind of talk in circles because human/animal bodies are that complex so ill just zone in on the points you specified. here's a little image with a bunch of pointers:

the above image condenses a lot of the points I'd make, but basically the key parts are to start with the bare essentials and build up that complexity. using a line of action is a good way to get a quick, rough start. you draw a line out in the general direction of the pose and do your best to adhere to it to give the pose a sense of flow.
you can also draw smaller, thumbnail versions that throw a lot of caution to the wind but capture the basic energy of what you're going for. even having a tiny little stick figure version of your idea can make for a good guideline of where to take it forward.
when it comes to actual limbs, you wanna consider how they integrate and work together, kind of like how chains do. you can see on some of the parts of pear i've drawn out these wireframes to kind of portray how the mass of her legs works in a three dimensional space. for aspects like the waist/hips, i use that X technique i highlight above a lot, particularly for the lower torso. a lot of the times, even when drawing a character totally naked, imagining them wearing things like skintight underwear can help a lot to guide you in the right direction.
its also a good idea to consider things like gravity and weight to a degree. humans are essentially big meat sacks and gravity is always pulling down on that, but theres all kinds of aspects that effect that, such as character build or clothing. pear technically isn't naked in this, but i've tried to imagine her as such and take that into account.
if you are drawing digitally, don't be afraid to take advantage of the convenience you get with that workflow. you can retry and iterate on things a lot faster that pen and paper, and do things that aren't really feasible at all when it comes to editing and modifying your existing work. things like resizing certain bodyparts, instantly flipping the canvas, or using selection tools to completely adjust the positions of parts of your drawing. to give you an example heres a timelapse with all the little edits i made just to this demo drawing:

you don't have to use these techniques linearly, either. sometimes ill have a really solid idea for a piece in my head, and go back to basics with certain elements if they’re not coming out right or i just want to brush them up a bit more. some of the tutorial-y parts i added in i didn't actually use during the drawing but often do use so they're there just for demonstration. not every drawing i do starts as building blocks or a really basic version, often ill just start with a face and build it out from there.
i always encourage liberally using references (this can include yourself) and trying out stuff like life drawing or looking at things like existing photographs of real people/places/things if you can, the more you use learning material the better you'll draw up a mental inventory in your head that you can rely on more and more. some of these tips are things i've learned from other artists over the years (the chin one especially i remember seeing a tutorial about lol), so this is a lot of knowledge i've amassed from other sources over time myself. there are plenty of times ill use all sorts of reference material and its all in service of arriving at the final destination as smoothly as possible. learn by doing, as they say. hope this helps!
548 notes
·
View notes
Last Seen Blogs

viridiansunset
Viridian Sunsets

videogamefiles-blog
Video Game Files

dogantlerss
INCOMPLETE

aura-maybe
im just a squid and life is a nightmare!

viccastelo
I. Write.