#50-200mm
Photo
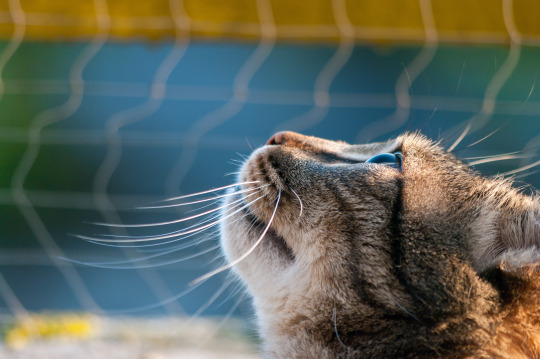
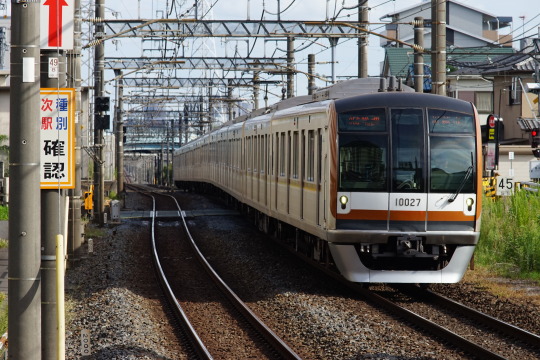
Smelling fresh air
Caught him smelling the air and staring at random spots on the balcony. The sunny morning did the rest!
Taken with Pentax K20D digital camera and smc Pentax-DA L 50–200mm F4–5.6 telephoto lens, part of the lightweight kit lens duo (hence the L). Not bad for a mere kit lens!
#IFTTT#Flickr#cat#pet#tabby#tomcat#moustache#fur#eye#depth of field#bokeh#kit lens#Pentax#K20D#Pentax K20D#DSLR#50-200mm#smc Pentax-DA L 50-200mm F4-5.6 ED#digital photography#cattography
7 notes
·
View notes
Text
Parus cristatus
1 note
·
View note
Video
Bainbridge Ferry Meetup by Taomeister
Via Flickr:
Seattle Photowalks, Bainbridge WA June 12, 2022
#Bainbridge Ferry#WSFerries#Canon EOS 50#Pro100#Kodak Pro100#EF 70-200mm F2.8 III#Kodak ProImage100#flickr#Seattle#Washington#PNW#Pacific Northwest#Puget Sound#Space Needle#Architecture#Travel#Skyline
22 notes
·
View notes
Photo
Some of the prints available in my Printler shop [link]
#70-200#70-200mm#2.8#f2.8#tamron#70-200/2.8#50mm#1.4#50/1.4#nikkor#f-mount#explore#exploration#curious#curiousity#adventure#adventuring#quest#documentary#snapshot#spontaneous#x-pro2#xpro2#x pro 2#x-pro 2#fujifilm#fuji#x pro#x-pro#fuji x
7 notes
·
View notes
Text
[NOTICE] TOMORROW X TOGETHER '2024 DECO KIT'' Release Announcement
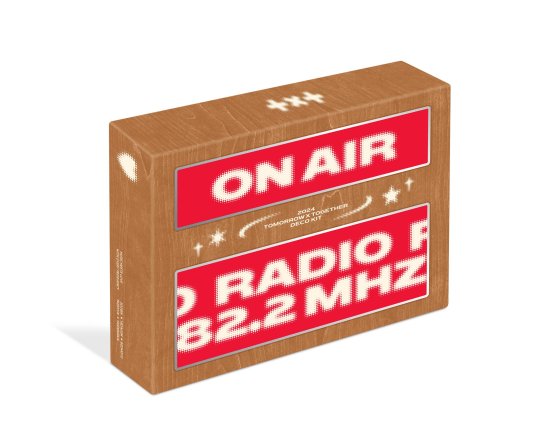
We would like to inform you of the release of “2024 DECO KIT,”
The Special Radio 82.2MHZ with TOMORROW X TOGETHER.
TOMORROW X TOGETHER members have become radio DJs for the day, just for MOA!
The joyous times the members had as they planned a variety of events to liven up MOA’s days overflow
throughout the photobook in 76 pages.
In addition to the abundant bundle of decorative items ideal for capturing your moments with TOMORROW X TOGETHER,
such as a 40-page long notebook, 8 different types of stickers,
and a 50-page memo pad,
you can also meet with the members in the radio booth through various photo items
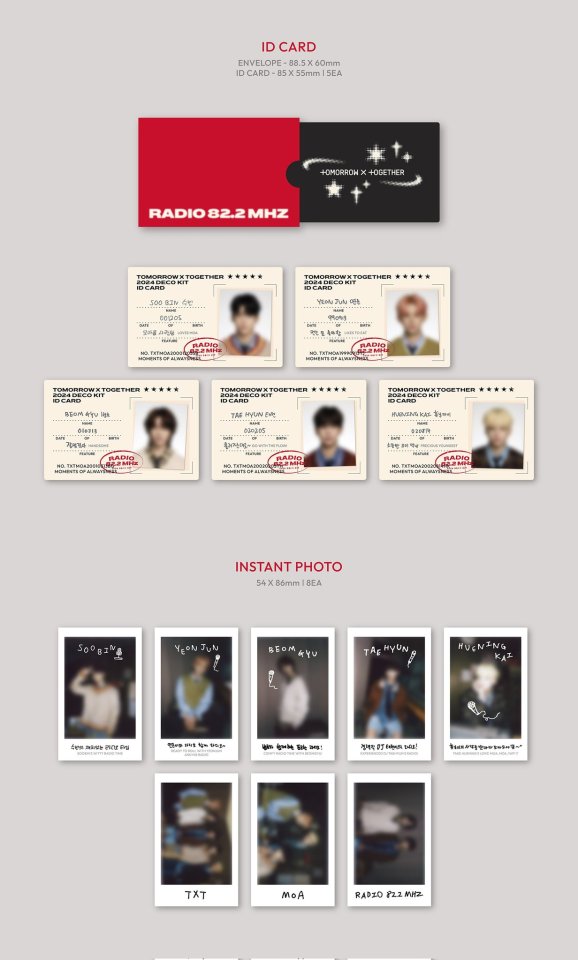
including a frame card set consisting of handwritten stories of the members,
a photo card set, an official ID card set, Instant photos, and more.
This personalized radio will undoubtedly add a splash of color to MOA’s daily routine.
“TOMORROW X TOGETHER 2024 DECO KIT”
will be available for pre-order from February 7 and officially released on April 1.
[PRE-ORDER DATE]
- From 11AM, Wednesday, February 7, 2024 (KST) *WHILE SUPPLIES LAST*
[RELEASE DATE]
- Weverse shop GLOBAL : February 19, 2024 (KST)
- Weverse shop US : April 1, 2024 (PDT)
- Weverse Shop JAPAN & UNIVERSAL MUSIC JAPAN : February 22, 2024 (KST)
- QQ Music & Kugou Music : Scheduled to be released in March, 2024 (KST)
*Online Retailers : February 19, 2024 (KST)
- Kakao Talk Gift
- Aladin
- YES24
- KTOWN4U
- KYOBO BOOK CENTRE(HOTTRACKS)
- Apple Music
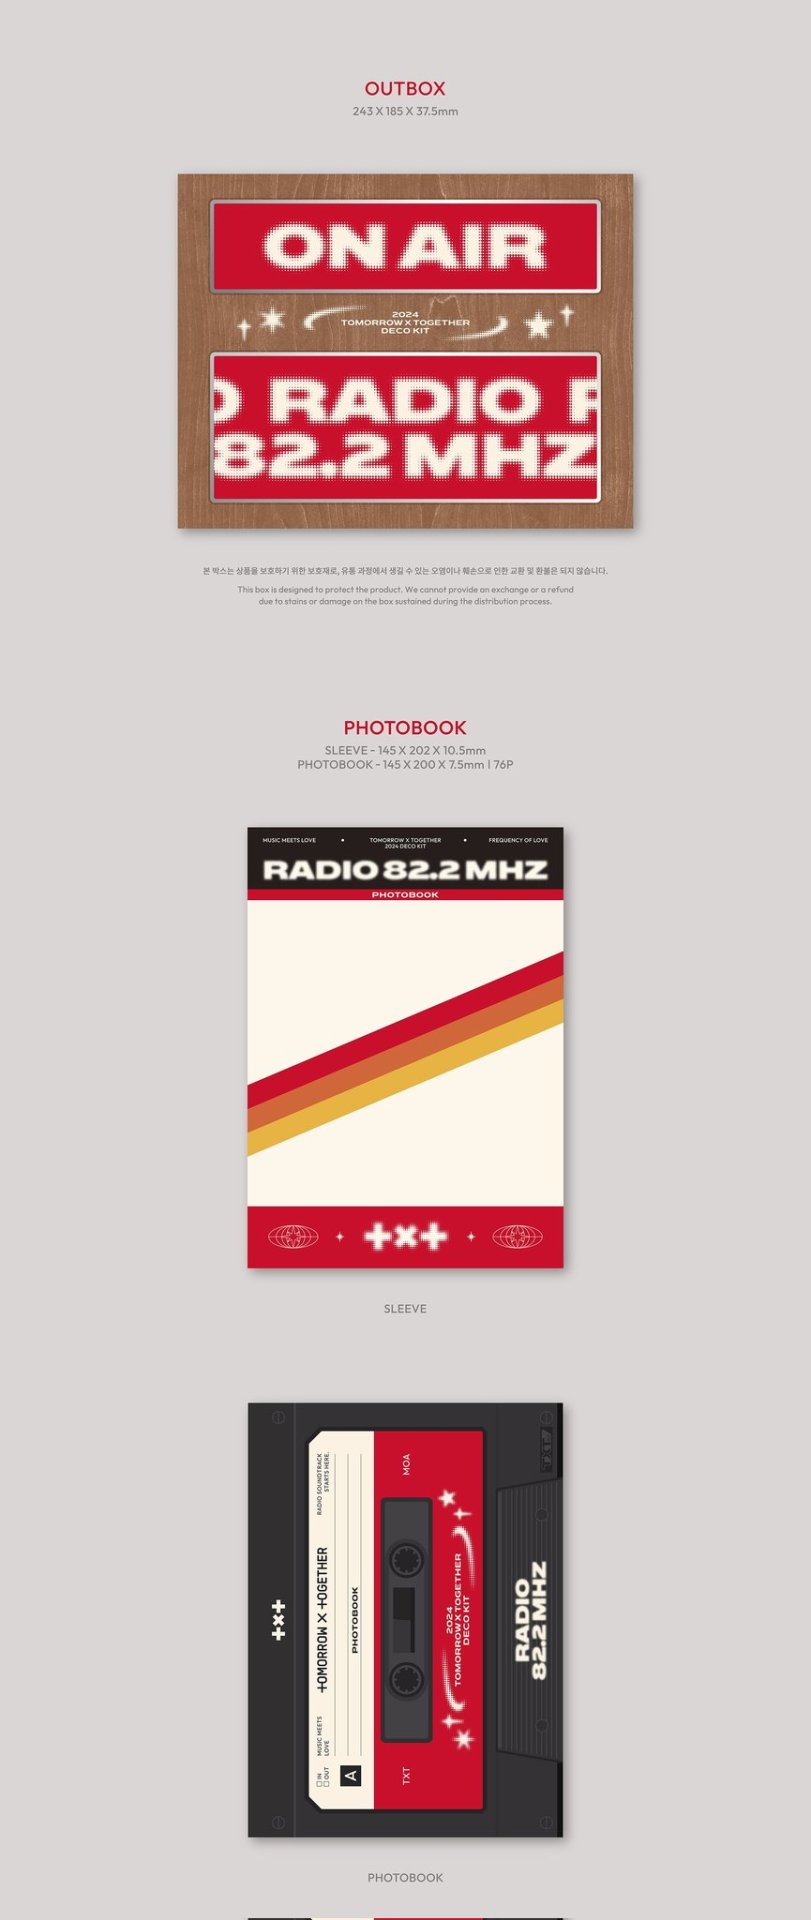
- OUTBOX Size: 243 x 185 x 37.5mm
*This box is designed to protect the product. We cannot provide an exchange or a refund due to stains or damage on the box sustained during the distribution process.
[SPEC]
1. PHOTOBOOK
SLEEVE Size: 145 x 202 x 10.5mm
PHOTOBOOK Size: 145 x 200 x 7.5mm / 76p
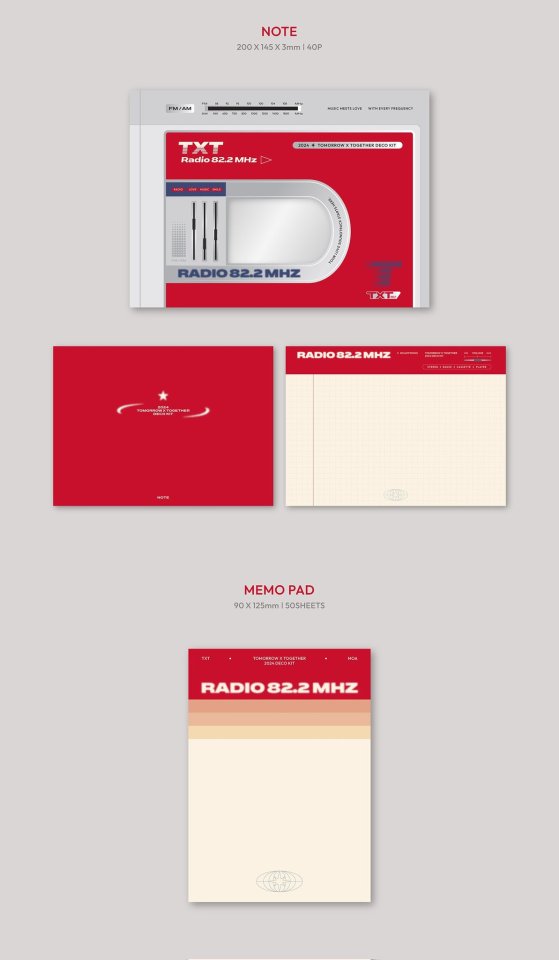
2. NOTE
Size: 200 x 145 x 3mm / 40p
3. MEMO PAD
Size: 90 x 125mm / 50sheets
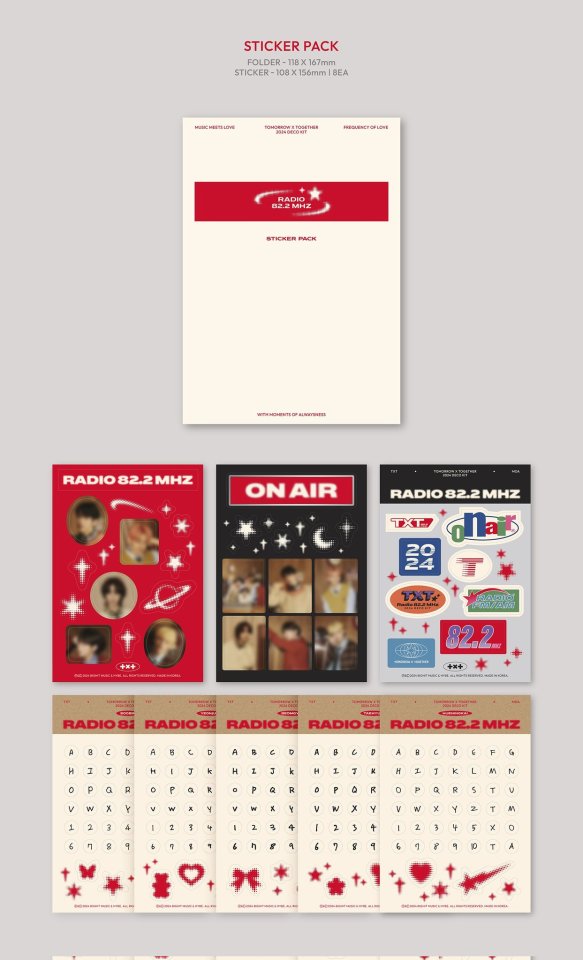
4. STICKER PACK
FOLDER Size: 118 x 167mm
STRICKER Size: 108 x 156mm / 8ea
5. ID CARD
ENVELOPE Size: 88.5 x 60mm
ID CARD Size: 85 x 55mm / 5ea
6. INSTANT PHOTO
Size: 54 x 86mm / 8ea
7. LETTER SET
ENVELOPE Size: 160 x 110mm / 2ea
LETTER Size: 145 x 200mm / 5ea
8. POSTCARD SET
FRAME Size: 130 x 90mm / 1ea
POSTCARD Size: 125 x 85mm / 5ea
9. PHOTOCARD
ENVELOPE Size: 98 x 60mm
PHOTOCARD Size: 55 x 85mm / 6ea
10. POSTER
Size: 330 x 440mm


#txt#tomorrow x together#240206#weverse#notice#soobin#yeonjun#beomgyu#taehyun#hueningkai#2024 Deco Kit#Deco Kit
29 notes
·
View notes
Text

This small waterfall captured Jason's attention last year while scouting for fall colors in the San Juans.
By Jason Coward
📆 Sep 23, 2022
📷 ISO 50, 0.5 s, f/18, 200mm
#Jason Coward#Amazing#Beautiful#Nature#Travel#Waterfall#Waterfalls#Nikon#Photography#Landscape Photography#Capture one pro
33 notes
·
View notes
Text
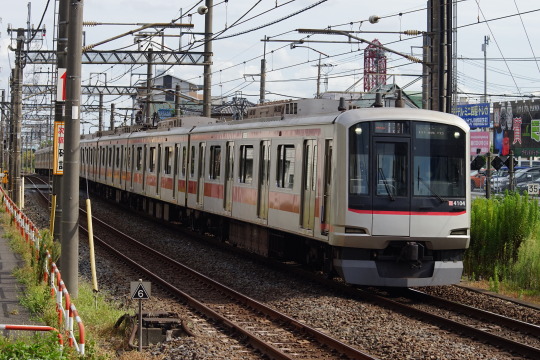
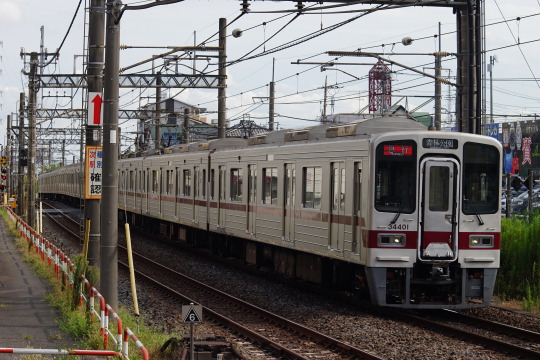
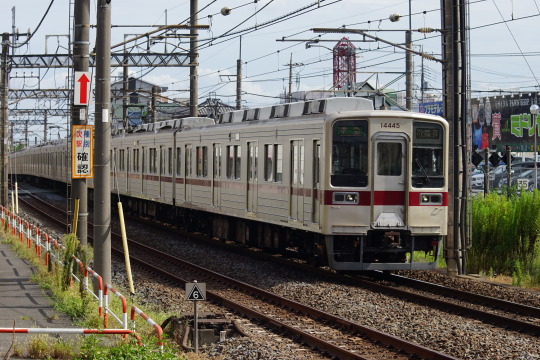
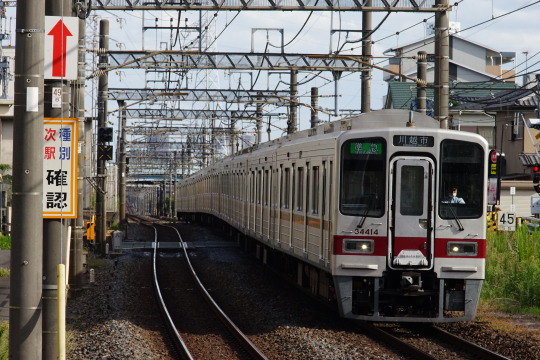

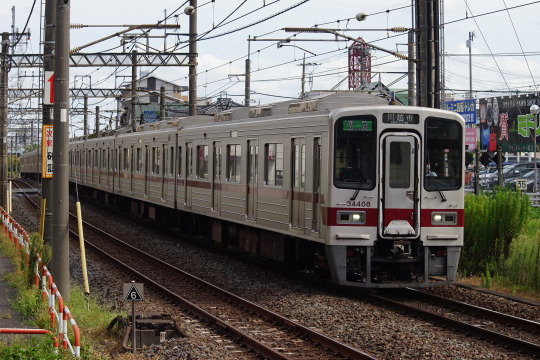
SONY α7II+Canon FD100-200mm F5.6 S.C.で東上線を撮影。発売が50年前のハードオフジャンク550円レンズだが、レンズの描写自体は現代でも一応鑑賞に耐えるかなと言う印象(35mmフルサイズセンサー2400万画素での使用なんて想定していないから、等倍で見るとアラは出るけど)
14 notes
·
View notes
Photo


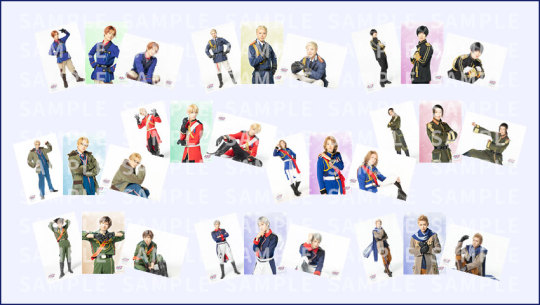

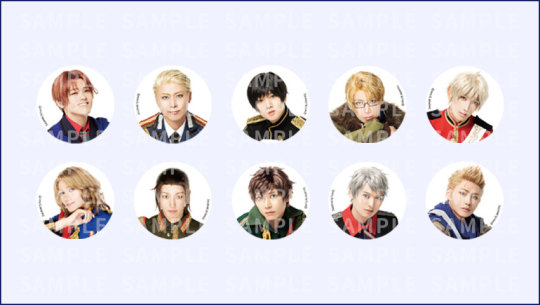
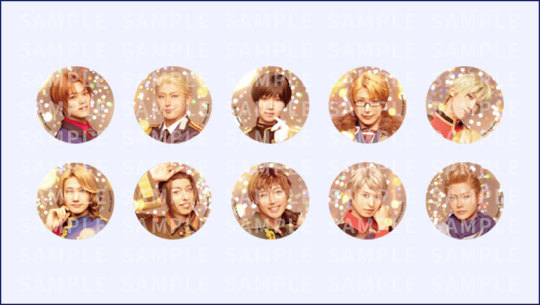


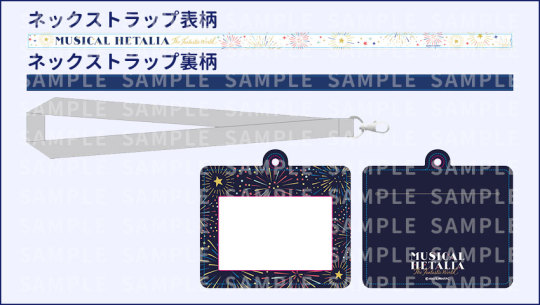
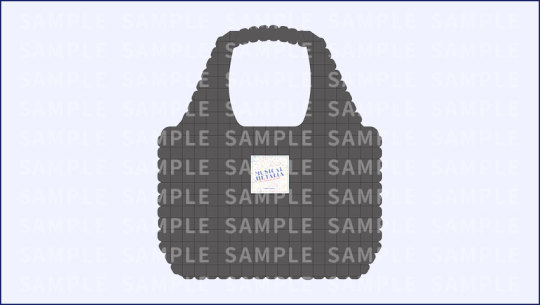
Goods for Musical 「Hetalia 〜The Fantastic World〜」
Pamphlet
2,800¥ | Full Color / 36P / A4 Size
Flag
1,000¥ | B5 Size
Individual Bromide Set
600¥ | L Version / 3 bromides in 1 set / 10 sets in total
Random Bromide
200¥ | 50 in total (10 main casts x 5 variations each)
Can Badge A (white)
500¥ | 10 in total / matte finish / 56mm
Can Badge B (illumination)
500¥ | 10 in total / holo finish / 56mm
Acrylic Stand
1,000¥ | 10 in total / Size: 100x50mm, base 50x50mm
Ribbon Charm
800¥ | Osaka: blue & Tokyo: red
Neck Strap & Card Holder
1,500¥ | Size: strap 25mm (width) x 900mm (length), card holder 80x100mm
Bag
2,300¥ | Polyester, Polyurethane / Black / Size: 440(W)x320(H)x110(D) mm, handle part 200mm
15 notes
·
View notes
Text

On the edge
Canon T70, Tokina SD 35-200mm f/4-5.6
Fomapan 400, Rodinal 1:50
Tumblr - Instagram
#35mm#film photography#canon t70#analog#bnw film#fomapan#rodinal#home developed film#landscape photography#original photographers#film grain#explore nature#lone tree#silhouette#blu27nature
8 notes
·
View notes
Text
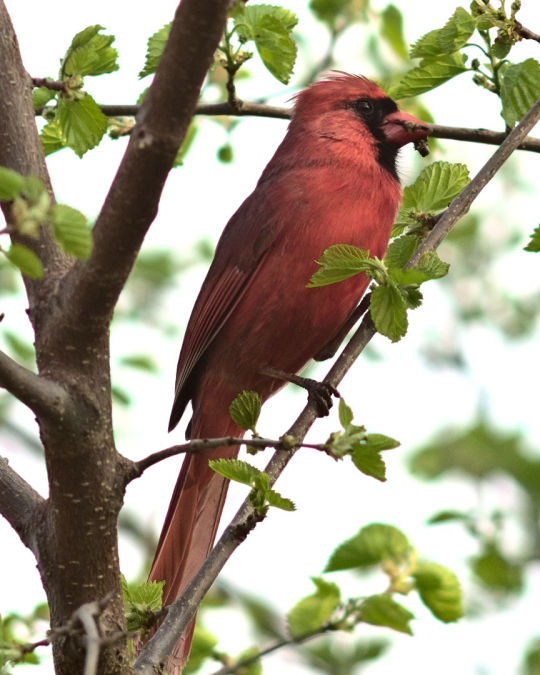
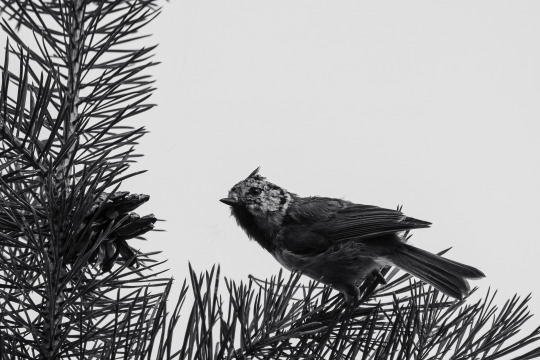
Northern Cardinal. Shot with a 50-plus year old Super-Takumar 1:4 200mm on an Olympus E-M1. Douglas Douven. Ontario, Canada.
#photographers on tumblr#photography#nature#wildlife#birds#cardinal#photographers#wildlife photography#nature photography#original photographers#original photography#super takumar
6 notes
·
View notes
Photo

A very small fly. You can tell how small it is as you can see the out of focus tip to the insect pin to the right of the head shot. Not sure what species, but the beauty of the wing and the white integument and contrasty hair and eyes were appealing. Collected inadvertently while netting bees in Eastern Neck National Wildlife Refuge on a bright sunny day in the 70s.
<b> ~~~~~~~~~~{{{{{{0}}}}}}~~~~~~~~~~</b>
All photographs are public domain, feel free to download and use as you wish.
<b>Photography Information: </b>Canon Mark II 5D, Zerene Stacker, Stackshot Sled, 200mm Pentax-m with Nikon 10X infinity microscope objective lens mounted on front , Twin Macro Flash in Styrofoam Cooler, F5.6, ISO 100, Shutter Speed 200
<i>
Love for Other Things
It’s easy to love a deer
But try to care about bugs and scrawny trees
Love the puddle of lukewarm water
From last week’s rain.
Leave the mountains alone for now.
Also the clear lakes surrounded by pines.
People are lined up to admire them.
Get close to the things that slide away in the dark.
Be grateful even for the boredom
That sometimes seems to involve the whole world.
Think of the frost
That will crack our bones eventually.
- Tom Hennen
</i>
You can also follow us on Instagram account USGSBIML <b>Want some Useful Links to the Techniques We Use? Well now here you go Citizen:</b>
Basic USGSBIML set up:
<a href="http://www.youtube.com/watch?v=S-_yvIsucOY" rel="noreferrer nofollow">www.youtube.com/watch?v=S-_yvIsucOY</a>
USGSBIML Photoshopping Technique: Note that we now have added using the burn tool at 50% opacity set to shadows to clean up the halos that bleed into the black background from "hot" color sections of the picture.
<a href="http://www.youtube.com/watch?v=Bdmx_8zqvN4" rel="noreferrer nofollow">www.youtube.com/watch?v=Bdmx_8zqvN4</a>
PDF of Basic USGSBIML Photography Set Up:
ftp://ftpext.usgs.gov/pub/er/md/laurel/Droege/How%20to%20Take%20MacroPhotographs%20of%20Insects%20BIML%20Lab2.pdf
Google Hangout Demonstration of Techniques:
<a href="https://plus.google.com/events/c5569losvskrv2nu606ltof8odo" rel="noreferrer nofollow">plus.google.com/events/c5569losvskrv2nu606ltof8odo</a>
or
<a href="http://www.youtube.com/watch?v=4c15neFttoU" rel="noreferrer nofollow">www.youtube.com/watch?v=4c15neFttoU</a>
Excellent Technical Form on Stacking:
<a href="http://www.photomacrography.net/" rel="noreferrer nofollow">www.photomacrography.net/</a>
<b>Contact information:</b>
Sam Droege
[email protected]
301 497 5840
30 notes
·
View notes
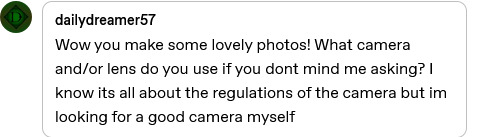
Photo

Watching random spots
Caught him smelling the air and staring at random spots on the balcony. The sunny morning did the rest!
Taken with Pentax K20D digital camera and smc Pentax-DA L 50–200mm F4–5.6 telephoto lens, part of the lightweight kit lens duo (hence the L). Not bad for a mere kit lens!
#IFTTT#Flickr#cat#pet#tabby#tomcat#moustache#fur#eye#depth of field#bokeh#kit lens#Pentax#K20D#Pentax K20D#DSLR#50-200mm#smc Pentax-DA L 50-200mm F4-5.6 ED
6 notes
·
View notes
Photo
Thanks @dailydreamer57! I’ve owned an Olympus that I really liked (don’t remember the model) and when that finally died I got a Pentax K-500. That was years ago. They probably have a slew of new models now. The K-500 had a bad shutter problem. Hopefully they’ve improved upon that. The lenses I have for it are the Pentax 50-200mm and the 18-55mm. I really don’t know anything about cameras. I mostly just fooled around.
6 notes
·
View notes
Photo

I’m absolutely delighted to share that I’m a finalist in the 2022 Travel Photographer of the Year awards! A huge thanks to the judging panel and organisers. My photograph has been shortlisted in the Mark of Mankind category. The photograph was made using my Lumix G9 and Leica DG 50-200mm f2.8-4.0 lens; very much a favourite combination of mine. The raw file was processed in LightRoom Classic and finished in Exposure Software’s X7, on my Mac Pro, using calibrated Eizo CG monitors. [Caption] Altered Realities. A man taking his dog out for a walk is seen in the reflection of a building's portico (external ceiling). Whilst nothing in the photograph has been altered, it has been rotated by 180 degrees. Canary Wharf, London, UK. July 16, 2022. Photo: Edmond Terakopian. @travelphotographeroftheyear @lumix @lumixuk @lumix_fotografia @lumix_de @lumixjapan @lumix_france @lumixusa @apple @lightroom @adobe @exposuresoftware @thinktankphoto #lumix #lumixg9 #leicadg50200 #tpoty #tpoty2022 #tpotyfinalist #canarywharf #mindshiftgear #selfie #photographeratwork #surreal #abstract #pet #dog #alteredrealities #creativephotography #awardwinningphotographer #awardwinningphotography @eizouk @eizoeurope @eizo_global @eizocolour #eizomonitor #myexposureedit (at Canary Wharf, London) https://www.instagram.com/p/Cl9I3F7I0OR/?igshid=NGJjMDIxMWI=
#lumix#lumixg9#leicadg50200#tpoty#tpoty2022#tpotyfinalist#canarywharf#mindshiftgear#selfie#photographeratwork#surreal#abstract#pet#dog#alteredrealities#creativephotography#awardwinningphotographer#awardwinningphotography#eizomonitor#myexposureedit
2 notes
·
View notes
Note
hi, I was just wondering what kind of camera you use for skating events! I'm going to my first one this year (SCI) and I really want to get some good photos like yours, but I don't know anything about cameras lol. (sorry if you already talked about this in a post or something, I couldn't find anything like that but I know tumblr's search algorithm sucks 😂)
I am so sorry that I haven't answered this in time at all for your trip to Skate Canada. 🙇♀️ I hope you had fun there! And I hope that even without my reply you took amazing pictures!
Thank you for complimenting my pictures! ❤️
____
I will still answer the question - just much too late!
Tbh I am not an expert on cameras either - I am just some fan with a camera 😅 Taking pictures looked fun so I went with that. I informed myself via Google which camera to buy and that's was it.
I use a system camera - Canon EOS M10 (I have no idea if this is the correct English term for it) with two different objectives, both in the 50mm to 200mm department. I bought my camera and my first objective in 2017 - the system camera was a compromise between a really expensive reflex camera with detachable objective and the system camera which quality is a bit less compared to the reflex camera but is much lighter and cheaper. The first objective I got is a Canon EF-M 50-200mm. For last seasons world championship however I bought a new objective, which was much more expensive almost 8times the price of my first objective a CANON EF 70-200 mm f / 4L IS II objective with an adapter to make it compatible with my system camera. I used it for Worlds and Nebelhorn Trophy and the difference in quality is apparent, but the objective is also much heavier to use.
My next goal is to finance a better corpus for my new objective so I don't need the adapter that also reduces a bit of the reaction time of the camera.
In general I think for starters a good reflex camera or a system camera like mine and one objective will do. The expensive parts are always the different objectives and their level of performance. For figure skating photography you need a focal distance of 50-200mm at least, because otherwise you have very small figures unless you are super close. I don't think you need an expensive objective for the first time, because you should try if you like taking pictures at all. The objectives the official photographers use at rinkside costs 3000€+, my new one was around 1600€.
Btw I can't recommend digital cameras because they are too slow and also make quite blurry pictures in skating, optical zoom is no comparison to the zoom of the attached objectives.
Also I am not a professional photographer at all, so I mostly rely on the automatic use of settings. I also have loads of pictures you cannot use afterwards. In figure skating getting perfectly clear pictures is a challenge as it's so fast. I think most importan is that you have fun taking pictures and you also have to decide whether you want to see the full action or take pictures bc both at the same time is not possible.
My goal for the future - if my irl gets a bit less busy - is to invest in a new corpus for the new objective and do a photography course, because atm I learned everything on my own.
Let me finish with a favorite Shoma picture and the difference between my objectives in sharpness. (I didn't upload either in full quality like on my computer but I still think the difference is quite clear)

___
Sometimes asks get buried in my inbox, also the last weeks were a struggle in real life with so many things happening at the same time. Who knew life could change so much in just 8 weeks, anyway I am sorry if I don't answer your questions on time.
#figure skating#replies#personal#camera equipment#pls ignore the different names of the watermarks on my pics#one is Instagram handle - the other my twitter handle
2 notes
·
View notes
Text
Installation content of air cooling modular cooling and hot water unit
The installation contents of air cooling modular cooling and hot water unit are divided into: host installation, fan coil installation, air duct installation, auxiliary equipment installation, water pipe construction, power distribution and communication, etc.
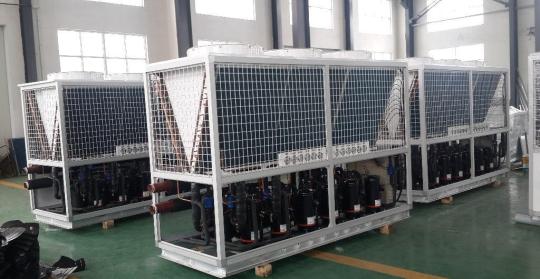
Host installation
Host installation location
The main engine is fixed with bolts, and there are shock cushion, cement pier, and drainage ditch below the unit. To sum up, the installation position of the host has the following requirements: installation foundation, fixed with bolts, shock absorption measures, and drainage channel. The host installation also considers the distance from the surrounding objects, and the distance is too close will affect the heat exchange. The general requirement is good ventilation and adequate maintenance space. The specification requires that the distance is not less than 3 meters from the roof, not less than 2 meters from the objects before and after, and not less than 1 meter between the units.
Host leak check
The equilibrium pressure of the system is generally close to the corresponding saturation pressure at the ambient temperature. After the unit is in place, the leakage inspection should be conducted step by step. The method is to observe the pressure gauge on the unit or measure the balance pressure of the system with the composite pressure gauge, which is required to be close to the corresponding saturation pressure at the ambient temperature.
Installation of fan coil
Installation mode of fan coil unit:
Air duct and room air outlet should be added soft connection, both vibration reduction and easy to install. Add 50~200mm soft connection between the air outlet and the air duct and heat preservation. Air duct shall be installed horizontally with diameter or long side size less than or equal to 400mm, spacing shall not be more than 4m; greater than 400mm, not more than 3m. The air duct shall be installed vertically, and the spacing shall not be greater than 4m, and a single straight pipe shall have at least two fixed points.
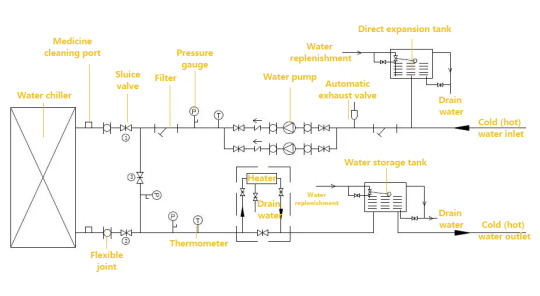
Auxiliary equipment installation
Main engine water inlet and water outlet:
Install soft connection, pressure gauge, thermometer and butterfly valve at the inlet and outlet of the main engine.
water pump:
The installation of the pump is relatively complex, the main purpose is to ensure the normal operation of the pump and facilitate maintenance. Many parts are installed in front and back, forming standard components, including manual stop valve, Y type filter, soft joint, pressure gauge, check valve, etc.
expansion cistern:
Expansion water tank is an important device to make the water system able to adapt to the volume expansion caused by the change of water temperature, stabilize the water pressure, and make the water system work stably. It is composed of water supply pipe, expansion pipe, overflow pipe, sewage pipe, and anti-freezing circulation pipe. The micro-pressure difference between the expansion tube and the circulation tube is used to form the water microcirculation to achieve the purpose of antifreezing.
Water pipe construction
In order to connect the main engine, the fan coil pipe and the auxiliary equipment, the water pipe construction should be carried out. This work mainly includes: lifting, bracket installation, pipe connection, pipe pressure test, pipe cleaning, drainage pipe installation and water testing, pipe insulation and protection.
distribution and communication
The power line specifications of air cooling module cooling and hot water unit are selected according to the requirements of the manual, and an electrical box needs to be specially made to install the AC contactor for auxiliary electric heating and water pump. The power supply of each module is independently controlled to facilitate unit management and maintenance.
0 notes
Last Seen Blogs

czas-n-a-zmiany
Czas na zmiany

butwaitthereismore
But Wait There Is More...

sketchbirdie
Sketch Birdie

deepseed
Deep Seeded

crippledpunks
ow! my everything!