#each gif is 60 frames
Text

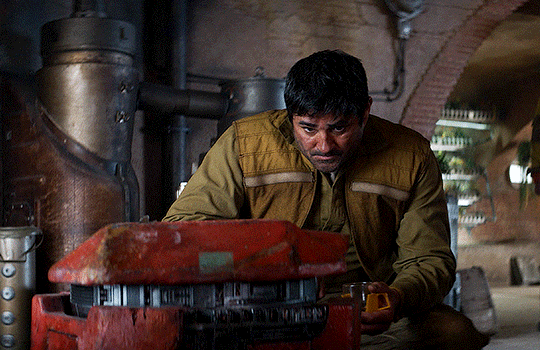


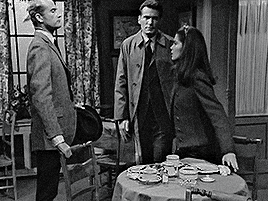
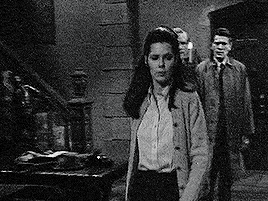
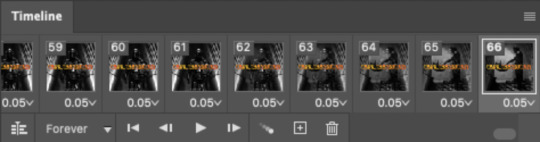
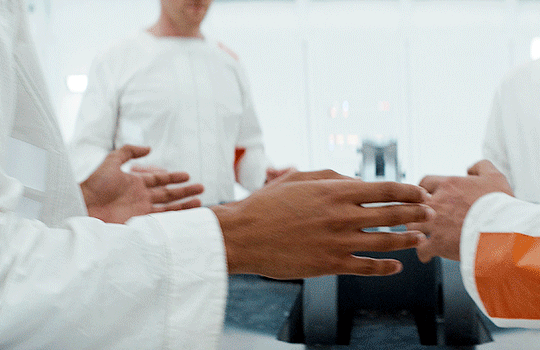
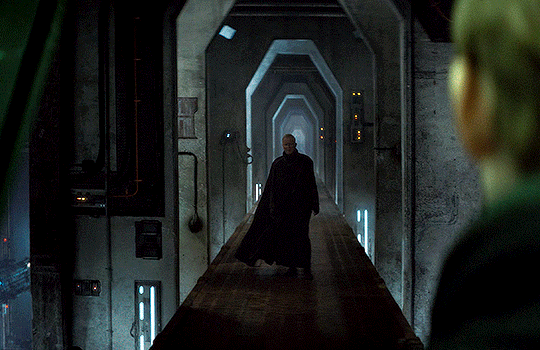
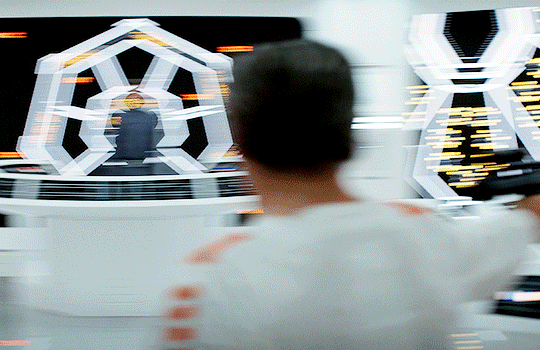
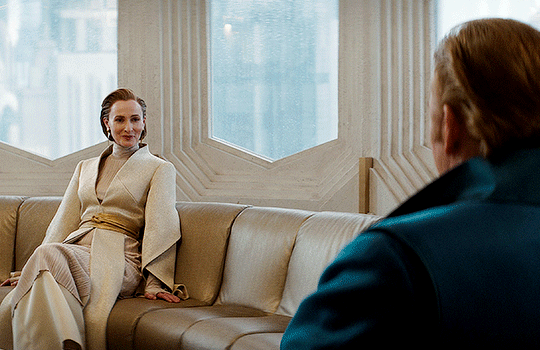
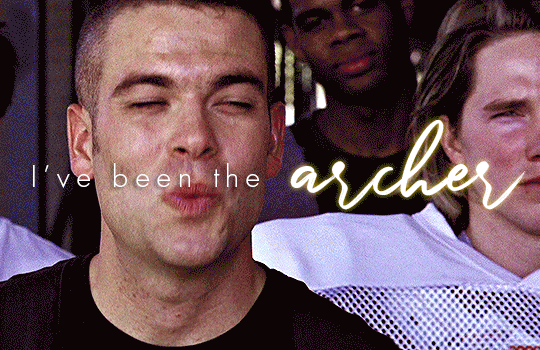
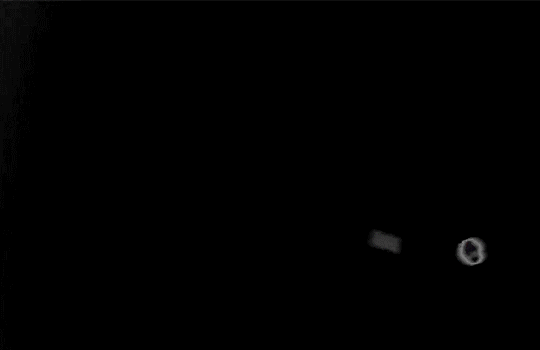
ANDOR | 1.11 Daughter of Ferrix
-> 10 random timestamps per episode (11/12)

#andor#starwarsandor#star wars#andor s1 timestamps challenge#andor roulette#my friends pick the timestamps#each gif is 60 frames#i am so sorry if something is off with this it is the first time i'm using the new post editor (against my will)#*mine: gifs
316 notes
·
View notes
Text
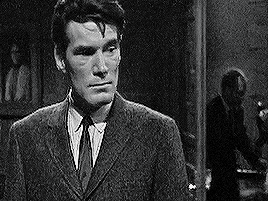
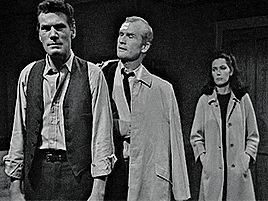
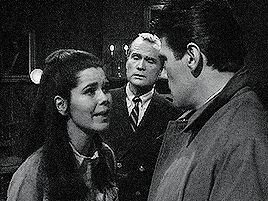
— I couldn't care less about your future.
— Well, you'd better care, because you're part of it, and so is your wife.
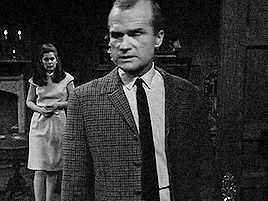
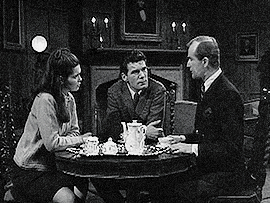
r/v/b for @tortoisesshells.
#victoria devlin starring in: i gave up trying to find my father so i just got a few boyfriends old enough to be my dad. or my uncle.#tortoisesshells#➤ roger collins & victoria winters & burke devlin. ┊ to know how it ends‚ and still begin to sing it again.#➤ edits & art. ┊ the evans cottage art gallery.#gifs.#i've been accused of not exactly truth-telling when it comes to posting about r/v ... well.#this is lies. we made it up. but look at them! aren't they just darling!#thank you 60's daytime television.#this is my unethical polycule. the nonmonogamy is consensual and negotiated we're just evil in other ways.#(one of them framed another one for vehicular manslaughter and sent him to prison.#two of them have been the other one's employees at one point or another.#they have all — at some point — accused each other of murder; except for accusing vicki who is by all accounts an angel#and who would NEVER frame her boyfriend for her manslaughter on purpose. although this does happen in canon. accidentally.)#also that she stabs roger with a knife in the au but that's not *really* her fault because she's under hypnotic vampire influence.#(and – moreover that roger a. deserves it and b. enjoys it)#because they are doomed to reenact the machinations of collinsport's tripartite love story.#because a woman in possession of josette's (& laura's) locket; of an adventuring‚ prosperous husband who builds her a home in collinsport;#of a vampire-coded boyfriend also in love with her but doomed chiefly to yearning and the occasional bite;#of a foretold fate of falling from the cliffside; and on top of all that is a brunette – well‚ she must be josette.
27 notes
·
View notes
Text
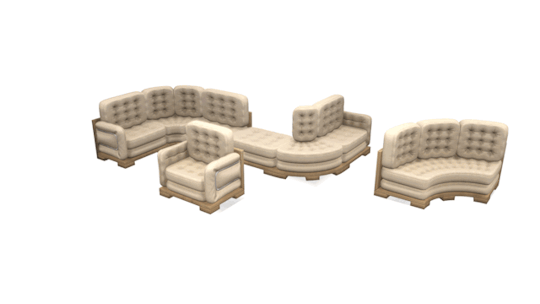
Judith Living Room
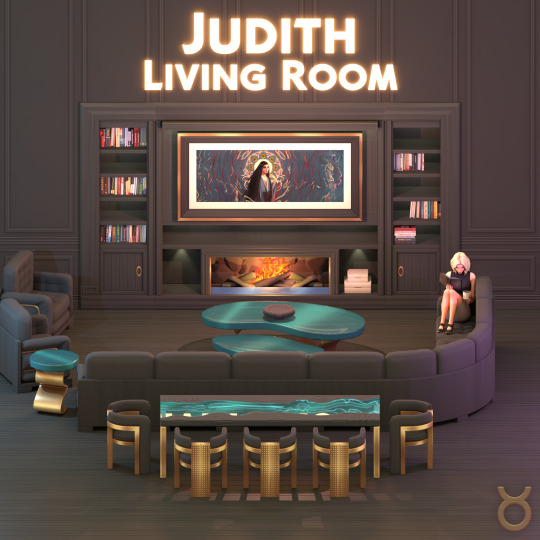

Hi guys!
After 98 years later, finally new set is here! Thank you again for supporting me during this long time. You guys are the best! ❤️
The set consists of 60 items. It has a luxurious and at the same time modern style. Although I say living room, there is also a dining set included in the set. I think my favorite items are also this dining set. The reason for the large number of items is bookcases, I think. The most important feature of these bookcases, which have different sizes and variations, is that each of them has a version that can be embedded in the wall. And tons of books to decorate with. So you can also use them in built-in. You can even add rails to them and stairs to these rails. (Sometimes it can be impossible to place decor on objects embedded in the wall. And this one, you can enter the "bb.moveobjects on" cheat and decorate the object without placing it on the wall, then place it on the wall.) At the same time, there is a fireplace that is compatible with these bookcases. In the same way, there is a built-in variation of this fireplace. You can even add a Art Frame TV, which is included in the set, on top of this fireplace.
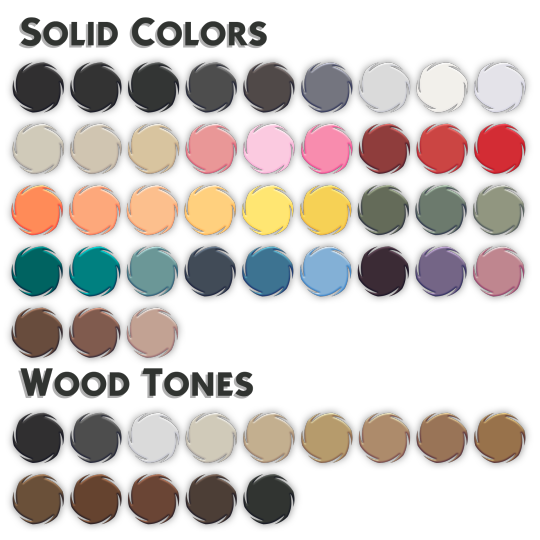
By the way, I have switched to a new color palette with this set. You can see the new colors in the picture below.
The other items included in the set are down below.
Bookcases (16 items in total)
Books (14 items in total)
Wooden Floors (2 versions)
Wall with Baseboard
Wall with Baseboard and Friezes
Wall with Friezes
Wall Full Panelling
Wall Paint
Wall Panelling
Wall with Wainscoting
Chaise Lounge (4 models)
Marble Coffee Table
Glass Coffee Table
Deco Bowl
Deco Boxes
Deco Large Painting
Deco Small Painting
Deco Vases
Dining Chair
Dining Tables (3x1 and 2x1 sizes)
End Table
Fireplaces (2 versions)
Frame TV
Hallway Table
Sculpture
Sectional Sofa
All items are base game compatible. You can find everything included in the set by typing "Judith" in the search box. Except walls and floors.
I think that's it. I hope you'll like it.
See you soon! 🥰❤️
Public Release 3.3.2024
(AVAILABLE FOR FREE)
DOWNLOAD AT
PATREON
#sims4cc#the sims 4 custom content#the sims 4 cc#the sims cc#sims4#ts4 simblr#simblr#simblur#simblog#maxis match cc#sims 4 cc#sims4 cc#ts4 maxis cc#ts4 cc#ts4cc#ts4 download#sims 4 maxis match#maxismatch#maxis match#sims 4 custom content#ts4 build#sims 4#the sims 4#the sims#thesims4cc#taurusdesign
3K notes
·
View notes
Text

FALLING LETTERS ANIMATION tutorial
hello! @kimmomi asked for a tutorial on how i made the letters "fall" in this gifset and so i figured i would make it and post here! this effect isn't hard to achieve but it might get a little tedious if you have a lot of letters.
note: you will need photoshop with a timeline!
STEP ONE: create your base gif! be mindful of number of frames in your gif. the number of frames doesn't really matter here, altho the longer the gif the better the effect. i'd say try to limit it to 60-70 frames, depending on how big your final gif will be.
STEP TWO: make your text the way you want it to look. this effect is basically the last step of your gif making process. (i will be using the typography from my set as an example as i already have that psd saved)
this is what my typography looks like now.

STEP THREE: i would recommend that the word at the bottom be the word that "falls". for me that is forever.
now, you will have to duplicate the "forever" layer and make your non-copy forever invisible.
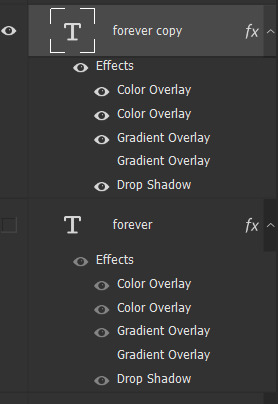
what you will want to do now is delete all the letters but the first one in the duplicated layer. for me that is f. then you just duplicate the f layer and write your second letter instead of it, in my case o. you will have to do this for all letters. also as you do that make sure to move them a bit away from each other.

now, what helps to align those letters where they start off, is making your non-copy layer to be visible again.

after you've aligned your letters, make the non-copy layer invisible again.
STEP FOUR: so now we come to a bit of a tedious part.
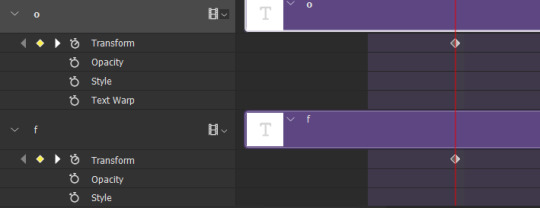
what you will do now is move the playhead (blue timeline arrow) a bit further from the beginning of the gif (this allows for the text to stay still a bit before it starts "falling") and click on the first letter.
next step is to click on the little arrow next to your letter and clicking on the stopwatch next to Transform.

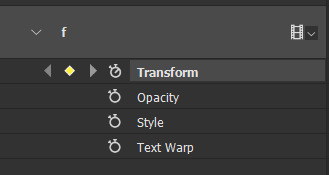
then, you will take the playhead and drag it to the end of the gif where you will start with transforming your letter with Free Transform tool (shortcut ctrl+T on windows). and what you will do is, while in Free Transform mode, drag your letter to the bottom of your gif while also rotating it a bit. when you're happy with your placement of the letter, hit enter. see below gif for how i did it.

you will have to do this for every letter, but make sure to rotate some in the other direction. also make sure that the beginning of the stopwatch mark is the same for every letter.
and that is basically it! after you transform every letter, you can go and save your gif.
this is my final result:

for some extra dramatic look, you can duplicate your initial layer with the whole word on it, drag it above all layers, clear layer style and add a stroke and make sure its FIll is at 0% where you will get the outline text that stays behind.

i hope this was helpful and understandable. if you have any questions, feel free to send me an ask or dm me <33
#usergif#completeresources#allresources#gif tutorial#ps help#userkimchi#uservivaldi#userraffa#tusermona#userelio#usercats#tuserheidi#usershreyu#userhallie#userroza#userdean#userisaiah#thingschanged#tusercasey#usertj#userwwz
526 notes
·
View notes
Text
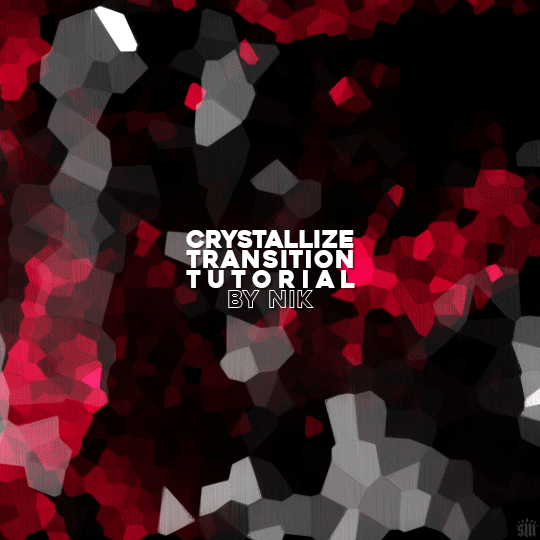
HOW TO: Do A Crystallize Gif Transition
Hi! I was asked to explain how I did the transition effect in this gifset, so here's a quick tutorial! Disclaimer: This tutorial assumes you have an intermediate understanding of gif-making in Photoshop using Video Timeline and requires the use of keyframes.

PHASE 1: THE GIFS
1.1 – Determine how many frames you need.
Since you need at least 2 scenes for a transition, consider limiting the amount of frames you'll use per scene. For a transition between 2 scenes that's 540x540px, I would recommend no more than 30 frames per scene (for a final gif that's 60 frames). Even that may be pushing it depending on your coloring. Just be sure to consider the dimensions and colors of your gifs in relation to the amount of frames to keep your final gif under Tumblr's 10MB limit.
1.2 – Import frames, crop, resize, convert to smart object for Video Timeline, color, blend, etc.
Do this as you normally would! If you need a tutorial for the basics, here's my tutorial. :) Please note, the methods in this tutorial only work with gifs that are converted into smart objects in the Video Timeline workspace.
Tip A: I recommend using scenes where there's a lot of one color (or scenes where you can manipulate it to look like that). The crystallize filter on a gif creates A LOT of movement that can feel a bit chaotic. Having your gif be primarily one color reduces the eye strain a bit imo.
Tip B: I like how this effect looks with blended scenes because it allows me to use different "crystal" sizes (more on this in Step 2.2). Check out the USERGIF Resource Directory for plenty of blending tutorials!
1.3 – Move all your gifs into one document, group into folders, and arrange.
Once everything's in one doc, keep everything organized in a group folder! I have just two scenes, so that's Folder 1 & 2. Within those folders are the gifs I blended, which I labeled by gif color. Then, simply drag Folder 2 so it continues right after Folder 1. (Make sure none of your adjustment layers from Folder 2 accidentally affect Folder 1! You can do this by clipping your adjustment layers to match the length of the gif as I did, or using clipping masks.)
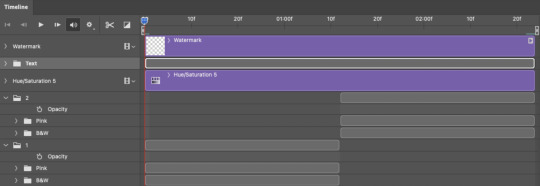
(Ignore that lone Hue/Saturation layer lol. I decided last-minute that I wanted my gif to lean more pink than red.)
PHASE 2: THE FILTERS
2.1 – Duplicate each scene.
We're going to use opacity keyframe animations on these duplicated scenes that allow it to go from "normal" to "effect" and vice versa. The filters will only be applied to the duplicates. In the screenshot below, all of my duplicates are highlighted:

2.2 – Apply the Crystallize Filter.
Above your sharpening settings, apply this filter by going to Filter → Pixelate → Crystallize. On the pink gifs, I made the crystals bigger (cell size: 45), and on the black and white gifs, I did a cell size of 25.
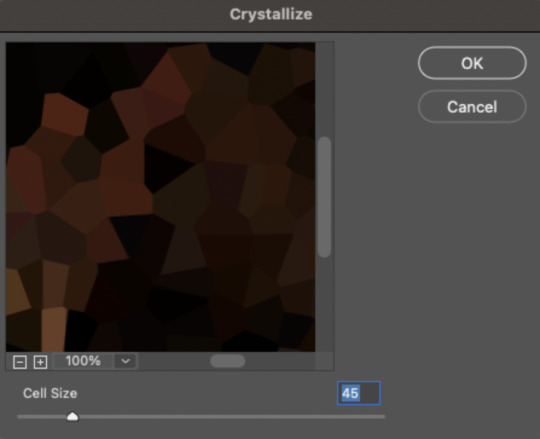

The different sizes help break up the uniformity of the crystals imo, creating more of a mosaic-like look, which is what I wanted to match my gifset concept.

2.3 – Apply the Oil Paint Filter (Optional).
Filter > Stylize > Oil Paint. Here are my settings (they're the same for both crystal cell sizes):
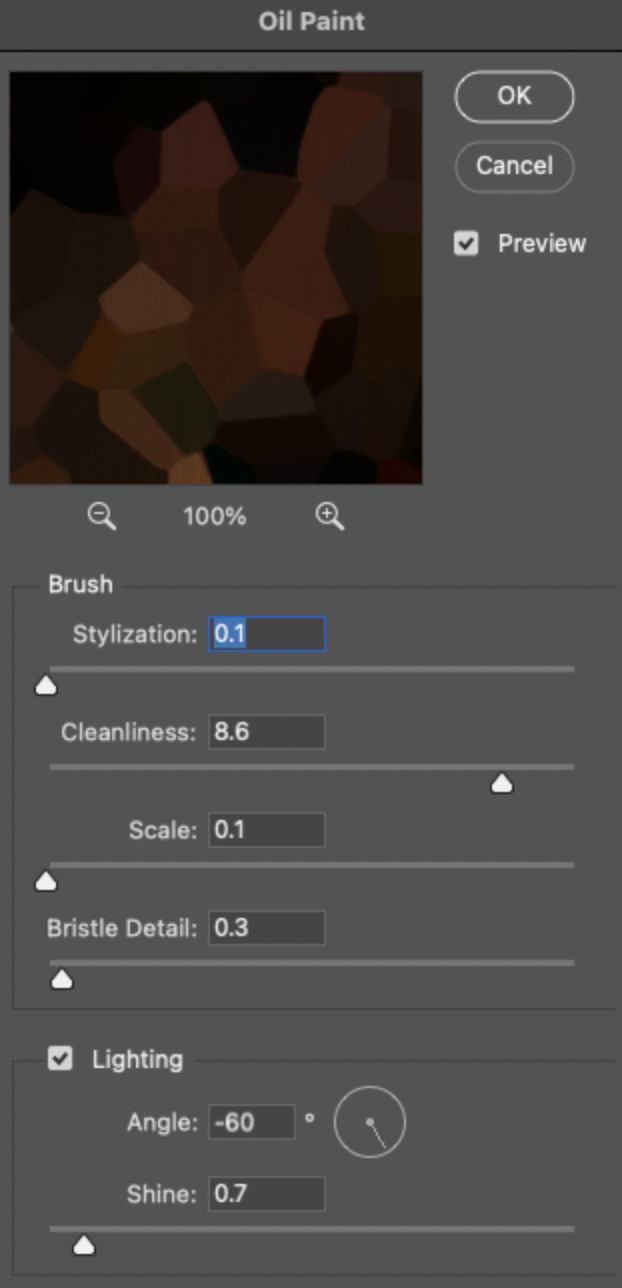
Brush – Stylization: 0.1, Cleanliness: 8.6, Scale: 0.1, Bristle Detail: 0.3
Lighting – Angle: -60, Shine: 0.7
This filter helps soften the cells a bit while adding some texture (left: no oil paint; right: with oil paint):

2.4 – Repeat steps 2.2 & 2.3 on all duplicated scenes.
PHASE 3: THE KEYFRAMES
3.1 – Add opacity keyframes.
The very start and end of each scene needs an opacity keyframe set to 100% opacity. Move 0.09 seconds from each of those points, and place another opacity keyframe, this time set to 0% opacity. We're basically making the crystals fade in and out. Please reference the screenshot below for keyframe placement:

If you need more info on opacity keyframes, check out Phase 2 from this fade transition tutorial I did on usergif.
3.2 – Repeat step 3.1 on all duplicated scenes.
All the keyframes in Folder 1 should line up exactly and all the keyframes in Folder 2 should line up exactly!
PHASE 4: THE DUPLICATES
4.1 – Convert back to Frame Animation.
If you're not sure how to do this, I've written out the steps here. I rec the action linked in my general gif tutorial which I shared earlier!
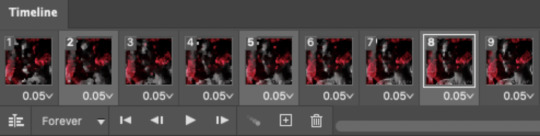
4.2 – Delete duplicate frames.
Whenever you use keyframe animations, you'll get duplicate frames. That's just how it works, unfortunately. If you follow my steps exactly (specifically the 0.09-second spacing, which follows my tried-and-true 0.03-second rule), you'll have a total of 12 duplicate frames exactly — 3 duplicates per keyframe section. Just manually delete them! You can spot the duplicates by eye, but with this spacing, it's usually the 2nd, 5th, and 8th frame for each transition section. The selected frames below were my duplicates:
If you want to learn more about why there are duplicates and the math behind it all, I explained it in more detail in this ask.
4.3 – Export and you're done!
I hope this tutorial helps! Let me know if you have any questions :)
#gif tutorial#completeresources#usershreyu#usernanda#useryoshi#userzaynab#userrobin#usersalty#userhella#alielook#uservivaldi#tuserabbie#useraish#userabs#tuserlucie#mialook#resource*#gfx*
274 notes
·
View notes
Text
HOW TO: Cross-Fade Multiple Gifs
Hi! In this tutorial, I'm going to go over how I typically do a fade transition that works with Video Timeline. Disclaimer: This tutorial assumes you have a basic understanding of gif-making in Photoshop and requires the use of keyframes.

Before I start, if you're wondering "why don't you just use the cross fade tool on the Timeline?" — this thing:
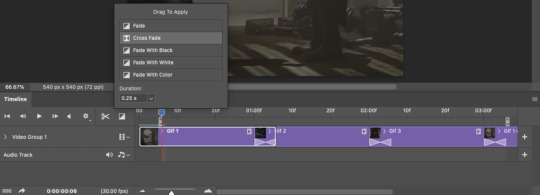
It doesn't work for me 🤷🏻♀️ Something happens when converting from Video Timeline back to Frame Animation (the converting everything into a smart object step) that completely negates the cross fade whenever I use it. I'm not sure why, but this is why I do fade transitions the way I'm about to explain.
PHASE 1: THE GIFS
1.1 – Determine how many frames you need.
There are 3 things to remember here:
1) Ideally, each gif section should have the same amount of frames, so the transitions feel evenly spaced.
2) The gif's dimensions and total number of frames affect file size. Your final exported gif needs to be under 10MB (Tumblr's limit), so you should consider the total number of frames in relation to the size of your gif. My example gif is 540x540px and 60 frames total; final file size = 7.8MB.
3) Add 4 extra frames to each section to account for the cross-faded portion. (The reason I chose 4 specifically is because Video Timeline works in 0.03-second intervals. The typical duration of my fade transitions is 0.06 seconds — which, when converted back to frames, is 4 frames.) I knew 60 total frames would be a safe bet for a gif this size. Since I had 3 gif sections, each would be 20 frames. I added 4 additional frames, making each one 24 frames (before removing duplicates in the exporting process, which will be explained in Phase 3). You can make your transitions longer than 0.06, but I recommend keeping it to intervals of 0.03 due to the way Timeline works. Every 0.03 seconds = 2 frames, so use this when deciding how many extra frames you'll need.
1.2 – Import frames, crop, and resize.
Do this as you normally would! If you need a tutorial for the basics, here's my tutorial. :)
1.3 – Move all gifs onto one document/canvas.
Right-click the gif layer and select "Duplicate Layer:"
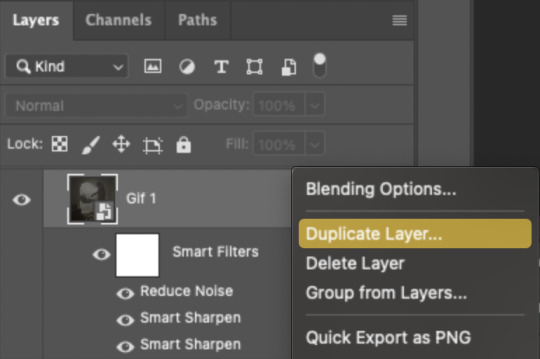
Then choose the appropriate document from the dropdown list:

Do this for each gif section so you can work on one document for the rest of the process.
1.4 – Put each gif into its own group.
Select each layer and use the shortcut Command+G or right-click and select "Group from Layers." In Phase 2, we'll be putting the opacity keyframes on the groups instead of the individual layers.
1.5 – Arrange each gif's group on the Timeline.
At the end of Gif 1, move backwards 6 times. Move the starting point of Gif 2 to this spot. At the end of Gif 2, move back 6 times and make this Gif 3's starting point. Here's how my gifs look arranged on the Timeline, animated so you can see the 6-space distance:

We'll be adding keyframes to these overlapping sections in Phase 2.
1.6 – Set up the last transition.
At the very beginning of the Timeline, hit the forward button 6 times and click the scissors to divide the clip. Move the starting point of your gif to the newly trimmed beginning as shown below:

Then, move the original beginning chunk of Gif 1 — that tiny 0.06-second clip — to the end of the timeline above the rest of your layers, aligning its end with the end of Gif 3. Put it in a group like you did in Step 1.4:

Note: This screenshot shows my final workspace with the coloring layers in groups and the keyframes already placed.
1.7 – Color your gifs.
Do this however you want, just keep all your adjustment layers and any other effects within their respective groups:
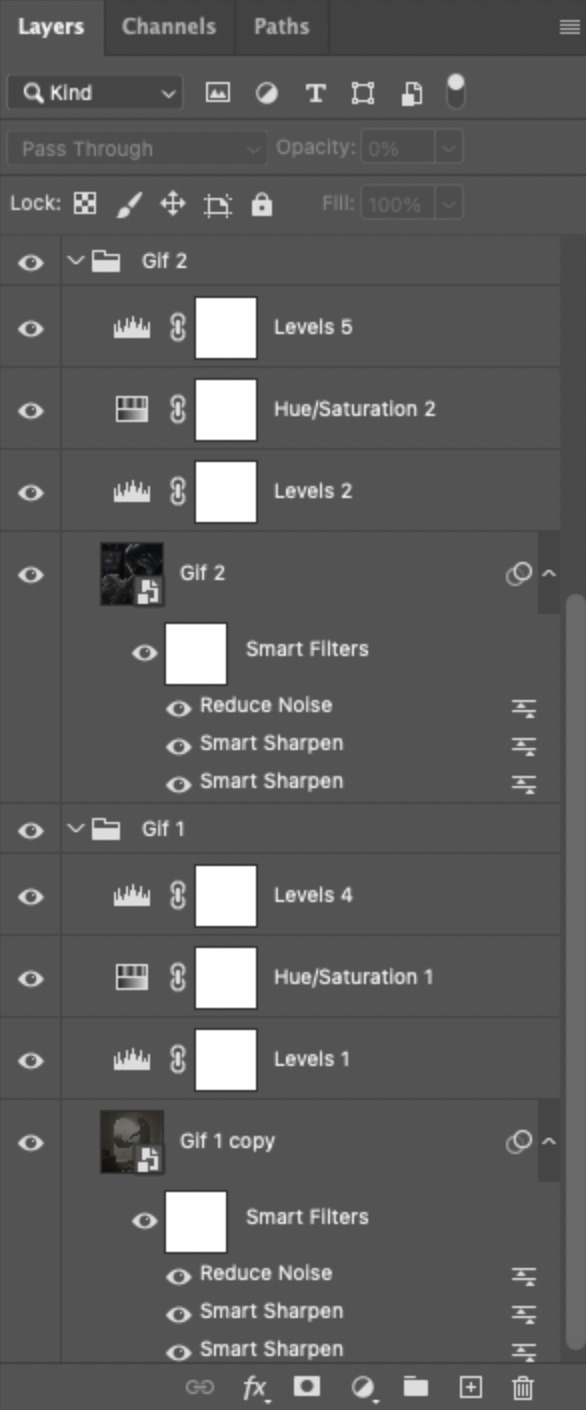
Duplicate the adjustment layers from Gif 1 and move them into the folder Gif 1 - Beginning (where your tiny 0.06-second clip is). Be sure the adjustment layers line up with the rest of the group so those adjustments don't affect your other gifs! You may want to trim the adjustment layers to match the duration of the clip or just move them so they start at the same spot as that clip.
PHASE 2: THE KEYFRAMES
2.1 – Place a 100% and 0% keyframe at the beginning of each gif's group.
Drag the playhead (red vertical line) to the end of Gif 1. Expand the Gif 2 group to reveal the opacity keyframes on the left side of the Timeline panel, then place a keyframe by clicking the icon that looks like a stopwatch. This opacity keyframe is at 100% by default; leave it like that. Drag the playhead to the beginning of Gif 2 and drop another keyframe. While that new keyframe is highlighted yellow, go to the layers panel, make sure Gif 2's group is selected, and reduce the opacity to 0%.
Repeat these steps for each gif's beginning, including the tiny chunk we moved to the end! Here's a gif to show the process:
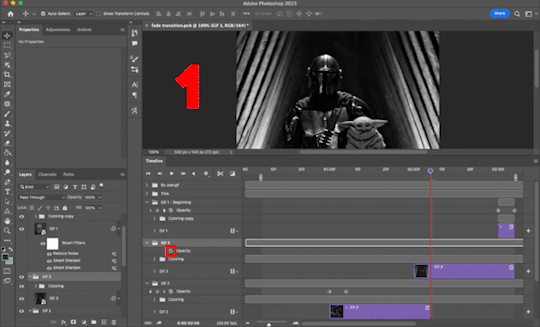
(Btw, if you click this gif, it should expand to full size so you can get a better look! I made it 1080px.)
PHASE 3: THE DUPLICATES
3.1 – Convert back to Frame Animation.
If you're not sure how to do this, I've written out the steps here. But I recommend using an action in your general gif-making process to make this step a lot faster. The one I use is linked in my tutorial which I linked earlier!
3.2 – Delete duplicate frames.
Remember, at the beginning I set out to make my final gif 60 frames total. With the keyframe animations, I now have 66 frames:
Palpatine's number 👎 Anyway, that means I have 6 duplicate frames. This is what the gif looks like without removing these duplicates:

Watch closely during the transitions; there's a tiny lag. It doesn't look smooth to me. It's the clones!! Here's why we have these duplicates:
For every 0.03-second long keyframe animation, you'll get 1 duplicate frame. Unfortunately, that's just how Video Timeline works with any kind of animated keyframe. Since our fade transition is 0.06 seconds, we have to get rid of 2 duplicate frames per transition section (2 x 3 transitions sections = 6 total duplicates. Ew, math!).
There's not really a way to avoid this step that I know of, but it's not a big deal in the long run. You just have to look at each transition section, eyeball the duplicate frames yourself, and delete them. It's usually the first frame where the fade starts and then two frames after that. I already deleted the duplicates from the first two transition sections, so here's how it's done for the last transition:

Side note: I set up keyboard shortcuts so I can quickly move forward and backward by one frame and delete frames. You can do this by going to Edit > Keyboard Shortcuts and editing these:

And now I have 60 frames like I originally said I would!
If you want the transition sections to be quicker, you can even decrease the frame delay for the 3 transition frames only — 0.03 or 0.04 might be up to your speed 🥁 but I don't usually do this since I'm fine with the way it looks already.
3.3 – Export.
That's it!
I hope this tutorial is helpful. As always, if you have a specific question about this tutorial, feel free to send us an ask!
#gif tutorial#fade transition#transition#completeresources#usershreyu#userelio#userzaynab#userives#usertreena#userrobin#userkosmos#userhella#alielook#uservivaldi#tuserabbie#tusermona#tuserlucie#*usergif#*tutorial#by nik
418 notes
·
View notes
Note
Smut prompts: 6 + 17 + 56 + 60 with Gallagher please? Female reader as well.
You can do one of the smut prompts or add any more if you like. After doing the main quest, I immediately starting maiming and building this guy. His design is very unique as well! Especially how he had one white glove and the other..well, the colors and all that. I find it so cute that his outfit is like a dog/wolf kinda. Especially if you look closely, he has a paw print underneath his shoe, it’s so cute!
Oh my god, same. I started building Gallagher the second I got him. I put him on my Dr. Ratio team and in my Acheron team. And I like his design as well. Finally, a playable character with a bit of facial hair to spice things up. AND OH MY GOD THE LITTLE PAWPRINTS UNDERNEATH HIS SHOES ARE SO CUTE. I love the little feetsies, it's a nice touch.
I hope you don't mind, but I just did number 6 + 56 for this one. I hope you like it, thanks for stopping by and requesting :)
Smut Prompts
Prompts 6 + 56
cw. smut, oral sex (fem receiving), fingering (fem receiving), overstimulation, squirting, female reader

"Ahh shit, Gallagher, that’s sensitive" you said, voice almost tapering off into a broken whine.
Your jaw clenched, teeth nibbling on the dry skin of your kiss swollen lips as a soft hiss whistled through your teeth. You jolted beneath Gallagher’s large frame, your bare skin searing to the touch as his fingers trailed over your soft thighs. His touch was featherlight as his fingertips ghosted over your wet slit, your pussy puffy and soaked with arousal. You shied away from his touch, the tips of your fingers tingling with numbness as you raked your nails across the silk bedsheets beneath you, the sheets soaked with sweat as it clung to your clammy skin.
A warm hum bubbled up Gallagher’s throat as his fingers lazily circled the glistening pearl sitting pretty at the top of your pussy, his lazy eyes sparking with mirth as he brushed his thumb against the sensitive hood of your clit. Your hips canted forward against the pressure, the smouldering embers of pleasure sparking back to life in the pit of your stomach. Every hair on the nape of your neck stood up in anticipation as he dragged his gloved fingers along your drooling slit, the slick drag of leather making your heart jump up into your throat as his fingers gently pried the petals of your silky folds apart.
"Come on darl, you’ve got one more in you" Gallagher whispered with a husky purr of your name.
His face hovered between your parted thighs, tongue slowly dragging across his lips as your dazed eyes followed the movement. You could feel his warm breath puffing against your pussy with each deep breath he took, the simple huff of air setting every single white-hot nerve in your body on edge as your face burned with renewed arousal. You tried to think past the thick haze of lust fogging up your mind but you couldn’t. It was difficult to hear your own thoughts over the sound of your pulse droning loudly in your ears like the pound of a drum. You could barely recall how long you had been at this. Minutes? Hours? You lost track of time the moment Gallagher placed his head between your supple thighs. You swallowed thickly, tasting desire lingering in the back of your throat as Gallagher patiently waited for you to speak, his ears twitching forward when your breath hitched for a brief moment.
You softly nodded before your head flopped back into the fluffy, safe confines of your pillow, damp strands of hair stubborly clinging to your forehead.
"Just be gentle" you softly warbled. "Still so sensitive."
Gallagher chuckled softly, his large hands patting your thighs before he squeezed, fingers sinking into your plush skin until it spilled between the digits.
"I’ll take care of you, darl" Gallagher promised.
Nothing could prepare you when he dragged the flat of his rough tongue through the silky folds of your pussy. You shrieked, lungs pinching in your chest as you closed your eyes against the onslaught of bliss. It felt like his tongue was lapping at a raw nerve as it flicked over your sopping pussy, the scruff of his beard scratching your sensitive skin and making your body hyper aware of every intimate movement between your legs. Your toes curled into the soles of your feet as his gloved fingers pressed against your dribbling hole, fluttering and clenching around nothing in anticipation as his tongue poked at the hood of your clit.
A constellation of tears clung to the corners of your lashes as a wet sob got stuck in your throat, tongue glued to the roof of your mouth as you twisted beneath Gallagher’s large frame. You couldn’t control how fast the coil in your gut twisted, unable to escape as your blood simmered in your veins and the fire inside your belly was fanned into fiercer flames under your lover’s expert touch. A purr of content stirred in Gallagher’s throat as he savoured the taste of you as it danced along his tongue, your intoxicating scent curling in his lungs with each deep breath he took. His fingers teased your opening, the tips of his fingers dipping into the tight ring of muscles before two thick fingers sunk in.
A harsh cry of rapture was wrenched from your lips as your hips shuddered. It was too much yet at the same time, it was too little. The tips of your ears burned red hot at the filthy sound of your pussy slobbering around his fingers as he languidly pumped them inside of you, soft leather rubbing against your plush walls and setting your teeth on edge. Your nails threatened to tear holes in the bedsheets as you held on for dear life, eyelids fluttering wildly as you tried to prevent your eyes from rolling into the back of your head. You could barely see Gallagher through the tears that dotted your vision, his mop brown hair tickling your skin as he buried his face deeper into the apex of your thighs. A pleased moan rumbled in his chest as he sucked on your swollen lips, the lashing of his tongue making the edges of your nerves start to fray as it bullied the sensitive nub of your clit.
Your lips parted but no words came out. Only dry heaves and soft hiccups of pleasure as your body was driven higher and higher with ecstasy. You could feel Gallagher’s fingers curl and twist inside of you, the tips brushing against the soft, gummy patch inside you that made stars swell in your vision. You were so close you could almost taste it on the tip of your tongue. A constant push and pull, an ebb and flow of pleasure that you had no control over, body burning with sensitivity that made you want to cry into the moonlit night. A third finger teased your hole as your velvety walls clenched around Gallagher’s fingers tightly, desperately trying to suck him deeper and keep him pressed to the spot where you ached the most. A smile curled his lips as his gaze flicked up to your face, watching it contort and twist in pleasure as you were slowly ripped apart at the seams. The coil in your gut twisted unbearably tight, the pressure inside you threatening to break something as your pussy throbbed and ached for another release.
You found it when you chanced a peek at your lover’s face squished between your thick thighs, long eyelashes brushing against your burning cheeks as you watched Gallagher’s tongue toy with your clit, the sensitive bundle of nerves twitching on the tip of his tongue as he savoured it like it was his favourite sweet. The dam inside of you broke and you could do nothing as your orgasm tore through you without remorse, nor surrender.
You couldn’t quite recall how many times you had already cum tonight. You lost count after the fourth one. It was all just a hazy blur now as you screamed and cried with bliss, coil in your stomach shattering as your veins were flooded with white hot relief. Your walls clenched around Gallagher’s fingers, hot and throbbing; sore and tired as you desperately tried to cling to him. Your hips jolted as your juices squirted from your overstimulated pussy, thin strands of translucent fluid drenching his fingers and the bottom of his chin. There was not a single ounce of complaint as Gallagher happily lapped up the culmination of your arousal, drinking your sweet nectar from your core as you continued to cry and whimper above him.
Gallagher parted from you with a loud pop when he was finally satiated, tongue lapping at the remnants of his meal still lingering on his lips. His strong hands massaging against your tired, overstimulated body was like a soothing balm as he placed fleeting kisses between your thighs, tongue idly lapping at the beads of arousal that stained your skin.
"Good girl" he said, his voice vibrating between your twitching legs. "I knew you had it in you. Don't worry, I'll pamper you rotten now."
#my writing#honkai star rail#honkai star rail smut#hsr#hsr smut#hsr gallagher#hsr gallagher x reader#gallagher x reader#fem!reader#x reader
190 notes
·
View notes
Text

Someone asked me how I created the fade transition in this gifset which I’ll try to explain in the most comprehensive way that I can. If you've never done something like this before, I suggest reading through the full tutorial before attempting it so you know what you'll need to plan for.
To follow, you should have:
basic knowledge of how to make gifs in photoshop
some familiarity with the concept of how keyframes work
patience
Difficulty level: Moderate/advanced
Prep + overview
First and foremost, make the two gifs you'll be using. Both will need to have about the same amount of frames.
For ref the gif in my example is 540x540.
I recommend around 60-70 frames max total for a big gif, which can be pushing it if both are in color, then I would aim for 50-60. My gif has a total of 74 frames which I finessed using lossy and this will be explained in Part 4.
⚠️ IMPORTANT: when overlaying two or more gifs and when using key frames, you MUST set your frame delay to 0.03 fps for each gif, which can be changed to 0.05 fps or anything else that you want after converting the combined canvas back into frames. But both gifs have to be set to 0.03 before you convert them to timeline to avoid duplicated frames that don't match up, resulting in an unpleasantly choppy finish.
Part 1: Getting Started
Drag one of your gifs onto the other so they're both on the same canvas.
The gif that your canvas is fading FROM (Gif 1) should be on top of the gif it is fading INTO (Gif 2).

And here's a visual of the order in which your layers should appear by the end of this tutorial, so you know what you're working toward achieving:

Part 2: Creating the grid
Go to: View > Guides > New guide layout
I chose 5 columns and 5 rows to get the result of 25 squares.

The more rows and columns you choose, the more work you'll have to do, and the faster your squares will have to fade out so keep that in mind. I wouldn't recommend any more than 25 squares for this type of transition.

To save time, duplicate the line you've created 3 more times, or as many times as needed (key shortcut: CMD +J) and move each one to align with the guides both horizontally and vertically. You won't need to recreate the lines on the edges of the canvas, only the ones that will show.
After you complete this step, you will no longer need the guides so you can go back in and clear them.

Follow the same duplicating process for the squares with the rectangle tool using the lines you've created.
Align the squares inside the grid lines. The squares should not overlap the lines but fit precisely inside them.
This might take a few tries for each because although to the eye, the squares look all exactly the same size, you'll notice that if you try to use the same duplicated square for every single one without alterations, many of them will be a few pixels off and you'll have to transform the paths to fit.
To do this go to edit > transform path and hold down the command key with the control key as you move one edge to fill the space.
Once you're done, put all the squares in their separate group, which needs to be sandwiched between Gif 1 and Gif 2.

Right click Gif 1 and choose "create clipping mask" from the drop down to mask it to the squares group. This step is super important.
After this point, I also took the opacity of the line groups down to about 40% so the lines wouldn't be so bold. Doing this revealed some squares that needed fixing so even if you aren't going dim the lines, I recommend clicking off the visibility of the lines for a moment to make sure everything is covered properly.

Part 3A: Prep For Key framing
I wanted my squares to fade out in a random-like fashion and if you want the same effect, you will have to decide which squares you want to fade out first, or reversely, which parts of Gif 2 you want to be revealed first.
In order to see what's going on underneath, I made Gif 1 invisible and turned down the opacity of the squares group.

If you want text underneath to be revealed when the squares fade away, I would add that now, and place the text group above Gif 2, but under the squares group.

Make a mental note that where your text is placed and the order in which it will be revealed is also something you will have to plan for.
With the move tool, click on the first square you want to fade out. Every time you click on a square, it will reveal itself in your layers.
I chose A3 to be the first square to fade and I'm gonna move this one to the very top of all the other square layers.
So if I click on D2 next, that layer would need to be moved under the A3 layer and so on. You'll go back and forth between doing this and adding key frames to each one. As you go along, it's crucial that you put them in order from top to bottom and highly suggested that you rename the layers (numerically for example) which will make it easier to see where you've left off as your dragging the layers into place.

Part 3B: Adding the Keyframes
This is where we enter the gates of hell things become tedious.
Open up the squares group in the timeline panel so you can see all the clips.
Here is my example of the general pattern that's followed and its corresponding layers of what you want to achieve when you're finished:

So let’s try it!
Expand the control time magnification all the way to the right so you can see every frame per second.

As shown in Part 3A, select your first chosen square.
Where you place the time-indicator on the panel will indicate the placement of the keyframe. Click on the clock next to opacity to place your first keyframe.

Move the time-indicator over 3 frames and place the next key frame.

Things to consider before moving forward:
Where you place your very first keyframe will be detrimental. If you're using a lot of squares like I did, you may have to start the transition sooner than preferred.
If you're doing 25 squares, the key frames will have to be more condensed which means more overlapping because more frames are required to finish the transition, verses if you're only using a 9-squared grid. See Part 4 for more detailed examples of this.
The opacity will remain at 100% for every initial key frame, and the second one will be at 0%.

Instead of creating two keyframes like this and changing the opacities for every single clip, you can copy the keyframes and paste them onto the other clips by click-dragging your mouse over both of them and they'll both turn yellow. Then right click one of the keyframes and hit copy.
Now drop down to your next clip, move your time-indicator if necessary to the spot where the first keyframe will start and click the clock to create one. Then right click it and hit "paste".


Tip: When you have both keyframes selected, you can also move them side to side by click-dragging one of them while both are highlighted.
Your full repetitive process in steps will go as follows:
click on square of choice on the canvas
drag that square layer to the top under the last renamed
in timeline panel: drop down to next clip, move time-indicator tick to your chosen spot for the next keyframe
create new keyframe
right click new keyframe & paste copied keyframes
repeat until you've done this with every square in the group
Now you can change the opacity of your squares layer group back to 100% and turn on the visibility of Gif 1. Then hit play to see the magic happen.
PART 4: Finished examples
Example 1

the transition starts too soon
Cause: initial keyframe was placed at frame 0
the squares fade away too quickly
Cause: overlapping keyframes, seen below.
(this may be the ideal way to go with more squares, but for only 9, it's too fast)

Example 2

more frame time for first gif
transition wraps up at a good point
Cause: in this instance, the first keyframe was placed 9 frames in, and the keyframes are not overlapping. The sequential pair starts where the last pair ended, creating a slower fade of each square.


Part 5: Final Tips and Saving
You can dl my save action here which will convert everything back into frames, change the frame rate to 0.05 and open the export window so you can see the size of the gif immediately.
If it's over 10gb, one way to finesse this is by use of lossy. By definition, lossy “compresses by removing background data” and therefore quality can be lost when pushed too far. But for most gifs, I have not noticed a deterioration in quality at all when saving with lossy until you start getting into 15-20 or higher, then it will start eating away at your gif so keep it minimal.

If you've done this and your gif is losing a noticeable amount of quality and you still haven’t gotten it below 10gb, you will have no choice but to start deleting frames.
When it comes to transitions like this one, sometimes you can't spare a single frame and if this is the case, you will have to return to the timeline state in your history and condense the key frames to fade out quicker so you can shorten the gif. You should always save a history point before converting so you have a bookmark to go back to in case this happens.
That's pretty much it, free to shoot me an ask on here or on @jugheadjones with any questions.
#gif tutorial#photoshop tutorial#transition tutorial#grid tutorial#usergif#ps help#tutorials#tutorials*#requested
222 notes
·
View notes
Text
So, someone asked for a tutorial of this animation so, why not?
I need to say first that I'm not a profesional animator, I'm a selftaught artist and I'm terrible at teaching/making tutorials so maybe this isn't the best example of how to animate.
Having said that, this was my process:
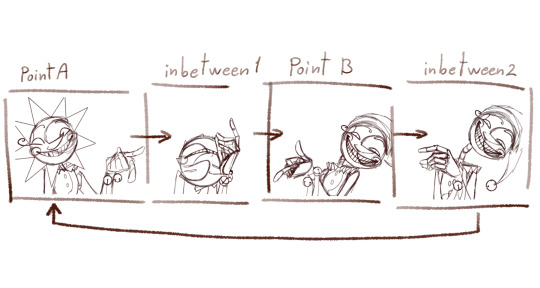
I first drew the important key frames, in other words, where I wanted point A and point B to be. No details, only body and head (I have no save of the original frames but basically no bells or ribons nor ruffles)

Then I needed a frame in betwen to conect them
I added a bounce effect duplicating the images, squeezing and stretching it a little (I have no save of this part but I have a video on my phone from january of last year, sorry it looks a little bad, I had to crop it)
I slowed it down so you can see the bounce
It's just like 3 frames each bounce
Now, to animate all the frames I started from A to inbetween 1,

then later to point B and closed the loop with inbetween 2.
To make this easier I drew a "rute" on the background
It looked something like this
and with the animation

It's a process of trial and error. While you are drawing the frame you don't actually know if it's the correct pose (unless you are some kind of god), so you have to draw the inbetweens, check how it looks in movement, spot where it lack/exceeds frames or where it needs more space between frames... untile it's finished and you get something like this.

As you can see only 8/46 frames aren't drawn. These 8 frames are little "stops" for the images so the character is still.
Some of these frames has the character still but something else is moving, like Moons hat.
Finally, I got to animate the details: sunrays, hat, bells, etc. Each of these objets has its own physics and this part enters more in how I belive the physics would behave like having in mind the mass of the objet and the inertia.
Example:
The hat has a lot of inertia because fast movement so: it moves faster and it takes time to stop.
The ribons and ruffles has less inertia because even though it is still fast is a slower movement so: it moves fast BUT stops fast.
Note to add: the faster and objet moves the less frames it needs to be drawn, sometimes it may need to draw the character/object deformed to look right. The slower it moves the more frames you'll have to draw and the more precision you'll need to make it look right.
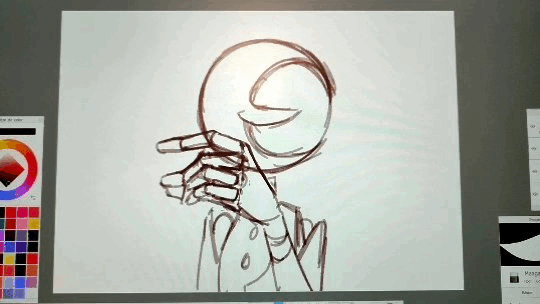
Some cursed frames:
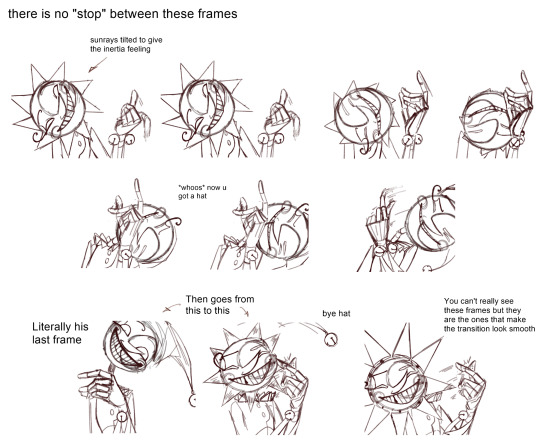
Some "still" frames:

Another note to add: this is animated at 24fps, this means every 1 second has 24 images. Most cartoons and movies are animated at 24-25 fps, this not only aplies to 2d animation but also 3d and stopmotion.
Fun fact: the human eye perceives between 30-60 fps, however animating at 30 fps or more can give an unnatural feeling to the animation.
At last, here is the animation clean up that I never finished

I added a couple of frames to make it a lil' more smooth.
Hope this crapy tutoria helped somehow.
Now I'm going to bed and hope when I see this in the morning it looks decent.
714 notes
·
View notes
Text
Pinky Promises | Michael Myers x F!Reader | MDNI 18+
A/n: Michael and (Y/n) finally passionately hug each other and mush bathing suit areas but it is marked where it starts if you just wanna know what happens next without the spice.
Warnings: Canon typical violence with probably too graphic a description, size kink, p in v, allusion to oral sex f receiving, Michael Myers is a virgin, Y/n is not but he’s a big boy, he does not give a fuck, and charges on through, unprotected sex, uhhh the mask stays on, Michael cums a lot cuz i’m gross. oh and his favorite cereal is Sugar Pops because the 60′s had sucky cereal.
1, 2, 3, 4 (Release unknown if at all, lemme know if you want a part 4?)

With pinkies locked, (Y/n) felt like she did all those years ago with little Michael, her best friend. The one she had always wanted to be with. Here he was with her, blood coating her skin. His head cocked to the side and his breathing was shallow behind the latex. He was so close to her that she could smell the copper and the sweat that came off of the towering man.
She moved her hand from his strong grip, rubbing the blood on the once pristine white towel around her body. Her mind was screaming at her that he was dangerous. That he would kill her. He was a monster covered in blood.
But her heart still saw the eyes of the little boy she knew so long ago. (Y/n) still cared for Michael, perhaps she only cared for her precious memories. The words that fell from her lips felt foreign. They echoed as if someone else was saying them inside of her head.
“Are… you going to kill me, Michael?” she said.
He was a confused puppy as if he hadn’t heard those words uttered before. His head cocked to one side and then slowly to the other. He did not raise his knife to stab her, in fact, the voice in his head didn’t seem interested in killing her.
Michael’s bloodied hand reached out and gripped her waist. His hand trailed up her body as if he was confused by the shape of it. Something in his mind snapped when his calloused fingers brushed the side of her breast. Something Michael hadn’t felt before, deep in his stomach, in his chest, and loins.
“Michael, you can’t touch me there. I--”
She grabbed his wrist and pushed him off of her torso.
“I know I promised Michael, but I’m engaged,”
(Y/n) swallowed, glancing at the knife in his hand.
“Listen, why… don’t you clean up. I’ll get dressed and we can talk,”
She expected him to stay in place when she moved forward but he sidestepped and gracefully slipped into the spot she was in.
--
(Y/n)’s hands tremmored as she pulled night clothes from her suitcase. Adrenaline pumped in her body and she couldn’t decide if she should turn Michael in. Her soft nightgown cascaded over her body, and she could hear the water in the bathroom running.
She was allowing him to wash off the evidence in her bathroom. (Y/n) fixed her hair for bed as it was needed before her heart seemed to race when she realized the water was no longer running.
Her feet padded against the pea green carpet she both loathed and loved, out into the hallway. The bathroom door opened and steam fell out, clearly, he enjoyed the water unbelievably hot. His hulking figure stepped out softly, (Y/n)’s face burned at the sight. Only a white t-shirt and cheaply made tightly whiteys were on his body. A splotch of blood stained the collar and she had to admit he looked good from what she could see. He was raw muscle from head to foot. No matter her weight or size he seemed to engulf her like a solar eclipse. It was no doubt that he could pick her up and move her as if she weighed nothing.
His hand clung to his knife, as a child would a favorite stuffed animal but in the other hand was something rectangular.
“You remember that day?” she asked.
He walked towards her, shame long forgotten in his years in a mental hospital. Or perhaps Michael wasn’t born with the feeling of shame. He held the picture frame up to her and she smiled a natural cheeky smile that made Michael’s chest hurt again.
“We played knights! Remember?” she giggled.
Gently she took the picture from his hands. “It’s the only picture of us I have anymore,”
The frown on her face was something that made Michael feel the need to kill all over again. But not her. Never her. The shape wouldn’t touch her, not like that… at least not permanently. The same wetness he wiped from his own eyes days ago seemed to drip down her cheek.
His thumb curiously rubbed the tear from her face and she flinched before leaning into his warm tanned hand.
“I’m sorry Michael,” she said softly. “I just miss those days you know. Those are my best memories. But my fiance doesn’t want me to live in the past,”
Michael was glad he killed him the moment he saw him. Michael didn’t know how to comfort her, but at least the source of her sad look was done.
The Shape lifted the latex mask just enough to uncover his lips. His hand on her cheek lifted her chin and he bent down and pressed a chaste kiss to her lips. It was small, childish, sweet, and similar to the one she gave him when they were children. The first and only kiss he ever had from anyone that wasn’t his mother.
(Y/n) didn’t stop him. She leaned into him and enjoyed the warm chapped lips against her own. Then his tongue invaded her mouth like an aggressive intruder. Poking and prodding around her. Tasting every inch of her surprised mouth. Michael’s rough hand slid from her cheek to her throat, squeezing the pad of his thumb into the side of her neck. Firm but not choking.
He pulls away and tugs the mask over his face quickly. Honey strands of saliva connected them for a moment before dribbling down her lip. Her face felt like it was on fire, and she knew it was awful but she wanted him to do it again to her.
But she knew Michael. Perhaps she was the only one who knew Michael. He would do things only if he wanted to do them. Though, those things he was willing to do were often if she was there or if she was asking him to do them.
“Michael, are you hungry? I didn’t have dinner,” she asked gently.
--
It was hardly a dinner at all. It was a bowl of sugary cereal and milk. She had to dig around for the bowls and spoons and Michael watched her from the corner of the kitchen.
“Do you still like Sugar Pops?”
The only response she got was him sitting down at the small table. (Y/n) poured their bowls and sat down.
It was fascinating watching Michael eat, he maneuvered around the mask as if he had it on his entire life. Not even a peak of his face could be seen as he downed bowl after bowl of cereal. (Y/n) only consumed the one, downing the milk and rubbing the milk mustache off with the back of her hand. She was enchanted with Michael.
(Y/n) was always enchanted by Michael.
The front door slammed open and shut again. (Y/n)’s back stiffened.
“That must be Richie,” she stands up. “Stay here, Michael,”
Michael’s hand went to his trusty blade that was set on the table. He watched her walk past him and leave beyond the kitchen.
“Oh my god, Richie,” She said.
He stood covered in blood and limping.
“We need to get out of here, there’s a maniac out there,” he coughed.
Crimson splattered from his lips and into the carpet.
“He tried to ki--” he froze.
(Y/n) knew if she turned around at that moment she would see Michael’s looming figure. So she did.
“Michael, please,” she said softly. “Go back into the kitchen,”
“Michael?” Richie spat. “THIS IS THAT LITTLE BLONDE BASTARD I’VE BEEN COMPETING WITH ALL THESE YEARS,”
(Y/n) flinches at the volume, and Michael takes several steps forward. Richie grabs (Y/n)’s arm and throws her to the ground.
“Take the bitch, you bastard. Kill her, fuck her, I don’t fucking care. Just let me go,” he pleaded.
Michael is frozen. Stuck between picking her up and stabbing him until he was sure he couldn’t get up again. But then she stands up, and the choice is made for him. A shadow in the night, he rushes Richie and stabs him in the chest.
(Y/n) screams.
“Michael!,” She calls, but she can’t seem to care.
At least not about Richie. Her fiance’s bloodied hand reaches up and tries to gouge Michael in the eye. He fumbles, unable to find the socket through the latex of the mask. With a sickening crunch of skull and brain matter, Michael stabs Richie in the temple. Blood flies across the burnt orange carpet staining the shag forever.
(Y/n) exhaled the breath she was holding. Relief seemed to flood her entire body, and endorphins caused her skin to produce goosebumps. The stress of an unhappy relationship was gone from her entire being and Michael was the one to do it.
“What do we do now?” she asked softly.
Her shaking hands returned. Michael as always, said nothing. He lumbered up the stairs and came back down them in his blue coveralls. He grabs Richie’s corpse by the ankles and begins to haul him off, somewhere she did not know.
--
Hours passed and the night grew darker. (Y/n) worried he was caught. That somehow they’d track her down and they’d never see each other again. The stress bit at her skin with a swarm of mosquitoes that seemed to eat at her unless she was doing something else.
The blood was cleaned from the carpet. Boxes moved and unpacked. Laundry was started in the basement and she put out some clean clothes, which were of course much too short for Michael, on the bed for him to sleep in.
She suddenly felt like she was playing house with little Michael Myers all over again. Her final stop was the two empty cereal bowls that sat in the sink. She had no clue of the figure behind her until his large hands wrapped around her neck. (Y/n) gasped before she felt the large body behind her, soft latex pressed against her cheek.
-SPICE STARTS HERE-
In the center of her spine, she could really feel him. Thick and hard, did murder excite him? His hips pushed forward pushing her into the sink, rubbing himself against her and against the fabric of his clothing.
Her heart dropped into her warm loins and her eyes fluttered shut. The drag of rough cotton and clotted blood made her body tingle in such a strange way. (Y/n) wanted to turn, to see him but his grip on her neck wouldn’t allow her to move.
“Michael,” she choked. “Bed. Please,”
Michael pulled away, and for a beat, she thought she had upset him. Made him stop what he wanted, but then he lifted her over his shoulder like a sack of potatoes. His hand gripped the space where her buttcheek and thigh met, he couldn’t help but squeeze it as he did so.
The Shape lumbered up the creaking stairs and into the master bedroom. He threw her down and she bounced slightly against the spring, the clothes on the bed flew off and Michael stared her down. The silky nightgown had dragged up her hips and revealed sweet cotton panties with growing dampness staining the front.
He wanted to see more of her. Michael climbed into the bed on his knees, hovering above her body. Rough fingers dragged up her arms, covering her in fresh blood. His thumbs hooked over the thin straps of the dress and pulls them down until (Y/n)’s breasts were uncovered.
Hot breath escaped the bottom of the mask, brushing against her skin. He stared, unmoving at the breasts that seemed to suit his wife so perfectly.
Michael didn’t care for laws or technicalities. As far as he was concerned they had been married since the day she asked him. It only took time for him to finally be with her.
His large hand finally moved from the place against her arm and down to her waist like he had before. Up her curves and squished anything he could before grabbing her breast in his hand. He ran a thumb over the hardened nipple and a soft hum of approval escaped (Y/n)’s soft lips.
So he did it again.
She hummed again.
He pinched the nipple and she moaned.
That moan sent a shiver down his spine and the fabric of his clothing felt suffocating. It was like she could read his mind, her fingers pulled the heavy zipper down his body. Warm hands traced his strained t-shirt and down into his underwear. Soft fingertips followed his long shaft to the tip and the way her eyes widened in fear caused a low grunt to leave Michael’s lips.
His hips slammed up into her hand. The fingers wrapped around him and he grunted again and another animalistic hump into her palm followed. (Y/n) smiled at him, and her free hand ran up his chest and to his mask.
Michael grabs her wrist just before she could tug off the mask.
“It’s okay Michael, you can leave it on,” she assured him.
Her hand on his throbbing cock moved down his length, his pubic hair was soft against her fist. Up and down she pumped his shaft and Michael could hardly control his hips. But his own hands were now exploring her body as she touched him.
He enjoyed the softness of her breasts but he soon found his way into the front of her panties. Blood leaving trails down her body and ruining her underwear. She hardly had time to care. Michael found her clit and touched roughly. A long moan escaped her pretty lips and he moved his fingers faster around the nub. Her hips lifted off the bed and she could feel an orgasm building quickly.
“Wait,” she tried to slow him down and stop him but her body beat her to the punch.
She came while being barely touched by him. Her scream was loud and he liked it. It was better than the screams of his victims. Much better than any music or cries for help. He didn’t even stop his fingers over her clit. Her hands were removed from his cock and now wrapped around his wrist.
But he didn’t slow down the assault on her clit. He pushed her through a second orgasm and tears prickled at the corners of her eyes.
“Slow down Michael,” she begged.
He grunted at the tone. He licked his lips behind the mask, his fingers finally leaving the sensitive nub. Michael inserted two fingers, and she jumped in surprise at the intrusion. Thick and rough in the best ways. The grip on his wrist loosened and he began pumping in and out of her, his head cocking to the side as he watched her face contort.
The digits were removed just before she could reach another euphoria. He looked at the glistening on his fingers before slipping them under his mask for a taste. Michael groaned at the flavor and knew he would become addicted to her.
His hands hooked around her panties and he ripped them into two. Then his jumpsuit was around his hips and his cock was released from its irritating prison. (Y/n) leaned forward from her spot on the pillows. He was huge, of course, he was huge. This and long, curving just right. Pre-cum oozed from the tip and she licked her lips.
“Michael, you have to be careful, you’re big--”
Words caught in her throat as he flipped her onto her stomach. He squeezed and smacked the meat of her ass before pressing against her body. He was prodding at her wet entrance.
“It’s too big, Michael,”
He huffed and roughly pushed into her, a yelp of pain and surprise at the stretch caused him to twitch inside of her. Michael’s hands traced up her body again, stopping to grab her tits and then around the front to her throat for leverage. His dull nails bit into her skin but it was nothing compared to the pleasurable burn of Michael as he began to rock his hips.
It didn’t take long for him to find a wild, yet consistent rhythm. He growled and grunted like a caged animal and the burn turned into pure pleasure as his cock brushed against the pressure point deep inside her walls.
“Oh, fuck Michael,” she whined.
He rammed into her hard at that and she moaned. His fingers tightened around her throat, (Y/n)’s vision began to get hazy as he pulled her against his pistoning hips. Just as she was about to fall into the darkness he let go and he felt her walls flutter around him.
“Holy fuck,” She whined as she came around his cock.
The tight sensation was too much. Michael couldn’t hold off anymore. He came. Hard and thick ropes of cum from years of isolation and lack of sexual interest. He kept cumming, more than anyone she had ever been with.
His body slumped heavily against her back as it finally stopped. He grunted into her ear from beyond the mask and his huffing hot breath brushed against her shoulder. (Y/n) had no choice, she lay with his weight on top of her. His cock pulled from her body finally, rolling to the side flat on his back.
(Y/n) turned over and sighed.
“I love you, Michael. I know you probably won't or can’t understand that, but I always have and I always will,” she said softly.
(Y/n) leaned up and kissed the soft cheek of his mask.
As she turns to pull from Michael, he grabs her arm again. He lifts the mask with his free hand just enough for his lips to show. The soft pink lips crashed into hers with all tongue and teeth invading her mouth again. She welcomed it and he pulled away again. Instead of pulling his mask down, however, he began kissing down her body. Licking and tasting her.
“Again already?”
She jumped in surprise when his tongue licked over her folds.
#Michael Myers#michael myers x reader#michael myers x y/n#michael myers x you#slashers x reader#slasher x reader#part 3#Pinky promise#Pinky Promises | Michael Myers x F!Reader#x reader#early post#?
640 notes
·
View notes
Photo


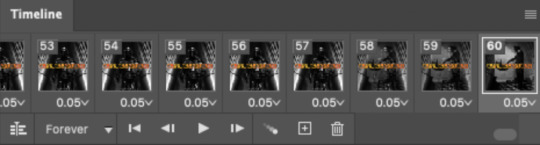
ANDOR | 1.10 One Way Out
-> 10 random timestamps per episode (10/12)

#andor#star wars#starwarsandor#andor s1 timestamps challenge#andor roulette#my friends pick the timestamps#each gif is 60 frames#i love this episode so much#literal chills#*mine: gifs
307 notes
·
View notes
Text
How To Gif: Glass Shatter Effect
By popular demand (ie, 7 people who voted in this poll), here is a tutorial on how to do the glass shatter effect I used to create the first gif in this set.
I use Photoshop CC 2015 (yes I know it's old) for my gifmaking, but you should be able to apply everything to newer versions of Photoshop. For this tutorial I'll be assuming you know the gifmaking basics, but if not, I would recommend this tutorial, which is the process I use to make gifs. Note that this particular process involves saving all of the frames, importing those frames into Photoshop, and then using an action to convert to a smart object.
Keep reading below the cut to learn how to do this effect!
Before I could start making this gif, I needed three things; the two scenes that I wanted to use, and a video of the glass shattering effect. I already knew the scenes I wanted, so then I took to YouTube to find a video which I can't for the life of me find again, but it looked like this:
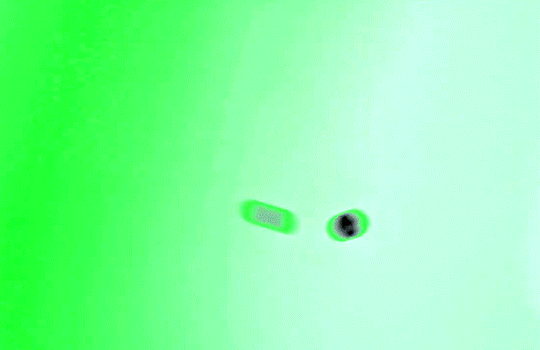
Something like this is what you want. Ideally the green part would be entirely white, but as long as there are two clearly different colours you can usually work with it.
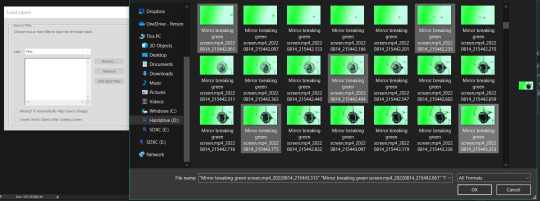
This looks a lot slower than the gif that I made, but that's not because of the frame rate - which is exactly the same above as in the final gif - it's just because there are extra frames in this slower one that I cut out. In the video I used, the glass shattering happened very slowly. I didn't want that, so I ended up skipping several frames when I loaded the frames into Photoshop before using my gifmaking action. I just did this by manually selecting one frame, skipping the next several before selecting another frame, and repeating this until I had selected 60 frames.
After using my gif action, I had a smart object of the glass shatter effect that looked like this:
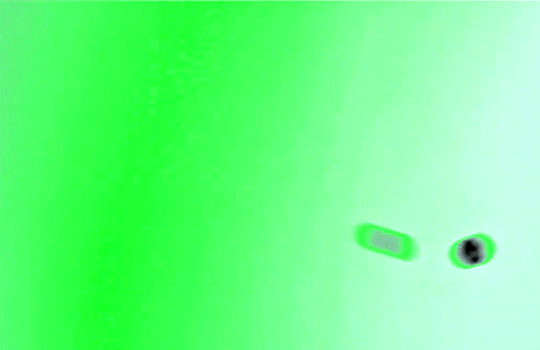
That's a much better speed! It still wasn't quite where I needed it to be though. I needed this in black and white, so I slapped a hue/saturation adjustment on the smart object and set the saturation all the way down to -100.

Okay great, I could start putting the gif together now.
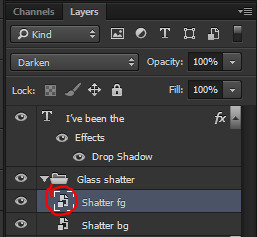
First, I made a copy of the glass shatter smart object, because I'll need that later. Then, I pulled in frames from the scene that I wanted to appear in the hole after the glass shatters, and I used those to create a new smart object with my gif action (we'll call it Scene-bg). I pulled Scene-bg into the same window as the glass shatter objects. Then I created a new smart object by combining one of the glass shatter objects with Scene-bg, which I did by selecting both layers right clicking, and selecting "Convert to Smart Object".
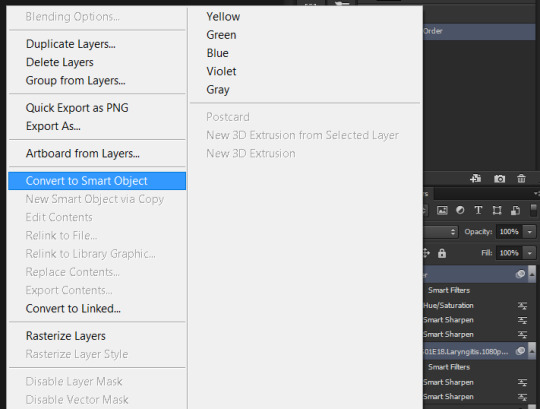
I renamed this smart object to Shatter-fg. I opened it by clicking on the little icon next to the layer name in the layers window here:
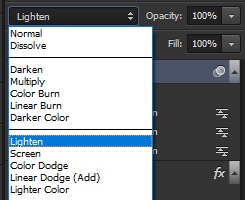
The most important thing here is that the shatter effect object should be the top layer, and I set the mode to "lighten". This will make sure that the lightest colour of either this layer and the layer behind it is displayed; that means that anywhere that's white in our shatter animation will still show up, but anywhere that's black we'll see what's in the layer(s) behind it.
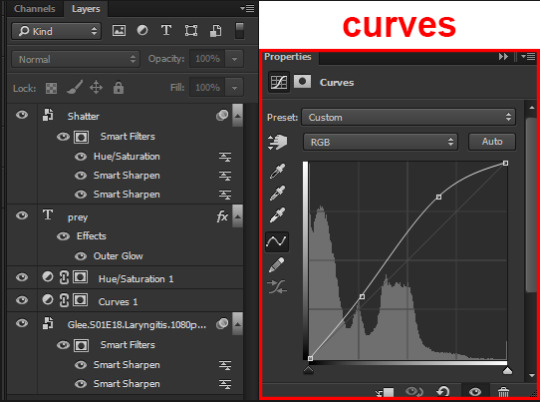
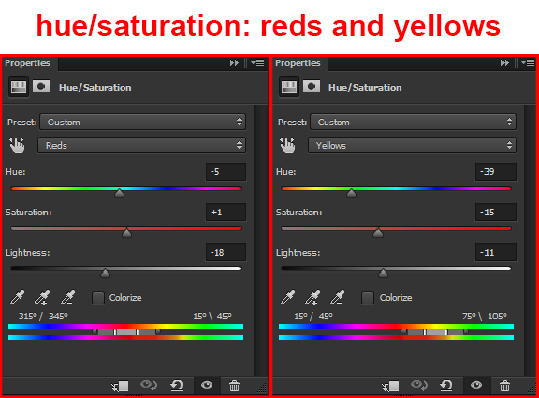
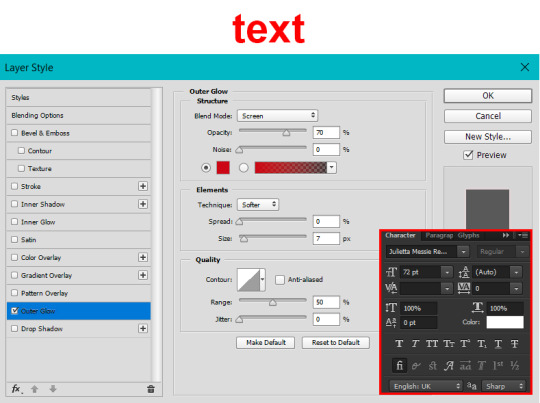
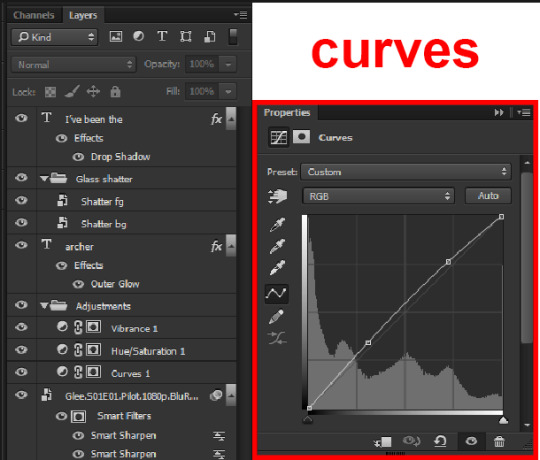
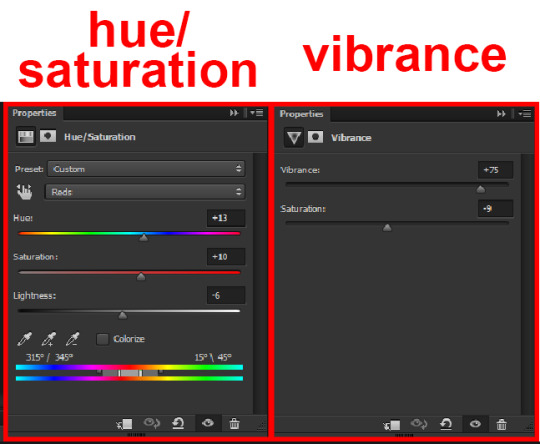
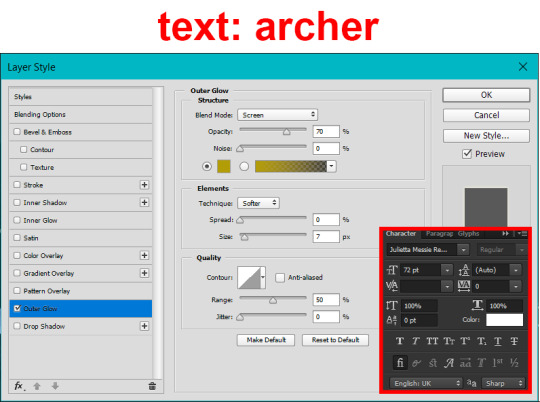
Then I threw some adjustment layers between them to get the colouring I wanted. I used a curves layer, a hue/saturation layer, and I also added text with an outer glow layer effect. Here's what the layer order looked like and the settings I used for each layer:
After this process, Shatter-fg looked like this:

Okay nice, this is starting to look like something! I saved this and went back to the main file with the other glass shatter object.
I needed to invert that other glass shatter object. There's a weird quirk with the version of Photoshop that I use where it doesn't like it when I apply specifically an invert adjustment to a smart object (it appears correctly when editing, but not on export) so I did this by creating a new smart object which included a separate invert layer, but if you have a newer version of Photoshop you can probably just apply the invert adjustment directly. Just note that you'll need to do one of these options; it won't work if you add a separate adjustment layer in the main file, it needs to be applied specifically to the smart object (which we'll now be calling Shatter-bg). It looked like this after I inverted it:
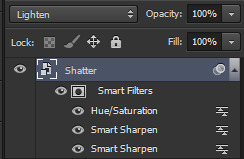
Once that's done, I made sure Shatter-fg was the layer directly above Shatter-bg, and set the mode of Shatter-fg to "darken" and Shatter-bg to "lighten". Since Shatter-fg is set to darken, it will be visible only when it is darker than the layer behind it. By setting Shatter-bg to lighten, I've guaranteed that the layer behind it will always be lighter (ie, white) in the places we want Shatter-fg to be visible, and will be black otherwise. Once I update those settings, this is what the gif looked like:
This is all there is to the glass shatter effect itself. Next I pulled in frames from the second scene to fill in the black areas. This layer needed to go below both glass shatter layers, so that it only shows through where the black. Then I added adjustment layers and some text. I used curves, hue/saturation, and vibrance adjustment layers, and I also added the "archer" text below the glass shatter layers so that it would be hidden to reveal the "prey" text. The other text I added above all of the layers, since I wanted this to be visible all the time. Here is the layer order and all of the settings I used for each of the layers:
I also grouped Shatter-bg and Shatter-fg and shifted them on the timeline so there would be some time to see the background gif before the shatter effect starts.
And that's all! Then it''s just a matter of exporting the finished product:
This is the first gifmaking tutorial I've ever made, so I hope I was able to be reasonably coherent and helpful! I'd love to hear if you make anything by following these steps, or even if you just feel like you've learned something reading through this. And if you have any outstanding questions, feel free to reply or send me an ask and I'd be happy to answer!
#gifmaking#tutorials#gifmaking tutorial#gif tutorial#photoshop#photoshop tutorial#usergif#gleesource#my tutorials#mine#how to gif#tw mark salling#mark salling tw#not tagging as glee because it's not actually about that but wanted the tw tags just in case#this was so much more effort to put together than I thought it would be lmao#I was like oh yeah I've already made the whole gif I just need to go back and explain how I did that...#it took A WHILE#anywayyyy it was fun though so I'm glad I did it#would love to know if anyone finds this helpful or interesting or tries out the effect or something similar!#you can also just grab the black/white gif I included above if you want to do the effect since I can't find the video... sorry lol#but yeah you have my permission to steal the black/white gifs for gifmaking purposes if you would like#just don't like. post your own tutorial claiming you made it or something?? but like you don't need to credit me or anything obviously.#ANYWAYYYY#I feel like... a LITTLE pretentious thinking I'm good enough at making gifs to be qualified to make a tutorial#but like it's fineeee everything is fine#gonna finally post this now enjoy byeeee
97 notes
·
View notes
Text
Making Baldur’s Gate 3 GIFS Tutorial
TOOLS USED:
Nvidia or alternate game video recording software
PotPlayer
GIMP (Optional)
Adobe Photoshop
PART 1: Recording
I personally use the Nvidia recording software that came with my computer to capture videos of the game, but there are plenty of video recording options out there. I know OBS Studio is a popular one, for example. Whatever your choice may be, here are three important tips for when capturing video:
Use the least amount of compression settings your recording software can output, and I recommend at least 30FPS, though 60 is better
Press F10 to hide the Baldur’s Gate 3 UI and capture the entire screen
Give about three seconds worth of video before and after the section you want to record, as safety buffers, if you can
PART 2: Frame Extraction
Open the video you’ve recorded in PotPlayer in window mode (not full screen), and pause a little bit before where you want to start your GIF. Press Ctrl + G to open up the Consecutive Image Capturer window, and drag it to the side of the video player. These are the settings I recommend in general:
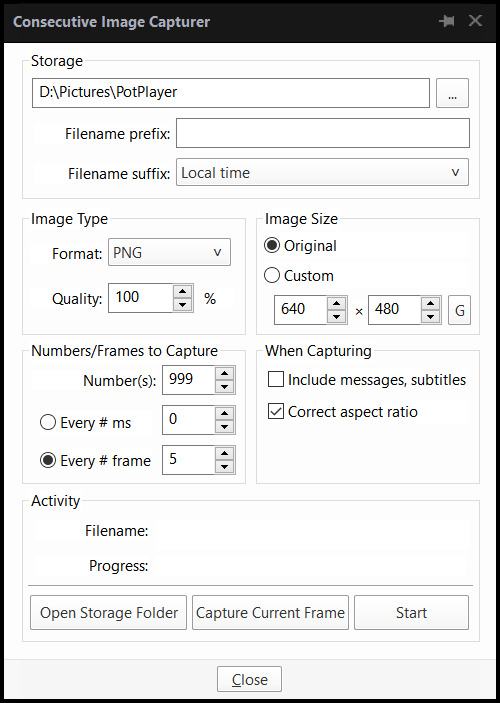
HOWEVER, I suggest playing around with the “Every # frame” option to your own liking. I have a pretty high framerate for this video I’m using, so 5 is fit for me, but if you have a lower framerate, you may want a lower number, like 2.
With your settings in place, click “Start” and unpause the video. Pause the video again after you’ve captured all the frames you want, then click “Stop”. If you’re making a gifset, I recommend then storing each set of frames in a single folder at a time.
PART 3: Resizing
I personally use GIMP to resize/crop the images because I find it easier, then export the image as a PSD for the next steps in Photoshop. But you can use Photoshop for this step too, if you’re more comfortable with that.
The number of frames you can get away with in a single GIF for Tumblr depends on the aspect ratio you plan on saving it as—for example, 270x200 obviously can handle more frames than 540x300 while still fitting within Tumblr’s size limit.
PART 4: Sharpening
In Photoshop, use the Filter > Sharpen > Smart Sharpen tool on each layer. The settings are your choice, but I usually use 200 for the Amount and 0.5 for the Radius.
PART 5: Animation
If you don’t yet have the timeline set up in Photoshop, click on Windows > Timeline to bring it up. Then from the arrow, choose “Create Frame Animation” and click on the button to do so. This will insert the first frame into your timeline. Click on “Make Frames from Layers” in the timeline options menu to add them all.
Click on frame 1, then hold down Shift and click on the last frame to select them all. Then click on the drop-down arrow from the last frame and set the delay between each frame changing. I usually use 0.1 seconds.
Change the “Once” option to “Forever” to make the GIF repeat itself ongoing.
PART 6: Editing/Colouring
Click on frame 1. Then click on the top layer, while still keeping frame 1 visible.
You can use a variety of tools in Photoshop to editing the colours, brightness, contrast, etc. of the gif. Make sure the filters are the top layers to apply them to all the frames. If you test out your gif and see that the filters are not applied to all the frames, toggle the visible option on them off and on again.
I’m not going to go into detail of how to edit your GIF here, because each one is different. But I will say the tools I most typically use are Brightness/Contrast and Curves.
PART 7: Export
Click on File > Save for Web. These are the settings I like to use:
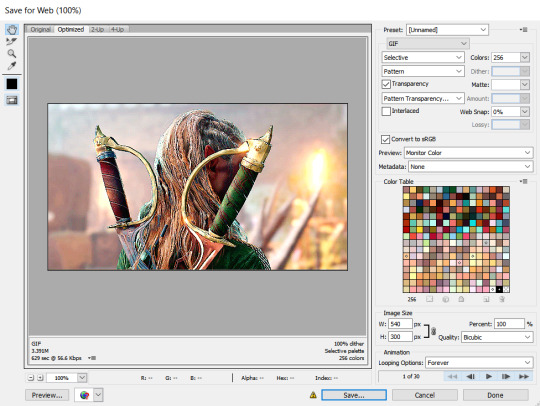
Congratulations, you’ve made a GIF!
143 notes
·
View notes
Text
I’m By Your Side

Pairing | Doctor!Steve Kemp x female reader
Warning | This is all fluff. Doctor/girlfriend!patient dynamic.
Summary | Steve takes care of you, while you’re sick.
Word Count | 2113
A/N | Thank you, nonnie for your ask!! It got me all soft and warm!! 🥺❤️ Beta’d by @christine-the-soprano-31, but all mistakes are my own. Banners made by @vase-of-lilies. If y’all enjoy it, leave some feedback, comment and reblog. I’d greatly appreciate it!! 💗
Masterlist


You usually didn’t mind the mornings. Steve let you sleep until whatever time your body needed, your alarm clock typically being the morning sunlight trickling in through the curtains.
This morning, however, you woke to find yourself drenched in sweat. Your skin felt like it was on fire, yet it felt impossible to stop shivering. With a groan, you peeled the damp covers off of your clammy skin and tried to sit up. Tried being the operative word. Your body felt too heavy and too sore to move. Mustering what little strength you could, you finally pulled yourself into a seated position. The moment you tried to get out of bed, you whimpered. You were too lightheaded and weak to even move. Having heard you whimper, Steve came running to the bedroom and was immediately at your side.
“Hey, hey. Get back in bed, sweetheart,” Steve murmured softly. His brows knitted in concern as he lowered your shivering frame back onto the bed.
“No, I’m fine Steve,” you insisted. A harsh cough racked your body, a stabbing feeling radiating through your chest. You blinked back tears as you tried to catch your breath.
“You don’t sound particularly fine, bunny. Just lay back and let me have a look at you,” he said, his tone laced with worry. He moved to grab his medical bag before returning to you.
He meticulously laid out each tool he needed: his stethoscope, his blood pressure cuff (or sphygmomanometer, as he’d taught you), thermometer, otoscope, and a tongue depressor, sterile and in still its packaging.
“Can you tell me how you’re feeling, right now?” he asked, his demeanor warm and clinical. He’d settled down beside you, expertly beginning to prop you up against the pillows. Ever the physician, he looked down at you with a curious gaze. Something about him surveying you this way always gave you butterflies, regardless of what state you were in.
“I feel tired, my limbs feel heavy, my body feels hot, my nose is stuffy, and I have a sore throat. And I feel weak,” you listed, your voice hoarse. You gave a tiny sniffle, trying futilely to clear the congestion in your nose.
“Do you feel any aches or pains?” he asked, gently pressing his palm to your forehead.
“Yes. Everywhere. My throat burns, too. But only when I swallow.”
He nodded as he took in the information. “Your forehead is very warm. Definitely a fever,” he observed. He gave a sympathetic pout and positioned the buds of his stethoscope in his ears. “I’ll have a peek at your throat in just a moment, Bunny. For now, I just need you to breathe normally for me.” Steve’s tone grew low and velvety, as it always did at that specific instruction. Breathe normally for me…
You closed your eyes and stayed perfectly still as he listened, the cool metal of the stethoscope soothing against your burning skin.
“Hmm, your heartbeat is a bit slower than usual,” he noted aloud. “Sit forward for me, sweetie.” Though before you could try to move yourself, he’d slipped a hand behind your back and gingerly pressed you forward. He caught your chest with his opposite hand, supporting you with ease. He pressed the diaphragm to your back. “Deep breath, baby girl,” he murmured, beginning to listen to your lungs.
“Lungs are congested,” he sighed. “And your breathing sounds labored.”
“Is that a concern?”
“Perhaps...” he answered. He quickly grabbed the sphygmomanometer and secured the cuff around your upper arm. He positioned his stethoscope before beginning to work the device. His expression grew even more concerned as he looked at the reading.
“90/60. That’s low, very low,” he stated as he took the cuff off of your arm. He looked at you, clearly worried.
“That’s why I feel lightheaded.”
Steve didn’t respond. Instead, he began feeling around your neck and jaw, looking for any swelling. He mumbled a few notes to himself before he picked up his otoscope and tenderly tucked your hair behind your ears. He started on your right ear, speaking softly to you, his warm, minty breath tickling your skin. Satisfied with the right side, he moved to repeat the process on the left. “Nothing alarming there,” he said as he pulled away. “No signs of infection.”
Next, he took the thermometer. “Open for me, sweetheart,” he instructed. You opened your mouth obediently, allowing him to place the thermometer under your tongue.
A few moments later, the thermometer beeped. Steve took it from your mouth, his eyes widening.
“A hundred degrees?! Oh, bunny. I’m going to clear my schedule for the next few days and give you my undivided attention.” He stroked your hair, his features twisted into a distressed expression.
“One more thing, baby,” he said, unwrapping the tongue depressor. “Can you open your mouth and say ‘ahh’ for me?”
You let out a strained ‘aah’ as he pressed on your tongue, shining his flashlight down your throat.
“That doesn’t sound or look good. I’m thinking it’s the flu. So you have to stay in bed, sweetheart. I’m going to check on you every hour or so to monitor your condition.” He sighed and began to put his equipment away.
“Is this for your research?” you asked innocently, watching him through tired eyes.
Steve looked at you, his expression softening. He cupped your cheeks. “No, darling. This has nothing to do with my research. I’m doing this because I genuinely care about your health and well being. You’re my perfect patient, my everything. My love.” He brushed his thumbs over your cheeks at that, his lips quirking up into a soft smile. “No one could ever take better care of you. It’s all gonna be okay. I’ve got you. You’re not going anywhere.” He held your face a moment longer before returning to his tools. Once they were put away, he returned to your side. His arms were secure as he held you, lovingly stroking your cheeks and hair.
You looked up at him through adoring eyes. He was right. Who could take better care of you than your doctor? “Thank you, Steve. Does this mean I get cuddles?”
“Yes,” he chuckled warmly. “Isn’t that what I’m doing right now?” He gave your nose a gentle boop. “You’re getting all the cuddles and attention I can give you.
“Tell you what,” he continued, “I really need my bunny to eat something. I’m going to make the best batch of soup I’ve ever made just for you. I’ll get you started with some nice, warm tea, too. And when I come back, you’ll eat your soup and I’ll cuddle you for as long as you’d like.”
Once he was sure you were comfortable, Steve went to make some tea. Knowing how much you hated taking medicine, he slipped whatever medication he saw fit into your tea.
As promised, he returned with your favorite mug. You mustered a barely audible, “Steve?” in your exhausted state.
“It’s me, my love. I made you some tea with honey in it. This should soothe that icky feeling in your throat,” he cooed. “Can you take a sip for me?”
“I feel so heavy,” you whimpered as you tried to sit up.
“I know, baby. I know. But I need you to take a sip for me. I let it cool a bit so you won’t burn yourself.” He helped you sit up a tiny bit and brought the cup to your lips. “Drink, my love,” he said with gentle authority.
You obeyed, taking a couple of sips and ignoring the medicinal flavor against your tastebuds. Your doctor did know best, after all.
He smiled. “Good girl,” he praised. “Such a good girl.” He set the tea on the nightstand. “I’ll be back soon. Rest, okay?” He ran a hand over your arm before retreating to the kitchen once more.
Much like his lab, Steve’s kitchen was a sacred place. To him, at least. You’d spent countless hours watching him expertly navigate both spaces in fearful awe. So sure of himself as he seemed to be holding the entire world at his fingertips. In those moments, Dr. Steven Kemp answered to no one. The world was at his mercy.
You drifted off to sleep, only to be woken up by Steve stroking your cheek. “Wake up, Princess. Time to eat,” he said, his voice a hypnotic lilt. You blinked your eyes open to find him smiling down at you. “Hello,” he chuckled. He sat beside you, helping you sit up. “There we go,” he cooed. “Just like I promised. Do you want me to feed you, baby girl?”
Your eyes slowly shifted to the tray, which held a steaming bowl of soup, your favorite crackers, and some fresh orange juice.
You nodded, a groan slipping from your throat as you rested your head against his shoulder. “feel terrible Steve,” you mumbled, though it came out as more of a whimper.
“I know, I know,” he assured you, as though he was speaking to a child. “But it’s important that you eat. I need to make sure my little patient is properly nourished. There are lots of veggies and proteins in your soup to keep you strong while you heal. I promised you the best batch of soup I’ve ever made, and that’s exactly what I’m giving you.”
You sighed, fully alert now. “You are the doctor, I guess,” you giggled softly. “I should follow your orders, shouldn’t I?”
He laughed and settled against the headboard. “Good girl. Now open up.” He took a spoonful of soup and brought it to your lips. He wrapped an arm around you as you took the first mouthful.
“I think I can feed myself,” you told him after your third bite. “Now that I’m not so out of it.”
Hesitantly, Steve handed you the spoon. “Okay. Take your time, though. If you need me, I’m here to feed you again.”
You thanked him quietly and picked up the spoon. The soup was the best he’d ever made you. Flavorful and soothing as it ran down your throat. You hummed happily. “This soup tastes amazing, Steve. You were right. It’s your best. Thank you.”
“I’m glad, you like it darling. I want my baby to make a quick recovery. Is there anything else you need?” he inquired while stroking your hair gently.
“Cuddles. Can we cuddle after I eat my food?”
“Yes, of course, dear. But I have to check your vitals first.”
“It’s not even an hour yet, Steve.”
“So? As your doctor, I have to make sure to give you the best treatment, and that involves recording your vitals as often as I see fit.” He tilted your chin up for you to look at him. Your mouth went dry, heart skipping a beat. You knew that look.
“But, don’t you want to cuddle me first? Please?” you pleaded, giving him your best puppy dog pout.
He looked at you, his stern expression unwavering. “Bunny, I know what you’re trying to do and it’s–” he began while looking deeply into your eyes. His firm expression soon broke and he sighed. “Working.” He shook his head, chuckling.
You giggled triumphantly and continued to eat your soup and sip your tea slowly, savoring each bite and sip until the bowl and mug were empty.
“Okay, I ate everything and I drank the tea entirely. Can we cuddle now?” you asked as you set the tray carefully on the side table.
“Sure. We can. Come here, sweetheart.”
You let yourself melt into his embrace, humming against his chest as you nuzzled deeper into him. You felt his hand stroke your hair tenderly, and could hear his heartbeat thumping steadily beneath your cheek. It instantly calmed you.
“Is this what we’re going to do all day?” you asked softly, curiously.
“Yes. Besides the checkups, I think so. Do you feel like doing anything else?”
“No, no. This is perfect.”
“Good. Because, I’m not going anywhere. I’m by your side, whenever you need me,” he said softly as he pressed long and light kisses to your forehead. He held you tightly.
“You should rest a little, I’ll wake you for vitals soon.”
“Okay. And Steve?”
“Yes?”
“Thank you, babe,” you said as you let your eyes close.
“Shhh, shhh… rest, my bunny,” he cooed, continuing to stroke your hair.
Feeling his arms around you made you feel safe, as if nothing could ever hurt you. Your body easily relaxed into his hold, while you gradually drifted off to sleep. You could never feel safer than you did right now. Here, in his arms. Your sanctuary. Your home.
#thebluemage writes#thebluemage writings#mage writes#mage writings#steve kemp#doctor!steve kemp#steve kemp x female reader#steve kemp x reader#steve kemp x you#steve kemp x y/n#steve kemp fanfiction#steve kemp fluff#brendan steven kemp#brendan steven kemp x female reader#brendan steven kemp x reader#brendan steven kemp x you#brendan steven kemp x y/n#brendan steven kemp fanfiction#sebastian stan#sebastian stan x female reader#sebastian stan x reader#sebastian stan x you#sebastian stan x y/n#sebastian stan fanfiction#fanfiction#reader insert#reader insert fanfiction
322 notes
·
View notes
Photo
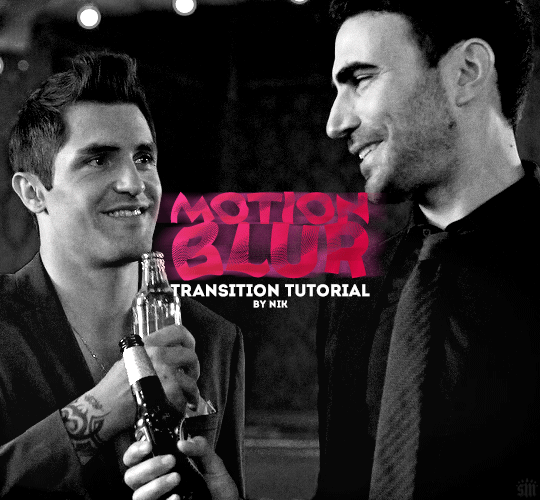
HOW TO: Do a Motion Blur Transition
Using Timeline or Frame Animation
Hi! Someone asked me for a tutorial on the transition effect in the second gif of this set (also featured in this set and the text on this set). So, here it is! This is one of the easiest and least tedious of the gif transition effects in my opinion — and I’m going to go over how to do it both in Timeline and Frame Animation (using the screencap method). Disclaimer: This tutorial assumes you have a basic understanding of gif-making in Photoshop.

PHASE 1: PREP
This phase applies to both the Timeline and Frames method!
1.1 – Prepare your caps.
(New to gif-making? Check out my basic tutorial here!)
The key to this kind of gif is making sure your final gif, with all the transitions, won’t be too long or too big of a file to post (Tumblr’s limit is 10 MB).
If your gif is going to be big like mine (540x500px), you might want to keep your total frames between 50-60. I decided to try getting away with a whopping 70 frames total... because I like to test fate (spoiler: my final gif ended up being 9.6 MB 🙈). Since my gif is transitioning between two scenes, that means each scene was 35 frames.
If you aren’t doing screencaps like me, just make sure your clips are equal in length. And if you’re transitioning between more than 2 scenes (like the Mando example I linked at the beginning), you’ll have to use shorter clips/fewer frames per scene. In my Mando gif, each scene was 16 frames and my final gif was 64 frames.
1.2 – Crop, sharpen, color, etc. as you would.
For this, since you’ll probably have 2 more more sets of coloring, just make sure your coloring is only being applied to the appropriate gifs. The way I do that is by aligning my adjustment layers with my gif as you can see in the screenshot in 1.3 below.
1.3 – Arrange your frames or clips.
If you’re working in Timeline, drag the clips/layers of your second gif so they’re immediately after the ones of your first gif. I like to keep things separated in Groups:

Note: I’m keeping my text layers separate because I don’t want the motion blur to affect them. But if you wanted to make your text transition from one word to another, you can either follow the same steps I’m about to show you and apply them to your text layers, or simply merge your text layers with your gif and adjustment layers, so they can all get the motion blur filter applied to them!
If you’re working in Frames, simply paste the frames of your second gif after the frames of your first gif. Again, you can either keep your text separated or part of the motion blur.
METHOD: TIMELINE
T.1 – Divide the Timeline.
Using the Scissors Tool, you’ll want to divide each gif so there are 3 small segments at the beginning and end. (3 is my go-to, however, for my Mando gif, I actually only did 2 segments because each section was already so short.)
Now there are two options for this:
OPTION 1: Simplest, 00:01 Seconds Each, Makes Duplicate Frames
You might be wondering, why on earth would I want duplicate frames? You wouldn’t, usually. But this method only causes the duplicates to happen on the blurred frames, so it’s not noticeable at all! However, if you’re like me (read: Type A) — just knowing there are duplicate frames may bother you. If that’s you, go to Option 2.
Each of these segments are the absolute smallest Photoshop will allow, a duration of 00:01.

Sometimes Timeline won’t let you cut things that short (for me, this typically only happens at the end of a clip). So my work around is to cut the segment so it’s 00:02 seconds long, then drag the clip until it’s as small as it can be. Here’s a gif showing that process:

You can see that after I dragged the clip so it would be 00:01, I also dragged the big clip over so it would still continue as normal. Timeline is neat because, even if you divide a clip, each segment can be dragged back to its full length.
OPTION 2: 00:02 / 00:01 / 00:02, No Duplicate Frames
Timeline works in a weird way... when you move forward one frame by clicking the right arrow, you don’t always see movement in your gif. And if you don’t line up the clips properly with the movement, it can create duplicate frames. The easy way to fix this is by making the 3 segments 00:02, 00:01, and 00:02 seconds respectively. This goes for the segments at the beginning and end.
You can see the duration of each segment and an example of how the gif doesn’t move on certain frames in this gif of my workspace:

T.2 – Apply the Motion Blur filter in varying distances or strengths.
Now that we have all of our segments, it’s time to apply the blur. Motion Blur is under Filter > Blur > Motion Blur!

This is the window you’ll see when you click it:

Note the fields where you can change the angle and distance.
The angle is basically the direction in which you want the blurred effect to stretch. I always do 0 because I want my gifs to blur together horizontally — I just think it looks smooth. You can play around with it if you want to get a different effect!
The distance is what I like to refer to as the strength of the blur. But really, it’s distance because it’s how long the blurred effect is being stretched.
The rule of thumb here is to apply the filter in a gradation. The part at the beginning of one gif should go from strongest (greatest distance) to weakest (least distance). The part at the end of one gif should go from weakest to strongest.
I keep things easy to remember and do 20, 15, 10 for the beginning and 5, 10, 15 for the end. The reason the numbers aren’t the same is because I don’t want the end of Gif 1 (which is blurred 15px distance) to be the same as the beginning of Gif 2 (which is blurred 20px distance). If they’re the same amount of blur, I don’t think the transition looks as smooth.
Here’s my entire timeline and the strength of blur I used for each of the transitional clips:
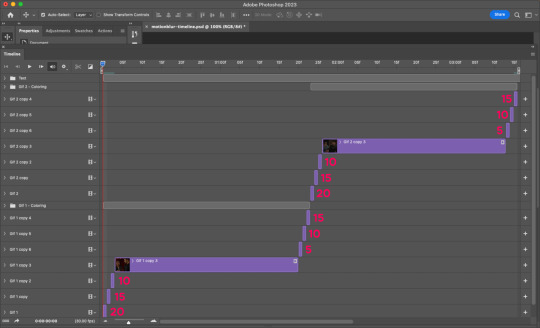
T.3 – Export
That’s it! Convert from Timeline to Frames, export your gif, and there you go!
Reminder, if you decided to do Option 1, you’ll have duplicate frames, and therefore more frames than you started out with when you initially imported caps.
METHOD: FRAMES
F.1 – Apply the Motion Blur filter in varying distances or strengths.
In Timeline, we created segments. But in Frames, each frame acts as one of those segments — so we don’t need to divide anything. We can just get straight to the filter!
Now, disclaimer: the way I’m working with Frames right now is with the adjustment layers merged with the frames. I typically work in Timeline, so I colored in Timeline and then converted into Frames for this. However you work, just make sure the coloring from one part of your gif doesn’t affect the other part.
Anyway, here’s where to find Motion Blur again:
And here’s what the window will look like:
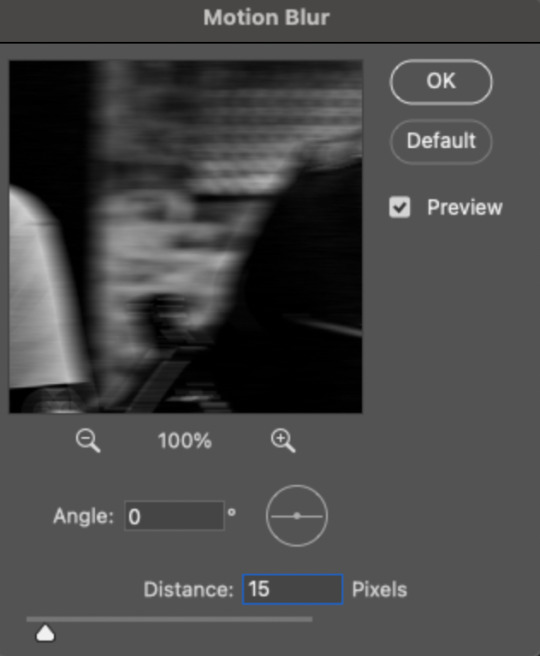
Now just apply the filter in increasing and decreasing degrees. In case you didn’t read the Timeline section, I’ll paste exactly what I said there:
Note the fields where you can change the angle and distance.
The angle is basically the direction in which you want the blurred effect to stretch. I always do 0 because I want my gifs to blur together horizontally — I just think it looks smooth. You can play around with it if you want to get a different effect!
The distance is what I like to refer to as the strength of the blur. But really, it’s distance because it’s how long the blurred effect is being stretched.
The rule of thumb here is to apply the filter in a gradation. The part at the beginning of one gif should go from strongest (greatest distance) to weakest (least distance). The part at the end of one gif should go from weakest to strongest.
I keep things easy to remember and do 20, 15, 10 for the beginning and 5, 10, 15 for the end. The reason the numbers aren’t the same is because I don’t want the end of Gif 1 (which is blurred 15px distance) to be the same as the beginning of Gif 2 (which is blurred 20px distance). If they’re the same amount of blur, I don’t think the transition looks as smooth.
Here are all my frames and the strength of the blur I used for each of the transitional frames:

Note: I wanted to mention again that I kept my text layers in a separate group and didn’t apply the transition to them:

F.2 – Export
Finished! Easy peasy!
EXPORTING TIP
If you’ve read my other tutorials, you already know this tip — but since I’m part of Discord servers where members are encouraged to share embed links to their creations, I often rearrange the order of my frames before saving them. (This tip is also handy for making sure the best frame of your gif is visible for Tumblr users who turn off auto-playing gifs.) In this case, I made frame 27 my new frame 1 because I didn’t want my embed preview to look like a blurry gif. Everything will still be in the same order, but anywhere your gif is paused, the best frame will be displayed!
Anyway, that’s it! If you have specific questions about this tutorial, my ask box is open. Hope this helps! <3
#gif tutorial#completeresources#usershreyu#useryoshi#userelio#userannalise#userzaynab#userives#usermarsy#usertreena#usercim#userrobin#userkosmos#usersalty#userhella#alielook#userk8#uservivaldi#resource*#gfx*
764 notes
·
View notes
Text
How to Make High Quality Gifs
A few people have asked me for a gif tutorial, so here we go! As a disclaimer, there are many parts of gif-making that are subjective, and this is just my personal process/preferences. If anyone is confused about a particular step, or wants more in-depth info about something, just message me!
Tools:
✧Laptop/computer
✧Adobe Photoshop 2024
✧External Hard Drive (mine is 250GB)
✧Video Downloader (I use the Video Downloadhelper extension on Firefox)
PHASE ONE: Make Animated Gif
1. Download high quality video
This is very important! You should download the highest quality of the video you can find. I use the free Video DownloadHelper extension on Firefox, but it doesn't download audio sometimes (it could be me not using it properly, or they want you to pay to get audio). No audio is fine for gifs, but if I'm doing a video edit, I either need to record the audio separately with Quicktime or use a free online downloader for youtube, twitter, or instagram videos.
For this gif, I downloaded an HD interview from the F1 website with the Video DownloadHelper extension on Firefox.
Tip: Make sure your video file is an .mp4 -> photoshop can struggle with .mov files bc they're larger
2. Import: Video Frames to Layers...
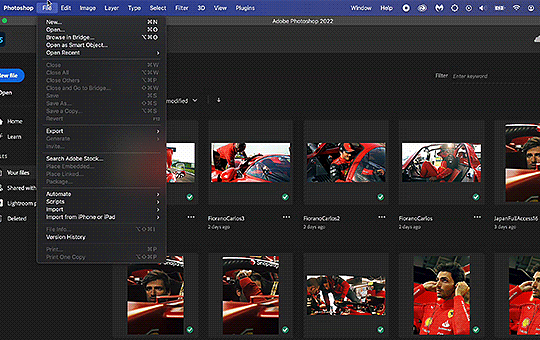
File -> Import -> Video Frames to Layers... -> Open your video -> Selected Video Range -> Make Frame Animation
If photoshop has to load a while to make the frames, it means you should select a smaller portion of the video to animate.
Tip: If you discover that there are duplicates of every frame or that there are way too many frames for the portion of video you want to gif, you may need to re-import and check the "Limit to Every _ Frames" box, and write in "2". This will import every other frame of the video and get rid of duplicates or too many frames.
Once your frames are imported, make sure you're working in the "Motion" workspace by going to the top to Window -> Workspace -> Motion.
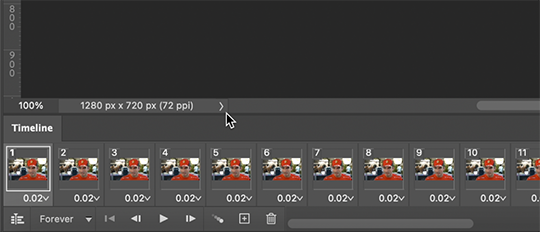
Now, all your frames should appear at the bottom in the Timeline. Make sure that the box in the left corner is set to "Forever", and now it should play the frames and loop back to the beginning each time.
3. Choosing your frames
I usually aim for around 60 frames total for a gif, but sometimes I'll go under or over that number. This particular gif is 55 frames in total. In general, I want my gif to be around 3 seconds in length bc under that feels too short and over that starts to be a large file size. Totally subjective, though! (edit: I have started to experiment with up to 80 frames for some gifs, which comes out to about 4 sec.)
Play through your frames and if you want to delete some, select them and click on the trashcan icon, which you can see in the screenshot above. (If you don't delete them this way, you'll have issues later.)
4. Set Frame Delay

Once you're happy with your frames, select all of them and click on the part that says "0.02", then go to "Other..." I usually choose 0.05 or 0.06, to land my gif around 3 seconds, but it depends on the video and how many frames you have. This particular gif is set to 0.06 because it looked good and brought me to around 3 seconds.
You can always choose a delay and if you don't like it, go back and change it! Just do what looks good to you.
5. Convert to Video Timeline
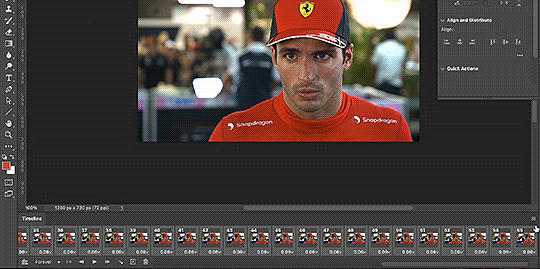
Click on the symbol that looks like 4 lines stacked, and choose "Convert to Video Timeline". Now is usually when I play through the gif to see what the speed is looking like/if I like the frame delay and it's landing somewhere around 3 seconds. If not, you can just Undo and adjust anything when it's still in the frame animation stage.
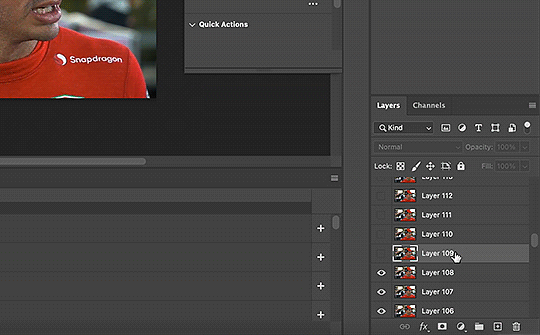
Next, scroll through the Layers on the right side and delete any layers that don't have the "eye" symbol next to them -> these are frames you deleted in the frame animation stage, but they need to be deleted in the timeline stage as well. Lastly, select all your remaining layers (which should all have the "eye" symbol) so they're all highlighted.
6. Convert to Smart Object
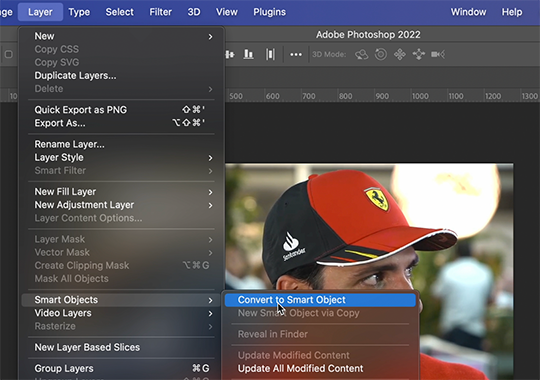
With all layers selected, go to the top to Layer -> Smart Object -> Convert to Smart Object. Ta da! You have a gif.
I always make sure to save my file at this point (you can do it before, but it just depends on how fast you work). Remember to frequently save your progress while gif-making: sometimes, photoshop gets overwhelmed and quits while you're mid-color correction 🥲. You never want to start over from scratch...
Now, some people like to crop & resize their gifs first. Or do sharpening before color. Or color, resize, then sharpen. It's really up to you. The order I like to do is Color, Sharpen, Crop, Resize, Export.
PHASE TWO: Color & Sharpening
(the fun part!)
1. Brightness/Contrast
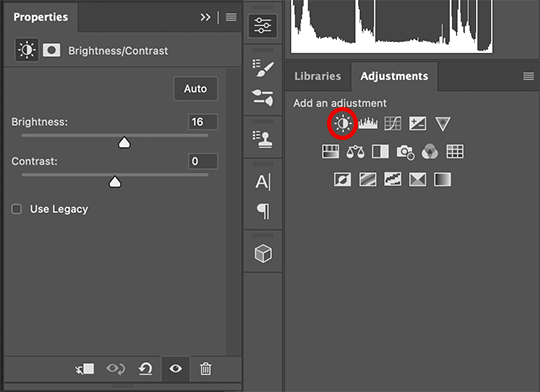
So here's where we start getting into the really subjective stuff. I always use the Brightness/Contrast and the Selective Color adjustment layers to do my coloring. I rarely touch the contrast bc that can be adjusted in selective color, but almost always, the gif needs overall brightening.
Tip: Even when I think a video looks bright to my eyes, sometimes I post the gif and they look dark once they're in the app. My advice is to always brighten a little bit, even when you don't think it's needed...
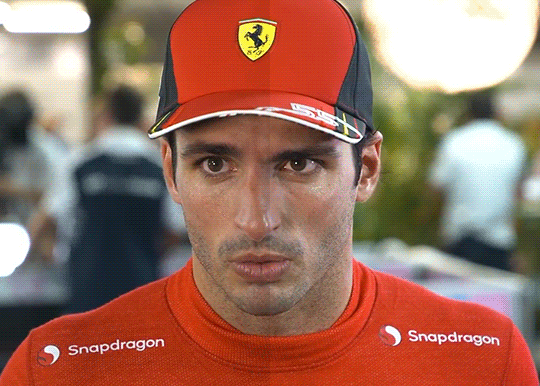
Here shows the very subtle shift in brightness I did for this gif. It can be a lot more intense depending on the video quality/lighting. The difference will also look a lot more stark after the color layer is applied.
2. Selective ColorNext is color. This is totally up to you and what looks good to your eyes. Make sure you have any software turned off that might change the color of your screen (like a nighttime filter or something that removes blue light).
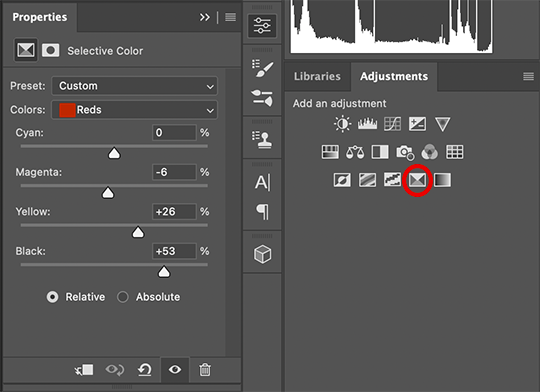
I use selective color bc you can adjust the levels of cyan, magenta, yellow, and black in each color channel independently. This is how I adjust the specific color of red that Charles and Carlos wear, or the amount of cyan in the blacks, etc. The "Neutral" layer effects the whole image, so I'll sometimes add some yellow there if I'm wanting a warmer image, or I'll add or remove black to brighten or darken the mid-tones.
Just play around! Sometimes, I'll take the slider from +100 to -100 back and forth just to see what it's doing to the gif. And I frequently turn on and off the color layer to see what the gif looked like before and after color. (I've found that most F1 content is really magenta-skewed, which you may not even notice until you've corrected it out).
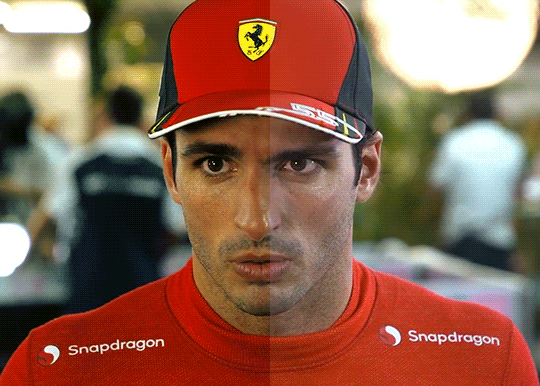
Above is Color vs. No Color.
It might look extreme to you presented this way, but when the whole gif is colored, no one questions it! As long as there's consistency across gifs, that's all that matters. I frequently copy and paste my adjustment layers onto another gif from the same interview/video so the look stays consistent.
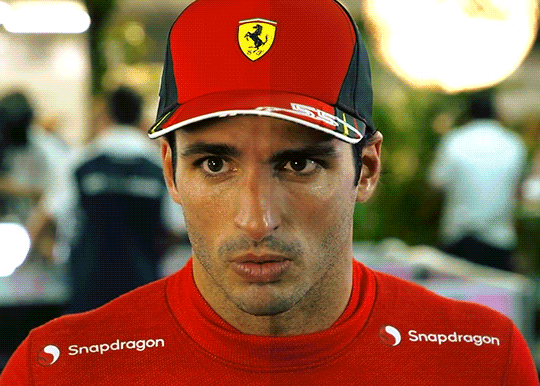
Above is Color w/ Brightening vs. Without.
This gives you a better idea of how much of a difference that Brightness/Contrast layer makes.
3. Sharpening
I got my Sharpening routine of choice from this tutorial on gif-making. To be honest, I don't know if it's the best sharpening procedure bc I haven't taken the time to in-depth compare to other ways of doing it, but it looks good to me! So I've stuck with it. (edit: I've also added a Reduce Noise filter to my sharpening routine. But as always, just do what looks nice to you!)
I copy and past the sharpening from my other gifs onto new ones so I don't have to do all the steps again. There are quicker ways of doing this, like using quick actions and stuff, but how I do it is fast enough for me.
If you want to figure out your own Sharpening routine:
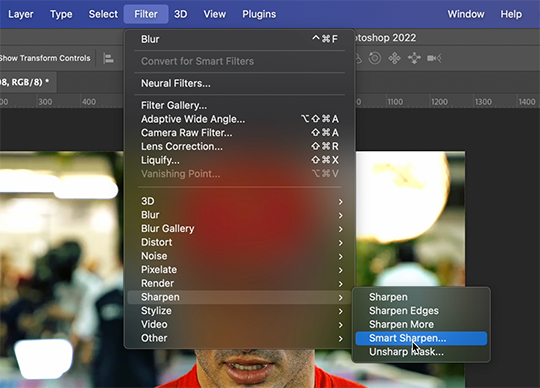
With the gif layer selected, go to the top to Filter -> Sharpen -> Smart Sharpen. It will bring up this window:
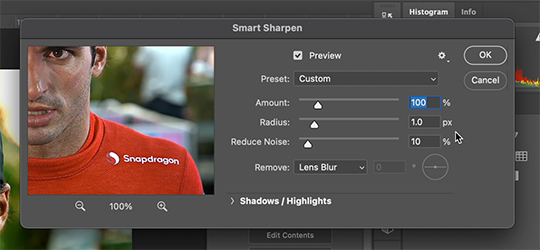
Here you can play around with the amount, radius, noise reduction, etc. and see what you like.
I also add a Gaussian Blur effect, which you'll find under Filter -> Blur -> Gaussian Blur.
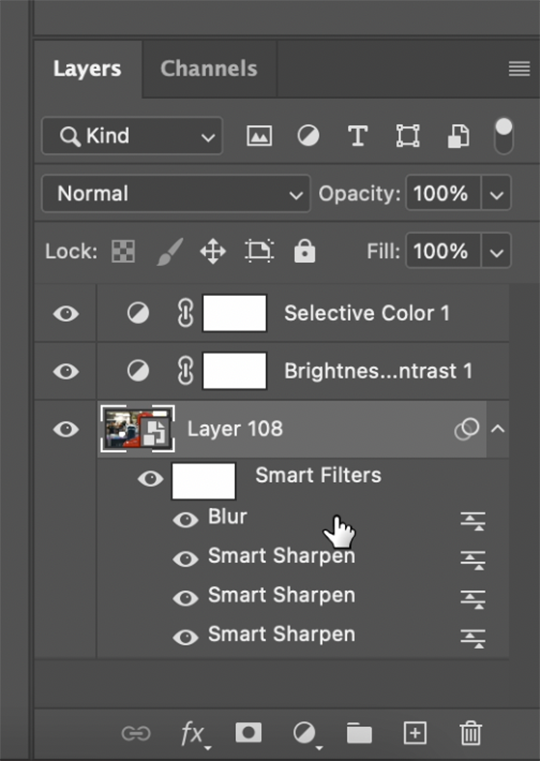
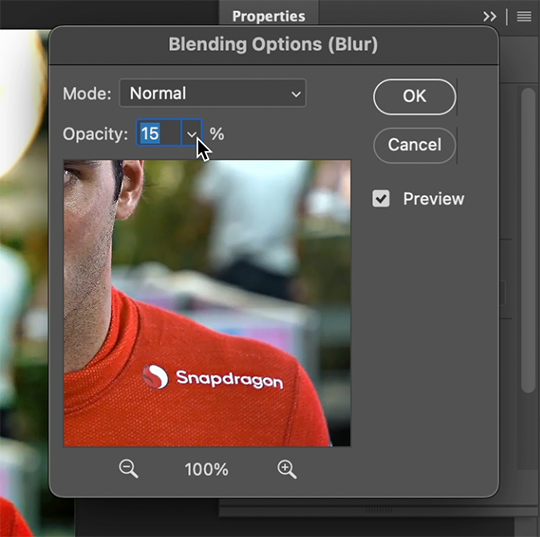
^All of your Sharpen and Blur effects will stack up underneath your gif layer like this. To adjust the opacity of one of these effects, double click on its adjustment/slider symbol to the right, and it'll bring up the Blending Options window.
If there's any sharpening or blurring layer you don't like, you can easily drag it into the trashcan symbol to get rid of it.
Above is a visual of Sharpened vs. None.
You can really tell with the difference in the Snapdragon logo on either shoulder. But I also personally love how much more Carlos' eyes pop to me on the Sharpened side.
As you can see, it's up to your preference. Sometimes, I really love gifs I see that aren't sharp, but rather really smooth and almost painterly. It's up to the gif-maker!
PHASE THREE: Crop & Resize
1. Cropping
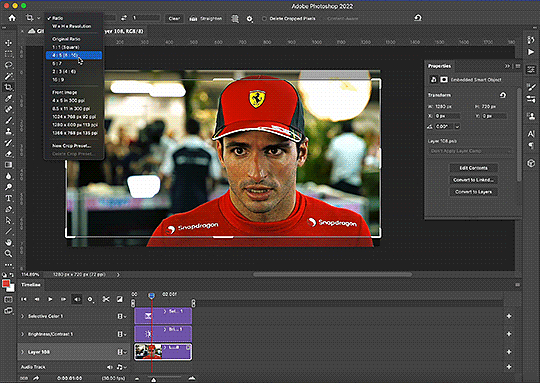
Go to the toolbar on the left and choose the Crop Tool. Above where it says "Ratio", you can choose from preset ratios that photoshop has, or you can make your own. I like to use the presets, or at the very least, clear numbers that you can apply to a whole gifset. Free transforming without a ratio makes it nearly impossible to maintain consistency across a gifset.

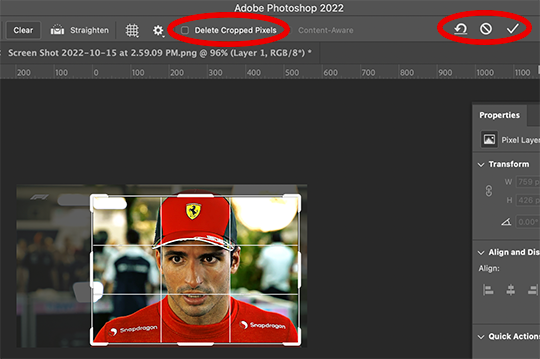
If it isn't already, uncheck "Delete Cropped Pixels". This will allow you to move the gif around inside the cropped area later if you want to adjust what's in frame. It also gives you the option to increase the frame later, if you want. You can also click the gear icon next to "Delete Cropped Pixels" and change how you view the gif during cropping.
When you're done, click the check mark or hit Enter. Now, you've got a cropped gif!
2. Resizing
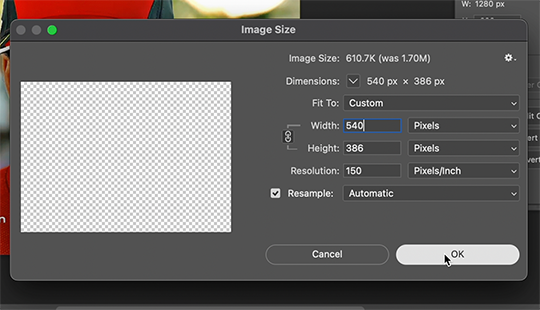
Go to the top to Image -> Image Size...
Make sure you have Pixels selected. For the Resample tab, I have it set to Automatic here, but sometimes I'll use Bicubic smooth or sharpen, depending on what I'm doing. Here's a cool post that compares the different settings. Just experiment with it.
(edit: I no longer change the resolution to 150. I've found that increasing the resolution, and therefore the size, before ultimately resizing down to 540 px means you are compressing even more (the larger something is, the more it has to be compressed within 540 px). I now leave the resolution at 72, which is what it's set at originally, and if the image composition allows it, try to crop in as close to 540 px as I can get so that when I resize, there's the least amount of compression happening.)
If I know a gif is going to be the full width of a tumblr post, I'll resize the width to 540 pixels (the height doesn't matter). But if I make a portrait-style gif which will be sharing a row with another gif, I'll resize anywhere from 270 px -> 350 px. If it's smaller than 270 px, tumblr will enlarge the gif and it'll look bad. If it's wider than 270 px, tumblr might reduce its quality a bit and it won't look as good. But personally, I prefer that if someone clicks on the gif to enlarge it, it looks better enlarged, so I usually will leave it around 345 px as long as the file isn't too big.
PHASE FOUR: Export (last one!)
Once you're happy with everything about your gif, it's time to export. (Remember to save your progress frequently!)
Go to the top to File -> Export -> Save for Web (Legacy)...
^It'll bring up this Save window.
These are the settings I like to use for gifs. You'll find a lot of differing opinions out there about Adaptive vs. Perceptual/Pattern vs. Diffusion, but you should always have "GIF" selected, "Transparency" checked with "No Transparency Dither" selected, Looping set to "Forever", and Colors set to "256". I like "Bicubic Sharper" for my Quality tab, but there are whole tutorials just about comparing those settings. The best thing to do though is to try them out and compare for yourself.
(edit: I've discovered that if a gif is slightly too large and I don't want to shorten it or resize it down, I can try to reduce the colors from 256 to 128 to get it under the limit. I'll never go below 128, and sometimes I will go to 200 or 170 to try to eliminate as little color variety as possible, but often there is not a noticeable difference in your finished gif. But always compare, of course, to make sure.)
On the bottom left is where the size of the gif is shown -> tumblr requires gifs 10MB and under, but in my experience, gifs load/play best on tumblr when they're around 6MB. I always leave a little growing room as well, bc it might say 5.8MB in this window, but after it saves, the file will have grown a little bit and will likely be over 6MB at that point. (edit: I now regularly post gifs that are around 9.5MB and tumblr seems to be able to handle it better.)
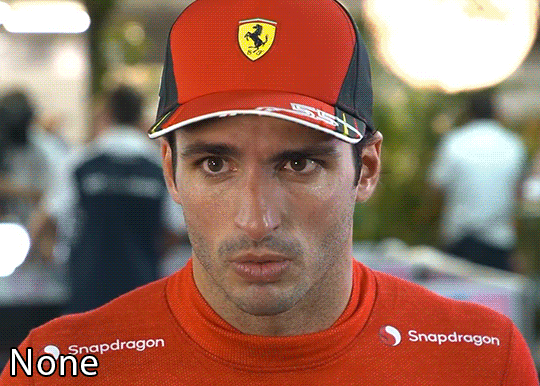
AND THAT'S ALL!
If you've made it this far...congratulations! haha
I know this is a whole lot of information and you might be feeling overwhelmed! But I hope, if anything, this shows you just how complex gif-making can be, and how it is absolutely an art! No one should be stealing anyone's gifs, as a lot of hard work and love goes into the process.
This doesn't include things like adding text to a gif, or more complex adjustments and corrections like masking or key frames. But I'm happy to do more of these if there are specific questions people have.

Let me know what you're curious about or if something is unclear! And happy gif-making! ❤️
#wooow this was a process to make lol#people can let me know if they're curious about adding text or more complex adjustments - i am at your service!#gif tutorial#ask
199 notes
·
View notes
Last Seen Blogs


p-oconnor
Property Tax Trends


djamelsview
Djamel´s View