#this was one of the few psds i had saved so i could show you layer by layer
Note
would you mind sharing advice on coloring gifs? yours are absolutely gorgeous
hey love! sorry for the wait, i've put a mini tutorial under 'read more' explaining how i made my coloring for this particular gif & some of the ways in which i use my go-to adjustment layers. i didn't have a chance to use every adjustment layer (like hue/saturation, which is a layer i use a lot!), but if you have any other questions that i didn't cover here, do let me know 🥰
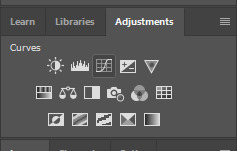
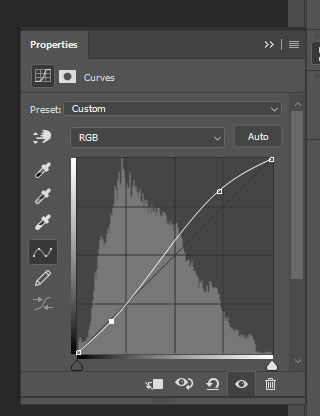
start with curves - i personally find that adding the curves later on in the process will either undo some of the color editing you have already worked on or the changes you are going to end up with will be too drastic (so you run the risk of quality loss). because the curves layer makes such a big difference, finding the right black and white points and getting rid of weird tints/filters in the original footage in the very beginning will help you have a clean base to work with, where (hopefully) all the colors are clearly separated.
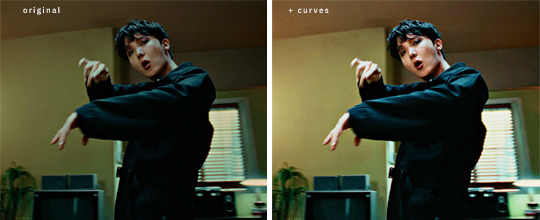
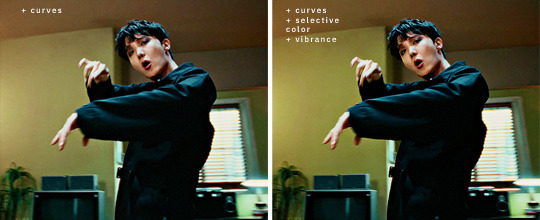
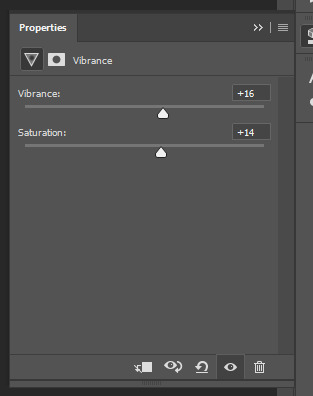
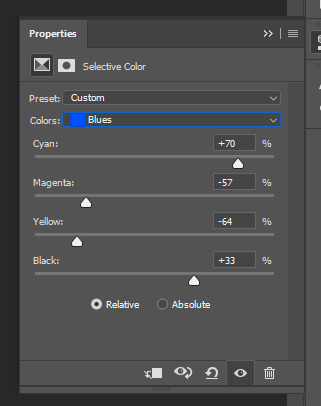
already a big difference! i found a white spot i liked somewhere on lighter window area, turned the layer opacity down to around 70% until it looked natural enough and this is the base i’m gonna work with. the colors are much better separated now & ps can isolate the reds, yellows and greens far more easily for me now when i add in the next steps (selective color with an emphasis on making the reds and yellows warmer + some vibrance):
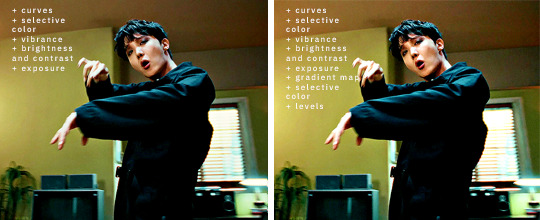
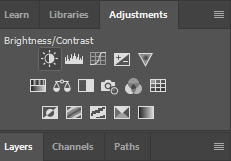
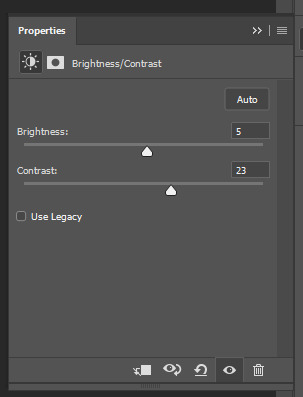
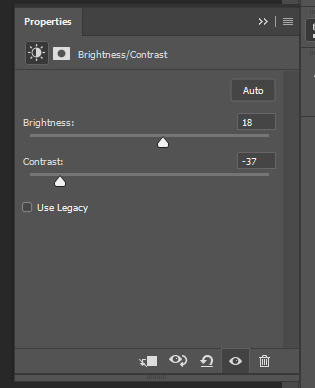
if the style you are going for is bright and vibrant, this is where i would normally come in with some brightness+contrast and exposure. for this particular gif, i added a brightness layer where i did not edit the actual values, but instead did this to the layer itself:

then i added an exposure layer, where i increased the exposure by about 0.17, decreased the offset by about 0.0015 and brought the gamma correction to ~0.95. all of these steps brightened up the gif and added some definition:

this is just my own personal preference, but sometimes i like to add a gradient map just to emphasize some of the colors in the gif; in this case, i wanted the gif to feel warmer and lean more heavily into the warm yellow/green hues, so i’ve created a gradient map that looks like this:

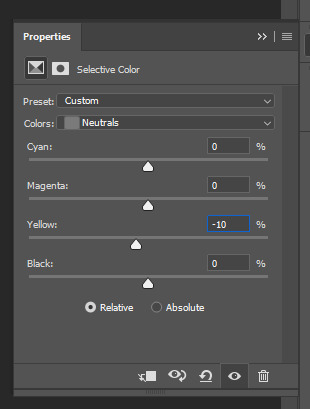
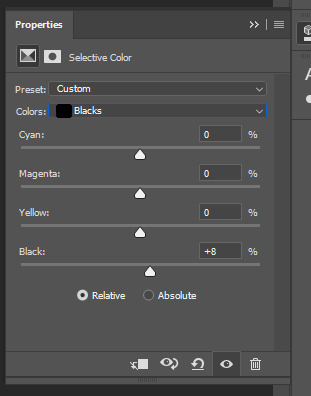
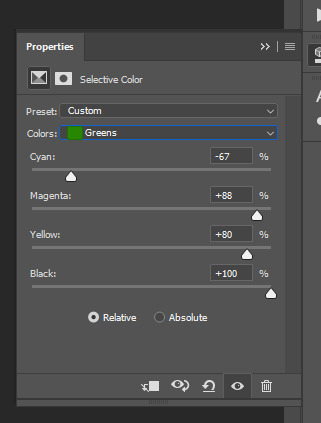
this is 1) going to accentuate those warmer tones and 2) naturally bring in a bit more light into the footage. i bring the opacity down to ~20%, play around a bit more with the selective colors to get the shades of red/yellow/green i want & correct the blacks/neutrals if i need to.
then i come in with a final levels layer, where i create the final contrast - if i love starting with curves, i also almost always end with levels because i find that it gives me the perfect finishing touches. to me, that’s the stage where i am happy with the colors themselves, i juuust want to make them stand out a little more & make the gif feel a little more alive. here, i brought the arrow on the far right closer to a value of ~230 and the arrow on the far left to 4-5. this depends entirely on your footage and what you’ve done with the coloring up to this point. it’s very easy to over-brighten a gif at this stage and pay in quality loss (i’ve had my fair share lmao) or over-contrast it by making the darks too dark, if that makes sense. in the end, this is what i ended up with:
aaaand here is the before/after of the gif itself:
#ps tutorial#..? i guess..?#i used to have a tag for this at some point but. anyway.#i hope this helps a bit nonnie!#this was one of the few psds i had saved so i could show you layer by layer#and there was no need for me to use hue/saturation and photo filter on this footage#but they are both layers i end up using almost every time i gif#if i can be of any more help let me know 🤗#answered#anon
42 notes
·
View notes
Text


❥ ; baizhu’s color blindness
a couple of days ago , i made an offhand joke in discord of baizhu being blind but also most likely ‘ sees ’ like a snake . which got me to think about it . no , i didn’t mean that he sees in infrared . he doesn’t . but i had asked , what do snakes see ? it turns out that they see in two colors rather than three : blue and green . ( according to good ol’ google ) so i thought i would look into what that would really look like in baizhu’s case . i wanted to see what i could do for somebody who cannot see reds . but first i had to look up the different kinds of colorblindness before i could work with making a filter that fits closely with what i personally wanted .

i found that there is proton color blindness . meaning that the eyes have trouble differentiating between reds & greens . after snooping around on photoshop i was able to look at a proton color blind filter . the problem is that with that specific color blindness , the greens are also different . i didn’t want to drastically change green as well . so instead i messed around and found a filter that is more what baizhu sees rather than a protonomaly . with this filter , it really takes out only colors that have reds in them .
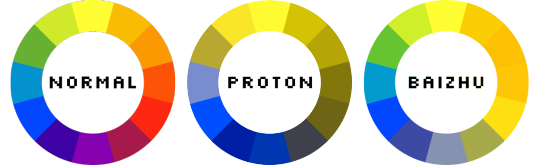
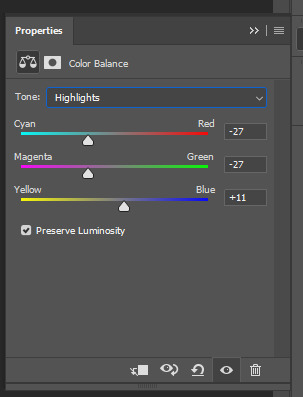
before I give examples of what baizhu would see in a landscape , i wanted to show you all what the color wheel would look like . obviously i wrote down what each wheel is . the center is what a proton color blind person would see , the right is what baizhu sees .
below are the examples of what baizhu sees .
the first / top image is ‘ NORMAL ’
the second / middle image is PROTON
the thirst / bottom image is what BAIZHU sees .
example 1 :


example 2 :


example 3 : this kind of shows that baizhu can still see color , the blues and greens just look a bit different .


example 4 : when using elemental sight , certain elements look different for baizhu .


example 5 : fire looks yellow instead of orange .


example 6 : more examples of reds being yellow


example 7 : shows how reds / oranges are yellow . meaning that baizhu cannot differentiate between reds , oranges , & yellows


essentially , baizhu does see color !! he is not like 100 % color blind , and he can still see some colors ! but some of the colors are dulled or not as bright . but the greens are !? a bit brighter for him ?! which is a bit of a plus for him .
in all honesty , i saved the psd for baizhu’s sight , so in case anybody is interested in seeing what baizhu sees for a certain character , please let me know , i would be more than happy to show you . diluc is one of the few that look VERY different than what people normally see . zhongi isn’t gold / brown to him , & qiqi actually doesnt have her bright pink eyes ( they actually look very dead for him ) .
anyway i had some more thoughts about this but i’ll save it for another time .
oh , one thing to keep in mind is that baizhu doesn’t mind the colour blindness . i know that for us ( who see color ) , it is weird to see , and it might not look appealing , but for baizhu , he doesn’t mind , he’s always grown up with this kind of sight anyway . that & he’s blind anyway , so he doesn’t rely on his sight much anyway . but that is for another day and another post .
#hc.#repost.#this is still one of the best things tha ti have every made#& i am so very proud of it .
0 notes
Photo

HELLO!!! it is i, e with my first muse! you’ll be able to find some quick stats, her intro & some connections under the cut!
Not everyone can say they’ve been to the Big Apple, but [ ALARA AYDEM ], a [ 30 ] year-old [ CIS WOMAN ] has lived in [ BROOKLYN ] for [ 12 YEARS ]. This is the city of dreams and [ SHE ] knows it, because they came to NYC to be an [ EVENT PLANNER ]. Well, that and as an [ EX-GIRLFRIEND ] to [ DEREK BISHOP ]. Living in the city means they meet all kinds of people, but everyone always seems to think they look like [ MELISA ASLI PAMUK ]. They even got away with free cab fare once because of it!
trigger warnings: drugs, abuse & overdose
character psd credit: katzenx on deviantart
𝓺𝓾𝓲𝓬𝓴 𝓼𝓽𝓪𝓽𝓼:
full name: alara deniz aydem
nicknames: al, ali, lar, lara
age: thirty
date of birth: february 15, 1992
gender: cis female
pronouns: she/her
romantic orientation: biromantic
sexual orientation: bisexual
occupation: event planner
𝓫𝓪𝓬𝓴𝓰𝓻𝓸𝓾𝓷𝓭:
alara’s childhood wasn’t really easy. she never met her father, since he’s been in prison for as long as she could remember. as far as she knew, her mom wasn’t even sure if he was the father, but she needed a name to write down on the birth certificate so his was placed there. she never talked to him, or made any indication that she wanted a relationship with him.
her relationship with her mother, on the other hand, was something else entirely. when she was younger, alara’s mother loved dressing up. she was her mom’s personal little doll, and she loved it. she loved the attention, the doting her mother did on her.
however, as she grew up and became a woman, alara’s mother slowly started resenting her.
her mother was a beauty queen, the kind who constantly talked about the “old days” and how she could have been an actress if she just hadn’t gotten pregnant with alara
her mother liked to sleep around, and eventually, she started getting into the company of a prominent drug dealer back in their shitty little town
so her mother was now not just the local town whore, but she was also the resident drug addict whose house she almost sold just to buy another stash
alara swore that she’d never be like her mother. she’d been working for as long as she could remember and had been saving up, so as soon as she graduated high school, she moved as far away as she could, all the way to new york city and she never looked back
with her high school grades, she was able to get a partial scholarship, so that meant she was working while getting her degree
a few years after graduating college, she caught the eye of a businessman named kyle. now, kyle here didn’t seem to be at first (since he seemed so charming and all about her) but eventually showed his true colors as an abusive asshole.
he (sometimes) physically & (always) emotionally abused her to the point that there was a lot of self-hatred there, and when she finally got the support she needed to get away from him, she did something she swore she would never do -- drugs.
she never wanted to be like her mother, but the high was the only thing stopping her from hating herself. it became a coping mechanism every single time she wondered how she could have reached such a low point in her life, which was often
it got so bad that she was rushed to the hospital one night because she suffered an overdose, and it definitely put things into perspective. she vowed to get clean, and has been clean since.
𝓹𝓮𝓻𝓼𝓸𝓷𝓪𝓵𝓲𝓽𝔂:
she’s incredibly loyal; loyal to a fault. if you’re her friend then you’re her friend for life because she knows how rare true friends are. she’ll drop everything and anything if you need her by your side
however, she’s also going to expect the same thing from you. if you disappoint her and leave her hanging when she needs you, there’s a 99.94% chance she’ll never forgive you.
she has a tendency to bottle it all up – all her emotions, her frustrations, her needs – until it all explodes in everyone’s faces (and that’s not a pretty sight)
she’s definitely a cynic when it comes to love now. none of her relationships had been successful, and it caused her to look at the notion of love with disdain
she doesn’t like to talk about herself that much, and she will most definitely not talk about her past with just anyone
she can be abrasive at times, definitely temperamental
if the saying “trying her best” was a person, that would be her tbh
𝓯𝓾𝓷 𝓯𝓪𝓬𝓽𝓼:
an absolutely shitty driver. probably shouldn’t have gotten her license tbh
absolutely cannot live without coffee. you do NOT wanna talk to her before she’s gotten a cup of it in the morning
definitely a type a personality
organized to a fault
talk about sitcoms and she’s your girl. new girl, friends, how i met your mother, the office, b99, etc. she LOVES those shows a lot
𝓹𝓸𝓼𝓼𝓲𝓫𝓵𝓮 𝓬𝓸𝓷𝓷𝓮𝓬𝓽𝓲𝓸𝓷𝓼:
THE ABSOLUTE RIDE OR DIE - best friends since pretty much forever. got the friendship bracelets she still has and everything. the person she told everything to. every fear, every dream, every little detail, every gossip about the famous people she works with!!
CLOSE FRIENDS - people she would take a bullet for, and can talk to about anything. they meet up regularly to catch up on each other’s lives and usually go to the same parties.
FLIRTATIONSHIP - just someone who she can flirt with a bit, and they flirt back, and they don’t really know if there’s anything more there but they don’t really wanna stop with the flirting?
PREVIOUS TOXIC RELATIONSHIP - they both know they’re no good for each other but they kept coming back to each other, even if it’s just to hook up for a night. they swore up and down that nothing’s happening between them, though, until all communication was lost when one of them decided to end things.
EXES THAT ARE ON GOOD TERMS - they knew it was never going to amount to anything, but they enjoy each other’s company, and hold no ill will that things between the two of them didn’t work out.
EXES THAT ARE ON BAD TERMS - their relationship’s end was met with animosity, possibly a lot of fighting prior to one or both of them officially ending things.
PREVIOUS OR CURRENT TOXIC FRIENDSHIP - they’re nice to each other’s faces but once the other’s back is turned, the backstabbing begins. they’re not callous enough to not help when the other is in need, but both would definitely think twice before helping the other out.
PREVIOUS BAD INFLUENCE - someone who’d convince her to go out and party and drink when they should be studying, urging them to take the decisions that probably aren’t for the best
FRIENDS FROM BACK HOME - they come from the same shitty small town and how they ended up in new york as well is completely up to you!
FRIENDS WITH BENEFITS - everyone needs a bit of a release and these two have an understanding that there’s nothing more there, just a mutual & beneficial relationship with no strings attached
i’m more than happy to brainstorm some more connections!
6 notes
·
View notes
Text
#showyourprocess
From planning to posting, share your process for making creative content!
To continue supporting content makers, this tag game is meant to show the entire process of making creative content: this can be for any creation.
RULES: When your work is tagged, show the process of its creation from planning to posting, then tag 5 people with a specific link to one of their creative works you’d like to see the process of. Use the tag #showyourprocess so we can find yours!
Thank you so much to @cloudylotus and @wendashanren for tagging me for this set ❤ (please check out their respective posts here and here as well 🥰) and to the members of mdzsnet who started this!
1. Planning
I try to alternate between gifsets based on quotes and gifsets based on a single scene for the cql edits I create! This is because the ones based on quotes require significantly more thinking for me to come up with scenes to fit, alongside getting all of them to adhere to one colour scheme and then inserting the typography, rather than just me focusing on a single scene 😅 This time it was time for me to pick a quote, which I usually do from my #words tag on my tumblr where I like to collect poetry I resonate with.
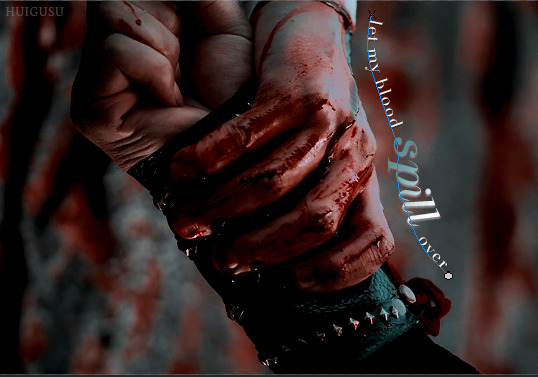
“Oh, let my chest split open, let my blood spill over, body be still! I’ve bled for you, and you won’t even show me your face.” - Yi Kwangsu (via skogenflicka)
For the quote used in this set, I had thought that it fit wangxian so I had already tagged it to find later 😄 I also searched it up to read a little more on the background of the story and author and was surprised to find that it was from a short story on gay, unrequited love, which made it somehow more appropriate as I wanted to fit lwj’s perspective during his mourning years.
To select the scenes, I split the quote up into four lines and wrote the summary of the the scenes that demonstrated them quite literally, as in the things lwj did for wwx out of love even when wwx was pushing him away, + ep number and timestamps for easier gif creation. I knew that I wanted to focus on text effects too so the 3rd gif was specially picked for the horizontal movement of lwj across the frame.
2. Creating
- oh, let my chest split open (wen brand at the cold springs)
- let my blood spill over (blood running down his hand as he holds onto wwx)
- body be still! (lwj holding the rods as punishment for visiting burial mounds)
- i’ve bled for you, and you won’t even show me your face. (wwx pushing lwj’s hand off his and turning away)
I use Handbrake to isolate the scenes I want and then Photoshop to import and pare down the number of frames. I favour larger gifs, especially so that there’s room for the typography, so these were the usual 540px ratio across for cropping. For the first gif in this set, I didn’t have the special episodes downloaded so I used a screen recorder to get the needed frames of lwj’s chest brand! I remember not being happy enough with the length/framing of the brand from the regular episodes. I didn’t cut out his nipple and so many tags I see talk about it 😂
Colouring
Okay so! I knew I wanted to try out a darker colouring as the ones I do are more bright, so I went to look for tutorials and I found this psd that had a good effect for what I wanted after I modified/removed many of the layers. I wanted to work with existing colours already within the chosen scenes rather than modifying or emphasising them to go with the muted, anguished mood of the quote. The colour scheme thus became dark, maroon red (wwx) from the blood and wwx’s tassel, as well as turquoise (lwj) from the water and lwj’s robe. I then added a channel mixer layer and selective colouring layers to make the turquoise of the waters that the psd had removed stand out more, and then another vibrance layer and an additional selective colour so that I could match the blues/reds across gifs. Thankfully, I could copy this colouring over to the other gifs with a few alterations of hue/saturation, curves and levels 😊 After colouring, I resize, denoise, and sharpen the gifs.

Typography
I really wanted to work with some text effects and get out of my comfort zone in this one. In line with the three parts of the first line of exclamation in the quote (and the parallel structure for the first two parts which I found hit so hard 😭), I wanted to highlight the alliteration I found in them - the words ‘split’, ‘spill’, and ‘still’. For the first two gifs, I decided on linear gradient overlays at 45 degrees + taupe drop shadows with the colour from the colour scheme other than the colour already in the gif. In the second gif, I used the pen tool to draw a line (in blue below!) that followed the curvature of their hands, then pasted the text in. I realised that I had to draw a separate line for the word ‘spill’, which after a lot of trial and error turned out to be much simpler after turning off the first pen layer visibility (the new line kept connecting to the first 😓)
As for the third gif, I initially thought of masking each frame to make the words appear as lwj moved from left to right, then I remembered that using the ‘overlay’ blend mode on the text hides it when it is on top of the colour black! 😄 In this case, lwj’s hair is black so I just had to position the words properly so that the words ‘body be’ would reveal themselves while giving time for the word ‘still’ to also have a nice effect after. (If you look closely you can see them a little in lwj’s hair 😅) The word ‘still’ took a lot longer to figure out, but in the end using ‘difference’ for the overall text layer and ‘pin light’ for the dark maroon colour overlay gave the clearest dark red effect as the camera panned.

Finally, in the last gif, I wanted to have the effect of the word ‘face’ change from a dark maroon gradient to turquoise with wwx’s hand moving lwj’s away to have it be a bit symbolic I guess 😅 of wwx’s leaving lwj? The ‘linear burn’ setting for the overall text layer (solid turquoise) and ‘difference’ for the gradient overlay (maroon) ended up working best to make the red disappear the moment wwx’s hand ran over the word, unlike other settings where the colour looked mixed/too messy.
3. Posting
I usually save the gifs and look at them on tumblr to see if I need to adjust any colours to match better or make them more vibrant (and ask yan what she thinks HAHA). These were fine, so I wrote the caption to summarise the source of the quote, added links to research and the op of the quote on tumblr, and wrote my tags. If it’s a post with translations of what the characters are saying/from the novel I typically take more time to edit the translations/do my own translation. I check if it is loading fine on mobile and edit the saved draft if necessary, then I post! 💕
Tagging but no pressure please!! 💗
@lanwuxiann for this amazing wangxian wedding night edit 🤧🤧🤧 that had me yelling into my pillow
@inessencedevided for this heartbreaking nie brothers set (which included manhua scenes!!)
@lan-xichens for this really lovely wwx + lotus pier edit, the colouring of which i think about from time to time
@mylastbraincql for this gorgeous jyl set with soup set with such pretty blending
@still-snowing for this beautiful piece of wangxian art about lwj holding wwx’s hands through the years that i teared up over multiple times
#showyourprocess#phew thank you for reading the whole way if you did!!#and thank you jasmin and ali for the tag#❤❤❤#tag game#tw blood#tw scars#gifmaking
17 notes
·
View notes
Note
oh my god that romance tale was great! Isha is just the best 🧡 how did you even manage to make it? It looks like a lot of fun but also probably really challenging 😅
It was a lot of fun creating a tale from scratch but, yes, challenging. For me, the writing was the hardest part by far and, for context, I started this is March so it took me ~3 months to write 3.5k words...
This is probably more detail than you wanted but I’ll go through my process.

You may be able to tell from my heart hunter doc, my sprites psd, and my memories psd but I like to compile references whenever I draw/write trying to imitate something. For this, I transcribed the existing tales, noting the word counts, lengths of scenes, and lengths of sentences.
I used Nahara’s romance tale as a base for pacing, breaking it down into 6 scenes (intro, set up, fun, climax, bonus, and wrap up). I wrote a one sentence outline for each scene and then expanded into a detailed outline where I wrote everything that happened, just not in good writing.
Coming up with the story idea was pretty difficult for me (which may sound silly considering how basic it is). I planned it for a while, thinking about which traits of Isha I’d want to show off, what sort of stories I enjoy to read, and the type of stories already told in these tales. I managed to mix and match different ideas and scenes until I finished the outline.

Once the outline was done, I rewrote it in a script style, noting scene changes, bgm/sfx, who was speaking, and what sprites needed to be used. I went through ~3 drafts of this. My first draft was far too long. I had to cut 25% of it for the right wordcount and, while I’m sad some scenes were cut, it was the right call.
With the script done, for me that was the hard part out of the way, but I still had to figure out how to actually... present it.
I’d already drawn Isha and Barqi’s sprites before this, but if you want to include an OC, it’s good to draw out a sprite and different expressions to use.

Ideally for the video editing, I’d use a programme where I could import the UI, character sprites, and music, while being able to fade transition between scenes and animate the text. However, I’m cheap so I don’t have that.

Using a slightly modified UI base in Clip Studio Paint where I’d collected backgrounds and sprites and could edit text, I manually copy and pasted the script into the text box and saved each frame one by one. For this 20 minute video/3.5k script I ended up with 337 frames.

I imported each one into movie maker, altering how long each frame was depending on the amount of text. I know I made my video a little fast to read so I’m going to try and fix that if I make another one.
Each frame has a small fade transition as in game, sprites and scenes fade in and out. After putting everything in the right order and timing it, I then added the music.
The wiki has a list of all the tracks the game uses and they’re all free to use (bless Kevin MacLeod) so I used those to keep it feeling like the game. I even played through a lot of the chapters to see which tracks went with what scenes. I also added a few sound effects but because movie maker doesn’t layer audio, I actually had to export the video with the music and then add sound effects onto that video in another file which got.... tedious when I found a mistake....
Then, it’s finished. I exported the video and uploaded it to youtube after agonising waits due to my slow internet.
What I made wasn’t an exact replica of the game, but it goes to show that you can create a pretty good imitation with basic editing software. I’m actually proud I managed to finish it and it turned out as well as it did.
I hope this helped or was at least interesting. It would be amazing if more people made stories like these. I know @timmys-and-scribbles has made a fantastic angsty one about her apprentice and Julian recovering her lost memories. I’d check it out to see another attempt at this style :D
#the arcana#the arcana game#art ref#writing ref#the arcana tale#not art#idk how to tag this#long post#in general the wiki has great resources#you can get sprites backgrounds music and general useful information from it#lord knows how much i referenced it while making this#i'm stupidly happy to have finished a summer project#for once in my life#amber-acrylic
177 notes
·
View notes
Text

❥ ; baizhu’s color blindness

a couple of days ago , i made an offhand joke in discord of baizhu being blind but also most likely ‘ sees ’ like a snake . which got me to think about it . no , i didn’t mean that he sees in infrared . he doesn’t . but i had asked , what do snakes see ? it turns out that they see in two colors rather than three : blue and green . ( according to good ol’ google ) so i thought i would look into what that would really look like in baizhu’s case . i wanted to see what i could do for somebody who cannot see reds . but first i had to look up the different kinds of colorblindness before i could work with making a filter that fits closely with what i personally wanted .
i found that there is proton color blindness . meaning that the eyes have trouble differentiating between reds & greens . after snooping around on photoshop i was able to look at a proton color blind filter . the problem is that with that specific color blindness , the greens are also different . i didn’t want to drastically change green as well . so instead i messed around and found a filter that is more what baizhu sees rather than a protonomaly . with this filter , it really takes out only colors that have reds in them . anyway i will put the rest under a read more .


before I give examples of what baizhu would see in a landscape , i wanted to show you all what the color wheel would look like . obviously i wrote down what each wheel is . the center is what a proton color blind person would see , the right is what baizhu sees .
anyway , below are the examples of what baizhu sees . i will put the ‘ normal ’ image first , the proton second , and then what baizhu sees last .
example 1 :


example 2 :


example 3 : this kind of shows that baizhu can still see color , the blues and greens just look a bit different .


example 4 : when using elemental sight , certain elements look different for baizhu .


example 5 : fire looks yellow instead of orange .


example 6 : more examples of reds being yellow


example 7 : shows how reds / oranges are yellow . meaning that baizhu cannot differentiate between reds , oranges , & yellows


i am honestly like half asleep , and extremely exhausted but essentially , baizhu does see color !! he is not like 100 % color blind , and he can still see some colors ! but some of the colors are dulled or not as bright . but the greens are !? a bit brighter for him ?! which is a bit of a plus for him .
in all honesty , i saved the psd for baizhu’s sight , so in case anybody is interested in seeing what baizhu sees for a certain character , please let me know , i would be more than happy to show you . diluc is one of the few that look VERY different than what people normally see . zhongi isn’t gold / brown to him , & qiqi actually doesnt have her bright pink eyes ( they actually look very dead for him ) .
anyway i had some more thoughts about thsi but , again , i am SUPER exhausted , so i will talk about this another time .
oh , one thing to keep in mind is that baizhu doesn’t mind the colour blindness . i know that for us ( who see color ) , it is weird to see , and it might not look appealing , but for baizhu , he doesn’t mind , he’s always grown up with this kind of sight anyway . that and he’s blind anyway , so he doesnt rely on his sight much anyway . but that is for another day and another post .
#hc tbd.#// i am actually kinda proud ?#of this though ?#like really .#i tried a ot of characters to see what they would look like for baizhu .#and damn .#everybody looks different .#some not as drastic but still .
13 notes
·
View notes
Note
any tips on how to color ???
Learning how to improve your coloring process takes time, and it takes making some mistakes. I have improved a lot over the past few years and only because I have made some questionable editing mistakes in the past (I just always make sure to never make them again). Under the cut are all the tips I could think of :)
Gifs can only be 256 colors. When you’re coloring a gif, you’re basically trying to reduce the amount of colors in a scene so your gif doesn’t lose quality when exporting. A gif can never actually represent the true colors of a scene.
I know this is obvious, but every single gif needs some sort of color modification / editing for it to look better.
My most important tip is to learn the very basics of color theory. It changes how you color dramatically and you can understand how color functions within a gif. Learn about the color wheel, primary/secondary/tertiary colors, complementary colors, and cool/warm colors. Afterwards, I also suggest looking up basic paint mixing videos where someone shows you how colors are mixed together or made darker/lighter (even better if you’ve had personal experience with mixing paint). Personally, I approach coloring gifs like I would my paint canvas in real life—when I color a scene I’m essentially “painting” over it with the adjustment tools in photoshop.
And building on the previous concepts of color theory, do not attempt to turn the original scene from red to green, blue to orange, yellow to purple, etc. It looks horrible because those are complementary colors; they are the absolute opposite of each other and mixing them makes a very muddy brown color. Instead, warm colors can easily be turned into other warm colors, and same goes for cool colors.
Reducing contrasting / clashing colors in gifs can improve the color of your gif drastically when exporting.
In gifs, red, blue, and green are the worst colors to edit because they’re the most likely to break up within a gif. These colors also break down the fastest as a gif ages.
I don’t know who said this to kpop gifmakers years ago, but please don’t be afraid to use the curves, exposure, brightness/contrast, and levels adjustment layers. Using those layers can actually help you improve the quality of your gifs drastically and make your gifs actually pop out on the dash. If you’re afraid of whitewashing someone, that can always be fixed later on by learning to adjust those layers and various others.
For kpop editing specifically, please know that Asians are not straight up canary yellow, bright orange, or tomato red. Asians do not have the same universal skin tone/color—Asia is comprised of thousands of ethnic groups which means we also have tons of variations in skin tone. Basically, Asians aren’t yellow. All the members of a single idol group do not have the same complexion, and much less to say the whole Korean music industry. In terms of color mixing for editing, Asians are a mixture of yellow, red, orange, white, and a very minimal amount of a cool color depending on undertone.
I highly suggest learning about how lighting works in a gif. Always question where the light in a gif is coming from—is it from the side, the front, the back, the top? I often see editors try to reduce contrast completely or make someone completely yellow/orange/red/brown in an effort to reduce whiteness/lightness on one side of the face. Differences in lighting are completely natural and one side of the face being lighter than other is just how lighting works.
Personally, I always color to enhance a gif. I’m always trying to reduce the gray layer/cast on scenes that occurs from compression (but sometimes that’s also unavoidable because of the grain or quality). I try not to over-edit most of the time but that’s also personal preference and everyone has a distinctive style. When I make a gif, I want it to age well although that may seem impossible.
Making the blacks blacker and whites whiter increases contrast in a gif. It makes your gifs pop and stand out.
Be careful with the use of vibrance/saturation/hue. Those can easily reduce the quality of your gif. The most important layers for coloring gifs (in general) are selective color, levels, and color balance.
The higher quality a file particularly is, the easier it is to manipulate colors for editing. Those gifs are less likely to break up and can withstand more coloring than the average gif. Basically, the more layers you add to a gif, the heavier it’ll be to export—so a reduction in quality. I find that gifs with tons of layers end up looking “sticky.”
In my opinion, the best editors on here are those who always color from scratch. They’re more flexible in how they color and actually know how to color a wider variety of content no matter what. PSDs are very nice and easy to use once you’ve developed them, but you also get stuck in a rhythm and forget how to color from the very beginning. An editor can become inflexible with the use of the same PSD.
I highly suggest checking your gifs on mobile. Gifs in general look very similar on desktop, but on mobile it’s a completely different story. Load your gifs into Tumblr’s photo uploader then publish them on a separate sideblog. Then, with your brightness turned up all the way, look at your gif on mobile and zoom into it. You’ll be able to see how the gif has been compressed, how the coloring has changed, if there’s any “breakage” in the gif. Then you can slowly modify your editing process to also look good on mobile. For me, my editing has improved a lot since I started making my gifs primarily for mobile—how gifs look on desktop do not really matter to me anymore.
Exporting gifs: I suggest checking what diffusion vs pattern looks like on mobile. Pattern has some little difference with diffusion in the desktop browser (sometimes you have to look closely to tell the difference on desktop), but on mobile there’s a huge difference. Gifs exported in pattern in general look very old and worn on mobile, especially with yellow/orange hues. Pattern on mobile can make a 2160p Blu-ray remux file look like it was originally a 1080p 2 GB compressed file—it essentially adds a worn surface to a gif that makes it look like it was made in 2017 not 2021 (completely refutes the need to download a HQ file in the first place).
Saving in pattern: If you’re giffing from a Vapoursynth processed file, please do not save the gif in pattern. Vapoursynth makes gifs very smooth and diffusion works best with smooth, grainless gifs. The pattern export sits on top of a Vapoursynth gif like a dirty mosquito net. In general, pattern is best when you have two dominant complementary colors in a gif that are directly clashing with each other in movement OR gradient scenes with lots of shifts in hue and movement. Pattern can help hide the breakage of color within those gifs due to the excess movement of color. Also, I think pattern works best with animation, especially figured with black outlines or scenes with tons of color (those look least worn on mobile).
12 notes
·
View notes
Text
detailed giffing + basic coloring tutorial for beginners
so a lot of gif/coloring tutorials are pretty outdated or not that detailed & i wanted to put my own out there! in this:
how to get the screencaps for your gifs
how to make a general gif
basic coloring (no psds here, it just gives you a basic idea for making colors pop and look nice. you can look up how to use psds, but i prefer making my own for every gif as it’s much more personal, gratifying, and creative. there’s nothing wrong with using psds as long as you don’t claim them as your own, it’s just not my personal thing)
how to save a gif
we’ll be going from this:
to this
what you need:
photoshop (cc 2019 is what i’m using, but this works with any version of photoshop really as long as you download a version with the timeline feature) i won’t add download links here since i don’t want this deleted, but you can look some up on tumblr or use the pirate bay (current url is pirateproxy.blue as of 4/29/2020) & follow the instructions there.
for windows: potplayer/kmplayer (both use literally the exact same instructions) this tutorial uses potplayer but kmplayer uses like literally the same instructions, it just doesnt work right on my computer
for mac: mplayer. this tutorial does NOT cover this so find a tutorial on tumblr on how to take screencaps with mplayer & then skip to the “how to make a general gif” section. though, again, i’m on a pc so i have no idea if this is entirely accurate for mac.
if you’re downloading from youtube: clipconverter
if you’re Definitely Legaly torrenting: utorrent + the pirate bay (again, current url is pirateproxy.blue as of 4/29/2020) or another torrent site + you should really consider getting a VPN when torrenting (i use privateinternetaccess but you can find one that suits you)
note: download an adblock of some kind, disable automatic downloads on your computer, & download an antivirus program if you want because some sites are sketchier than others! this is ESPECIALLY crucial on sites like piratebay. keep your computer safe babes.
1. screencapping
there’s several ways to get screencaps on photoshop, but this is the easiest imo and i’ve never done the whole convert video frames to layers thing. like i said, you’ll need potplayer or kmplayer. i’m using potplayer. important note: don’t accidentally download viruses here! read each screen carefully & make sure you’re not hitting accept to download any secondary programs.
1. download your .mp4/.mkv. you can go to youtube & find a clip/scene/whatever and use clipconverter to download it. just make sure you download it at 720 (or higher) as anything lower than that will give you a poor quality gif. you can also download using somewhere like the pirate bay, but for this you need utorrent & i would HIGHLY recommend using a vpn if you live in a country where torrenting copyrighted content is illegal, as your internet provider may flag your ip address if you don’t & you torrent too often.
2. download potplayer/kmplayer & get it set up
3. create a screencaps folder. i always put mine on my desktop. in your screencaps folder, make a folder for however many gifs you want in your set. i just have one for mine so:
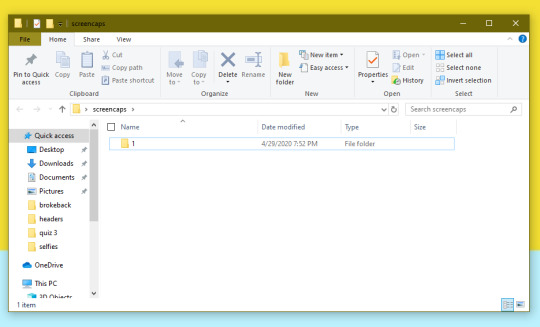
4. open up your .mp4/.mkv

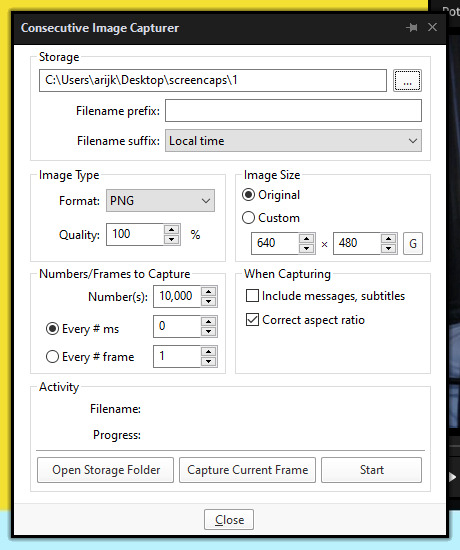
5. hit ctrl + g to bring up the screen capture pop-up & set your settings to these. click the button w/the three dots next to the storage option & select the folder you created for your first gif
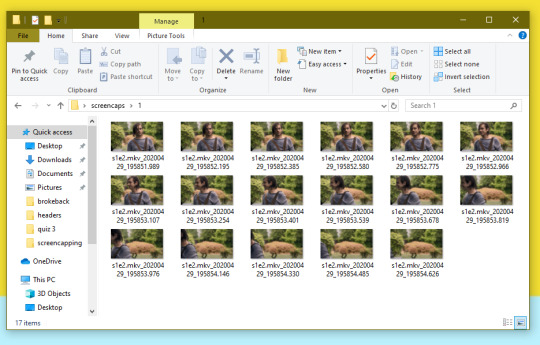
6. navigate to the scene you want to gif. when you’re there, pause it and hit the start button on the consecutive image capture screen, then play the video. how many screencaps you need depends on the size of your gif. for larger gifs (so like 540px wide gifs), you’re probably going to want to keep it below 30 frames. for smaller gifs (268px wide or less) you can maybe stretch it to 60, depending on how much coloring you add. you can always delete screencaps later though in photoshop, so don’t worry about it too much. for this gif, i only had 17 frames because the scene was really short lmao
7. go to your screencap folder you made & delete any unnecessary frames. it’ll look like this:
8. repeat the process for any other gifs, making new folders in your “screencaps” folder, numbered for however many gifs you’re making. make sure to change the folder you’re loading the images into on the image capture pop up though so they don’t all go into folder 1.
2. making a simple gif (+sharpening)
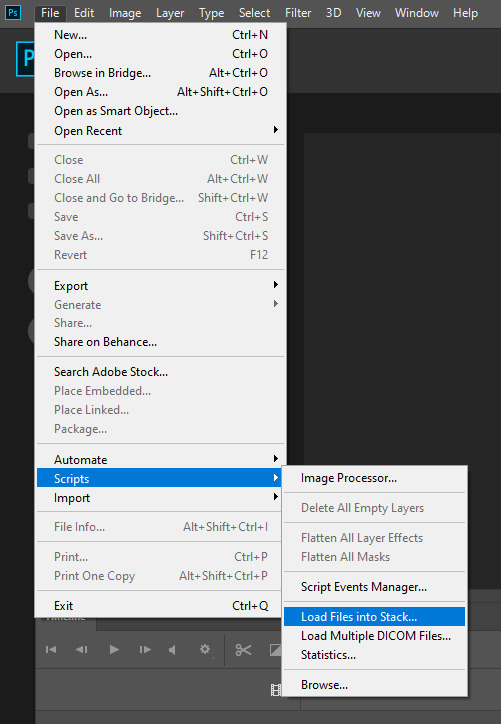
1. first, you need to load your screencaps. when you open up photoshop, go to file > scripts > load files into stack
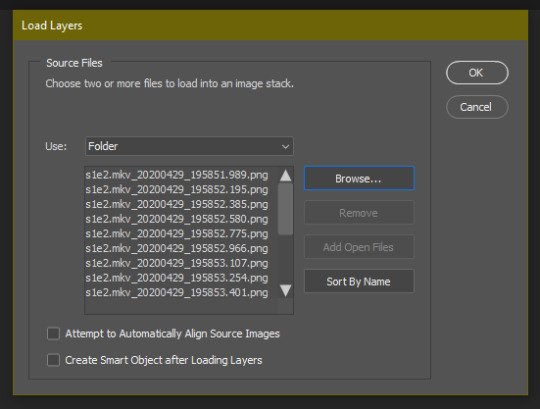
2. when the window pops up, switch the “file” option to “folder”

3. click browse and find your screencap folder for your first gif (in my case, desktop > screencaps > 1) once it’s all loaded, click “OK”
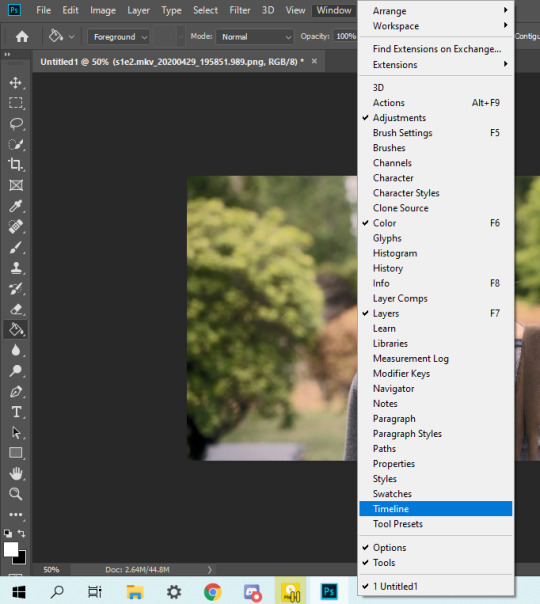
4. it’ll take a minute to load all your screencaps into photoshop. when they do, go to the upper bar on photoshop > windows > timeline
5. when the timeline bar shows up, click “create frame animation”

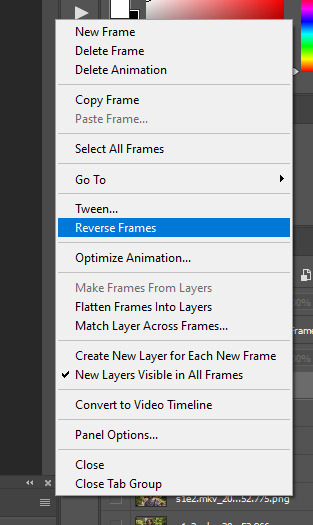
6. hit this button and click “make frames from layers”

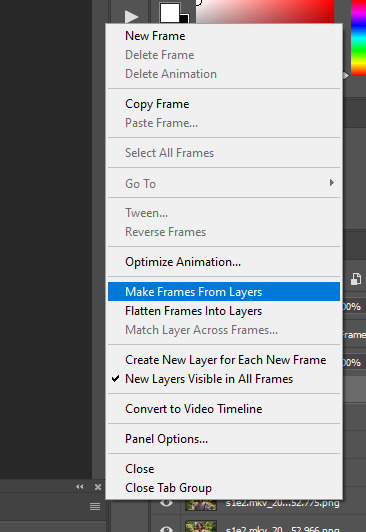
7. hit the button again and click “reverse frames”
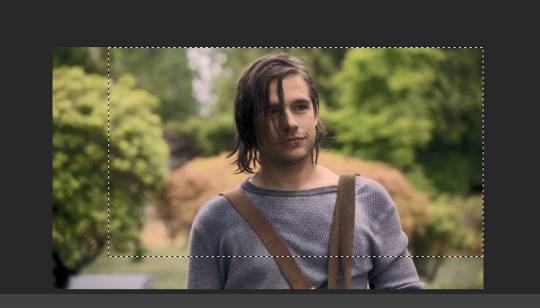
8. click back onto your first gif. then select the rectangular marquee tool and set it to whatever gif size you want. the width for 2 small gifs next to each other is 268px, the width for full size gifs is 540px. most people use 268x150 px for gifsets of 4+


9. use the marquee tool to select what area you want for your gif, like this. it’s up to you how to crop it! get creative!
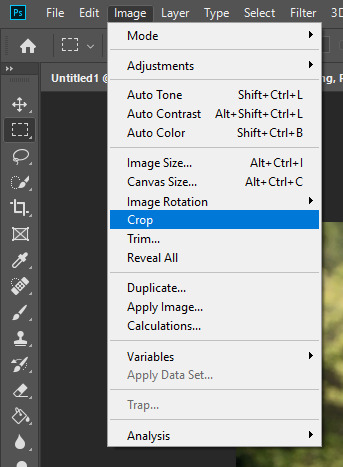
10. go to image > crop
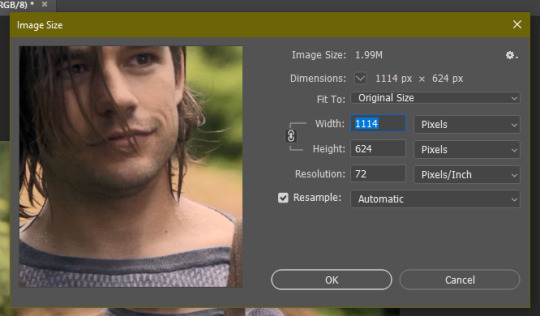
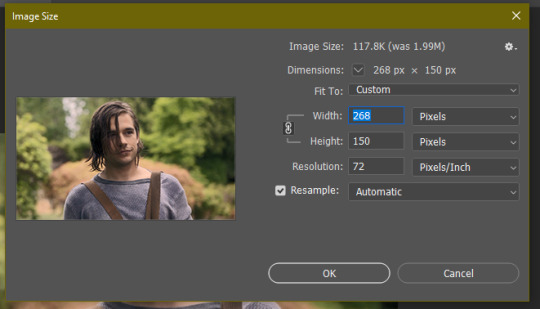
11. now that your image is cropped, go to image > image size. change the size to your desired gif size (in this case 268x150). hit “OK”. then make sure it’s zoomed in to 100%

12. now, you COULD just save this gif, but they look way better sharpened. so you need to convert this to a smart object. to do so, first select all your layers in the righthand layer window. to select all the layers, click on your top layer, hold shift, and scroll down to your bottom layer & click on it as well while still holding shift
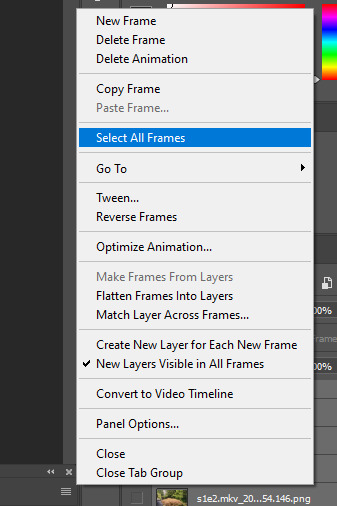
13. next, you need to select all your frames. go back to the options button from part 6 > select all frames
14. next, we’re going to create an action to make your life 100x easier when it comes to sharpening gifs in the future. to do so, go to the actions icon (may look different on different versions of photoshop, but basically just find the actions window)
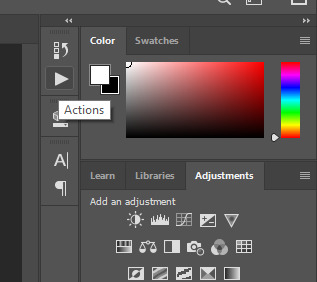
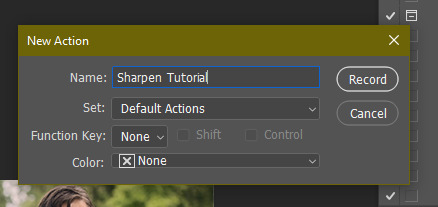
15. create a new action with this button. name it something. i named this one “sharpen tutorial” and hit “record”
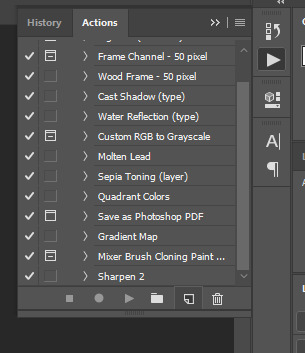
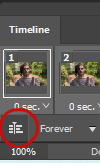
16. click this button to convert to video timeline
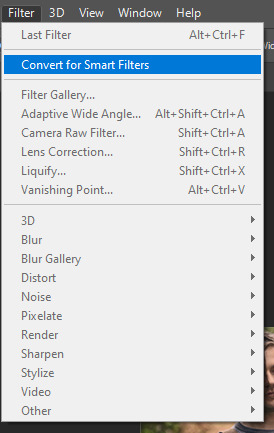
17. go to filter > convert for smart objects
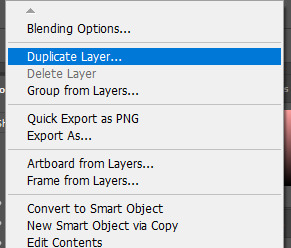
18. go to your single created layer and right click and click duplicate layer. this helps get rid of the transparent border around the gif.
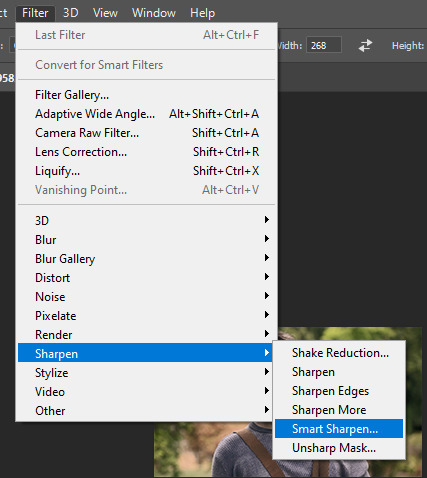
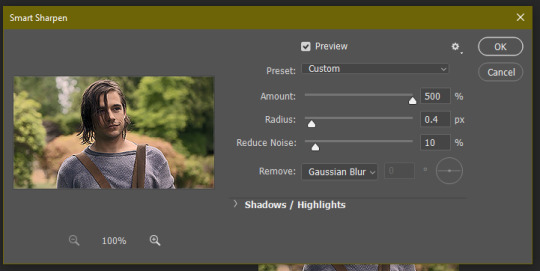
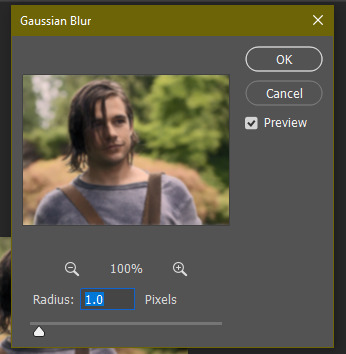
19. go to filter > sharpen > smart sharpen & use these settings
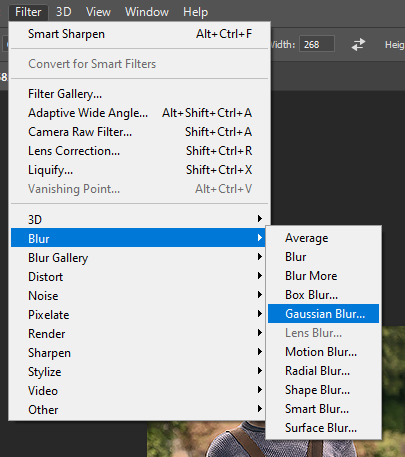
20. go to filter > blur > gaussian blur. set it to these settings.
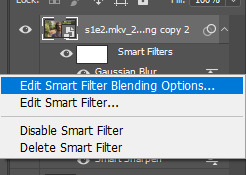
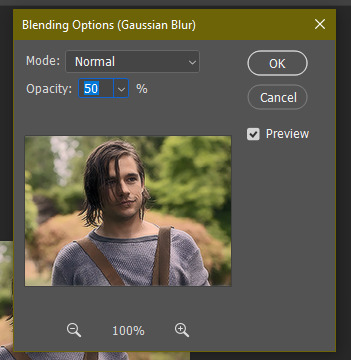
21. go to your second layer with the filters on it & right click on the gaussian blur filter to select “edit smart filter blending options” and set the opacity to 50%. you can mess around with this for different levels of sharpness. the closer to 0%, the sharper your gif will be.
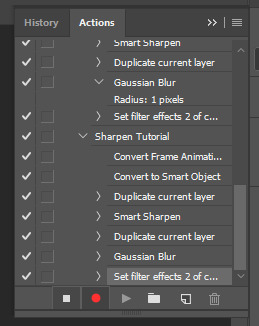
22. hit the stop recording button on your sharpen action. now you’ll have an action to use next time you make a gif! after you’ve followed all the steps 1-13 you simply go to actions, click on your saved sharpening action, and hit play instead & it’ll do steps 14-21 in a few seconds. here’s a pic of the stop button on the actions window
23. our gif is now sharpened! you can end with this & skip to the saving a gif section, or you can continue to coloring. here’s what we have so far.
3. coloring
now on to coloring. this is pretty basic coloring and it probably won’t work if you follow my numbers exactly, as every single scene is different color + lighting wise. but this is just an example of the kind of thing you could do. basically, if you’re making vibrant gifs, you want to up the brightness + contrast + vibrance and make the colors already present pop. if you want anything more complicated (pale gifs, changing the colors to make, say, quentin’s shirt in these gifs red instead of blue), you’ll have to find other tutorials or experiment on your own. learning how to color & finding your style takes time! you can download psds if you want, but imo those kinda take the fun out of making gifs? that’s just me though.
after each step, i’ll show you what the gif looks like.
1. i usually start with a curves layer. i usually don’t mess with the color curve options, just this one:

2. next, i do a brightness/contrast layer

3. next, i do a vibrance layer. make sure not to make it TOO saturated or it’ll look bad.
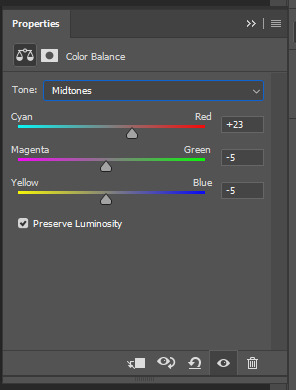
4. next i do a color balance layer. this is where it really starts differing depending on what color you want your gif to be.

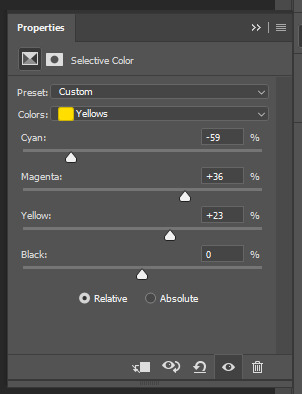
5. next we move to the selective color layers, which are arguably the most powerful. here you can make colors pop, change colors, etc. it’ll take lots of practice & messing around with, but here’s what i did with this gif. this one is making yellow + blue pop
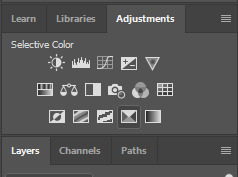
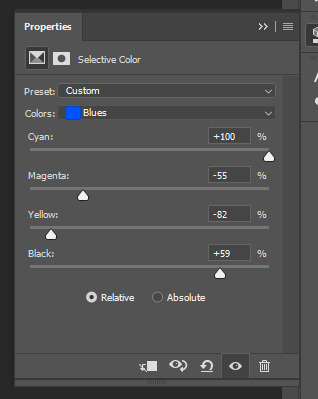
6. next, i did two more selective color layers editing the blue tab to make the blue pop even more

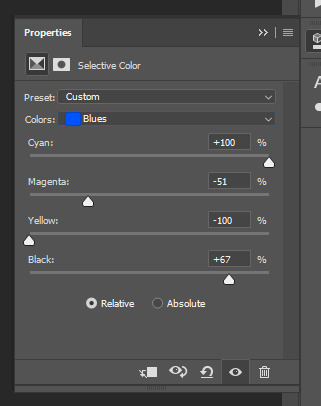

7. i still wasn’t quite happy with it, so i added another selective color layer to edit the blacks + neutrals + greens
8. for good measure, i added one more brightness/contrast layer

9. and the gif is done! however, you can play around with various adjustment layers until you’re happy. again, this is just an example of how to do basic coloring. it’s a skill like any other & takes practice. to keep consistent coloring in a gifset,
9b. you may want to make a psd of this coloring. to do so, you need to put all your adjustment layers in a folder, delete your frame layers, and click file > save as. save it as a .psd. then you can open it and drag it onto any other gifs you make, adjusting the coloring accordingly but still with the same vibes. you don’t have to do this, but it makes life easier. here’s how to use your saved psd, though obviously you’re using your own in this case and not a downloaded one.
4. saving your gif
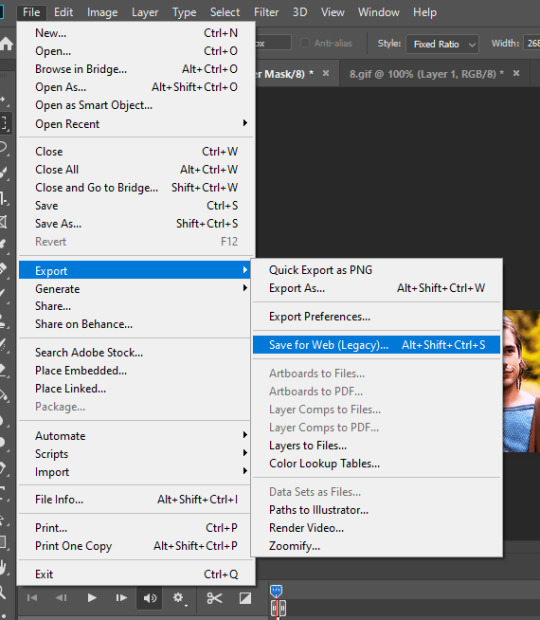
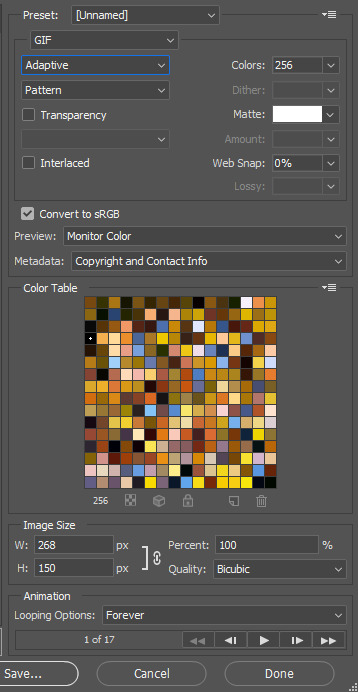
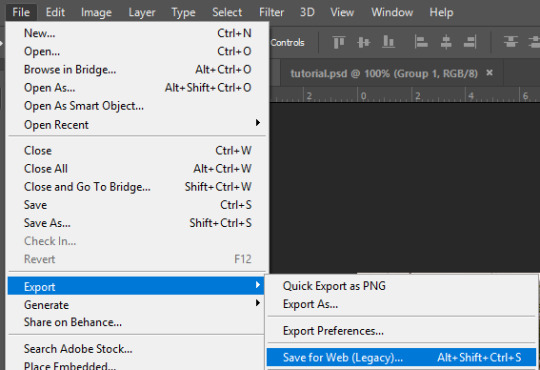
1. on photoshop cc 2019, you go to file > export > save for web (legacy). for other versions, you can just go to file > save for web. use these settings. the gif size limit is 3mb per gif, so make sure your file size is under that. if it’s not, you’ll need to delete some frames or some adjustment layers.
2. now, photoshop is a bit of a pain & this gif timing will not be right. so you need to open your newly saved gif. then you hit this button + select all frames
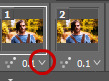
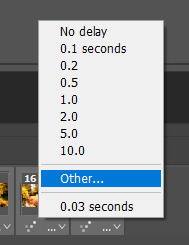
3. click this button & select “other”. tumblr gifs are typically .05-.08. my photoshop is glitchy and i have to set mine to .1-.15 or they’re WAY too fast. but usually, go with .05-.08 unless yours ends up glitching too.
4. save it like you did the first time and ta-da! you’ve made a gif!
#gif tutorial#photoshop tutorial#edit tutorial#coloring tutorial#yes im using the magicians its my hyperfixation and i get to choose the gifs
164 notes
·
View notes
Note
I really wouldn't mind you aiding me with some tutorials love
giffing tutorial/resources
hi anon! sorry it took me so long to answer. i figured this might be helpful for others out there who have asked me similar questions, so i’ve compiled a pretty comprehensive list of tutorials/resources. idk about others but when i was new to giffing, it took me a lot of painful effort to go around and look for resources, so i’m putting it all here to make it a little easier!
i download videos using 4k video downloader. it will download very good quality 1080p videos in .mp4 format. if you’re downloading a 4k video, make sure to change the setting option to .mkv so that you get 4k and not 1080p—for obvious reasons since you want the highest quality.
i rely on kpopexciting to get .ts files — which are basically raw, very high quality video files for live performances. they are much less grainy than .mp4 versions of live performances—which are the ones you’ll see uploaded to youtube. i’ve found that 4k videos (in .mkv) are just as good quality as .ts, but obviously you will rarely see live performances in 4k, so get .ts when you can!! you can also try to find .ts files on twitter, but you may have to do a lot of digging. i wish i could recommend you twitter accounts, but the ones i used to go to have been very inactive/taken down all their drives :( but this website is really nice and updated frequently so i would recommend it!
vapoursynth links + download. the reason you would use vapoursynth is to resize your gif, while maintaining the optimal quality of the gif. if you gif without vapoursynth (.ie only using photoshop), it will still be fine, but the image quality may be grainier. also, you will definitely need vapoursynth to gif .ts files —more will be explained in the tutorial i’ve linked below. i would recommend that you have a high processing/lots of ram/newer desktop or laptop to use vapoursynth so that 1, your computer isn’t fried and 2, your vapoursynth process will go a lot faster. i am using a 2017 macbook pro for all my work, and it runs pretty well, but my laptop still gets pretty hot so just make sure you’re not running a million things in the background while using adobe products and vapoursynth lol. i used a pretty old and beat up 2011 model macbook air back then, and i will say that yes vapoursynth worked and ran on it, but it took much longer, and basically fried the laptop’s battery (aka i had to get the battery changed twice and the laptop would die randomly) but issok it was a school borrowed laptop so i didn’t feel too bad lol. im just saying this as a precaution, to preserve the health of your electronic devices!! but don’t be afraid to use vapoursynth! you should still try it at least once.
thank you to @realstraykids for this super detailed, really nice tutorial! it includes how and where to download videos, how to gif using vapoursynth, using photoshop, comparisons, coloring, and pretty much all you need to know. 10/10 would recommend
thank you to @dreamcolouring for this lifesaver!!! the best and easiest way to blur out unwanted captions/objects in your gifs. i recommend doing this step after converting your frames to video timeline and before you do sharpening and coloring. another tip i’ll add is to feather the selection you’ve made right before you click on “add vector mask” —this will make sense once you’ve read through the tutorial. feathering it will make the blurred spot less noticeable and more subtle.
i use this generator to create gradient colored captions! copy and paste your text, then select the colors you want. generate the code, and copy it. change the settings of the text editor on your post to HTML. paste the code, preview, and voila! add elements <blockquote>,<b>,<i>, etc as needed. see more on colored captions in this tutorial by @kylos --i believe op mentioned a different and better color generator but for some reason it won’t work for me :( hopefully it works for u! basically same idea as the previous generator i mentioned.
my own mini tutorial/workflow process of making gifs. this includes working with a .ts file, vapoursynth, photoshop, coloring, watermarking, etc. and a few of my own tips below:
if you are working with an .mp4, you do not have to make any changes to the preprocessor/denoise filters/sharpening in the resizing part of vapoursynth—it doesn’t make that big of a difference if you do. but if you are working with a .ts file, definitely do make those changes,, that’s the whole reason you have vapoursynth. with an .mp4, i like to use vapoursynth to just resize, but i don’t add any additional settings. i use smart sharpen in photoshop to sharpen it, which is pretty good on it’s own (at least in photoshop 2020!).
my rule of thumb is to do add .02 seconds when i am setting frame delay. so if when you first import the frames, they are at 0.04 seconds, i usually change them to 0.06. of course, this is my personal taste—you can make all your gifs faster or slower depending on how you want em to look.
if you are on a mac, you can screen record by pressing Command+Shift+5 (it’s a shortcut to quicktime screen recording). I only screen record for things like the beyond live concert or other live streamed events. the image quality of the screen recording, in my experience, is actually pretty good. when you gif the screen recording however, you may notice that it adds extra frames that you don’t need. by that i mean duplicate frames. you could keep the duplicate frames but that just means the size of your gif is going to be much bigger (keep in mind the limit is 8mb). in order to remove those duplicates, my only solution has been to remove them manually (by holding Command while selecting), or when you are importing the video to frames, select the option to “limit to every 2 frames”—but this method will be less precise and still not as good as manually removing frames. if you remove the duplicate frames, this means you will need to set the frame delay even slower, to make up for lost frames. in my experience, fps(frames per second) and frame delay work in conjunction. so for example, if i delete every other frame because they are duplicates, but the starting frame delay is 0.02, i am now going to change it to something like 0.05 (so i added 0.03 seconds rather than my usual 0.02). if the duration length and the image dimensions of the gif are short/small, feel free to keep the duplicate frames in—i only delete duplicate frames in order to keep my gif under the 8mb limit. then, if you keep the duplicate frames in, continue with your standard frame delay preferences. now that i’m writing this im realizing this might not make a lot of sense lol.. but don’t worry about it for now and if you run into trouble w screen recorded gifs then you can come back to this for reference. again, this is only my experience recording on a mac—it may be a lot different if you use a screen recording program or are on a pc.
i don’t really use .psd templates because i like to give every gif/gifset it’s own unique coloring—so i remake the coloring every time, but if you get into a rhythm it’s pretty easy. there are a lot of nice coloring tutorials out there, too! my personal coloring adjustments in order: levels, exposure, color balance, selective color (if needed), vibrance, photo filter (if needed), color lookup (i use 2strip most often and i put it on ‘color’ blending mode). don’t forget to adjust the opacities and fills of the ‘color lookup’ adjustment layer in case it’s too strong. go back to correct each adjustment layer as needed. then, when you’re done and satisfied, group all those layers, copy the group (you can do an easy command+c), and paste it onto the next gif you’re working on for easy workflow.
if for some reason you can’t see the frames when you import your layers/video, it’s likely because your ‘timeline’ window isn’t showing up. just go to the window menu on photoshop, go to the bottom and you’ll see ‘timeline.’ make sure it has a check next to it.
i recommend watermarking your gifs because a lot of people like to repost tings these days 😠 - so make sure u got your brand on it! i keep my watermark saved to my ‘libraries’ in photoshop so it’s ready when i need it. i use the blending mode ‘overlay’ and adjust the opacity, but if you don’t want to do that you can also add a stroke/shadow to your watermark/do all sorts.
tag #nctinc for your nct creations and #jenonet for your jeno creations!!
here’s my own mini tutorial (well not much of a tutorial ig more like a work process vid?): took about ten minutes including the time to search and download the video (but i didn’t record that part i trust yall know how to do that), vapoursynth, and exporting. i hope this helps somewhat! feel free to ask more questions whenever :)
youtube
keep in mind that giffing takes a lot of patience, energy, and experience—so don’t worry if it takes you a bit to figure things out or if your gifs don’t turn out the way you want them to the first time around. we all start at the same place and all run into problems. i know giffing can sound intimidating and seem like a lot of work, but i promise, once you get into a routine, giffing is going to happen in minutes—and you’ll get beautiful gifs. have fun! 😊
#anon#answered#tut#tuts#giffing tutorial#should i make a tut/resources post on gfx? not rly sure if gfx can be taught.. it's like a lottt about personal style imo lol#hope this helps!#not just for anon but for anyone
117 notes
·
View notes
Photo

an updated psd faq/tutorial!
i’ve decided to create a masterpost of psd questions and tips based on messages and requests that get sent in! feel free to keep sending in questions or shoot me some messages. first i’ll start with what is a psd?
a psd:
this is a photoshop document. it’s commonly used in the editing world for icons or in the digital editing world to store any adjustment made on photos itself. i’ll be explaining further some tips on how i create my psds for my editing blogs!
how do you create a (soft) psd?
just a fair warning, my style of psds may not be the same as other psds. over the past few years, i’ve been inspired through soft blogs such as velvestuff & another popular editing blog who went by silkedits.
i’ve had a psd blog since 2017 and over the years i’ve gone through multiple editing epiphanies. i use the word epiphany due to the fact that if you were to take an icon i made back in 2017 and compare it to now, it’s incomparable. HAHA.
so basically, i’ve gone through multiple.. many.. MANY psd formulas and i’ve gone through trial an error and am finally satisfied with my product: so just know it doesn’t take overnight to perfect your craft.
for starters, i often had the issue of creating really dark and vibrant psds with a shit ton of hue. as of now how i start my psd with a negative brightness layer. normally for darker soft psds i go -30 and below, for my lighter soft psds i start off with about -20 to -15. this will save your psd from whitewash and will balance the tones. then i follow it with a saturation, normally i set my settings to -5 or -10. then i add a brightness layer again to around +7 or +10 (for lighter psds). i’m going to name this formula the balancing base (or foundation, if you will) for starting the psd off.
then, at this point on think about what vibe you want to give off with your icons or layouts. do you want a psd that’ll show red tones? purple tones? and start building from there. i normally follow up with a color balance layer.
lets say you want a purple psd, i.e. what you want to do is build the purple while also balancing the other colors. you can’t have a vibrant purple psd that’ll be too overruling, right? for purple psds, you can use the color balance formula -13, -14, and -14. this’ll even out the psd enough that it’ll still emphasize those purple tones, whilst not being too POW.
sometimes, i skip the color balance especially for icons (i normally use it for moodboards or layouts) since if used with a lot of icons and come when you do post your 9 icons, it’ll look too colorful. but that’s another topic.
another thing i focus on is gradients. i feel like gradients is like an upgraded version of color balance. you have more room to bring in stronger colors that you want. when i use this, i normally use 2 opposite colors. so if i wanted a purple psd, i’ll take the first color marker and put it on a dark brown, and then i’ll take the 2nd color marker and put it to a semi-dark violet/blue color. this’ll again: balance out the 2 colors. i’ll then set this to 70%, occasionally. after that i’ll apply a solid color to and orange/red color and set it to ‘hue’. then change the opacity to 20% (sometimes 30% depending on the picture used.) after gradients, i use a lot of photo filters!! they’re your bestfriend!! whenever you use it, stay on the high left side and it gives a touch of the photo filter, but nothing too heavy. this is also something i’ve learned myself.
it’s important to note that if you do find yourself with a vibrant photo, lets say your undertones or neutrals (in selective colors) are too red for some reason, which will 100000% happen often as it does to me, or your vibrance is high but you’re scared of lowering it because you’re satisfied with the results: just adjust the cyan to where it lowers that vibrance without ruining the result as much. this was such a struggle for me before and i found a way to fix it so now i’m sharing it!
lastly, another thing is you’ll ALWAYS have to adjust a psd. no psd will look good on any photo. for me it varies so i can’t really give specifics because i’m a perfectionist occasionally so every little thing bothers me. but just keep that in mind. the psd that you made could look good on one photo then look bad on others. so try to edit with tones on photos that your psd compliments.
also please remember guys!! creating a psd that you’ll be satisfied with won’t happen overnight. there’s been times i’ve quit because i just wasn’t satisfied enough because people don’t compliment my edits or it doesnt get enough likes. at this point, i dont even edit because of that. i do it because this is a passion of mine and i love to help people and i love to see my edits being used everywhere. it makes me happy to know that i inspire people too, so that motivates me even more. just keep working at it!
i’ll keep updating this masterpost whenever i get a question or get asked for help. until then i hope this helped you or whoever out! <3 you can bookmark this post or search it on my blog under #petitpsds help
#psd help#petitpsds faq#petitpsds help#photoshop#learn photoshop#Photoshop resources#photoshop help#photoshop coloring#soft#soft icons#soft psd#petitpsds#learning photoshop#psd#psds#colorings#coloring
96 notes
·
View notes
Photo
Recently someone asked if I would do a gif making tutorial, so here I am! I’m going to make this as in depth as I can, but if you have remaining questions or problems, feel free to send me them and I will try to help you to the best of my abilities.
Disclaimer: There are many ways to make a gif, but this is the method I’ve been using for years. This tutorial is very long and may make the process seem tedious, but I assure you, once you get the hang of making gifs you could do it in just under a few minutes!
This tutorial includes:
links to all of the sites and programs I use
lots of rambling (w/ pictures)
a short masterlist of my favorite photoshop sources at the end
Links:
Adobe Photoshop CC 2017
PotPlayer (64 bit)
uTorrent
4K Video Download
Photoshop, PotPlayer and uTorrent are the three programs you MUST have for this tutorial. The 4K Downloader is for YouTube/Instagram, which there are other sites you can use for that, but I prefer 4K to make sure I’m getting the best quality I can get. Best part, they’re all free :)
Torrent sites:
PirateBay
yts.lT (favorite)
Nyaa (anime)
These aren’t the only sites that offer torrents (nor are they the only ones I use). When you download torrents, try to be careful; if you think it’s sketchy, go ahead and try to find another. It’s not as scary as it seems, just be aware of what you’re clicking. Some are total duds but I usually have a pretty smooth time finding what I need unless it’s something unpopular or obscure. Whatever site you’re on, try to use the latest links (past hour/day/week) if it’s for a new movie or ongoing show. Also, if there’s the option, download magnet.
PirateBay gives me an ongoing issue with their links, so I try to avoid getting torrents from there if I think I can find it elsewhere. YTS is my favorite site for movies; they’re trustworthy and I’ve never had an issue :)
HD/1080p torrents often start popping up when the BluRay comes out, so don’t depend on any site to have it the day something premieres. Usually you’ll have to wait a few weeks/months. Until then it’ll just be CAMs which no one likes!
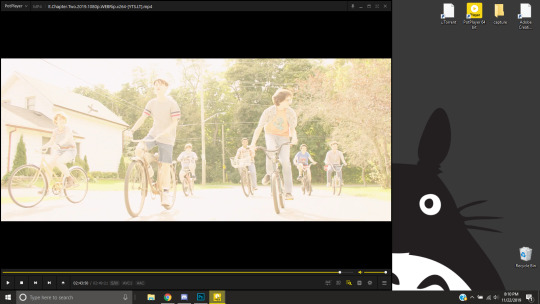
For this tutorial I’m going to be making a gif from IT: Chapter Two (link- click 1080p.WEB). Once you’ve gotten your torrent, open up uTorrent. It’ll ask you where you want your download stored, which I always just choose my Downloads folder.

It’s normal for it to take a while. It doesn’t take all day, but 40 min-2 hrs is usually what I have to wait. My laptop is pretty slow, RIP.
After it says it’s downloaded, you’ll have the .mp4 sitting in your Downloads folder (or whatever destination you chose, but Downloads is the default).
Before you close uTorrent, press the torrent file and then delete it (trash can icon above) so you can delete it from your Downloads folder. Otherwise, your computer will tell you the torrent is still open in the program and won’t let you. You won’t need it after you’ve gotten the .mp4.
So now we have the movie! Go ahead and open it up in PotPlayer. Right click > Open file(s) and select the movie. It will start playing automatically.
Note: You need to make folders for the frames to be held in. Its been so long since I’ve set up PotPlayer, I can’t remember if the program made the capture folder that’s in Desktop or if I did... if not, go ahead and make sure you have designated folders. (If you’re making 4 gifs, you need 4 separate folders, and so on.)
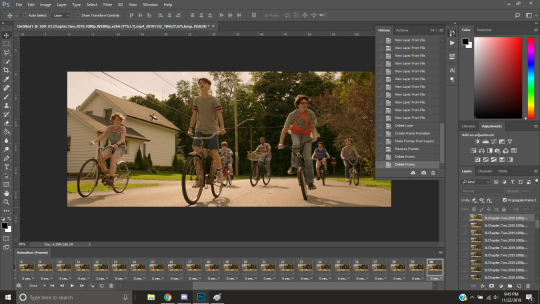
Go to the scene you’d like to gif. The scene I chose in this movie is one of the end scenes of the young Losers Club on their bikes (2hr43min).
Slide the edge of the program in to minimize the screen a little for the next step.
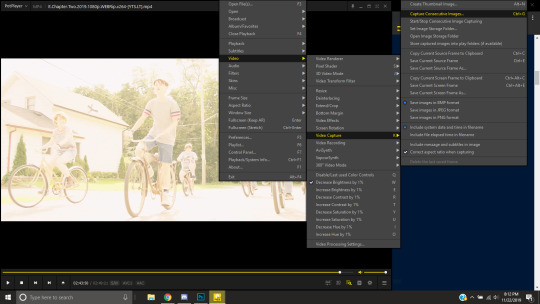
Now, right click > Video > Video Capture > Capture Consecutive Images
This will pop up:
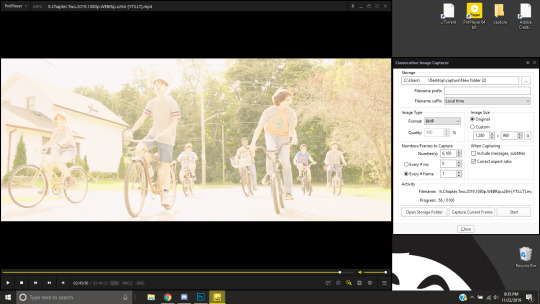
Here is a closer look at the settings:
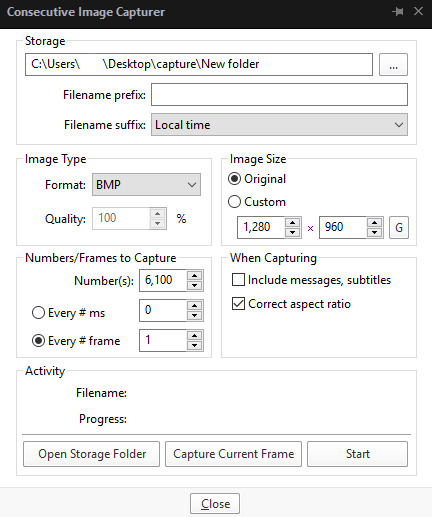
The key things to look at are the Image Type, Image Size, and Numbers/Frame to capture. And of course, make sure you have the right destination chosen in the Storage box because that’s where your frames are going to be. PNG and BMP are the best quality for the type of image. Always choose the original size of the frames. And, make sure you’re saving every frame (Every # frame must be kept at 1).
Make sure to start a few seconds before where you actually want to make a gif. Sometimes (every time lol) the start will lag and you won’t get every single frame you want or thought you were getting. In my case, the screen is fading from white, so I’m going to capture a few frames where the white can still be seen before the full color appears. This way I know I’m getting the most frames I can, and I don’t have to redo it later when I think my gif is too short because I’m missing frames.
While the movie is still paused, press Start in the smaller window, then press Play on your movie. Keep your mouse over the Pause button and end it when you’ve gotten all the frames you wanted. Then, Stop back in the small window.
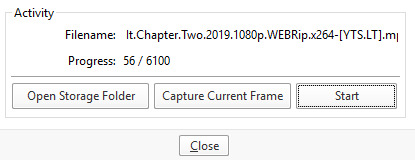
I’ve saved 56 frames to my folder.
The size of the gif you want to make dictates how many frames you’ll be using. Remember the file size needs to be under 3MB. Recently Tumblr increased that size to 8MB, but the quality of the gif will drop drastically, so I ignore it now. (Although, it probably won’t look too different if it’s at like 3.1MB and barely goes over that limit.
540px wide- ~30 frames and under. Because these gifs are so wide, naturally, they’re already going to be a large file.
268px wide- ~50 frames
177px- ~70 & up
These numbers aren’t concrete, though. The taller and/or more contrasting colors in a gif, the bigger the file will be. The shorter and less contrast in colors, the smaller, and more likely you will be able to fit more frames into your gif. These are just what I find to be the case most of the time.
For the gif I’m making now, I’m going to keep it at 30 frames, so I know I’ll be deleting ~26 out of the 56 I saved to that folder.
Tip: I rarely make big changes to the coloring of my gif if I really like the way it looks. If my gif exceeds 3MB, I’d rather delete frames. IMO, nice coloring comes before fitting in as many frames as I can.
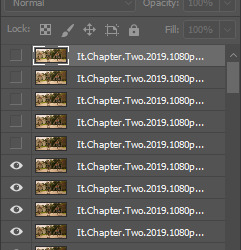
Moving on, now that we have the frames we want, go ahead and open up Photoshop. Go to File > Scripts > Load Files into Stack. The drop down that says ‘Files’ I change to ‘Folder’ and simply select wherever your frames are held. For me, they’re here:
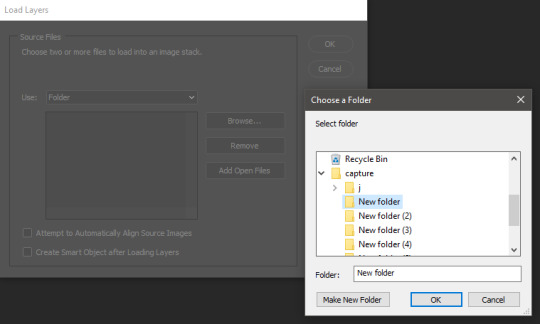
Press OK, let them all load up, then you’ll press OK again in that grey window.
It takes a minute for all of the frames to load up in photoshop. The more you have, the longer it’ll take. Again, my laptop is slow as hell, so maybe it will be really fast for you.
When they’re done loading, go to Window > Animation.
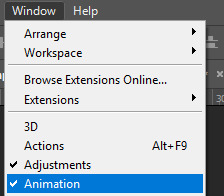
Then, inside the Animation tab, make sure you have Create Frame Animation selected:

Then once you’ve pressed it Create Frame Animation, your first frame will appear. But we need them all, so look over to that four bar icon to the right of the tab and press Make Frames From Layers.
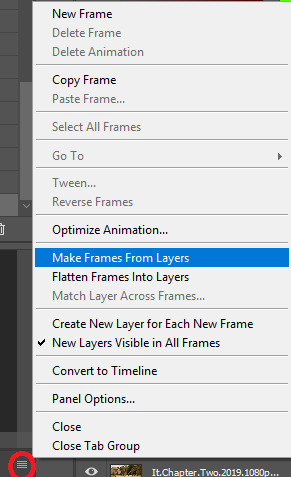
They’ll load all at once, but the gif is backwards. To fix that, simply go back to the same four bar icon and click Reverse Frames.
I’m going to go ahead and delete the frames I don’t want. For me, the beginning frames are unusable because there’s that white fade out in the start of the scene I chose. I’m going to delete those, then go ahead and delete any frame that comes after frame 30.
Here’s where I’m at now:
Now to resize it. I like the dimensions it currently has, so I’m not going to use the crop tool at the moment. But once you’ve cropped it to where you like, go to Image > Image Size and a new window will pop up. The widest a gif should be is 540px. How tall it is is up to you. Since I’m keeping the dimensions currently, my gif will resize to 540x225.
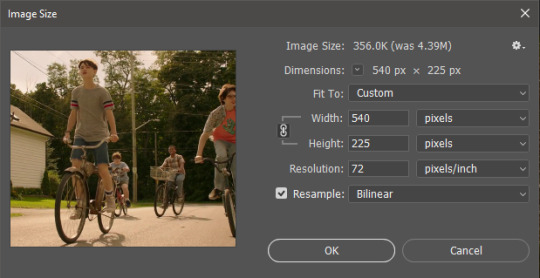
It’s VERY important to note, where it says ‘Resample:’ you need to have Bilinear selected. This effects the borders of your gif. Also, don’t make the mistake of resizing it in centimeters instead of pixels.
Now that it’s resized, you need to set the the frame delay. I choose either .05, .06, or .07. Anything outside of that looks to fast/slow to me (but I know a lot of people who like the way .03 or .04 look. It’s all preference.)
To select all of your frames at once, select the first frame, hold shift, then select your last frame. Then press where it says ‘0 sec.’ > Other > type in however fast you’d like your gif to be. I’m going to use .06. Double check every frame says .06, otherwise it’ll stay at 0 and be way too fast.
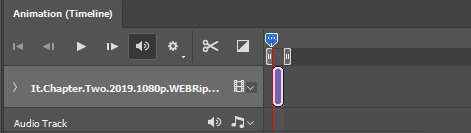
Now, again, click that four bar icon and select Convert to Timeline. The Animation tab looks like this now:

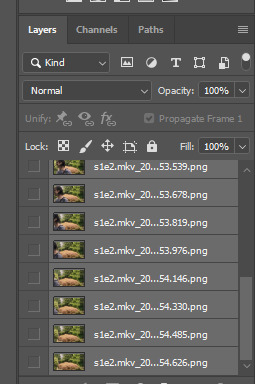
For now, look at our Layers Tab, so we can delete every frame that doesn’t show an eye icon next to it (as you can see, my first 5 frames):
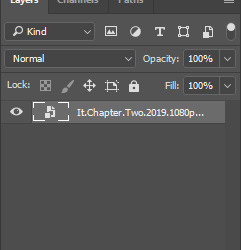
With all of the excess frames gone, select all of the frames you have left (hold shift again) and then right click > Convert to Smart Object

Now, we see this left:
And, technically we’re done with the very basics of making a gif. But you definitely should sharpen and color it for it to look ‘nice’ and aesthetic. I’m going to color my gif now. Personally, I rarely use psds. It takes way too long for me to look through millions of psds, so I make coloring my own for each gif I make. I have two of my own psds, if you’d like to use either of those.
PSD01- this is a super basic psd I use to make any gif look brighter and more vibrant. There are more details in the post on how I use it.
PSD02- I included this psd within another tutorial for how I do color edits.
Both of these are my base psds, but if anyone wants me to do a separate tutorial for how I color gifs on a regular basis, I’ll gladly make one of those too!
Once you’re happy with how the colors look, it’s time to sharpen. Select your gif layer and go up to Filter > Sharpen > Unsharp Mask.
Here are my settings:
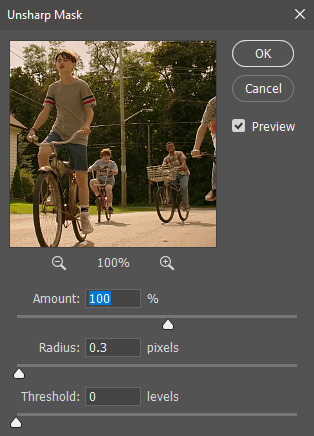
(Amount: 100%, Radius: 0.3px, Threshold: 0 levels)
Now sharpened and colored, here is my final result ready to post:
If you’re wondering, this gif is 2.42MB, so I could still make it brighter/more vibrant if I wanted to!
To save, go to File > Export > Save for Web.
A new window will pop up. There are more settings that you should check to make sure your gif looks as nice as possible, but they’re also up to preference and can range from creator. This is what I prefer:

Diffusion is good for bright and/or colorful gifs, but if the gif is dark, I’ll change it to Noise to see if I like that better. Also, always double check you have the loop set to forever, otherwise your gif will only loop once.
And you’re all done!
Here is a short masterlist of resources I recommend checking out and use often:
allscallie (DeviantArt)
Their psds are beautiful, especially if you’re into making moodboards. Everything is very aesthetic!
sttoneds (DeviantArt)
More psds, especially if you’re into gifsets/photosets that are color focused.
BEAPANDA (DeviantArt)
Literally everything they publish is gold. From brushes, textures, psds, renders; they have it all. Their packs are extremely well made, too. I highly recommend bookmarking them. (The renders and brushes look beautiful when you use them in your headers!)
allresources (Tumblr)
There are so many photoshop resource blogs here on tumblr, so to make it easy on you, theirs is the one I recommend the most! The tutorials and resources she makes herself are really great too.
Thank you for reading, and good luck +.゚(*´∀`)b゚+.゚イィ
139 notes
·
View notes
Text
Stop Motion - technical post production - my workflow Photoshop
26 March 2021
Follow a tutorial and create a finished product. Having had a practice in your software options, suggest the workflow you are going to use? From Optimisation to Export. Note any problem areas / solutions.
I followed tutorial about stop motion video post production in Photoshop and based on this tutorial and notes taken during today’s afternoon class I created my video. There is my workflow:
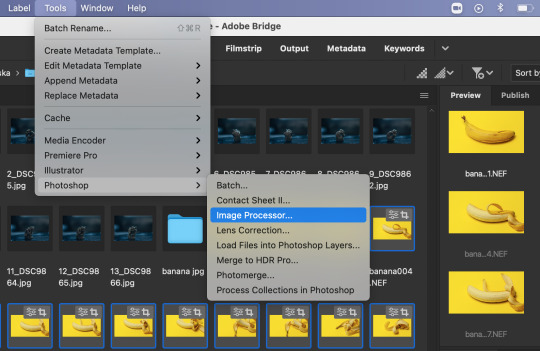
1. Download files from sd card onto laptop. Open in Adobe Bridge.
2. Select files I wanted to use for the brief and rename. I renamed files as banana and chose the sequence number starting from 001.

3. Open one of banana raw files in Camera Raw and make basic edition start from optics - remove chromatic aberration, geometry correction, then adjust sliders after applied auto correction.
4. In crop tool chose ratio 16:9 which is required for the brief and standard display option for most of the devices.
5. Saved settings (done) in this file then right click on the thumbnail >Develop Settings >Copy Settings.
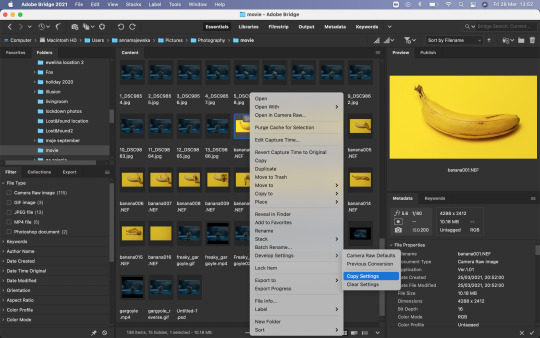
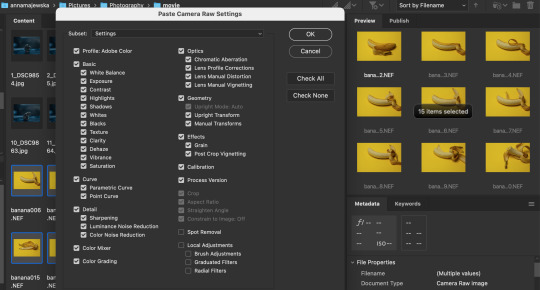
6. Select all banana files, hold shift + cmd and right click >Develop Settings >Paste Settings. I didn’t make any local adjustments so I selected all settings to paste.

7. Keep all those files selected and go the top Adobe Bridge toolbar >Tools >Photoshop >Image Processor and wait for the Photoshop to open and show the Image Processor window. Choose the location or create new folder where your processed images will be placed. Select save as jpg and make sure to change quality for the highest option which is 12, than click Run. It may take a while to finish the process. Then Photoshop home page will open.

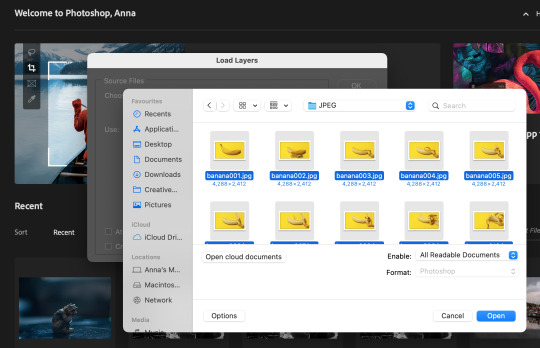
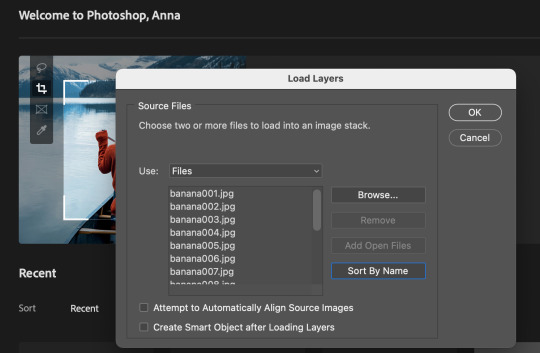
8. From top toolbar choose File > Scripts >Load Files Into Stack, browse files and don’t thick any small boxes. Sort files by names and ok to load layers.

9. Choose Window >Timeline and Timeline panel should open on the bottom of the screen


10. Then select Create Frame Animation and click on the bar, so the first frame should appear in the Timeline. Then go to Timeline option and select Make Frames From Layers.
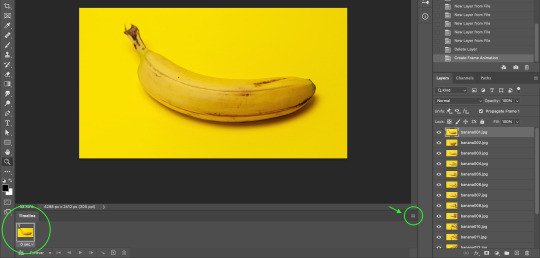

11. In Timeline panel options chose Make Frames From Layers and this should bring all images as frames into Timeline. If they appear not in order, go to Timeline options and select Reverse Frames and they should go in the right sequence.

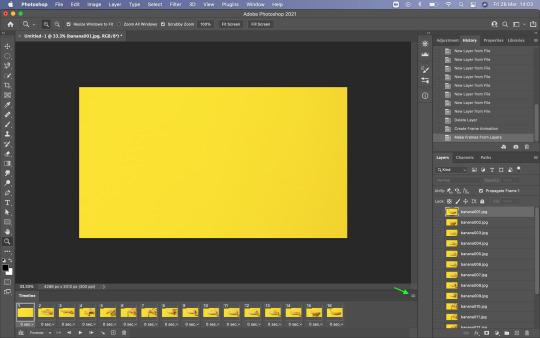


12. On the bottom of each frame is an option to choose frame delay time, that could be set for every frame individually or apply to all selected frames at the same time. You can change duration of the frames if they run too fast. To select all frames select first one and press and hold shift then click on last one.
13. There is an option to duplicate frames, when frame or frames are selected, by click the little square with + icon on the bottom Timeline bar. It is a good option to make video longer when we have just few frames.

14. Once happy with video it is good to save it as psd file, so we could go back to this at anytime if we need to make some changes.
15. To save video, go to the top Photoshop bar File >Export >Render Video and name your video so it would be saved as mp4 file (if you don’t name it Photoshop will save it as default untitled mp4 file). Then you can change the other properties and choose what will suit the best for you video and Render.

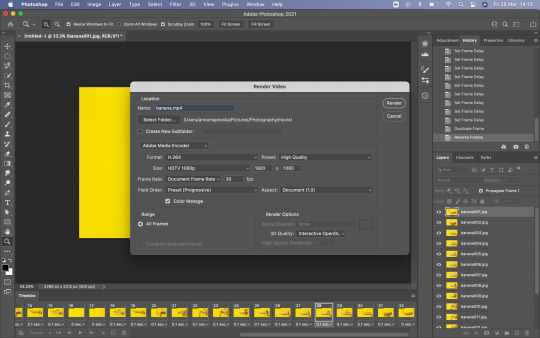
Problem occurs when Render Video?
If you see the spinning wheel for wee while that means that Photoshop needs more space in memory of your laptop. Click esc to stop the Render process as it will take forever. Clean up you hard drive from unused large files. You can change option in your Mac system preferences >Security & Privacy >Privacy >Full Disc Access, unlock as an admin and give Photoshop access to full disc, so it could use your laptop hard drive as a scratch disc for the space (it needs a lot of memory when working on large files) when required. If Photoshop is not listed you can add program by click on + and find it in Application, then select Photoshop. Click back on the padlock to lock the access. Close Photoshop and re-open. You can use an external hard drive to use as a scratch disc and you can set this option in Photoshop preferences, but I read that it is good to set scratch disc on the same hard drive where Photoshop is installed because it will improve the performance. Close all other applications if they are not necessary and web browser. That should also help to improve your laptop and Photoshop performance.


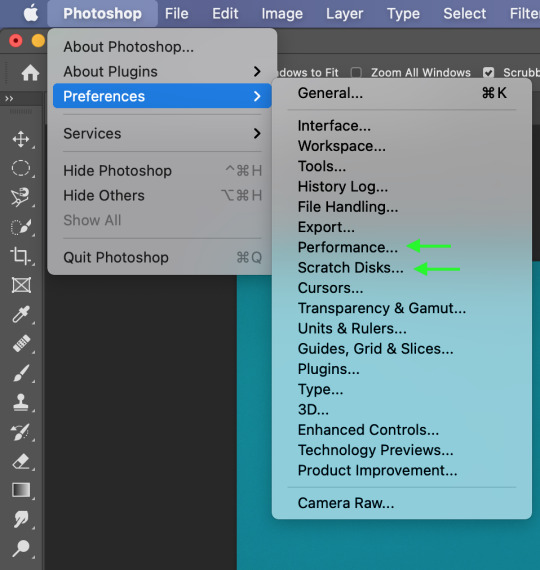
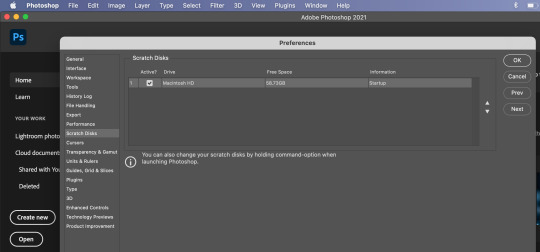
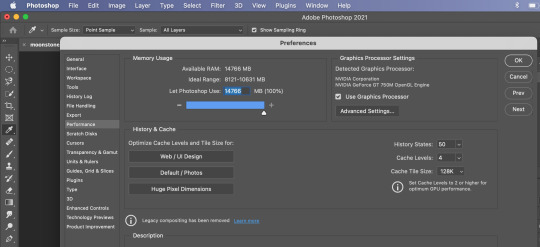
The Photoshop needs a lot memory to work well and fast. In Photoshop Preferences, go to Photoshop >Performance and check how much of your laptop memory usage is set for this program to use. Photoshop requires 4GB - 8GB of RAM. I moved the slider to give Photoshop maximum of RAM to use. Then click ok and reopen Photoshop. I would advise to restart your laptop before reopening Photoshop. If you keep your laptop working for long time it remembers all operations it made, so it is good to give it a reset and improve its performance. That should solve the problem.
16. If you want to export your video as gif you need to go File >Export >Save For Web and you can change resolution or other changes before you save the file.


I decided to use iMovie software to add audio to my stop motion video because it works more intuitive than Photoshop in this field and there is a lot of sound effects to choose from and suit the best audio for the video. I will create another post about it.
1 note
·
View note
Photo

ASKS 18
Andromeda’s a big wide open galaxy; okay anyways here are some asks about Dead by Daylight, ayoshi collab, sims 5, my old recolors, and just some sweet people who sent me some nice messages <3

Anonymous said: In your collab with Ayoshi, the outfit that shows off the Ciara Top and Jess shorts, where can I find the garter belt accessory used with the shorts?
Those stockings get asked about SO much lmao. They are BY Ayoshi like.. idk why people ask about them. I desperately want him to remake them with new textures. Maybe one day lmao. All of his CC is in this post including the stocking (Miso Tights).

Anonymous said: Omg whos your dead by daylight main
Kate and Yui <3 I have been using Jane recently too. I play as Spirit for killer but I only do killer for the challenges LMAO

Anonymous said: I am very new to The Sims world, ts4 is my first time playing, and finding out I can have mods on my game change my world, and you are one of my favorite creators! So I just came to say you are really amazing. I think I have all of your hairs, and most of you others cc, it is because of you my townies look so cute nowadays!! Remember your effort is really valued and you are loved!!!
thank you so so so much ;n; I would really advise against having all of my hairs lmao there are like 150+ and a lot of the older ones have issues i want to fix... just need to find the time
Anonymous said: what do u use to get the little sparkles in your edits :o is it a brush?
I honestly don’t remember. Every since the first one I just use the same lookbook PSD that has the sparkle on it. These look similar though so try them.
Anonymous said: wcif the first two chokers used in your pic for your hairs you just put up on your patreon?
All of my patreon cc posts are public the day they go up. the download is for patrons only but the CC posts are public. Those always have the CC i use linked at the bottom. Always. They have since June of last year. Just go to my Patreon and scroll down to the hairs, and you will see them linked. No pledging or following required.
Anonymous said: Do you have a Ko-Fi? I’m wary about trying to send a one-off via Patreon incase I forget to cancel the next month.
I have a paypal.me link > here < but please don’t feel inclined to donate. Also if you do a one-off with Patreon you can cancel it right after you pledge and you’ll still have access to the Patreon content til the end of the month.
Anonymous said: not to rush you or anything but bella is one of the prettiest sims you've ever created and i can't wait for you to release her omg
Bella queen wbk (thank you)
Anonymous said: your models are so pretty! would you consider release the tray files of them?
that is the plan, not sure when though. I am building them a house rn which i’ve been having fun doing. They all lived in a basement before
Anonymous said: hi :) just out of curiosity, what is the EA policy u always mention concerning the third hairs in ur posts? thanks!
CC put on Patreon is supposed to be post within 21 days of going on Patreon. One of the community managers said it a while ago. I have the details on my Patreon about me page if you want to read and get links. <3
@ariapixie said: Happy New Years!!🎆🎉🎉🎆🎇🎆
thank you!!! i hope youve been having an amazing year so far <3
Anonymous said: Heey love :) I am obssessed with your hairstyles *_* you're the reason I switched from alpha to MM :) just wanted to ask you how come you no longer include recolors for your latest hairstyles? :)
well there were a few reasons:
1). I never used the recolors myself. I like the colors I just never used them
2). I got comments about the colors looking too metalic
3). I had started Patreon around that time and doing recolors for 3 (and sometimes more) hairs every month would have been a lot. Especially bc my DDS was broken so I had to do them a bit more complicated than just saving as DDS.
I know that some people really liked my recolors, and I am sorry if me stopping caused any issues. There are actions for the hair colors and recoloring hair is really easy to learn and do.
@sadnessimmer said: 💌This is the Amazing Person Award! Once you are given this award you are supposed to paste it in the ask of eight different people, who, in your opinion, deserve it. If you break the chain nothing will happen, but it is sweet to know someone thinks you’re amazing inside and out! 💌
Anonymous said: how is your content so amazing ily so much 🥺💕
Anonymous said: Thank you so much for all that you do! Your hairs and collabs are amazing
thank you so much!
Anonymous said: Could you ever see yourself creating hairs (or custom content in general) for the Sims 5 once it comes out?
If the style is something I enjoy and the creation method is similar yes
@ariapixie said: Hi I think tumblr ate my ask so I’m sorry if you’ve already gotten this. I really love your editing it’s so beautiful and I was wondering if you would ever consider doing a tutorial on how you do it
honestly most of the time i do stuff differently. I run the same topaz/sharpening actions every time and then add some shadows and play with curves. Nothing that is super intensive tbh. I wouldn’t even know how to go about doing a tutorial tbh
Anonymous said: What's your name on the gallery? I can't ever seem to find anything from you, or do you not have one?
aharris00britney; make sure you have CC enabled
@wcifblog said: Hi, I am in love with your CC. I'm a simmer for a long time but just lately I've been trying to learn how to make my own CC. I've seen some of your speed meshing videos and I was wondering if you'd ever consider making a tutorial for beginners on how to create a new mesh from scratch. (I'm trying to create a curly hair on blender but I'm stupid I guess). Thank you so much for all your work, love, Kel.
hey! thank you so much <3 I actually don’t mesh stuff from scratch though. So I’m afraid I am not able to help in that department :( I’m sorry
@tarrinix said: would it be possible for you to upload a mass file for download that has all of your hairs? (I'm asking for only the ones created by you so others don't miss out of credit links and things like that.)
I really wanted to get all my 2019 CC updated before the end of the year and have it up in a .zip. But I never got around do updating stuff from the start of the year. I need to get back into updating stuff I just am so.. unmotivated recently? Idk hopefully I can get all my stuff updated in the next few months and have some mass downloads for 2017, 2018, and 2019 stuff.
@xayami said: any thoughts on 365? 😳
well.... im excited for B#RN. that is what matters, right? LMAO I’m going through a Weyes Blood/FKA Twigs phase rn so I haven’t been listening to much kpop. Especially at the time that 365 released.
Anonymous said: the sim modeling your piper hair can murder me and i will thank her over and over how make good sim
Anonymous said: it's not even just her it's every GODDANG MODEL!!!
LMAO Ivy is my 2nd blond model. She is a queen isn’t she? She is actually the sim from this lookbook and I just randomly added her to my models household and she stayed.
#asks#if anyone knows some albums that are like titanic rising pls recommend#i listened to front way seat to earth already#and loved that too#love Magdalene too#i just want some new music zzz#ive been building an actual house for my model sims the past few days#bc they lived in a basement before#and it is so bad edfgsefdc i like NEVER build anything#then my mouse broke and i struggle using the trackpad#so im on break from it
52 notes
·
View notes
Note
Hello! Hi! Your stuff is AMAZING! I have been using photoshop my entire life and have always been deathly afraid of trying GIFs. Is it hard? It seems so & when i start to try and google Im like hmm nah lol. I notice on tumblr people comment stuff like “wow your smoothness is great” or the quality & also I see some say the coloring of a certain scene made the GiF edit hard for them. Do you have any pointers for this stuff or some resource where I can pick up and learn to make nice gif sets :) TY
awww, thank you, that’s so sweet!
no, i don’t think making gifs is hard at all :) especially once you get it down it’s just basically following steps. i could do it in my sleep lol.
one of my internet friends actually taught me how to make them via text/videos a few years ago! so i was able to ask her about certain things i was confused about as i was learning. it probably only took an afternoon to really get it down! and once i got the basic structure down i could learn more about sharpening, coloring, text, etc. on my own.
i can teach you some basics, but there are tons of good tutorials on here you can follow as well :) under the cut cause it’s gonna be long
To answer your questions: 1. some scenes/shows are really hard to color. sometimes that’s due to the lighting of the scene itself (i.e. dark/bright lights, etc.) or just due to the color palette the show itself uses. 2. i’m assuming you’re talking about sharpness when you say smoothness, but correct me if i’m wrong. gifs will look the best when they are taken from high quality content (netflix/hulu, HQ youtube videos) and you can sharpen them in photoshop itself (much like you would a picture). i have a sharpening action presaved in photoshop that is the first thing i do when opening up the video i want to gif in photoshop.
Now for some giffing basics! 1. I typically screen record whatever it is i want to gif unless i can find a hq youtube video to download, but i find screen recording works best for quality. i use QuickTime Player for this. once i have what i want captured i export it in 4k and save it to a folder i have designated for videos i want to gif. 2. moving to photoshop the first step is opening the video you want to edit. to do this you go to file -> import -> video frames to layers once you do that a window will pop up asking for you to pick a range. you do not want to import the entire video bc you’d end up with way too much and if it’s too large ps won’t be able to process it. you’ll pick ‘selected range only’ and ‘limit to every 2 frames’. then i typically move the middle slider to the part of the clip i want to use and use the first and last sliders to pick the beginning and end of the clip you want (it’s okay if you get stuff in the beginning or end you don’t want as you can delete it later) 3. once i do that the first thing i do before messing with anything is use my sharpening action shortcut i have programmed in photoshop and wait for it to do it’s thing (this step you’ll have to skip until you can learn more about that and i really don’t remember how i actually set it up) 4. after that i’ll use the timeline and delete the frames i absolutely don’t want in my gif (i.e. if you got any extra stuff from the beginning/end). never never never delete from the middle as it won’t look right in the end. 5. after that i click on the three little lines on the far right of the timeline and click ‘select all frames’ then i click the three lines again and choose ‘flatten frames into layers’. then on the layers panel you’ll have frames that were just added on top of the layers. you want to then delete all the layers so you’re just left with frames 1-X. 6. after that i use the timeline to time delay the clips. It’ll usually say 0.02, but that’s much too fast so we want to slow it down. I usually change it to 0.07, but if i am working with something where i have fewer frames (like 25 or less) i will use anything from 0.07-0.11, just depends what looks right. 7. now comes cropping! you should know what you want your gif to look like before even making it (probably even before you start gathering clips). With my new Brio edit I had to figure out which lyrics i wanted to use, how many gifs i was going to use, what size i wanted them to be, and what scenes i wanted to use. the size i used for that one was 540 x 280 (you want to make sure your sizes are in pixels, not inches). For the smaller gifs that are side by side i usually use 245 x 160 and you can put up to 12 of those in your set. 8. since i suck at coloring i use pre-saved psds for my coloring. i have some basic ones saved, but also some more fun ones as well. these are pretty easy to find around tumblr and all you have to do is save them to your computer and then just open then in photoshop! you’ll want to select all the layers on the psd then drag it over on top of all the layers on your gif. note that not all psds work for everything and you may have to do some adjustments on different layers to get it to look right. 9. after editing it’s time to save! tumblr has some size restriction so if you pass them your gif won’t move or might just be a blank space. all gifs must be under 3 MB and i think your whole set has to be under 10 MB for it to work correctly. When saving I select those 3 little lines on the far right of the timeline again, make sure all layers are selected, then again flatten all frames into layers. after that you go to file -> export -> save for web. after that you’ll just hit save in the next window then you’ll be able to save it in .gif format and it’s ready for tumblr!
there are tons of different ways to gif, this is just how i do it :) the more you practice the more you’ll learn
#i am no ps expert#and i haven't been giffing much the past year#but i hope this helps#xenalovesoq#ask
5 notes
·
View notes
Text
Trying | Natasha Romanoff x Bucky Barnes

(psd by allscallie on deviantart)
- Pairing: Natasha Romanoff x Bucky Barnes
- Summary: For a first time, Natasha and Bucky are on the mission together. While searching for the files about HYDRA’s bases, they somehow manage to engage into the conversation about love.
- Warnings: None
- Word Count: 2.9k
- A/n: A fanfiction for @softhairbarnes‘ “I love you 3000″ writing challenge. My prompt will be in bold.
_______________
The air was heavy, filling a dirty basement of HYDRA’s base with an awful scent of chemicals and dust. They seemed to crawl into the lungs further and further with each breath, covering every little bone and area, making it almost impossible to breathe freely. It only seemed like that, in reality, those scents where causing nothing besides feeling of disgust.
Both ex-assassins were covered in cuts and blood from a barbarous fight. Their enemies had appeared right by the door as they were trying to break into the underground laboratory, located in the basement
The fight was brutal. They grabbed any weapons they could get their hands on: guns, knives, tear gas pellets and of course, Bucky’s metal arm, which Natasha had to admit he used rather gracefully along with other weapons.
The metal arm always was a flaw in his eyes; a reminder of winter soldier, a reminder of how many lives he has destroyed, how many sins he carries on his shoulders and how much blood he has spilled, but that ‘flaw’ still was helpful during missions, it was his main and most powerful weapon which always will be with him.
But this fact was not helping and would never help him emotionally.
Everyone in the team understood that. Everyone knew what he went through, but no one besides the Black Widow fully realized and felt every part of his story, and even though she and Bucky basically never talk, she partly knew what he felt after killing so many people, what it’s like to live with that thought and guilt which slowly destroyed you from inside. She has been through something like this too when she joined the SHIELD. After all, don’t forget that once she was the Russian spy and the assassin which has killed thousands of innocent people
“Barnes, mind stopping looking on the floor and helping me?” the redhead hissed out with unhidden annoyance in her raspy yet soft voice as she opened another cabinet in the desk with small glass bottles of colorful liquids (which were giving out that disgusting scent) on the top, in an attempt to find the file that they needed.
Male’s eyes quickly moved up on the Natasha as she called him out, by that bringing him back to reality.
With apologies, Bucky slowly made his way to her, asking what to do.
“Help with searching for the file which contains data about all HYDRA’s bases” she explained, still kneeling opposite the right part of the desk, pulling out yellow files from the last cabinet and reading each of them. “Go to the left part and search there” she said and glanced upon him, carefully studying his appearance before going back to work.
“I’m not sure that they would save such kind of information in the simple, unprotected cabinets” Bucky stated as he took a few steps forward to the left side of the desk, slightly bending over it and opening the first cabinet.
“I doubt that too”
“Then why are you searching there?”
“Keyword: doubt” Natasha told him and slightly shook her head, glancing over at Bucky once again to check if he started doing his part of the job. “I’m not hundred percent sure and even if I was, we would check everything anyway she explained and watched how he opened one of the yellow files before searching through its papers with a cold, almost blank facial expression. It was a little bit hard for him to read all those things. They reminded him of the past, all the terrible things they forced him to do, dark laboratories in which they were wiping him over and over again, the physical and mental pain which he had to experience and accept.
“S-so, what do all those files contain overall?” He asked her, slightly stuttering as he did not move his gaze from the file. He wanted to know if all files would give him that feeling. Natasha had been searching and reading them for a long time already, so he was sure she knew the answer to the question.
“Mostly they are about laboratories, chemicals, and experiments that they have done with them, but I still hope that there will be at least a little information about bases” she answered and pulled out few of them from the cabinet “For example, this one is about…” she paused as she quickly opened a file to read papers and finish the sentence “About a now closed laboratory in South Carolina”
“South Carolina? Never been there but I’m sure it is a beautiful place” Barnes suddenly said in an attempt to keep talking and distract himself from thoughts about the past which kept floating up in his head more and more as he read papers.
The redhead got a bit ...when her teammate continued to talk in such a casual manner, unrelated to their work. But they were doing a simple task that didn't require much focus, so she didn't mind. Even if she wasn't the most open or talkative person.
“Once, I have been there on a mission. That’s why that laboratory is closed now” she said with the corners of her lips curving into slight smirk at memory of the mission “it was indeed a very beautiful place but unfortunately I did not have time to go on the beach and fully experience its beauty” she said “as they say – зло некогда не спит (evil never sleeps), so I always have to be on guard, no time to relax” she said and put the file back in its place.
“So, you don’t have any day off?” he continued the talk, matching his own tone to hers.
“Nope. No day offs”
“I’m pretty sure that’s illegal” Bucky joked while still doing his work, without even suspecting that Natasha’s gaze was on him the whole time when they were talking.
“Darling, I’m the definition of illegal by itself” she teased back and drew her lower lip between her teeth with the smirk still present on her face.
A small but genuine laugh escaped from his fine, pink lips, leaving a light trace of a smile for the first time in a while.
Seems like talking with her to get distracted from the dark thoughts worked. He would even say – more than worked. He did not expect to enjoy the talk that much.
“Oh, are you?” he continued teasing, refusing to give up “Because you seem pretty innocent to me,” Bucky said, turning his head to her direction with a small devilish smile playing on his lips as he caught her biting her lower lip with a smirk.
“Innocent?” repeated Natasha, raising her eyebrows “Since when is knocking out five men in three minutes – innocence?!” she asked as if she was offended.
“I don’t know. Maybe you knocked them out, out of love?” Bucky said with his tongue running over his lips. Of course, he did not mean what he said. He perfectly remembered how Natasha fought, how violent, fast but graceful and smooth her moves were. He felt like he was fighting alongside her his whole life even though this was their first mission together. He was not surprised that Natasha was great like this, Steve had told him a lot about her, what an amazing fighter and person she was.
“Love? Love is just a pretty lie” she said, meaning it even though her tone did not change.
“Well, I will have to disagree with you there, Ms. Romanoff” Bucky told her, a bit surprised when he understood that Natasha really meant it “Love is a quite real thing” he said, looking into her emerald green eyes for a few seconds before moving his own gaze to the files but still waiting for any kind of answer from her.
“Hmm… I’m not surprised that you disagree, Mr. Barnes” Natasha told, knowing that most of the people believe in it “But I’d be glad to hear what love is in your opinion” she suddenly said without thinking, by surprising not only Bucky but also herself.
“Well… love” he started, glancing down on Natasha before opening the second cabinet “Love is something that we usually believe in by default without acknowledging it,” he said, trying to find the right words “But we know the true taste of love once we fall for someone. Even the word is as magical and mysterious as the feeling by itself: passionate, deep, fiery but yet calming and full of warmth, as if it is a blanket which covers you during cold days but surrounds with care and affection, throws a shade on your past, helps you to accept yourself and deal with inner demons” Bucky said, his voice became softer and softer with each word. He remembered perfectly what it was like to be in love and be loved. After all, he had quite a colorful life before fell down from the train to darkness “trust me on this one: The greatest thing you’ll ever learn is just to love, and be loved in return”
“No” Natasha snapped looking upon the male and gently closing the cabinet “Maybe it feels great but in the end they always hurt you” she said and recalled a memory with Bruce Banner in her mind as she stood up “You slowly fall for them, give them little pieces of yourself, show them that you care and love and they seem to return the same feelings but then later they crush your heart in the nastiest, worst way, leaving you alone to fix it by yourself”
“Then they were not right for you” Bucky snapped back, glaring at Nat, his eyes burned with confidence in what he said “The one who truly loves you would never leave you” he said and returned his gaze on files “If they ended things then there was no true love, and it is better to be with a broken heart than in one-sided relationships”
The widow clenched jaw after inhaling the air. She knew there was a piece of truth in his words but from another side – he did not know all ‘events’ that convinced her into this.
“Nothing is eternal, including love,” Natasha said and turned her head to the side to avoid looking on him. Her voice was calm but with a mix of slight coldness “So, why should you let yourself fall for someone if at the end they hurt you anyway?” she asked rhetorically, keeping her gaze away from him.
“and what if they don’t hurt you? What if they promise to never leave and love forever?”
“The promises are nothing but empty, meaningless words thrown into the air”
“They are not”
“They always break them. Don’t lie, Barnes, you have done that too – promised a girl love and happy life together but dumped her on the next day. I have heard that you were ladies’ man back in the forties” she said, mentally slapping him with those words without even moving a single muscle on her face.
His eyebrows snapped together as soon as those words reached his ears. Yes, he was a ladies’ man, a bit of a player, he’d been on numerous amount of dates with different girls, not to even mention his one night stands, but he was always honest and treated women with respect. He was a man of his word, always completing what he has promised, so he would never use such a dirty way of flirting and getting a girl. To say more, he has been only in few relationships, and he never promised them anything if he was not sure in his ability to complete it.
“I’m not one of those men and never was” Bucky stated, referring to empty promises “No man should do such a thing to a woman,” he said and took a few steps forward to the redhead.
With each step the tension between them was growing. It was either because of Natasha’s cold attitude or slight offense which he faced after her words… or both. It was surprising how joyful talk so quickly turned into this mess which was hard to label.
“And if someone did that to you” he started again, figuring out that Natasha might have gone through tough relationships in the past. After all, she must have a reason to think like that “If you went through empty promises and heartbreak, then they are not worth it” he said, gently sliding his flesh index finger under her chin to move her head to face him once again “But if you never experienced relationships, then it is worth to give a shot for the first time and try” he said, moving away his fingers from her chin and crossing arms as Natasha’s gaze remained cold.
“No,” she told him, still being stubborn about her opinion. She did not want to accept the truth. It was hard. Maybe she got rid of Red Room but the beliefs with which they raised her, stayed with her.
‘You are one of the black widows. You are not supposed to feel love,’ ‘Love is for weak, and you must be strong– old voices echoed through her head, reminding her of the true reason why she did not believe in it, and the reason she later got stronger instead of got destroyed by previously mentioned ‘ex’
“Why?” he asked as he took a few steps towards her, not understanding what or why he was doing that but he knew that he wanted to change her opinion.
“Love is a lie. Love is for children” she repeated once again, finally looking into his eyes, not bothering to take step away
“But deep down, we all are children, are we not?” Bucky told her with his arms still crossed and pressed against his chest “All of us need a bit of affection in our lives”
“Not me”
“How do you know that?”
“Never had a desire” a small lie left her mouth. Of course she had such wish a few times in her lifetime but each of them ended badly.
“I don’t believe you” the soldier said without hesitation, getting closer and closer to Natasha “You can’t tell me you never wanted to even kiss someone” he said, taking a deep breath in “to feel their lips on yours and melt under their touch” he continued, not planning to stop yet “Even if you did not love them. Just wanted to kiss them”
”No. Never”
“Liar” he said almost instantly, getting closer and closer to her, not knowing even by himself what intentions he had, but one thing was for sure - they both forgot about files “You just don’t let yourself feel it”
“What about you, James?” she asked and took step towards him as well. Now they were a few centimeters away from standing chest to chest “You say that I don’t let myself feel such things but you are doing same since returned, are you not?”
Bucky did not answer.
“I was always acting like that towards romances but you…” she started but never finished the sentence. The words faded into the silence which fell between them.
It did not last long. Bucky broke it soon enough.
“The main difference is – I don’t mind trying”
“Then why don’t you try?”
“You are not going to give up, are you?”
“No”
Her words left him wordless. He did not know what to say to break her. She was stubborn but so was he. Neither of them wanted to give up nor leave without a fight. After all, both of them were soldiers - they were taught to fight until the last drop of blood.
His eyes slowly travelled down to her lips as he stood there for a few more seconds, doubting his actions. She was right, he stopped himself from even thinking about it since he returned. He did not want to hurt someone physically (with the metal arm) or mentally (with his own mental state) but now it was a whole different type of situation.
The soldier took a step closer to her, closing the gap between their bodies. He could feel her hot breath against his skin, he could feel how tense she was, he could feel the coldness in her…
“What are you doing?” She asked carefully with a whisper as she tried not to touch him.
“Trying” He answered, pressing his lips against hers, tasting blood & dirt along with her strawberry-flavored lipstick as if winter soldier got in the perfect mix with his old days. His heart raced faster with each passing second as he parted her lips using his to slip his tongue inside her mouth and slowly take over the kiss before she could process the situation and act. He expected a push, a slap, a punch or a kick but neither of them happened. At first, he felt how her body tensed more but eventually started to relax. She did not try to break it, but she did not try to kiss him back yet. He was confused, he did not know what she thought and felt, did not know if she enjoyed or hated it... honestly, he did not know what he felt either. A few seconds passed, neither of them broke the kiss, none of them even tried to do it, instead, he felt how she kissed him back, blending two broken souls into one and shattering the wall of chaos around them. Neither of them understood why they kept kissing but it did not stop them anyway, they paused only when Bucky pulled away for a little bit, only to softly whisper something against her lips
“Never had a desire, huh?”
#natasha romanoff x bucky barnes#winterwidow#bucknat#natasha romanoff#bucky barnes#winterwidow fanfic#bucknat fanfic#marvel fanfic#avengers fanfic#avengers#bucky barnes x reader#natasha romanoff x reader#shb3000wc#my writing
100 notes
·
View notes
Text
Gif Tutorial
I’ve had a *lot* of questions really about gif making. There are a MILLION gif tutorials on youtube and Tumblr but I figured I would show you guys how I personally do it, and maybe that will help! I’ll show you how to make this gif, and god help you because I'm bad at teaching.

HERE is where you find the dimensions for gifs on Tumblr for them to work properly.
Step 1: Import your video clip into Photoshop. I only use MP4 files--I find it the best and easiest way to make gifs *shrug* Import video frames to layers
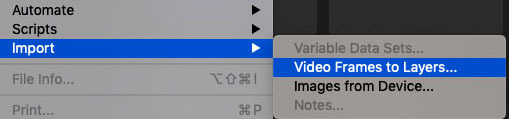
and then you’ll isolate which portion of the clip you want for your gif. (if it’s a whole episode/movie/whatever that you’re giffing from, trim it in Quicktime first so you’re not just throwing the whole thing in there and then trying to isolate from there. That’s a *pain*
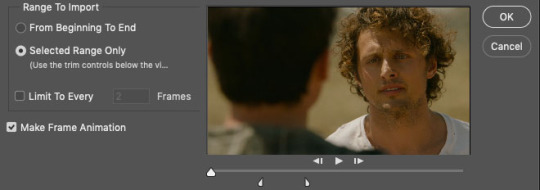
IF you’re using MP4 files, you do NOT need to limit to every 2 frames unless you just want it to be a super fast gif and hey, no judgment. You do you.
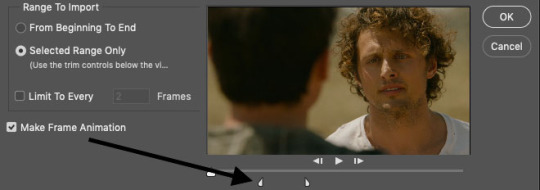
use the tabs at the bottom to further isolate the moment you want (advice: always import a few frames before and a few frames after the part you want. You can delete frames later. Also there is a limit to how many frames you can import--don’t worry, Photoshop will sure as fuck yell at you when you try.)
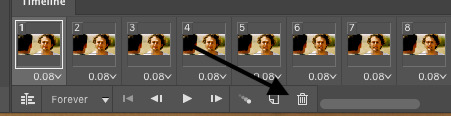
Now when everything is imported, you'll see your “timeline” at the bottom of your screen. These are the frames you’ll be working with. The little garbage can icon is, unsurprisingly, where you will delete frames you do not need. Frame count depends A LOT on how big the gif is, the way you color, how vibrant the colors, how you've sharpened it, etc. A good rule of thumb is 35-40ish frames for a 540 pixel wide gif, 70-100 for a 268 wide gif, and even more for a 177 pixel wide gif (I don’t often use that size...as you can tell)
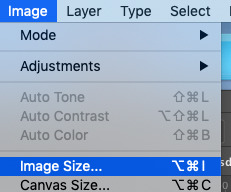
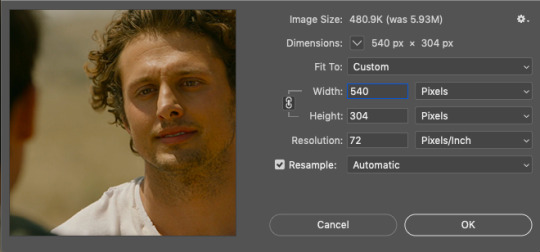
I’m making a large gif (540 pixels, a common size for me personally) so I set it the width here (the height will be adjusted later)

Once you’ve got the width you need, then you can start cropping to get the height you want. This particular gif is 269 pixels in height, based on...well, what I think looks good (A plus for teaching here)
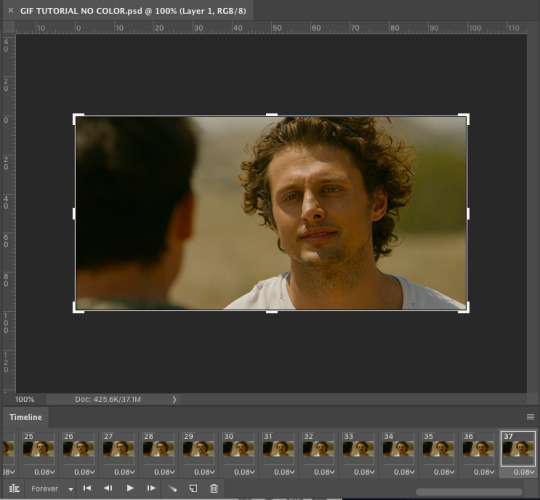
So now we’re here. We have 37 uncolored frames with the correct width and the desired height. Now, you could leave it here, and still have a gif.

But that’s no fun. There’s no color! We gotta see those curls in technicolor, darling.
SO NOW FOR THE FUN PART

The adjustment tab is where you’re going to add light, brightness, saturation, whatever your little heart desires. No limits (ok there’s limits, sorry)
Now, we’re lucky here because A) we have a good quality download and B) the scene is in natural light so we really don’t have to do *too* much. If it’s a dark scene....well, that’s when you’ll want to die.
This is the part where EVERY gif maker is different. This is just what I do. You find what works for you. I start with curves.


a good place to start is just to hit “auto” and then adjust from there, which is what I did here. It’s better to have it a tad too light than too dark (at least for me!) (yes he looks orange, yes that will be fixed)
Next: brightness/contrast
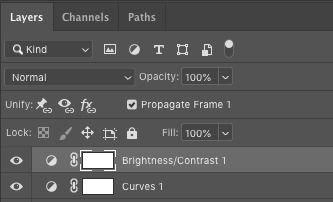
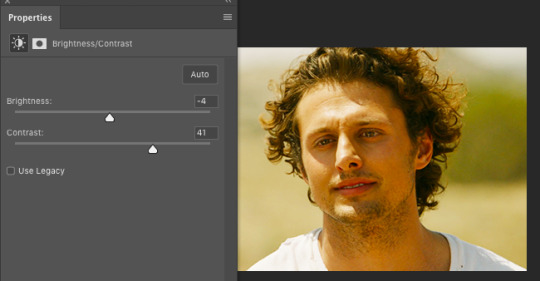
Now we’re cookin’ with fire! It’s still too orange but now the gif is highlighting what I want it to. I want it to be deeply saturated (especially the curls and facial hair)
Next: color balance


Run buck wild. That dropdown will let you adjust the color in shadows, midtones, and highlights. You’ll find your style VERY quickly here. Spend lots of time here learning what each sliding color scale does (tip: I RARELY use the magenta/green colors. And when I say rarely, I mean basically never.)
Once you’ve done that, you can do vibrance, hue/saturatio, whatever you want (keep in mind that the more “vibrant” the gif, the fewer frames you can use)
Me personally? I use selective color A LOT
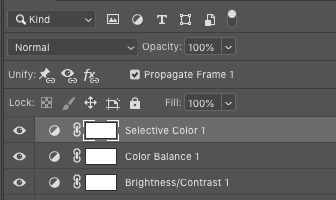

ESPECIALLY blacks. And because Roswell is addicted to YELLOW YELLOW YELLOW, I alter yellow a lot to try and balance it.

The ONLY thing that can help you here is practice. Slap a scene into photoshop and figure out what color/light works for YOU

Once you've done all the coloring you want to do, now you can add dialogue. This is where I will direct you to these tutorials here and here because these are how I learned and they do it better than I ever could. (a tip though: USE THE RULER IN PHOTOSHOP. Make sure your dialogue lines up in the same spot in every gif. I do mine at 93% but whatever works for you. Don’t leave it up to your eye, I promise it won't work)
OK we now have the right color AND the right dialogue let’s sharpen this bitch! But first, let’s make sure our gif is the right size because sharpening and saving the gif will increase the size and you need to keep it under 3 MB for Tumblr. AT THIS POINT, SAVE THE PSD. Because sharpening and things may take some room for error and you really don’t want to lose it all. Trust.

Click your “File” folder, then “Export” and then “Save for Web” and you’ll see this:
2.61 MB is a very good size to have before sharpening. Anything more than that and you’re playing with fire. Because once you've sharpened and it looks great you may very well discover it’s too large and then you have to undo what you just did to delete frames and that’s rage inducing.
Go down to your timeline and click “convert to video timeline”
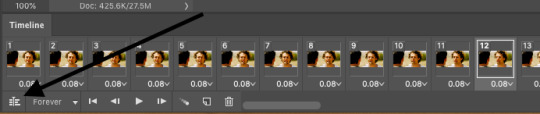
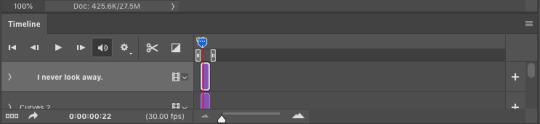
THEN go the right side of your screen and highlight all your layers

And then go to “Filter” and click “Convert for Smart Filters”
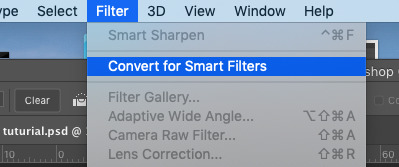
and it will look like this:

All your layers have been grouped together so now you can sharpen.
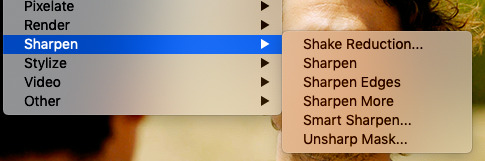
Under “Filter” you’ll find all the things you can do to your gif now that it’s been converted for smart filters. have a ball! Experiment!
For my gifs, I use “Smart Sharpen”

and then I have it set to what I think looks good. I typically tend to over sharpen.
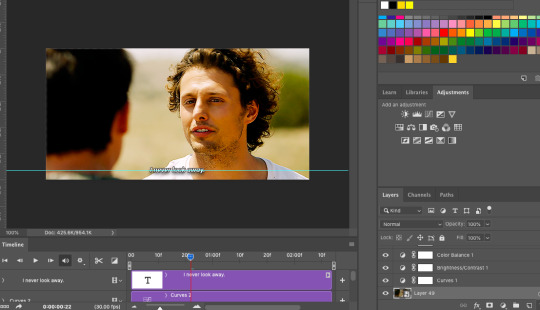
So this is what we have! We’ll check the size one more time before we save
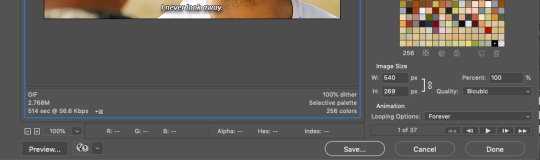
2.76 MB! Perfect! I’ve found that at this point anything about 2.85 MB will save to my computer as a file that is bigger than 3 MB and thus unusable on Tumblr.
And tada! A gif!
#long post#and I do mean long#gif resource#giffing resource#gifmaker resource#gifmaking#my gif tutorial
87 notes
·
View notes
Last Seen Blogs
oliviacirce
OLIVIA C.

dfwsellfast
DFWSellFast Blog
dkwjr87
yummy
beelzebuzz
OK class fucking dismissed every1.

hymuk
Hold The Pickles