#Crispy Triangles Recipe
Text
I'm trying to create the ultimate quesadilla.
Right now my recipe is as follows...
Cut up onions and bell peppers (I got the variety pack with all colors) and then I cook those with the toaster oven air fryer. I don't know how to use a stovetop yet (I had a disaster on my first try so I'll probably need lessons). But the air fryer cooks them decently for now.
I have three different meats that I alternate. I have this precooked angus beef that is made for Mexican style food. I have precooked frozen chicken breasts. And I also like using Jimmy Dean sausage links.
Once the onions, peppers, and meat are cooked, I dump them into a bowl and pour taco sauce onto them. I mix it around so they have a coating of sauce.
Then I lay out a flour tortilla, cover it with cheese, and spread my ingredients on top. I add a little more cheese on top as a kind of glue and put another tortilla on top.
I stick all of that back in the toaster oven on the air fryer setting so the tortillas get crispy and the cheese melts.
I cut everything into triangles and dip in sour cream as I go.
I've been pretty happy with the results, but I am heading back to the grocery store and I was wondering if there are any additional ingredients I should try. Or maybe a better sauce recommendation. I can do medium spicy.
Any suggestions are welcome.
93 notes
·
View notes
Text

Many years ago I learned to make spinach pie, loaded with crumbled feta cheese and seasoned with fresh dill. My family absolutely loved it, so it was — still is — a regular item on my menu. It’s almost always part of my break-the-fast feast.
Most of the time I make spinach pie using buttered layers of phyllo pastry, which makes for a crispy, delicate crust for the savory spinach filling below.
But we like the dish so much that on Passover, I top the pie with buttered matzo.
At one time I used the filling for spanakopitas, making spinach-filled layers of phyllo dough into small triangles. These were perfect as hors d’oeuvre and I would make dozens at a time and stock them in the freezer.
That was a LOT of work!
This year, thanks to inspiration from my Facebook friend Dana Shrager (@Danastable), who posted her recipe for spinach and cheese bourekas as a treat for Purim, I realized that I could make those wonderful hors d’oeuvres again using puff pastry, as she suggested!
SO MUCH EASIER!
I made a whole bunch of these, using my recipe for spinach pie as filling but using puff pastry. All I can say is that I will never go back to phyllo dough for these hors d’oeuvres. My tasters gobbled these down and I served them again to everyone’s absolute delight.
Thanks Dana, for your suggestion to use puff pastry and also that these, triangular shape that they are, would be perfect for Purim. Yes. They are indeed!
Here’s the recipe for spinach and cheese filling and instructions on how to make the triangle bourekas.
Follow me on Instagram @RonnieVFein
SPINACH AND CHEESE BOUREKAS
1 10-ounce package frozen chopped spinach, thawed
2 tablespoons olive oil
1 medium onion, chopped
1 large egg
4 ounces feta cheese, crumbled
3 tablespoons grated Parmesan cheese
1 tablespoon finely chopped fresh dill
freshly ground black pepper to taste
2 sheets puff pastry, defrosted
Preheat the oven to 375 degrees. Squeeze as much water out of the spinach as possible and set aside. Heat the olive oil in a saute pan over medium heat. Add the onion and cook for 2-3 minutes. Stir in the spinach and mix well. Remove the pan from the heat. Add the egg, feta cheese, Parmesan cheese, dill and pepper. Mix well and set aside. Using one sheet at a time, roll the puff pastry on a lightly floured board slightly thinner (I did 12”x9”). Cut each sheet on the long side into 4 equal strips (3”). Cut the strips into thirds (making 12 pieces). Place equal amounts of the filling in the center of each piece of dough. Fold the dough to enclose the filling and make a triangle. Press the edges to seal them. If necessary, wet the edges of the pieces before folding, OR, press the edges down with the tines of a fork. Refrigerate for at least 30 minutes before baking. Bake for about 15-18 minutes or until browned and crispy.
Makes 24
#bourekas#spinach and cheese bourekas#spanakopitas#Purim#Purim 2024#puff pastry#spinach and cheese puffs
3 notes
·
View notes
Text
translated a recipe for fried potato pirozhki for my friend, thought maybe you guys would like it too
ps its one of my favorite foods lol
recipe from https://1000.menu/cooking/15862-pirojki-s-kartoshkoi-na-drojjax
MAKES 10 SERVINGS (10 PIROZHKI)
FOR THE DOUGH:
Water (boiled) 0,3 liters (101 oz)
Dry yeast (or 50g(1,76oz) of fresh ones) 1 teaspoon / 5 g (0,17 oz)
Vegetable oil (+300g(10,5oz) for frying) 50 ml (1,7oz)
Sugar 10g (0,35 oz)
Salt 1 teaspoon (0,17 oz)
Wheat flour 390g (13,7oz)
FOR THE FILLING:
Vegetable oil 40 ml (1,35oz)
Salt To taste
Potato 250g (8,8oz)
Onion 50g (1,7 oz)
DIRECTIONS
1. Put the flour through a fine sieve to get some oxygen in (p.s. usually optional but its better to get rid of clumps either way). Wash the potatoes thoroughly and dry them. Take the skin off an onion, wash and dry it.
2. In a bowl, combine the dry ingredients. Part of all the flour (≈350g(12,3oz)), dry yeast, salt and sugar.
3. Make a hole in the flour. Pour half a cup(≈100ml(3,4oz)) of olive oil into the dry ingredients.
4. Add warm (≈40°C(≈104°F)) water into the flour. The water cannot be too hot* so as to not kill the yeast. Thanks to the warm water, the dough rises very quickly.
*-yeast dies at over 60°C(120°F)
5. Add the remaining flour in parts and mix the elastic dough. You might need a little less or more flour. The dough should not stick to your hands, but shouldn't be too tough either. Cover the dough with a clean cloth and let it rise for about 20-30 minutes while the potatoes for the filling boil. It's preferred to leave the dough next to the stove so the steam from the potatoes helps the dough rise.
6. While the dough is rising, start the filling. Skin the potatoes, wash them and boil them in salty water. Later, remove the water and make a mash. It's best to do it using a potato masher(?? this thing shaped kind of like a triangle with a circle with holes at the bottom).
7. Finely chop the (skinless) onion. Later fry it in some vegetable oil until golden brown.
8. Add the onions to the mashed potatoes and stir. The filling is done. (p.s. the place i go to also adds tiny chopped carrots, you would also need to skin and boil them and then chop into small pieces and add to the potatoes)
9. By this time the dough has risen well. We didnt touch it. Now we will press it down slightly* and begin forming the pirozhki/pies immediately. Press it with your hands, fold it for about 3-5 minutes.
*-likely referring to when people sometimes punch dough that has risen
10. The dough is very elastic and nice so we will not be using a rolling pin, instead doing everything with our hands slightly coated in vegetable oil. Place the bowl containing the oil next to you, dip your hands in it and take off equal bits of dough from the pile, creating the templates(?) for future pirozhki/pies.
11. Set the oil to heat up in a pan and begin making the first pirozhki. Form the dough into a flatbread shape, it doesnt have to be perfect or pretty, they'll rise later anyway which will cover up any imperfections. Put down the filling, there should be about half the amount of the dough. But you may put more according to your wishes. (ps lol)
12. Put together the sides of the dough in the shape of a pirozhok*. Immediately put it in the pan to cook, so that the seam faces the bottom of the pan. Do the same thing to the next pirozhok. You have to do everything quickly. If you wish, you can form all the pirozhki prior to frying.
*the shape in question
13. After taking them out*, set the pirozhki on a paper towel (p.s. or a rack if you have one) to absorb all the excess oil. Enjoy!
*-just fry them until both sides are you preferred level of crispy, since all the ingredients are already basically cooked. The average is around 5 minutes on each side but this can depend on the type of pan/stove you use. After heating the oil well, cook on the middle temperature setting. The 'doneness' can also depend on the thickness of the dough layer, as thicker dough can take longer to cook. Someone in the comments recommended frying it on each side and then putting a lid over the pan and letting them cook for 1 more minute. You can also check the doneness by poking the pirozhok with a toothpick, if it comes out with dough on it, it's not done yet.
15 notes
·
View notes
Note
hi sage it’s tofu anon….would you like to speak about tofu? (maybe some of your favorite ways of eating it!)
Hello beloved tofu anon!!! I have missed you. I will give you my top 5 favorite ways to eat tofu (not in any specific order)
1. Chopped, air fried with corn starch, seasoned with nutritional yeast, and put in a salad!! You can also use literally any other kind of seasoning. I tried lemon pepper on it last time, and it was SO good
2. Chopped into triangles, drenched in soy sauce, nutritional yeast, garlic powder, and salt, baked in the oven. I like to serve it with oven roasted potatoes and broccoli. I imagine this would also be good with rice!
3. Green tofu scramble. Crumble the tofu into a hot oiled pan, add seasonings (I use salt, garlic powder, and onion powder) and then add any kind of green salsa or hot sauce once the tofu is golden brown in the pan. It can be on tortillas, on toast, in its own, etc. I like making breakfast tacos.
4. In fried rice! I like to pan fry my tofu BEFORE adding it to the rice, veggies, and eggs. This helps if get crispier and hold it’s shape better so it doesn’t crumble and disappear into the rice
5. Tofu orange “chicken”. This is probably my FAVORITE tofu recipe at the moment. Basically you chop the tofu, get some oil and corn starch on there, air fry it (so it’s crispy) and then make a basic orange chicken sauce and toss the tofu in it. Serve over rice :)
5 notes
·
View notes
Text
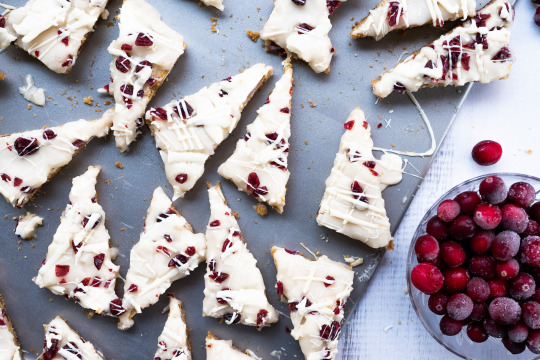
Vegan Starbucks Cranberry Bliss Bites
This is my second version of these, I like both versions but the cookie from the previous one was a little crumblier and I wanted chewy, so I went back to the drawing board! I remember the first winter season after going vegan when I walked into a Starbucks and realized I couldn’t order a Cranberry Bliss Bar, I was absolutely crushed. Where else could I get white chocolate blondies with notes of orange and chewy bits of cranberry but without the animal derived butter and eggs? My own kitchen, that’s where. And now yours too!
Vegan Starbucks Cranberry Bliss Bars
Makes: 32 Bars
Serving Size: 1 Bar
For the bars:
1 cup vegan butter, melted
1 ½ cup packed light brown sugar
2 vegan eggs (bob's red mill, just egg, zero egg) or flax egg *see note
1 teaspoon orange extract
1 teaspoon vanilla extract
2 cups all-purpose flour or 1 to 1 gluten free baking flour for gluten free
½ teaspoon ground ginger
1 teaspoon baking powder
½ teaspoon sea salt
1 cup vegan white chocolate chips
¾ cup dried cranberries
For the frosting and drizzle:
8 ounces plain vegan cream cheese
3 cups organic confectioners sugar
½ teaspoon orange extract
½ teaspoon vanilla extract
⅓ cup dried cranberries, roughly chopped
1 cup vegan white chocolate chips, melted
Coconut oil, as needed
Preheat the oven to 350 F. Line a 13x9 rimmed baking sheet with parchment paper.
Add the butter and brown sugar to the bowl of a stand mixer. Mix on low with the paddle attachment until creamed together. Add the vegan egg, orange extract, and vanilla extract and mix until well combined.
Add the flour, ginger, baking powder, and salt to a separate bowl and whisk to combine. Slowly addthe flour mixture to the butter mixture in the stand mixer and continue to combine on low speed with the paddle attachment. Fold in the chips and cranberries until well combined. Do not over mix.
Transfer mixture to the prepared baking sheet and spread into an even layer. Bake for 18-22 minutes until golden brown on the edges. Remove from the oven and let cool. Cool completely before frosting. I like to remove it from the pan and cut off the crispy edges, the edges make great little snacks on their own! Then you have the perfect rectangle for your cranberry bliss canvas, set the cookie rectangle on a large cutting board.
Add the cream cheese, sugar, orange extract, and vanilla extract to the bowl of a stand mixer. Use a paddle attachment and mix on low until well combined.
Frost the cooled uncut rectangle with frosting and sprinkle with chopped cranberries.
Melt the chips in the microwave, heating for 30 seconds at a time until melted. Mix with a fork between 30 second increments. Add a dash of coconut oil, if desired, to thin the chocolate and make it easier to drizzle. It will also add a slight sheen.
Drizzle melted chocolate over the bars. Place the sheet pan into the refrigerator to let everything set for about an hour, until the drizzle on top seizes completely. Remove from the refrigerator and cut into 24 triangles.
Place in a tightly sealed container and store in the refrigerator. Will keep for up to one week.
Notes: For vegan white chocolate chips my go to has been King David Kosher chips for years. To make 2 vegan flax eggs mix 2 tablespoons of flax meal with ¼ water and let sit for 5 minutes to thicken, use in recipe as directed. If you want the frosting thicker use less cream cheese, start with half and add more as desired.

2 notes
·
View notes
Text
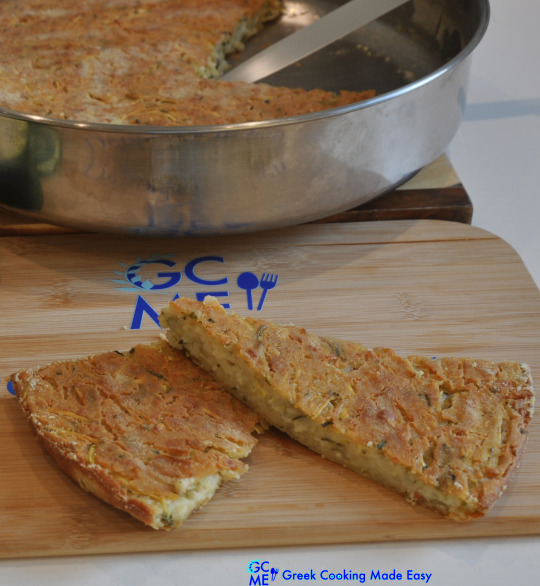
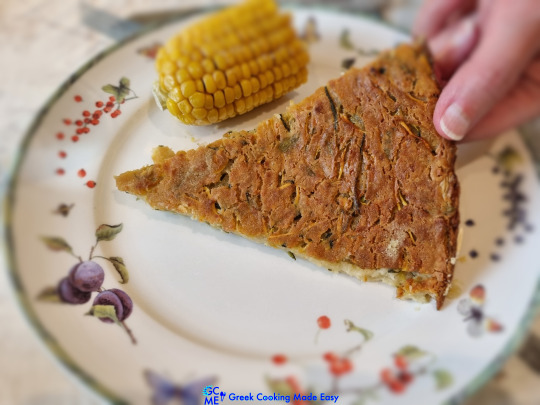
Greek Crustless Zucchini Pie aka Thessalian “Batzina”
🥧

Greek Crustless Zucchini Pie aka Thessalian “Batzina” – Thessaliki Batzina (Kolokythopita hwris fillo)
BY: Greek Cooking Made Easy
SUBSCRIBE TO MY YOUTUBE CHANNEL: https://www.youtube.com/greekcookingmadeeasy
Check my YouTube Video: HERE
Κοιτάξτε επίσης την συνταγή μου σε YouTube βίντεο, το λίνκ είναι: ΕΔΩ
youtube
Makes 8 large triangles, enough for 4 pers. as main course, or 8 pers. as 1st or side
Many of you asked me for this recipe that has become a huge trend lately!
Batzina is a crustless pie, from the Thessaly prefecture. Its ingredients are as humble as its origin. In the old days, it was simply made from flour, cheese, milk and eggs. When zucchini was added, “Batzina” was created and it is being prepared exactly the same way until today.
Similar idea to Batsaria (hortopita) pie from Epirus but made with zucchini instead, it is very easy to prepare, inexpensive and with ingredients that you usually have at home.
Suitable for lacto-ovo vegetarians.
More Information about the history and name origin of Thessalian Batzina at the end of my recipe.
INGREDIENTS:
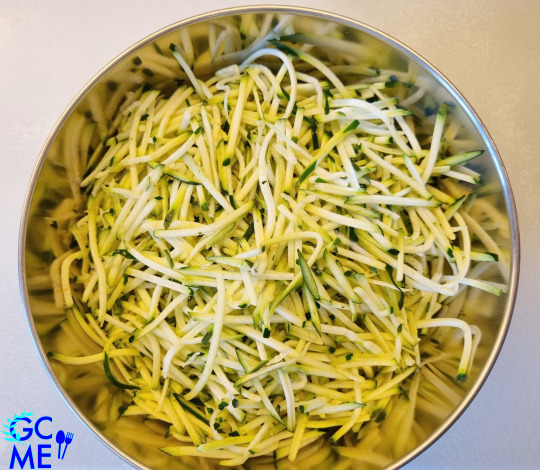
• 450 gr / 1 lb Zucchini, grated
• 1 medium Onion and 3 Spring Onions, chopped together in food processor
• 2.8 cups / 350 gr / 12 oz All-purpose Flour, sifted
• 3 tbsp. / 33 gr / 1.2 oz Corn Meal
• 1 cup / 250 ml Fresh Milk, warm
• 1 large Egg
• ½ cup / 125 ml Water, warm
• 1/3 cup / 80 ml Olive Oil
• 270 gr / 9.5 oz Feta cheese, crumbled in food processor
• Ground Salt and Pepper
• Optional: 2 tbsp. Melted Butter

METHOD:
Important Note:
Traditionally, Batzina should be extremely thin and extremely crispy. Using All-purpose instead of self-raising flour is important in this recipe, in order to get a very thin pie which doesn't rise when baked!
A. Prepare the zucchini 1h before baking:
1. Place the grated zucchini in a large bowl, season it with salt and leave it to sit and "sweat" (bring out its moisture!) for 30'-1h.
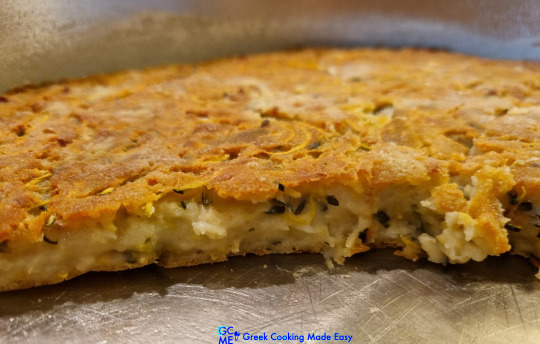
2. After 1 h, press or squeeze the zucchini and shed the excess water. That helps the pie get crunchy and prevents it from turning soggy when baked.
3. Reserve.
B. Prepare the crustless pie:
4. Break and whisk the egg in a large bowl.
5. Pour the olive oil as well as the warm milk in the bowl.
6. Add gradually half of the sifted flour in the mix, and whisk to blend it in.

7. Next, pour in gradually the warm water and the rest of flour, whisking until you get a lump-free, thick mush.

8. Add the finely chopped onion and spring onions in the bowl with grated zucchini.

9. Add the crumbled feta cheese on top.
10. Season with ground salt and pepper, to taste and with a large spoon mix all ingredients very well.

11. Now, tip the mush in the grated zucchini mix. Fold it in and mix to incorporate ingredients.

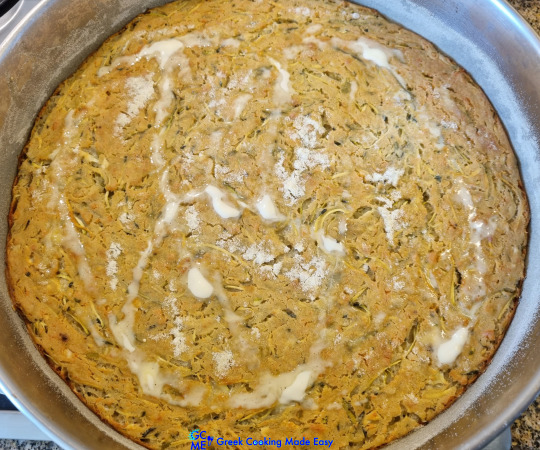
12. Brush with a bit of olive oil the bottom and sides of a round oven tray of 33 cm / 13 in diameter. You need to use a large tray to get a thin pie 1 cm / 0.4 in thick.

13. Flour the tray next with half of the corn meal and shake to remove excess (it is used to get a crispy pie).
14. Tip the pie mix in to the tray, and level its surface.
15. Sprinkle the rest of corn meal on top of the pie.
16. That’s it, ready for baking, so easy.

C. Baking instructions:
17. Bake the pie on the bottom shelf of a preheated oven, both heating elements on @ 190-200 ℃/ 375-400 ℉ for about 1 hour & 15’- 1 hour & 30’ or until it turns golden all around (depends on the oven).
18. Note: This pie needs to be baked properly in order to have the traditionally desired result i.e. a pie that's very thin, crunchy and golden all around.
19. Halfway through baking, remove pie from the oven and drizzle a bit of melted butter on top, for a nice glazing (optional).
20. When ready, remove from the oven.

D. Serving suggestions:
21. Place the tray with baked pie on the kitchen bench to cool down a bit.
22. Then cut in in large triangles.
Batzina can be served very hot, warm, lukewarm or at room temp. and that makes it the perfect pie to serve practically all day and anywhere!
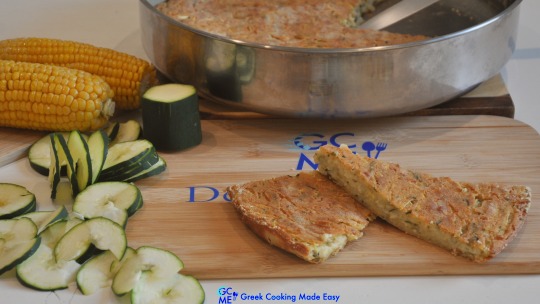
A great meze (appetizer), snack, lunch, school/work lunch, even fingerfood for a party buffet!
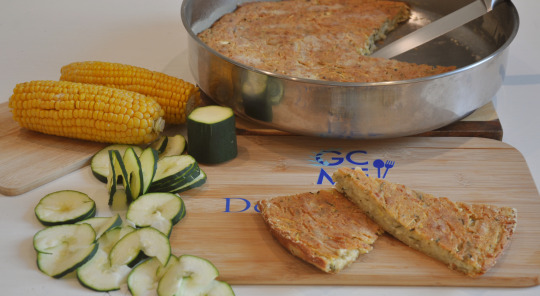
Golden, super thin, crunchy and crispy all around full with rustic, earthy flavors!

An easy dish, ideal for busy parents. No wonder it has become such a trend!
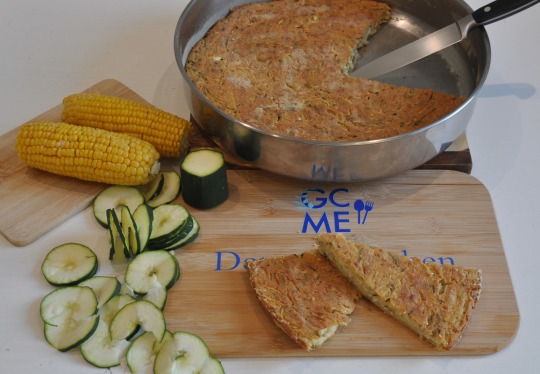
Crunchylicious & scrumptious! Enjoy!!
Other Recipes-Ideas with Zucchini? Check them all HERE
E. Storage Info:
After it cools down, this Pie can be stored, in individual triangles, wrapped in aluminum foil, in the fridge for 1 week, or in the freezer for 1 month.
F. Info about Thessalian Batzina:
Batzina is a crustless pie, i.e. without fillo, especially from the Karditsa area.

The word “Batzina” comes from the word batzos (or batsos) which is a Greek white, hard, goat cheese, originated from Western Macedonia.
The traditional batzina is quite thin, for two reasons. Firstly, to be baked quickly and secondly to remain crispy for many hours or even days. Its easiness in preparation made it ideal for all occasions. It is the meal that the farmers took in the fields, wrapped in a towel. It is the snack that parents gave to children for school lunch.
It was an easy solution for the rural families of the Thessalian plain and specifically of Karditsa where the work in the fields was always waiting and the housewives had to catch up with everything.
That's why they had to find easy, but also delicious recipes to satisfy and feed the whole family.
With excerpts from Wikipedia
Check my YouTube Video: HERE

Θεσσαλική Μπατζίνα (Κολοκυθόπιτα χωρίς φύλλο)
BY: Greek Cooking Made Easy
SUBSCRIBE TO MY YOUTUBE CHANNEL: https://www.youtube.com/greekcookingmadeeasy
Φτιάχνει 8 μεγάλα τρίγωνα, αρκετά για 4 άτομα ως κυρίως πιάτο, ή 8 άτομα ως 1ο ή συνοδευτικό
Πολλοί από εσάς μου ζητήσατε αυτή τη συνταγή που έχει γίνει πολύ της μόδας τον τελευταίο καιρό!
Η Μπατζίνα είναι μια ζυμαρόπιτα, από τη Θεσσαλία. Τα συστατικά της είναι τόσο ταπεινά όσο και η καταγωγή της. Παλιά την έφτιαχναν απλά από αλεύρι, τυρί, γάλα και αυγά. Όταν προστέθηκαν τα κολοκύθια, δημιουργήθηκε η «Μπατζίνα» και παρασκευάζεται ακριβώς με τον ίδιο τρόπο μέχρι σήμερα.
Παρόμοια ιδέα με την Ηπειρώτικη Μπατσαριά αλλά φτιαγμένη με κολοκύθια, είναι πολύ εύκολη στην ετοιμασία της, οικονομική και με υλικά που συνήθως έχετε στο σπίτι.
Κατάλληλη για χορτοφάγους.
Περισσότερες πληροφορίες για την ιστορία και την προέλευση του ονόματος της Θεσσαλικής Μπατζίνας στο τέλος της συνταγής μου.
ΥΛΙΚΑ:
• 450 γρ / 1 lb Κολοκύθια, τριμμένα
• 1 μέτριο, ξερό Κρεμμύδι και 3 φρέσκα Κρεμμυδάκια, ψιλοκομμένα μαζί στο μούλτι
• 2,8 φλ. / 350 γρ / 12 oz Αλεύρι για όλες τις χρήσεις, κοσκινισμένο
• 3 κ.σ. / 33 γρ / 1,2 oz Καλαμποκάλευρο
• 1 φλ. / 250 ml Φρέσκο Γάλα, ζεστό
• 1 μεγάλο Αυγό
• ½ φλ. / 125 ml Νερό, ζεστό
• 1/3 φλ. / 80 ml Ελαιόλαδο
• 270 γρ / 9,5 oz τυρί Φέτα, θρυμματισμένη στο μούλτι
• Φρεσκοαλεσμένο αλάτι και πιπέρι
• Προαιρετικά: 2 κ.σ. Λιωμένο Βούτυρο
ΜΕΘΟΔΟΣ:
Σημαντική σημείωση:
Παραδοσιακά, η Μπατζίνα πρέπει να είναι εξαιρετικά λεπτή και εξαιρετικά τραγανή. Η χρήση αλευριού γ.ο.χ. αντί για αλεύρι που φουσκώνει μόνο του είναι σημαντική σε αυτή τη συνταγή, για να έχετε μια πολύ λεπτή πίτα που δεν φουσκώνει στο ψήσιμο!
Α. Ετοιμάστε τα κολοκύθια 1 ώρα πριν φτιάξετε τη πίτα:
1. Σε ένα μεγάλο μπολ βάλτε τα τριμμένα κολοκύθια, αλατίστε τα και αφήστε να κάτσουν και να «ιδρώσουν» (να βγάλουν την υγρασία τους!) για 30'-1 ώρα.
2. Μετά από 1 ώρα, πιέστε ή στύψτε τα κολοκύθια και πετάξτε το περιττό νερό. Αυτό βοηθάει την πίτα να γίνει τραγανή και την αποτρέπει από το να νοτίσει κατά το ψήσιμο.
3. Βάλτε στην άκρη.
Β. Ετοιμάστε τη Μπατζίνα:
4. Σπάστε και χτυπήστε με σύρμα το αυγό σε ένα μεγάλο μπολ.
5. Ρίξτε κατόπιν στο μπολ το ελαιόλαδο καθώς και το ζεστό γάλα.
6. Προσθέστε σταδιακά το μισό από το κοσκινισμένο αλεύρι στο μείγμα και ανακατέψτε να αναμειχθεί.
7. Στη συνέχεια, ρίξτε σταδιακά το ζεστό νερό και το υπόλοιπο αλεύρι, ανακατεύοντας καλά με το σύρμα μέχρι να γίνει ένας πηχτός χυλός, χωρίς σβόλους.
8. Προσθέστε το ψιλοκομμένο κρεμμύδι μαζί με τα φρέσκα κρεμμυδάκια, στο μπολ με το τριμμένο κολοκύθι.
9. Προσθέστε από πάνω την θρυμματισμένη φέτα.
10. Αλατοπιπερώστε κατά βούληση και με ένα μεγάλο κουτάλι ανακατέψτε πολύ καλά όλα τα υλικά.
11. Τώρα, ρίξτε τον χυλό πάνω από το μείγμα τριμμένου κολοκυθιού. Ανακατέψτε να ενσωματωθούν καλά όλα τα υλικά.
12. Αλείψτε με λίγο ελαιόλαδο τον πάτο και τα πλαϊνά ενός στρογγυλού ταψιού φούρνου διαμέτρου 33 εκ. / 13 in. Πρέπει να χρησιμοποιήσετε μεγάλο ταψί για να γίνει λεπτή η πίτα σας με πάχος 1 εκ. / 0,4 in.
13. Αλευρώστε το ταψί μετά με το μισό από το καλαμποκάλευρο και ανακινήστε να φύγει το περίσσιο (το χρησιμοποιούμε για να γίνει τραγανή η πίτα).
14. Χύστε τώρα το μείγμα για τη πίτα στο ταψί και ισιώστε την επιφάνειά του.
15. Πασπαλίστε το υπόλοιπο καλαμποκάλευρο πάνω από την πίτα.
16. Αυτό ήταν, έτοιμο για ψήσιμο, τόσο εύκολα.
Γ. Οδηγίες ψησίματος:
17. Ψήστε την Μπατζίνα στο κάτω ράφι ενός προθερμασμένου φούρνου, στις πάνω και κάτω αντιστάσεις @ 190-200 ℃/ 375-400 ℉ για περίπου 1 ώρα & 15'- 1.30' ώρα ή μέχρι να χρυσίσει γύρω γύρω (εξαρτάται στο φούρνο).
18. Σημείωση: Αυτή η πίτα πρέπει να ψηθεί σωστά για να έχει το παραδοσιακά επιθυμητό αποτέλεσμα, δηλαδή πίτα πολύ λεπτή, πολύ τραγανή και χρυσαφένια γύρω-γύρω.
19. Στα μισά του ψησίματος, βγάλτε την πίτα από τον φούρνο και περιχύστε λίγο λιωμένο βούτυρο, για ωραίο φινίρισμα (προαιρετικά).
20. Μόλις η πίτα ψηθεί, βγάλτε τη από το φούρνο.
Δ. Προτάσεις σερβιρίσματος:
21. Τοποθετήστε το ταψί με την ψημένη πίτα στον πάγκο της κουζίνας να κρυώσει λίγο.
22. Στη συνέχεια κόψτε τη σε μεγάλα τρίγωνα.
Η Μπατζίνα μπορεί να σερβιριστεί πολύ ζεστή, χλιαρή ή σε θερμοκρασία δωματίου και αυτό την κάνει ιδανική για να την σερβίρετε σχεδόν όλη μέρα και οπουδήποτε!
Ένας υπέροχος μεζές, σνακ, μεσημεριανό, γεύμα για το σχολείο/δουλειά, ακόμα και fingerfood σε μπουφέ για πάρτι!
Χρυσαφιά, σούπερ λεπτή, τραγανή και κριτσανιστή γεμάτη με ρουστίκ, γήινες γεύσεις!
Ένα εύκολο πιάτο, ιδανικό για πολυάσχολους γονείς. Δεν είναι παράξενο λοιπόν που έχει γίνει τόσο μεγάλος ντόρος!
Τραγανή & λαχταριστή! Απολαύστε τη!!
Άλλες Συνταγές-Ιδέες με Κολοκύθια? Δείτε τις όλες ΕΔΩ
Ε. Πληροφορίες φύλαξης:
Αφού κρυώσει, αυτή η πίτα μπορεί να φυλαχτεί, σε τρίγωνα τυλιγμένα ατομικά σε αλουμινόχαρτο, στο ψυγείο για 1 εβδομάδα ή στην κατάψυξη για 1 μήνα.
Ζ. Πληροφορίες για τη Θεσσαλική Μπατζίνα:
Η Μπατζίνα είναι μια ζυμαρόπιτα, δηλαδή πίτα χωρίς φύλλο, ειδικά από την περιοχή της Καρδίτσας.
Η λέξη «Μπατζίνα» προέρχεται από τη λέξη μπάτζος (ή μπάτσος) που είναι ένα Ελληνικό λευκό, σκληρό, κατσικίσιο τυρί, που προέρχεται από τη Δυτική Μακεδονία.
Η παραδοσιακή Μπατζίνα είναι αρκετά λεπτή, για δύο λόγους. Πρώτον για να ψηθεί γρήγορα και δεύτερον να παραμείνει τραγανή για πολλές ώρες ή και μέρες. Η ευκολία στην ετοιμασία την έκανε ιδανική για όλες τις περιστάσεις. Είναι το γεύμα που έπαιρναν οι αγρότες στα χωράφια, τυλιγμένο σε μια πετσέτα. Είναι το σνακ που έδιναν οι γονείς στα παιδιά για το κολατσιό στο σχολείο.
Ήταν μια εύκολη λύση για τις αγροτικές οικογένειες του θεσσαλικού κάμπου και συγκεκριμένα της Καρδίτσας όπου η δουλειά στα χωράφια πάντα περίμενε και οι νοικοκυρές έπρεπε να προλαβαίνουν τα πάντα.
Γι' αυτό έπρεπε να βρίσκουν εύκολες, αλλά και νόστιμες συνταγές για να ικανοποιήσουν και να ταΐσουν όλη την οικογένεια.
Με αποσπάσματα από τη Βικιπαίδεια
Κοιτάξτε επίσης την συνταγή μου σε YouTube βίντεο, το λίνκ είναι: ΕΔΩ
#breakfast#meze#lunch#snacks#figerfood#sandwich#maincourse#dinner#pie#pastry#vegetables#cheese#party#kids#mother#vegetarian#children#region#mainland#batzina#crustless zucchini pie#μπατζινα#μπατζίνα
2 notes
·
View notes
Text
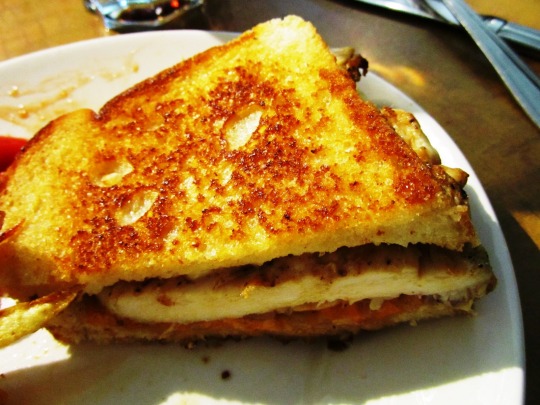
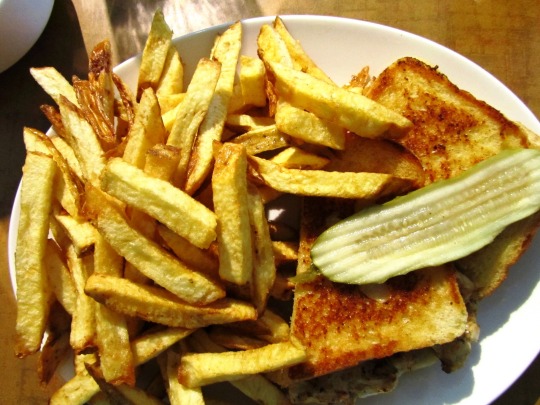
National Grilled Cheese Sandwich Day
Crispy bread and melted cheese. How can something that tastes so good be this simple? Welcome to National Grilled Cheese Sandwich Day on April 12!
What’s the secret?
We asked Aaron Christenson, the owner of a small Central Oregon restaurant which won a recent readers’ poll in the categories of “Best Kids Menu” and “Best Family Restaurant.”
His response?
“A perfect grilled cheese has to have a super crispy exterior, brushed with garlic oil. Lots of melty cheese in the center. Thick cut, handmade bread is a must!”
And there you have it.
Now get grilling.
History of National Grilled Cheese Sandwich Day
Food historians and experts tell us that cultures around the world have been enjoying cheese on bread since ancient times. The modern grilled cheese sandwich that we enjoy today originated in the 1920s.
While we don’t know the creator of grilled cheese sandwiches, we owe its success to Otto Frederick Rohwedder, who invented the bread slicer during the Industrial Revolution. His invention made dividing bread into even slices easier and more affordable. Luckily, shortly before the bread slicer was perfected, James L. Kraft created processed cheese. This meant that cheese could be transported over long distances and not spoil. Each significant in their own way, both inventions revolutionized sandwiches forever!
So who was the genius behind grilling the combination of cheese and bread to create the grilled cheese sandwich? According to government-issued cookbooks, surprisingly it is the American Navy who thought of it or, at the very least, were the first to publish the recipe. Hundreds of “American cheese-filled sandwiches” were prepared by Navy chefs for military personnel during World War II.
The term ‘grilled cheese’ was coined in the 1960s when the second slice of bread was added to the top of grilled cheese. Other popular names were cheese toasty and toasted cheese sandwiches.
National Grilled Cheese Sandwich Day timeline
1902
First Reference to a Melted Cheese Sandwich
One of the earliest references to melted cheese sandwiches is featured in Sarah Tyson Rorer’s “Mrs. Rorer’s New Cookbook.”
1910
The French Have a Word for It
The ‘Croque Monsieur’ (consisting of toasted bread, ham, and cheese) hits the menus in France.
1927
Culinary Revolution
Otto Frederick Rohwedder designs a bread-slicing machine.
1993
“Benny & Joon”
In the movie, the character of Sam, played by Johnny Depp, prepares a stack of grilled cheese sandwiches using a clothes iron.
National Grilled Cheese Sandwich Day FAQs
How many grilled cheeses are eaten in a year?
Americans notoriously consume a whopping 2.2 billion grilled cheese sandwiches every year.
How was the first grilled cheese made?
Grilled cheese sandwiches were first made open-faced and grated cheese was used.
What percentage of people eat grilled cheese?
86% of Americans have consumed at least one grilled cheese sandwich in the past year.
National Grilled Cheese Sandwich Day Activities
Make a sandwich: There is no better way to celebrate National Grilled Cheese Sandwich Day than by getting your grilled cheese on. Bread, butter, cheese, go!
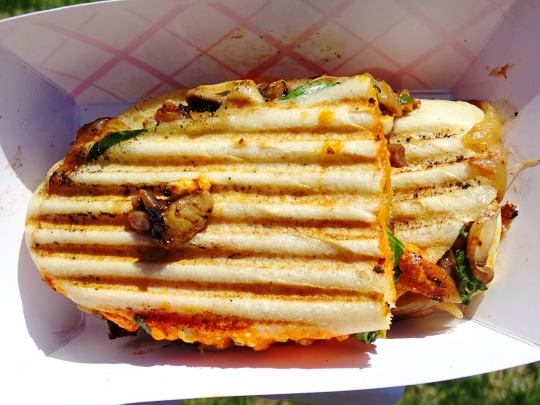
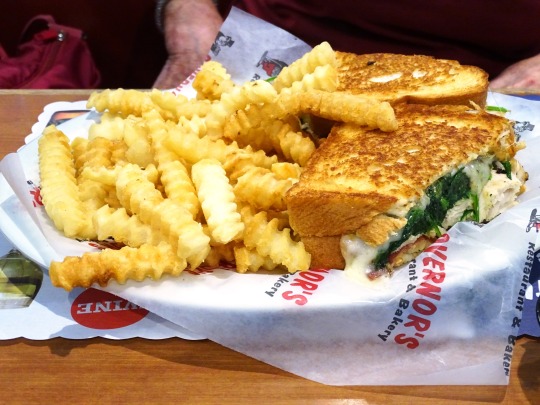
Fondue it: Cut some grilled cheese sandwiches into cute little triangles and put them on a warm platter next to a plate of “finger food” veggies for perfect party munchies. You could even set up a pot of cheese fondue and a platter of toasted bread so everyone makes their own melty cheese sandwiches at the table.
Make a romantic meal for two: Grill your significant other’s favorite cheese sandwich for a warm and gooey surprise romantic dinner. Give yourself points for picking the right wine (or craft beer) to pair with it.
5 SURPRISING FACTS ABOUT GRILLED CHEESE SANDWICHES
The secret ingredient: Mayo is the secret sauce that makes a grilled cheese sandwich creamy from the inside.
The original name: Grilled cheese sandwiches were originally called a Cheese Dream.
Complementary dishes: A grilled cheese sandwich is often accompanied by tomato soup.
The pioneers: The Ancient Romans were the first civilization to bake bread and combine it with cheese.
Grilled cheese customs: In Switzerland, it is customary to toast the bread and melt the cheese separately before combining them.
Why We Love National Grilled Cheese Sandwich Day
Ultimate comfort food: Grilled cheese sandwiches remind us of having our moms make us grilled cheese sandwiches for lunch; then, being a little older and craving something warm, and deciding that grilled cheese counts as cooking.
They go well with everything: Grilled cheese and tomato soup is the most classic combination, but this sandwich seems to go well with every tin soup, salad, milkshakes — the salty sandwich makes any meal better.
They offer an opportunity to explore the cheese case: However it is set up – by texture, by country, by variety – that cheese case is your friend. Go through it systematically and make cheese combinations that will elevate your grilled cheese experience.
Source
#Turkey Bacon and Spinach Melt#Sourdough Chicken Melt#travel#original photography#vacation#USA#Canada#restaurant#fries#summer 2012#2018#National Grilled Cheese Sandwich Day#Hot Mushroom Sandwich#Hero Panini#12 April#NationalGrilledCheeseSandwichDay#salad#pickle
1 note
·
View note
Text
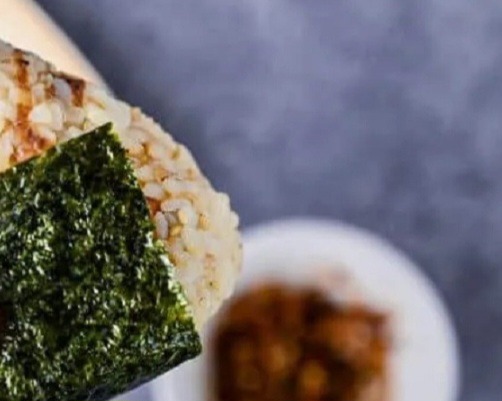
Okaka Onigiri, a crispy rice ball dish is a staple in Japanese cuisine. The ball is actually shaped into a triangle and can be different flavors, but this recipe features bonito flake flavored Okaka Onigiri.
It’s often eaten at lunch time as a quick and easy fix as it is super filling too or eaten alongside larger meals.
0 notes
Text
Korean Cream Cheese Bun Recipe | Wingreens World
Treat yourself to the delicious Love Triangles Recipe from Wingreens World - a delightful mix of creamy cheese, zesty salsa, and crispy nachos. Savor a burst of flavors with every bite! Visit: https://wingreensworld.com/blogs/recipes
#korean cream cheese bun recipe#korean cream cheese bun recipe online#korean cream cheese bun recipe wingreens#wingreensworld#wingreensfarms#recipes
0 notes
Text
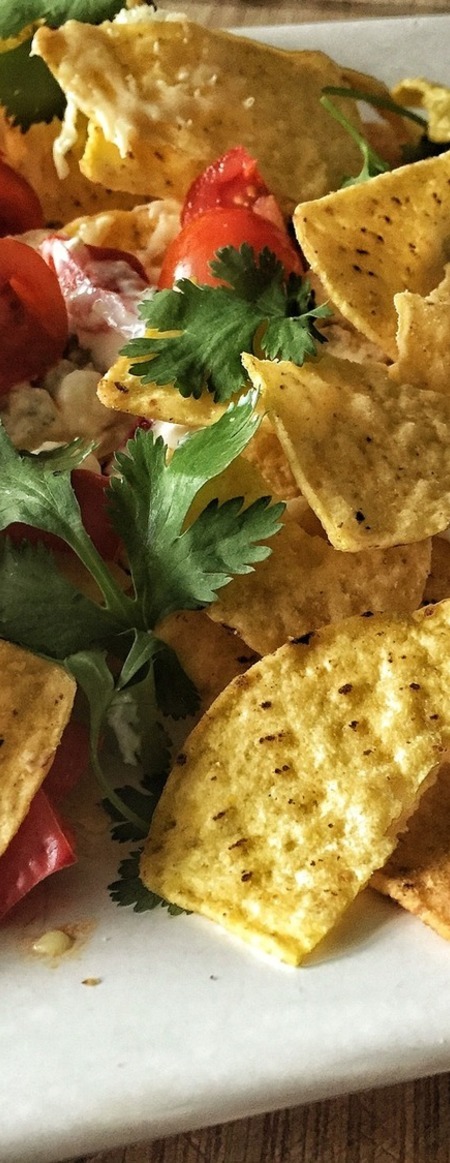
Gluten Free Tortilla Nachos with Guacamole Dip - Gluten Free Recipe
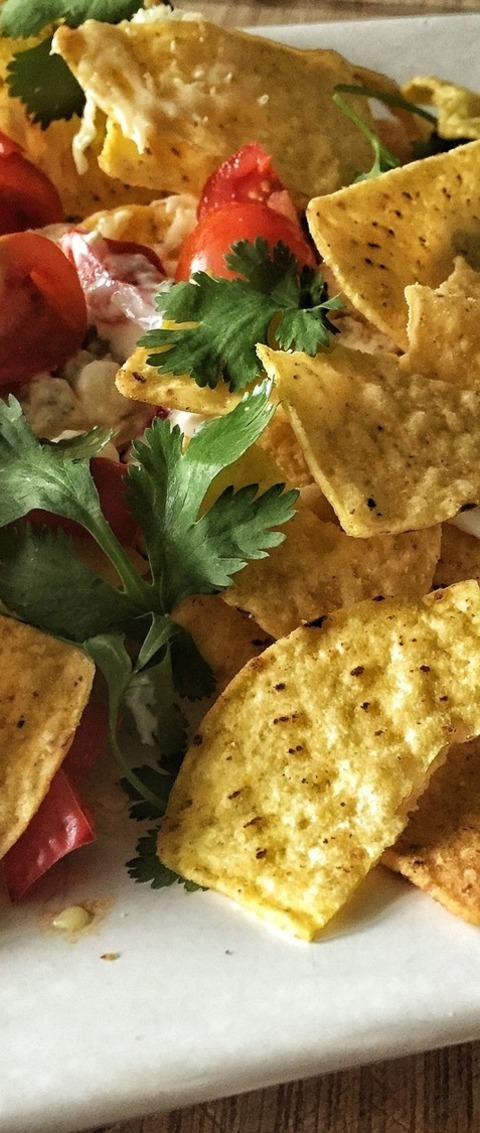
Gluten Free Tortilla Nachos with Guacamole Dip. Gluten Free Tortilla Nachos with Guacamole Dip are a tasty and simple appetizer or snack. The tortilla triangles are baked until crispy and seasoned with a flavorful blend of spices, while the guacamole dip is made with fresh avocado, onion, garlic, lime juice, and cilantro. The combination of crunchy tortilla chips and creamy guacamole will be a hit with everyone.
0 notes
Text
Rainy Season Food Recipes
Can you think of a rainy day, which is complete without a hot bowl of soup or crispy fritters or lip-smacking samosas, with a hot cup of tea? A good book or a movie with some delicious food is what you need on a rainy day. Here we welcome the monsoons with some super dishes, which are perfect for the rain showers.
Some Monsoon recipes are as follows:
1. Bread Pakoda
Ingredients
Bread slices
Coriander and Mint chutney
Boiled potatoes
Dry mango powder
Salt
Chilli powder
Besan
Water as needed
Oil for frying
Method
Mash the boiled potatoes and add salt, chili powder, dry mango powder, chaat masala and mix well
In a bowl, take some besan, add salt, chili powder, chaat masala, and mix well with water to bring to a required consistency.
Now cut the bread into triangles, apply some chutney, and add the mashed potato masala. Take another slice and cover it.
Now dip that bread into the besan batter and deep fry till golden brown.
Serve hot with ketchup.
For a healthier option, you can also use an air fryer.
2. Aloo paneer cutlets
Ingredients
Boiled potatoes
Grated paneer
Chopped Coriander and green chilies
Salt
Jeera powder
Garam masala
Rice flour
Method
In a bowl, mash the boiled potatoes and add the grated paneer.
Then add the chopped coriander and green chilies
Now you can add salt, garam masala, jeera powder and mix well
Then make it into flattened rounds and pat it in rice flour
Shallow fry these patties till golden brown and serve hot with chutney and ketchup.
3. Besan ka Chila
Ingredients
Besan
Chopped onion
Chopped tomatoes
Finely chopped green chilies
Chopped coriander
Water
Salt
Chilli powder
Method
In a bowl, take some besan and add water to it. Mix well to bring it to a required consistency.
Now add chopped onion, tomatoes, green chilies, coriander, salt, chili powder and mix well.
Then heat the non-stick pan and apply some oil to it.
Now make the chilas and cook it will on the pan and serve hot with mint chutney.
4. Corn Chaat
Ingredients
Sweet corn
Chopped tomatoes
Chopped Onions
Chopped coriander
Salt and chili powder
Lime
Sprouts
Chaat masala
Butter
Sev
Method
Boil the sweet corn for
5 minutes in a bowl.
Heat a pan and add a tablespoon of butter. As soon as the butter melts then add the boiled sweetcorn and mix well. Keep it on a medium flame.
Now add salt, chili powder, chaat masala and fry for 2 minutes
Take it in a bowl and add chopped tomatoes, onions, coriander. Also, add sprouts and mix well.
Now you can squeeze a lime to make it tangy and garnish with sev.
Serve it with a cup of tea as a perfect monsoon dish.
5. Masala Chai
Ingredients
Milk
Water
Tea powder
Sugar
Cardamom powder
Grated ginger
Tulsi
Cloves
Cinnamon
READ MORE....Best Indian Diet Plan Weight Loss Weight gain
0 notes
Text
Gluten Free Tortilla Nachos with Guacamole Dip Recipe
Gluten Free Tortilla Nachos with Guacamole Dip - Gluten Free Tortilla Nachos with Guacamole Dip are a tasty and simple appetizer or snack. The tortilla triangles are baked until crispy and seasoned with a flavorful blend of spices, while the guacamole dip is made with fresh avocado, onion, garlic, lime juice, and cilantro. The combination of crunchy tortilla chips and creamy guacamole will be a hit with everyone.
0 notes
Text
Indulge Your Taste Buds with Walkers Pure Butter Shortbread Triangles - The Irresistible 150g Delight
In the world of sweet treats, Walkers Pure Butter Shortbread Triangles have emerged as the latest sensation, capturing the hearts and palates of biscuit enthusiasts everywhere. This 150g pack is a perfect blend of tradition and innovation, offering a delightful snacking experience that's hard to resist.
The Butter Goodness:
What sets Walkers Pure Butter Shortbread Triangles apart from the rest is the emphasis on quality ingredients. Made with pure butter, these biscuits embody the rich, buttery goodness that shortbread is renowned for. Each bite is a symphony of flavors, delivering a taste that is both classic and indulgent.
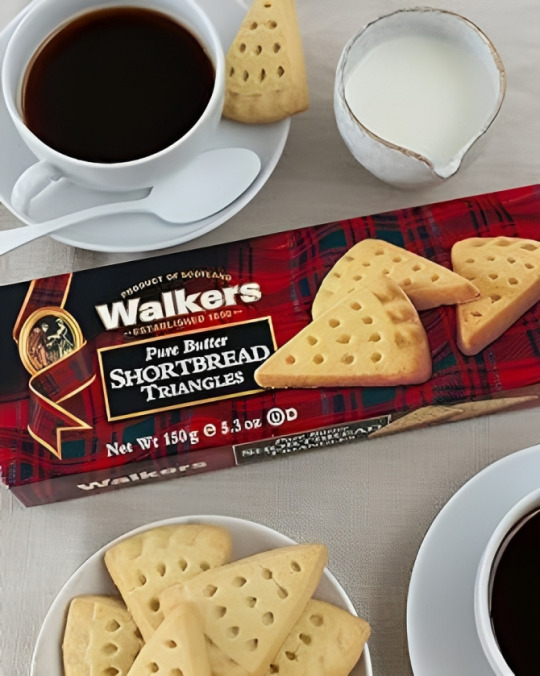
Triangle Magic:
The unique triangular shape of these biscuits adds a touch of elegance to your snacking experience. Beyond mere aesthetics, the triangular form enhances the crispy texture and allows for an even distribution of flavor. It's a small detail that makes a big difference in every bite.
Perfect for Any Occasion:
Whether you're hosting a tea party, enjoying a solo snack, or looking for a delightful treat to share with friends and family, Walkers Pure Butter Shortbread Triangles are the ideal choice. The 150g pack is just the right size for a satisfying snack, making it convenient for any occasion.
Premium Packaging:
Walkers understands the importance of presentation, and the packaging of these shortbread triangles reflects just that. The elegant design not only keeps the biscuits fresh but also makes them a perfect gift option for special occasions. Share the joy of Walkers Pure Butter Shortbread Triangles with your loved ones.
Trending Across Social Media:
These biscuits have taken social media by storm, with influencers and foodies alike sharing their love for the irresistible taste of Walkers Pure Butter Shortbread Triangles. The hashtag #ShortbreadJoy is trending, filled with rave reviews, creative recipes, and delightful moments of indulgence.
Health Conscious Choice:
In a world where mindful snacking is gaining importance, Walkers Pure Butter Shortbread Triangles strike the perfect balance. The use of high-quality ingredients and the absence of artificial additives make these biscuits a conscious choice for those who prioritize both flavor and well-being.
Conclusion:
Walkers Pure Butter Shortbread Triangles in the 150g pack are more than just biscuits; they are a delightful experience waiting to be savored. Join the trend, indulge your taste buds, and discover the joy of pure butter goodness in every triangular bite. Your snack time will never be the same again!
0 notes
Text
A Culinary Celebration: Diwali Recipes to Savor and Share
A Culinary Celebration: Diwali Recipes to Savor and Share
Festivals / By lovenheal
Introduction
Diwali, the festival of lights, is not only a time for sparkling fireworks and vibrant decorations but also a celebration of delectable flavors and mouthwatering dishes. It’s a time when families and friends come together to enjoy a delightful spread of sweets and savory treats. In this blog, we will take you on a culinary journey through some of the most cherished and scrumptious Diwali recipes that are sure to add an extra layer of sweetness to your festivities.
1. Besan Ladoo: The Golden Globes of Diwali
Besan ladoo is a classic Diwali sweet made from roasted chickpea flour, ghee, and sugar. These golden orbs are easy to prepare and have a rich, nutty flavor. The aroma of besan ladoo being prepared is a telltale sign that Diwali is just around the corner.
2. Gulab Jamun: Sweet Syrupy Delights
Gulab Jamun, a popular Indian dessert, consists of deep-fried dough balls soaked in a cardamom and saffron-infused sugar syrup. These sweet, spongy dumplings are a favorite at Diwali celebrations and represent the essence of indulgence.
3. Chakli: The Crispy Spirals of Happiness
Chakli, also known as Murukku, is a savory snack that is both crunchy and addictive. Made from a mixture of rice flour, urad dal, and spices, these spiral-shaped treats are a must-have on the Diwali snack platter.
4. Kaju Katli: Cashew Nut Diamonds
Kaju Katli is a decadent Indian sweet made from ground cashews, sugar, and a hint of cardamom. These diamond-shaped delights are not only rich and creamy but also make for elegant gifts during the festive season.
5. Samosas: Savory Triangles of Delight
Samosas are irresistible triangular pastries filled with spiced potatoes, peas, and sometimes minced meat. They are deep-fried to a golden perfection and offer a tantalizing mix of flavors and textures.
6. Poha Chivda: The Crunchy Snack Mix
Poha chivda is a savory snack mix made from flattened rice, nuts, and spices. This crispy, spiced delight is perfect for munching on during Diwali get-togethers and pairs wonderfully with a cup of masala chai.
7. Aloo Tikki: The Comforting Potato Patties
Aloo tikki, or potato patties, are a popular street food in India. These crispy, spiced potato cakes are often served with chutney and are a beloved snack that can be enjoyed during Diwali celebrations.
8. Coconut Ladoo: Tropical Sweetness
Coconut ladoo is a sweet treat made from freshly grated coconut and condensed milk. These little white balls of goodness are a delightful fusion of coconut flavor and sweetness.
9. Paneer Tikka: The Flavorful Skewers
Paneer tikka is a vegetarian delight made by marinating cubes of paneer (Indian cottage cheese) in a spicy yogurt mixture and then grilling them to perfection. These skewers are a favorite appetizer at Diwali parties.
10. Malai Kofta: Creamy and Delectable
Malai kofta is a creamy and indulgent curry made with deep-fried dumplings of paneer and potato, served in a rich tomato-based sauce. It’s a luxurious dish that’s sure to impress your guests.
Conclusion
Diwali is a time for celebration, and what better way to celebrate than through the joy of food? These Diwali recipes are not just culinary delights but also a way to create cherished memories with loved ones. So, roll up your sleeves, don your chef’s hat, and let the aromas and flavors of these delectable dishes infuse your Diwali celebrations with warmth and happiness. Wishing you a festive season filled with culinary delights and culinary adventures!
ReachLovenHeal Pvt Ltd ( Reiki Healing, Reiki Courses, Black Magic Reversal ), Pune, Maharashtra, India.
Lovenheal Reiki healing Center in Pune is one of the best places for Reiki healing in India. The center offers Reiki training, healing sessions, and workshops. It has a team of experienced Reiki masters who have helped many people heal from various ailments. The center also offers distance healing for people who cannot visit in person.
Lovenheal Reiki healing Center in Pune is experienced Reiki practitioners who provide healing sessions to clients. Lovenheal also offers Reiki training for those who want to learn this technique.
The team of Reiki masters at the center is dedicated to helping clients achieve physical, emotional, and spiritual balance.
Get connected to LovenHeal 🎀
📷 Instagram: Login • Instagram
📲 Facebook: LovenHeal | Pune
🎥 YouTube: Reachlovenheal
☎️ Ph no. 8956256919
A Culinary Celebration: Diwali Recipes to Savor and Share, Best Diwali Recipes, Diwali Appetizers, Diwali Cooking Tips, Diwali Delicacies, Diwali Dessert Recipes, Diwali Dinner Recipes, Diwali Festival Recipes, Diwali Food Ideas, Diwali Fusion Cuisine, Diwali Fusion Recipes, Diwali Healthy Eating, Diwali Mithai Recipes, Diwali Party Recipes, Diwali Recipe Roundup, Diwali Snack Ideas, Diwali Snacks Recipes, Diwali Special Dishes, Diwali Special Recipes, Diwali Sweets and Savories, Diwali Sweets Recipes, Diwali Sweets with a Twist, Diwali Vegetarian Recipes, Easy Diwali Recipes, Healthy Diwali Recipes, Homemade Diwali Recipes, Indian Diwali Recipes, Quick Diwali Recipes, Traditional Diwali Recipes, Unique Diwali Recipes
#A Culinary Celebration: Diwali Recipes to Savor and Share#Best Diwali Recipes#Diwali Appetizers#Diwali Cooking Tips#Diwali Delicacies#Diwali Dessert Recipes#Diwali Dinner Recipes#Diwali Festival Recipes#Diwali Food Ideas#Diwali Fusion Cuisine#Diwali Fusion Recipes#Diwali Healthy Eating#Diwali Mithai Recipes#Diwali Party Recipes#Diwali Recipe Roundup#Diwali Snack Ideas#Diwali Snacks Recipes#Diwali Special Dishes#Diwali Special Recipes#Diwali Sweets and Savories#Diwali Sweets Recipes#Diwali Sweets with a Twist#Diwali Vegetarian Recipes#Easy Diwali Recipes#Healthy Diwali Recipes#Homemade Diwali Recipes#Indian Diwali Recipes#Quick Diwali Recipes#Traditional Diwali Recipes#Unique Diwali Recipes
0 notes
Text
Nupurdua
This is a simple and basic broiled nibbles recipe made with warm cheddar stuffing and additional bread cuts. This can be an ideal nibble recipe for kids as it is prepared with various vegetables and cheddar to make it more nutritious. These can also be served straight as a break time bite or you can serve them with pureed tomatoes or green chutney as a party starter or hors d'oeuvre Bread Cheese Bites Recipe.
Bread-based snacks recipes are consistently a famous break time snack among people of all ages. For the most part, these are powders to be mixed with other ingredients or flour, although they can also be used to deep fry and create a solid bite. One such simple and straightforward bread-based nibble recipe is Bread Cheddar Chomps Recipe which is known for its crispy surface. I generally get a lot of requests from my readers regarding additional recipes. Especially with bread cuts. We bring a large batch of bread which should be ready in a couple of days. Sandwich and toast recipes are great yet not good enough to make consistently.
So let us consider some alternative recipes made from bread cuts. Bread rolls are great but cheddar bread triangles or cheddar bread chomps might be even better. The most amazing aspect of this Bread Cheese Bites Recipe is the stuffing which makes it extraordinary and extravagant. This stuffing can be made exclusively with flavor and cheddar, although it can also be made with cheddar and vegetables. Another famous option is to fill this pizza with puff filling. This abundance of fillings makes it really attractive, yet the outer layer remains stable with the sandwich bread cut. Hence, this is an effective way to remove excess bread crumbs.
Plus, some additional tips and ideas for Bread Cheddar Nibbles. First and foremost, there are different types of breads available in the market that vary in size and variety. I would suggest using square shaped generally utility based sandwich bread cuts. They are not difficult to shape and can also make wonderful triangles. Also, I have deliberately made these light snacks less spicy and lighter. You can make the stuffing tastier by adding a few drops of stew to warm it up. Finally, I would suggest using panko bread morsels for a great solid surface. You can also double coat it by dipping it in cornflour mixture and breadcrumbs.
For more information visit the link: https://cookingkhajana.in/bread-cheese-bites-recipe/
0 notes
Text
Gluten Free Tortilla Nachos with Guacamole Dip Recipe

Cumin, Onion, Cilantro, Chili Powder, Garlic Powder, Lime Juice, Cloves Garlic, Avocado, Smoked Paprika, Salt And Pepper, Olive Oil, Salt. Gluten Free Tortilla Nachos with Guacamole Dip are a tasty and simple appetizer or snack. The tortilla triangles are baked until crispy and seasoned with a flavorful blend of spices, while the guacamole dip is made with fresh avocado, onion, garlic, lime juice, and cilantro. The combination of crunchy tortilla chips and creamy guacamole will be a hit with everyone.
0 notes
Last Seen Blogs

soulcorra
Well, here we go again

myeon00
제목 없음


transasian69
I'm just a Busy Woman

kbrmakeover
Untitled