#Embroidered fashion clothing
Photo
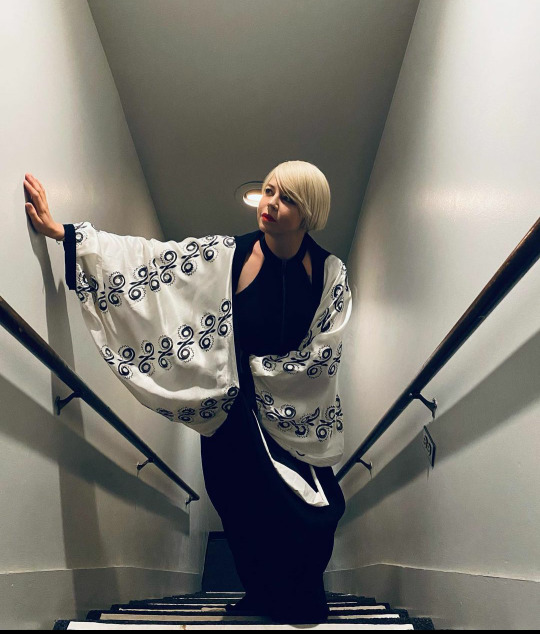

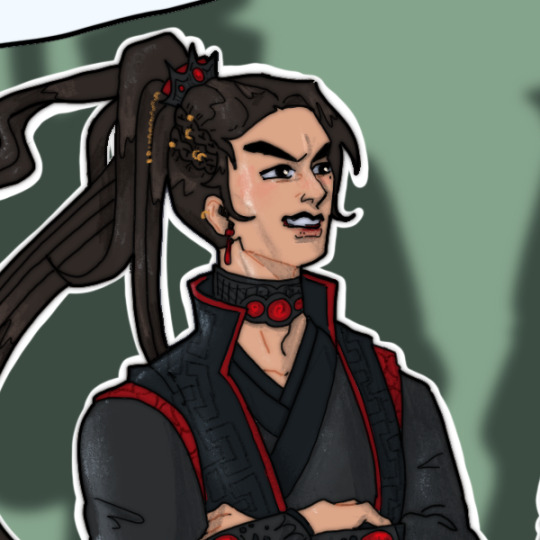
Ukraine's big folk-electro music sensation: Nata Zhyzhchenko, the lead singer of Ukrainian electronic pop band Onuka
#ukraine#ukrainian music#ukrainian art#woman#onuka#embroidery#embroidered dress#Embroidered fashion clothing#Boho Dress#vyshyvanka#embroidered shirt#pop band#urban sounds#heritage#itunes#kiev#electronic#folk#modernity#sopilka#inspirations
23 notes
·
View notes
Photo

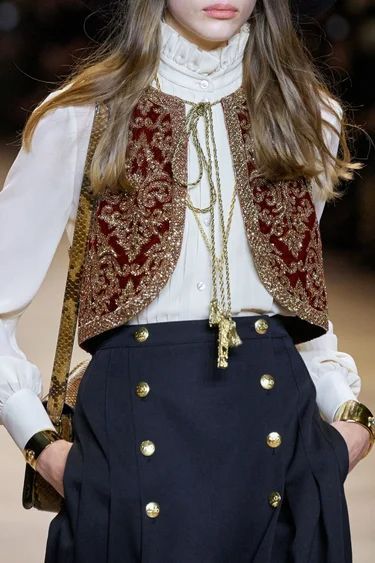
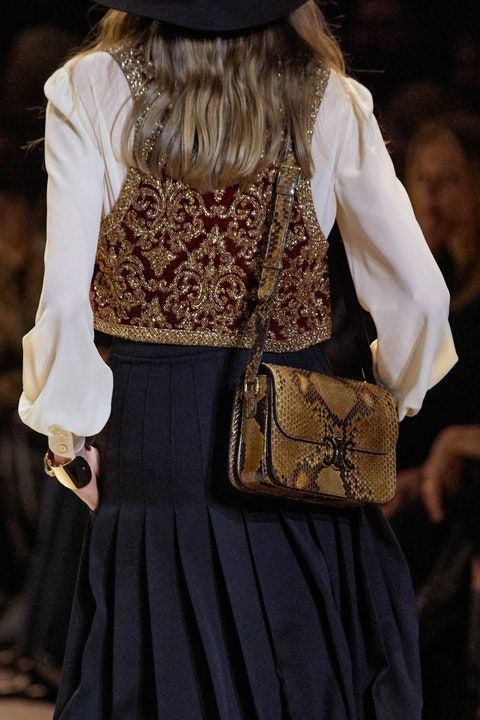
Celine Collection Fall 2020
#more runway photography#the buttons on the trousers...#the embroidered vest...#YES#fashion#dark academia style#dark academia aesthetic#dark academia#dark academia fashion#dark academia clothing#dark academia moodboard#dark academia inspiration#celine#vogue
2K notes
·
View notes
Text
mend ur clothes paint ur clothes rip em up and sew em together customise ur clothes how u want it'll feel infinitely better than buying fast fashion crap and u will cherish those items foreva
#if u can. obviously#not everyone can but for those who can feel my words infect ur brain#this isnt to shame ppl who buy from fast fashion brands for financial reasons#but if ur fast fashion clothes are showing signs of wear and tear fix em!!#u COULD replace them.... or u could patch them up and embroider cute flowers or a cool ass dragon on them#and then boom ur fast fashion item is longer lasting and ur own creation that u can wear proudly#u can sew a rip together#and darn over a threadbare section#if u have gained/lost weight u can try to adjust them bc theres lots of guides out there#u can embroider over a stain or just purposefully add more so it looks deliberate#eg. bleach painting#also if u were just gonna throw it out buy a replacement anyway why not give mending a go!!#or cut it up to make patches for future mends
327 notes
·
View notes
Text
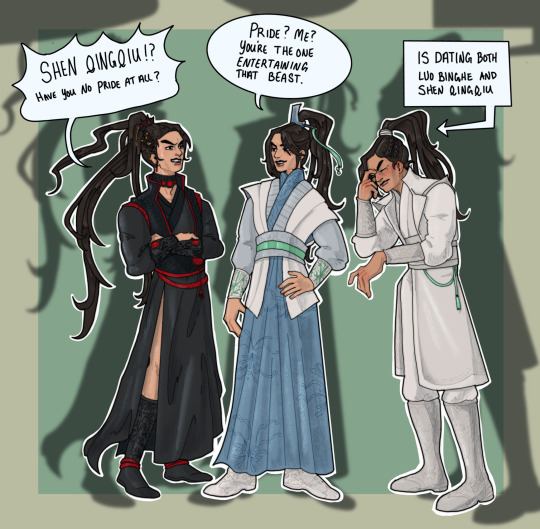
Liu Qingge date lineup… I was thinking about how funny it would be to see how dating might change your lifestyle
#kamaetedraws#svsss#liu qingge#bingliu#liujiu#bingliushen#(implied)#svsss lqg never gets in on the fashion party bc lbh and sqq are too busy spoiling each other#liujiu lqg's hair is better taken care of bc sqq does that for him. sqq doesnt like braids tho#liujiu lqg also has The Most decked out clothes bc sqq embroiders them when he is feeling petty#he likes hiding bamboo motifs and chrysanthemums#lqg doesnt care except when he does in which case he vacillates wildly between#'haha look how much sqq wants to show me off' and 'UGH can he NOT leave my clothes alone for ONE second'#bingliu lqg has servants who bully him into taking care of everything he normay ignores so that's why his hair is longer#lbh replaced his whole wardrobe with Bingge Colors and burned all the cqms stuff#AND he is always giving lqg fancy fiddly little gifts of jewelry and stuff#lqg doesnt actually care for it but he's gotten better at manipulating so he sometimes wears it as a bribe#bingliushen lqg is SO embarassed right now and is thinking about hiding his little bingqiu belt tassle so he doesnt get dragged into this#(but he is obviously coming out winning.#HE still has his principles he tells himself HE still dresses his own damn self HE isnt so fussy and self absorbed about his relationship#he is a little jealous)
115 notes
·
View notes
Photo
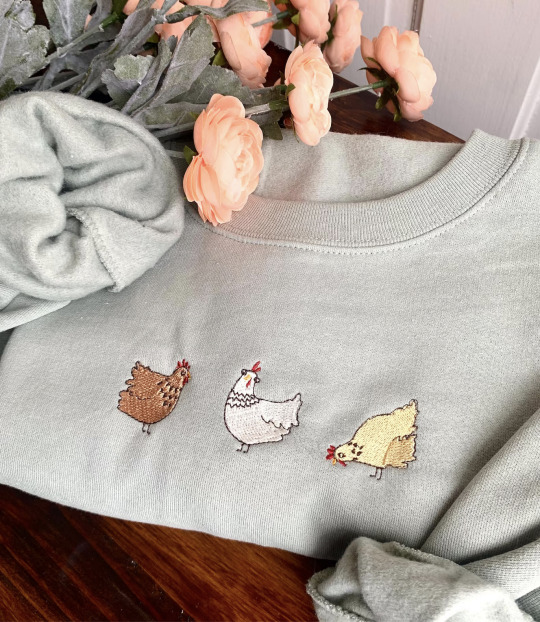
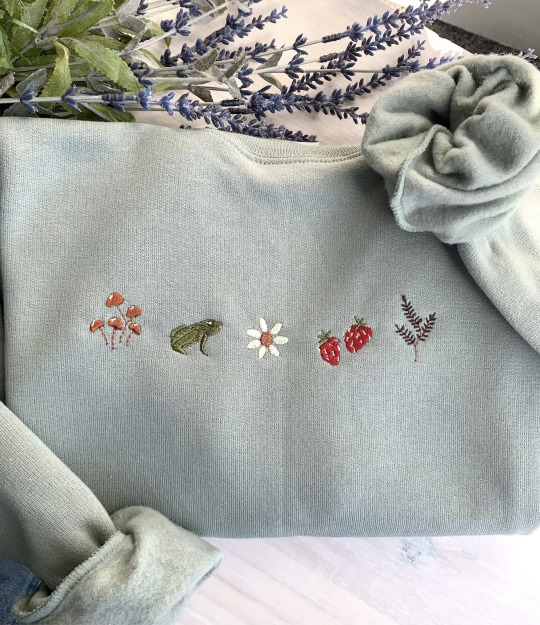


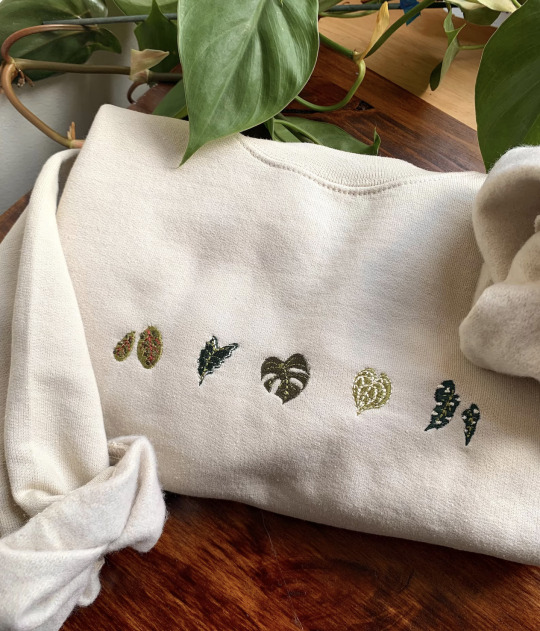
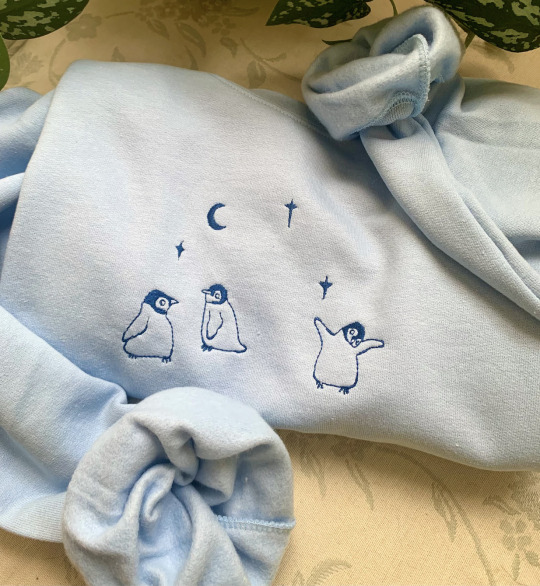

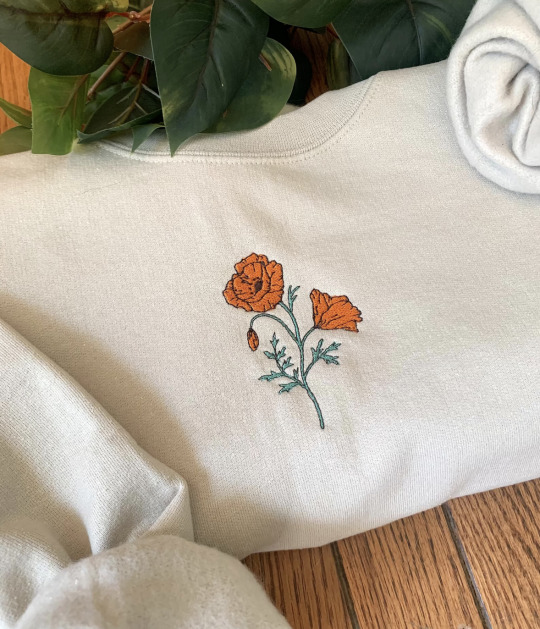
Embroidered Crewnecks from PartyDuckStudio
#crewneck#tops#shirt#sweatshirt#sweater#embroidery#embroidered#embroidered shirt#upcycled clothing#upcycled#upcycle#floral#flowers#mushroom#fungi#chickens#penguin#cats#clothing#fashion
236 notes
·
View notes
Text

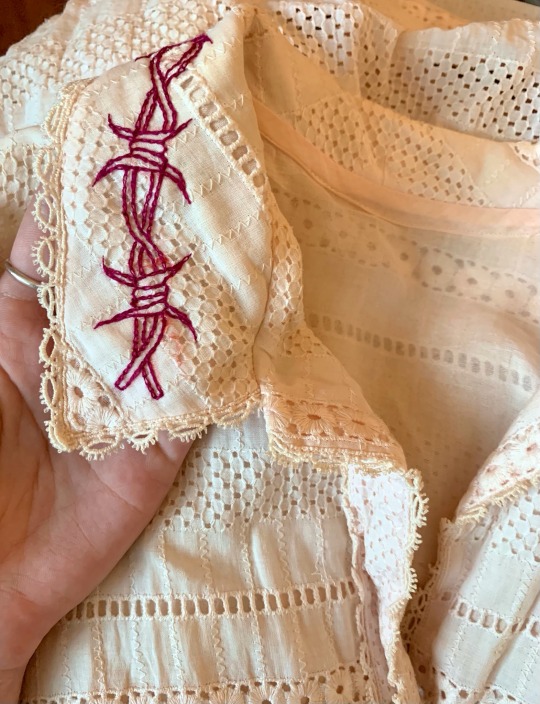
hand embroidering a vintage cotton dress ⛓️✨❤️🔥 my mock-up vs what i have so far. i’ll definitely share the finished product when im done!
#if it looks cool i’ll start embroidering vintage and secondhand clothes more often :)#maybe offer some in my shop next year who knows#my art#mine#art#needlework#embroidery#hand embroidery#hand embroidered#textile art#original art#vintage dress#fiber art#needlecraft#slow fashion#traditional tattoo#barbed wire#american traditional#tattoo art#tattoo flash
16 notes
·
View notes
Text
Coverings for the fae of heart


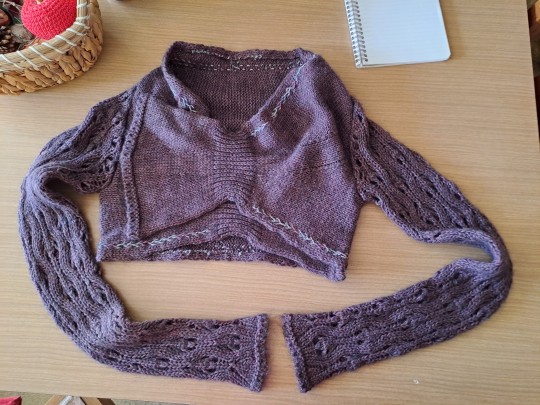
I got majorly lucky when I thrifted this gorgeous wool-mix bolero shrug! It was buried deep in a bargain bin with otherwise hats and scarves. I can never resist a good rummage (even though I didn't plan on getting anything - but rummaging is most of the fun anyway!
I almost couldn't believe my eyes when I unearthed this gorgeous bolero shrug. The colour is so beautiful and the details are sooo good! I love the lace knitting on the sleeves and the bow like closure at the front. If that bolero came in my size, better believe I'd wear the hell out of it! As it is, it's a perfect upcycling/refashion project for my handmade advent calendar swap. This was the present for Christmas Eve ♥
I've hand embroidered a fern grass border along all the edges of the cardigan with a colour changing yarn in light mauve-and-gray-colours. I really hope my swap partner loves it as much as I do!
[image description]
Picture 1: The finished refashioned knit bolero shrug. It has a deep mauve/dusty purple colour with lace knit details on the sleeves. The edges of the bodice (neck and bottom) have been hand embroidered with a thick yarn in light mauve-and-gray colours in a fern pattern stitch.
Picture 2: My cat (a brown tabby) claiming the freshly thrifted bolero shrug (along with some other items) as her newest cat bed!
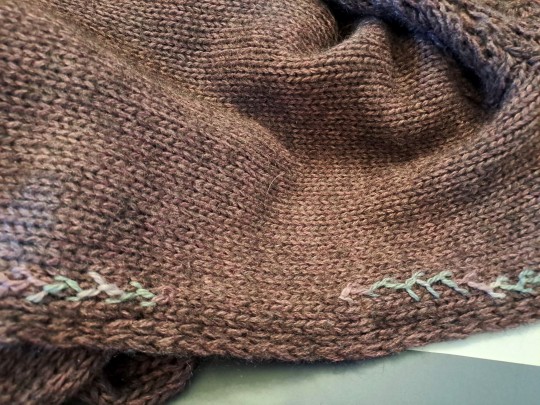
Picture 3: A close-up shot of the beginning of the fern stitch embroidery on the deep mauve coloured bolero shrug. You can already see the colour change from light mauve to gray in the first couple of stitches.
Picture 4: A long line of embroidered stitches along one edge. Laying next to it are two balls of yarn: the colour changing yarn I've used for the embroidery and a uni coloured lighter reddish berry-purple that also was a contender.
Picture 5: A close-up of the embroidered fern grass stitches almost (but not yet!) meeting along the bottom edge of the bolero shrug in the back.
Picture 6: The deep mauve coloured bolero shrug is laying down with it's arms folded across the bodice. 3/4 of the hand embroidery is finished, only one edge is yet to be embroidered.
Picture 7: A close-up of the fern grass embroidery, that shows but the "good" side (what you see on the outside) and the "bad" side (what you see on the inside). On the inside the embroidery shows up as a row of short stitches.
Picture 8: The deep mauve coloured bolero shrug laying down on the table with the fern grass embroidery in light mauve-and-gray colours finished. [/image description]
#readymade#diy#handmade#handmade fashion#embroidery#embroidery on knit#knit bolero is second hand#I've added the embroidered fern border#advent calendar#present idea#thrifting#sustainable presents#sustainability#upcycled clothing#upcycled fashion#hand embroidery#fiber art#image described#fashion described#advent calendar content posted in no chronological order
10 notes
·
View notes
Text
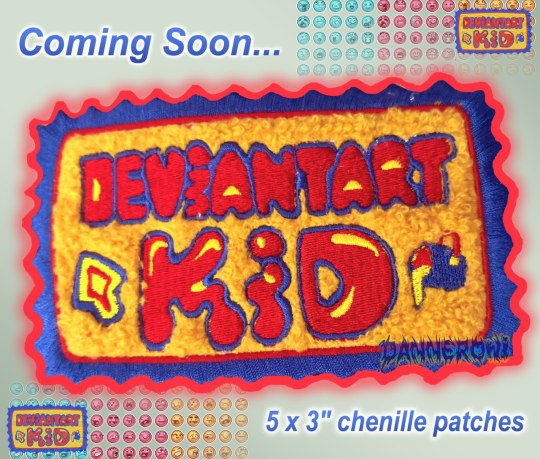
Raised by DeviantArt 🖍️⭐💙
#nostalgiacore#kidcore#webcore#old web#deviantart#chenille patches#embroidered patches#alternative fashion#primary colors#diy clothing#clowncore#furry art#anthro art#decora kei#toycore#expressive art#expressive fashion
343 notes
·
View notes
Note
historical fashion question: what is your favorite period for fashion(including location, you may specify womens or mens or something more specific)? also favorite piece of historical clothing? cause tie on pockets fuck hard
I had to think to whittle down to favorites, haha. My favorite period for fashion is Edwardian/Late Victorian and Ancient Greek. I'm a huge sucker for the Late Victorian curved silhouette, and I really like the loose, pinned/tied functionality of the Greek chiton. Probably women's fashion for the Victorian era, but all genders for Greek. I'm also a huge sucker for colorful men's clothing of any nationality ~1730-1800, but I think that's just because I like color in general~
Favorite piece of historical clothing: maybe the maternity corset.

It SOUNDS counterintuitive, but it's still functional for back pain and bust support during pregnancy, and there are other versions for jumps and stays throughout history. I'm definitely not an expert on them, but I love esoteric, forgotten undergarments; I wish they got a little more limelight in fashion history.
Maternity Corset Video / Blog Post


#Thanks for asking! :33#Tie-on pockets DO fuck hard. I love the embroidered ones so much. I really want to make my own someday.#It was so hard to pick a favorite piece of clothing too haha. I only found out about maternity corsets recently.#I'd always wondered but mostly thought ppl wore something like tea gowns past mo. 5...? Idk. xD But they're cool! And tricky to make#and so adjustable! Tbh I think they'd be better than regular corsets for bloating and period pain imo.#fashion history#ask answered
3 notes
·
View notes
Text

x. my scrunkle <3333
#myevilposts#pete wentz#the c brand on the shirt as part of the design. oh pete.......#were these decaydance records branded stuff he wore during mania era able to be bought as merch or were they one of a kind/just his?#like was this mass produced or did somebody embroider it for him? the text looks textured.#it'd be soooo awesome if he did that himself but i kinda doubt it?#for a fashion guy he doesn't talk enough about actually MAKING clothes.#then again i kinda don't do that myself. lol. and i make some of my own stuff by hand.
3 notes
·
View notes
Text
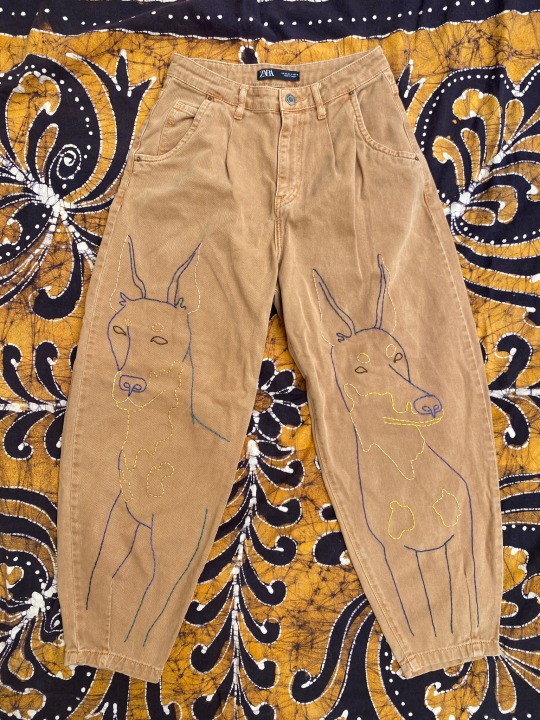
#artists on tumblr#women artists#embroidery#hand embroidery#embroidered#embroiderer#handmade#handcrafted#art for sale#fiberart#upcycled clothing#upcycled fashion#upcycling#doberman
38 notes
·
View notes
Text
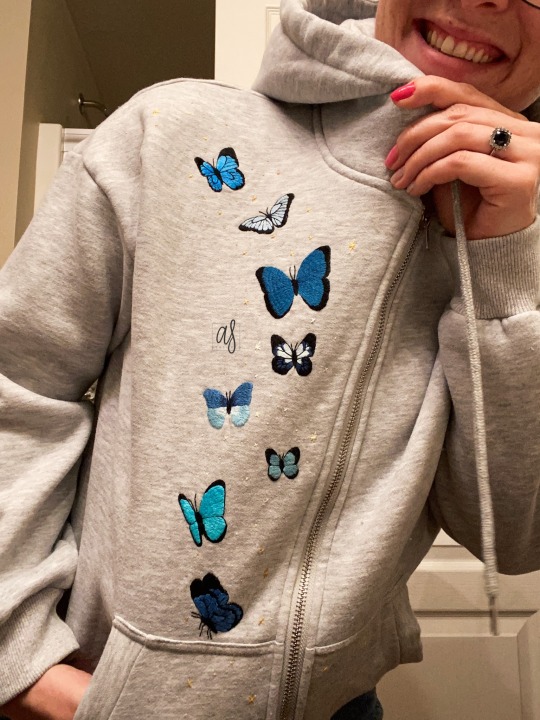
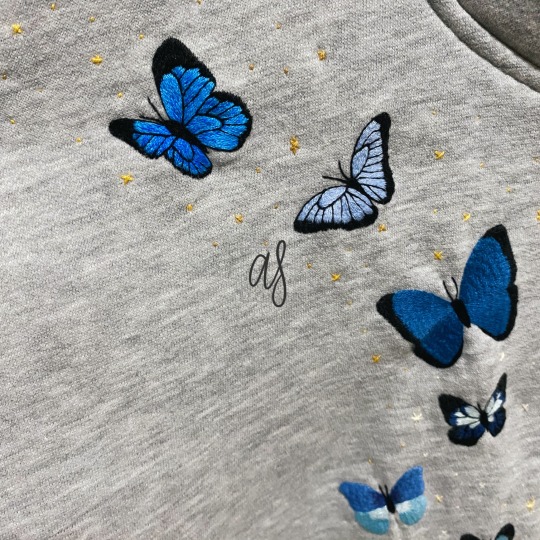
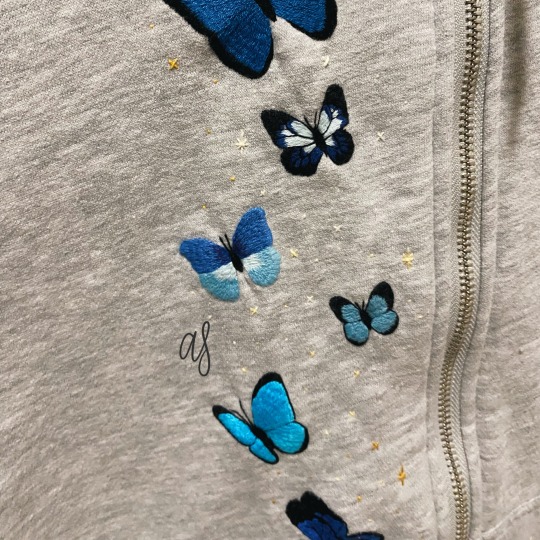
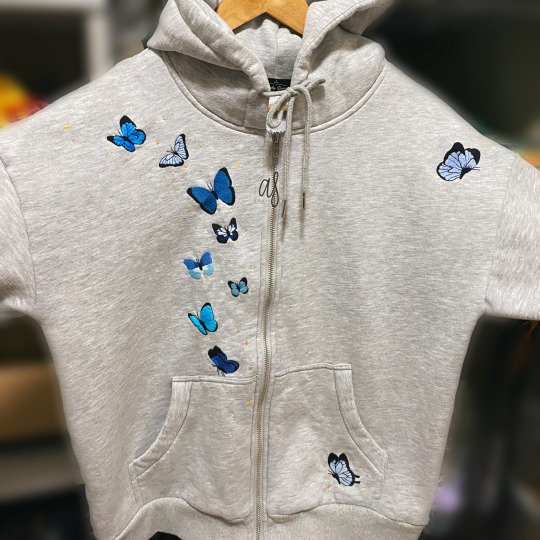
Ten blue butterflies hand embroidered on an oversized zip up hoodie 🦋
Zip up — from Amazon (Trendy Queen)
Rough process:
I took a picture of the zip up laid flat. Planned out the butterfly designs in Procreate. Traced the drawings on Sulky Sticky Solvy. Cut out the different butterflies and stuck them in the locations I planned with my iPad. Then I stitched a running stitch around each butterfly. Then I placed an embroidery hoop on the fabric & solvy. I did have to go to my local hardware store to purchase a longer screw and bolt to be able to fit the sweatshirt fabric in the hoop. When I was all finished, I applied iron on interfacing to cover and protect the threads and backside of the embroideries. I soaked the embroidery in a water-vinegar mixture to set the colors and to minimize chances of the colors bleeding. Then soaked and rinsed off the remaining solvy. I did have to run the zip up through the wash a couple of times because the sticky goo residue was being stubborn to remove.
#embroidery#embroidery art#modern embroidery#embroidered clothing#upcylced#butterfly#blue butterfly#hoodie#fall days#sweater#sweater weather#clothing#clothes#oversized hoodie#hobby#wearable art#fashion#fashion art#thread art#fiber art
3 notes
·
View notes
Photo

#aesthetic#art#clothes#fashion#fashionista#fashionporn#girly#lingerie#sexy#style#blue and white#floral print#embroidered flowers#skater dress#fit and flare#fit and flare dress#sexy thighs#sexy arms#bewbies#collar bones#sandy blonde#long hair#pretty#pretty smile#teeth showing#wavy hair#pink lips#long eyelashes
10 notes
·
View notes
Photo
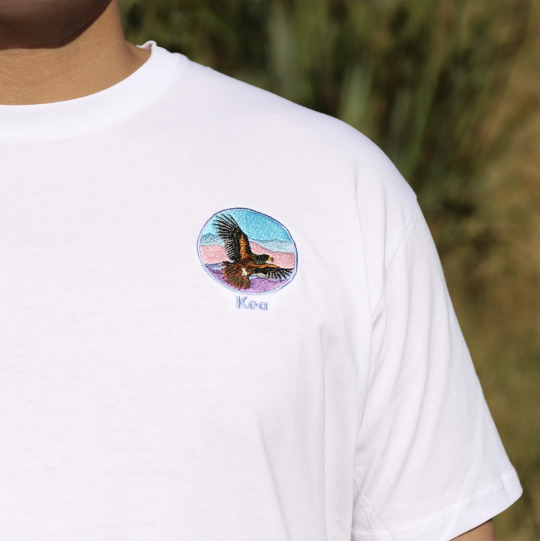

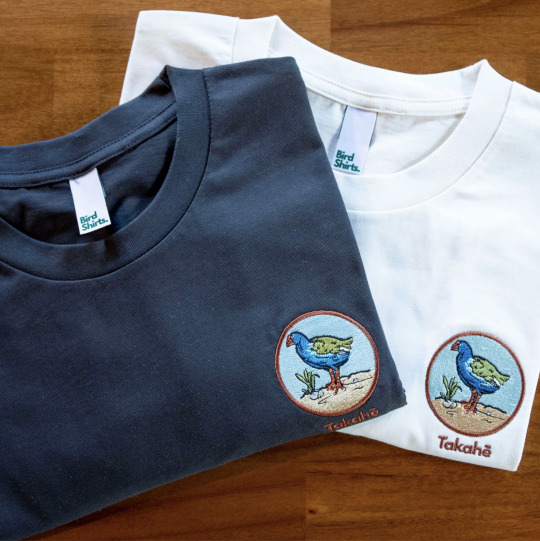
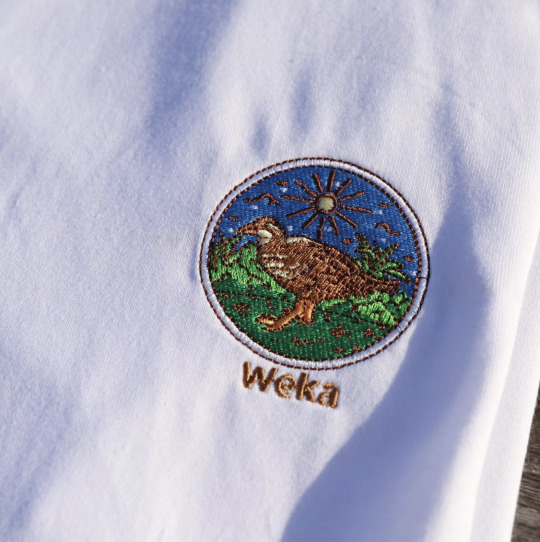

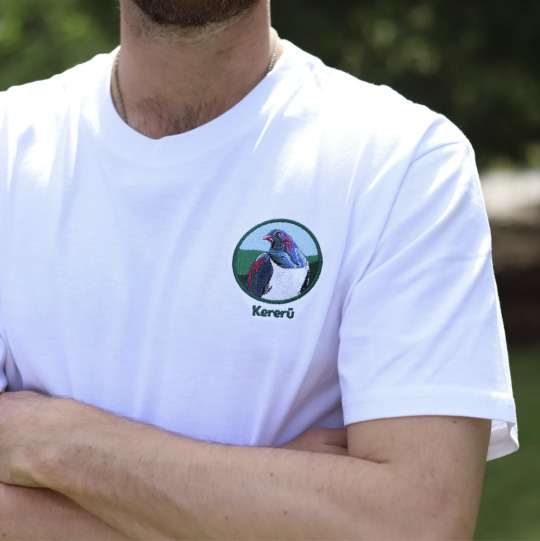
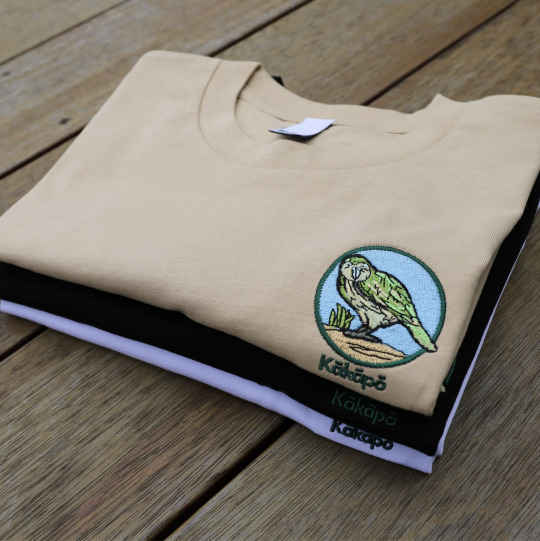
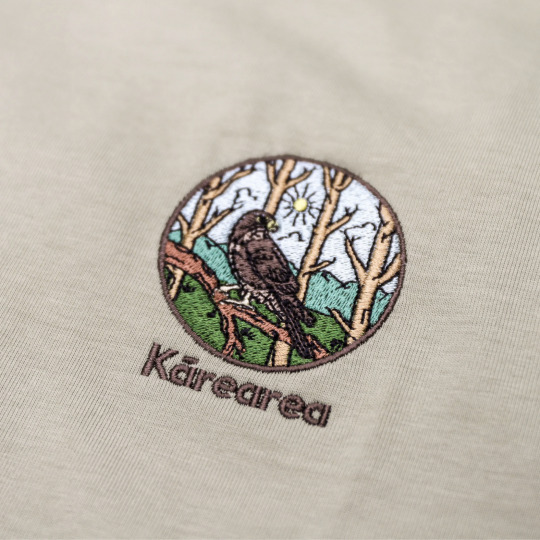
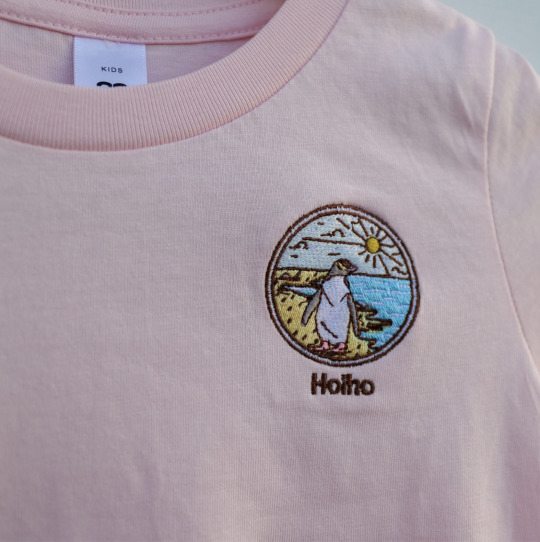


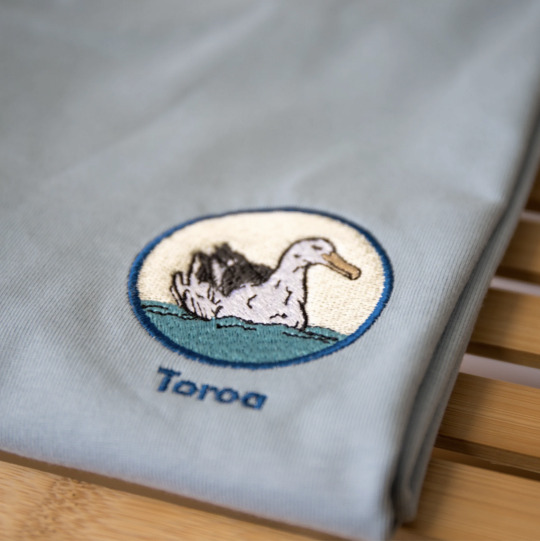
Aotearoa New Zealand Birds Embroidered Shirts by Bird Shirts
Wear the bird. Save the bird
Our native birds are cheeky, trusting and specialised for an island without humans and predators. For the same reasons we get to enjoy close sightings and intimate moments with our birds we need to look after them. Bird Shirts is our helping hand and we are grateful you are joining us.
When you purchase a tee, half of the profits are donated to a bird conservation project.
Kea // Kōkako // Takahē // Weka // Pekapeka-tou-roa // Kererū
Kākāpō // Kārearea // Hoiho // Pīwakawaka // Tawaki // Toroa
#shirt#t-shirt#t shirt#embroidered shirt#embroidery#new zealand#new zealand birds#nz birds#aotearoa#bird conservation#new zealand native birds#native birds#embroidered#tops#clothing#fashion
79 notes
·
View notes
Text
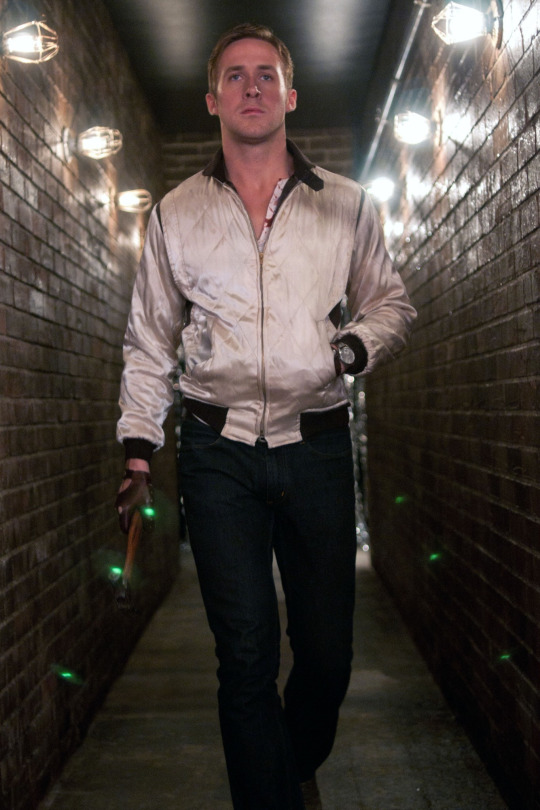
Vengeance personified as a style icon
Drive (2011)
#menswear#men’s style#men’s fashion#style#fashion#men’s spring clothing#men’s spring fashion#men’s spring trends#men’s spring style#spring jackets#men’s spring jackets#classic style#vintage style#souvenir jacket#embroidered jacket#drive movie#Ryan gosling#drive#men’s lifestyle#cult classic#2010s style
135 notes
·
View notes
Photo


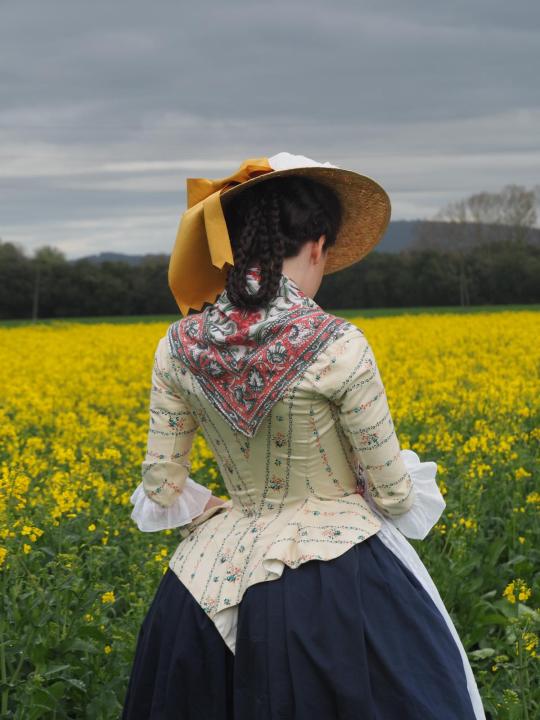
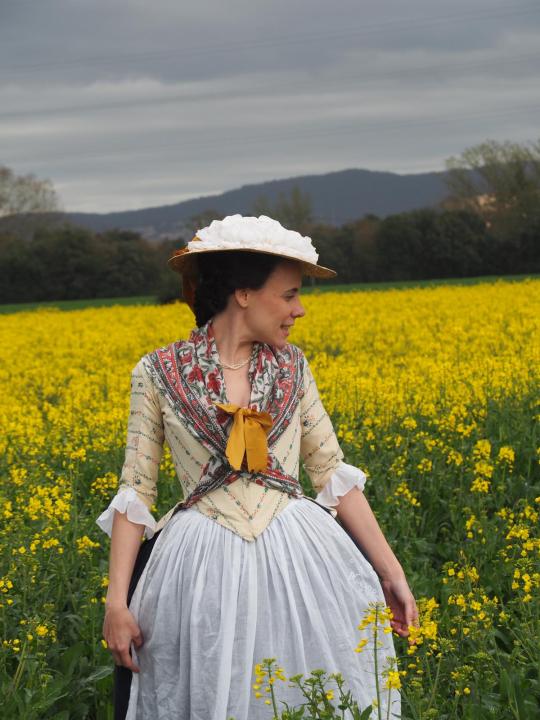
Printemps
photos by Ariadna
#18thcenturycostume#18thcentury#rococo#18th century fashion#siglo xviii#xviiie siècle#xviii century#historical clothing#embroidered apron#rapeseed field#printemps#georgian era#reenactment
69 notes
·
View notes
Last Seen Blogs
yearnlearnburn
Yearning, Learning, Calorie Burning

vijayverma65
Vijayverma

doraforstyle
doraforstyle

baek-me-right
🍭응응🍭

chekerbored
cheddar and bread