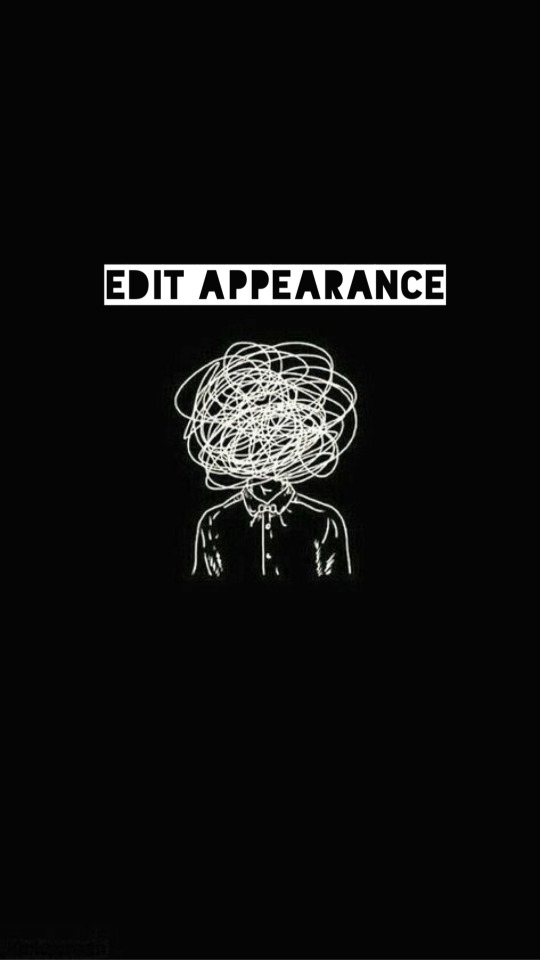
#the layout is not what makes tumblr tumblr! the functionality is. and sometimes that does change for the worse
Text
i just saw someone say that "the vast majority of the userbase is complaining" about tumblr's recent layout change. i see this a lot after a change: people complaining about it (sometimes without saying what about it is bad, making it sound like either it's self-evident (it usually is not) or just that it's bad because it's change and change is always bad) and saying that everyone else is complaining about it too. i don't know how to tell you this but a) you don't follow every user on tumblr so how can you possibly know what "everyone" or "the majority of users" thinks about anything and b) ONLY THE PEOPLE WHO FEEL VERY STRONGLY ARE TALKING ABOUT IT!! people who are not bothered are not spending time posting about how unbothered they are! please look up "selection bias" and stop making me read this nonsense with my own eyeballs.
#i don't get what's so bad abt this change bc it doesn't bother me & no one is explaining it! the most i've seen is it's 'like twitter'#which people don't like i guess bc this might imply that tumblr could be taking more cues from twitter than just the layout?#which is also fallacious reasoning#some changes i do hate. like for instance the change that made it so i can no longer click to the version that someone rbed from#which breaks the prev tag culture :(#but some changes are whatever! and some changes are good even!!#it's fine if it takes time to get used to something being different of course but it seems like the reaction on here can be so extreme#so fast. 'bombard the app with 1-star reviews!!!!' how about you give it a couple weeks and maybe you'll calm down.#i think there's a sense of 'if it ain't broke don't fix it' but it is broke though! tumblr is unsustainable and they gotta do stuff to make#the site more attractive and easier to use for new users. they can do that without losing what makes tumblr tumblr#the layout is not what makes tumblr tumblr! the functionality is. and sometimes that does change for the worse#and i get having complaints about that. but not really about moving the location of some buttons#anyway i haven't said anything before because i don't have strong feelings about this UX change but i DO have strong feelings about#the vague yet very forceful complaints about the UX change that i keep seeing lol#tumblr#fallacies#anyway don't get distracted by my tags. this post is not really about me not understanding what's so bad about this specific change#it's about people who hate a change assuming that everyone agrees with them because they're only seeing the reactions from#a biased subset of the userbase#(by biased i don't mean the users are biased. i mean the sample is biased...it's highly likely to include people who feel strongly#and unlikely to include people who are neutral or feel less strongly)
22 notes
·
View notes
Text
Quick guide to SAVING LIVEJOURNAL/OTHER FAN CONTENT with THE WAYBACK MACHINE:
(quick note: Tumblr content is honestly much more at risk, so if you have the stomach to try finding things on Tumblr, you can also use this method on that and do some good work)
Uhhh this got long, so look for the bolded parts if you’re not here for a long read lol.
Okay so, at some point, LJ is going under. Or at least all the gay stuff they can find on there. More to the point, PHOTOBUCKET, TINYPIC, IMAGESHACK.... all of those have left huge scars in the records of LJ fandom. So I’ve been using the fact that the Wayback Machine lets you save outlinks if you sign up with the Internet Archive! (Free!)
There’s a Save Page Now function! Good places to use it on include:
Rec lists
People’s masterlists of their own fics/art/meta
Somebody’s well-organized LJ Memories (the page you save needs to contain direct links to the posts you want to save, so if there are sublevels in the Memories you need to go as deep as possible)
community profiles
Every page of a community, if you really feel like it--I’ve been doing this with some small comms, but it’s.... less than feasible with big communities.
Check the “Save Outlinks” button, and the WB will also save links from the page you enter! You can get a lot of stuff at once. Unfortunately there’s a limit on the number of links it’ll grab, but it’s better than nothing. You’ll also see a lot of ERROR!s and it’s annoying. When it’s a Job Failed you can try the page again later.
I don’t know yet how it picks the outlinks to save, so maybe it’s random and you could eventually get all of them by Saving repeatedly??? I’m pretty sure it tries to start at the top, though, because communities with a huge list of tags in their layout are probably not worth your time: I’ve been trying to get stuff from the KKM Fanfic Challenge comm, but.... well, look at it. Trying to save any page with outlinks just picks up a whooooole bunch of those tags on the sidebar, and barely any actual posts. No matter what kind of URL you put in, that sidebar’s always there. You’d have to save each post individually to get every fic. Hope LJ’s not going anywhere fast!
Community profiles are among the most important, because that gives us a lot of info like how many members are left (after years of bleeding users) and how many comments and posts there were in the community! Unfortunately this method is REALLY BAD for art and icons--lots of them are just gone with tinypic and people’s personal LJ albums. Also the WB isn’t good with images in general and there’s no real alternative. But the profiles of icon communities, plus fanfics, meta, stuff like that: a lot of it left to be grabbed! Big main community profiles are best, because they often listed other smaller communities for the same fandom. Saving the big profile with Outlinks will pick up the profile links of all those smaller communities!
Sometimes the big community profiles will just make you sad. Try to soldier on. (If you’re really committing to this, don’t forget that smaller comms will also have even smaller comms listed as affiliates that never made it into the Big Fandom Community’s profile. You can come back later and Save their profiles directly. Sometimes they also have links to fanlistings and other rare things that are also useful to have saved!)
If you can think of a small community, you can also use the method of saving every page, which takes some work and time: you have to save the skip=10 URL, and after that skip=30, skip=50, etc. Then come back later and do skip=20, skip=40, skip=60, etc. The reason for this is that the Wayback Machine will only save one single URL every 30 minutes. So if you’re saving outlinks from skip=30, you’ll also get an incomplete snapshot of skip=20 and skip=40, minus all the important links on skip=20 and skip=40. Obviously, this isn’t much fun and works only with small comms. But it does save a lot of text.
Here’s the type of stuff you’ll get:

a saved PROFILE url: This is good! It saves info about how active a user or community was. In this case it was a user, but the profile is info they chose to put front and center, and the WB isn’t gonna crawl any deeper and grab personal posts from 2004 or anything. (You’ll get a lot of user profiles that aren’t really necessary when using this method.)

a modified POST url: Also good, but you’re gonna get a ton of duplicates on these due to how many different ways LJ would link to a single post. The style=mine doesn’t alter the content. You’ll also see lots of “#cutid1″, which of course is the link left by an LJ-cut. That’s fine, it gets the post. The content of posts 82379 is safe! (but NOT all the nested comments!)

a comment link (in this case dreamwidth which isn’t in danger, but the same format): This saved both the post itself (79392) and a comment thread (131360). You probably can’t get every comment thread just because the WB is bad at unfolding LJ threads, but this does contain the post itself. If you don’t see the plain post URL itself in the list of saved URLS once WB is done saving outlinks, but you do see a comment link: that comment link also has the original post! You don’t need to keep trying!

a journal’s tag link: This is less useful. It saves a snapshot of the tag page itself, but nothing deeper. Any content under an LJ cut or in the comments is not saved. There’s no way to keep these from saving, though. Just keep in mind, that tag in the picture doesn’t mean that the fics this person linked to have been saved. You’ll have to enter the tag link URL itself into the Wayback Machine’s SAVE page for that.

ERROR! JOB FAILED.: These are annoying! Most likely nothing was saved. Unless a comment link was successfully saved, you’ll have to copy-paste the URL that failed and put it into the SAVE page.

LIVE PAGE IS NOT AVAILABLE: There’s nothing you can do unless this URL was already saved somewhere.
BUT WHAT ABOUT IMAGES????
The passage of time means it’s probably too late. Imageshack and Tinypic took out a huge chunk of images on LJ, and PhotoBucket tried to make people pay them by putting big ol’ watermarks on all pictures except those hosted by premium users. It didn’t work and they said sorry, but the watermarks are still there. Lol. If you right-click +Open image in new tab, the watermark goes away, but who wants to do that with every single image? Also, the Wayback Machine sucks with big images and there’s no alternative at the moment.
If you’re lucky enough to find some holy grail like a big post of 1000 icons hosted on someone’s premium Photobucket, you could save a snapshot of the page. Wayback Machine lets you check that as an option, but IF YOU SAVE A SNAPSHOT WITH A TOOL LIKE “GoFullPage”: I find that GoFullPage, at least, will save you a big long image with no Photobucket watermarks! But you’ll have to save that image yourself, or store it somewhere, so keep that in mind.
Also, the snapshot means no animated gifs--although if you want to save those, they’ll be tiny little LJ icon gifs, so pretty easy to store on your own computer.
#fanlore#fandom preservation#is that a tag#livejournal#wayback machine#just gonna add as a tag that i'm trying to avoid doing this with comms where everyone was clearly about 13#let's let them have the privacy of vanishing into the ether someday
100 notes
·
View notes
Text
Basic Giffing Tutorial
How I make gifs for a simple scene + coloring + captions under the cut:

I’ll show you how to make this ^^^ gif (including the sharpening, coloring and captioning process).
Okay let’s start with what you need to do this: A version of photoshop with timeline (I use photoshop 2020 but probably any version will work, the program layout might just look a bit different), HD videos to gif from (preferably 1080p, especially for making big gifs, but 720p is also okay if you can’t get anything better, I just recommend making smaller gifs with it), some kind of video player that lets you trim clips in it (I use Quicktime Player because it’s the default for Macs)
1. Start with a video clip of the scene you want to gif. I usually download full episodes and clip scenes from the episode. My computer is a MacBook Pro and the default video player is Quicktime so I just trim my clips directly in that. In Quicktime you can just press CMD+T and it’ll give you trimming options. Most people use the screencapping method to make gifs, but it requires extra software and that’s not how I learned, so I’m going to tell you how to gif straight from video clips. I have no idea if there’s a difference in quality or ease between the two methods, but if you find that my way is too difficult then there are plenty of tutorials on how to do it via screencapping too like this one.
2. Open the clip in Photoshop. Just hit CMD+O and then select the video you want to gif from (or go to File > Open). Then, in the Timeline window at the bottom, scrub through the video and trim it (with the little scissor icon to the left) at the first frame of the scene/shot you want to gif and the last frame. Delete the excess clips. Before the next part, I usually crop off the black borders that some videos have if their original aspect ratio isn’t 16:9 (which most aren’t). For TV shows from Netflix, for example, the aspect ratio is usually 2:1 (or 540:270) so if you set the crop ratio to this you can get rid of exactly the black, no more and no less. I have several preset crop ratios (540:270 for TV shows, 540:225 for most movies, etc.). You can do further cropping after you have made and colored the gif, but getting rid of borders before converting the video to frames makes this easier. If your video does not have these black borders to begin with, ignore this part.
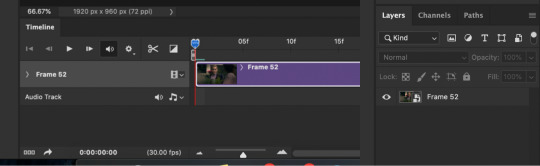
3. Convert video to frames. In the upper right hand corner of the Timeline window there is an icon that is four small lines stacked on each other (time line menu). When you click on it, a drop down menu will appear. In this menu select “Convert Frames > Flatten Frames into Clips.” Then click the button in the lower left hand corner (three small rectangles next to each other; frame animation button) that says “Convert to frame animation” when you hover over it.

After, it should look like either of these. Sometimes, if you crop the video before you start the process, it gives you two frames like in the image on the right above. If this happens, delete the frame with the shorter time stamp on it (as indicated by the number at the bottom). Next, click the dropdown menu in the timeline window again and select “Make Frames From Layers.” It will then turn into multiple frames, as shown below:

Delete the first frame (it will have a number under it, while the rest of the frames say “0 sec”), then use “select all frames” from the dropdown menu so that they are all highlighted and click “0 sec > other” and set the frame delay to “.06 seconds.” Scroll down to the bottom of the layers channel window and click and delete “Video Group 1″ then scroll back to the to top of the window and select all the layers by holding Shift and clicking on the top layer. Click the icon in the lower left hand corner that says “Convert to Video Timeline (video timeline button) and the frames should convert to long purple bars stacked vertically on top of each other. Then, under the “Filters” drop down menu at the top of the screen, select “Convert for Smart Filters.” This converts the layers to a smart object, turning the stack of bars a single purple bar and a single layer in the layers channel. When you press play in the timeline window, the image should move and play through like a video. If it doesn’t, you missed a step. It should now look like this (the left is the timeline window; the right is the layers window):
This seems like a lengthy process, but I have compiled most of these steps into a few Actions. With the actions (starting at step 3 of this tutorial) you use “Part1″, delete the frame with the shorter time stamp on it (if needed), “make frames from layers,” delete the first frame and Video Group 1, select all frames in Timeline and change frame delay to .06 seconds, select all layers in the Layers window, then use "Part2″. I assign my actions to function keys so all I have to do is use a few keyboard shortcuts ( i.e. Part1 is F1, Part2 is F2, etc.). This makes the whole process much quicker. Here is a link to download the actions I created for this process. Once you get the hang of using the actions, it all goes pretty fast. Also, when using the actions you might get messages like this:
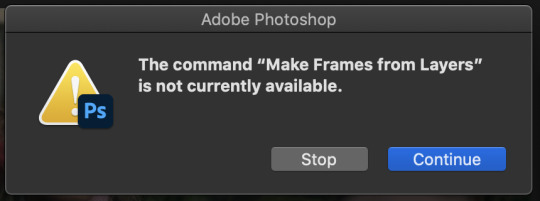
Just click stop and keep going with the instructions.
4. Duplicate the frame in the layers window and set the top layer to screen using the drop down menu in the window (it’s the second from the top and should say “Normal” to begin with. That changes the scene from this:

to this:

5. Make coloring adjustments. Everyone colors gifs in their own ways, so you absolutely don’t have to follow what I do. This is just the basics of how I color:
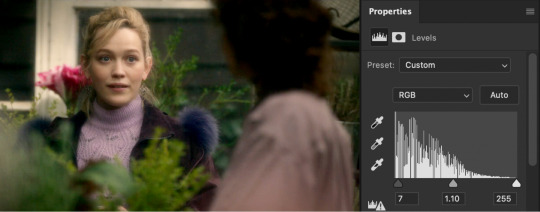
I always start with Levels (some people use curves, some people use both, I never learned how to use curves though). Under the levels adjustment menu, I start by using the black point dropper and select the darkest part of the image. Sometimes it takes a bit of clicking around with the dropper to find what works. Depending on the scene (colors, lighting, etc.) I also move the sliders if needed. There’s no real formula to it, I just do everything by sight, changing things until it looks good to me. For this gif, I selected a dark part of Jamie’s hair with the black point dropper. Then I did some minor adjustments with the sliders on the graph. If you’re coloring a darker scene, the sliders are very useful for brightening the scene, but this is a fairly well lit scene so not much is needed. This is the scene with Levels added:
Next, I usually use color balance to fix the color changes that Levels made. This looks too yellow to me now, so I use the yellow-blue slider to add in blue. You’ll have to play around with what looks best for whatever scene you’re giffing, but I’ve found that most scenes I add blue and sometime add red or cyan, but rarely use the magenta-green slider. With color balance added:

Next I use a series of selective color layer. Make a new layer for every different color adjustment you make, it makes it easier to edit if you make a mistake or want to make changes later. I always start with Black, usually just adding a little to Cyan, Magenta, and Yellow so that it increases the contrast of the whole scene.

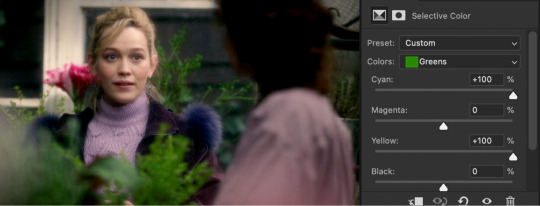
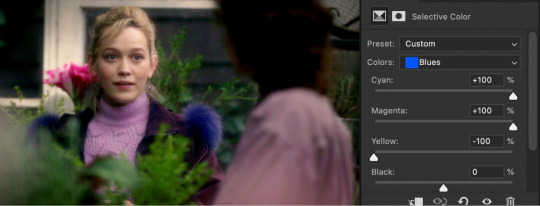
From there, you have to pick out what colors you want to accent or correct. You get better at this the more you do it. In this scene, I want to accent the green of the plants and the purple of their clothes. Normally I would do Red next to adjust skin tone, but because I want to increase the green in the picture, I’m going to start with Yellow. This will make skin tones look too yellow-green, but you can correct this with a Red Selective Color layer. The Yellow layer made the plants greener, but the Red returned the proper color to Dani’s skin.


I keep adding more selective color layers to bring out more color in the scene.

To make it even more vibrant, I use several Hue/Saturation layers to increase the saturation of certain colors.


Sometimes I also add a Vibrance layer, but for this scene it wasn’t needed. Lastly, I usually add a Brightness/Contrast layer. I prefer to get contrast out of deepening the blacks in the scene rather than use the contrast setting in this adjustment layer, but sometimes I do use it. Most of the time I just increase the brightness a little, depending on the lighting in the scene.

Really, coloring is all about just messing with different settings until things look right to you. I’m still learning new things every time I make a new gif. There are tons of other adjustments available that I haven’t even tried out, so feel free to mess around with them. Note: The more adjustment layers you add, the more the quality might decrease. I do try to do minimal adjustments normally, but I wanted to make this coloring fairly vibrant so it has a lot more layers.
If you are making multiple gifs from the same scene, repeat the process of Steps 1-4 and then copy the adjustment layers from the first gif to each subsequent gif. I normally group all the adjustment layers together (select the layers and press CMD+G) which makes it easier to copy the layers to another PSD.
6. Crop and resize the gif. You can crop your gifs any way you want. I’m in the habit of making rather large gifs (which is thankfully now possible due to the 10mb size limit) and most of my gifs are cropped at ratios of 3:2, 4:3, or 1:1. For longer scenes I usually use 16:9. Crop your gif at whatever ratio you want and then resize it. For Tumblr, there are specific dimensions that gifs have to be for them to format properly in posts. For “large” gifs (one per row), they must be 540px wide. Height does not matter. For smaller gifs they have to be either 268px (two per row) or 177px (three per row). Resize the gif by either using CMD+OPTION+I or going to the “Image” dropdown menu at the top of the screen and clicking on “Image Size” If you already cropped at your desired ratio, just change the width to 540, 268, or 177, according to the size gifs you want.
7. Sharpen the gif. After you have cropped and resized the gif as desired, you need to sharpen it. Because of the method I used in the beginning (duplicating the layers and setting the top to screen), you will have to add a Sharpening filter and a Gaussian Blur filter. Select the top layer of the gif (not the top coloring layer) and click on the “Filter” dropdown menu at the top then select “Sharpen > Smart Sharpen” These are my sharpening settings (if you’ve ever giffed before, or looked at other tutorials, you’ll notice this is sharper than most people would use. That’s because you also have to slightly blur the layer below it, which dilutes it to a proper sharpness):
Next, select the lower layer of the gif and go back the the “Filter” menu and select “Blur > Gaussian Blur” and set the radius to “1.0 pixels.”
These sharpening and blur settings are also actions I’ve created. If you download the action I listed before, assign them to function keys and you will just have to select the appropriate layer and use the function key to do the work. Additionally, learning the keyboard shortcuts speeds along the process.
8. Export/save the gif. Go to “File > Export > Save for Web (Legacy)” or CMD+OPTION+SHIFT+S. These are my save settings (I actually have no idea what any of these things mean... I’ve never changed any of them).
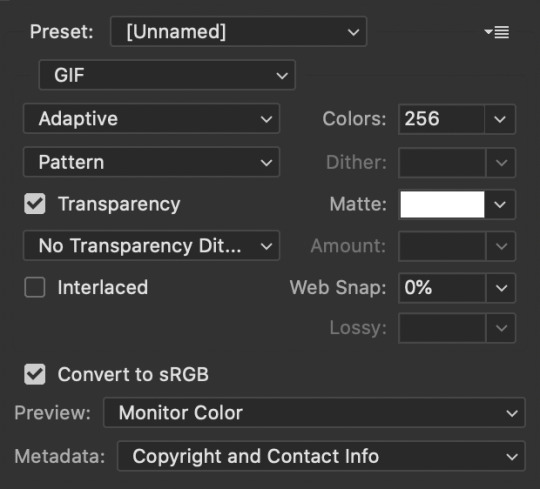
The important thing really is that you make sure that under looping options near the bottom (not shown in this screenshot) it says “Forever,” not “Once.” And also check how big the file is in the bottom left corner:
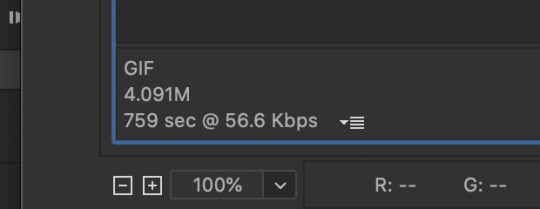
As long as the number under GIF is less than 10M, you’re good to go. Then save the file and name it.
9. Caption the gif (if needed). You can either do this in the PSD you already had open to create the gif or you can open the gif you just saved and caption it there. I find it easier to add captions directly in the current PSD. When it comes to captions, it’s really based on your own preferences. I’ve seen people use all different fonts, sizes, colors, and placements for captions. Some fonts I can recommend are: Myriad Pro, Calibri, Arial Rounded MT Bold, and Keep Calm.

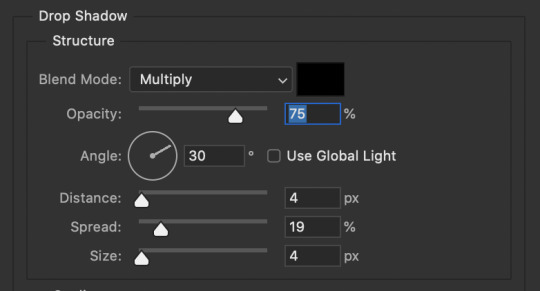
There are plenty of others too. The main thing is that they normally look best when they are bolded and italicized. I have been using Keep Calm for my captions lately. I also add Stroke and Drop Shadow to the text (my text settings are also included in my Actions):

Just make sure the text is centered and has a good margin from the bottom.

This is what it looks like with those effects ( font: Keep Calm; size: 13; tracking: -25).
Anyway, that’s my basic process for gifmaking and coloring. I hope this gives you some kind of foundation to work off of. Just keep experimenting with different techniques and you’ll keep getting better. Read other people’s tutorials and tips and try them out to see what you like and works for you.
#if you're seeing this now i dont make gifs like this anymore#if you ask i'll make an updated tutorial#riah.txt
223 notes
·
View notes
Note
Hello! I've oredered a bullet jornel but idk how to make it so pretty
hi anon! well firstly i just wanna remind u that ‘pretty’ is 100% subjective when it comes to these things, and i have to say that i especially notice it in regards to bullet journaling - i always feel like everyone’s spreads look miles better than mine, but people seem to like my bujo posts just fine :) so what i’m trying to say is, don’t focus on how pretty your journal is, focus on the process - do what feels good, let your creativity run wild, try new things etc. i assure you you’ll start liking your spreads more and more as you go and get a hang of it :)
here’s just a couple tips you might find helpful:
discover what medium you like best - what type of pens? gel/ballpoint? maybe markers or crayons? do you enjoy adding printed photos or stickers? it’s easy to get overwhelmed by all the options you see on studyblr, but remember that you don’t need fancy stationery to make ‘pretty’ spreads :) i usually just go for a black gel pen, a pastel marker for my accent color, sometimes i add some washi tape, but that’s it - i prefer a pretty minimalistic look to my spreads
draw inspiration from others’ bujos - ofc this doesn’t mean copy them completely (unless they say it’s alright if you do, most will if you ask them beforehand!), but you can find layout ideas and handwriting styles etc. by going through the #bujo or #bullet journal tag here on tumblr, you can also go on youtube (amanda rach lee is my fave bujo youtuber, her videos are lovely if you’re just starting out, as she does explain her process well) or instagram (again, amanda posts lots of doodle tutorials that you might like there). you can also see all bullet journal posts i’ve reblogged by searching ‘bujo’ on my blog.
when you first start out, i think the most important thing is to play around with different spreads and layouts so you can find what works best for you. do you prefer vertical or horizontal weekly layouts? do you enjoy making playlist spreads? maybe quote pages or memory collages? remember that your bujo can be anything you want! a practical life planner with a hint of art, an artistic outlet with zero functionality, do what you want and what you want only. don’t think you have to make a certain spread just bc loads of other people are making them in their own journals. i, for instance, have come to realise i have absolutely zero use for a year at a glance spread. it does look lovely, though :)
most importantly: try not to hold yourself to a too high standard. i know. it’s not easy, but toning down on perfectionism will free you and allow you to focus on journaling for the fun of it, l'art pour l'art and all that :) additionally, you can use a pencil to sketch your spread before going in with a pen, just so you can easily fix any spacing mistakes you might make
Lastly, you might also find this post by @journalsanctuary helpful
and here’s a list of some studyblrs who post their bujo spreads frequently if you want to check their work out (i find their bujos inspirational myself, so): @jeonchemstudy @study-van @museeofmoon @starrystvdy *these clearly aren’t all of my faves, just a couple i can name off the top of my head atm*
+ @merostudies who hasn’t posted in a while, but their spreads are drop dead gorgeous and @saltwaterstudies who doesn’t post as frequently, but i love his spreads all the same :)
@ everyone: if you also post your bujo frequently, feel free to reply to this so others can discover your blog through the notes xx
#if you have any more questions you can always send me another ask!:)#bujo#tips#anon#sabrinas mail#sabrinas masterposts#i guess lol#studyvan#jeonchemstudy#saltwaterstudies#heyzainab#starryvstudy#just gonna tag some more mutuals in case anyone else finds this helpful/useful:#medustudies#stuhde#heystasia#myhoneststudyblr#uglystudies#athenastudying#serendistudy
163 notes
·
View notes
Text
gifmaking tutorial
As requested, here's a tutorial on how I make my gifs. Everyone's process is a little different, and mine changes from time to time, so it'll take some experimenting to find the settings that you like best. I’ll also link this tutorial here by Em, who is way more thorough than I’ll probably be, so check that out! The tutorial will be found in the read more below (apologies if it doesn’t work on mobile - this is a screenshot heavy piece of text).
My process uses Vapoursynth and Photoshop CS5 (I’m ancient I know!!). Avisynth is also another popular option if you already have that, but it’s been a while since I’ve used it. After the frames have been loaded into Photoshop, I then sharpen and colour my gifs before exporting. Some people will also use Topaz to clean up their gifs, but unfortunately that does not work well on my laptop. I use a Windows computer, so things may look slightly different if you’re using a Mac.
STEP ONE ⤅ Downloading your video
To start off, find the highest quality possible of the video that you want to gif from. If it’s a stage, I highly recommend using ts files, which are much better quality than the versions you’ll find on Youtube. Ts files can be found on a variety of website such as 4sashi, kpop24hours (requires membership) and on Twitter. Here is an additional resource for finding ts files and downloading videos. For non-stages, 1080p will work best, though 2k and 4k are absolutely lovely and I would highly recommend those if they’re available.
STEP TWO ⤅ Run your video through Vapoursynth
You can install Vapoursynth following this tutorial. Vapousynth is essentially a program that will crop and compress your video files without losing any quality. It also has built-in sharpen and denoise functions that can take over the functions of Topaz.
To start the process, you’ll drag your video onto the vapourscript and see a pop-up from Command Prompt. It will prompt you to enter two numbers: the first is the timestamp on the video for the start time for your gif (mine was at 3 min, 27 seconds). After pressing enter, it will then prompt you to enter the duration of the moment you want to gif (mine is 3 seconds). If you’re using Avisynth, the second prompt will be the second time stop (when you want the moment to end). I find that sometimes adding an extra second will help me capture the entire moment, but it’s up to your own discretion.

Once you press enter a third time, the command prompt will run and then a pop-up will appear on your browser. You can then adjust several settings, including gif size, preprocessor, denoise filters and sharpening. There’s a lot of freedom here to choose what you’d like to do.
In terms of gif size, you can pick any height that you think looks good but the widths that are optimized on Tumblr go as follows:
1 gif per row: 540px width
2 gifs per row: 268px width (I tend to use the default 350px for height when making these)
3 gifs per row: 178px width (it’s funky here because the middle gif is 178px while the two on the side are 177px each, so you have to crop off a pixel later)
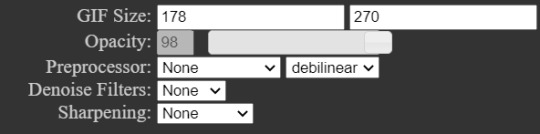
For the purposes of this tutorial, I’ll be making 178px gifs. The next option is preprocessor. This option will alter how the video renders. There are two main options - 30 or 60 - and this will refer the number of frames per second you’ll obtain. For live performance gifs, qtgmc 60 slow is generally the option I choose as it gives better quality frames (especially with a lot of movement) but you may find that qtgmc 30 slow is sufficient. For non ts files, I typically do not use any preprocessor settings.
Most of the time, I don’t use denoise or sharpening filters as I prefer to do my sharpening and denoise in Photoshop. When I do choose to use denoise and sharpening, these are the settings I use. I don’t have a particular reason, but just that I like the way the gifs look. You can experiment with the settings to see what you like, and it can also vary with the gif.

The difference between having those sharpening/denoise settings vs. doing it in Photoshop vs. no sharpening/denoise can also be seen with the three gifs below (note that I've coloured them, which we’ll get into a bit later). As you can probably tell, there’s not a HUGE difference in quality between the three because ts files tend to be already be very high quality but I would always recommend sharpening as it can make a very big difference in the quality of your gifs!

After choosing the settings you want, you’ll then paste them into the VapouSynth Editor (which should’ve automatically popped up at the same time as the browser setting adjuster). For the purposes of this tutorial, I have chosen not to sharpen and denoise. You will copy paste the code from the browser (found at the right side) into the editor. My code was 4 lines and goes in between the code from the 11th line and 22nd line (yours should as well, though the line numbers may not match up - just make sure they say the same thing!)

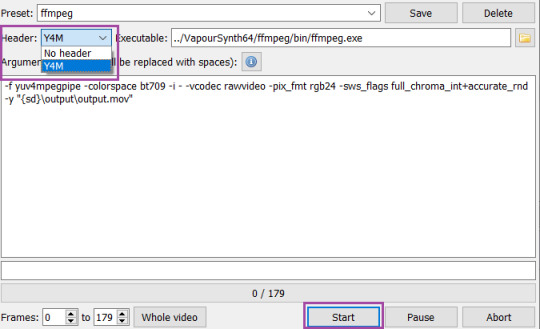
You’ll then want to hover on the script on the top bar and click on “Encode video”.
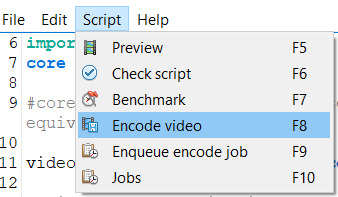
Once you click encode video, another box will pop up. Here, you’ll want to make one adjustment (shown in purple), before pressing start. At the header bar, you’ll want to exchange the preset “No header” for the Y4M option. After you’ve done that, you can press start found below (also highlighted in purple).
Congrats! You’ve finally finished processing your video!
STEP THREE ⤅ Make the gif in Photoshop
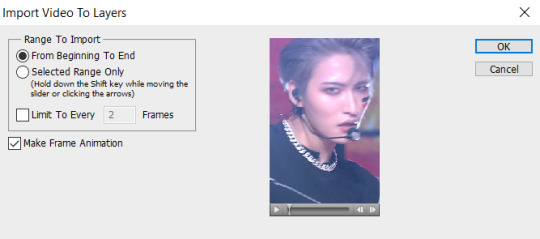
To important the frames into Photoshop, you’ll click File (top bar) > import > video frames to layers. Your output file from vapousynth should be found in the VapourSynth64Portable folder (based on where you first saved it) > gifs > output. Finally, click on the output.mov file to select it. You will then get a pop-up that looks like the following. I always keep these settings, though sometimes people will use limit to every 2 frames, but I find that will make your gifs look choppy.
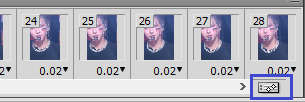
Based on the way your Photoshop layout is set up, the following steps may be found in different places than they’re found on my screen. You’ll want to have animation turned on (can be turned on under the windows dropdown menu, and just click on animation to turn on the frame view). If your bar is on the bottom of the screen, in the bottom right corner, you should press on the button (convert to timeline animation). I’ve highlighted the button in blue.
After converting to timeline, I select all the frames in the layers window (can also be turned on in the windows dropdown menu and selecting layers). Then, right click and and press convert to smart object. This will turn all your layers into a single object so you can edit all the layers at once rather than having to edit each layer separately.
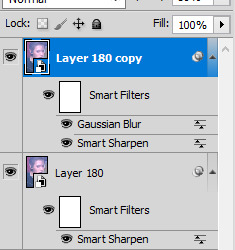
After your smart object is created, I like to sharpen. I have an action, but to recreate the same effect, you will need to (1) duplicate the smart object (right click on the smart object > duplicate layer) (2) smart sharpen both smart objects with the following settings and then (3) put a gaussian blur only on the top layer with 1.0px. Both smart sharpen and gaussian blur can be found under the filter dropdown menu (filter > sharpen > smart sharpen or filter > blur > gaussian blur).

Depending on the quality of the video, if I find the sharpening too strong, I will sometimes change the radius to 0.3 or 0.2 (a higher number = more sharpening). Finally, set the top layer to 50% opacity (I go anywhere from 35% to 50% depending on how “soft” I want the sharpening to look. A higher opacity for the top layer will create a softer look). When I finish this step, my layers will usually look like this. And good news: your basic gif is done!
STEP FOUR ⤅ Colouring
Before you save the gif, you may want to colour the gif to make the colours look the way you want. This step is super subjective and every CC will colour differently - it’s why it’s so fun to see multiple sets of the same moment giffed, because each CC will colour a little differently!
I’m not a colouring expert at all, but I’ll put a basic skeleton of the way I colour below and show you the difference between no colouring, a basic colouring, and a more complex colouring. Another fun thing about colouring is that it can also make your gif look much sharper and higher quality depending on what you do.
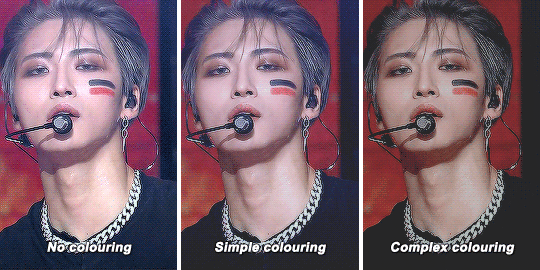
To access the possibilities for colouring, you’ll want to go the adjustments window (once again can be accessed in the window dropdown menu and selecting adjustments). As you can tell, there’s a ton of adjustment options, which may seem overwhelming. You should definitely experiment to find that looks best to you! I usually go in the following order: curves (red), colour balance (orange), hue/saturation (yellow), selective colour (green), levels (blue) and finally exposure (purple). I won’t attempt to explain what each one does (there’s tons of tutorials out there!), but note that sometimes you’ll want to use an adjustment more than once to get the effect you desire. Layering of multiple of these adjustment layers is what will create a more complex colouring that you will find you like more. I also haven’t mentioned some of the other options, but definitely explore them all to figure out what you like!
STEP FIVE⤅ Saving your gif!
We finally made it to the end! To save your gif, head into the file dropdown menu and select save for web and devices. There’s a lot settings you can fiddle around with here in order to save the best possible gif, but these are typically the settings I go with. The most important to note in the top right corner with selective and pattern selected (play around with those as you may find that the other settings will look better based on the gif!). Also make sure colors is at 256 (maximum) as having less than 256 colours can make your gif look patchy. At the bottom right, make sure you’ve selected looping options: forever to make sure the gif will loop. Finally, at the bottom left, you can see the size of the gif in megabytes. Note that Tumblr will allow gifs up to 10mb to be uploaded, but gifs will typically look best when under 3mb (though debatable).

Press save and you’re done! Note that sometimes after you’ve saved, the timing of the gif will be either too fast or slow. You may need to reopen the gif again and adjust the timing. I find that if you’re using 60fps, 0.02-0.03s generally looks best, while 0.04-0.05 will look best when using 30fps or with a preprocessor. Try them out and see what looks right to you.
Congrats on making it through this tutorial and taking the time to make gifs. Making gifs you find nice won’t always come easily or with the first try, but keep going and you’ll eventually find a way that works for you that you’ll be happy with. As always, if you have any questions, feel free to stop by and ask me and I’ll do my best to help. Almost every CC will be happy to share tips and advice as well, so don’t be afraid to reach out to the people whose gifs you love.
#gif tutorial#tutorial#mine#*tutorial#omg this took so long i hope this helps though anon!!#if there are any mistakes or grammar issues please let me know i'm too tired to read this over again LMAO#again everyone has different processes so this may not be something that works for you
99 notes
·
View notes
Text
How To Customize Your Tumblr Blog!
Alright! Here is the long-awaited blog post I’ve been meaning to make for a long time now. When I was trying to customize my tumblr blog, I found it extremely difficult(especially because the first time I got on tumblr I didn’t customize my own page at all) So hopefully, this will help you try to create a masterlist, how to navigate features and implement a theme for your blog! Also I hope this can answer some questions people have if they’ve come to an error when creating your blog.
I’ll also be making a AO3 guide(mainly how to customize your writing on the HTML page on ao3) so if you’re looking for that go here.
I’ll also be making a potential youtube video for these two guides. Since I don’t have a lot of time today, I’ll be making a video on these two guides the next time I decide to revamp my blog and I’ll be sure to link those.
Alright! Let’s start!

Alright! So starting in your homepage we’d be focusing on choosing, implementing and setting up a theme for your blog.
But before we do that, I highly—HIGHLY suggest you go through your blog and delete the clutter on your page. By clutter I mean—reblogs. Or at least delete MOST of them. Reason being—if you are a fic writer(like myself) and you publish your stories on your tumblr blog, your masterlist etc; and you want to link your chapters on your masterlist or you want to locate your masterlist(the original post NOT the reblog) it’s hard to do that with all the reblogs cluttering your page. This is crucial for later when we create our masterlist. If you are a fic writer and you’ve been uploading your chapters and you already have a masterlist—locate them, copy their link addresses(which I will teach you how to get copy link addresses in this guide) and paste them on a google doc or a notes of some sort. It’d save you so much time later when creating/revamping your masterlist.
If you absolutely refuse to de-clutter your blog and/or you’ve never published on tumblr but you plan to so you don’t necessarily need to scroll so much to find your original masterlist post/story post/chapters etc; then ignore this step.
But if you are a fic writer or writer in general and you have a masterlist and/or story posts/chapters published on your tumblr blog—go ahead and scroll to find those original posts(NOT the reblog) and get their copy link addresses and paste those links in a separate google doc, notes etc. You can refer to this doc/notes when creating/revamping your masterlist/story post without having to delete any of your reblogs. I must warn you tho, it WILL take you a lot of time. Especially if you reblog A LOT. Happy scrolling!
TUMBLR THEME:
Okay—moving on—THEME! Alright so you need to find a theme for your blog. What is a theme?
A theme is a decorative set up for your blog.
But before you go looking for/implementing a theme, here is some things you need to know:
1- Many of these themes are made by fellow tumblr creators who have spent SO MUCH time creating the codes for these themes. In saying that, when you do select a theme by a creator, READ THEIR RULES! It’s very important that we’re following the rules that these creators put for some of these themes.
2 - The general rules for themes if you plan on using one:
*Do not change/steal the themes and/or use them as a base to implement a different theme.
3 - If you want to change something, look at the rules and see what you are allowed to change and what you’re not allowed to change. If its not listed, reach out to the creator to see if making these changes are okay. Generally, these creators are good at listing their rules and/or do’s/don’ts for their themes.
4 - Reblog the theme you chose! Not only does this let the creator know you’re using their theme, it also lets other people check out their page in search of themes.
Now that’s out the way—I’m going to list a couple of theme pages I frequent:
· https://maziekeen.tumblr.com/
· https://glenthemes.tumblr.com/
· https://raiidens.tumblr.com/
· https://amboise.tumblr.com/
· https://kosmique.tumblr.com/tagged/t:recs
· https://magnusthemes.tumblr.com/
· https://seyche.tumblr.com/tagged/%26themes
· https://egg.design/tagged/egg%20theme
· https://lemonfawn.tumblr.com/
· https://yeolithm.com/portfolio
· https://xuethms.tumblr.com/tagged/codes-by-xue
· https://warugaki-themes.tumblr.com/tagged/warutemas
· https://www.floralcodes.com/page/2
If you find that you don’t like any of the themes I’ve listed here, you could always search on tumblr, “tumblr themes” and a whole list of pages come up.
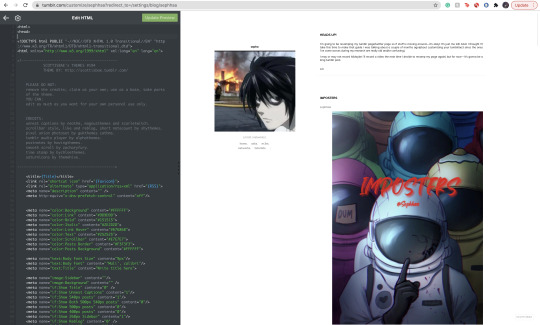
Once you’ve found your theme, let’s head on over to “Edit Theme.”

Once you’ve located “Edit Theme” in your settings, click on it and it’d open up to a new tab where you’d be implementing your new theme.

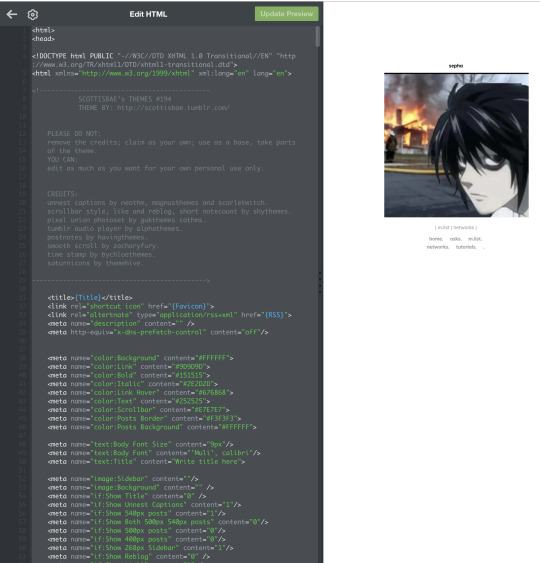
Today I’ll be using a theme from @maziekeen !

Once you have opened your “Edit Theme” page, you’d see that theres a bunch of functions to your right. This is where we will be implementing our new theme, specifically this bar:

Now, you’re going to click, “Edit HTML,” this will open a window that will look like this:
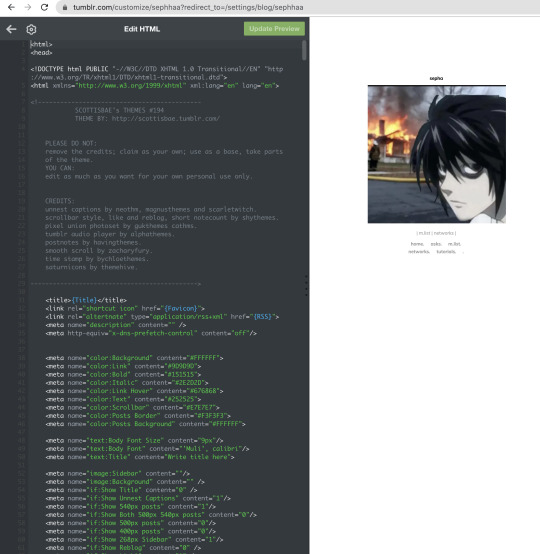
It will open up a window with a bunch of coding, here we will be deleting that code to replace it with a new code that is our new theme. To quickly delete this old code you’d press down on keys:
SHIFT+CMD+A(MAC)
SHIFT+ALT+A(Windows)
This will select all the code:
Now as you can see, all of that code is highlighted. You’re going to go ahead and delete it by clicking:
delete(MAC)
or
backspace(Windows)
Once all of it is empty we’re going to head on over to our new code theme.

On your creators theme page(or the theme post, whichever is fine) Many creators have different verbiage for getting codes. Sometimes it’d say, “CODE”, “GET CODE”, “Download,” etc. Either way,(and in my case) you’d click “Get Code,” which will redirect you to a website to download the code.
Many creators use Pastebin as a way to paste these VERY long codes. If there’s an option, you’re going to find and click “download.” If you can’t find a download option, it’s likely that you have to click “RAW” to download the code. In my case, the download option is available for me so it’d just click download and it’d open in a separate document. I find that if you download on raw, it will open to a new tab with a long list of code. Either one is fine.
I also want to mention that—some themes you might come across are priced. VERY affordable and if you have some money to spare, def buy a theme and support the creator!
Once you’ve downloaded your theme’s code it will open in a separate doc(or open in a separate tab) with a long list of code. Here you will select all the code:
SHIFT+CMD+A(MAC)
SHIFT+ALT+A(Windows)
This will select all the code, copy the code:
CMD+C(MAC)
ALT+C(Windows)
Go back to your Edit Theme page. You’re going to go ahead and paste your new code onto the empty HTML space:

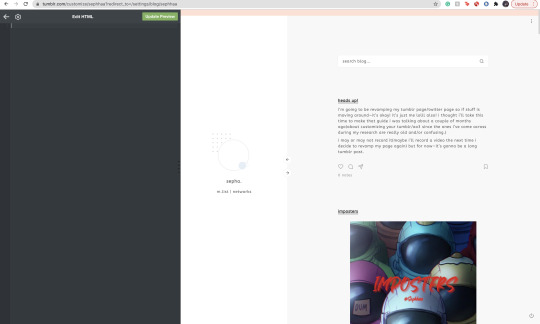
Now with your new code, you will click on “Update Preview” Once it loads, your entire page will change to that new theme’s layout:
Now click save!
Alright! Now, let’s say you don’t really like the colors, or you want your profile icon to appear on said theme layout(sometimes your avatar icon won’t appear at all or you won’t have that option. If you want that option it’s likely you’re going to have to search for another theme where it’s obvious you can put your profile picture in one of the icons.) You’re going to go to the sidebar, scroll until you see all of these functions:

Here on the sidebar you can change the colors to your theme! You can also change the theme’s background, and in this case(photo icon) in the sidebar feature. You can also scroll down a bit where it says “links” and add names and links to things people can click on.

That’s all for adding your theme!!
COPY ADDRESS LINK:
Now, here is where de-cluttering your blog comes in handy. Here, we’re going to locate our chapters, story post, masterlist etc(if you publish all your written posts on your tumblr) or if you’ve already published all of your story posts/chapters onto your masterlist here on Tumblr then we need to locate the original master post.
The reason we need to locate the original master post is so that when people/readers click your masterlist—it won’t be a reblogged version of it with a bunch of writing you have previously posted on that reblog. The original, 9 times out of 10 looks a lot more organized etc.
Once you have located your masterlist—go on ahead and follow these steps:
*Hover your mouse on the very top, right hand corner of your masterlist.
*A flap animation is going to appear(like the above photo)
*Once it appears, right click it
*A little window will appear, it’d look like this:
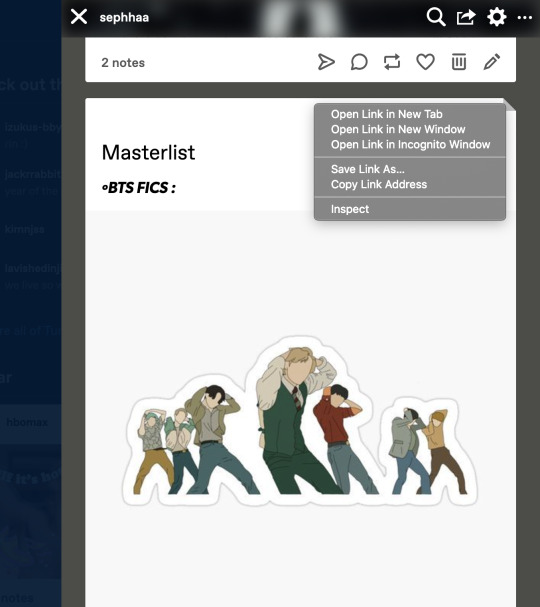
Here you’re going to click, “Copy Link Address.”
Once you have copied the link address you can place this link on your Edit Theme bio so people can click your link to your Masterlist. You can also use this to copy link addresses for all your chapters/story posts when you’re trying to link your chapters within your masterlist. I’ll explain how to do that later in this guide.
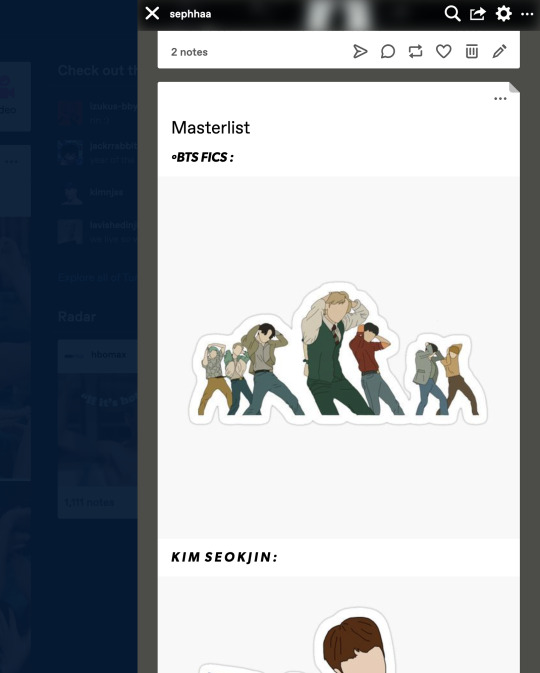
MASTERLIST:
Okay! Moving on to creating/revamping your masterlist!
If you already have a masterlist then completely ignore this step and go on over to how to put your masterlist on your bio/any errors you might have come across when trying to put your masterlist on your bio.
You’re going to go to your homepage and create a new post:
Here you’re going to title your masterlist, add images etc. Here are some features I find that a lot of people don’t know about/where to locate these features:
The, “Keep Reading” feature is a feature I find more than often a lot of people don’t know how to locate/add to their posts. The read more option is especially great if you have a really long chapter or a long post(such as this one) It’s especially helpful if you have a very long masterlist. I’m going to use my masterlist as a example to add the read more feature:
On your masterlist post, you can add the “Keep reading” feature by simply clicking the little three dots icon:

By clicking it—it immediately creates a page break saying, “Keep reading”

Another feature I find people not knowing how to do is linking their stories(story posts) on their masterlist. Here’s how to do it:

Here’s my fic, “Here’s to Forgetting 1974″ and I’m trying to add it to my masterlist. We’re going to copy the address link on this post(make sure if you’re going to add a story to your masterlist that it is the original post) once we have the link let’s go back to our Masterlist:
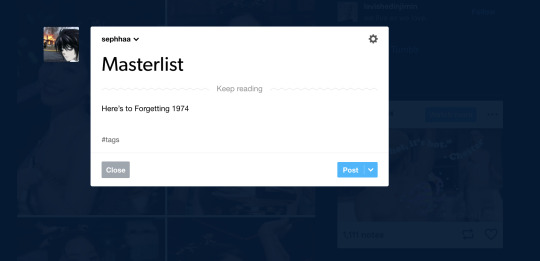
First we need to set up a title or some sort of text for this feature to work. I simply just titled, “Here’s to Forgetting 1974″ as my text. You’re going to highlight your title—immediately, a set of features will appear:
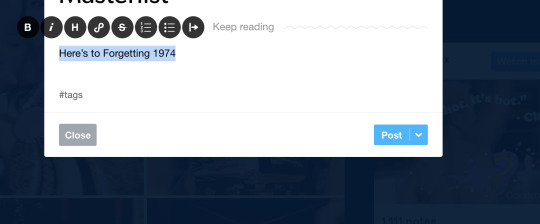
Here we’re going to click on this icon:

This will open to a smaller window to paste a link in:
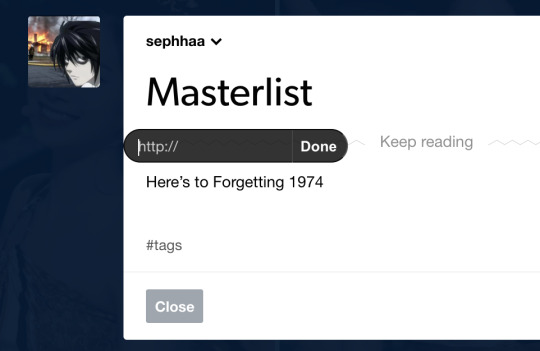
Here we will paste our copy link address from our story post onto this small window link. Once you’ve done that, click “Done.”

Immediately your title is underlined and if you hover your mouse over it and/or click it, it’d redirect you to your story from your masterlist post.
This process is similar if you want to link your chapters onto your story posts.

Here’s my story, “The Case of 1979″ and lets say I published a new chapter for this fic and I want to put the chapter link onto my story post.
*Go copy the copy address link of your new chapter
*Locate your story post:

Let’s say I’m adding a surprise chapter 12(lol)
Type your text, “Chapter 1.” “1, 2, 3″ any type of text. Here I’m just going to title my text, “Chapter 12,”:

And follow the same steps as before:
*Highlight the text
*Click on the link icon
*Paste the copy link address of your published chapter onto the https:// window
*Click done
Once you do that, hover your mouse above the chapter text/click it and it’d redirect you to the chapter from your story post.
Now that your masterlist is set up, here is the very long, and complicated process of adding your masterlist(or any link in general) to your bio.
Head on over to the “Edit Theme,” page.
Here, we will be paying extra attention to the “Description” bar.

Now, there is a bit of coding you’d have to do here and how you write the code MATTERS:
The coding is:
<a href=“
that is:
<a SPACE href= QUOTATION MARK ( “ )
Now. You cannot—CANNOT copy and paste this code in/copy and paste your links on your bio(in case you want to go ahead and copy everything in your bio and save it on a separate doc to save for later) I love copy and paste—less time consuming etc—but unfortunately, the description bar DOES NOT like it so we gotta deal with it lol.
Now you’re going to go ahead and locate your original masterlist post, copy the address link and start setting up the format:
After you have pasted your link and ended it with a quotation mark( “ ) at the end. We need to set up some kind of text so that the entire link doesn’t show up on your bio. I’ll title my text: “ | M.List. | ” You can write any title, as long as its within this coding:
</a> (Beginning)
</a> (End)
</a> TEXT </a>
(of course, all together, no spaces. For the sake of this example I just want to separate the text from the code so you can clearly see what you’d have to do.)
You’re going to put your text in between this coding:
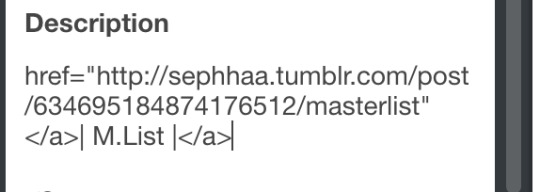
Your link should look like this and it’d appear like this on your theme layout:
You should be able to click these links even in the theme layout.
And that’s how you set up your links in your bio!
Here is a common problem that happens when you add links to your bio. Let’s say you go ahead, go to settings and decide to change your “Edit Appearance,” to your blog:

Alright, you change your page’s coloring, the background, your profile picture—cool! Not so cool for your links!
Almost immediately, you’d find that your links will cease to work if you change your profile’s appearance. Why? because when you change it, your links are in that bio where the coloring is—those links are also being changed since they’re there.
You’d need to go back to, “Edit Theme” go to the description bar and TYPE out your entire code/text again. You can just copy and paste your copy address link of your masterlist but you’d have to type out the coding and text all over again.
And you’d have to do this every time you decide to change your Tumblr blog’s appearance.
Alright! That is all for this guide! I hope you’ve found this useful! I’ll be uploading an ao3 guide under my “guides” link on my bio where I’ll share how to navigate ao3 and all it’s weird functions. I’ll also teach you guys how to customize your writing(indenting, images, fonts(bold, underlined etc) on the HTML format in the case you don’t like the the other writing format that ao3 has to offer(it’s real ugly lowkey lol) also I’ll be providing some tips and tricks to make posting your ao3 chapters on HTML more simpler.
If you’re interested in me or my stories, I write both BTS content and Anime content( Currently it’s Voltron but I do plan on writing a fic for Death Note and Inyuasha(cuz there isn’t enough Sango and Miroku content and that’s a CRIME) follow me and give my stories a read!
Until my next guide!
7 notes
·
View notes
Video
youtube
CYBERBULLYING within the Sims-Community
- Spread LOVE and not HATE - with Tips
This is important to me. Okay, I was thinking back and forth if I should do that, and guess what? I will express my opinion. Because I think it’s extremely important to say something. This Sims-Community, especially here on Tumblr can be a very toxic place at times for simmers who do make a mistake. It’s literally the end of some great simmers who did provide beautiful content, before you judge, hear me out.
Even if you apologize and recognize that you made a mistake and promise to do better it doesn mean anything. Because there are simmers who keep trashing each other out there. You won’t get a second chance by the community to prove you learned from your mistakes and let you be. I’m not a big simmer in this community. Yet, it’s sad to see that BULLYING is obviously accepted. It seems to be okay to keep trashing those who made that one mistake, even after them leaving the community and simmers still join the ride and keep going on that like yeah I'm happy they learned their lesson and left, finally. We don’t need that trash here.
Okay, I’m not religious by any means, but this quote is damn true, and I will say it:
Let them who are without sin cast the first stone.
After all we are humans (from preteen till senior, regardless the heritage and nation). Most simmers tend to forget that behind each profile there is a real human. We tend to make mistakes and in most cases we learn from them.
But is it really okay to keep trashing each other? I mean, we are all here to enjoy what we love the most, and that’s the Sims, right? I get this feeling that you need to fear our Sims-Community because once you do make mistake, mostly without intention, there is no way to recover from that. At least I’m convinced that some simmers are not aware of whatever mistake they made and then realize it, oh damn, this is not what I wanted. But such issues lead mostly to riots up to boycott.
A bunch of Simmers don't think about it how toxic this can be and what it can do to the emotional state. In fact, there is a name for this it’s called cyberbullying.
Let’s face it guys: Causing embarrassment or humiliation isn’t fun, and in most cases, this is happing in our Community with simmers who made a mistake. This sort of behavior is inadequate, and there is no excuse, regardless of the case.
More information on cyberbullying here.
I simply believe in the good within a human's heart. Most simmers who fall into this mixed-up trap called "Real Life vs. Sims Reality" must think about the fact that their stories leave a distinct impression. Maybe some of them just didn't think about the potential consequences that it could hurt someone.
Understandably, some topics are highly sensitive. So here are some tips from a small simmer for all those who fear to make a mistake. If you are a new Storyteller or even a long-time Storyteller please make sure to read my suggestions.
Under the cut I gathered, I hope some useful tips:
Minimize Conflicts: Tips on how to minimize conflicts as a simblr in a multicultural simming community
The Mistake Maker [ You made a mistake now what?]
The Offender [The attacker, who feels hurt]
The Bully [Well, yeah]
Keep in mind I don’t take any side, nor I will.
I speak in general terms overall.
Minimize Conflicts
How to minimize conflicts as Simblr in a Multicultural Simming-Community. If you are new to this Sims-Community and you want to prevent being attacked, for what you do. Here are some examples which caused issues in the past. Because some simmers haven't been diverse enough or talked about topics without doing proper research and considering potential consequence that specific choices can cause drama and action you didn’t intend to happen:
Diversity Create SIMS of all nations from all sorts of background (e.g. Age, Nation, LGBT, Transgender, Religion, etc.) Regardless, even if you have your playstyle, which is fine, by the way. But you are a part of a multicultural melting pot from the moment you joining this global Sim-Community. Sure, you can’t make everyone happy but show you are diverse, and you will be loved ;).
Stories: Depending on the topic you choose for your Simstories you always need to keep in mind: Can I hurt someone's feelings with what I say and how I portray it? Is this accurate? Don’t simmify anything without taking such thoughts into account. Simply, because it can unleash a backlash. Writing about certain traditions, lifestyles, cultural or historical facts can be at times tricky. You must be aware that specific topics can blow up in your face. More particularly, if you have no experience with these topics or do not understand their historical implications. As you can hurt real people through what and how you write about situations, relations, and the way you portray it. Some people will resent you. Especially with regard if you want to talk about topics from minority [+ethnic] groups. That goes for relationships, historical events, and everything that can be considered as sensitive. Yo have to think twice before you write about it and dig into such topics.
Pre-work: Be sure to do your pre-work before using sensible topics: Such as historical events and any form of diseases, religion, sexuality, violence, crime, racism, alcohol, abuse, and other aspects that fall into this category.
Research: It is strongly encouraged that you to do a profound and good research before you implement somewhat a heavy topic into your story. Make sure to layout ahead before you post it. Write it and read each line. Think about what kind of impact your words can have. Like could it imply something you don’t want to?
Stereotypes: Can you hurt someone’s feelings with how you portray them without thinking about your intention and what you try to achieve by using a stereotype? Does your reasoning sound logical and valid? Why are you using a stereotype? Explain the reason if it's not clear enough.
THE MISTAKE MAKER
You made a mistake now what?
Show understanding and tell your intention why you did what you did.
Remove Post. If it happened without intention - remove your post instantly.
Don’t take it personally. Don’t let this hurt your emotional state.
You are human. We tend to make mistakes. Always keep that in mind.
Anxiety. If you suffer any form of anxiety, don’t let this go to your heart.
Suicide Thoughts. If cyberbullying achieved this? This not good at all. Please reach out to suicide.org to get help in your country via a helpline simply because life is too beautiful and too precious.
How to deal with digital attacks
Ignore it. Don’t react or respond to negative comments.
Block online haters. As soon they make negative or hateful comments, delete first. They keep going? Block them. Don’t let words hurt you. Yes, you can also block the anon (IP will be blocked) or turn off the annon function in your settings for your inbox. Talk to someone you can trust and report “offensive content” on Tumblr here. Tell that they bully you, keep the messages until you are done with the report, and do screenshots for proof.
Be kind and respectful. Yes, even to haters. It shows that you’re in control of your emotions and that you aren’t letting negativity bring you down.
Stick with your supporters. Keep your followers who do appreciate and understand you. Having a friend nearby if you think you might encounter a hater not only makes it less likely that an incident might happen, but also means you’ll have positive reinforcements just in case.
Reminder. Remind yourself that comments from a hater are a reflection of them and aren’t really about you. People who feel good about themselves don’t need to put others down.
Criticism. Understand criticism can be a sign of pain. People sometimes lash out because they have other life struggles. Negative comments may have nothing to do with you.
Feelings. Acknowledge your feelings. Talk to a trusted adult or friend and get some encouragement and support.
Be yourself. Keep being you. Keep moving forward, pursuing your interests, and being who you are.
OFFENDER
The attacker, who feels hurt
Ask. First ask, what did you mean by saying XYZ?
Intention. Question the intention. Did you intentionally imply XYZ?
Express feelings. You have all the rights but give them the chance to explain themself but be forgiven and show understanding if they tell you they did not want to hurt your feels.
Forgive. If the person apologizes, be forgiven.
Second chance. Did the person learn that their behavior can hurt? Do they do it right now? Well, why not keep following and enjoy, right? Or let them be if you don’t want to follow them any longer.
BULLY
The dickhead that keeps going.
Listen, Bullying is not okay.
You don’t know who is behind that profile.
You don’t know in what emotional state that person is.
Words do hurt even more than physical pain.
It can lead that person to do something dramatic (like suicide etc.)
Your words have an impact, and you don’t know what it can cause and do to someone. Put yourself in their shoes.
Be forgiven.
Unfollow, if you don’t like them any longer but don’t trash that one simmer. This is so NOT cool.
SIDENOTE
Speaking on general terms. Big simmers do have a specific role model function as well. Many, in most instances, several thousand simmers of all ages are following you. It’s your responsibility not to support any form of Cyberbullying.
Because children and young people follow you. They adore and love what you do. Take your role model function seriously and please, don’t support any form of Cyberbullying.
Reblog if you agree.
Much love,
Malia❤️
PS: I love this community because it’s a melting pot of cultures of all nations and background. Let’s make our spot a safe and welcoming place for those who feel unsecure about themself. Don’t judge before you have valid evidence and proof that a human being is evil or bad because of ONE mistake. We all did mistakes in our life.
14 notes
·
View notes
Link
This is my letter to @taylorswift and I hope she can see it. I’m disabled with a brittle bone disorder & epilepsy, I’ve been through so much and just her reading it would mean the world. I need all my Taylor Swift friends to help me get this out there! I made a Tumblr just to get this done and to join in on the fun!
I'm sorry for all the run on sentences and grammatical errors you're about to read, I'm typing this quickly and from the heart. I'm really a much better writer than this will suggest. My name is Sean & I am a probably one of the biggest fans of Taylor and I pray that my letter comes across as genuine as I mean it. To start I'll tell you a bit about me, which number one thing is to know, I am severely disabled. I was born with something called Osteogenesis imperfecta or simply OI, OI is a brittle bone disease that is usually passed on genetically but can sometimes be spontaneous mutation and in my case, my biological father had it as well. I had my first fracture when I was two weeks old and to date have had well over 200 of them. All throughout growing up I was in and out of hospitals, three major surgeries to put titanium rods through a few bones, I was in a double blind drug study and was diagnosed with asthma, sleep apnea, scoliosis and more along the way. It was rough but to be honest, I became very used to the medical side of things, it was my personal life that wore me down.
When I was a child I was bullied severely and it never has truly stopped. I was beaten up, threatened, picked on and since an early age, I developed depression, by the time I was 10 I had already attempted suicide. I had no real outlet for my pain, I couldn't go out and "play" so I sat, festering in the horrible thoughts my mind kept producing, it really was a scary time, looking back. Around the age of 12, I started getting into music. Unlike most of the people who view music as a fun past time, I saw it as an escape from reality where I could feel a sense of normalcy, to live in another world and then bring back some peace of mind to figure out the problems in my own life. In music I wasn't in a wheelchair, no one hated me, I could do anything.
Music was and is one of the only things that make life worth living, driving me to be creative and actually allowing myself to get better hand-eye coordination, amongst other physical things.I remember as I got older listening to Taylor's first record, I really dove into headfirst - it came at a time where my personal life was crumbling even more, I had graduated high school, couldn't find work and was realizing that the bullying aspect of my childhood wasn't going away but merely adapting to the outside world in the form of pure bigotry. I played that album all of the time to escape when I discovered it I was actually, again, contemplating suicide, I started it up and immediately remembered what creativity could do. Since then I've been a die hard fan and I have found myself really surviving from the inspiration she gives me. She not only stands for what her music says, but also never shies away from defending all who need it.
Now what I am about to say is what happened to me in the last two years, it was very scary and I'm lucky to be alive.
In March of 2017, I suffered two grand mal seizures without any prior history of epilepsy. I went into complete respiratory and cardiac arrest, was transported to the hospital and awoke with no knowledge of who or where I was. The emergency room doctors didn’t believe it to be a seizure and twelve hours later, I had another that was stronger than the first. These seizures, mixed with my brittle bone disorder, caused four broken bones with two so severe I required emergency reconstructive surgery. The second seizure also put me into cardiac and respiratory arrest where I was without any brain activity for two minutes. I was on life support for two weeks and now after the surgery, I’ve lost most functionality in my left hand due to extensive nerve damage. I’ve already spent my life in a wheelchair and now most of what little I could do on my own has been stripped from me.
I spent six months in a reclining wheelchair unable to move, lost my job and apartment and sold off everything I have to try and pay off the tens of thousands in hospital bills. I had no insurance when it all began and when I was approved for Medicaid, they wouldn't cover all of the past costs, neither did they cover completely any of the new ones. I had nothing left of myself and depression had come back tenfold. I felt worthless and a drain on my family, no longer able to really do anything for myself. Now eventually I did regain some independence, getting back in my wheelchair and being mobile, but still unable to work, make a living or do half of what I used to. It seemed like things were finally on the upswing.
February 5th, 2018, I went back into the hospital after having a petite gran mal seizure caused by influenza A. I was admitted with a severely high carbon dioxide level and was put on an oxygen mask. That night, at 2:04 A.M., I again went in complete cardiac and respiratory arrest. My family got pulled away and they were told I had no pulse, the nurse wasn't hopeful, and the doctors thought it finally was over. Miraculously I was revived after 4 minutes being lifeless on the hospital bed. I woke up two days later with a breathing tube down my throat like before, I had multiple bone fractures and was kept sedated and under heavy pain medication. Doctors worked hard to figure what if anything could bring me back to normal, not even knowing if I'd even be able to speak again. By another miracle, I came off the ventilator with full cognitive function, all that remained were the bone fractures and fear of more seizure activity. I now have thousands in debt and can't work, I'm trying every day to make it better and I can say without her work she does to keep me inspired, I would not be here anymore. I'm living off of my GoFundMe which is here bit.ly/seanshealth .
I can no longer really play guitar, which I did for ten years...with the extensive nerve damage, the layout of the neck for me just doesn't work. I create in any way possible because it's so important to me, it's something people don't understand is so important to me, but it really is. That's why I wanted to reach out to you and thank you. Taylor, for the work she does. The world can be beyond cruel, so many people don't care at all for the wellbeing of others and finding your place in the mess is a challenge, she gives me that focus and inspiration to be okay no matter what. I would not be alive without her work and that's a fact. Most people would find that pathetic but inspiration is an inspiration.
Due to the epilepsy diagnosis, I know I can never live out my dream of seeing her live, the lights are no longer anything that I can handle. On top of that because I can't work and my massive debts, I don't own any of her music/items as I can't afford them, nor do I think I'll ever be able to live out my biggest dream of meeting Taylor. It's a sad truth that I've had to come to terms with but I thought passing along this letter may be my one shot to get my message across and maybe make some friends in the process.
I suppose all in all I am just saying thank you to her for everything, for making me believe in myself, for making the world a better place with her work. I know firsthand of the darkness this world can cast but it's how we react and how we treat others that can define us. I know so many people share my sentiments and I hopefully speak for everyone when I say thank you to her for saving lives, for being who she is and I hope to realize my only dream one day of shaking her hand but most importantly, just knowing she may have heard my story is great enough... I hope everyone knows the impact everything you do can have on one person. I will continue to fight on.
#taylorswift#taylor swift#swifties#swiftie#disabled#handicap#dreams#lovers#letters to taylor#reddit#accessibleproductions#sean smith#Help#disabled swiftie night#disabled swifties#disabled swiftie
1K notes
·
View notes
Text
How to create a budget event.

Hello, my lovely Tumblr family!
I am back with yet another post where I will be talking you through how I personally have created budget events within the comfort of my own home and friends’ homes.
I have created a few budget events in the space of my own home which I set up in my living room. I managed to transform the room in to a small, beautiful function. I have created this on more than one occasion. You must be thinking how? Well let me break it down for all of you wonderful readers.
First and foremost, the most important thing is HELP. Without any help it is close to impossible to get things sorted in a timely manner. Just like any other event planner you will always need a few pair of hands to get things completed on time. In the professional world of events this would be part of your operational staff, and they go by the name of event porter. Their job role is to help set up all the equipment and any furniture that may be required for the function. They also must ensure that the layout is in line with the furniture set up. Since we do not have any event porters and are setting things up on a budget, a helping hand from friends is crucial. That does not mean that you cannot do it on your own, of course you can. However, if you are doing it alone you have to take into consideration that it will be a time-consuming process, which can get tiring, especially when it comes to moving furniture around. I would recommend having a helping hand on board for any heavy lifting or moving.
Now that we have established that help is crucial, the first step would be to create a plan. As you are putting this plan together make sure to gather your pen, notepad, and sticky notes as it is best to be organised. Trust me you are going to need these for organising a small budget event.
The first part of planning you should focus on is making sure that you are set on a colour scheme & theme. Once you have decided what your theme and colour scheme will be, you need to start thinking of all the resources you are going to need to start building the event. I always go for something borrowed. You guys must be thinking something borrowed? I know it might sound crazy but what I mean by borrowed is some where I can collect any goods that I may possibly need for this budget DIY event. This could vary from:
· Friends
· Asking friends of friends?
· Search Gumtree and see if they have anything on the site for free that could be of use to me.
· Or simply do I need to purchase it
Most of the time you will find that people have the resources you are looking for as it is for an indoor event.
Now that you have made a list of the resources you require, it is time to make some phone calls to see what you can get your hands on. Sometimes you will need to purchase your own materials and when working on a budget it can get a bit tricky. You might not have the funds available so you will have to think of the best way to gather the funds together. What I have personally done for past budget events that I have created. I invited all the attendees into a group chat and asked everyone that is attending if they would be willing to pitch in with a small contribution towards the event. It could be as little as £10 pounds. Any input is a massive help. Once you have the funds raised it is time to get to business.
When working with a budget it is best to shop from budget websites. A favourite of mine is eBay. You can find materials that you need for the budget event at a cheaper rate. Sometimes you can create your own materials from items that you may have lying around the house. A good example of this is a vase. This can be used as a centre piece which can be filled with colourful artificial flowers. Little things like this will help you save money while also creating the perfect look.
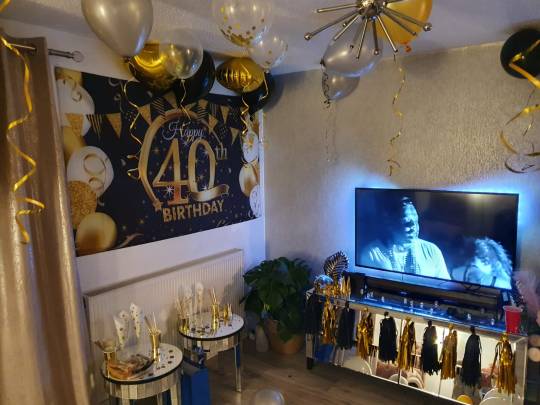
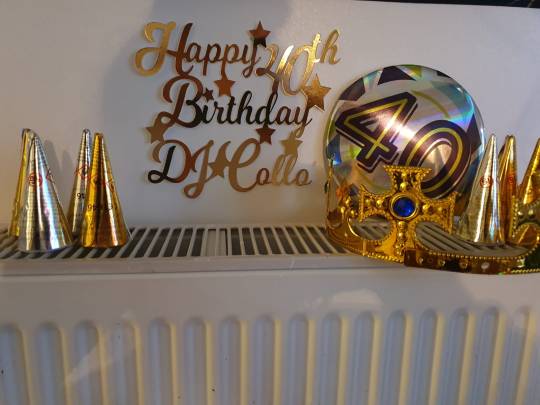
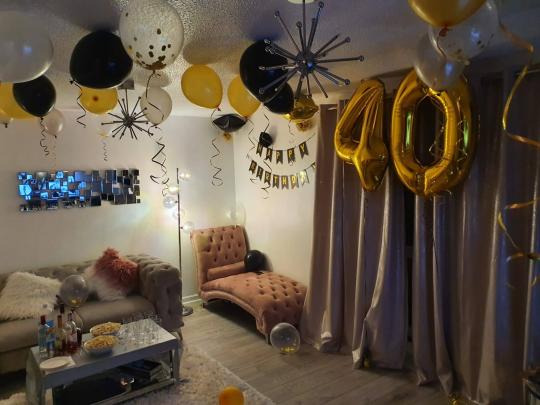
I will be sharing images with you of a friend’s birthday I had organised. If you have any questions, feel free to drop me a message and I will be sure to give you a speedy reply!

#budget#friends#40thbirthday#events#planning#organised#theme#diy#colour scheme#creativity#ebay#onlineshopping
1 note
·
View note
Note
awesome-fanfictionada * tumblr * com / post / 615676095589728256 so anon ask how it's possible that no one's ever let the cat out of the bag this entire time (not to mention no one's ever captured a surreptitious pic of C/D together) and the answer is a rambling response filled with fake rumors and inane talk about smiling at each other. basically, there is no answer for how darren's "incompetent" team has kept a lid on this secret for nearly a decade. cuz they haven't. cuz it's all bullshit.
The first thing to keep in mind is that awesome is a newbie- she popped up in January 2020. Everything she knows is from "researching” the ccers favorite gifs and answers Abby and co gave to their nonnies in the last few years. She was trolling through the cc masterposts but most of them are long gone so she basically learned through their favorite gif playlist-if you put all the gifs together and took away the slow-mo feature it was probably a total of 4 minutes or less of Chris and Darren’s lives and all of it was from the Glee set or during promo for the show.
I wrote my comments after her post:
Anonymous asked:
So, we're 8-9 years? into this whole situation. I want to know how no one has ever let something slip about the truth. There's a lot of pieces in motion...PR houses, SM, appearances with beards, them being together (physically in the same place, like living together) without public knowledge. There's also a lot of people that would have knowledge of the situation. And some of them are not that bright or discreet. It's an incredible amount of time to maintain all of this.
Dear Anon, I’m not sure about the tone of your ask and if you want me to convert you or reassure you? However, I’ll just comment on the things you say. It’s not correct that no one has ever let anything slip about them, there have been in the past people who (2) tweeted about them as a couple just to dleete the tweet shortly after. Not always, some tweets are there still. (3)There have been IG posts and radio interviews with the voice of one of them in the background when there was supposed to be no official interaction. There have been other let’s call them (4)“clues” - even if they weren’t meant to be such. (5) It’s been many years, yes, and with the years comes the ease and the routine, everybody is aware of the situation, teams know what they have to do to keep it going (though sometimes they also slip up, some more than others). With the years the startling suspicion that they might be indeed a couple subsides and nobody cares about it anymore (but us), no one goes out to investigate because why should they? (6)Who cares about D marrying to hide the fact that he’s gay? He’s not the first nor the last to do it. (7) And he’s not that famous that people will want to know at all costs or have tabloids to pay for the scoop. (8) No, it is still his team that needs to pay to get articles out (talking about M mostly). And based on the comments they get on such articles, D’s secret seems to be an open one. Why would anyone tell about them? In HW everyone knows everything about everybody but they seldom tell cause they are all in it together - so who should tell and whom to? (9) Besides - there are plenty of couples in HW and around HW who are pretty secretive about their relationships and have been for years without anyone finding out anything they did not want exposed. Some couples are never seen together anywhere but are known to be married because they have at some point or another confirmed their relationship. (11) It is a long time to maintain this but if the parties involved are fine with the outcome (I doubt D and C are now, but for argument’s sake) nothing will get in the way to disturb the situation.
Do you want me to confirm to you that they actually live together? I cannot. That they have been together all the time? I cannot. (12) But look at them interact at the G/lee reunion and tell me honestly that there isn’t anything going on between them - they have been looking at each other that way for almost 10 years now. Have they at any time looked at their official SO in the same way? They make each other smile and laugh, that counts for very much in a relationship.
Yes, I started on 2...ignore there is no 1.
2. She mentions the Tweets that were soon deleted- this is one of my favorite arguments because it’s the most pathetic proof and proves just how easy it is to con a tinhat. Faking a Tweet has been easy for many years and anyone with photoshop skills could do it from day one. Tweets that showed up, then quickly disappeared but luckily ONE person managed to get a screencap? Riiigggghhhhttttttt. We also know that a couple of those famous disappearing Tweets were never real but were written about as part of the “news” post that GleekinthePink mistook for real but was later proven to be fanfiction.
3. The videos where they hear the voice of the other -usually in a laugh- aren’t “proof” of a relationship. First of all, the obvious, we don’t know who it is since they are off-camera and the person on camera never makes a face of surprise like I would expect if the other outed them. It also makes no sense to imagine that Darren married Mia to protect the secrets but they took a risk by having the other in the room during a live or while shooting a video they posted to social media. I can’t imagine taking a chance like that on something as stupid as a promo Livestream or a haircut-maybe to attend a small family event like Chris’s mom’s funeral or his dad’s wedding, but not a haircut.
4. What clues did they give away exactly? The not-actually-matching shirts? The not-at-all matching duvet covers? The song lyrics? None of these “clues” are evidence of a relationship. They are simply evidence of a fandom obsessed with making everything into confirmation bias and Abby’s talent at bringing everything back to Crisscolfer.
5. Now she starts to layout her argument that “everyone knows and they are willing to keep it a secret because who cares”? This argument is so weak I would hope that her community should see right through it, but I’m sure they don’t. I’ve learned through my interactions with Trump supporters and ccers that people who are in a group because they want to win and to be special, people who are bonded together through anger, misogyny, and hate require very little fact-based information. They thrive on short sentences-repeated often- and in anger and having a scapegoat to hurl all their shit at. Having someone to hate is like meth- it’s highly addictive, it rots their brains and it keeps them coming back even after it is killing them. I am sure that any ccer who reads awesome’s post will accept it all at face value. Hollywood isn’t a close community full of people who either love and respect each other enough to protect Darren or are indifferent as long as it doesn’t affect them. The fact is, Hollywood is a small community, yes. If cc were a couple, everyone would know but being a small community and one willing to hide another’s deep dark secrets aren’t the same thing. Nobody has a reason to protect Chris and Darren by lying or actively working to protect their secrets.. People like and respect Darren because he’s genuine, honest, kind, and interesting but ccDarren is none of those things. He’s a liar who is hiding in the closet because he’s can’t give up his fame, he “treats Mia like shit”, he continues to work with the man who put him in the closet using THE Contract. THE Contract alone would be HUGE and go well beyond tabloid fodder. The NYT and WaPo would be all over the story of Ryan Muphy and Fox TV forcing Darren into the closet, forcing a beard and forbidding them to interact for a decade.
The biggest reason her theory is nothing but a naive fantasy is that Hollywood isn’t a static community. Over the last decade, many people came and went and there is no way you will ever convince me that in 10 years, not one person let it slip or was willing to sell them out for their own 15 minutes of fame or blackmailed one of the players get something they wanted. Darren is a vary social man and lots of people consider him their friend. He attends a lot of functions where people see him with Mia. Either ccDarren and ccChris never go out in public- for 10 years they have kept their relationship inside at one of their homes and only a couple of friends know the truth or it’s statistically inconceivable that someone hasn’t slipped or outed them. Glee had a huge cast and crew- add the plus ones and we have a crap ton of people who know, but not one person told a friend who let it slip? Nobody told a friend who works at TMZ or knows someone who does or who is on TMZ payroll? Puh-leaze .
The tabloids would LOVE to get ahold of CrissColfer- not simply because they are gay, but because Darren has presented as straight for over 10 years and he just married a woman! He also said as a straight man he won’t play another gay character. A gay Darren would be tabloid fodder at any level but as Abby loved to point out, he just won every award; he’s one of the Ryan Murphy Players and his career is on fire right now. CDAN has posted multiple blinds about Darren being gay over the years which proves that tabloids would be interested in such a story.
6. In 2020 it would be big news if a celeb married to hide a gay relationship. Especially if that man was famous for playing gay characters and who has been in a relationship with the woman he married for 10+ years. Awesome is dreaming if she imagines nobody would care about such a story. It’s a story about deception and lies but if you add in the shit they believe, THE Contracts and being forced in the closet, a paid beard who abuses Darren and hidden relationship with another man who has presented another man as his long-term boyfriend? Yeah, that would be huge news.
7. I have no clue why she thinks he isn’t famous enough to have a tabloid pay for information. Has she read TMZ in the last 5 years? It’s full of stories about Farah Abrahman and other reality stars and their shenanigans. You don’t have to be a huge blockbuster movie star to get a tabloid interested. You only need a sordid story about love mixed with deception, sex, money murder or abuse of power. The tabloids feed off stories like the tinhats have written CrissColfer.
8. I always love the comments about his team forcing articles out -especially Mia. WTF? His team doesn’t force out articles- they get him publicity when he has a project. Darren hasn’t done all that much press I would call fake, certainly, not many that are written by his team or read as if they just pieced together PR pieces written by his team. Maybe ccers are finding nonsense articles that are clearly written for clicks (they were debating about one last month that was clearly written by someone who Googled Darren and cobbled together his story from what they found online without trying very hard. It wasn’t even written well. It’s super easy to avoid those articles- if they say “sponsored” that’s a good clue. If you have to click through paragraph by paragraph or photo by photo, or you can barely see the article among the flashing ads, you’re probably reading something of poor quality and not worthy of your time. Stick with articles that are more reputable-actual entertainment publications that cover the industry and including interviews or stories written by journalists. BTW, when was Mia in an article last? I mean more than a mention or two? She was quoted in some for TSG’s opening but other than that she isn’t in the pieces.
9. There are plenty of couples who keep their relationships quiet but Darren Criss is NOT one of them. Neither is Chris Colfer... but especially not Darren Criss. He doesn’t talk about his relationship per se but is mentioned in places where one would normally talk about one’s spouse. Mia is always by his side and clearly enmeshed in his life- they share old friends and live and work together. The people awesome is referring t-those who keep their private lives private- aren’t running around with a fake wife or fake husband to protect their actual relationships- they are just keeping everything quiet-think Ryan Gosling and Eva Mendes or early Angelina and Brad. Arguing that because some celeb’s keep their private life private, it is rational to believe that Darren and Chris are simply one of those couples is a fallacy-but it’s almost 3 am and I’m too tired to think about which one it is.
11. Now she’s arguing that in over a decade in Hollywood, the people in Darren’s and Chris’s lives have been static and therefore there isn’t anyone to rock the boat and out them. An interesting argument in light of Darren’s resume over the last 9 years- Broadway (4 different shows (2 Hedwigs)), TV (Royalties, Hollywood, Glee, AHS, ACS), music (including a few tours, 2 albums, multiple one-off shows, and several music videos), Elsie Fest, two feature movies and all the award shows, charity events, fundraisers, and other random things that Darren does. He also owns two businesses that we know of- TSG and The Motley. That’s a shitload of people that he’s interacted with just at work in the last decade. Oh and add all the people who worked on the wedding-the vendors and their staffs- it’s unrealistic to believe that not one of them realized something was ccUp. Chris entirely changed careers adding all the people in the publishing world that an author works with. He also has done a couple of shows for TV. I’m not even considering the charities they both work with. Not only is this a LOT of people who are keeping their mouths shut, but it isn’t a static group-Darren filmed Hollywood and Royalties this year and rehearsed Amerian Buffalo bringing in an entirely new set of people to work with. If Chris gets his TLOS movie off the ground that will be hundreds and hundreds of new people with him The fact is, Hollywood isn’t static- it’s the most unstable business I can think of with new people coming to seek their dreams and others giving up or going off to do something else like music or Broadway. There are alwasy new people coming and others going. If Darren and Chris were in fact in a relationship then lots of people near htier homes would know- grocery store workers, restaurant staff, dry cleaners, etc. Yet nobody with this type of evidence has ever even suggested they are a couple. The legit media has never sniffed around trying to find out if Darren is actually gay or with Chris. That says a lot about the validity of the story. Darren would have been hounded by the media when he started playing Blaine but was telling everyone he was staright and showing up at events with Mia.
Hollywood isn’t known for being altruistic and kind. It’s a ruthless industry full of people with huge egos and big power and people who are broke and just want to get hired for a part, they want their dreams to come true. Hollywood is a town of desperation for so many with big dreams and a quick buck selling a story to a tabloid or the 10 minutes of fan that it would bring- hell even someone making a deal with TMZ to cover them for a period of time in exchange for info about Chris and Colfer is wayyy more credible rational than believing Hollywood is static and nobody has a reason to out Darren.
12. Laughter and joy are important in a relationship but smiling at someone during a charity online reunion isn’t proof of anything- it’s just common courtesy to be polite in that scenario. Notice they once again are relying on a photo- a stillshot from a video- 1 single frame is “PROOF they are in love” because Chris is giving heart eyes to Darren.
If your entire argument is they have overwhelming chemistry then you must know that nobody will take you seriously and you should really get listen to an objective opinion by someone who isn’t desperately searching for confirmation bias that they are a couple. Good chemistry doesn’t make a relationship-lots of people have good chemistry and they aren’t in a relationship and lots of people in relationships have poor chemistry. It isn’t proof of anything except that ccers have no evidence.
8 notes
·
View notes
Note
Do you have any tips for people looking to get involved in Chinese fandoms on Lofter? Or just setting up a Lofter account in general?
Hi anon! What kind of tips are you looking for? Do you just want to look around or do you want to interact with people? In general, getting involved with lofter isn’t too hard. What I would keep in mind for basics are:
There’s no English layout on lofter. Can you read Chinese? If not, maybe the chrome translate option can help. Otherwise, it’s still not terribly hard. Think of it like setting up a tumblr (email, password, etc.)
To make things easier, I’d suggest setting up a weibo first (there is an English option on weibo)- you don’t have to post anything on it. But you can use weibo to log in to lofter and create an account.
Lofter “interaction culture” works a bit differently than tumblr; ex. It’s possible to reblog, but almost nobody does and OPs don’t expect anyone to- what they do want are comments (like the reply function here), likes, and “recommendations” (lofter gives the extra option of giving the post a thumbs up instead of a heart- you can give both though)
There’s a message function, which quite frankly, is better than the tumblr one lmao
Sometimes people who tag for a ship (referred to as “CP” by fandoms) won’t tag it in the main tag and vice versa. Instead of saying n sfw, they’ll say “nc-17, R, or the character for ‘meat’” so if you want to see or avoid those, keep an eye out.
How much content there is probably depends on the fandom too. Ex. “Ne Zha” and MDZS are probably as big as Star Wars or the MCU there, but something like Good Omens would be a small fandom.
2 notes
·
View notes
Text
The Art of Web Image Selection: Creating a Perfect
As much as we'd like to think that the content and layout of a web page make or break its success, it's sometimes difficult to ignore the images. Images can be an excellent communication tool when integrated into a website. Choosing the right image for your web design can help you create the perfect impression, elicit emotions, and attract the attention of anyone visiting your site.
In this article, we'll explore how to carefully select the best images for your website, which will help you achieve success.
Website Design and the Importance of Images
Every designer is familiar with designing mockups. In fact, most designers spend a lot of time assembling the html and CSS for their mockup before adding images. This is a mistake since it's impossible to understand the effect of a design without images. The purpose of an image on a website is often different from that in print design. For a print design, the image may be meant to reinforce the message of the text. For example, an article about unique and unusual animals would include a photo of an unusual animal to reinforce the concept. On sites like Pinterest or Tumblr, visual design is very important; in this case – images are a key part of the message.
What Images Can Do For Your Site
Images can help you establish an atmosphere for your e-commerce website, introduce your brand, or add a touch of professionalism. Images can help set the tone for your content and interpret verbal communication such as sound effects inside a blog. Images can help you create a more personal feel for your website; it's much easier to imagine what cool things the author of a blog does for a living if there are photos of them surfing, snowboarding, or engaging in some other pastime.
Images can also help you maintain user engagement through emotional appeal. For example, an image of an energetic-looking person enjoying a product can make the viewer want to try it out themselves.
Images can also enhance the appeal of your website. A product page with a plain background and minimal design elements in comparison to other sites selling the same product could be perceived as unprofessional. Adding a few design elements such as a unique background image or illustrations can help to enhance the appeal of your site, helping you to stand out from the competition.
There are a number of different ways you can use images on your website:
Brand Promoting images: Images help to tell a story about your brand and the values you represent. For example, if you're selling vintage clothing on your website; you could use images of vintage items to create an emotional appeal.
Information/sitemap: Pictures are a great way to give your website visitors an overview of the information and functionality available on your website.
Emotional Appeal: Pictures can help you add a more personal touch for users to connect with your website.
Product presentation: Whether you're selling products or services, using images make it easier for users to understand what they will be getting if they purchase from you.
Creating the Right Atmosphere for Your Site
If your brand is fun, friendly, or trendy, then adding fun and cool images to your site is a great way to maintain that atmosphere. For example, if you're selling clothing, adding pictures of the model showing off your items could help to express the brand and atmosphere you want to create.
Drawing Users In Through Emotional Appeal
When designing a product presentation page, showing a user how they will look when wearing your clothes or using your product is a great way to create an emotional appeal. If you're selling a pair of jeans, you could include an image of the model wearing those jeans. If you're designing a food blog, adding images of mouthwatering food can help to express the passion you have for cooking.
Adding Personality and Fun
Fun images can give your website a more personal touch. For example, adding images of you or your employees having a good time can help users to connect with you and your brand.
Creating a Touch of Professionalism
Using images can also help give your site a more professional feel. For example, if you're selling products that require users to pay a lot of attention to detail, adding images of the product being used in real-life situations can help users to see how it will function. Using product images can also make it easier for users to identify products on your site.
At Digital Starter Pack Ltd – the leading web design Norfolk, we develop a high quality, mobile friendly site for your business services. Our pricing starts from £199 for single page websites. Visit https://www.digitalstarterpack.co.uk/ for more details.
0 notes
Text
Summary of Notes
What’s expected?
Requirements Filled in and signed cover page uploaded to Turnitin. Attendance. Final presentation uploaded to your Tumblr blog.
Learning Outcomes On successful completion of this paper students will be able to:
1. Demonstrate knowledge of fundamental interaction design principles and concepts.
2. Analyse digital user interface (UI) problems, then undertake user research and evaluation.
3. Explore, experiment and analyse a range of creative ideas and concepts.
4. Prototype, further analyse, refine and communicate concepts.
5. Reflect on design processes and learning.
Siobhan’s Notes
Week 1.2
First assignment is a infographic of what you've learnt.
Taxonomy/diagram/infographic
Put it all together in the last week
Section 2
making - based on systems - grids, typography etc.
design system (music app)
do it with prototyping software
hand in design system, asset library, all the icons, all stages, plan for colours, typography, artwork
Taxonomy (general) is the practice and science of classification of things or concepts, including the principles that underlie such classification. Originally used only about biological classification, taxonomy has developed to be a synonym for classification (see Classification (general theory)).
Design for finding
Design for understanding
The hamburger menu, or the hamburger icon, is the button in websites and apps that typically opens up into a side menu or navigation drawer. It was created by interaction designer Norm Cox for the Xerox Star personal workstation in 1981 as an easy way to communicate to users that the button contained a list of items.
The Power of Design Jams (And How They Can Help Your Startup)
we work for findability.
classify things
basically organise our places of information - we are placemakers
we make online environments structured in such a way so that people understand
the understanding is driven from context, content and user.
Design for Understanding
Some organising principles that carry over to information environments from physical environments include: structure and order, rhythm, typologies and modularity and extensibility.
We experience information environments as places where we go to transact, learn and connect with other people, among many other activities.
How people make sense of where they are and what they can do there
Placemaking in the physical world and in information environments
Design for Finding.
Information needs are like fishing: sometimes people know exactly what they're looking for, but often they're casting a wider net.
Everything (exhaustive research)
A few Good things (exploratory seeking)
The right-thing (known item seeking)
Need it again (re-finding)
IA starts with people and the reason they use your product or service: they have an information need.
Three circles of information architecture
We need to understand the business goals behind the project and the resources available for design and implementation.
Context | Business goals, funding, politics, culture, technology, resources and constraints. We’re looking to understand goals, budgets, schedules, technology infrastructure, human resources, corporate culture, and politics.
Content | Document/data types, content objects, volume, existing structure. We’re looking to understand “the stuff in the information environment”.
Users | Audience, tasks, needs, information-seeking behaviour, experience. We’re looking to understand the people – real, living human beings – who will be using the information environment.
Finding and managing
The organisations and people who manage information are important, too. An information architecture must balance the needs of users with the goals of the business. Efficient content management and clear policies and procedures are essential.
Findability is a critical success factor for overall usability. If users can't find what they need through some combination of browsing, searching, and asking, then the system fails. But designing for the needs of the user isn't enough.
Structuring, organising and labelling.
Labelling means figuring out what to call those categories and the navigation structure elements that lead to them.
Organising involves grouping those components into meaningful and distinctive categories, creating the right contexts for users to understand the environment they are in and what they're looking at.
Structuring involves determining the appropriate levels of granularity for the information "atoms" in your product or service and deciding how to relate them to one another.
Information
We are concerned with information of all shapes and sizes: websites, documents, software applications, images, and more. We are also concerned with metadata: terms used to describe and represent content objects such as documents, people, processes, and organisations.
Knowledge managers develop tools, processes, and incentives to encourage people to share that stuff. Information exists in the messy middle. With information systems, there's often no single "right" answer to a given question.
We use the term "information" to distinguish information architecture from data and knowledge management. Data is facts and figure. Relational databases are highly structured and produce specific answers to specific questions. Knowledge is the stuff in people's head.
Information Architecture
The art and science of shaping information products and experiences to support usability, findability, and understanding.
The synthesis of organisation, labelling, search, and navigation systems within digital, physical, and cross-channel ecosystems.
The structural design of shared information environments.
It does this by asking the designer to think about problems through two important perspectives: that our products and services are perceived as places made of information, and that they function as ecosystems that can be designed for maximum effectiveness.
Information architecture is focused on making information findable and understandable. Because of this, it is uniquely well suited to address these issues.
This has had two important effects in our time: information is more abundant that ever before, and we have more ways of interacting with it than ever before.
Historically, information has shown a tendency to dematerialise, going from having one-to-one relationship with its containers to being completely detached from its containers.
Week 2.1
The Anatomy of Information Architecture
Organisation systems present the site’s information to us in a variety of ways, such as contect categories, or to specific audiences.
Navigation systems help users move through the content, such as with the custom organisation of the individual drop-down menus in the main navigation bar.
the only thing is sometimes organising info can hide info.
Search systems allow users to search the content; when the user starts typing in the site’s search bar, a list of suggestions is shown with potential matches for the user’s search term.
Labelling systems describe categories, options, and links in language that (hopefully) is meaningful to users; you will see examples throughout the page.
Top-Down Information Architecture
In top-down info architecture, the environment's designers posit a structure that aims to answer users' questions such as these.
The form that the environment takes – its content, page layout, etc. - is designed and produced to support this structure that has been centrally defined “from above”.
Categories are used to group pages and applications throughout the site.
Labels systematically stand for the site’s content.
Navigation systems and a search system can be used to move through the site
Questions users will ask from a top-down perspective.
Where am I? I know what I am looking for; how do I search for it? How do I get around this site? What’s important and unique? What’s available on this site? What’s happening there? How do I engage with them via various other popular digital channels? How can I contact a human? What’s their address? How can I access my account?
Bottom-Up Information Architecture
Instead of being dictated from above, bottom-up info arch is suggested by and inherent in the systems content (e.g., Netflix as it’s Based on what you've been watching/ Spotify is a mixture of top-down and bottom-up)
It’s important because users are increasingly likely to bypass your system’s top-down information architecture; instead, they’re using webwide search tools like google search, clicking through ad, while reading your content vis social media to find themselves deep in your site.
UNDERSTAND: Top-down vs Bottom Up - Initially I didn't really grasp what this meant
Week 2.2
DEFINE High-fidelity prototype?
Organising information then visualising information
Grid systems
Slides readable
Make sure you can communicate your research to your team and stakeholders
Fruit stall - hands on card game.
Assumptions VS. Facts
Week 3.1 | INRD | Card Sorting
Top-Down Information Architecture
LABELS systematically represent the site’s content.
We label things all the time.
Labelling is the most obvious way to show our organisation schemes across multiple systems and contexts.
We must try to design labels that speak the same language as our environment’s users, while also reflecting its content.
Textual labels are the most common type we encounter in our work; they include contextual links, headings, navigation system options, and index terms.
Iconic labels are less common, but the widespread adoption of devices with less screen real estate means that they are an important component of many information environments.
Designing labels is one of the most difficult aspects of information architecture.
TEXTUAL LABEL TYPES:
Contextual Links
Hyperlinks to chunks of information on other pages or to other locations on the same page
Headings
Keywords, tags, and subject headings that represent content for searching or browsing.
Labels that simply describe the content that follows them, just as print headings do.
Navigation system choices
Labels representing the options in navigation systems.
Index terms
Content, users, and context affect all aspects of an information architecture, and this is particularly true with labels. Any of the variables attached to users, content, and context can drag a label into the land of ambiguity.
Presentation
Similarly, consistent application of fonts, font sizes, colours, whitespace, and grouping can help visually reinforce the systematic nature of a group of labels.
Syntax
It not uncommon to find the following mixed together.
Verb-based labels (e.g., “Grooming Your Dog)
Noun-based labels (e.g. Diets for Dogs)
Question-Based Labels (e.g. How do you paper train your dog?)
Within a specific labelling system, consider choosing a single syntactical approach and
sticking with it.
Granularity
Within a labelling system, it can be helpful to present labels that are roughly equal in their specificity. Exceptions (such as site indexes) aside, it’s confusing o encounter a set of labels that cover differing levels of granularity – for example “chinese restaurants,” “restaurants,” “taquerias” “fast food franchises” “burger king”
Comprehensiveness
People can be tripped up by noticeable gaps in a labelling system. Aside from improving consistency, a comprehensive scope also helps people do a better job of quickly scanning and inferring the environment’s content.
Audience
Consider the languages of your environment's major audiences. If each audience uses a very different terminology, you may have to develop a separate labelling system for each audience, even if these systems are describing the same content.
Open Card Sorts vs. Closed Card Sorts vs. Hybrid Card Sorts
Open card sorts allow participant to cluster labels for existing content into their own categories and then label those categories (and clearly, card sorting is useful when designing organisation systems as well as labelling systems.
Closed card sorts provide participants with existing categories and ask them to sort content into those categories. At the start of a closed card sort, you can ask users to explain what they think each category label represents and compare these definitions to your own.
Hybrid card sort use elements of both
Week 3.2
Recap card sorting
Good research means asking the right questions, and choosing the right questions requires a conceptual framework of the broader environment.
We use our Content/Context/Users conceptual framework as the basis of our research.
Diagramming Information Architecture
Provide multiple ‘views’ of your information architecture.
Information environments are too complex to show all at once; a diagram that tries to be all things to all people is destined to fail.
Instead consider using a variety of techniques to display different aspects of the architecture.
No single view takes in the whole picture, but the combination of multiple diagrams might come close.
Develop those views for a specific audience and needs.
You might find that a visually stunning diagram is compelling to client prospects, therefore justifying its expense.
However, it probably requires too many resources to use in a production environment, where diagrams may change multiple times per day.
Whenever possible, determine what others need from your diagrams before creating them.
You may need very different diagrams for communicating “upstream” with stakeholders and executives than for communicating “downstream” with designers and developers.
Content components.
What constitutes a unit of content, and how those components should be grouped and sequenced.
Connections between content components
How content components are linked to enable actions such as navigating between them
Sitemaps show the relationships between information elements such as pages and other content components, and can be used to portray organisation, navigation, and labelling systems.
Both the diagram and the navigation system display the ‘shape’ of the information space in overview, functioning as a condensed map for site developers and users, respectively.
As you create sitemaps, it’s important to avoid getting locked into a particular type of layout. Instead, let form follow function.
Keeping sitemaps simple.
As a project moves from strategy to design to implementation, sitemaps become more utilitarian.
At this stage, they are focused more on communicating the information architecture to others involved in design and development, and less on strategy and product.
Bring detail to your sitemaps.
As you move deeper into the implementation stage, your focus naturally shifts from external to internal.
Rather than communicating high-level architectural concepts to the client, your job is now to communicate detailed organisation, labelling, and navigation decisions to your colleagues on the development team.
Modularise your sitemap.
The top-level sitemap links to subsidiary sitemaps, and so on. These diagrams are tied together through a scheme of unique IDs.
UNDERSTAND upstream and downstream communication
Content Components
How they are being grouped or sequenced - their relationships to each other
Let form follow function - don't get locked down into a particular type of layout. Don't force it into a certain shape
Sitemaps become more utilitarian as a project strategy moves form design to implementation.
You may need a second site map to explain smaller - itemised components from the bigger picture of the first sitemap.
top-level sitemaps links to subsidiary sitemaps, and so on, and so on. These diagrams are tied together through a scheme of unique IDs e.g. colour, how components are related to each other - keep people interested and make it so that understanding is easy. e.g. certain colours refer to certain level, if you were to zoom in on the sitemap you'd know exactly where you are on the sitemap. e.g. keep it organised and easy to understand
interaction-design.org
informationisbeautiful.net
Week 4.1
Wireframes
Consistency is key, especially when presenting multiple wireframes.
More importantly, colleagues take wireframes quite literally, so consistency makes their design and production work go more smoothly.
Callouts – small notes placed around and over your wireframes – are an effective way to provide details about the functionality of page elements. Be sure to leave room for them at the sides and top of your wireframes.
Like any other deliverable, wireframes should be usable and professionally developed. So, tie your collection of wireframes together with page numbers, page titles, project titles, and last revision dates.
When more than one team member is creating a project’s wireframes, be sure to establish procedures for developing, sharing, and maintaining common templates and components.
Schedule time in your project plan for synchronising the team’s wireframes to ensure consistent appearance, and for confirming that these discrete sdocuments do indeed fit together functionally.
In this design phase, the emphasis of the project moves from process to deliverables – it's where the information architecture starts to become manifest.
These deliverables aren’t the whole story – process is as important during this phase as it is during research and strategy.
Make sure your team are all working in up-to-date version, be clear to title your work so it's clear which is which. Establish procedures for developing, sharing and maintaining common templates and components. It's about how to design the design. You will never work by yourself in the real world - you will always work in a team.
Schedule time in your project plan for synchronising the team's wireframes to ensure consistent appearance, and for confirming that these discrete documents do indeed fit together functionally.
Make sure there is consistency in your work.
In your wireframe you can show your mistakes or opportunities for improvement in your sitemap. The process is still a way to figure things out.
Information Architecture diagrams define content components and the connections between them.
Sitemaps show the relationships between information elements such as pages and other content components, and can be used to portray organisation, navigation, and labelling systems.
Wireframes depict how an individual page or template should look from an architectural perspective. (Wireframes are working documents.)
A2 diagram/infographic of everything you've learnt so far.
Peer session with post it notes to comment on people's work.
You learn by giving feedback.
A2 poster
Choose a visual language - decide how you want.
Wireframes - how are you going to link your map to the wireframe.
Wed: wireframe to a prototype on Wednesday
Do this in Xd or Figma?
A2 examples of other's work will be shown.
Wireframes
-
Grid system - the easiest way to find out grid system for the website you're looking for - it's almost never touching content - there will always be margins and gutters, etc. go deeper into grid systems in Project 2, but it's important to keep in mind here.
Each website will have a grid system - examine them and get your head around.
Never try and make a grid system where one row interacts with the other.
0 notes
Note
odd numbers for the oc ask!!
1. Your first OC ever?
its my boy, Vaughn Zander!! he was made on 13 feb 2016 and is my most treasured oc i have
3. Have you ever adopted a character or gotten a character from someone else?
yea! Vincent Hudson that belongs to @theartofblossoming , we both adopted our ocs and they are cousins.
also got from @lilyblue-bubbles a happy package: Deborah “Debbie” Gaines (RR tourist, later heavy, also Minuteman sniper and close friend to Vaughn in both canons); Ellie Connor (Sole version, General of Minutemen in her canon story, and Companion version, ex caravan guard, (ex) Operator, later becomes too a Minuteman in Vaughn’s canon), Rosaline Dupart (tinkerer and mechanic, part time Minuteman, both canons), Anika (caravan guard, in Ellie’s canon story, she is a close friend to her since pre war; in Vaughn’s canon, also caravan guard, befriends Ellie and Rosaline), Charlie (vault 81 dweller, joins up the Minutemen when they want to leave the Vault for better treatment and life)
Note: both me and @lilyblue-bubbles got 2 perfect canon stories, as for me, its Sole Vaughn’s canon and Ellie is Companion,and Sole Ellie’s canon and Vaughn is Companion (different story, vault 81 doctor, part time scavenger, becomes a Minuteman as he no longer returns to the Vault for good), with Debbie and the others keeping their roles
5. If you could make only one of your OCs popular/known, who would it be?
i mean…..Vaughn was known in the fandom a while, but i guess they got tired of my doctor with a kind heart :/
7. Are your OCs part of any story or stories?
yea! they all come from games, its Noné the Vault Dwellwe from FO 1, the unamed Chosen One, unnamed Lone from FO 3, Tamir from F NV, Vaughn, Oliver, Olivia, unnamed ex gunner and unnamed ghoul ocs from FO 4, Kahurangi from S/kyrim….
9. Would you ever be willing to give any of your OCs to someone else?
already had! i gave Vaughn to @theartofblossoming . and to @lilyblue-bubbles, i gave Vaughn, Tamir, Oliver and Olivia (the last 2 are different in both canons)
i can give my ocs to my friends anytime ;)
11. Is there any OC of yours you could describe as a “sunshine”?
Vaughn! or Olivia!
13. Do you have any troublemaker OCs?
Tamir!!! she is the wild card of the squad
15. Do you like to talk about your OCs with other people?
YESSSS I LOVE!!!!!!!!!!!
17. Any OC OTPs?
Vaughn with H/ancock and Nick, Tamir with Cait, unnamed ex gunner with Piper
19. Introduce an OC that means a lot to you (and explain why)
oh my god…..
so….Vaughn is the most important for me….as he is my first oc, i gave him my entire person, with obvious differences between us, but basically….he functions just like me, personality, fears, illness, he got them from me…
but also… he helps me alot to cope with my own issues, and he is the person i am, and the one i want to be, if that makes sense….its a lot to explain tho
21. Your most artistic OC
Olivia! she loves to knit, to sing and she even know how to dance
23. Introduce OC that has changed from your first idea concerning what the character would be like?
i think that would be Tamir….her original design was to be complete opposite of Vaughn, someone to be mean and evil, but i couldnt, so i changed her in being chaotic good
25. The OC that resembles you the most (same hobby, height, shared like/dislike for something etc?)
Vaughn!!! he is ltierally 70% me
27. Any OCs that were inspired by a certain song?
nope?
29. Which one of your OCs would go investigate an abandoned house at night without telling anyone they’re going?
Tamir for sure
31. Pick one OC of yours and explain what their tumblr blog would be like (what they reblog, layout, anything really)
i think i take Oliver, as he would post pics of vehicles, mechanical stuff, jokes, news, pics of animals, sometimes post pics of Dogmeat…
33. Your shyest OC?
could be my unnamed Lone
35. Any sibling characters?
not by blood, but by bond, Vaughn and Debbie are close to each other, can consider each other brother and sister
37. Introduce an OC who is not quite human
ummm Olivia, as she is a ghoul? or Oliver, as being a synth? or Kahurangi as being Khajiit? does Tamir and Vaughn (6 years after main event) as cyborgs counts?
41. Has anyone drawn fanart of your OCs? If yes, maybe show a picture or two here (remember sources & permissions!)
yea! here is made by @lliviadoodles , this commission of my friend for Vaughn and Debbie made by @anafigreen , this, this and this by @nokikissa and this made by @her0ismsart !!!
43. Do you have any certain type when you create your OCs? Do you tend to favour some certain traits or looks? It’s time to confess
tragic past i mean i want to give them kindness and good heart
45. A character you no longer use?
*sigh* it was my Lone, Sammie, but i scrapped her cause i didnt felt any connection to her, so i will need other Lone
47. Has anyone ever (friendly) claimed any of your OCs as their child?
yea! and i dont mind tbh ;)
49. Which one of your OCs would most likely enjoy memes
Vaughn maybe, he would laugh with Debbie at memes
THANKS @enclave
4 notes
·
View notes
Note
how do you deal with passive aggressive anons? got an anon ask telling me to use larger text underneath my gifsets, because in their words, "small text makes it very hard for the visually impaired or even seeing people to read". what rubbed me the wrong way was they weren't really asking me, more like implying that i was going to change this for them rather than suggesting that i should. does that make sense? example of the ask: love your blog but change this, it'd be for the best! thanks!
kinda wild how i came across a post about how to politely decline anons who message you about tagging things a few days ago. i didn’t save it, and then i get this message along the same vein!!
but to answer your question, yes, i know exactly what you mean with pushy/demanding anons. the best thing i can tell you is to politely decline or at least say that you appreciate the suggestion, but you’re not up for changing previous gifsets because of how time consuming it can be (bc it actually is time consuming and a fucking bitch. i goddamn hate it when i miss a tag or have to go back and correct something bc tumblr is so fucking bulky and going back to edit anything, esp gifs, it’s such a pain in the ass).
there’s also the fact that regardless of how many websites try to integrate a generalized layout for viewing, it truly doesn’t matter because every screen and display is going to show something different—meaning that one screen is going to show one size text, while another is gonna be different. there’s not much any of us can do to actually change that, unfortunately. just because you edit text, doesn’t mean it’s going to be better/worse, especially on tumblr. the text may be fine for you to read, but difficult for a couple hundred just because of the devices they’re using and vice versa.
if they really want to see the text, just copy and paste it in a browser as if you were typing in a new website link. it reformats it to plain text. sometimes there’s not always a way to make accommodations for people (when it comes to websites that are out of your control in terms of functionality and design), and as well, the content you create is the content you create. they don’t have to interact with it, engage with it, etc. especially because at the end of the day, it’s your blog, your space.
the content people make here, or anywhere, is for others to enjoy, yes, but they are not entitled to it—especially when you’re doing it on your own time, for free.
#x#like if you really do have a request for something to be different#then be nice and don't actually assume that person is gonna make an accommodation just for you lol#i've iignored ppl asking me to tag certain content bc 1. lazy but 2. my blog and there's an unfollow button#i think ppl have really forgotten that other ppls social media spaces are not your own#ppl want others to create the perfect space for them instead of creating it for themselves#that's just not how it works or how it'll ever work SM is too big and too vast for that#anonymous#answered
0 notes
Text
1. When was the last time you watched fireworks? Are you into going to watch them or do you think they’re over-rated?
Last 4th of July. I think they’re visually pleasing, but I’m not fond of the loud BOOM they make.
2. Is there anybody that you know that looks better with glasses than without them?
I look uglier without my glasses.
3. What is something that everybody seems to own that you don’t? Is there a reason for not owning it?
At my age probably a car. I don’t have one because I can’t drive.
4. What is something you’ve been wanting to buy for a long time but can’t afford?
Not me alone, but my family and I would like to move and have wanted to for awhile.
5. Do you ever travel to another city just to go shopping? What city do you go to and why do you go there?
Sometimes just because the mall there is better than my local one.
6. Think of one place you really want to travel to. Why do you want to go there so bad?
Hawaii. I’d love to relax by the beautiful, clear, ocean and listen to the waves crash in as I sip a cold drink.
7. If you’re listening to music right now, what meaning does the song have to you?
I’m not.
8. Have you ever actually cried over the death of somebody famous? Who were they and why were they so special to you?
No, but I’ve felt sad.
9. Describe the layout of your house. Post pictures with your description if you’d like!
I did a house survey recently, so I already explained all that.
10. What is one dream that you have that feels totally unrealistic? Is it actually physically possible for that dream to ever come true?
it’s just hard to imagine things being any other way than they are now. It’s physically possible, but the way things have been and are currently going, I don’t see it happening any time soon.
11. What is one thing that you like about yourself, physically, that you hope never changes?
I don’t particularly like anything about myself physically all that much.
12. What is one stereotype that you can’t help but make? Why do you think you feel this way?
I don’t think I do that. Not consciously anyway. <<< Same.
13. Do you listen to any music that you’ve been listening to since you were a small child?
Yeah, like 90s stuff, 80′s stuff, classic rock, some country, and oldies.
14. If you use YouTube, what do you usually use it for?
For ASMR and to watch the YouTubers I follow.
15. Would you ever actually want to be in a band and go on tour, or do you think that’d be too much for you?
Nooo. I couldn’t handle that at all. It’d be physically and mentally exhausting/draining.
16. What is something you’ve been meaning to do but just haven’t got around to actually doing?
Getting a hold on my life and being a functioning adult?
17. What is something that a lot of survey-takers do that annoys you to no end?
The only thing that bugs me, and it’s nothing to do with anyone personally, is when the format is messed up. That’s just a picky thing of mine.
18. Have you ever made your own layout(s) for Xanga? Describe it/them.
Nope. I’ve messed with some stuff in the coding when it comes to the themes I use on Tumblr, but I don’t actually make any of them.
19. Describe the backgrounds you have on everything you can choose your own background for (your phone, iPod, other electronic devices, internet background, Tumblr, Xanga, etc.).
My home screen on my iPhone is an image of a hand/fingers snapping with the words, “Snap out of it” written over it. The image and writing is in white, and the background is black. The lock screen is a black and white photo of Alexander Skarsgard at the Golden Globes this year.
My laptop wallpaper is of Alexander Skarsgard sitting on a wooden lounge chair in front of a lake from a photo shoot he did a couple years ago.
The theme of my personal Tumblr as well as this one are ones I got from a blog that makes theme. It’s just a simple, clean layout.
20. Do you ever associate certain genres of music with certain things (examples: you listen to a lot of country music in the summer, you usually listen to dubstep or techno when you’re drinking/partying, etc.)?
Yeah, like if we’re driving I prefer more upbeat music, same if we’re having a party or something.
21. Think of somebody you’ve been wanting to say something to. Write them a letter - it can be as long or short as you please - with some of the things, or everything, you want to say to them.
Naaaah.
22. What was the last thing you saw on the internet that made you laugh really hard?
Hmm. I don’t remember at this moment.
23. What is one hair style that you cannot stand?
There aren’t any I would I say I couldn’t stand, there’s just some that aren’t the right hairstyle for me.
24. How long can you take surveys before getting bored and having to take a break?
It depends. I generally do about 3 or 4 most days.
2 notes
·
View notes
Last Seen Blogs

totallycorrectstarwarsquotes
Totallycorrectstarwarsquotes

eu-nasciassim
Adoce a vida

cy01er-blog
Untitled

sognosveglia
Io sono il frutto di ciò che mi è stato fatto.