#you can get topaz clean 3 for free now
Note
hi! what do you use to edit your sims 2 screenshots? 😍
Hi anon!
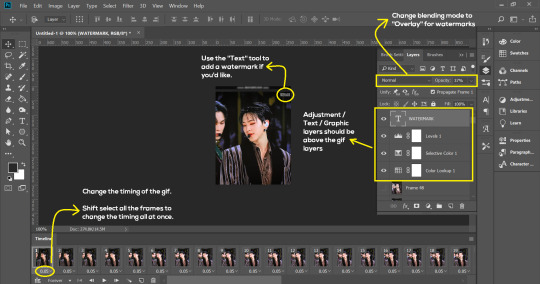
First off, I am using my own personal ReShade preset. Afterwards, I use Photoshop to resize/crop the screenshots to my liking, increase the brightness, and apply my action to the photos.
You can use this Photoshop action, if you'd like. It's essentially the same as the one I currently use (I only use unsharp mask and topaz clean 3).
5 notes
·
View notes
Note
How do you get your lighting so scrumptious in edits?
Lighting tutorial under the cut (it's long lol) I use photoshop + topaz clean btw :)
This will be our starting pic!! I use @hazelminesims photoshop action (all in one) to get the smoothening and overall base done first.
First step to colograding is using the 'Camera Raw Filter' in photoshop and adjusting the tint and curves tools. I generally like a greener, more cool toned color for pictures.
2. Now for the shadows on the sim! I make a new layer, set to 'Multiply' and use a soft brush at around 25-40% opacity with the color Black. I generally will add shadows to the parts of the body that are being 'covered' (neck, side of the nose, forehead, insides of arms and clothes). *If you use reshade/ gshade and have the mxao filter on, mimic where that filter adds shadows and either enhance it or add it in photoshop!*

3. In a new 'Multiply' layer, I do the same thing with the background. I darken the elements in the back to emphasize that my sim is in the forefront of the shot. TIP: don't add shadow to the light sources (neon signs, lights in the background) ! We actually want to enhance those.
4. Make a new layer, set to 'Pin light' at 100%. Grab a soft brush and highlight those light sources in the back. You can go crazy here, just take the Eyedropper tool to color match the highlights you want to emphasize. It might look a bit much right now, but we can tone this down by decreasing the layer opacity, Gaussian blurring the layer, and erasing any excess highlights if we want.
5. Now we add highlights to the sim. I make a new layer, set to 'Soft light' at 100% opacity, and with the white color, I highlight the sims body and clothes. (Now we want to add light to the 'raised areas' such as the center of the forehead, nose bridge, chin, chest, and arms). I also like to highlight any jewelry (necklace and belt buckle).
On a separate new layer, set to 'Vivid Light', I changed the brush colors to the ones in the background light sources (I used blue, yellow, and purple.) I'll go over the outlines of the sim's body with these colors (shoulders and arms, hair, side of face and neck.)
If you ever feel like you've gone overboard, just lower the opacity of the highlight layers and Gaussian blur them!
6. After you've messed around with the highlights, add the finishing touches. Usually once I merged all the layers I would go over with the Dodge and Burn tools to enhance the contrasts even more. I also recommend downloading and using LUTs for photoshop (I just use any free ones I find online).
83 notes
·
View notes
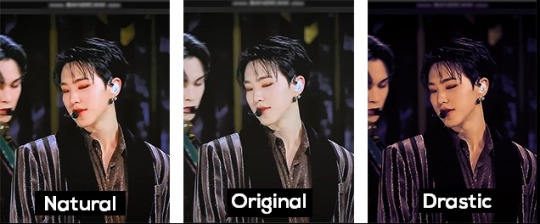
Text

* ( ❀ ˆ꒳ˆ˵ ) ♡ Ꮺ 𝗧𝗜𝗡𝗬𝗧𝗢𝗪𝗡𝗦 — 𝖩𝖤𝖮𝖭𝖦𝖧𝖠𝖭.𝖠𝖳𝖭 ੭

— introducing jeonghan.atn version 01 & 02 , this is a photoshop action that uses topaz clean and is designed for medium reaction gifs with a sizing of 268x151 but can probably go up to 268x165 ! this is my first time messing with topaz clean by myself so it's not going to be perfect , which is why i included two versions + feedback is heavily appreciated ♡ download is in the source link + below the read more along with a known bug & fix. please like & reblog if you plan on using this action ! it will not work unless you have topaz clean , but to my understanding it is now free so i'll link it below and hopefully it works for you ( ˘͈ ᵕ ˘͈ ♡) ~
❀ DOWNLOAD + DISCLAIMER.
download the action file - here
you require topaz clean otherwise this action will not work. from what i've been told topaz clean is now free and you can get it here by scrolling down to "classic plugin downloads" and downloading "clean" for either windows or mac.
❀ APPLYING THE ACTION + BUGFIX.
it's not always obvious , but if you observe the top and left side of your gif you may notice a strange line where the clean doesn't seem to have applied. this has an easy fix ! it's not actually prominent on the gif i used for this example but i've attached a video tutorial on how to fix it if it effects you.
watch the tutorial - here
from 00:00 - 00:56 the video shows you how to apply the action.
but make sure "actions" is ticked in the windows tab and that you've actually loaded the downloaded action; you can load the action by clicking on the four lines in the corner of the action tab and selecting "load actions".
from 00:56 to 01:55 the video shows you how to fix the bug if you encounter it - just drag the rectangle selection tool down to where you see the bug end. it's not the proper way to fix it but it works at least. looking back , i can see that 0.4 on gaussian blur looked a little strange so i would fiddle with the number again and see what looks best.
❀ RECOGNITION.
this action was inspired by xb3/apa/nd/4's own topaz action , but was never reuploaded by them when their account got deleted. you can view their remade deviantart by searching the name above without the "/s"

what the gifs look like with colour if anybody's curious </3 this will always vary of course but i happened to think the black and white version showed what it actually looks like in photoshop more effectively.
#photoshop action#action#rph#rpc#gif action#resources#rph resource#rpc resource#action resource#rph action#rpc action#free rpc#free rph#free#tinytowns#m: resources#gif resources#gif resource#ps action
102 notes
·
View notes
Photo


JANUARY 2023 UPDATE
Hello everyone and happy new year to all of you ♥
As a new year is starting I wanted to let you know a bit more about all the things I’ve planned for this year and also how my life could affect those plans. Feel free to read or skip this. But remember ...
Thanks a lot for being here and take very good care of you ♥
Blog update : As a new year is coming, I might change my theme but this is not my priority. You can see it above, those 3 stories are my main goal for this year ! As Another Side started last year, I really want to give you the entire story. The end of 2022 was quiet hard and I couldn’t work on it as much as I wanted to and you’re still here waiting for the next parts so I also feel like I have to end this story properly. This should take the first months (I think at least until february/march for sure) as the first part of the story is still not done and I’ve planned 4 parts for this ghost story. Are you enjoying it so far ? What do you think might happen ? Do you already have any favourites ? Don’t hesitate to tell me everything through asks and comments :)
After Another Side, we will finally get back to Destiny Harbour with the part I wrote the entire story around. Like, this 3rd act is the first one I wanted to developp but decided to include more background story first with DH1 and 2. So here comes the Britechester arc, which also is the end of teenagehood for our characters. This arc will be cut in two parts : a special musical episode called Melodia (I’ll tell you more about it on the next post) following by DH3 that will takes place 6 months after Melodia. This arc will be as light as very dark and will explore a lot of young adult theme such as : harassment, male toxicity, civil rights and the discovery of ourselves. All the characters will face some of the darkest issues of their lives and you will also know more about most of them (even the main ones like Leïla or Destiny). DH3 will also be a tribute to Wes Craven’s Nightmare on Elm Street and Scream, so if you’re a horror fan, this part should really be for you ♥
As Melodia and especially DH3 are pretty long (DH3 is the longest season so far with 12 episodes) it should take the entire year so are you ready ? If everything goes as planned, I can already tell you that 2024 will be focused on a new Another Side story, a DH LGBTQIA+ spinoff (that will take place several months after DH3) will start as well as DH4 if my life doesn’t get pretty impacted.
I guess that’s all for the blog update. I guess that now I have to be more intimate with you all and tell you more about the shitshow going on behing the making of sims stories ! Feel free to skip this part if personnal stuff isn’t your thing.
Personal update : So as most of you know, I lost my job in September and I’ve been struggling to find a new one since. What most of you don’t know though, is that I live with my ex for a bit more than a year know (after 6 years of relationship) and that has been affected both our lives. It’s not a nightmare, we’re both adults who also do our best to have a peacefull life, but it could be better (how many years would you live with your ex even though you’re friends? think about it) so we’re both kind of focused on moving on this situation.
As you can imagine, this has become a priority for me, especially since I got fired (it’s waaaaay harder to find a place when you don’t have a regular income - no I won’t do any patreon shit and will rather be homeless again than taking advantage of kind and poor people who want to help because they understand how it is while rich ones don’t give a single fuck anyway). So, between all these, life drama and death also came around lately so more stuff to deal with and guess what ... I’m still using a broke laptop on Windows 8 (which is kind of dying this year) so I’m facing some kind of issues with more and more software I used previously (no more Topaz Clean T_T / Good bye Gshade ...thank god Reshade still works) and I’m a bit scared it’s some kind of planned obsolescence that will ruin my computer and all my writting plans (it’s litterally one of my biggest fear. It’s the only computer I have and I won’t be able to buy a next one if it breaks for good U_U).
Thankfully, you’ve been around ♥ Seriously, I know I always thank everyone a lot and always say that you’re a strenght but you really are. 2022 has also been awesome because of you all and I will never thank you enough for all the support you’re giving by simply enjoying my content. I mainly post here to escape and also to practice my writting skills so it’s been a real joy and it always cheers me up a lot to see I actually have some readers who are interested about my stories or characters’ fate. You are also a true daily inspiration when I’m discovering my dash everyday like a kid in front of a new episode of their fav anime ! So, thank you for being awesome and being that creative my friend ♥
I wish you all the best for this new year. Let’s make 2023 an epic year of content ! It has already started on my dash ♥
#blog update#January 2023 update#it's been a while#sorry I wasn't active more#let's make 2023 an epic year#but for good reasons#not the end of the world#anyway a lot to say this time
17 notes
·
View notes
Note
Hey, Can I ask how you edit your gameplay pics? I am a mac user and my ss' are bad and I struggle so hard cause I've never used photoshop before starting a simblr and I can't use reshades to assist me :\
I'd really appreciate any help esp how you blur the backgrounds and make everything look so pretty. TYSM
hi! thanks so much for the compliment!
this is specifically for gameplay posts, but what I do in ps is pretty much using actions then I play around with those settings.
here's a not so little tutorial for you:
here are some actions I've downloaded and use:
smooth by earlygrape // perfect for smoothing out pictures
avonlea // another action that's good for smoothing out pictures, you need topaz clean for 2 of them, but the other 2 you don't (like smooth sharp -- use that one)
sonder by intramoon // these actions will change the color of your pictures and there's a lot of options! it might be a little advanced but these will give you a chance to play around with the style of your pictures once you're more comfortable
sunbloom by fairyfang // these are old but I used them when I was first starting to edit posts myself and they're good to use when playing around and getting the hang of using actions, these are other actions you can play with to change the color/overall vibe of your pictures
how to load actions: you load actions by locating 3 tiny lines on the top right hand of your actions window then drop down to load actions. this will open up finder so you can select the files. the files will have the title.atn, select that and they'll load into photoshop
where to find actions in ps: you find actions by going to window > then select actions, it should be the 2nd one listed after 3D. a little box will pop up and once you have loaded some actions, that's where they will be
how to use the actions: so you downloaded, you located them in ps, now its time to use them. how you do this is by finding the one you want to use > selecting the folder > pick a specific one > then at the bottom of the actions tab will be a little triangle, click that & you will have used the action. it'll either be added on top of your picture in a new layer as a folder, or it'll just change the picture.
tiny tip: if you don't like how it changed your picture, there's a tab called history that you can go to and delete what you did
another tip: it helps to just always make a new layer or copy a layer bc if you make a mistake it's easier to locate where the action started or you can just delete the layer and start over. to copy, it's command+j, for a new layer there's a little + inside of a box at the bottom of your 'layers' window. if you don't have a layers window, you can also find that in window >layers
that's pretty much the basics for actions, now onto blurring:
for starters, there should be a little tool bar on the left side of your screen (that's where mine is) you'll know it's the tool bar bc it'll have a little + with arrows on each corner, a dashed box, a lasso, a magic wand, etc. the tool bar has what you need to begin the blurring background process.
there are multiple ways to blur backgrounds but here's my basic version: right click the magic wand > select quick selection tool.
like in sims, you can make the brush bigger and smaller with [] depending on how big the area that you want to blur is.
then go over the area you want to blur, it'll have the moving dashes around the area once its selected. now go to filter > blur > lens blur (or any other selection you want to play with) > then go to radius & adjust the number to make your selection more blurred or less blurred > hit ok & you're done!
that's pretty much the basics, so I hope this helped! please feel free to reach out again if you need clarity or more help or send me a little chat! ♥️
14 notes
·
View notes
Text
Macphun creative kit 2016 review

#MACPHUN CREATIVE KIT 2016 REVIEW FOR MAC#
#MACPHUN CREATIVE KIT 2016 REVIEW INSTALL#
#MACPHUN CREATIVE KIT 2016 REVIEW SERIAL#
#MACPHUN CREATIVE KIT 2016 REVIEW UPGRADE#
The application relates to Design & Photo Tools. Macphun’s Creative Kit is a super-impressive entry into the bundled photo editing app arena, rivaling packages like On1 Photo 10, the Google Nik Collection, and Topaz Labs’ vast collection. This Mac download was checked by our built-in antivirus and was rated as clean.
#MACPHUN CREATIVE KIT 2016 REVIEW FOR MAC#
The actual developer of this software for Mac is Macphun.
Our website provides a freeload of Creative Kit 2016 1.1 for Mac.
Macphun Creative Kit 2016 by ryanedick Beginners, Gear, Intermediate, Professional, Software 0 Macphun is releasing a brand new creative kit on October 15th! Macphun, maker of elegantly powerful photo editing tools including Tonality, Noiseless, and FX Photo Studio, has announced the impending release of Creative Kit 2016 a bundle of 6 of the.
#MACPHUN CREATIVE KIT 2016 REVIEW SERIAL#
Even at full price, the package of apps in Creative Kit 2016 is a pittance to pay (compared to some competing Photoshop plug-ins) for what you get, and the single serial and automatic. Updated 08:00 am EDT, Wed Octoby MacNN Staff Apps and plugins promise to transform your photo workflow. I used the kit on my Retina MacBook and have had no performance issues at all, even while running some of the more intense editing features.įor other app news today, see: Verizon and Enlight bring stunning photo editing for free, ProCamera now offers enhanced recording and 3-D touch, and Find only the best places to eat with FoodChasers.The level of control at your disposal is very impressive. And you don’t need to worry about having the most powerful Mac to run the apps. Even if you’re not a professional photographer, the kit is well worth the money and can add another layer of polish to images. Crack Flare 1.1 Intel/Serial Danganronpa 2: Goodbye Despair Total Video Player Pro 3.0.2 Crack PicFocus 2. thanks for the write-up about our Creative Kit XXL bundle Great to see. Macphun Creative Kit 2016 Crack Elsten Software Bliss V20191129 Crack SofaPlay 2.1.3 DRmare Audio Capture 1.2.0 GitBar 1.2.3 Royal Envoy 3 Collectors Edition 1.0 IPhone Backup Extractor 7. I’ve been able to give the entire suite a nice run through and have been extremely impressed. Hands-On Review with Macphuns New Noiseless Pro Noise Reduction Application for Mac.
#MACPHUN CREATIVE KIT 2016 REVIEW UPGRADE#
It’s a free upgrade for current Creative Kit users. If you were buying the MacPhun Creative Kit applications separately, Tonality would be the most expensive. But if you’re willing to preorder today, you can reserve the software for just $89.99. The kit will officially arrive tomorrow on Thursday, Oct. WrapupĪnd if you’re ready to dive in, Macphun has a great deal that you can still take advantage of today. Easily my favorite was Snapheal Pro, which allows you to erase unwanted objects or details in an image. To see some interesting interactive previews of each app, you can visit the developer’s site. It is also compatible with the Photos app as well. You can now easily move from one app to the other without needing to ever leave the Macphun interface, which is a huge timesaver.Īll popular image formats, including RAW photos, are supported throughout the suite. And the streamlined features don’t stop there.
#MACPHUN CREATIVE KIT 2016 REVIEW INSTALL#
Instead of needing to install each app separately, there is now a single installer and product key. Luminar Review Luminar is an extremely powerful and fast photo editor that can do not only the most basic adjustments, but literally millions of looks for. System requirements Mac only For OS X 10.9+, 106. REVIEW: Aurora HDR by Macphun & Trey Ratcliff (includes Tutorial) UPDATE: Now with over 270,000 downloads (as of 3/21/16). The entire kit offers six photo editing apps – Tonality Pro, Intensify Pro, Focus Pro, Noiseless Pro, Snapheal Pro, and FX Photo Studio Pro.Īnd Macphun has made the entire kit even better – starting with the installation. The software is part of Macphun’s Creative Kit selection but can also be purchased as a single standalone App. With Snapheal Pro, you can remove unwanted objects from an image.
0 notes
Text

I posted 902 times in 2021
889 posts created (99%)
13 posts reblogged (1%)
For every post I created, I reblogged 0.0 posts.
I added 3.212 tags in 2021
#ts4 swans - 764 posts
#ts4 legacy - 754 posts
#g7 - 352 posts
#flora - 287 posts
#roquefort swan - 235 posts
#g8 - 226 posts
#g6 - 181 posts
#otis - 149 posts
#larkyn - 140 posts
#brie swan - 124 posts
Longest Tag: 81 characters
#it's not out right now because i have no idea how to fix it if and when it breaks
My Top Posts in 2021
#5

The Java Box
With its pristine location it is a popular hangout for the young and cool Windenburgians.
Set as a restaurant serving brunch.
Built for the Hare and Hedgehog lot.
Available on the gallery. ID: OpheliaNygmos
121 notes • Posted 2021-03-15 20:25:18 GMT
#4
youtube
Cute Tangerine - Starter Home
17k..ish
1 Bed // 1 Bath
Perfect for a couple or a single sim.
No cc.
Gallery ID: Ophelia Nygmos
132 notes • Posted 2021-03-29 12:51:38 GMT
#3
For one night and one night only, Poppy and Reef have transformed into their former youthful selves.
This Date Night Collab by @joliebean ⭐@trillyke ⭐ @oakiyo is EVERYTHING! 😍😍😍 Seriously, everything is GORGEOUS!
162 notes • Posted 2021-02-27 16:27:22 GMT
#2


Smooth Pop!
~ A photoshop action! (not a psd).
So I originally made this action to edit my sims 3 pictures, which is why the blurry effect is so strong.
The pictures on the left are unedited, the pictures on the right are edited using the Smooth Pop!
Resizes to 1280 x 720*
Smooths our the surfaces.
Brightens up the image
Enhances colors**
It does not use Topaz Clean.
*This is the first step and can easily be deleted/altered.
**It especially enhances the color red, so I would not recommend it for the images where red is the dominant color.
DOWNLOAD: sfs // mediafire (no ads)
Bonus pics of Smooth Pop on top of my reshade preset Subtle Paradise underneath
219 notes • Posted 2021-04-08 17:34:48 GMT
#1

Townie Makeover Savefile
I have been receiving a few requests to release my townie makeovers as a savefile so people wanting to use them in a new save won’t have to place them all manually.
I’m happy to do that, but cannot stress enough that this is not a savefile in the classic sense - it’s just a shortcut to placing townies. I did not touch about 95% of the buildings. They are just as EA left them. (uninhabitable, ugly and useless 🤣)
Useful infomation:
All the townies are cc free.
All the townies can be found on the gallery under OpheliaNygmos
Link to the official townie makeover thread
I still need to do the makeovers for the Eco Lifestyle and Snow Escape sims.
Link to my youtube video discussing the makeovers.
Aging is off per default
Installation:
This is a save file and not a mod. The file is called Slot_00000400.save and goes in your saves folder. (Electronic Arts/The Sims 4/Saves).
Please back up your saves before installing it and make sure you don’t already have one with this number.
Download:
MediaFire // SimFileShare (no ads)
667 notes • Posted 2021-02-15 16:20:12 GMT
Get your Tumblr 2021 Year in Review →
25 notes
·
View notes
Text
Bullet For My Valentine
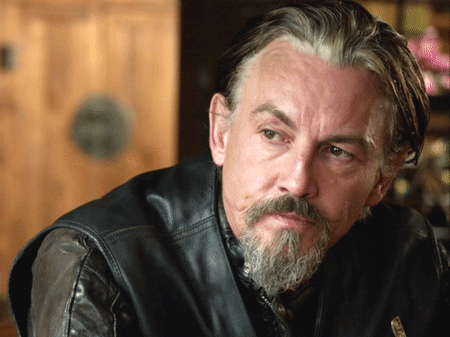
requested by - @adela-topaz-caelon - Hiya, can I get a Chibs x Female reader fic, where they both like each other, but never gotten together for varying reasons. She's the younger sister of Opie, but a ferocious addition to the sons, despite her bubbly demeanour, and one day she takes a bullet meant for Chibs and that leads to a fluffy confession. Is that okay?
warnings - gunshot wound, swearing, blood.
The gunfire outside woke you up from a dream you were having about a certain Scotsman. At first you thought it was part of your dream, but the shouting outside was unmistakeable and too close to home to be in your head. You threw on the closest things to you which was a pair of joggers and a black hoodie and you lifted your gun from the night stand, tucking it in the waistband.
You were Opie's little sister which meant you were automatically a part of the Sons. They took you in under their wings when you left home and wound up at Teller Morrow, and that was 3 years ago now, and you wouldn't change it for the world. They didn't let you have a gun straight away, but when you showed them that you could easily handle yourself, they immediately knew you would be a great addition. You didn't go on runs with them, or have your own bike, but you did get a say in decisions they made, a dorm and a friendship with each and every one of the guys, so you could hardly complain.
Creeping towards the clubhouse you made sure to check around the corners and doorways. Years of you playing Call of Duty came into practice in times like this, although it hardly compared to the real life shooting happening around you at the moment. You rounded the corner and dived behind the bar, peeking up slightly to see if you could see any of the men.
You spotted Jax and your brother just outside the doors so you leaped over the bar and ran over to them, ducking behind one of the many cars in the parking lot. “Who the fuck are they?” you asked out loud, not aiming your question at anyone in particular.
“People that clearly don't know who the fuck we are” Jax answered with a slight smirk on his face, standing up and shooting a few bullets in front of him.
You looked to your right and saw Chibs hiding behind one of the bikes with barely any cover. “Oi, Scotty, get your arse over here!” you shouted, using your nickname for him. Chibs looked at you and gave you a slight nod of the head before running towards the three of you. Just as he was about to get behind the car, you saw that one of the men from the charter shooting at you had managed to sneak up behind you all. His gun was aimed at Chibs and before you could think about what you were doing, you jumped in front of the Scotsman taking the bullet meant for him. As you lay there looking up at the sky, you heard a few more shots before there was total silence.
“Fuck love, what did ye dae that for?” Chibs asked discarding his gun beside him and putting his hands on your shoulder to try and stop the blood that was coming from it.
“I just woke up today and thought fuck it, I wanna get shot” you laughed but immediately regretted it as the pain hurt more when you did.
“Don't move, you'll make it worse” Chibs instructed as he ripped a bit of his vest off and tied it around your shoulder. He then picked you up bridal style and led you into the clubhouse, placing you down on one of the tables and walking away to find a first aid kit.
Happy handed you a bottle of whisky from behind the bar and you took a few big gulps, welcoming the burning sensation in your throat for a second instead of your shoulder. Chibs came back and opened the first aid kit, placing it between your legs. The movement had you shuddering and he didn't even touch you. “I've got it” he said to the men and they all took the hint and gave you some space.
“Yer a lucky lass” Chibs said, untying the makeshift sling and throwing it behind him. He then got some scissors form the first aid kit and cut your t-shirt, exposing your bra strap. Chibs looked at you and you nodded, knowing he was asking if it was ok for him to cut your bra strap too. He then gently washed the wound with hot water and dabbed it with some cotton wool. Chibs lifted your hand and placed it on his own shoulder. “Feel free to squeeze me to help ease the pain” he instructed you. Chibs finished cleaning the wound and he ripped open a square bandage and placed it over the bullet hole before putting a bit of tape on it so it stuck to you. “There, all done” he said admiring his work.
“Thanks Scotty” you said, not moving your hand from his shoulder.
“It's the least a can dae, ye did take a bullet fur me after all” he answered, packing away the scissors and the tape. “Why did ye jump in front of me anyway?” he questioned catching you off guard.
You shrugged. “I didn't want to see you get hurt” you whispered, taking your hand of him and picking at a crack in the table.
“Y/N” Chibs spoke, “Hey, look at me” he gently lifted your chin with his fingers and you looked into his eyes. They were full of admiration. “That's the kindest thing anyone has ever done fur me”.
“I wouldn't have done it for just anyone Filip” you admitted. The look in his eyes made you continue “this wasn't the way I wanted to tell you, but I love you, I have loved you for a while now, and when I saw that bullet I didn't even think, I just knew that I couldn't bear to see you in any pain so I took it for you”. You finished your sentence and let out a deep breath. Still staring at Chibs you couldn't gauge his reaction.
Just then Opie walked over to the two of you. “My sister is a badass, right?” he remarked, aiming his statement at Chibs.
“That she is brother, but I suggest ye walk away because I'm about to kiss her” Chibs said not waiting to see if Opie took his warning or not. He placed his arms around your waist and pulled you closer to him so you were now sitting on the edge of the table with Chibs standing between your legs. His lips were on yours immediately and frankly it had been a long time coming.
After a few seconds you pulled away, leaning your forehead against his. “I've been waiting for you to kiss me like that for months now” you admitted to him.
“Would ye believe me if I said I've been waiting to kiss ye like that for months?” He chuckled, placing both hands on either side of your face. “I just wasn't sure the feelings were reciprocated, but for the record, I'm in love with you too” he admitted with a huge smile on his face. You put your hands on his cheeks and ran your fingers up and down his scars.
“It's just a shame I had to get shot for you to admit you loved me” you teased him.
@rebelwrites @everyhowlmarksthedead @yourwonkywriter @mrsmarvelous1995 @mayans-sauce @filipthescot @encounterthepast @meteora-fc @frightfulnite @shelliechen @little-diable @starrynite7114 @lauraashley93 @peaches007 @queenbeered @i-love-scott-mccall @agirllovespancakes @lovebishoplosamiguelgalindo @rocketqueen @destynelseclipsa @gemini0410 @sheeshgivemeabreak @blessedboo @sadeyesgf @jadesamhart @talicat713 @anangelwhodidntfall @multiyfandomgirl40 @withmyteeth
165 notes
·
View notes
Photo
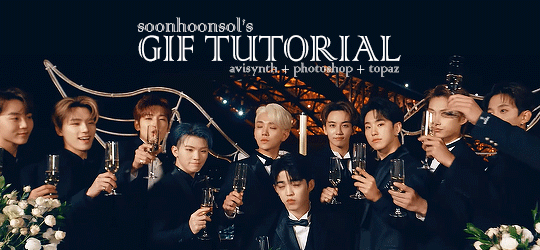
Welcome to soonhoonsol’s gif tutorial!
As a nice anon asked me how I make my gifs, I thought it’d be cool to create an in-depth tutorial :) Perhaps this can help some others enter the gif-ing world too!
What we’ll be using for this tutorial:
Software: Bandicam, Avisynth, Photoshop CC 2018, Topaz Labs
File Format: .mp4
Operating System: Windows
Disclaimer: This is just my method. Every gif maker works differently and has different preferences. What works for me may not work for you, and that’s completely okay!
Let’s get into it!
1. Find the best quality video you can find
This really depends on the content you want to gif. For variety shows, music videos or photoshoots, any video of [1080p] should be sufficient. Try not to use anything below 720p.
For stage performances, fancams tend to have higher resolutions [1440p, 4k]. Use these if your computer can handle it. If not, usually 1080p works fine. The best option would be to download .ts files, which provide clearer and less grainy videos.
For Seventeen, you can get .ts files from The Rosebay on Twitter :)
2. Screen recording
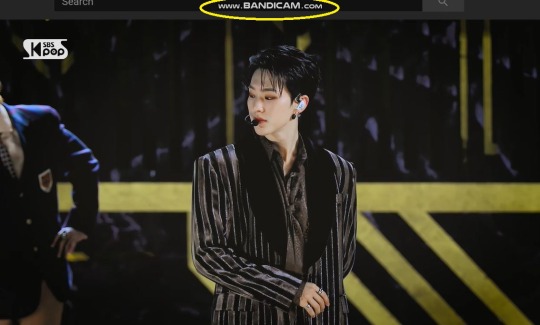
As a Windows user, I don’t have a built-in screen recorder on my laptop. So, I use Bandicam, which is a free screen recording software. The only con to it is that it has a watermark.
To combat the watermark, I always have the boundary box a little bigger than the video itself so that I can crop it out of the gif.
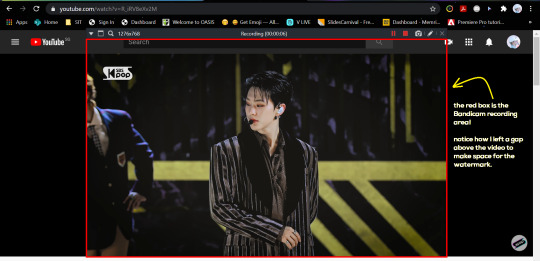
This is what the recording would look like:
Just record the scene(s) that you want to gif so your video file doesn’t end up too large! Your recording should be in .mp4 format.
(You may use pure .ts files in Avisynth but it never worked well for me so I usually screen record the .ts video and move on)
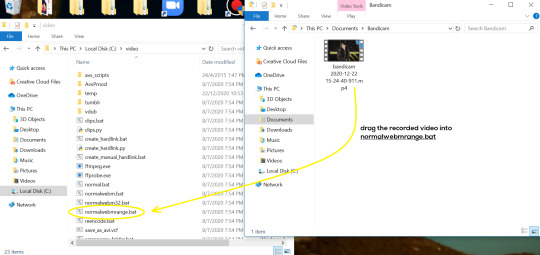
You can find your recorded videos in Documents > Bandicam.
3. Avisynth
I followed THIS tutorial to download Avisynth. This software is really helpful if you want sharp and clear gifs! I recommend to follow the steps in the tutorial as the below method stems from it.
- Once you have downloaded it, open up your recorded video from Step 2 and watch it. Take note of the duration you want to gif. (e.g. from 00:01 to 00:05)
- Drag your video file into normalwebrange.bat. On Windows, you can find this in File Explorer > Local Disk (C:) > video. For other .bat files, you may check out THIS tutorial.
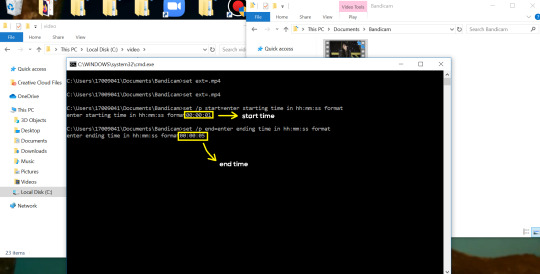
- In the pop-up box, key in the start time for your gif (e.g. 00:00:01). It has to be in hh:mm:ss format. Press “enter”.
- Key in the end timing and press “enter” again. A resizer should pop up in an Internet Browser. I found that Firefox works best for me.
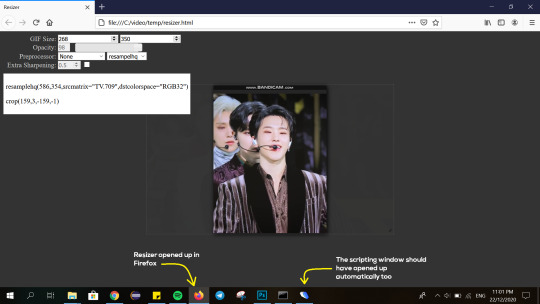
- In the resizer, you may indicate the size of the gif you’d like to make. You can also click and drag the video to resize and frame it to your liking. You may refer to THIS post for Tumblr dashboard sizing.
(These are some common gif sizes for stage performances):
1 gif - 540px by 540px (square)
2 gifs - 268px by 350px
3 gifs - 177/178px by 250px
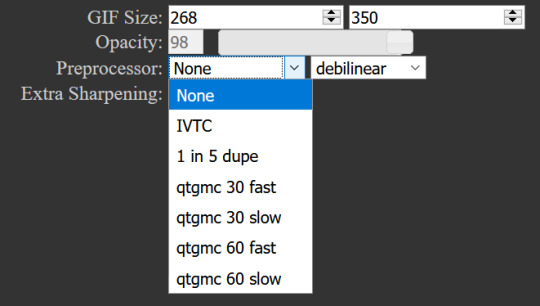
- Under “Preprocessor”, select “debilinear” for the second box. For the first box, you may pick between qtgmc 30 (same frame rate as video) or qtgmc 60 (doubles the frame rate; smoother).
- You will also see “fast” or “slow” options. These are just how long the video will take to render. “Fast” will give you slightly lower quality as compared to “slow”, but usually is good enough.
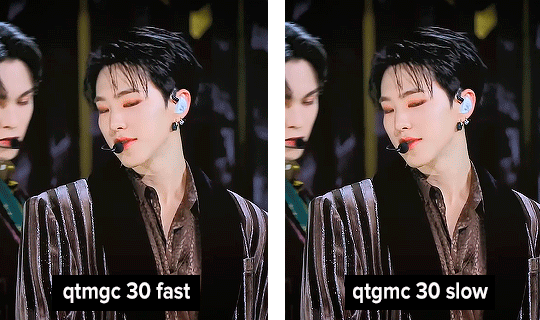
(You can see that his features are sharper and more defined in the “slow” gif as compared to the “fast” one.)
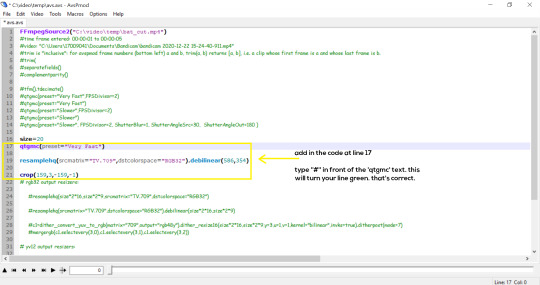
- Copy the code in the white box. Navigate to the scripting window (it should have popped up with the resizer) and paste the code at line 17. Type a “#” before qtgmc on the same line. This will prevent the software from lagging.
- Click on the inverted triangle at the bottom of the screen. Your video will now appear in the scripting window. Drag the slider to the intended starting point of your gif and press the “home” key on your keyboard.
- Drag the slider again to the intended ending point of your gif and press the “end” key on your keyboard. This blue area you see is the duration of your gif.
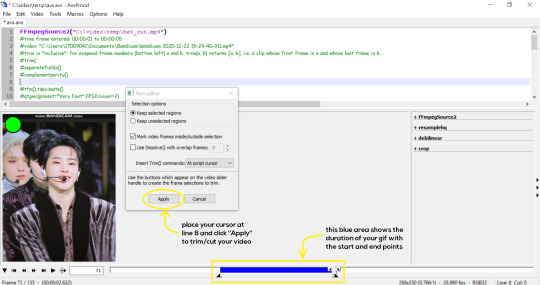
- On an empty line (I usually go to line 8), place your cursor there and click “Apply” in the mini pop-up window. Afterwards, remove the “#” from line 17.
- Go to File > Save or press Ctrl + S to save the code. Close the scripting window. The video renderer will pop up. When it’s done, it will automatically close by itself.
4. Using Photoshop and Topaz
I’m using my school license for Photoshop 2018, but if you don’t have that, there are plenty of cracked versions for free. I don’t have any to recommend though so I’m sorry about that :(
I followed THIS video tutorial to download Topaz plug-ins for free. I use Topaz DeNoise (the most helpful) and Clean, but you may use others if you’d like :)
Alright, let’s dive in to the steps!
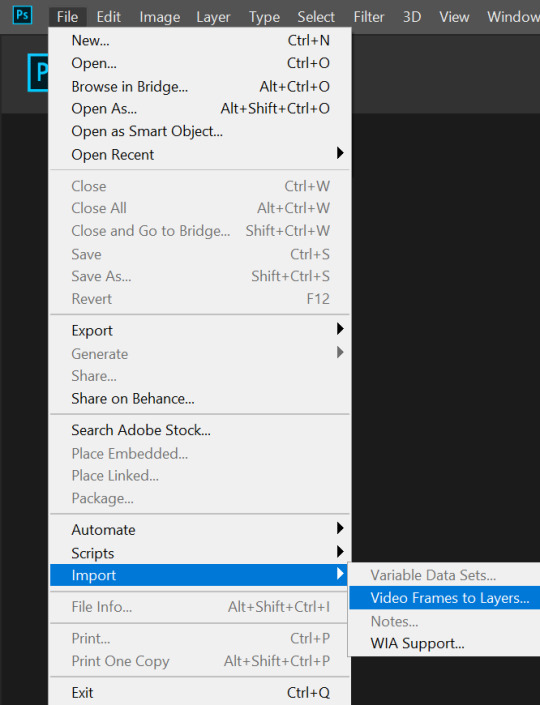
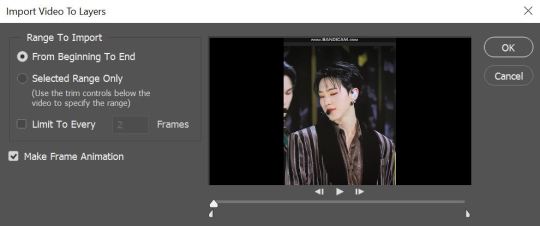
- Open up Photoshop and go to File > Import > Video Frames to Layers.
- A pop-up will appear. You can find your deinterlaced Avisynth video in File Explorer > Local Disk (C:) > video > temp > video.avi. Follow the settings in the picture and click “OK”.
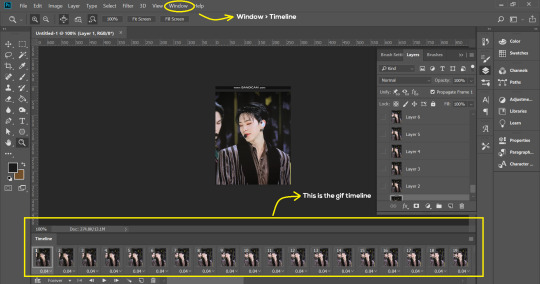
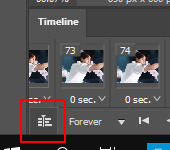
- Go to Window > Timeline to open up the timeline. You should be able to see your gif spread out in frames. If you press the play button, it should play like a video.
- (Quick optional step I learned from THIS tutorial) Go to Image > Canvas and set the Resample option to “Bicubic (smooth gradients)”.)
- Select the first frame of your gif in the timeline. Shift select the last frame. Go to Window > Layers. Shift select these layers as well.
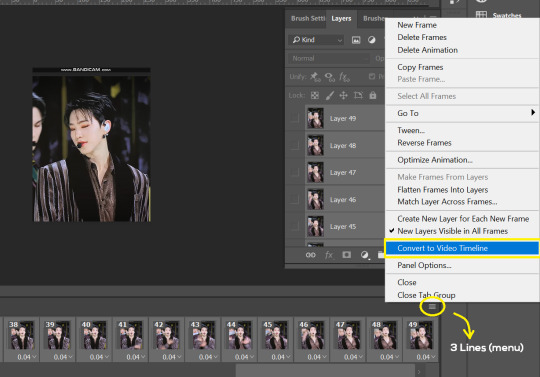
- With everything selected, click the 3 lines at the top right corner of the timeline. Select “Convert to Video Timeline”.
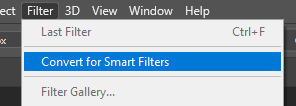
- At the top of the screen, select Filter > Convert for Smart Filters. Your layers will condense into one layer. Don’t worry, your gif is fine.
- Now it’s time to sharpen the gifs. Go to Filter > Sharpen > Smart Sharpen. Play around with the settings to your liking!
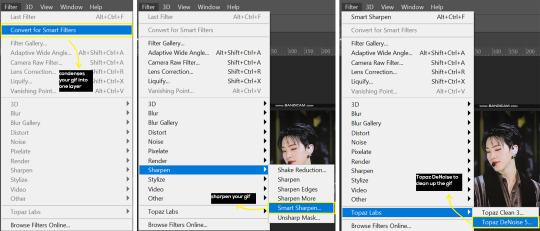
- If you’ve downloaded Topaz correctly, it should appear under Filter > Topaz Labs. If a pop-up asks you for an activation key, you may use THESE to activate it for free.
- Go to Filter > Topaz Labs > DeNoise and/or Clean and play with the settings until you’re satisfied.
5. Blurring
If your gifs have captions/logos that are distracting, you’d want to blur them out. Don’t be like 2018 me that blurred out the logo frame by frame; it’s very tiring. Instead, using this method from @scoupsy‘s tutorial, you’ll save lots of time.
- In the Layers tab (Windows > Layers), select the “New Layer” icon. It should be blank.
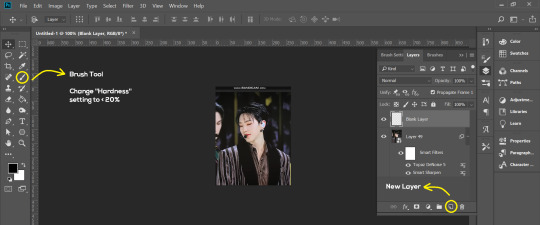
- Select the Brush tool. Make sure the “Hardness” setting is below 20%. This will blend the blurring nicely into the gif.
(For the sake of this tutorial, I will be blurring out the Bandicam logo to show you.)
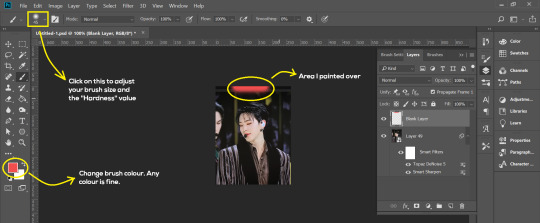
- Paint over the captions/logos. Make sure this is on the blank layer!
- Duplicate (Right Click > Duplicate) the gif layer and drag it so that it’s on top of the blank layer.
- Right click on the duplicate layer and select “Create Clipping Mask”.
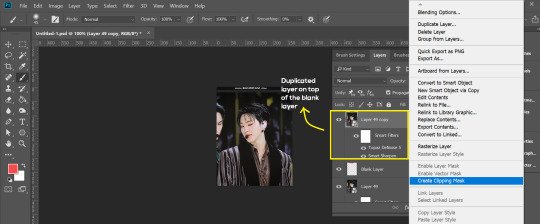
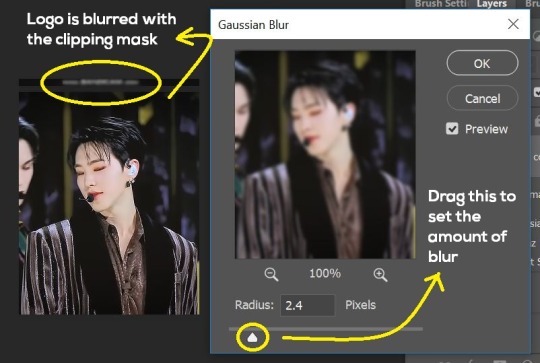
- Go to Filter > Blur > Gaussian Blur and play around with the settings until you’re satisfied with the level of blurring. Click “OK”.
6. Flattening & Colouring
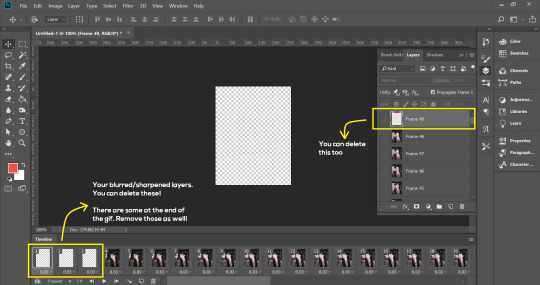
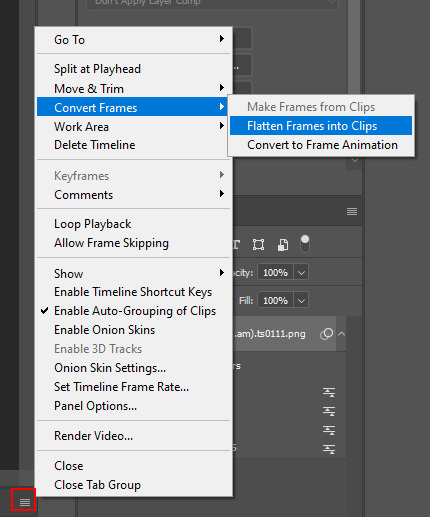
- Once you’re done with sharpening and/or blurring, click on the 3 lines on at the right corner of the video timeline and go to Convert Frames > Flatten Frames Into Clips.
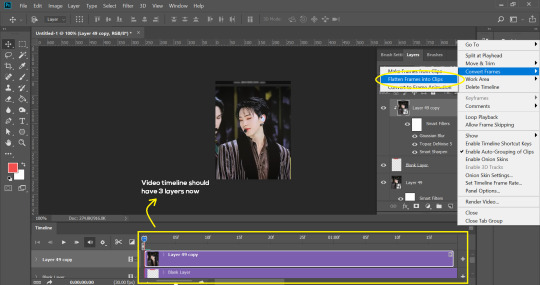
- Topaz layers and blurring will take some time to render so you can just chill for now~
- When it’s done rendering, click again on the 3 lines and go to Convert Frames > Make Frames From Clips.
- Convert it back to the gif timeline by clicking on the 3-box icon at the bottom left of the timeline.
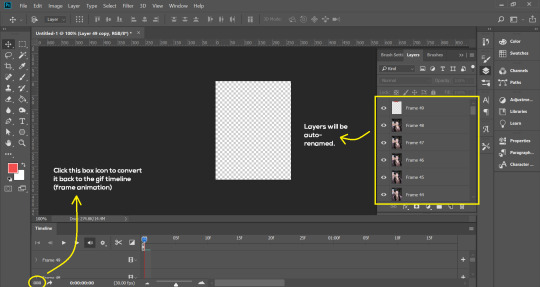
- Select the first frame of your gif. It must be the FIRST.
- Scroll to the top of the layers and select the layer at the top. Any other layers you add should be on top of this layer. VERY IMPORTANT!!
- In the Adjustments Tab (Window > Adjustments), there are many different things to play with. There’s a high chance you won’t use everything, but here’s a few of my favourites.
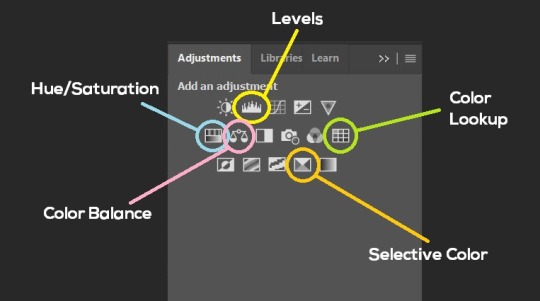
Levels - Adjust the brightness and contrast of your gif in depth.
Hue/Saturation - Useful for changing colours, or switching it to black and white.
Color Balance - Tweak the colours to your liking.
Colour Lookup - Comes with built-in LUTs that you can use as a preset. Great starting point for colouring. Saves time too. You can even download plug-ins for this. 11/10 tool.
Selective Colour - Adjust the vibrancy of specific colours.
- Colouring is completely up to the gifmaker. Go crazy go stupid :D
7. Exporting
We’re almost to the end!
- Set the timing for your gif.
If you used qtgmc30, the best timing would be 0.04s / 0.05s / 0.06s.
If you used qtgmc60, the best timing would be 0.02s / 0.03s / 0.04s.
- Once you’re satisfied with everything, go to File > Export > Save for Web (Legacy).
- Follow the settings in the picture below:
- Tumblr’s gif limit is 10mb per gif. Check the gif size at the bottom left of the pop-up window. Make sure it’s below 10mb; the smaller the better.
- Click “Save”. Choose where you’d like to save the gif.
- Done!
~~~~~~~~~~~~~~~~
And that’s it! You’ve successfully made a gif! Good job you :D
I hope this tutorial was helpful! Please leave some feedback if it helped, or if you have other methods you’d like to share :)
Lastly, if you have any questions, feel free to send in an ask or DM me!! :)
Good luck and happy gif-ing :’D
#gif tutorial#kpop gifs#avisynth tutorial#topaz tutorial#gifs#chey.resource#kpop#idk what else to tag so...#i finally posted the tutorial yay!!#please spare a reblog if you find this even remotely helpful thank you <3#also to spread it hehe i spent a lot of time on this#if anyone has any questions please feel free to DM me!!#i apologize if there are any spelling errors
221 notes
·
View notes
Text
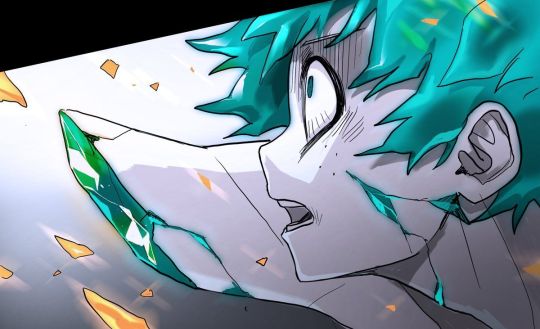
💔Gem!Deku x Gem!Reader
"You think this is the place?" Asked a rouge.
"Yep, that's what our sources tell us," Said another.
"You got the cages and rope ready," The leader asked.
"Yeah of course, but why did we bring this dead weight," A low Lackie asked kicking a tarp-covered cage.
"Because this dead weight is our bait. Those rocks have a soft spot for their own kind, especially the weaker and fragile ones," The leader said as he ripped the tarp away.
Revealing a bound Phosphophyllite gem with messy dark green hair and green eyes. His wrists and ankles were tied together, and a piece of cloth was wrapped around his mouth.
"You know the drill, right Deku," The leader smiled cruelly.
"MMhhm! NNmph!" Deku tried to scream.
The Trappers grabbed the helpless gem as they descended into the caves.
The Kessho people, or gem people many humans call them. Being made entirely of crystals of all kinds, they are highly sought after by humans. Because their entire body was made of pure and untainted crystals, many hunters seek these beauties. For things from jewelry to weapons, or just want a shiny servent, many reasons.
So the gems hide in many places of the world, from small islands to deep underground tunnels and caves. Anywhere out of human reach.
-------
Please. I don't want any part of this. Please let me go! I tried to cry out but I couldn't with the gag in the way. The memories of previous raids started resurfacing. They would use gems like me to lure others out of hiding, for what reason they help me varies. Some communities of gem had an elitist-like community, or even ones made up of one kind of gems. But when they got close they were ambushed and locked away in cages. They would after be turned into weapons and jewelry.
"Here, place him here," The leader Rato said.
They placed me down near a ledge and ripped away from my gag. Looking over I could see two gems walking by down below. I tried to stay as quiet and still as I could so they wouldn't notice me.
"Deku's too quiet," Rato growled.
He stomped on my hand shattering it. I could hold back the pain as I cried out, it echoed throughout the cave. Looking down at the gems below they quickly spotted me and ran away. Good at least they won't get caught.
-------------
Suddenly there was a rustle and a-
"SMASH!!" shouted a large gem.
The gem delivered a powerful punch knocking three of the rouges away. Deku stared in awe at the scene and the powerful gem with a brave smile on his face, but the wind was so strong that Deku was blown off the edge. Time seemed to slow as he watches the edge grow farther and farther away. Deku shut his eyes closed waiting for his painful end When an f/c blurr caught him.
"Are you alright?" Asked a kind voice.
Deku looked up to his hero to be meet E/c eyes with their hair the same color to match. His eyes sparkled as his hero's hair Glimmered beautifully in the moonlight. He looked down to see he was being held bridle style.
"Y-yes," Deku stuttered bashfully.
"Don't worry your safe now, as long as your under All Mights protection you have nothing to fear," The (gem type) smiled.
But Deku couldn't help but just stare at this new gem as an infatuation grew. His captures were long dealt with as the new group of gems escorted him back to their hidden home.
"u-um who are you?" Deku asked the mysterious G/t(gem type).
"Well my friends like to call me Y/n," they smiled as they untied Deku.
"I-I'm Deku," He said with a beet-red face.
"Pleasure to meet you Deku," Y/n greeted as they handed him over to other gems.
"Ochaco, Momo this is Deku. Please get him property clothed and make sure he feels welcomed," All Might a Yellow diamond smiled. (No not that one)
-------------
From that day on I have lived with these Gems for the past 300 years, and my feelings for Y/n only grew. They were so brave and confident, was also one of the greatest fighters in the village. One of the few gems trained under All Might. Sadly cause I only have a toughness scale of 3, so I wasn't suited for combat.
Though All Might noticed that I was very observant and good with notes, so he assigned me to the encyclopedia. My job is to take notes of the enemies we encounter and record events. Then there were some books about stuff I made up, humans would call them fantasies or stories. Though I didn't mind this being my job cause Y/n would come by and read my works. I couldn't help but feel lighter than air and embarrassed at the same time as they were reading my work.
Y/n would always come in after her patrol, come in and read, or more often just sit down and talk to me. Though most of the time it was just him listening to whatever good memories of the human world, or my memories of my original home.
I tried to keep my feeling to myself the best I could by just doodling in my private book, just for my eyes only, but I guess I wasn't secret enough.
"Wow dude, you really have a thing for Y/n," said a voice.
I gasped as I jumped back to see it was Denki, who quickly snatched my drawing book and speed through my embarrassing drawings.
"Wow, you've got it bad. All these drawings are of Y/n and you being lovey-dovey," He said out loud.
Attracting the attention of Iida the Topaz and Ochaco the pink diamond ( No not that one you SU fans). They quickly came over and looked through my book.
"Wow, looks like Touya has a love rival," Ochaco gasped.
Touya the padparadscha gem, was also one of the top fighters for the village and is always Y/n's patrol partner, who was also pinning after them too. There would be times he would just randomly jump into our conversation and steal their attention. But I couldn't hear what they were saying as I covered my ears in embarrassment.
"Oh no, Y/n forgot their other sword," Momo gasped.
"I'll take it to them!" I offered as I quickly grabbed the weapon and ran out of the library.
"Does he know where Y/n and Touya are?" Momo asked.
"It even notes was Y/n patrols today," Denki said flipping through the pages not paying attention.
----------
Y/n and Touya stood guard at one of the cave entrances, as the warm sunlight funneled through. Y/n smiled as she felt the warm light on her powered covered surface.
"Hey Y/n, do you ever wonder what could be on the surface?" Touya asked.
"Ever since Deku came and told me stories of the surface, it only fueled my imagination," Y/n turned to her trusted partner.
"One day we'll be the ones on top, and I'll take you all over the surface. Just you and me," Touya said with confidence.
" That's an awfully big promise Touya," Y/n said as they sat next to him.
"I mean we can always just wait till the humans go extinct," Touya suggested.
"Haha, all right. I'll hold you to that promise," Y/n laughed as they gently held Touya's hand.
Deku watched from the side of a tunnel wall, as he sighed sadly and turned back into the tunnel. He wandered the cave tunnels as he hugged Y/n's sword close to him. As he turned the corner he bumped into something, something large.
------------
I felt lighter than air as I stared into Y/n's e/c eyes.
"AAAAHHHH!" Someone screamed.
"How did the enemy pass us?" Y/n gasped.
"No, maybe the other entrances were compromised," I suggested.
"You go check the next entrance over and see if anything is wrong, I'll go check up the tunnels," Y/n said as she ran down into the dark caves.
With a sigh, I ran to the next entrance that leads to the forests, which was supposed to be guarded by Katsuki and Shoto. Turning the corner he saw two humans picking up pieces of Shoto and Bakugou and stuffing them into potato sacks. Touya quickly drew his sword and cut down the intruders.
Touya to worried about his partner quickly stuffed the rest of Shoto and Bakugou into the bag, not caring he is mixing their pieces, and quickly ran to the village.
---------
"Looks like we caught a phosphophyllite, hold that rock tight Nomu," A light blue hair human smile.
The giant mutant humanoid figure Nomu nodded silently as it the poor gem in its giant hands. Deku's arms were broken off as he was restrained by Nomu's brute strength.
"What fine craftsmen ship, able to slice through rock," Said a tall human with dark back- purple hair.
"LET ME GO!" Deku screamed as he tried to break free from the Nomu.
"Nomu shut the pebble up before he alerts the others," The man growled.
"HEY!" Y/n shouted.
"Another one," The other human grumbled.
"Y/n," Deku smiled in relief.
"Let him go," Y/n said lowly.
"Nomu get it," Tomura pointed at the G/t.
Y/n ran towards the creature and sliced its head clean off, with the sharp edge of her arm. Deku stared with worried and sad eyes as he looked over their damaged form. The left section around her face was broken off, the elbow broke off their left arm, they were missing their right hand, and her right leg was horribly cracked, and it looked like it could fall apart at any moment.
Y/n moved swiftly and kicked the human hard in the face. Deku quickly got up as the two ran down the tunnel.
Deku looked back to see Y/n was having a bit of trouble keeping up with Deku.
"Y/n, are you okay?" Deku asked.
"Don't worry turn right and follow," Y/n said as she pushed forward.
As the two quickly turned the corner, the humans regained their composer and made chase after the two. Y/n pushed a medium-sized boulder away from a tiny hole in the side of the cave wall. Deku hesitantly got in when suddenly Y/n started to close the opening.
"Y/n What are you doing?" Deku asked as the opening became too small for him to even squeeze out of.
"Hiding you, I'll come back for you. I have to lead them away from the village," Y/n explained as they backed away.
"No, Please don't do this. Don't leave me Y/n. I- I want to tell you something first,'' Deku said quickly.
Y/n smiled sadly as she turned to face Deku from the other side of the boulder. Deku could tell they were ready to throw their life away for everyone, for him.
"Y/n, I love-,"
Suddenly Y/n's head was sliced clean off by a thrown sword. Deku gasped in horror as he watched Y/n's body fall to the ground, he tried to reach out but he had no arm to hold out.
Deku wanted to scream and cry, but no sound came out of him. Y/n slowly turned their head towards Deku and mouthed.
'Please live for me, Deku," they mouthed as the humans quickly gathered her broken body.
They were in such a rush they left Y/n's head behind. Deku fell to his knees as he stared at his crush for so long. It felt like an eternity When All Might and Touya arrived, Their eyes widen with horror and sorrow as Touya fell to his knees and held Y/n's head. He put their foreheads together as he cried out in sorrow.
"NOO!" Touya cried.
All might soon notice Deku was trapped behind the boulder and quickly moved it aside with no effort.
"Let us go Young Deku, we need to evacuate the village before they bring more of them," All might said as he helped Deku to his feet.
-----------
(400 years later)
It has been a long time since Y/n's death, All Might changed in a way after his student's death. If he weren't needed, he would lock himself away, but for the most part, he was still the jolly smiling gem he was before. Touya, on the other hand, didn't take Y/n's death all that well, he did lose his love who was his partner for 800 years. He started to call himself Dabi and started to cover only parts of his face, giving him a patchwork look. It not only scared most humans but fellow gems too.
I was upgraded to a medic after Momo was taken about 200 years back, we some people over the years and gained new ones too. I helped piece gems back together, but my main goal is to bring Y/n back. The village moved up high into the mountain, so high it would be difficult for them to breathe, but Humans would risk their lives and come up anyways. Some came with Weapons and tools made of gems, and many times they were G/t so I slowly put Y/n back together piece by piece.
I Finished them for the most part, but there were still 3 large gaping holes in their torso. I tried to use other gem pieces that matched her Mohs scale. Yet it only worked sometimes, she would wake up for about three minutes. Yet when they do everyone who was watching my work quickly rushed in to tell them how much they missed them and update them on everything.
Even Tou- Dabi would come by. Y/n was weirded out at first but they got used to it quickly and I would never really get a chance to talk to them, but I will never forget the last time they woke up. As they said their goodnight to everyone, they turned to me as said.
"I'll miss you Deku, I can't wait to wake up to see you again," Y/n smiled as they fell back unconscious.
I'll bring you back Y/n so I can tell you how I feel.
#houseki no kuni#gem#mha#mha angst#mha deku#izuku mydoria#izuku x reader#deku x reader#angst#bnha midoriya#bnha#bnha x reader#mha x reader#CrossOver
86 notes
·
View notes
Photo

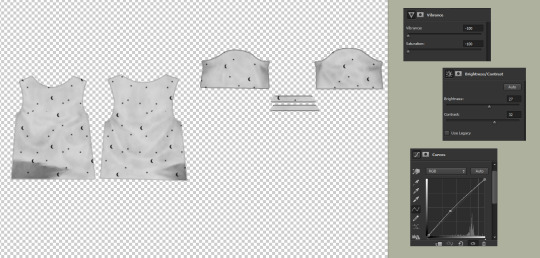
- recoloring tutorial -
WHAT YOU’LL LEARN:
how to recolor with solid colors, patterns, and graphics
how to find patterns & import them into photoshop
how to recolor an item that doesn’t have a white or solid swatch
WHAT YOU NEED:
sims 4 studio
any photo editing software (i’ll be using photoshop cs6)
dds plug-in
difficulty level: beginner
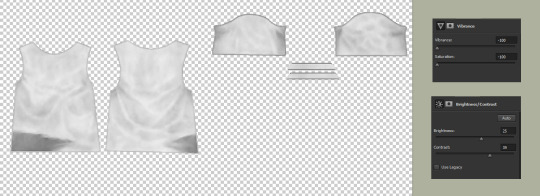
1. open the clothing you want to recolor in sims 4 studio (s4s) and find the white swatch.
if there’s no solid swatch at all, skip to the very end of this tutorial where i’ll show you how to fix this! (look for the pink line)
if there are solid swatches but no white swatch, find the lightest color you can. even though there’s a white swatch in my example top, i’ll use a colorful one to show you how to fix it.

[for this tutorial, i’ll be using simiracle’s judd shirt.]
2. click the green “export” button. save it as “white swatch”.
3. open it in photoshop.
optional; if your swatch is already white, skip this step: to get rid of the color, simply decrease the saturation & vibrance all the way down. if it still looks too grey or dark, increase the brightness & contrast. finally, merge your layers. here are my settings and what i ended up with:
4. create a new layer and check “use previous layer to create clipping mask”. color everything in completely with a pure white brush.

5. on the layer tab towards the right side of your screen, change “normal” to “multiply”.

now your texture should look exactly like it did back in step 3! (i promise you didn’t just waste your time lol)
optional: if you have recoloring actions ready, now would be the time to apply them. if not, carry on!
6. right click on your new layer and click “blending options” at the top. here, you can either click “color overlay” or “pattern overlay”.
either way, you’ll want to change the blending mode to “multiply”.
here’s an example of what you can do with color overlay:

and here’s an example of pattern overlay:

but wait! you might be thinking “where do i get cute patterns like that?” and my answer is... everywhere. try searching for things like “seamless patterns”, “tileable patterns”, “fabric swatches”, etc. it’s even easier if they come in a .pat file (here’s a quick guide to using .pat files!)
here are some good patterns or places to find them:
my patterns pinterest board
mothz patterns
free pattern site
deviantart patterns
free .pat files
more .pat files
even more .pat files
yeah... more .pat files
okay, now that you’re all loaded up with patterns, let’s get back to the tutorial!
7. adjust to your liking. i prefer my recolors to be more faded and worn-looking, so i turn down the opacity a bit and i tend to use patterns that already have a vintage look to them. but do whatever you prefer! you can even mix color overlay & pattern overlay together to create an entirely new design.
8. save as a PSD!! trust me, you’ll be really sorry if photoshop crashes and you have to do all of this over again.
9. merge your layers and save as dds.

optional: now i’m going to show you how to add graphics. if you’re not interested in this, skip ahead to the next green line.
1. find your graphic. preferably, it’ll be flat, on a plain colored background, with minimal wrinkles.
2. i like to use the website 6 dollar shirts because they have a nice worn look already!
here’s the image i’ll be using for now:

3. make it transparent. there’s many ways to do this! if your image is really simple, you can outline it with the lasso tool and delete everything outside of it. but my image is a bit more complicated than that, and i don’t have all day... so let’s use the color range tool. (select → color range)
click on the color you’re trying to get rid of (in this case, the light tan color) and crank up the fuzziness to the max. press OK.

now all of your background color should be selected. press ctrl + X to delete it.
4. make it look nicer, depending on the image. if it’s blurry, try sharpening it. if it’s crunchy, try using topaz clean. if there are still some spots of color, use the color range tool again as many times as you want. make it black and white. decrease the brightness & increase the contrast to the max. it all varies, just try new things and see how it looks!
5. when you’re done adjusting, copy your image and paste it onto your shirt. you can do this on a solid color shirt or, if you really want to go crazy (lol), paste it onto a patterned shirt. adjust the opacity settings so it looks like it’s blending into the shirt nicely, not just sitting on top of it.
ta-da! you now have a cheesy graphic tee :-)

BONUS TIP: if your graphic doesn’t look worn, but you want it to, you can use these free overlays to roughen up the design! there’s even a little tutorial on the page.
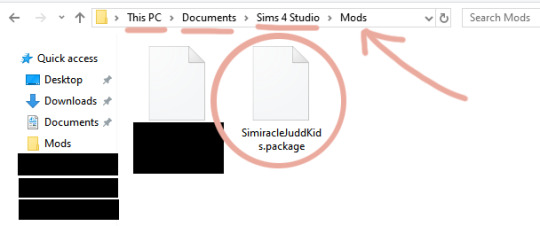
10. if you haven’t already, add the file you’re recoloring to your sims 4 studio mods folder. here’s what it looks like:
11. reload s4s. under “cas” click “create cas standalone”.

12. sort by custom content, click the first swatch of whatever item you’re recoloring, and click next. name your file.
13. now click the blue “import” button and import your first texture. then click “add swatch” and import again for all your other swatches.
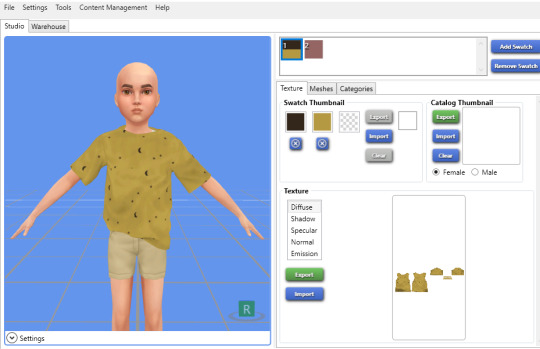
BONUS TIP: for the swatch thumbnails, you can right click one of the empty boxes and it will pull up a dropper tool that you can use to match the color of your cc.
14. save!
you’re done!!

if the item you’re recoloring doesn’t have a solid swatch...
1. find the simplest swatch you can. some swatches won’t work no matter how hard you try, but it’s always worth a shot!
i’ll use the yellow moon-patterned recolor i just made as an example.
2. turn the saturation & vibrance all the way down. increase your brightness & contrast. increase curves (if necessary). here are my settings and what i ended up with:
now comes the tedious part...
3. use the patch tool to remove the pattern, piece by piece.
here’s a demonstration:

here’s my progress so far:

you may notice that the patch tool doesn’t work well on the outer edges of your clothing. for that part, i use the clone tool.
i can’t screenshot this part, but basically all you do is hold alt and select a blank spot directly next to the pattern you’re covering up. then hover over the pattern and click down. make sure you move your cursor in a completely straight line, otherwise the seam will look wiggly.
we’re finally done! here’s what my final image looks like:
now that you have a white swatch, jump back to step 4 to continue the tutorial ♡
#my god i spent my entire night on this..... :o#tutorial#sims 4#ts4#recolor#recoloring#recolor tutorial#graphics#graphic tutorial#just trying to make sure this shows up when someone searches my blog for it lmao
1K notes
·
View notes
Note
I saw that you’re on a MacBook and I am as well and I was just wondering how you get your shadows like that? Or if you know of any good tutorials that could help me? All I’ve ever really wanted are some good shadows :,(
omg i just realized you only wanted to know about shadows and i just made a full tutorial but i... tried my best… aaaaa
what i use: a macbook pro, photoshop cc 2020, topaz clean 3
what i don’t use: reshade, SRWE
what you need:
photoshop cs6 (p*rated — photopea, gimp or paint.net are free alternatives)
topaz labs (free)
topaz clean (p*rated)
download my actions and coloring psd’s
u can download all of them at once here, or:
psd 163
psd 176
psd 24 “pancakes”
avonlea’s actions
i take a screenshot on the sims (w the highest “ultra” settings)
i open the screenshot on photoshop and crop it to my liking (i usually zoom in quite a lot)
i immediately run the action called “super smooth” from avonlea’s actions, linked above. this opens topaz clean for a second and automatically applies it to my photo! now it looks smoother.
i rasterize the pic & duplicate it just in case, bc i’m gonna do some changes to it
with the “quick selection tool” and the “polygonal lasso tool” i select the parts of the image that i want to blur out.
i go to filter > blur gallery > field blur, and i use around “15-20px” depending on the picture. you can also add “bokeh”, just play with it! — press okay
the part that i selected before should be blurry now. what i do next is duplicate the layer again, and I add some more blur to some other parts with the “Blur Tool”, and also sharpen (only a bit) the parts that are more important from the part that isnt blurred
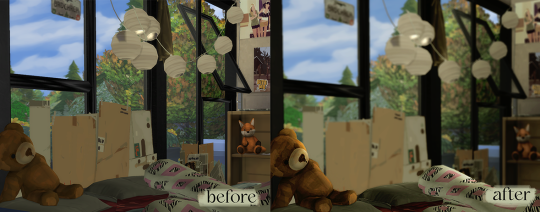
i duplicate the layer again and with the “Dodge Tool”, i draw on top of it to apply some shadows. i usually shade the borders of each object to mimic reshade’s shadows. *here’s a great tutorial made by pea-milk on how to shade your sims tho im lazy and dont do all that
i add the 3 coloring psd’s mentioned above, i group them in a folder and i decrease the opacity to about 15 or 20%!
tl;dr — screenshot, run super smooth action, select what u want to blur, add field blur, dodge tool for shadows, add coloring psd’s
113 notes
·
View notes
Note
how do you sharpen your gifs?
it really depends on the type of video and its quality. but i now (thanks to @jadeines) use avisynth on music videos and stages.
if i use a 4k video (mainly music videos), 70% of the sharpening comes from resizing. after that i'll use smart sharpen + blur + high pass (to make highlights stand out more) (++ i'll also add grain sometimes)
when it's 1080p, it's when it starts to get complicated. i personally dislike with photoshop sharpening is that it can gets grainy, the type of grain that you see on low quality videos and i really don't like that😭😭 but i also like the sharpening (love-hate relationship!!). so to counter that, i use topaz clean + topaz denoise. you can find bunch of good topaz settings on deviantart or sometime on tumblr.
so to resume, ALWAYS use the highest quality possible. you don't have to use avisynth nor topaz to make a good set. some of my favorite set are almost raw but with good coloring and good quality, you can do pretty sets.
if you have more questions, feel free to directly ask me in dms, i won't mind <3 (p.s : except for coloring. im bad at it 😐😔)
5 notes
·
View notes
Text
how I make my gifs: a tutorial
Hi everyone! Just in case someone asks in the future + for those curious, I'm here with a tutorial on how I make gifs! If you have any questions whatsoever, please do send me an ask! I’ll be glad to help! The gif I made with this tutorial is the one right here!
So... let’s start this tutorial with the programs I use.
Adobe Photoshop 2020
- To make the gifs, majority of the work is done in this program.
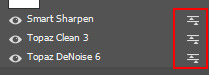
TopazLabs (Topaz DeNoise 6 and Topaz Clean 3)
- To "denoise" and "clean" the gifs, as the names would suggest.
Links for download: Topaz DeNoise 6 & Topaz Clean 3
KMPlayer (an alternative would be PotPlayer, or any other video playing program that allows you to capture the frames)
- To capture the frames.
- I use an older version of KMPlayer, though I don't know which exact version that is.
Now let’s continue onto how I use these programs to create gifs!
Step 1: After you’ve downloaded the necessary programs, download your video. The way to get the best gifs? Quality videos. That’s the first step. For K-pop performances, I recommend this website (the hq files are in .ts form, KMPlayer should be able to open these). Bookmark it! It’s really handy :) Get the video you want to make a gif from and open it in KMPlayer (or PotPlayer or any other program, but for this tutorial I’ll use KMPlayer). Open your video in said program and look for the part you want to make a gif of. Then press CTRL+G (I apologize because I cannot for the life of me remember if this was a standard shortcut or not)
Step 2: After pressing CTRL+G, you’ll be met with this screen:

I’ll briefly explain the numbered parts, but before that, these are my standard settings and just make sure you have them all the same and it should be good!
1: This is where your captured frames will be extracted to. I have them extracted to the standard folder, but you can change this if you want to. You’ll need this folder later when opening the frames!
2: Like it says, this is the image format. I use PNG in the highest quality, as the name would suggest, for the quality.
3: These are the amount of frames the program captures. Say you put in every 2 or 4 frames, you’ll get more choppy gifs. To get the smoothest gifs, put “every frame” (this in turn will increase the gif size as the amount of frames will obviously be bigger).
Once you’ve put in the correct settings and you’ve put the slider where you want the capturing process to start, press “start” (now, before you do this I recommend putting the video on mute as the audio will start to get kinda demon-y the longer you record lol save your ears pls). Then, when you’ve captured all the frames you need, pause the video, press CTRL+G again and click “stop” and close the pop-up/program.
Step 3: It’s time to open up Photoshop! Then go to File > Scripts > Load Files into Stack... (for older versions/another version I used in the past this one didn’t work and I had to use the “Load Multiple DICOM Files...” instead. It should work similarly though, if I remember correctly).
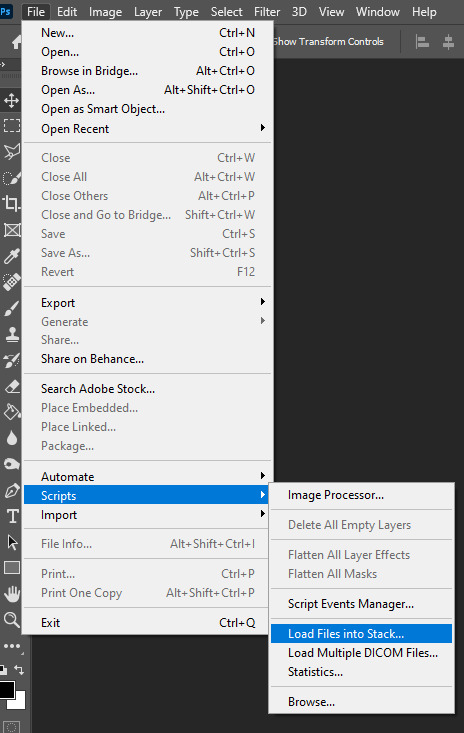
You then get a little pop-up that looks like this:
All you have to do here is click “browse” and navigate to the folder where your captured frames have been saved in. Select all the frames you need, wait for them to load in and then click “OK”!
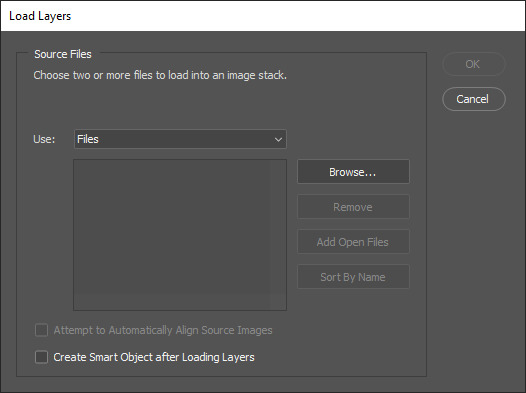
Step 4: Depending on the amount of frames you’ve selected to load in, as well as the beefiness of your PC/laptop, the frames loading part might take a little while. Photoshop is importing every frame as a separate layer into one file, so just... grab a drink or something and wait a bit! When you’re done waiting, if you haven’t already, go to Window > Timeline. This will show you the animation timeline. For older Photoshop versions this is slightly different (I believe it’s called animation). Then click “Create Video Timeline” and click the 3 squares on the left bottom side (in older versions it’s on the right bottom side, not sure).
Step 5: After you’ve done all that, you’ll want to select all your layers. You can do this by pressing ALT+CTRL+A or going to Select > All Layers. With all the layers selected, you have to go to Layer > Arrange > Reverse. You only have to do this if you used the “Load Files into Stack” option!
Step 6: After reversing all your layers, you’ll want to go to the three lines you see in the following screenshot, and click “Make Frames From Layers”.
As the name suggests, this turns all the layers into frames. I don’t know why but the first frame will always be 5 seconds long, so to make it easy on yourself when you want to check your gif while editing, just put that on 0 for now. You can do that by clicking the seconds under the frame and clicking “No delay”. After this, check to see if you have the right frames and if you need to delete some (you can do this at any point in the process but I didn’t know where to put it in the tutorial oops).
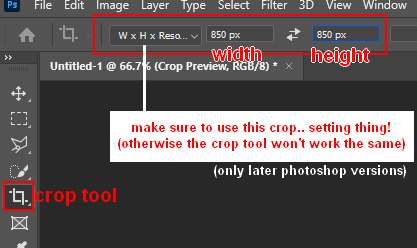
Step 7: Time to crop the gif to the correct size! For this gif I’m using as an example, I’m making it specifically for Twitter, so the sizes aren’t that obvious (for Twitter I usually use a width of 850 px to keep it sharp, for long size gifs (more height than width for example), I add a background so that it eventually still becomes 850x850 pixels). There’s many posts on Tumblr about the correct sizes for gif/photosets, but a brief rundown of my most used sizes: one gif spanning the entire width of the post has to be 540 px in width. Two gifs next to one another need to have a width of 268 px. I use these dimensions the most! For others, you can Google!
Step 8: After you’ve cropped the gif, you can do either of two things: either you first add the coloring of your choice and then sharpen the gif OR you do it the other way around. I usually switch these two around depending on how sharp the gif already looks before sharpening because I can’t stand looking at 2 pixels while coloring (lmao). For this one I’ll do the sharpening first.
The whole sharpening process is actually quite simple but you need to make sure that you do the following little steps in the right order or else it won’t work! Select all the layers (CTRL+ALT+A or Select > All Layers) and then click this little thingy:
Then you’re going to Filter > Convert for Smart Filters
If you don’t do it in this order, your gif will end up... well, not being a gif and not moving. If that happens, track back in your history to see if you did it in the correct order! :)
Step 9: The actual sharpening process! After clicking the “Convert for Smart Filters”, you’ll want to go to Filter again and find the Topaz Labs tabs. Personally, I usually do it in the order of DeNoise first and then Clean, but this is a personal thing, really.
I recommend playing around with the settings to see what fits the gif but here are my go-to DeNoise settings (tip: save these as a preset so you only have to click that for faster giffing!):
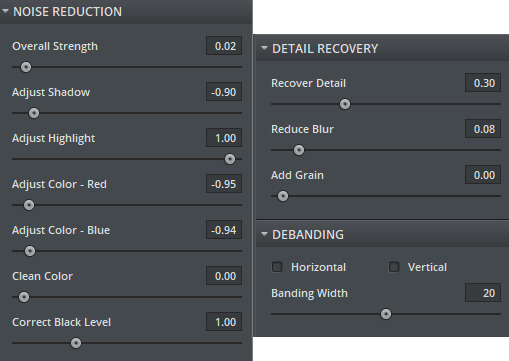
And my Clean settings:
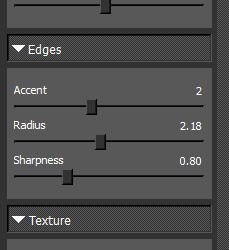
Press OK when you’re done with these and then go to Filter > Sharpen > Smart Sharpen. These are my SS settings (just copy these, and again, save as a preset!):

Depending on how sharp you want the gif to be, you can input the same settings or go to this in the layers and change the percentage.
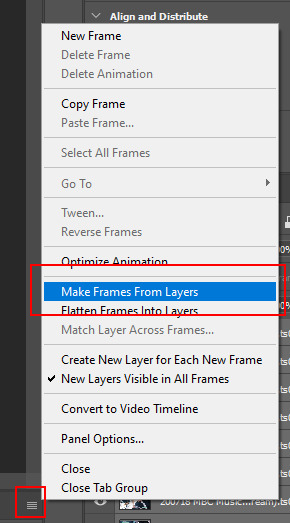
Now that we’re done with these... it’s time to flatten it! Just follow these little steps:
And then you wait. Again. I know.
Step 10: After playing the waiting game, you’ll click the three little squares again and do the same thing you did earlier: “Make Frames Into Layers”. Delete the first frame. Add a coloring of your choice (can be a PSD, can be your own coloring, etc. this is honestly just... playing around with things and see what it can do). After you’ve done coloring, select all your frames (same lines as previous screenshot except now you’ll see a “Select All Frames” option, click it!) and change the time to whatever you like (I usually go for 0.05, 0.06, or 0.07. Again, just play around with this!! Try different things!)
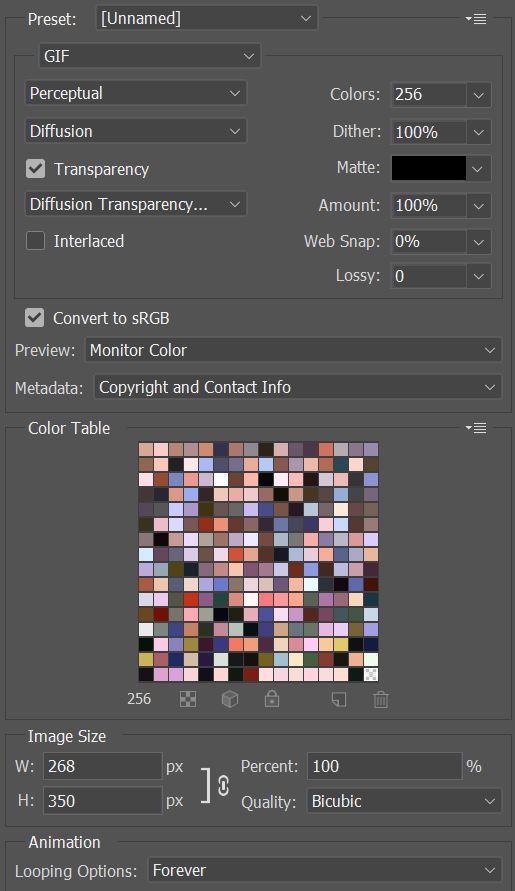
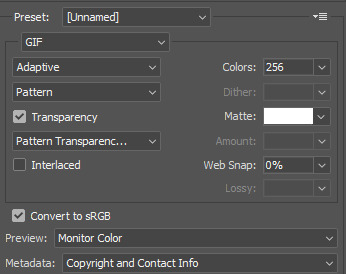
Step 11: Final step! Saving :) I use shortcuts a lot to make things faster so either press ALT+SHIFT+CTRL+S or go to File > Export > Save For Web. Not much to do here, just copy the following settings and save the file!
!!! NOTE: After making a new gif today I realized there’s a weird dotted border on the top of my gifs, it’s a bit difficult to explain but I had no idea what it was. Turns out that the reason why this showed up was because, as shown in the screenshot below, I had “Transparency” selected. If you’re experiencing this too, UNSELECT the transparency and it should be all good!
Also make sure that the “Looping Options” is set to Forever, or else your gif will play only once and then stop!
Tip: While making gifs for Twitter I at one point noticed that if I added in a white background, no matter what I’d do, it’d show up as yellow-y in the preview box. After googling I found that going to the options (1 in the screenshot) and then clicking “Sort by Luminance”, then double-clicking the lightest color (not the transparent one, 2 in the screenshot) and selecting white (or FFF) will get rid of this! This likely won’t be that useful for Tumblr gifs but just in case you ever want to have a white background...!

Then just... save, and upload to Tumblr! :)
Final note: Tumblr has a mix gif size of 3MB. If you have a gifset of 4 gifs you want to upload, all 4 gifs can be max 3MB each. Keep this in mind! If you’re over 3MB, delete a few frames and try again, or resize/crop your gif!
As it turns out, Tumblr has increased their gif size to 8MB, however, the quality tends to get compressed with larger gifs like that so per recommendation: keep them below 5MB! (thank you @yeoli for letting me know!)
I hope this helped! If you have any questions, feel free to send me a message and I’ll try my best to answer them.
75 notes
·
View notes
Text
OCTOBER UPDATE 🎃
Hellow everyone 👻
Finally, October is here and the spooky season that belongs to it ! Simblreen is turning slowly but surely in spooky mode and I already love to see some great content on my dash. As usual, this is a little post about what's going to happen during this month on this page. You'll find more info about Another Side in the blog update part.
Feel free to read or ignore this but always take very good care of you ♥
Also, thanks a lot to all of you for being here and remember, you're not alone ... This season in particular 👀
Life update : A hell lot happened in a month. I usually love September but this one was probably one of the hardest month of my life. To be short, after 6 months of full implication and hard work, I got fired after a burn out at work. I'm also living with my ex for almost a year now and it has become harder and harder to feel good living together. To be honest, I spend my nights crying these days so I'm fully commited to my sims story this month in order to have some kind of escape. Anyway, I guess that's all, sorry for being that negative this month, I'll get better don't worry. Here comes the blog update anyway :) More fun inside this one.
Blog update : Another Side is starting tomorrow 🎃
I'm soooo happy to see the little hype around this story and I can tell you that it's the one I've been putting so more efforts into it for now. The chapters are a bit longer than usually, I'm really trying to create the best cinematic experience for you dear readers. I made a little poll this week to check your desire about this story and the posting around it. So far, those who voted mainly voted for half a chapter a day so I guess that's what I'll do, but I reserve myself the right to post the entire chapter if it's a short one (like 2 parts).
The intro is already here in 2 parts, Chapter 1 will be called "Yuki" and will be 4 parts long. Tomorrow, October 1st, I'll post 2 parts of this chapter, the first one dropping at midnight (Paris time) and the other one a little bit later during the day. I'll make a timezone reblog and you'll get part 3 and 4 Sunday. Not all chapters will include 4 parts so I can't already tell you how many chapters there will be nor how many parts they will include. For now, the only thing I can tell you is that I'm trying to write it like a serie and so far, ep 1 to 3 include 7 chapters each so ... This should give you an idea. It should also go through October and November I think. Maybe a bit more if the story is longer than planned.
About Simblreen, I'm super excited for the event but I'm still thinking whether or not participating fully this year. For now I still have to fix my topaz clean on Photoshop (everything is installed correctly but nothing appears on Photoshop anymore, it worked fine 2 days ago U_U) but if I have the time I'd love to share some presents ! So far, I'm thinking of some CAS spooky backgrounds and also a new set of horror posters. Expect at least some new posters (who said A24 HORROR ?!) and if I have the time (and energy), some CAS backgrounds then.
About DH, don't worry my loves, Destiny and all should be back for some edits around the end of the year but the story will be officially back in 2023 for a full DH year 😍 I've planned a lot, including a casting call so be prepared !
And I think that's all ! As usual, thank you so much for reading this and for being here. You all are a daily strenght you don't even know 😊
Take very good care of you, enjoy a looooot this spooky season as much as I do (only for the medias part, otherwise, please October be nicer than September who was hell !) and always remember that you're not alone ♥

#October Update#Monthly update#DH edit#lots happened lately#I feel soooo tired#like emotionnaly drowned#anyway#thank god there's horror movies and shows this month#yes I do love to solve my problems watching scary things#it's actually making my problem look so small compared to some movie plot
16 notes
·
View notes
Text
something unrelated to sims...
hey friends, it's the pandemic, the economy tanked and it pains me to think that most of you are hurting right now. our govts have failed us by not stepping up their social services and capitalism is eating us alive. i want to help — in a way that i don't have to convert my measly currency into usd/gbp/euros.
one thing i've observed is that tech industries are still hiring. more specifically: developers for robotic process automation (aka software robotics)/RPA.
no background in computer science or coding skills required; you just need a pc or laptop, internet, electricity, patience, and creative energy. there's RPA software that is free to use, virtually forever. and once you've learned it, it's a skill you can take with you anywhere.
i've done some cursory research into the job market for RPA developers in US, Canada and Europe, and it looks like there's many places still hiring. best part is, some of those jobs are remote positions, so it's not a problem if you can't commute regularly. (you may have to do a 1-time commute to pick up your company laptop or security pass, stuff like that)
if you have reached this far and this sounds appealing to you, i've got some tips on getting started after the cut:
there's several RPA software to choose, but the cheapest solution that i know of (which i am also using for work) is uipath. register for a free account, then download the community edition of its software.
link to create account and download community edition of uipath studio
then get into uipath academy and enroll in these 2 learning plans:
1. RPA Developer Foundation
2. RPA Developer Advanced
you should skim through the first one quickly and get it over and done with. the most important part is to work on the assignments in the second learning plan. you will apply the stuff from plan 1, which you can always revisit after finishing. once you've done that, feel free to learn some extras, like the Solution Architect role.
things that help:
1. focus (or HYPERFOCUS, if you're ADHD/autistic)
2. uipath forums. you can google "uipath" followed by your query
3. determination (to solve a problem until it's fixed) (sometimes)
4. creative energy. experiment! automate your photoshop to topaz-clean your entire folder of screenshots or something
5. talking out your problems when you're blocked. like, sometimes just saying stuff aloud helps guide you to a solution.
i hope that this post opened a new opportunity for you! and feel free to hash out your ideas with me. i've been using uipath for almost a year so i might be able to help you troubleshoot stuff.
hope you have a good weekend!
8 notes
·
View notes
Last Seen Blogs

militarystripes
Military Stripes
connverse4life
Everyone
Needs Therapy

azonlinepllc1
Untitled

8dannyocean8
Unbetitelt